
X (Twitter) Pixel for Magento 2: Integrate Conversion API with GTM
Struggling to track conversions effectively for your Magento store? The X (Twitter) Pixel for Magento 2 is a tool that allows you to track user behavior & conversions from Twitter ads.
This tutorial will cover how to set up and configure the X (Twitter) Pixel in Magento 2.
Key Takeaways
- Features and benefits of setting up Magento X pixel.
- Steps to integrate your store with Twitter’s analytics and retargeting capabilities.
- Tips to implement conversion tracking and improve your marketing strategies.
- Detailed insights into user actions and ad performance.
- Troubleshooting common issues to integrate with your Magento store.
- Future updates for installing and implementing vital tracking features.
-
How to Equip Your Magento Store with X Pixel Event Tracking?
-
5 Steps to Set Up Twitter (X) Pixel in Your Magento 2 Business Account
-
Custom Conversion Techniques with X Pixel for Magento Hyvä Theme
-
Strategies to Maximize ROI with Detailed Reports Using X Pixels in Magento
-
Advantages of Combining Special Offers with the Twitter (X) Pixel
-
3 Steps to Set up Destination for Pixel Helper Chrome Extension
-
Best Practices for Optimizing User Experience with X Advertising Campaigns
-
Future Updates for Tracking Detailed Information with X Pixel
-
4 Steps to Set Up Magento 2 Twitter (X) Conversion API on Your Store's Frontend
-
2 Steps to Implement the Magento Twitter (X) Pixel Tracking via GTM
What is Twitter (X) Pixel Conversion API?
The X (Twitter) Pixel is a tracking code that connects your Magento 2 store with Twitter.
The Twitter (X) Conversion API allows businesses to send web events directly from their servers to Twitter(X). Unlike traditional client-side tracking methods, this API enables server-side data transmission. It improves accuracy and gives businesses more control over the data they share.
By integrating the pixel, you can:
- Measure conversion rates
- Track user actions
- Improve your marketing efforts
- Analyze ad performance
- Optimize campaigns
- Understand ecommerce tracking
How to Equip Your Magento Store with X Pixel Event Tracking?
| Component | Features | Implementation Details |
|---|---|---|
| Basic Setup | - X Pixel extension implementation. - Pixel ID configuration. - Store view selection. |
- Navigate to Stores > Configuration. - Add Pixel ID from X Ads account. - Select specific store views. |
| Event Tracking | - Frontend event logging - Custom event configuration - Real-time validation |
- Store data in /var/log/x_pixel.log. - Configure event IDs from the X Ads account. - Track user behavior patterns. |
| Debugging Tools | - X Pixel Helper extension - Recent Activity Log - Event validation |
- Chrome browser extension for testing. - Event Manager monitoring - Real-time error detection |
| Performance Features | - Automatic data hashing - Server-side tracking - API integration |
- Secure data transmission. - Optimized loading speed. - Custom endpoint creation. |
| Analytics Integration | - Conversion tracking - ROI measurement - Campaign optimization |
- Customize reports. - Return on spend analysis. - Track performance metrics. |
| Multi-Store Support | - Unique pixel IDs per store - Independent tracking - Separate event logging |
- Implement store-specific configuration. - Track events individually. - Segment analytics. |
5 Steps to Set Up Twitter (X) Pixel in Your Magento 2 Business Account
- Create and configure a Twitter (X) Pixel for your Magento website.
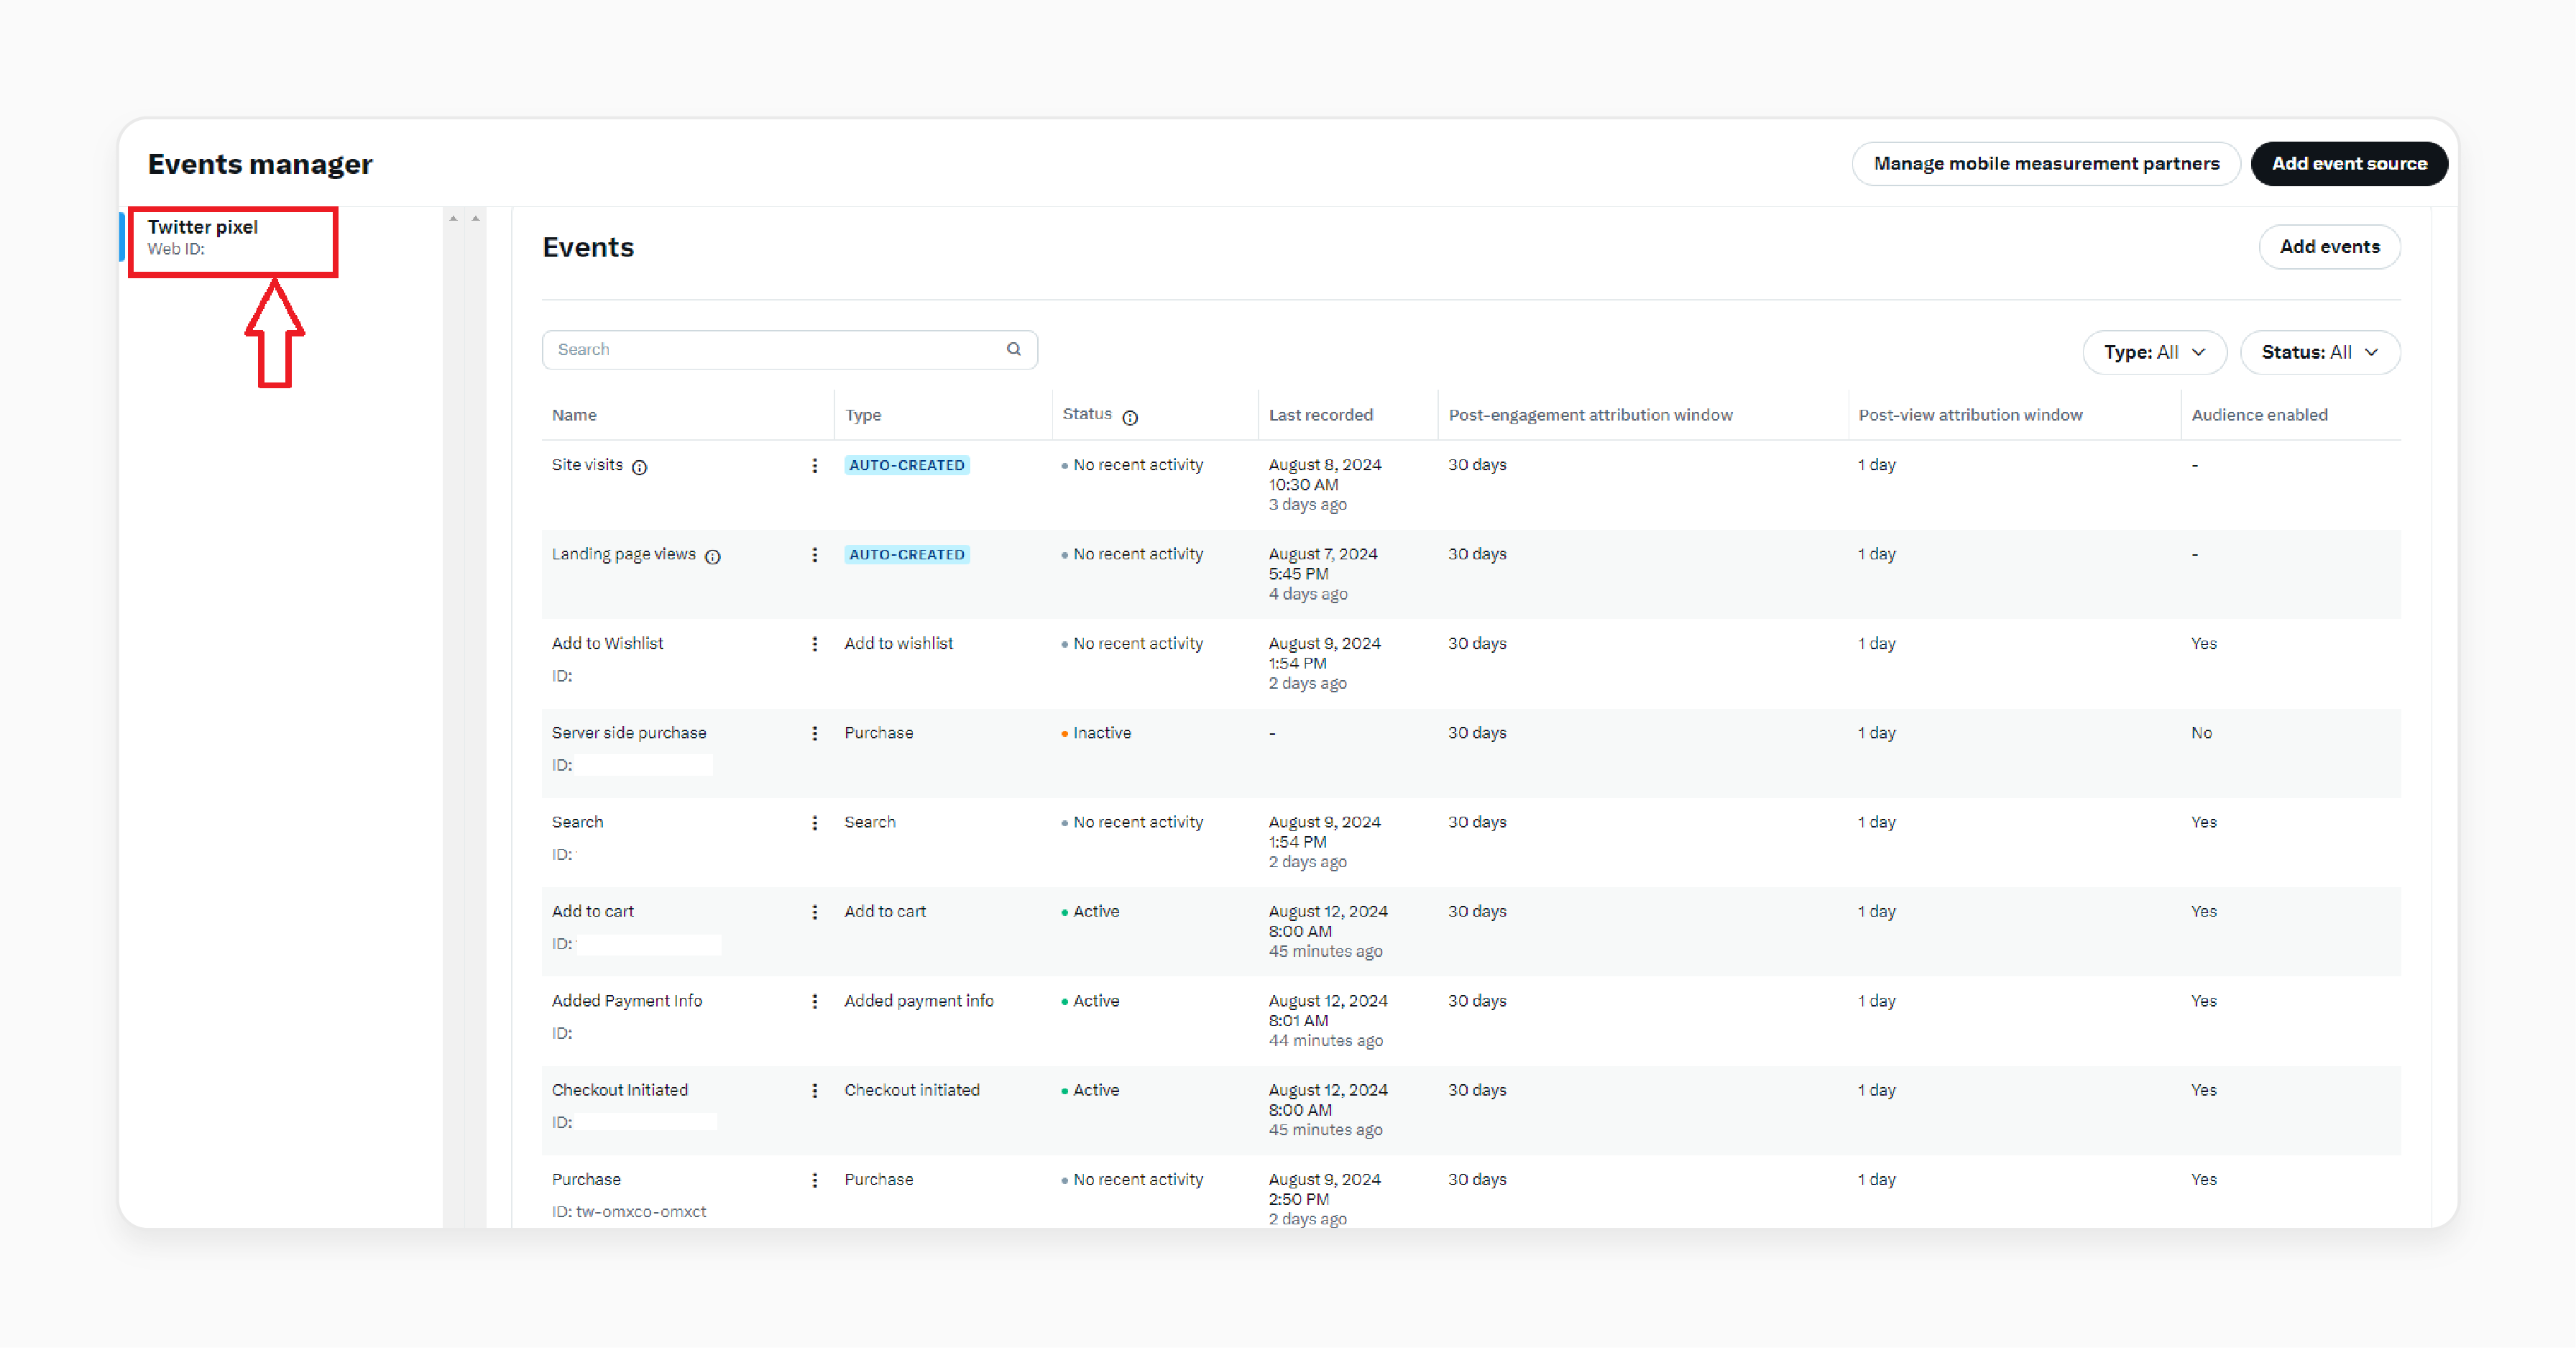
- Access your Twitter Ads account and navigate to 'Events Manager'.
- Click "Create Pixel", provide a name, and choose a setup method.
- Select "Google Tag Manager (GTM)" as your preferred method.
- Once created, note the "Pixel ID". You’ll use it later while configuring GTM.
Custom Conversion Techniques with X Pixel for Magento Hyvä Theme
| Component | Features | Implementation Details |
|---|---|---|
| Basic Setup | - Hyvä theme compatibility - X Pixel integration - Custom event tracking |
- Composer installation - "X Pixel ID" configuration - Hyvä admin panel |
| Performance Benefits | - Reduced JavaScript footprint - Optimized page load - Enhanced tracking accuracy |
- "0.2MB" total resource load - "100/100" PageSpeed score - Real-time conversion tracking |
| Event Implementation | - AlpineJS integration - Tailwind CSS support - Custom conversion points |
- Inline event handling - Simplified DOM manipulation - Server-side validation |
| Development Features | - ViewModels support - Reduced dependencies - Custom parameter tracking |
- PHP-based templating - Direct conversion mapping - Event debugging tools |
| Integration Capabilities | - GraphQL compatibility - API connections - Multi-store support |
- Custom endpoint creation - Store-specific tracking - Data layer integration |
| Optimization Tools | - Built-in debugging - Performance monitoring - Conversion validation |
- Chrome developer tools - Real-time tracking verification - Error logging system |
Why Choose Pixels for E-commerce Notifications?
Both pixels and third-party cookies are tools for online tracking and cookie configuration. They focus on collecting first-party data directly from specific websites or platforms. It makes them more reliable and privacy-compliant.
Their utility increases significantly when integrated with Google Analytics 4 (GA4). This combination enables automated data sharing. It offers a deeper understanding of user behavior and website interactions.
Strategies to Maximize ROI with Detailed Reports Using X Pixels in Magento
| Component | Features | Implementation Benefits |
|---|---|---|
| Real-Time Analytics | - Live conversion tracking - User behavior monitoring - Campaign performance metrics |
- Immediate performance insights - Quick campaign adjustments - Better budget allocation |
| Conversion Tracking | - Purchase tracking - Add-to-cart monitoring - Checkout behavior analysis |
- Accurate ROAS measurement - Enhanced campaign optimization - Better targeting decisions |
| Audience Insights | - Custom audience creation - Cross-device tracking - User journey mapping |
- Advanced segmentation - Improved retargeting - Enhanced user experience |
| Performance Metrics | - Click-through rates - Conversion rates - Customer acquisition costs |
- ROI optimization - Campaign effectiveness - Budget optimization |
| Event Tracking | - Product views - Cart abandonments - Purchase completions |
- Detailed user behavior - Enhanced targeting - Better conversion rates |
| Debug Tools | - X Pixel Helper - Event validation - Real-time testing |
- Quick issue identification - Improved tracking accuracy - Better data quality |
| Custom Reports | - Store-specific tracking - Multi-view analytics - Campaign comparisons |
- Detailed performance analysis - Store-specific insights - Better decision-making |
Advantages of Combining Special Offers with the Twitter (X) Pixel
1. Accurate Conversion Tracking
Track sales, leads, and other desired actions directly from your Twitter (X) Ads. It provides a clear view of your Return on Ad Spend (ROAS) and highlights the most effective campaigns.
2. Powerful Retargeting
Build targeted audiences based on specific actions taken on your website. For instance, retarget users who abandoned their shopping carts. It will result in higher conversion rates and more efficient ad spending.
3. In-Depth Website Analytics
Gain insights into user behavior on your Magento store. Learn which pages are most visited, how long users stay, and where they drop off. This data is invaluable for improving website design and user experience.
4. Campaign Optimization
Leverage pixel data to refine your Twitter (X) Ads. Identify successful strategies and adjust targeting, bidding, and creative elements to improve continuously.
5. Enhanced Data Accuracy
Minimize discrepancies caused by ad blockers or browser limitations. It allows businesses to ensure reliable tracking data.
6. Customizable Data Control
You can customize the information shared with Twitter (X). It allows you to comply with privacy regulations and ensure data security.
7. Improved Attribution
Attribute conversions accurately to specific campaigns. It enables more informed decision-making and better resource allocation.
Facebook Pixel vs. X Pixel
| Feature | Facebook Pixel | X Pixel |
|---|---|---|
| Integration Method | Tag-based and API options | Pixel code and Conversion API |
| Data Collection | Detailed user behavior tracking | Focus on post-ad interactions |
| Audience Targeting | Advanced demographic and behavioral segmentation | Action-based audience targeting |
| Conversion Tracking | Multi-touchpoint attribution | Direct response measurement |
| Event Tracking | Custom and standard events | Predefined conversion events |
| Retargeting Capabilities | Dynamic product ads and catalog retargeting | Basic retargeting based on site actions |
| Analytics Features | Detailed funnel analysis and LTV tracking | Campaign-focused performance metrics |
| Implementation Complexity | Moderate to complex | Relatively straightforward |
| Debugging Tools | Facebook Pixel Helper | X Pixel Helper Chrome Extension |
| Cost Structure | Free pixel, paid ads | Free pixel, paid ads |
| Privacy Compliance | Advanced consent management | Basic consent implementation |
| Server-Side Options | Extensive server-side capabilities | Basic server-to-server options |
| Custom Parameters | Extensive custom parameter options | Limited custom parameters |
| Real-Time Reporting | Immediate data availability | Slight reporting delay |
| Cross-Platform Tracking | Cross-device and cross-platform | Platform-specific tracking |
Key Benefits of Adding New Pixels with GA4
1. Detailed Conversion Tracking
Pixels simplify conversion tracking by transmitting data to analytics platforms like:
- Microsoft Advertising
- Facebook Business
With automatic data sharing to GA4, they help merchants track website conversions.
2. Advanced Reporting and Cross-Channel Insights
Integrating GA4 with pixels enhances reporting capabilities. It allows you to analyze revenue contributions across channels. These insights help optimize marketing strategies for a better return on investment (ROI).
3. Efficient Automated Marketing
The combination of GA4 & social media pixels delivers precise data for audience segmentation. It enables impactful automated campaigns, including retargeting and personalized offers. Businesses can use this feature to improve engagement and drive conversions.
Differences Between Twitter and TikTok Pixels
| Feature | X (Twitter) Pixel | TikTok Pixel |
|---|---|---|
| Integration Methods | Pixel code and Conversion API | Javascript code and server-side API |
| Setup Complexity | Moderate setup with Chrome extension support | Easy setup with partner platform integrations |
| Event Tracking | Post-ad interactions and website conversions | Complete user behavior and engagement signals |
| Data Collection | Basic user interaction data | Detailed timestamp, IP, and device information |
| Conversion Tracking | Direct conversion attribution | Multi-point conversion tracking |
| Audience Building | Action-based audience segmentation | Custom and lookalike audience creation |
| Retargeting Features | Basic website visitor retargeting | Advanced retargeting with cart abandonment focus |
| Analytics Depth | Campaign-focused metrics | Detailed user journey analytics |
| Cookie Handling | Standard cookie implementation | Enhanced first-party cookie support |
| Optimization Tools | X Pixel Helper for debugging | TikTok Event Manager with automatic optimization |
| Custom Parameters | Limited custom event options | Extensive parameter customization |
| Data Processing | Client-side tracking focus | Both client and server-side capabilities |
| Attribution Window | Standard attribution model | Flexible attribution windows |
| Integration Partners | Limited partner integrations | Extensive partner platform support |
| Performance Metrics | Basic ROI tracking | Advanced value optimization |
Advanced Features of the X Pixel Extension for Magento
1. Intelligent Event Tracking Architecture
i. Automated Event Structure Mapping
X Pixel for Magento aligns your store's events with X's conversion tracking model. This means zero manual configuration for standard e-commerce events like:
- Purchases
- Add-to-cart actions
- Checkout initiations
ii. Smart Data Layer Integration
Your Magento store's data layers efficiently connect with the pixel extension. The system intelligently maps custom fields and user behavior metrics. It tracks conversion rates without breaking your existing tracking setup.
2. Advanced conversion optimization features
i. Real-Time Event Validation
X Pixel includes a built-in debugger that validates your conversion tracking in real-time. When user actions trigger events, you'll know immediately if they're being captured correctly.
ii. Custom Event Configuration
Beyond standard e-commerce tracking, you can set up:
- Dynamic pricing events
- Inventory alerts
- Custom checkout stages
- Wishlist interactions
. Security and Performance Optimization
i. Automatic Data Hashing
The X Pixel and Conversion extension handles sensitive data with enterprise-level security:
- Automatic email hashing
- Secure customer data transmission
- GDPR-compliant data handling
2. Performance-First Architecture
You can increase your store's speed with:
- Asynchronous loading
- Minimal JavaScript footprint
- Optimized server-side processing
4. Analytics Integration Capabilities
i. Multi-Platform Compatibility
The X Ads account extension works effortlessly with:
- Google Tag Manager (GTM)
- GA4 integration
- Third-party analytics tools
ii. Enhanced Reporting Features
You can get deeper insights into:
- User journey mapping
- Conversion funnel analysis
- ROI tracking per campaign
5. API and Developer Tools
i. Enhanced API Integration
The X Pixel Facebook Business extension's API capabilities allow:
- Custom endpoint creation
- Webhook implementations
- Server-side tracking options
ii. Developer-Friendly Features
The Twitter Pixel Ads Conversion Tracking plugins are built for customization with the following:
- Clean code architecture
- Extensive documentation
- Debug mode for testing
Troubleshooting X Pixel Issues in Magento Store
| Issue | Diagnosis | Solution |
|---|---|---|
| Pixel Not Firing | Check the browser console for JavaScript errors | - Verify the placement of pixel code in the header. - Clear Magento cache and browser cache. - Use the X Pixel Helper Chrome module to debug. |
| Event Tracking Errors | Events not showing in X Ads Manager | - Confirm the correct Event ID configuration. - Check data layer implementation. - Verify GTM trigger settings. |
| 503 Error | Server capacity or maintenance issues | - Restart web services. - Contact hosting support for server restart. - Check server logs for errors. |
| Cache-Related Issues | Delayed event tracking | - Clear Magento 2 cache directories. - Review caching settings. - Check var/log/x_pixel.log for errors. |
| Integration Problems | Pixel and GTM conflicts | - Verify GTM container setup. - Check for conflicting extensions. - Review JavaScript console errors. |
| Data Access Issues | Unable to view pixel data | - Verify X Ads account permissions. - Check store view configuration. - Confirm pixel ID implementation. |
| Performance Impact | Slow page loading | - Enable asynchronous loading. - Optimize JavaScript execution. - Monitor server resources |
| Multiple Store Views | Incorrect pixel assignment | - Configure unique pixel IDs per store view. - Verify store-specific settings. - Check multi-store implementation. |
3 Steps to Set up Destination for Pixel Helper Chrome Extension
Step 1: Create a Conversion Event
- Set up a conversion event in Ads Manager.
Note: You can either create a new event or use an existing one already linked to the Twitter Pixel.
- Access Ads Manager.
- Navigate to Tools > Events Manager.
- If you do not have a Twitter Pixel event source, select 'Add Event Source' to create one.
Note: The resulting identifier will be your Pixel ID. For more information, refer to the API Configuration section.
Step 2: Add Events
Once your Pixel ID is set, create an event by selecting 'Add Events'.
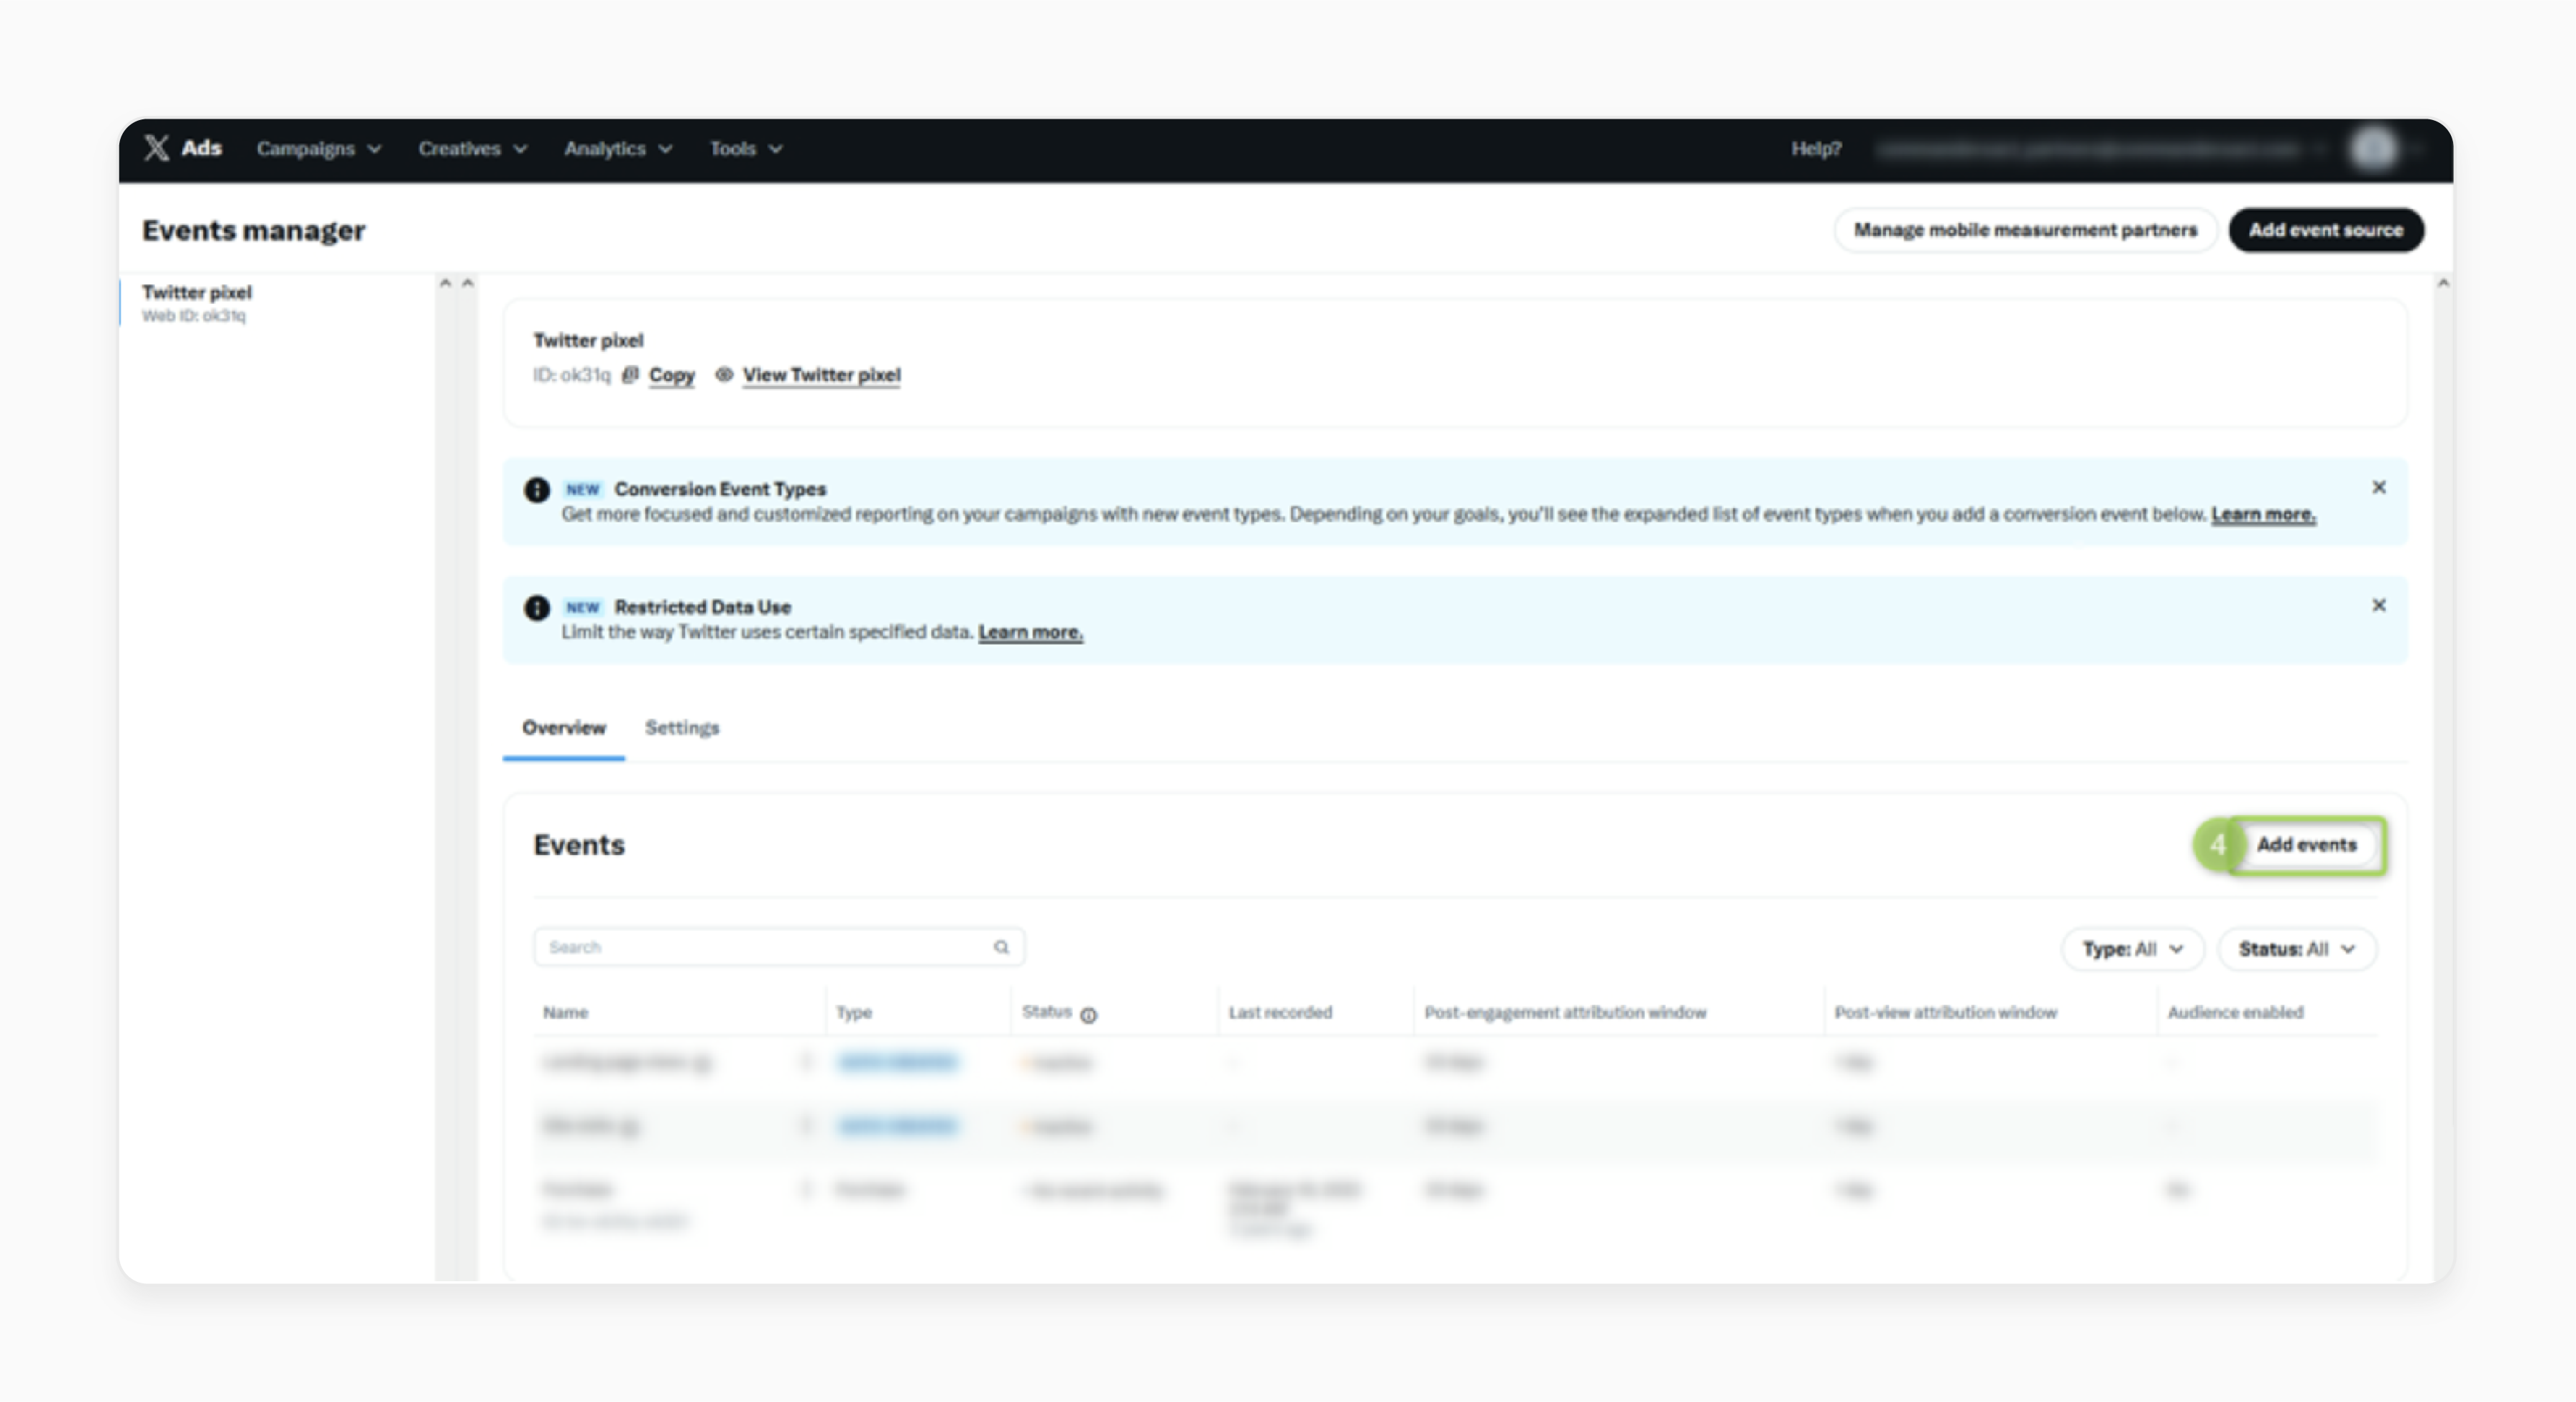
Note: It will generate an Event ID, which is essential for configuration. If you're using an existing event, retrieve its Event ID from the event list in the "Overview" tab of Events Manager.
Step 3: Configure Deduplication Support
The X Conversion API supports deduplication with your client-side Twitter Pixel. For proper mapping, refer to the Smart Mapping field, such as:
- Transaction ID
- Property conversion_id
Best Practices for Optimizing User Experience with X Advertising Campaigns
1. Campaign Strategy Fundamentals
i. Goal Definition
Start with clear campaign objectives to guide your advertising strategy. Whether focusing on awareness, consideration, or conversions, your goals shape the campaign approach.
ii. Audience Targeting
Implement precise audience targeting to ensure your ads reach the right people. Use X's advanced targeting options to segment based on interests, behaviors, and demographics.
2. Content Optimization
i. Visual Elements
Create engaging content with:
- High-quality images and videos that capture attention
- Videos that generate "6x more engagement" than text-only posts
- Eye-catching visuals that stand out in users' feeds
ii. Copy and Messaging
Craft concise, impactful messages that:
- Align with your brand voice
- Include clear CTAs
- Incorporate relevant hashtags strategically
3. Data Privacy and Compliance
i. GDPR and CCPA Compliance
Ensure that your tracking setup complies with data privacy regulations like GDPR & CCPA. Implement cookie consent banners and check your cookie consent setup. Alternatively, you can allow users to opt out of tracking if necessary.
ii. Optimization Tips
If you encounter issues with data not being sent or incorrect data being captured, revisit your GTM tag configurations and server endpoint settings. Check server logs for any errors related to API calls to Twitter(X). Also, optimize your tagging setup by consolidating tags and minimizing redundant data collection.
4. Technical Implementation
i. Performance Monitoring
Track key metrics through X's analytics tools:
- Engagement rates
- Click-through rates
- Conversion metrics
- Cost per result
ii. Testing and Optimization
Continuously improve campaign performance through:
- A/B testing different ad variations
- Monitoring revenue-generating metrics
- Regular campaign adjustments based on performance data
iii. Landing Page Integration
Ensure smooth user experience by:
- Creating dedicated, campaign-specific landing pages
- Maintaining message consistency between ads and landing pages
- Including strong and relevant CTAs
Future Updates for Tracking Detailed Information with X Pixel
| Feature Category | Current Capabilities | Future Enhancements |
|---|---|---|
| Event Tracking | - Basic conversion tracking - Standard event monitoring - User behavior analysis |
- Advanced funnel visualization - Custom event creation - Real-time event validation |
| Analytics Integration | - Basic ROI measurement - Campaign performance metrics - Conversion tracking |
- Enhanced data visualization - Predictive analytics - Cross-platform attribution |
| Data Collection | - Frontend event logging - User interaction tracking - Basic audience segmentation |
- Advanced user profiling - Machine learning insights - Behavioral pattern recognition |
| Pixel Performance | - Standard pixel implementation - Basic debugging tools - Event validation |
- Automated optimization - Performance forecasting - Enhanced error detection |
| Integration Features | - GTM compatibility - API connections - Multi-store support |
- Extended API capabilities - Enhanced third-party integrations - Advanced store view tracking |
| Reporting Tools | - Basic conversion reports - Campaign metrics - User behavior data |
- Custom report builders - Advanced analytics dashboard - Automated insights generation |
4 Steps to Set Up Magento 2 Twitter (X) Conversion API on Your Store's Frontend
Step 1: Create a Server-Side Tag in Twitter Ads
- Log in to your Twitter Ads account and navigate to 'Events Manager'.
- Click 'Add Events'.
- Provide a name for the event and select the type as "Custom".
- On the next screen, choose "Define Event with Code (Recommended)" and proceed.
- Under 'Event Installation', copy the "Pixel ID" for this event.
Step 2: Set Up a Server-Side Tag in GTM (Client-Side Container)
- Capture key data during conversions.
Note: Since there is no native Twitter client for server-side GTM, you must use the GA4 client to transmit the required data.
i. Create a new client-side tag
- Tag Name: GA4 Twitter Purchase
- Tag Type: Google Analytics: GA4 Event
- Measurement ID: {{GA4 Measurement ID}}
- Event Name: twitter_conversion
- Event Settings Variable: {{Google Tag Event Settings}}
ii. Configure Event Parameters
- value: Variable capturing conversion value from data layers.
- currency: Variable capturing currency.
- transaction_id: Variable capturing transaction ID from data layers.
- conversion_time: Custom JavaScript variable to get the conversion timestamp in UNIX format.
- conversion_hashed_phone: Variable capturing hashed phone numbers.
- conversion_hashed_email: Variable capturing hashed emails.
- twitter_clickid: Variable capturing Twitter Click ID from the URL.
iii. Set the Trigger
Fire the event when the GA4 event "purchase" is pushed into the data layers.
Note: It ensures all necessary values are captured for the tag.
Step 3: Configure the Twitter Conversion API Tag in GTM (Server-Side Container)
- Ensure your GTM server-side container is connected to your server-side.
Note: If not, refer to the prerequisite steps to complete the setup.
i. Create Required Variables
Define the following variables in your GTM server-side container:
| Variable Name | Type | Description |
|---|---|---|
| Stape API Key | Constant | API key obtained from the Stape.io platform |
| Twitter Consumer Key | Constant | Authentication key for X API access |
| Twitter Consumer Secret | Constant | Secret key paired with the consumer key |
| Twitter OAuth Token | Constant | Access token for API authorization |
| Twitter OAuth Secret | Constant | Secret token for API verification |
| Twitter Pixel ID | Constant | Unique identifier for your X pixel |
| Twitter Server Purchase Event ID | Constant | Specific ID for purchase event tracking |
| Twitter Value | Event Data | Transaction or conversion value |
| Twitter Currency | Event Data | Currency code for transaction |
| Twitter Conversion ID | Event Data | Unique transaction identifier |
| Twitter Conversion Time | Event Data | Timestamp of conversion event |
| Twitter Email | Event Data | Hashed email for user tracking |
| Twitter Phone | Event Data | Hashed phone number for user tracking |
| Twitter Click ID | Event Data | Click tracking identifier |
ii. Create the Trigger
Set up a custom trigger with the following settings:
- Trigger Name: Twitter Client
- Trigger Type: Custom
-
Conditions:
- Client Name: Equals "GA4".
- Event Name: Equals "twitter_conversion".
- Exclude events where Event Name equals "purchase" or "conversion_pii".
iii. Create the Twitter Conversion API Tag
Since the Twitter Conversion API Tag isn’t included by default, import it from the GTM Tag Gallery (Stape.io). Use these settings:
| Field Name | Value/Setting |
|---|---|
| Tag Name | Twitter Conversion API |
| Tag Type | Twitter Conversion API |
| Stape Container API Key | {{Stape API Key}} |
| Consumer Key | {{Twitter Consumer Key}} |
| Consumer Secret | {{Twitter Consumer Secret}} |
| OAuth Token | {{Twitter OAuth Token}} |
| OAuth Token Secret | {{Twitter OAuth Token Secret}} |
| Pixel ID | {{Twitter Pixel ID}} |
| Event ID | {{Twitter Server Purchase Event ID}} |
| Value | {{Twitter Value}} |
| Currency | {{Twitter Currency}} |
| Conversion ID | {{Twitter Conversion ID}} |
| Conversion Time | {{Twitter Conversion Time}} |
| {{Twitter Email}} | |
| Phone | {{Twitter Phone}} |
| twclid | {{Twitter Click ID}} |
| Logs Settings | Log to the console during debug and preview |
| Triggering | Twitter Client |
Step 4: Test the Setup
- Open Google Tag Manager Preview Mode to test the entire configuration.
- When the tag fires successfully, you’ll see a "200 status response" in the debug console.
2 Steps to Implement the Magento Twitter (X) Pixel Tracking via GTM
Step 1: Set Up Required Tags, Triggers, and Variables
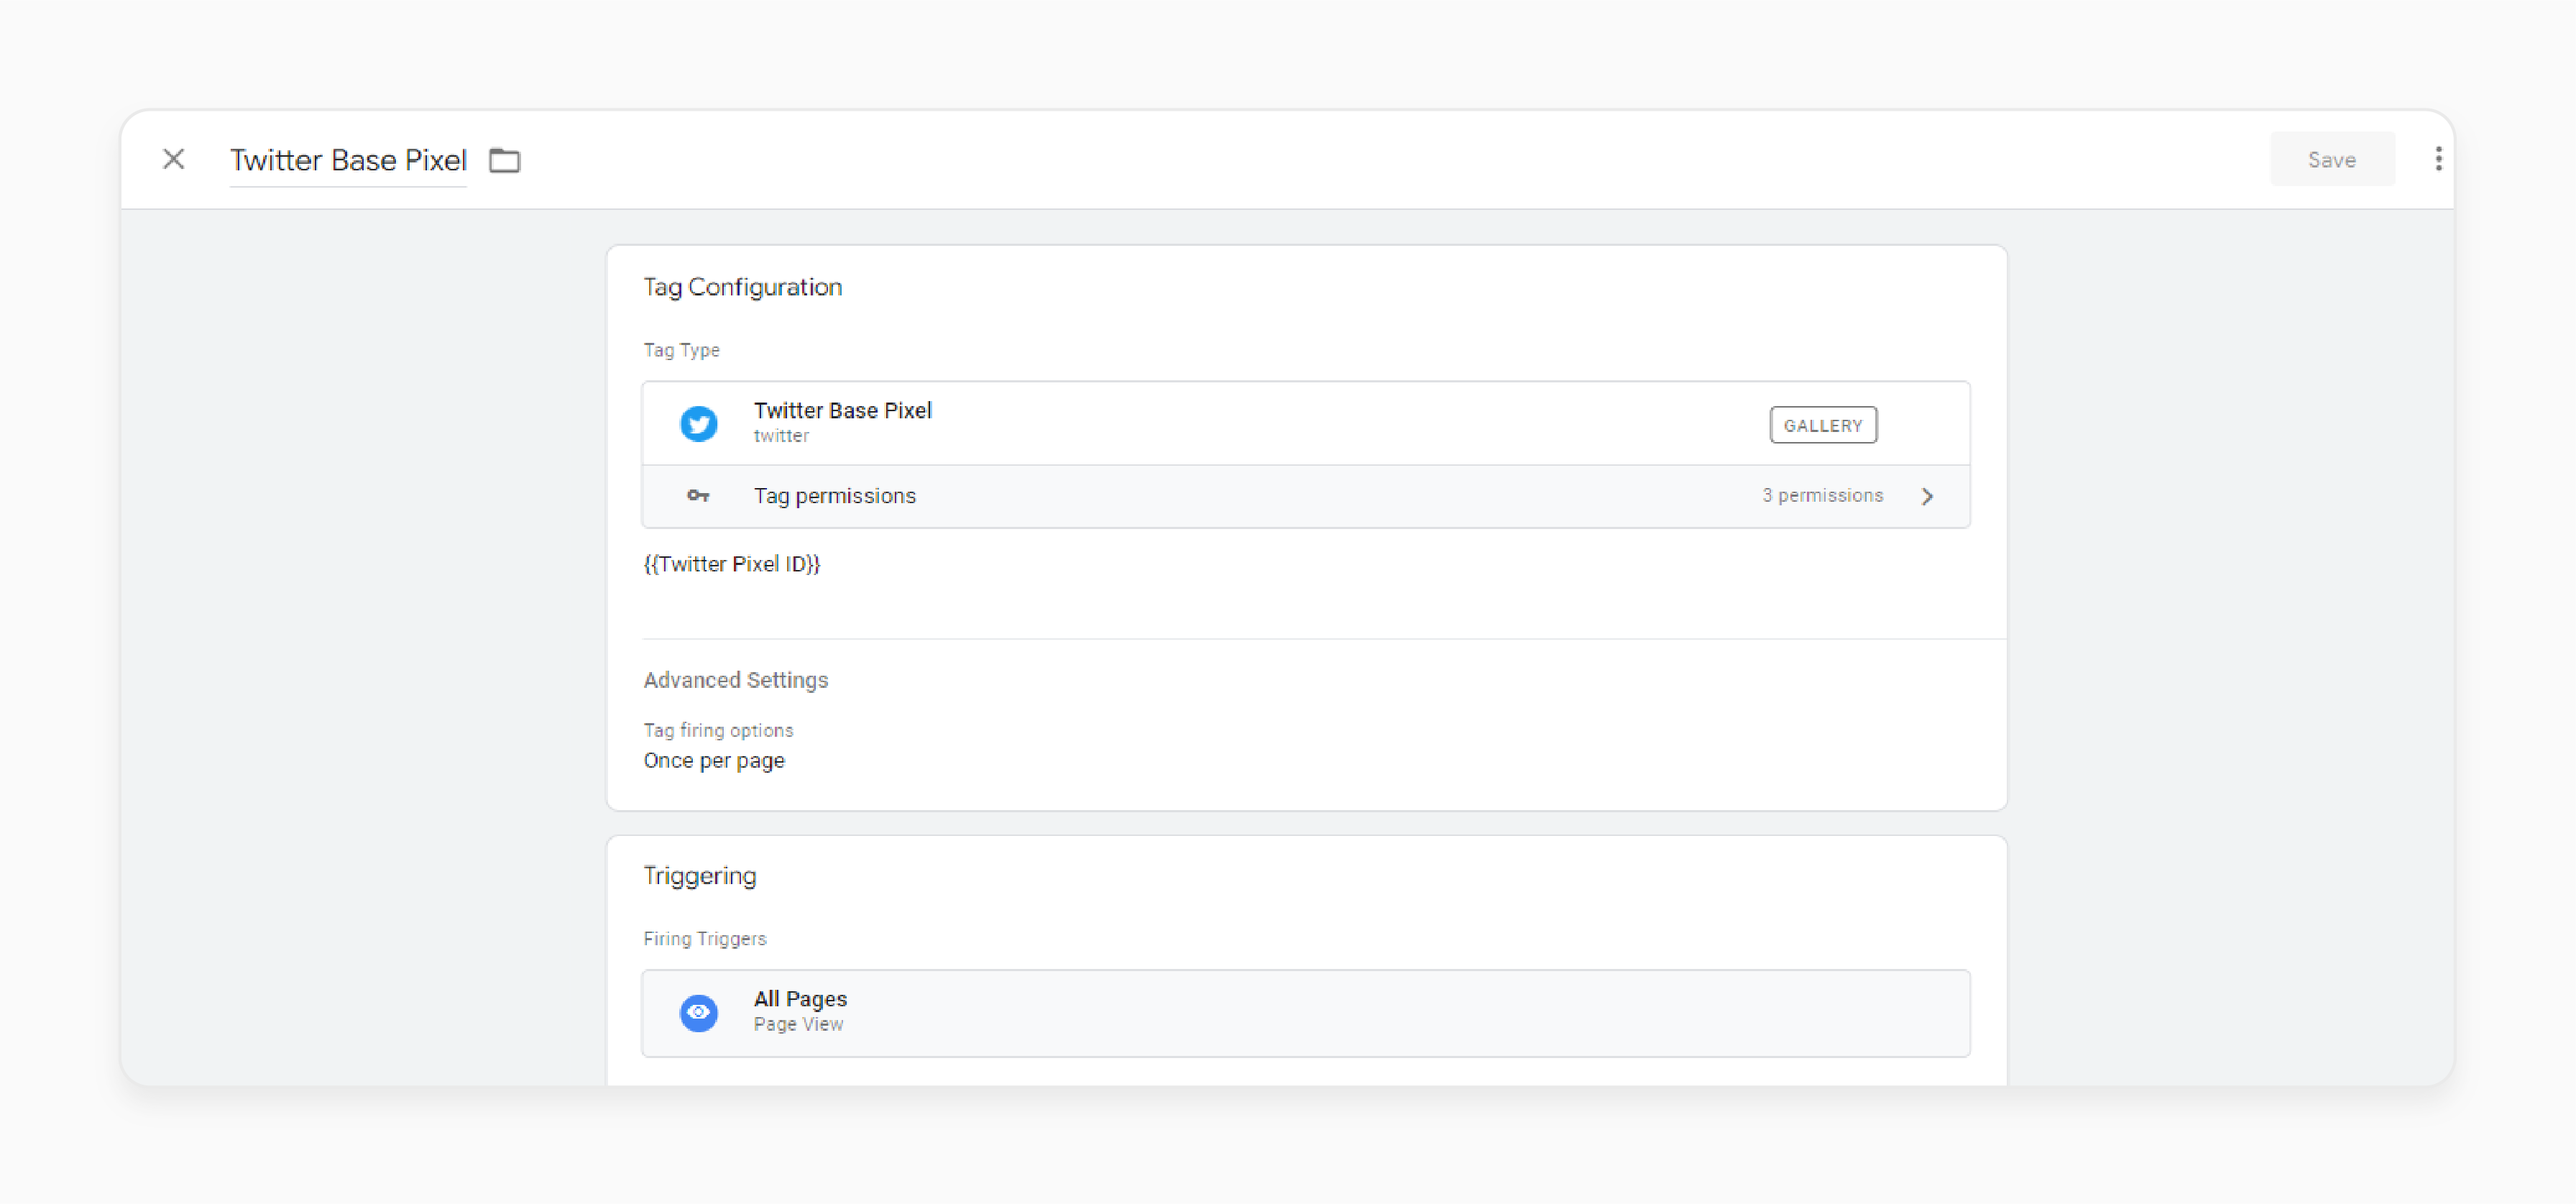
i. Base Pixel
- Tag Name: Base Pixel
- Tag Type: Base Pixel (import from the GTM gallery if not available).
- Pixel ID: {{Twitter Pixel ID}}
- Advanced Settings: Fire once per page.
- Trigger: All Pages (track page views across your site).
ii. View Content
- Tag Name: View Content
- Tag Type: Base Pixel
- Event ID: {{View Content Event ID}}
-
Event Parameters:
- Value: {{Ecommerce Value}}
- Currency: {{Ecommerce Currency}}
- Content ID: {{Twitter Item ID}}
- Content Name: {{Twitter Item Name}}
- Content Price: {{Twitter Item Price}}
- Content Group ID: {{Twitter Item Category}}
- Twitter Click ID: {{Twitter Click ID}}
- Trigger: Fire on the "view_item" GA4 event.
iii. Search
- Tag Name: Search
- Tag Type: Base Pixel
- Event ID: {{Search Event ID}}
-
Event Parameters:
- Currency: {{Ecommerce Currency}}
- Search String: {{Search Query}}
- Contents: Map GA4 items array to Twitter contents array.
- Trigger: Fire on "view_item_list" GA4 events when the URL contains "result".
iv. Add to Wishlist
- Tag Name: Add to Wishlist
- Tag Type: Base Pixel
- Event ID: {{Add to Wishlist Event ID}}
-
Event Parameters:
- Value: {{Ecommerce Value}}
- Currency: {{Ecommerce Currency}}
- Content ID: {{Twitter Item ID}}
- Content Name: {{Twitter Item Name}}
- Content Price: {{Twitter Item Price}}
- Number of Items: {{Twitter Item Quantity}}
- Content Group ID: {{Twitter Item Category}}
- Trigger: Fire on the "add_to_wishlist" GA4 event.
v. Add to Cart
- Tag Name: Add to Cart
- Tag Type: Base Pixel
- Event ID: {{Add to Cart Event ID}}
-
Event Parameters:
- The same parameters as "Add to Wishlist".
- Trigger: Fire on the "add_to_cart" GA4 event.
vi. Begin Checkout
- Tag Name: Begin Checkout
- Tag Type: Base Pixel
- Event ID: {{Begin Checkout Event ID}}
-
Event Parameters:
- Same as "Add to Cart".
- Trigger: Fire on the "begin_checkout" GA4 event.
vii. Add Payment Info
- Tag Name: Add Payment Info
- Tag Type: Base Pixel
- Event ID: {{Add Payment Info Event ID}}
-
Event Parameters:
- Same as "Add to Cart".
- Trigger: Fire on the "add_payment_info" GA4 event.
viii. Purchase
- Tag Name: Purchase
- Tag Type: Base Pixel
- Event ID: {{Purchase Event ID}}
-
Event Parameters:
- Value: {{Ecommerce Value}}
- Currency: {{Ecommerce Currency}}
- Conversion ID: {{Ecommerce Transaction ID}}
- Email Address: {{Twitter Email Address}}
- Phone Number: {{Twitter Phone Number}}
- Contents: Map GA4 items array to Twitter contents array.
- Trigger: Fire on the "purchase" GA4 event.
Step 2: Verify Your Setup and Troubleshoot
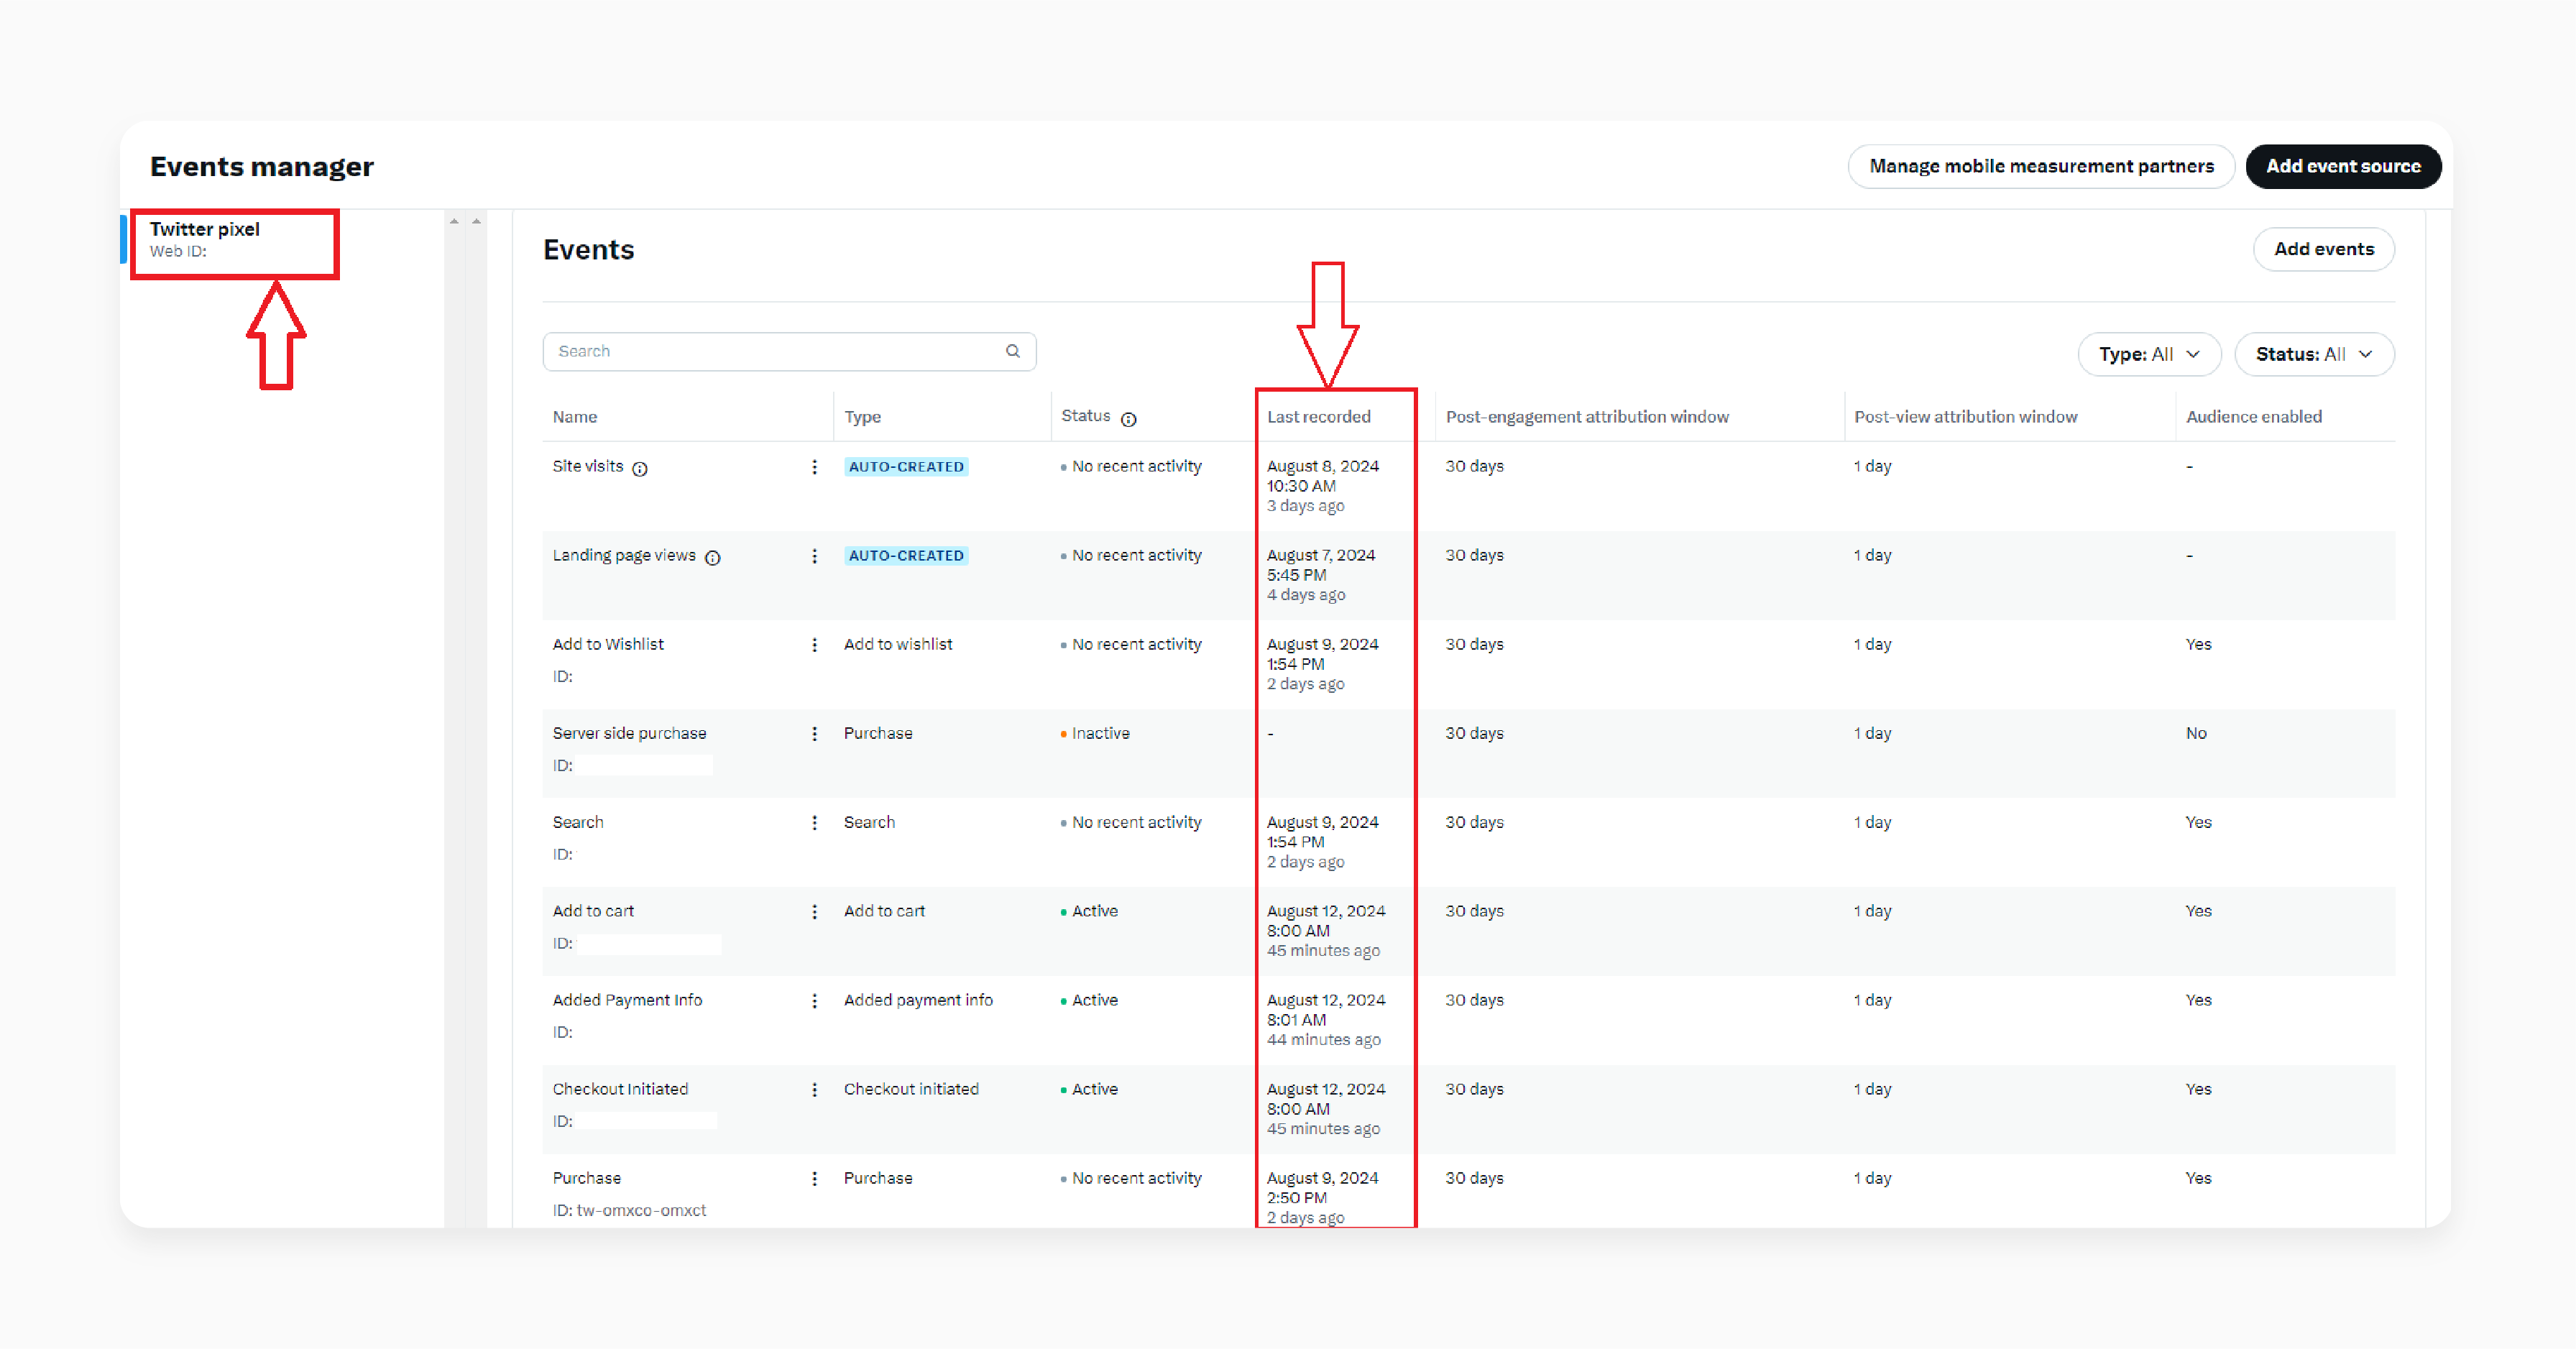
- Check the 'Events Manager' in your Twitter Ads account.
- Confirm that data is being received and events are triggering as expected.
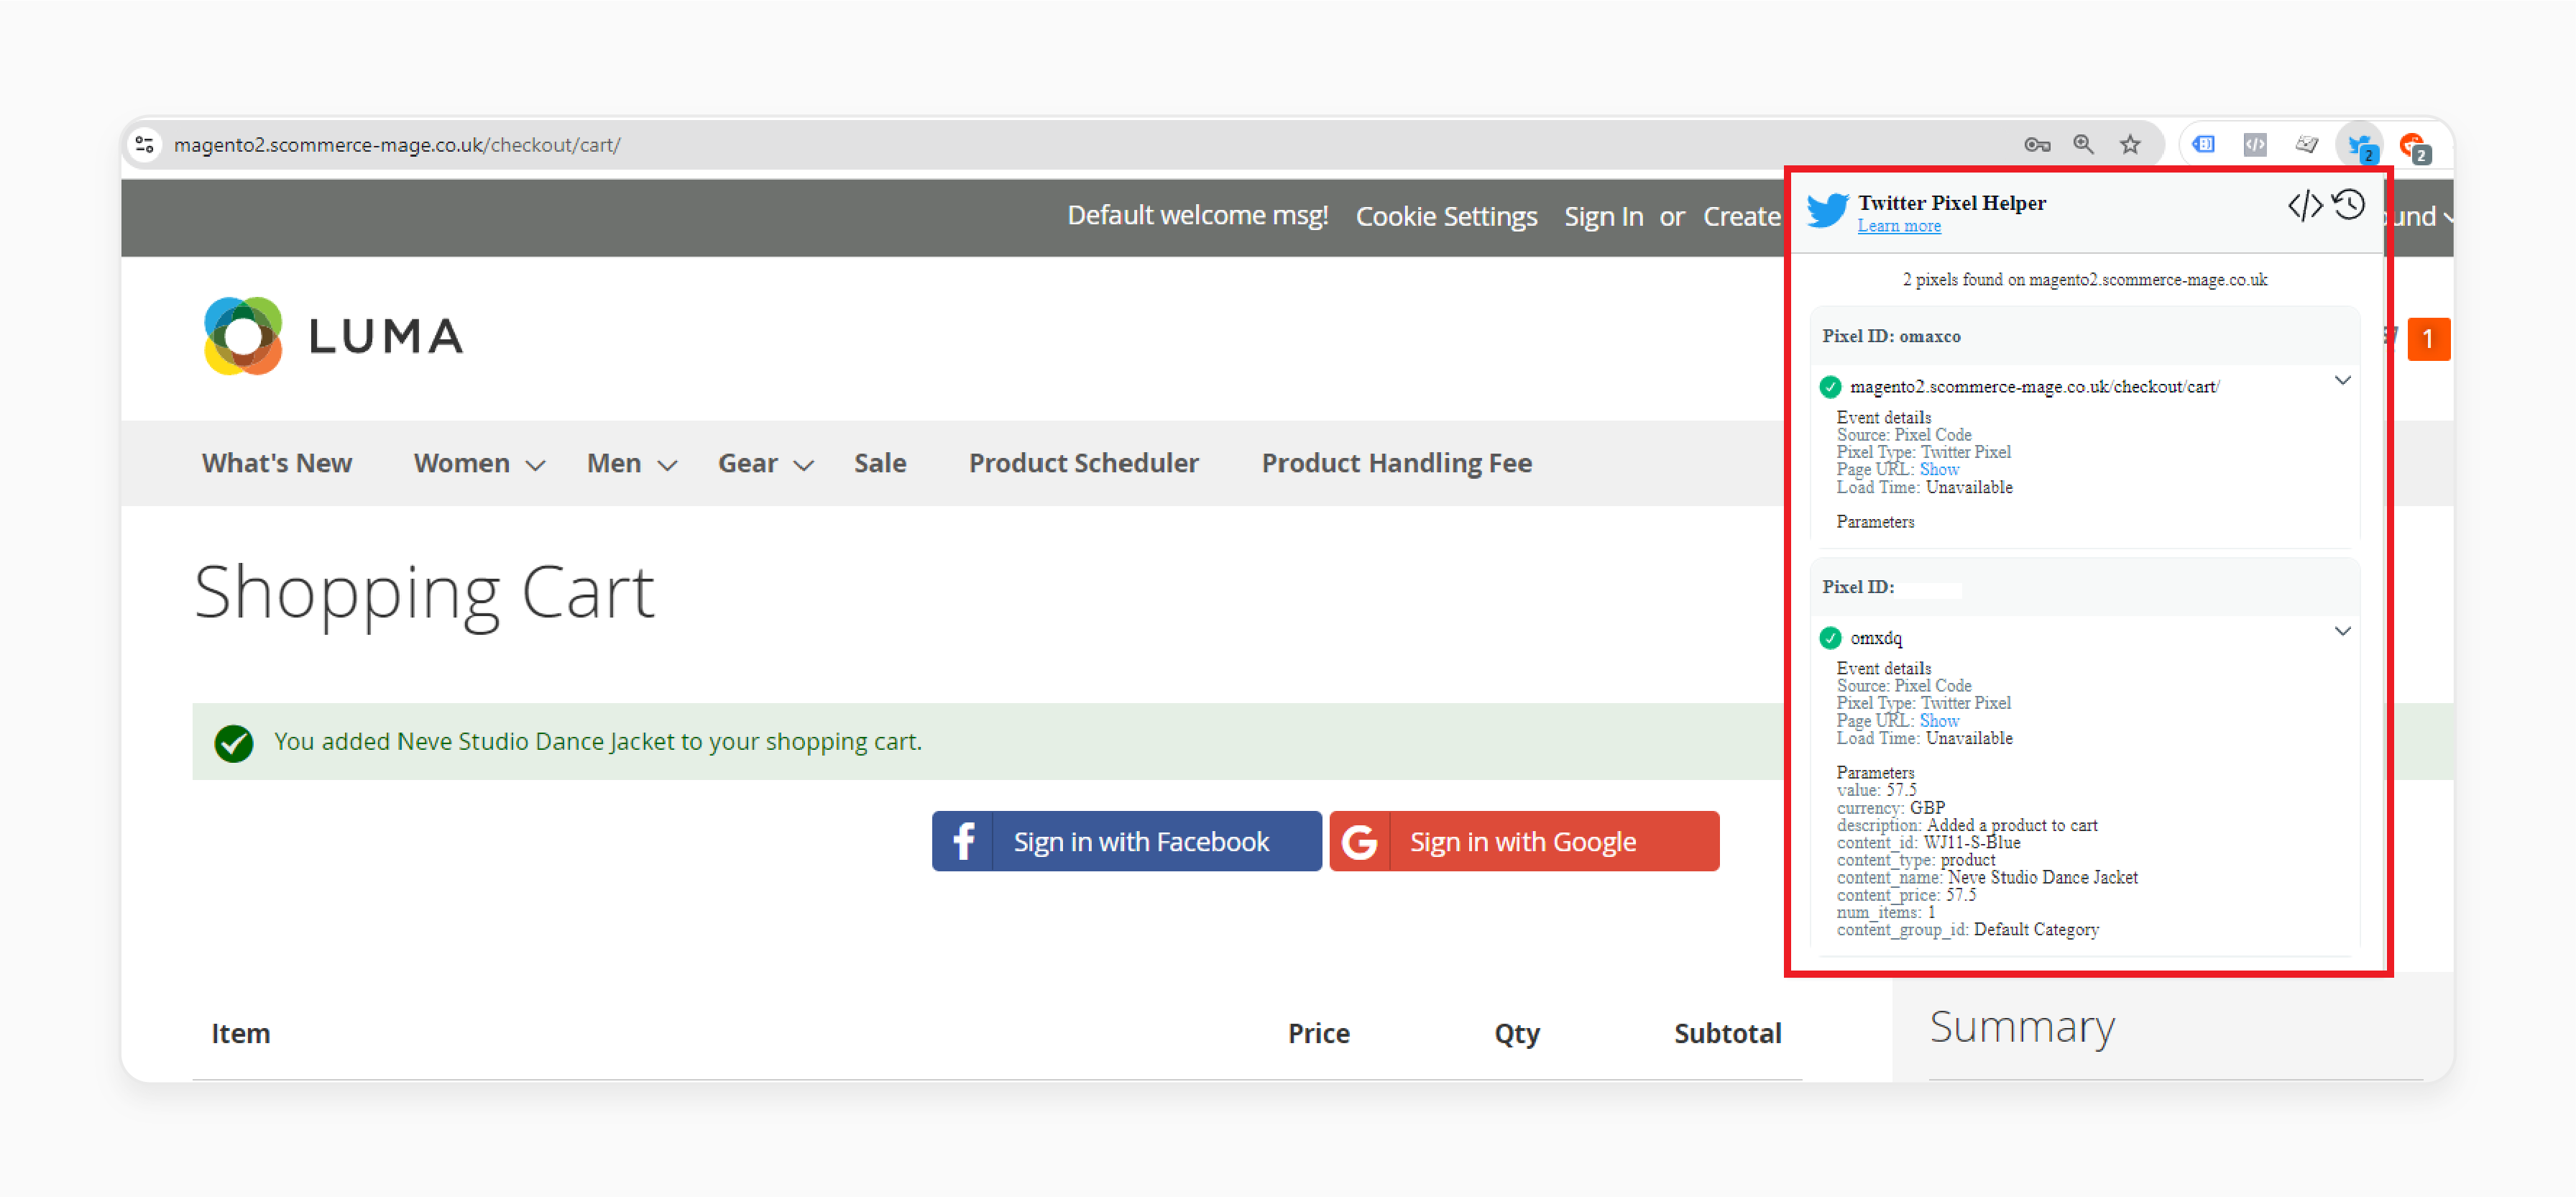
- Install the Twitter (X) Pixel Helper Chrome Extension.
- Debug and verify pixel activity on your Magento store.
Note:
-
No Data Received:
- Verify the Pixel ID in GTM tags.
- Ensure triggers are correctly configured for the intended pages.
-
Tag Not Firing:
- Use GTM’s Preview Mode to ensure the tag is firing on the correct events.
- Check trigger conditions for errors.
FAQs
1. Why does my X Pixel show "attention required" status?
This attention-required status appears when your pixel isn't firing correctly. Check your pixel ID setup and review your configuration settings. You can then verify the pixel code placement in your store's header. Use the Pixel Helper Chrome extension for debugging. If issues persist, clear your cache and refresh tracking settings.
2. Do I need to create a new X Ads account for pixel integration?
No, you can use your already-created X Ads account by following the setup wizard. Log in to your existing business account and navigate to the Events Manager section. Select your Magento store and add the new pixel through the interface.
3. What does "package for installing in composer suggest" mean during setup?
The "package for installing in composer suggest" message indicates recommended dependencies for the X pixel extension. Install these suggested packages for optimal performance. They support core pixel functions, which you can view in composer.json. Most packages enhance tracking capabilities and improve data accuracy.
4. Why am I unable to access pixel analytics data?
Check your user permissions in X Ads Manager to verify your pixel connection status. Make sure GTM contains proper triggers and review your data layer implementation. Wait 24-48 hours for data processing, and then check for any tracking blockages.
5. Can I integrate X Pixel while already using GA4?
Yes, X Pixel works smoothly alongside GA4. Both tracking systems operate independently and collect different data types. Your store supports multiple tracking tools, so configure each tool's specific settings separately.
6. How to include multiple store views with X (Twitter) Pixels?
Configure pixel settings for each store view separately. Add unique pixel IDs per view and update tracking parameters accordingly. Set different conversion goals if needed. Monitor each store's performance individually to track multi-store analytics effectively.
Summary
The X (Twitter) Pixell for Magento 2 tracks conversions and analytics for Twitter ads. It allows you to:
- Optimize ad performance and reach targeted audiences.
- Monitor user behavior and conversions on your ecommerce website.
- Link your pixel ID and enable accurate conversion tracking.
- Enhance your ability to retarget audiences and measure ROI effectively.
- Measure ad effectiveness and enhance analytics.
- Optimize your marketing or advertising campaigns for better ROI.
Explore Magento hosting services to track & optimize your store's performance with Twitter pixels.


