How to Set Varnish Cache Server for Magento 2?
Ever wondered how popular websites become lightning-fast using a varnish cache server? This powerful tool speeds up web application performance, ensuring a seamless browsing experience.
Dive into our tutorial to uncover the magic behind Varnish Cache. Learn how it could revolutionize your website's speed and user satisfaction.
Key Takeaways
- Discover the power of Varnish Cache and its impact on website speed.
- Learn about Varnish Configuration Language (VCL) and its role in customizing caching.
- Understand how to install and configure Varnish with Magento 2 for optimal performance.
- Gain insights into testing and monitoring Varnish to ensure seamless user experience.
Varnish Cache: A Quick Look
Varnish Cache is an open-source HTTP accelerator that helps serve cached content faster. It is a strong varnish software that speeds up websites with lots of content, like Magento 2 stores. It works as a caching HTTP reverse proxy, which makes your website load faster and improves the user experience.
Created by Poul-Henning Kamp, Varnish Cache started with varnish as an open-source project. It's popular because it's flexible, fast, and can handle lots of traffic. Varnish Cache is great for e-commerce platforms like Magento 2, where quick web page load times impact user experience and sales.
Varnish Configuration Language (VCL)
Varnish Configuration Language (VCL) is a key part of Varnish Cache. VCL is a domain-specific language that tells Varnish how to handle HTTP requests and cache content.
With VCL, you can control Varnish Cache and customize it for your Magento 2 store. VCL code uses built-in subroutines, which are premade steps for processing HTTP requests. These subroutines work at different points in the request-response process, letting you use custom logic when needed.
To use Varnish Cache with Magento 2, you'll need to install Varnish, configure your web server (like Apache or NGINX), and set up Magento 2 to use Varnish as the default cache. Once everything is configured in varnish, it's important to test Varnish to make sure it's working well and caching content for your store.
Setting Up Varnish Cache with Magento 2
Let's go through the steps to install Varnish and set it up with Magento 2. This includes configuring your web server, like Apache or NGINX, and telling Magento 2 to use Varnish as the main cache.
1. Install Varnish
First, put Varnish on your server. The steps may be different depending on your server's system. For Debian-based systems, do this:
- Update the package list:
sudo apt-get update - Install Varnish:
sudo apt-get install varnish
For other systems, check the official Varnish documentation for help.
2. Set Up Web Servers
Apache
To make Apache work with Varnish, do this:
- Edit the Apache configuration file:
/etc/httpd/conf/httpd.confor/etc/apache2/sites-available/000-default.conf - Change the default listening port from 80 to 8080:
Listen 8080 - Save and close the configuration file
- Restart Apache:
sudo service apache2 restart
NGINX
To make NGINX work with Varnish, do this:
- Edit the NGINX configuration file (
/etc/nginx/sites-available/default) - Change the default listening port from 80 to 8080:
listen 8080; - Save and close the configuration file.
- Restart NGINX:
sudo service nginx restart
3. Set Up Varnish
- Edit the Varnish configuration file (
/etc/varnish/default.vcl) - Update the backend server configuration to point to your web server:
backend default {
    .host = "127.0.0.1";
    .port = "8080";
}
- Save and close the configuration file
- Edit the Varnish service file (
/lib/systemd/system/varnish.service), changing the listening port from 6081 to 80:
ExecStart=/usr/sbin/varnishd -j unix,user=vcache -F -a :80 -T localhost:6082 -f /etc/varnish/default.vcl -S /etc/varnish/secret -s malloc,256m
- Save and close the service file
- Reload the systemd configuration:
sudo systemctl daemon-reload - Restart Varnish:
sudo service varnish restart
4. Set Up Magento 2
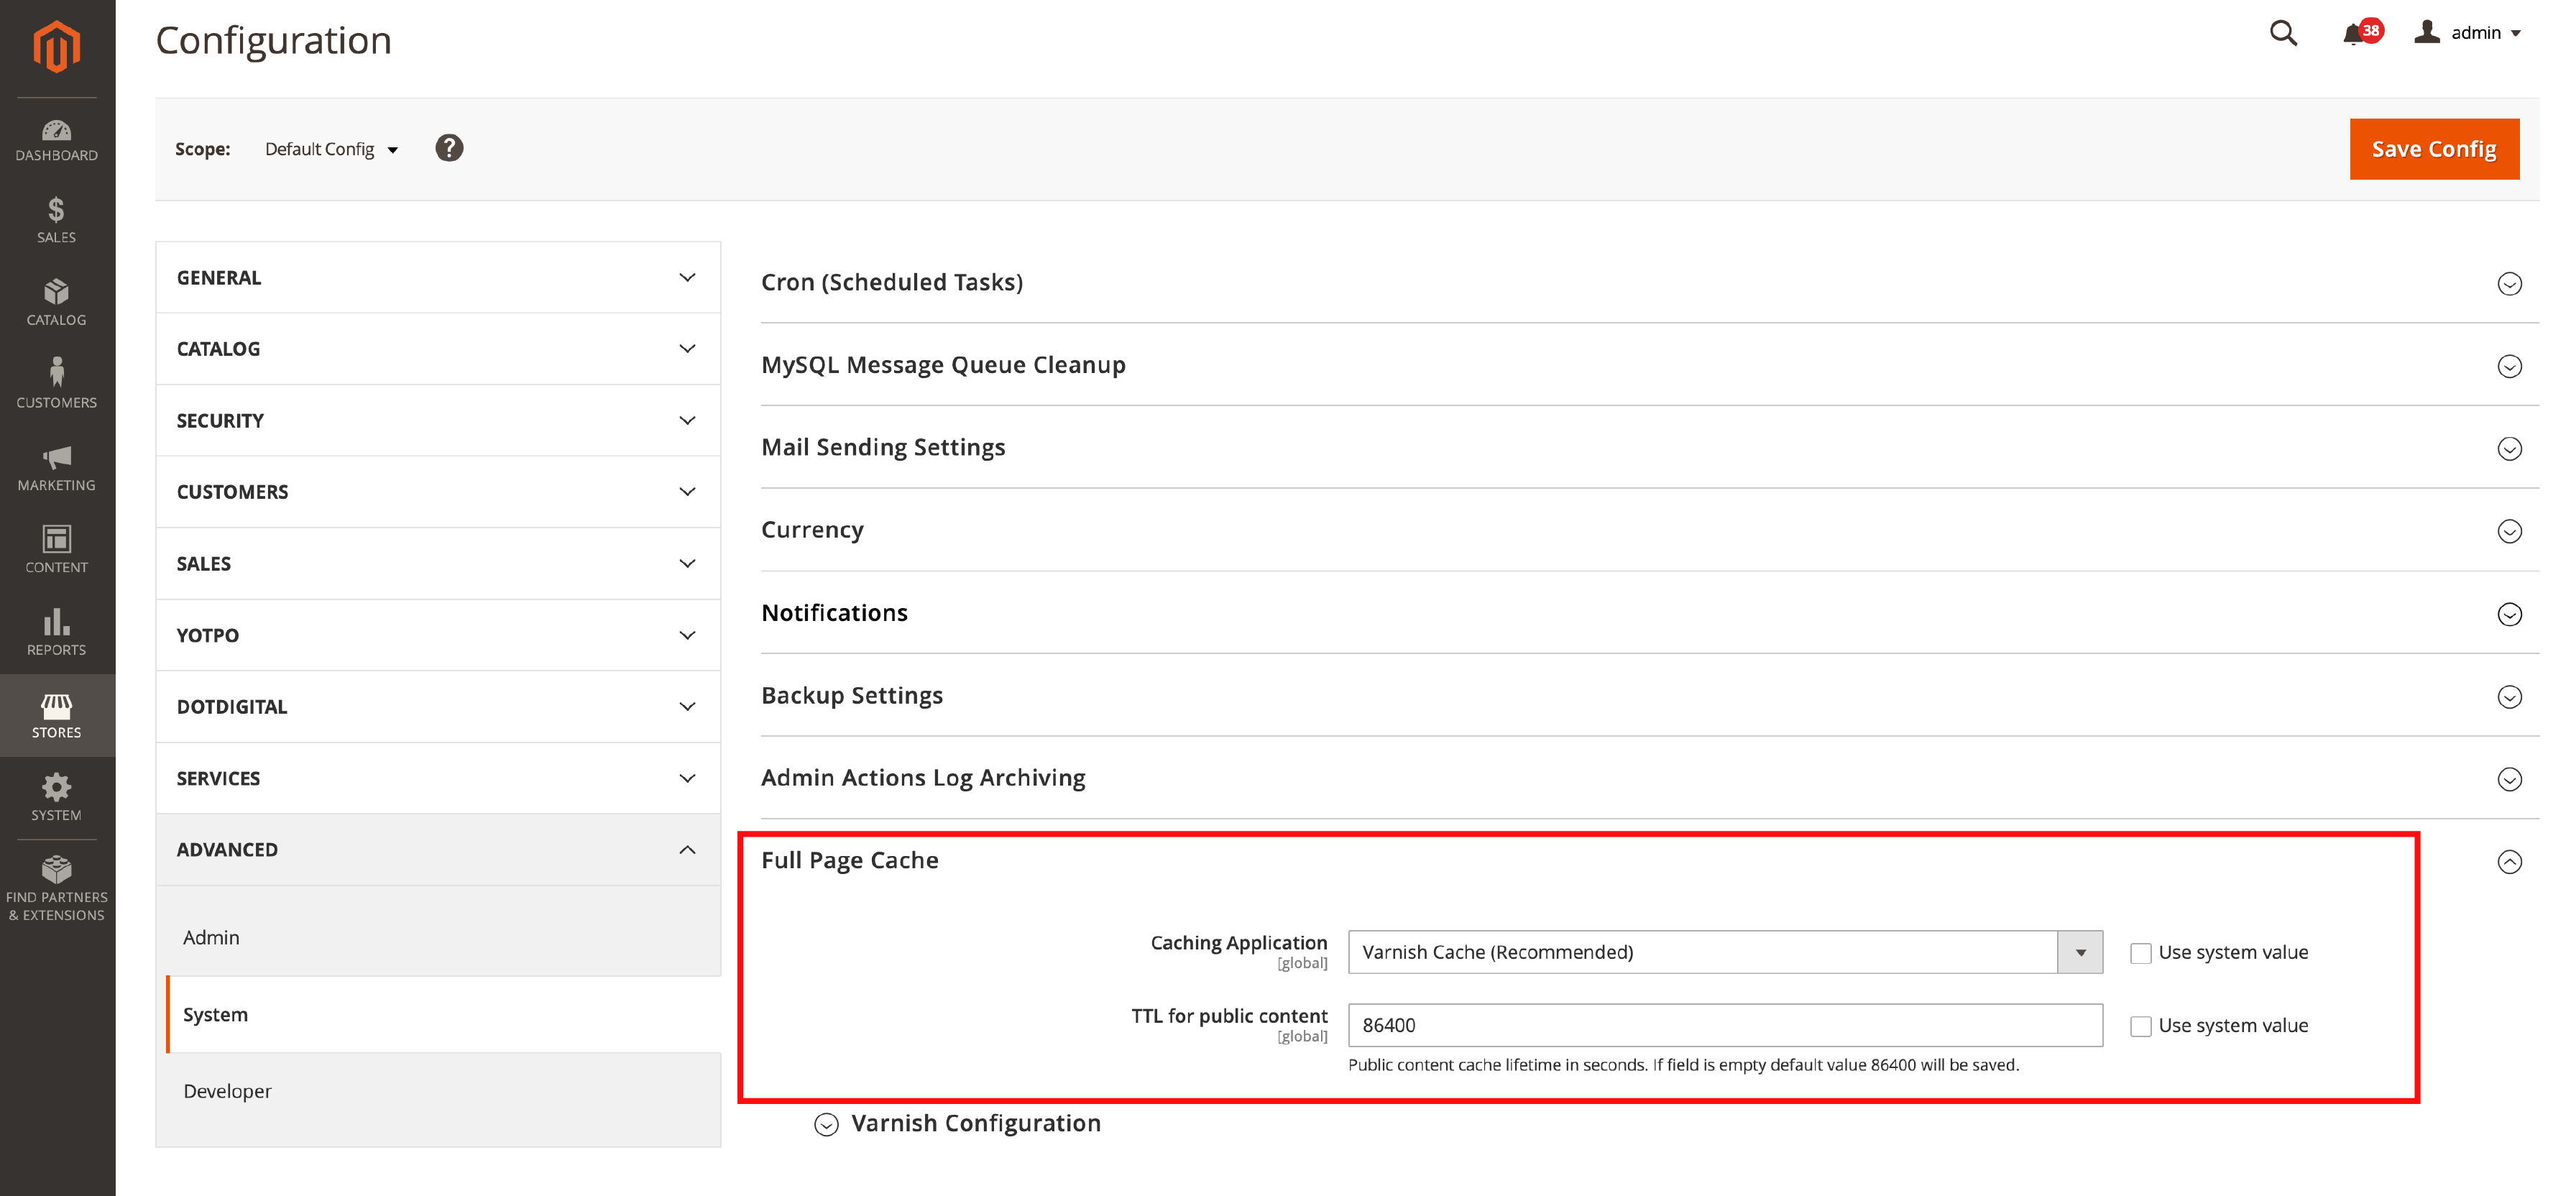
- Log in to the Magento 2 admin panel
- Go to Stores > Configuration > Advanced > System

- In the Full Page Cache section, change the Caching Application to Varnish Cache (Recommended)
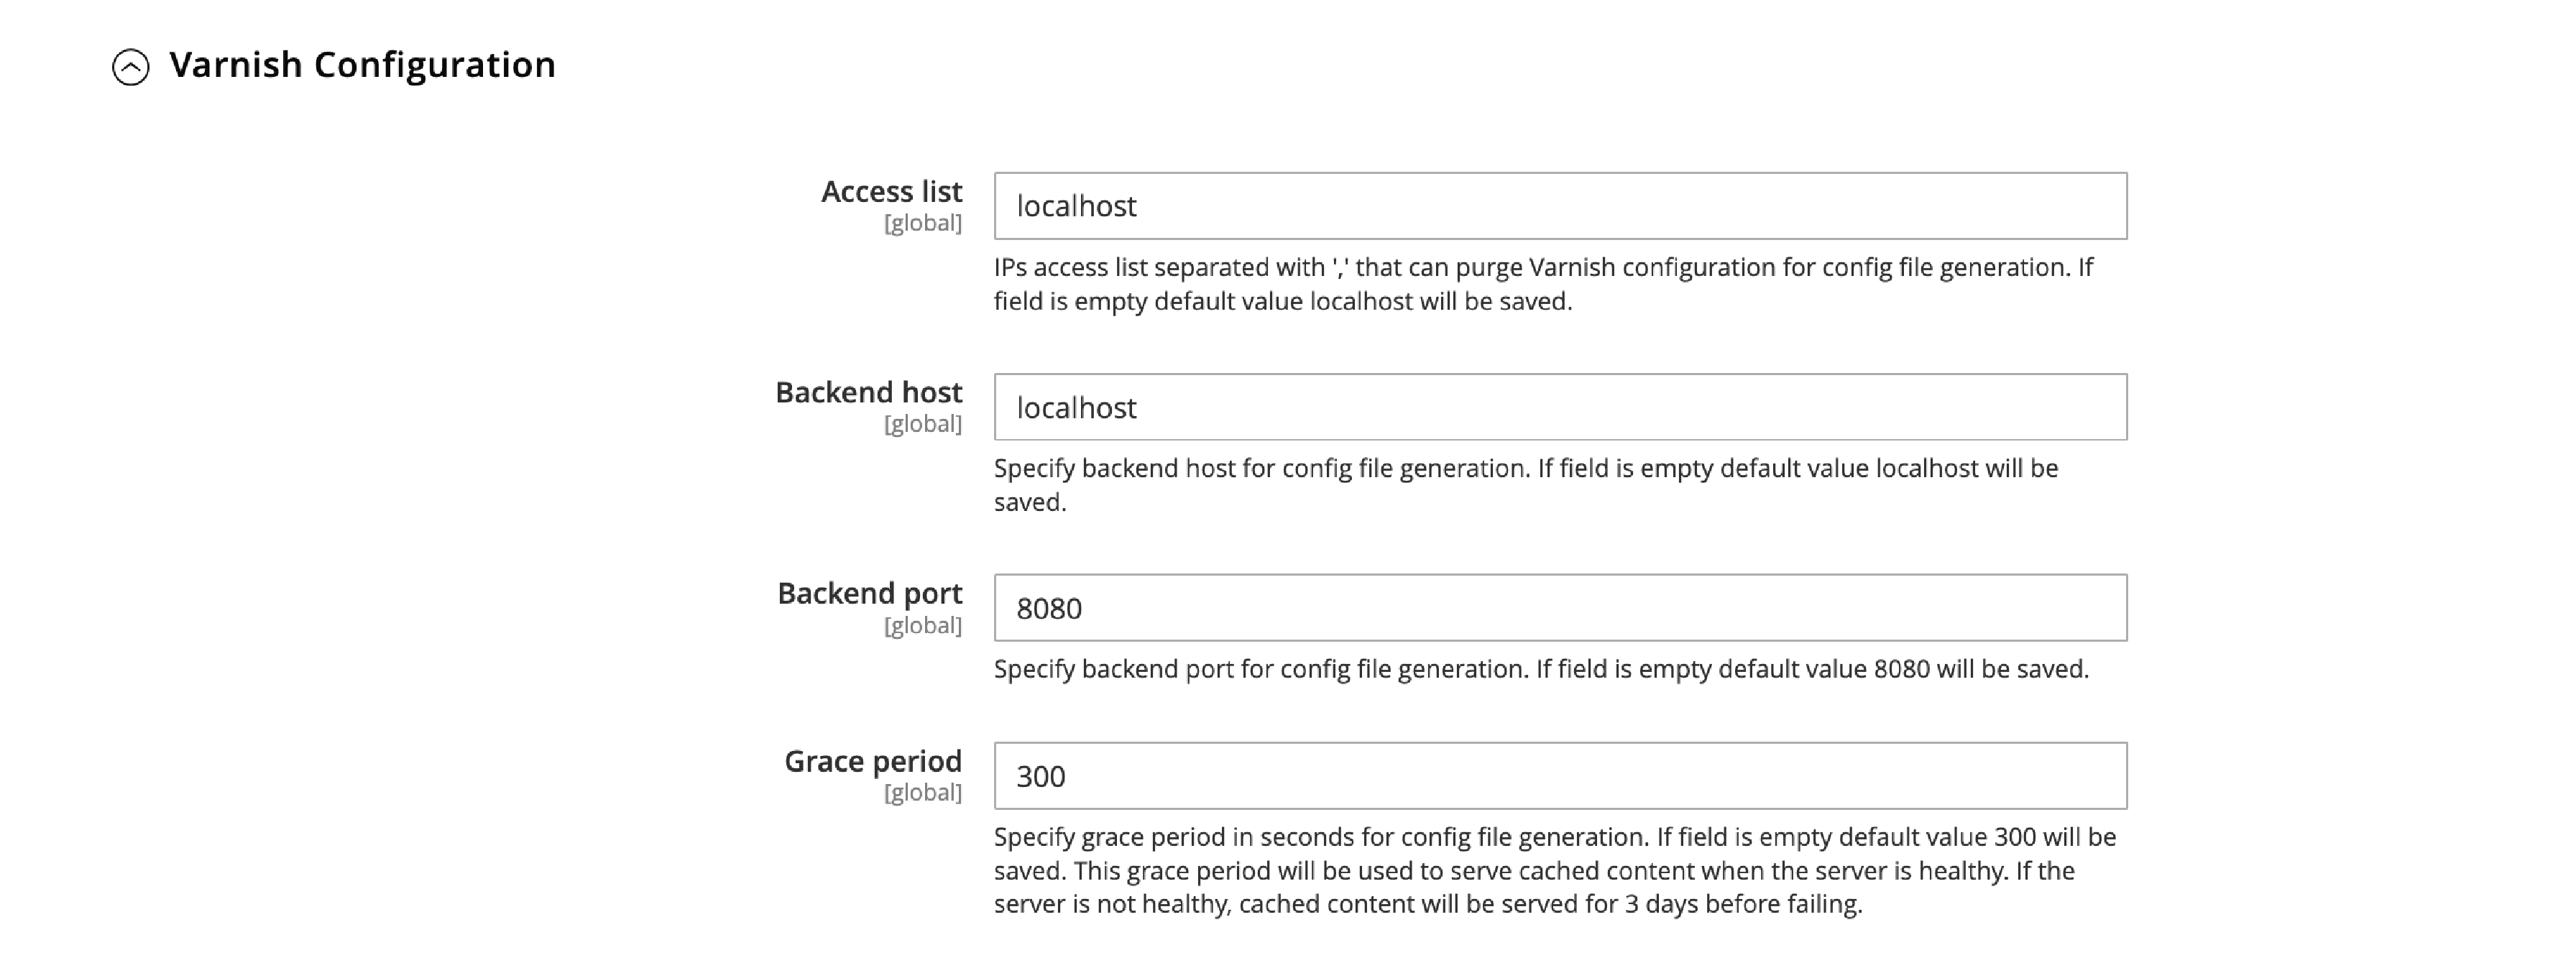
- Set up the Varnish Configuration settings like this:
-
Access list:
localhost -
Backend host:
localhost -
Backend port:
8080

- Save the configuration.
- Export the VCL file for your Varnish version by clicking the Export VCL for Varnish button
- Replace the
/etc/varnish/default.vclfile with the exported VCL file from Magento 2 - Restart Varnish:
sudo service varnish restart
5. Test Varnish
To make sure Varnish is working right with your Magento 2 store, use the curl command to check the HTTP headers:
curl -I -X GET http://yourdomain.com
Look for the X-Varnish and X-Cache headers in the response. If they're there, Varnish is working right.
By following these steps, you should have successfully set up Varnish with Magento 2, making your store faster and better for users.
Varnish Cache for Magento: Frequently Asked Questions
1. What makes Varnish software special?
Varnish software is special because it's an open-source project designed to speed up websites. It's flexible, fast, and ideal for e-commerce platforms like Magento 2.
2. How do I purge Varnish Cache?
To purge Varnish Cache, you can use the curl command or create a custom VCL subroutine that handles cache purging based on your requirements.
3. What are the steps for installing Varnish?
Installing Varnish involves updating your server's package list, installing Varnish using the package manager, and configuring Varnish with your web server and Magento 2 store.
4. What are Varnish modules?
Varnish modules (VMODs) are extensions that add extra functionality to Varnish Cache. They can be used to enhance caching capabilities or implement custom logic.
5. What does Varnish systemctl do?
Varnish systemctl allows you to manage the Varnish Cache service on your server. You can use it to start, stop, or restart Varnish, and check its status.
6. How does Varnish help my Magento store?
Varnish helps your Magento store by caching and serving content faster. This reduces the load on your server and improves your store's performance and user experience.
7. How does Varnish work?
Varnish works by sitting between your server and users. It caches and serves content quickly, reducing the load on your server and speeding up your website.
8. Can Varnish work with other platforms?
Yes, Varnish can work with other platforms besides Magento. It's a versatile tool that can be configured to work with various web applications and content management systems.
Summary
Are you ready to use varnish cache server and transform your Magento 2 store's performance? This tutorial explored the power of Varnish Cache, its configuration language (VCL), and the steps to install and configure it for optimal results.
By implementing Varnish Cache, you'll enjoy faster load times, improved user experience, and increased sales. Don't miss out on the latest Magento news - stay updated and informed for your ecommerce business.


