
How to Configure Magento Braintree Payment Method
Braintree is a popular payment gateway that allows e-commerce stores to accept various payment methods. It includes credit and debit cards, PayPal, Apple Pay, and Google Pay.
Adding Braintree to your Magento 2 store provides customers a secure shopping experience.
In this tutorial, we will guide you through the step-by-step process of configuring the Braintree payment method in Magento 2.
How to Configure Braintree in Magento 2
Set up a Braintree Account
Before configuring Braintree in Magento 2, sign up for a Braintree account.
Visit the official website of Braintree and complete the sign-up process.
Once your account is set up, you will receive your Merchant ID, Public Key, and Private Key. You will require these for the configuration in Magento 2.
Configure Basic Braintree Settings in Magento 2
- Log in to your Magento 2 admin panel.
- Navigate to Stores > Settings > Configuration.
- In the left panel, expand Sales and click Payment Methods.
- Locate the Braintree section and click on Configure.

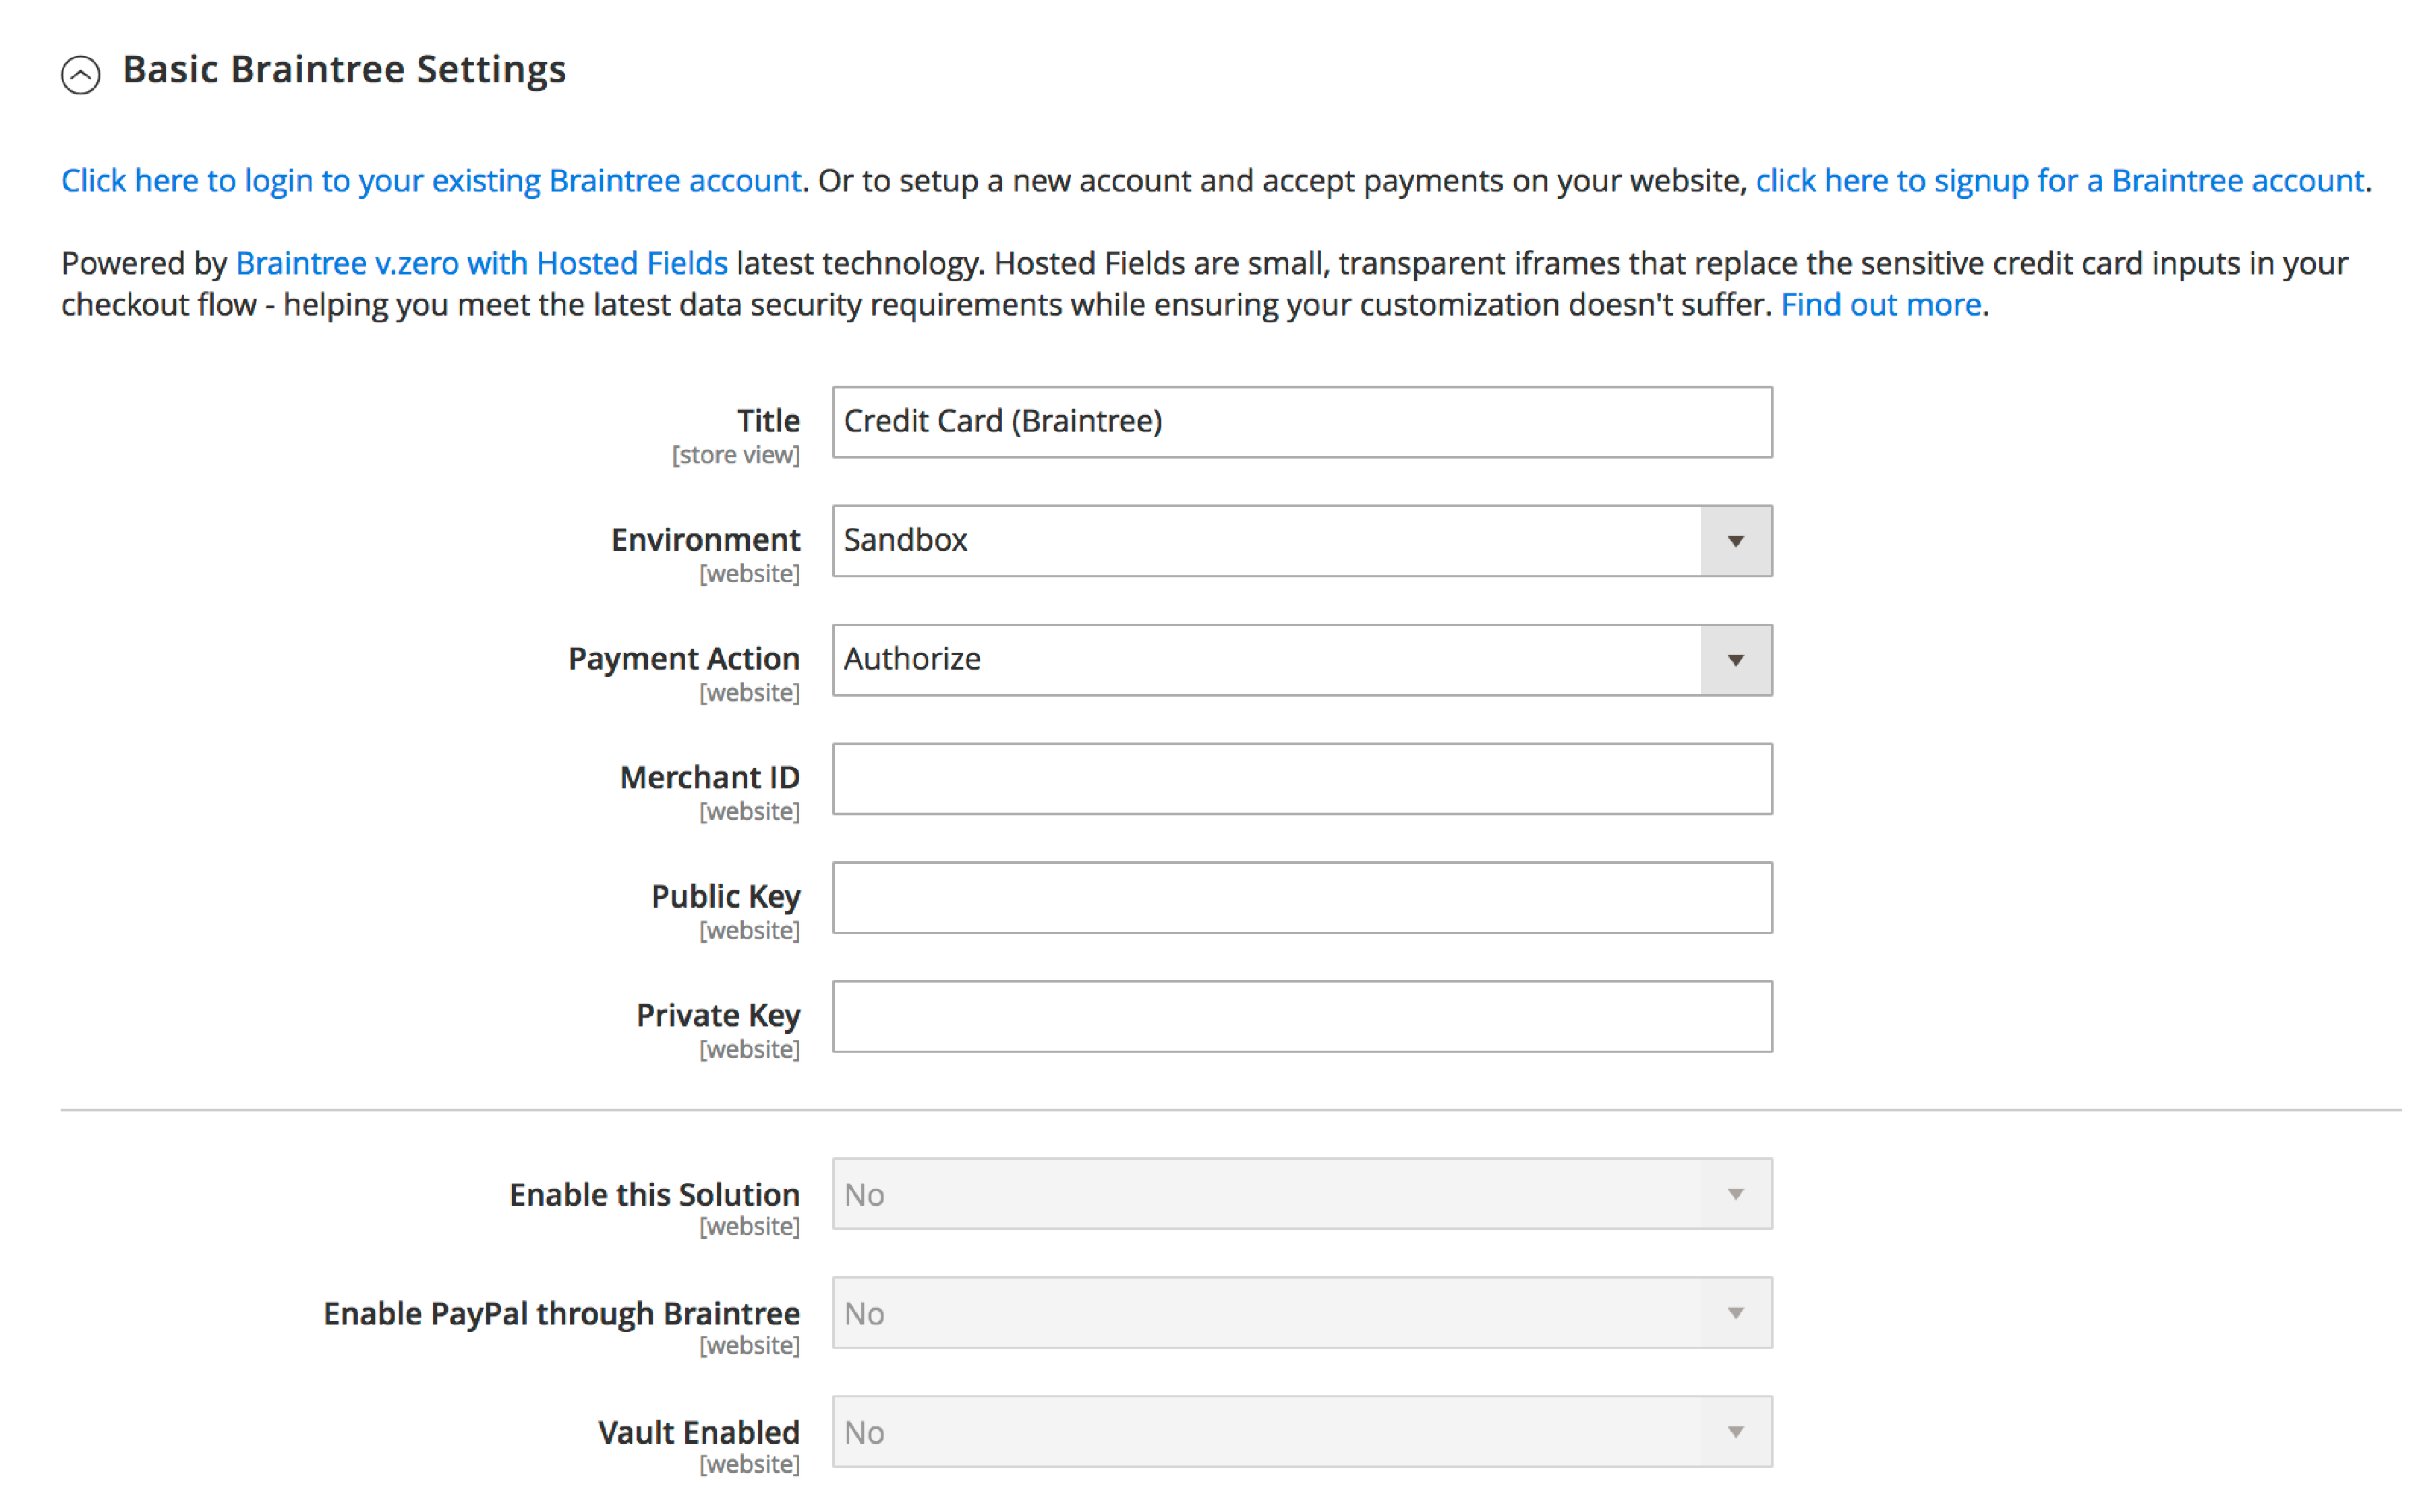
Now, fill in the following details:
-
Title: Enter a title to identify the Braintree payment method during checkout.
-
Environment: Choose between "Sandbox" for testing purposes or "Production" for live transactions.
-
Payment Action: Select "Authorize Only" to approve the purchase and put a hold on the funds, or "Authorize and Capture" to support the approval. It is withdrawn from the customer s account.
-
Merchant ID, Public Key, and Private Key: Enter the credentials obtained from your Braintree account.
-
Enable this Solution: Set to "Yes" to activate the Braintree payment method.
-
Vault Enabled: Set to "Yes" if you want to store customer payment information for faster future checkouts securely.
Configure Advanced Braintree Settings
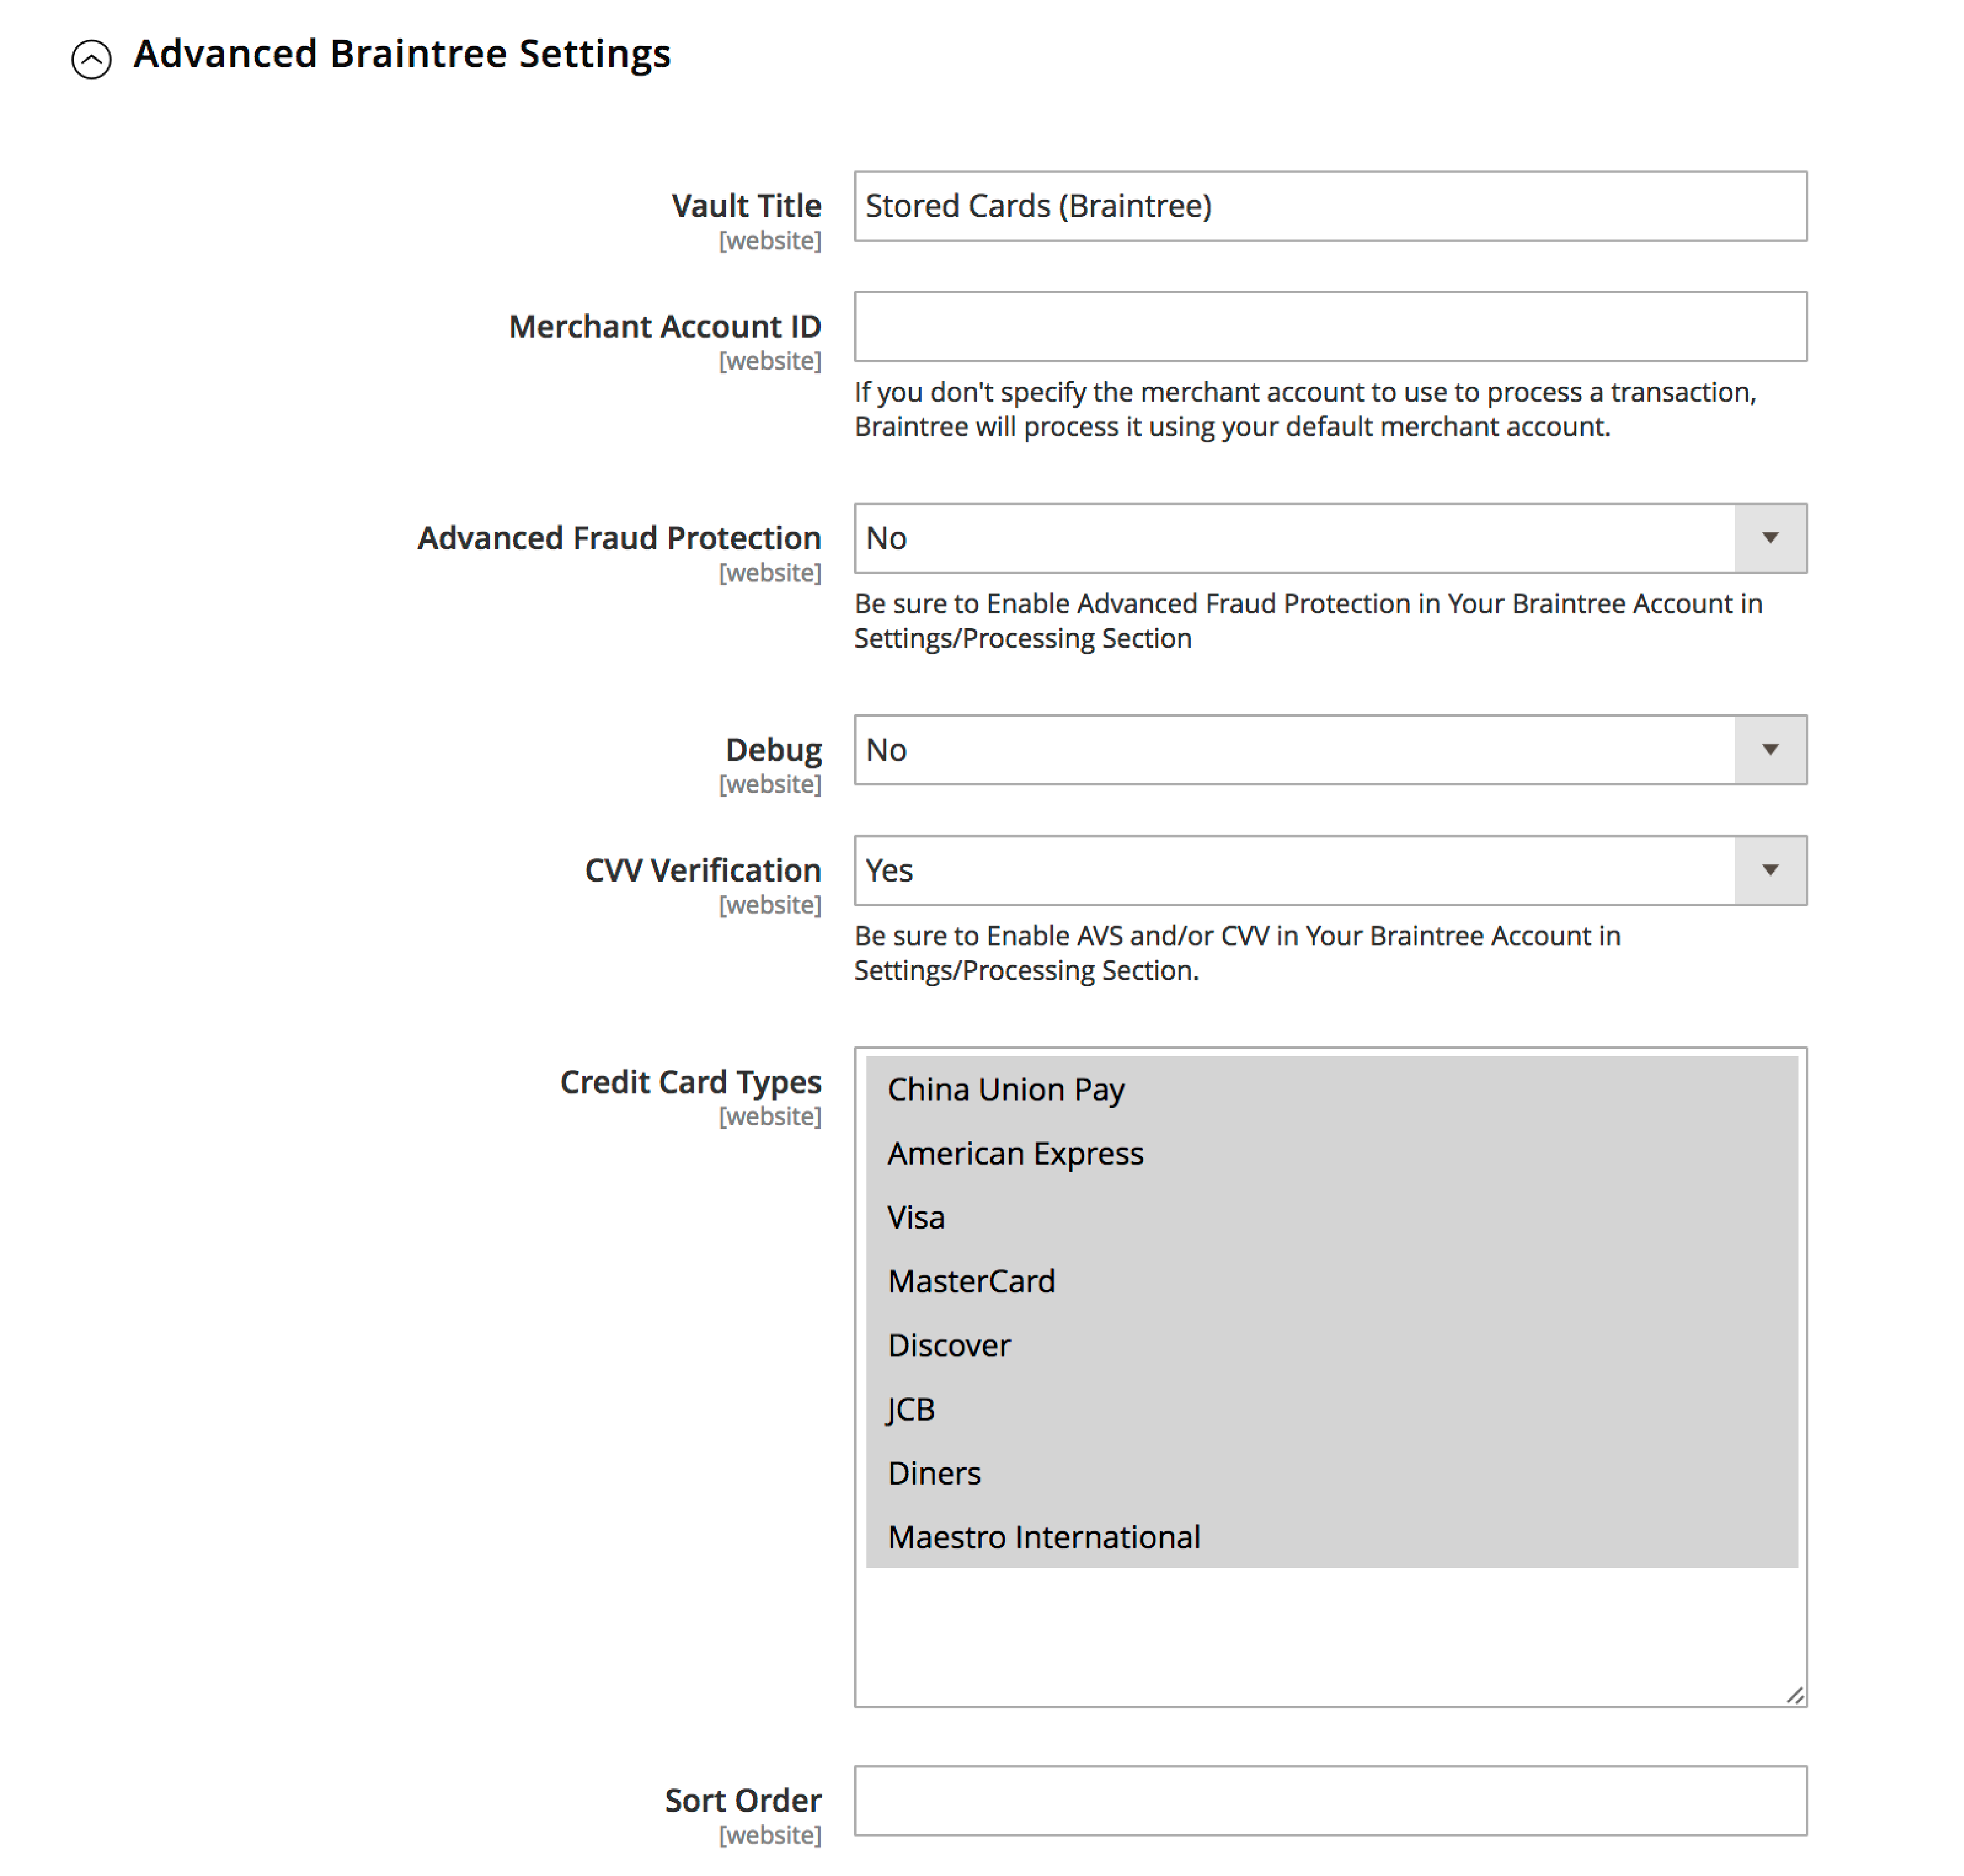
Expand the Advanced Settings section and configure the following options:
- Vault Title:
Enter a descriptive title for the Braintree vault where customer card information is stored.
- Advanced Fraud Protection:
Set to "Yes" if you want to use Braintree fraud protection for transactions. Ensure Advanced Fraud Protection is enabled in your Braintree account's Settings/Protection section.
- Debug:
Set to "Yes" if you want the system to save a log file of interactions between your store and Braintree.
- CVV Verification:
Set to "Yes" if you want customers to provide the 3-digit security code from their credit card for verification. Enable AVS and/or CVV in your Braintree account's Settings/Processing section.
- Credit Card Types:
Select the credit card types your store will accept as payment through Braintree.
- Sort Order:
Enter a number to determine the position of the Braintree payment method in the list of payment methods displayed during checkout.
Configure Country-Specific Settings
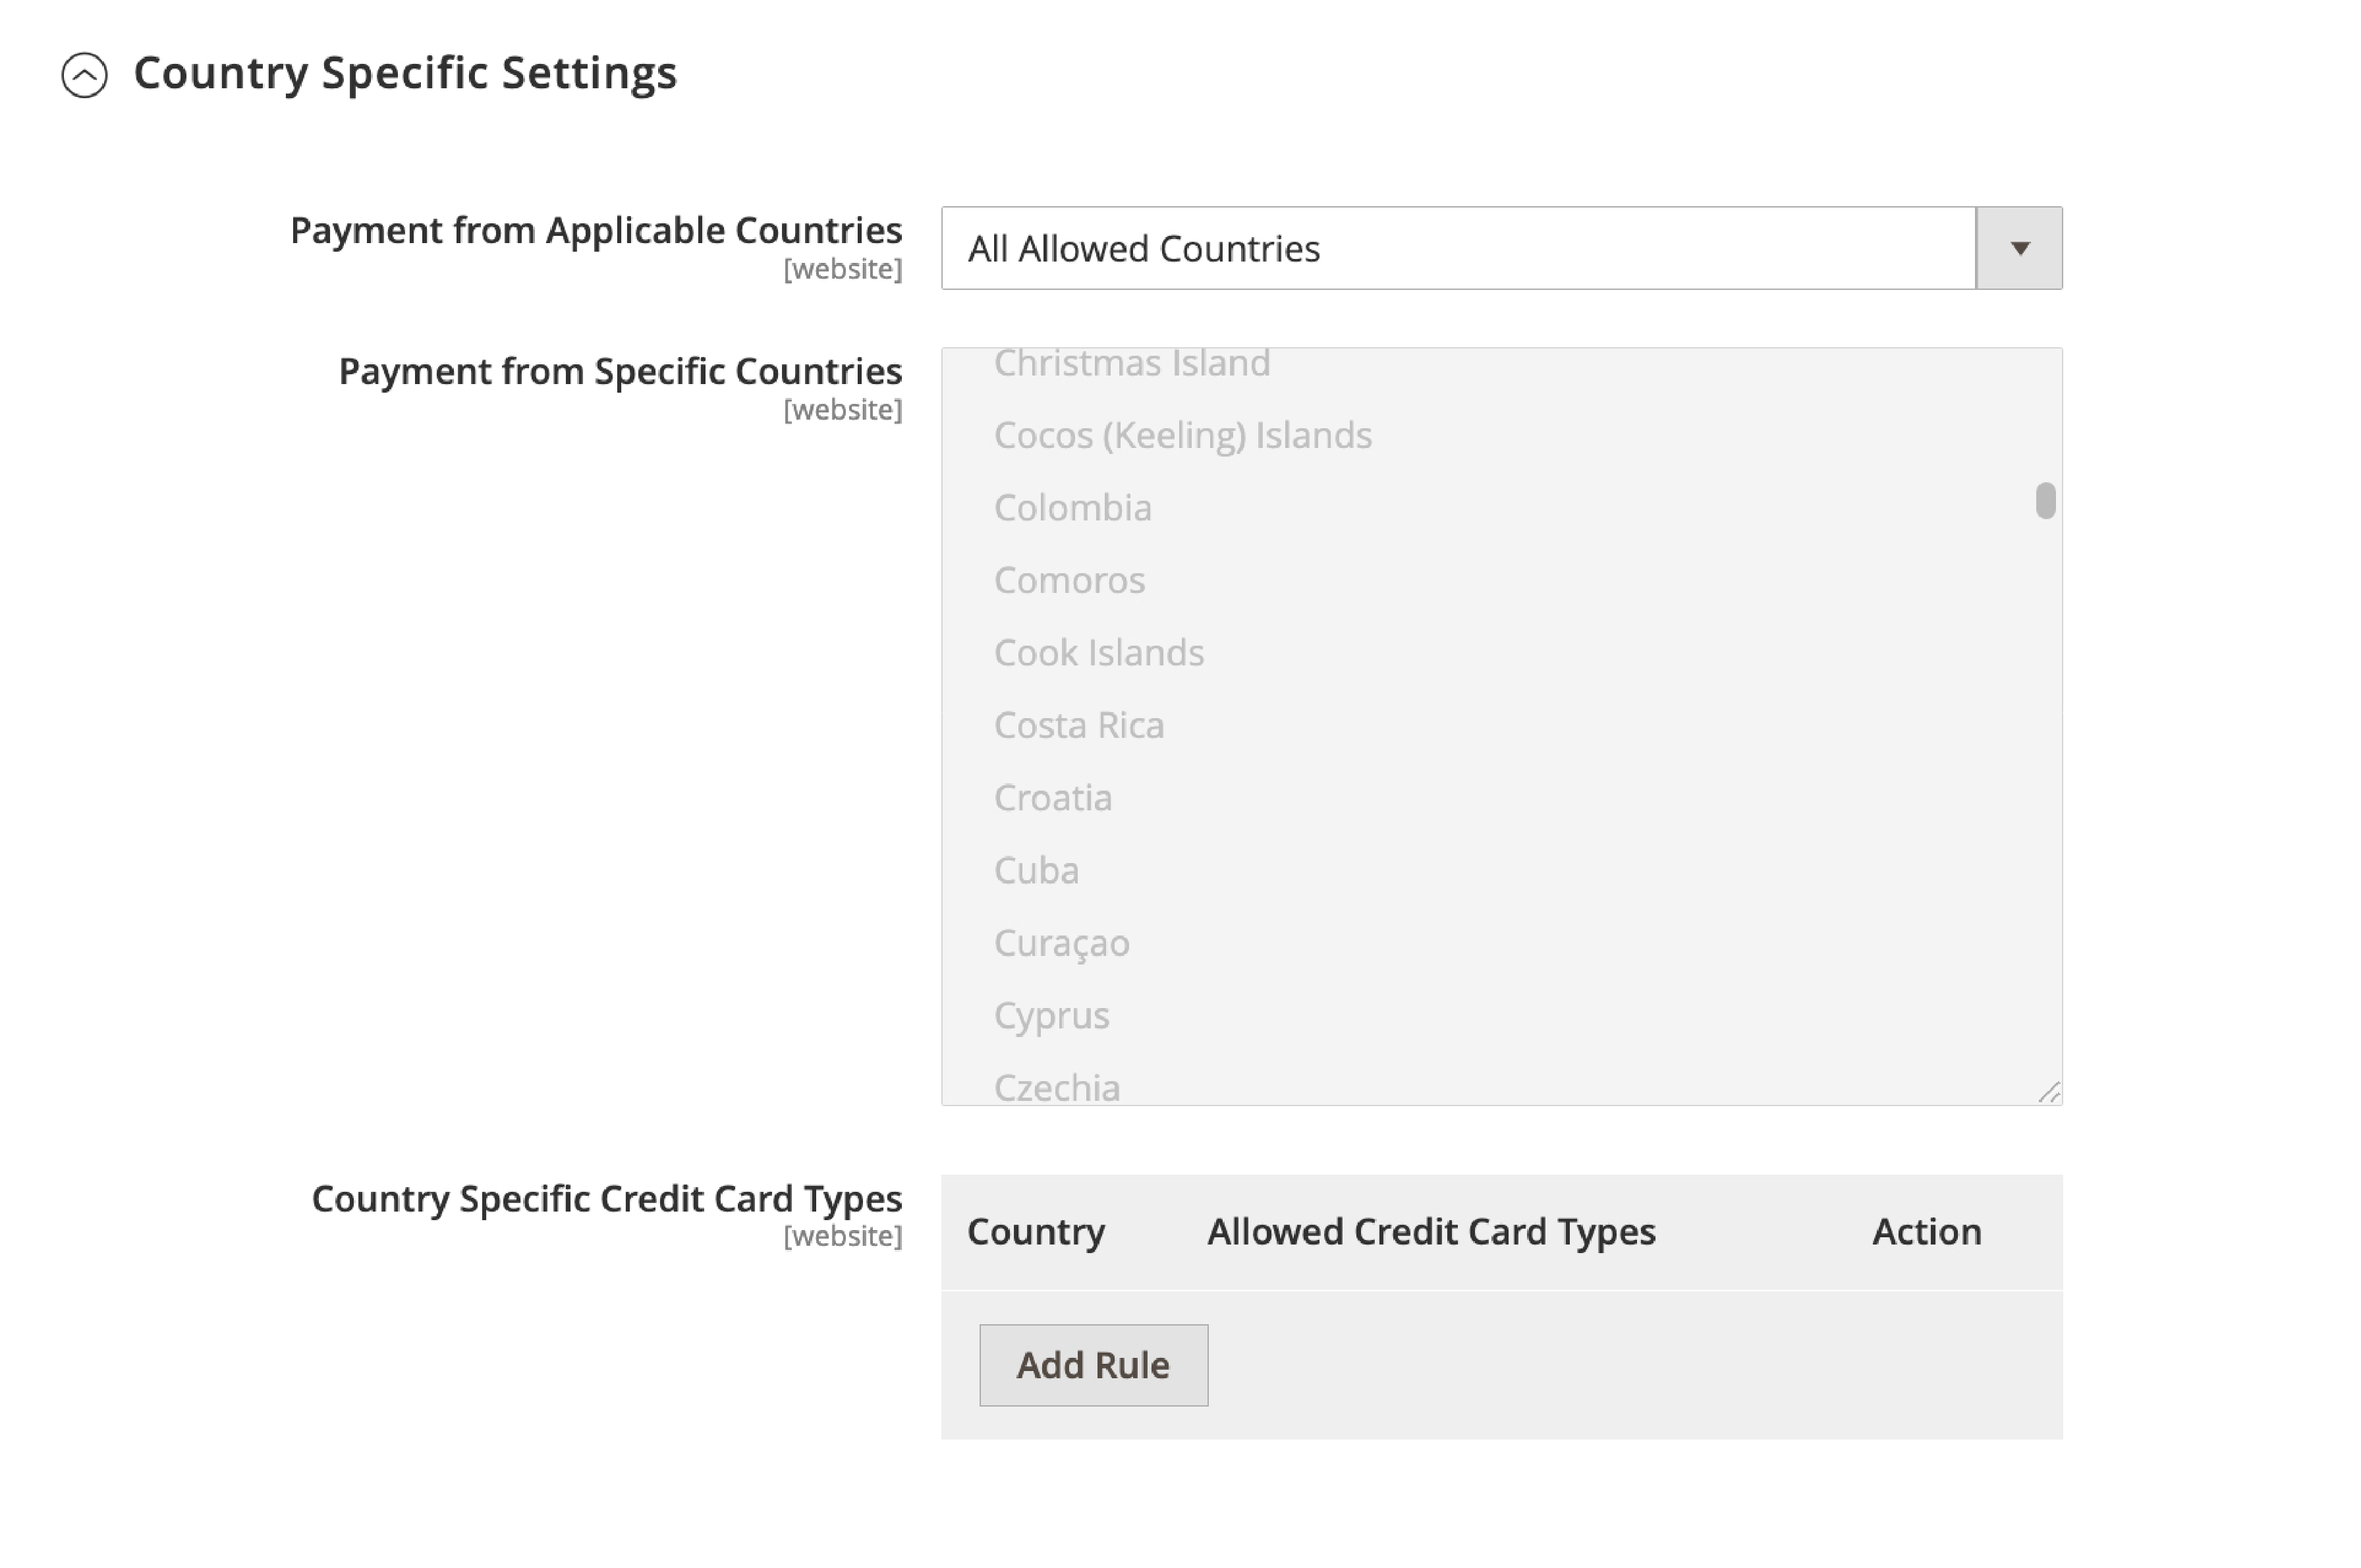
In this section, you can customize the Braintree payment method based on the customer's location:
- Payment from Applicable Countries:
Choose "All Allowed Countries" or "Specific Countries" based on your business requirements.
- Country Specific Credit Card Types:
Click the "Add" button to select a country and choose the allowed credit card type for that country. Repeat this process for each country as needed.
Configure PayPal Settings via Braintree
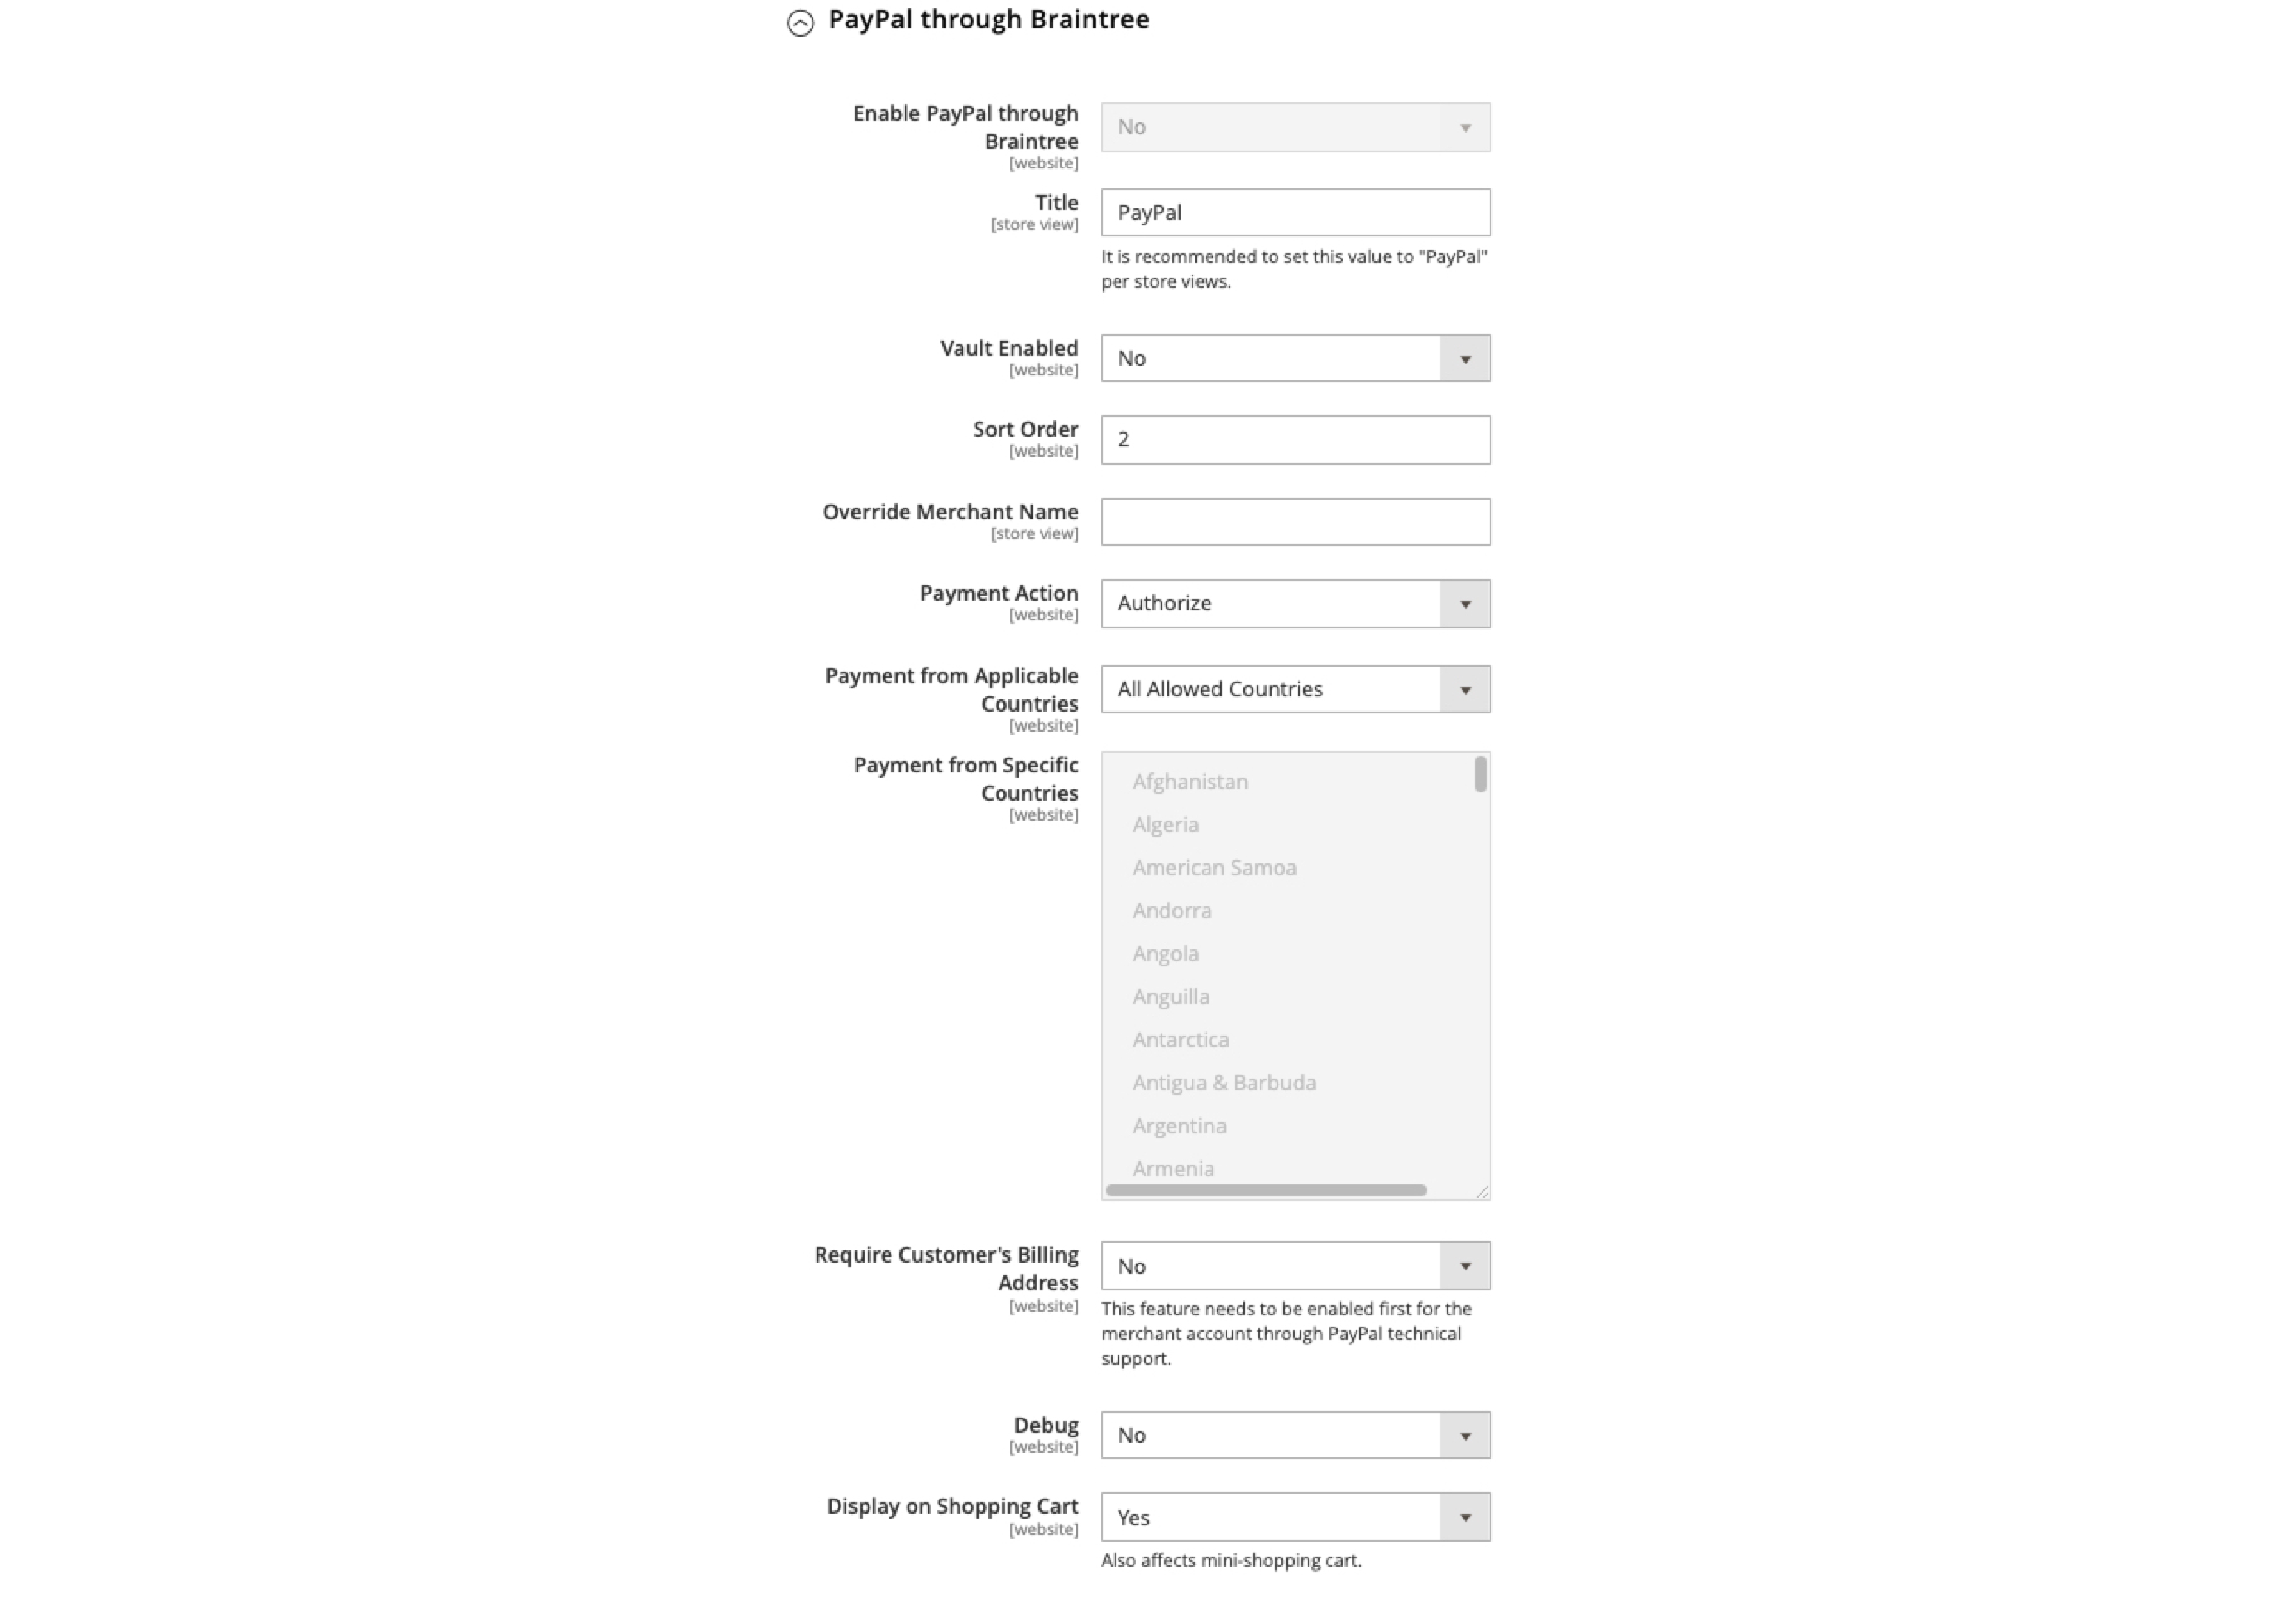
Expand the PayPal Settings via Braintree section and configure the following options:
-
Title: Enter a title to identify Braintree's PayPal payment option during checkout.
-
Sort Order: Enter a number to determine the position of Braintree's PayPal option in the list of payment methods.
-
Payment Action: Choose between "Authorize Only" or "Authorize and Capture," as described in Step 2.
-
Payment from Applicable Countries:
Select the countries where you want to accept PayPal payments via Braintree.
Configure 3D Verification Settings
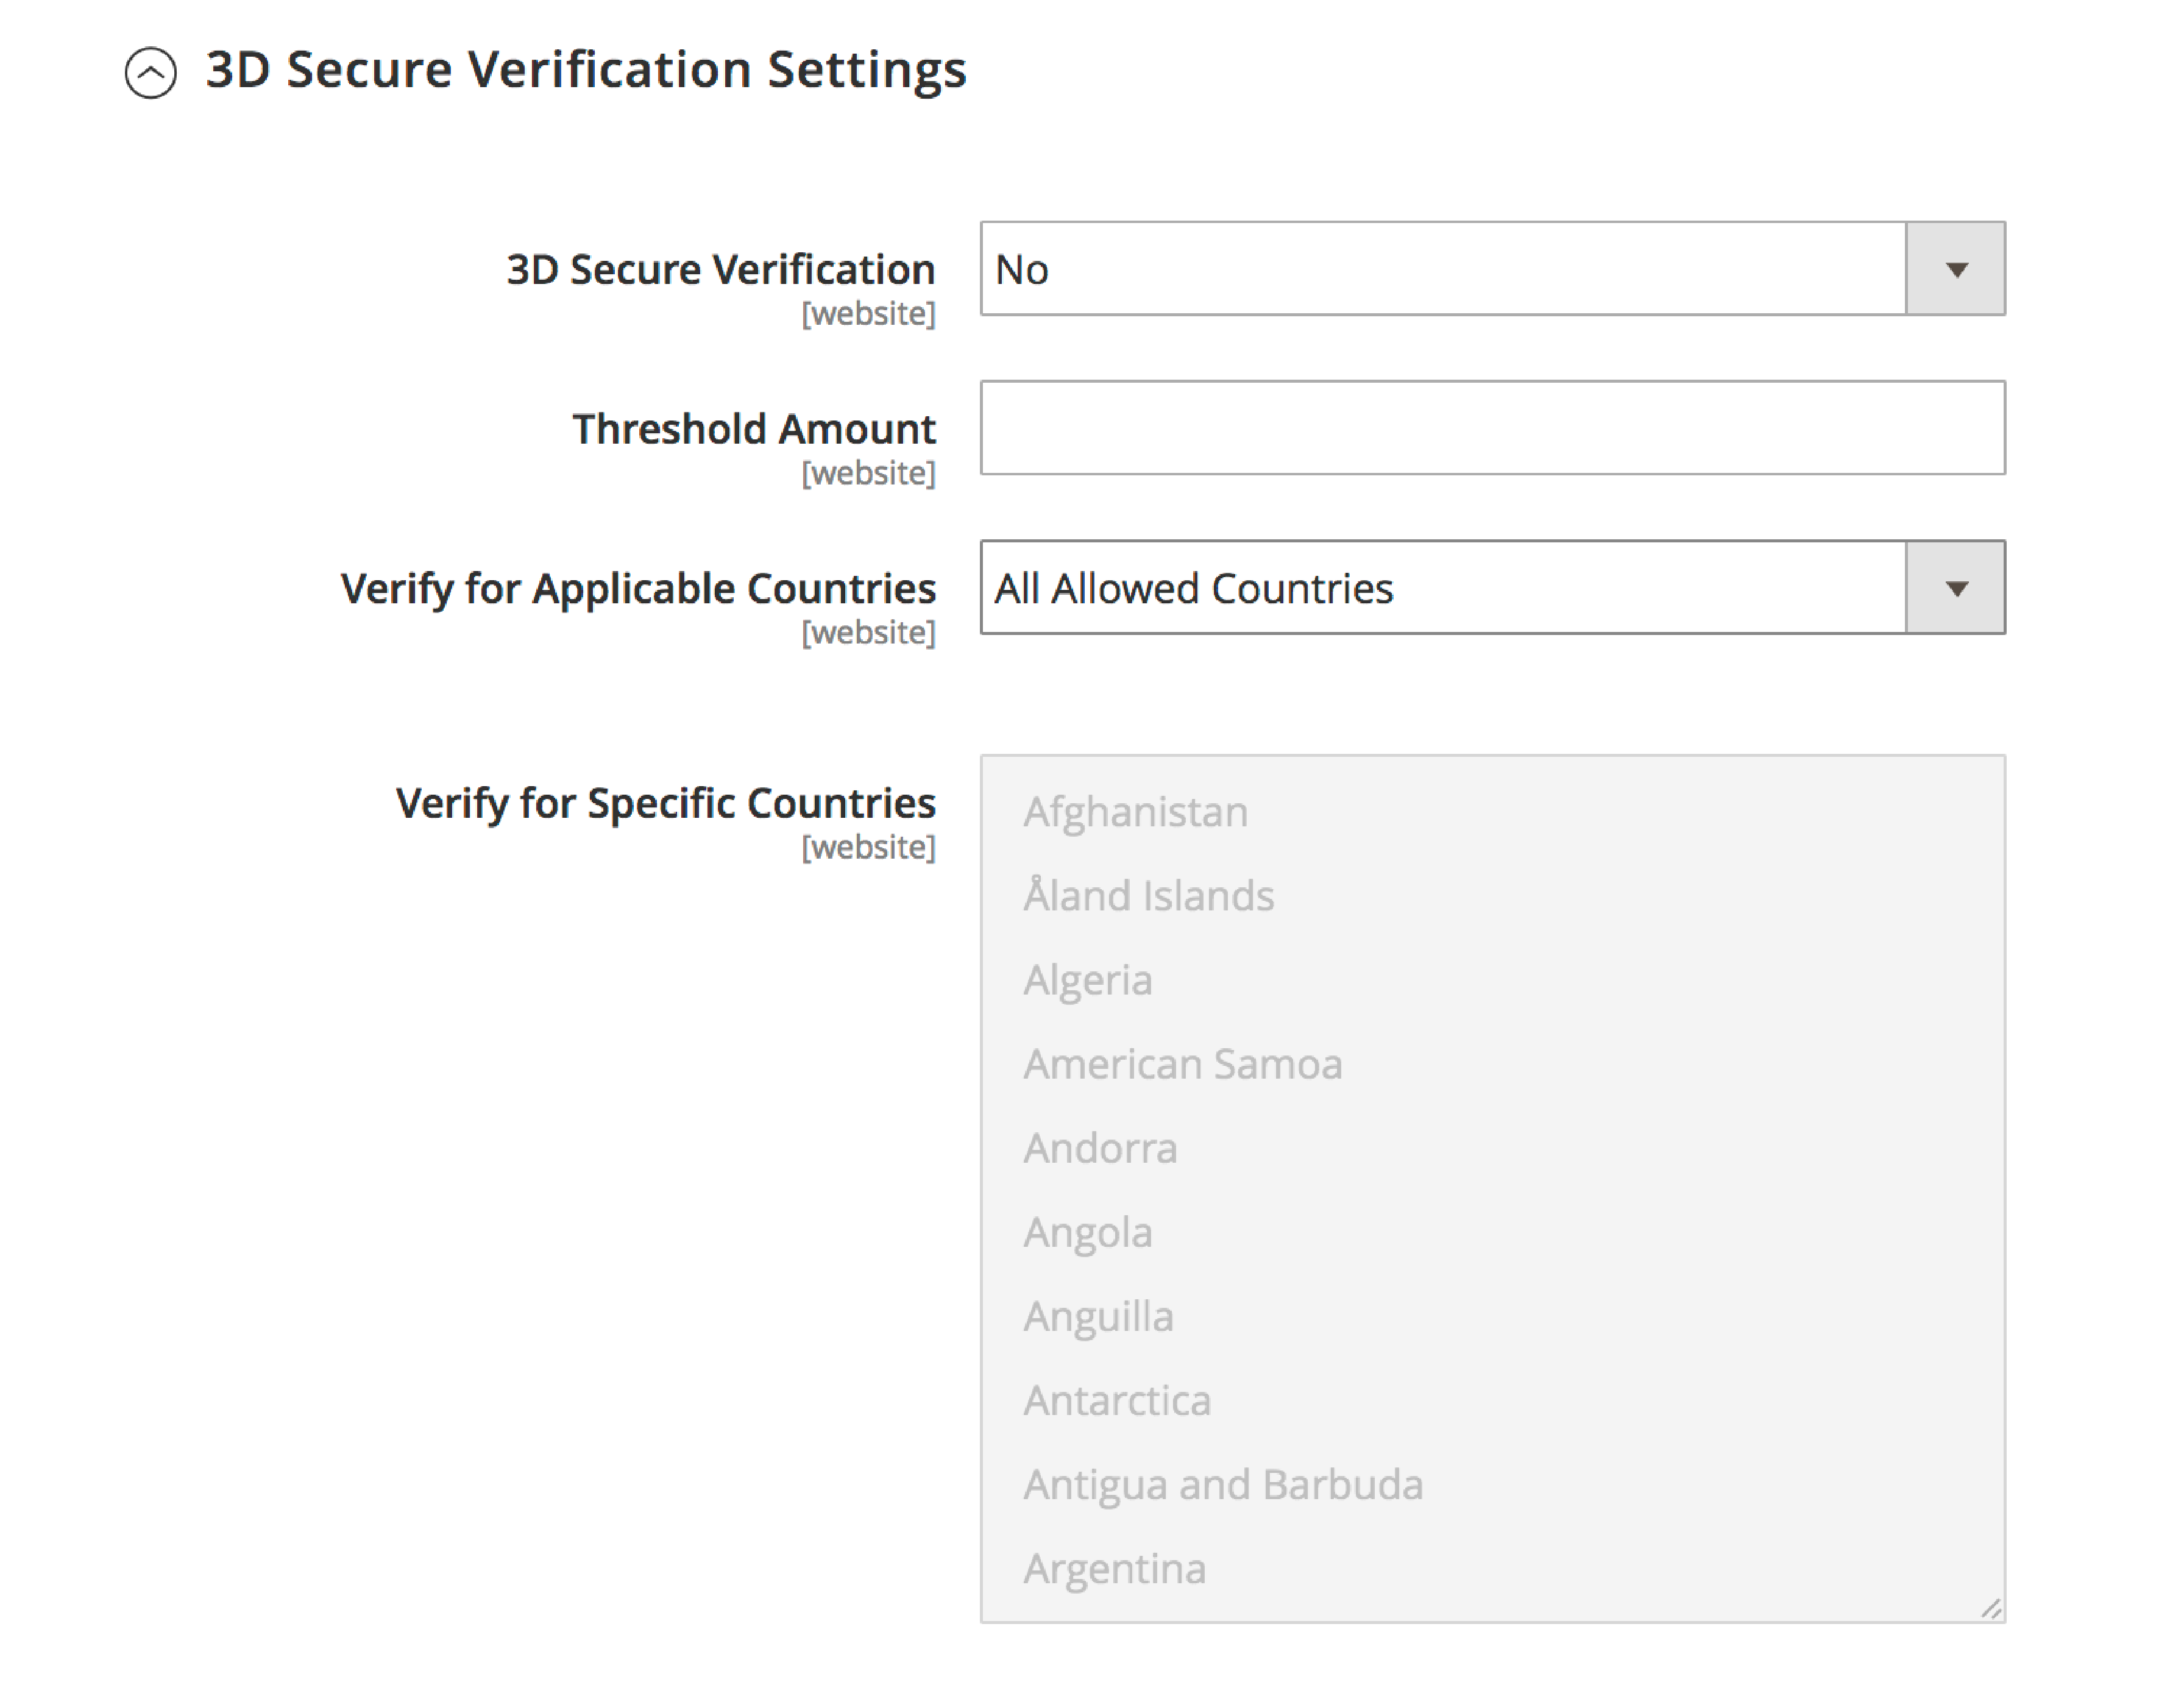
Expand the 3D Verification Settings section and set "3D Verification" to "Yes". Add it if you want to add a verification step for credit cardholder customers enrolled in a verification program such as "Verified by VISA".
This will add a layer of security to your payment process.
Configure Dynamic Descriptors (Optional)
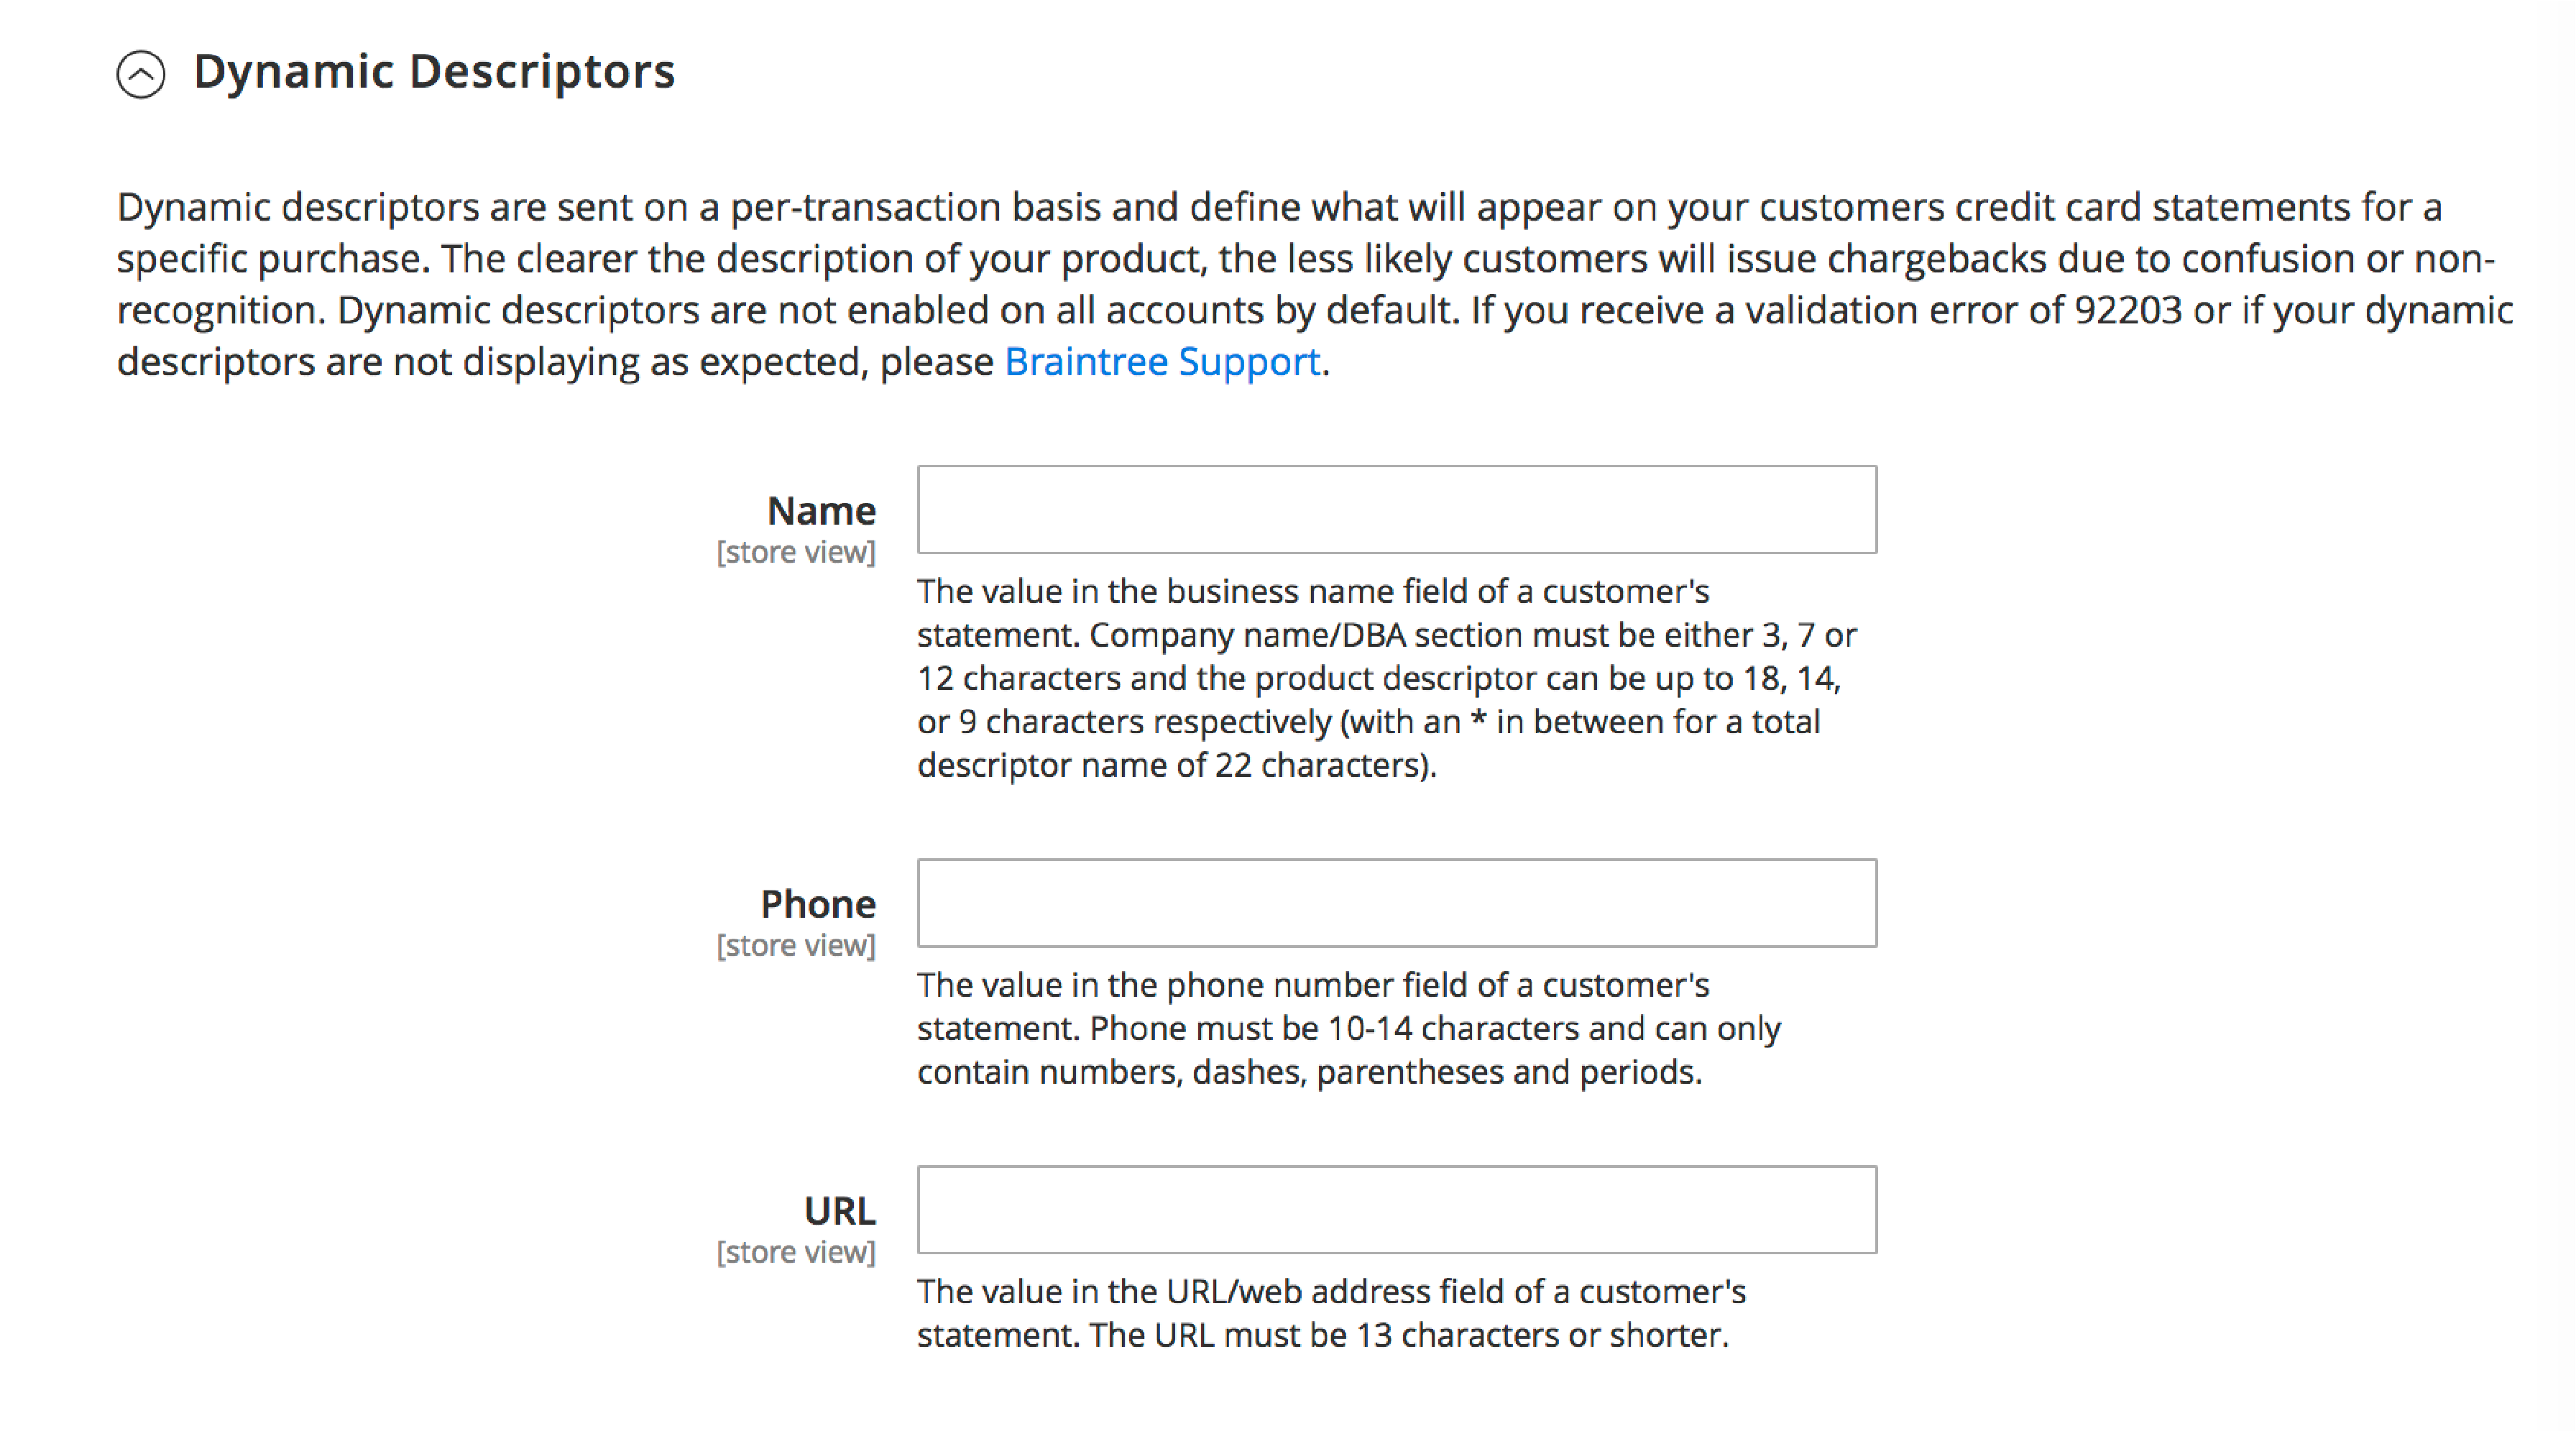
Dynamic descriptors are used to identify purchases on customer credit card statements. It helps merchants to reduce chargebacks.
If you want to use dynamic descriptors, contact Braintree Support to enable this feature. Once allowed, enter the appropriate emotional descriptors. It includes the Name, Phone, and URL in the provided fields.
Save Configuration
After completing the configuration, click the Save Config button. Now, your Magento 2 store is ready to accept payments via Braintree.
Set Up Apple Pay (Optional)
To add Apple Pay to your store, follow these steps:
- Log in to Braintree.
- Go to Settings > Processing.
- Find Apple Pay and follow the instructions.
Now, set up Apple Pay in Magento 2:
- Go to Stores > Settings > Configuration > Sales > Payment Methods.
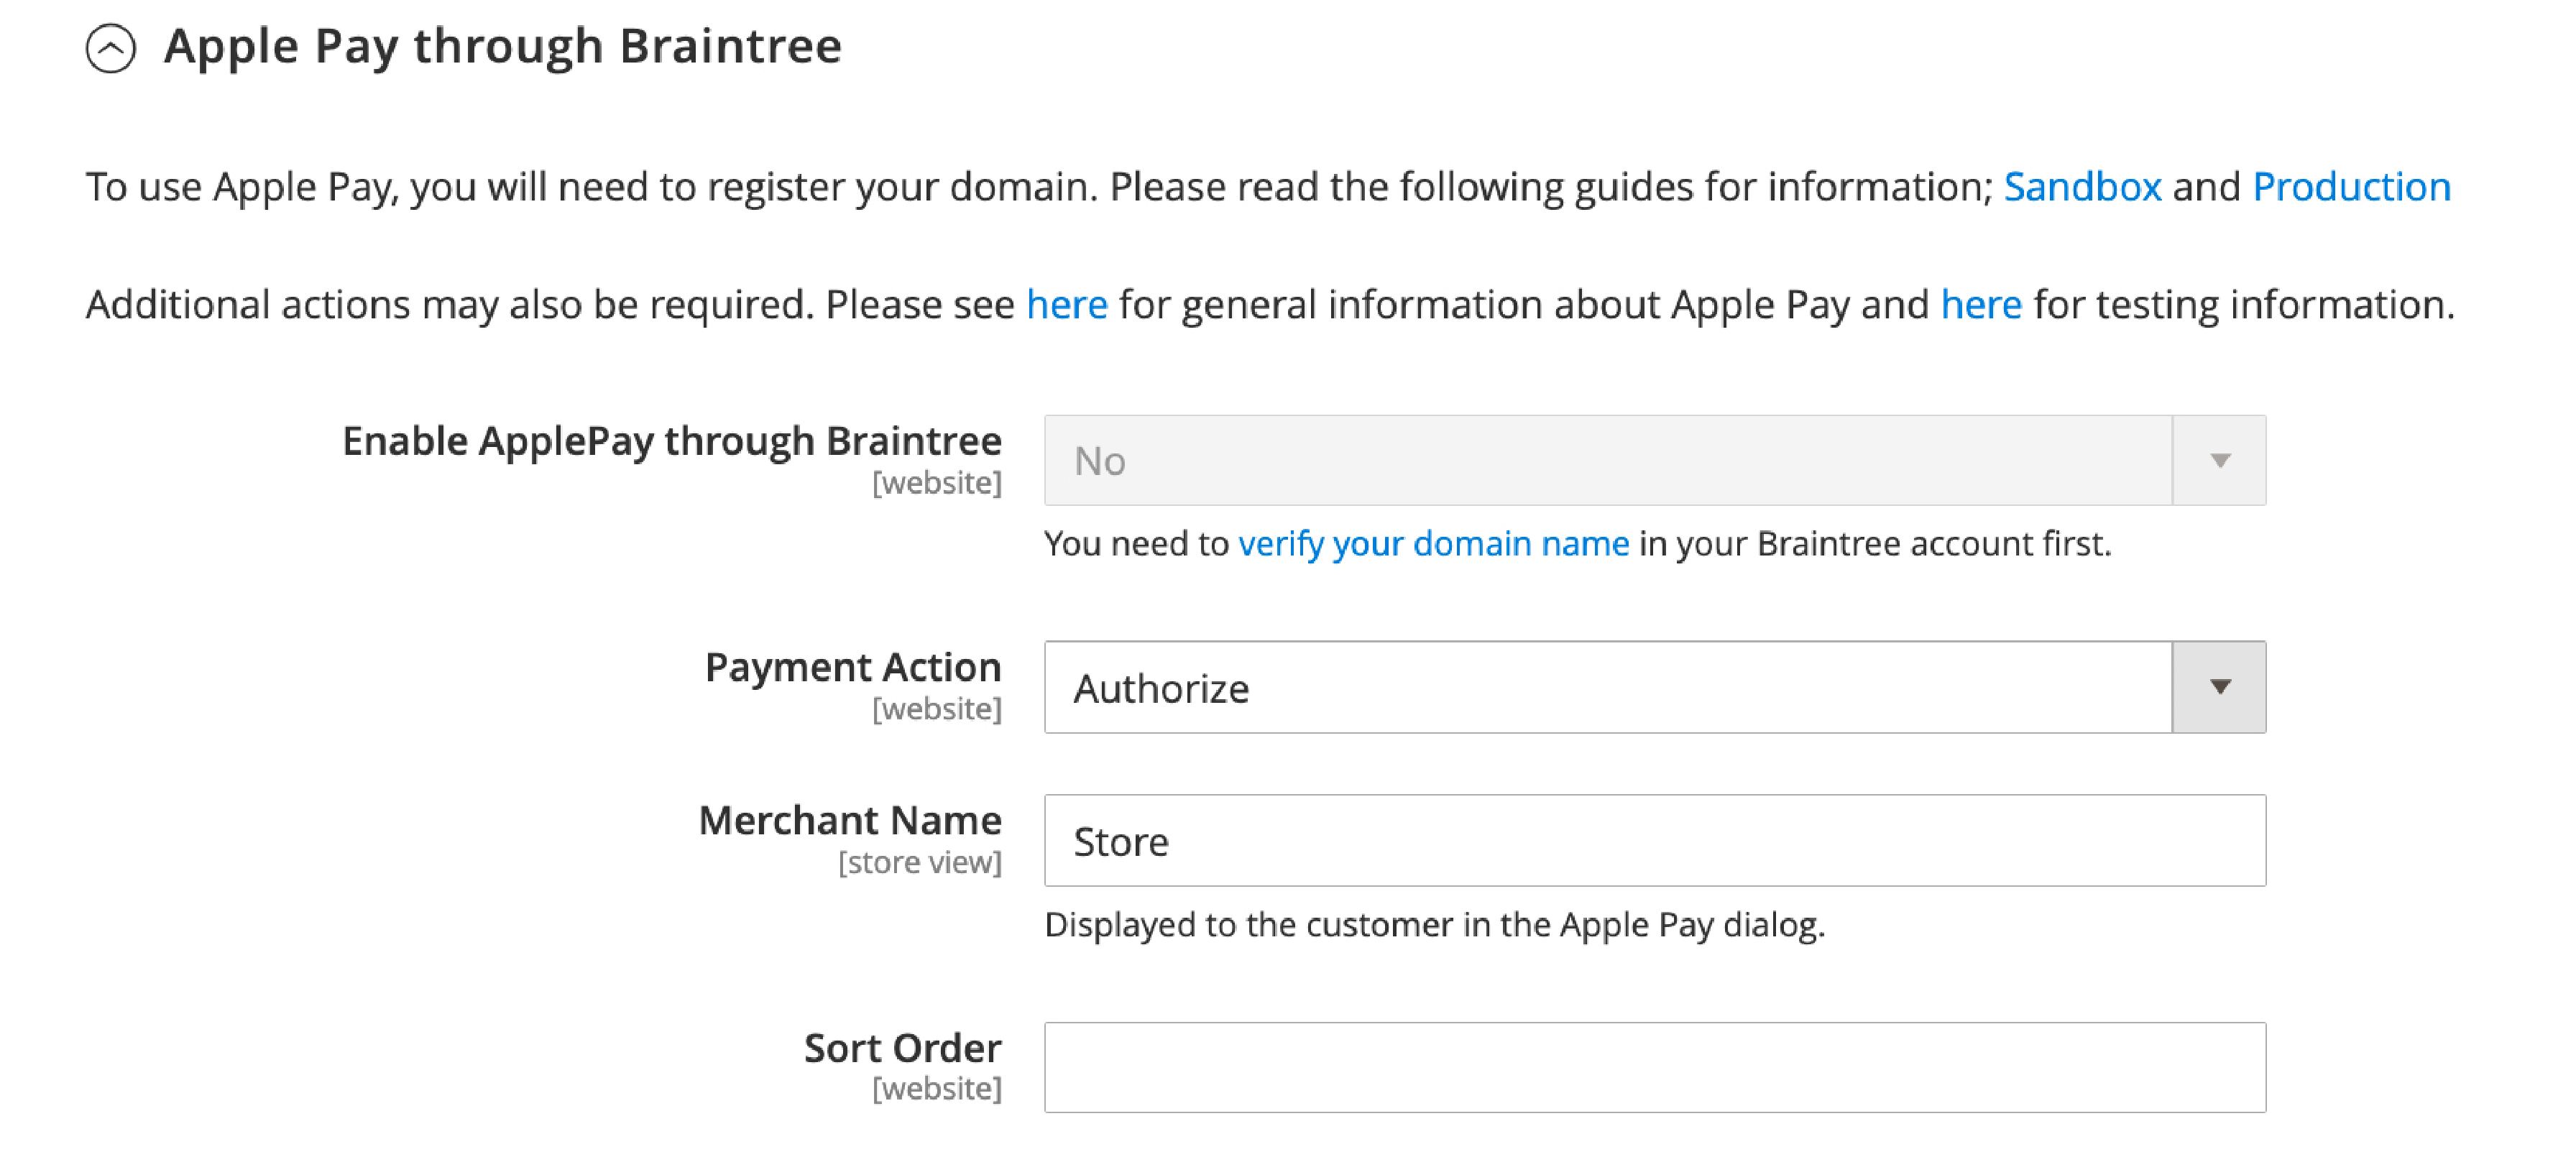
- Open the Braintree section and find Apple Pay Settings.
- Turn on Apple Pay and enter your Merchant ID from the customer's account.
- Configure the settings for the customer's billing address, payment from specific countries, and other options like Title, Sort Order, and countries.
Keep Customer Data Safe
Don't store sensitive customer data, like company or CVV, in a log file of interactions between your store and Braintree. It can cause security issues and hurt your store's reputation.
Test Your Braintree Setup
Before going live, test your Braintree setup on the checkout page. Ensure everything works correctly, including credit cards, Apple Pay, and PayPal.
Improve Your Payment Process
After setting up Braintree, keep an eye on your payment process. Look at your data and customer feedback to make your Magento payment methods better.
Summary
Following this step-by-step tutorial, you can easily configure the Braintree payment method in your Magento 2 store.
Customizing the payment process to suit your business requirements will help enhance customer satisfaction. It contributes to the overall success of your e-commerce store.
For more information on how to configure Magento, check out Magento tutorials.


