
Magento 2 Xero Integration Steps & Best Practices
Are you struggling to sync customer account data? The Magento 2 Xero integration allows you to sync key data like orders, invoices, customers, and products between the two systems.
In this tutorial, we will explain how to integrate Magento 2 and Xero via an extension.
Key Takeaways
- Integrate Magento 2 with Xero for seamless data syncing.
- Key features of different Magento 2 Xero integration extensions.
- Users can customize data synchronization settings to match their business needs.
- Best practices for managing taxes, mapping accounts, and handling exceptions are provided.
- Highlights the benefits of automating data export from Magento to Xero.
What is the Xero Accounting Software for Magento 2?
Xero is a cloud-based accounting software designed for small and growing businesses. It helps manage finances and automates accounting processes. It is integrated with Magento 2 via a connector or an extension. The Xero connector allows exporting key data from your Magento 2 store, including:
-
Orders: Export orders with product, customer, payment, and tax details
-
Invoices: Synchronizes invoices to Xero when created in Magento
-
Customers: Export customer data to Xero
-
Products: Match product/inventory items between the two systems
-
Credit Memos: Avoid duplicating credit memos between Magento and Xero
Data Sync Customization from Magento 2 to Xero
Most Magento 2 Xero extensions allow you to control which entities and data points are synchronized. Here's how you can typically customize the data sync:
1. Choosing Entities to Synchronize
Xero usually lets you select which main entities to sync, such as:
-
Orders: You can choose to sync all orders or only orders with specific statuses, like processing or complete.
-
Invoices: Decide if you want to sync all invoices or only those with certain statuses like “completed” or “failed.”
-
Credit Memos: Opt to include or exclude credit memos in the sync.
-
Products: Select whether to sync product data, like descriptions and pricing, to Xero.
-
Customers: Choose to sync customer data, such as billing and shipping addresses.
2. Mapping Data Fields
Xero often provides a way to map Magento data fields to their corresponding fields in Xero. It allows you to:
-
Customize field mappings: Link Magento fields to the appropriate Xero fields. For example, map the Magento 'Grand Total' field to the Xero 'Total' field.
-
Exclude certain fields: Choose not to sync specific Magento fields that aren't needed in Xero.
-
Combine fields: Map multiple Magento fields into a single Xero field, if needed.
3. Setting Sync Frequencies
You can usually control how often data is synced between the Magento store and Xero:
-
Real-time sync: Have data synced immediately whenever a change occurs in Magento. Like when an order is placed.
-
Scheduled sync: Set data to sync at regular intervals, like every hour or daily. It is useful for syncing large catalogs.
-
Manual sync: Initiate the sync manually as needed. It gives you full control over when data is transferred.
Top 3 Magento 2 Xero Integration Connectors
| Extension | Key Features |
|---|---|
| Magento 2 Xero Integration by Zapier | - Sync orders, invoices, credit memos, products, and customers from Magento to Xero - Automatic or scheduled sync - Map tax & payment between systems - Supports multiple websites |
| Fooman Connect: Xero | - Automatically export orders, credit notes, customers to Xero - Flexible sync settings by order status, payment method - Automatic customer record matching - Reconciled payments synced back to Magento |
| Xero Connector by Webkul | - Manually export orders & invoices to Xero - Sync products, customers, payments, taxes - Auto invoice creation on order events - Bulk export orders & invoices |
Steps to Configure the Magento 2 Zero Connector
Step 1: Enable the Xero Connector for Magento 2
- Log in to the Magento admin panel after installing the Xero connector.
- Go to Stores > Configuration > Xero Connector > General Settings.
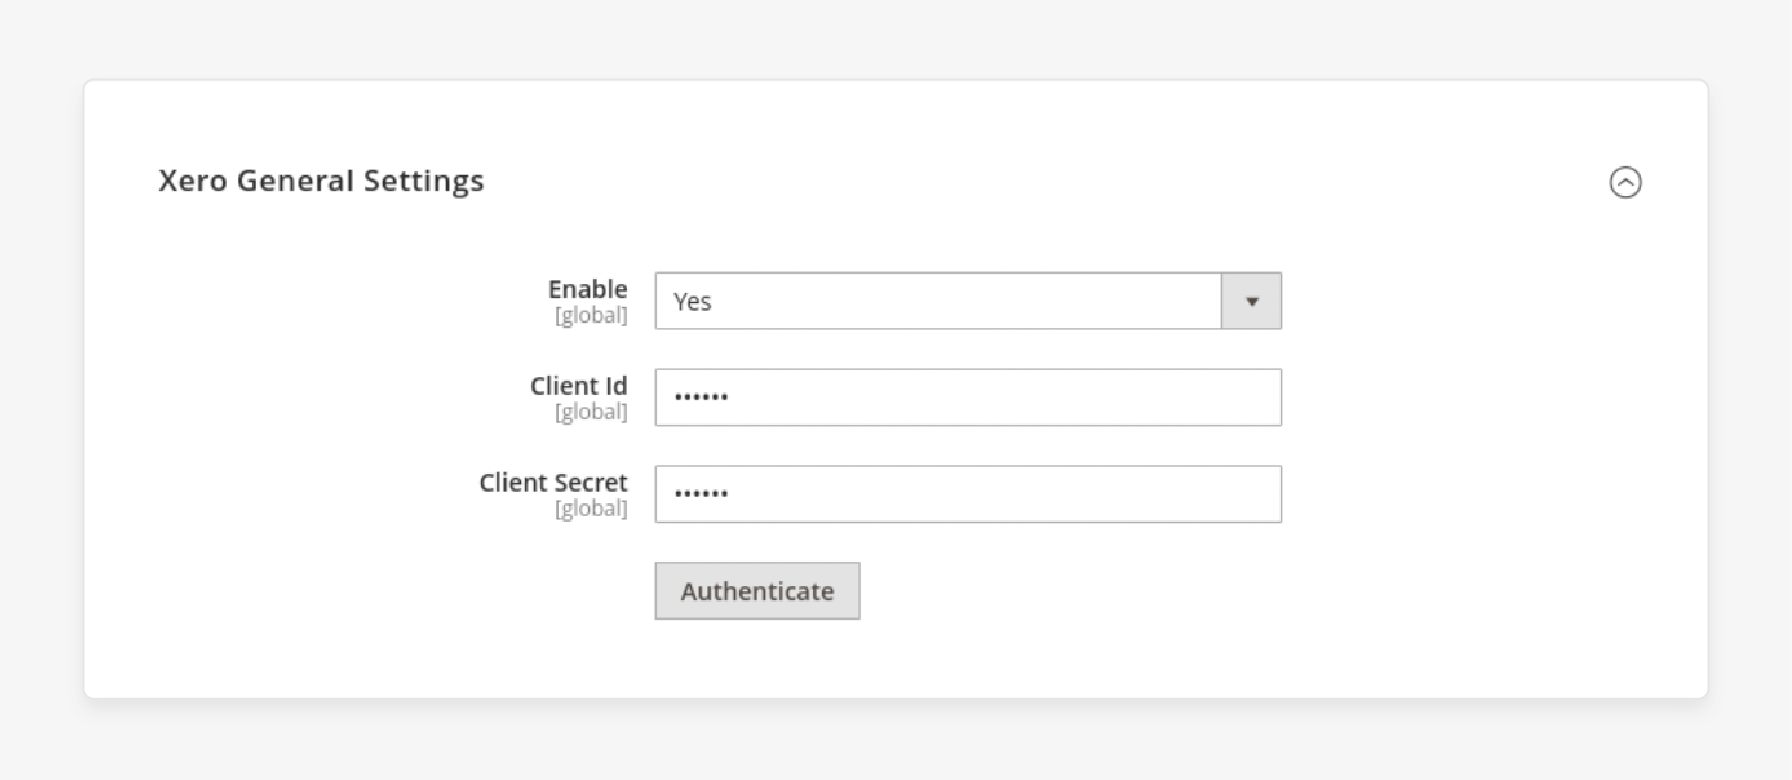
- Enable the extension and enter the Client ID and Secret.
- Click on Authenticate after entering the credentials.
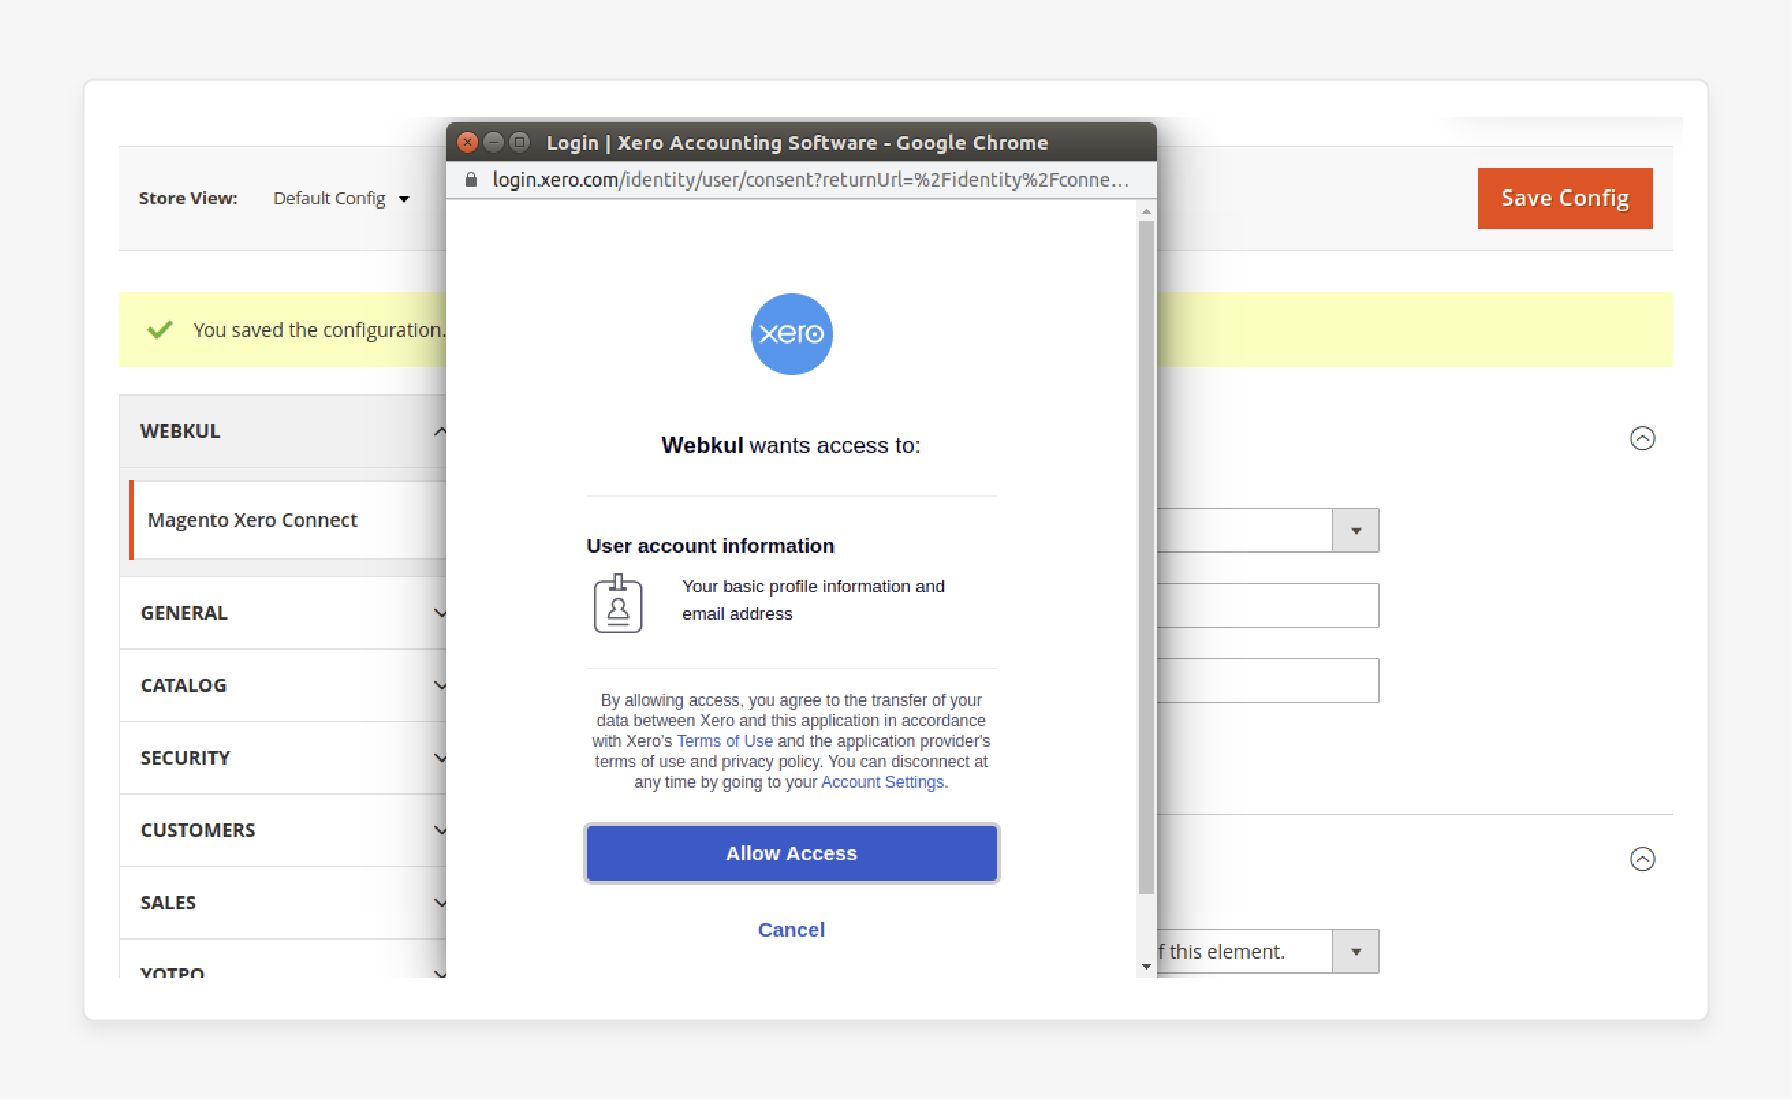
- Allow access and connect to the connector.
Step 2: Changing Default Configuration Settings
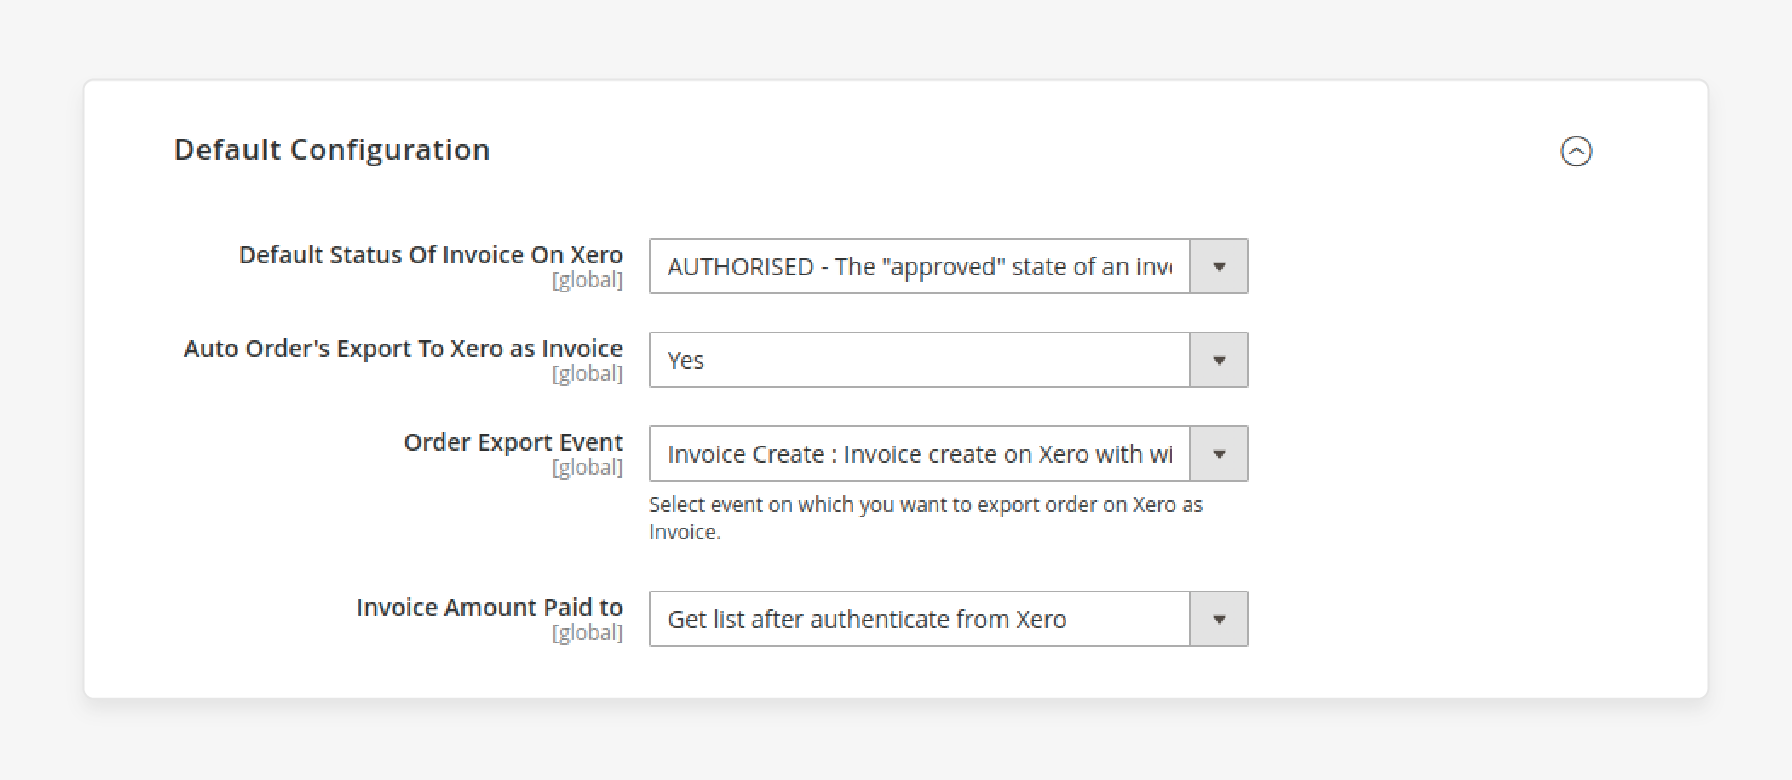
- Choose the Default Status of Invoice on Xero and enable Auto Order's export.
- Select the event to export the invoice orders on Xero.
- Choose the income or expense account for which the invoice amount is paid.
Step 3: Bulk Export the order & Invoice
- To export bulk orders, navigate to Sales > Orders.
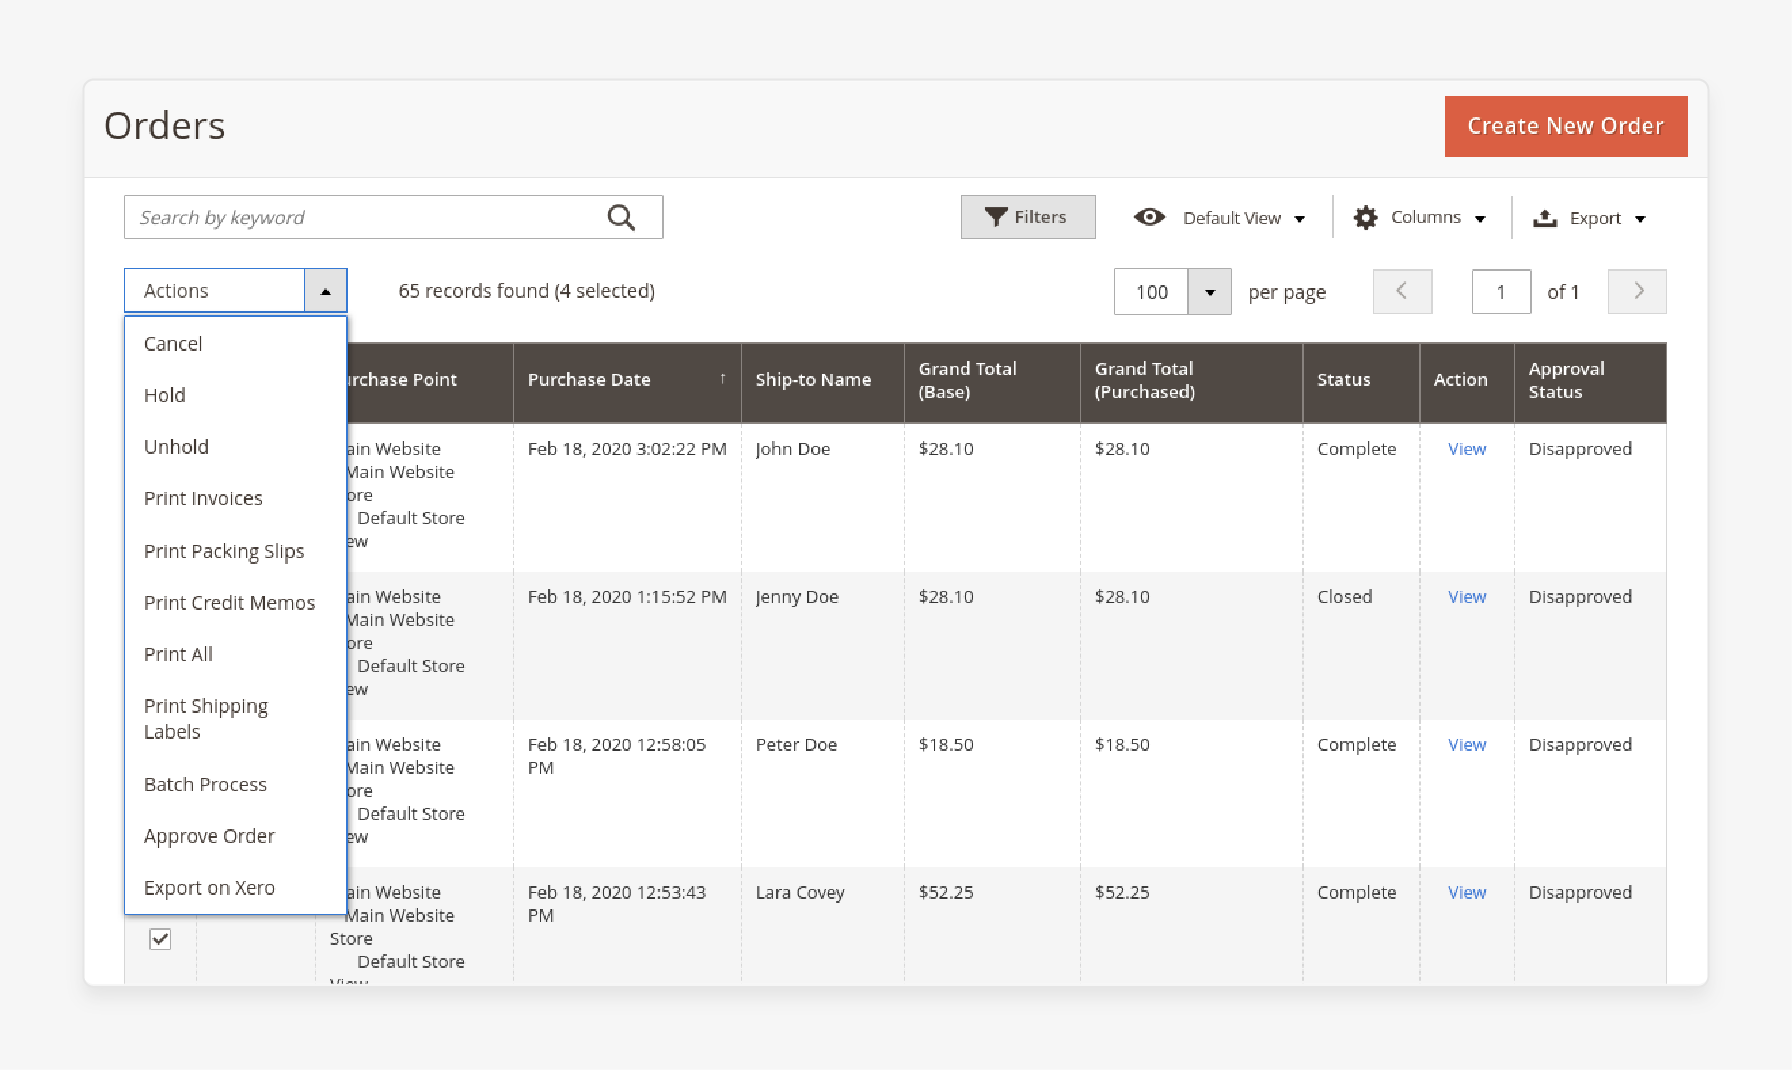
- Choose Export on Xero from the Actions menu.
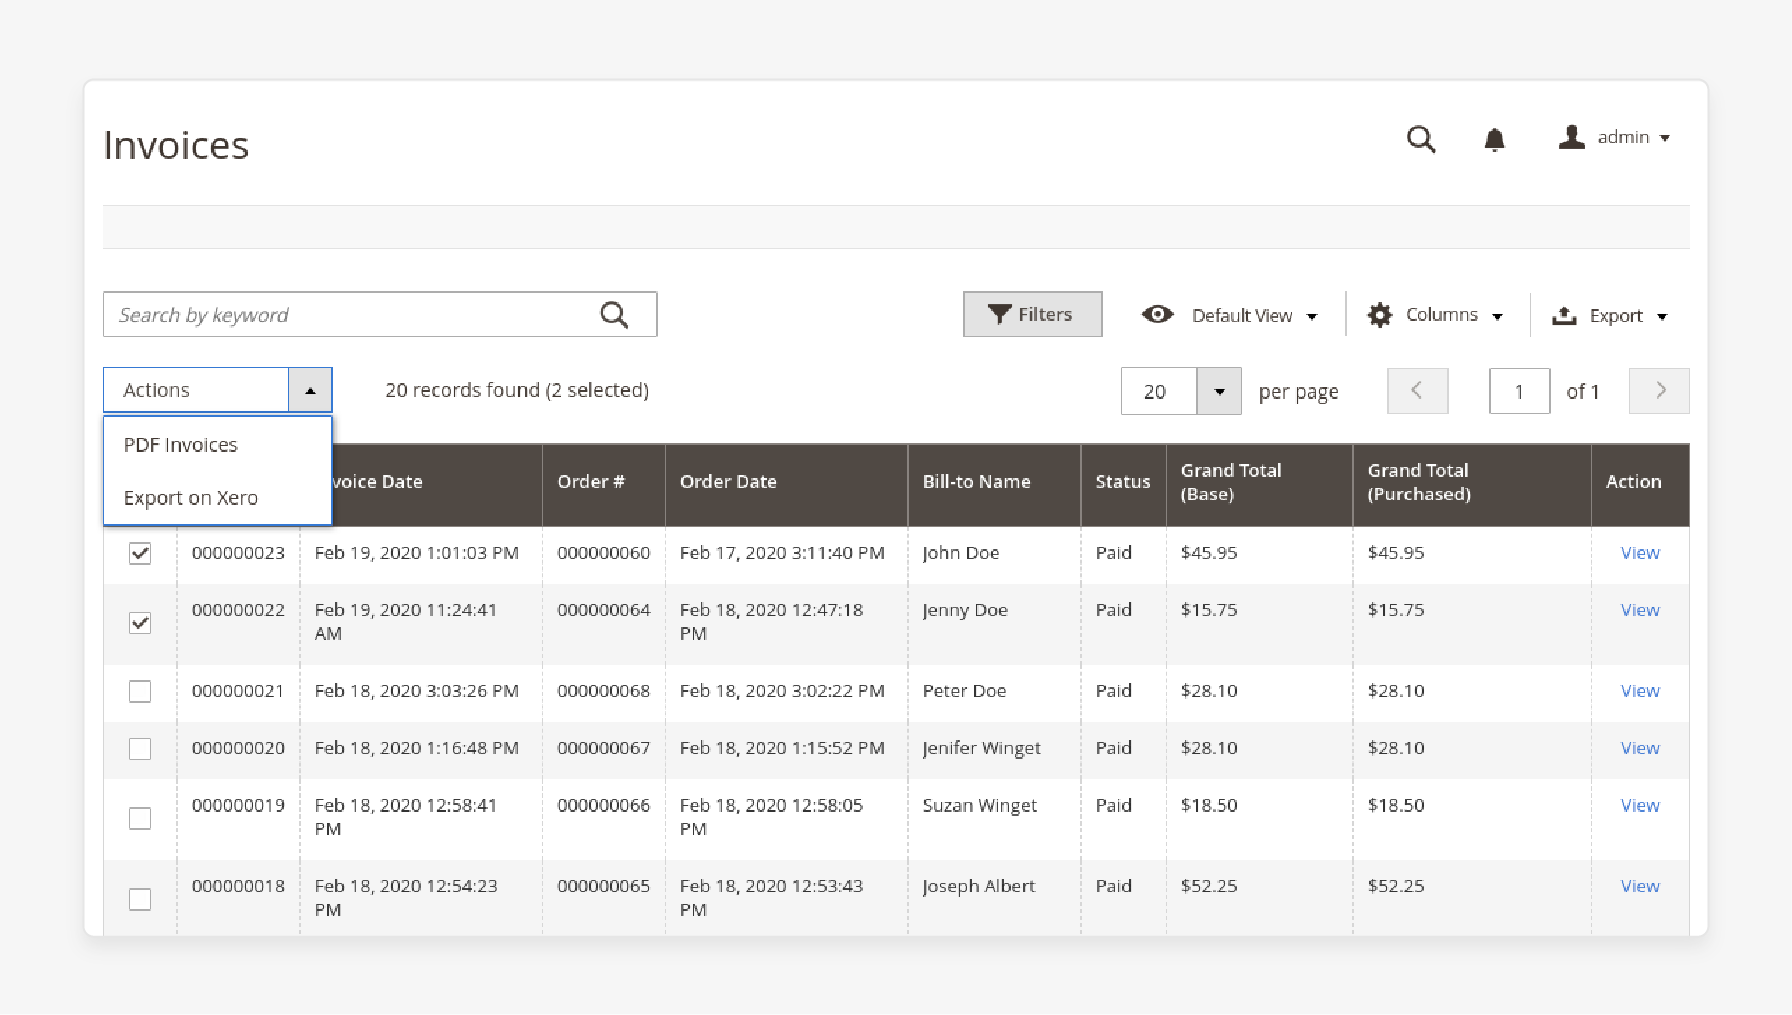
- To export bulk invoices, go to Sales > Invoices.
- Select Export on Xero from the Actions menu.
Best Practices for Using Magento 2 Xero Connector
1. Manage Taxes Carefully on Xero
- Tax handling can be complex, especially for Magento e-commerce businesses. Proper tax management ensures you meet legal obligations and avoid costly errors.
- Start by reviewing your tax settings in Magento. Ensure all tax rates are correct for each region you sell to. Check that product tax classes are assigned accurately. Verify that customer tax classes are set up properly.
- In Xero, confirm that tax rates match those in Magento. Set up tax codes for different rates and types of taxes. Ensure these align with your Magento configuration.
- Pay attention to how the integration handles tax calculations. Some connectors may transfer the total tax amount. Others might break it down by rate. Choose the method that best fits your accounting needs.
2. Map Accounts Correctly
-
Account mapping is essential for accurate financial reporting. It ensures that transactions from Magento are recorded in the right accounts in Xero.
-
Identify all relevant accounts in Magento. It includes
-
Sales revenue
-
Shipping income
-
Tax liabilities.
-
Refunds
-
-
Map your Magento payment methods to appropriate Xero accounts. For example, map credit card payments to your merchant account in Xero. Map PayPal transactions to your PayPal account in Xero.
-
Map shipping charges to a dedicated income account in Xero. It helps track shipping revenue separately from product sales. It's useful for analyzing profitability.
3. Use Unique Invoice Numbers
-
Unique invoice numbers prevent data conflicts between Magento and Xero. Each invoice must have a distinct identifier.
-
Consider prefixing Magento invoice numbers. Use a store code or year to ensure uniqueness. For example, "STORE1-2024-0001" clearly identifies the origin and timing. Refrain from including product ID or information in the number.
-
Magento allows customization of invoice number formats. Use this feature to align with Xero's requirements. Ensure the format includes sufficient digits to handle your sales volume.
-
Be cautious when manually creating invoices in Magento. Double-check that you're not duplicating an existing number. Manual entries can disrupt automatic sequencing.
-
If you find duplicate invoice numbers, don't delete them. Instead, void the incorrect invoice and create a new one with a unique number. It maintains an audit trail.
4. Handle Exceptions and Errors
-
In Xero, activate multi-currency features. Add all currencies you use in Magento 2. Set your base currency in Xero to match your primary accounting currency.
-
Configure the integration to pass currency information from Magento 2 to Xero. Ensure it sends both the transaction currency and amount. The base currency equivalent should also be included.
-
Decide on your exchange rate strategy. You can use Xero's rates, Magento 2's rates, or a third-party source. Consistency is key to avoiding discrepancies.
-
Set up currency conversion accounts in Xero. These track gains or losses from exchange rate fluctuations. They're needed for accurate financial statements.
-
Consider how refunds will be handled in different currencies. Ensure the integration can process refunds in the original transaction currency. It maintains consistency in customer transactions.
FAQs
1. How can I connect Magento and Xero quickly?
You can quickly connect Magento and Xero by using the Magento 2 Xero Connector module. This easy Magento integration allows you to sync key data into your workflow. It includes orders, invoices, customers, and products. It makes it seamless to manage your business data.
2. What steps do I need to take to integrate Xero with Magento 2?
To integrate Xero with Magento 2, all you need is an existing Xero account and the Magento 2 Xero Connector. Once the module is installed, you can configure settings and map data fields. Start syncing your store’s data to Xero, including orders and invoices.
3. Can I automate the export of data from Magento to Xero?
Yes, the Magento 2 Xero Connector allows you to export data from Magento automatically. You can set the automation to be triggered by specific events. It ensures your ecommerce store stays up-to-date with minimal effort.
4. What type of data can be synced from my Magento 2 store to Xero?
The Magento Xero integration enables you to sync various types of data. It includes orders, products, and Magento customer information. It ensures that all data from your Magento store to Xero is accurately reflected.
5. Is it possible to customize the data that gets exported to Xero?
Yes, the Magento 2 Xero Connector makes it easy to customize which data is exported. Admins can also view all the mapped invoices in the Xero dashboard. It allows for seamless data management that aligns with your business needs.
Summary
The Magento 2 Xero integration helps run ecommerce stores by automating complex accounting processes. In this tutorial, we explored how to configure the Xero connector. Here is a quick recap:
-
The integration streamlines financial management by automatically syncing sales data.
-
Xero reduces manual data entry errors with real-time data synchronization.
-
It enhances accounting accuracy by keeping records consistent across online stores.
-
Xero customers save time by automating invoice and payment processing.
-
It improves cash flow management with up-to-date financial reporting.
Choose managed Magento hosting options with Xero to scale and fully automate store accounts for better growth.


