
7 Steps To Configure Magento 2 Website Switcher
Want to expand your Magento 2 store globally? A Magento 2 website switcher helps you create multiple store views for different regions, languages, and currencies. It provides a localized shopping experience for your customers. This tutorial covers the steps to configure a website switcher and four extensions.
Key Takeaways
-
Learn how a Magento 2 website switcher simplifies global expansion and improves Magento UX.
-
Find benefits of website switchers such as better market adaptability and streamlined operations.
-
Get step-by-step instructions on configuring a Magento 2 website switcher.
-
Explore the top 4 Magento 2 website switcher extensions and their features.
Why Use Magento 2 Website Switcher?
1. Simplified Global Expansion
Expanding internationally with one store is challenging. Different languages, currencies, and shipping methods complicate things. A Magento 2 website switcher enables seamless global operations. Each store caters to a specific region's needs. This approach simplifies management and boosts efficiency.
2. Better Market Adaptability
Each market has unique needs and regulations. For example, the EU requires GDPR compliance while California needs CCPA adherence. Multiple stores allow you to adapt to local laws and conditions. This flexibility ensures you meet market-specific requirements. It protects your business from legal issues and builds trust.
3. Effective Marketing Strategies
Different markets have varied product preferences and search behaviors. You can’t optimize a single site for all. Multiple stores let you target each market effectively. Customize your keywords, promotions, and content for local audiences. It leads to better SEO and higher visibility.
4. Enhanced User Experience
Automatically redirect users to their local store. It ensures they see content in their preferred language and currency. Website switcher helps users find what they need quickly. A tailored experience increases satisfaction and boosts conversion rates. Improved user experience leads to higher sales and customer loyalty.
5. Increased Customer Satisfaction
Localized stores make shopping easier and more enjoyable. Customers feel valued when they see familiar language and currency. They can easily find products that suit their needs. This personalized experience increases customer satisfaction. Happy customers are more likely to return and recommend your store.
6. Streamlined Operations
Managing one store for multiple markets is complex. A website switcher simplifies operations by dividing them into manageable parts. Each store operates independently but under one platform. This streamlined approach reduces errors and improves efficiency. It helps you focus on growth and customer service.
7. Competitive Advantage
Not all businesses cater to diverse markets effectively. Using a Magento website switcher gives you a competitive edge. You can offer localized experiences that your competitors might not. This differentiation attracts more customers. It positions your brand as adaptable and customer-focused.
7 Steps to Configure Magento 2 Website Switcher
Step 1: Create Websites
- Log in to the Magento Admin Panel with an authorized account.
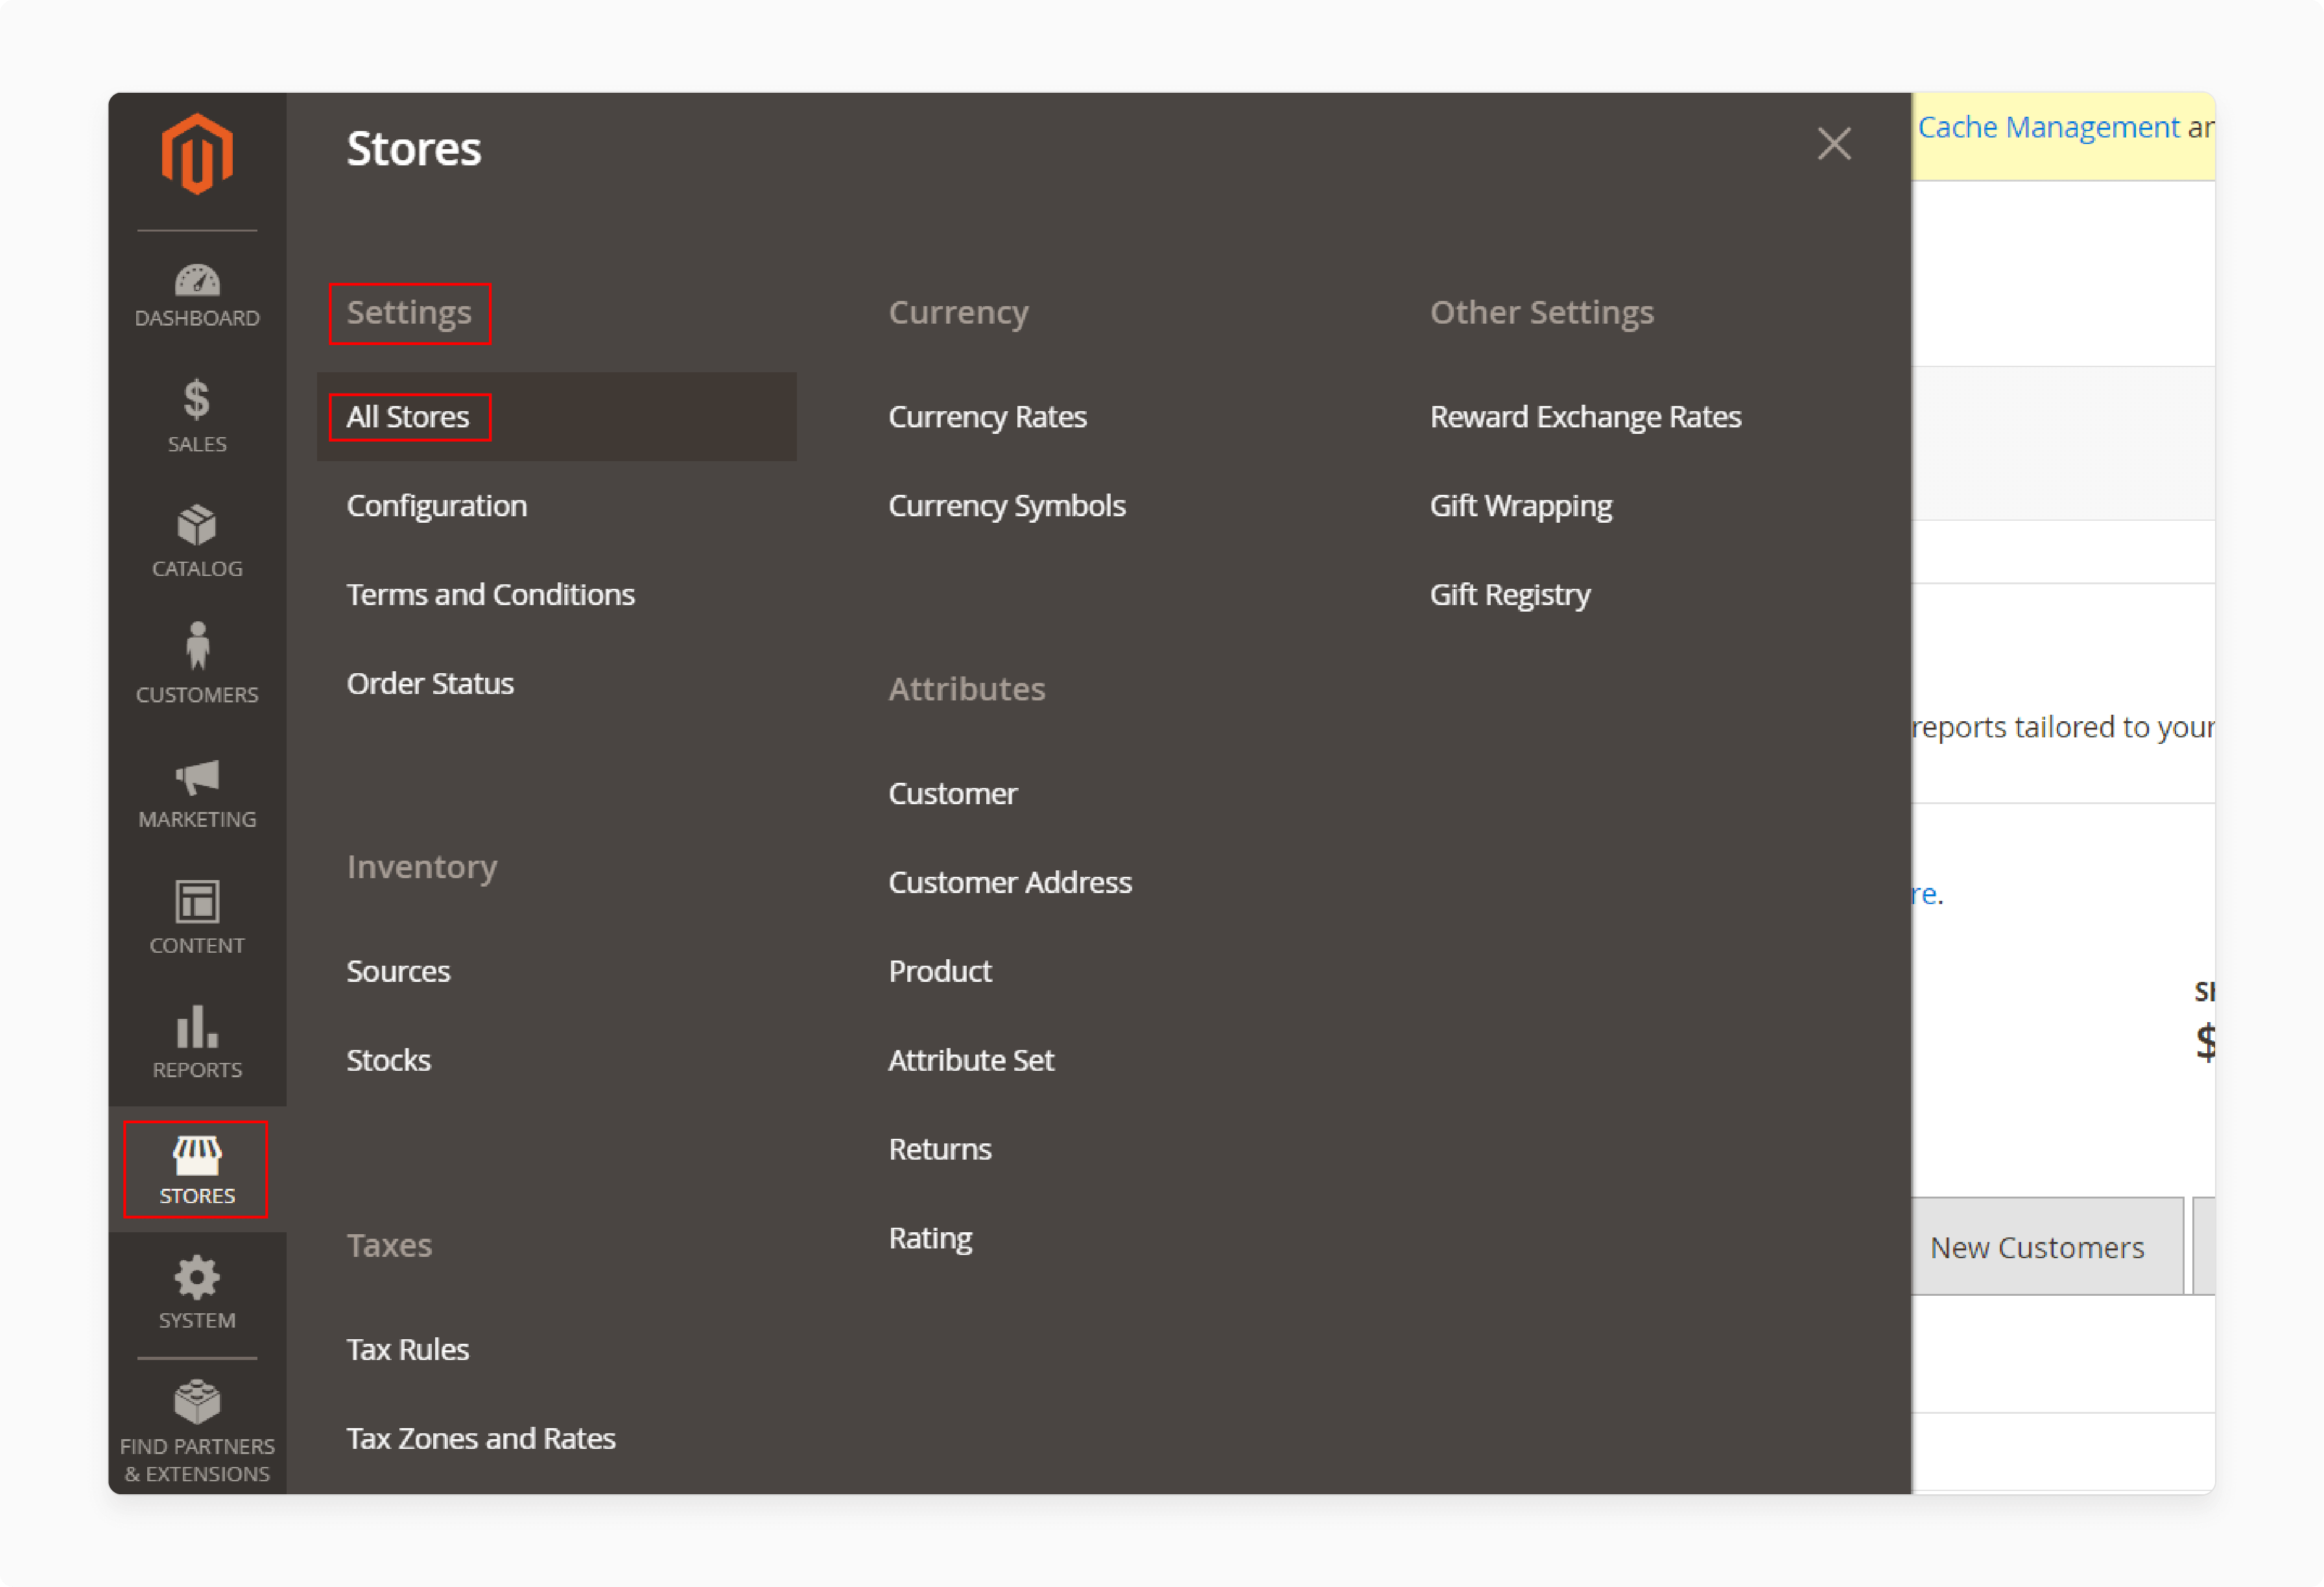
- Go to Stores > Settings > All Stores.
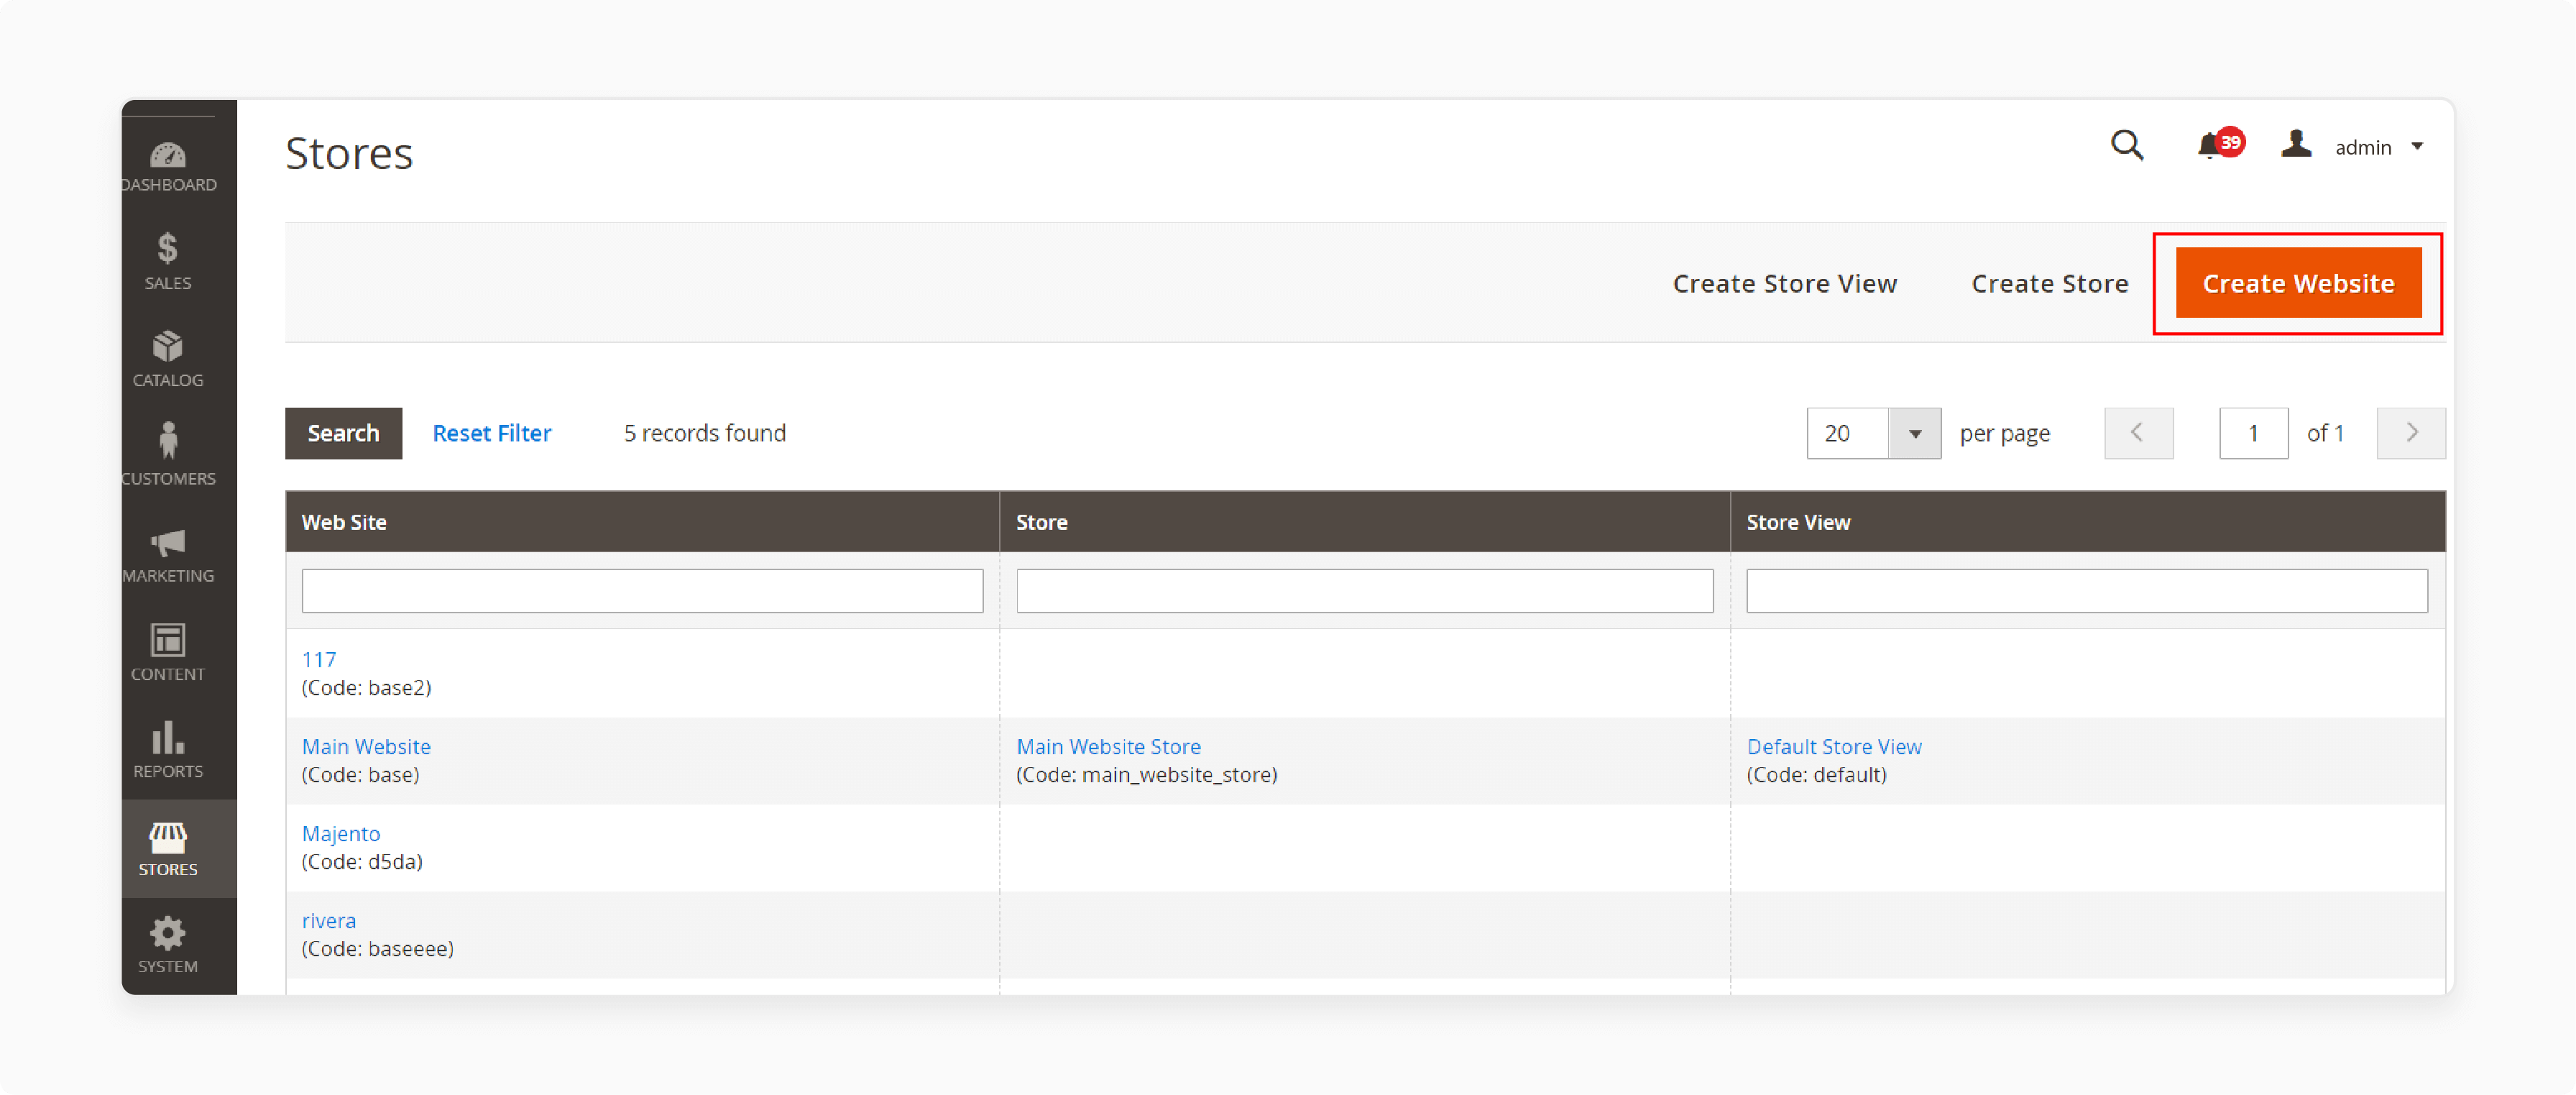
- Click "Create Website."
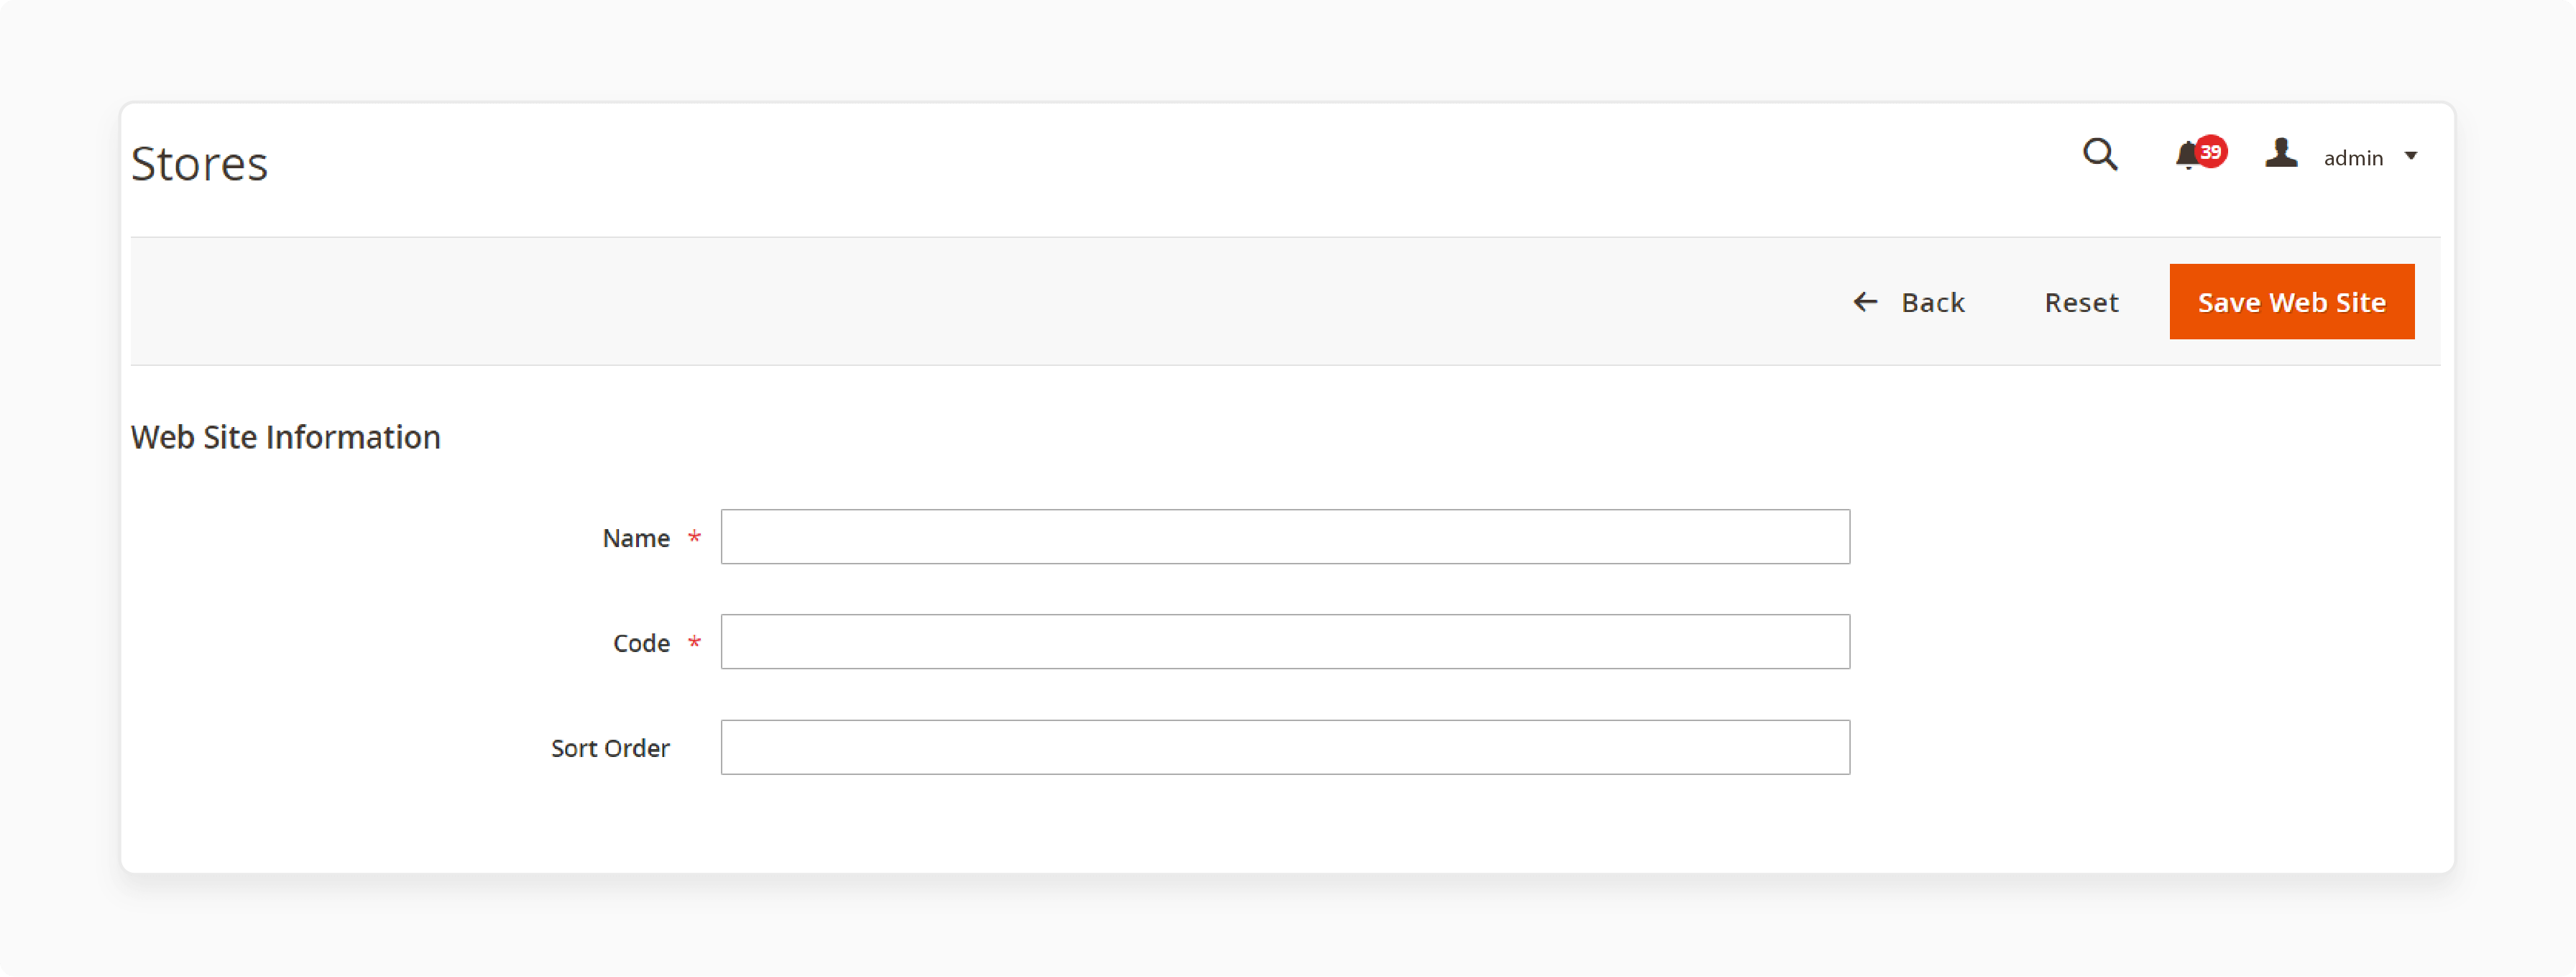
-
Fill in the required fields:
-
Name: Enter the website name.
-
Code: Enter a unique code to identify the website.
-
Sort Order: Set the website sort order.
-
-
Click "Save Web Site."
Step 2: Create Stores
-
In the Magento Admin Panel, go to Stores > Settings > All Stores.
-
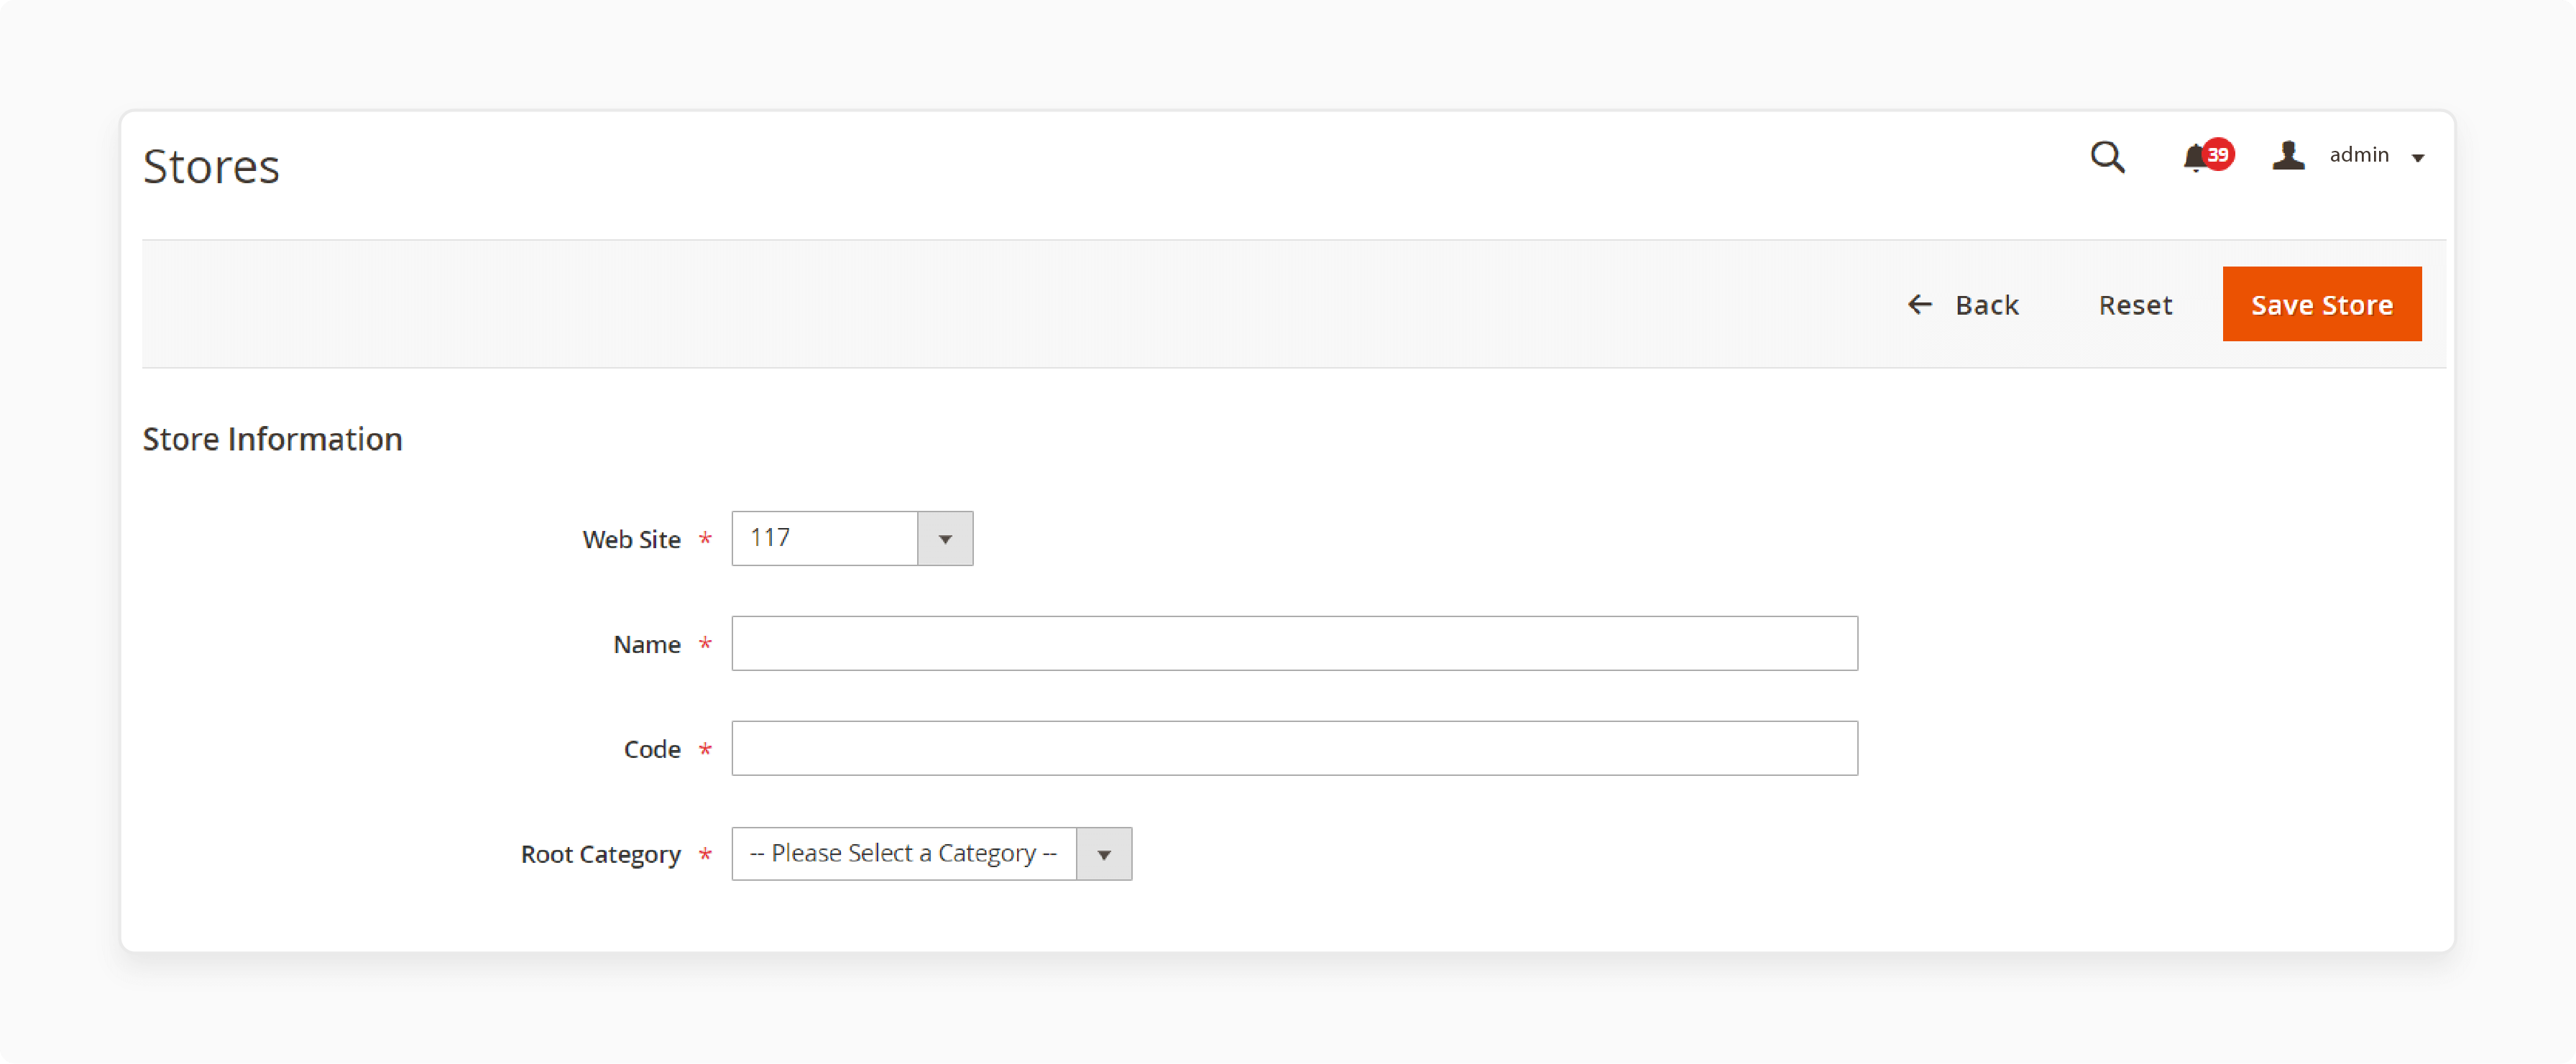
Click "Create Store."
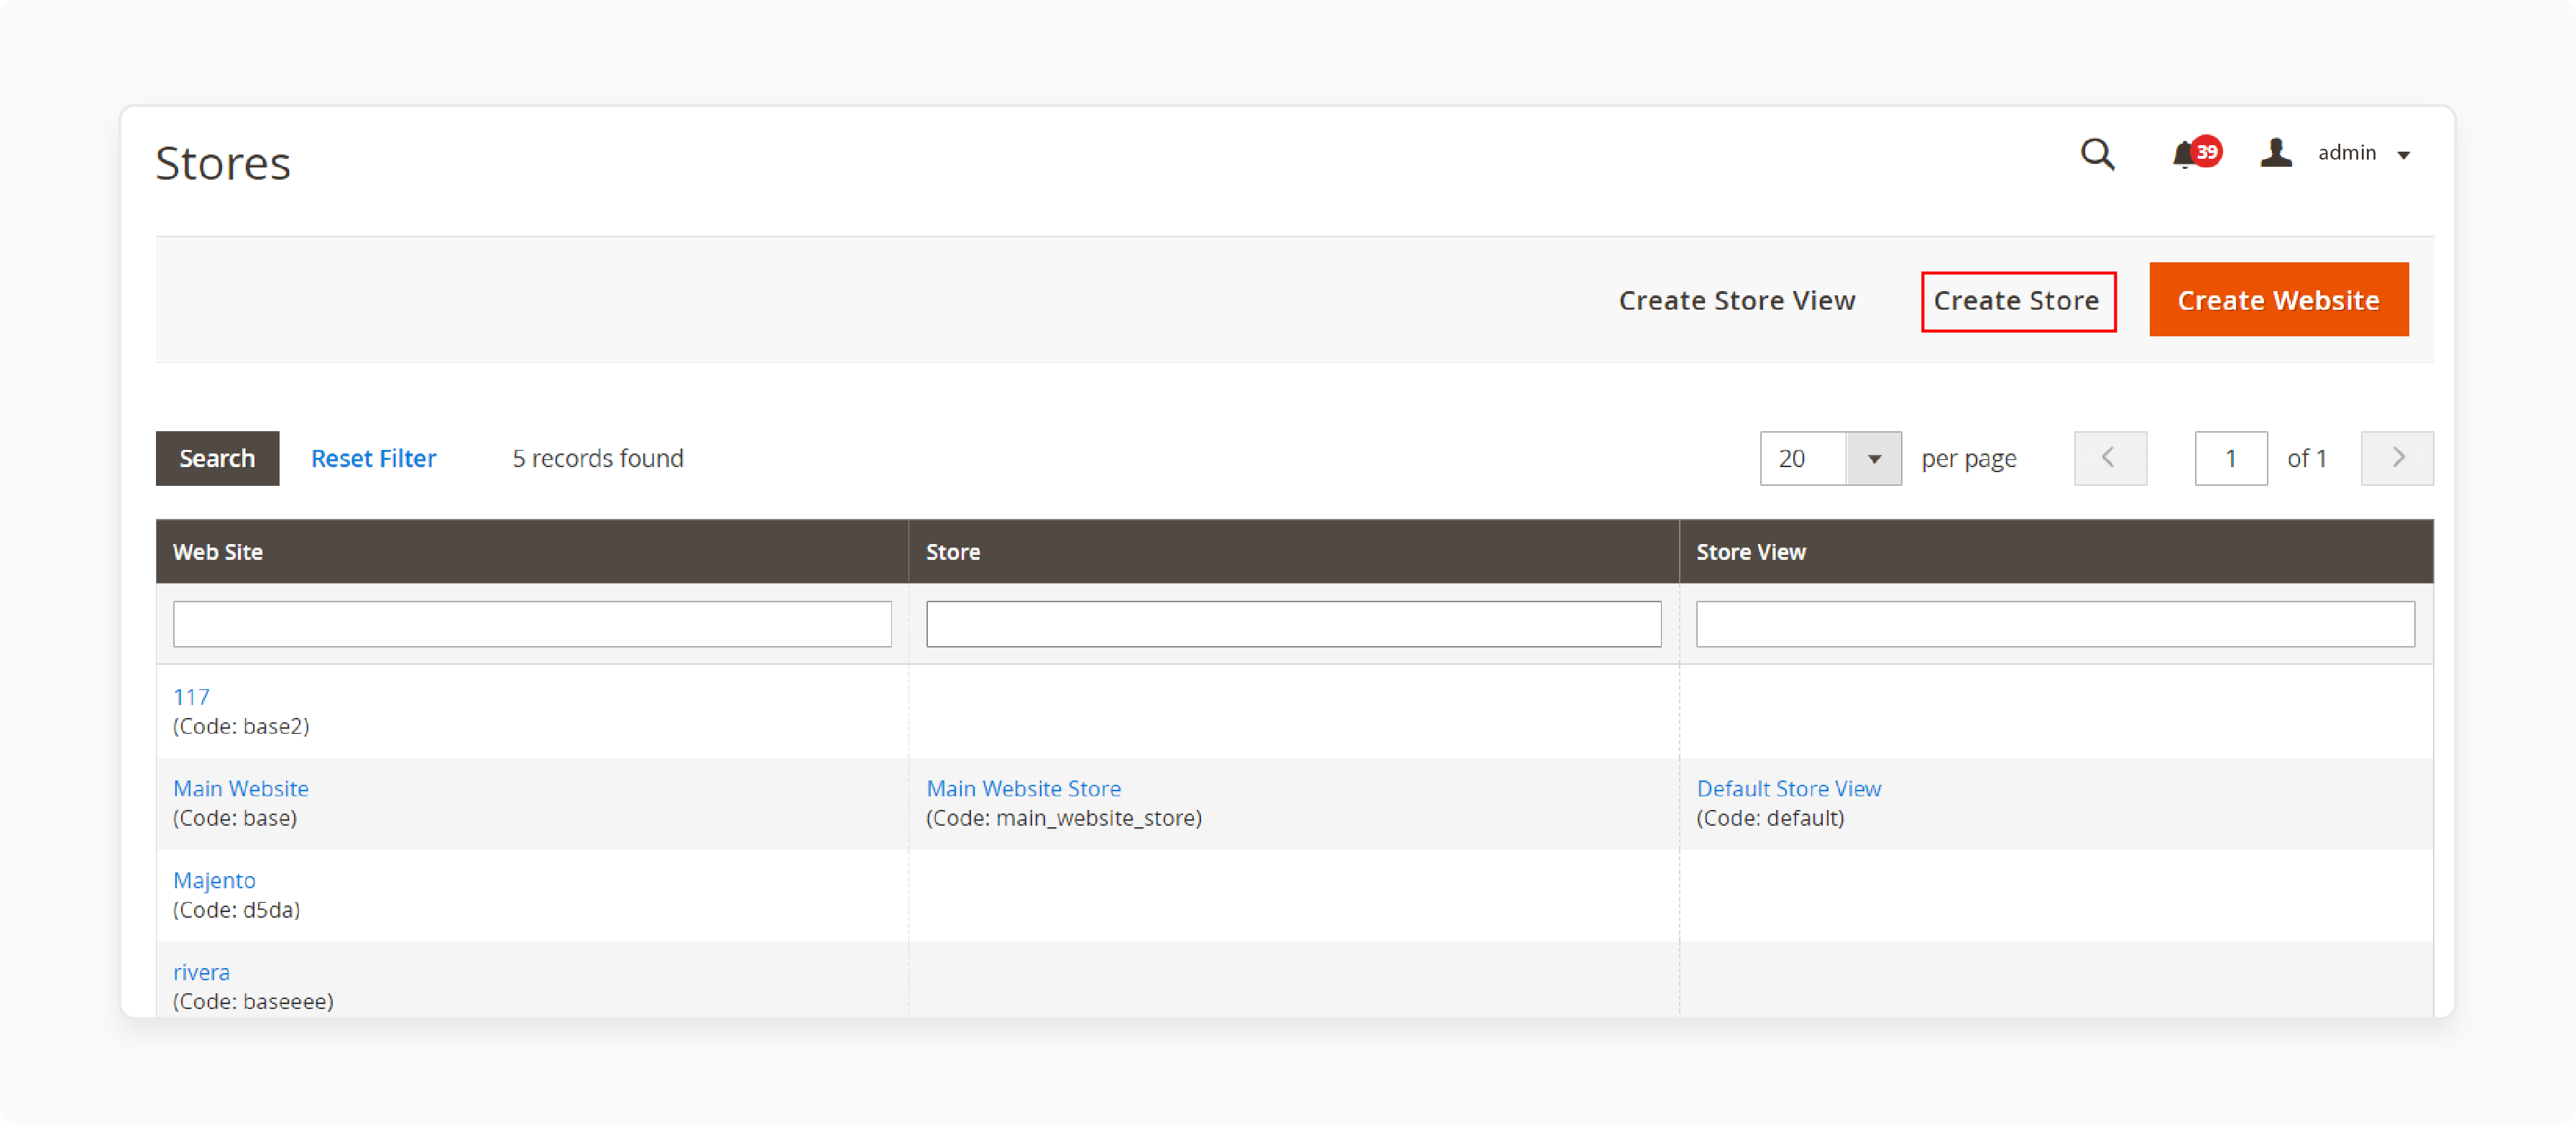
- Fill in the required fields:
-
Website: Choose the associated website.
-
Name: Enter the store name.
-
Code: Enter a unique store code.
-
Root Category: Select a root category (create a unique one if desired).
- Click "Save Store."
Step 3: Create Store Views
-
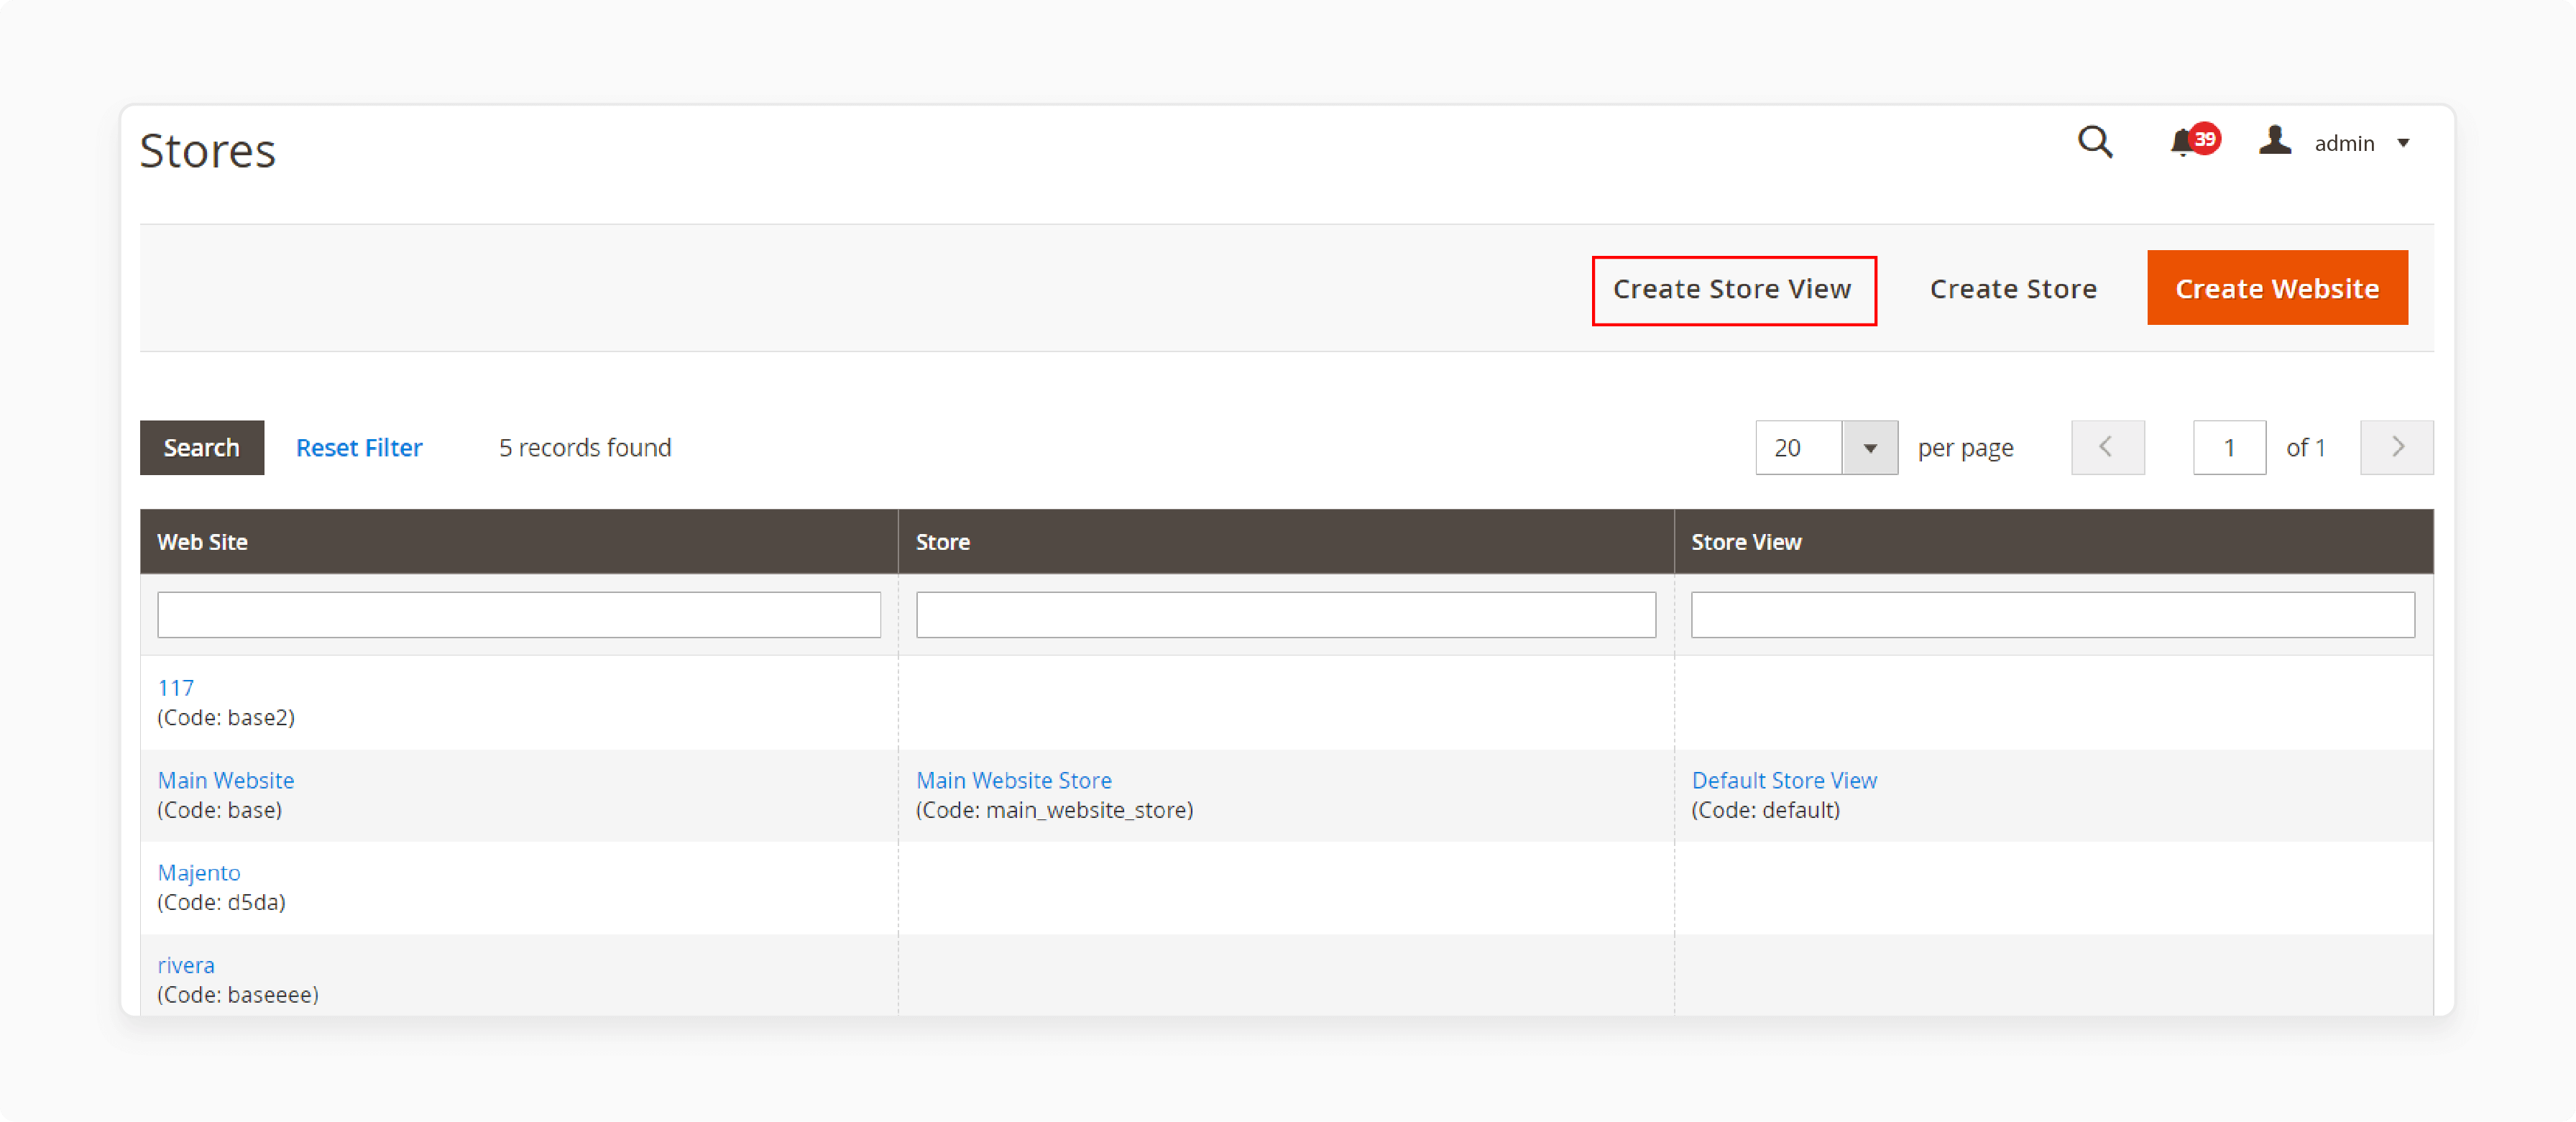
In the Magento Admin Panel, go to Stores > Settings > All Stores.
-
Click "Create Store View."
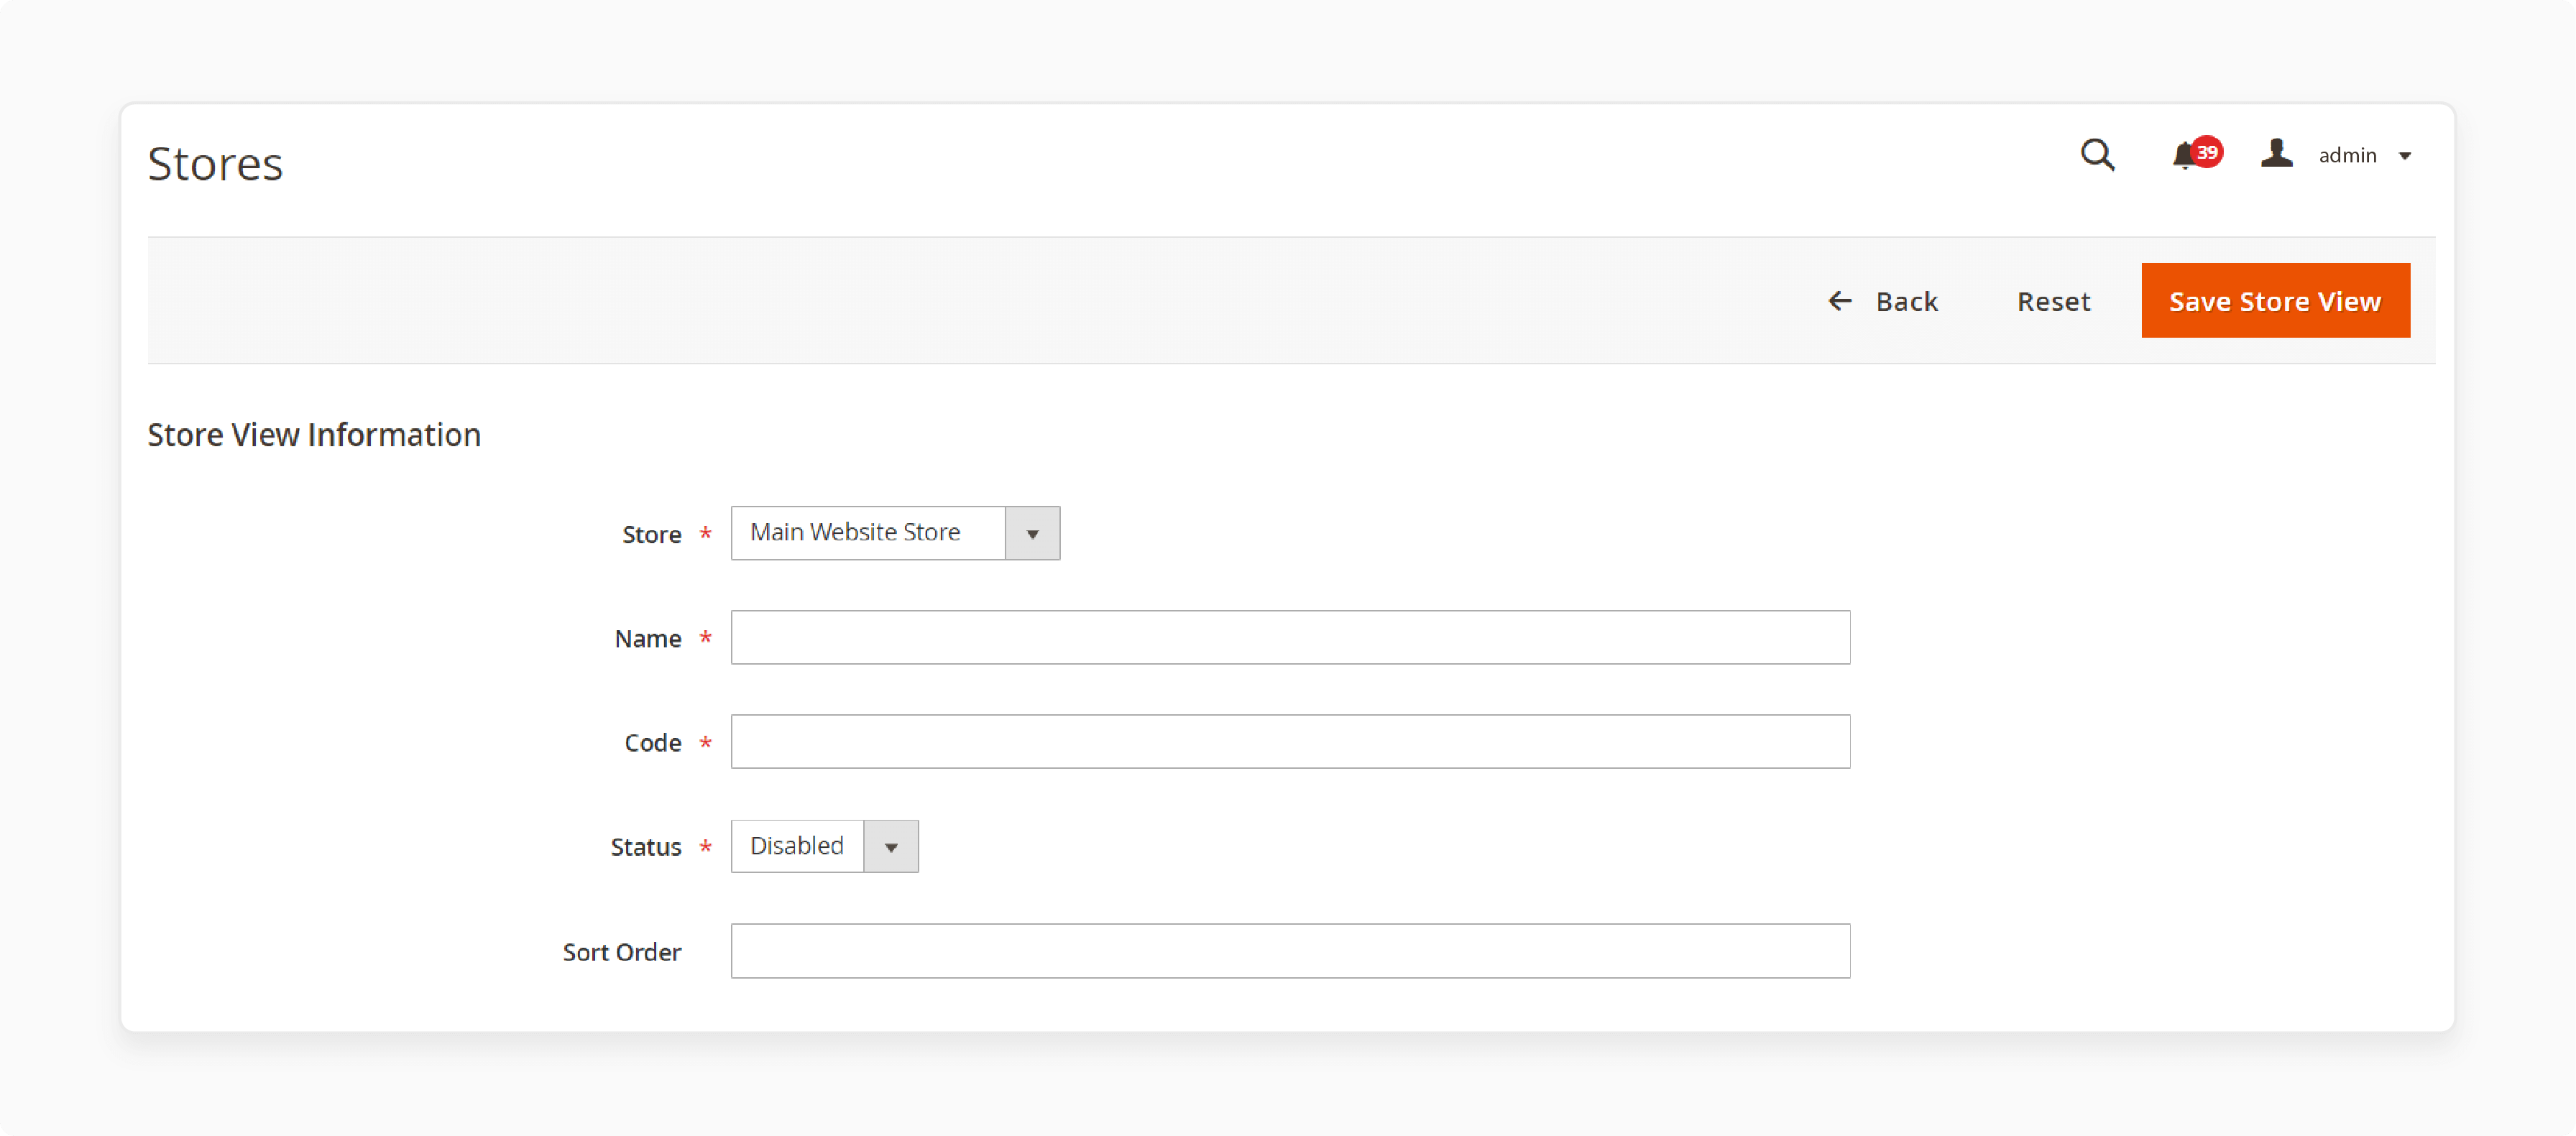
- Fill in the required fields:
-
Store: Choose the associated store.
-
Name: Enter the store view name.
-
Code: Enter a unique store view code.
-
Sort Order: Set the store view sort order.
- Click "Save Store View."
Step 4: Change the Website Base URL
- Go to Stores > Settings > Configuration in the Magento Admin Panel.
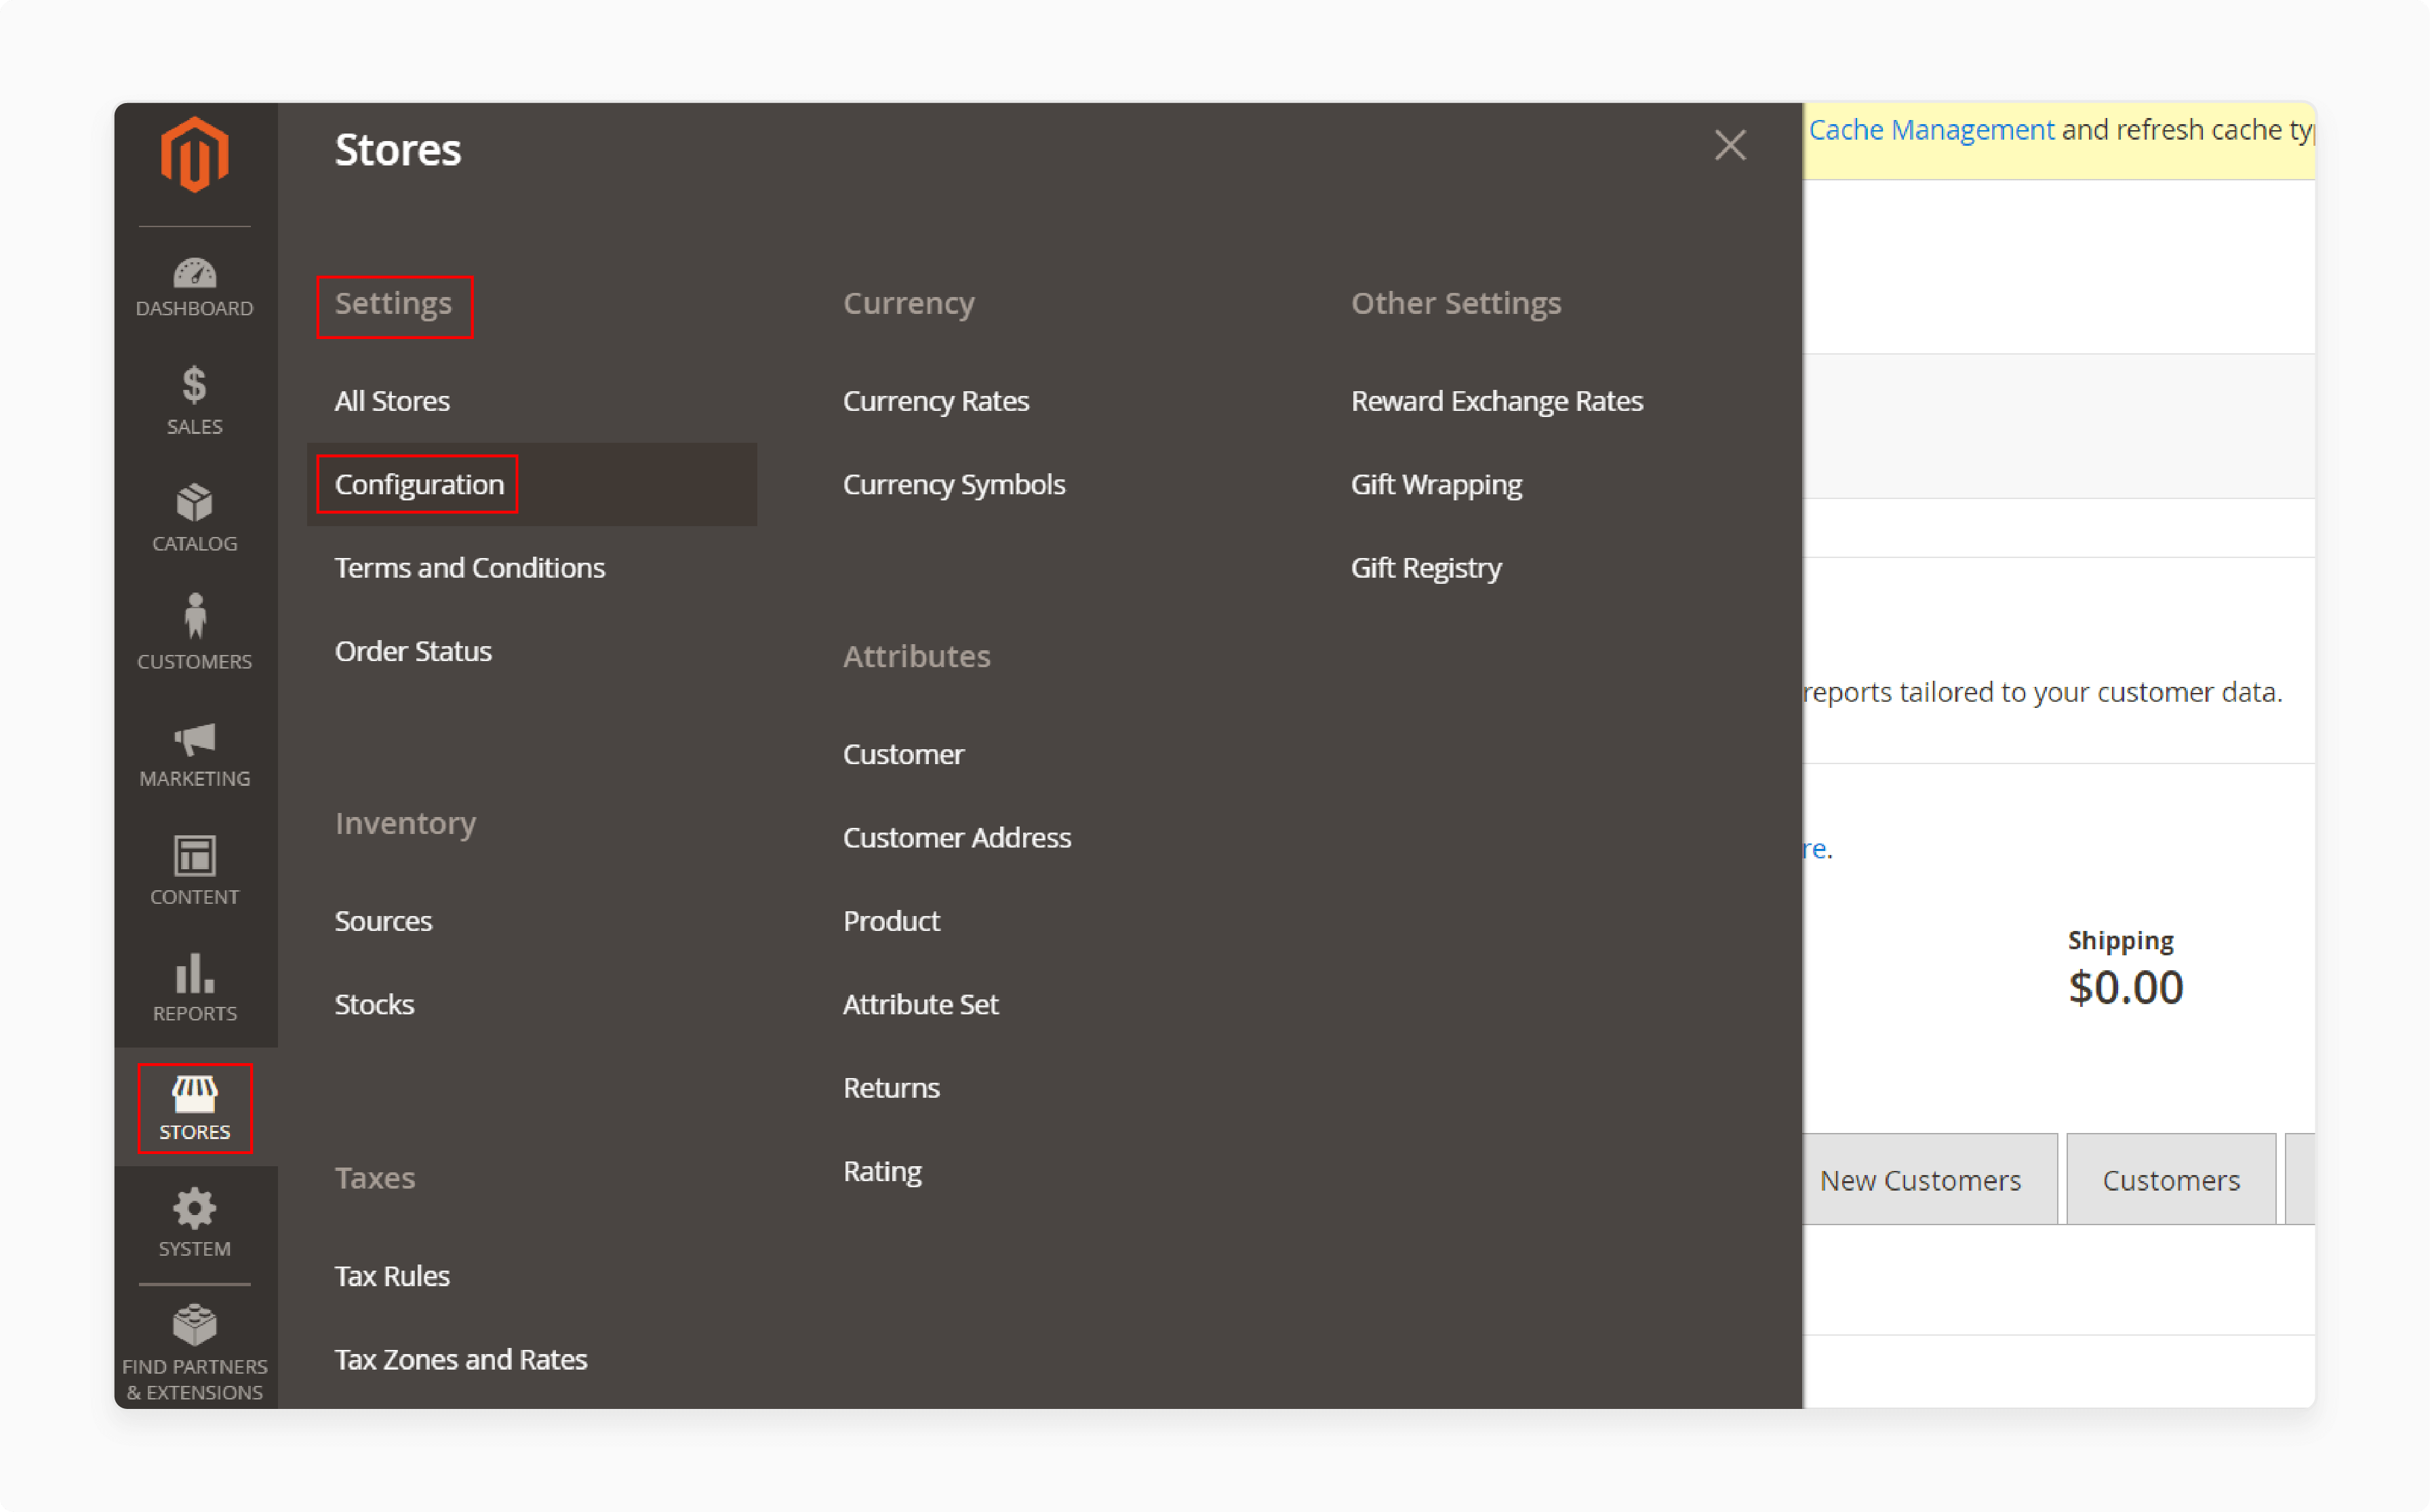
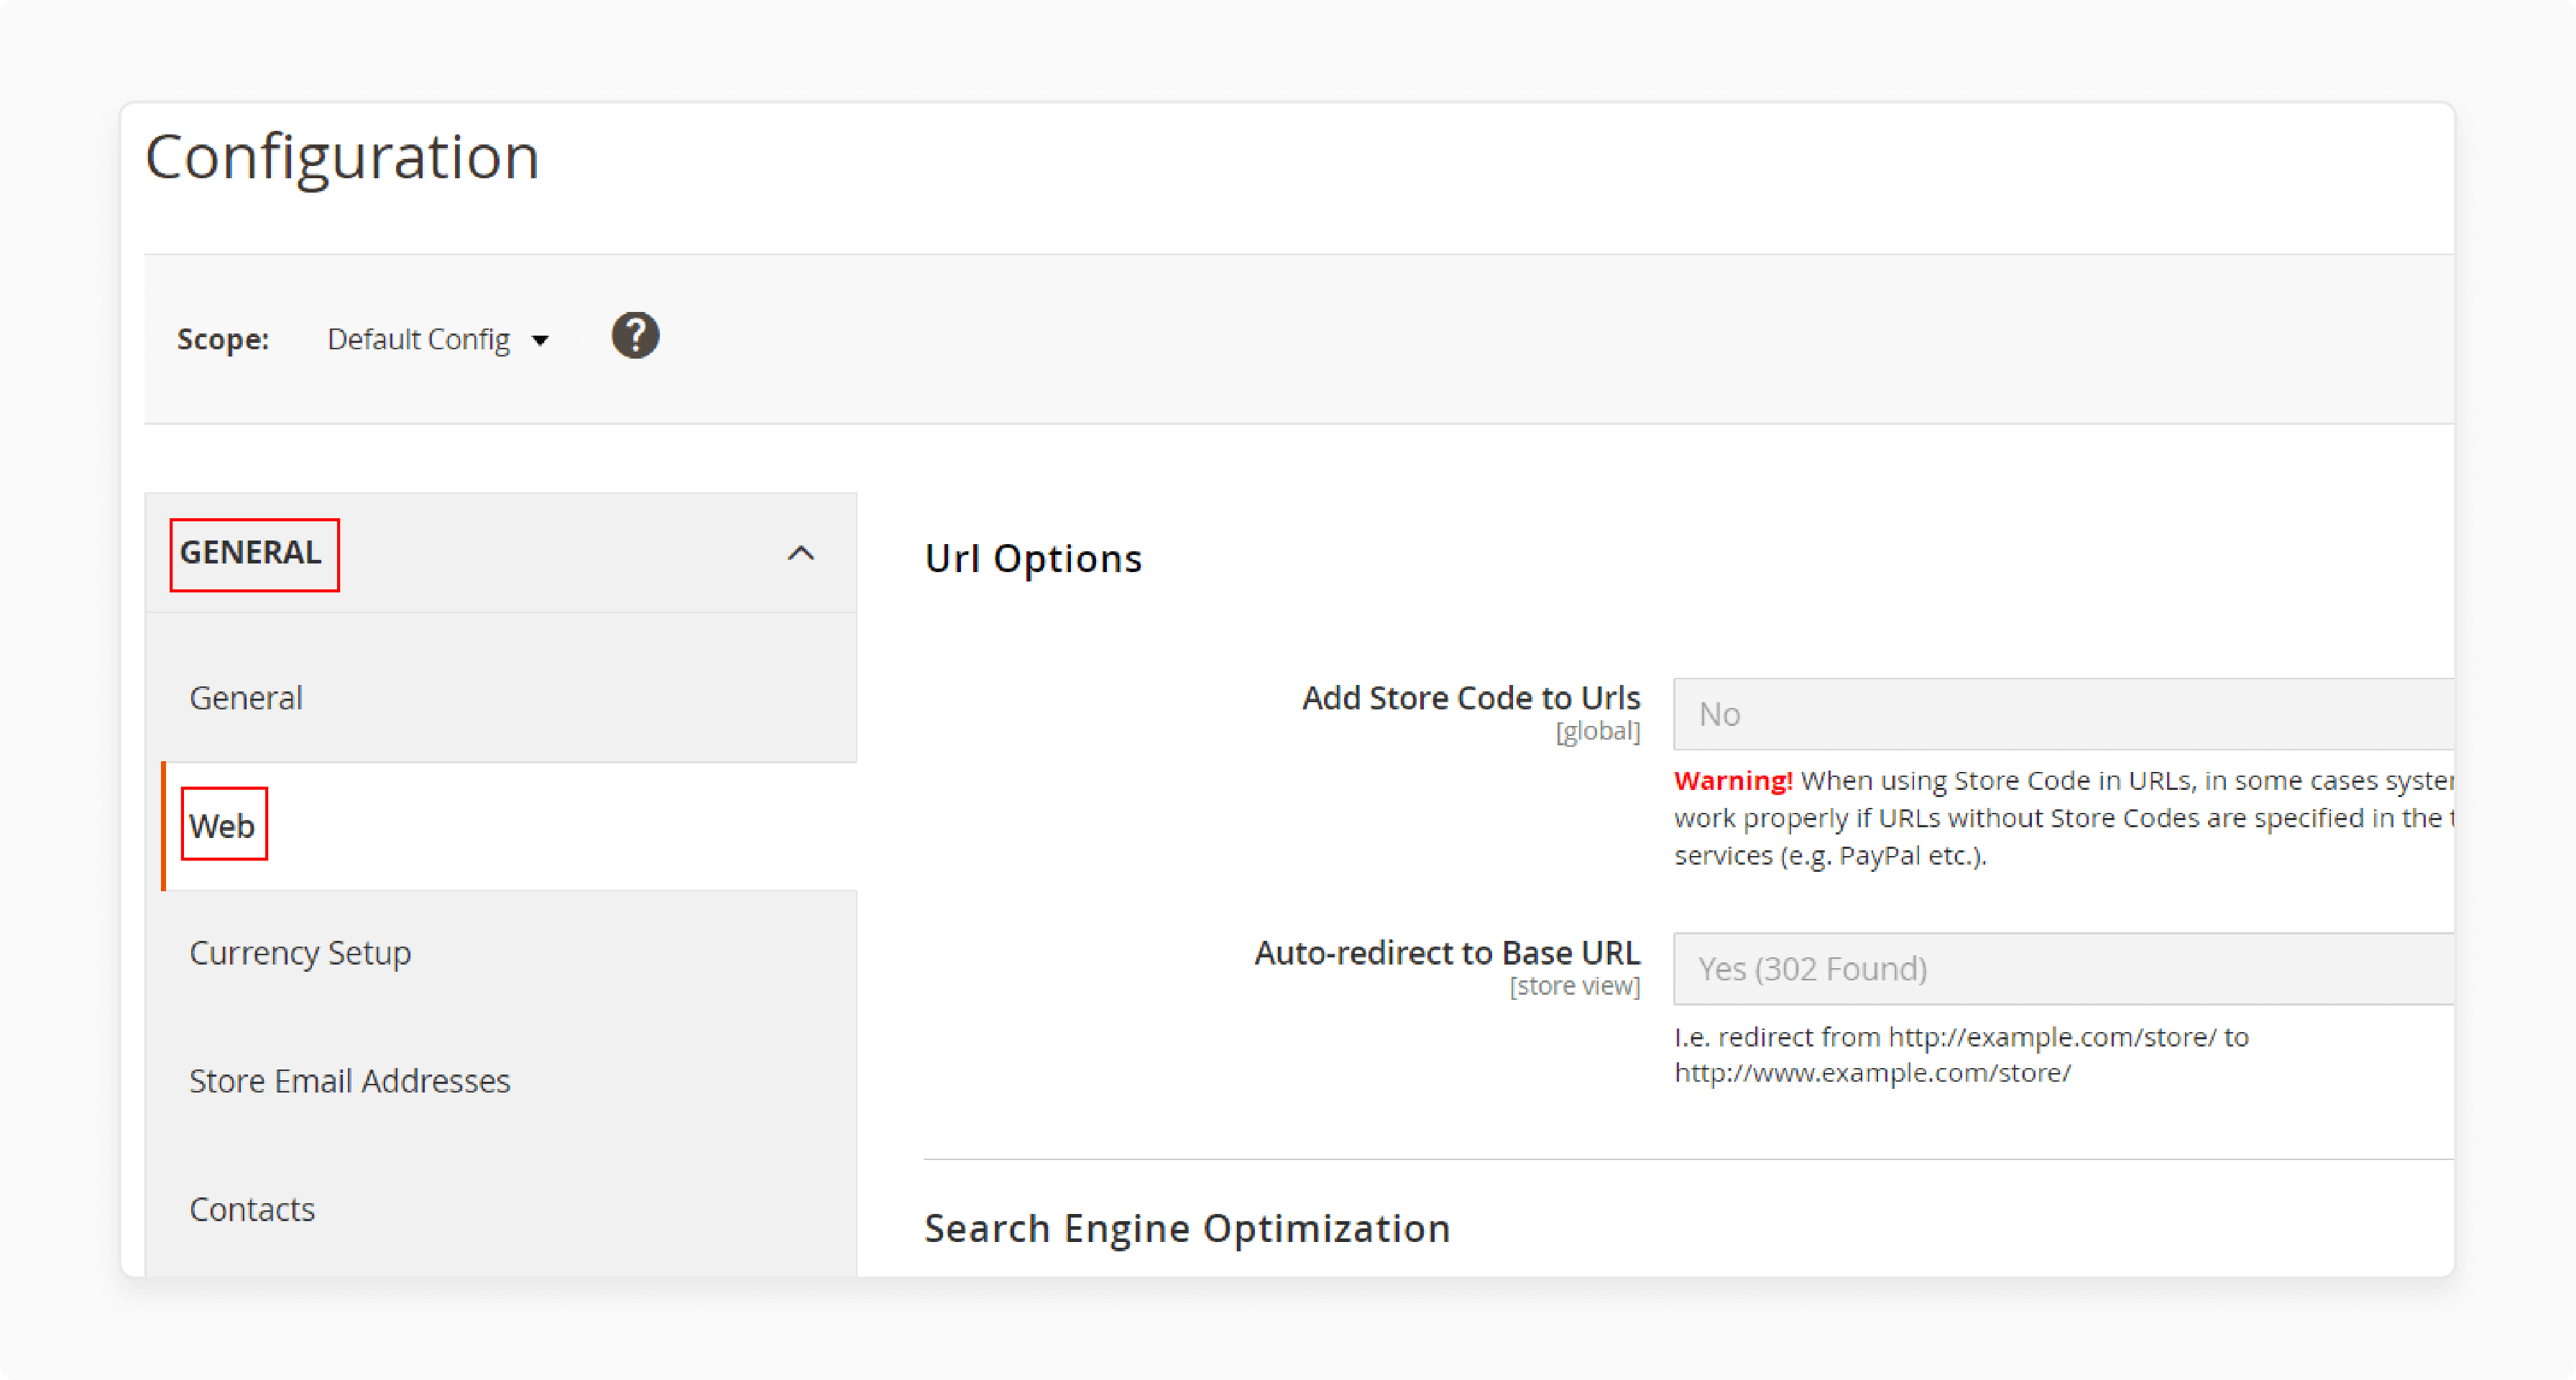
- Click General > Web.
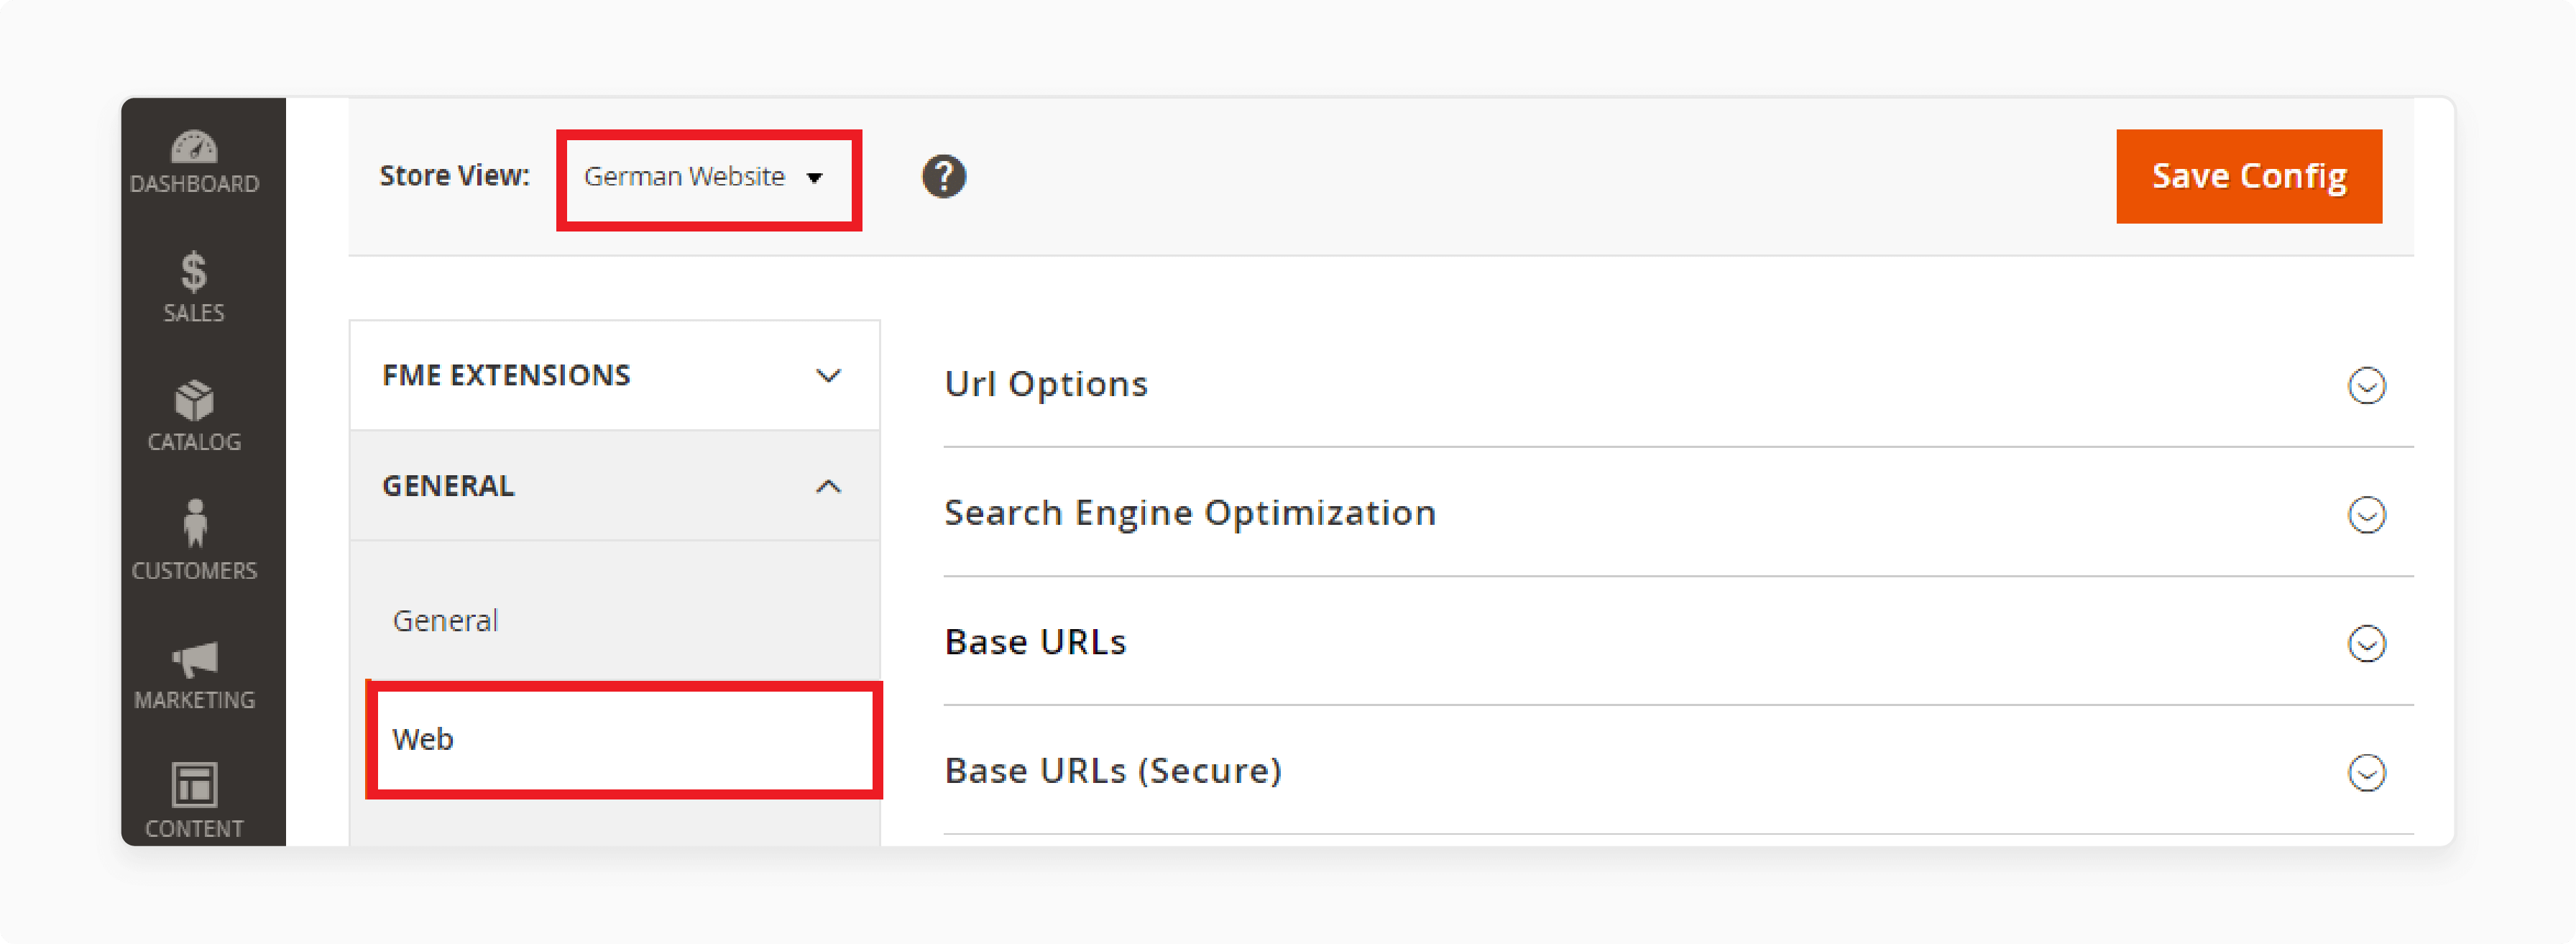
- Select the desired website from the Store View list.
- Expand the Base URLs section and uncheck "Use Default."
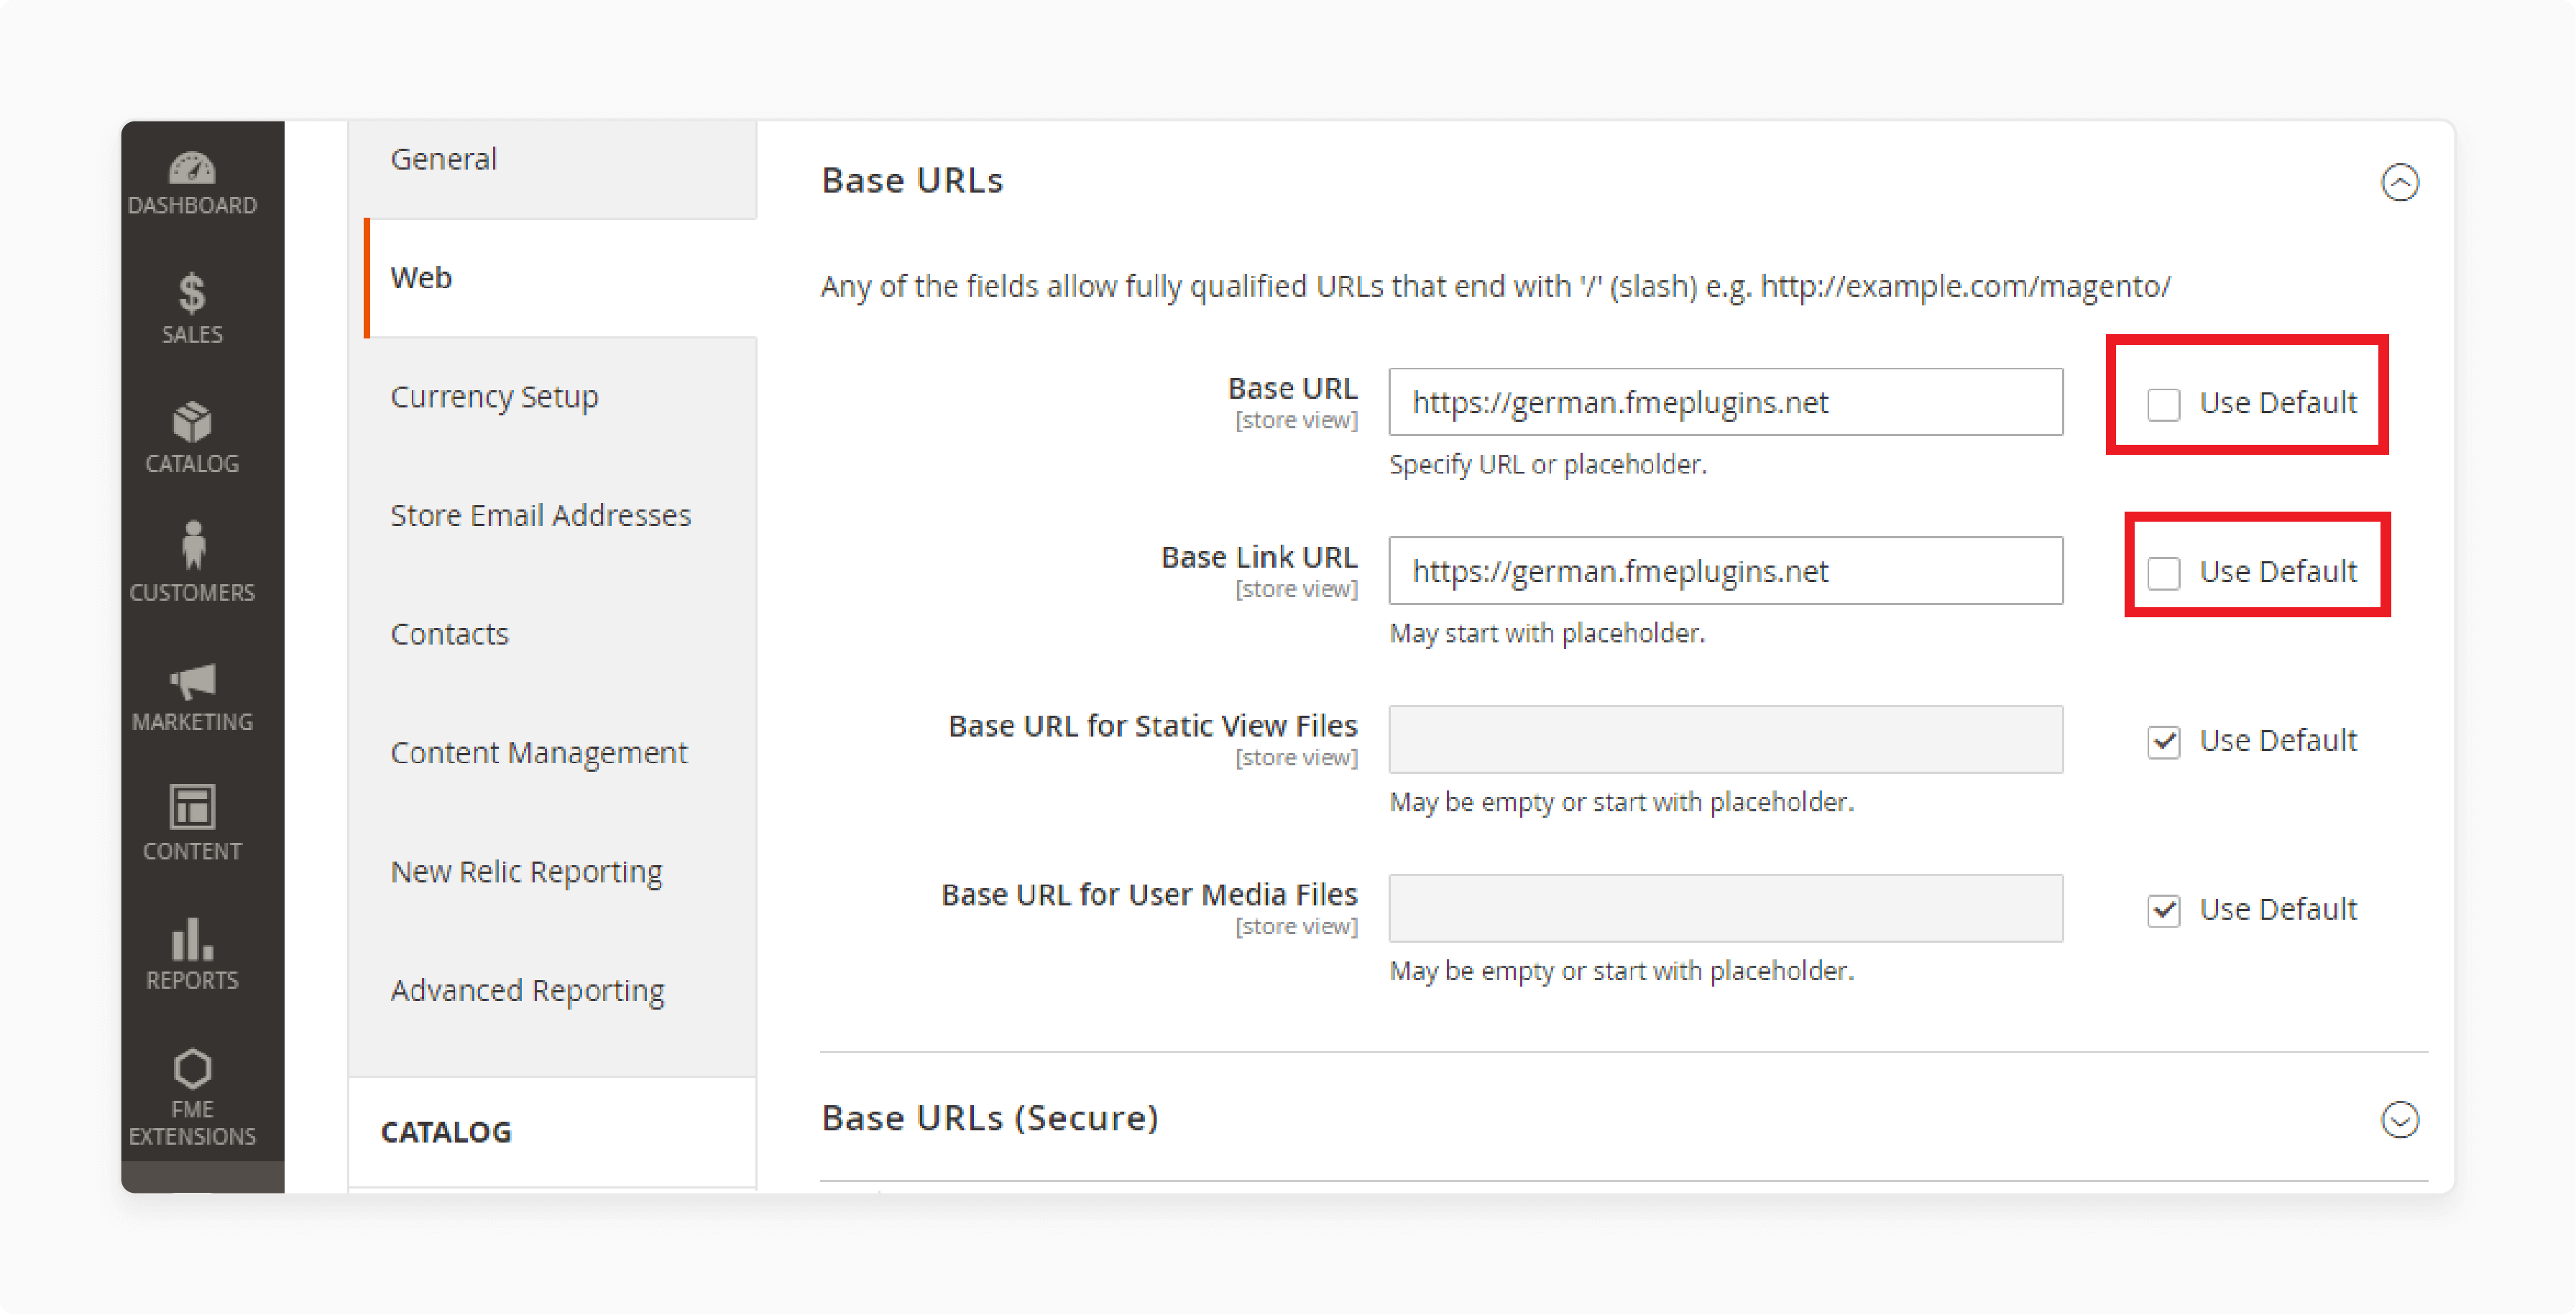
-
Enter the URL in the Base URL and Base Link URL fields.
-
Repeat steps 4 and 5 for the Base URLs (Secure) section.
-
Click "Save Config."
Step 5: Change the Default Store View Base URL
-
Go to Stores > Settings > Configuration in the Magento Admin Panel.
-
Click General > Web.
-
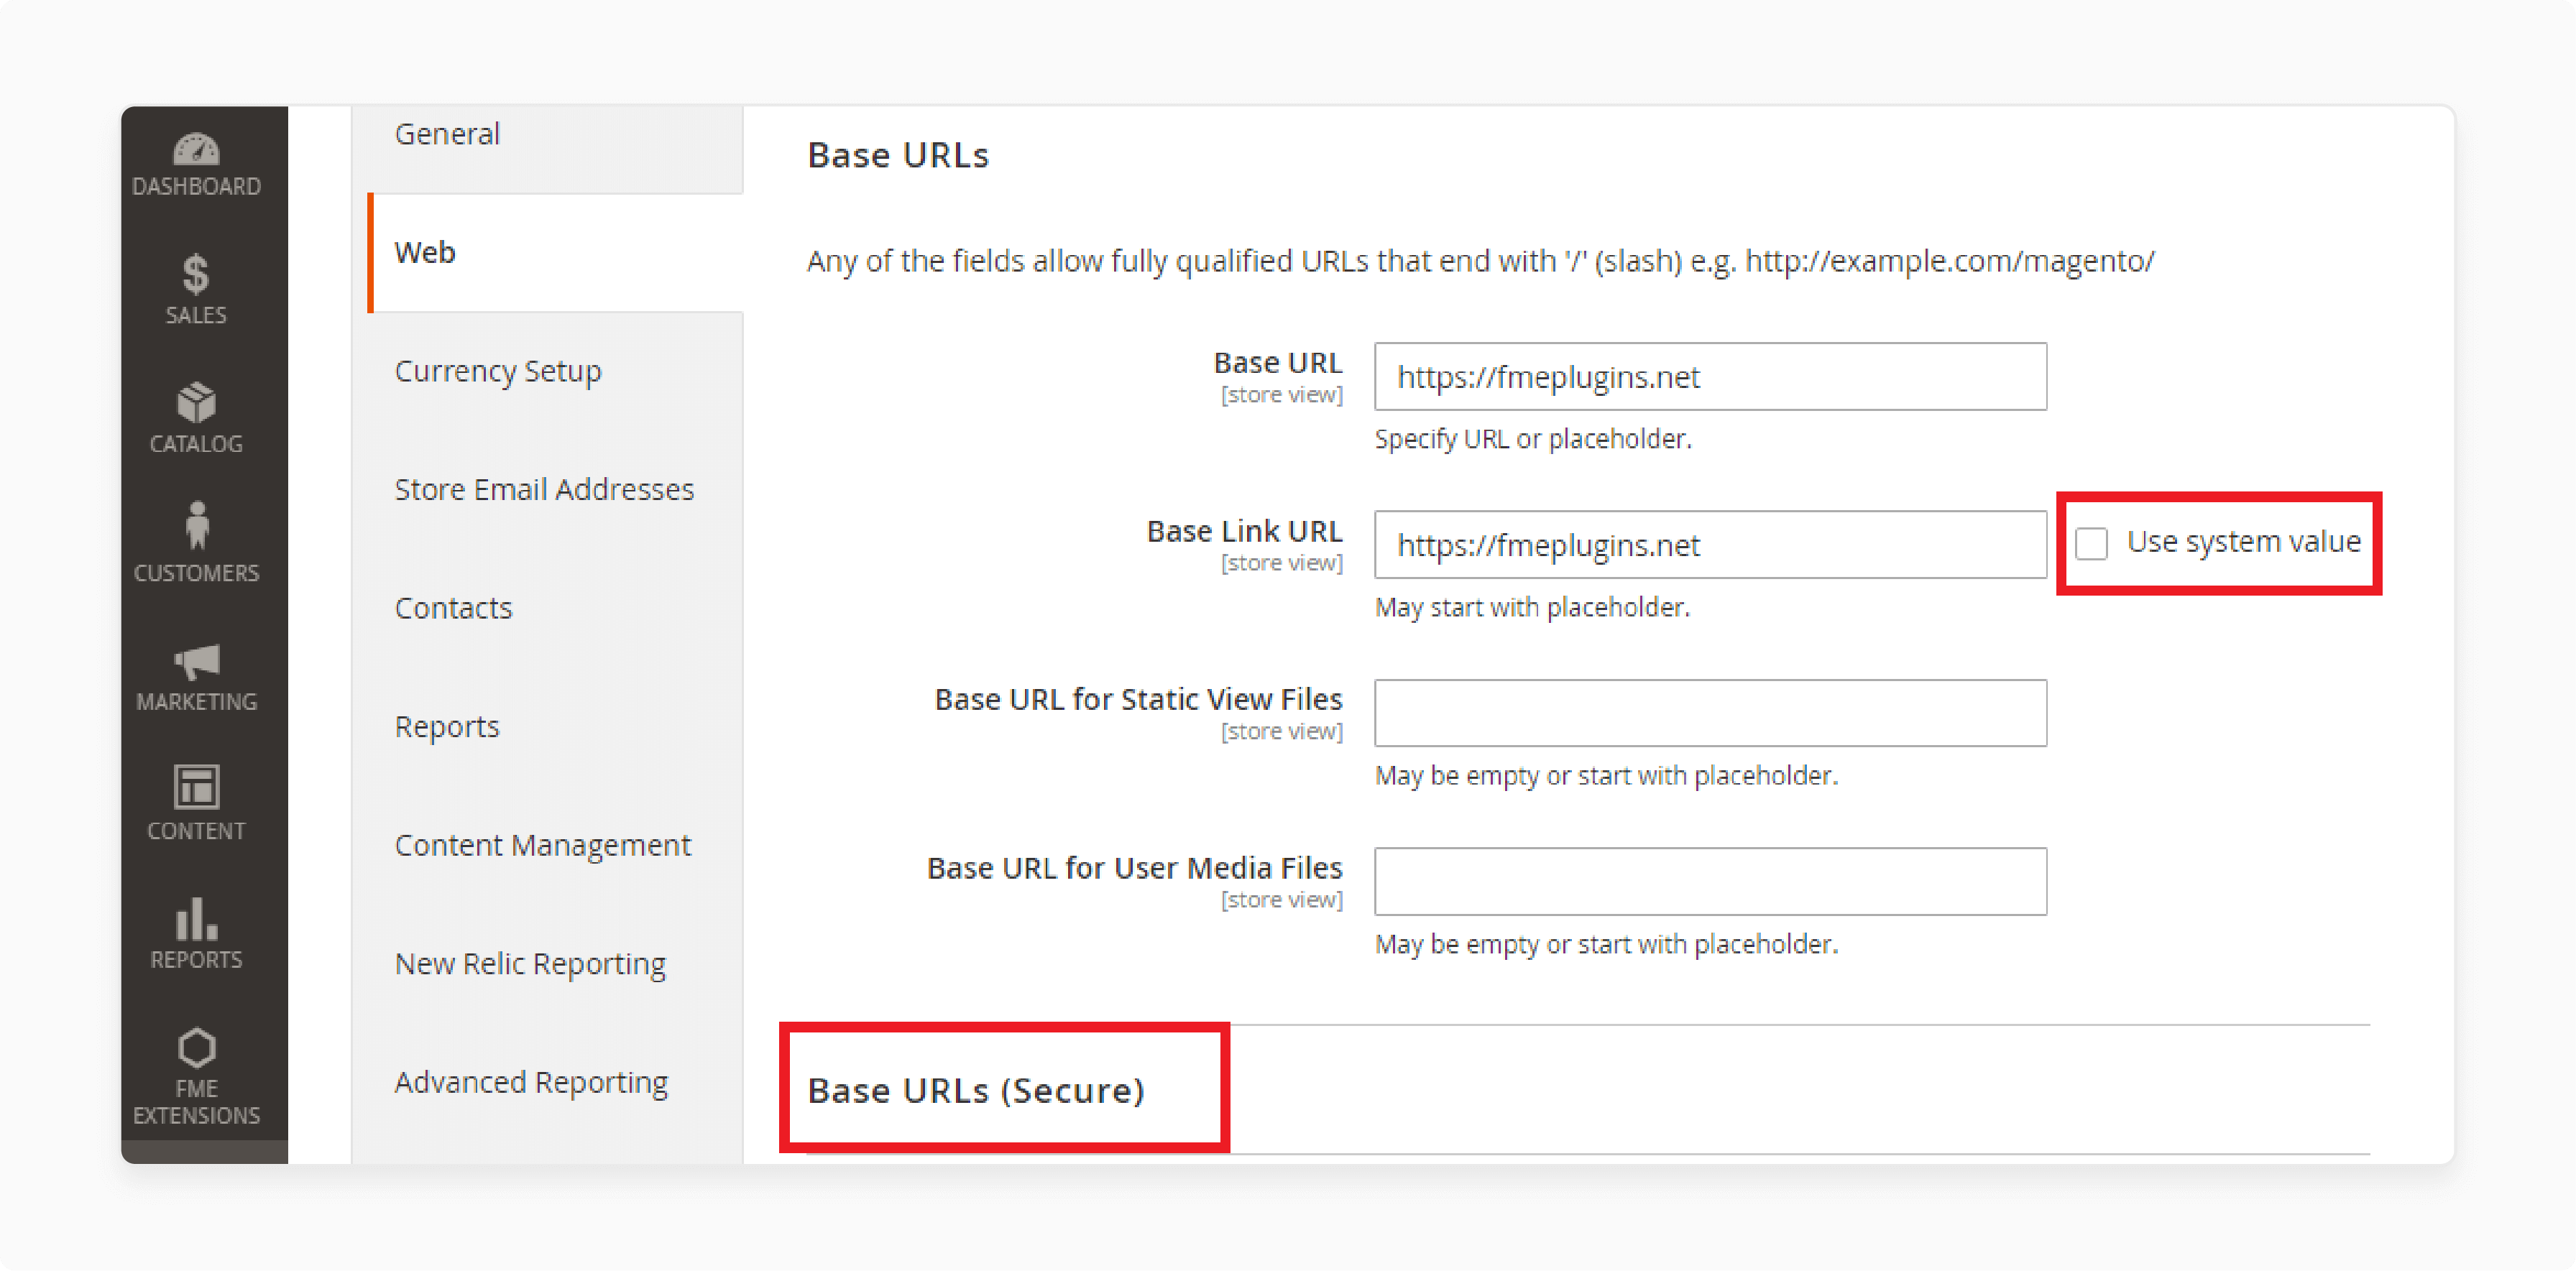
Select "Default Config" from the Store View list.
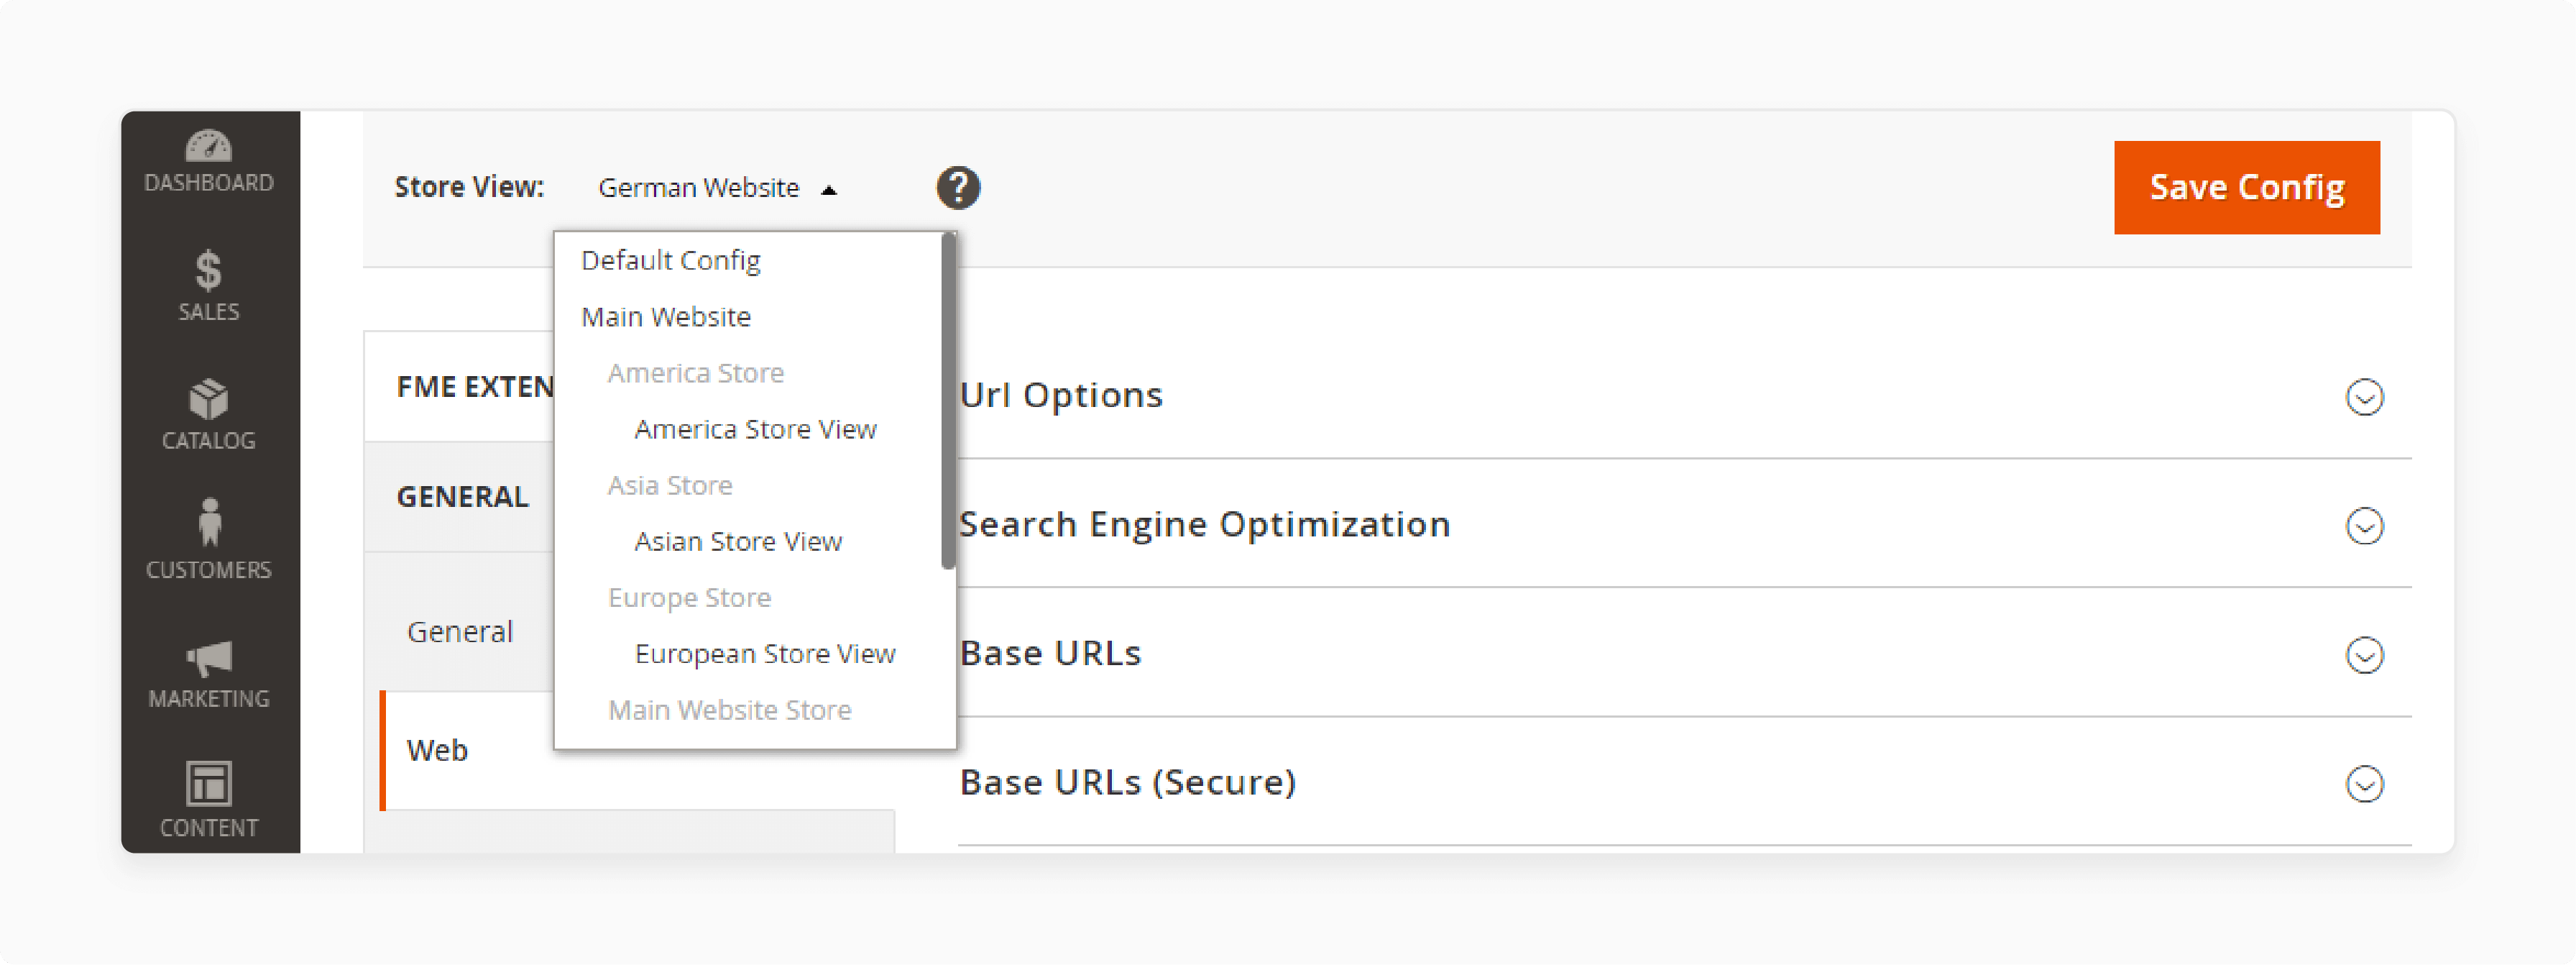
- Expand the Base URLs section and uncheck "Use system value."
-
Enter the Base URL in the Base URL and Base Link URL fields.
-
Repeat steps 4 and 5 for the Base URLs (Secure) section.
-
Click "Save Config."
Step 6: Add the Store Code to the Base URL
-
Go to Stores > Settings > Configuration in the Magento 2 Admin sidebar.
-
Expand General > Web in the left panel.
-
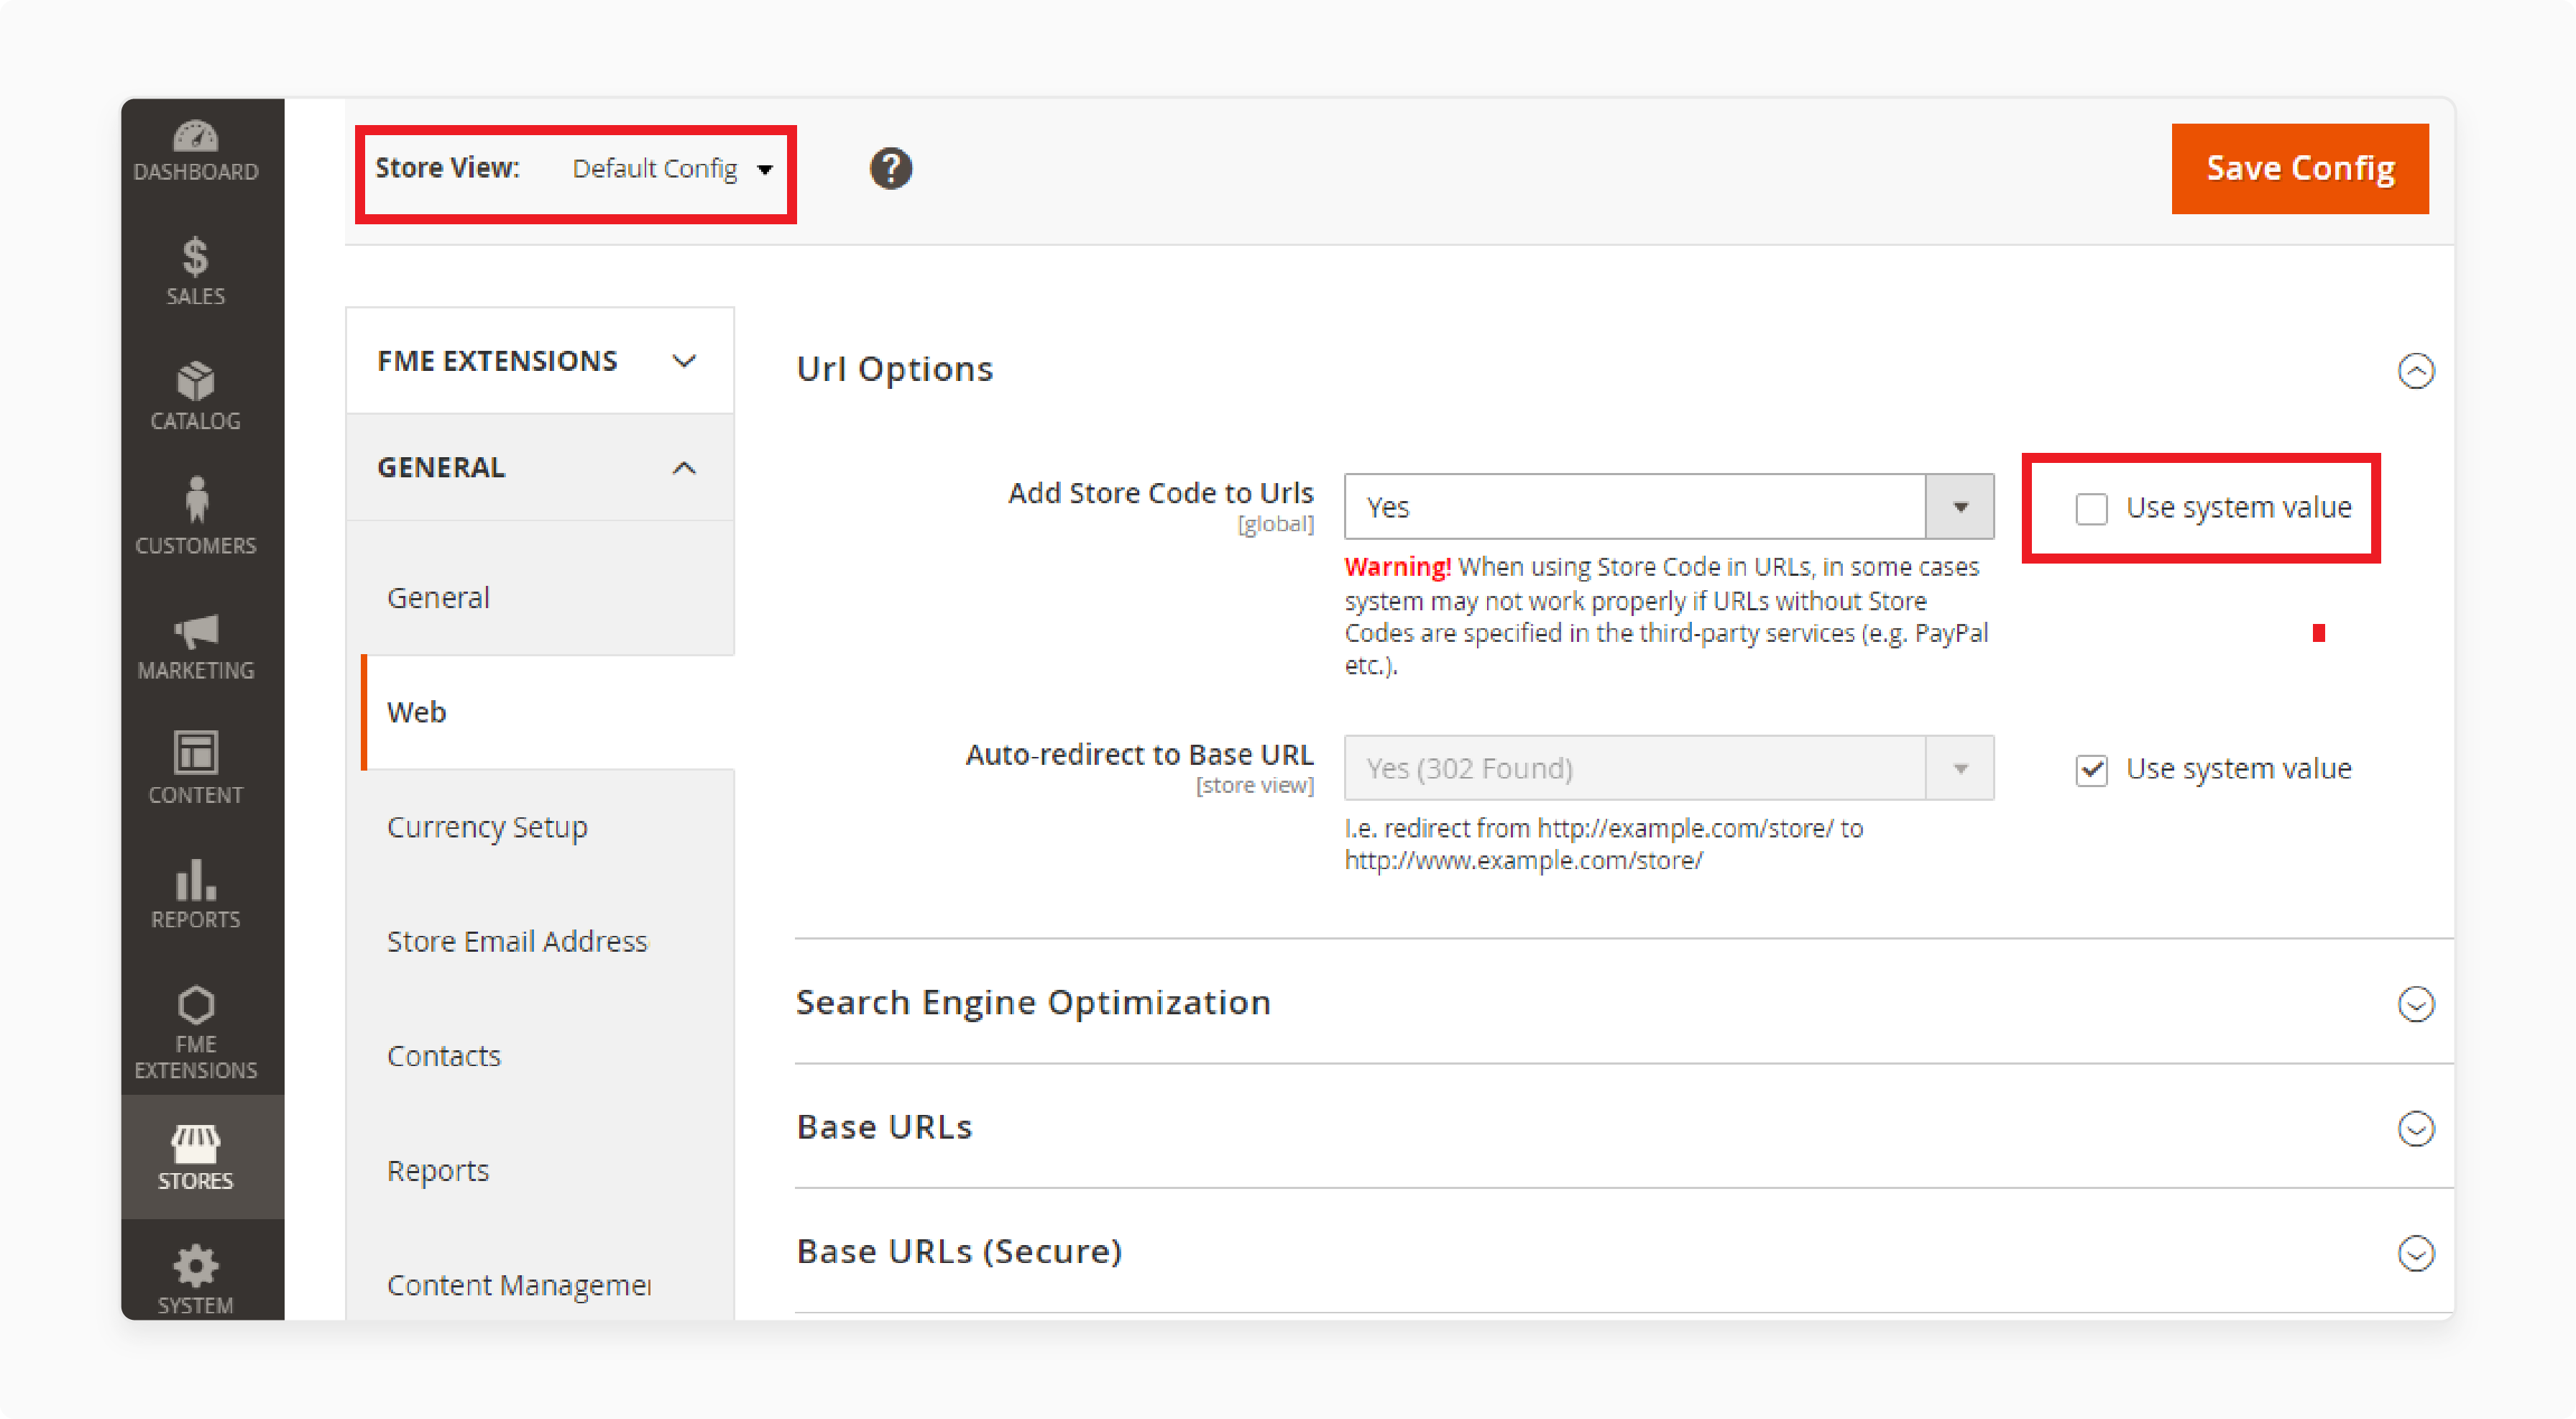
Select "Default Config" from the Store View dropdown.
-
Expand the URL Options section.
-
Uncheck "Use System Value" for the "Add Store Code to Urls" field.
-
- Set "Add Store Code" to "YES."
-
Click "Save Config."
Step 7: Flush Magento 2 Cache
-
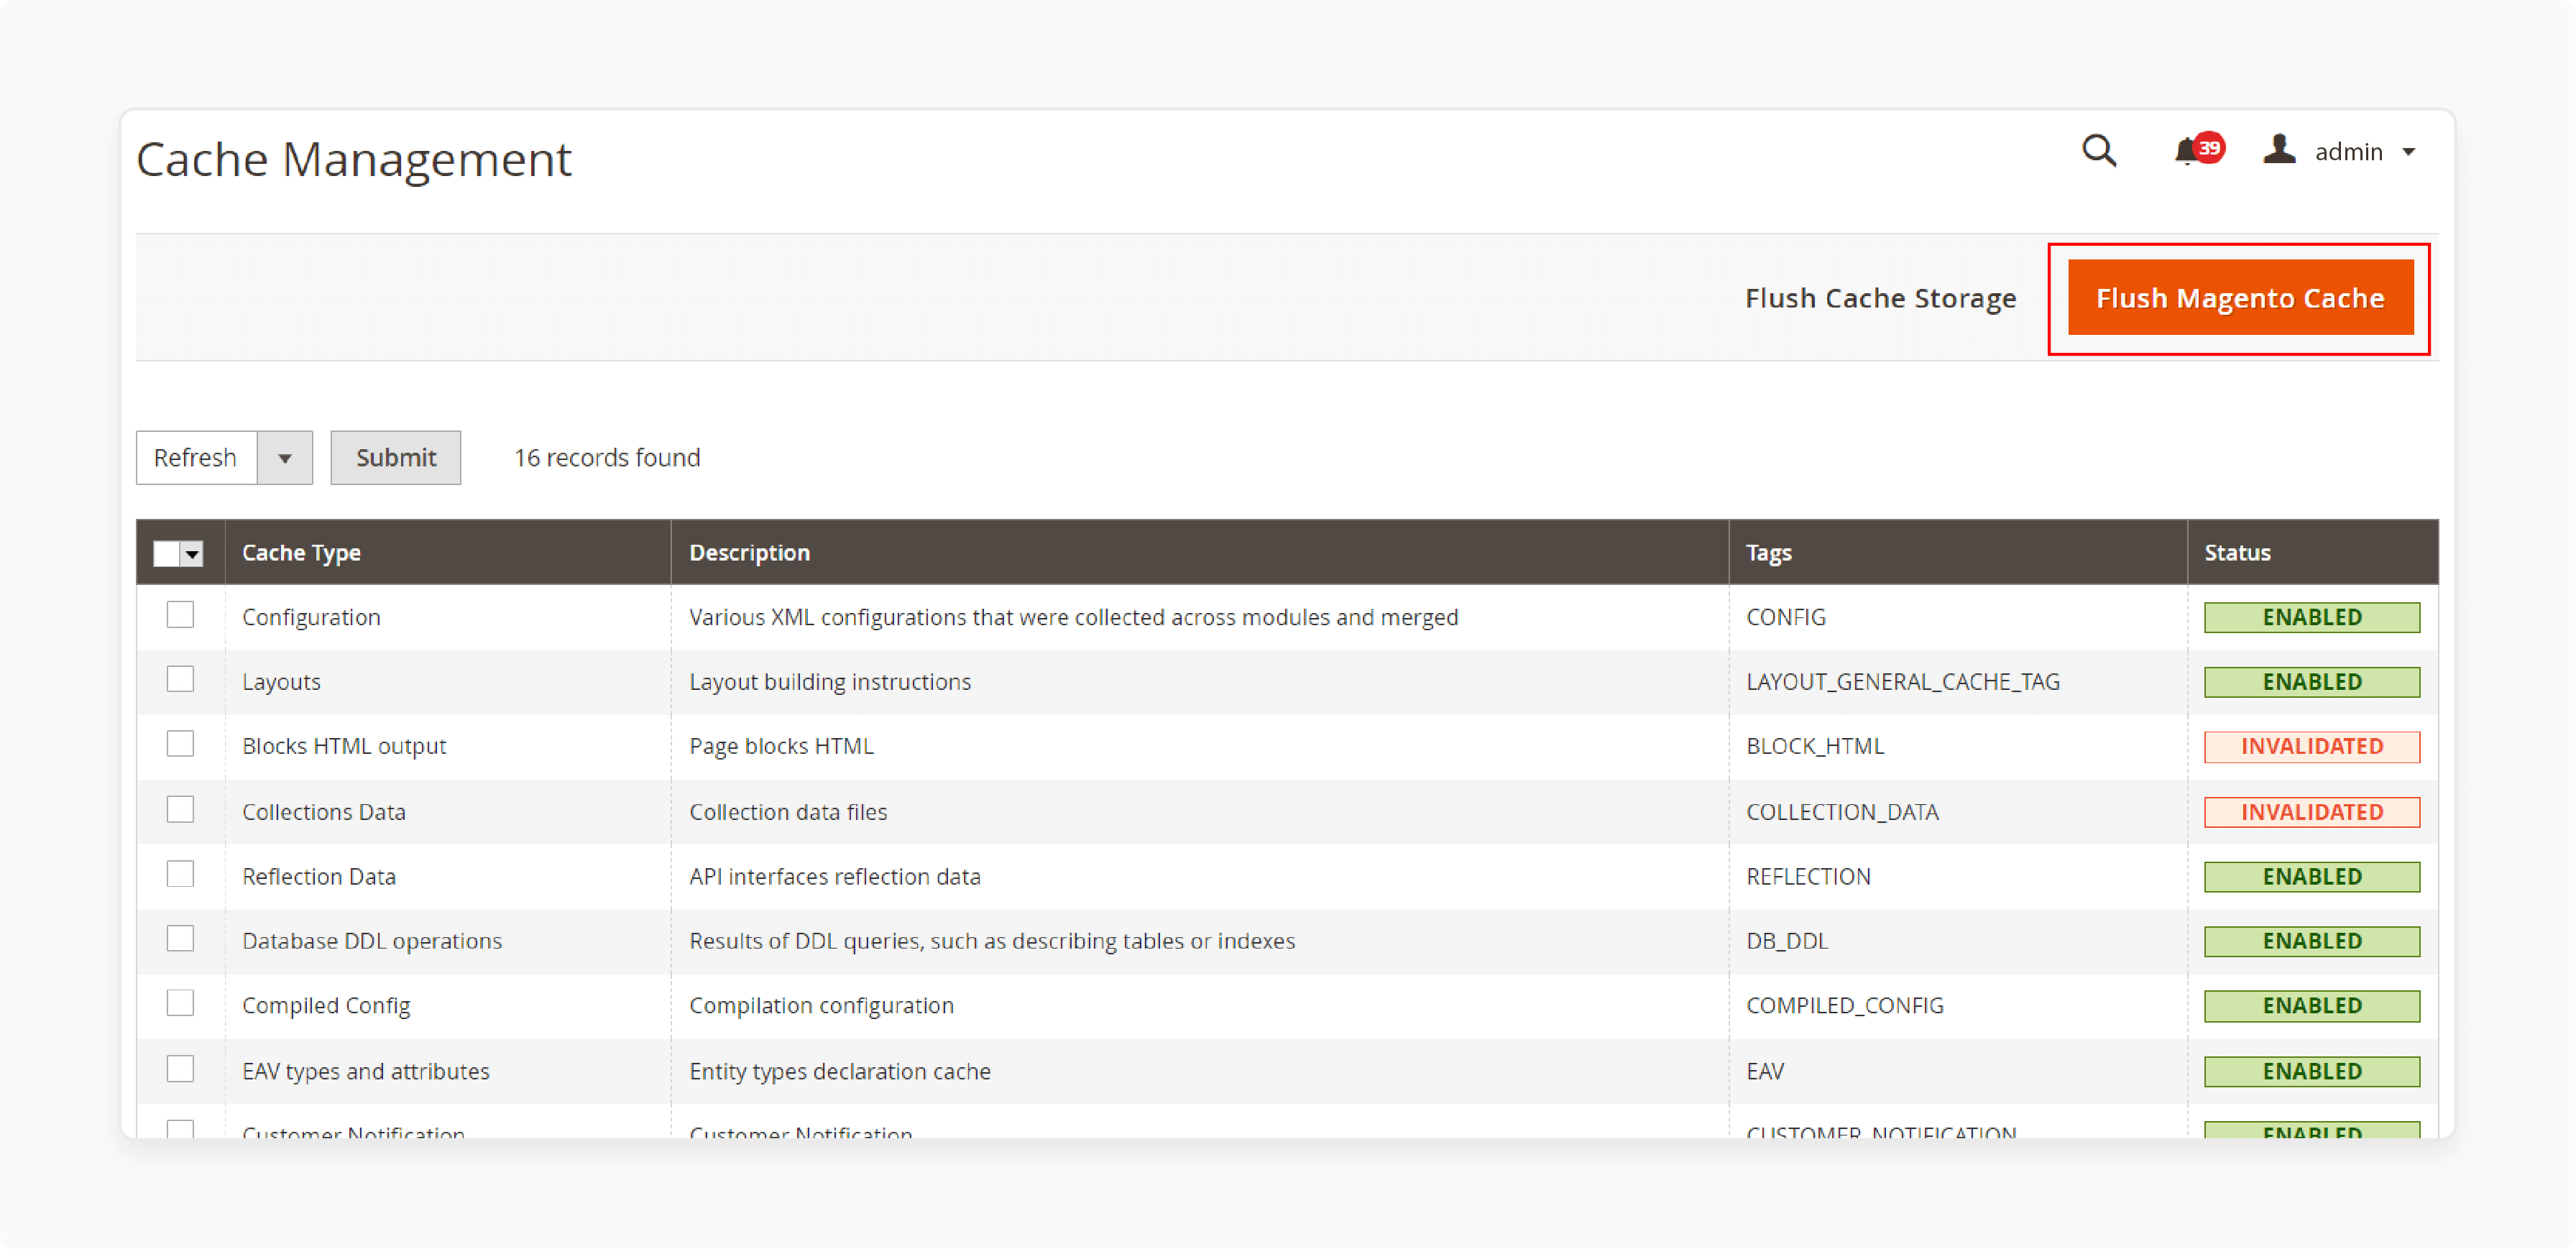
Go to System > Cache Management in the Admin sidebar.
-
On the Cache Management page, click "Flush Magento Cache."
The URLs will be in the following format:
- With Store Code:
http://www.yourdomain.com/magento/[store-code]/index.php/url-identifier
- Without Store Code:
http://www.yourdomain.com/magento/index.php/url-identifier
Top 4 Magento 2 Website Switcher Extensions
1. FME Store Switcher for Magento 2
| Details | Explanations |
|---|---|
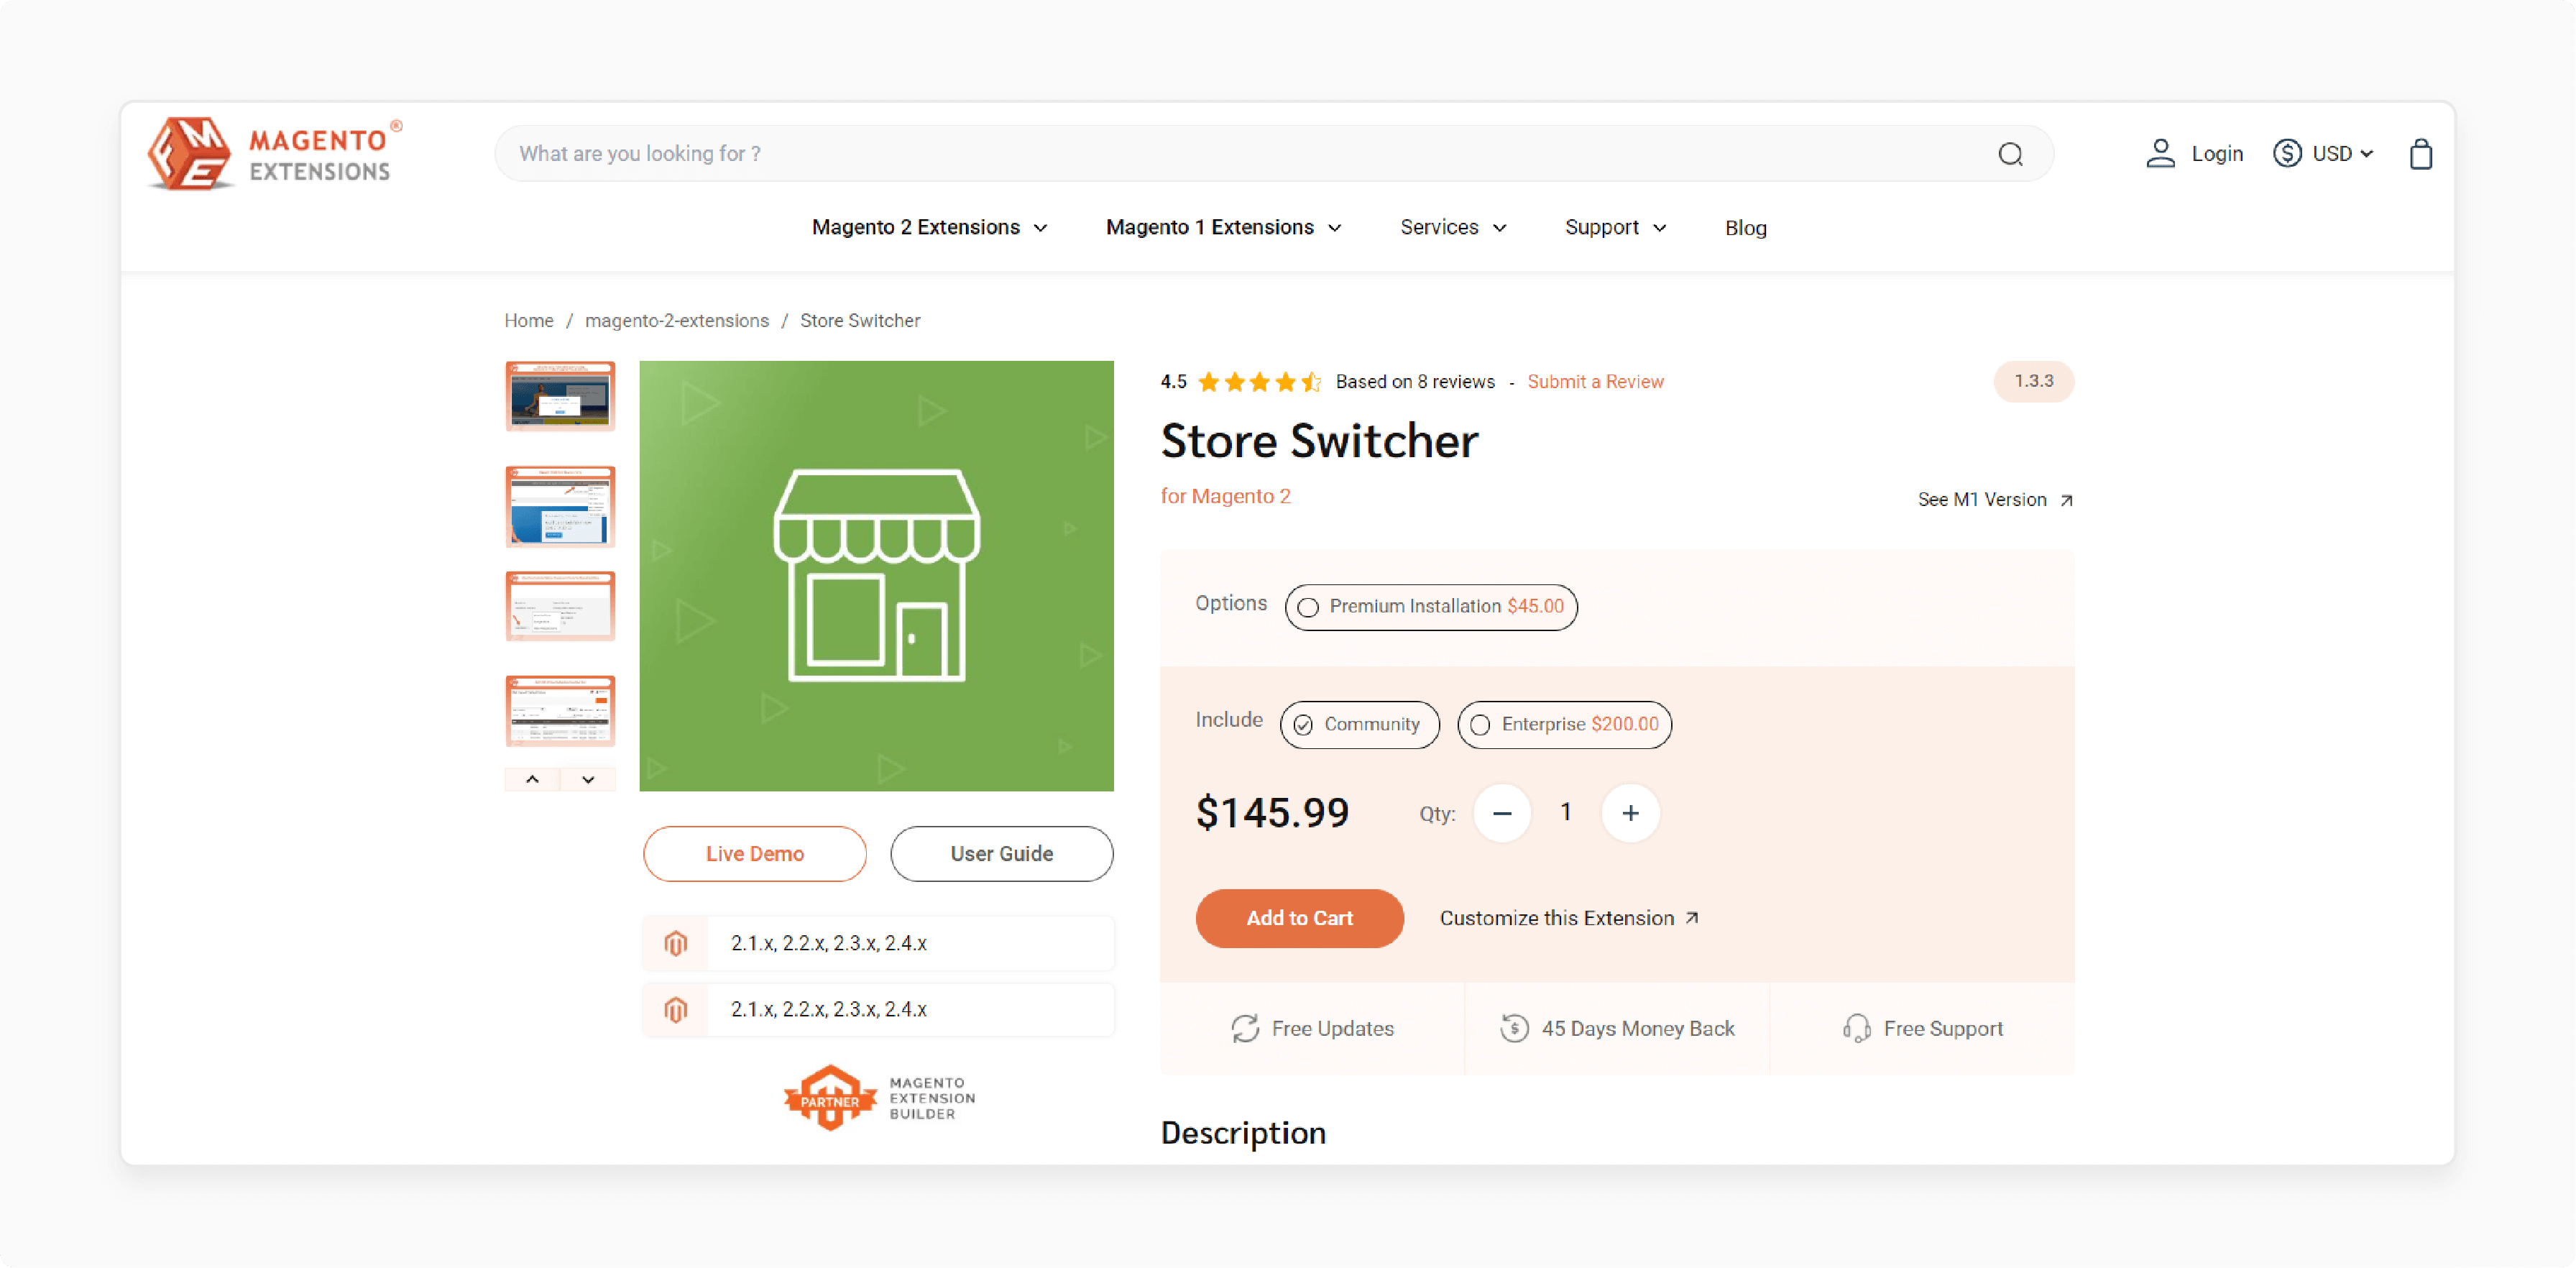
| Extension Link | FME Store Switcher for Magento 2 |
| Features | - Detect user's geolocation by IP addresses - Automatically redirect users to the relevant store - Configure store view switching for a region or country - Display products in the local language and currency - Store switcher dropdown for manual redirection - Disable store switcher for specific IP addresses |
| Benefits | The FME Store Switcher for Magento 2 helps you reach a global audience by automatically redirecting users to the most relevant store based on their geolocation. It displays products in the local language and currency providing a personalized shopping experience. This extension offers a manual store switcher dropdown and can disable the switcher for specific IP addresses. |
| Price | Community: $145.99 Enterprise: $200.00 |
2. Amasty Store Switcher for Magento 2
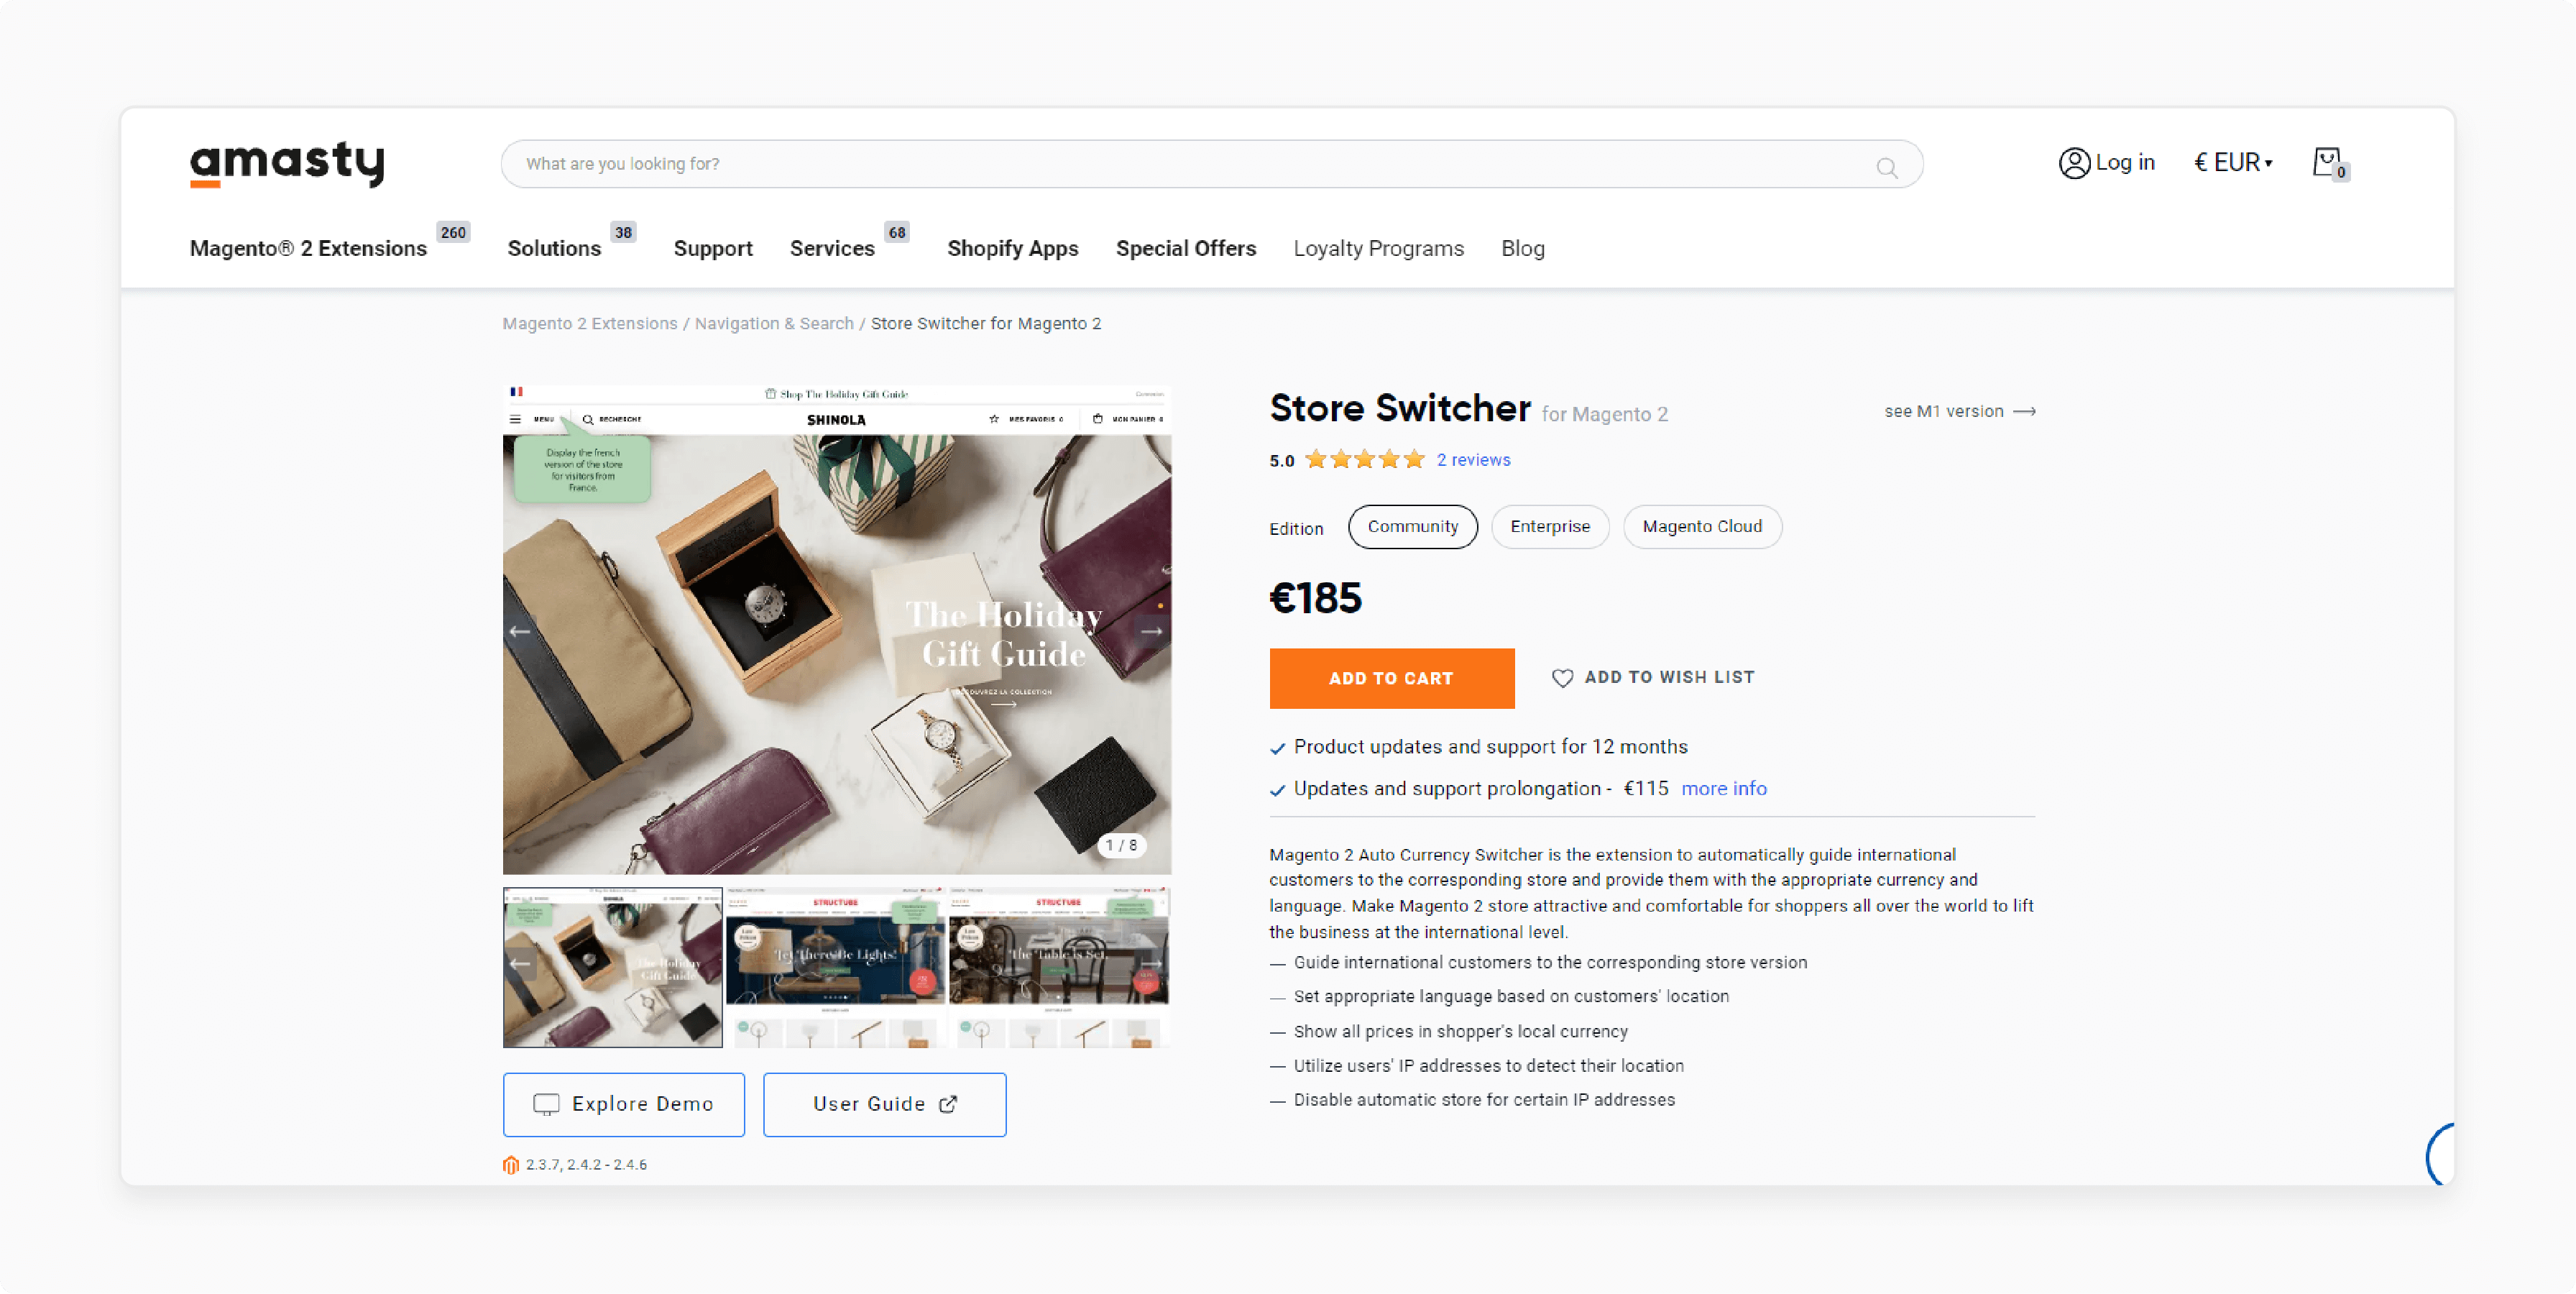
| Details | Explanations |
|---|---|
| Extension Link | Amasty Store Switcher for Magento 2 |
| Features | - Guide international customers to the corresponding store version - Set appropriate language based on customers' location - Show all prices in shopper's local currency - Utilize users' IP addresses to detect their location - Disable automatic store for certain IP addresses |
| Benefits | The Magento 2 Auto Currency Switcher by Amasty guides international customers to the right store and provides appropriate currency and language. This extension makes your Magento 2 store attractive and comfortable for global shoppers, helping elevate your business internationally. |
| Price | €185 (Community, Enterprise, Magento Cloud) |
3. MageZon Magento 2 Store Switcher
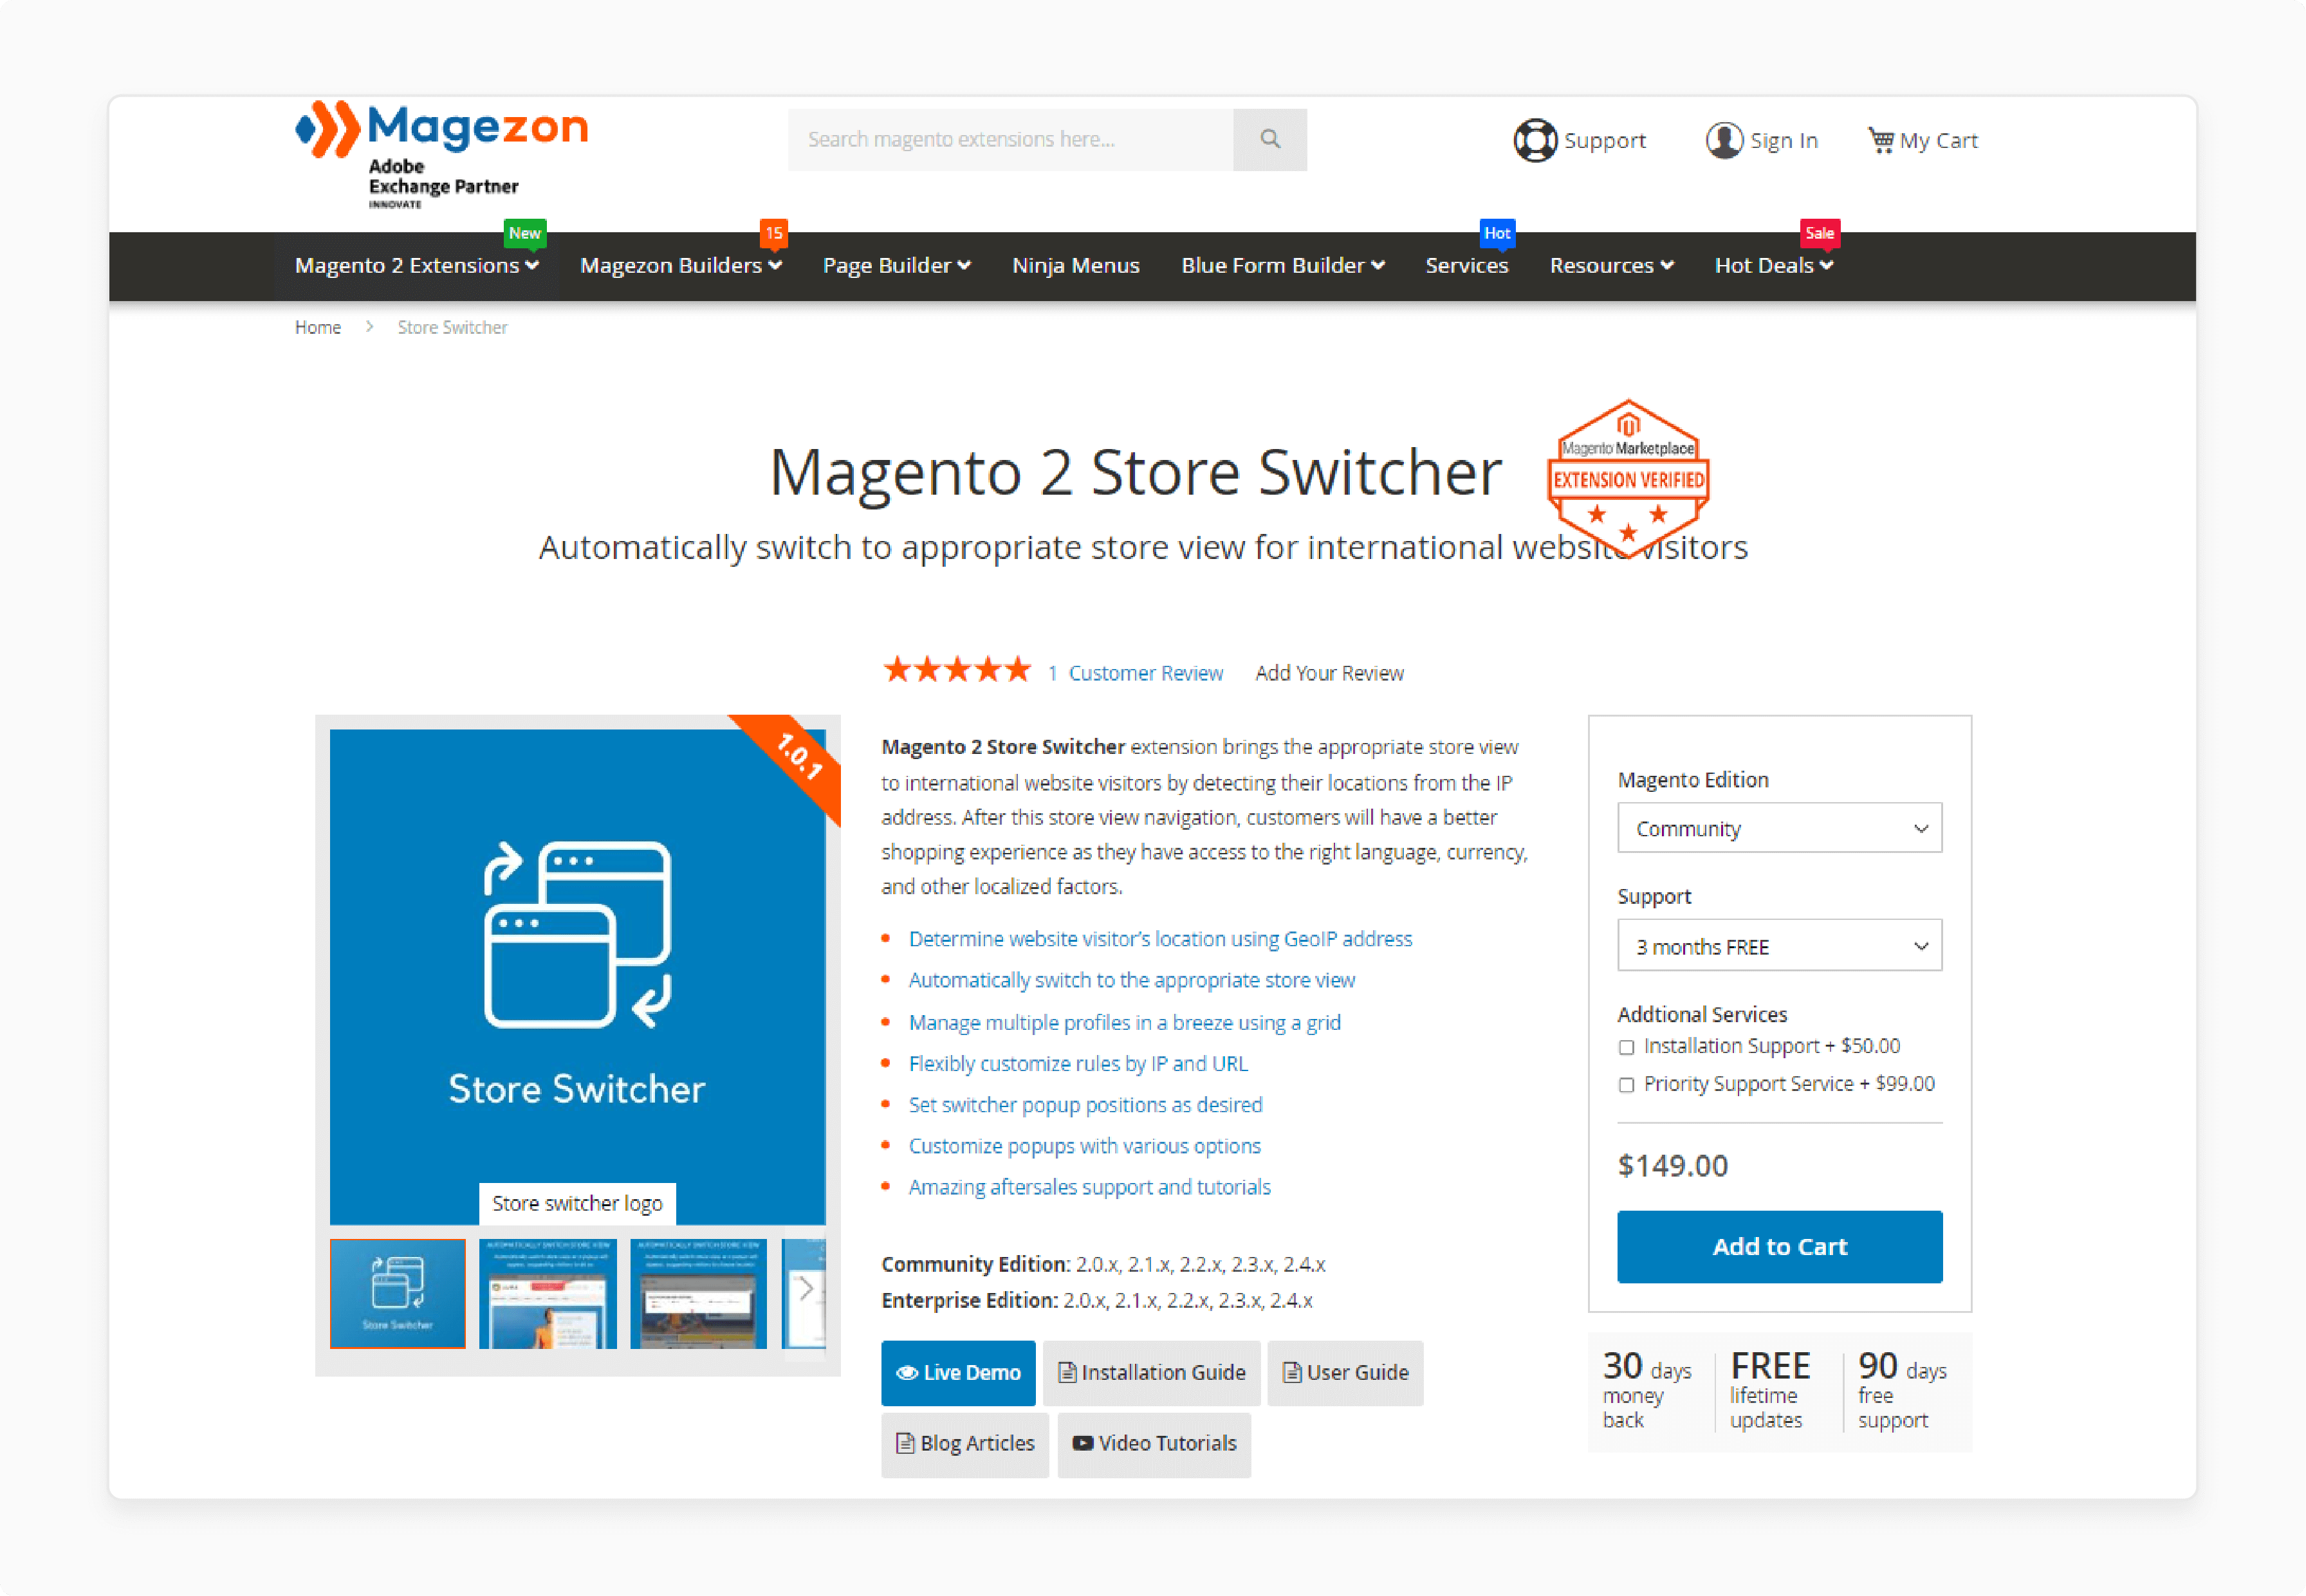
| Details | Explanations |
|---|---|
| Extension Link | MageZon Magento 2 Store Switcher |
| Features | - Determine website visitor's location using GeoIP address - Automatically switch to the appropriate store view - Manage multiple profiles using a grid - Flexibly customize rules by IP and URL - Set switcher popup positions as desired - Customize popups with various options |
| Benefits | The MageZon Magento 2 Store Switcher automatically directs international website visitors to the appropriate store view based on their IP location. This navigation provides a better shopping experience with the correct language, currency, and localized factors. The extension offers flexible customization and excellent aftersales support. |
| Price | $149.00 (Community) |
4. MageFan Magento 2 Language and Store Switcher Extension
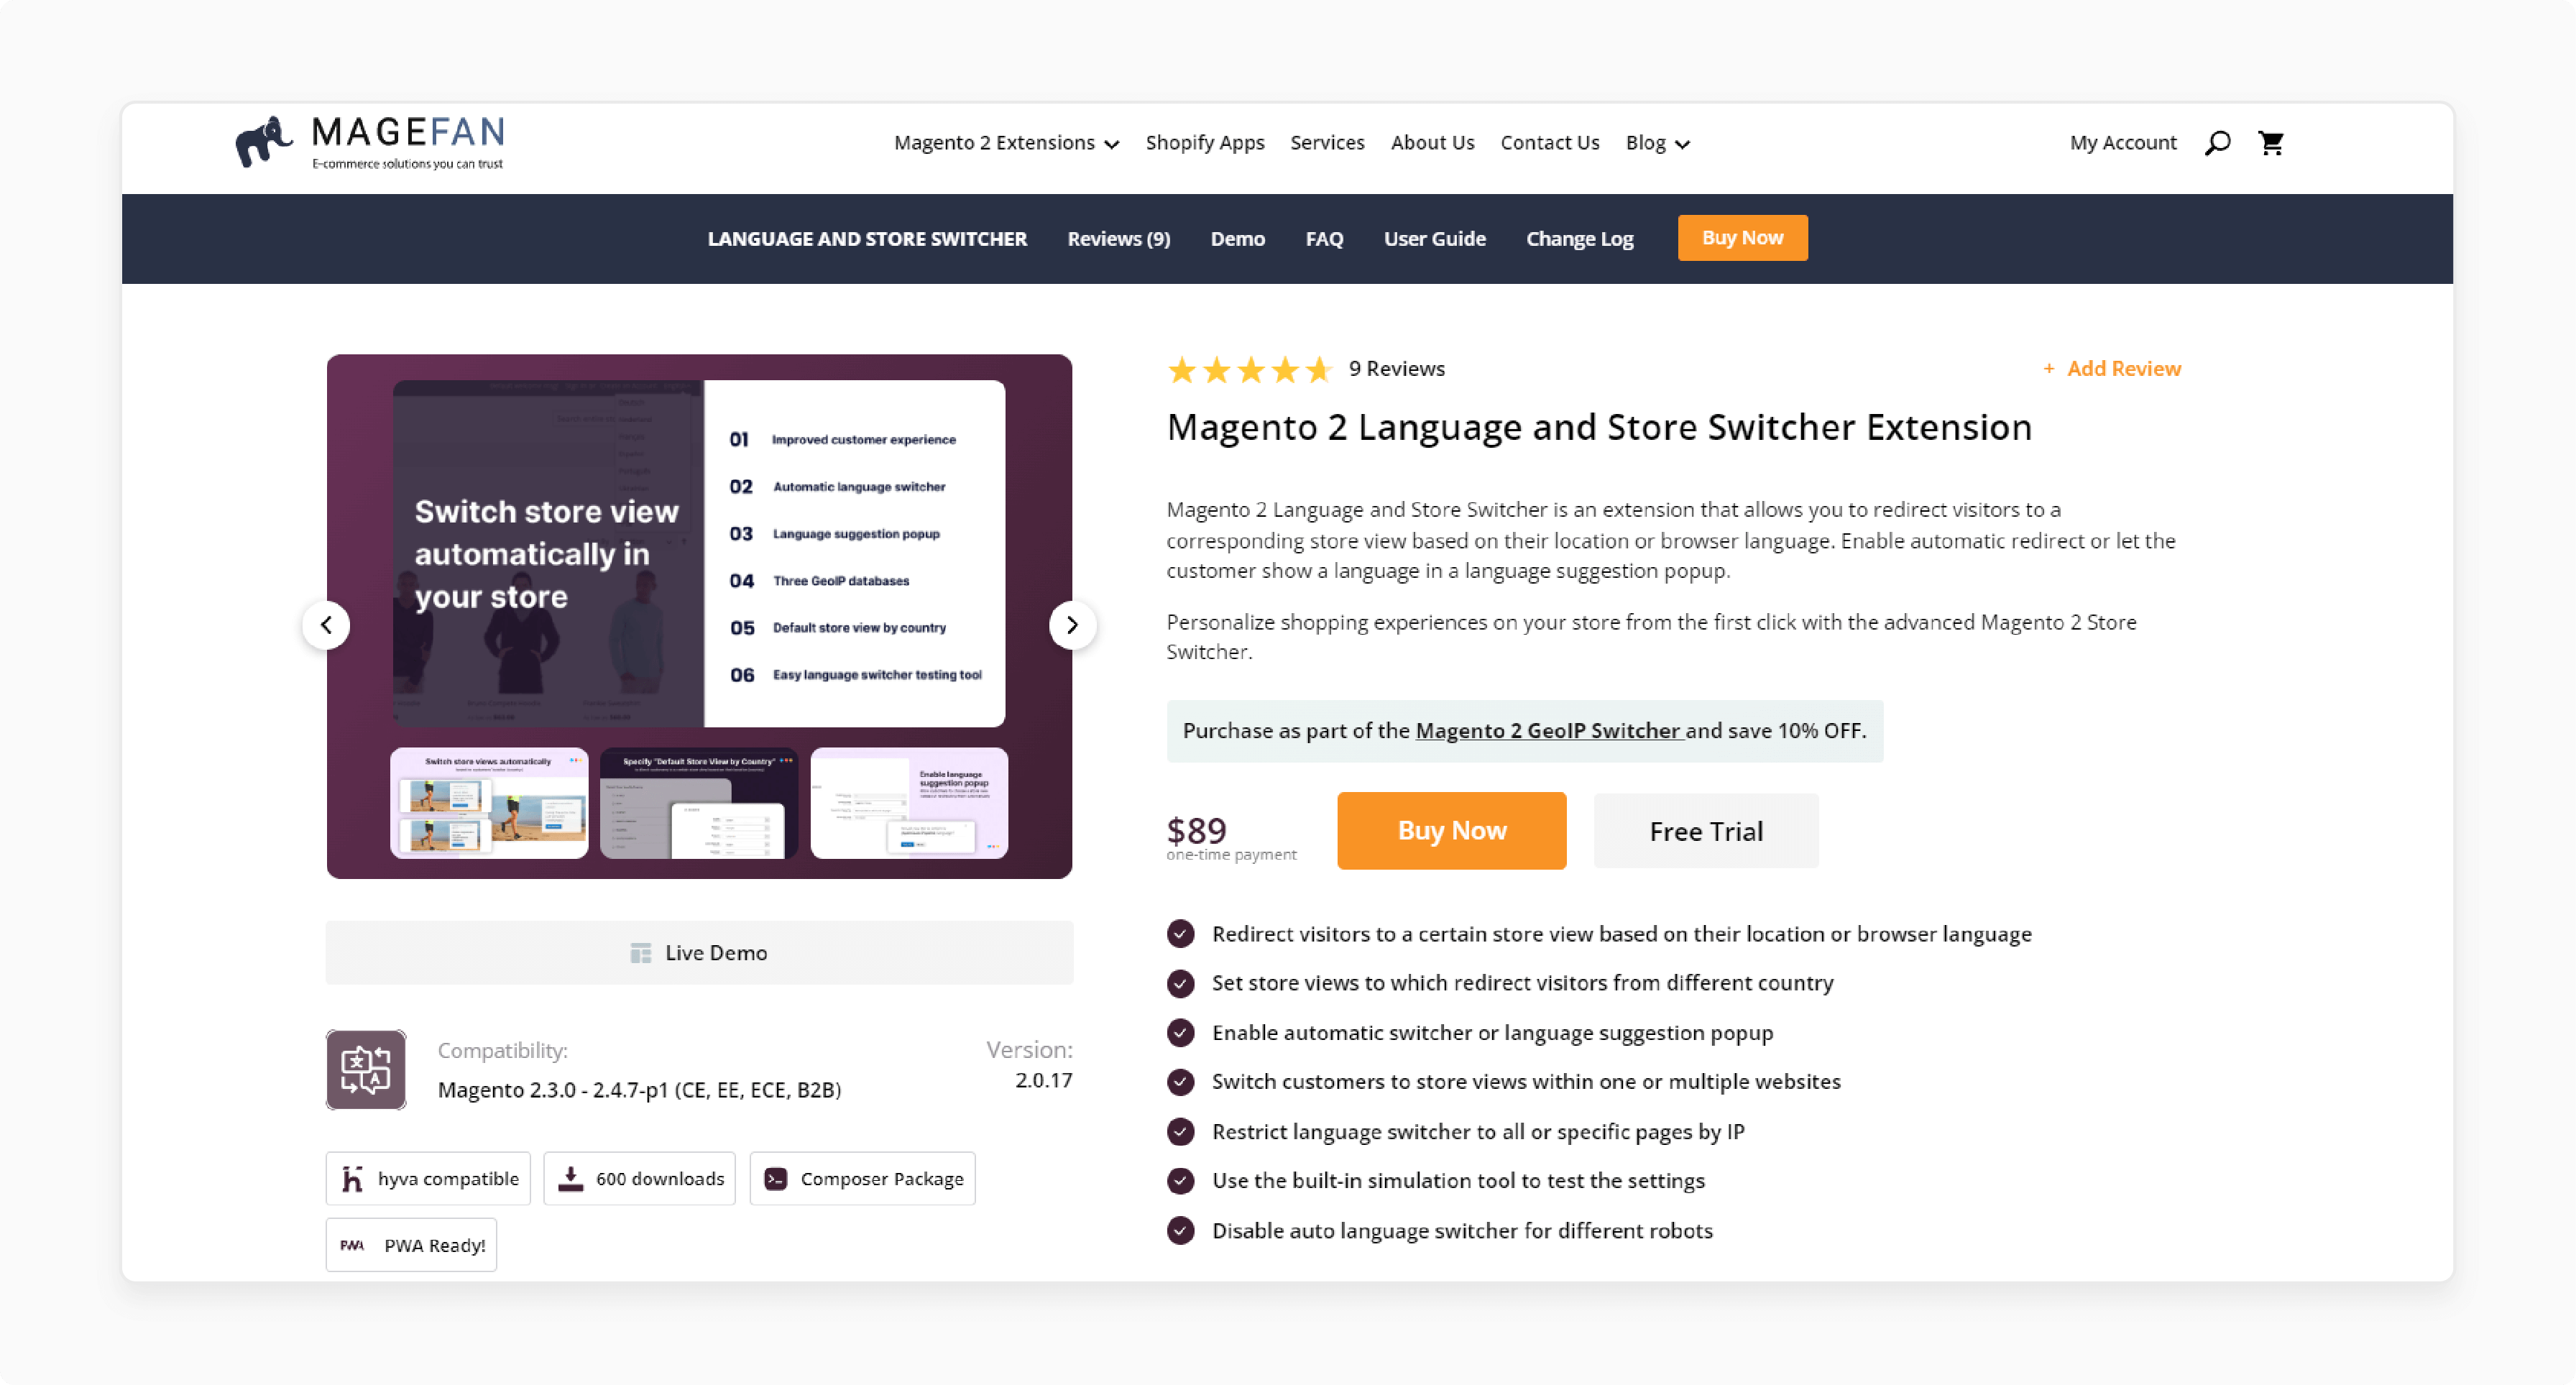
| Details | Explanations |
|---|---|
| Extension Link | MageFan Magento 2 Language and Store Switcher Extension |
| Features | - Redirect visitors based on their location or browser language - Set store views for different countries - Enable automatic switcher or language suggestion popup - Switch customers to store views within one or multiple websites - Restrict language switcher by IP - Use the built-in simulation tool to test settings - Disable auto language switcher for different robots |
| Benefits | The MageFan Magento 2 Language and Store Switcher redirects visitors to a corresponding store view based on location or browser language. It offers personalized shopping experiences from the first click. The extension allows you to set store views for different countries and provides options for automatic switcher or language suggestion popups. |
| Price | $89 (one-time payment) |
FAQs
1. How does the Magento 2 website switcher work?
The Magento 2 website switcher detects a user's location via their IP address. It automatically redirects them to the appropriate store view. It ensures they see content in their preferred language and currency. This process enhances user experience and boosts conversions.
2. Can I customize the store switcher settings?
Yes, you can customize the store switcher settings. You can set rules based on IP addresses, regions, or countries. You can also disable the switcher for specific IPs. It allows for flexible and tailored user experiences.
3. Is it possible to disable the automatic store switcher?
Yes, you can disable the automatic store switcher. You can set it to allow manual store switching via a dropdown. This is useful if you want users to choose their preferred store. You can also restrict the switcher for certain IP addresses.
4. How do I configure multiple stores in Magento 2?
Log in to the Magento Admin Panel and go to Stores > Settings > All Stores. Create websites, stores, and store views by filling in the required fields. Set the base URLs for each store. Ensure you flush the Magento cache after configuration.
5. What are the benefits of using a store switcher extension?
A store switcher extension improves user experience by displaying localized content. It helps with global expansion and market adaptability. It enhances marketing strategies and increases customer satisfaction. It with dedicated Magento hosting also streamlines operations and provides a competitive edge.
Summary
Implementing a Magento 2 website switcher helps businesses to expand globally. It simplifies the process of catering to different markets, allowing you to:
-
Local Adaptation: Helps you to adapt to local languages, currencies, and regulations.
-
Personalized Experience: Enables you to provide a personalized shopping experience for customers.
-
Competitive Edge: Offers a competitive advantage in the global market.
-
Customer Loyalty: Increases customer satisfaction and loyalty.
Opt for managed Magento hosting to integrate website checkers and optimize store expansion.


