Magento 2 Varnish Configuration & Optimization
Varnish Cache is an essential component for improving the performance of your Magento 2 store. This tutorial covers its importance, benefits, and requirements. You’ll get step-by-step instructions for Varnish Cache installation and configuration. We will also discuss verifying Varnish within Magento and checking frequently asked questions.
What is Varnish Cache and Why is it Important for Magento 2?
Varnish Cache is an HTTP accelerator. It is designed to speed up dynamic, content-heavy platforms like Magento 2.
It caches the content served by your web server. It helps to reduce the load and improve page response times.
It enhances user experience and offers increased sales and SERP growth. You get more flexibility and multi-layer server setups.
Requirements for Magento 2 Varnish Cache
Before configuring Varnish Cache in Magento 2, ensure your setup is compatible.
Magento 2 supports Varnish versions 4.x, 5.x, 6.x, and 7.0.
How to Install and Configure Varnish Cache in Magento 2?
Configuring Varnish Cache via the Magento Admin Panel
-
Log in to the Magento Admin as an administrator.
-
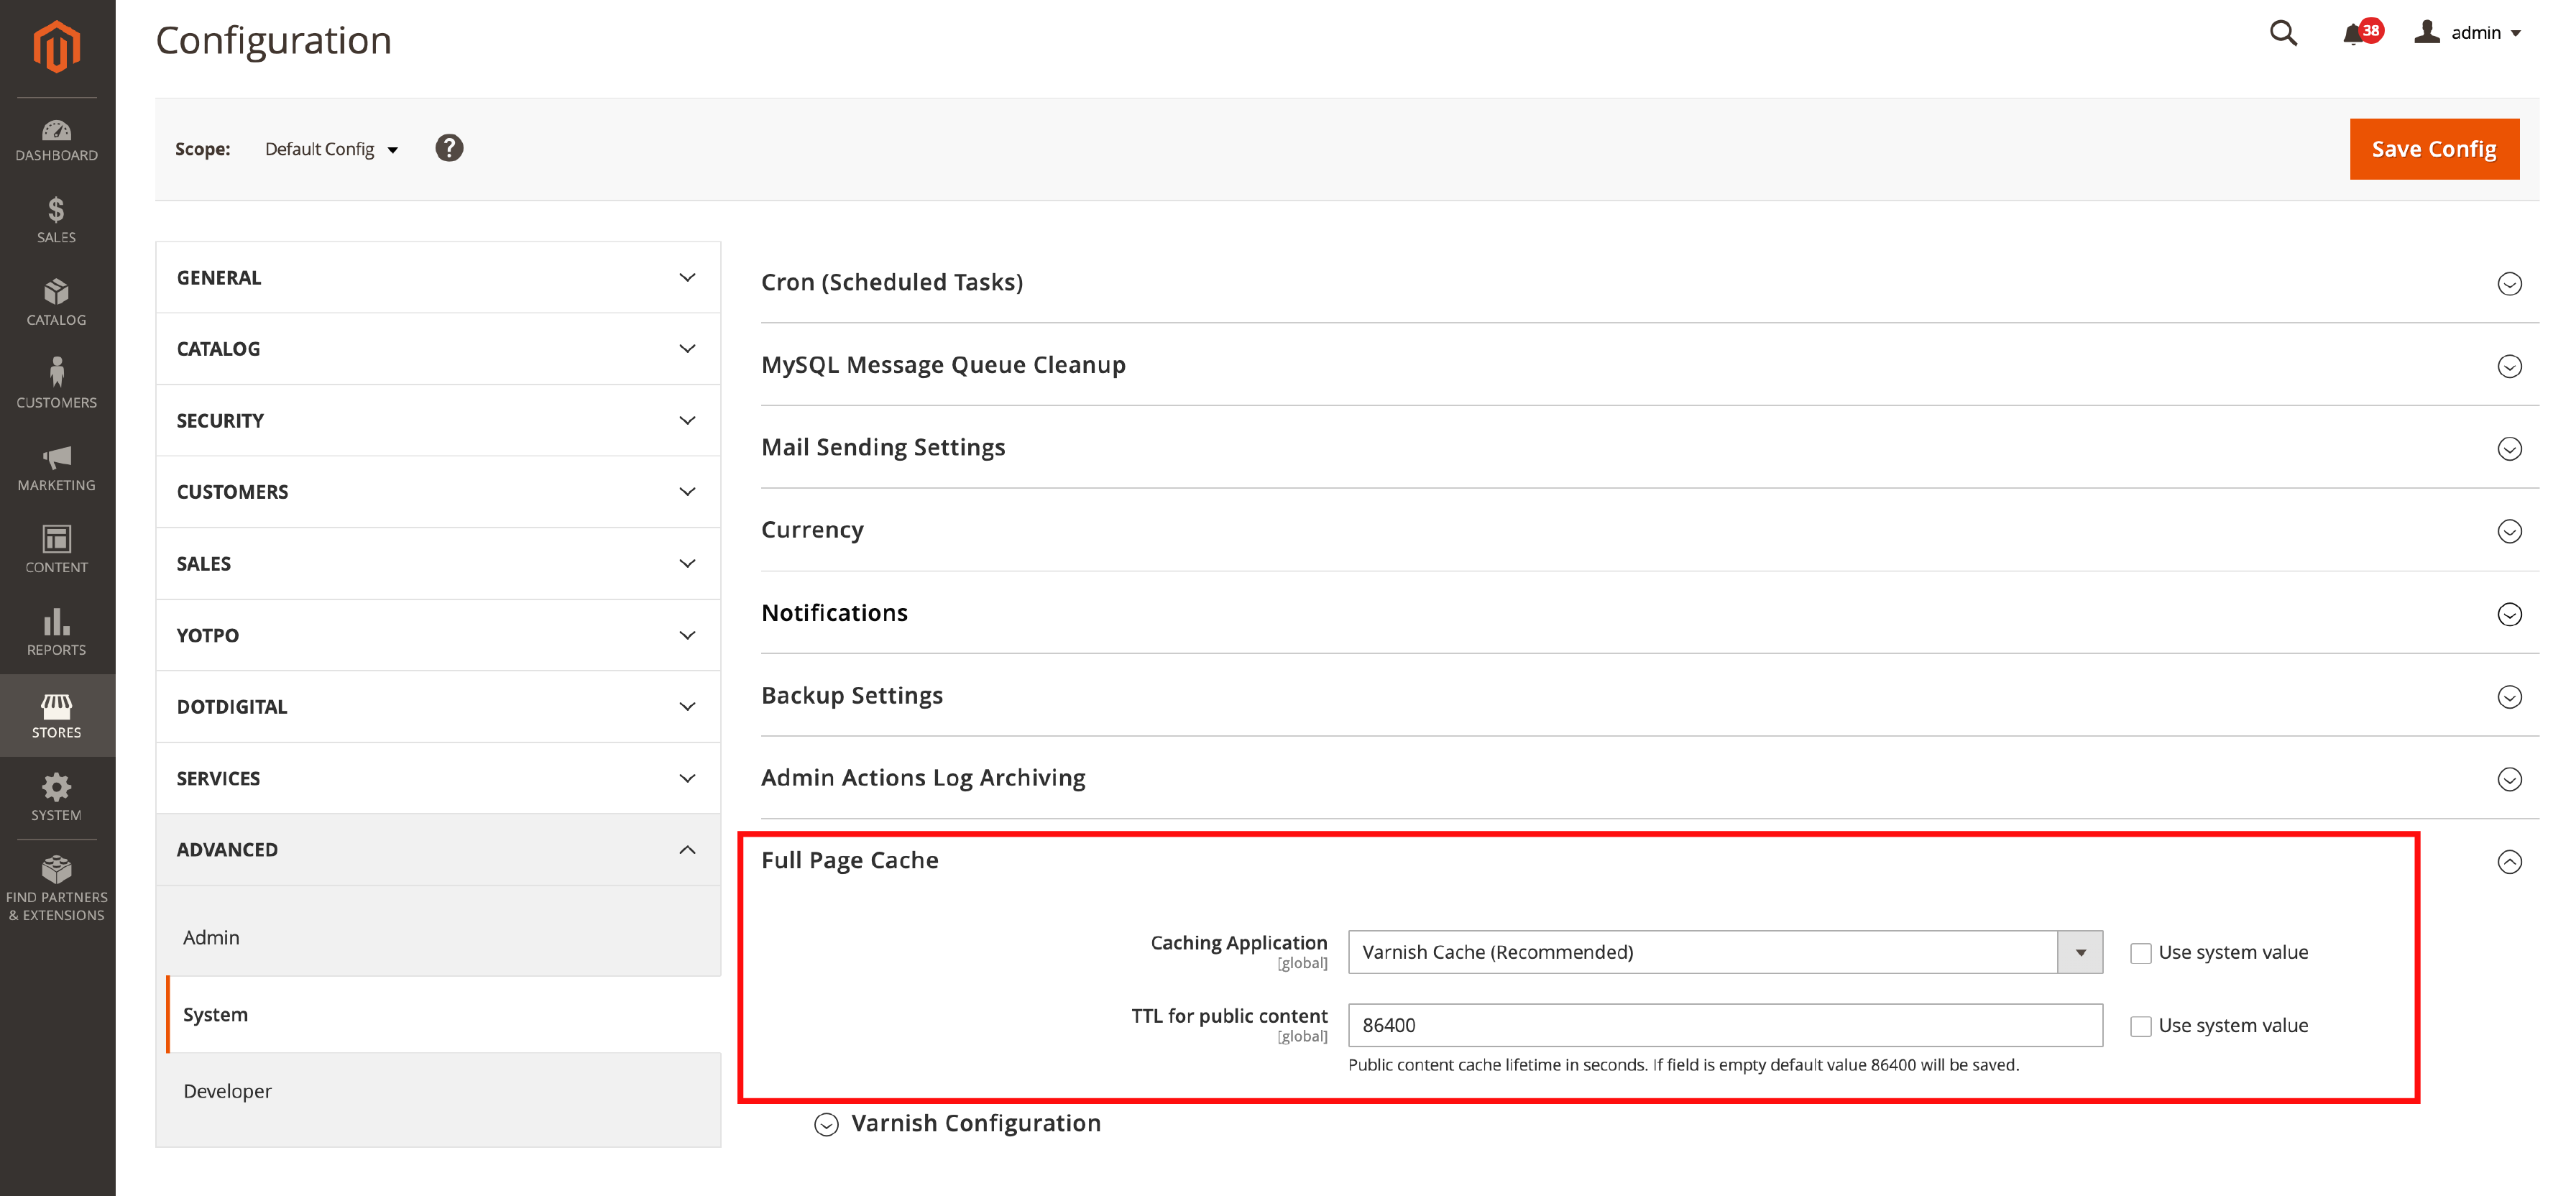
Navigate to Stores > Configuration > Advanced > System > Full Page Cache.

-
From the Caching Application list, select Varnish Caching.
-
Enter a value in the TTL for public content field.
-
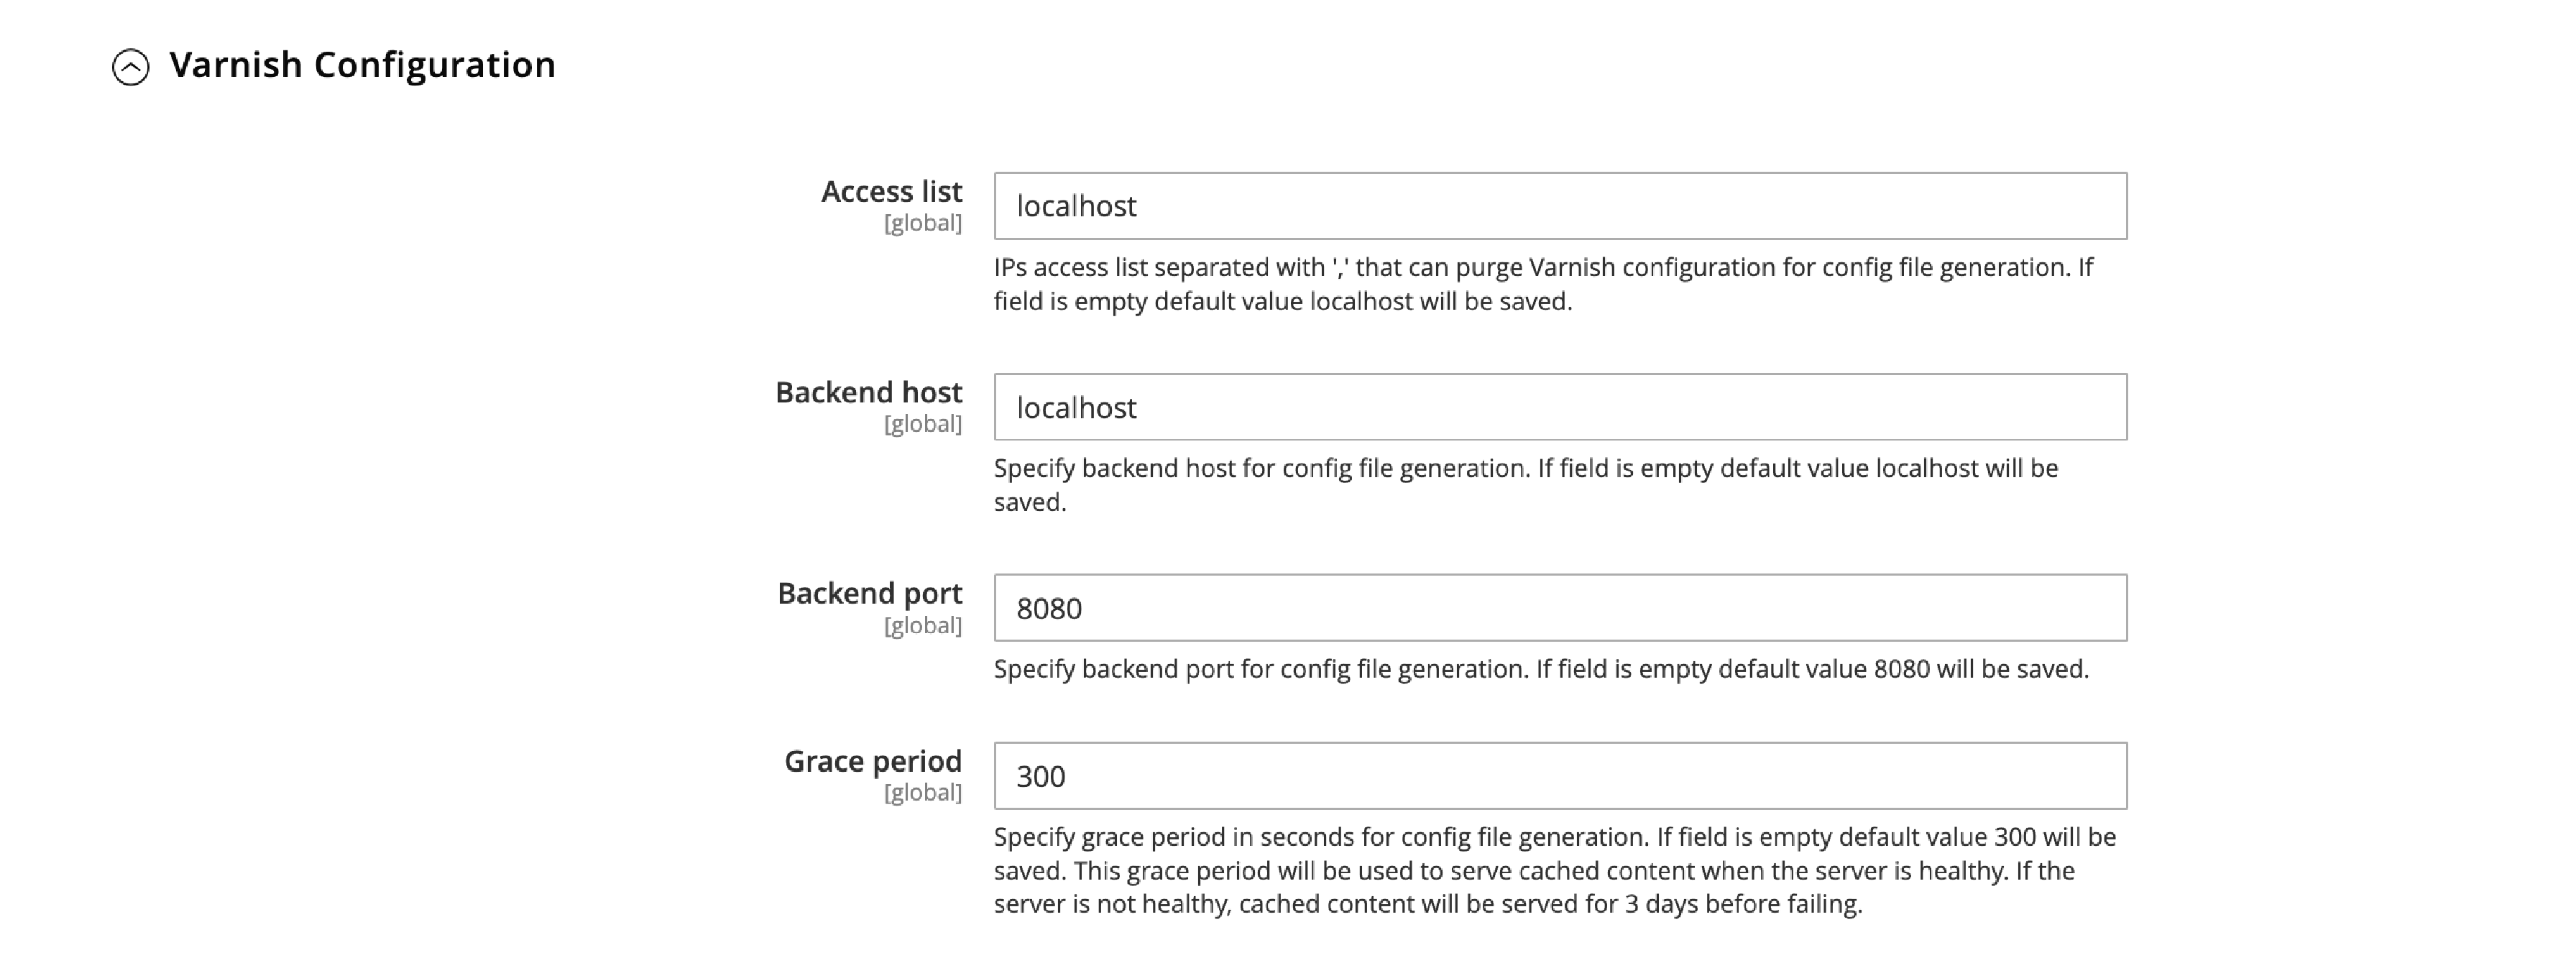
Expand Varnish Configuration and enter the following information:
-
Access list: Enter the fully qualified hostname, IP address, or CIDR notation IP address range for which to invalidate content.
-
Backend host: Enter the fully qualified hostname or IP address and listen port of the Varnish backend or origin server (typically, your web server).
-
Backend port: Enter the origin server's listen port.
-
Grace period: Set the grace period to determine how long Varnish serves stale content if the backend is not responsive (default value is 300 seconds).
-

- Click Save Config.
Configure Varnish Cache Using the Command Line Interface
You can also activate Varnish Cache using the Magento command-line interface tool by executing the following command:
bin/magento config:set --scope=default --scope-code=0 system/full_page_cache/caching_application 2
Frequently Asked Questions
1. Is Varnish Cache free?
Yes, Varnish Cache is an open-source project written in C. The code is available online, and Varnish is free for all projects.
2. How do I know if Varnish Cache is working?
You can verify Varnish functions by inspecting the response headers. It is done using browser developer tools or the cURL command.
Look for the "X-Magento-Cache-Debug:" header; if you see "HIT" in the value, Varnish is working as intended.
Multi-Layer Server Setups with Varnish Cache
In multi-layer server setups, Varnish Cache can be used to create a highly available cluster processing solution.
You can add one or more Varnish servers. It ensures a consistent user experience even in the case of server failure.
When a server fails to respond, Varnish Cache takes over. It serves the cached assets, maintaining the quality of the user experience.
Customizing Varnish Cache Configuration
Varnish Cache allows you to customize its behavior using the Varnish Configuration Language (VCL).
With VCL, you can control how Varnish handles incoming and outgoing requests. It provides greater flexibility and more advanced caching scenarios.
You can tailor the cache to your specific store's requirements and improve overall performance.
Additional Tips for Optimizing Varnish Cache
To further optimize the performance of your Magento 2 store with Varnish Cache, consider the following tips:
- Monitor Varnish Cache performance
Regularly monitor the performance of your Varnish Cache setup. Identify any areas that require optimization or changes.
- Keep Magento and Varnish Cache up-to-date
Ensure you use the latest versions of Magento and Varnish Cache. Updates often include performance improvements and bug fixes.
- Optimize your store's content
Compress images, and minify CSS and JavaScript files. Limit the use of external scripts to reduce the load on your server.
- Implement a Content Delivery Network (CDN)
Using a CDN along with Varnish Cache can further enhance the performance of your Magento 2 store.
It helps in distributing static assets across multiple servers worldwide. You reduce the load on your origin server and improve load times for users in different locations.
Troubleshoot Common Varnish Cache Issues in Magento 2
If you encounter issues with Varnish Cache, consider these troubleshooting tips:
- Clear the cache
If you notice problems with your store's content after configuring Varnish Cache, try clearing the cache manually.
It is done through the Magento Admin. Or you can use the magento cache:clean command via SSH.
- Check your VCL configuration
Ensure that your VCL configuration is correct and up-to-date. Incorrect VCL settings can cause issues with caching and content delivery.
- Verify your server settings
Double-check your server settings, such as backend host and port. Ensure that Varnish Cache correctly communicates with your web server.
- Review error logs
Consult your server's error logs for any issues or messages related to Varnish Cache. It helps gain valuable insight into potential problems and identify solutions.
Advanced Varnish Cache Configuration in Magento 2
In some cases, you may need to implement advanced Varnish Cache. It further enhances your Magento 2 store's performance.
Using Access Lists in Varnish Cache
Access lists in Varnish Cache allow you to control the IP addresses. It shows which IP addresses can perform specific actions, such as purging cached content.
To create an access list, add the following code to your VCL file:
acl purge {
    "localhost";
}
Replace "localhost" with the desired IP addresses or CIDR notation ranges. You can specify multiple IP addresses on separate lines.
Configuring Varnish for HTTPS Traffic
By default, Varnish Cache does not handle HTTPS traffic. To configure Varnish for HTTPS traffic, you must use a reverse proxy, such as NGINX.
Here's a brief outline of the steps required:
-
Install and configure NGINX as a reverse proxy for your Magento 2 store.
-
Configure SSL certificates in NGINX to handle HTTPS traffic.
-
Update your Varnish Cache configuration to work with NGINX.
Exporting VCL for Varnish
To export a Varnish configuration file (VCL) from the Magento Admin panel, follow these steps:
-
Log in to the Magento Admin as an administrator.
-
Navigate to Stores > Settings > Configuration > Advanced > System > Full Page Cache.
-
Click one of your Varnish version's Export VCL buttons.
-
Back up your existing
default.vclfile and replace it with the exportedvarnish.vclfile in the/etc/varnish/directory using the following commands:
cp /etc/varnish/default.vcl /etc/varnish/default.vcl.bak2
mv <download_directory>/varnish.vcl default.vcl
cp <download_directory>/default.vcl /etc/varnish/default.vcl
Summary
This tutorial allows you to install, configure, and verify Varnish Cache in your Magento 2 store.
Implementing Varnish Cache will boost Magento 2 speed, SERP growth, and conversions. Regularly monitoring your Varnish Cache will ensure that your store runs efficiently and provides a great user experience.
Want a well-configured Varnish Cache solution for Magento? Check out the MGT Varnish Cache module for up-to 250x faster Magento!
Get more useful guides and how-tos on the Magento tutorials page.


