
How to Configure Magento 2 UPS Shipping?
Looking to streamline your online store's shipping process? Magento 2 UPS shipping offers a powerful solution. It integrates United Parcel Service directly into your e-commerce platform. The feature allows for seamless shipping rate calculations and label creation.
This tutorial will comprehensively cover how to configure UPS shipping in Magento 2.
Key Takeaways
-
Understand the benefits of using UPS for shipping.
-
Discover how to set up and enable UPS in your store.
-
Get step-by-step guidance on configuring UPS settings.
-
Learn to add tracking numbers and print shipping labels.
-
Find out how to manage shipping rules and handling fees.
-
Explore options for offering free shipping with UPS.
-
Troubleshoot common UPS shipping setup issues.
What is Magento 2 UPS Shipping?
“UPS is a leading shipping carrier for ecommerce businesses. It offers fast, reliable delivery to over 220 countries and territories worldwide.”
Magento 2 UPS shipping is a built-in integration for Magento-based stores. It connects Magento 2 with United Parcel Service (UPS) shipping options. This feature allows store owners to offer UPS shipping methods. Customers can see real-time shipping rates during checkout.
Store owners can print UPS shipping labels directly from Magento. The integration supports both domestic and international shipping services. It also allows for setting up free shipping thresholds.
Magento 2 UPS shipping streamlines the entire shipping process. It saves time and reduces errors in shipping calculations. Store owners can offer various UPS services to customers. These include UPS Ground, UPS Next Day Air, and more. The integration also supports negotiated rates for UPS account holders. It can lead to cost savings for both businesses and customers.
How to Set Up a UPS Account?
1. Registering for a UPS Account
To start, go to ups.com and click "Sign Up". You'll need to provide your name and email. Choose a username and strong password for the account. Agree to the UPS Technology Agreement and click "Sign Up". Check your email and enter the verification code to confirm.
2. Required Information
When setting up your UPS account, you'll need:
-
Your full name and contact details
-
A valid email address for the account
-
A unique username (1-16 characters, no spaces/special characters)
-
A secure password (12-26 characters, mix of letters, numbers, symbols)
-
Agreement to the UPS terms of service
You may also need your UPS shipper number. It identifies your business. If you don't have one yet, you can request a UPS shipping account number separately.
3. Obtaining API Credentials
To access UPS APIs for Magento 2, you'll need:
-
Access Key
-
User ID
-
Password
After creating your UPS account, log in and go to the UPS Developer Kit. Select the API you need and download its documentation. Then request an Access Key, confirming your details. The key will be shown on the confirmation page. Your regular account User ID and Password complete the API credentials.
Step-By-Step Guide To Configuring UPS in Magento 2
Step 1: Open a UPS Shipping Account
-
To offer UPS shipping, first open a UPS account.
-
You need to visit the UPS website and register.
-
Once registered, you will receive UPS credentials. These credentials include a UPS ClientID and Client Secret.
-
Use these credentials to link UPS with your Magento store. It ensures smooth communication between Magento and UPS systems.
Step 2: Enable UPS for Your Store
-
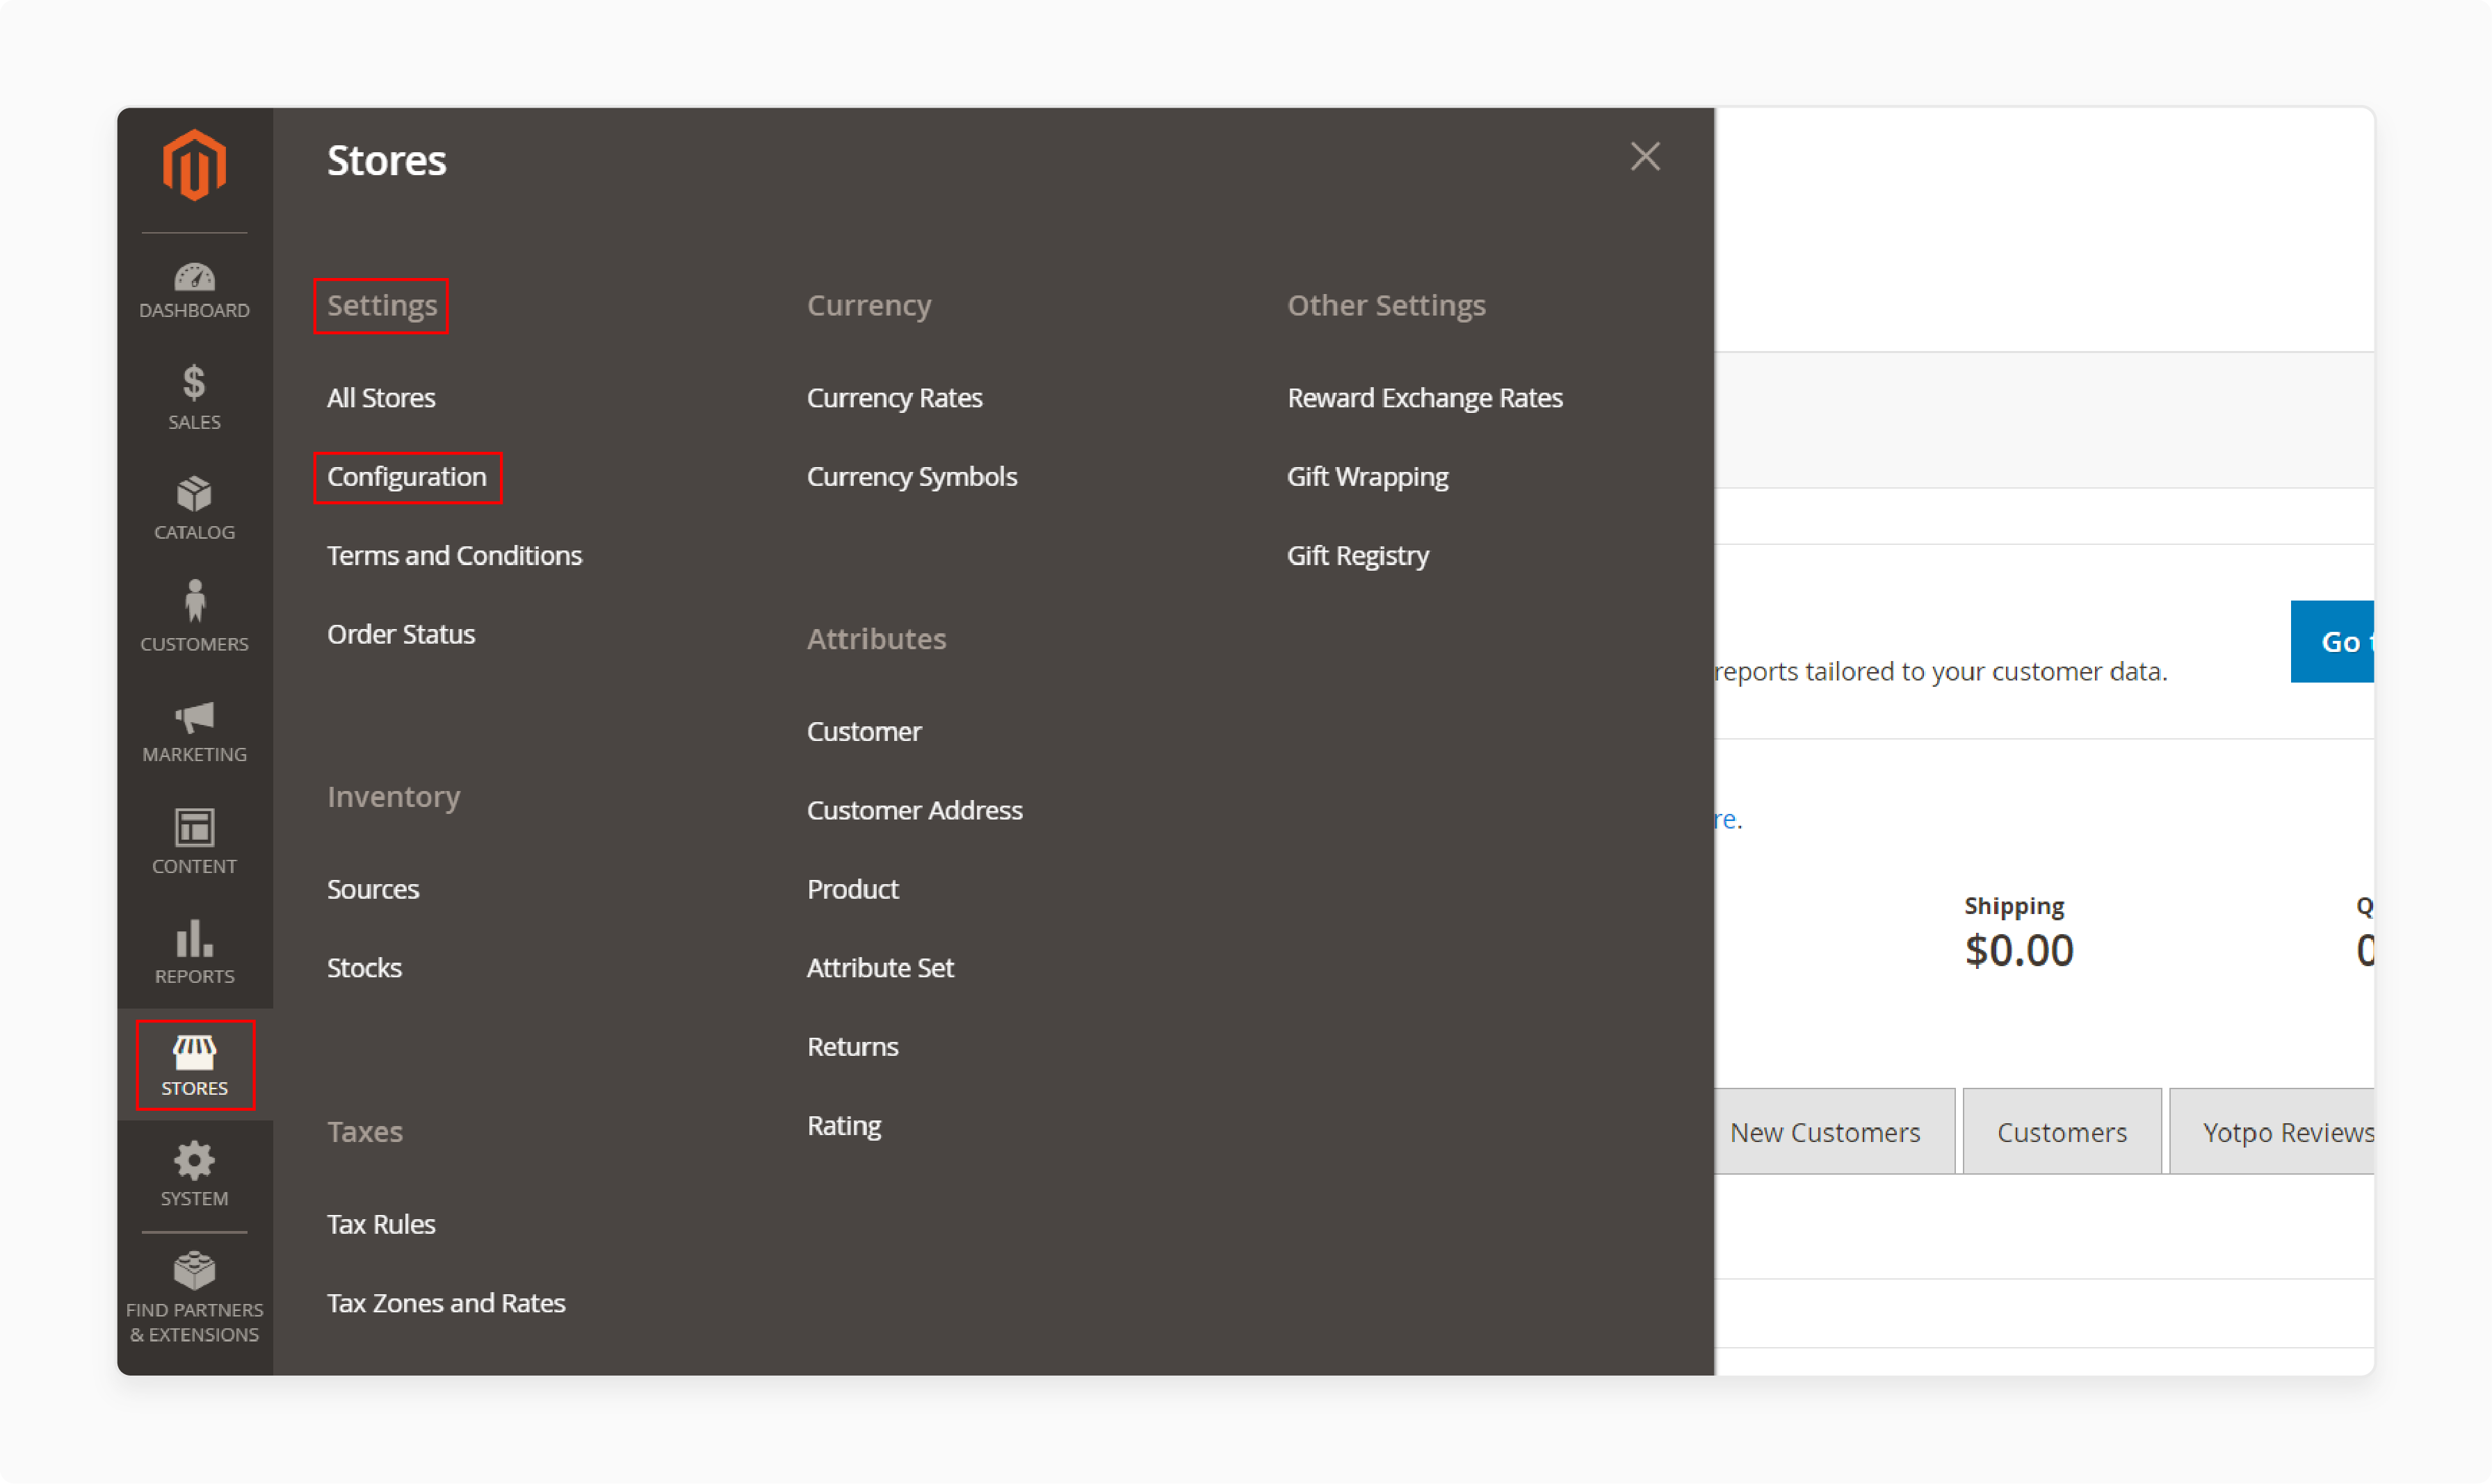
Go to the Admin sidebar in Magento.
-
Navigate to Stores > Settings > Configuration.
-
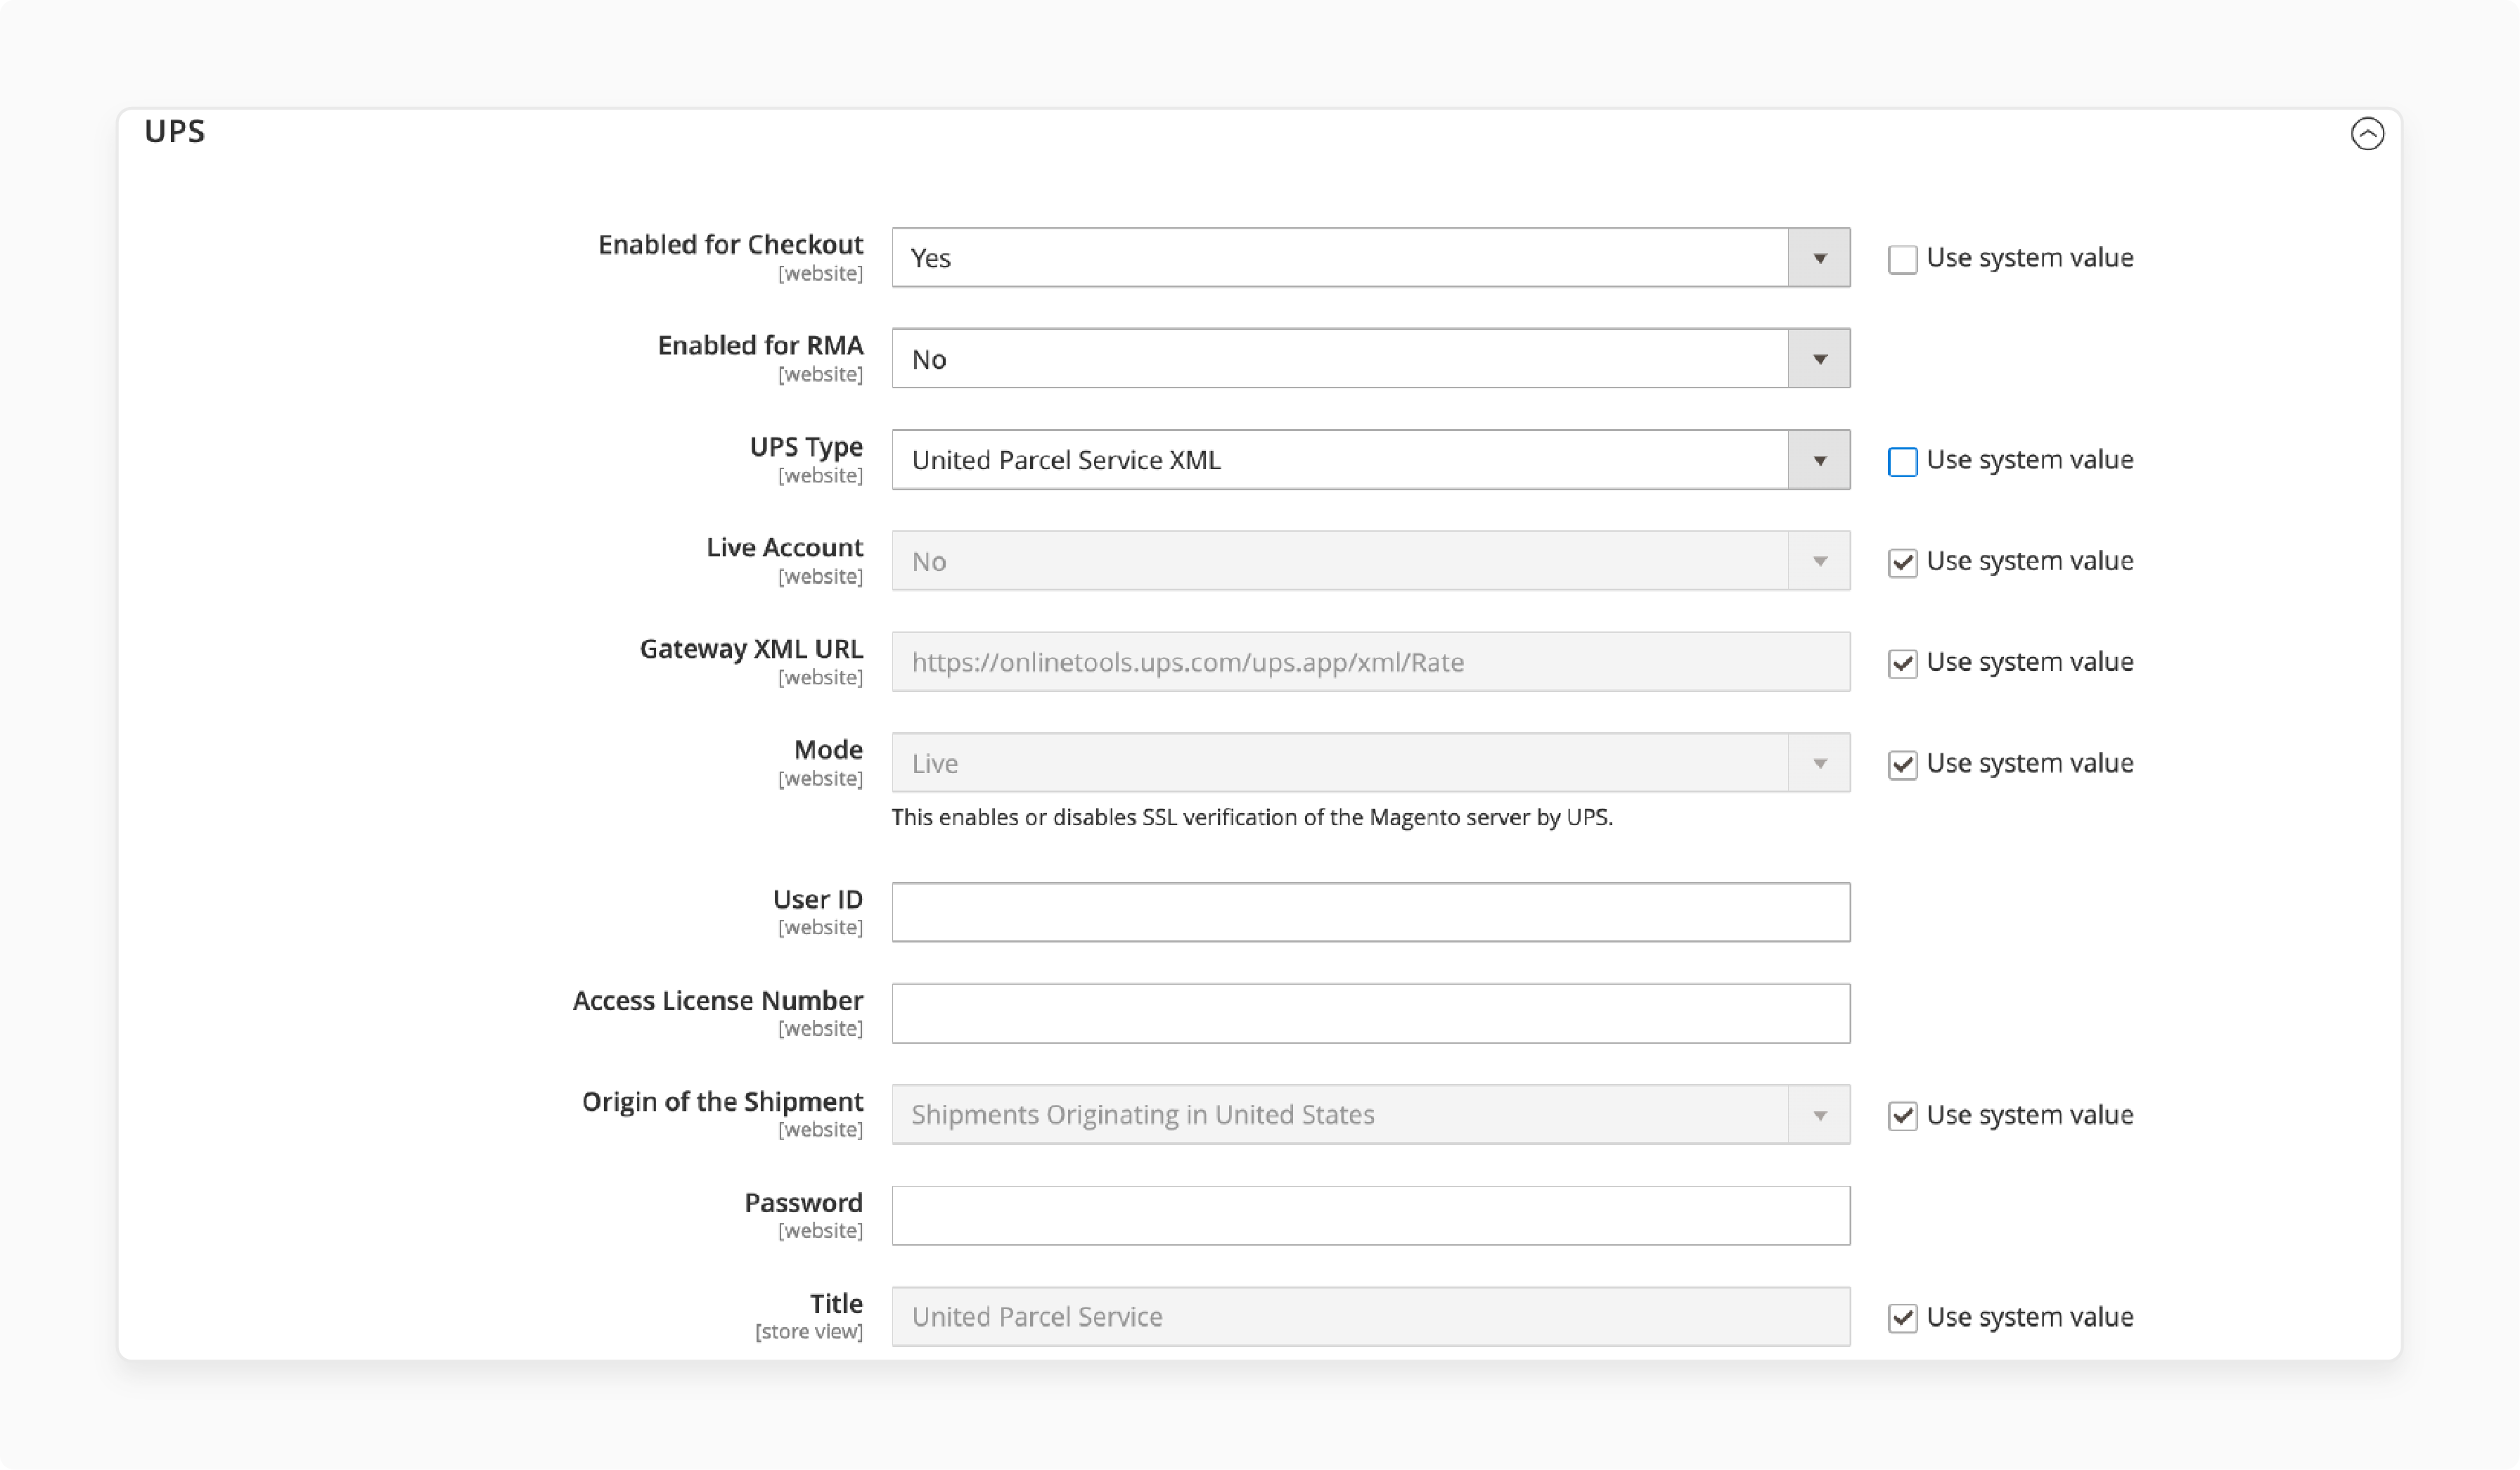
Under Sales, choose Delivery Methods and expand the UPS section.
-
Set Enabled for Checkout to Yes.
-
Enter your UPS credentials: UPS ClientID as User ID and UPS Client Secret as Password.
-
Verify the Gateway URL and Tracking URL to ensure they are correct.
Enabling UPS in your Magento store allows you to start offering UPS shipping options to customers. The step integrates UPS shipping services directly into your checkout process.
Step 3: Complete the Container Description
-
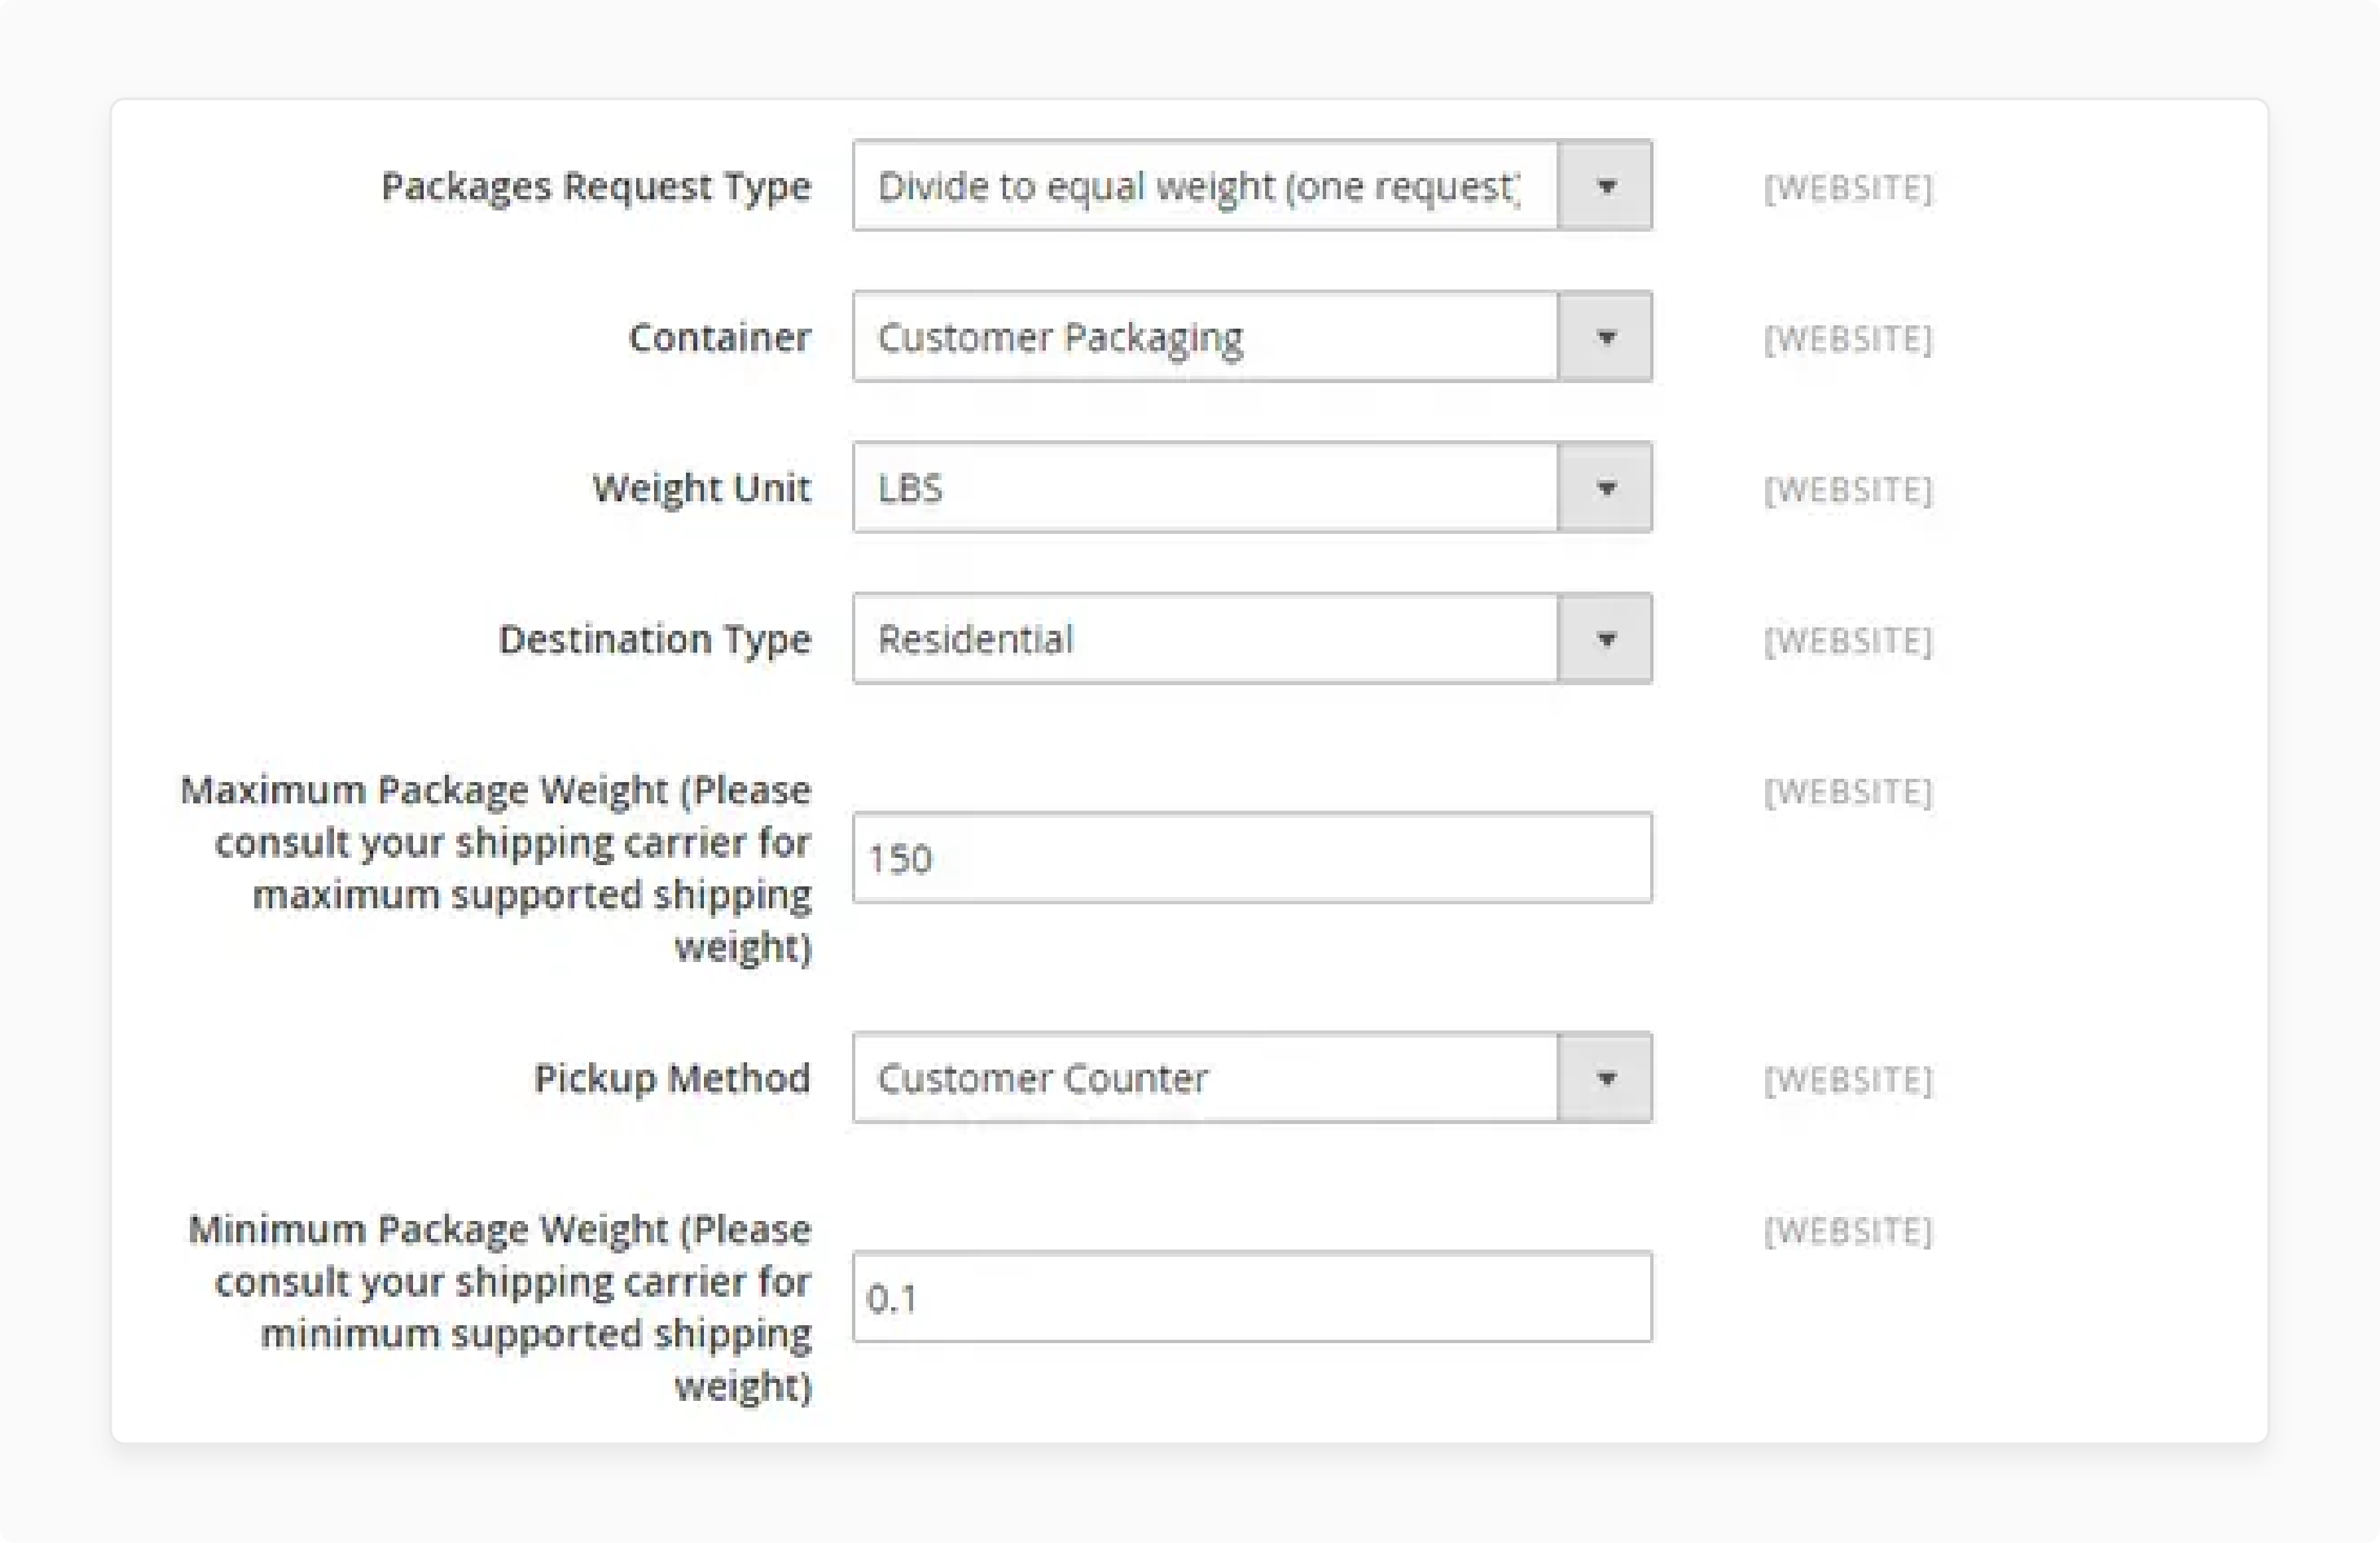
Specify the typical packaging types used for shipments.
-
Choose from multiple options. Options include UPS Letter Envelope, UPS Express Box, or Customer Supplied Package.
-
Set the Weight Unit to either LBS or KGS.
-
Define the Destination Type as Residential or Commercial.
-
Enter the Maximum and Minimum Package Weight allowed by UPS.
Defining container types and weights helps ensure accurate shipping costs and options. Customers can see exact shipping details based on their chosen package.
Step 4: Set Up Handling Fees

-
Configure handling fees if you want to charge extra for shipping.
-
Set Calculate Handling Fee to Fixed or Percent.
-
Determine how the fee is applied: Per Order or Per Package.
-
Enter the amount of the Handling Fee.
-
The fee is added to the UPS shipping cost during checkout.
Adding a handling fee can help cover additional shipping costs. It ensures you are not losing money on shipping charges.
Step 5: Specify Allowed Methods and Applicable Countries
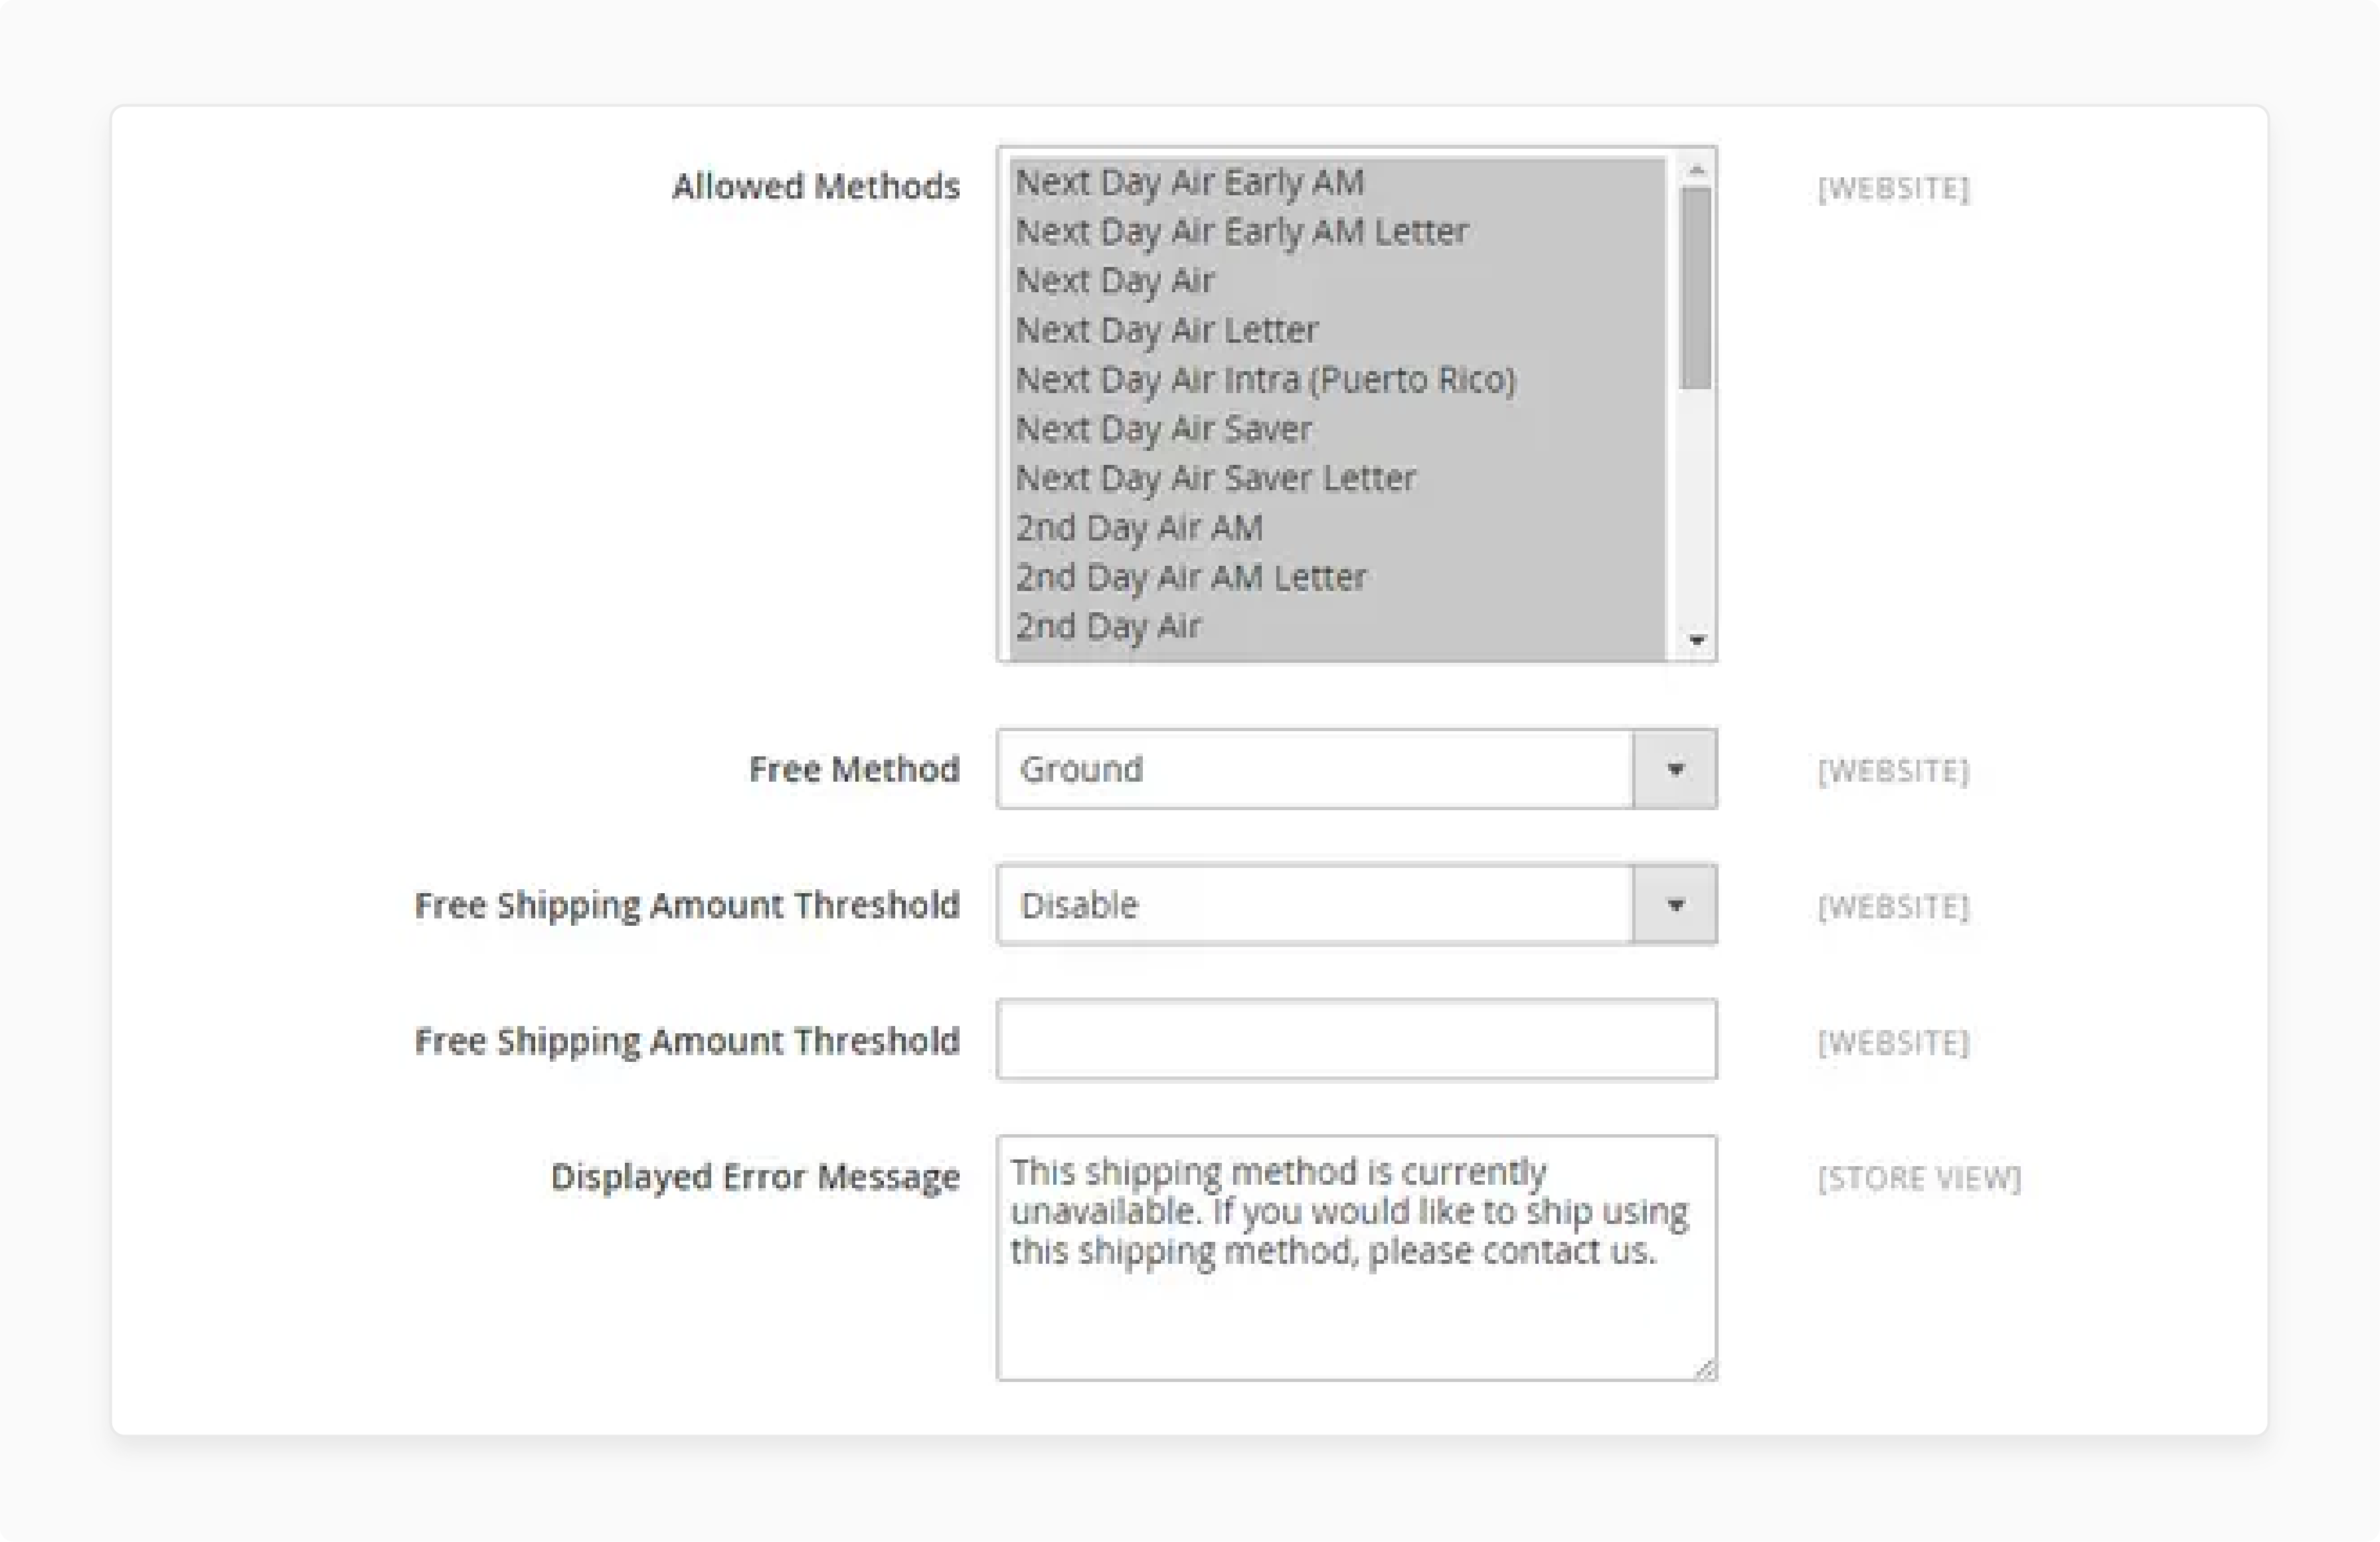
Choose the UPS shipping methods you want to offer. These methods will appear during checkout.
-
To select multiple methods, hold down the Ctrl key (PC) or the Command key (Mac).
-
Set Free Method to offer free shipping if desired.
-
Define the Free Shipping Amount Threshold to qualify orders for free shipping.
Offering various UPS shipping methods gives customers more choices. Setting free shipping thresholds can encourage larger orders.
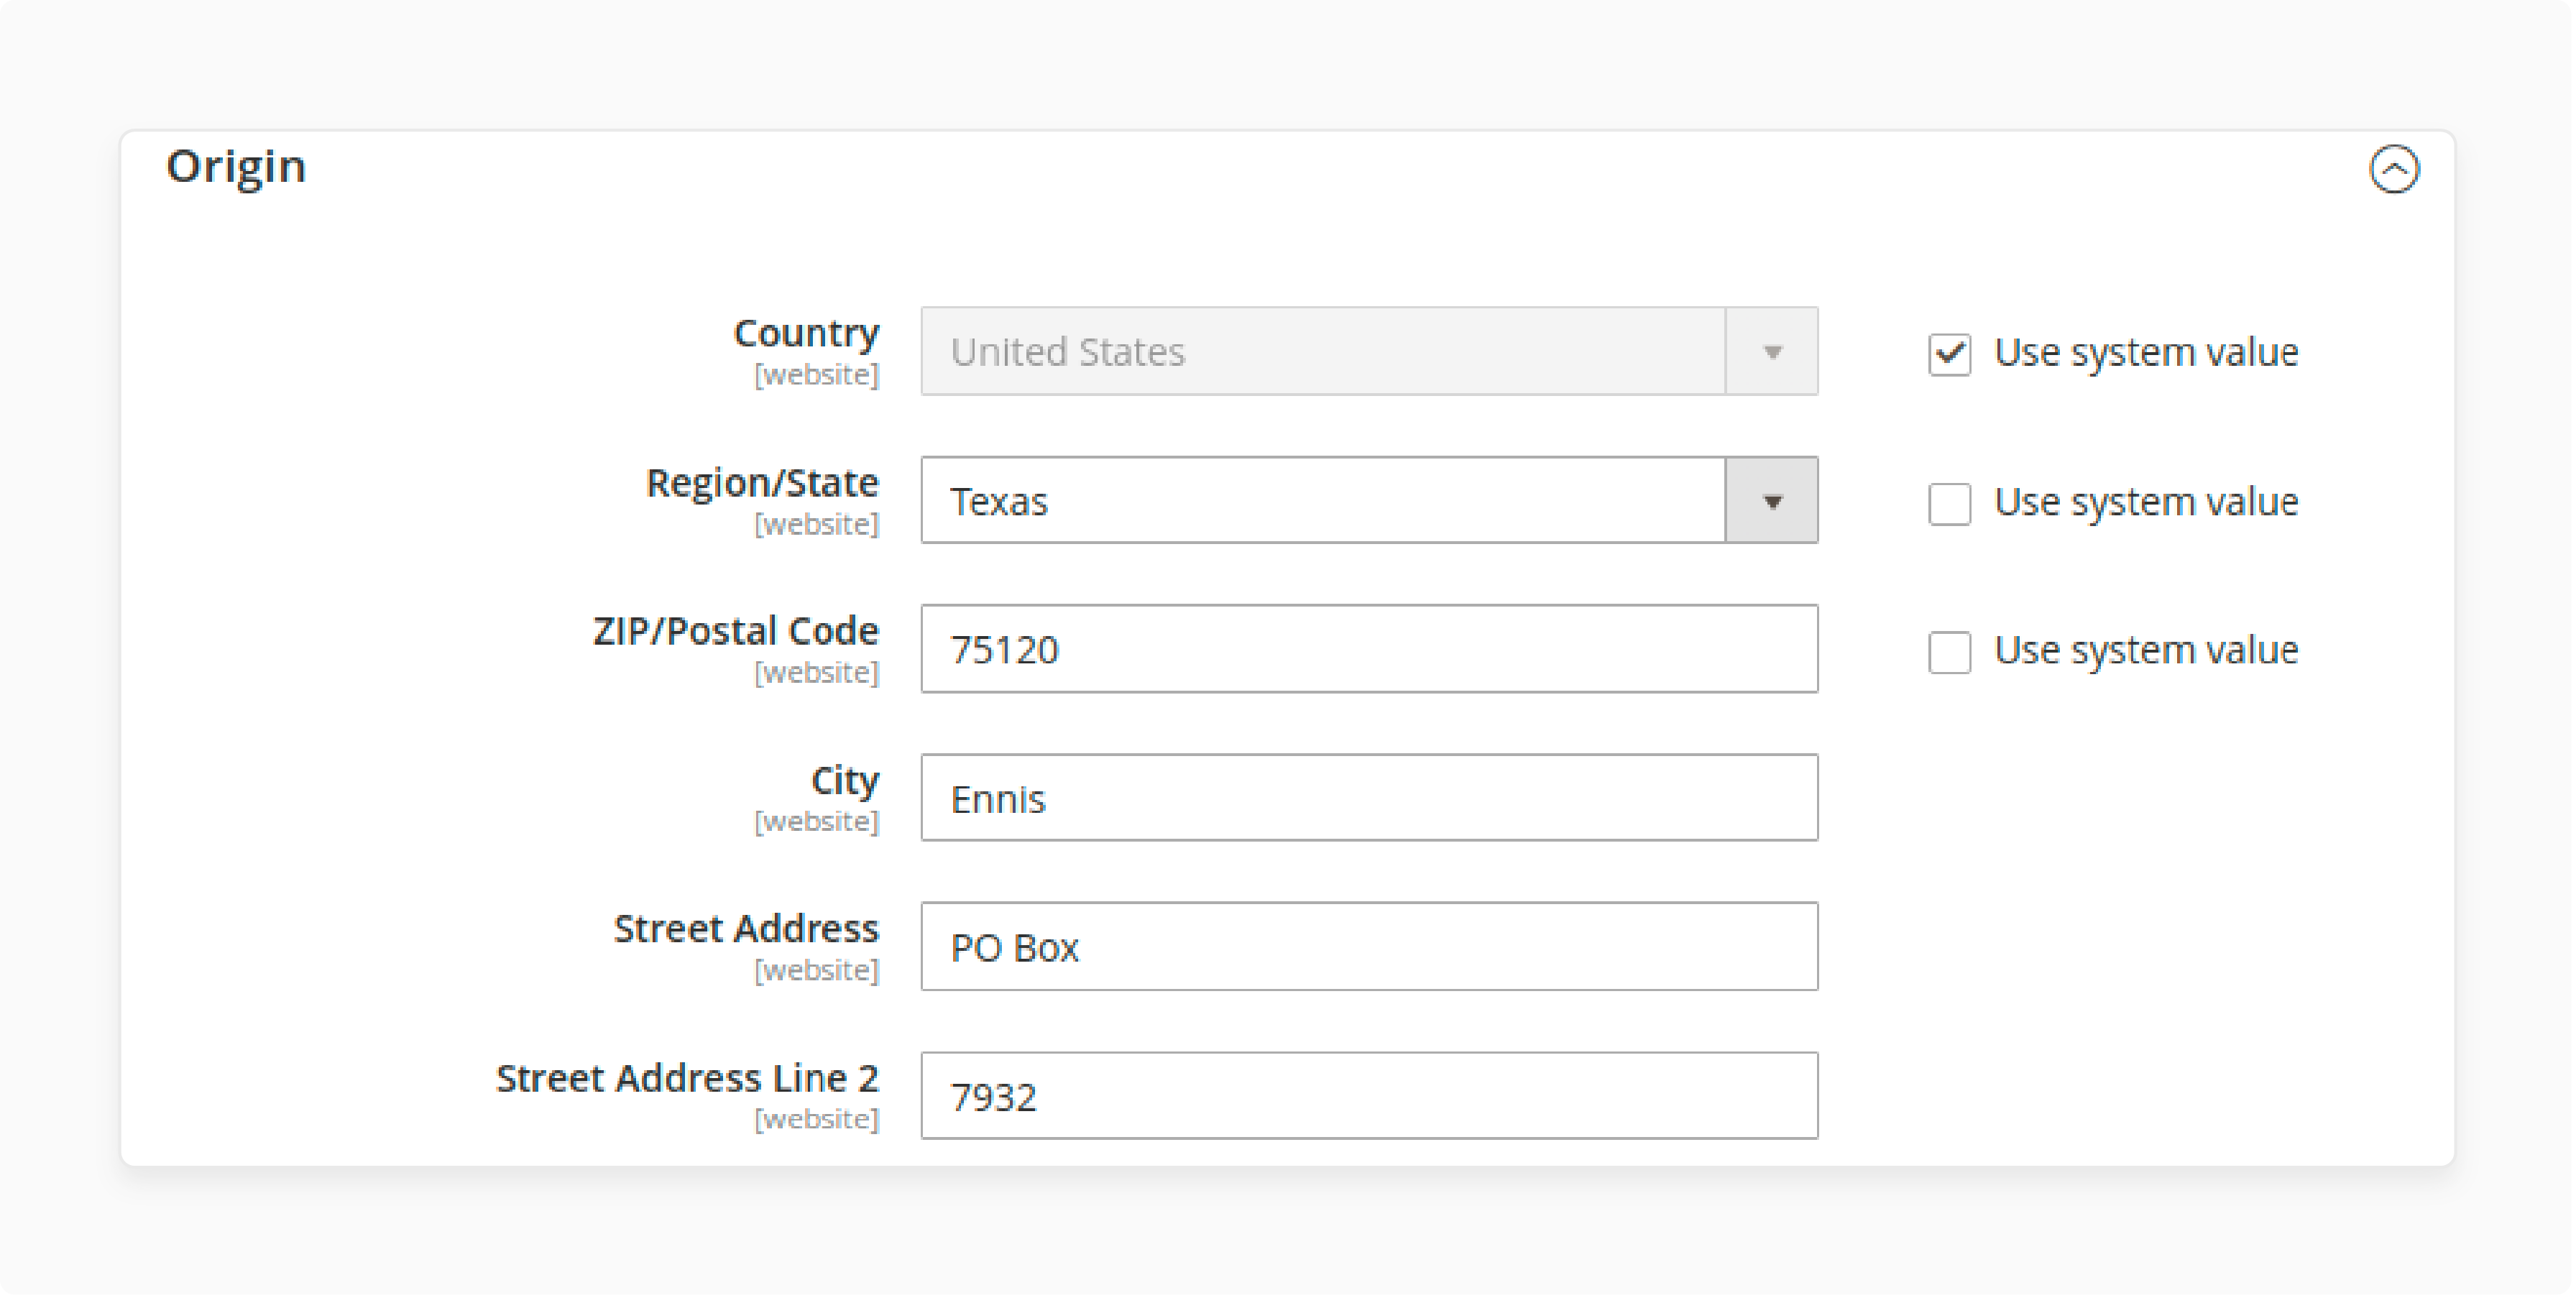
Step 6: Set Up Shipping Origin Address
-
Ensure your Store Information is complete.
-
Go to Stores > Settings > Configuration in the Admin sidebar.
-
Expand Origin under Shipping Settings.
-
Enter the shipping origin address. The address is used to calculate shipping costs accurately.
Providing a correct shipping origin address ensures accurate shipping rates. It helps customers see the correct shipping cost based on their location.
Step 7: Configure UPS Rates and Services

Enable negotiated rates if you have special rates with UPS.
-
Set Enable Negotiated Rates to Yes.
-
Enter your six-digit Shipper Number assigned by UPS. It allows you to offer discounted rates to your customers.
-
Set up different UPS services like UPS Ground, UPS 2nd Day Air, or UPS Worldwide Express.
Using negotiated rates can make your shipping options more competitive. Customers appreciate lower shipping costs. It leads to retained userbases.
Step 8: Enable Order Tracking
-
Set up order tracking for UPS shipments.
-
Enter the Tracking URL provided by UPS. The URL allows customers to track their orders.
-
Ensure the tracking information is accurate and updated.
Order tracking provides transparency and trust. Customers can easily check the status of their shipments.
Step 9: Set Shipping Rules and Restrictions
-
Define shipping rules based on order value, weight, or destination.
-
Set restrictions for specific countries or regions. Use these rules to control shipping options and costs.
-
Ensure that the shipping rules align with your business policies.
Shipping rules help manage costs and logistics. They ensure that shipping options are suitable for different order types.
Step 10: Print UPS Shipping Labels
-
Enable the option to print UPS shipping labels directly from Magento. The feature saves time and ensures accuracy.
-
Set up the required printer settings.
-
Ensure the labels comply with UPS standards.
Printing shipping labels directly streamlines the shipping process. It reduces errors and speeds up order fulfillment.
Step 11: Configure Free Shipping Options
Set up free shipping options for qualifying orders:
-
Define the minimum order amount for free shipping.
-
Enable Free Shipping Threshold and enter the required amount. It encourages customers to place larger orders.
Free shipping is a powerful incentive. It can increase average order value and customer satisfaction.
Step 12: Set Up Domestic and International Shipping Services
-
Define different rates and services for each.
-
Use UPS's extensive network to provide reliable shipping options.
-
Ensure that international shipping complies with customs regulations.
Providing international shipping expands your market reach. Customers from different countries can easily order from your store.
Step 13: Enable UPS Integration
-
Verify the API settings and connections.
-
Use a secure connection for data transfer.
-
Ensure that the integration is up-to-date with the latest UPS standards.
A seamless UPS integration ensures smooth shipping operations. It allows for accurate rate calculations and efficient order processing.
Step 14: Set Shipping Cost Calculation Methods
-
Choose how to calculate shipping costs.
-
Options include weight-based, flat rate, or table rates.
-
Ensure the chosen method aligns with your business model.
-
Adjust settings as needed for accuracy.
Accurate shipping cost calculation prevents overcharging or undercharging. It provides transparency for customers during checkout.
Step 15: Manage Shipping Labels and Tracking Numbers
-
Ensure that shipping labels and tracking numbers are correctly assigned.
-
Use the Magento Admin panel to manage this process.
-
Verify that tracking information is updated regularly.
Proper shipping labels management and tracking numbers enhance customer experience. It ensures orders are delivered accurately and on time.
Step 16: Finalize Configuration and Testing
After setting up all configurations, perform thorough testing:
-
Ensure that all settings work correctly.
-
Test different scenarios to verify accuracy.
-
Make any necessary adjustments based on test results.
How to Add UPS Tracking and Customer Notifications For Magento 2 Shipping?
1. Add UPS Tracking Numbers to Magento Shipments
-
When creating a shipment in Magento 2, you can add a UPS tracking number.
-
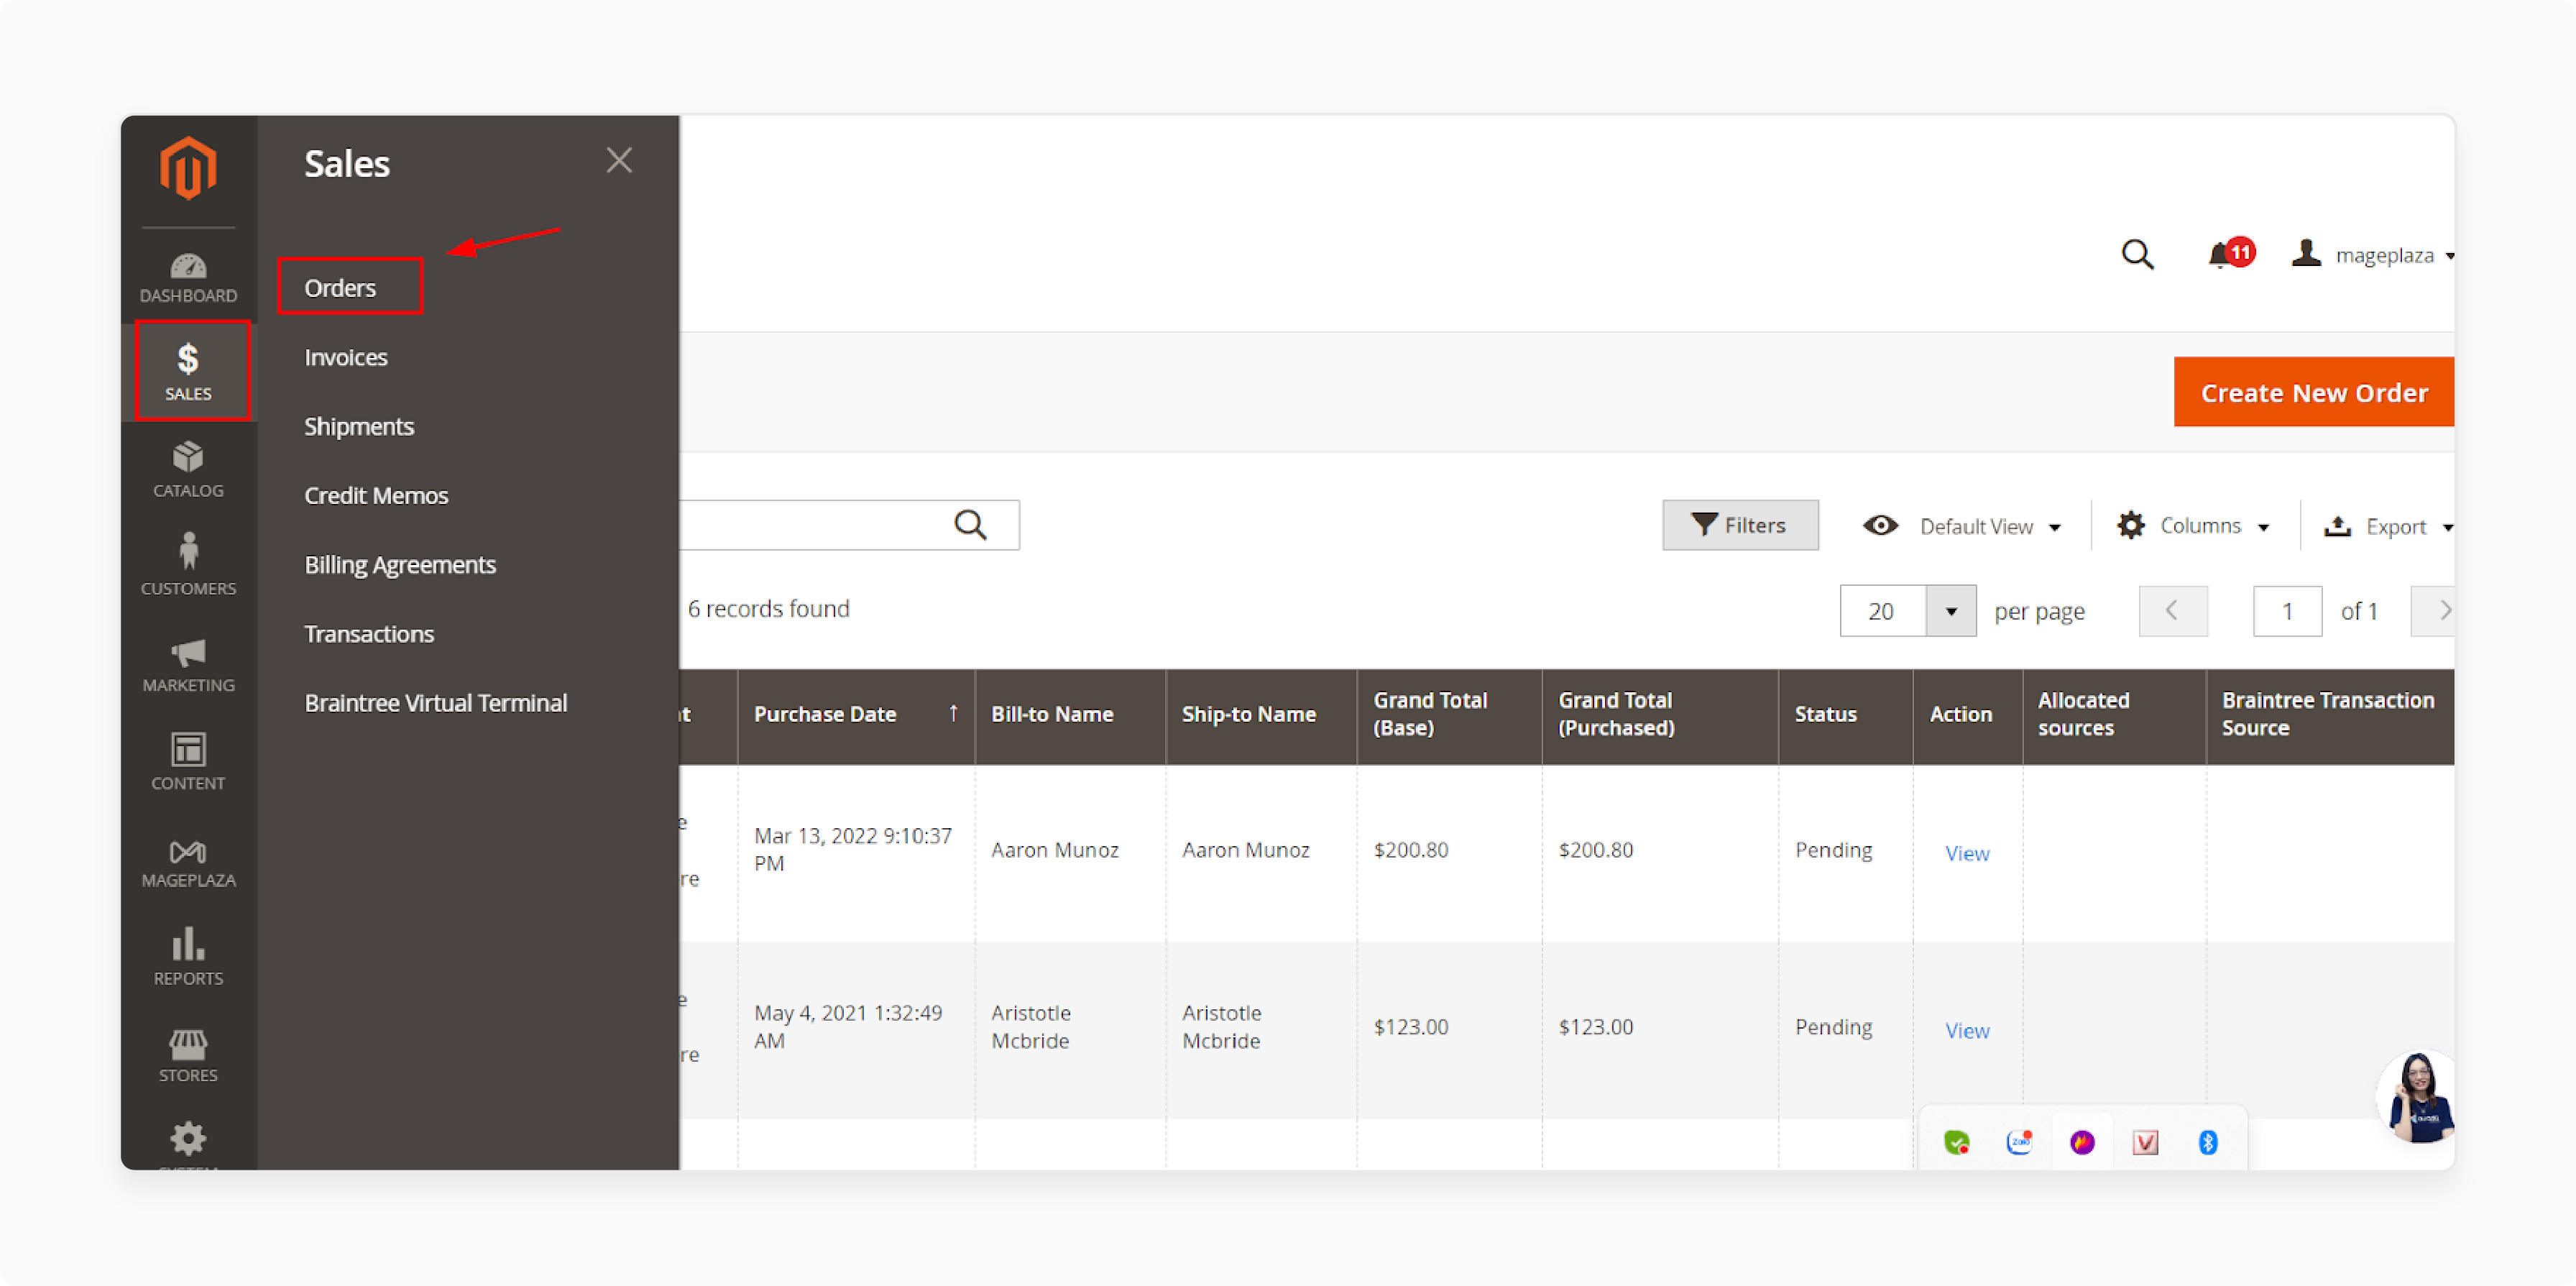
Navigate to Sales > Orders in the Magento admin panel.
-
Select the order you want to ship and click "Ship."
-
On the shipment creation page, enter the tracking number under the "Tracking Information" section.
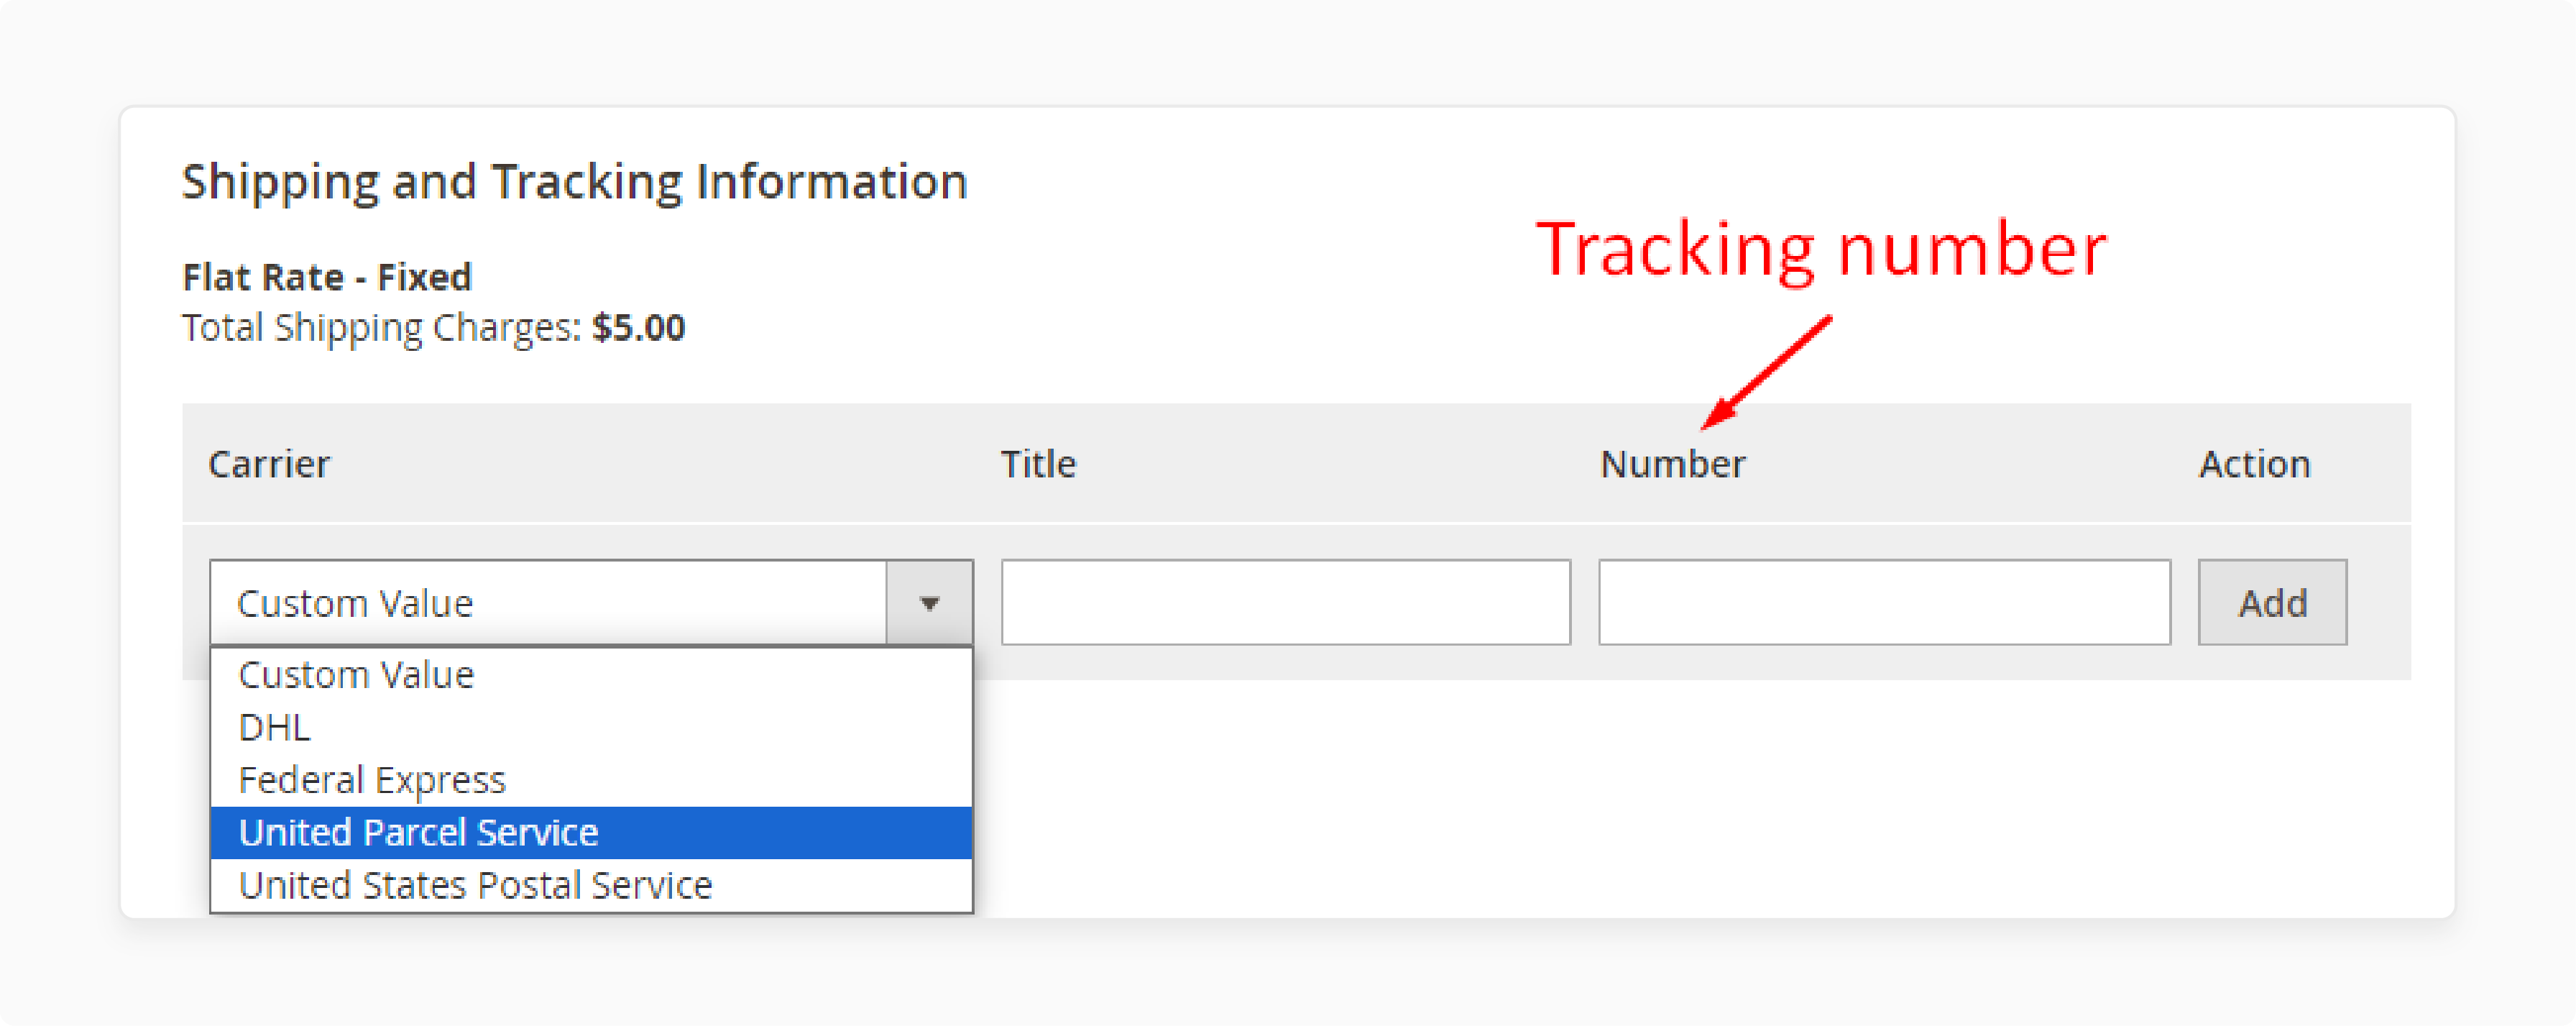
- Choose "UPS" as the carrier and enter the tracking number provided by UPS.
- Save the shipment to attach the tracking number to the order.
2. Configure Customer Email Notifications
-
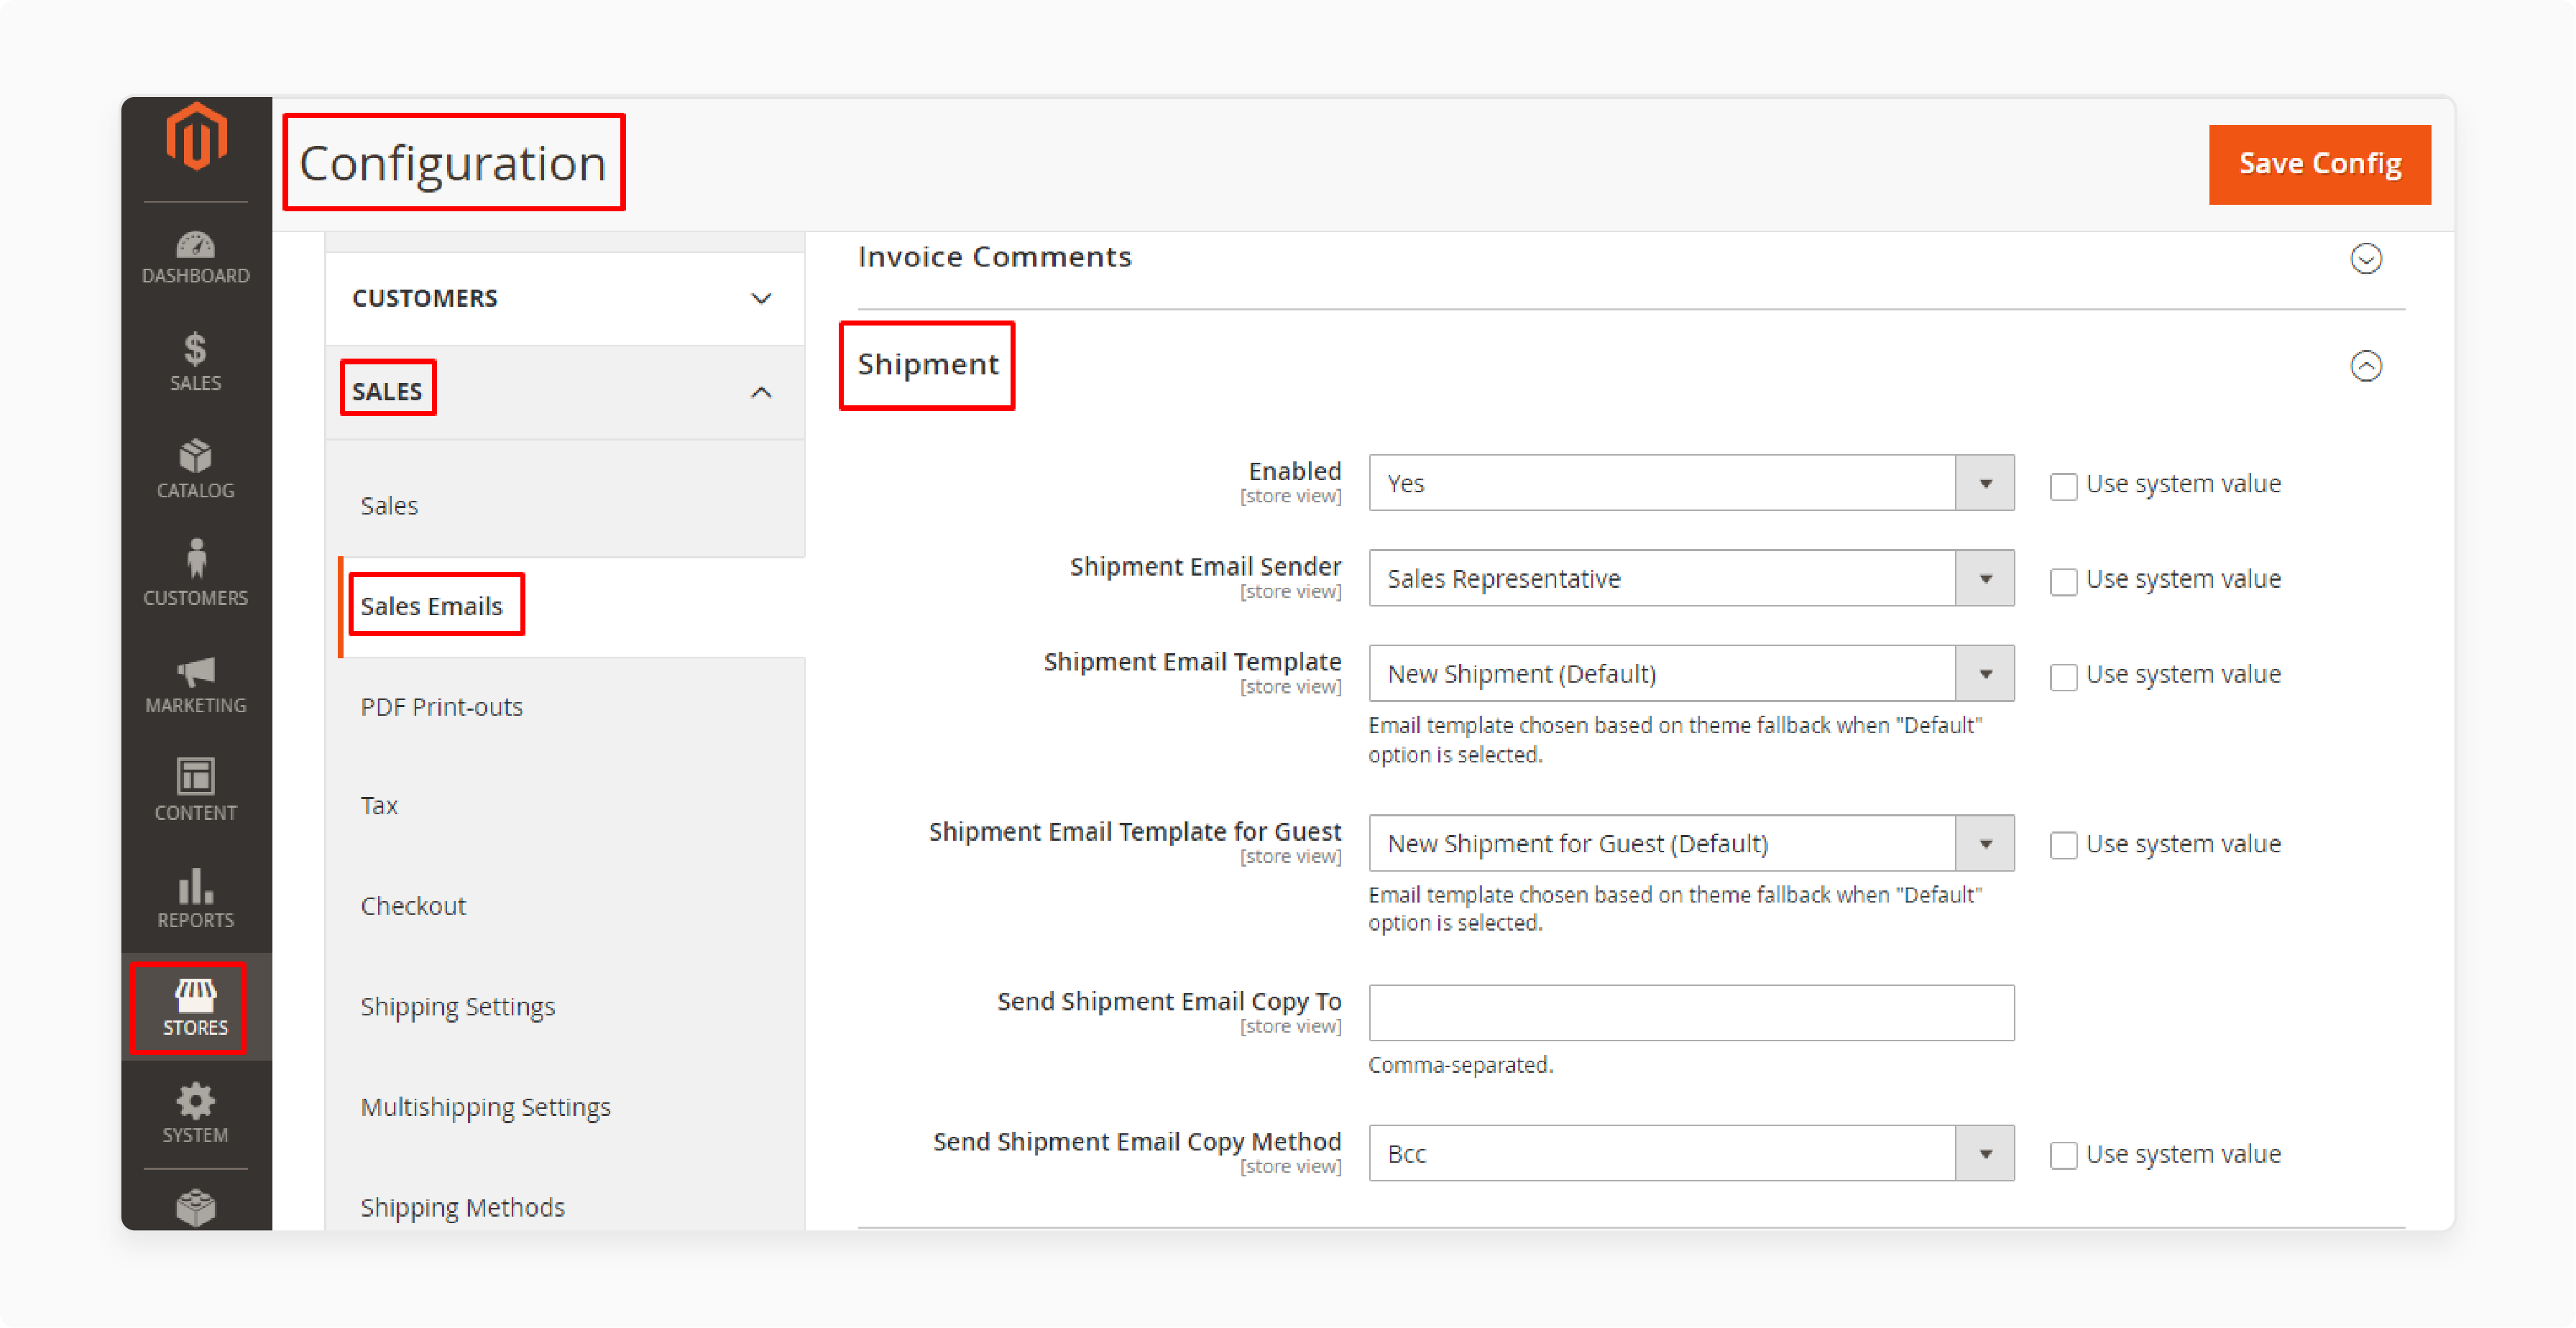
Magento can automatically send shipment notifications to customers.
-
Go to Stores > Configuration > Sales > Sales Emails.
-
Expand the "Shipment" section and set "Enabled" to Yes.
-
Customize the email template if needed by selecting a different template from the dropdown.
-
Ensure that the "Send Shipment Email Copy To" field includes the email addresses of any additional recipients.
-
Save the configuration to enable automatic shipment notifications.
3. Track Orders from Customer Accounts
-
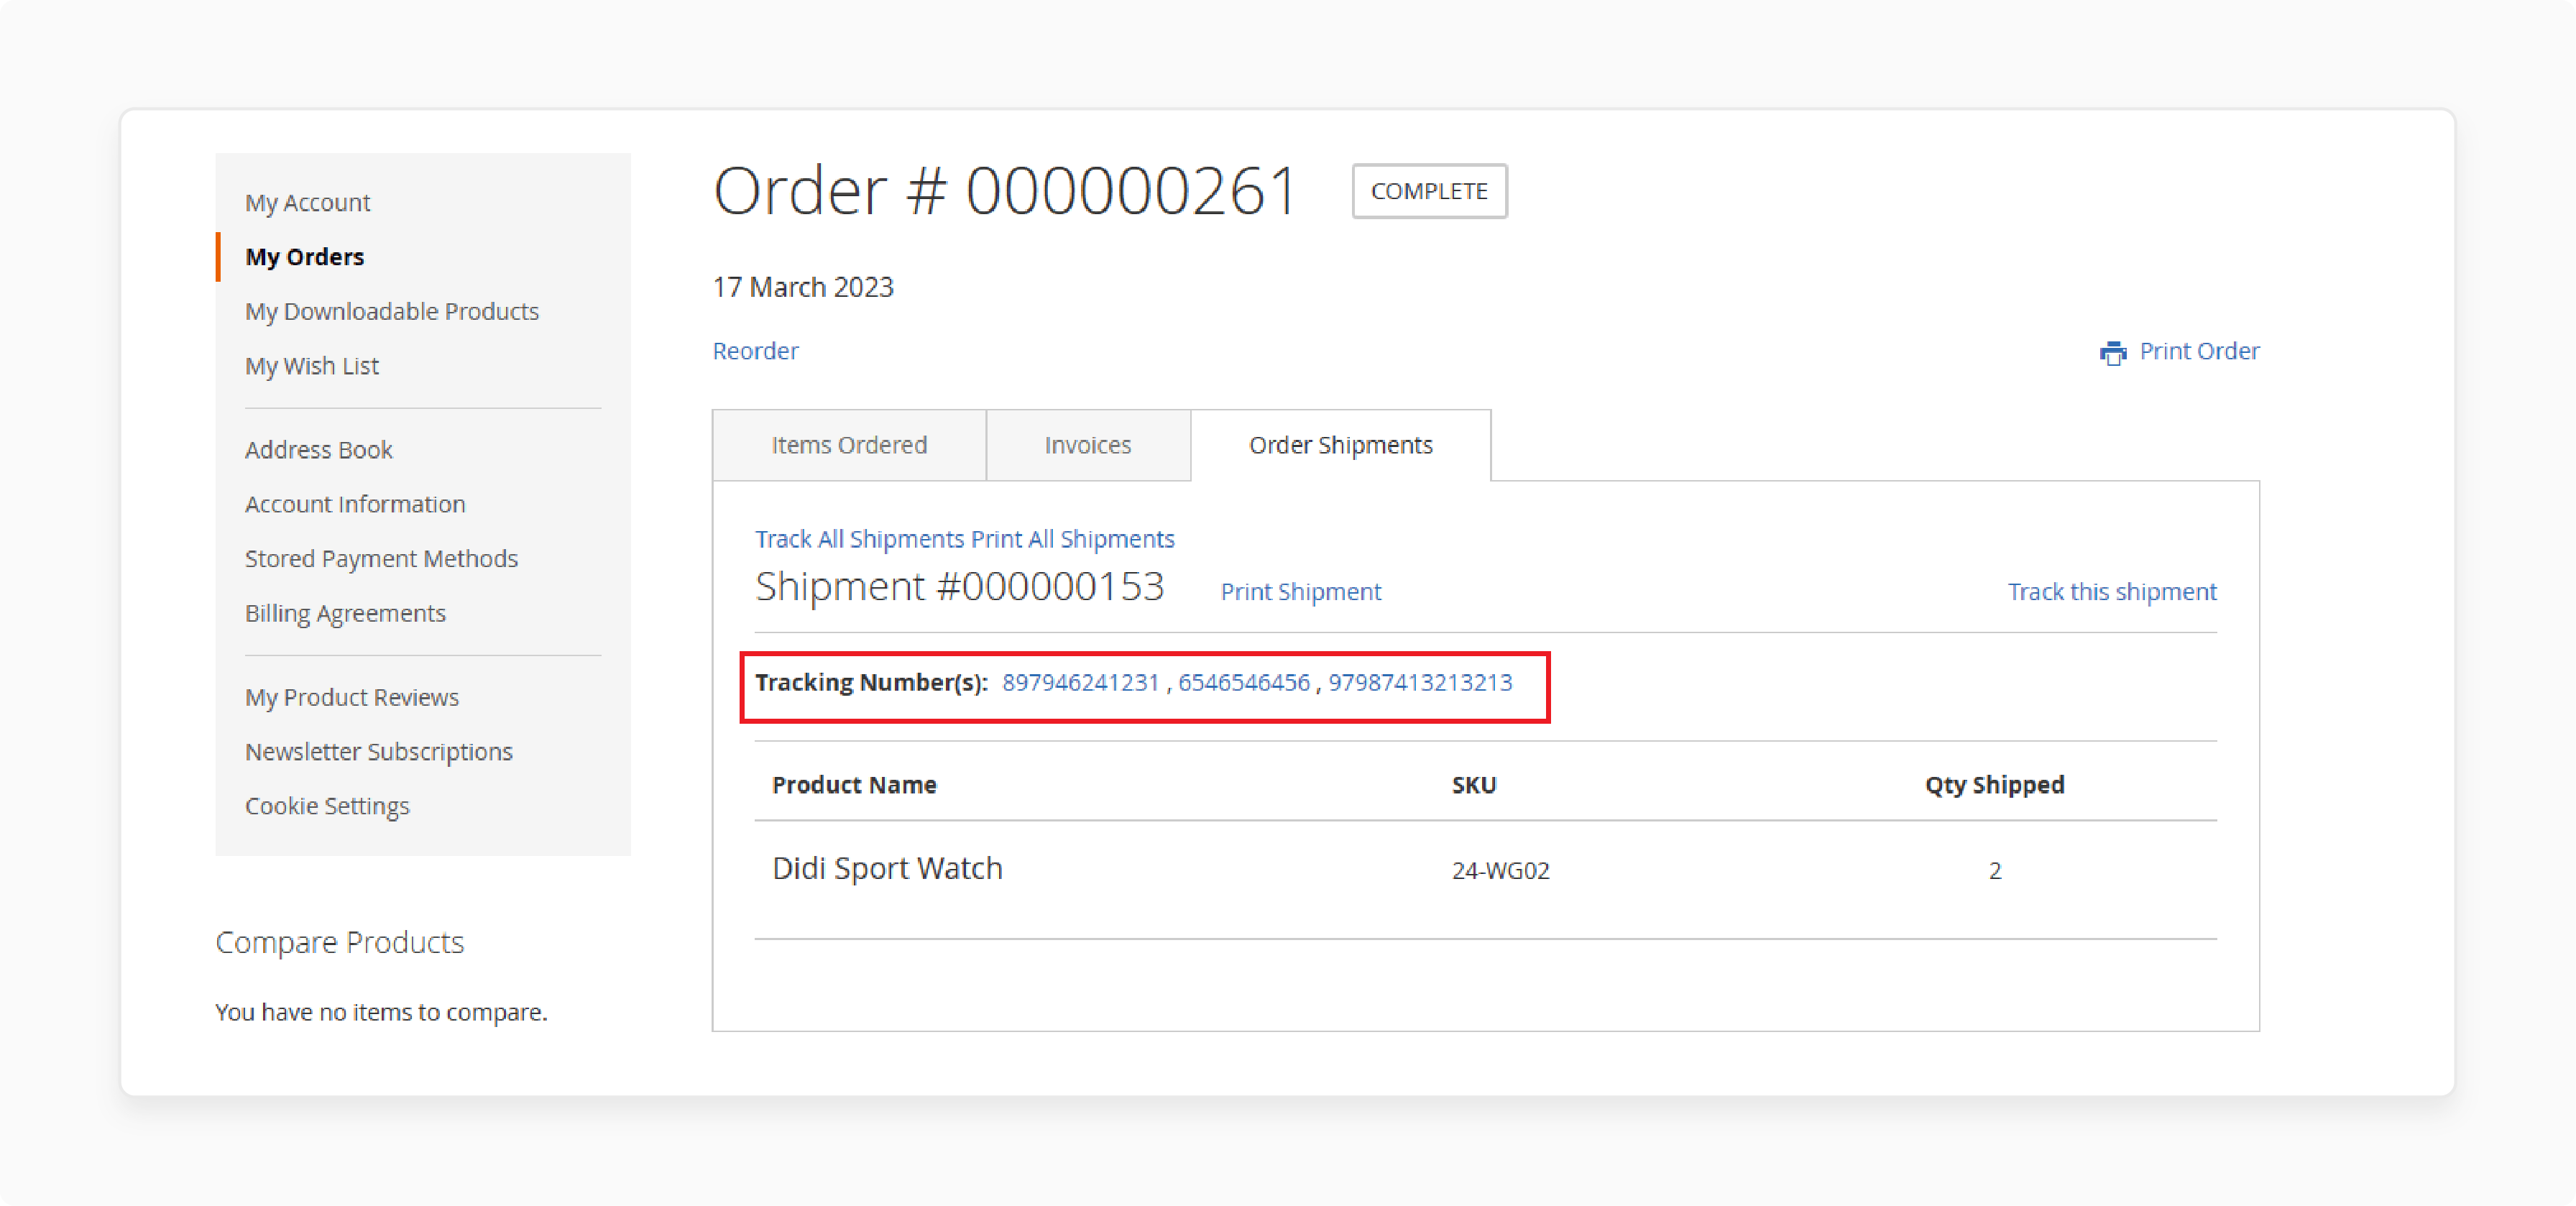
Customers can track their orders by logging into their Magento account.
-
Using carrier extensions, once logged in, navigate to "My Orders." It usually is under the "My Account" section.
-
Click on the order number to view order details.
-
The tracking number will be displayed along with a link to track the shipment on the UPS website.
-
Customers can click the tracking link to see real-time updates on their shipment status.
4. Set Up Tracking URL in Shipment Emails
-
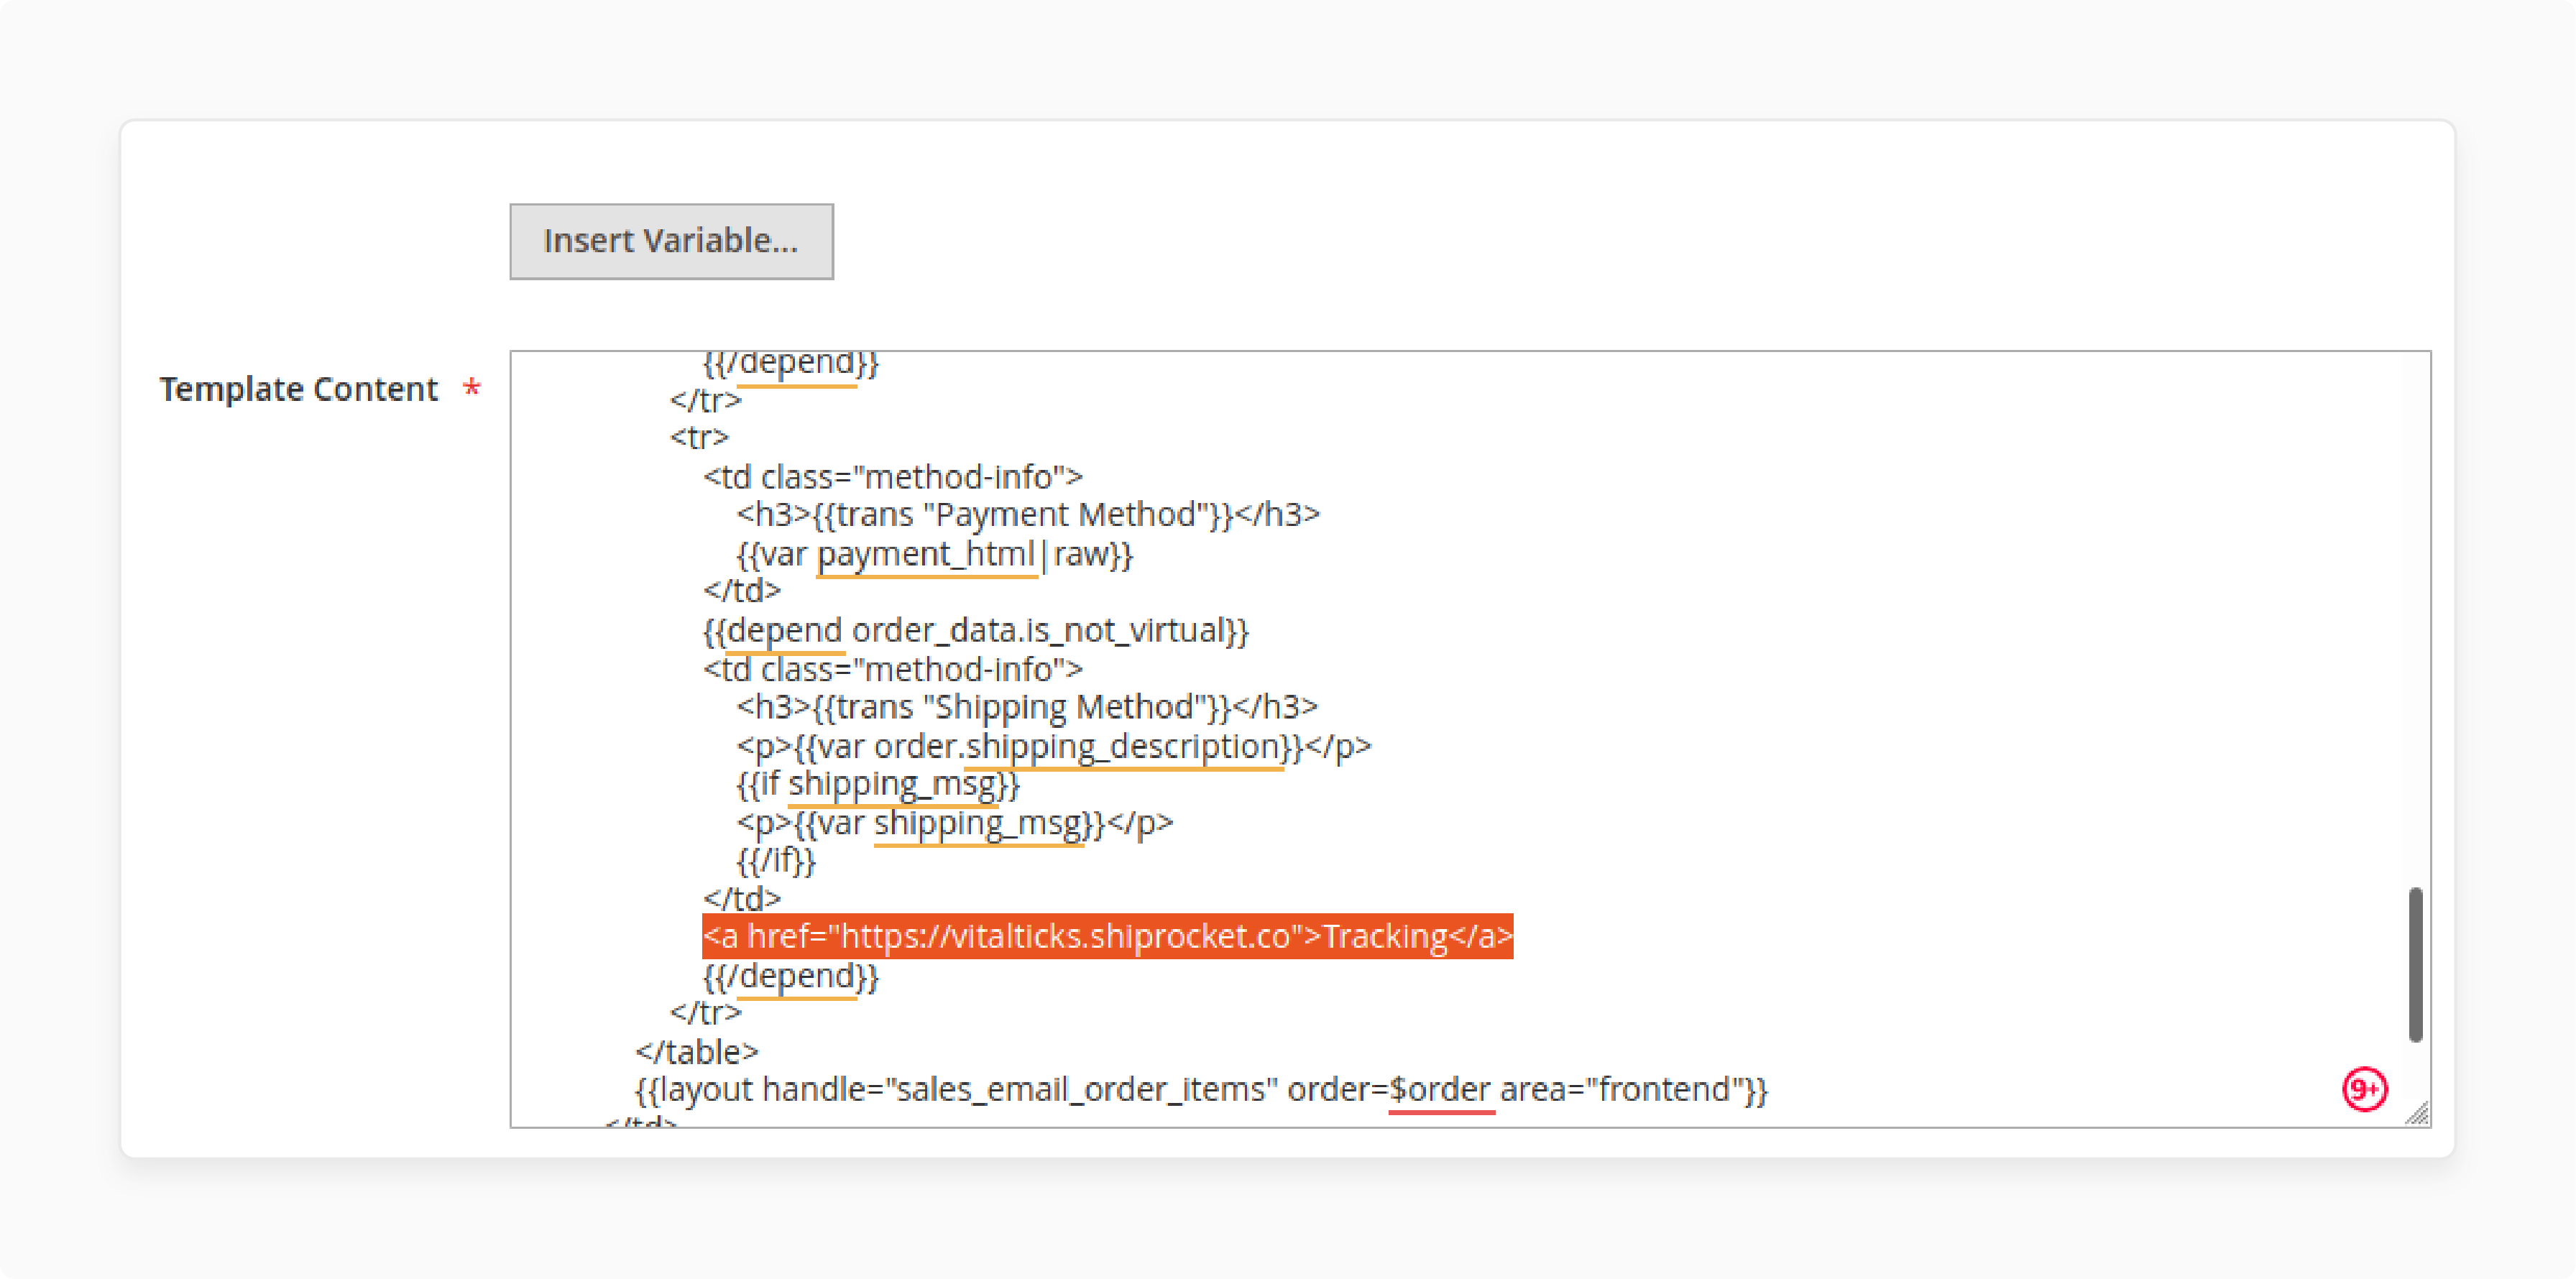
To include the tracking URL in shipment emails, modify the email template.
-
Go to Marketing > Email Templates and select the shipment email template.
-
Add the tracking URL placeholder to the template: {{var shipment.getTrackingUrl()}}.
-
Save the template and assign it to the shipment email configuration.
-
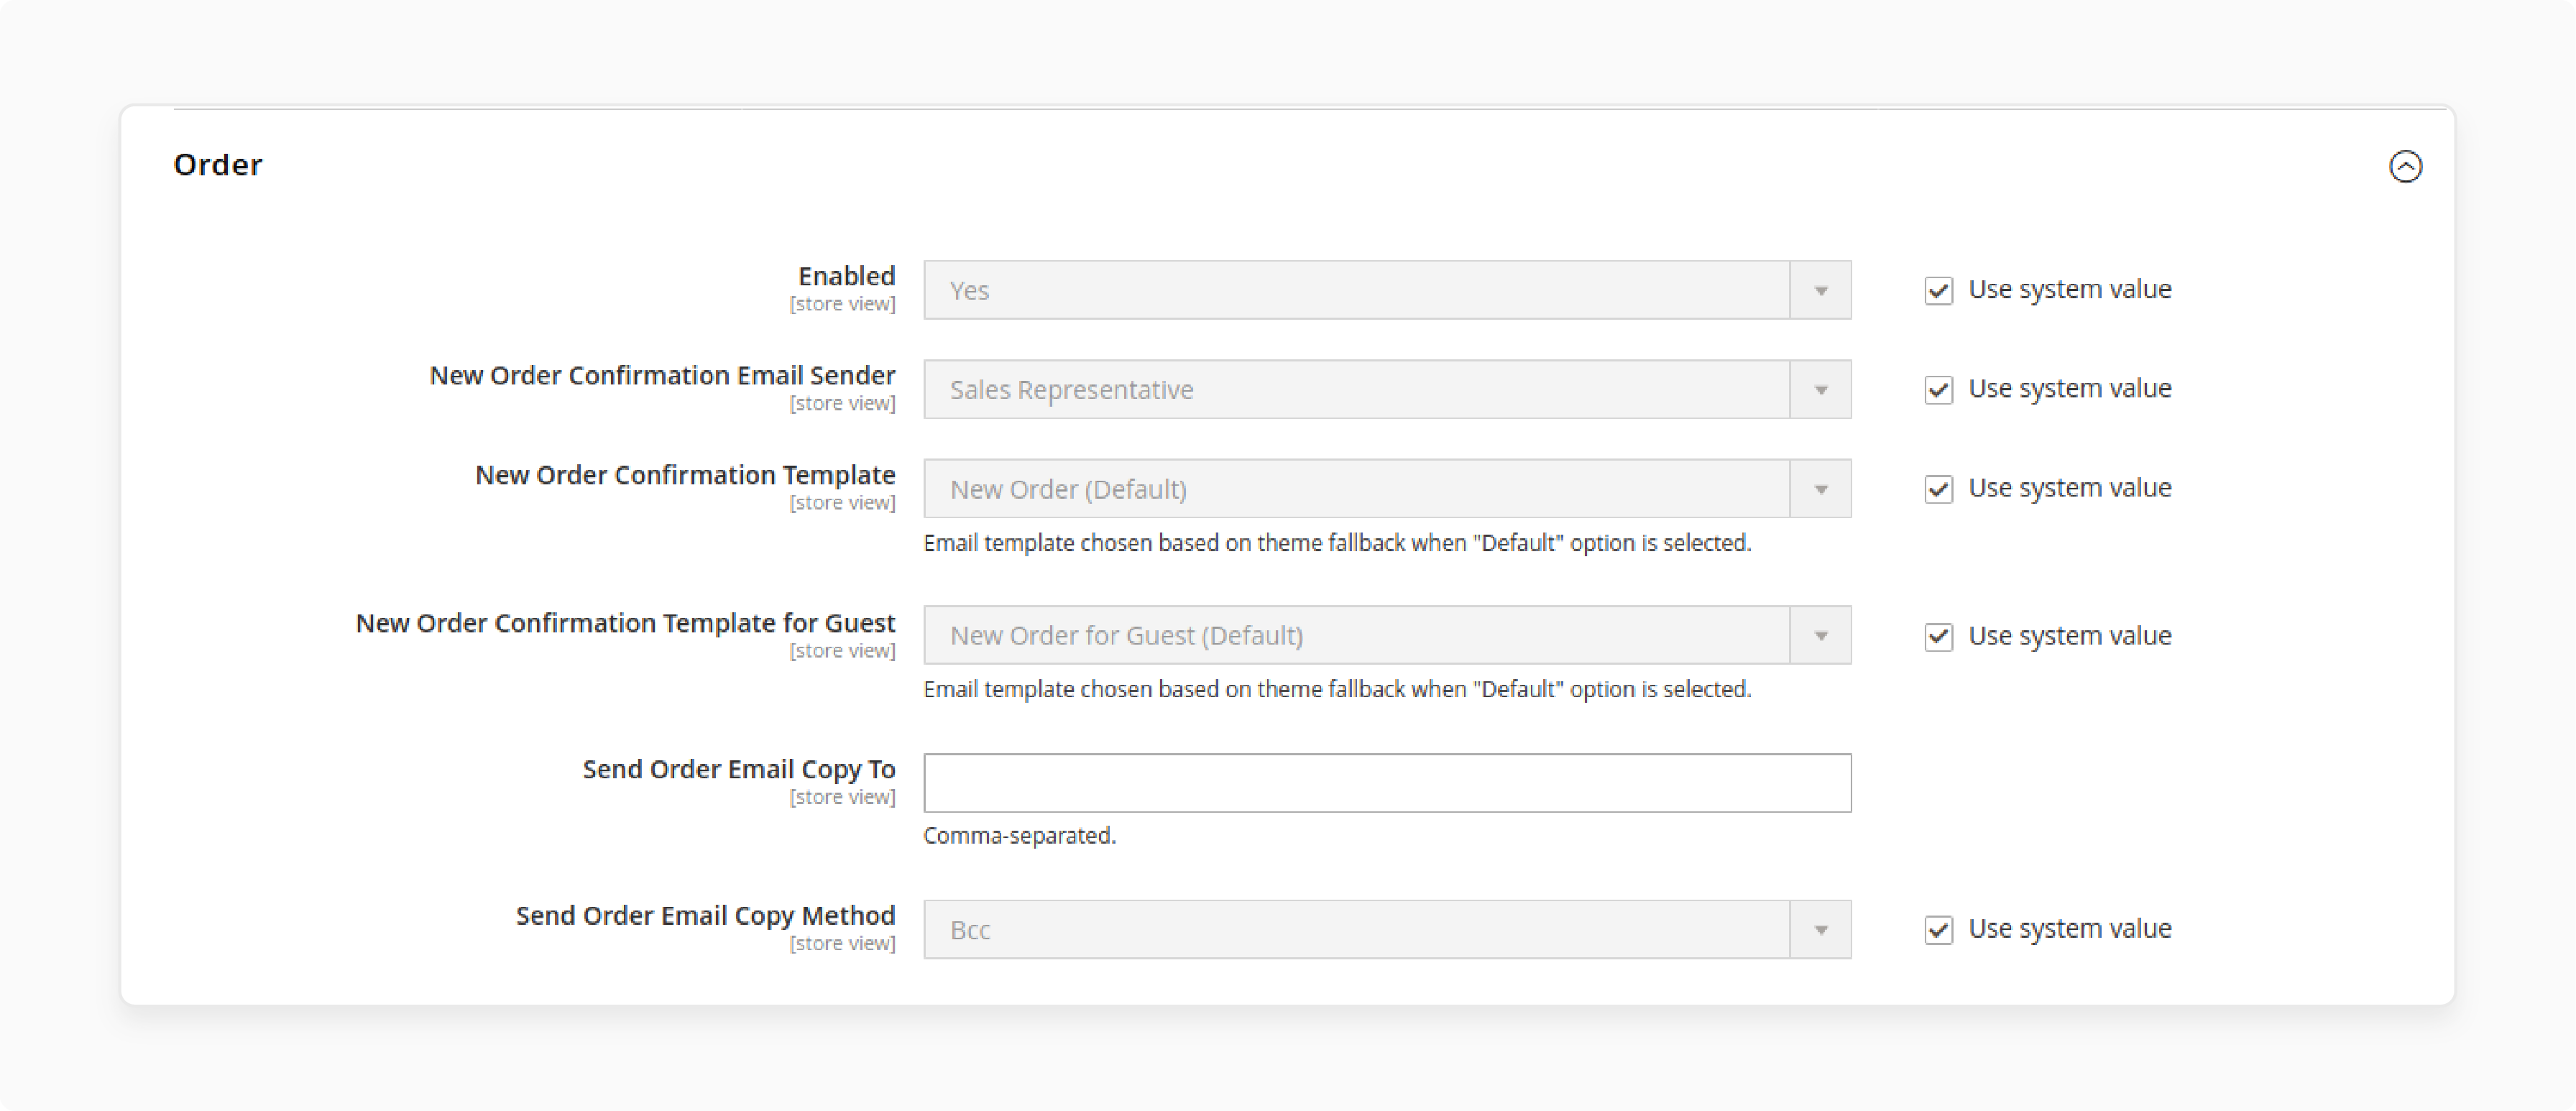
Navigate to Stores > Settings > Configuration, then Sales > Sales Emails.
-
In the Order section, uncheck the option "Use system value".
-
Select the custom template you created.
5. Handle Multiple Shipments
-
For orders with multiple shipments, each shipment can have its own tracking number.
-
Repeat the process of adding tracking numbers for each shipment.
-
Customers will receive separate notifications for each shipment with its respective tracking details.
Troubleshooting Magento 2 UPS Shipping Setup Issues
Issue 1: UPS Shipping Methods Not Showing Up at Checkout
-
Verify Credentials: Ensure your UPS account credentials (ClientID, Client Secret) are correct in Magento.
-
Check Gateway URL: Confirm the UPS Gateway URL is accurate and uses HTTPS.
-
Enable Services: Make sure UPS services are enabled in the Magento admin panel.
-
Shipping Origin: Verify the shipping origin address is correctly set in Shipping Settings.
-
Debug Mode: Enable debug mode to log errors and identify issues.
Issue 2: Incorrect Rates or Errors in Rate Requests
-
Weight Limits: Ensure the total weight of items does not exceed UPS limits.
-
Negotiated Rates: If using negotiated rates, confirm the Shipper Number is entered correctly.
-
Dimensional Weight: Check if dimensional weight is affecting rates; Magento supports weight-based calculations.
-
Rate Discrepancies: Compare rates in Magento with those on the UPS site to identify discrepancies.
-
Update API: Ensure you are using the latest UPS API version to avoid outdated rate calculations.
Issue 3: Problems Generating Labels or Submitting Shipments
-
Label Configuration: Verify label settings in Magento match UPS requirements.
-
API Access: Ensure your UPS API credentials are valid and have the necessary permissions.
-
Sandbox vs. Live: Confirm you are using the correct mode (sandbox for testing, live for production).
-
Package Details: Check that package dimensions and weights are correctly entered.
-
Error Messages: Review error messages in the Magento logs to pinpoint issues.
Issue 4: Tracking Numbers Not Importing or Syncing Properly
-
Tracking URL: Verify the UPS Tracking URL is correctly configured in Magento.
-
Order Status: Ensure orders are marked as shipped to trigger tracking number generation.
-
Email Notifications: Check that email notifications for shipments are enabled and configured.
-
Manual Entry: If automatic syncing fails, manually enter tracking numbers in the shipment details.
-
API Updates: Make sure the UPS API used for tracking is up-to-date and supports your integration.
Additional Tips
-
Clear Cache: Clear Magento cache after making configuration changes to ensure they take effect.
-
Test Orders: Create test orders to verify that UPS shipping methods and rates appear correctly.
-
Customer Feedback: Monitor customer feedback to identify recurring issues with UPS shipping.
-
Documentation: Refer to Magento and UPS documentation for detailed setup and troubleshooting steps.
-
Support: Contact Magento or UPS support if issues persist despite troubleshooting efforts.
FAQs
1. How do I set up UPS shipping in Magento 2?
To set up UPS shipping, first, create a UPS account. Then, log in to the Magento admin panel. Navigate to Stores > Settings > Configuration > Sales > Delivery Methods > UPS. Enter your UPS credentials and configure the shipping options. Save the configuration to enable UPS shipping.
2. What shipping methods does UPS offer in Magento 2?
UPS offers various shipping methods, including UPS Ground, Next Day Air, and Worldwide Express. You can select the methods you want to offer in the Magento admin panel. These methods will appear during checkout for customers to choose from.
3. How can I provide free shipping through UPS in Magento 2?
To offer free shipping:
-
Navigate to the UPS settings in the Magento admin panel.
-
Set the Free Method to the desired UPS shipping method.
-
Enable the Free Shipping Threshold and enter the minimum order amount required for free shipping.
-
Save the changes to apply the settings.
4. How do I configure UPS shipping rates in Magento 2?
UPS shipping rates are calculated based on the weight and dimensions of the package. Enter the package details in the UPS settings. Enable Negotiated Rates if you have special pricing with UPS. The rates will be displayed to customers during checkout.
5. How can I generate UPS shipping labels in Magento 2?
To generate UPS shipping labels:
-
Navigate to the order in the Magento admin panel.
-
Create a shipment and enter the package details.
-
Click "Create Shipping Label" to generate and print the label. The label will include the tracking number for the shipment.
6. How do I enable UPS tracking for orders in Magento 2?
UPS tracking is enabled by default when you create a shipment. The tracking number is added to the order details. Customers receive tracking information via email. They can also track their orders from their account on your Magento site.
7. What should I do if UPS shipping methods are not showing up at checkout?
If UPS shipping methods are not showing up, verify your UPS credentials. Ensure the shipping origin address is correctly set. Check that the UPS services are enabled in the Magento admin panel. Enable debug mode to log errors and identify issues.
Summary
Magento 2 UPS shipping integrates UPS into Magento stores. It offers real-time shipping rates and label creation. Here’s a summarised highlight of the setup procedure:
-
First, you need to set up a UPS Account. Sign up at UPS.com and verify your email. Obtain API credentials: access key, user ID, and password.
-
To configure UPS in Magento 2, enable UPS and enter credentials in Delivery Methods. Specify packaging types, weight units, and destination types.
-
Next, add tracking and notifications. Add UPS tracking numbers to the shipment page. Enable email notifications for shipment updates.
-
Lastly, verify credentials, gateway URL, and enabled services. Check weight limits, API updates, and tracking URLs.
For more support regarding shipping-related issues, opt for Managed Magento hosting and get expert assistance.


