Magento 2 Thank You Page: Key Features and Benefits
Is your Magento 2 store's thank you page making a strong impact on your customers? A well-designed Magento 2 thank you page can help you make a memorable experience for your customers.
In this tutorial, we will explore the design elements and steps to customize the Magento 2 thank you page.
Key Takeaways
- Understand the important functions of your Magento 2 thank you page, including order confirmation.
- Learn how to optimize your thank you page design for a better user experience.
- Explore the benefits of integrating your thank you page with other marketing channels.
- Gain insights into the steps to customize your Magento 2 thank you page.
What is a Magento 2 Thank You Page?
“A Magento 2 Thank You Page is the final page a customer sees after successfully placing an order on a Magento eCommerce website.”
The last step after a purchase or newsletter sign-up confirm the order and thank the customer. It also displays the customer's information and provides a unique order number for tracking.
It expresses gratitude to the customer for their purchase. The page helps reinforce a positive shopping experience, builds strong relationships, and encourages repeat business.
Customizing the thank you page in Magento 2 helps businesses improve the customer experience. It also helps them make the most of after-sales chances. Businesses can give customers a memorable experience by making the page match their brand and adding personal touches.
Important Functions of a Magento 2 Thank You Page
1. Order Confirmation
-
The Thank You Page provides a detailed summary of the customer's order, including:
1. Items purchased
2. Names
3. Images
4. Quantities
5. Individual prices
6. Total amount paid
-
It helps customers easily verify that their order details are accurate and as expected. It also ensures transparency.
-
The summary should be prominently placed and easy to read. Use clear fonts, appropriate font sizes, and sufficient spacing to enhance readability.
-
The layout should allow customers to check each item quickly.
2. Customer Information
-
The page displays the customer’s shipping and billing information. It helps them verify that all the details entered are correct. It reduces the chances of errors and improves trust.
-
It ensures that the order is delivered to the right address and the billing information is accurate.
-
Personalization also makes the customer feel valued and recognized. It enhances their shopping experience.
3. Order Number
-
It provides a unique order number. The customer can use it to track their order status and refer to any communication with customer service.
-
The number helps both the customer and the retailer to handle any inquiries or issues efficiently.
-
It also helps in organizing and managing orders. The number should be prominently displayed and easily accessible.
-
The order number should be easy to find and copy for convenience.
4. Next Steps
-
It offers information about what the customer can expect next regarding order shipments, such as:
1. Estimated delivery time
2. Shipping details
3. Special promotional offers for future purchases
4. Discounts
-
The transparency helps manage customer expectations and reduces post-purchase anxiety.
Essential Design Elements for Your Magento 2 Thank You Page
1. Estimated Delivery Time
-
Provide an estimated delivery date or timeframe on your thank you page to inform customers about when they can expect their order. It reduces post-purchase anxiety, increases satisfaction, and improves the overall customer experience.
-
Make sure to display a clear and accurate delivery timeframe. It takes into account:
1. Processing times
2. Shipping methods
3. Potential delays
-
By setting the right expectations. You can enhance customer satisfaction and reduce the likelihood of inquiries about order status.
-
Include a feature to receive updates if the delivery time changes. It keeps them informed throughout the shipping process.
2. Clear Call-to-Action (CTA) Buttons
-
Your Magento 2 thank you page helps guide the customers. It also helps businesses achieve more sales. You can use clear, big call-to-action (CTA) buttons to push them to the next step. The next step could be any of:
1. Shopping more
2. Checking their order
3. Joining a loyalty program
-
Your CTA buttons should include text that tells customers what to do next. The buttons should be placed where they can be easily viewed and clicked. Different CTAs should be offered for various customer interests.
3. Promotions and Recommendations
-
Include personalized product recommendations based on the customer's recent purchase to encourage additional sales.
-
Feature limited-time discounts or exclusive deals to motivate repeat purchases.
-
The strategic placement of promotions also encourages customers to make additional purchases. It increases the retailer's sales.
-
Use this section to promote complementary items that enhance the customer's original purchase.
4. Social Media Links
-
Add links to your store's social media profiles. It encourages customers to follow and engage with your brand beyond the purchase. It increases brand awareness and community building. It establishes your online presence by growing your social media followers.
-
Highlight the benefits of joining your social media community. These might include exclusive content, discounts, and offers to boost engagement.
5. Customer Support Information
-
Provide clear and easily accessible customer support contact information, including:
1. Phone numbers
2. Email addresses
3. Live chat options
-
It ensures that customers can quickly get help if they have any issues or questions.
-
The various contact methods cater to different customer preferences.
6. Loyalty Program Invitations
-
Invite customers to join a loyalty program or subscribe to a newsletter to increase repeat purchases. It also enhances customer retention.
-
Clearly outline the benefits of joining the loyalty program, such as:
1. Exclusive discounts
2. Early access to sales
3. Reward points
7. Printable Receipt Option
-
Offer an option to print a receipt for the order. It provides customers with a physical copy of their purchase details or for gift purposes.
-
The receipt should be in a format that is easy to find and read. It allows customers to print their receipts directly from the thank you page.
-
The receipt should be well-formatted with all necessary information, including:
1. Order number
2. Item details
3. Prices
4. Any applicable taxes or discounts
-
It can enhance professionalism and customer trust.
8. Order Tracking Link
-
Include a direct link to track the order status. It allows customers to monitor the progress of their shipments in real-time.
-
The feature keeps customers informed and enhances transparency. It also reduces post-purchase anxiety and the volume of tracking-related inquiries.
-
Integrate it with your shipping provider's tracking system for smooth updates.
-
Ensure the tracking link is prominently displayed and easily accessible.
9. Feedback and Surveys
-
Include customer satisfaction surveys or feedback forms. It helps gather valuable insights and improve your services.
-
Encourage customers to share their thoughts. It demonstrates that you value their opinions and are committed to continuous improvement.
-
The information can be used to identify areas for improvement. It also enhances customer satisfaction.
-
Design the feedback section to be brief and user-friendly. You might also offer an incentive for completing the survey.
10. Branding Elements
-
Incorporating branding elements into your thank you page reinforces brand recognition and loyalty.
-
Ensure a consistent visual identity across all touchpoints by using your brand's:
1. Colors
2. Fonts
3. Logo
4. Typography
-
It also communicates your brand’s values and mission. It connects with customers on a deeper level.
11. Security Badges and Trust Signals
-
Display security badges, trust signals, and any relevant certifications. It reassures customers that their transaction is secure.
-
Highlight your commitment to protecting customer data and privacy. It helps build trust and confidence.
12. Additional Information Section Settings
-
Include links to FAQs, return policies, and other relevant information. It may assist the customer post-purchase.
-
You might also show coupon codes to the customers on the order success page. It will motivate them for more purchases.
How to Customize the Thank You Page in Magento 2
-
Install the Magento 2 thank you page extension.
-
Navigate to Stores > Configuration > Success Page and enable the extension.

- Social Share Section Settings: Enable the social share section on the success page and enter your Facebook app ID.

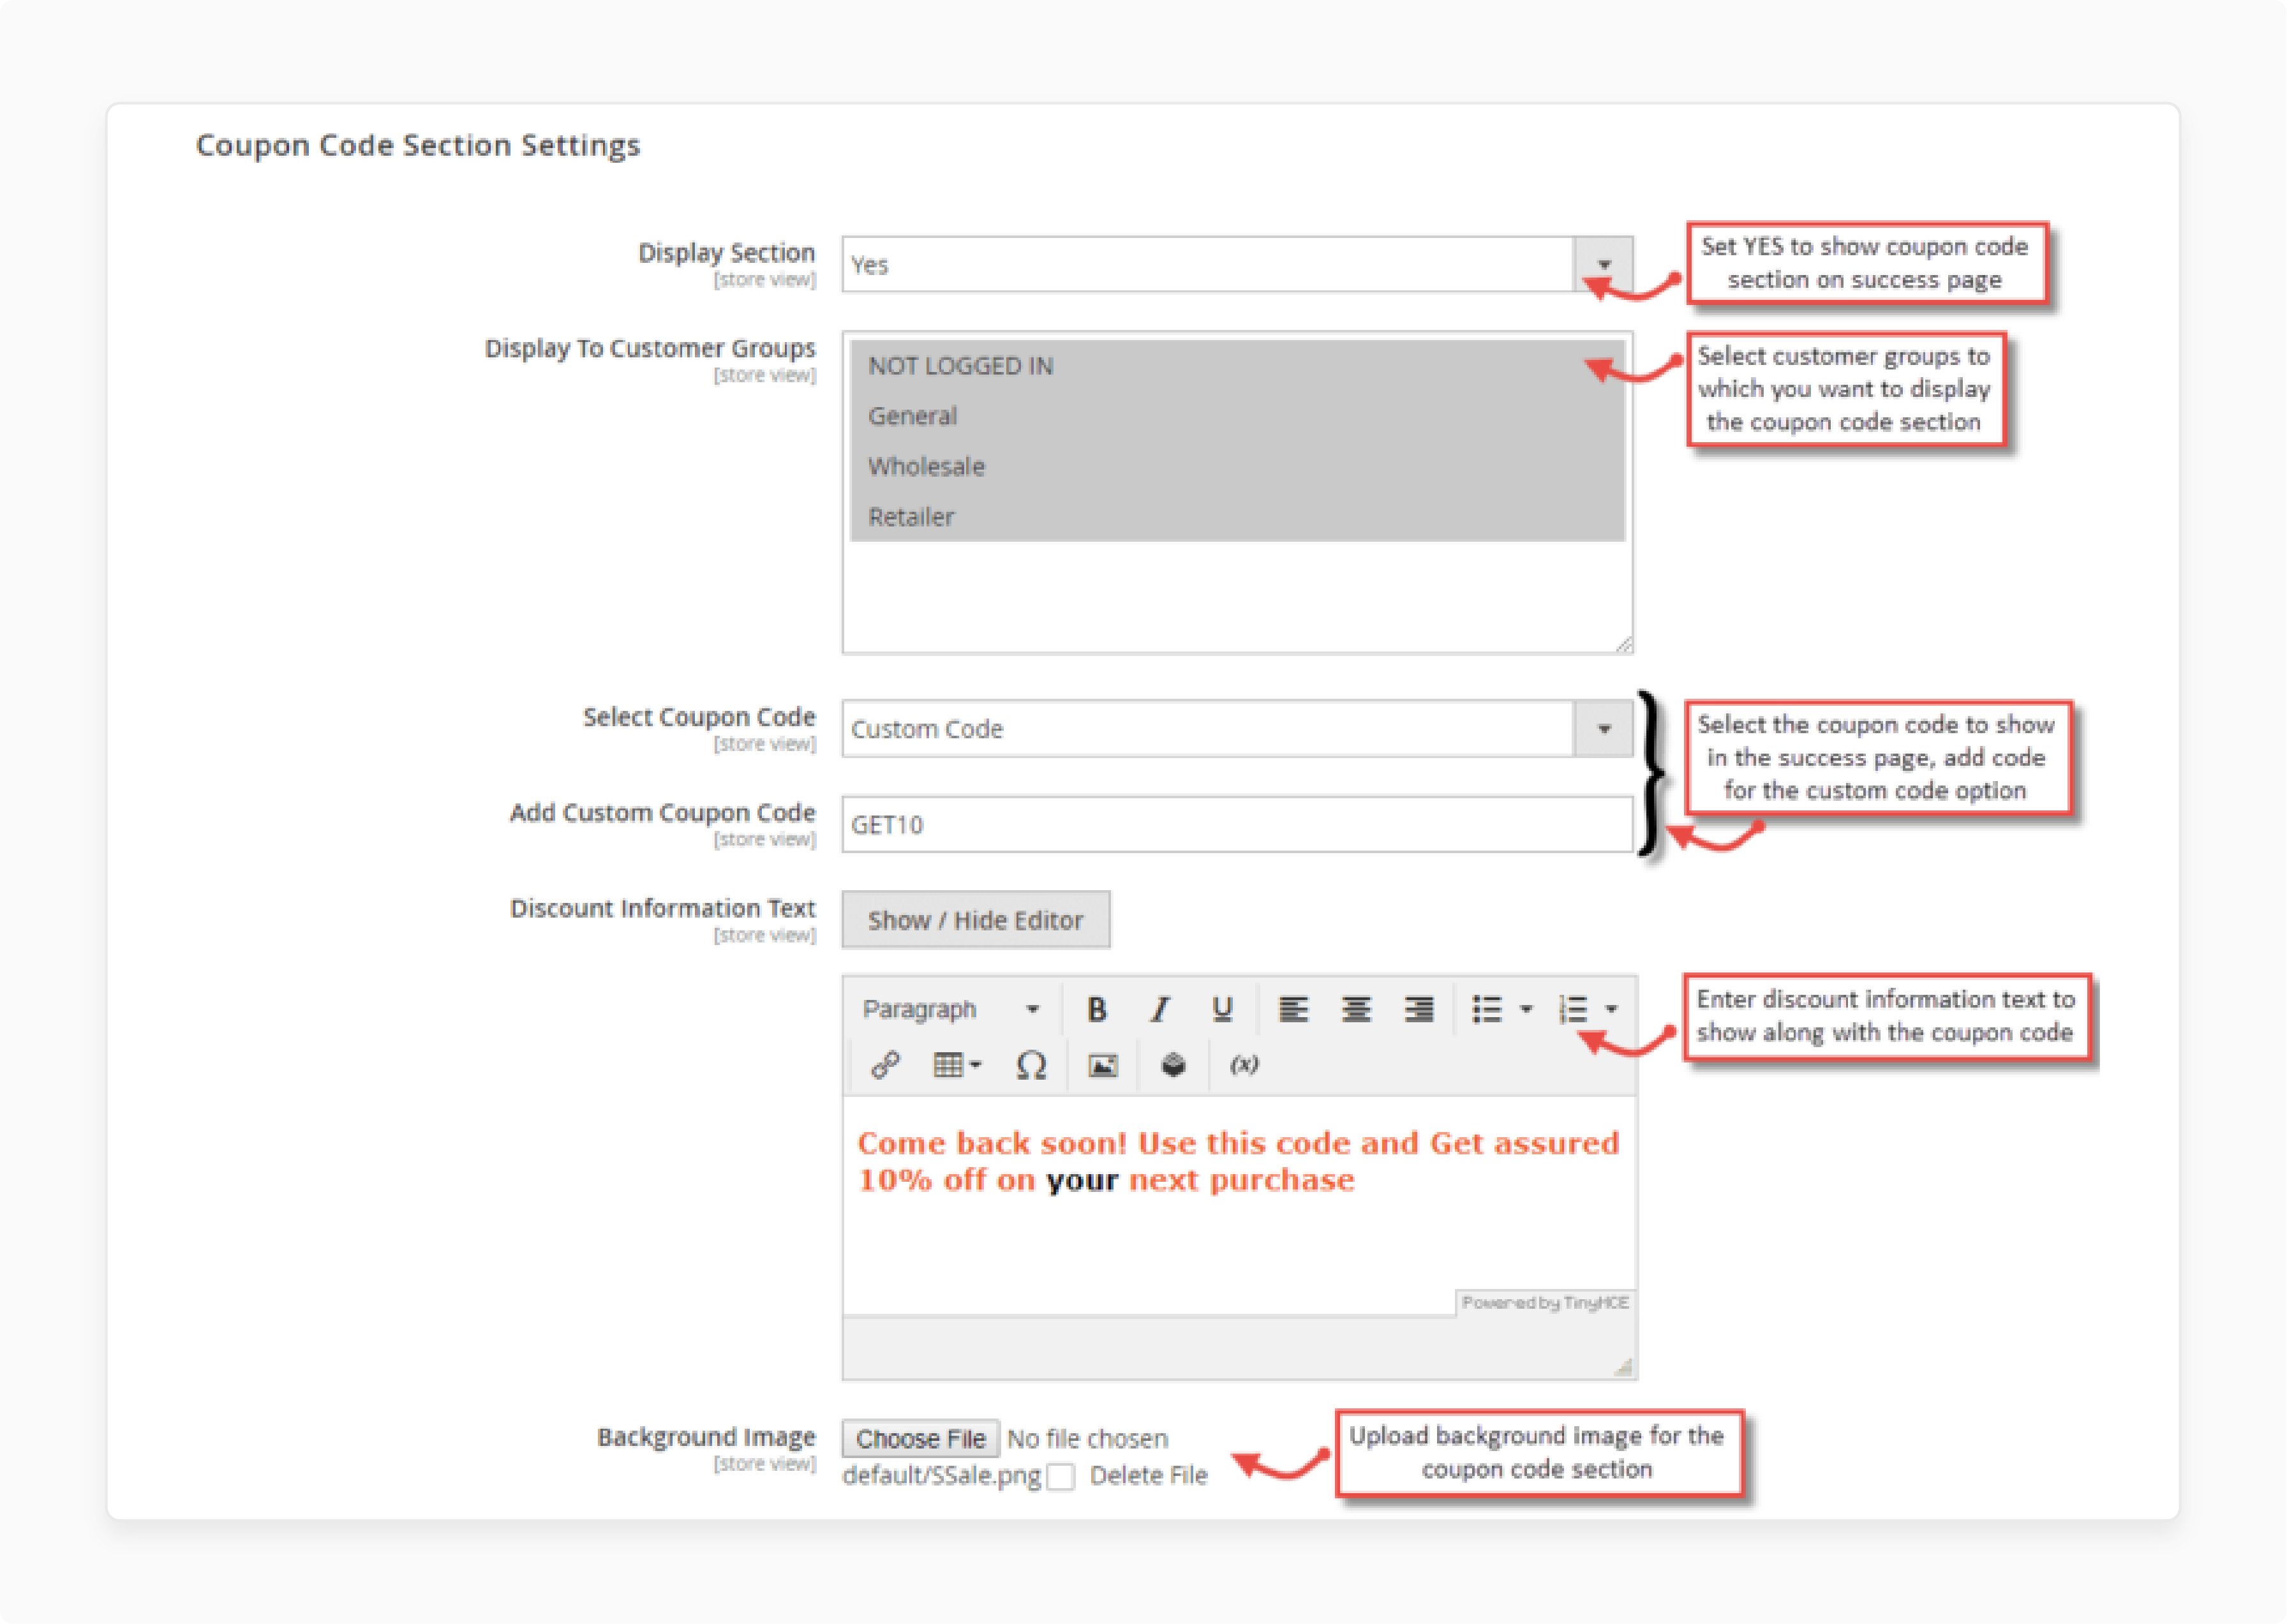
- Coupon Code Section Settings: Configure the following settings:

-
Display Section: Choose Yes to enable the coupon code section on the success page.
-
Display to Customer Groups: Select the customer groups to which you want to show the coupon codes.
-
Select Coupon Code: Select one of the available coupon codes you want to display on the success page.
-
Add Custom Coupon Code: Add a custom coupon code to display on the success page.
-
Discount Information Text: Enter the discount information text that best describes the offer.
-
Background Image: Select the background image that you want to show in the coupon code section.
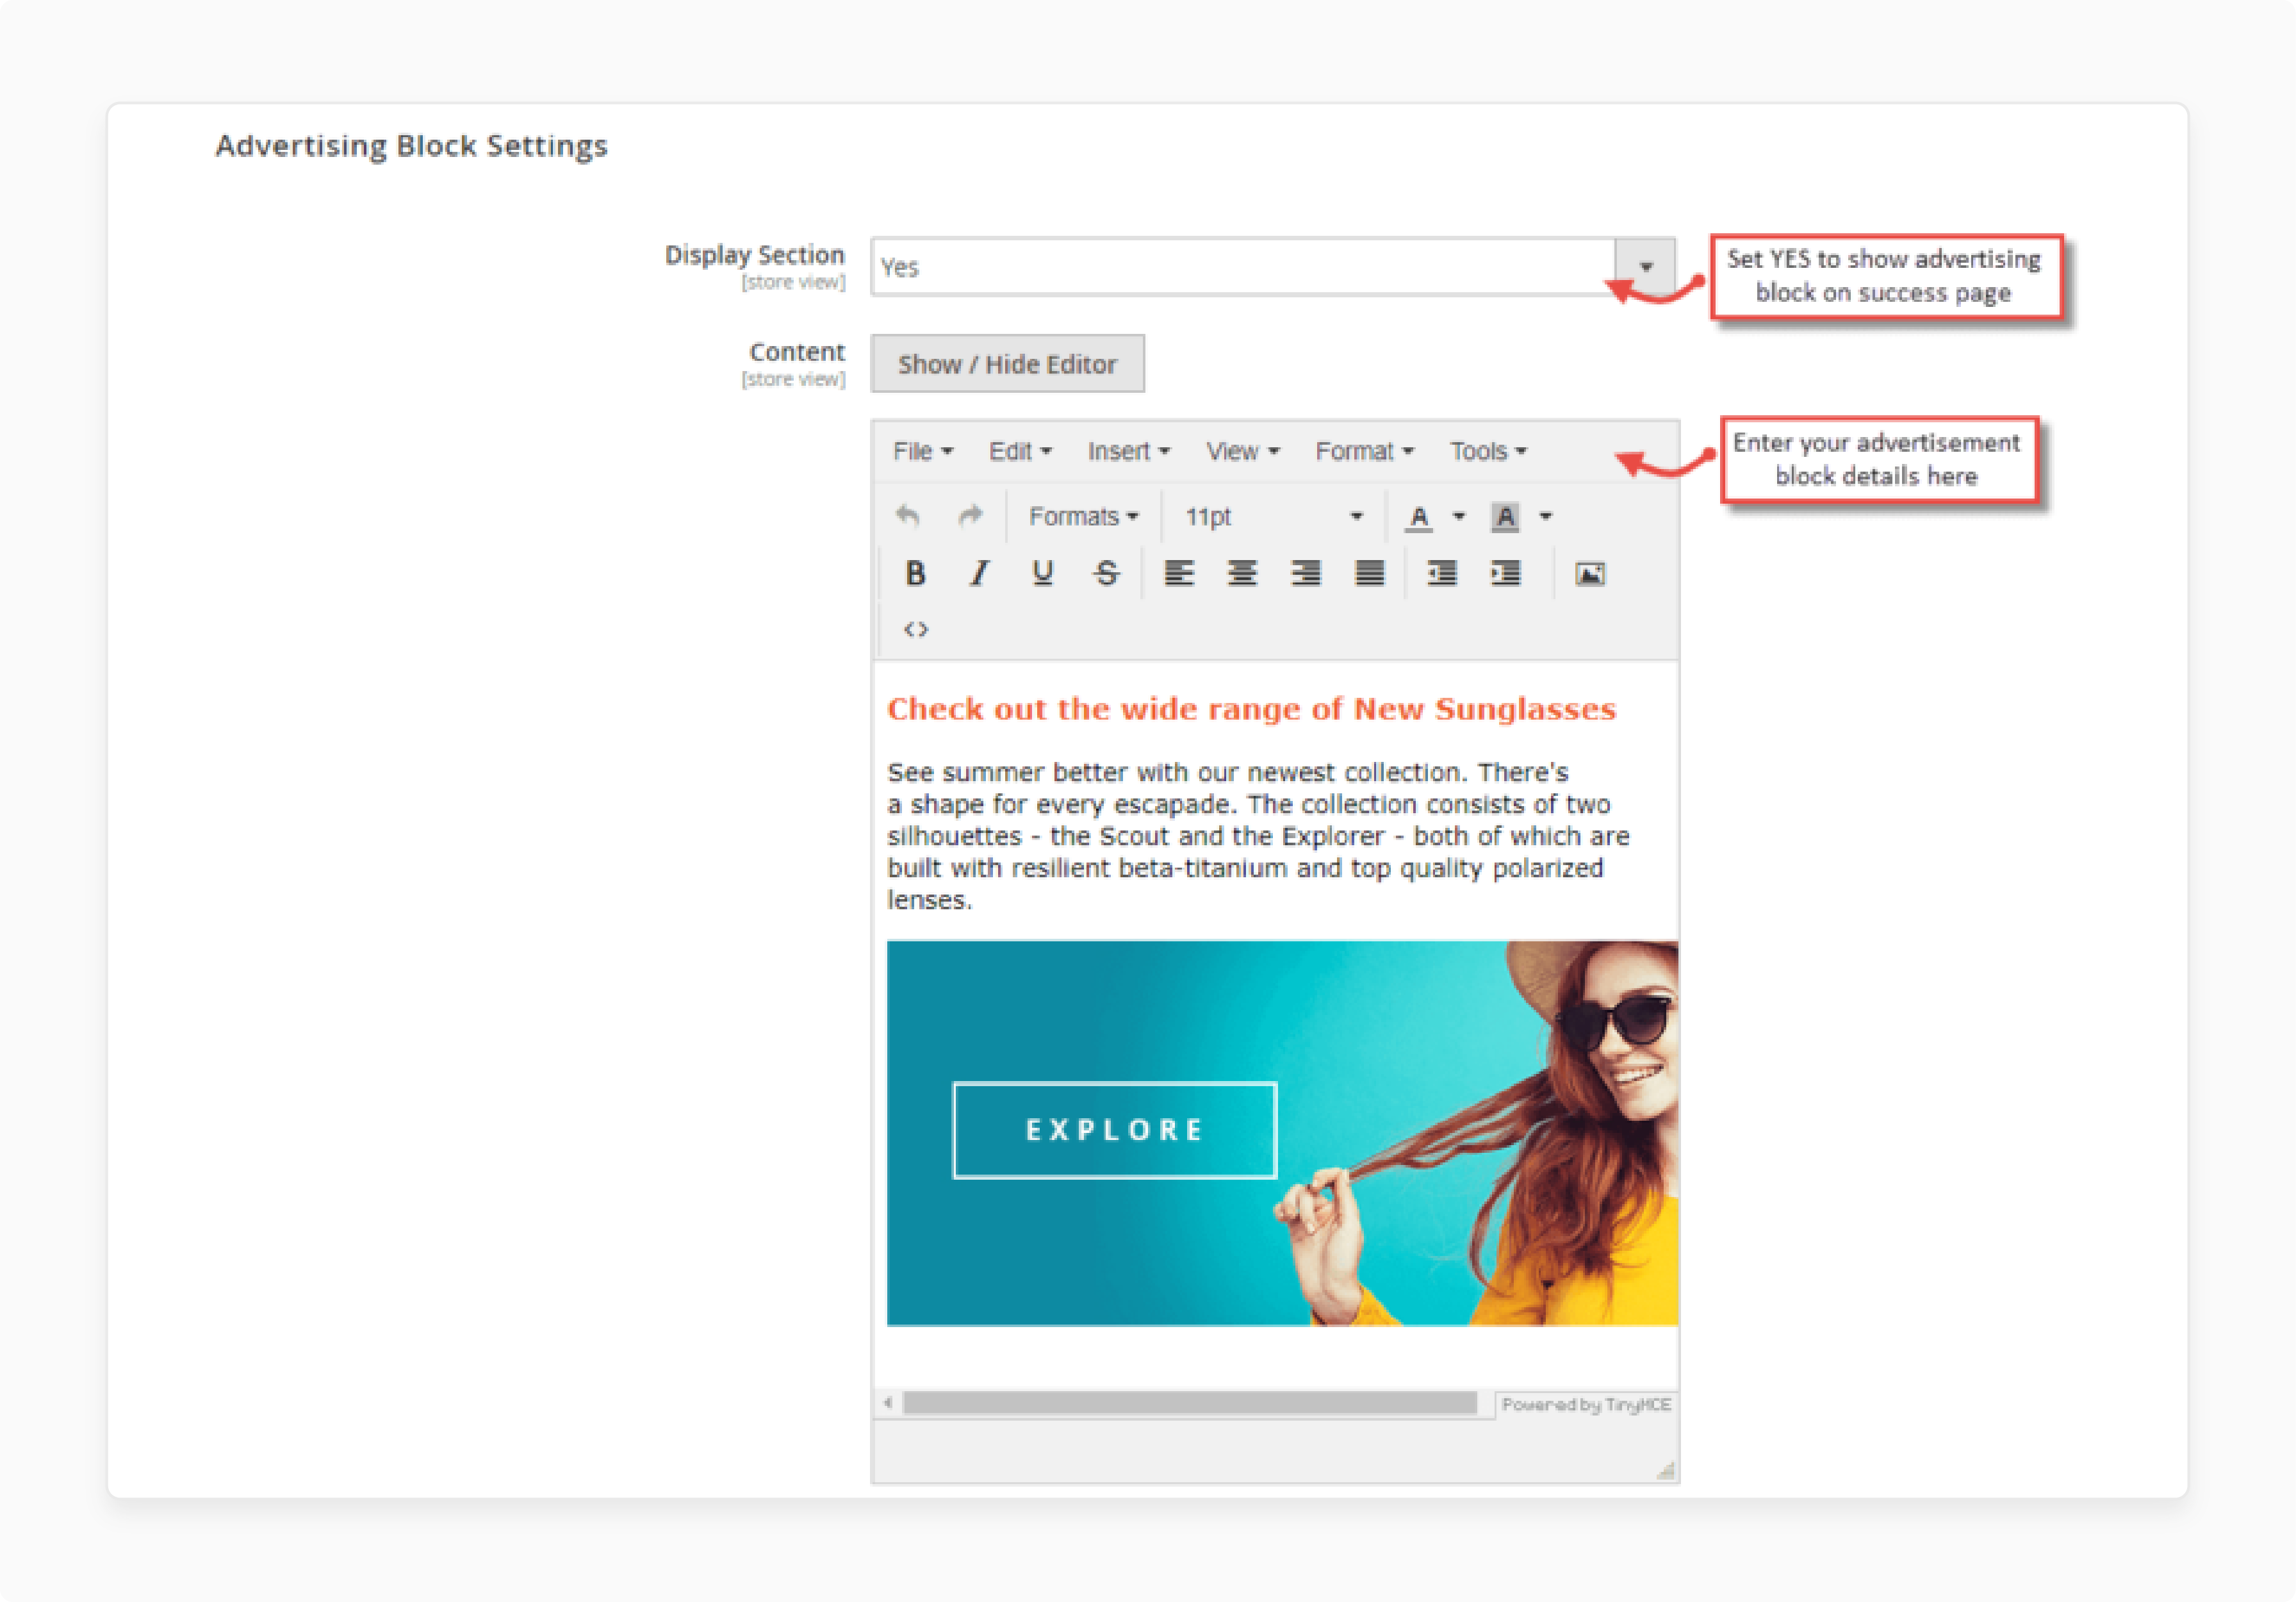
- Advertising Block Settings:

-
Display Section: Select Yes to enable the advertising block on the success page.
-
Content: Ensure you enter the advertising content in the WYSIWYG editor. It displays the content on the success page.
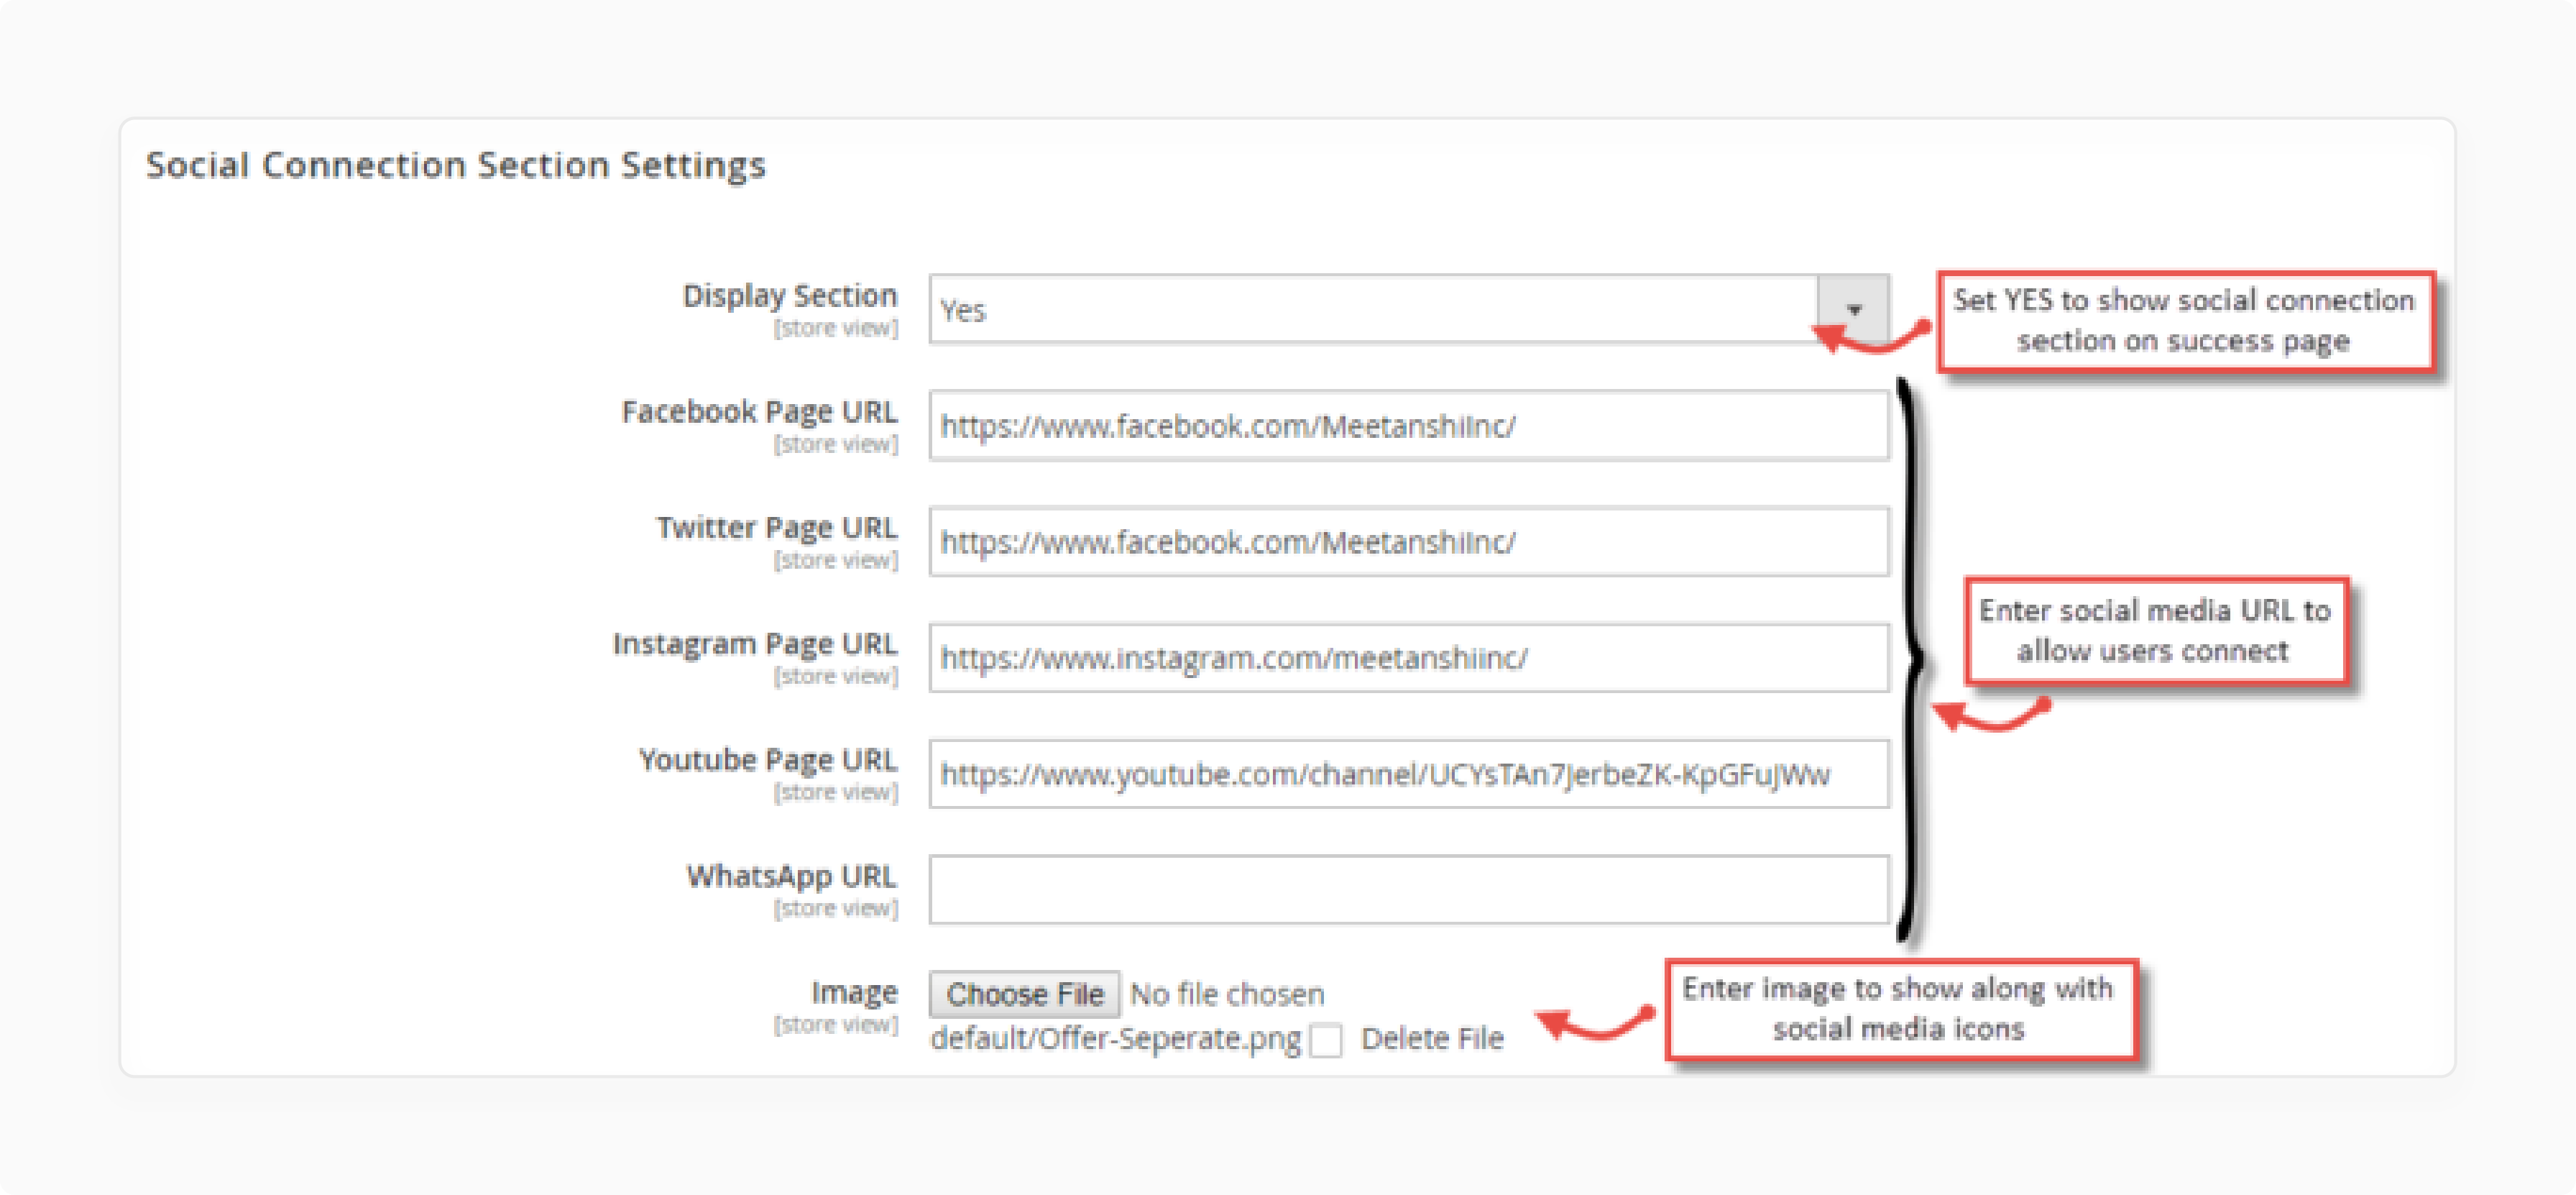
- Social Connection Section Settings:

a. Choose yes to enable social connection buttons on the success page.
Enter the page URL of the following social media channels
-
Facebook
-
Twitter
-
YouTube
-
WhatsApp
b. Image: Upload and select the image that you want to display on the thank you page in Magento 2.
- Newsletter Subscription Section Settings: Choose Yes to enable the newsletter subscription section on the success page.

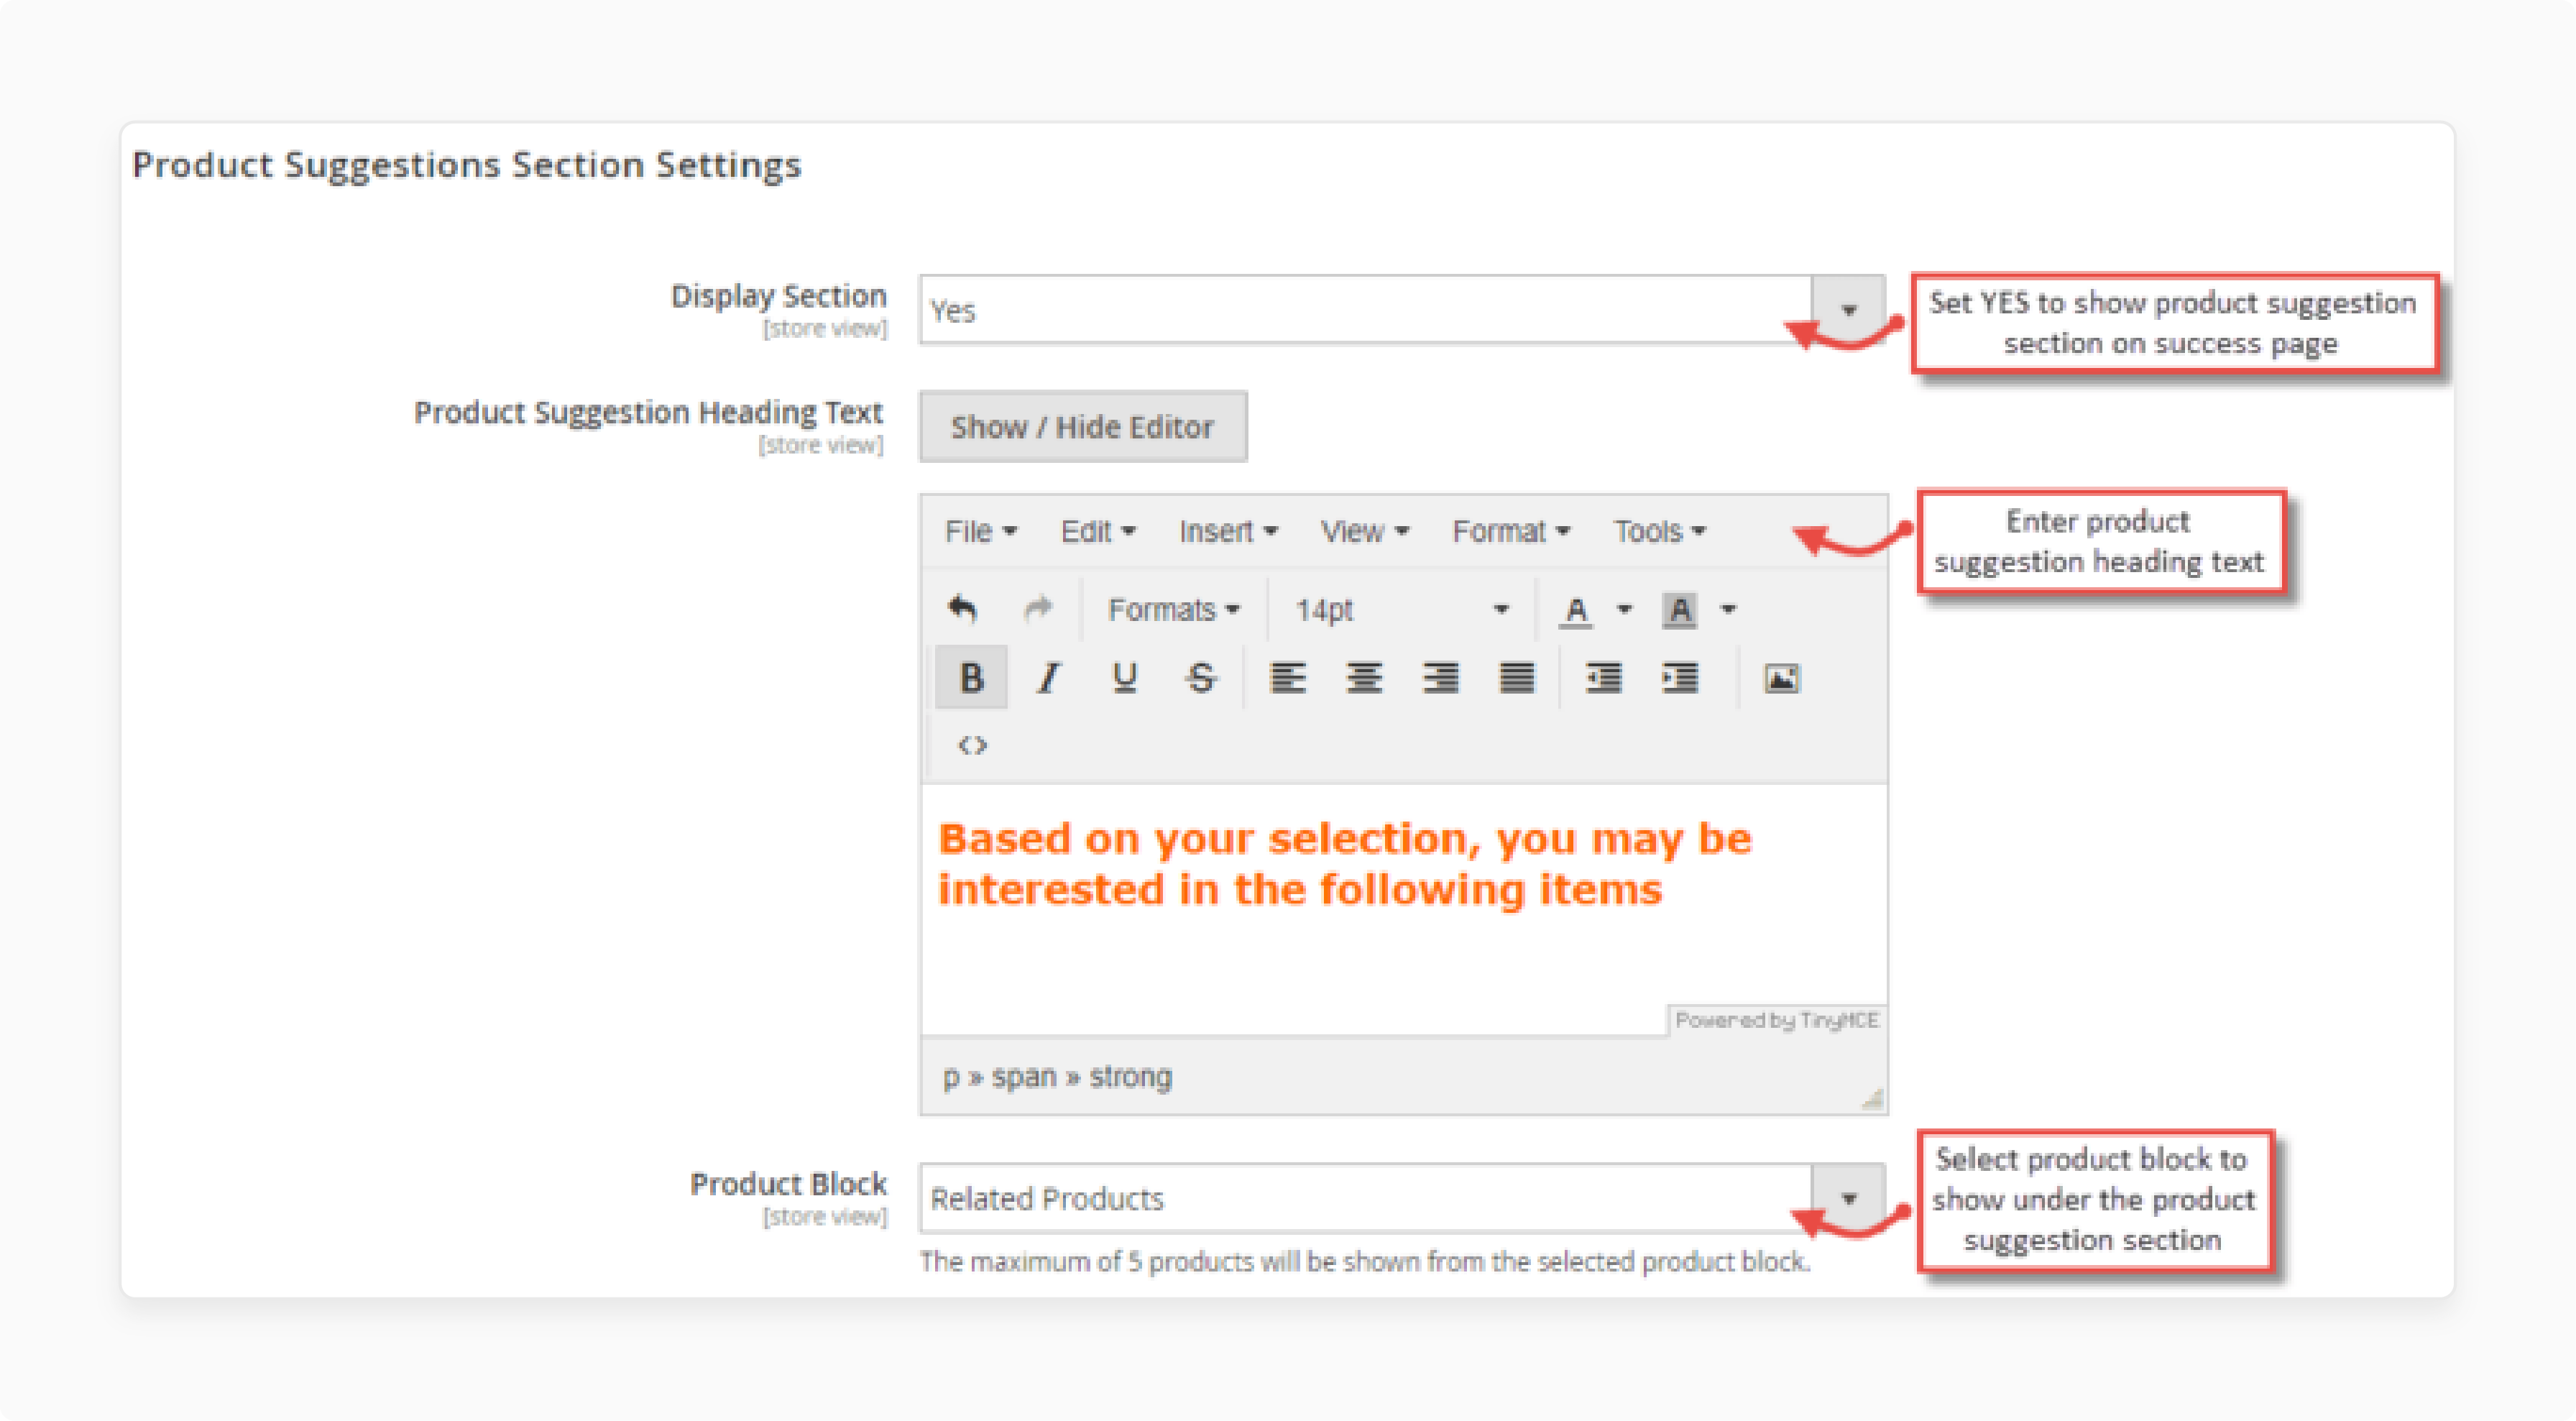
- Product Suggestions Section Settings: Configure the following:

-
Display Section: Choose Yes to enable the product suggestions section on the success page.
-
Product Suggestion Heading Text: Enter the heading text for the product suggestion block.
-
Product Block: Choose the product block to display products on the success page.
-
Additional Information Section Settings:
-
Display Section: Select Yes to enable the additional information section on the success page.
-
Content: Add the content here that you want to display on the thank you page.
-
FAQs
1. What is the Magento 2 Thank You Page module?
The Magento 2 Thank You Page module is an extension. It enhances the final page customers see after making a purchase. It provides detailed order information, customer details, and personalized messages.
2. How can I customize the Magento 2 Thank You Page?
Customization of the Magento 2 Thank You Page can be achieved by using the built-in options and extensions. You can modify the layout and add personalized messages. You can also include promotional content. It helps create a unique post-purchase experience for your customers.
3. What features does the Magento 2 Success Page Extension offer?
The Magento 2 Success Page Extension offers various features. These include displaying order details, customer information, social media links, and promotional offers. It allows you to enhance the customer's post-purchase experience.
4. How do I add a custom block to the Magento 2 Thank You Page?
You need to use the page's customization settings. You can include HTML or static blocks through the admin panel. It provides additional information or promotional content to your customers.
Summary
A well-designed Magento 2 Thank You Page enhances customer satisfaction and loyalty. The tutorial explores the critical functions and design elements of an effective Thank You Page.
-
Provides detailed order confirmation and customer information.
-
Displays a unique order number for tracking.
-
Offers next steps, including shipment details and promotional offers.
-
Includes a thank you message to build a positive relationship.
Want to boost your store's success with a customized Magento 2 Thank You Page? Experience the best with managed Magento hosting.


