
Magento 2 Shipping Table Rates: Configure Customized Shipping Rates
Magento 2 Shipping Table Rates can be a tricky terrain for online sellers. Did you know more than 70% of abandoned carts result from unforeseen shipping expenses? This guide presents a simple, step-by-step method to establish these shipping table rates via CSV files.
Key Takeaways
-
Configuring Magento 2 shipping table rates section can help online merchants avoid unexpected shipping costs, ultimately reducing abandoned shopping carts.
-
To establish table rates, begin by configuring default settings, organizing the data within a CSV file, importing it into Magento 2, and concluding with a thorough test to ensure seamless functionality.
-
Table-rate shipping offers flexible options, accurate rate calculations, and customizable rules that can enhance the overall shopping experience for customers.
-
The provided CSV example serves as a guide for comprehending how to fill in the essential information required for setting up custom shipping rates in Magento 2.
CSV Example and Setting Up Magento 2 Shipping Table Rates
To set up Magento 2 shipping table rates, begin by configuring the default settings. Then, prepare the table rates data, import it into Magento 2, and run a test to ensure everything is working properly. Here is a step-by-step guide to show you how.
Step 1: Complete the Default Settings for Table Rates
Setting up table rates in Magento 2 ecommerce starts with configuring default settings. Initiate configuring table rates by following these steps:
-
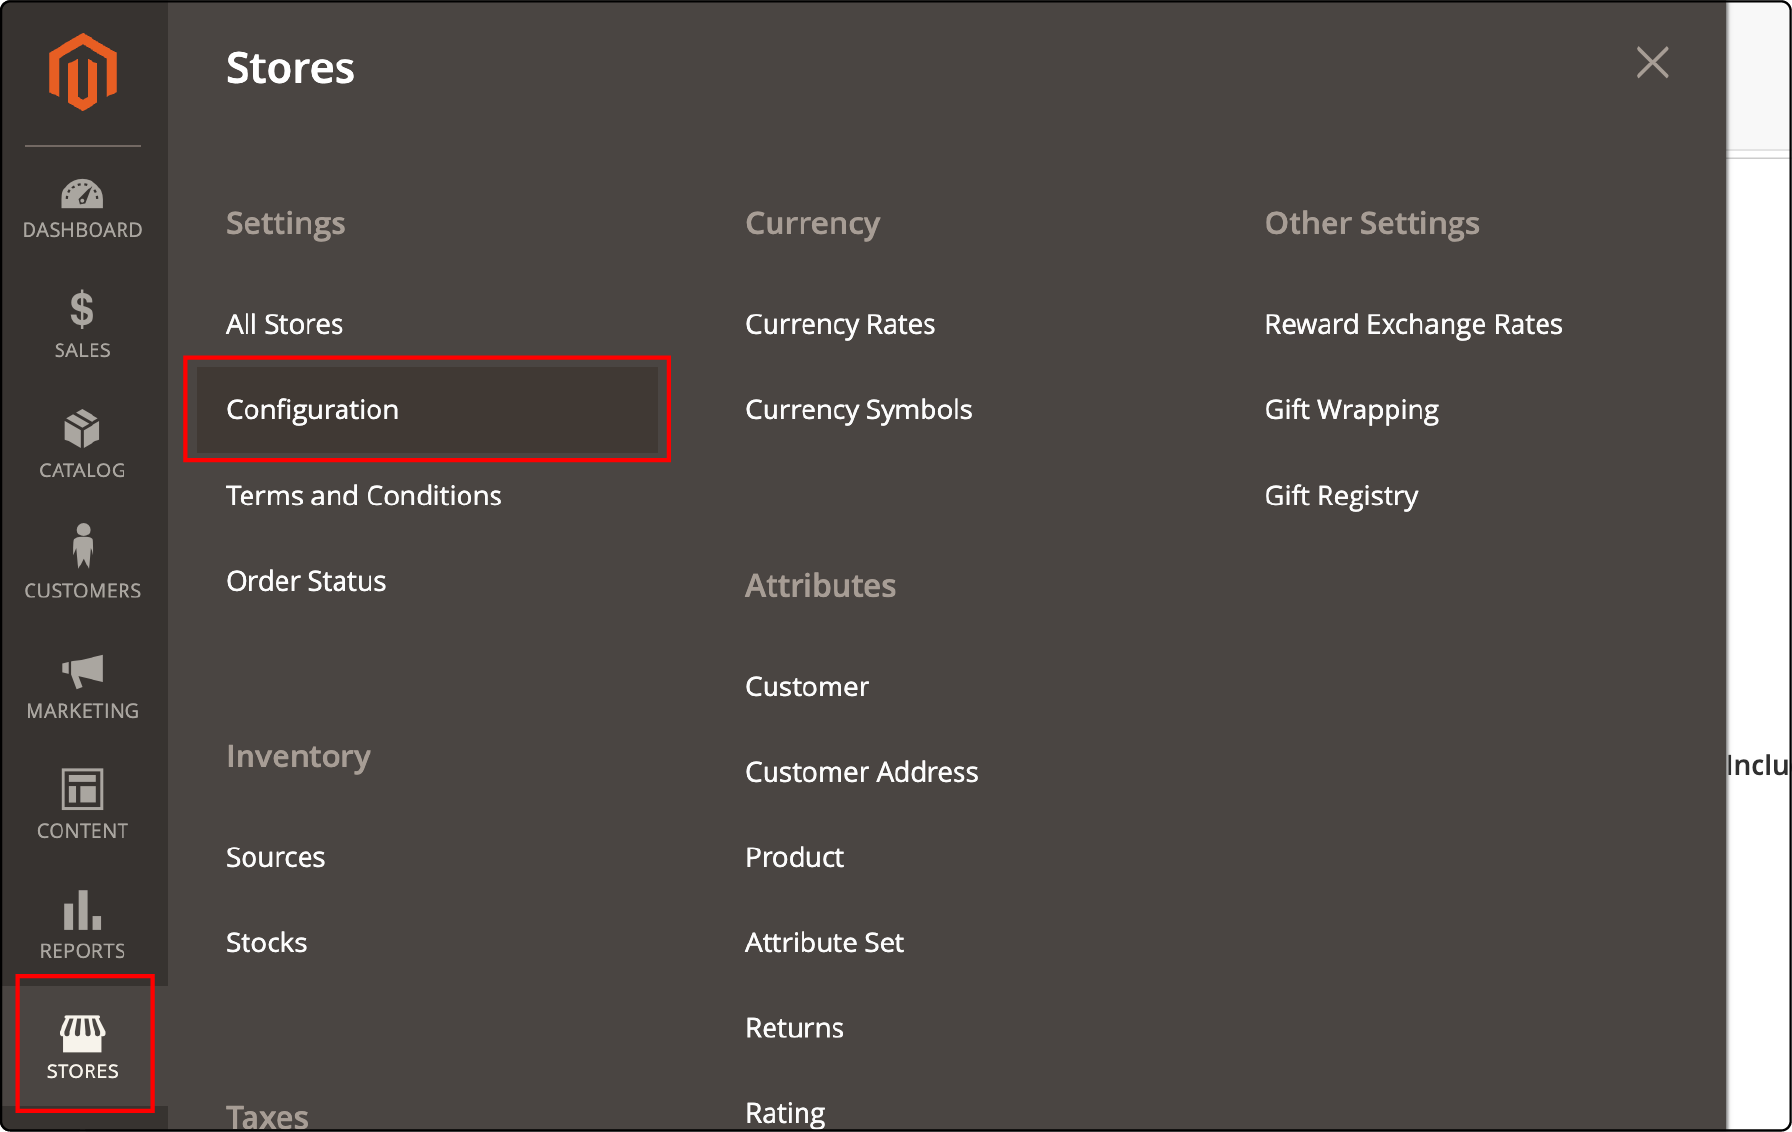
Access Stores in the Admin Panel.
-
Click on Configuration under Settings.
-
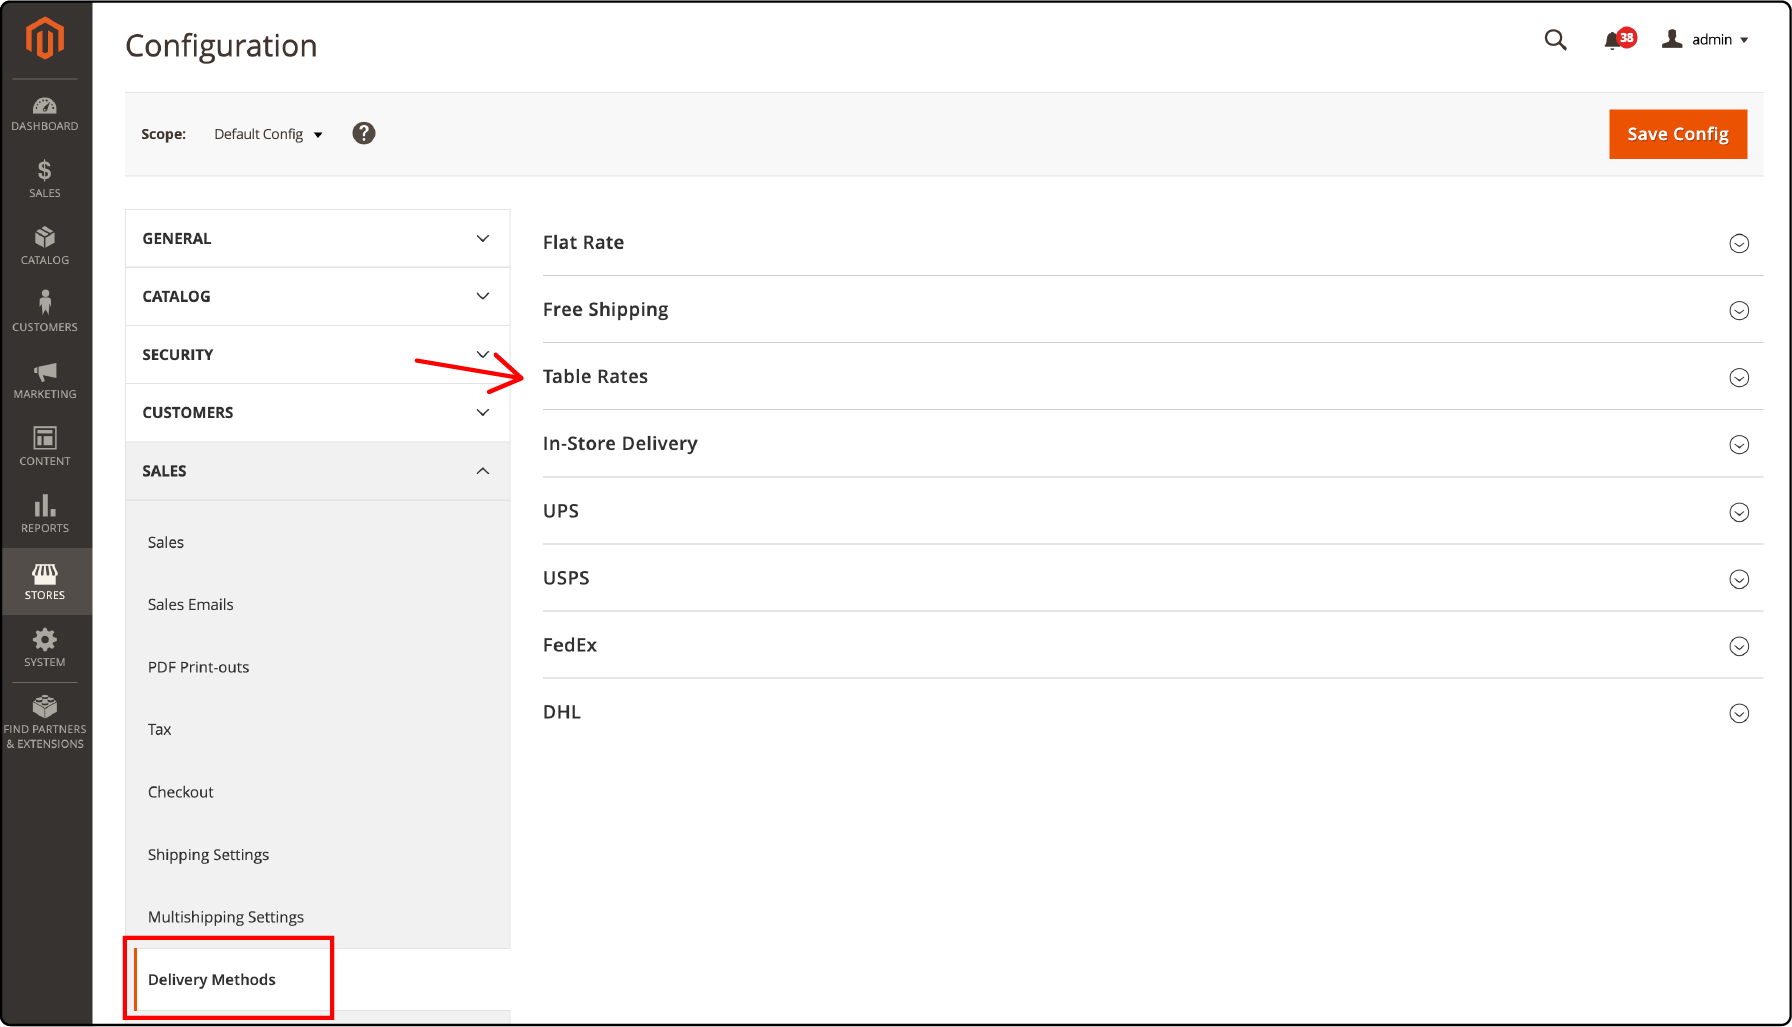
To access sales, navigate to the left panel and select Sales.
-
Navigate to Shipping Methods and proceed to select Table Rates.
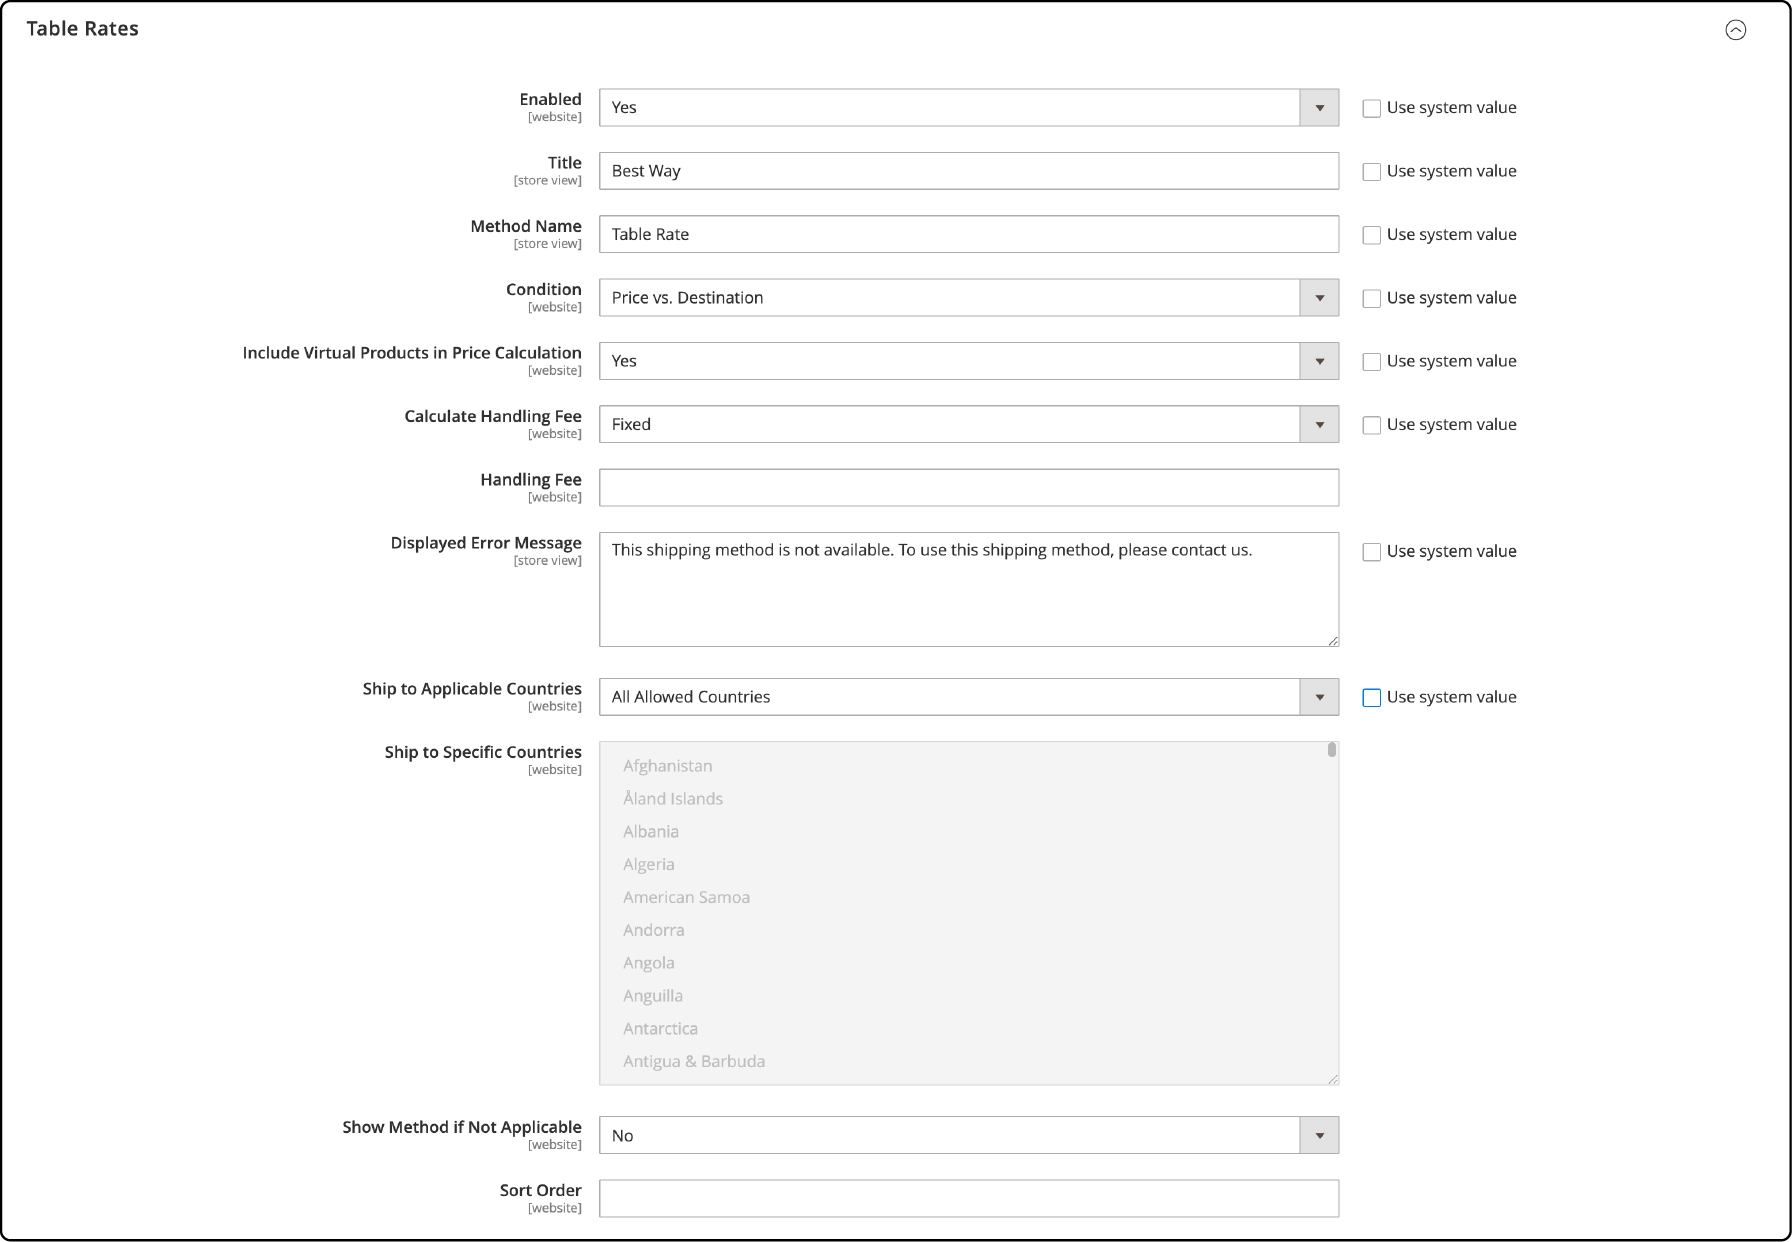
- Click the Enabled option to Yes to turn it on.
- Put the title and method names you want to display on the front end.
- Set
Ship to Applicable Countriesto either All Allowed Countries or Specific Countries. - If you opt for Specific Countries, pick the countries you want in the Ship to Specific Countries field.
- Set the Calculate Handling Fee as Fixed or Percent.
- Next, input the handling fee amount in the designated Handling Fee field. Make sure they are clear and easy to read.
- Select a Condition to determine the shipping rate, with options such as Weight v. Destination, Price v. Destination, or the number of Items v. Destination.
- Note: Virtual Products have no weight; be careful when picking Weight vs. Destination.
- Input an error message into the
Displayed Error Messagefield. This message will be shown in cases where multiple table rates shipping isn't available. - You can then configure the Show Method if Not Applicable option as per your choice, either Yes or No.
- To control the position of the table rates shipping method on the checkout page, specify the desired Sort Order.
- Click on Save Config.
Step 2: Preparing table rate data
Prepare the table rate data using the following steps:
-
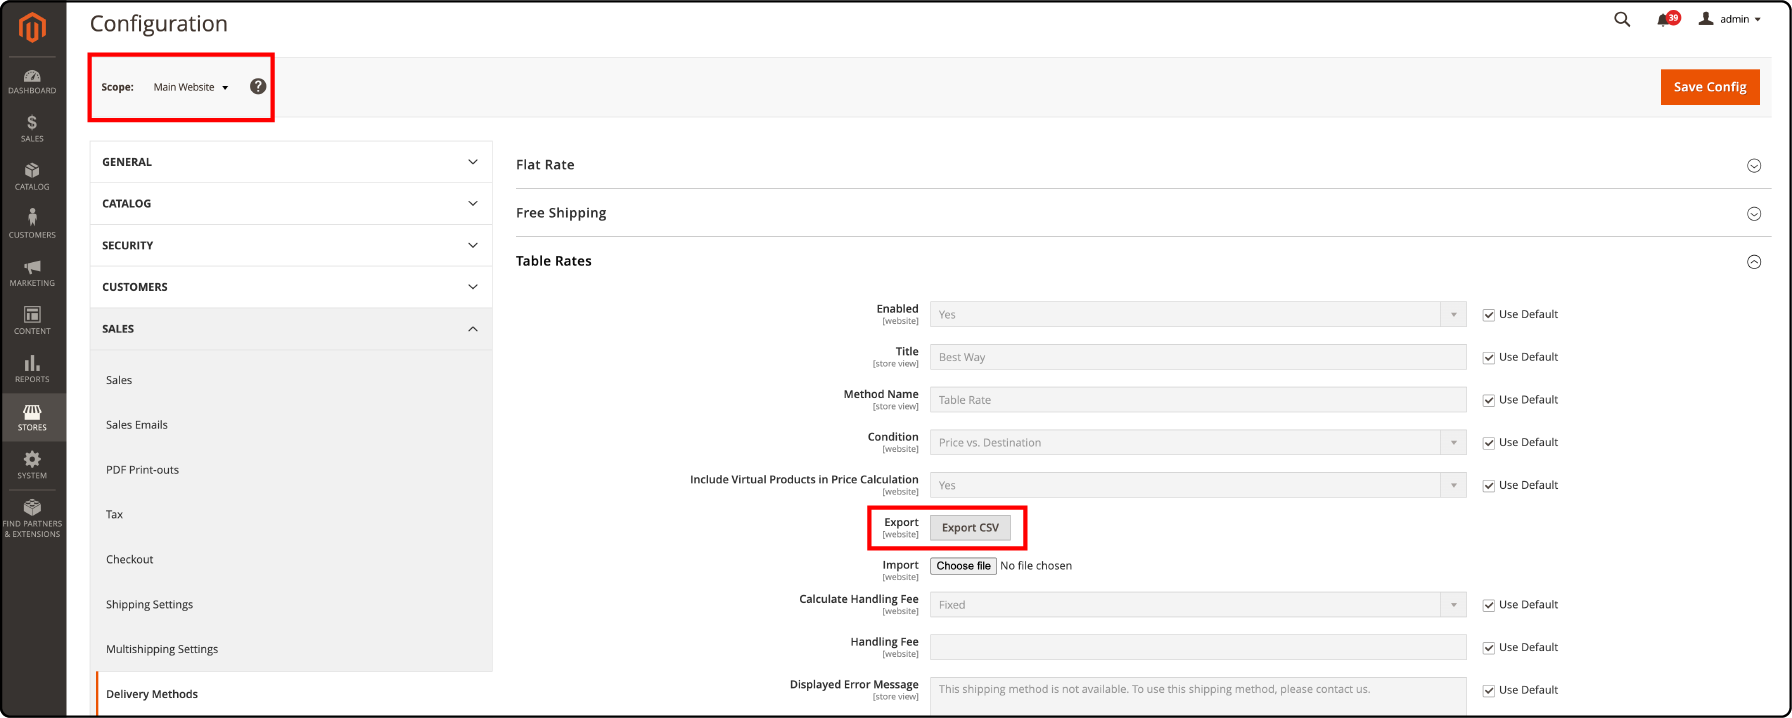
Go to the Admin Panel > Store View, where the configuration is active. You can choose the main Website or any website you need.
-
Under Table Rates, click Export CSV. A file called tablerates.csv will be added to your downloads.
-
Open the CSV in a spreadsheet. Here, you'll need to input essential details for each condition.
-
Provide the required data for your shipping rates by filling in the following fields:
- Destination country (Country column)
- Specific region or state within that country (Region/State column)
- Corresponding zip or postal code (Zip/Postal Code column)
- Pricing basis: price vs. destination, weight vs. destination, or number of items vs. destination (Condition column)
- Your shipping cost.

- Employ an asterisk (*) as a wildcard to symbolize all potential values across any category.
- Save and export CSV.
Step 3: Importing table rates data
Import the prepared table rate data into Magento 2 by following these steps:
-
Return to the Table Rates section within your Magento admin panel.
-
Click Choose file and upload the modified tablerates.csv file from your computer.
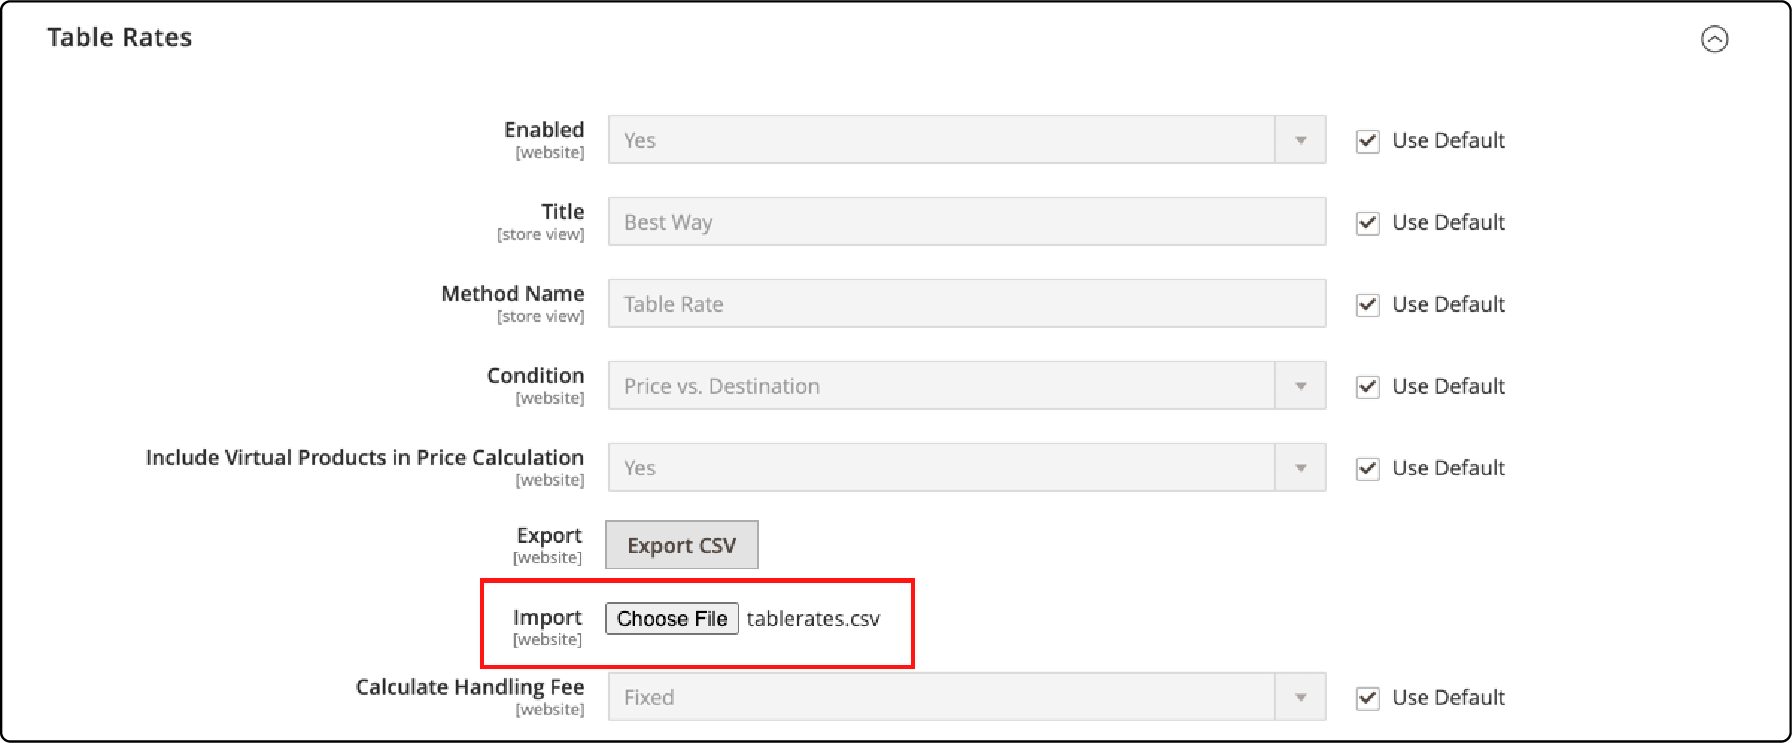
- Find your CSV file with all the rates and select it.
- Now, click on Save Config.

- If you get an error message, check your CSV file again for any mistakes.
Step 4: Running a test
You must run a test to ensure your table rates are set up correctly. Here's how:
-
Add/Include virtual products to your section of the shopping cart. These products will be used for testing the shipping rates.
-
Go to the checkout page.
-
Enter a valid shipping address. This address will calculate shipping costs based on your table rates.
-
In the available shipping methods, select the Table Rates shipping method. Here your configured table rates will come into play.

- Proceed with the Payment process as you normally would. This step helps you confirm that the table rates are correctly applied.
Benefits of Using Table Rates Shipping
1. Flexible shipping options
Magento 2 shipping table rates empower you to provide customers with diverse shipping options based on weight, destination, or price. This flexibility allows you to cater to various customer preferences, enhancing their satisfaction by enabling them to choose the method that suits them best. It means you can provide various delivery choices for your customers, such as express shipping or standard delivery, and ship to applicable countries.
2. Accurate rate calculations
Accurate rate calculations are one of the benefits of using table rates shipping in Magento 2. This method calculates shipping costs based on various factors such as destination, weight, and price. Setting up table rates with precise calculations increases transparency in your shipping process.
3. Customizable shipping rules
You can customize the shipping rules in Magento 2 to meet your specific business needs. It allows you to set different shipping rates based on various conditions.
Offer free shipping for orders above a certain amount or discount rates for specific products or customer groups. Crafting a tailored shipping experience for your customers helps manage your costs effectively.
FAQs
1. What is the table rate shipping method in Magento 2?
The table rate shipping method in Magento 2 is a feature that lets you set up different shipping fees. It uses items, prices, or destinations to calculate shipping rates.
2. How do you configure table rates in Magento 2?
First, complete the default settings for table rates under stores settings configuration to configure table rates. Then, go to the new section for your website where the configuration applies and update your desired settings.
3. Can I add multiple delivery methods using this feature?
Yes, you can use Magento 2's element of unlimited custom shipping methods to set up many delivery methods per customer's needs.
4. What do 'wildcard locations at the bottom' of table rates mean?
Setting up Magento 2 Shipping Table Rates and wildcard locations means including all possible values, such as all countries; this should be used last.
5. What if an error message appears after configuring my shipping fees?
If an error message displays, it suggests issues with entered absolute value data or other areas within configured steps; be sure to double-check.
6. How do you tackle a displayed error message in the Magento 2 table rate setup?
To troubleshoot an error message displayed during Magento 2 table rate setup, review and correct any inaccuracies in the entered data or configuration steps.
7. Can Magento 2 table rates consider the number of items v. destination for price calculation?
Yes, Magento 2 table rates enable price calculation based on the number of items vs. destination, ensuring accurate shipping costs tailored to each order's characteristics.
Summary
Adopting Magento 2 shipping table rates helps you get flexible shipping choices and accurate calculations that you can use to elevate your online store's shipping experience. In this tutorial, we covered the process of setting up Magento 2 Shipping Table Rates using CSV files and how to configure default settings, organize data, and perform successful imports.
Ready to optimize your Magento ecommerce business? Explore seamless Magento hosting plans for expert cloud hosting support.


