
How to Create Magento 2 Shipping Labels Using Shipping Methods?
Ready to streamline your shipping process and save time on every order? Magento 2 Shipping Labels make it easy to automate the creation and printing of labels. It makes e-commerce order fulfillment simpler.
This tutorial will cover how to create shipping labels in Magento to improve shipment.
Key Takeaways
-
What are the aspects of shipping labels in saving time and reducing errors?
-
Structure and key information for delivery labels.
-
Important essential labels for your ecommerce hipping efficiency.
-
Simple steps to create and configure shipping tags.
-
Easy comparison of labels and third-party options.
-
Common mistakes to avoid with shipping tags.
-
Why Magento Shipping Labels Are Essential for Your Ecommerce Business
-
3 Steps to Create Shipping Labels in Magento for a Professional Look
What are Magento 2 Shipping Labels?
Magento 2 shipping labels are digital postage slips created within the e-commerce platform. These labels include key shipping details and reduces errors for online merchants.
Magento 2 shipping labels automate the shipping process. They work with major shipping carriers like DHL, USPS, and United Parcel Service. This lets businesses quickly generate shipping labels and print them in document format. You can manage it all from the backend. They include important details like:
-
The sender address
-
Receiver address
-
Parcel’s weight
-
Tracking ID.
By entering the correct shipping information, the shipment is submitted to the service. Then, the system automatically creates a label and tracking number.
Structure and Key Information of Magento Shipping Labels
A shipping tag features key details that help simplify the delivery method. It automates order fulfillment. Here's how the structure looks:
1. A – Sender’s Address and Name
This section holds the sender’s name and address. It ensures the package can be returned if needed. When a Magento 2 store owner submits the order, this information is added to the label.
2. B – Recipient’s Address and Name
The recipient’s name and address ensure the package reaches the correct destination. The package’s information is taken from the products from order. It creates package labels. The address appears in the shipping papers.
3. C – Maxicode
The Maxicode is a symbol used by United Parcel Service. It works like a barcode but uses a hexagonal grid. This symbol helps the package connect to the shipping carrier system for sorting.
4. D – Routing Code
The routing code tracks the package inside the service’s network. The shipping service uses this code to direct the package. This is important for shipments that originate within the United States or internationally.
5. E – Barcode
The barcode shows the destination zip code. The service scans it to ensure the package is routed correctly. The number shows in the form of a barcode when you print shipping labels.
6. F – Tracking Number
Each label feature has a label and a tracking ID. Both you and your customer can use this number to track the parcel’s journey. If the tracking number appears on the label, it helps the customer follow their package. If the carrier cannot create the label, it’s often due to problems with shipping accounts.
7. G – Level of Service
The level of service tells whether the shipping is standard, expedited, or overnight. This is displayed in the package labels and depends on the carrier account settings. The XML format or United Parcel Service XML may also be used for advanced options.
8. Additional Information
- Package Weight
The package’s weight helps calculate shipping fees. Make sure to enter the correct weight to avoid extra charges. If the package is shown with the wrong weight, the rate might be wrong.
- Return Address (or Return Labels)
Adding a return address helps with the return process in case the item needs to be sent back. Shipping tags can include return labels to make this easier.
Why Magento Shipping Labels Are Essential for Your Ecommerce Business
1. Saves Time on Print the Shipping Tag
Shipping tags automate the creation and printing of labels. This saves time compared to entering shipping details by hand. After an order is placed, the system creates the label. You can then quickly print a shipping label.
You can also select multiple orders and process labels in bulk. This helps manage many orders at once. The labels are generated in pdf format, making printing simple and fast.
2. Reduces Human Errors
Manually entering shipping details can lead to mistakes. It includes wrong addresses or package weights. These errors can delay shipments or cause returns. Shipping tags pull accurate data from the system. This ensures the correct order number and details are included.
The system uses the order number and package number to create labels. A checkbox lets you double-check details before printing. This reduces mistakes and receives a shipping label with more information.
3. Integrates with Major Shipping Carriers
Magento shipping labels work with major services like FedEx and UPS. You can easily add shipping options and choose the best services or send method for each order. For advanced setups, you can also use the UPS XML option.
The system ensures that labels meet service requirements. It also generates the needed API signature confirmation v3 to finish the process. This integration lets you handle shipping without third-party tools.
4. Offers Real-Time Tracking
Each shipping tag comes with a tracking ID. This lets you and the customer track the package in real-time. Customers can check their order status and delivery time, which improves their experience.
If there are any problems with the connection, the system will alert you. It ensures the new tracking number is added. Real-time tracking reduces customer support requests and helps you monitor the issues.
5. Supports Bulk Label Printing
If you handle a lot of orders, shipping tags allow bulk printing. This saves time by printing labels for many orders at once. You can select multiple orders and generate the labels together. This feature is great during busy times like sales events.
Each label is generated in PDF format, making it fast and easy to print. Bulk printing helps you fulfill orders more quickly.
6. Customizable and Scalable
Shipping tags grow with your business. You can ship both local and global orders. It creates labels that fit different services. You can also customize labels by adding a return address or adjusting the level of service.
If your business handles returns, you can include return labels to process smoothly. The system’s flexibility makes it easy to scale as your business expands.
7. Improves Customer Satisfaction
Shipping speed and accuracy are key to customer satisfaction. Shipping tags help ensure on-time shipments and accurate shipping info. The provided tracking ID lets customers track their packages. This reduces the need for order status inquiries.
With accurate shipping info, customers get their packages faster. If a customer wants it to be shipped with a specific service, you can adjust the shipping method as needed.
8. Supports Both Domestic and International Shipping
The shipping suite extension handles both new and existing orders. It includes local or global shipping. The system manages domestic and international shipping from one platform. It also manages taxes, customs, and shipping forms for international orders. This makes it easy for businesses to expand to global markets. Magento simplifies managing both local and global orders, ensuring smooth shipping.
3 Steps to Create Shipping Labels in Magento for a Professional Look
Step 1: Install and Enable the Extension
-
Purchase and install the Product Labels extension by following the Magento 2 tutorial.
-
In the Magento admin panel, navigate to Product Labels > Configuration.
-
Enter the serial key to enable the extension.
Step 2: Configure Basic Display Settings
In the Configuration section, set up the following:
-
Display On: Choose where the labels will appear (e.g., product pages, category pages).
-
Show Multiple Labels in the Same Position:
-
Set to "No" to display labels in different positions on the product.
-
Set to "Yes" to overlap multiple labels. It shows only the one with the highest priority available in the package.
-
Step 3: Create a New Product Label
Go to Product Labels > Manage Labels and click Add New Label or edit an existing label.
-
Configure General Settings:
-
Enable Label: Toggle to activate the label when you submits an order.
-
Title: Enter a descriptive title for the label.
-
From / To: Set the dates when the label should be visible.
-
Priority: Assign a priority number. Lower numbers give higher priority. If there are multiple labels, the highest-priority one is added to the existing one.
-
Store View & Customer Groups: Choose the store views and customer groups that will see the label.
-
-
Set Up Label Design:
-
Label Type: Choose between text, shape, or image.
-
Position: Decide where the label will appear on the product image.
-
Label Image: Upload or select an image if needed.
-
Label Size: Set the size of the label.
-
Text: Enter the text for the label. You can use variables like {{discount_amount}} or {{discount_percent}}.
-
Text Color and Size: Customize the text color and size to fit your design.
-
Custom Styles: Add extra CSS styles. It includes transparency, rotation, or position to enhance the label.
-
-
Set Flexible Rules and Conditions:
Define the rules for when the label should appear. These can be based on product attributes or categories. For example, you can set conditions for items that ships both domestically and internationally.
5 Steps to Configuring Shipping Labels in Magento2
Step 1: Update the Country of Manufacture
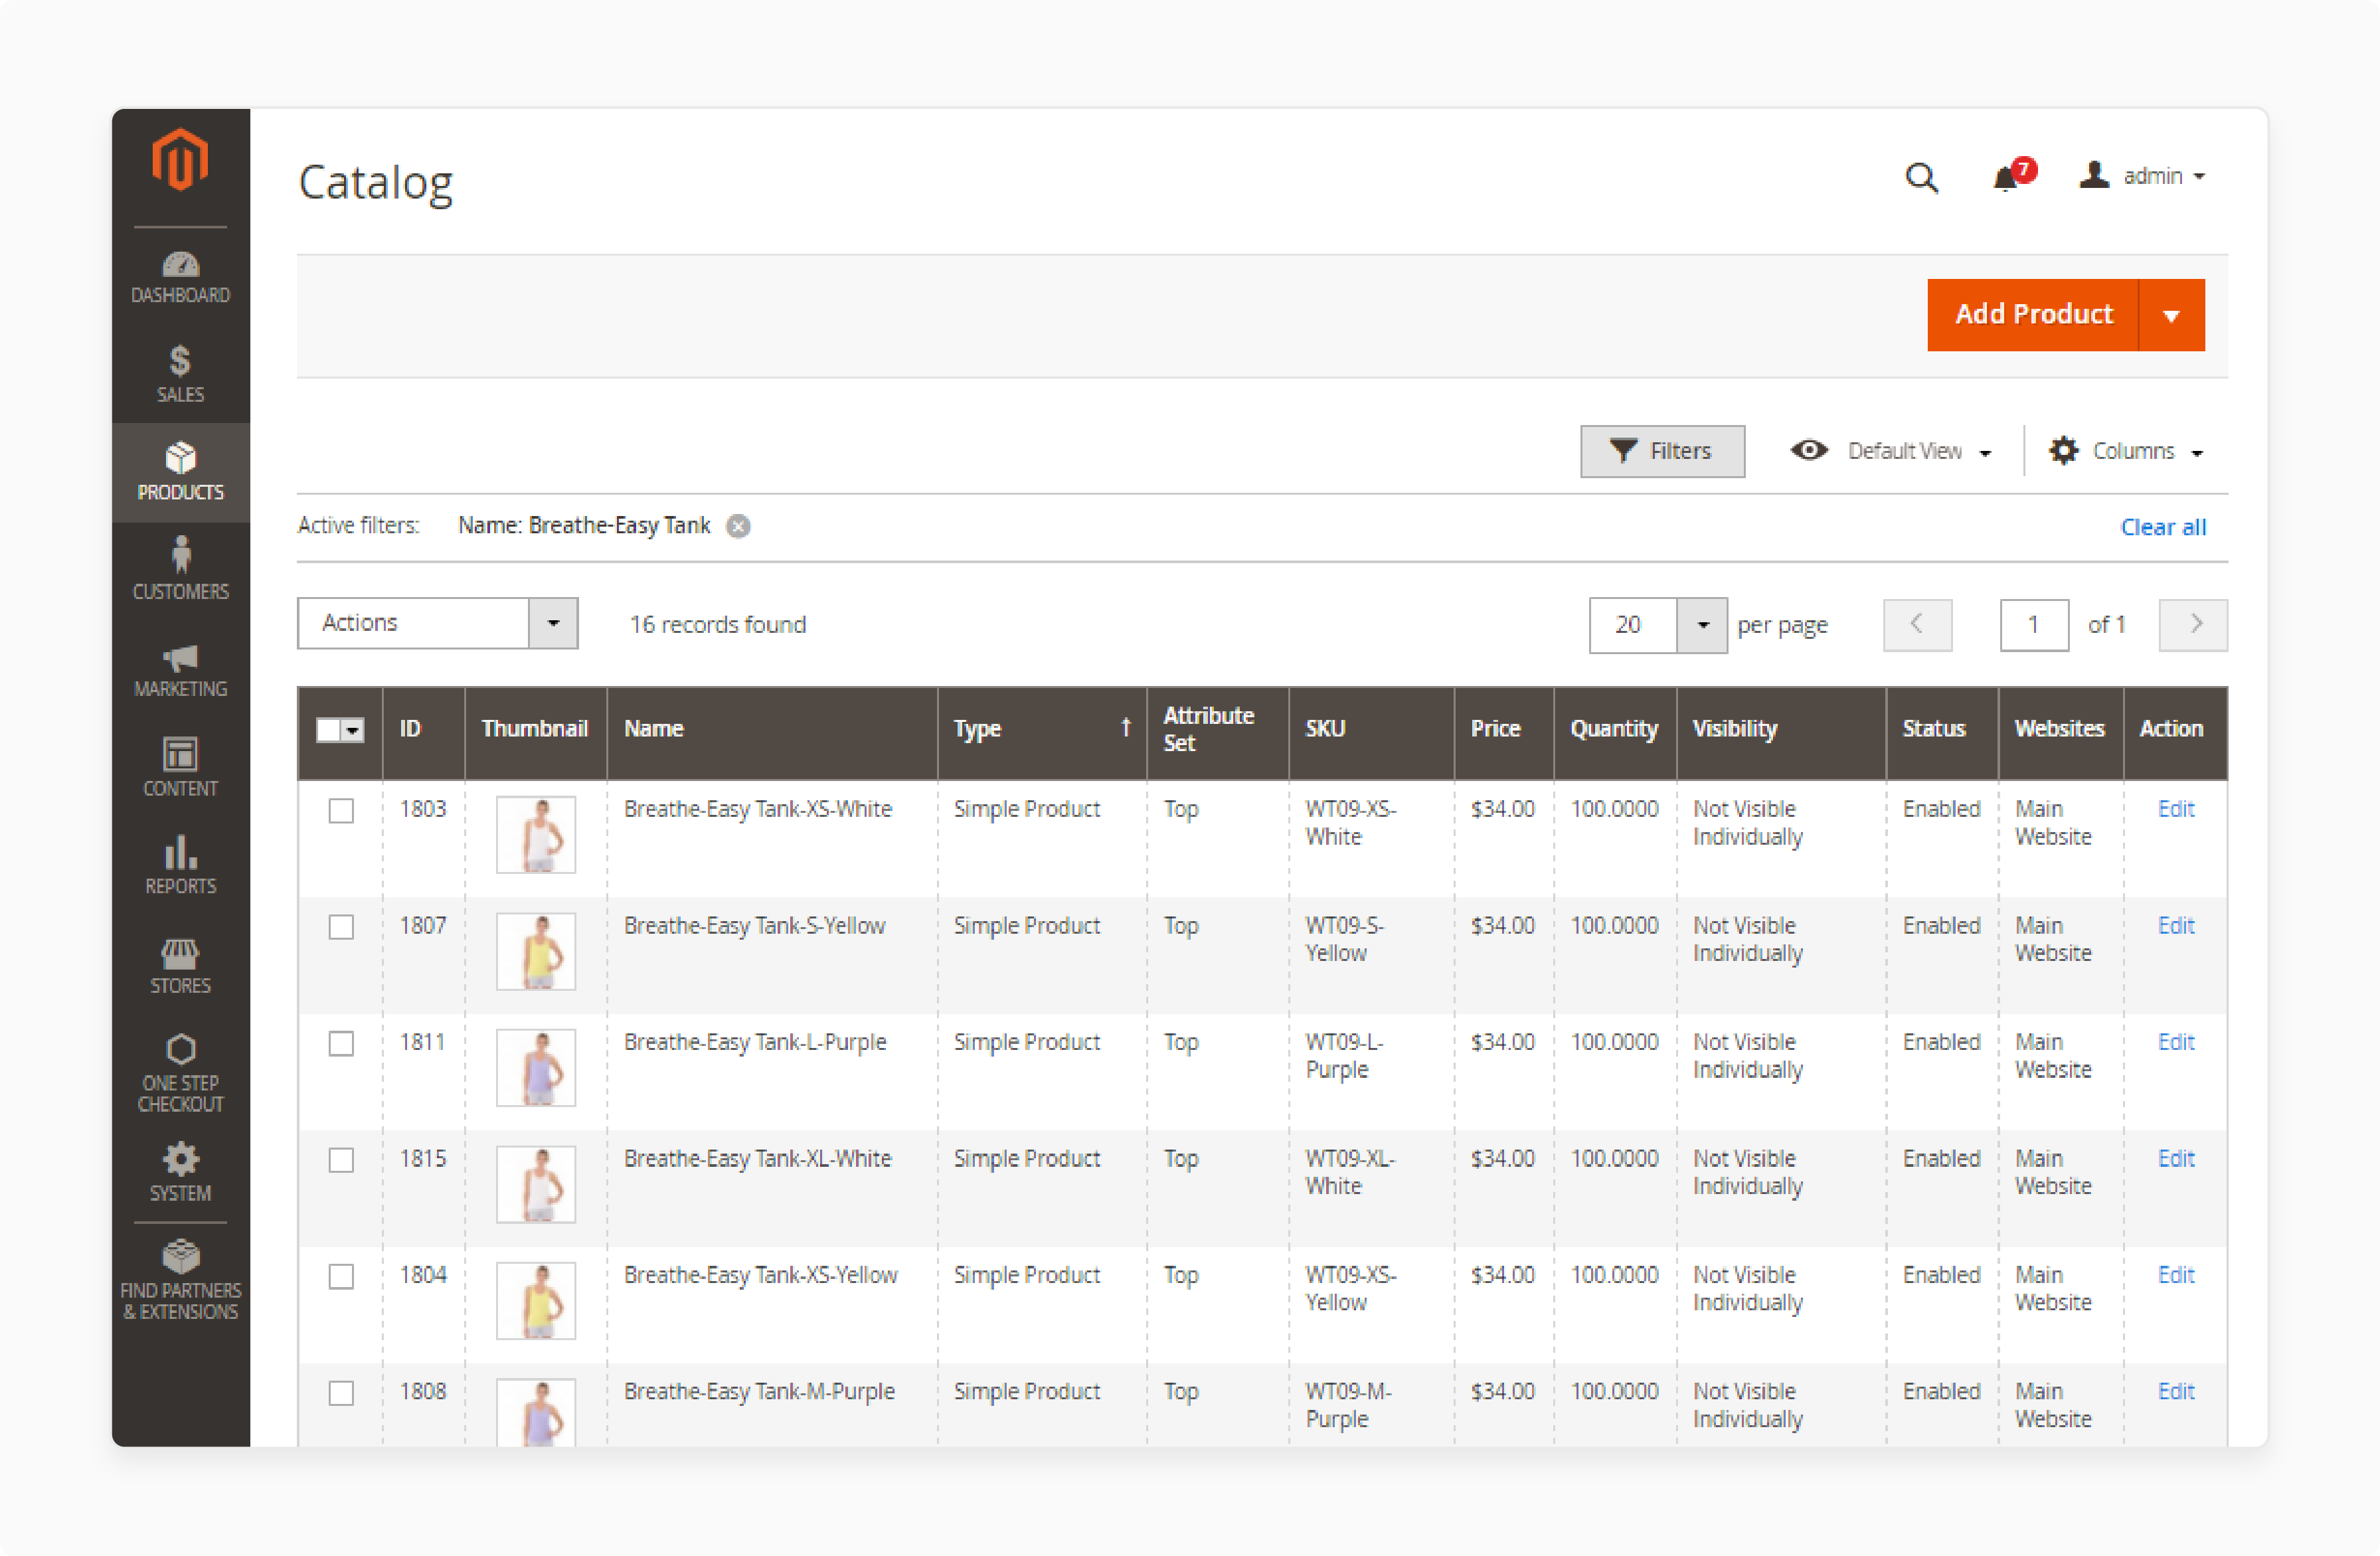
Method 1: Update a Single Product Record
-
In the Admin panel, go to Products and select Catalog from the Inventory section.
-
In the product grid, find the product you want to update and open it in edit mode.
-
On the left, expand Advanced Settings and select Autosettings.
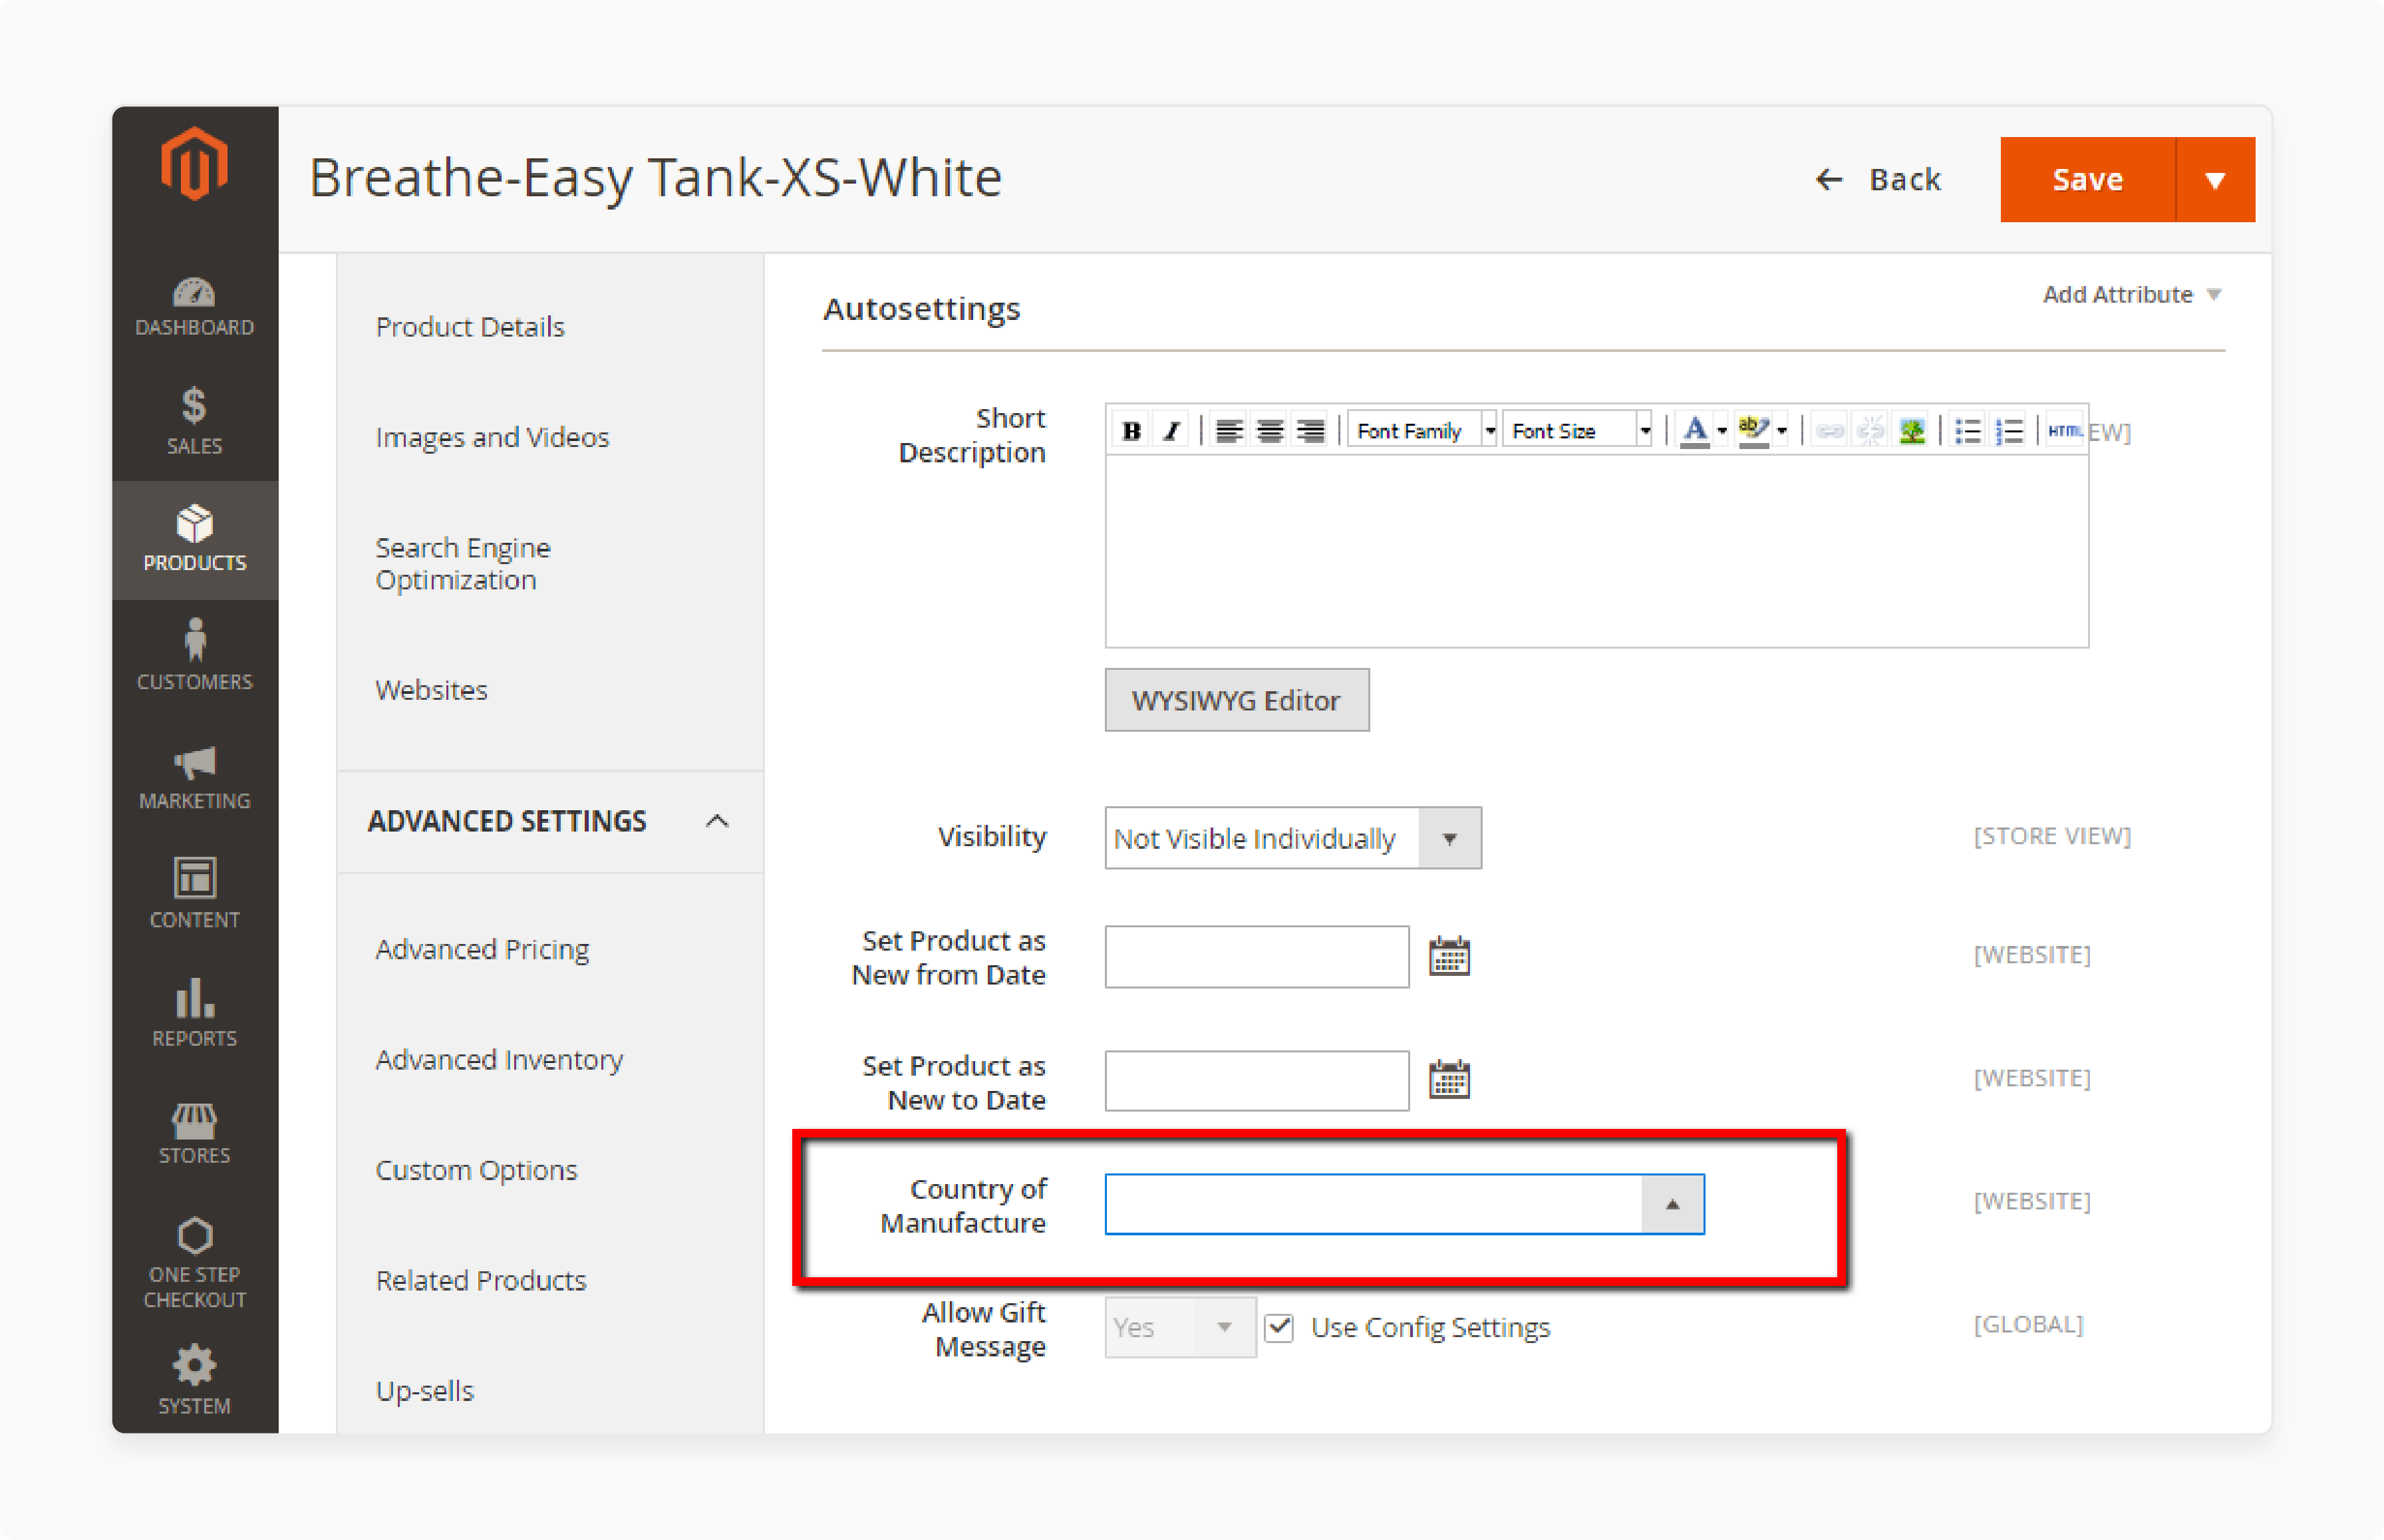
- In the Country of Manufacture field, choose the correct country.
- Click Save when done.
Method 2: Update Multiple Product Records
-
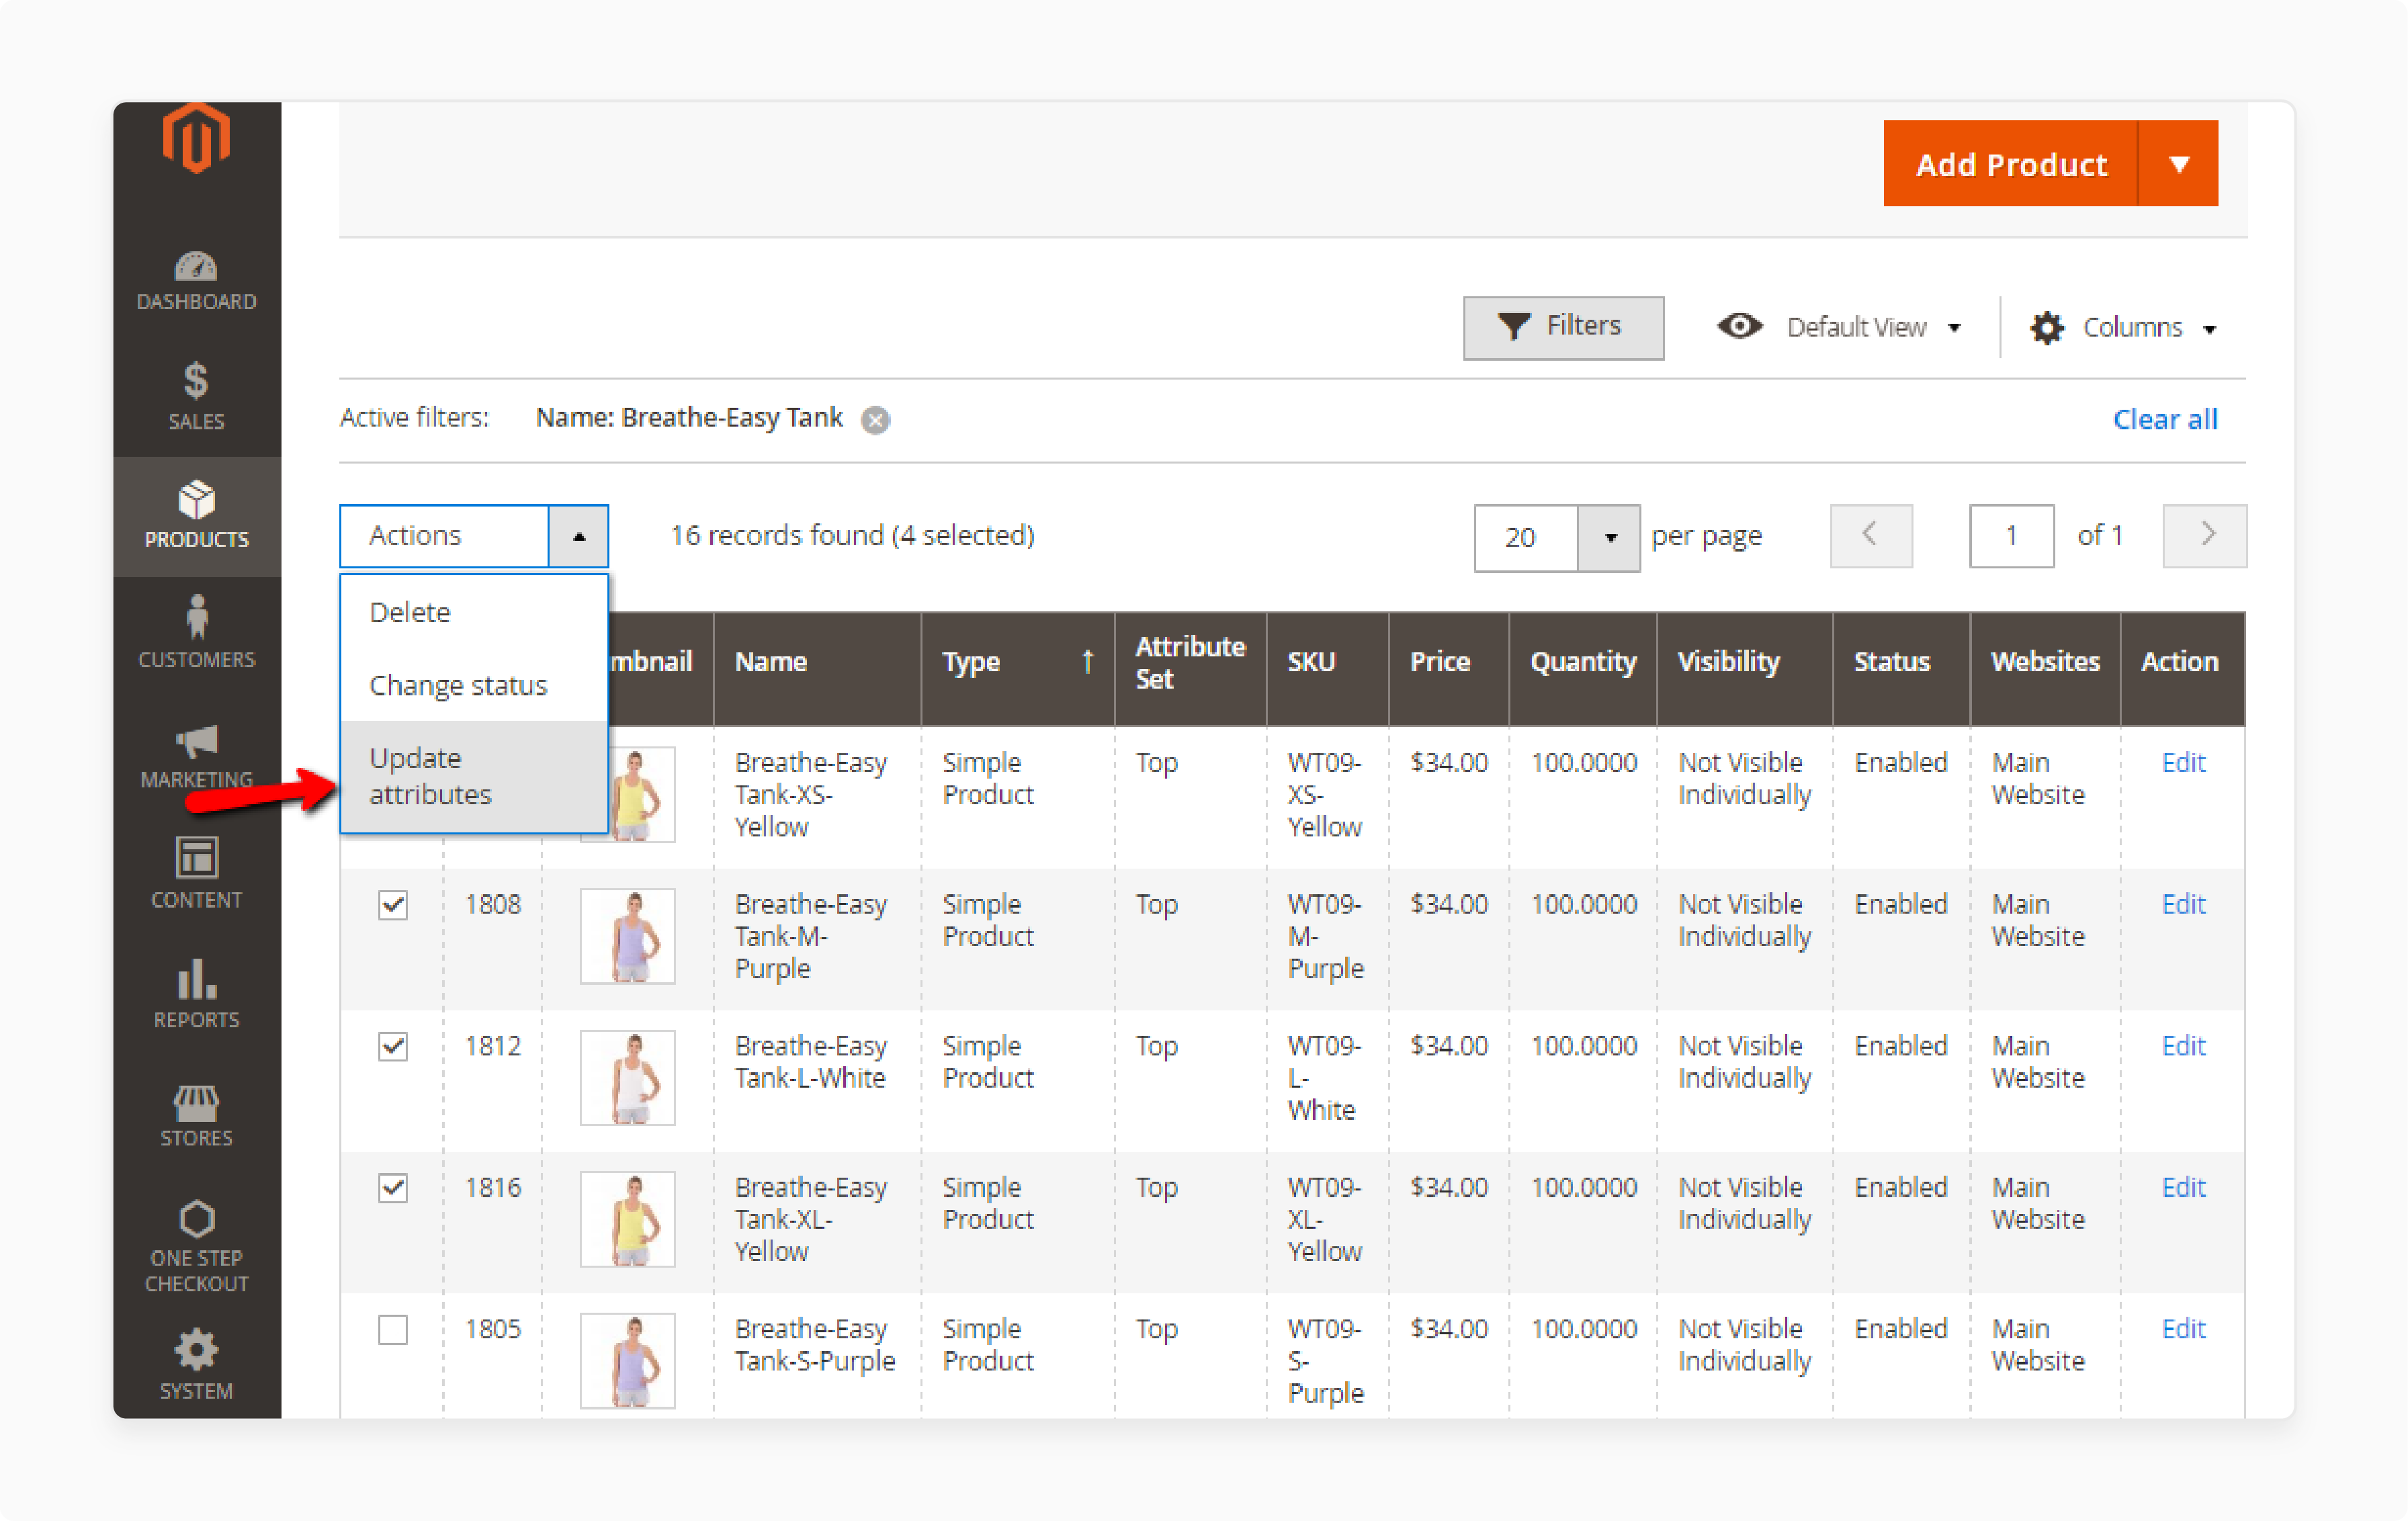
In the Admin panel, go to Products and select Catalog.
-
In the product grid, check the box for each product to update, as shown in the quantity column.
-
In the Actions dropdown, select Update Attributes.
-
In the Update Attributes form, check the Change box for Country of Manufacture.
-
Select the updated country.
-
Click Save when done.
Step 2: Complete the Store Information
-
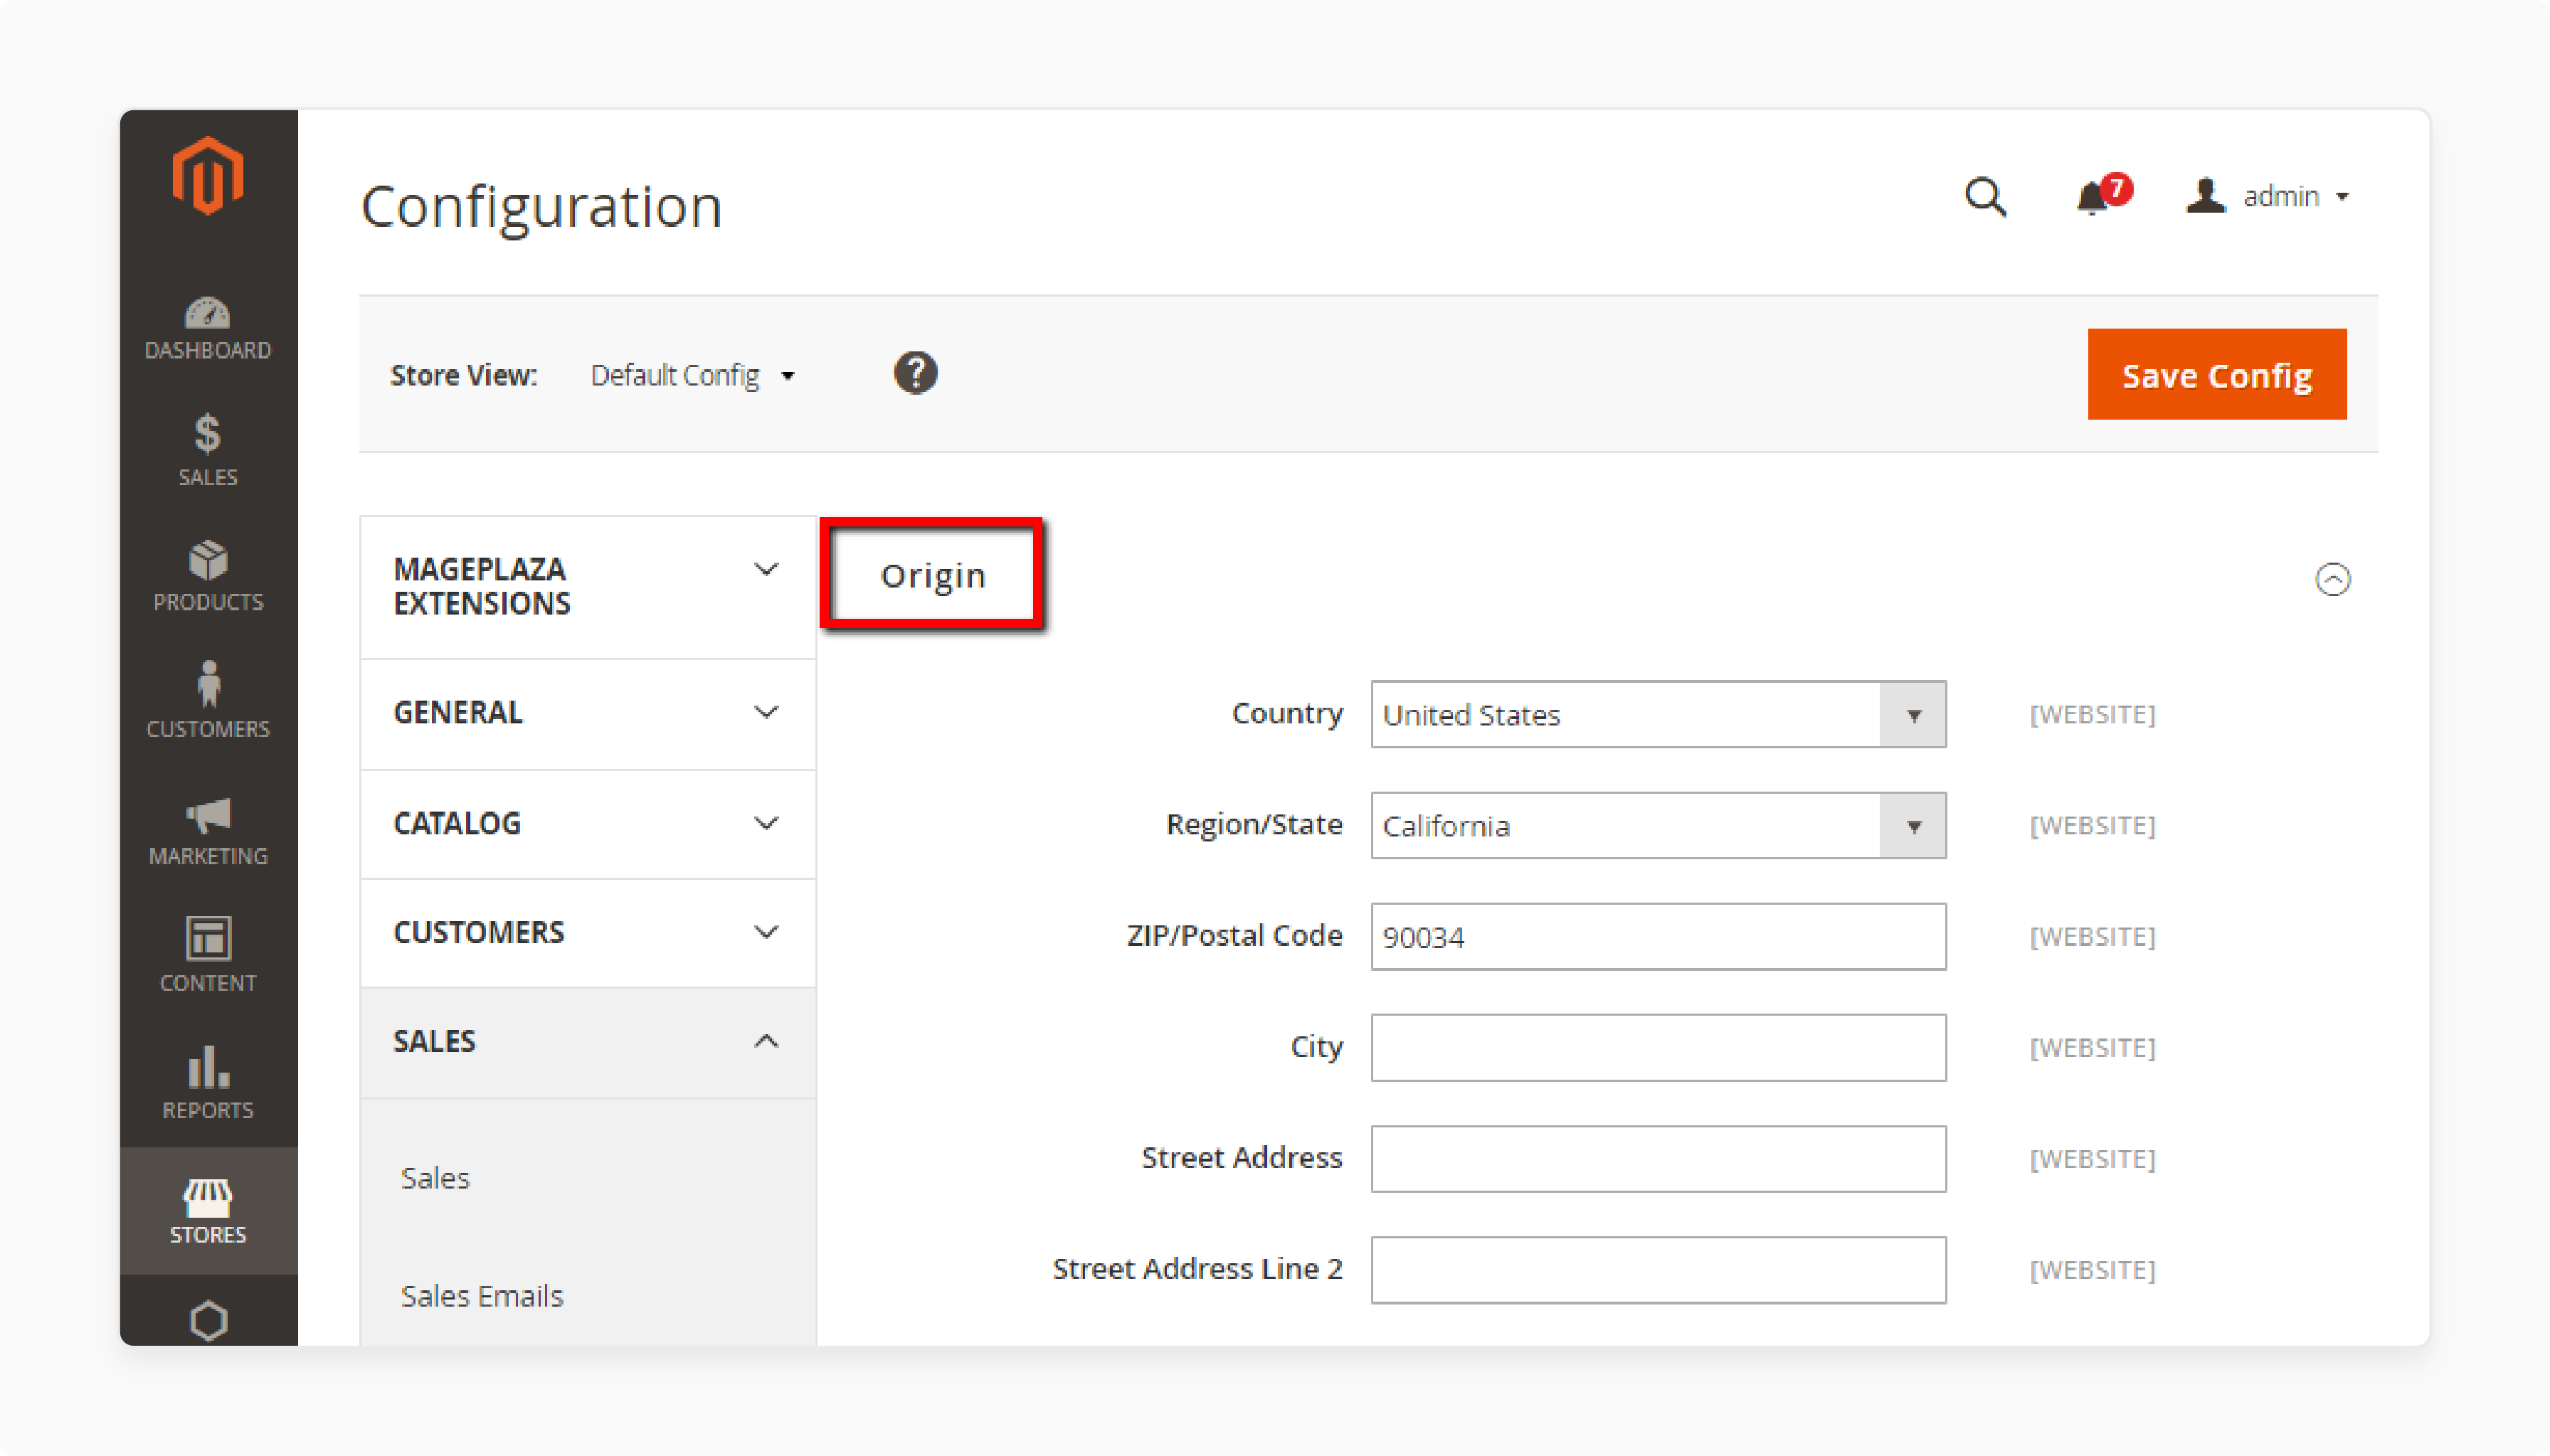
In the Admin panel, go to Stores and select Configuration under the Settings section.
-
In the left panel, select Shipping Settings under Sales.
-
In the Origin section, enter the following details:
-
Street Address: Add the address for shipments, like your company or warehouse location.
-
Street Address Line 2: Add more address details, such as the floor or entrance, for clarity.
-
-
In the left panel, select Shipping Methods under Sales.
Step 3: Configure Carrier-Specific Settings
-
USPS Configuration:
-
Open the USPS section under Shipping Methods.
-
Auto-fills the Secure Gateway URL.
-
Enter the Password provided by USPS to access their system through Web Services. Ensure your live USPS API access account is active.
-
In the Size field, select Large to customize the Length, Width, Height, and Girth of the package.
-
-
FedEx Configuration:
-
Open the FedEx section under Shipping options.
-
Enter the details:
-
Meter Number
-
Key
-
Password
-
-
This information connects to the system through Web Services.
-
-
DHL Configuration:
-
Open the DHL section.
-
Enter the needed details for DHL shipping. Refer to the DHL Resource Center for help if needed.
-
Step 4: Complete General Store Information
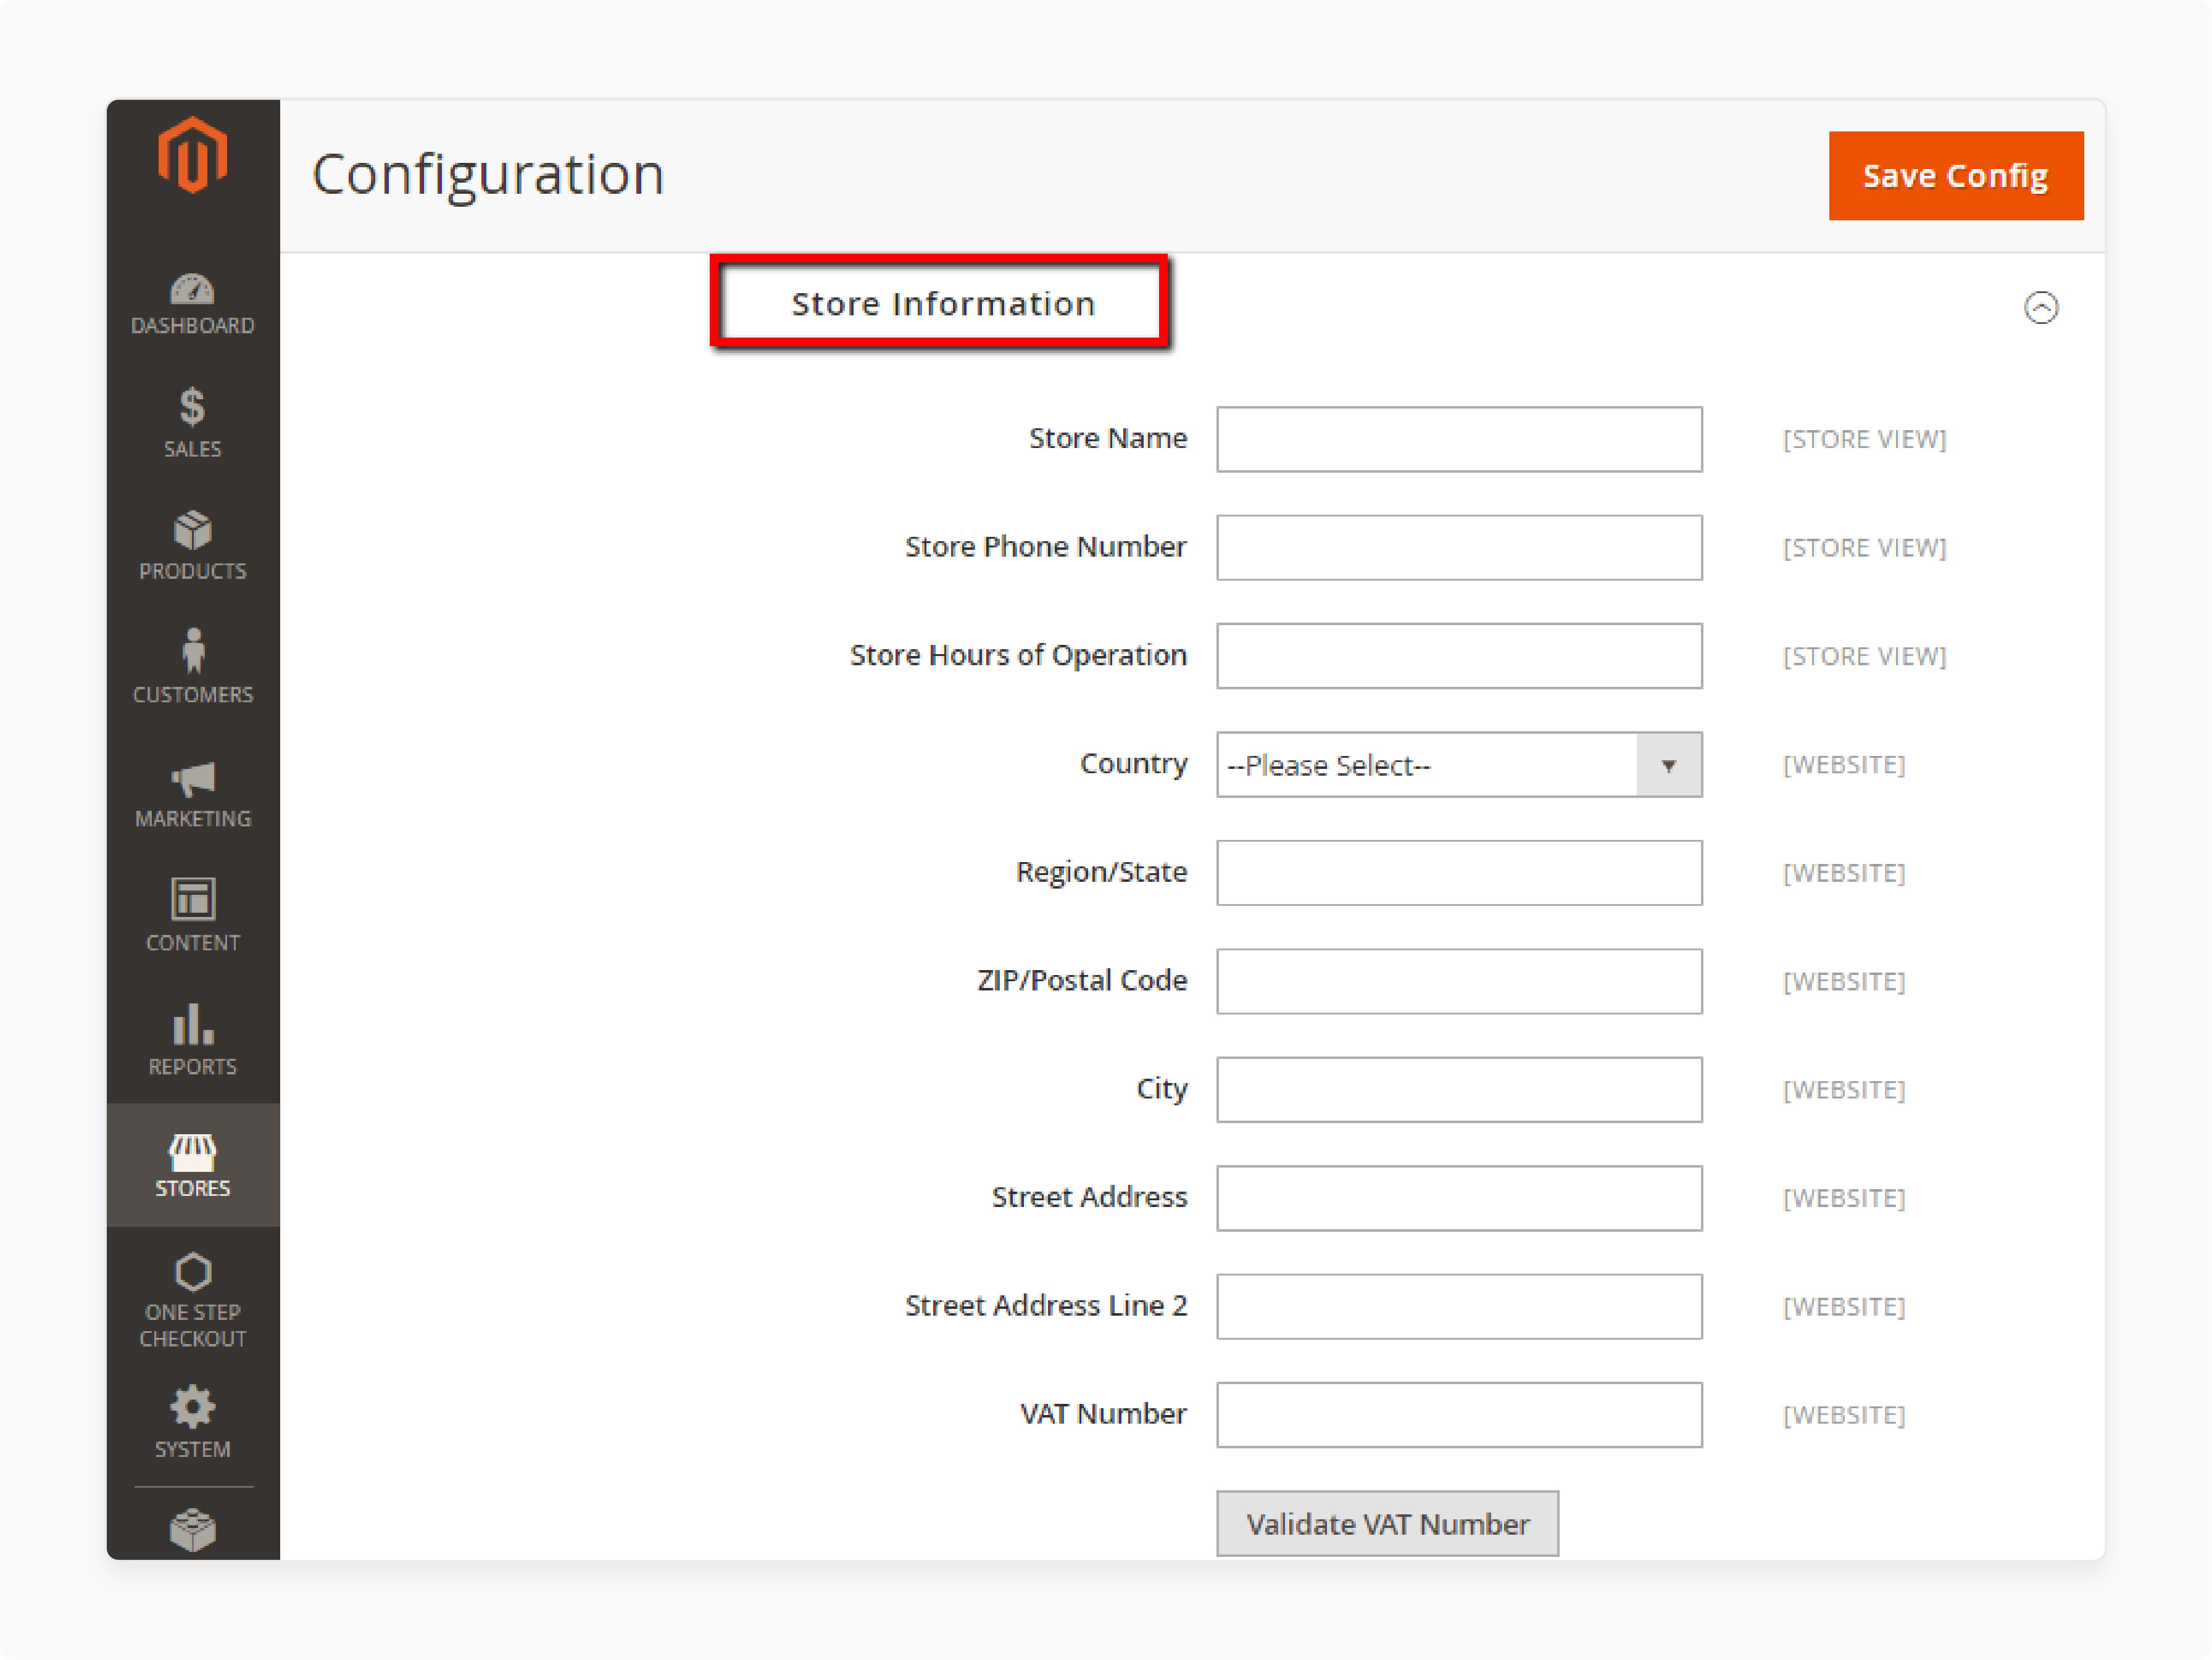
-
In the left panel, go to General > Store Information.
-
Fill in the Store Information section with the following:
-
Store Name
-
Store Phone Number
-
Country
-
Street Address
-
VAT Number
-
-
If you have different contact information for multiple stores.
-
Update the Store View settings for each.
Step 5: Save the Configuration
After completing all steps, click Save Config to finalize your shipping label configuration.
-
Troubleshooting for Steps:
-
If you encounter problems with connection or cannot create the label due to an error. Confirm that your account type supports shipping labels.
-
For further help, contact the contact center.
-
Magento 2 Shipping Labels vs. Third-Party Solutions
| Aspects | Magento 2 Shipping Labels | Third-Party Solutions |
|---|---|---|
| Integration | Built directly into Magento, it is easy to use. | Requires separate installation and setup of external apps or services. |
| Real-Time Tracking | Includes existing tracking numbers for real-time tracking. | Often includes advanced tracking with detailed notifications. |
| Ease of Use | Managed from the Magento admin panel, making it simple. | It may have a steeper learning curve, depending on the provider. |
| Shipping Rules and Automation | Basic shipping rules and automation. | Offers advanced automation and shipping rules for rates and destinations. |
| Supported Providers | Supports major services like FedEx and UPS. | Can support a wider range of providers, including local providers. |
| Multi-Store Support | Supports multi-store setups, allowing easy management of multiple stores. | Some third-party solutions offer more advanced multi-store features. |
| Cost | Included with Magento at no extra cost. | May charge subscription fees or per-use costs. |
| Carrier Rate Comparison | Provides basic rate calculations from supported carriers. | Often includes advanced tools to compare rates from multiple providers. |
| Customization Options | Offers basic customization like label size, position, and delivery method. | Provides more advanced customization like branded labels and special rules. |
| Scalability | Scales with your Magento store, supporting local and global shipping. | Can handle complex shipping needs, including fulfillment services. |
| Bulk Label Printing | Allows bulk printing and generates labels in PDF file format. | Bulk printing may be available but varies by provider. |
| Signature Confirmation | Signature confirmation v3 be enabled by providers. | Often includes more advanced delivery confirmation options. |
10 Common Mistakes to Avoid Shipping Labels in Magento 2
1. Incorrect Carrier Setup
Ensure your provider settings (FedEx, UPS, USPS) are correct. If they aren’t, you may face issues where you can’t ship orders. Always verify the interface credentials and service details to avoid problems with labels.
2. Missing or Incorrect Address Information
Wrong order to the package information, like sender or recipient addresses, can cause delays or returns. Double-check all shipping details and ensure the shipper number displays if needed.
3. Choosing the Wrong Label Size
Using the wrong label size can result in labels that don’t fit or are hard to read. Make sure the size and format are correct before printing. If needed, you can either add a custom size for better fit and visibility.
4. Not Verifying Label Information
Always review the label before printing. Skipping this can lead to costly Magento errors. Check all shipping details, including provider and tracking info. This step ensures you get the answer you're looking for in terms of accuracy.
5. Forgetting to Enable Multiple Store View Configurations
If you have multiple stores, each store’s shipping settings must be configured. Failing to do so can lead to wrong shipping details. Set up your store views properly to avoid this.
6. Not Updating Country of Manufacture
Always update the country of manufacture, especially for international shipping. Not updating this can lead to delays, customs issues, or failure to create shipping tags.
7. Ignoring System Notifications
Don’t ignore system alerts related to Magento delivery. These alerts help you catch and fix problems. Address them promptly to avoid shipping errors.
8. Using Outdated Carrier Information
Carriers often update their systems, and outdated credentials can cause label failures. Ensure your provider information is always current to prevent issues.
9. Failing to Set Shipping Options Properly
Incorrectly set shipping options can lead to customers not seeing the suitable options at checkout. Make sure your methods are set up and functional to avoid fulfillment issues.
10. Not Testing Shipping Labels
Before going live, take time to learn how to create and test shipping tags. Testing helps find any setup issues early, ensuring smooth shipping.
FAQs
1. How do I print the shipping labels for multiple orders in Magento 2?
Use the bulk printing feature to print shipping tags for multiple orders. Select the orders, generate the labels, and print them in a PDF file. This feature saves time and makes the process easier during busy periods.
2. What details are included when I generate the shipping labels?
The labels include key details like the sender’s address, recipient’s address, package weight, and tracking ID. There is also a barcode and routing code to help the carrier process the package.
3. Can I customize the design before I generate labels?
You can customize shipping tags in Magento. You can change the label size and position. You can also add a return address or adjust the level of service to match your needs.
4. What should I do if I cannot print the labels in Magento?
If you can’t print shipping tags, check your carrier settings and API credentials. Incorrect settings can block label creation. Ensure the shipper number appears and that the delivery method is correctly configured.
5. How can I add multiple labels in Magento?
Magento allows you to print multiple labels for different products in one order. This is useful if you ship items separately. You can configure this in the admin panel by updating the shipping settings.
6. Can I track orders after I print the shipping label?
Every shipping label comes with a tracking ID. You and your customers can use this number to track the package in real time. This feature improves transparency and customer satisfaction.
Summary
Magento 2 Shipping Labels are digital labels that make the delivery workflow easier for online stores. They include sender and recipient addresses, package weight, and tracking IDs. Magento automates label creation and printing with carriers. Consider the following features:
-
Saves Time: It automates label creation and printing, saving time.
-
Reduces Human Errors: It pulls accurate data to avoid mistakes.
-
Integrates with Major Carriers: It works with various carriers.
-
Offers Real-Time Tracking: Each label has a tracking ID for easy tracking.
-
Supports Bulk Printing: You can print many labels at once, speeding up the process.
Explore managed Magento hosting to boost your eCommerce efficiency with shipping labels.


