
How to Install Magento 2 Rental Booking Extension?
Looking to grow your rental business with a powerful booking system?
Magento 2 Rental offers a complete solution for managing rental products, bookings, and customer interactions. Whether you’re renting out equipment, cars, or properties, the extension simplifies your operations.
This tutorial covers key features, benefits, and how to install a rental extension.
Key Takeaways
-
The rental extension simplifies Magento 2 store rental bookings and inventory.
-
Flexible pricing models offer varied rates for different rental durations.
-
Booking calendar lets customers easily select rental dates.
-
Automated notifications keep customers informed about bookings.
-
Multi-vendor support allows multiple sellers to list rental products.
What is a Magento 2 Rental Extension?
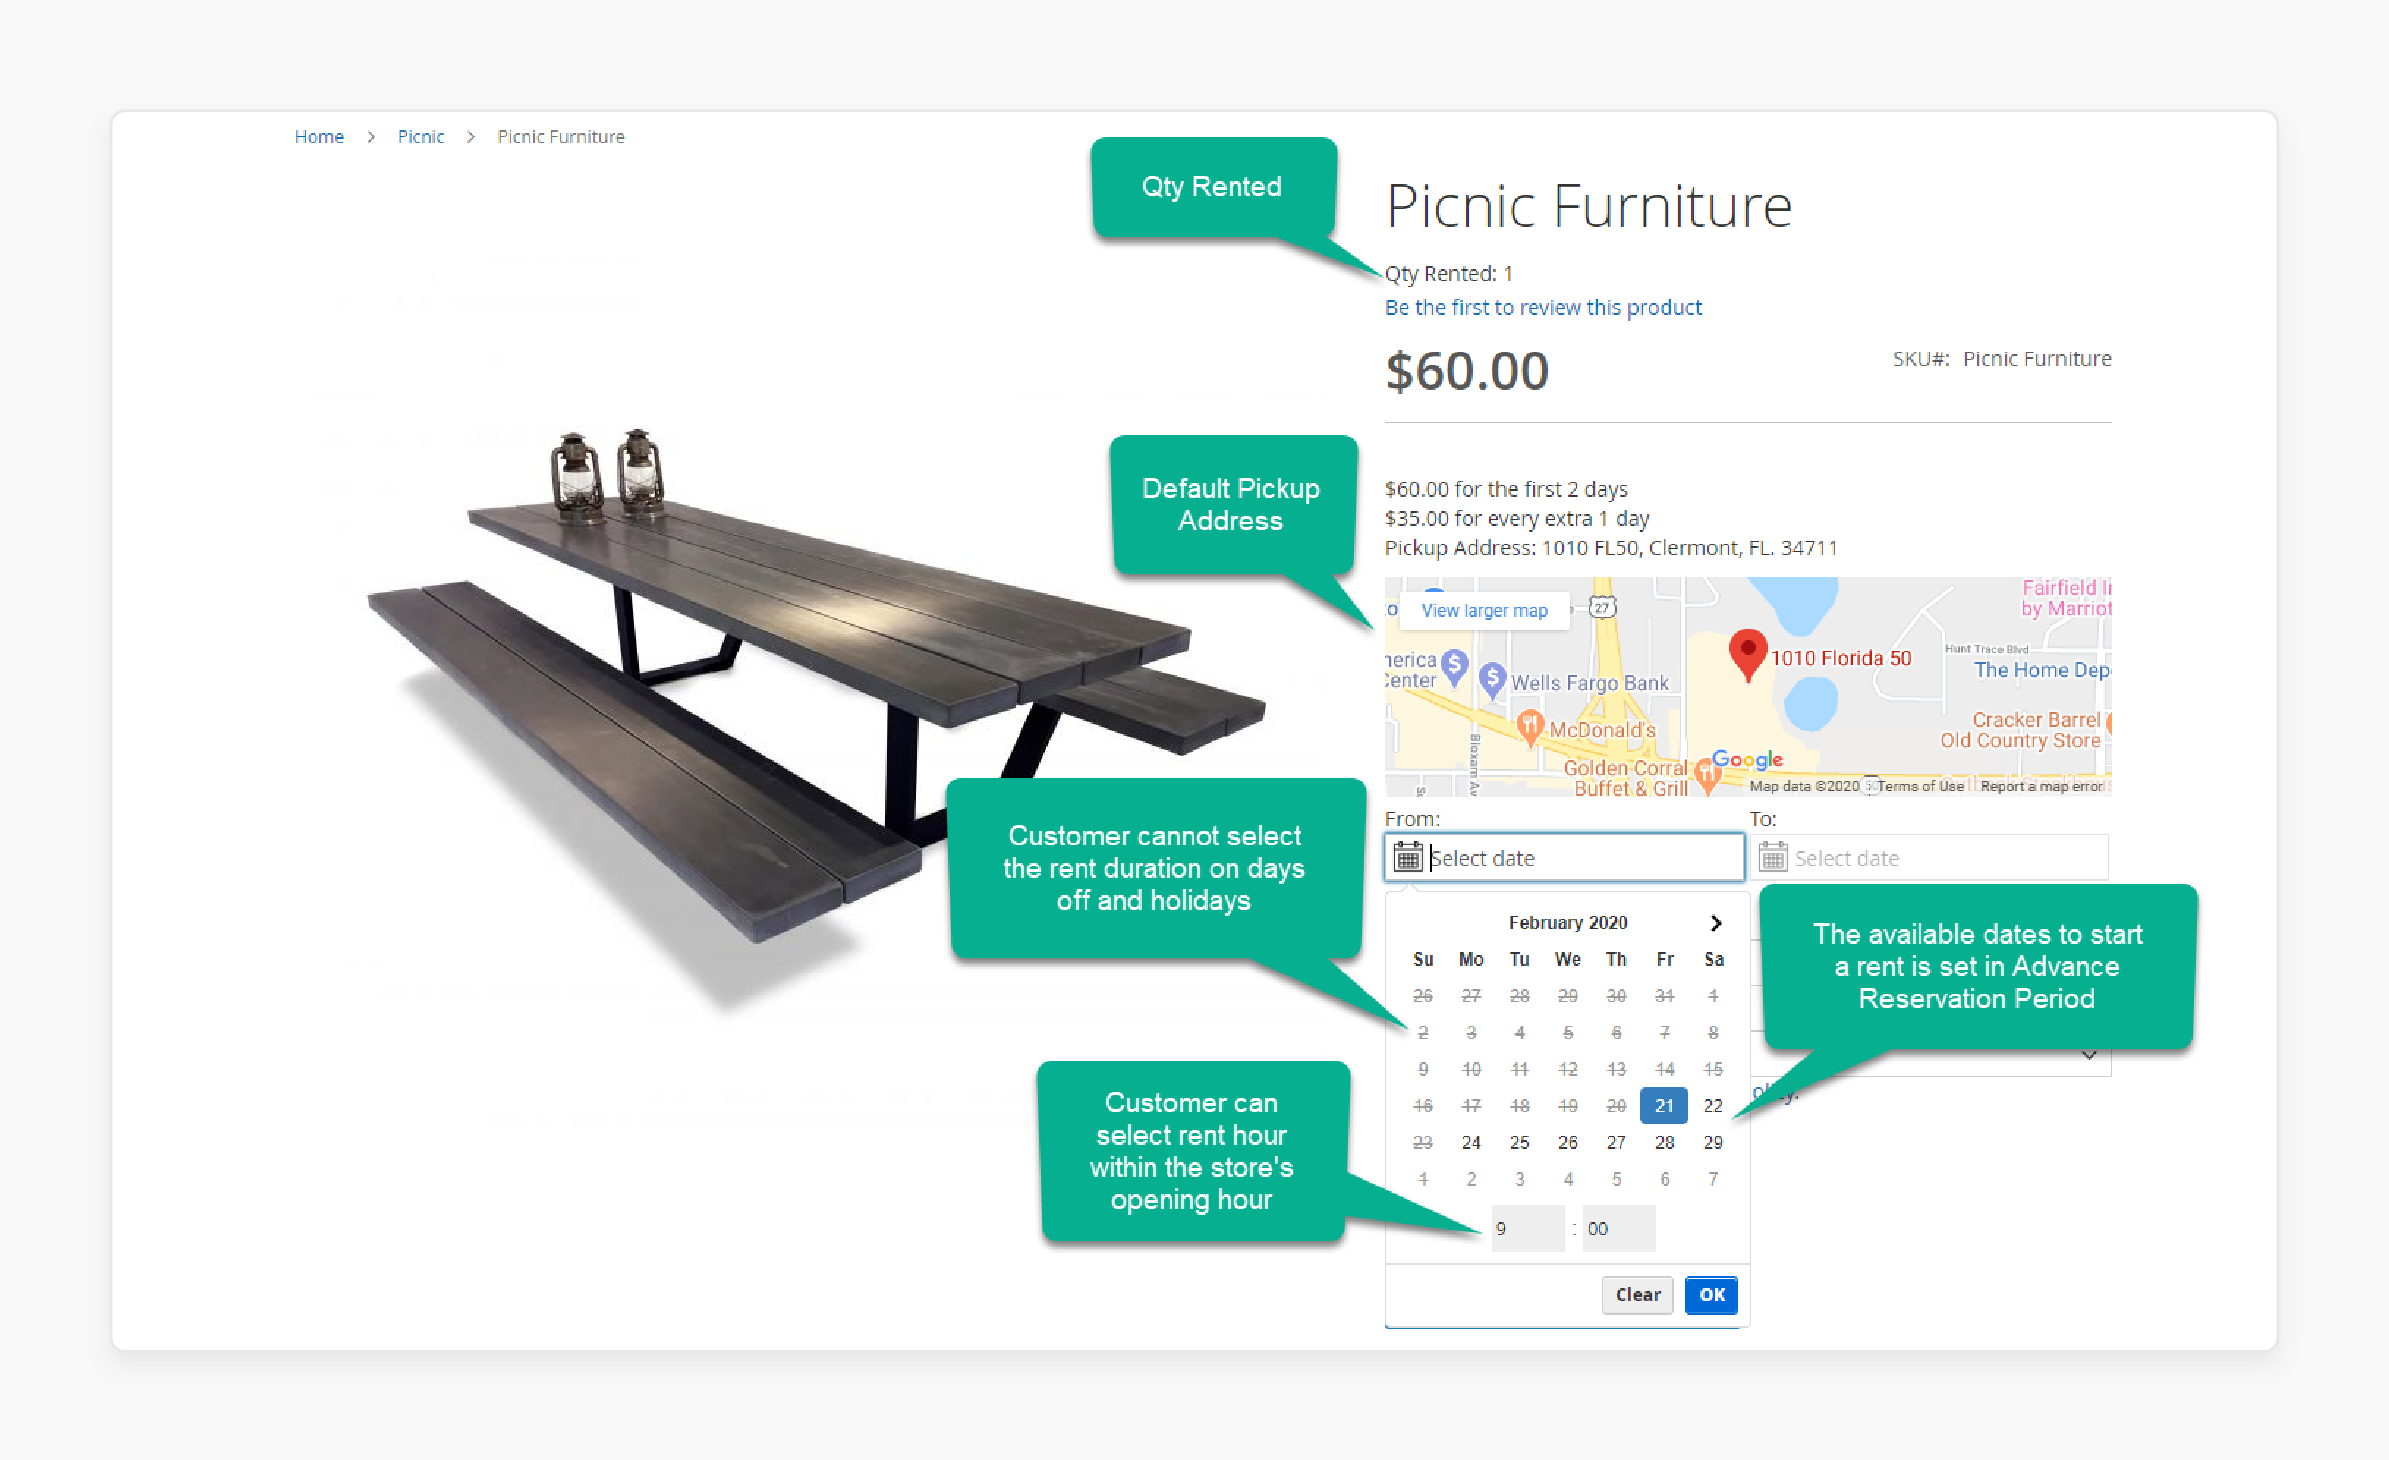
“A Magento 2 Rental extension is a specialized module for Magento 2 stores. It allows businesses to rent out products for specific periods. It helps manage booking dates and automates the rental process.”
The rental system integrates with core Magento features. It adds inventory management capabilities for rental products. The system supports various pricing models based on rental duration. It also provides customer notifications related to rentals.
Customers can select dates to rent a product using the booking system. The extension automatically calculates the price based on the chosen duration. Admins can manage product availability in the backend. They can set custom rules for rentals and track inventory levels.
The extension is suitable for various business types. It works well for short-term and long-term rentals of physical goods or services. Businesses can use it to run an online rental store or add rental options to existing products.
Some extensions also offer multi-vendor support. Such allows creation of a rental marketplace where different sellers can list their rental products.
Key Features and Benefits of a Magento 2 Rental Extension
| Feature | Description | Benefit and Examples |
|---|---|---|
| Flexible Pricing Models | Supports hourly, daily, weekly, and monthly pricing tiers. | Allows businesses to offer flexible pricing options. They can set different rates based on the rental duration. For example, car rentals can offer daily rates. Equipment rentals can have weekly rates. |
| Inventory Management | Real-time tracking of rental products' availability and status. It integrates with Magento’s Multi-Source Inventory (MSI). | Prevents overbooking. Only available items are rented out. For example, if you rent out construction tools, it tracks which items are in use and when they’ll be returned. |
| Booking Calendar | A user-friendly calendar interface. Customers can select start and end dates for their rentals. | Makes it easy for customers to visualize product availability. They can choose their preferred rental period. For example, property managers can display available dates for vacation homes or apartments. |
| Automated Notifications | Sends email or SMS notifications for booking confirmations, reminders before returns, or overdue notices. | Keeps customers informed about their bookings. No manual follow-up from the admin side is needed. For instance, customers renting photography equipment can receive reminders about return deadlines. |
| Contract Management | Generates rental agreements automatically. It is based on customer selections and allows digital signatures through integration with third-party services like DocuSign. | Simplifies legal processes. It automates contract creation and signing. For example, companies renting out heavy machinery can automatically generate contracts. These contracts outline terms of use and liability clauses. |
| Multi-Vendor Support | Allows multiple sellers to list their rental products on a single marketplace platform. It uses Magento’s multi-vendor capabilities. | Ideal for businesses operating a marketplace model. Different vendors can manage their own listings. Caters to online marketplaces for renting event equipment like tents or sound systems. |
Comparing Top 3 Magento 2 Rental Extensions
| Category | Amasty Rental | Magenest Rental | Sales Igniter Rental |
|---|---|---|---|
| Core Features | |||
| Inventory Management | |||
| Support Period | Under development | 1 year | 1 year with $299/year renewal |
| Versions Supported | Not specified | Magento 2.3.x, 2.4.x, 2.4.6 | Magento 2.3.x, 2.4.x |
| Base Price | Development stage | $499 (Regular), $899 (Pro) | $499 (Regular), $899 (Pro), $1399 (MSI Pro) |
Guide to Installing and Configuring Magento 2 Rental Extension
Step 1: Download the Extension
-
Purchase or download your chosen extension from the provider's website.
-
Check compatibility with your current version of Magento.
Tip: Always check if updates are available before installing any new extensions.
Step 2: Upload Files via FTP
-
Use an FTP client like CloudPanel.
-
Enter your credentials to log in to your host.
Step 3: Set Up Local and Remote Directories
-
Switch the local site to the extension directory.
-
Switch the remote site to the code directory.
Step 4: Upload the Extension Files
-
Go to the app/code directory on the remote site.
-
Create a new folder called [Custom Name].
-
Right-click on the Extension Name in your local site.
-
Click Upload. The extension will start uploading.
Step 5: Compress the Extension for the Alternative Method
-
Compress the extension to .zip or .tar.gz.
-
Use the command below to upload:
scp <path to your extension> <ssh server>:<path to [Custom Name] directory>
-
Log into your SSH server.
-
Go to the [Custom Name] directory.
-
Decompress the extension using:
unzip <.zip compressed extension>
or
tar -xzvf <.tar.gz compressed extension>
Step 6: R
Step 6: Run Setup Commands
- Go to your Magento root directory (e.g., magento2).
Run the following commands:
php bin/magento setup:upgrade
php bin/magento setup:di:compile
php bin/magento setup:static-content:deploy
Step 7: Flush Magento Cache
- Use the following command to flush the cache:
php bin/magento cache:flush
- Or go to System > Cache Management and click on:
-
Flush Magento Cache
-
Flush Cache Storage
-
Flush Catalog Images Cache
-
Flush JavaScript/CSS Cache
-
Step 8: Check Extension on Your Store
-
Go to your store.
-
Verify if the extension is working as expected.
Step 9: Configure the Extension
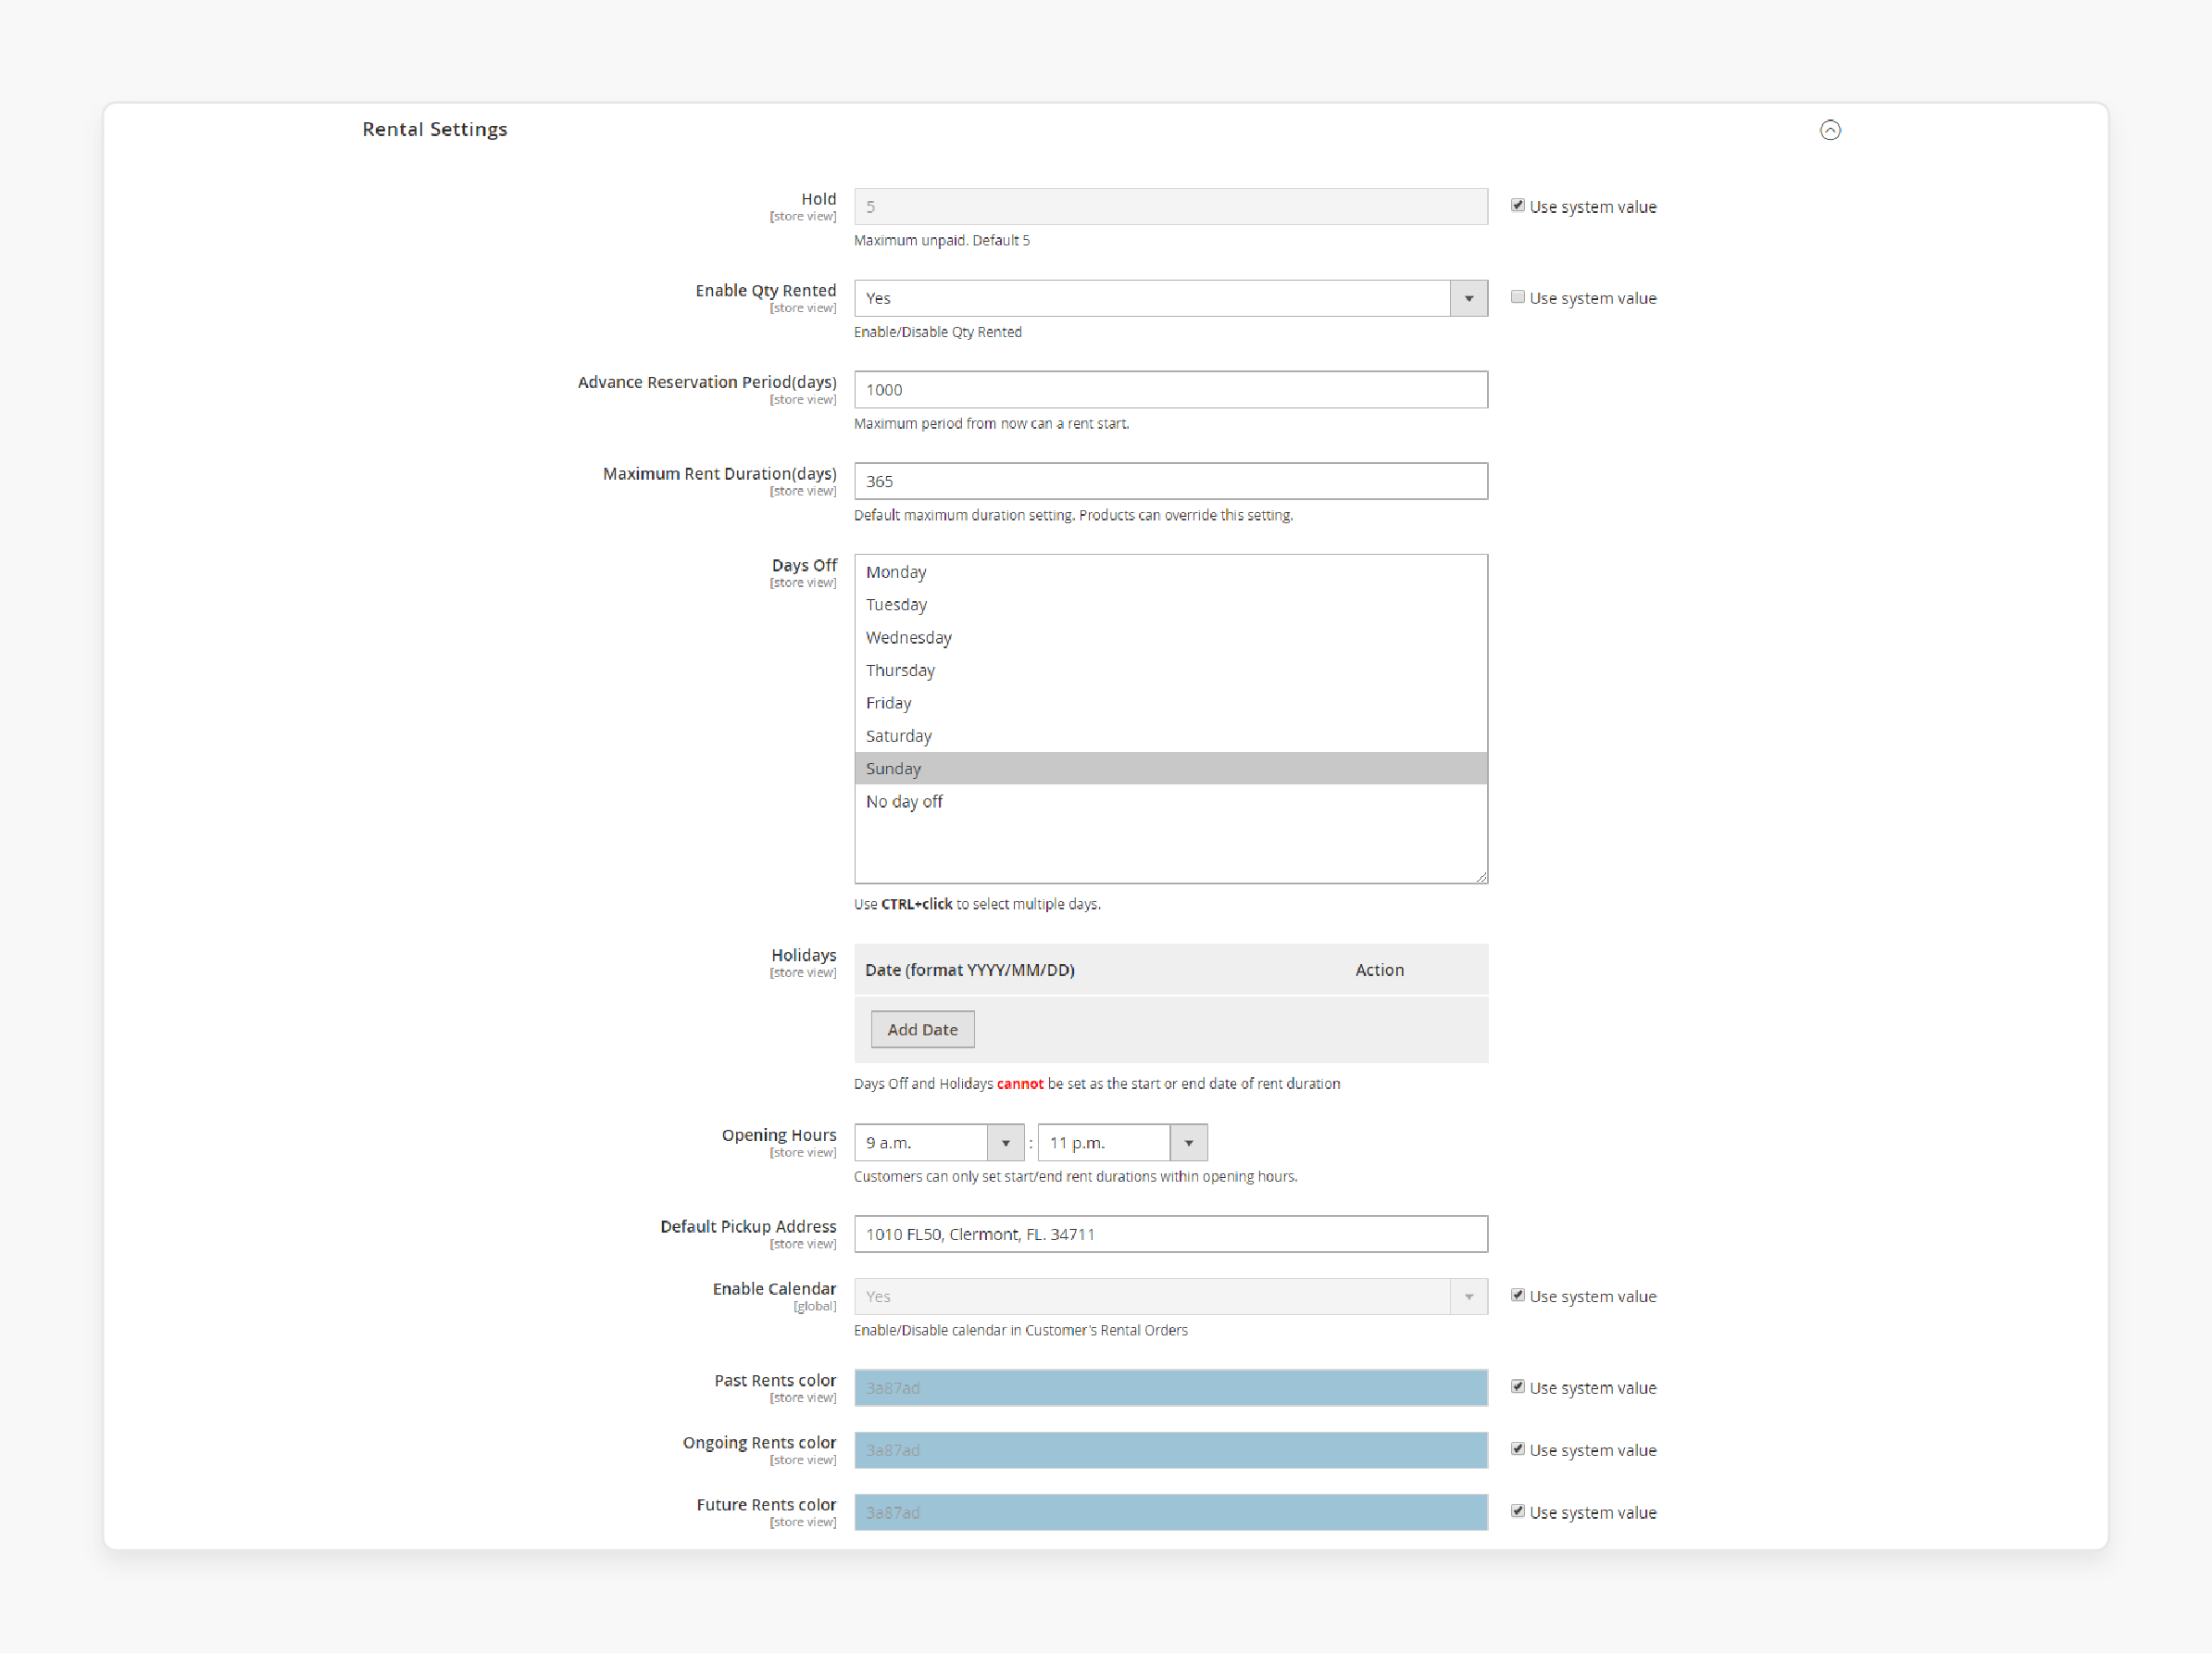
-
On Magento 2 backend, go to Stores > Configuration.
-
Expand the [Custom Name] section and select Rental System.
9.1 General Settings
-
Pattern to Generate Code: Set the format for the rental receipt code.
-
Google API Keys: Enter your Google API keys to integrate Google Maps.
9.2 Rental Settings
-
Hold: Set the maximum quantity held for unpaid orders.
-
Enable Qty Rented: Choose Yes to show rented quantity.
-
Advance Reservation Period: Set how far in the future renting can start.
-
Enable Calendar: Choose Yes to add a calendar to My Account page.
-
Maximum Rent Duration: Set the maximum time for rent.
-
Days Off: Select days off where renting is not allowed.
-
Holiday: Add holidays as day and month.
-
Opening Hours: Set the store's opening hours.
-
Default Pickup Address: Set default address for local pickups.
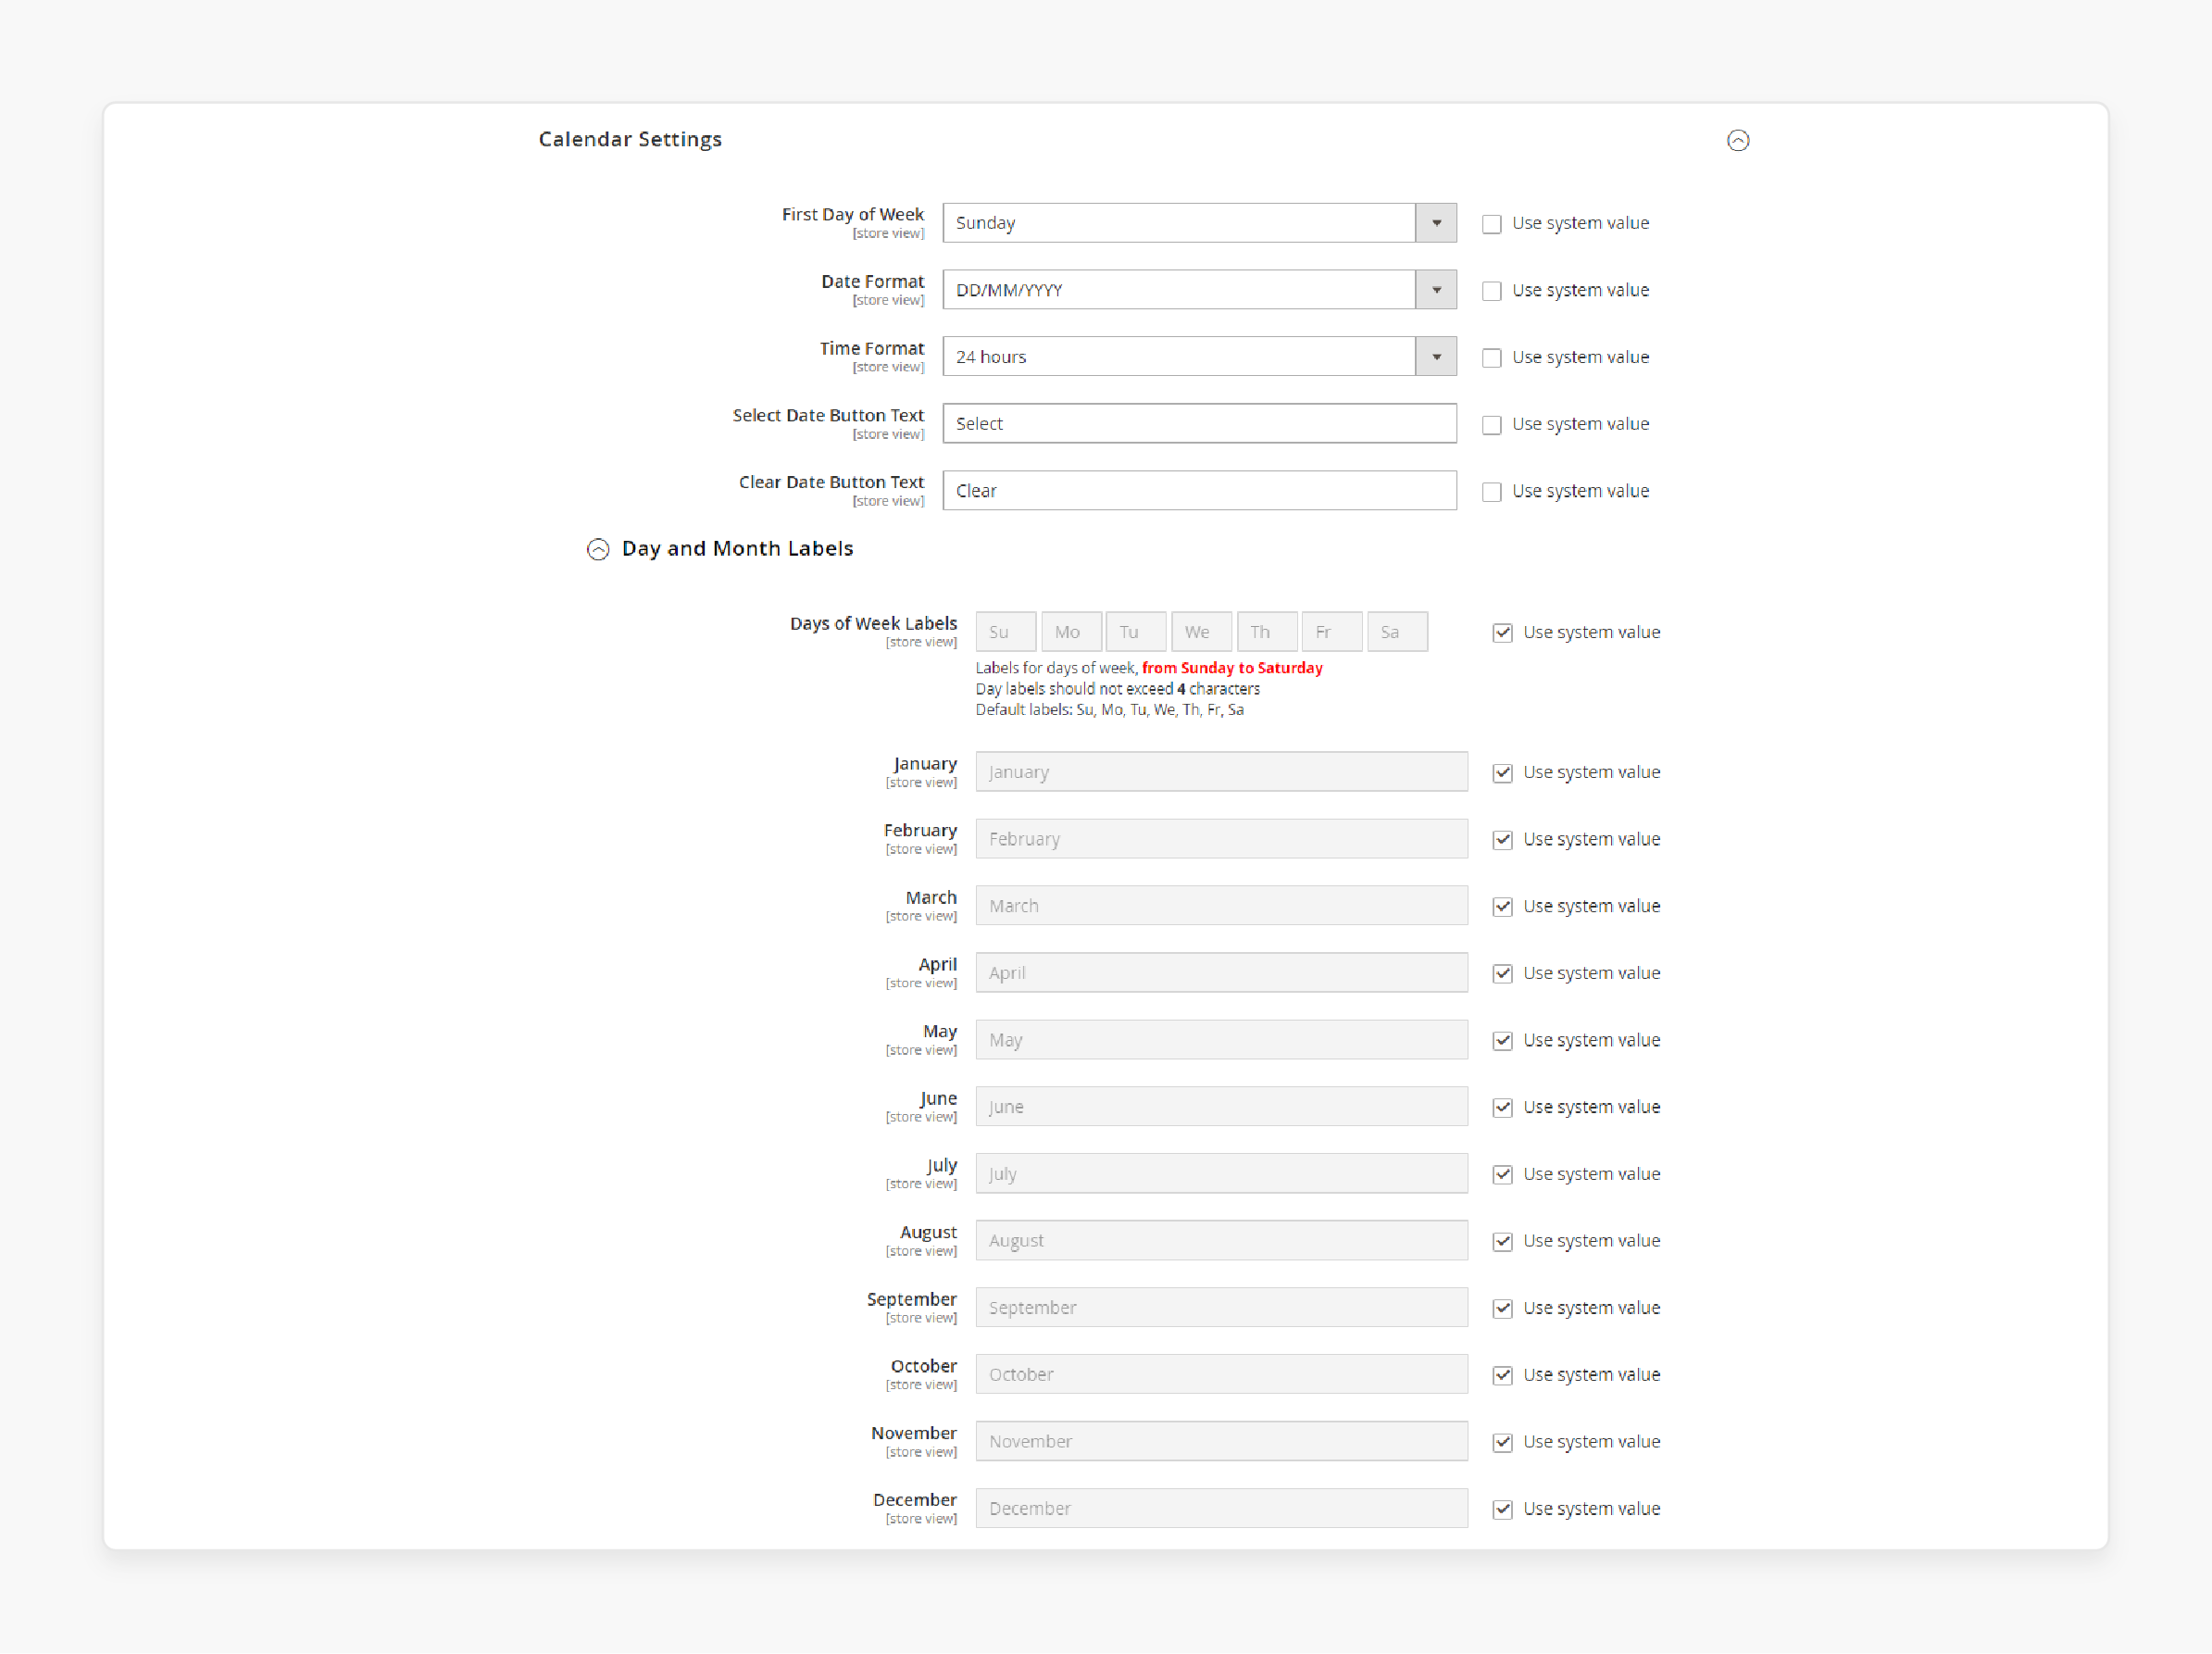
Step 10: Calendar Settings
-
First Day of the Week: Set the starting day of the week.
-
Date Format: Choose the format that appears on the rental page.
-
Select Date Button Text: Enter text for the button to select dates.
-
Clear Date Button Text: Set text for clearing the selected dates.
Step 11: Day and Month Labels
-
Day of Week Labels: Set labels for days of the week.
-
Month Labels: Set labels for months.
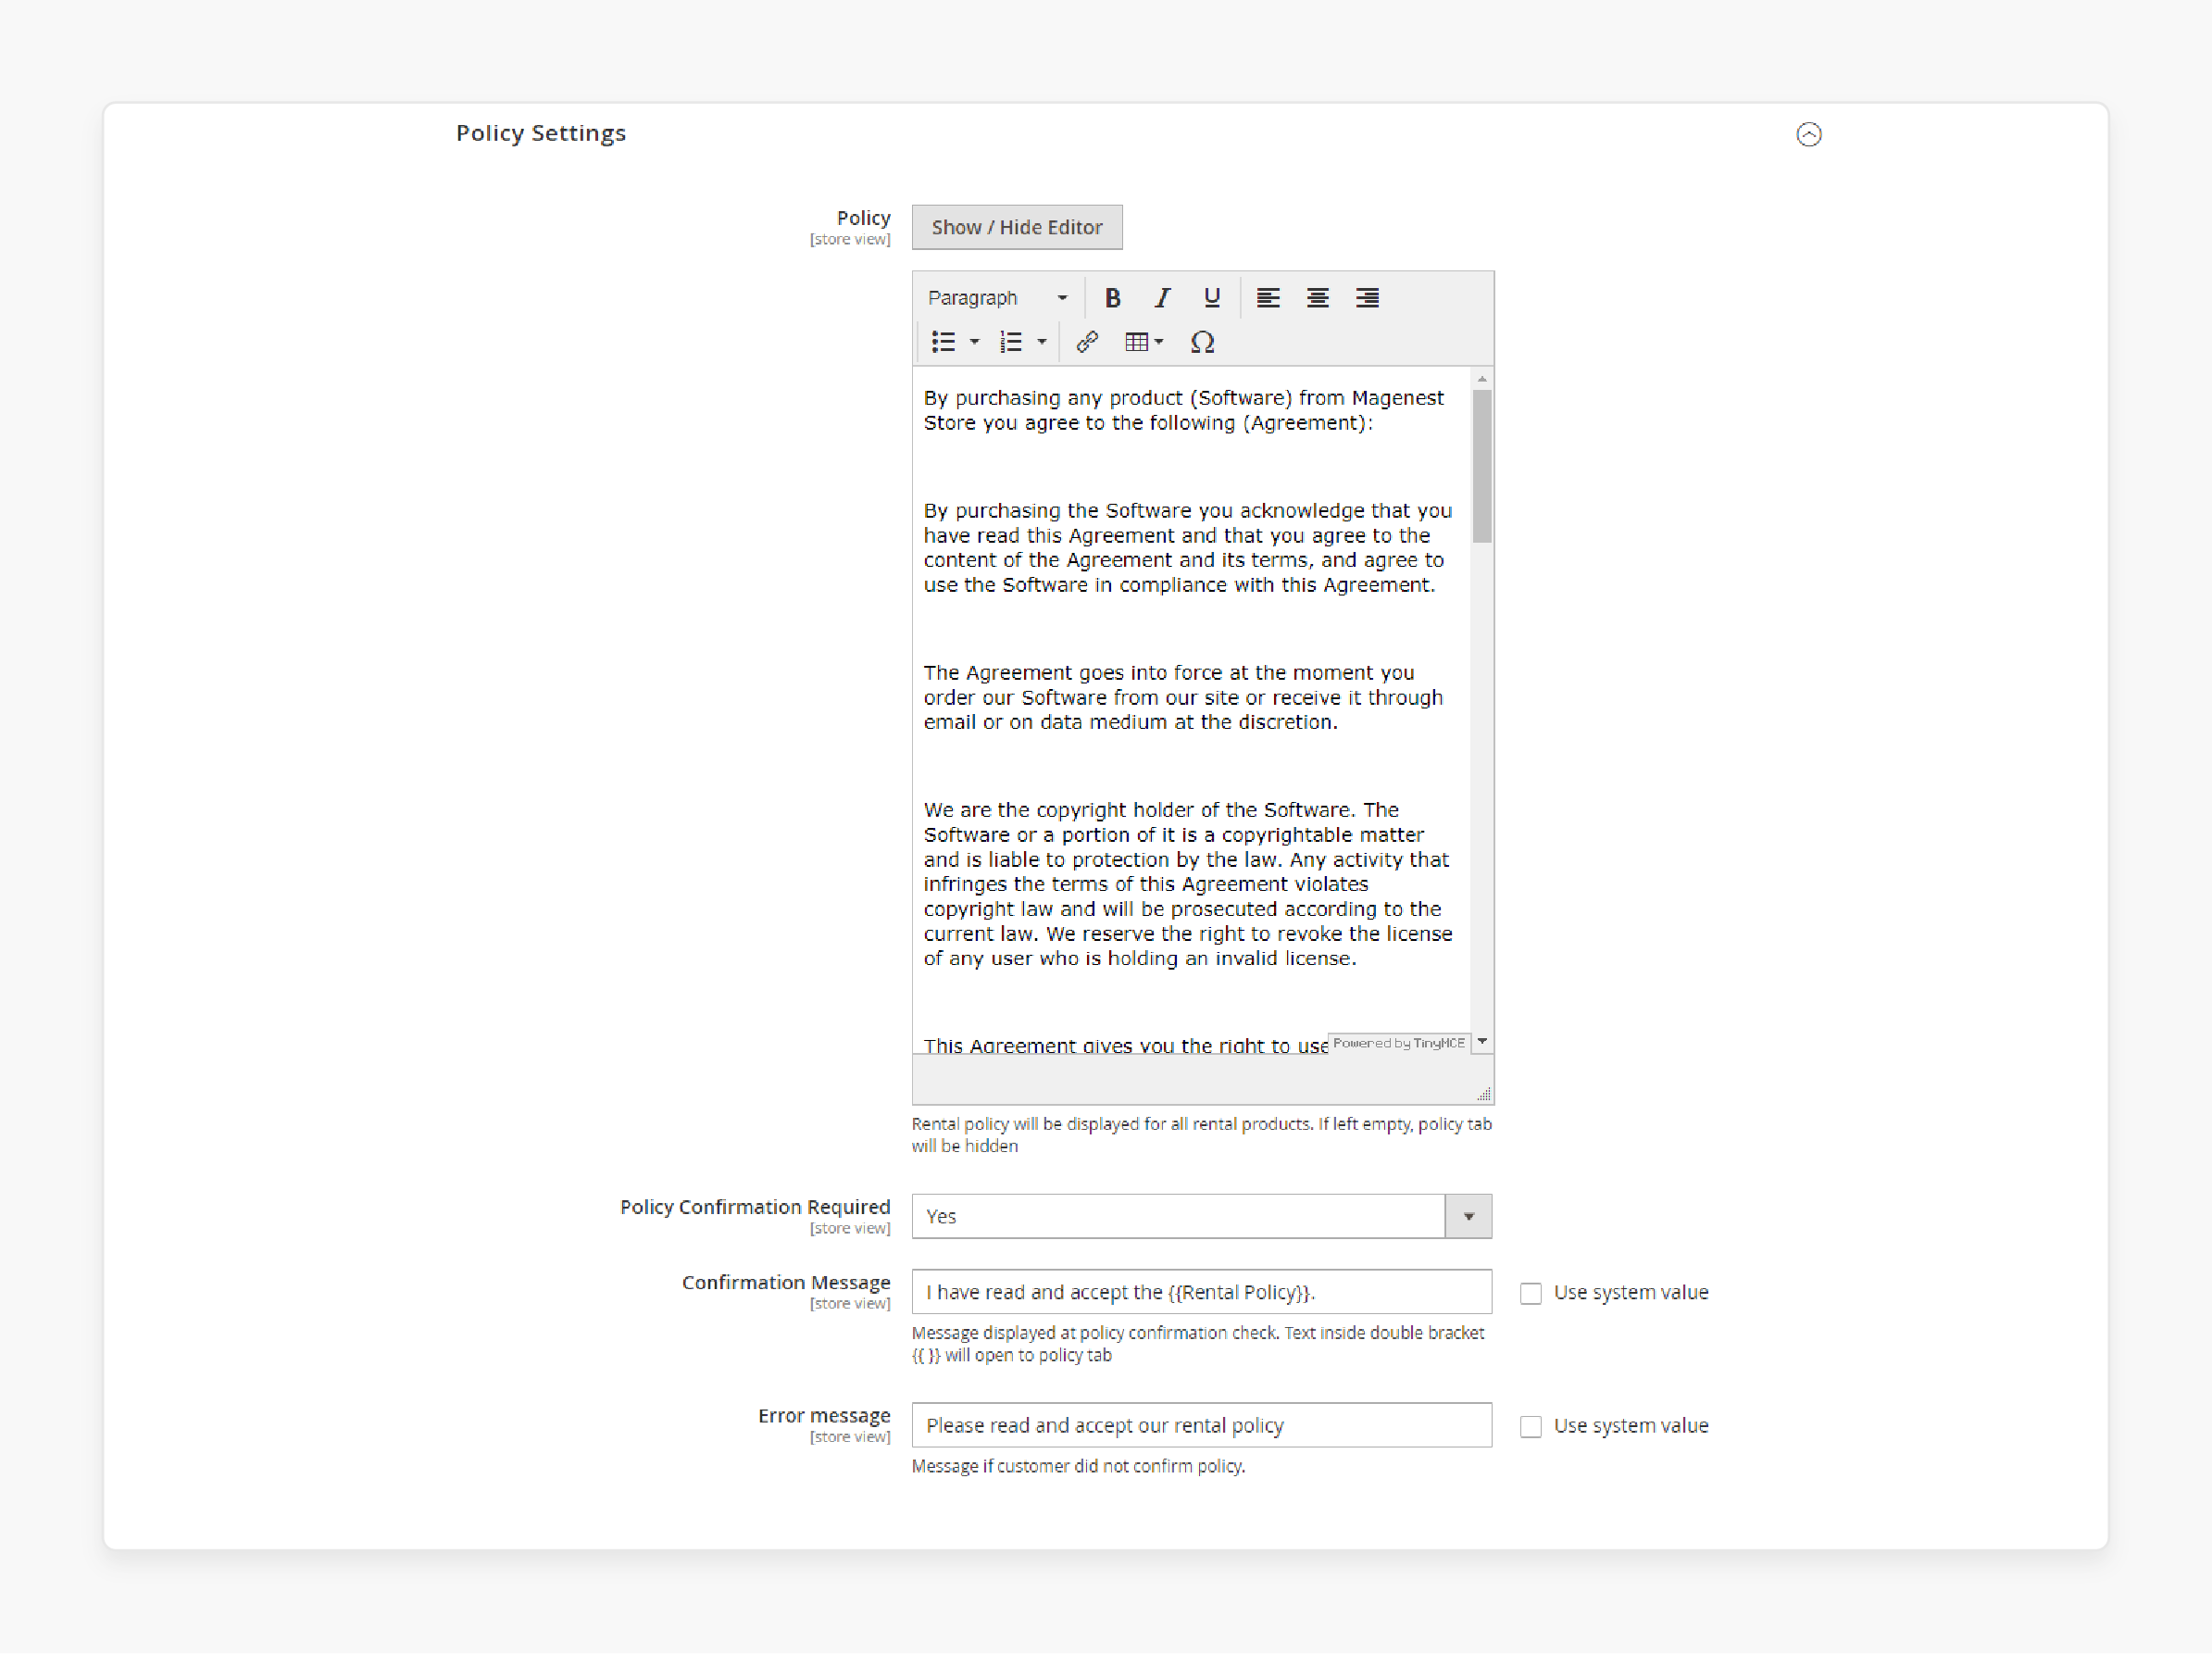
Step 12: Policy Settings
-
Edit Policy: Click Show/Hide Editor to add a rental policy.
-
Policy Confirmation Required: Choose Yes to make customers confirm the policy.
-
Confirmation Message: Enter the message for the policy checkbox.
-
Error Message: Set the error message if the policy is not confirmed.
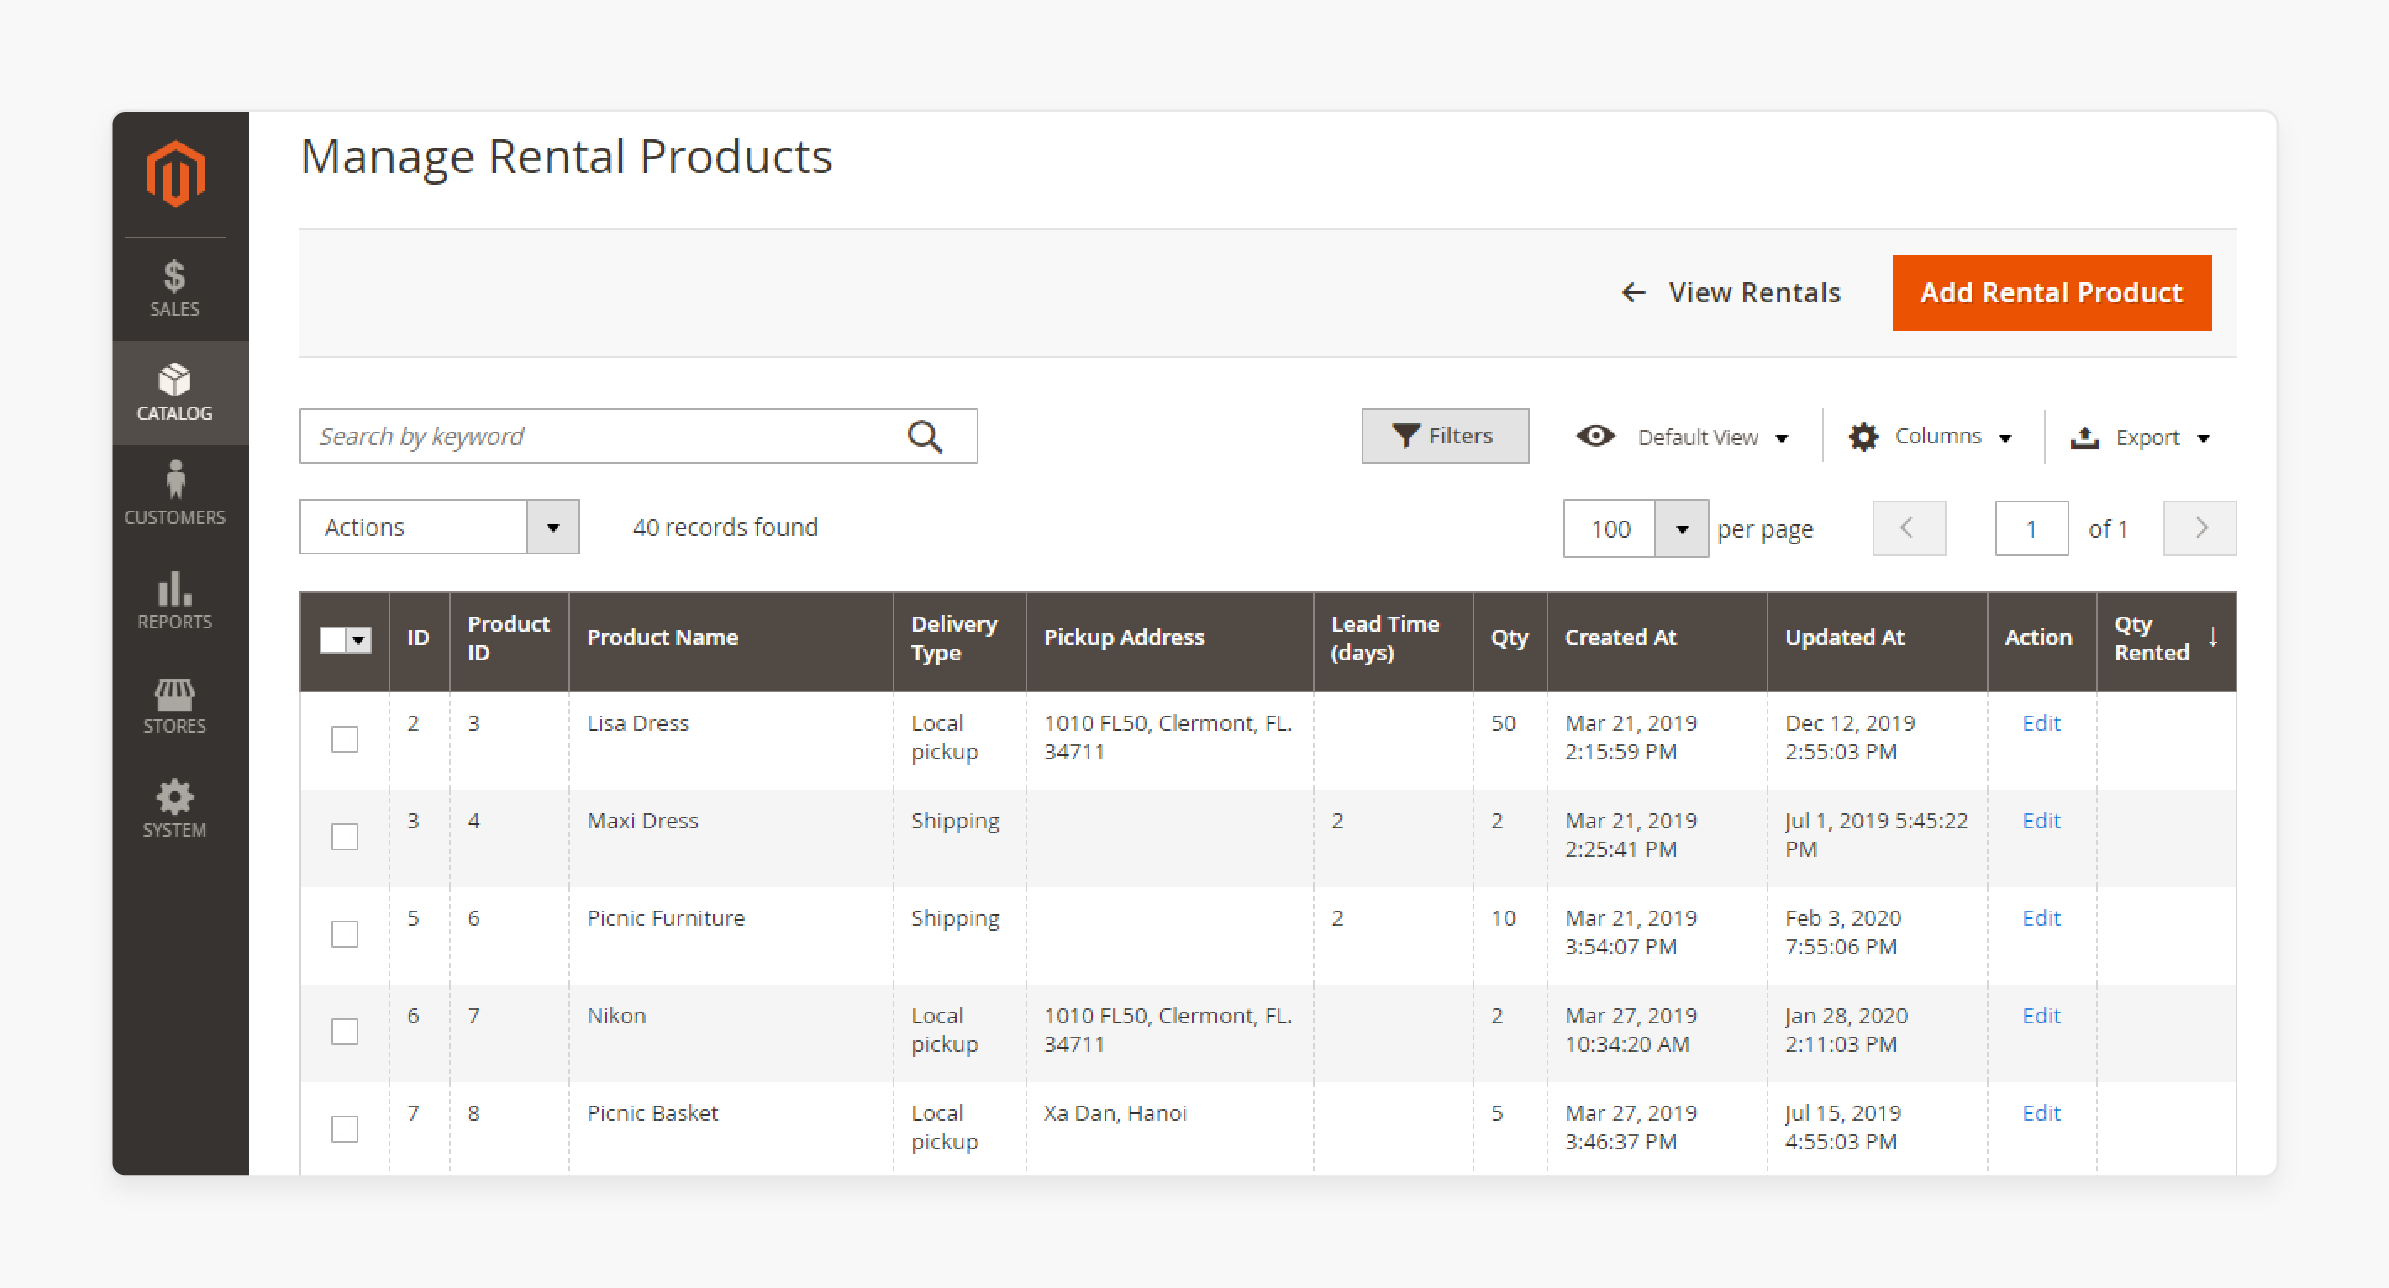
Step 13: Add a New Rental Product
-
Go to Catalog > [Custom Name] Rental Management > Rental Products.
-
Click on Add Rental Product.
-
Set the basic details like name, quantity, category, and image.
-
Expand the Rental section and set:
-
Base Price and Block: Set price for the rental duration.
-
Additional Price and Block: Set price for extra rental time.
-
Delivery Type: Choose between Shipping, Local Pickup, or Both.
-
Step 14: Email Setting
-
Choose a receipt email template.
-
Set details like product, order, customer, rent duration, and more.
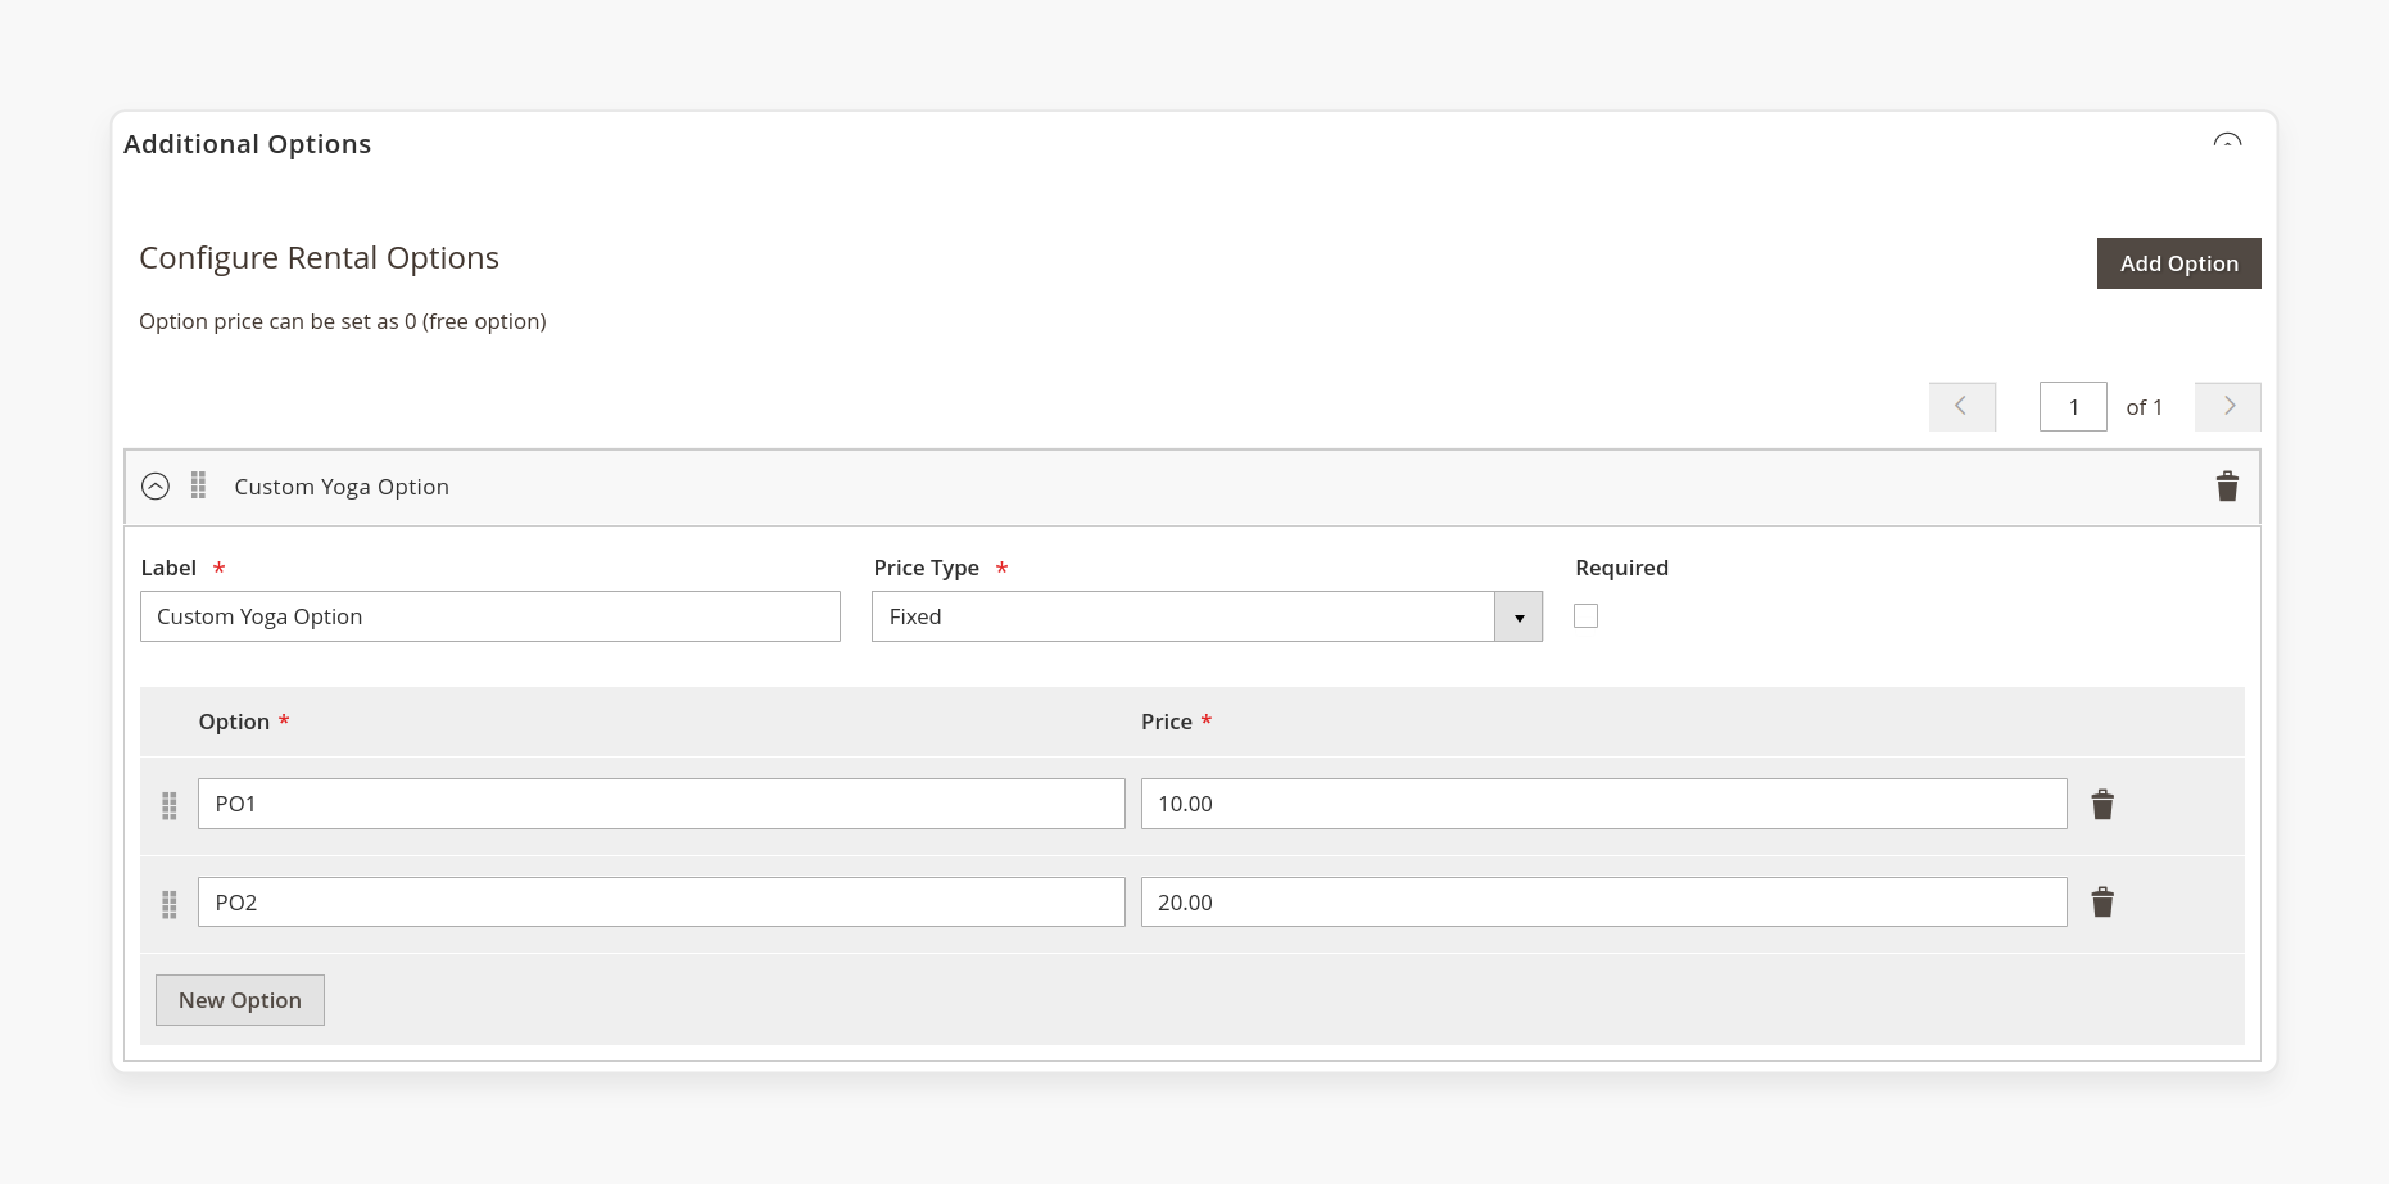
Step 15: Hold Settings and Adding Additional Options

-
Set the quantity to hold for unpaid orders.
-
Add additional items to rent with the main product.
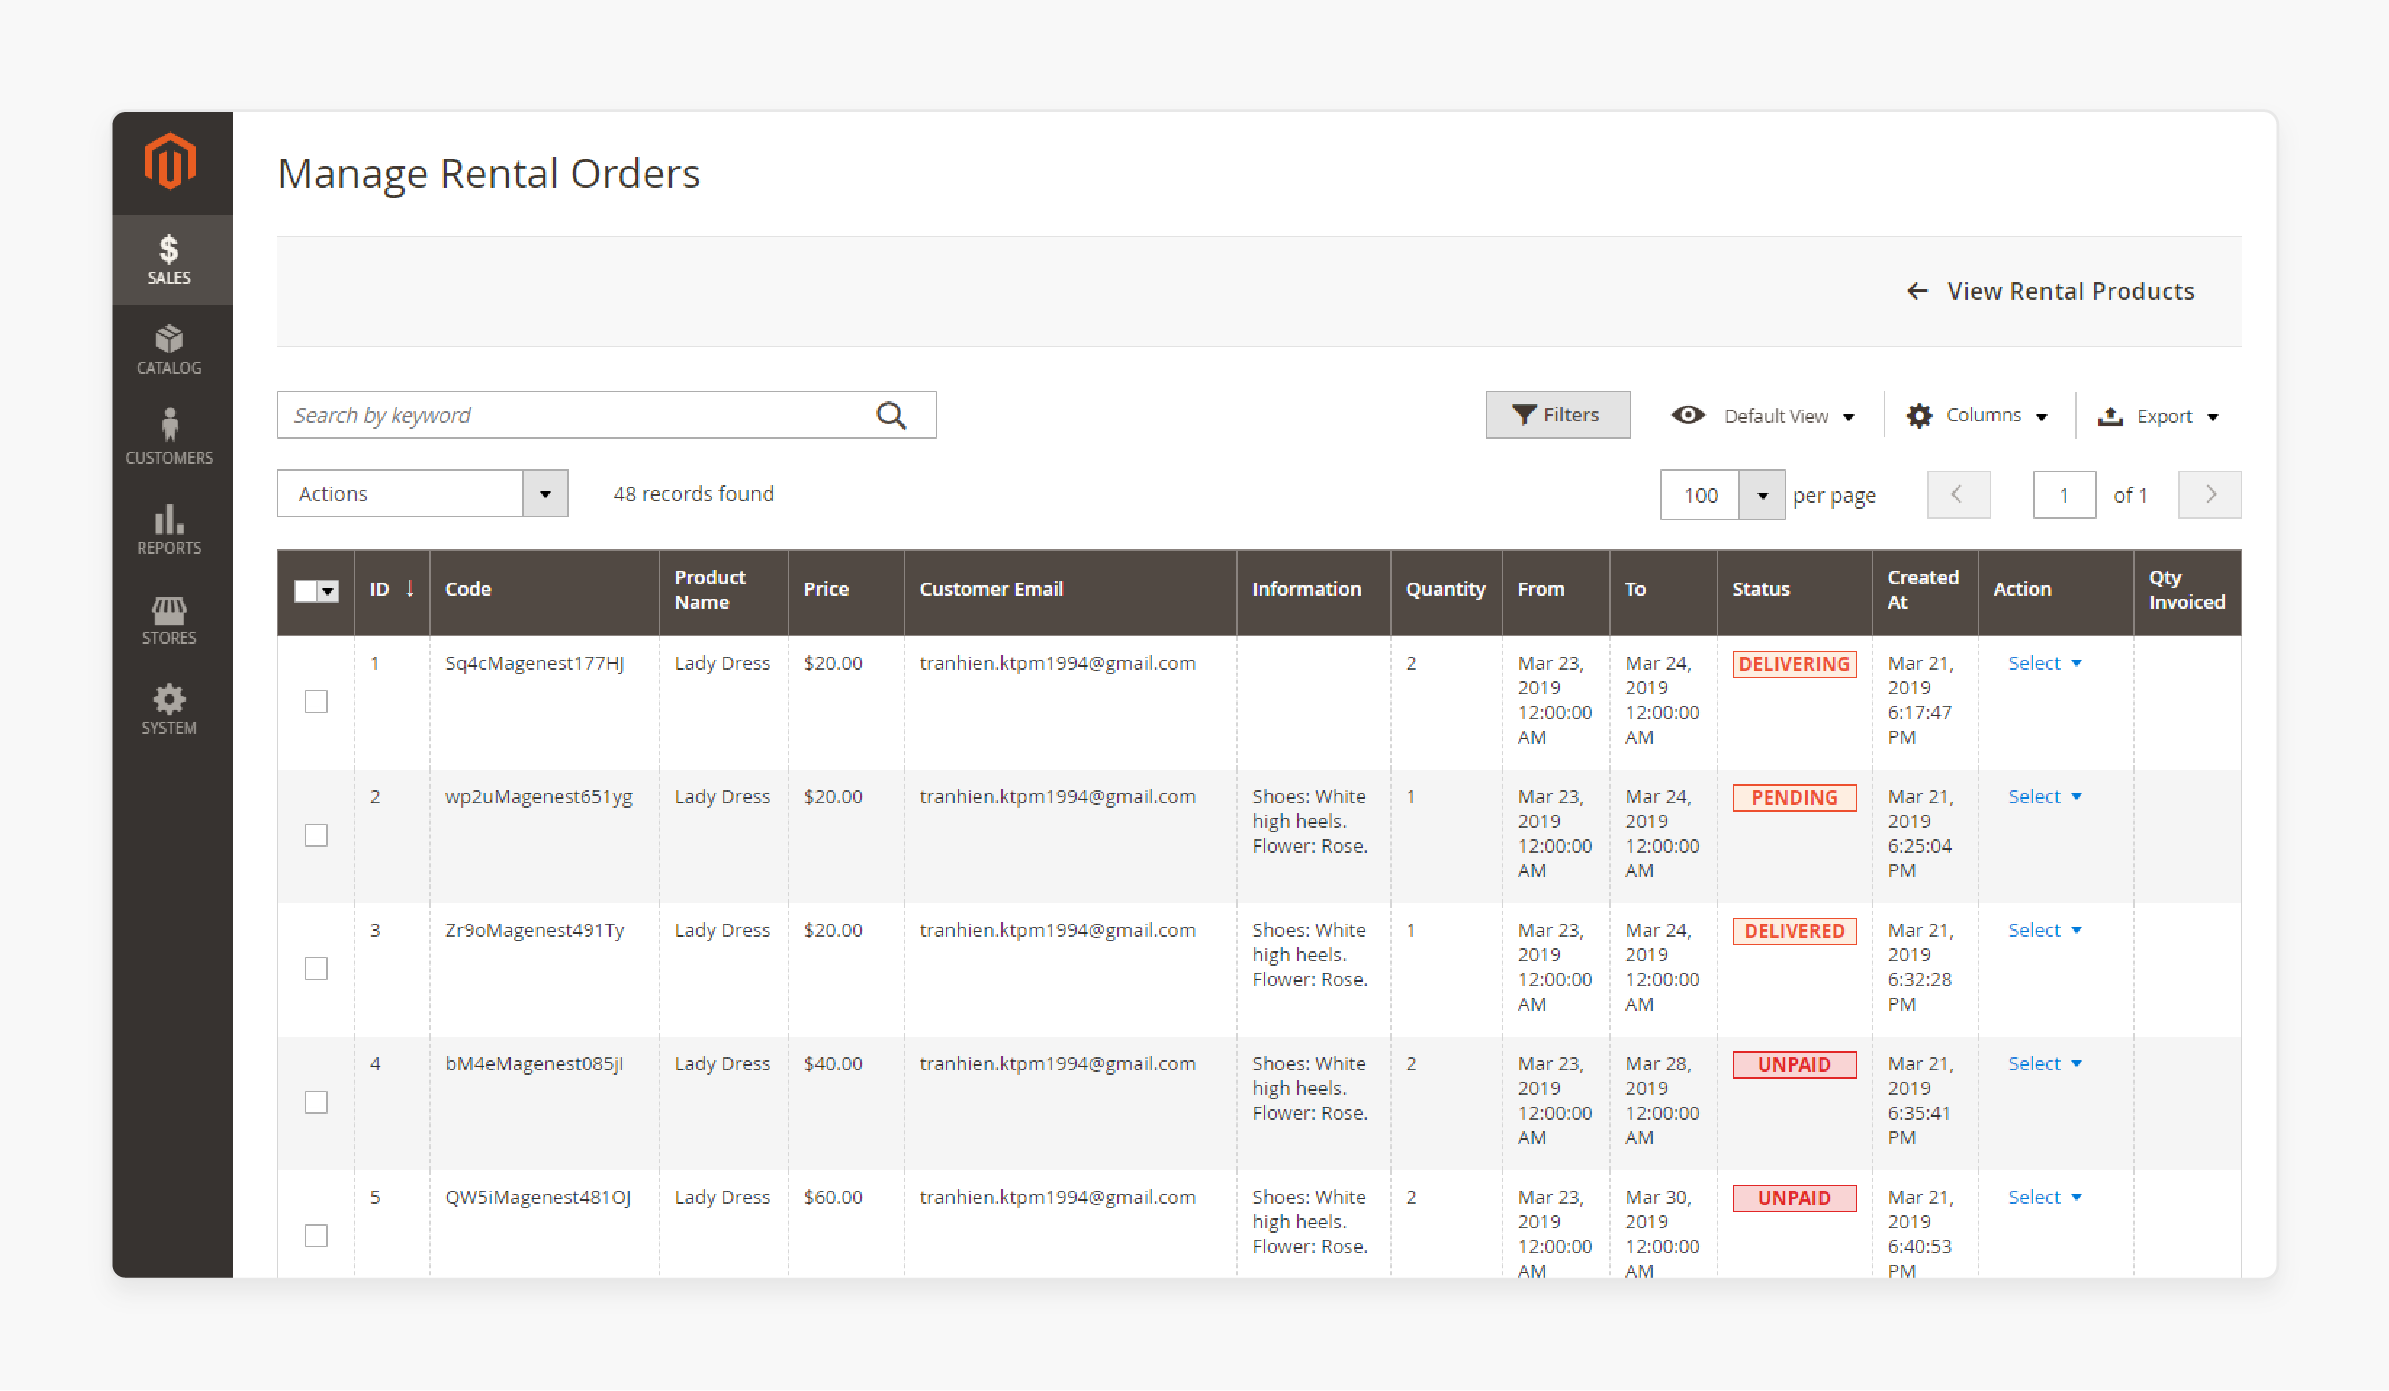
Step 16: Manage Rental Orders
-
Go to Sales > Rental Orders.
-
View orders, send receipts, or change order status.
-
Rental order statuses:
-
Pending: Customer placed order.
-
Delivering: Items are being shipped.
-
Delivered: Items reached the customer.
-
Returning: Items on the way back.
-
Complete: Items returned to store.
-
Cancel: Order canceled.
-
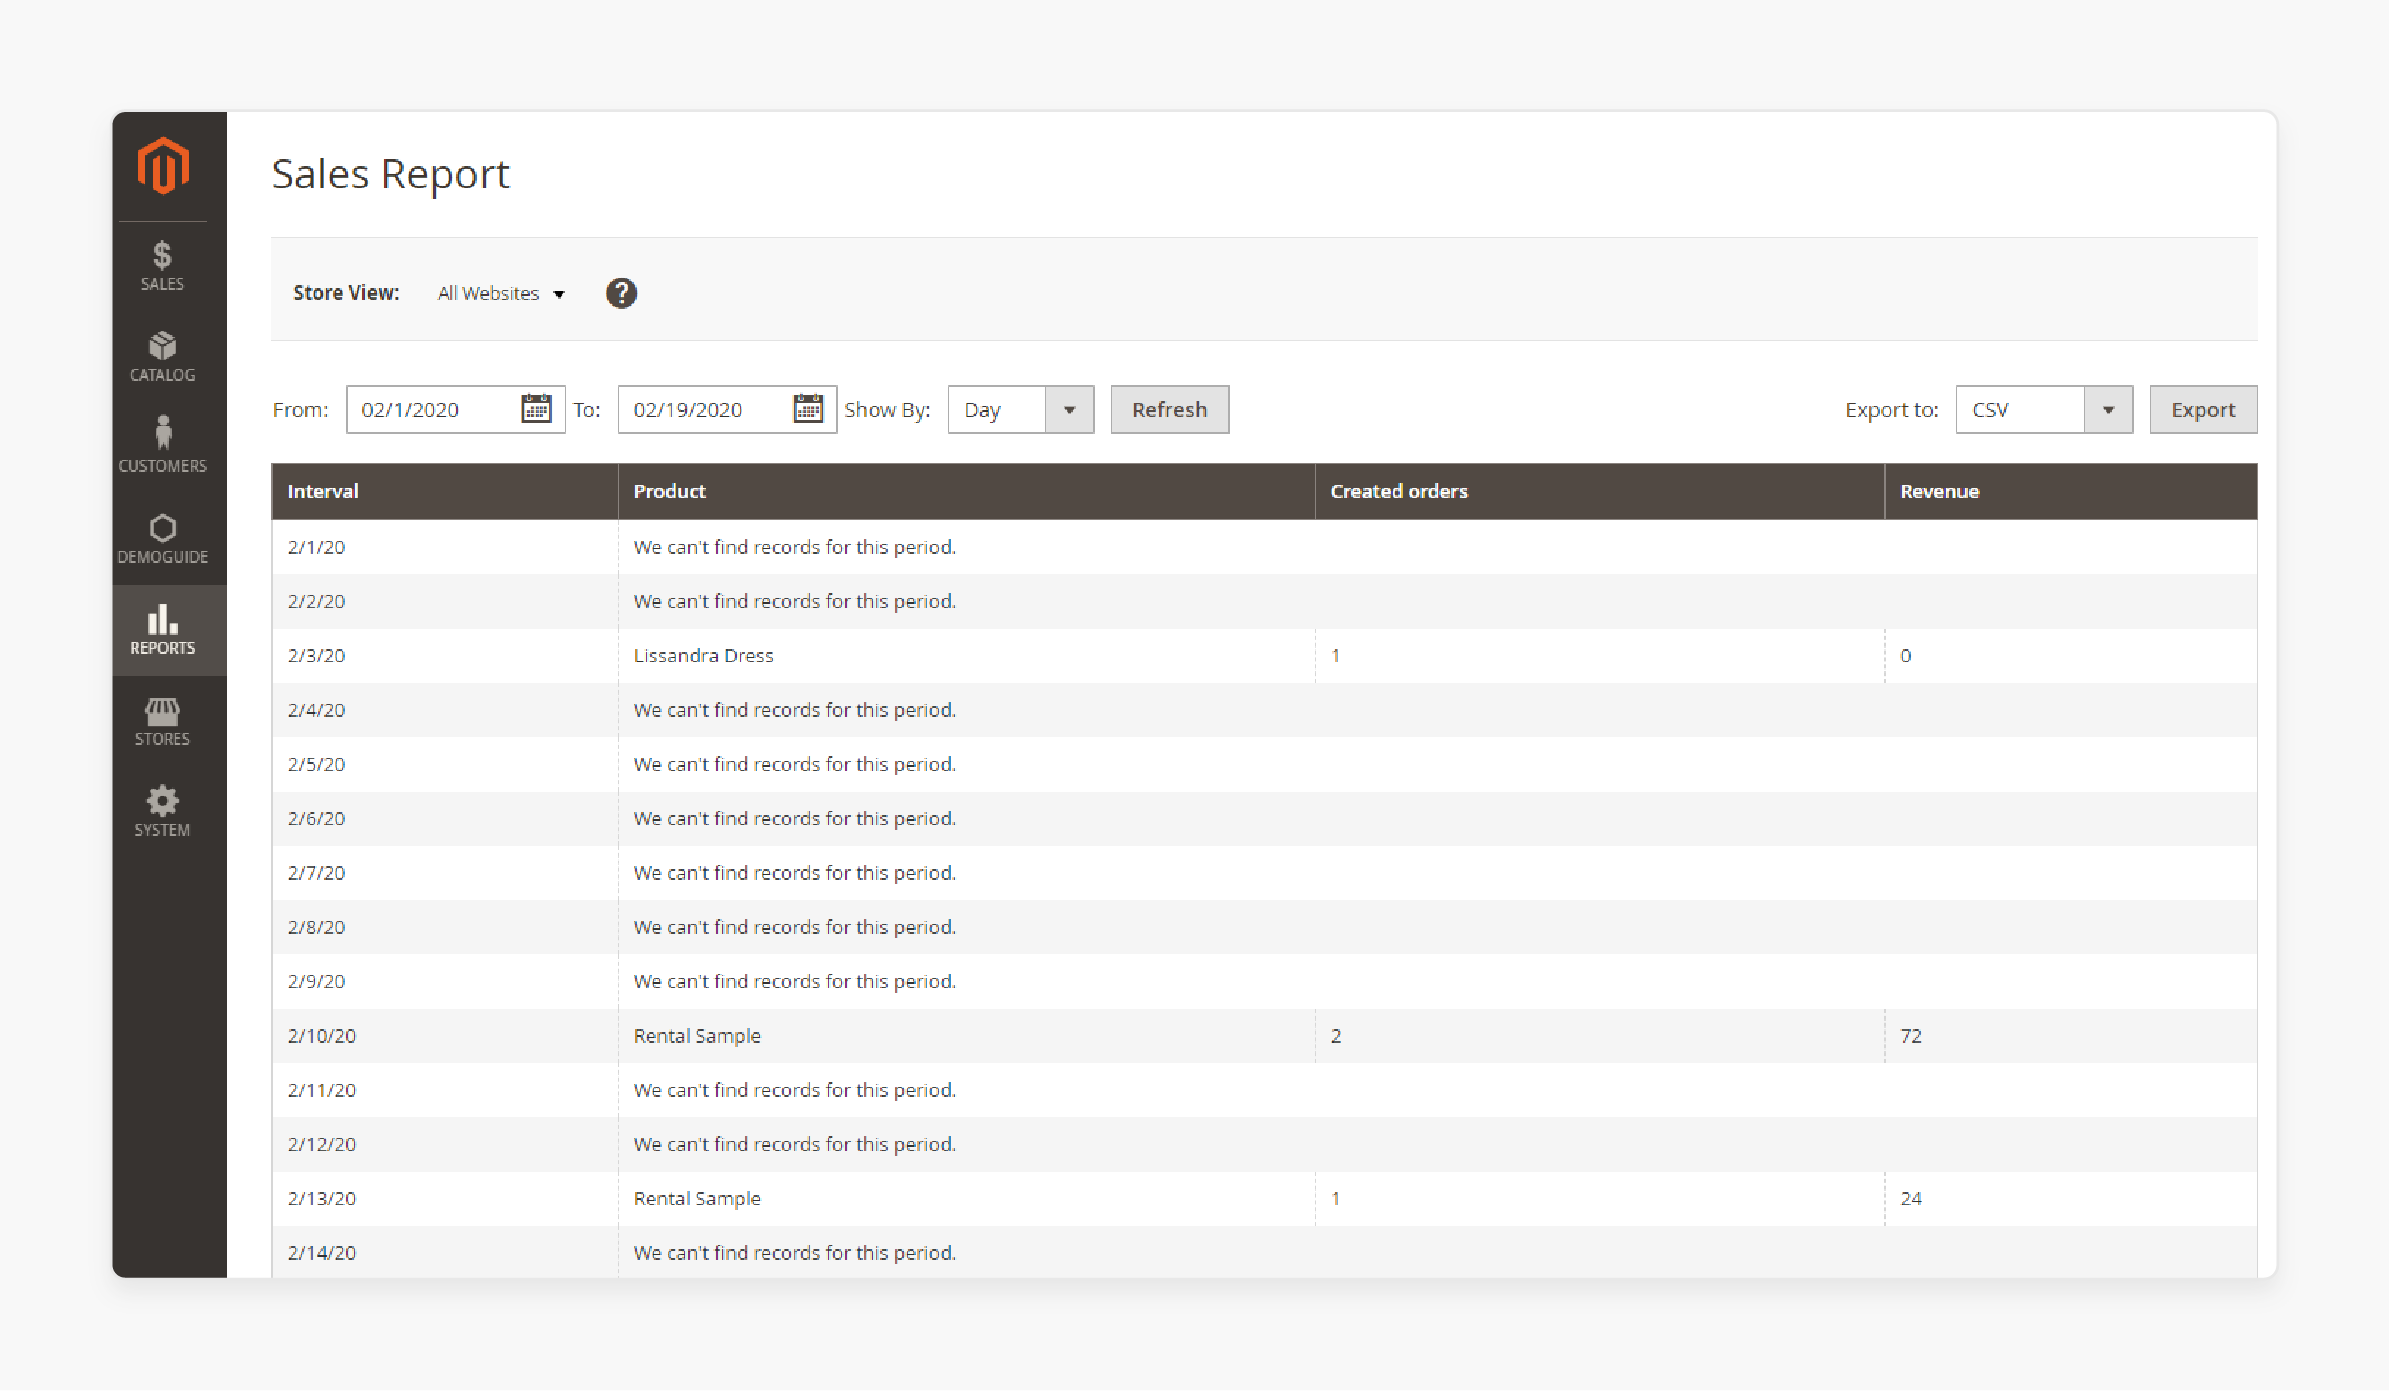
Step 17: View Rental Reports
-
Go to Reports > [Custom Name] Rental Report.
-
Choose Sales Report or Products Report.
-
Set the report time and click Refresh.
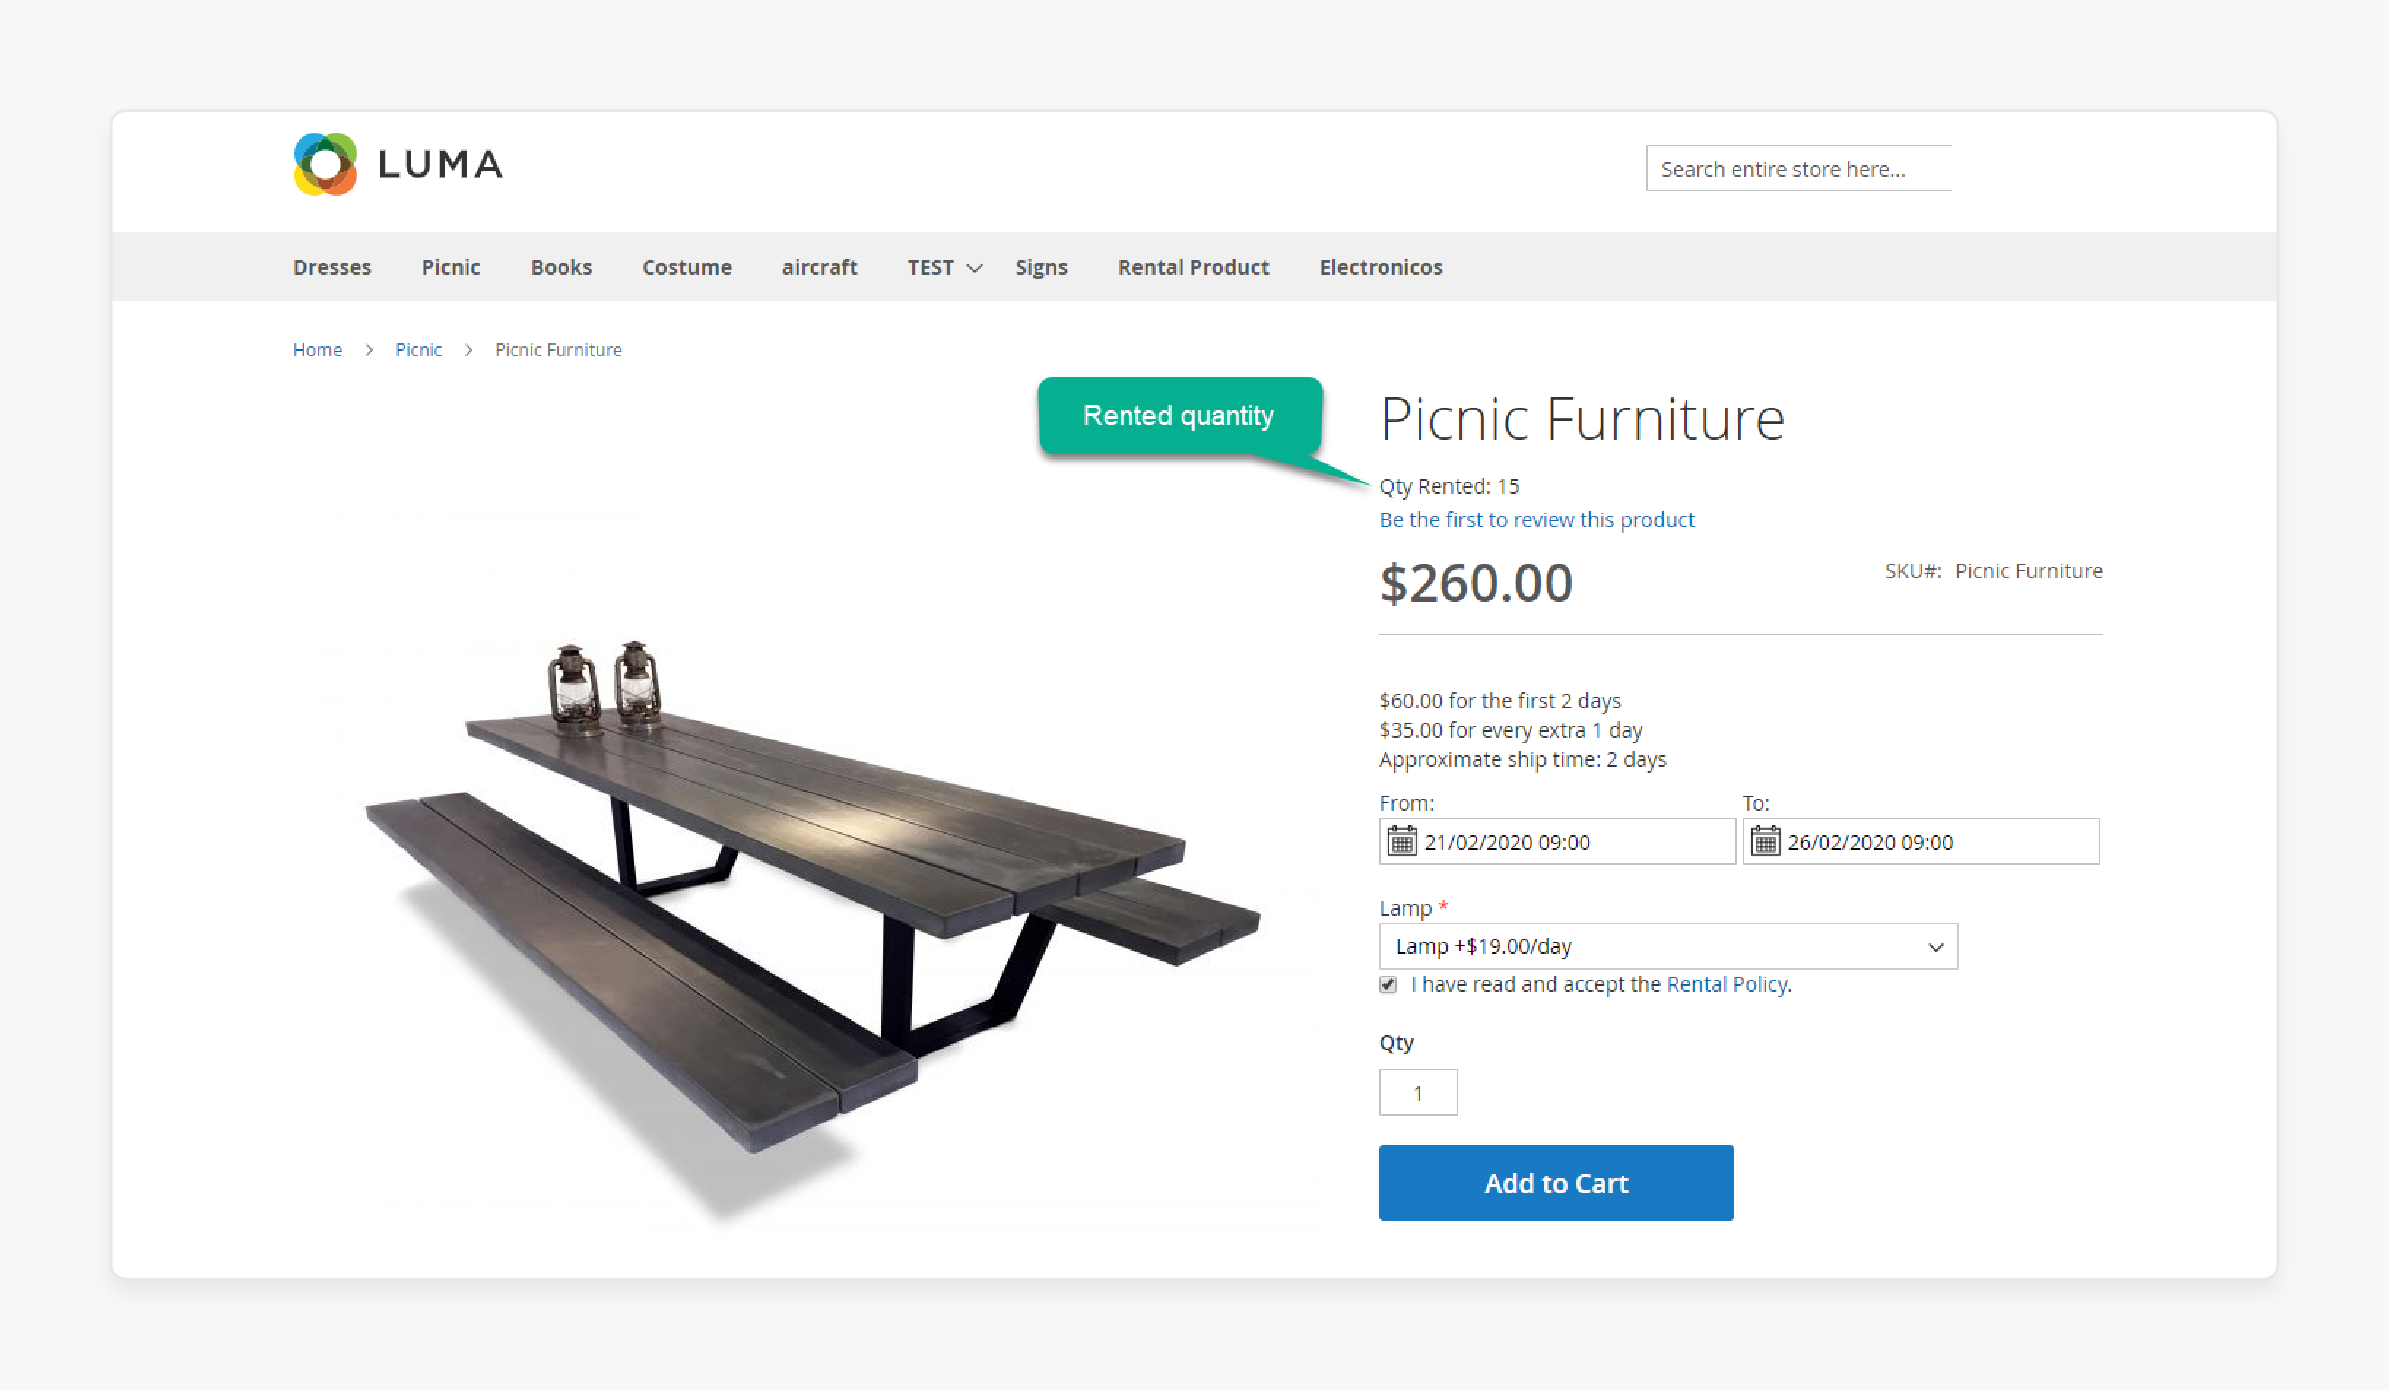
Step 18: Store Front Functions
-
Customers can view rented quantity on the product page.
-
Customers can select delivery type between Shipping and Local Pickup.
-
Customers can view rent details in the cart.
-
Customers can track rental orders in their account.
-
Customers can set items as returning after the rental duration.
Step 19: Import and Export Rental Products
-
Rental products can be imported via System > Import > Products.
-
Use columns like email_template, delivery_type, lead_time, and others.
-
Rental products can be exported via System > Export > Products.
-
For a sample CSV import file Refer to [module directory]/Sample/catalog_product_import.csv.
FAQs
1. What is a rental booking system for Magento?
A rental booking system for Magento allows businesses to manage rentals. It automates bookings, tracks inventory, and calculates prices. Users can select rental dates easily. The system enhances customer experience and simplifies operations. Many businesses use this system to streamline their rental processes effectively.
2. How does the rental system for Magento 2 work?
The rental system for Magento 2 integrates with your store. It allows customers to book products for specific periods. Admins can manage availability and set rules. The system tracks inventory levels in real time. It helps prevent overbooking and improves customer satisfaction.
3. Can I use a multi vendor setup with Magento 2?
Yes, Magento 2 will allow a multi vendor setup. It enables multiple sellers to list their products. Each seller can manage their own rentals through the platform. The marketplace rental system for Magento supports this feature effectively. The setup is ideal for businesses wanting to expand their offerings.
4. What features are included in the rental module?
The rental module includes flexible pricing options and booking calendars. It also provides automated notifications and contract management features. Users can view and manage their bookings easily. These features make it suitable for various rental businesses. They help streamline operations and enhance customer interactions.
5. How do I add properties for rent by location?
You can add properties for rent by location using the extension's settings. Sellers can add the rented properties directly through the admin panel. Customers can search for rentals based on location easily. The feature improves user experience on your booking website significantly. It allows buyers to find suitable rentals quickly.
6. What support is available for rental booking extensions?
You have access to support when using rental booking extensions. If you encounter issues, please create a ticket for assistance. The support team is available to help resolve problems promptly. They provide guidance on using features effectively as well. Customers receive product updates regularly as well.
7. How do I manage rented properties from the seller end?
Sellers can manage their rented properties through the admin dashboard. They can view and manage all bookings easily from one place. The system allows sellers to add new listings and delete multiple properties as needed. The functionality streamlines operations significantly within your marketplace rental system for Magento.
Summary
Magento 2 Rental extension adds essential functionality for managing rentals online. You can add rental/booking options along with normal products in your Magento store. Below mentioned are the key highlights of this tutorial:
-
Select an extension that fits your business needs. Consider features like pricing models and inventory management.
-
Utilize flexible pricing. Offer various pricing options for rentals.
-
Use a user-friendly booking system. Customers should easily select rental dates and view availability.
-
Set up automated notifications for bookings. Remind customers about upcoming returns and confirmations.
-
Track your rental inventory in real-time. It helps prevent overbooking and keeps your operations smooth.
-
Offer accessible customer support for inquiries. A responsive support team builds trust and enhances customer satisfaction.
Consider managed Managed hosting services for expert guidance and installation support.


