9 Steps to Configure Magento 2 Order Success Page
Do you want to make your customers' post-purchase experience exceptional? Magento 2 Order Success Page confirms orders and gives customers important details. Personalizing this page can greatly enhance their satisfaction and encourage them to return.
This tutorial will show you how to configure the Magento 2 Order Success Page in nine easy steps. These steps will help you customize the page to reflect your brand.
Key Takeaways
-
Learn how to enhance the Magento 2 Order Success Page.
-
Discover why the Success Page is important for customer satisfaction.
-
Understand the key features of the Checkout Success Page.
-
Find out how to customize order details and layout.
-
Explore options for adding custom blocks and content.
-
See how to integrate the Success Page with other extensions.
-
Get step-by-step instructions for configuring the page.
-
Learn about adding newsletter subscriptions and promotional offers.
What is the Magento 2 Checkout Success Page

The Magento 2 Checkout Success Page, also known as the Order Success Page or Thank You Page, is the final step in the checkout process.
After a customer places an order, they are directed to this page to view a summary of their order details.
The Checkout Success Page is an important touchpoint in the customer journey. It provides an opportunity to engage with customers who have just made a purchase. By customizing this page, store owners can enhance the post-purchase experience. It encourages customer loyalty. For example, a well-designed Checkout Success Page may include:
-
A personalized thank you message
-
Detailed order summary
-
Promotional banners or discount codes for future purchases
-
Related product recommendations
-
Social sharing buttons
-
Links to helpful resources, such as order tracking or returns policy.
By providing a positive and informative post-purchase experience, store owners can build trust with their customers. It can increase the likelihood of repeat purchases. Some common customizations include:
-
Adding a newsletter subscription option
-
Displaying related products or special offers
-
Providing links to track the order or create a return
-
Showing a custom thank you messages
-
Displaying social sharing buttons to connect with loyal customers.
-
Offering coupon codes for the next purchase
-
Linking to relevant FAQ articles or blog posts
-
Adding a contact form or support links for easy communication.
For instance, a fashion retailer may display product recommendations based on the customer's recent purchase. They might also provide a discount code for the customer's next order. Similarly, a technology store may include links to product manuals and setup guides. They could also offer access to customer support resources.
Key features of Order Details on Success Page for Magento 2 extension
1. Detailed Order Information
The extension allows you to display a variety of order details on the success page, including:
-
Order Number (or Order Increment ID): The unique identifier for the customer's order.
-
Order Date: The date and time the order was placed.
-
Shipping Method: The chosen shipping method for the order.
-
Payment Method: The payment method used for the order.
-
Billing and Shipping Addresses: The customer's billing and shipping addresses.
-
Order Summary: A detailed list of the products ordered, including quantities and prices.
2. Customizable Layout and Design
The Magento 2 Checkout Success Page Extension enables admins to customize the layout and design. They can tailor the success page to meet their business needs. It includes:
-
Adding custom blocks and content
-
Modifying the position of order details
-
Choosing which order details to display
-
Integrating with other extensions, such as One Step Checkout
3. Enhanced User Experience
The extension provides several features to enhance the customer shopping experience:
-
Create an Account: An option for customers to create an account directly from the success page.
-
Newsletter Subscription: An option for customers to subscribe to the store's newsletter.
-
Continue Shopping: A button to encourage customers to continue shopping and make their next purchase.
-
Print Order: An option for customers to print their order details for their records.
-
Reorder: An option for registered customers to easily reorder the same items from their previous order.
4. Easy Installation and Configuration
-
User-Friendly and Easy Installation: The Magento 2 Checkout Success Page Extension is straightforward to install. You can install the extension files using Composer.
-
Open for Customization: The code is fully accessible and customizable.
-
Flexible Backend Configuration: Admins can configure the extension settings from the Magento backend.
-
Customizable Display Options: Choose which order details to display on the success page.
-
Tailored Success Page: Customize the success page according to specific business preferences.
-
Enhances Customer Experience: The extension provides a comprehensive and customizable success page.
-
Increases Customer Satisfaction: Helps store owners create a positive post-purchase experience, leading to increased customer satisfaction and long-lasting relationships.
Step-by-Step Customization Instructions
Step 1: Installation
-
Install the extension files via Composer or manually.
-
Run the necessary Magento CLI commands to enable the extension.
php bin/magento module:enable OrderSuccessPage
php bin/magento setup:upgrade
php bin/magento setup:static-content:deploy -f
Step 2: Configuration
-
Navigate to the Magento backend.
-
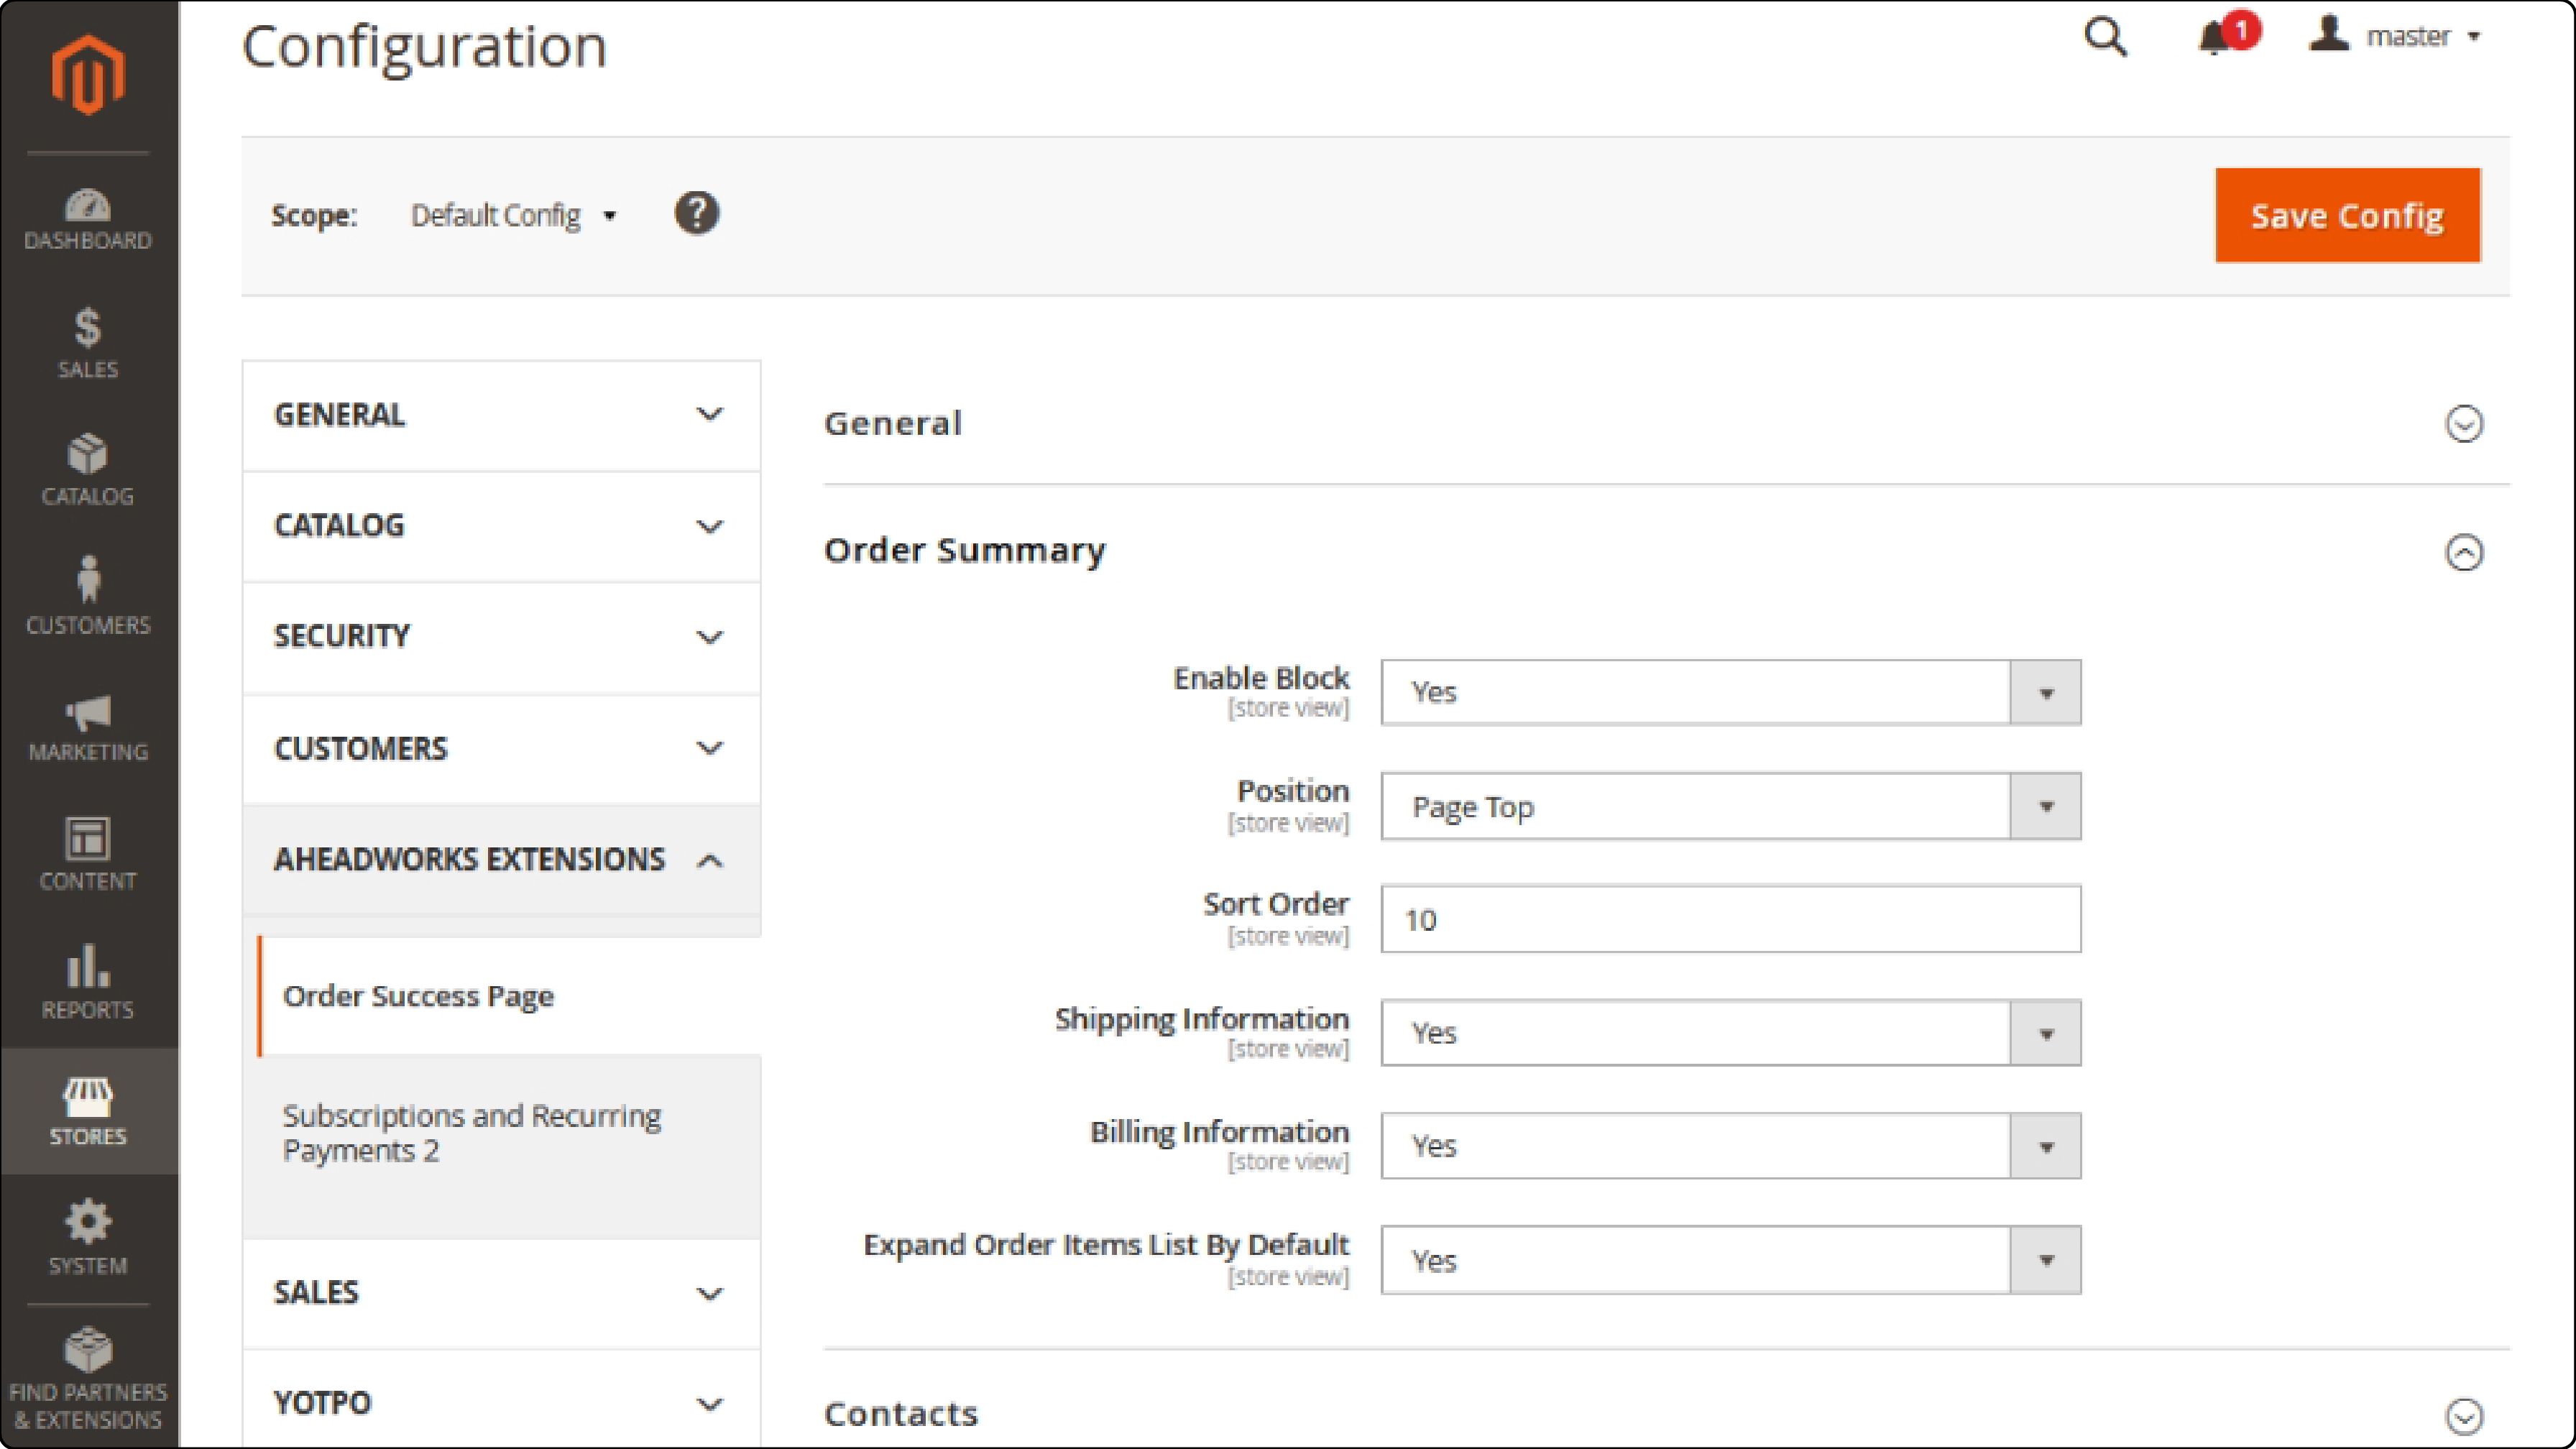
Go to Stores > Configuration > Sales > Checkout Success Page.
-
Enable the extension and configure the general settings.
Step 3: Customize Order Details

- In the extension configuration, choose which order details to display on the success page:
-
Order Number
-
Order Date
-
Shipping Method
-
Payment Method
-
Billing and Shipping Addresses
-
Order Summary
- Customize the labels for each order detail field.
Step 4: Add Custom Blocks and Content
-
Create a new CMS block for your custom content.
-
In the extension configuration, select the newly created CMS block to display on the success page.
-
Choose the position of the custom block (e.g., above or below the order details).
Step 5: Customize Button and Link Options
-
Enable or disable the Continue Shopping button.
-
Customize the Continue Shopping button label and link.
-
Enable or disable the Create an Account option.
-
Customize the Create an Account link label and destination.
-
Enable or disable the Print Order option.
-
Customize the Print Order link label.
Step 6: Configure Newsletter Subscription

-
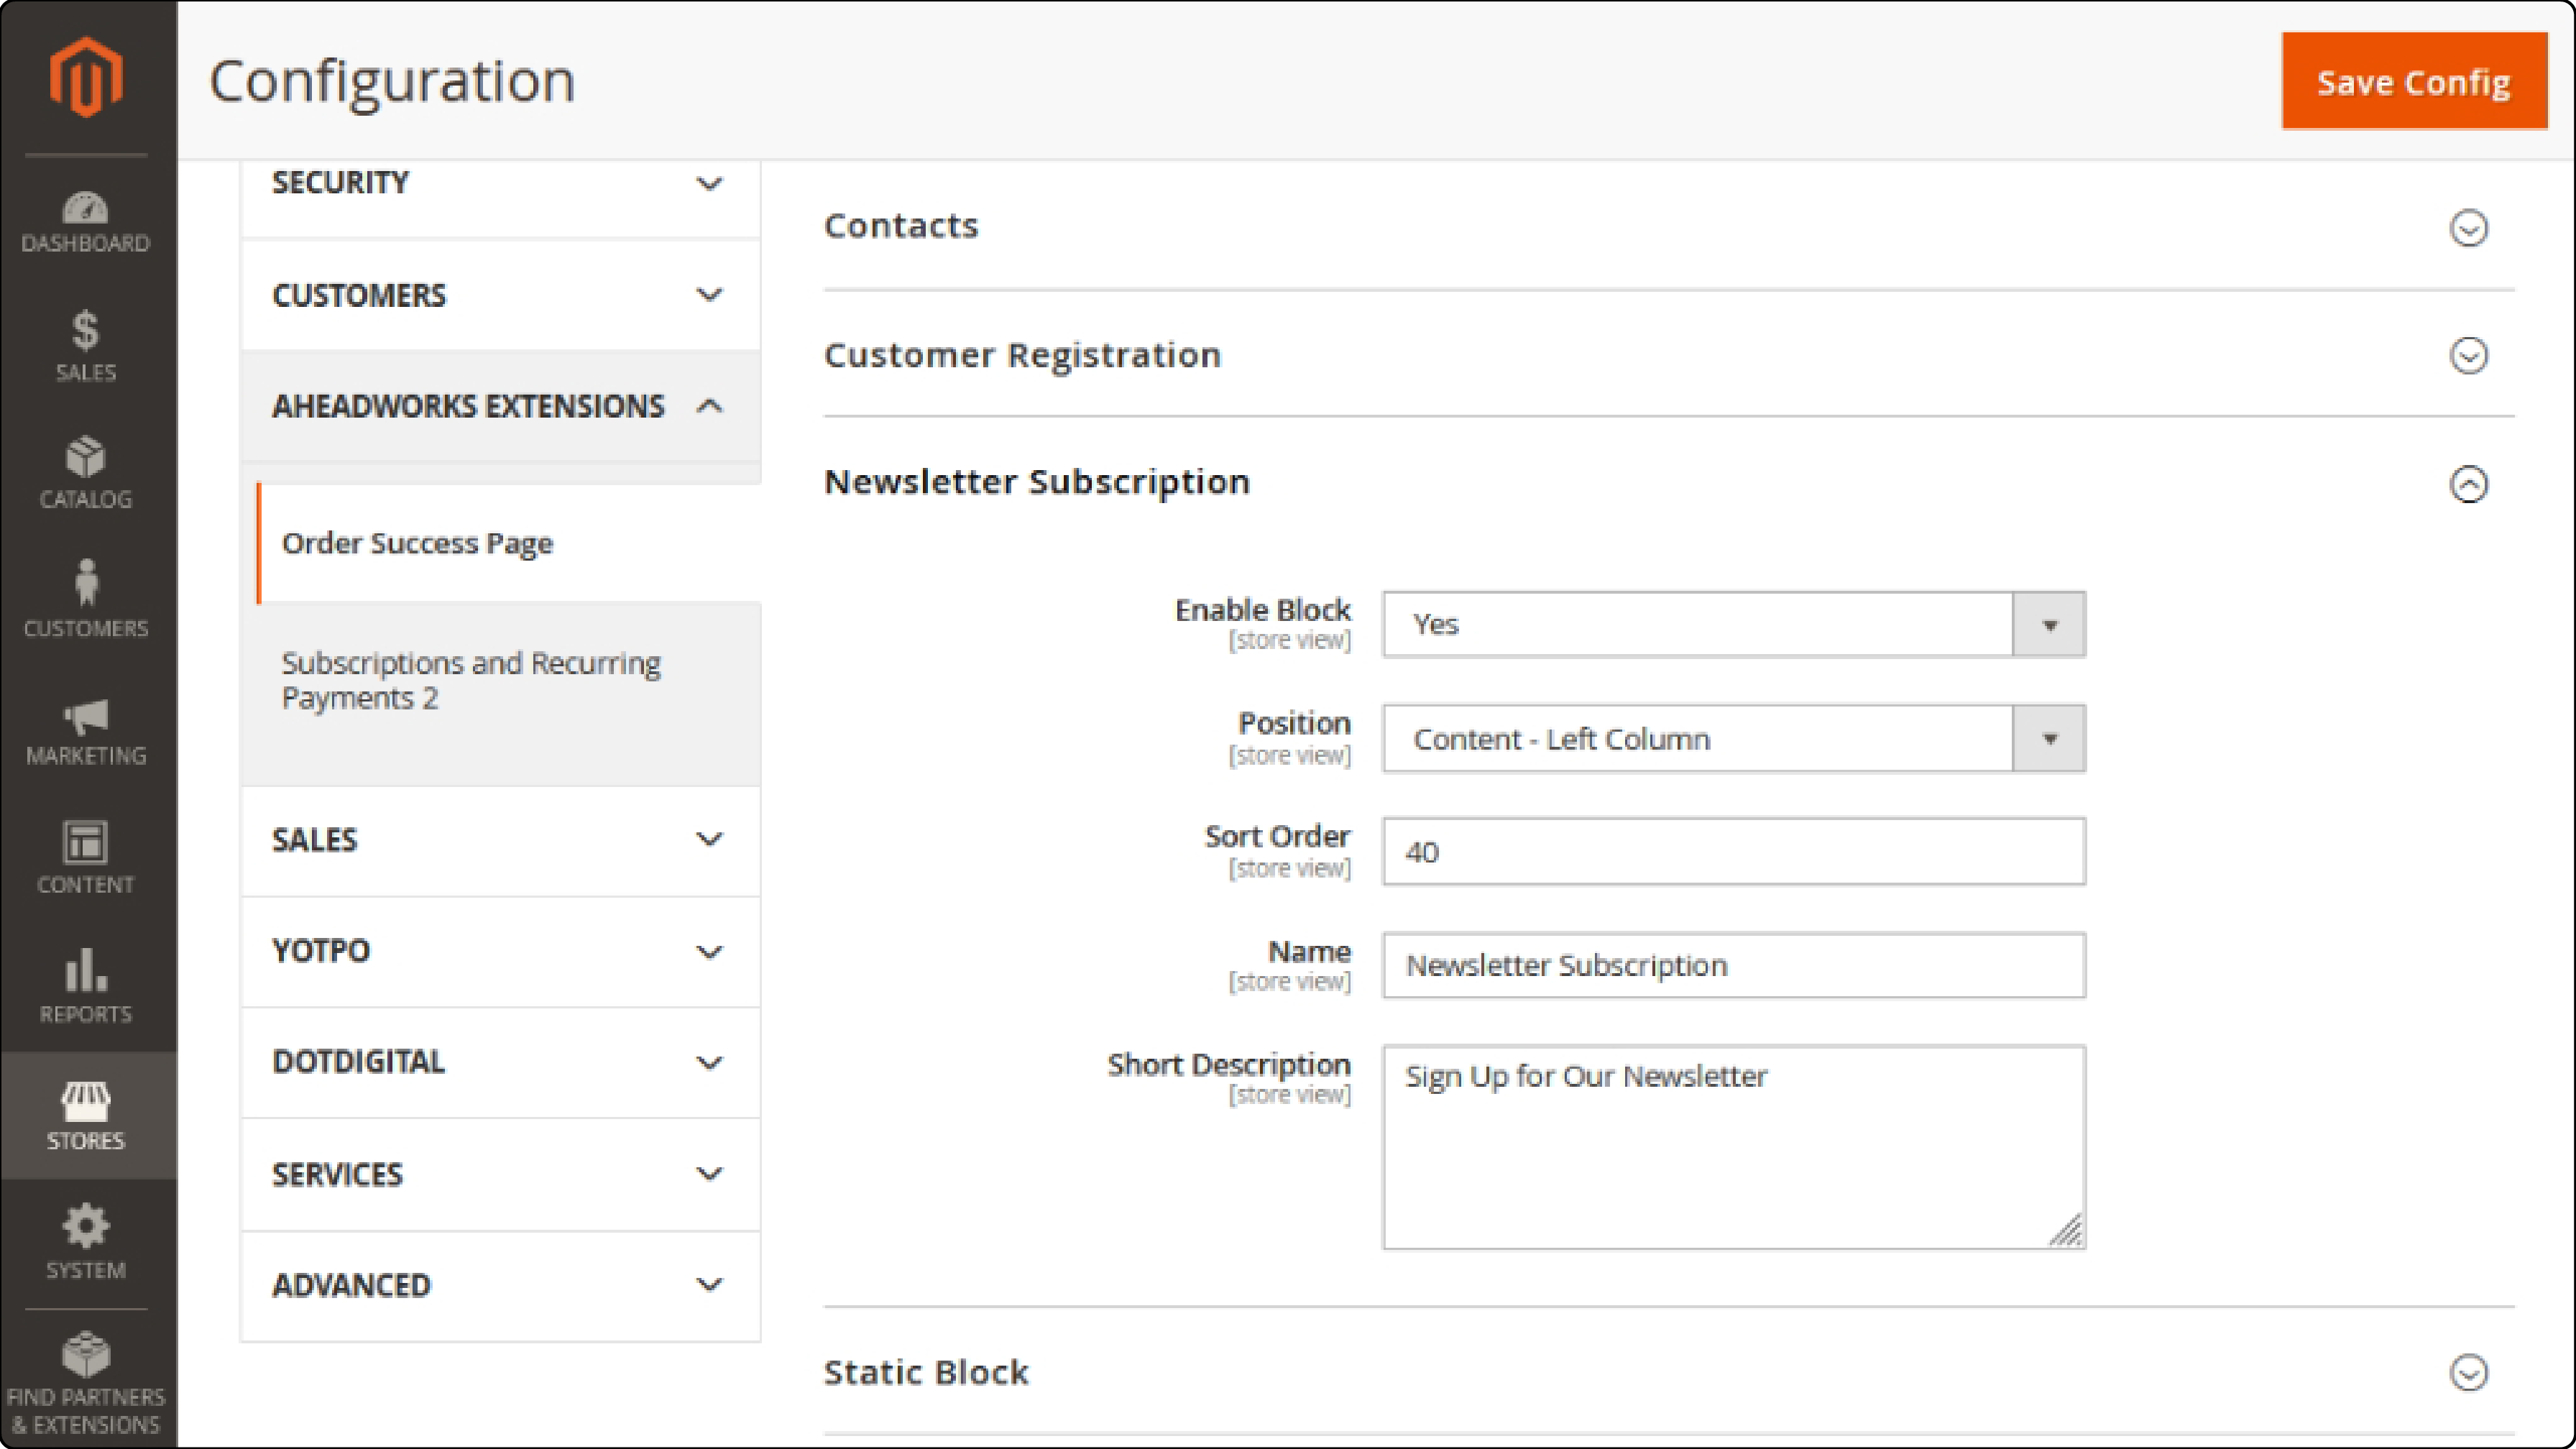
Enable or disable the newsletter subscription option.
-
Customize the newsletter subscription label and checkbox text.
Step 7: Integrate with Other Extensions

If using a compatible extension, such as One Step Checkout, configure the integration settings. Do this in the extension configuration section.
Step 8: Customize Styling
Use CSS to customize the styling of the success page elements, such as:
-
Fonts
-
Spacing
Step 9: Test and Deploy
-
Thoroughly test the customized success page on a staging environment.
-
Ensure that all order details are displayed correctly and that custom blocks and options function as intended.
-
Deploy the changes to your live Magento 2 store.
FAQs
1. What is the purpose of configuring a Magento 2 order success page?
The order success page, also known as the thank you page, is important. It provides order confirmation and enhances the post-purchase experience for customers.
2. How can I customize the Magento 2 order success page?
You can customize the order success page with modules or page extensions. These tools provide options to modify the content and layout of the thank you page.
3. What is the significance of a coupon code on the Magento 2 thank you page?
Including a coupon code on the thank you page can encourage repeat sales. It offers discounts to customers on their next purchase.
4. Can I use a plugin to enhance the functionality of the Magento 2 order success page?
Yes, you can use plugins or modules. These can add new blocks, coupon code fields, or other features to the success page in Magento.
5. How can I add a custom thank you message on the Magento 2 order success page?
You can create a custom thank you page using PHP. Modify the thank you message by using code snippets at the bottom of the page.
6. What is the role of composer.json in configuring the Magento 2 order success page?
The composer.json file manages dependencies. It installs modules needed to enhance the functionality of the Magento 2 success page.
7. How can I display order details on the Magento 2 thank you page?
You can use modules or custom coding to fetch information about order items and status. Display this information on your customers' thank you page.
Summary
Enhancing the Magento 2 Order Success Page can greatly enhance your customers' post-purchase experience. Here’s what you should remember,
-
Provide essential order details. These include the order number, date, shipping method, and payment method.
-
Add a personalized thank you message. Include promotional banners and related product recommendations.
-
Include social sharing buttons. Add a newsletter subscription form to encourage further interaction.
-
Use Magento's backend for customization. Customize order details, add custom blocks and content, and configure button and link options.
-
Thoroughly test the customized page in a staging environment. Deploy it live only after ensuring all features work correctly.
Explore managed Magento hosting options for enhanced post-purchase experience and performance with the order success page.


