Magento 2 Order Email Templates: Customize Order Confirmation
Looking to enhance your sales emails in Magento 2? Magento 2 Order Email Template allows you to customize email templates to match your store's branding.
This tutorial will cover how to set up and customize Magento 2 order email templates.
Key Takeaways
- Understand the importance of order confirmation emails in Magento 2.
- Learn how to access and modify many default email templates in Magento 2.
- Discover steps to create your custom templates and configure new order email.
- Explore ways to add your logo and brand elements.
- Get an overview of how to configure Magento email settings.
-
4 Steps To Edit The Files Of Magento 2 Order Confirmation Email Template
-
Predefined Directives Of Custom Magento Order Confirmation Email
-
2 Methods To Create Custom Email Templates Using Variables In Magento
Why Customize Order Email Templates In Magento 2?
Your order confirmation email is often the first touchpoint a customer has with your brand after making a purchase. It sets the tone for their entire post-purchase experience. A generic, uninspired email template does not stand out anymore.** Well-designed email templates** can guide customers through the post-purchase journey.
Setting up Magento 2 templates in the new order makes your new email template memorable, informative, and on-brand. It helps you create personalized order confirmation emails. It makes your communication with customers more effective and professional. Consistent branding in emails can increase brand recall and loyalty by:
- Providing examples of unique design elements or content structures.
- Including detailed information (e.g., order details, shipping estimates, related products).
- Describing how to incorporate brand colors, logos, and tone of voice consistently.
- Using customer data (e.g., name, purchase history) in templates.
- Incorporating examples of dynamic content that can be included based on customer segments.
- Discussing the impact of personalization on customer engagement and satisfaction.
Components Of A Magento 2 Order Email Template
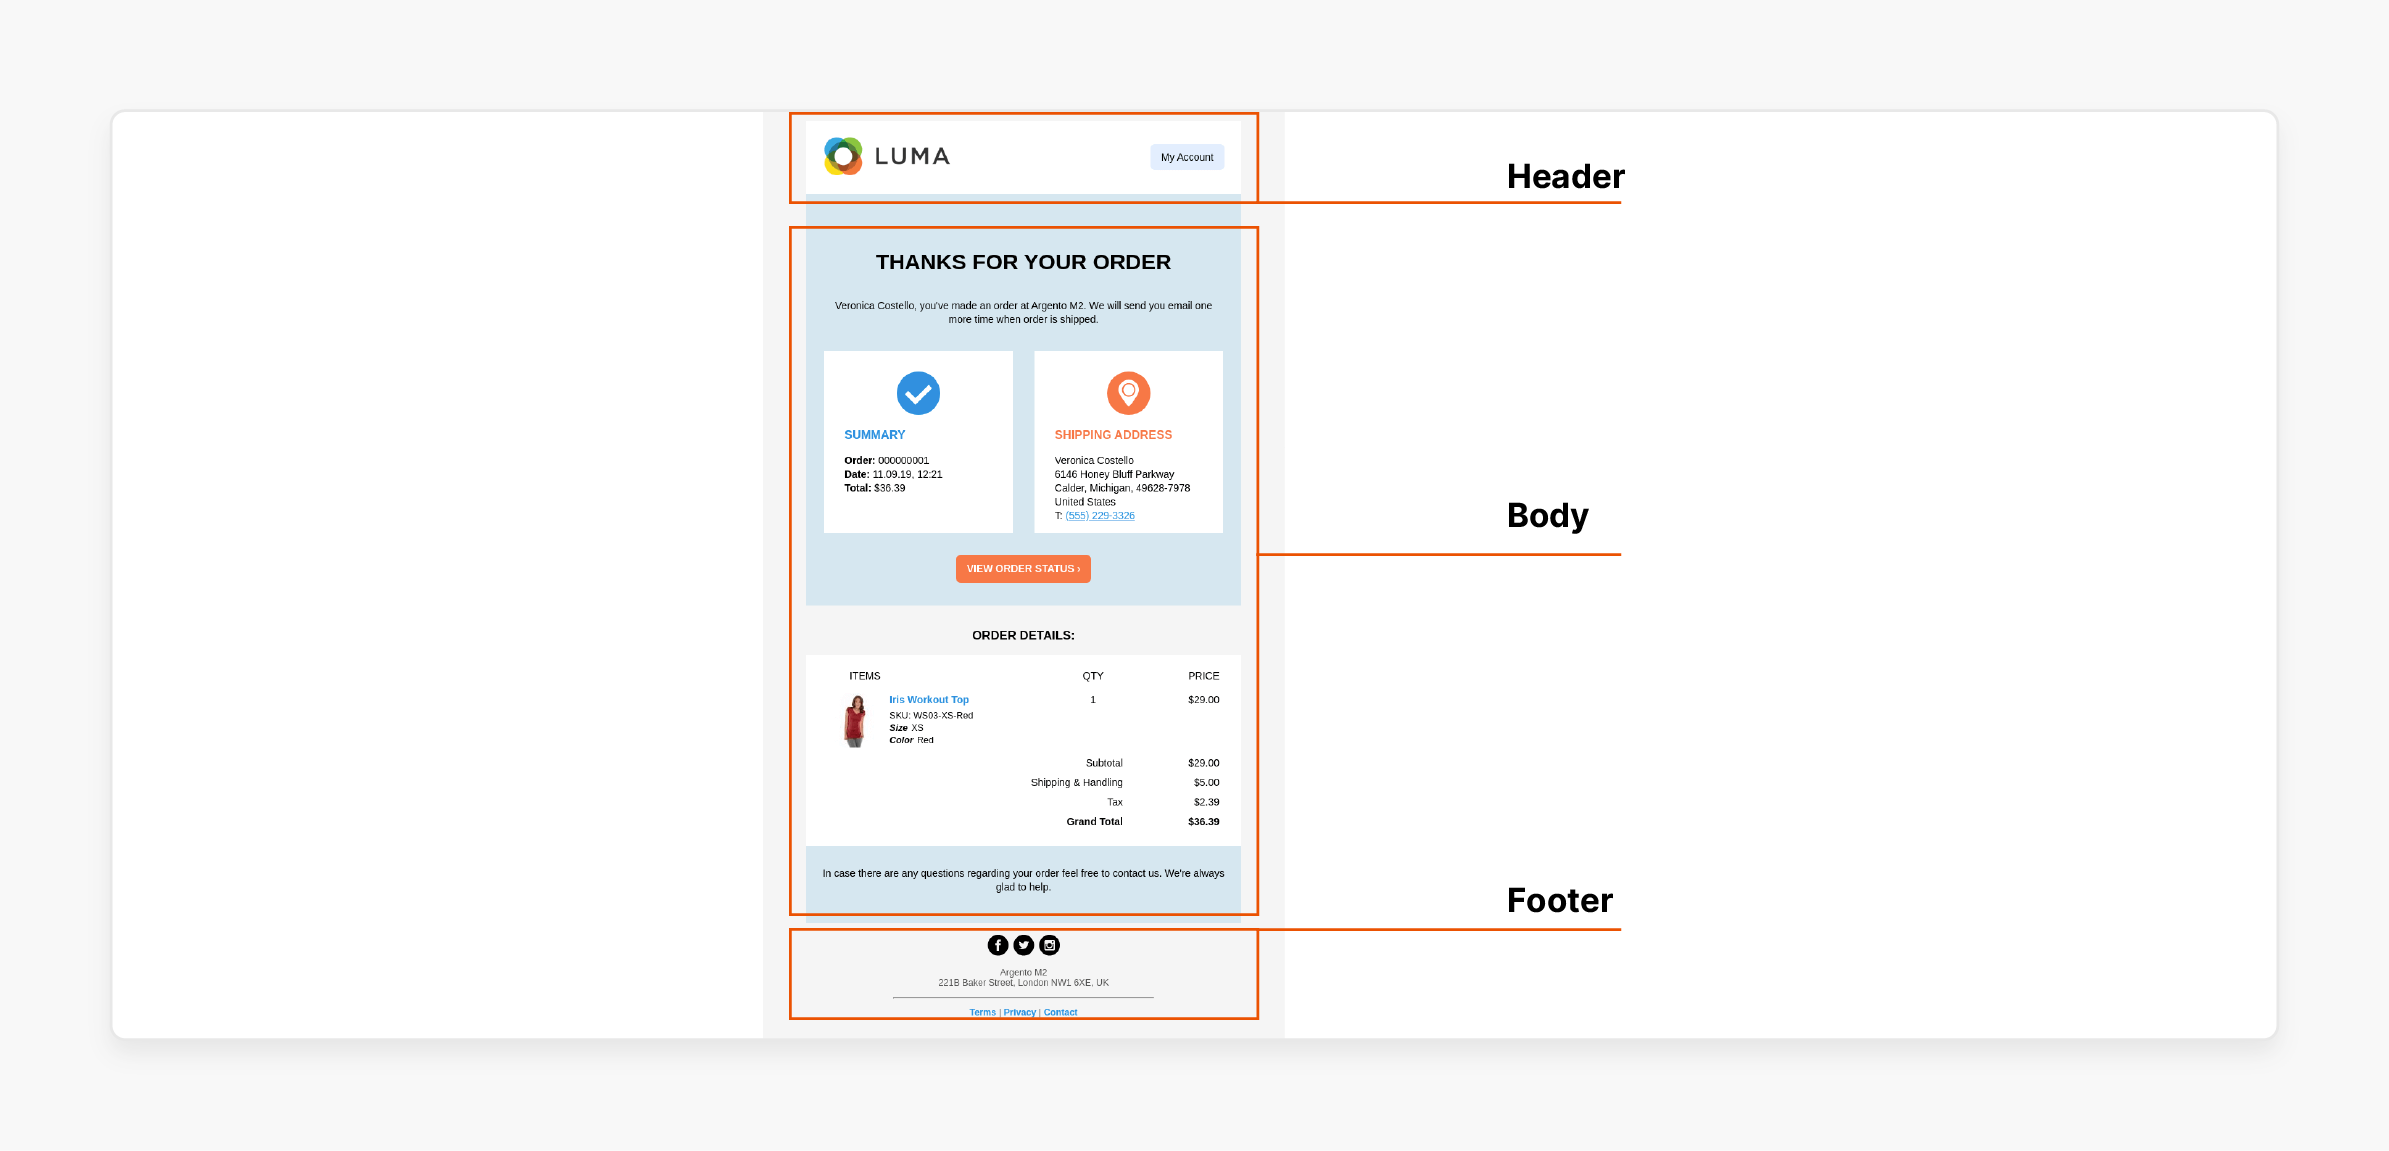
**[Customizing email templates in Magento 2] consists of three main parts, such as:
1. Header
The header is situated at the top of the email that is sent to customers. It captures the viewer's attention effectively, making it an ideal place for your logo. You can customize the email logo which is linked directly to your store. This helps drive more traffic to your site.
2. Body
The message template, or the body of the email, can be customized similarly to the header and footer templates. However, it varies depending on the activities or events. Magento provides all the necessary information to your customers. For example, you can start with the main information related to the recipients.
3. Footer
The footer template includes the conclusion and the sender's signature. You can freely edit the footer content and add more information. Examples include the company email, phone number, or address.
2 Methods To Create A New Order Confirmation Template
Method 1: Using Directory Folders & Files
- Navigate to the module folder.
- Create an email_templates.xml file in the etc folder of your module at
<Magento-root-directory>/app/code/<Vendor>/<Module_Name>/etc.
Note: Templates as physical files contain the configurations for your email templates.
- Create email_templates.xml.
Check the example of the contents of the email_templates.xml file:
<?xml version="1.0"?>
<config xmlns:xsi="http://www.w3.org/2001/XMLSchema-instance" xsi:noNamespaceSchemaLocation="urn:magento:module:Magento_Email:etc/email_templates.xsd">
    <template id="noufal_custom_email_template" label="Noufal Custom Email Template" file="noufal_custom_email_template.html" type="html" module="Noufal_email_template" area="frontend"/>
</config>
Here,
id: Unique template identifier. file: Path to the template file. type: Type of email (text or HTML). area: Application area.
- Create Templates with Unique Identifiers.
Check the sample template to create files for each module as needed:
   <?xml version="1.0"?>
<config xmlns:xsi="http://www.w3.org/2001/XMLSchema-instance" xsi:noNamespaceSchemaLocation="urn:magento:module:Magento_Email:etc/email_templates.xsd">
    <template id="noufal_first_custom_email_template" label="Noufal Custom Email Template" file="noufal_first_custom_email_template.html" type="html" module="Noufal_email_template" area="frontend"/>
</config>
Method 2: Using Default Magento Dashboard Settings
- Go to Marketing > Email Templates.
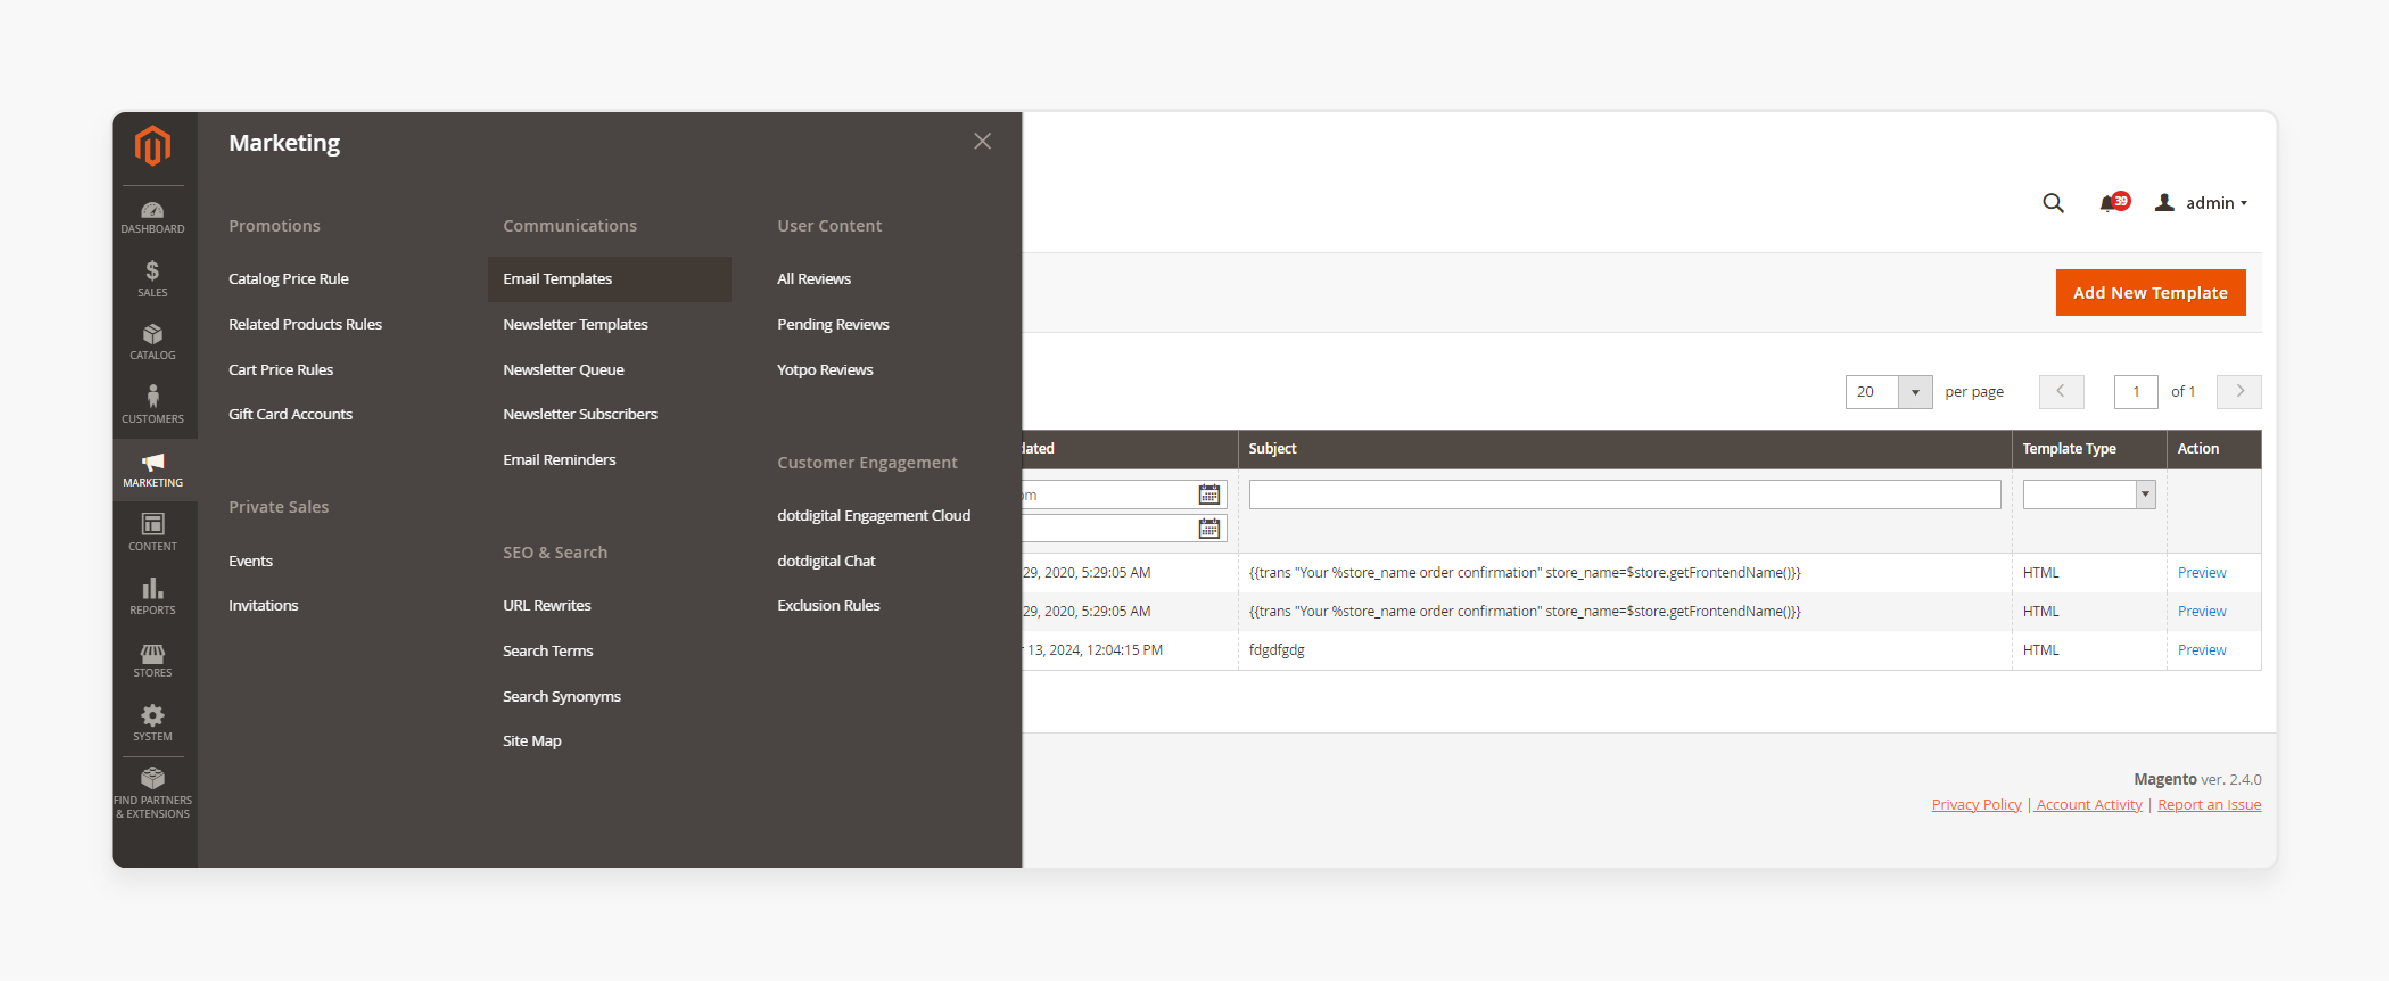
- Click on the 'Add New Template' button.
Check the example below for configuring New Template settings.
1. Load Default Template
- Template: Select one from the existing Magento templates.
For example, choose the “New order” template and click on the 'Load Template' button. The template content section will display “Loaded” when you scroll down.
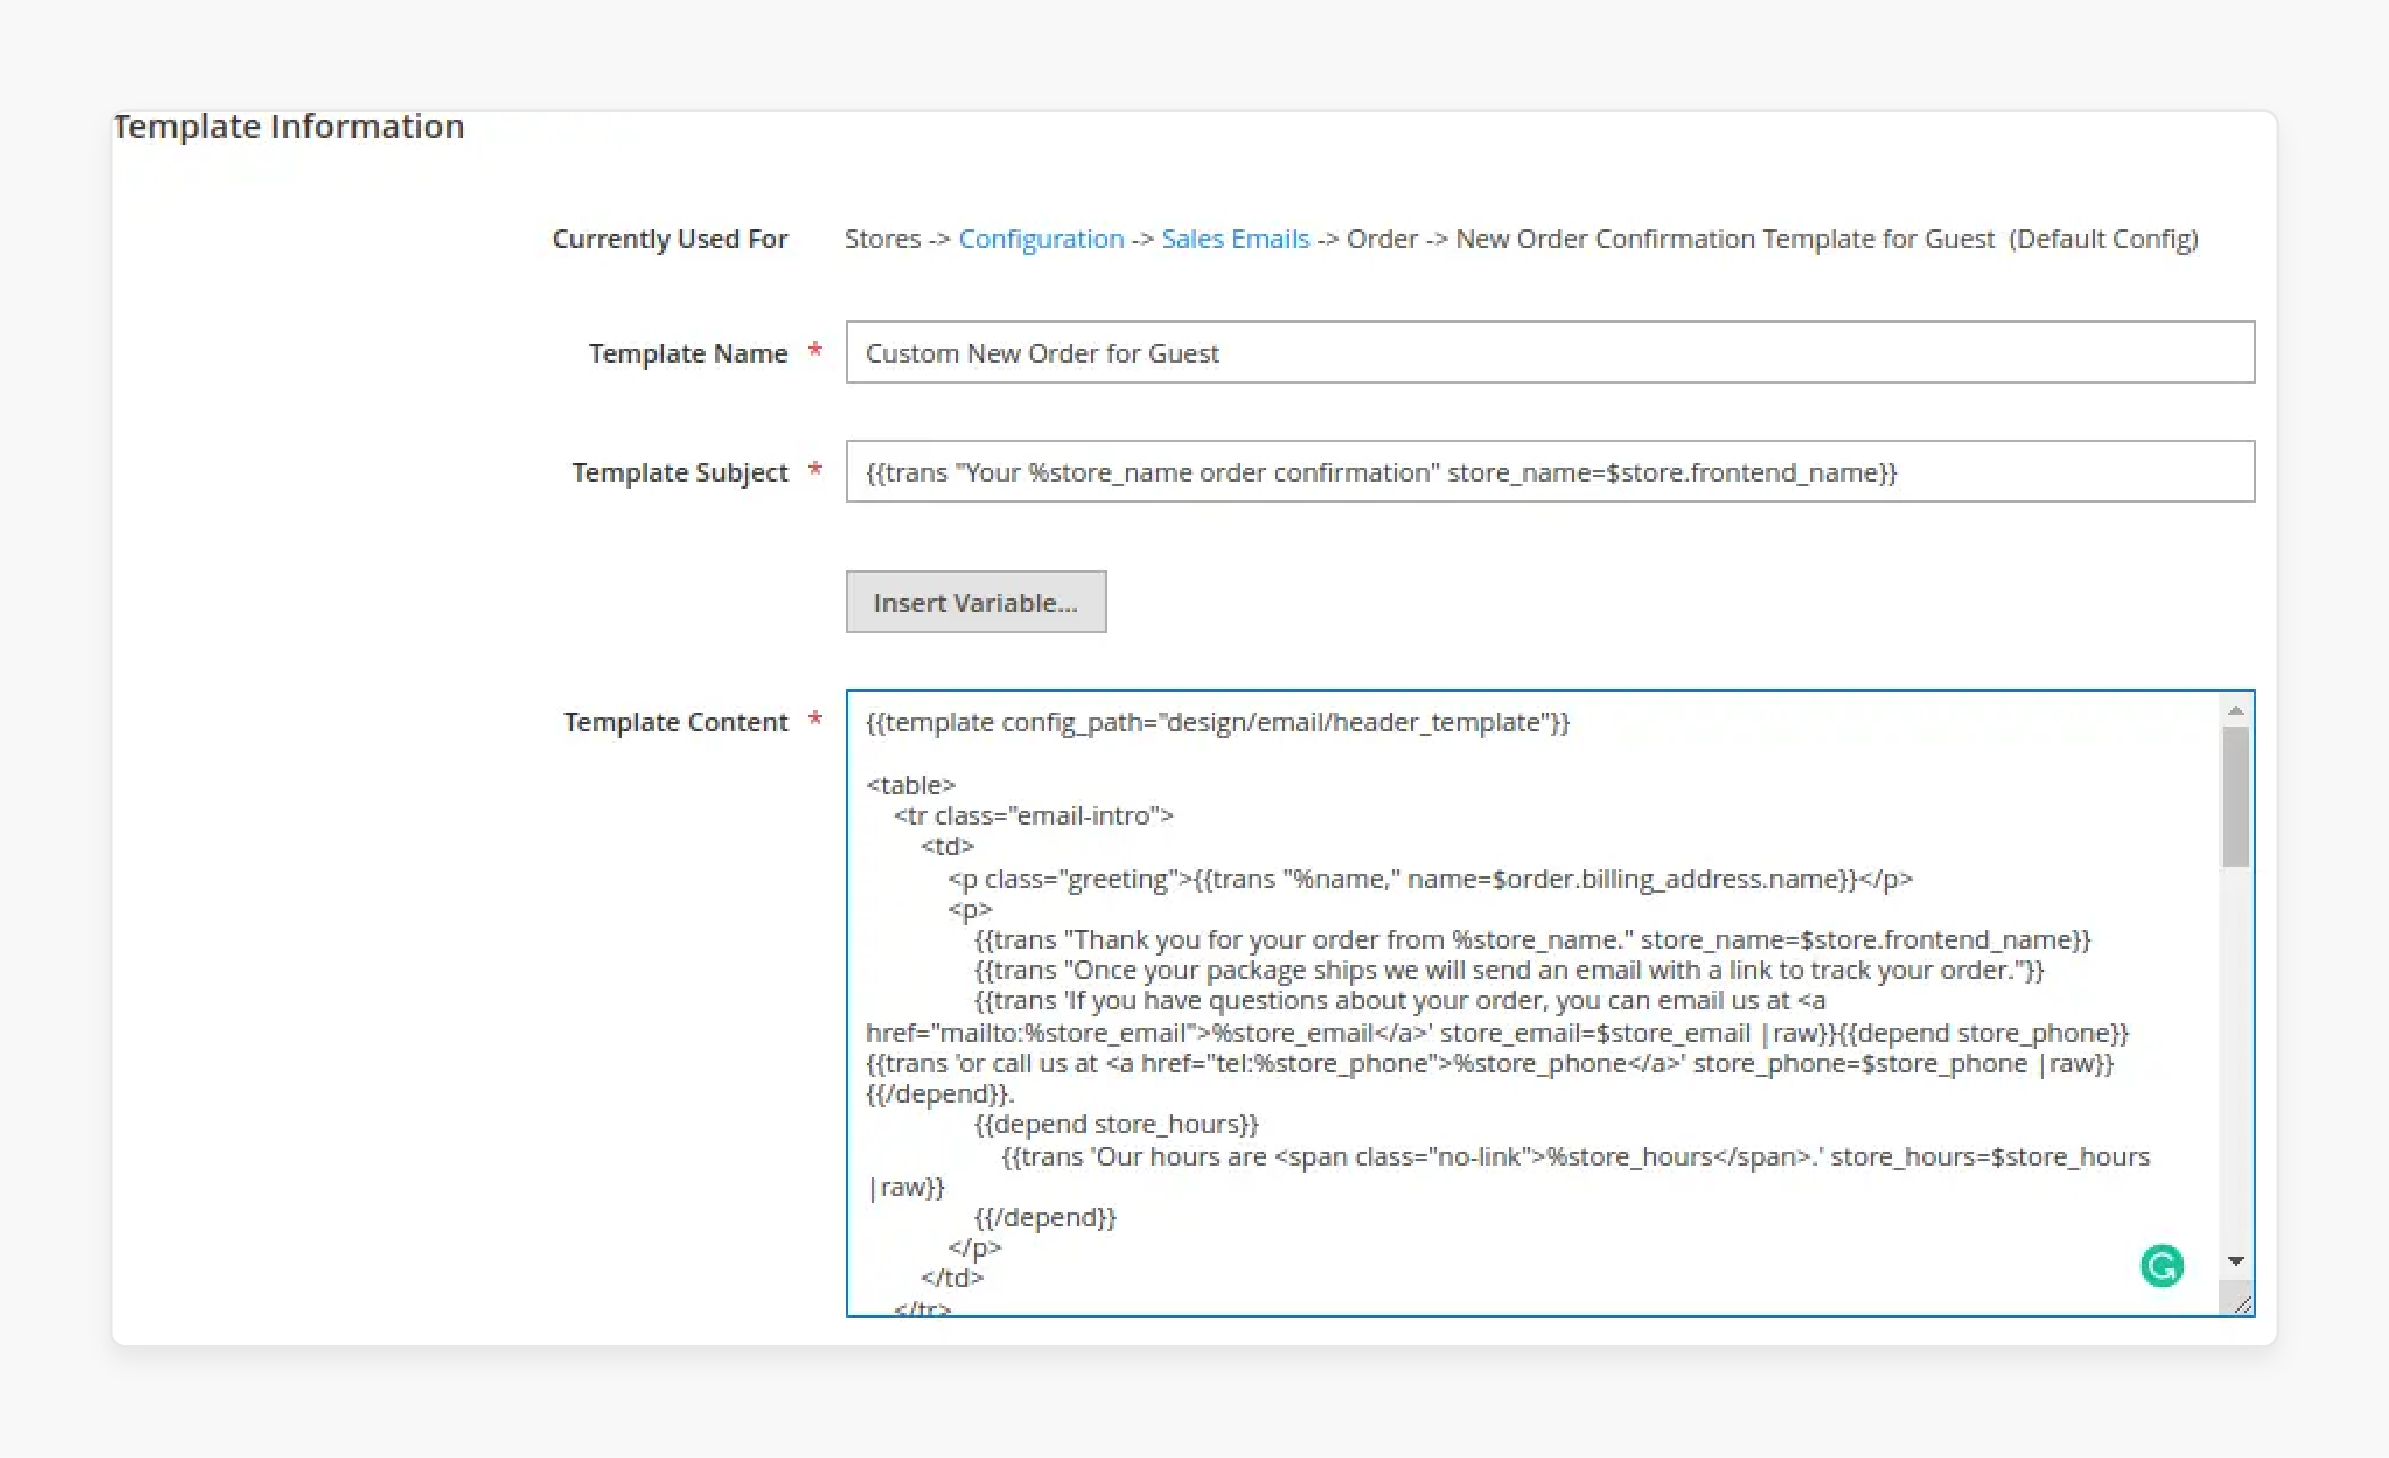
2. Template Information
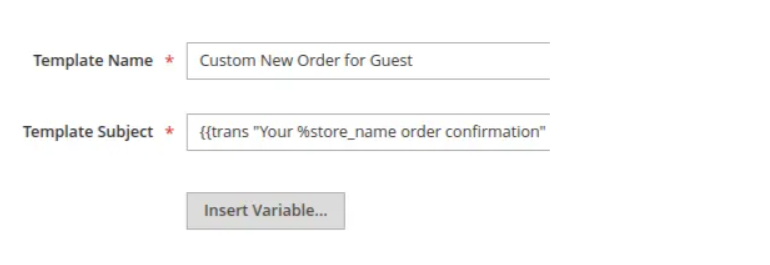
- Template Name: Put something meaningful for the name of the template. For instance, “New order template”.
- Template Subject: This field is auto-filled with complex code and variables from the default template. It's best not to alter it.
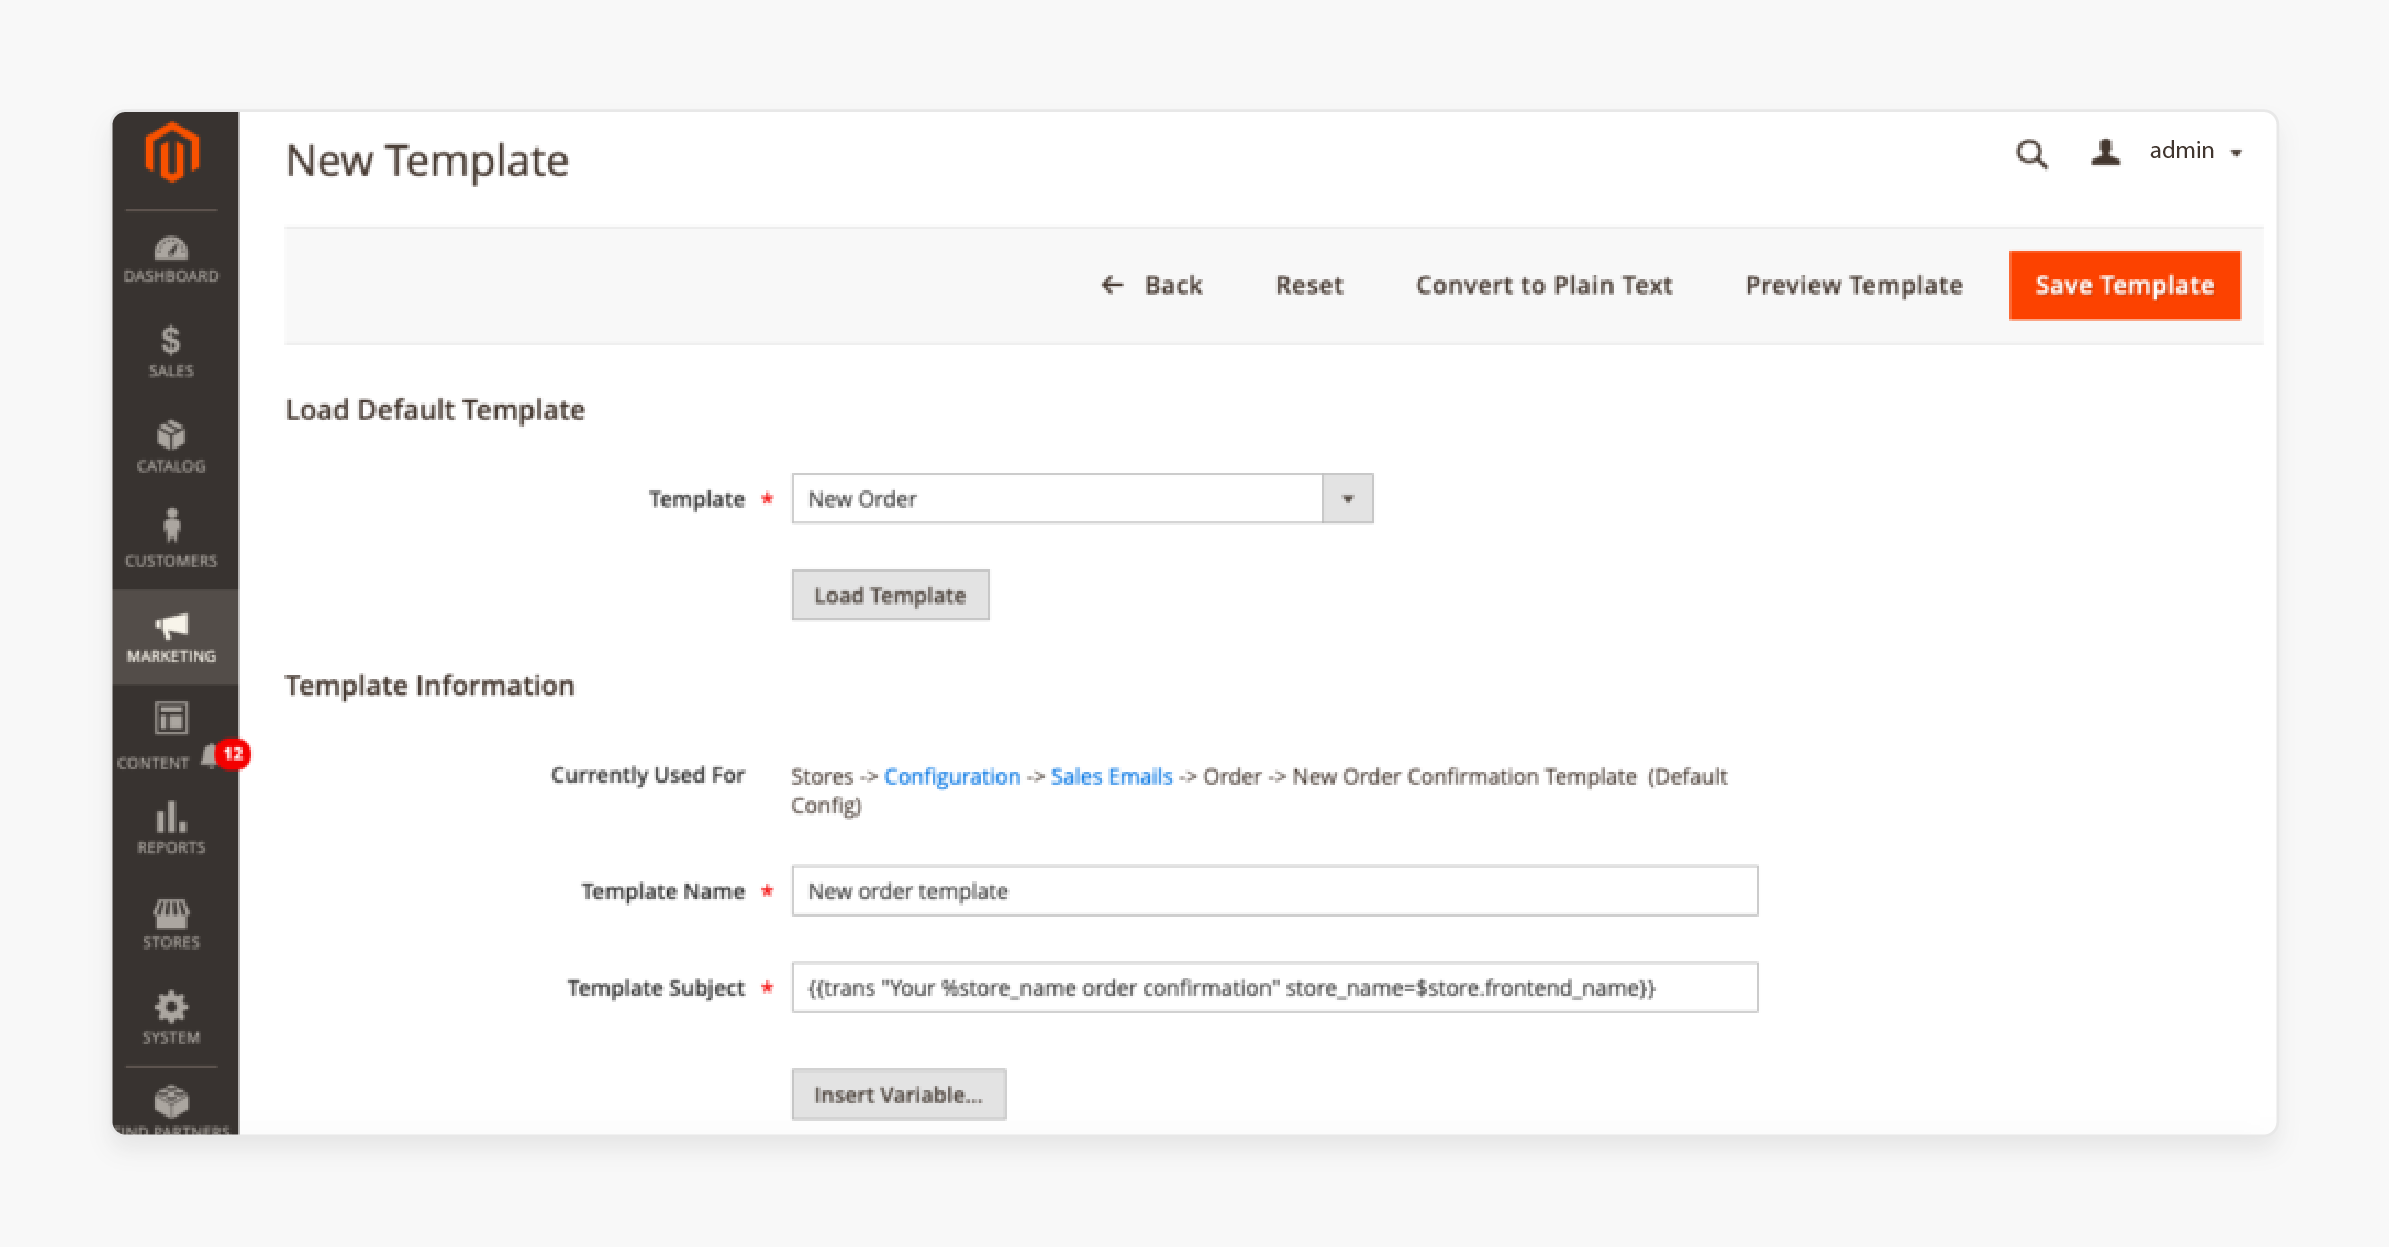
- Template Content: The content section is populated with the default template's information. You can customize it to fit your business needs.
For example, to add variables to the email template content:
- Place the cursor where you want to insert additional information.
- Click on 'Insert Variables'. A list of variables will appear.
- Choose the desired variable, such as the Sender Name.
- After customization, click on the 'Save Template' button.
- Preview the template by clicking 'Preview Template'.
Note: Ensure all changes are saved before previewing the email template on the frontend.
4 Steps To Edit The Files Of Magento 2 Order Confirmation Email Template
- Connect to your Magento account via FTP or SSH.
- Access the respective module files.
For instance, to open the file named account_new.html in the Magento customer module:
- Navigate to
<Magento-root-directory>/vendor/<Extension-name>/module-customer/view/frontend/email. - Use the vi or nano command to open the account_new.html file.
Predefined Directives Of Custom Magento Order Confirmation Email
| Directive | Description | Example |
|---|---|---|
{{store url=""}} |
Includes a link to the current store. The web address of the current store will be filled automatically if you leave the URL value empty. | {{store url=""}} |
{{var}} |
Inserts variables of a Magento 2 email template. | {{var customer.name}} |
{{var $object.method()}} |
If an email template contains the object, you can use suitable methods and properties. | {{var $order.getStatusLabel()}} |
{{template config_path=""}} |
Permits the addition of other templates to the letter. It is frequently used to format the header and footer in the same style. The path to an email template is applied with the help of the config_path attribute. | |
{{template config_path="design/email/header_template"}} {{template config_path="design/email/footer_template"}} |
||
{{trans}} |
Displays basic static content using a translation of the trans directive. | {{trans "sample string"}} |
{{media url=""}} |
Adds an image link to the corresponding image. It will extract the path to the file from the media folder. | {{media url="path/to/image.jpg"}} |
2 Methods To Create Custom Email Templates Using Variables In Magento
Method 1: Using Predefined Variables
- Click on the 'Insert Variable' button to display the allowed predefined variables.
- Access the data associated with the template to determine the list of accessible variables for a specific email template.
Method 2: Using Custom Variables
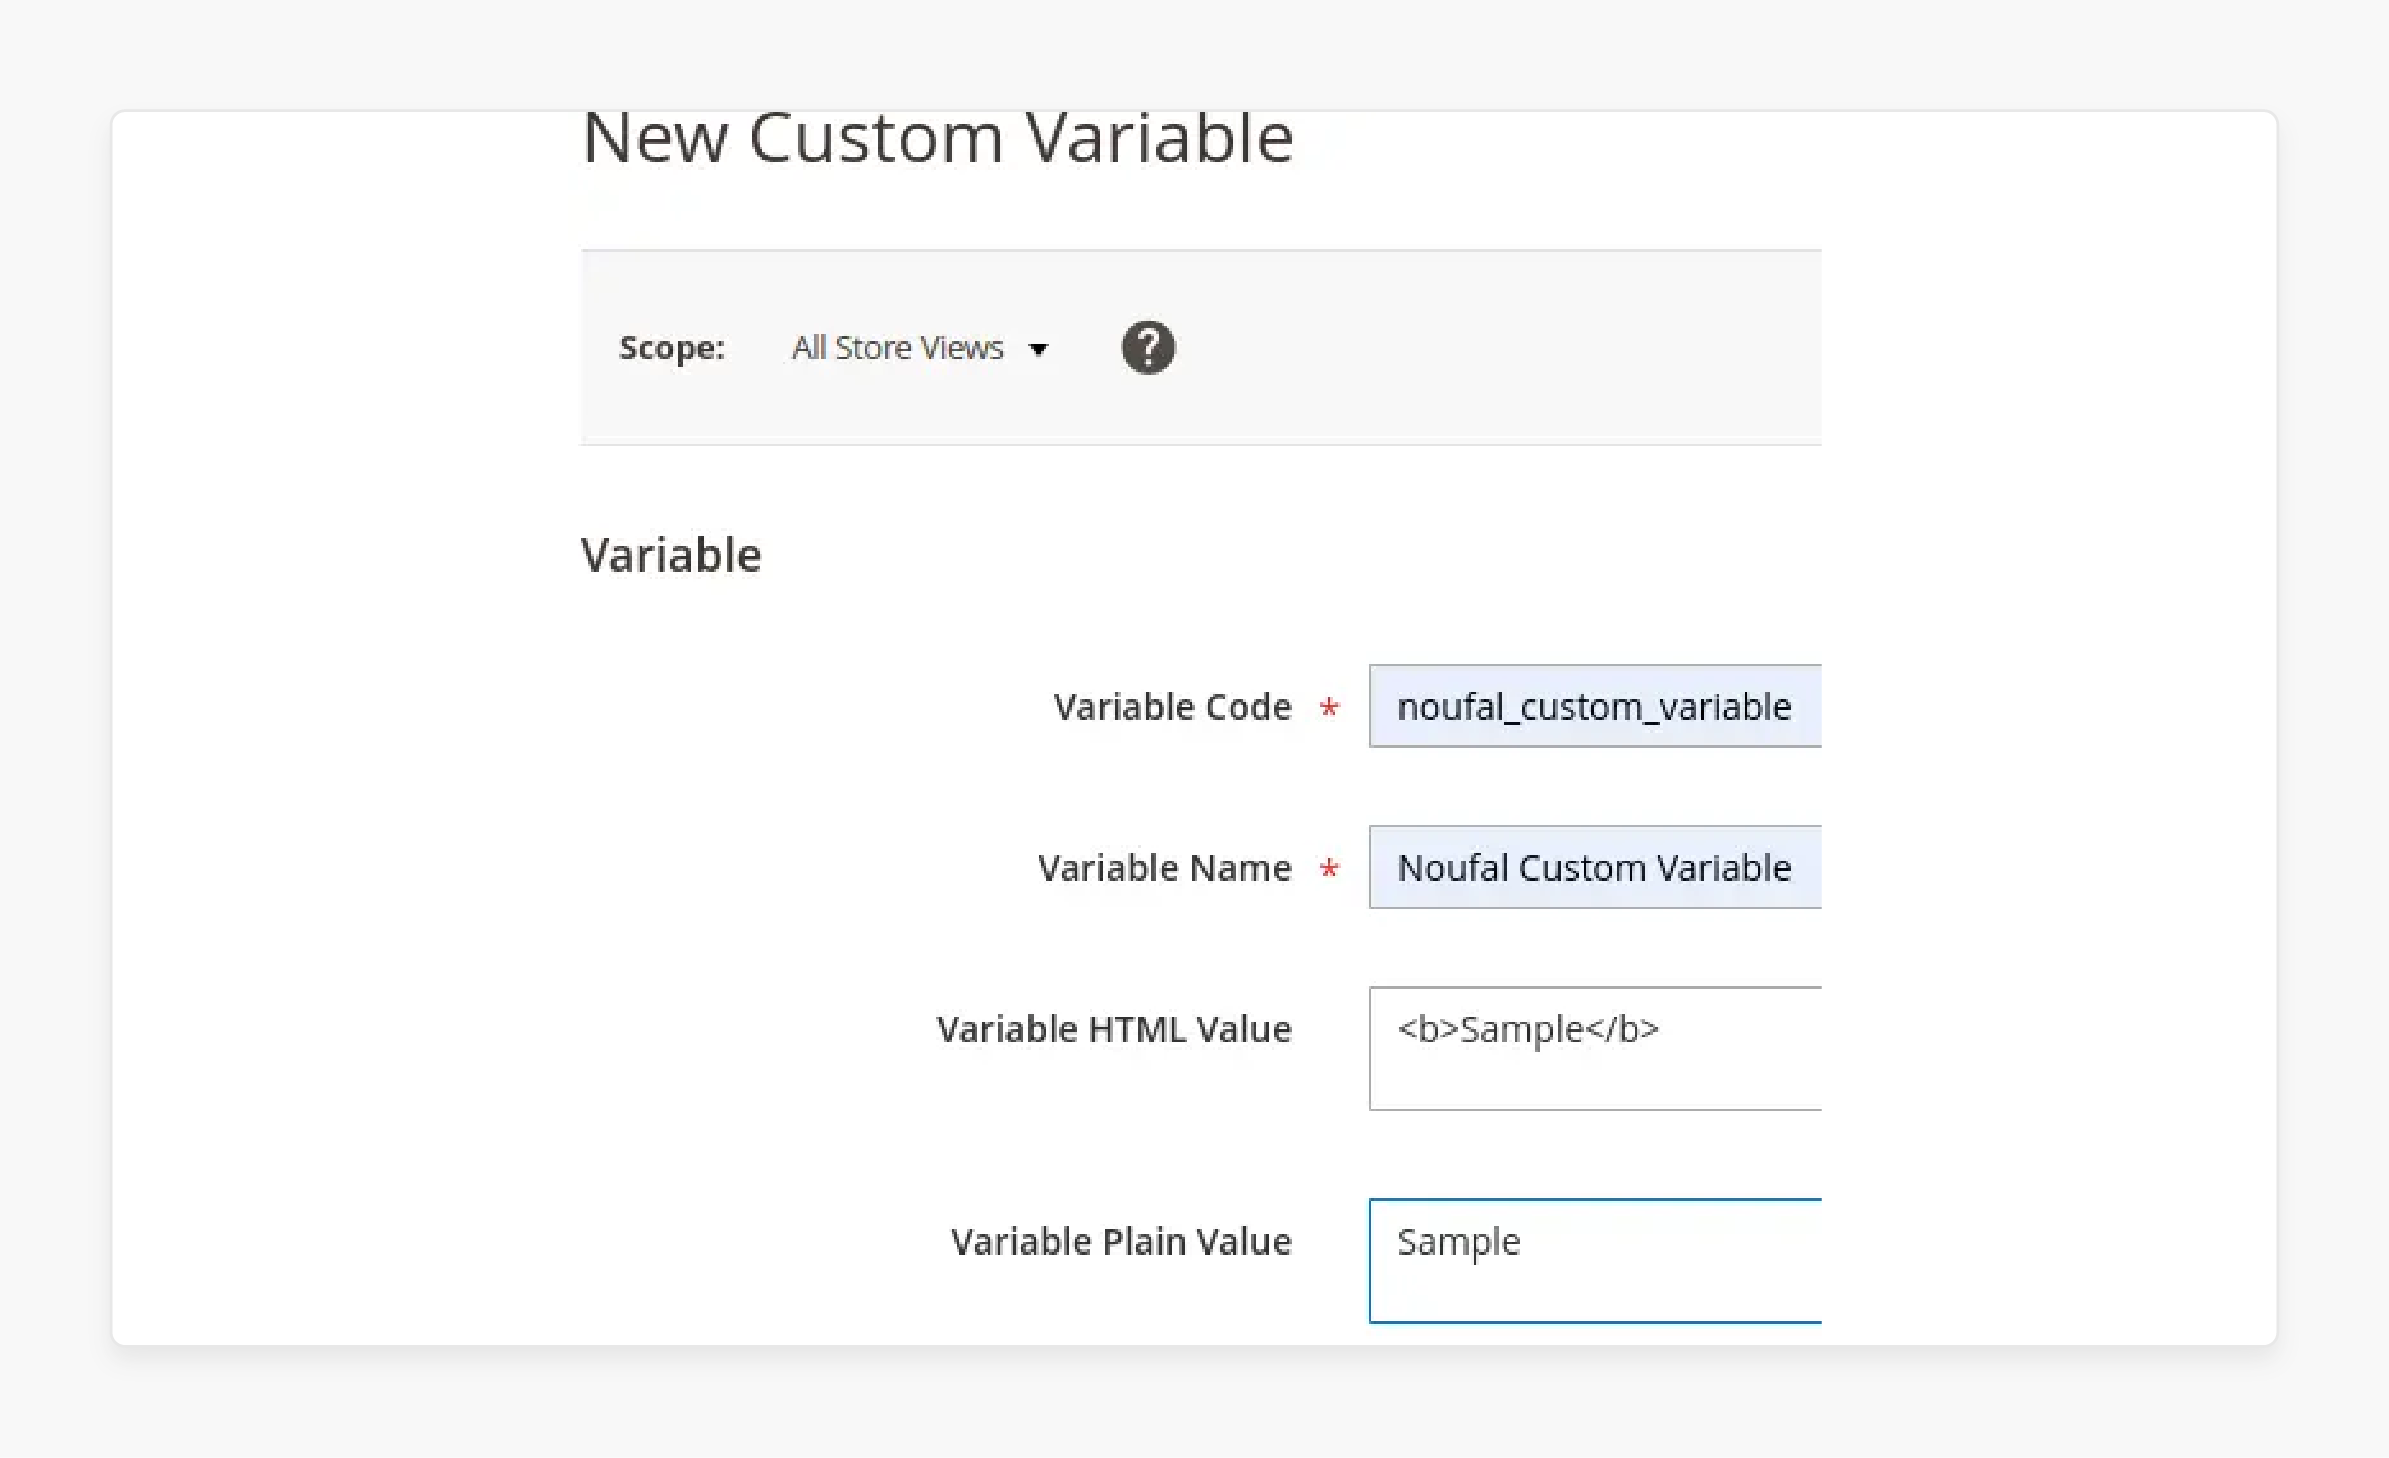
Step 1: Create a Custom Variable
- Log in to the Magento Admin Panel.
- Navigate to System > Other Settings > Custom Variables.
- Click on the 'Add New Variable' button.
- Enter the following details:
-
Code string for your custom variable (e.g.,
noufal_custom_variable). -
Name for your custom variable (e.g.,
Noufal Custom Variable). -
Variable value formatted with simple HTML tags (e.g.,
<b>Sample</b>). -
Variable value as plain text without formatting (e.g.,
Sample).
- Click on the 'Save' button to save the changes.
Step 2: Insert the Custom Variable
- Go to Content.
- Click on Pages or Blocks under Elements.
- Click the Edit link for the desired page or block.
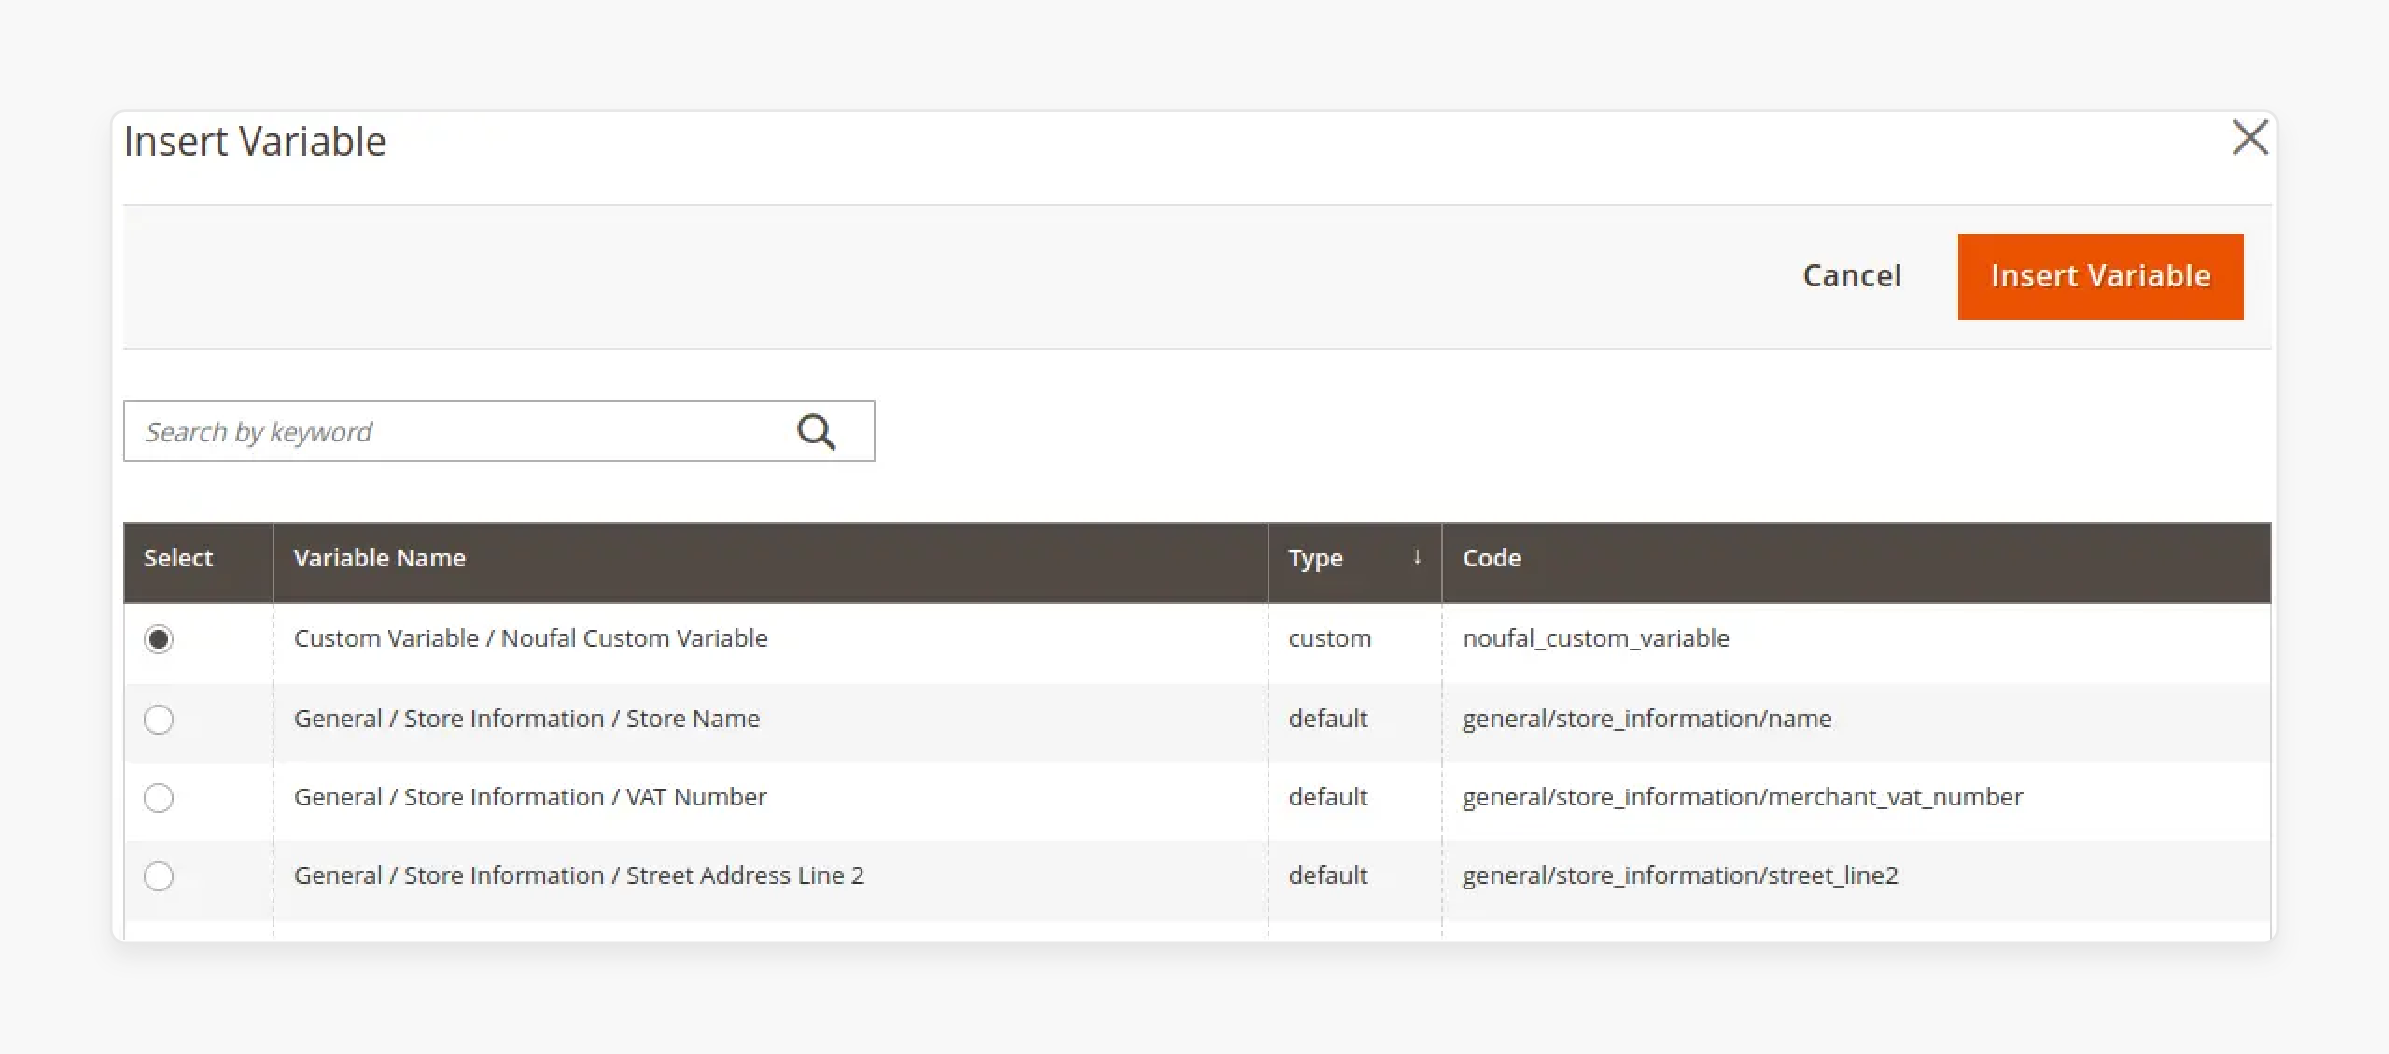
- In the Content section, click 'Show/Hide Editor' to switch to HTML mode.
- Click Insert Variable to select the custom variable from the list.
- Click on the 'Insert Variable' button again.
- Click on 'Save' to save the changes.
Magento 2 Email Template Layout Rules
| Rule | Description |
|---|---|
| Use responsive design principles | Ensure email templates adapt and display properly on various devices and screen sizes. |
| Optimize image sizes | Compress images to reduce file sizes for faster email loading times. |
| Keep the email width around 650px | Limit the email template width to approximately 650 pixels for optimal readability. |
| Simplicity is key | Avoid overly complex layouts and designs to ensure compatibility across email clients. |
Replace <div> with <table> |
Use <table> elements instead of <div> for creating the email template layout. |
| Inline CSS styling | Embed CSS styles directly into HTML tags rather than using separate stylesheets. |
| Avoid HTML5, use HTML4 | Stick to HTML4 markup for better compatibility, and avoid using HTML5 elements. |
| Use CSS2 instead of CSS3 | Prioritize CSS2 properties and features over CSS3 for wider email client support. |
Prefer background-color to background |
Use the background-color property instead of the background for background styling. |
| Utilize extended properties | Explore using properties like padding-top, padding-left, etc., for more precise styling control. |
| Employ HTML attributes over CSS | When possible, use HTML attributes (e.g., align, width) instead of CSS for styling elements. |
| Simple color backgrounds | Opt for solid color backgrounds instead of background images for better reliability. |
| Avoid JavaScript | Do not include JavaScript in email templates, as most email clients do not support it. |
| Use common or standard fonts | Stick to widely supported fonts to ensure consistent rendering across email clients. |
| Ensure mobile-friendly layouts | Design email templates with mobile devices using responsive techniques for optimal display. |
6 Steps To Configure Store Email Address In The Magento
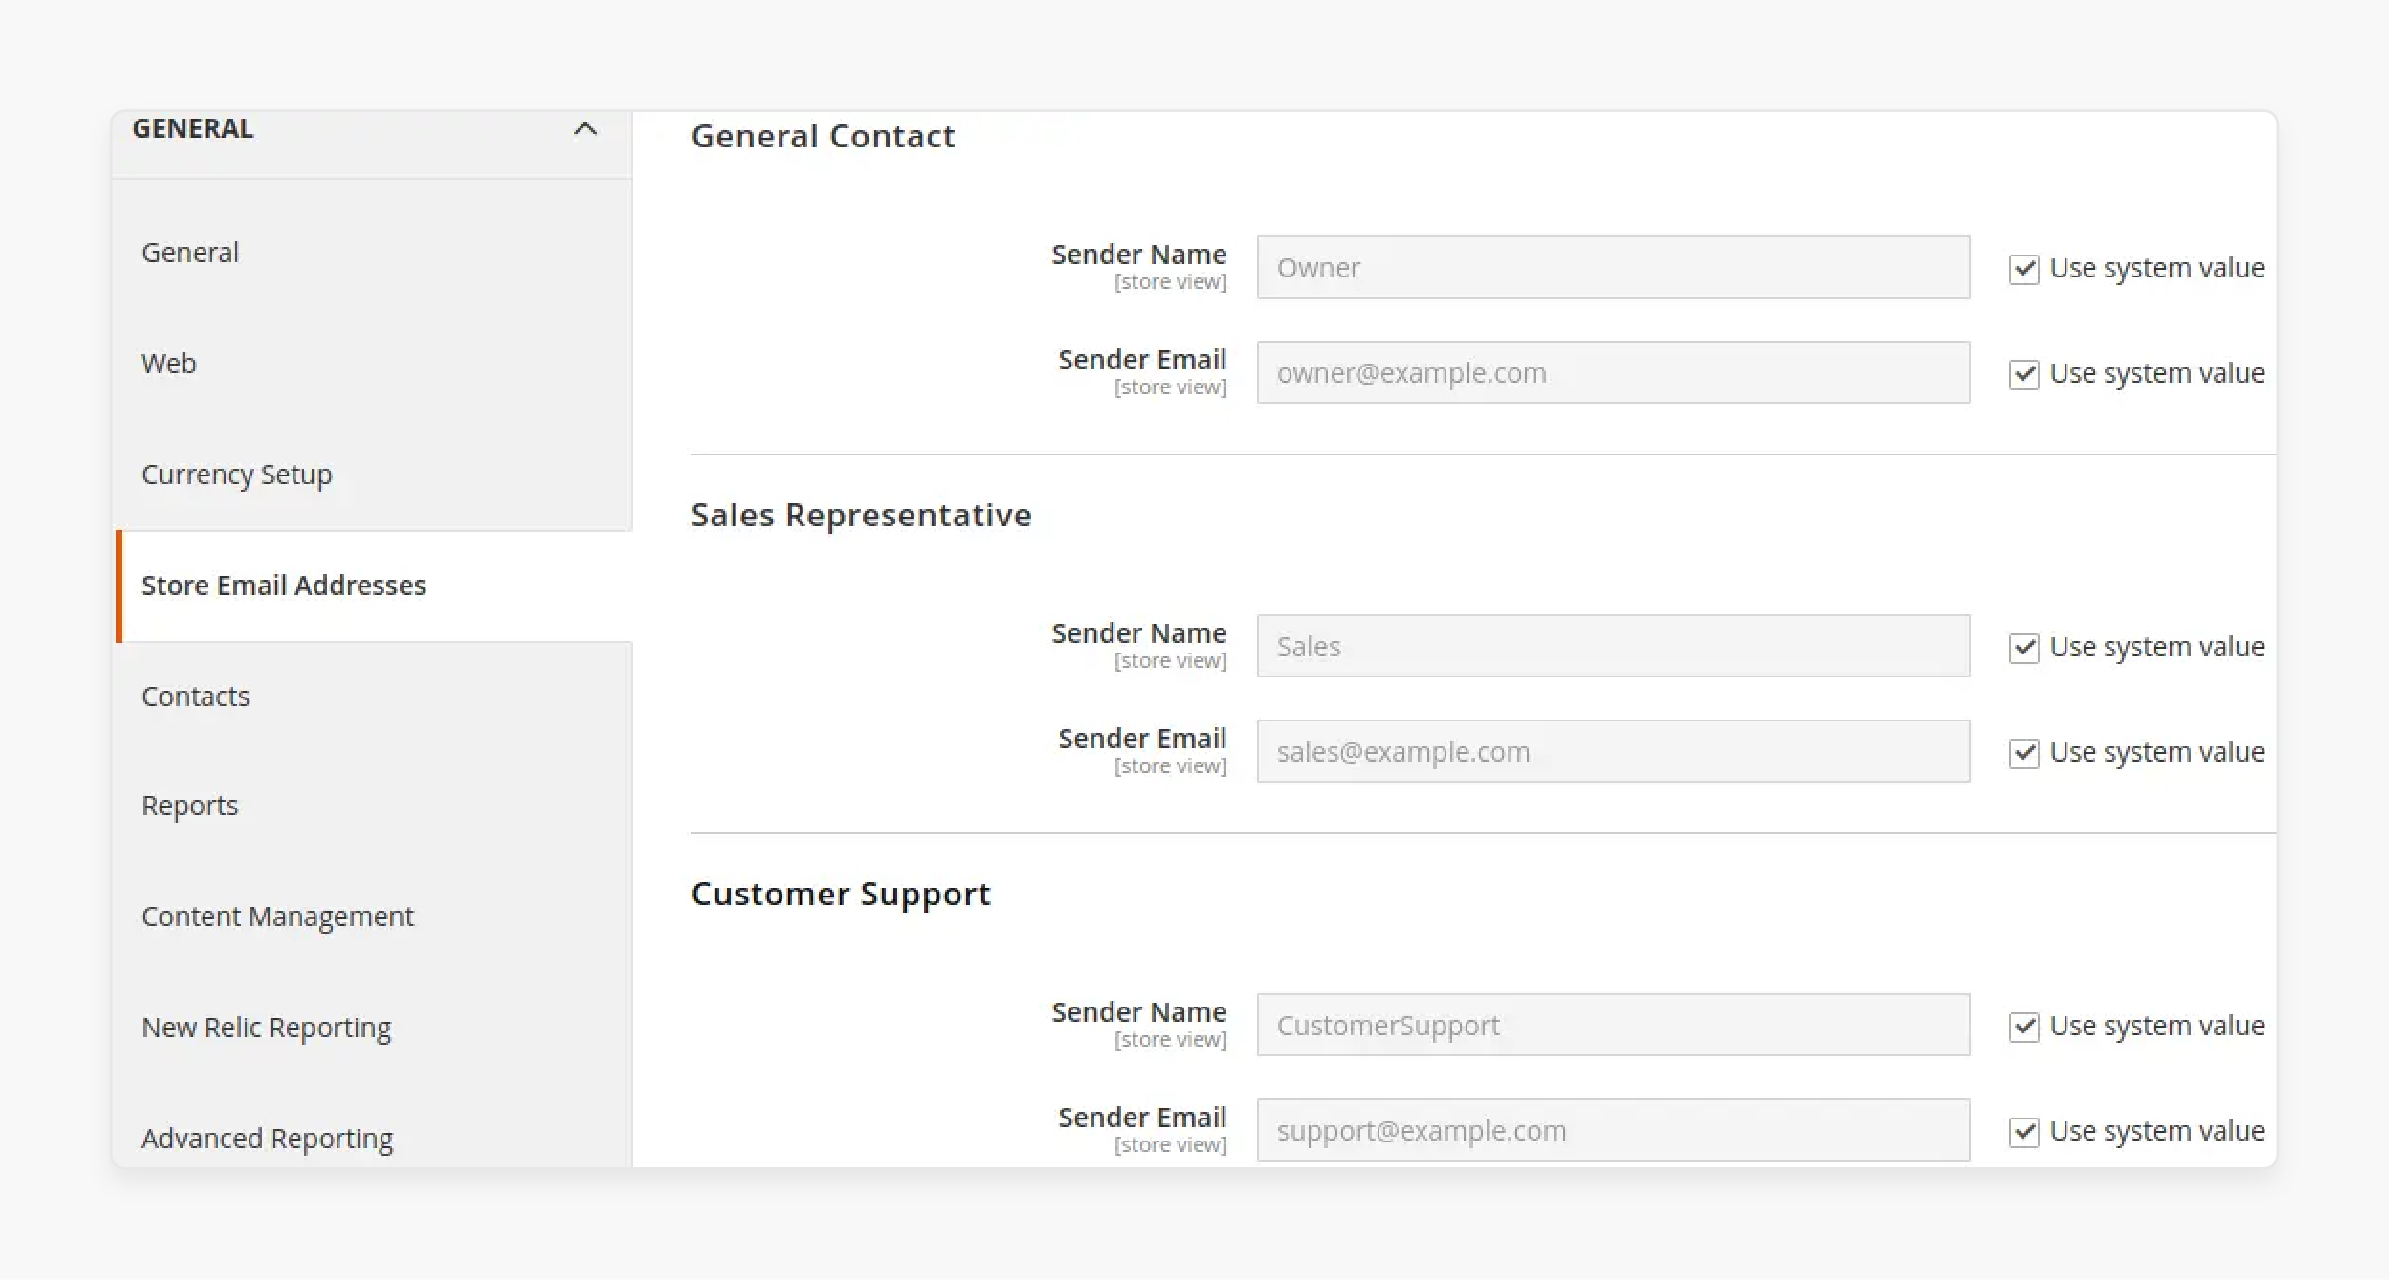
- Go to your Magento Admin Panel.
- Go to Stores > Settings > Configuration.
- Under General, click on 'Store Email Addresses'.
- Add Sender Name and Sender Email values for 'General Contact', 'Sales Representative', and 'Customer Support' as per your requirements.
- If you use 'Custom Email', add the Sender Name and Sender Email values in the Custom Email fields.
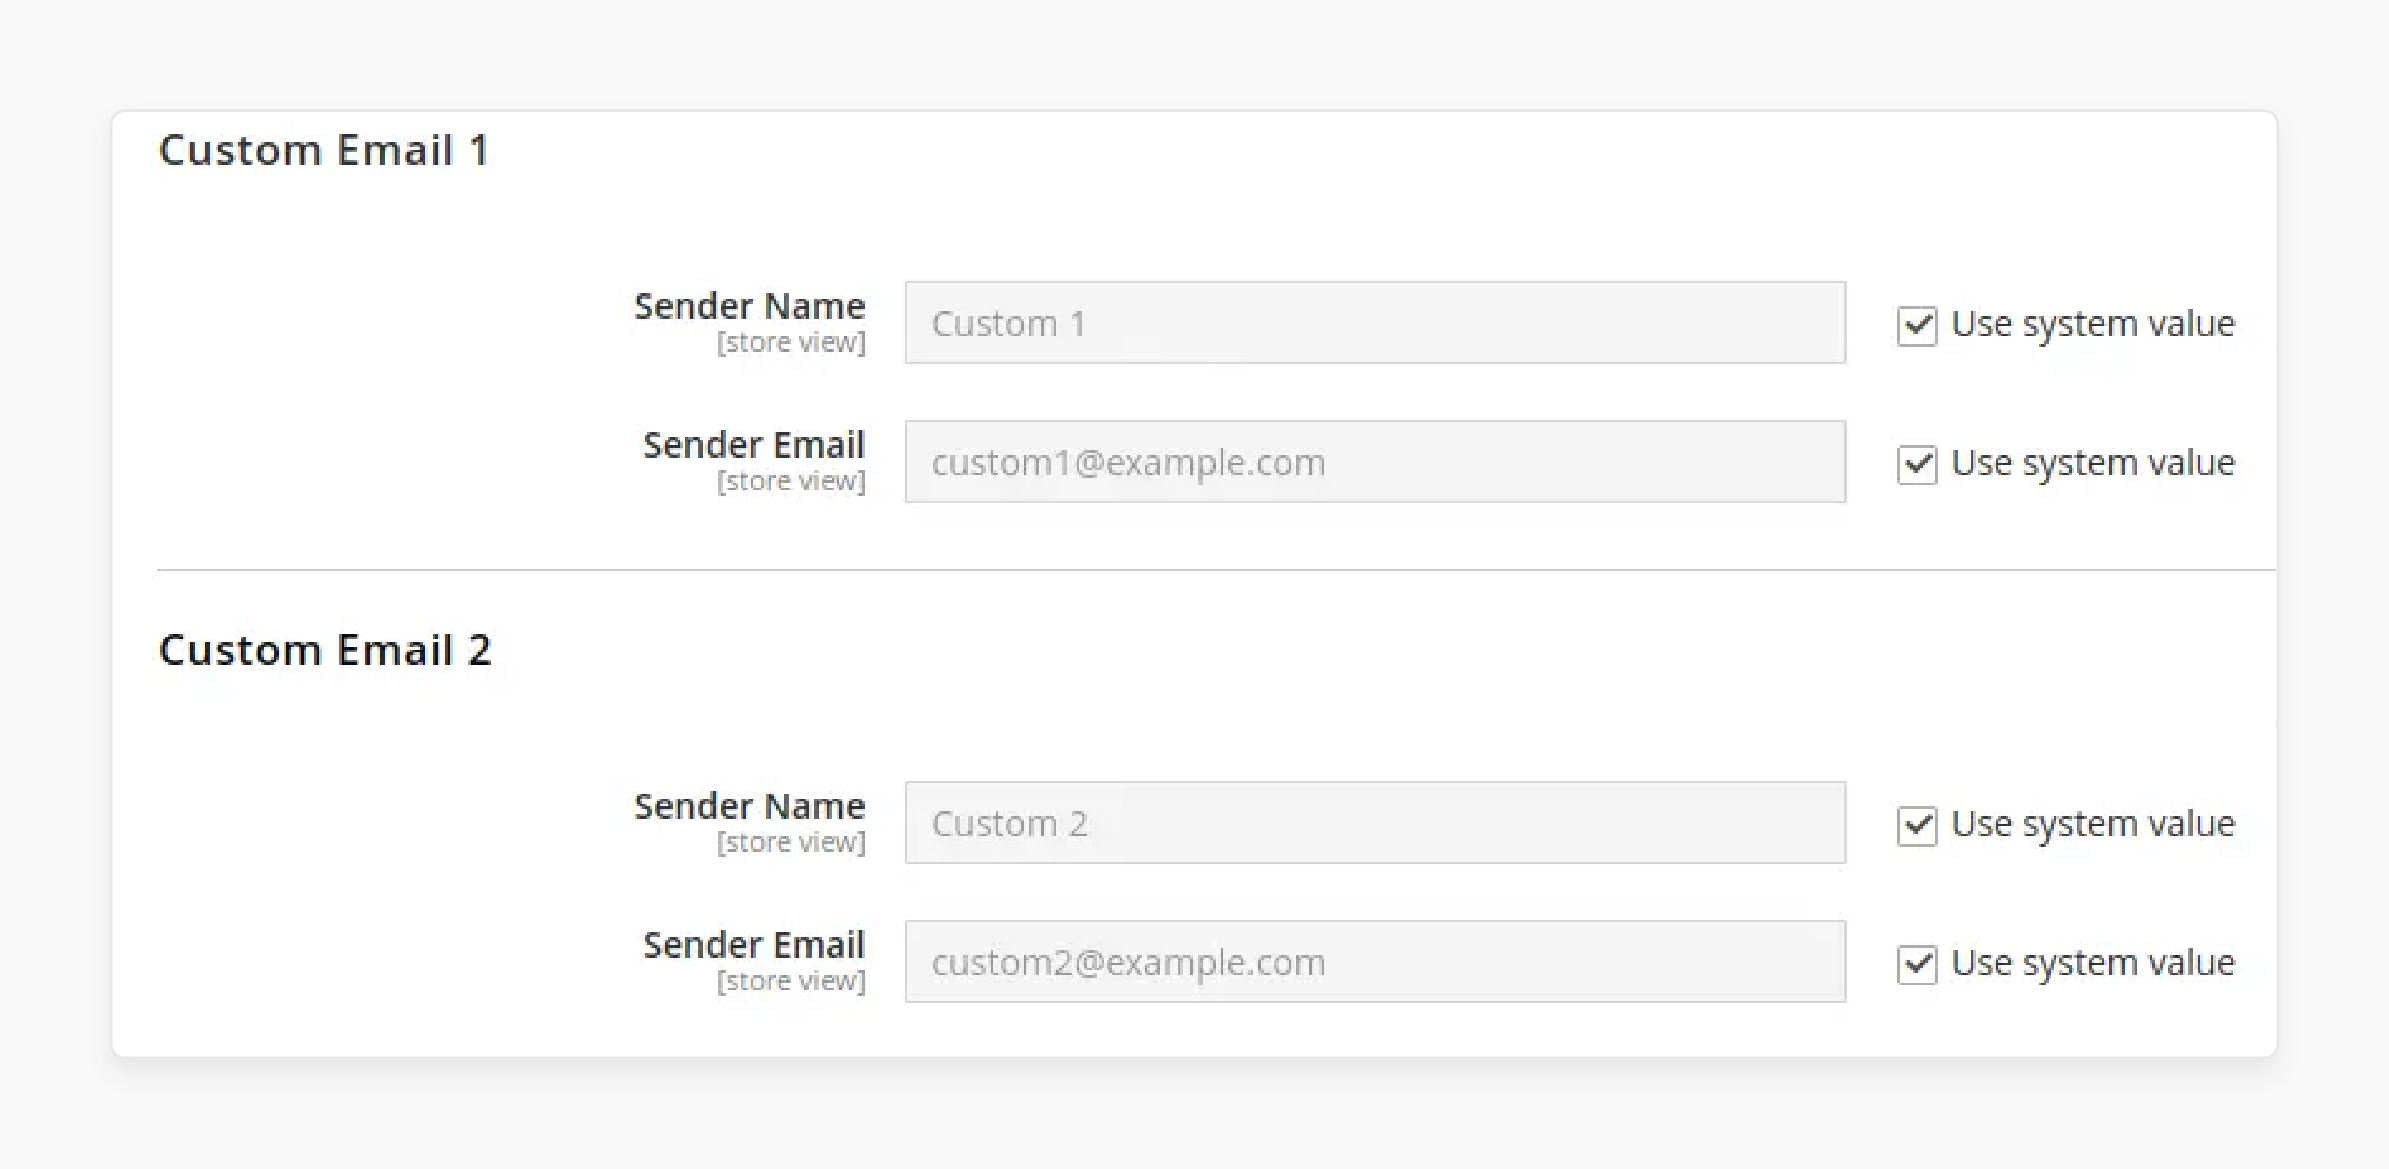
- Click on the 'Save Config' button to save the changes.
FAQs
1. How to configure the send order email copy method?
In the Sales Emails configuration, find the "Send Order Email Copy Method" field. Choose between "Copy" to include in the same email or "Separate Email" for a distinct message.
2. Can I create a separate template for guest customers?
Yes. You can set up a confirmation email for the guest category in your Magento 2 store. You can even configure other sales emails like order comments.
3. How to change the template subject for transactional emails?
When editing an email template, you will find a "Template Subject" field. You can also modify templates from the list of transactional emails in Magento 2.
4. How to configure other sales emails like order comments?
Similar to order confirmation emails, go to Stores > Configuration > Sales > Sales Emails. You can send a sales email or order confirmation instead of the default templates in the Magento stack.
5. Can I customize the default templates in Magento 2?
If you want to customize the default newsletter templates, follow these steps to customize email. Go to Marketing > Communications > Email Templates.
6. How to send a Magento order confirmation to multiple email addresses?
Choose the template in the new order confirmation email field. Select an email template and configure the application email address in the send order.
Summary
Magento 2 Order Email Template provides corresponding templates to suit your brand. It helps store owners to:
- Leverage a range of default templates to align with different brand identities.
- Enhance customer experience and reinforce your brand.
- Improve branding and professionalism while setting up order confirmation emails.
- Get customers excited about their purchase.
- Encourage repeat business and referrals.
- Build trust with the customer.
- Ensure your store's emails stand out.
- Provide all necessary information to your customers.
Consider managed Magento hosting to customize your order email templates without needing to code.


