
How To Access And Configure Magento 2 Menu Settings?
Are you looking to enhance your online store's navigation experience? Magento 2 Menu Settings play an essential role in creating an organized and user-friendly shopping environment. Store owners can access these settings through the admin panel.
This tutorial will cover how to access the Magento 2 admin panel. We will guide you through menu configurations.
Key Takeaways
-
Magento 2 menu settings help create an organized shopping experience.
-
Admins can configure categories, subcategories, and navigation depth.
-
Mobile responsiveness ensures a consistent experience across devices.
-
Customization options like mega menus and dropdowns enhance functionality.
-
Proper menu configuration improves store performance and user experience.
What Is the Importance of Menu Settings in Magento 2
1. Administrative Control and Configuration
The Magento 2 admin panel provides comprehensive control over menu settings. Store administrators can access the configuration window through the admin panel. This window manages all aspects of the top navigation menu. The admin menu in Magento 2 offers extensive customization options.
Merchants can create custom menu items for their stores. They can organize these items based on specific business needs. The backend interface provides complete control over navigation layers. Administrators can configure the main menu structure. They can also manage various subcategories. It ensures a well-organized navigation system for the store.
2. Navigation Structure and Organization
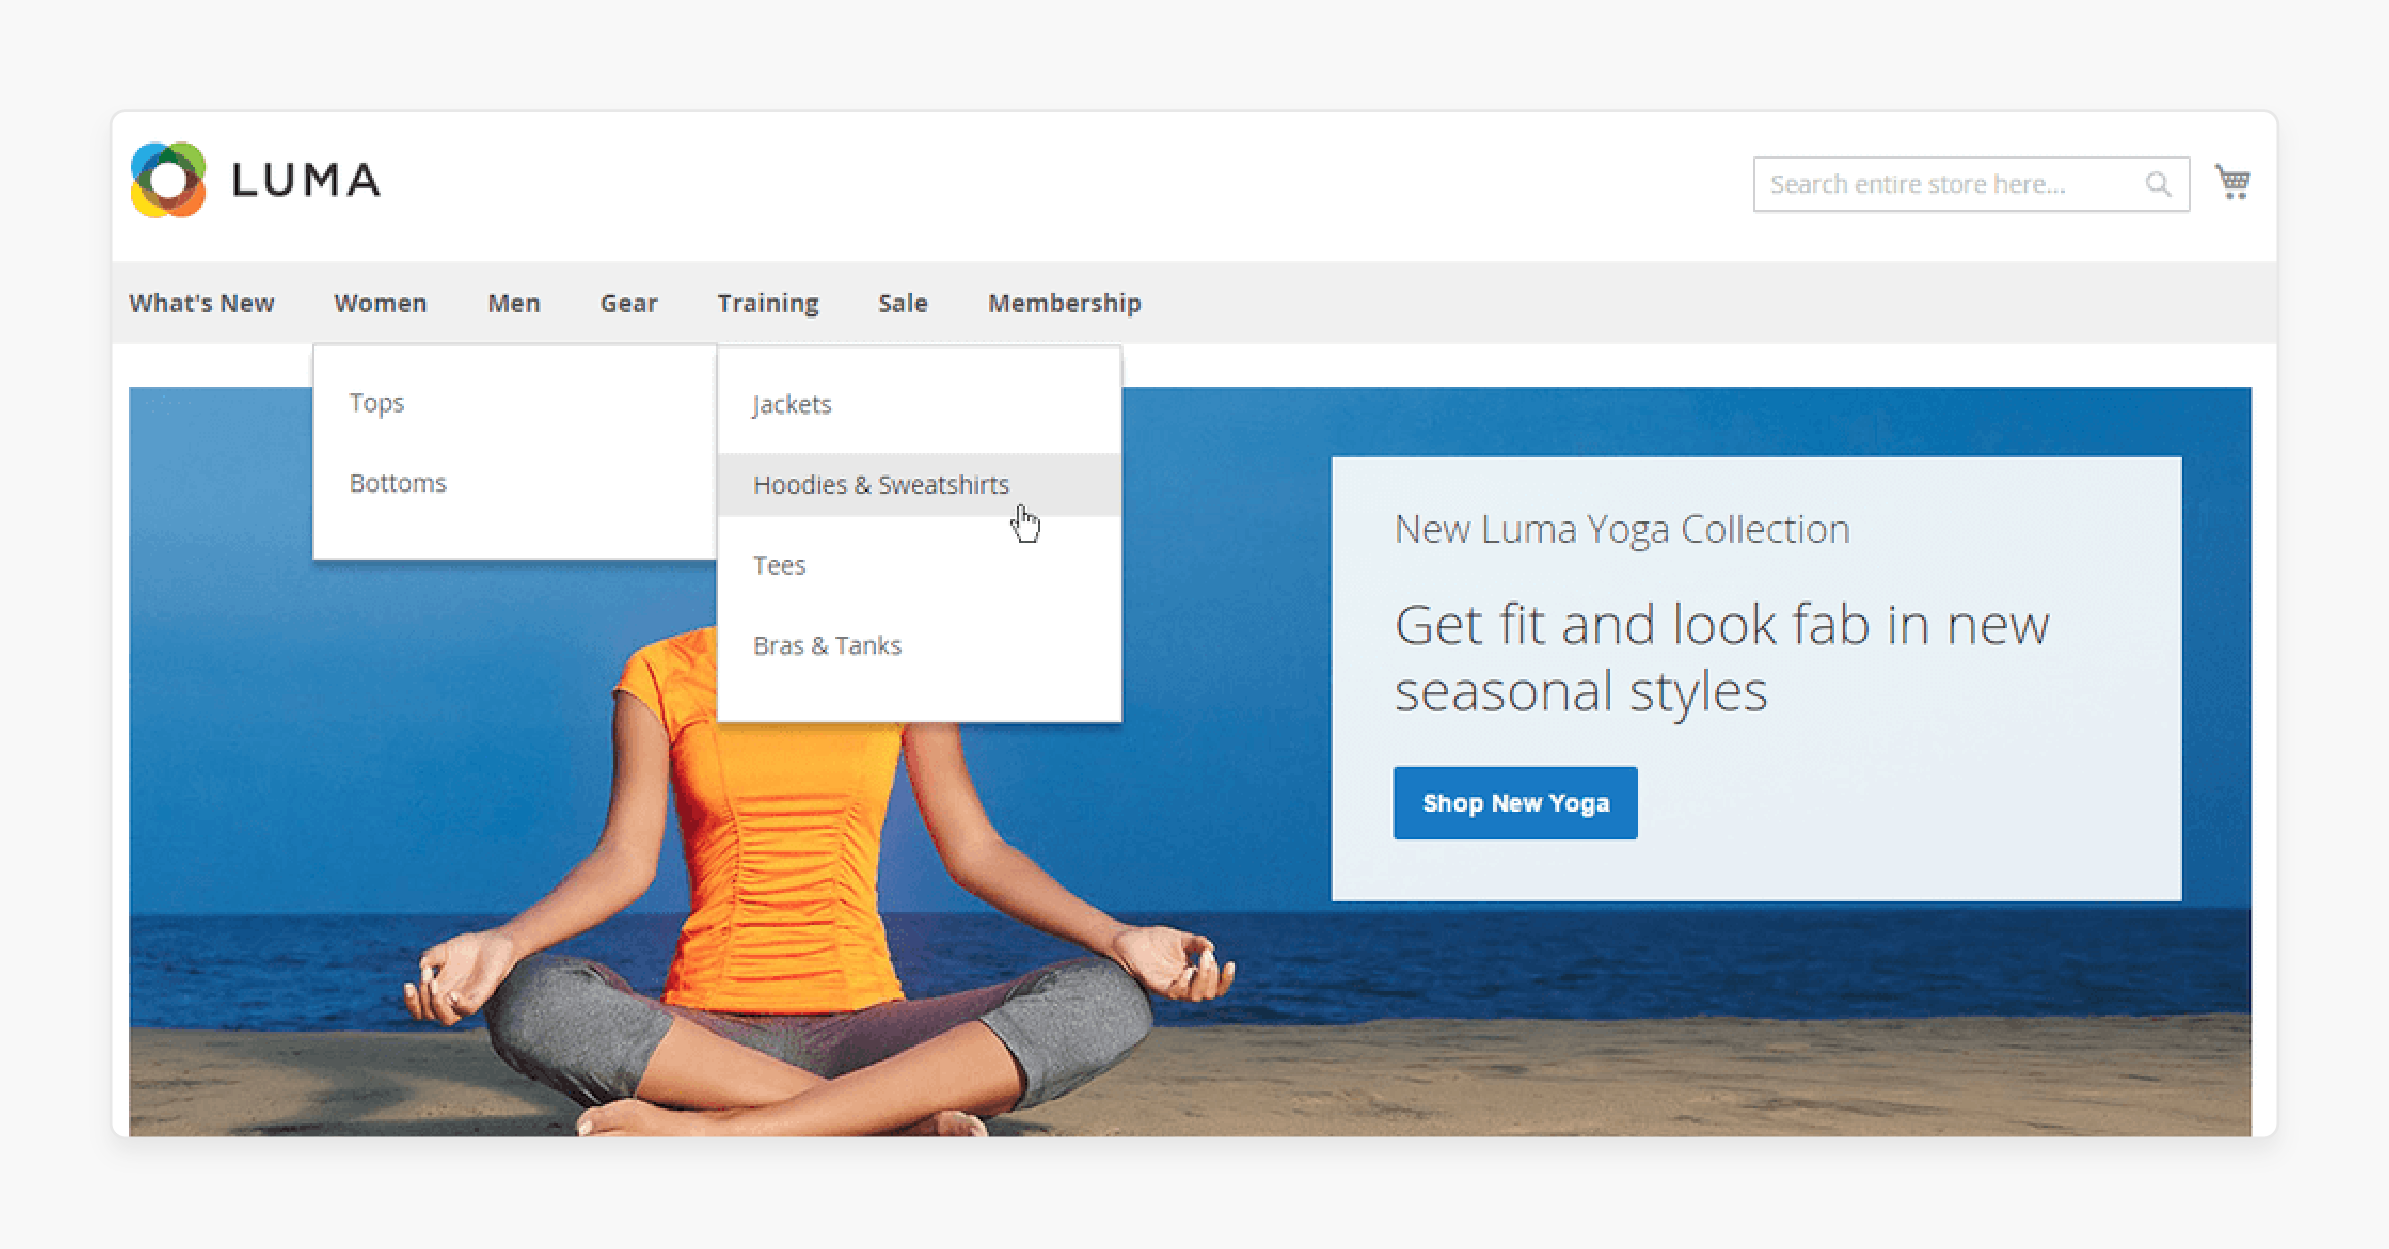
The top navigation menu in Magento 2 supports a hierarchical structure. It organizes both categories and subcategories effectively. Each menu item can be customized. These items display specific catalog sections.
The platform allows the configuration of menu depth. This depth ranges from level 0 to 4. This feature provides flexibility in organizing products. The layered navigation feature helps customers filter products. This efficient filtering enhances the overall shopping experience.
3. Mobile Responsiveness and User Experience
Magento 2's menu system includes dedicated mobile menu optimization features. The mobile navigation adapts automatically to different screen sizes. It ensures a consistent user experience across all devices.
Dropdown menus feature smooth transitions. Subcategory displays are optimized for mobile viewing. The interface functions effectively on both mobile and desktop platforms. Each menu element adjusts to match the viewing device.
4. Advanced Customization Options
Store owners can implement various customization features. It is possible through the Magento 2 mega menu extension. The platform supports different types of widgets. These widgets integrate into the navigation menu. They enhance overall functionality.
Custom layouts can be created for different purposes. These layouts apply to different store views. It allows unique navigation experiences. The customization works across multiple storefronts.
5. Performance and Technical Considerations
Proper menu configuration directly impacts Magento performance. The system utilizes cache management to ensure quick loading times for navigation elements. Store administrators must consider cache flush requirements when making changes to menu settings.
The configuration supports different store views, allowing for language-specific navigation setups.
6. Implementation and Maintenance
Setting up the navigation menu in Magento 2 involves several key steps. Administrators must first configure the root category and establish the main navigation structure. The system allows for drag-and-drop functionality when organizing menu items. Regular maintenance involves several key tasks:
-
Updating category positions in the menu
-
Managing the system cache
-
Checking menu items for correct frontend display
-
Verifying links and categories
7. Enhanced Shopping Experience
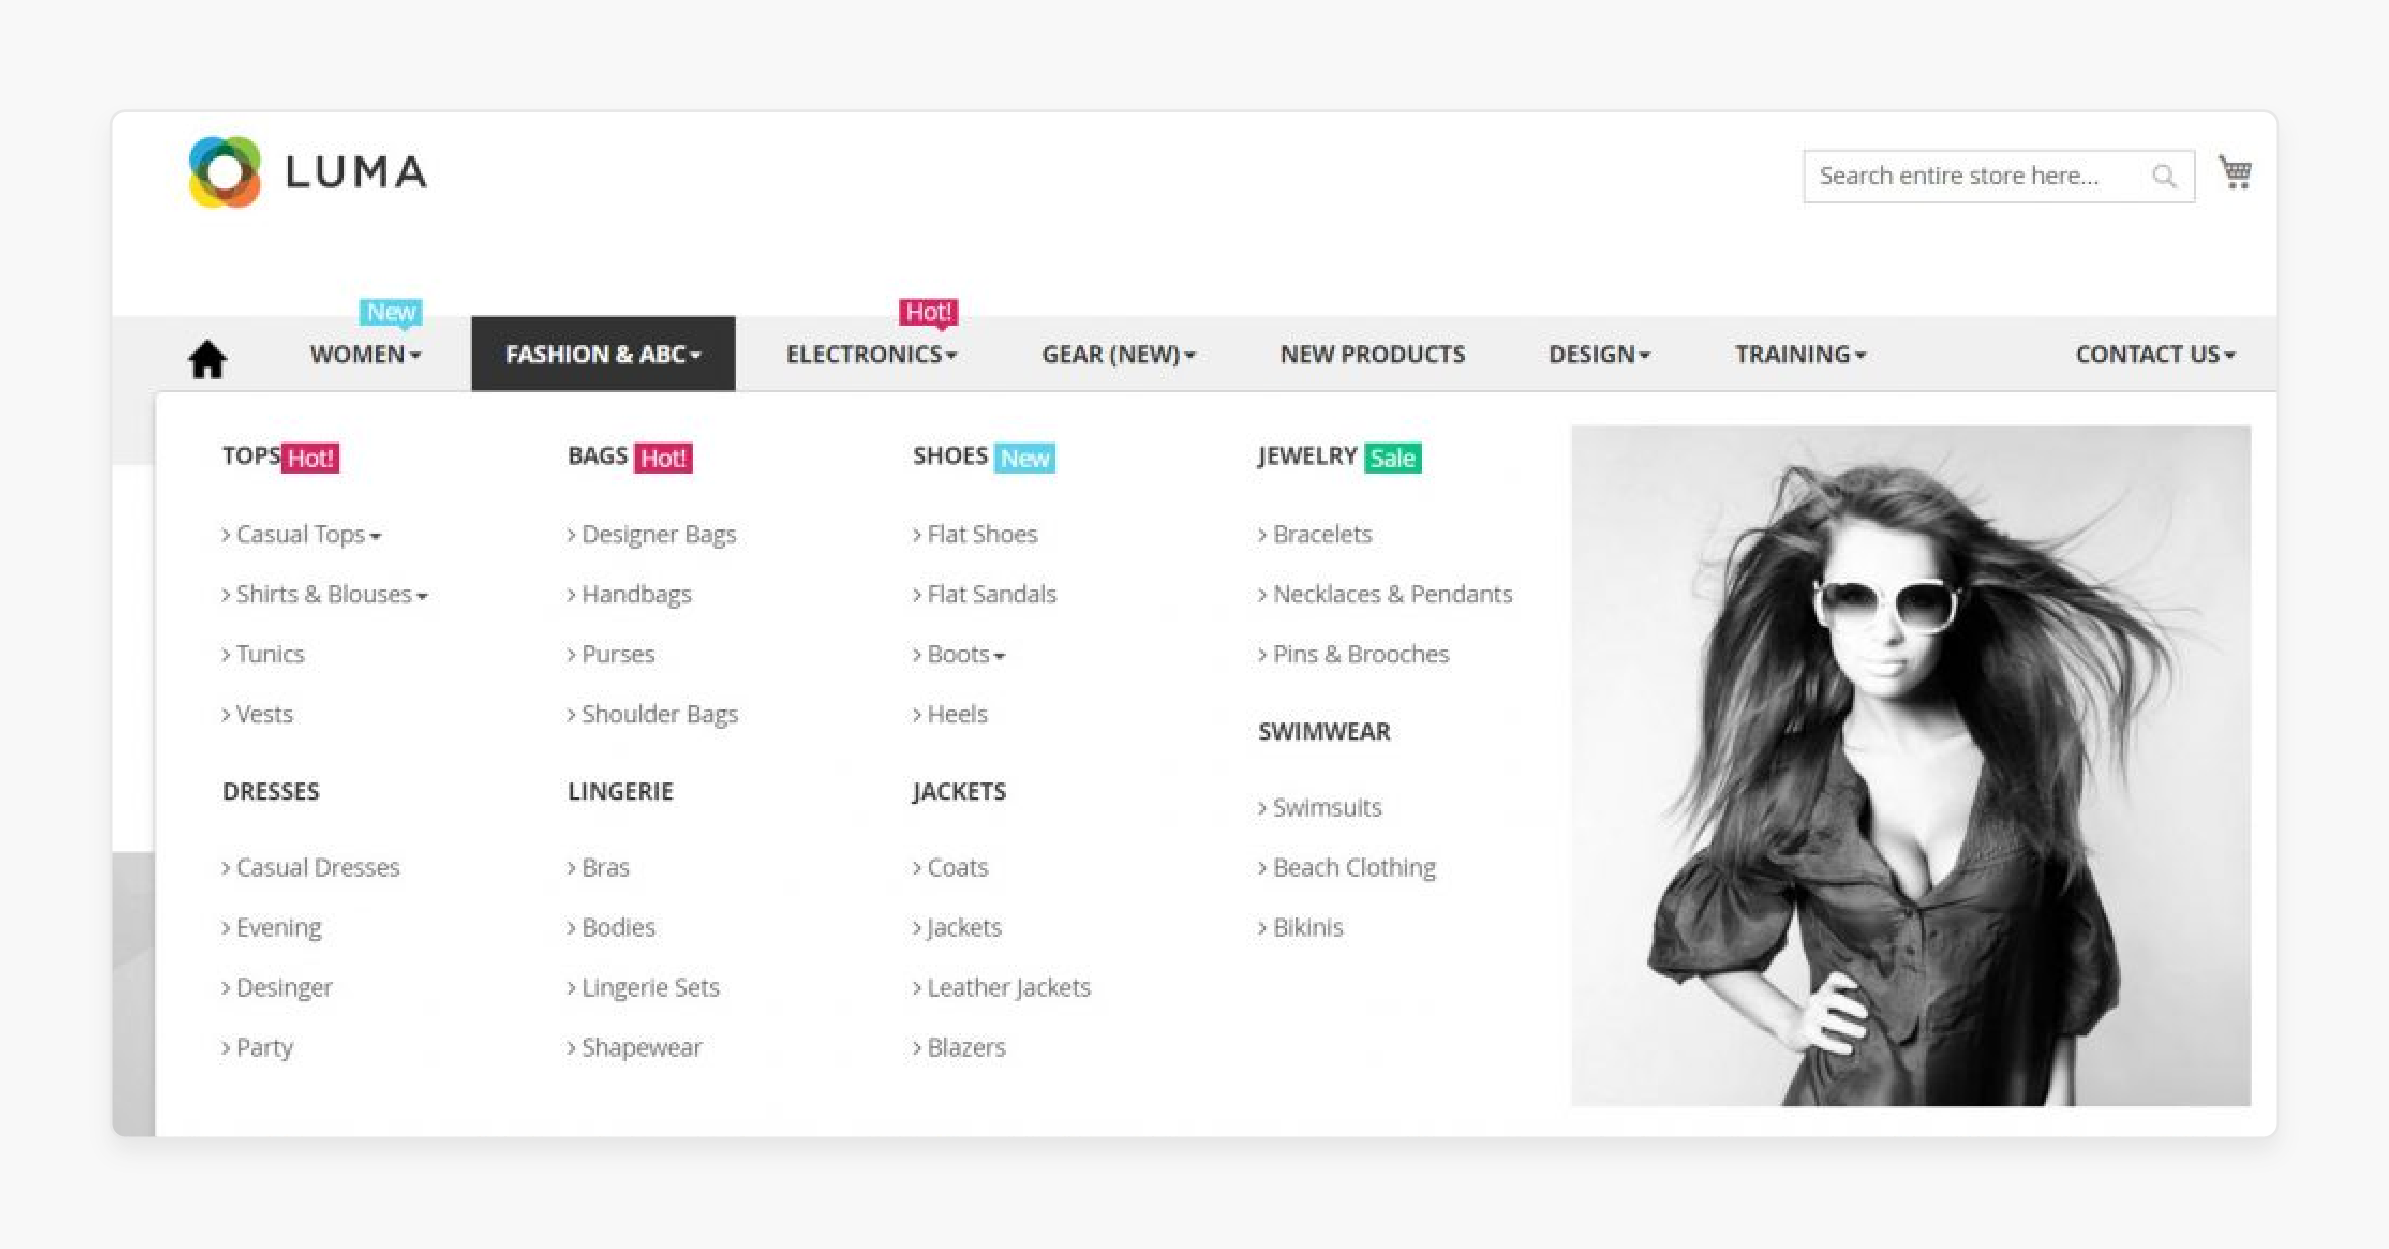
A well-configured menu system significantly improves the user experience. Customers can easily navigate through different product categories and subcategories.
The layered navigation helps shoppers filter products according to their preferences. Search engines can better index the store's content due to the organized navigation structure.
8. Integration with Store Features
The navigation menu integrates smoothly with other Magento 2 features. It works with the catalog management system. It integrates with custom layouts.
The system connects with search functionality. Menu configuration enables the creation of custom navigation. These navigation options align with business needs.
How To Access Magento 2 Menu Settings?
-
Log in to the Magento 2 Admin panel.
-
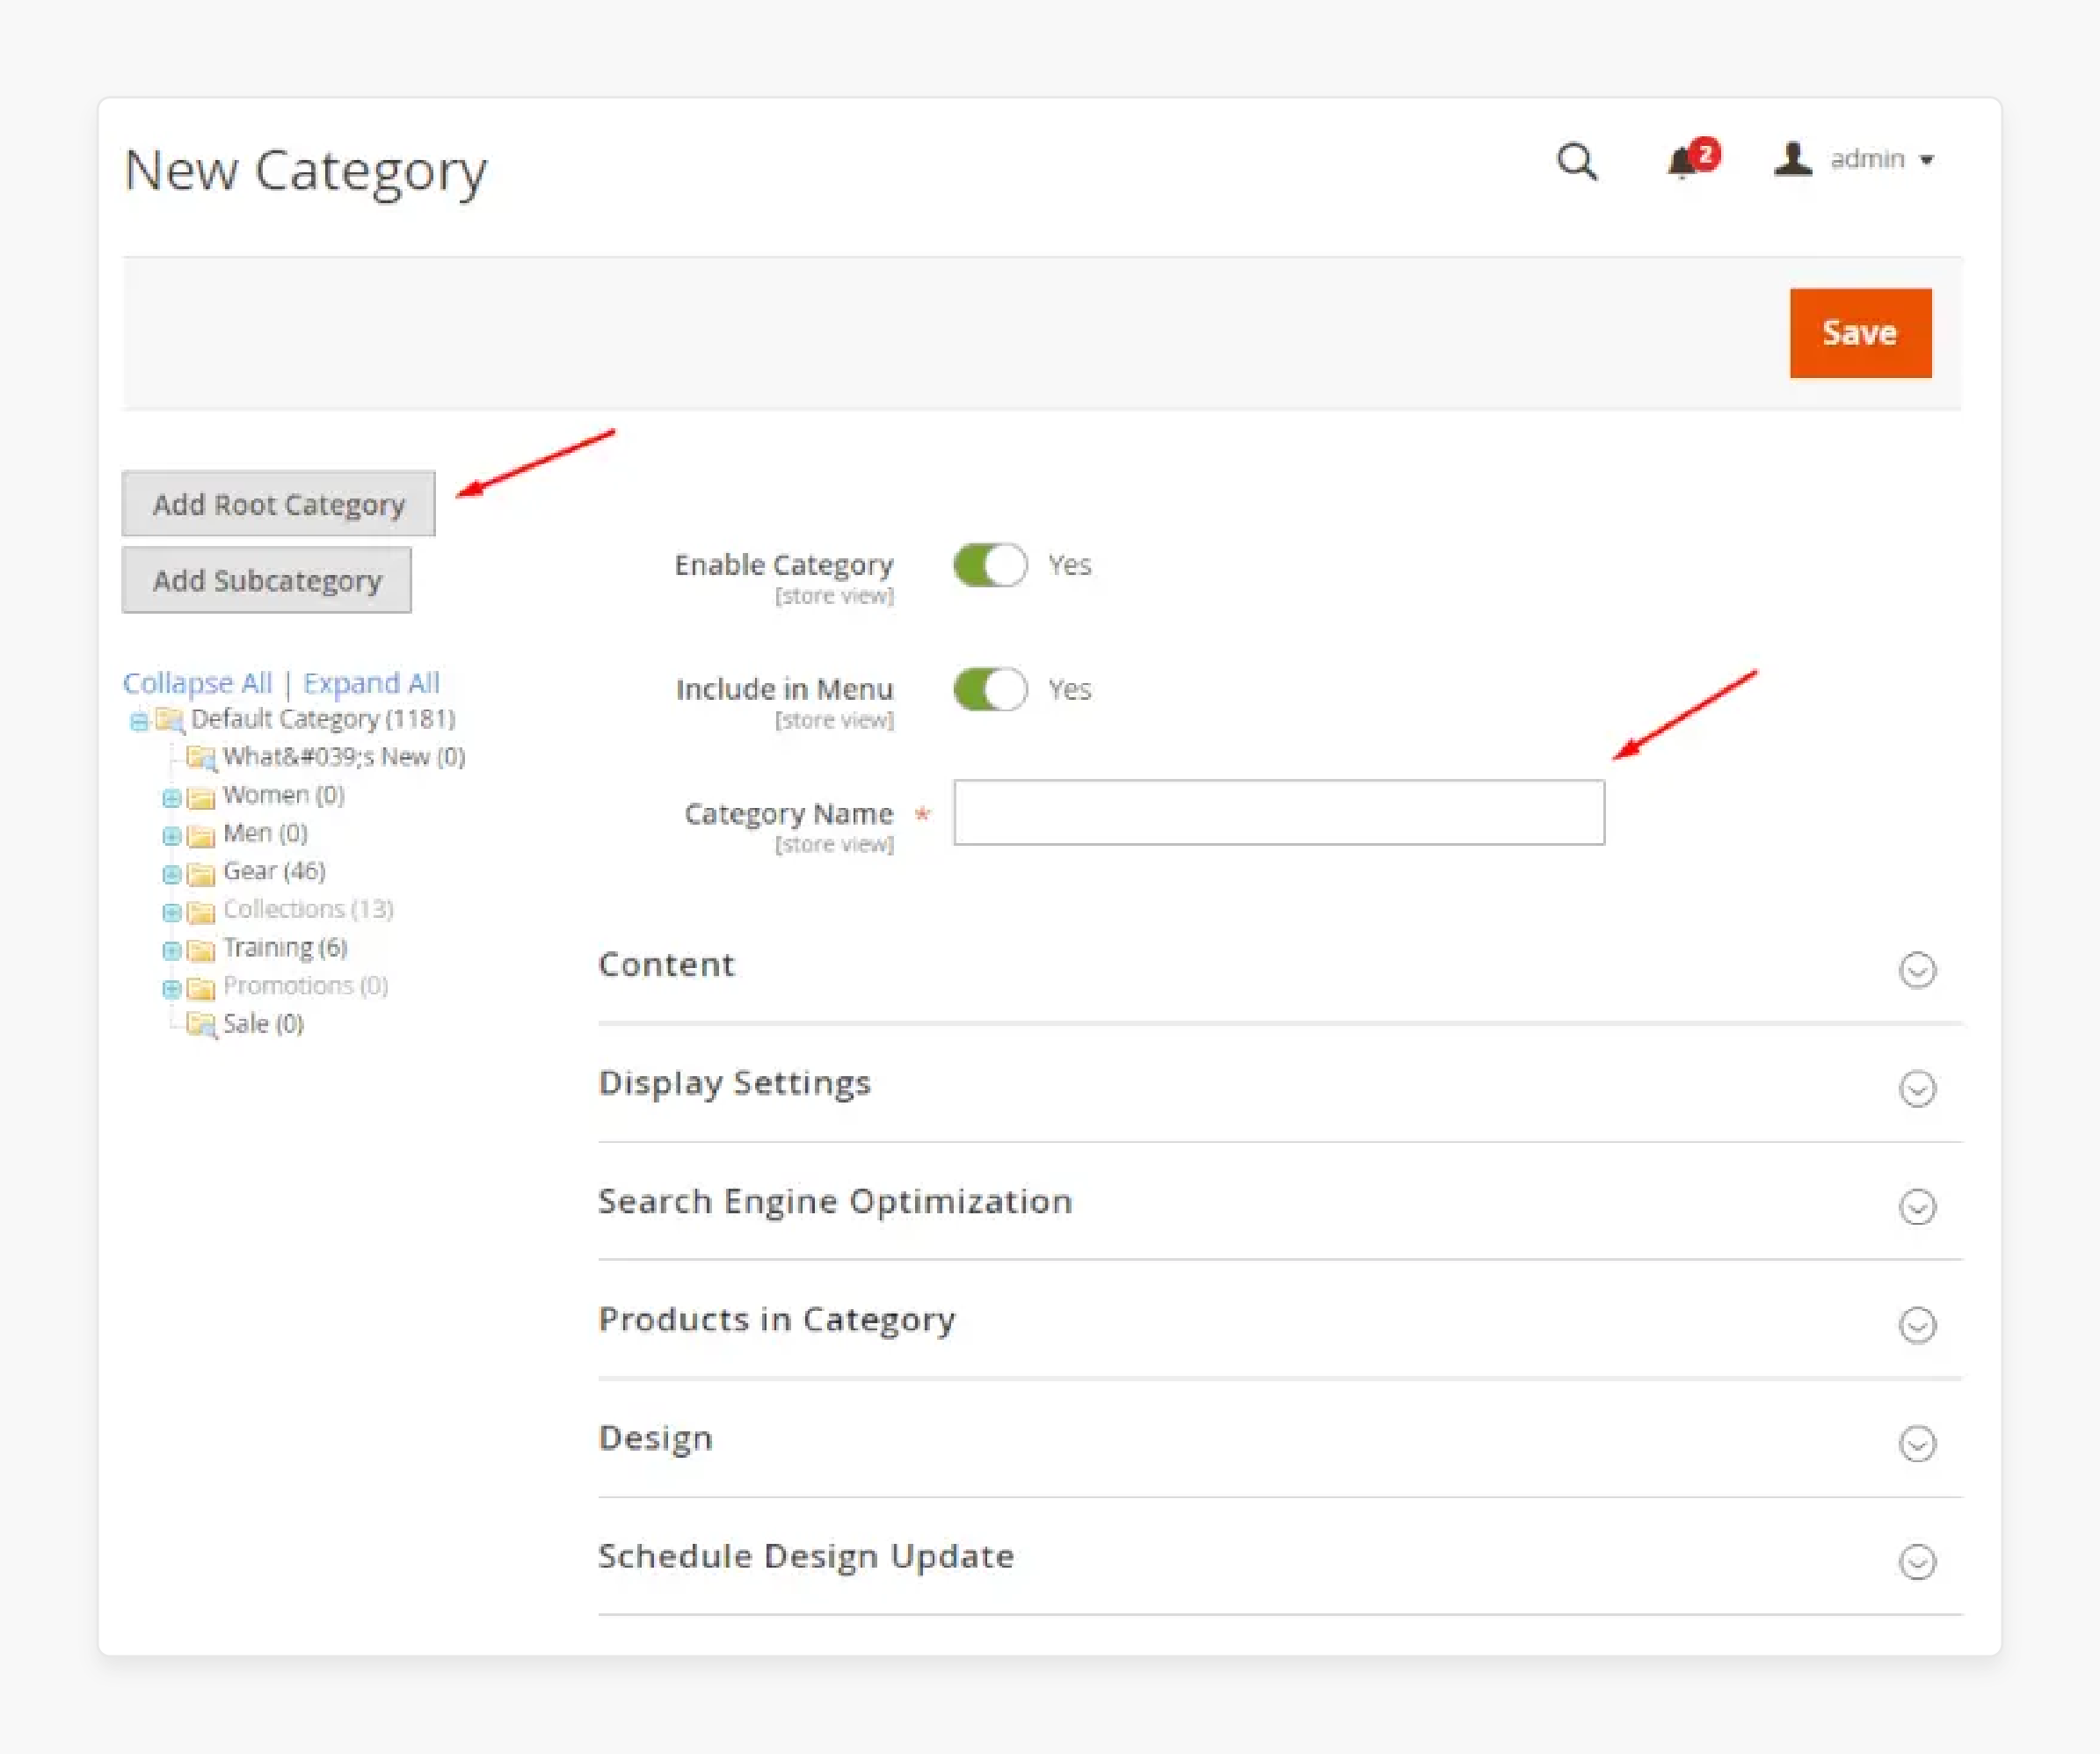
From the Admin sidebar, select Product > Categories.
-
Click Add Root Category to create a new root category.
-
On the General Information tab, enter a name for the root category, set Is Active to Yes, and enable Include in the Navigation Menu.
-
Click Save Category.
-
To add subcategories, select the root category and click Add SubCategory. Fill in the required information, and click Save Category.
-
To apply changes to the store, navigate to Stores > All Stores, select the store, and set the Root Category.
-
Finally, go to System > Cache Management and click Flush Magento Cache to apply the changes.
2 Methods To Configure Main Menu Settings in Magento 2
I. Top Menu Settings

Go to Stores > Settings > Configuration. Under the Catalog section, you can set the depth of the top navigation.
Customize Appearance
-
You can modify the appearance of the top navigation.
-
It can be done using custom themes.
-
You can also edit XML files under app/design/frontend.
-
These edits allow you to add new links.
-
They also let you modify existing navigation links.
II. Footer Menu Settings
-
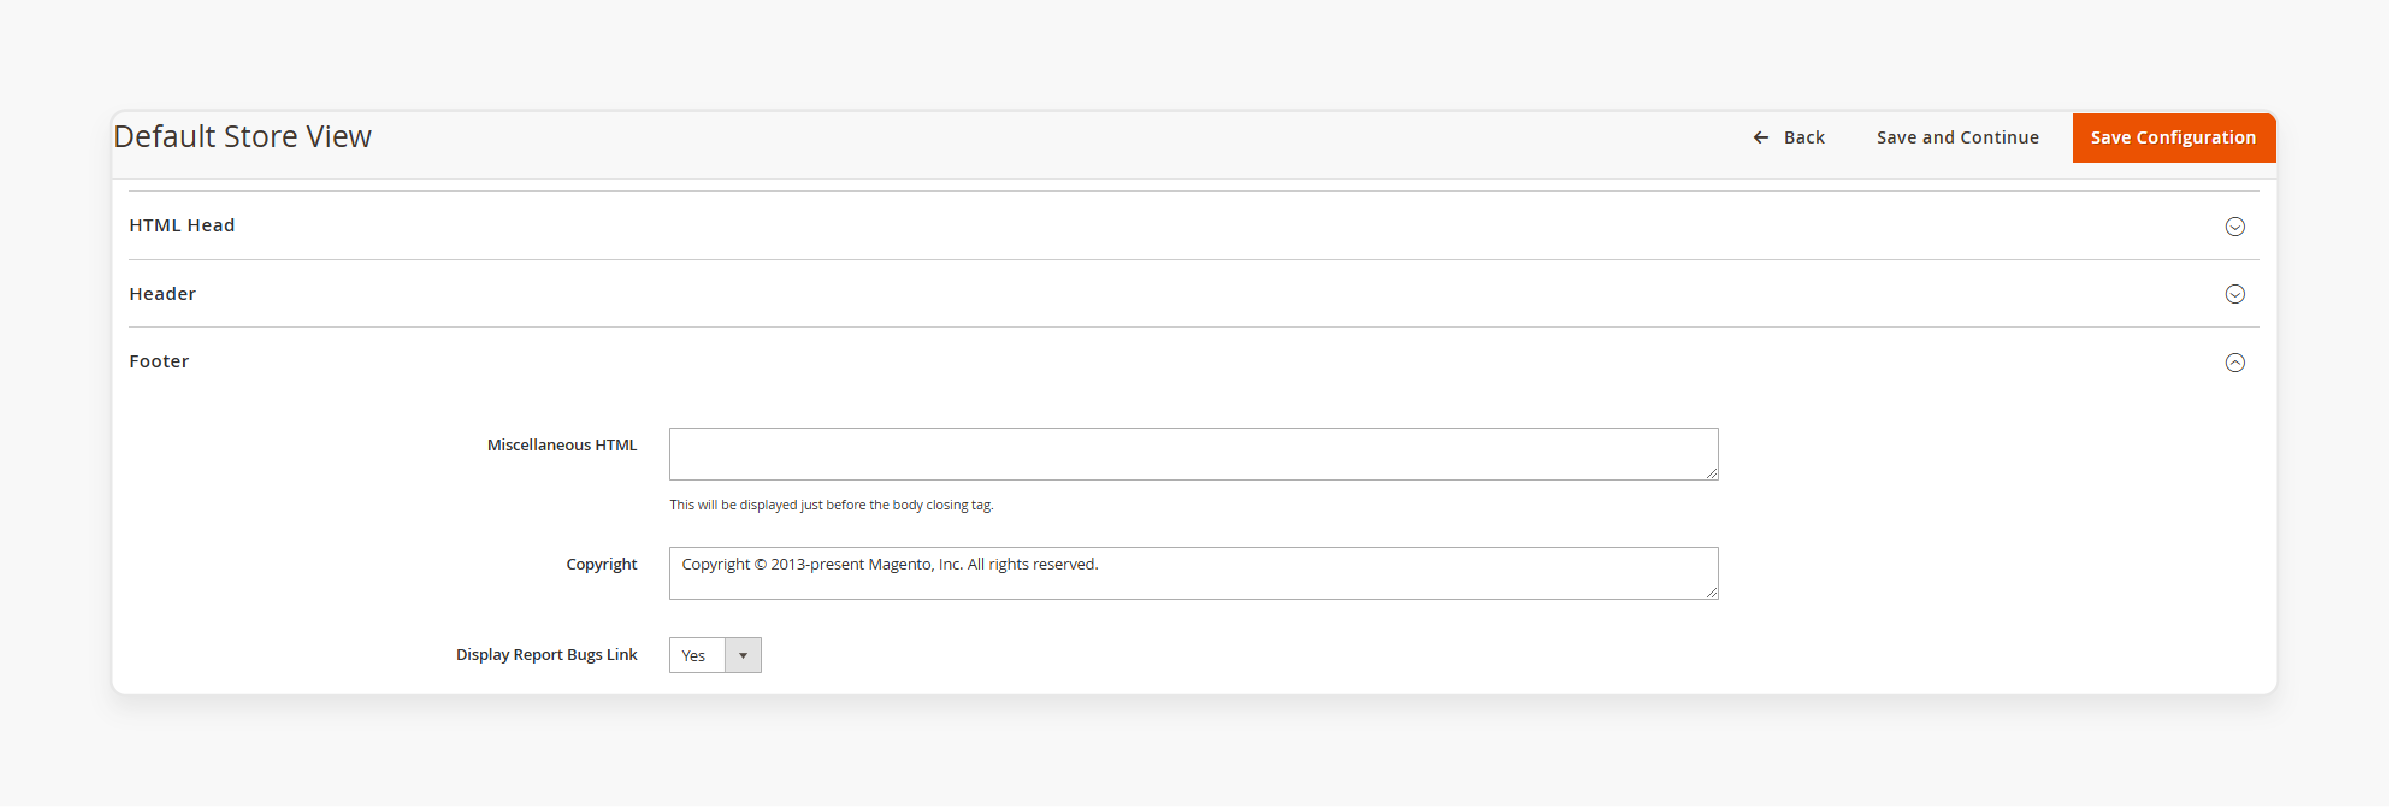
In the admin panel, go to Content > Design > Configuration. Find the store view you want to edit and click Edit.
-
Under Footer, you can access several options:
-
Edit or add HTML code
-
Insert variables
-
Update footer links
-
Modify additional footer settings
-
This information comes from the Adobe Commerce User Guide and Magento Forums.
Customizing Magento 2 Menu Appearance
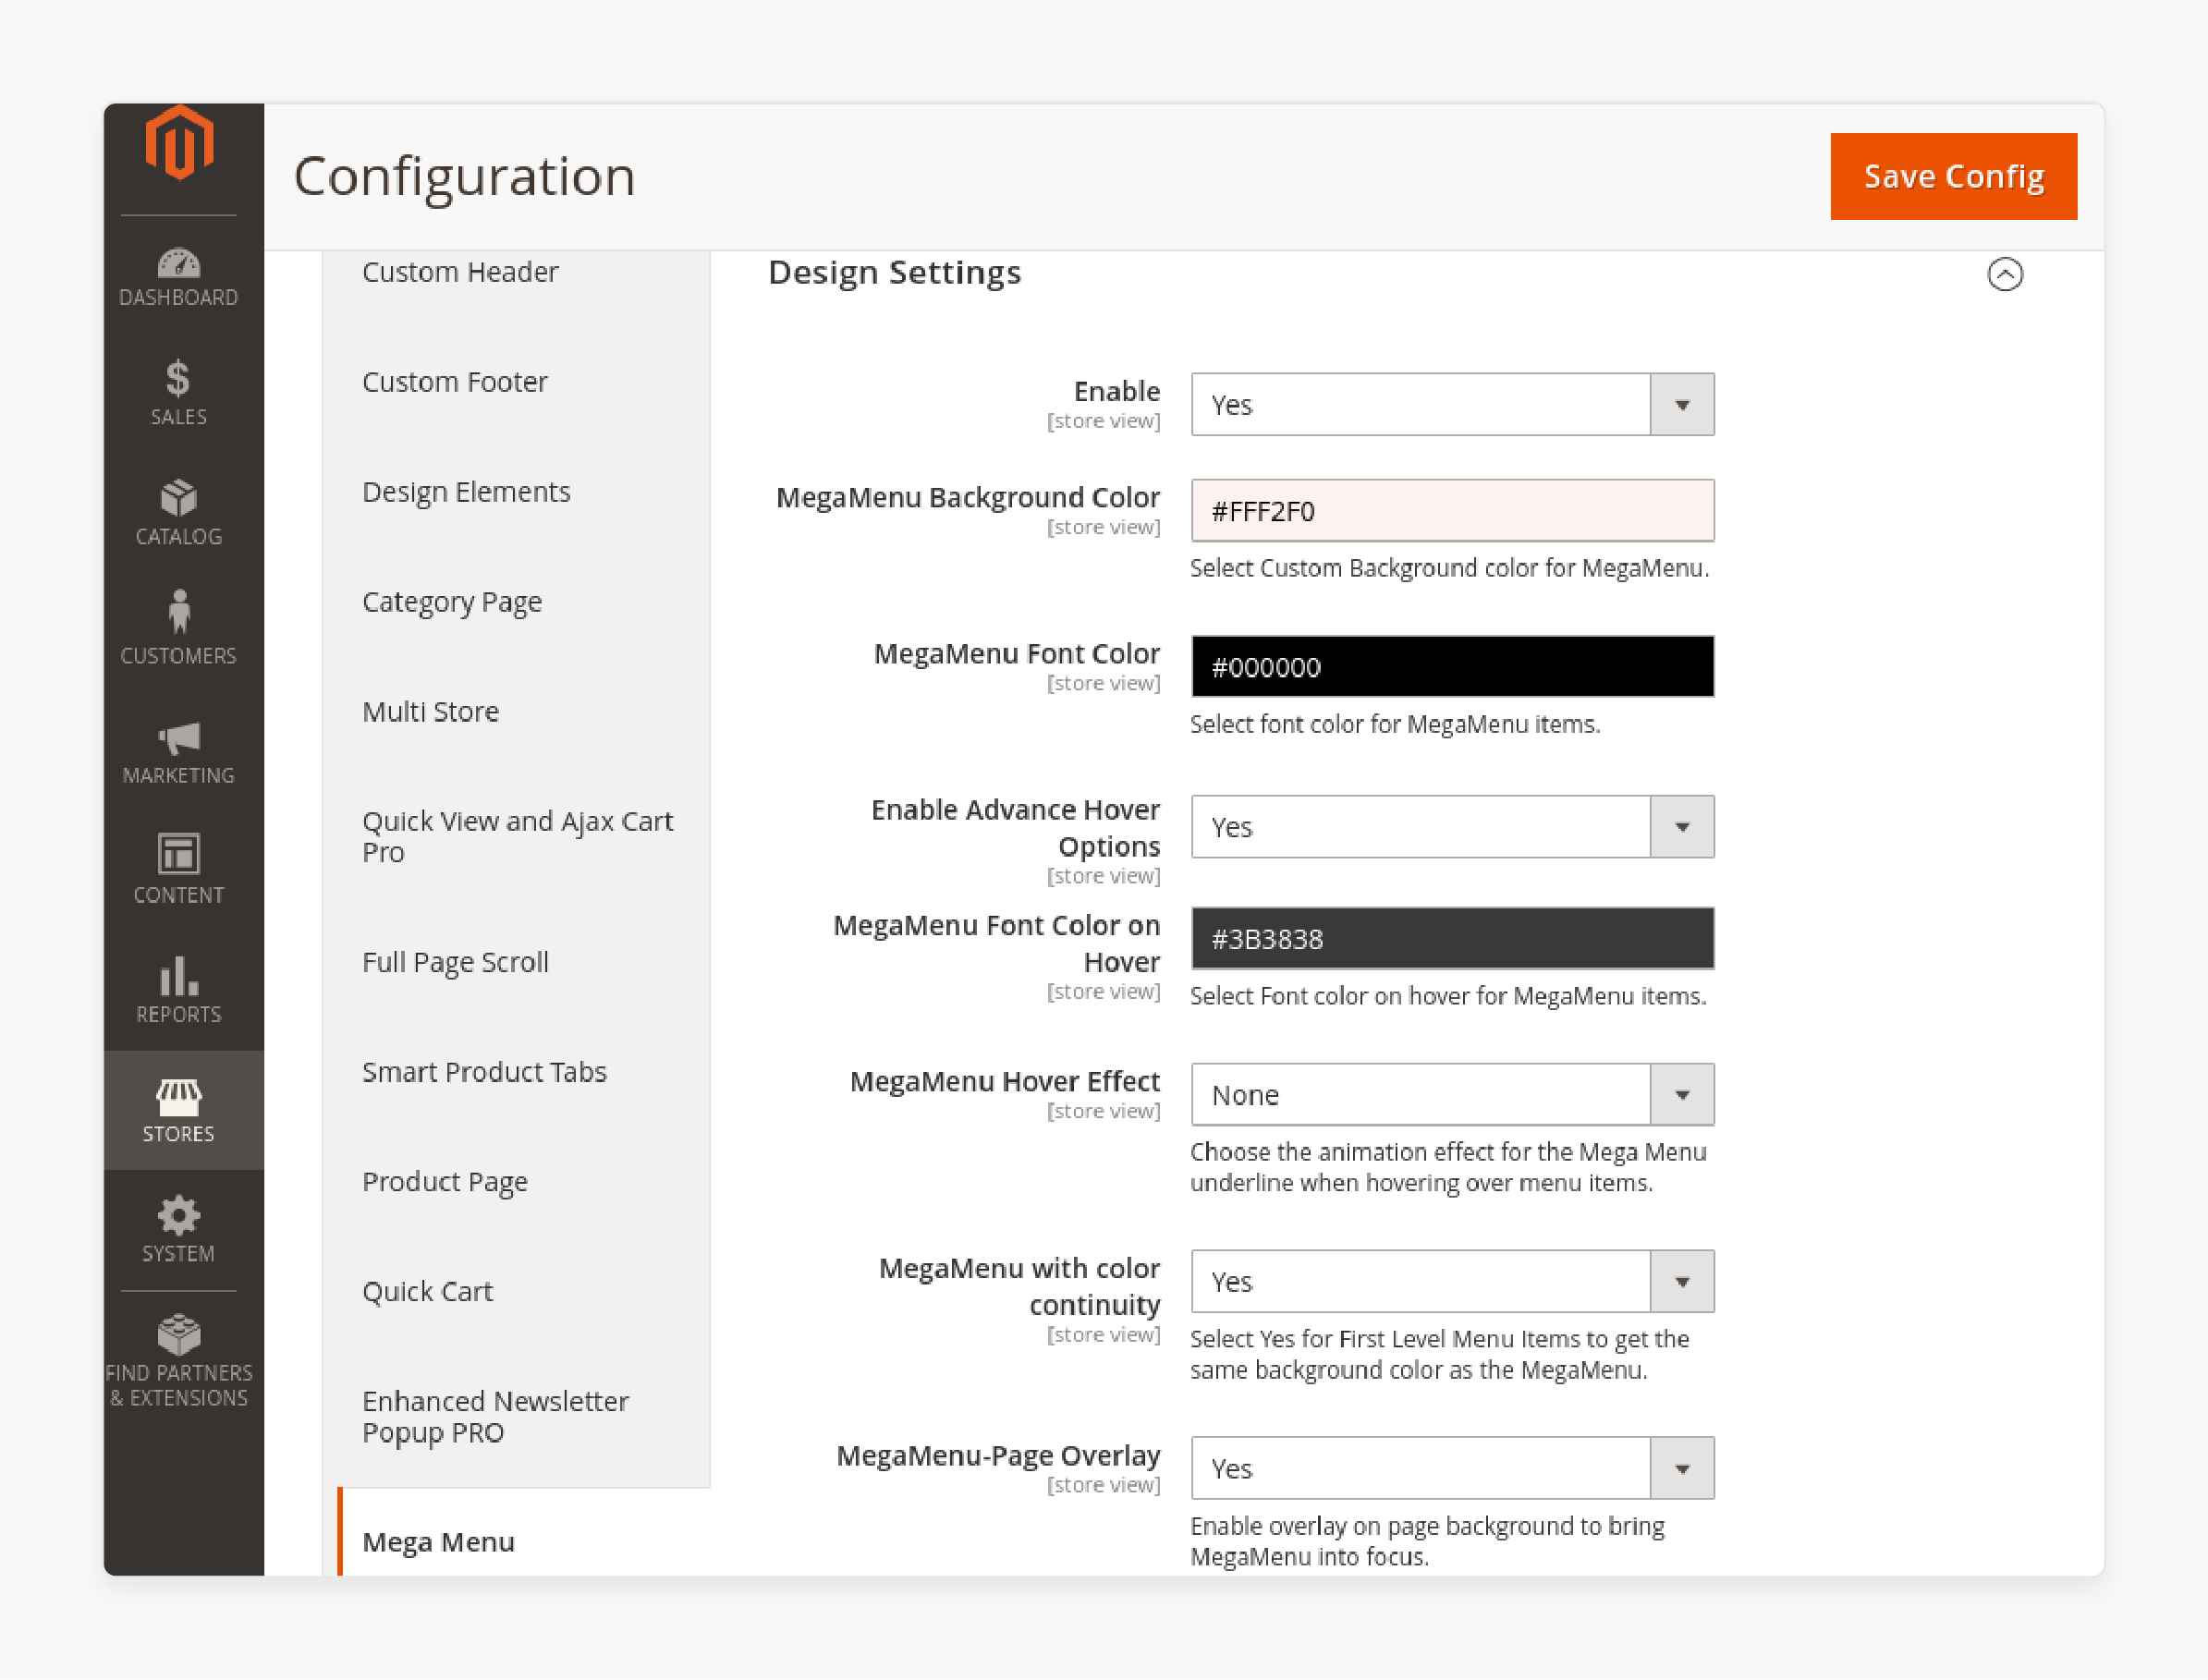
I. Menu Design Options
The design of your navigation menu improves site navigation. It enhances the visual appeal of your Magento 2 store. Magento allows you to make several improvements:
1. Add Custom Elements
-
Create new menu items for the top menu
-
Add links to landing pages
-
Include promotional content
2. Dropdowns and Mega Menus
-
Display multiple categories
-
Show organized subcategories
-
Present content in a structured format
-
Improve user experience
3. Positioning
-
Use drag-and-drop features
-
Move items within the menu bar
-
Place important categories prominently
-
Arrange menu items strategically
4. Theme Customization
-
Apply custom themes
-
Update XML layouts
-
Modify menu appearance
-
Access settings through the admin menu
These features help create a better shopping experience for your customers.
II. Menu Color and Style Settings
Your Magento 2 menu needs proper color and style customization. It helps align navigation with your brand identity. You can adjust multiple visual elements. These include the color scheme. They also include fonts and overall style. All these make your menu match your store's theme.
1. Theme Settings
The theme settings control essential visual elements. You can change the background color. Font colors can be modified. Menu item sizes are adjustable. The Luma theme makes these changes simple. Access these options through the Content section.
2. CSS Customization
Advanced styling needs custom CSS. Access this through Content > Design > Configuration. Here, you can add your CSS code. It allows detailed menu modifications. Your styling changes can be precise.
3. Menu Styling Options
Third-party extensions offer additional choices. The Mega Menu extension is one example. It provides more styling flexibility. You can create attractive navigation menus. No coding knowledge is required. The process is user-friendly.
Advanced Magento 2 Menu Settings
1. Dropdown Menu Configuration
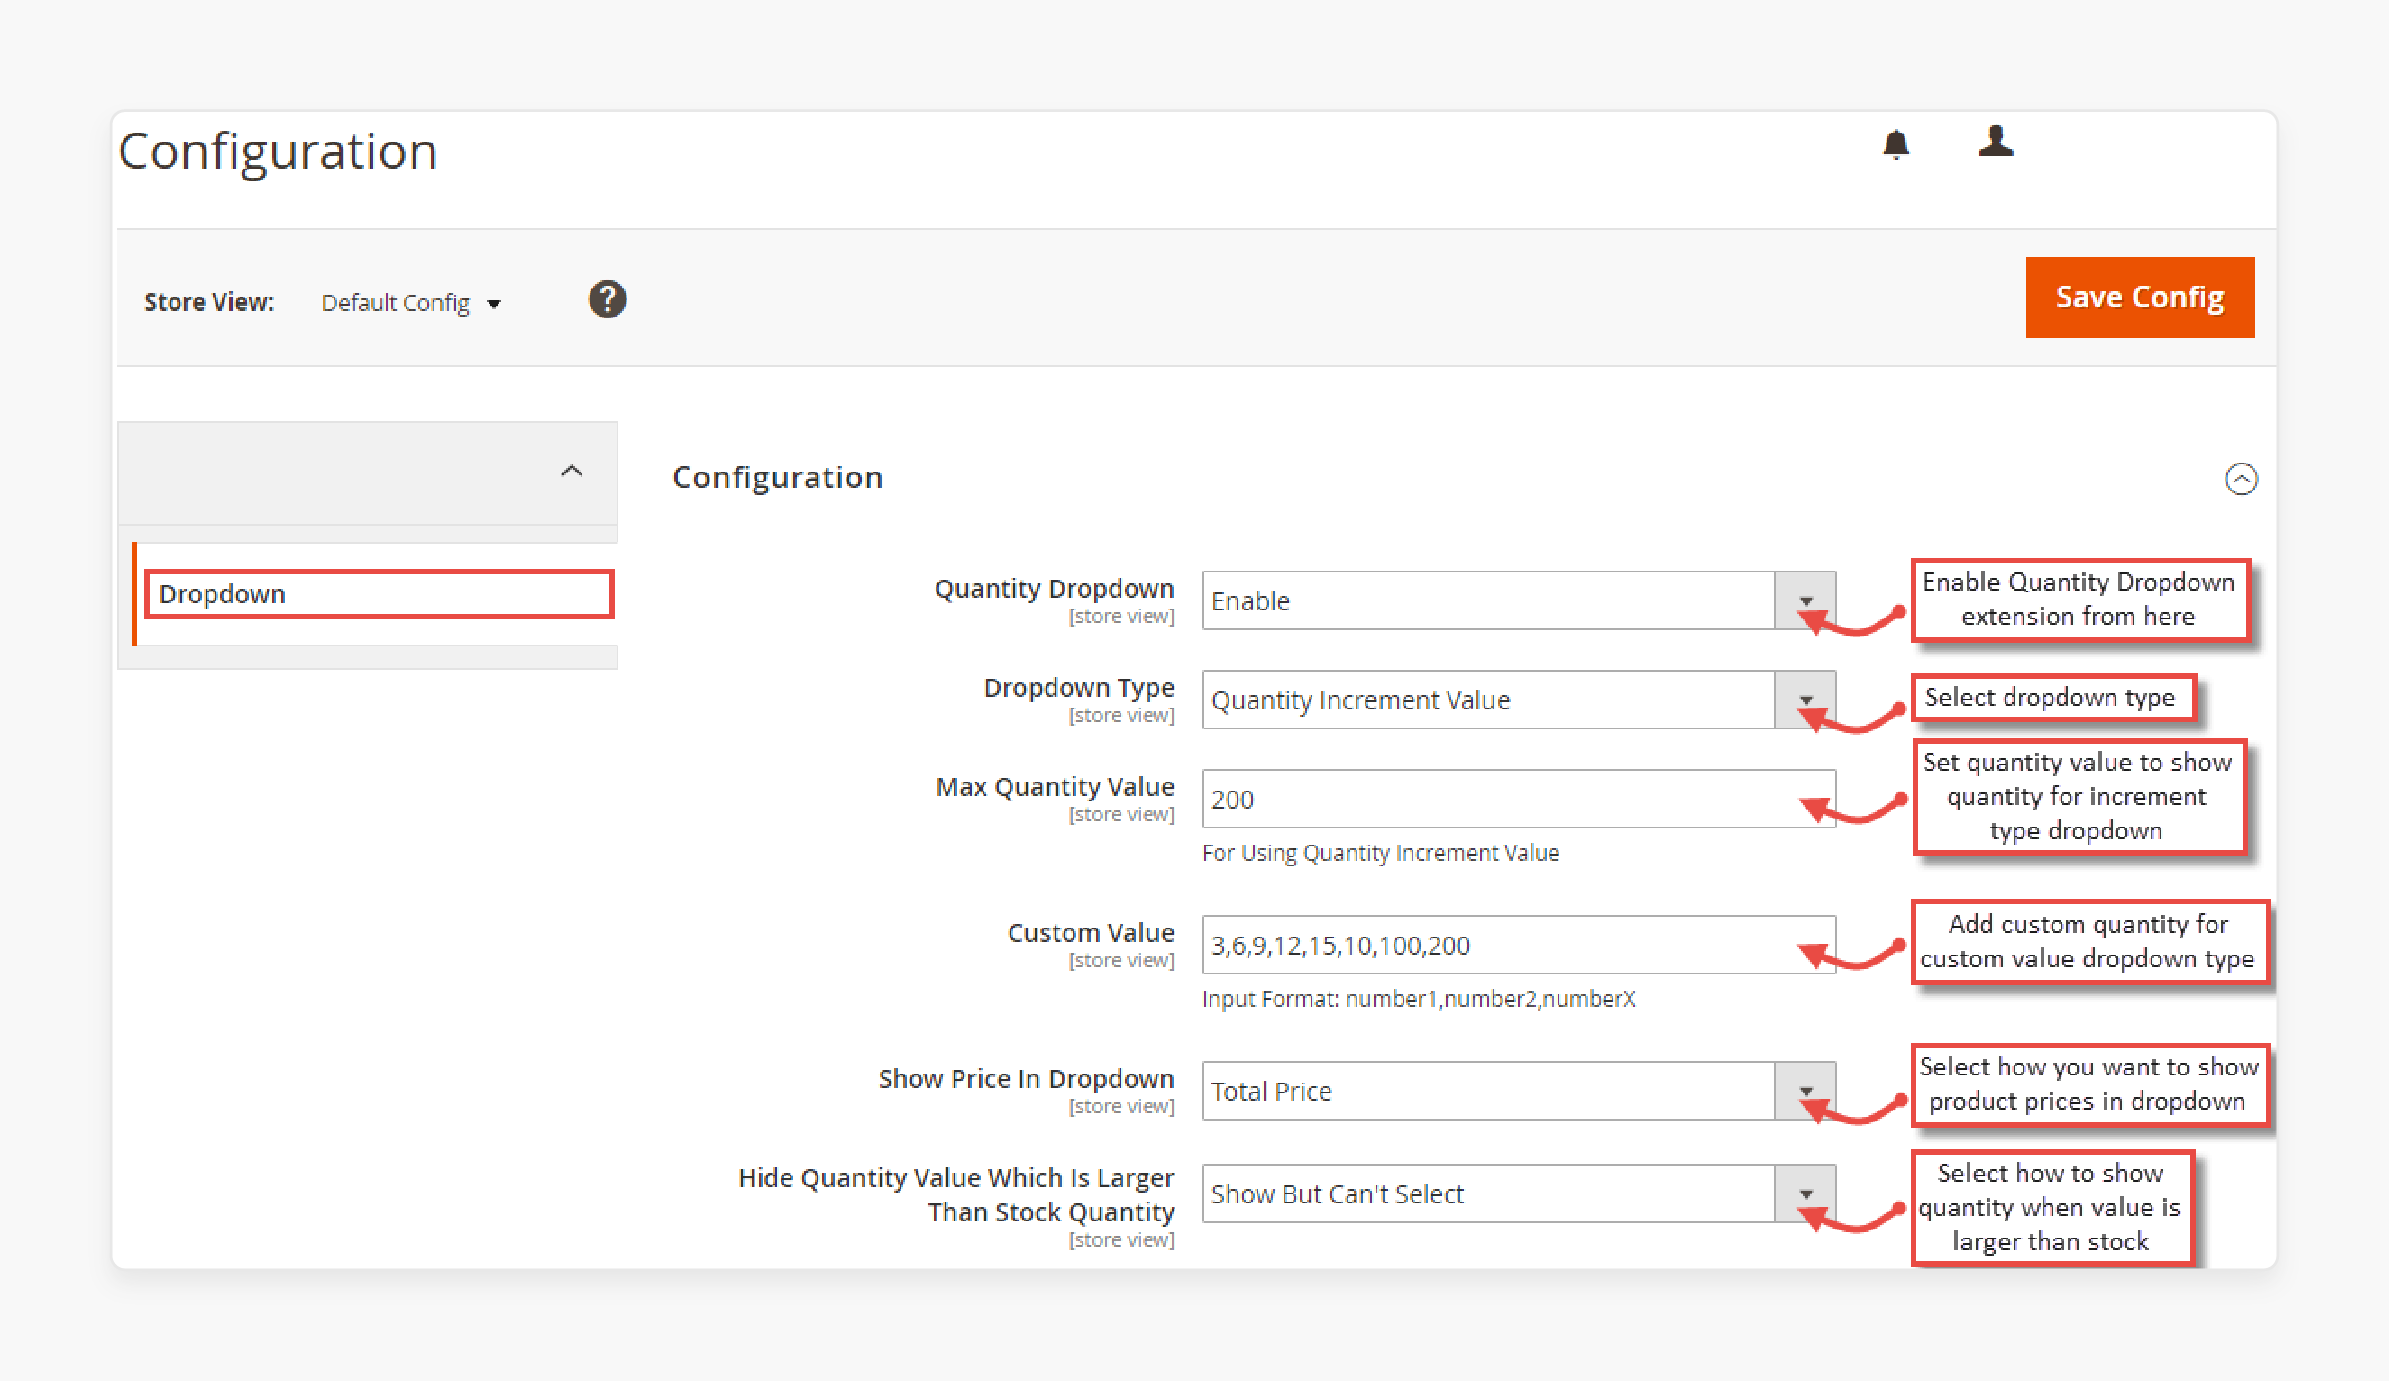
Dropdown menus are an effective way to organize subcategories and products, making the navigation more intuitive for users.
Steps to Configure Dropdown Menus
-
Access Admin Panel: Log in to the Magento 2 admin panel.
-
Navigate to Categories: Go to Product > Categories from the Admin sidebar.
-
Add Subcategories: Create subcategories under the desired main category to build the dropdown structure.
-
Enable Dropdown Display: Set Include in Navigation Menu to Yes for each subcategory.
-
Save and Refresh Cache: Save the changes and flush the Magento cache to apply the updated menu configuration.
Dropdown menus help in reducing clutter on the main navigation bar. They provide easy access to multiple categories. Dropdown menus are handy for large catalogs. Users can see detailed options through dropdowns. It prevents overwhelming the main interface.
2. Mega Menu Options
Mega menus are advanced dropdown menus. They provide enhanced customization options. They create better visual representations of categories. They also improve product display. Store owners can use mega menus to feature promotional content. Images can be added within the dropdown area.
Steps to Implement a Mega Menu
-
Use a Mega Menu Extension: Install a mega menu extension from the Magento Marketplace to add enhanced functionality to your store's menu.
-
Configure Categories: Go to the Mega Menu settings in the admin panel and configure categories, subcategories, and custom content.
-
Add Custom Elements: Use the extension to add images, promotional banners, and featured products to the menu.
-
Customize Layout: Arrange the layout of the mega menu to ensure that all critical categories are easily accessible.
-
Save and Test: Save the changes and test the menu on the front end to confirm the layout and functionality.
FAQs
1. How do I access the navigation menu in Magento 2?
To access the navigation menu in Magento 2, log into the admin panel and navigate to the 'Content' section. From there, select 'Pages' or 'Widgets' to view and manage the menu settings. It is where you can configure the top Magento navigation menu according to your requirements.
2. How can I create a custom navigation menu in Magento 2?
To create a custom navigation menu in Magento 2, you can use the 'Content' menu found in the admin panel. Select 'Pages' and then click on 'Add New Page' to design and create a menu that suits your store's needs. It allows you to create a menu with custom links and features to enhance Magento performance and user experience.
3. What steps are involved in configuring the top navigation menu in Magento 2?
To configure the top navigation menu, navigate to 'Stores' > 'Configuration' in the admin panel. From there, go to 'Catalog' and then 'Category Top Navigation'. You can adjust various menu settings. It includes the depth of the top navigation menu. You can control the number of categories displayed. Additional customization options are available for your store's navigation menu.
4. Why is the Magento 2 navigation menu important for my ecommerce store?
The Magento 2 navigation menu enhances the user experience. It helps drive customer engagement. A well-configured menu makes product discovery easier. Customers can find items quickly. It leads to improved sales. It also increases customer satisfaction. Having an intuitive navigation structure is key to optimizing an ecommerce platform.
5. Can I use the mega menu feature in Magento 2 to enhance my navigation?
Yes, the mega menu feature in Magento 2 offers expanded display options. It shows both categories and subcategories clearly. The mega menu improves top navigation depth. It creates a visually appealing layout. Users can see all options at once. The menu structure becomes more organized. It enhances the overall user experience.
6. How do I confirm the changes and check the updates in the navigation menu?
After making changes to the navigation menu, clear the Magento cache. Go to the 'System' section. Select 'Cache Management'. This step confirms your changes. It refreshes the online store. Your updates will appear immediately.
7. How does the top Magento navigation influence the overall site performance?
A well-structured top Magento navigation enhances site performance. It provides users with a smooth browsing experience. This design helps reduce bounce rates. It also encourages customers to stay on the site longer. Properly configured navigation can significantly contribute to overall ecommerce success.
Summary
Magento 2 menu settings are essential for creating an organized storefront. They help build a user-friendly shopping experience. Each menu setting serves a specific purpose. They work together to improve store navigation. Mastering these settings brings many benefits. It helps create an efficient shopping environment. Here’s why:
-
A well-structured menu helps customers easily navigate categories and subcategories.
-
Mobile-optimized menus ensure smooth navigation across devices.
-
Customization options like mega menus and dropdowns enhance functionality and user experience.
-
Proper configuration supports faster loading times and better store performance.
Explore managed Magento hosting plans to enhance security with appropriate menu settings.


