Setting up Magento 2 Media Gallery Module
Are you struggling to manage your Magento store's media files? The Magento 2 media gallery module is a powerful tool for managing and displaying Magento images, videos, and other content. In this tutorial, we will look at the benefits, configuration steps, and best practices for the Magento 2 media gallery module.
Key Takeaways
-
Learn how to efficiently organize and manage your store's media with the Magento 2 media gallery module.
-
Discover the benefits of advanced search capabilities and optimized performance for faster loading times.
-
Understand the simple steps to install and configure the Magento 2 Media Gallery module.
-
Explore how extensions can enhance your media gallery with features like image compression and lazy loading.
-
Gain insights into best practices for designing a media gallery that aligns with your brand’s identity.
Benefits of Magento 2 Media Gallery
| Benefit | Description |
|---|---|
| Improved Organization and Management | Enables efficient organization of media files (images, videos) with folders, tags, and metadata for easy management. |
| Advanced Search | Offers advanced search filters (file type, tags, metadata) for quick asset retrieval. |
| Performance and Speed | Optimized for fast loading of media in the backend and front end. |
| Bulk Upload and Edit Functions | Speeds up bulk uploading and editing for stores with large inventories. |
| Integration with Adobe Stock | Allows easy access and purchase of high-quality images via Magento backend. |
| Permission Control | Provides control over media access, ensuring management by authorized personnel only. |
| Responsive and Mobile-Friendly | Media assets are optimized for responsive design, guaranteeing correct display across all devices. |
| Customizable and Extensible | Magento 2’s open-source nature allows for gallery customization through extensions. |
Steps to Install the Magento 2 Media Gallery Module
Step 1: Upload Module Files
-
Log in to your Magento 2 store backend.
-
Extract the contents of the downloaded zip folder on your system.
-
Locate the app folder inside the extracted folder.
-
Transfer the app folder to the Magento root directory on your server.
Step 2: Run Commands
- Access your Magento 2 root directory using SSH or a terminal.
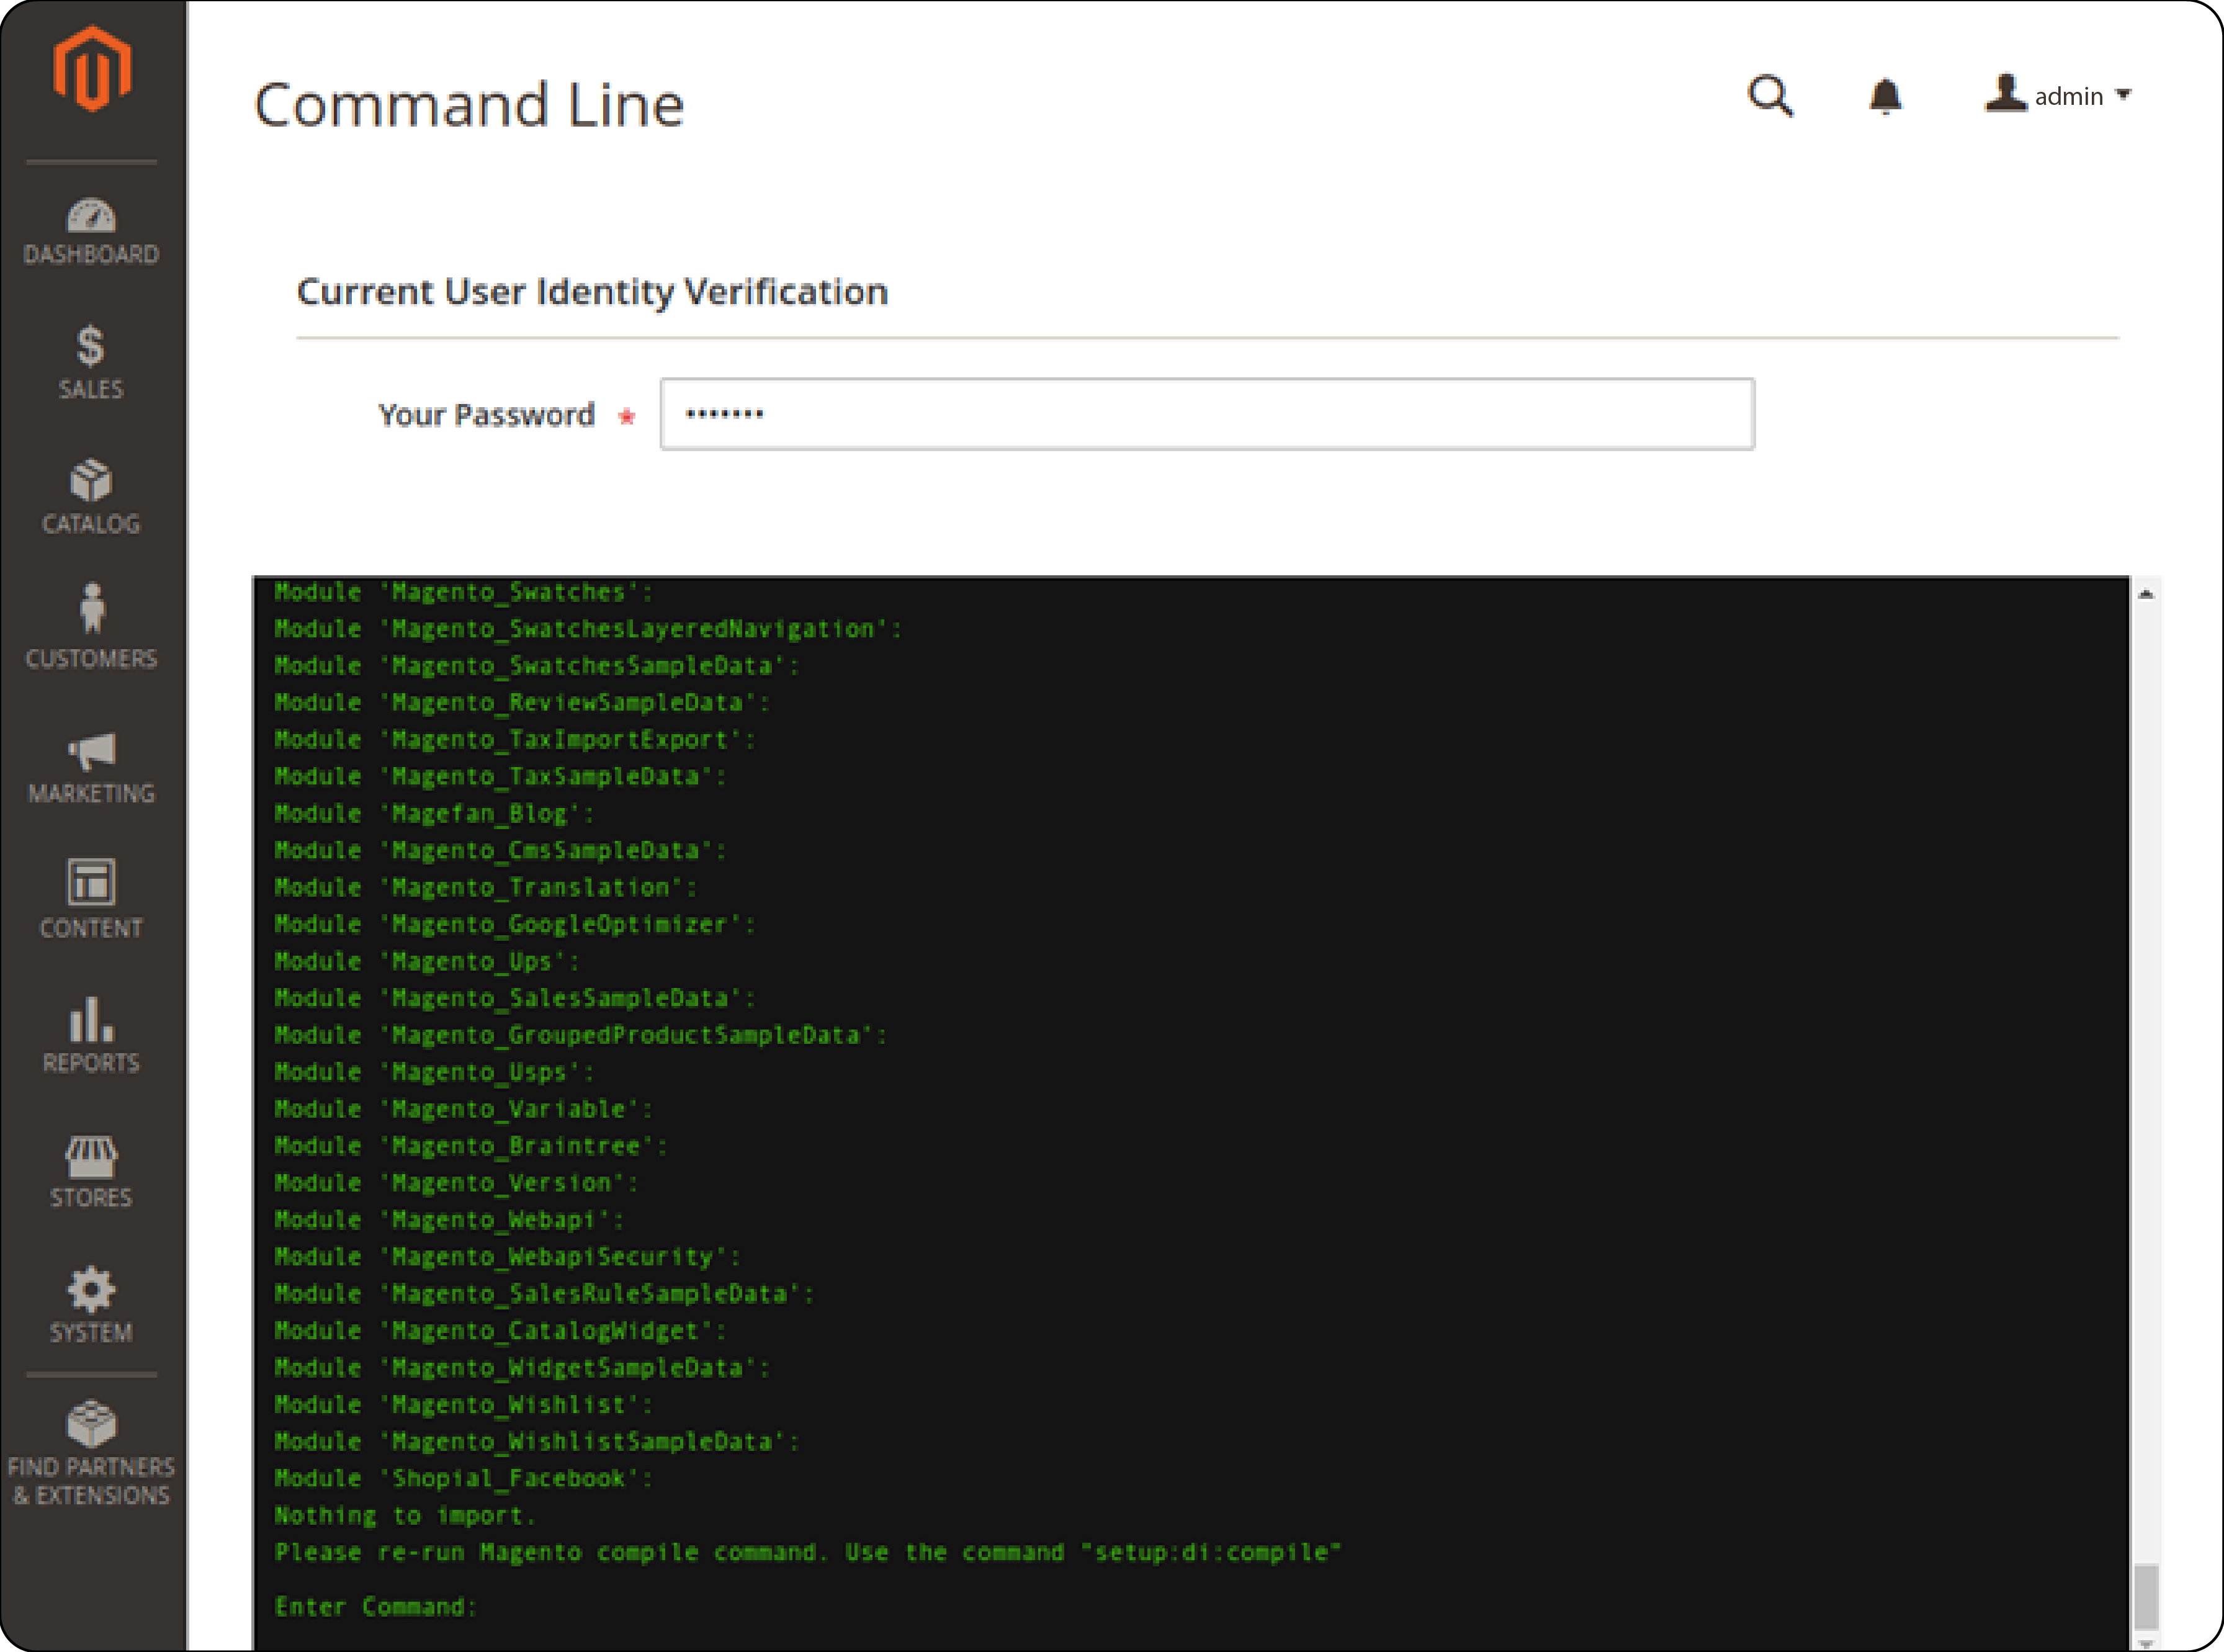
- Run the following commands in sequence:
-
php bin/magento setup:upgrade -
php bin/magento setup:di:compile -
php bin/magento setup:static-content:deploy
-
Step 3: Flush Cache
- In your Magento admin panel, navigate to System > Cache Management.
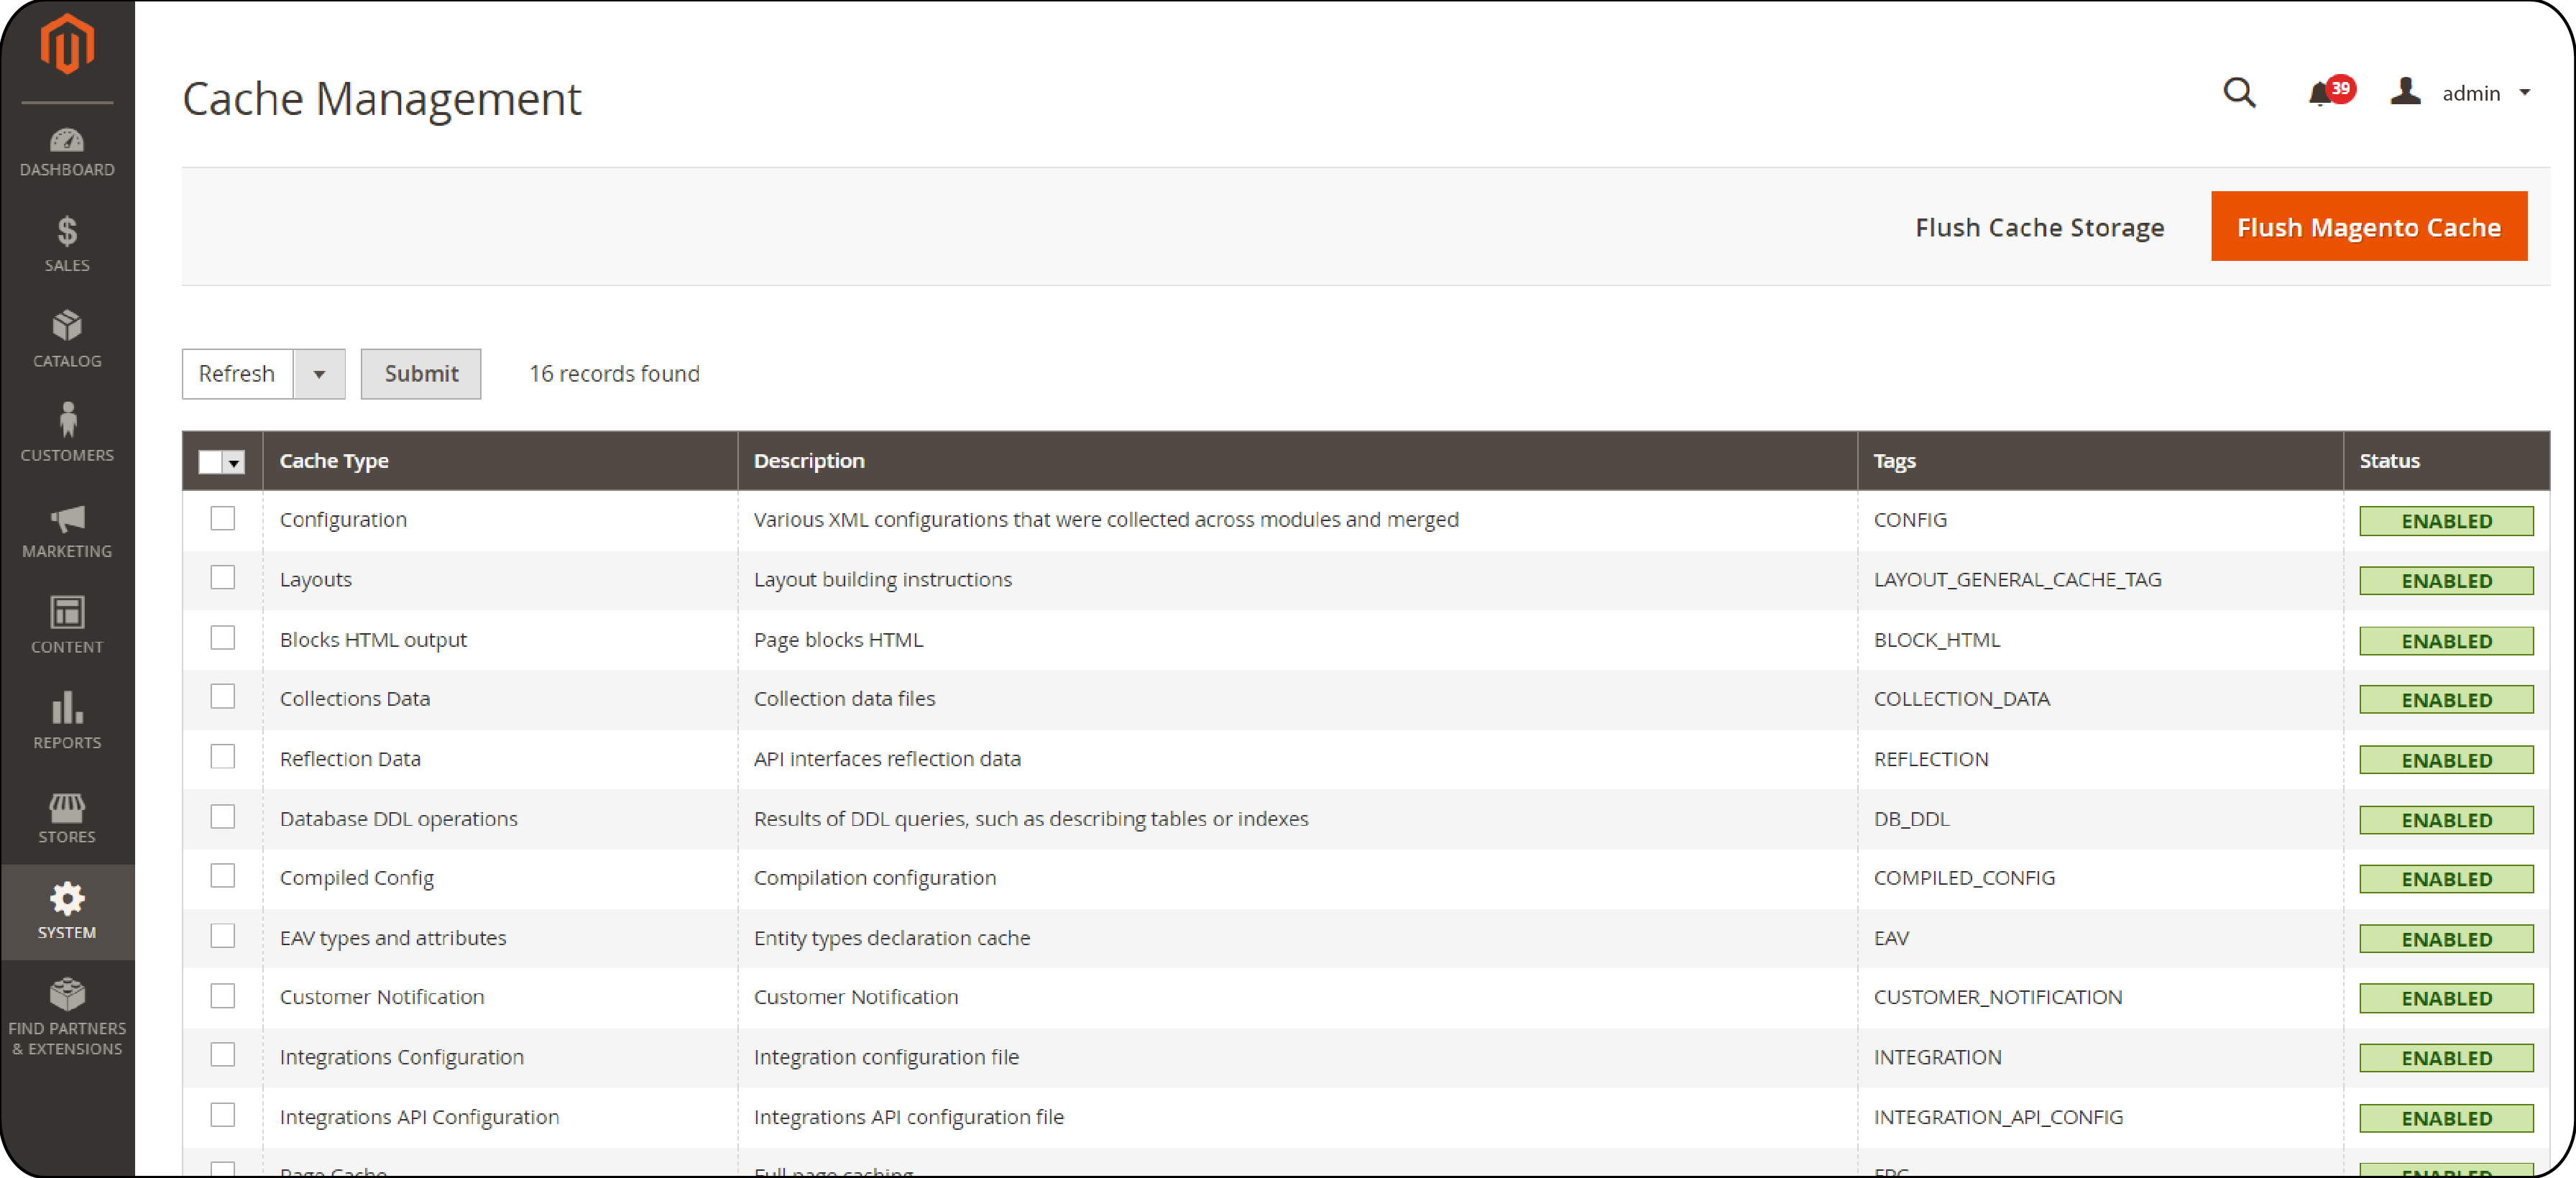
- Click on the option to flush the cache.
Steps to Configure the Magento Media Gallery
Step 1: Enabling and Adding New Media in Magento 2
-
Login to Magento Admin Panel.
-
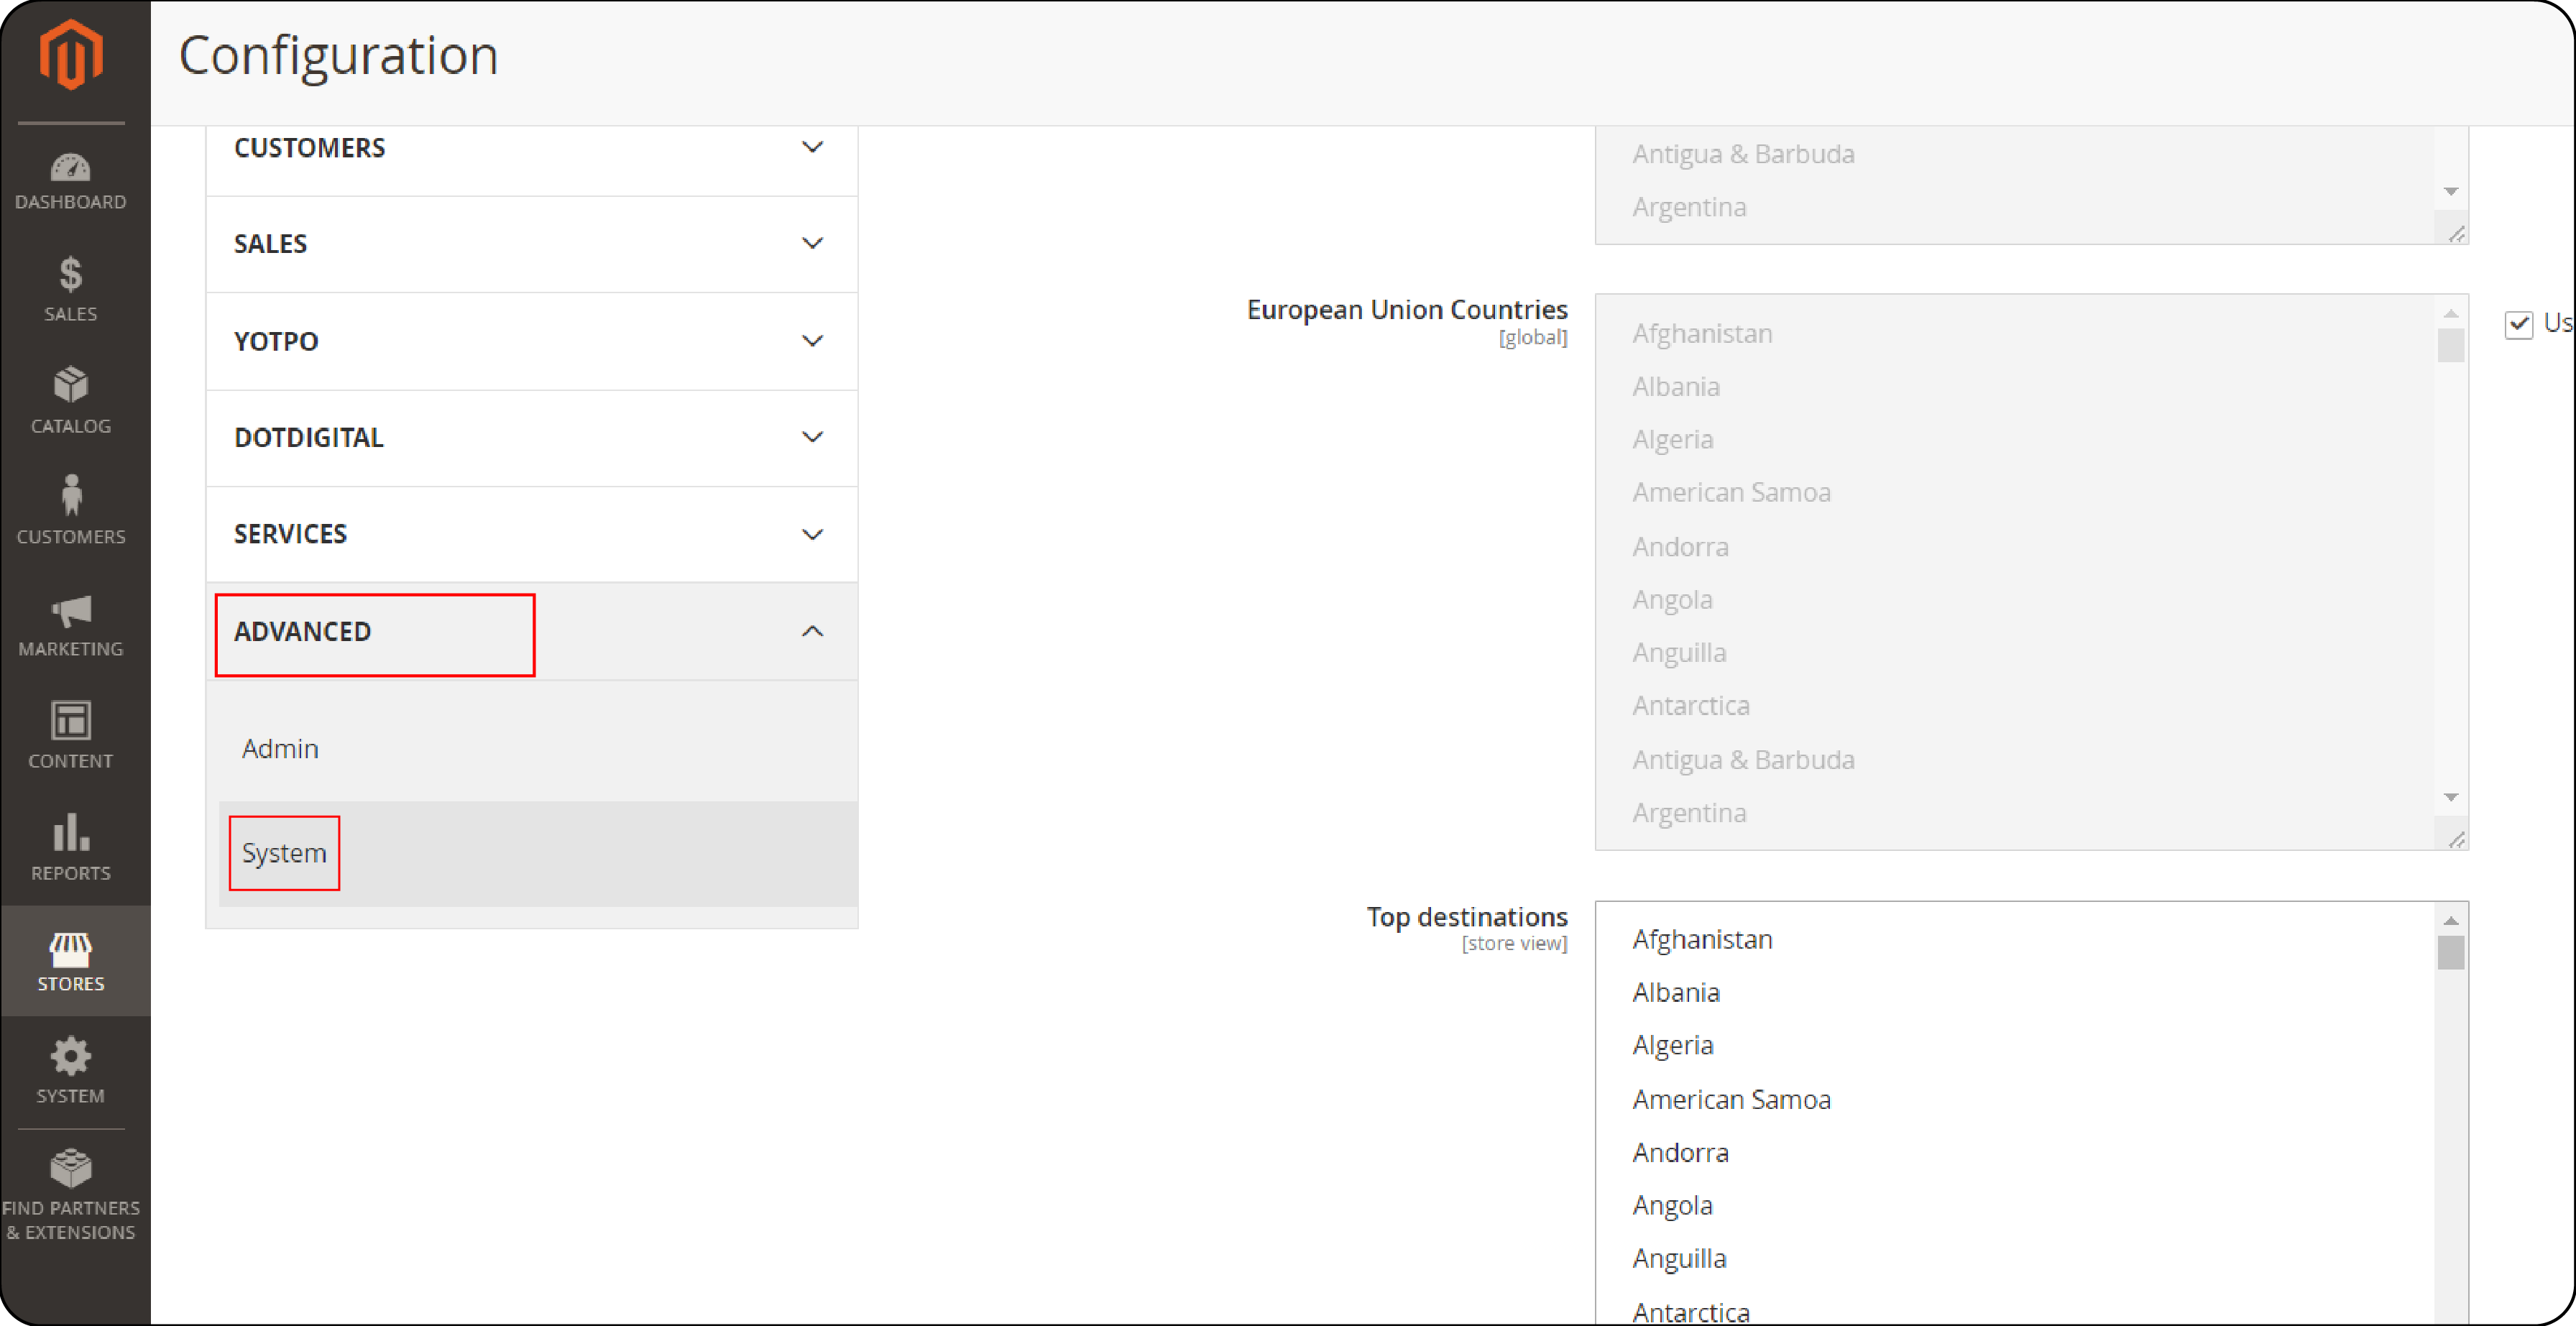
Go to ‘Store > Settings > Configuration’. Navigate to ‘System > Advanced’.
-
Select ‘No’ to enable ‘Old Media Gallery.’
-
On the admin sidebar, go to ‘System > Tool > Cache Management’ to refresh the cache.
-
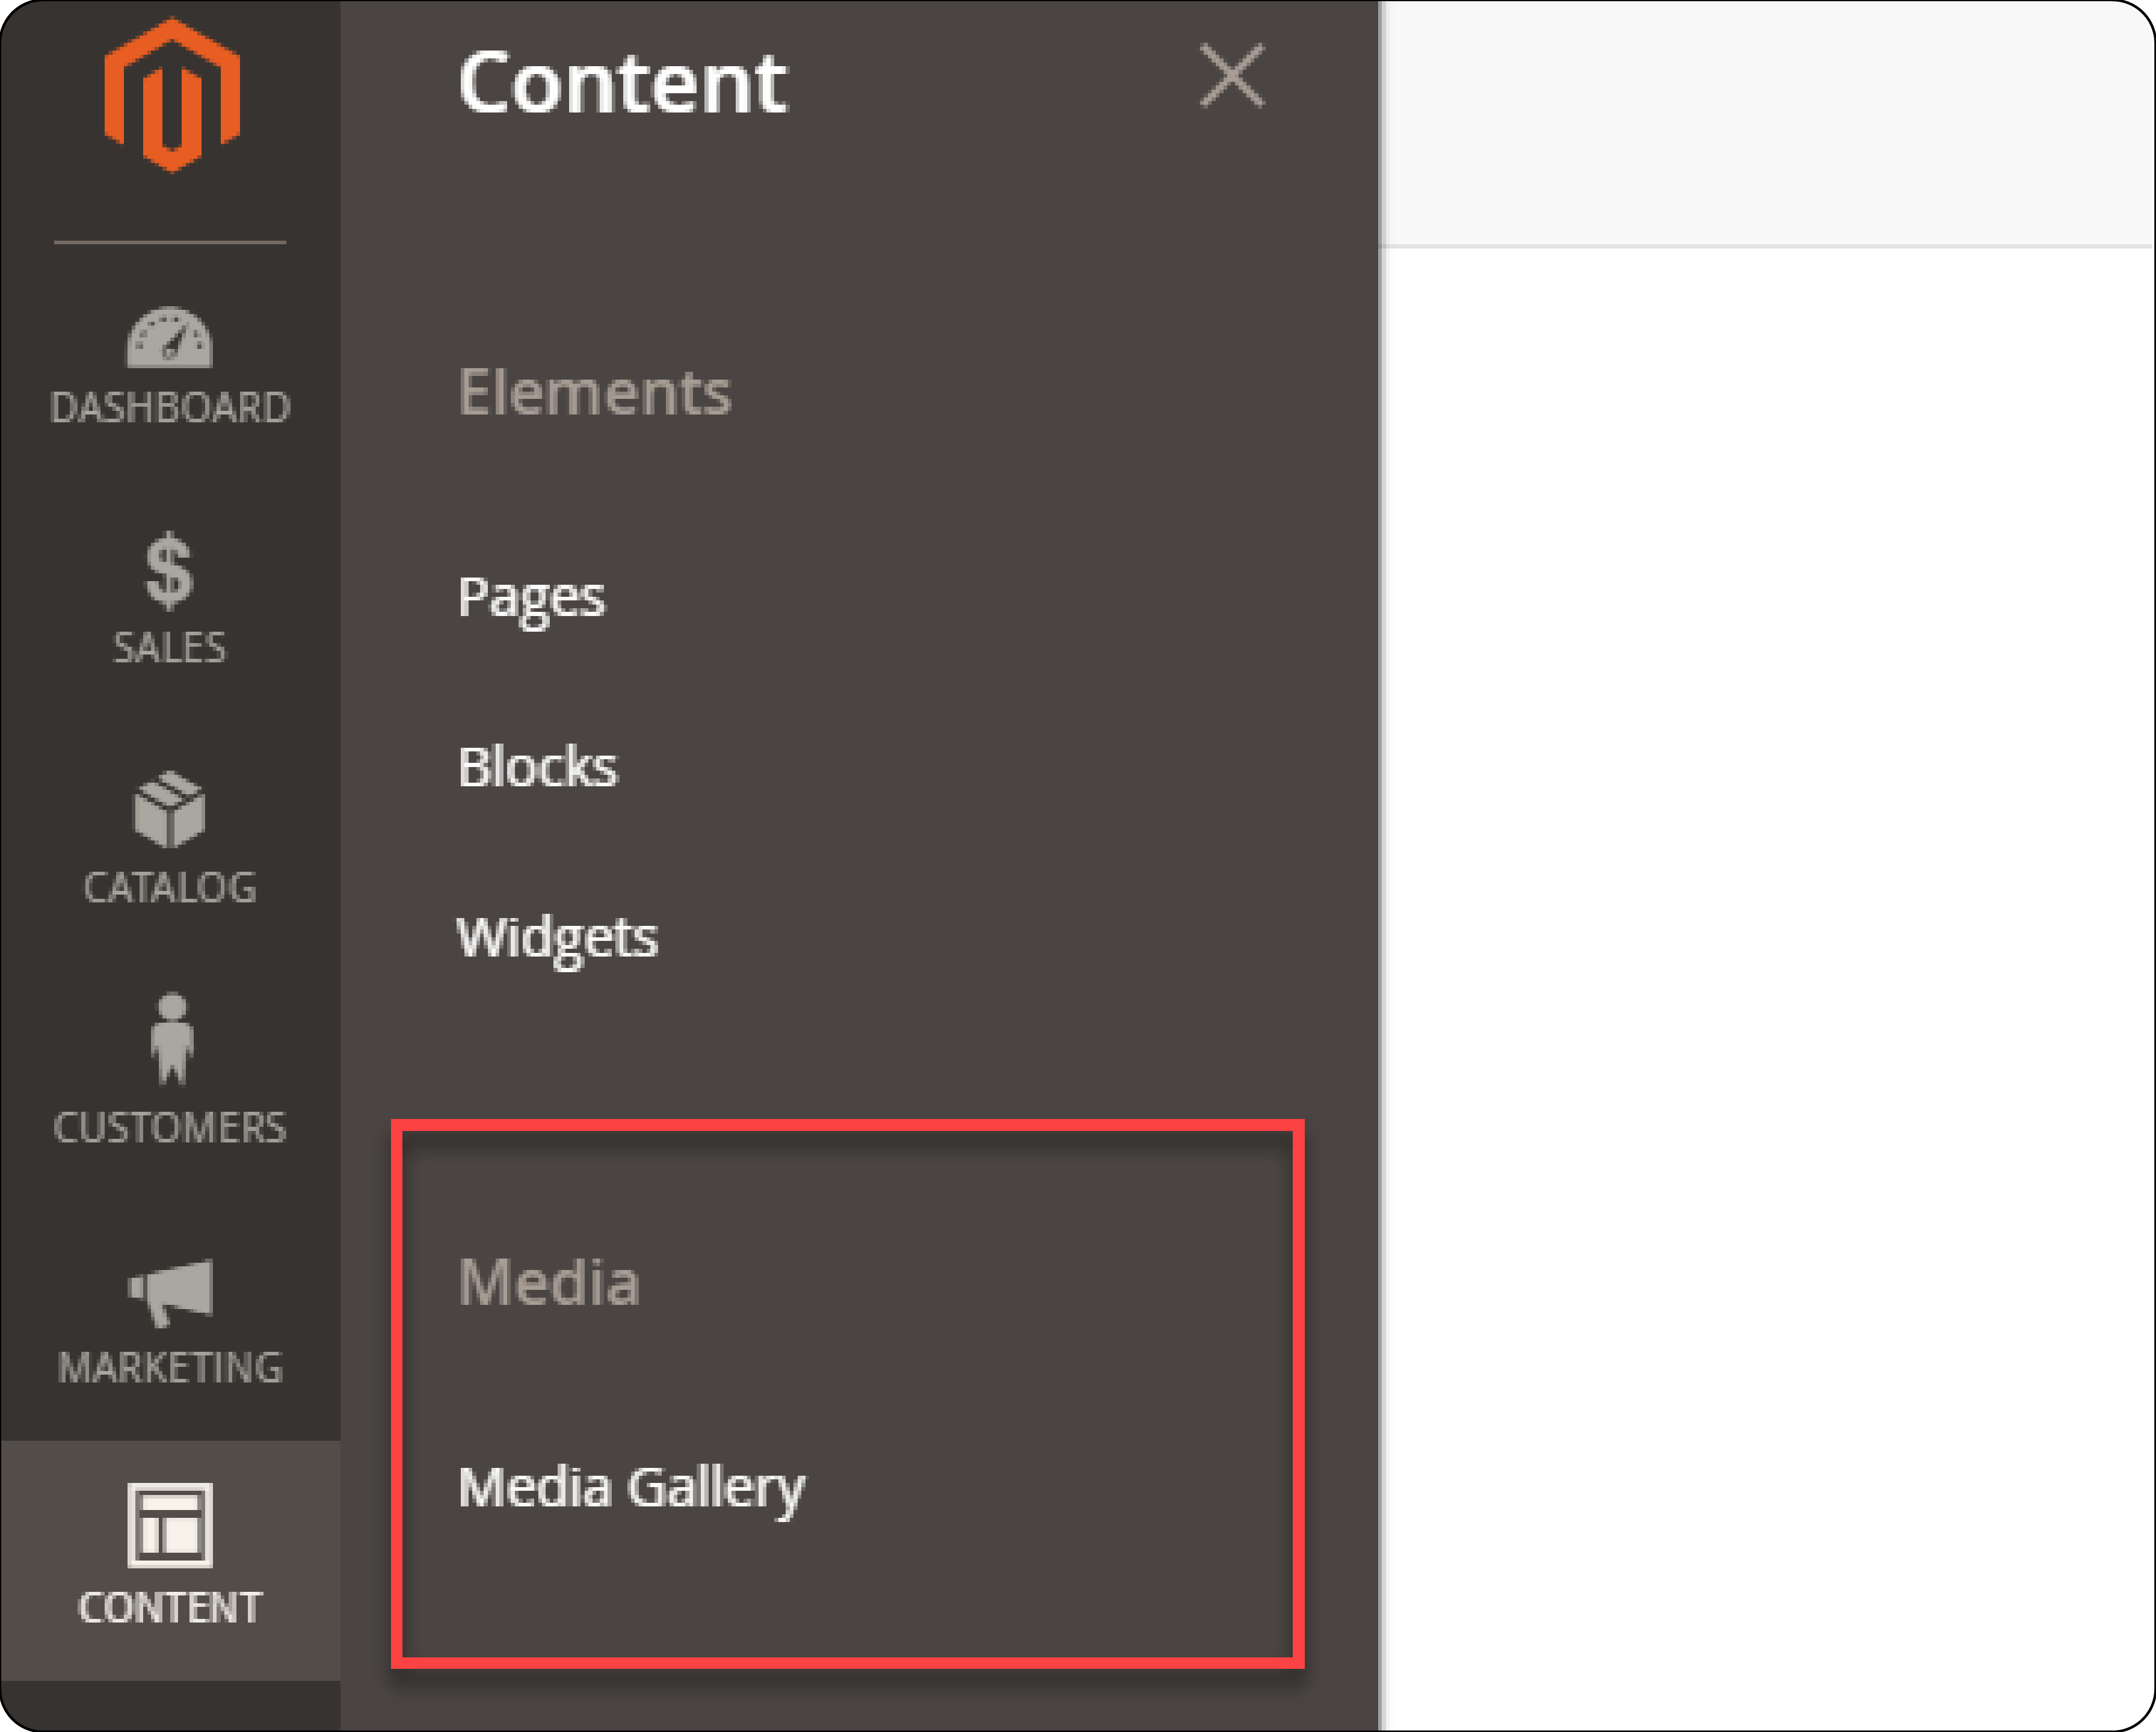
Navigate to Content > Media Gallery.
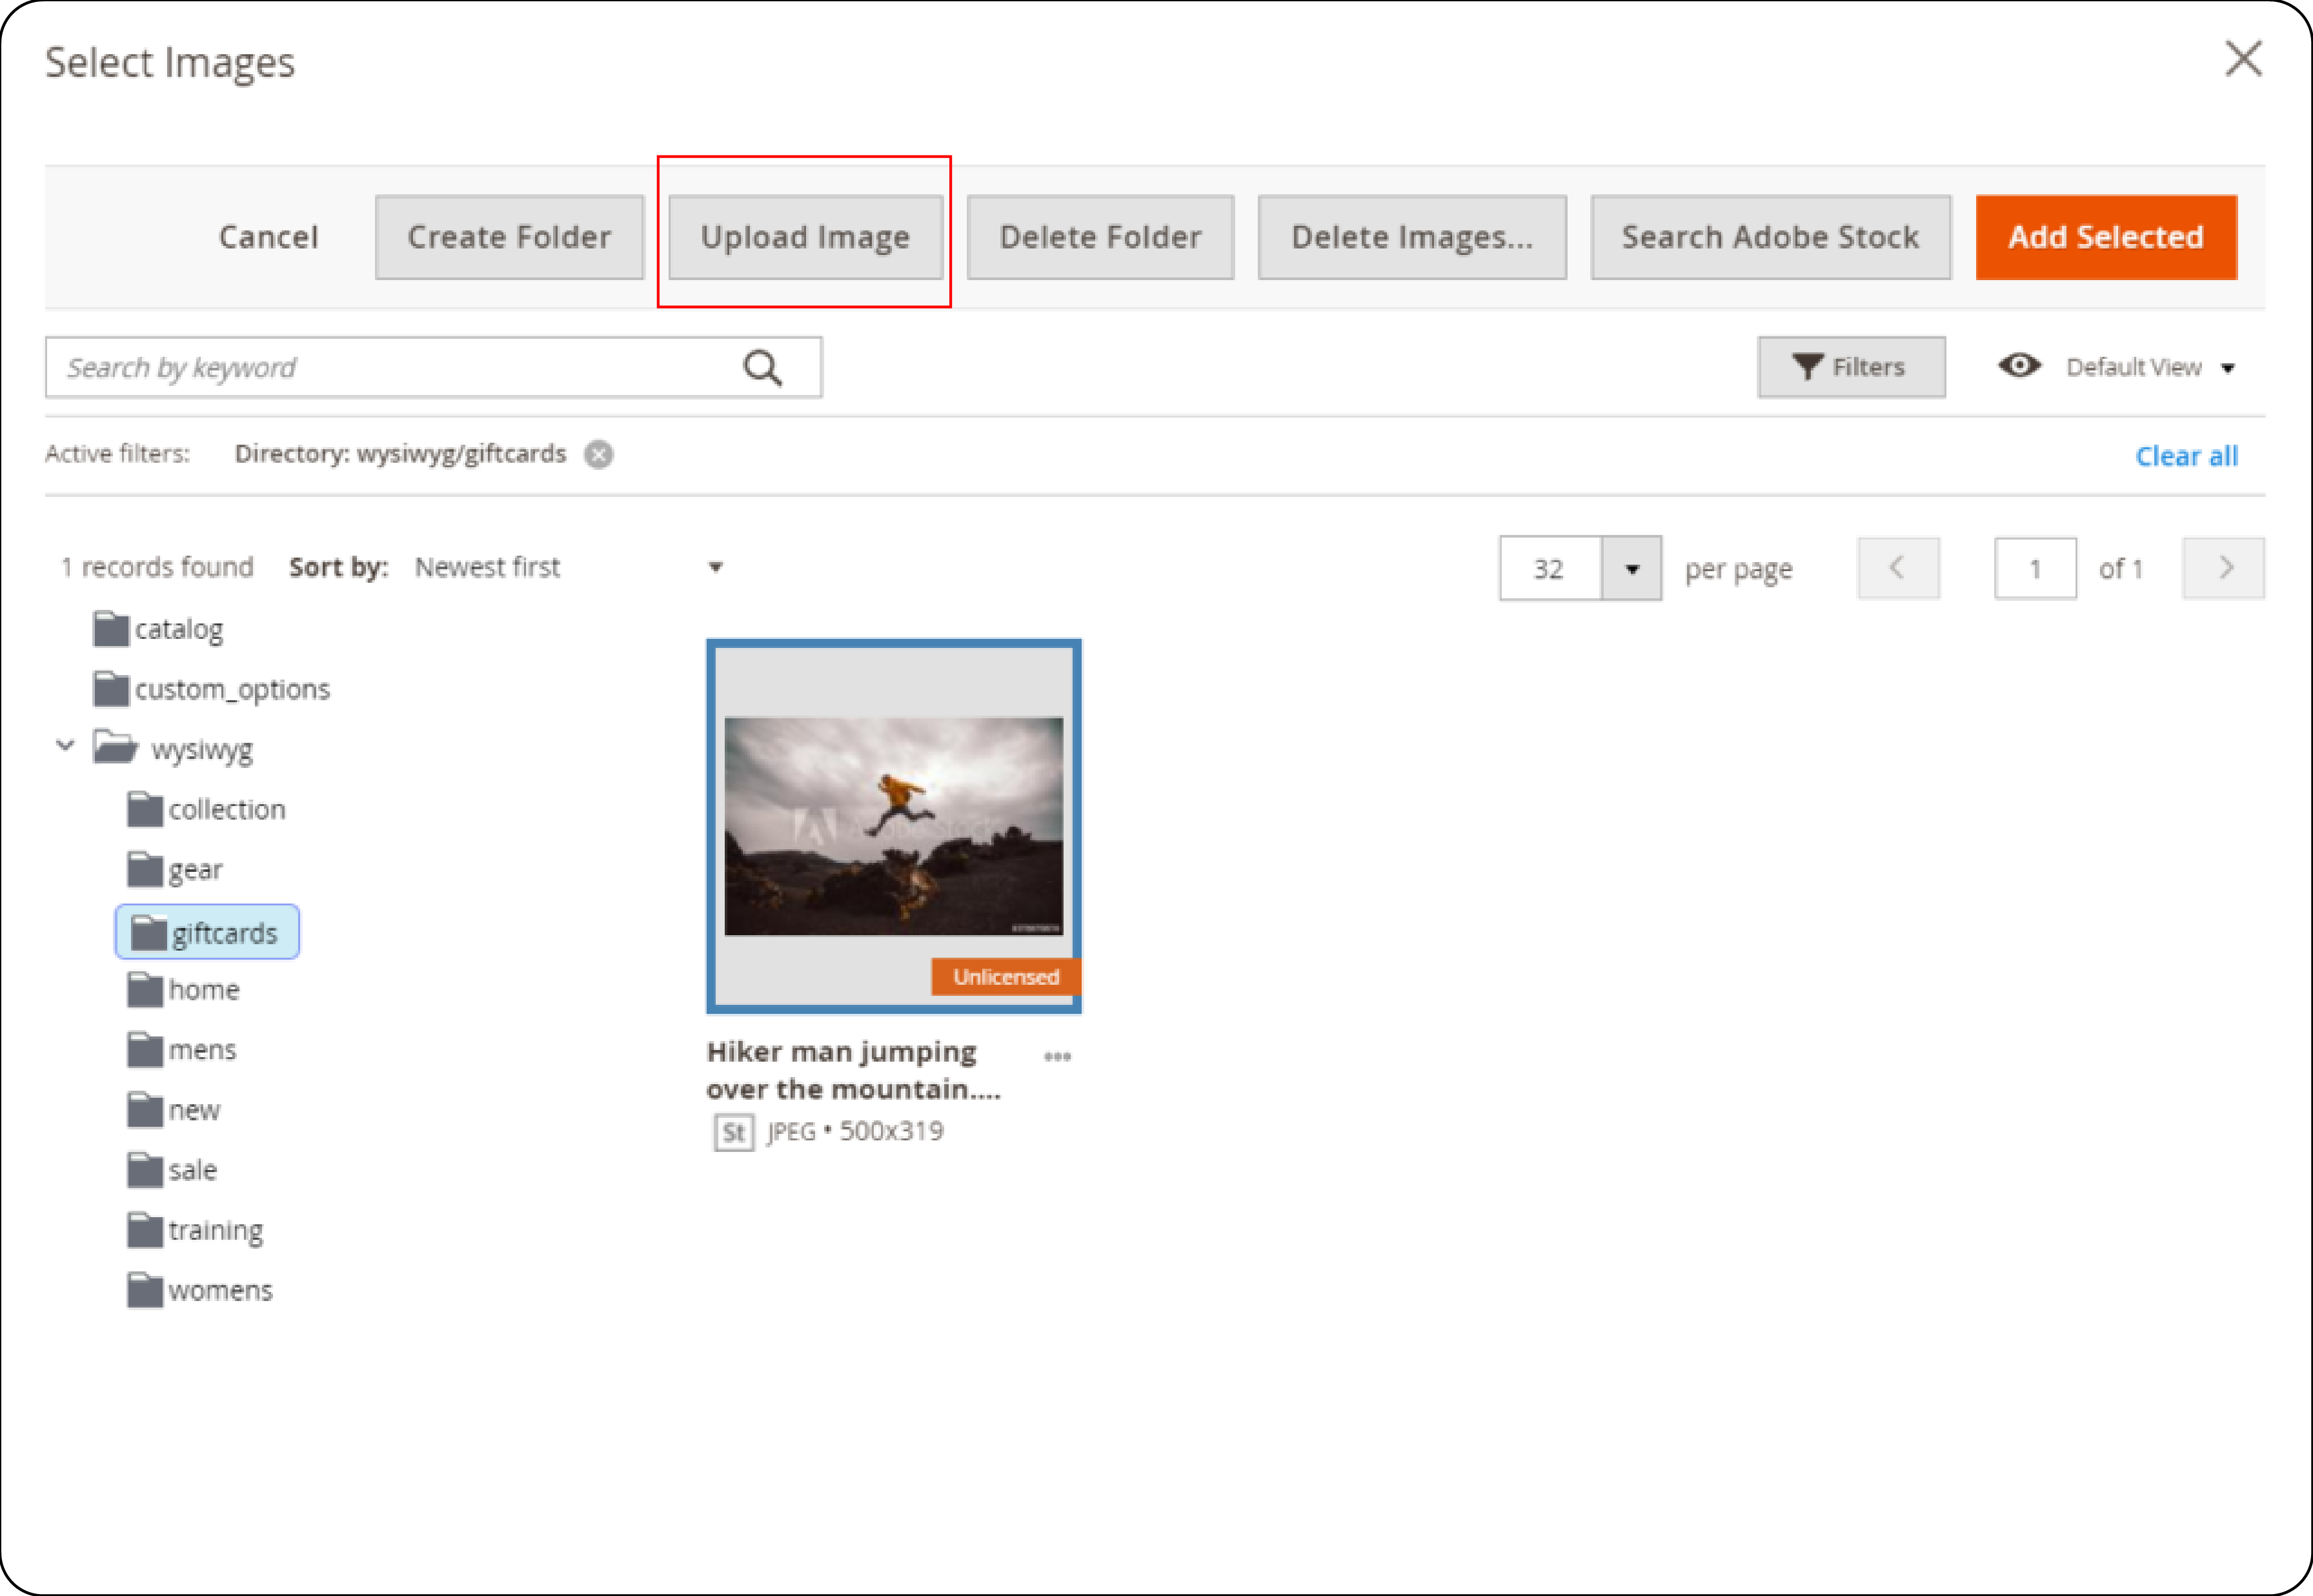
- To manually upload each file, select the ‘Upload Image’ button and then select the file.
-
Mention the specific image details like name, size, etc.
-
The supported image formats are JPEG, PNG, and GIF, while the supported video formats are MP4, FLV, and AVI. The supported audio formats are MP3, WAV, and WMA.
Step 2: Managing Media Files in Magento 2
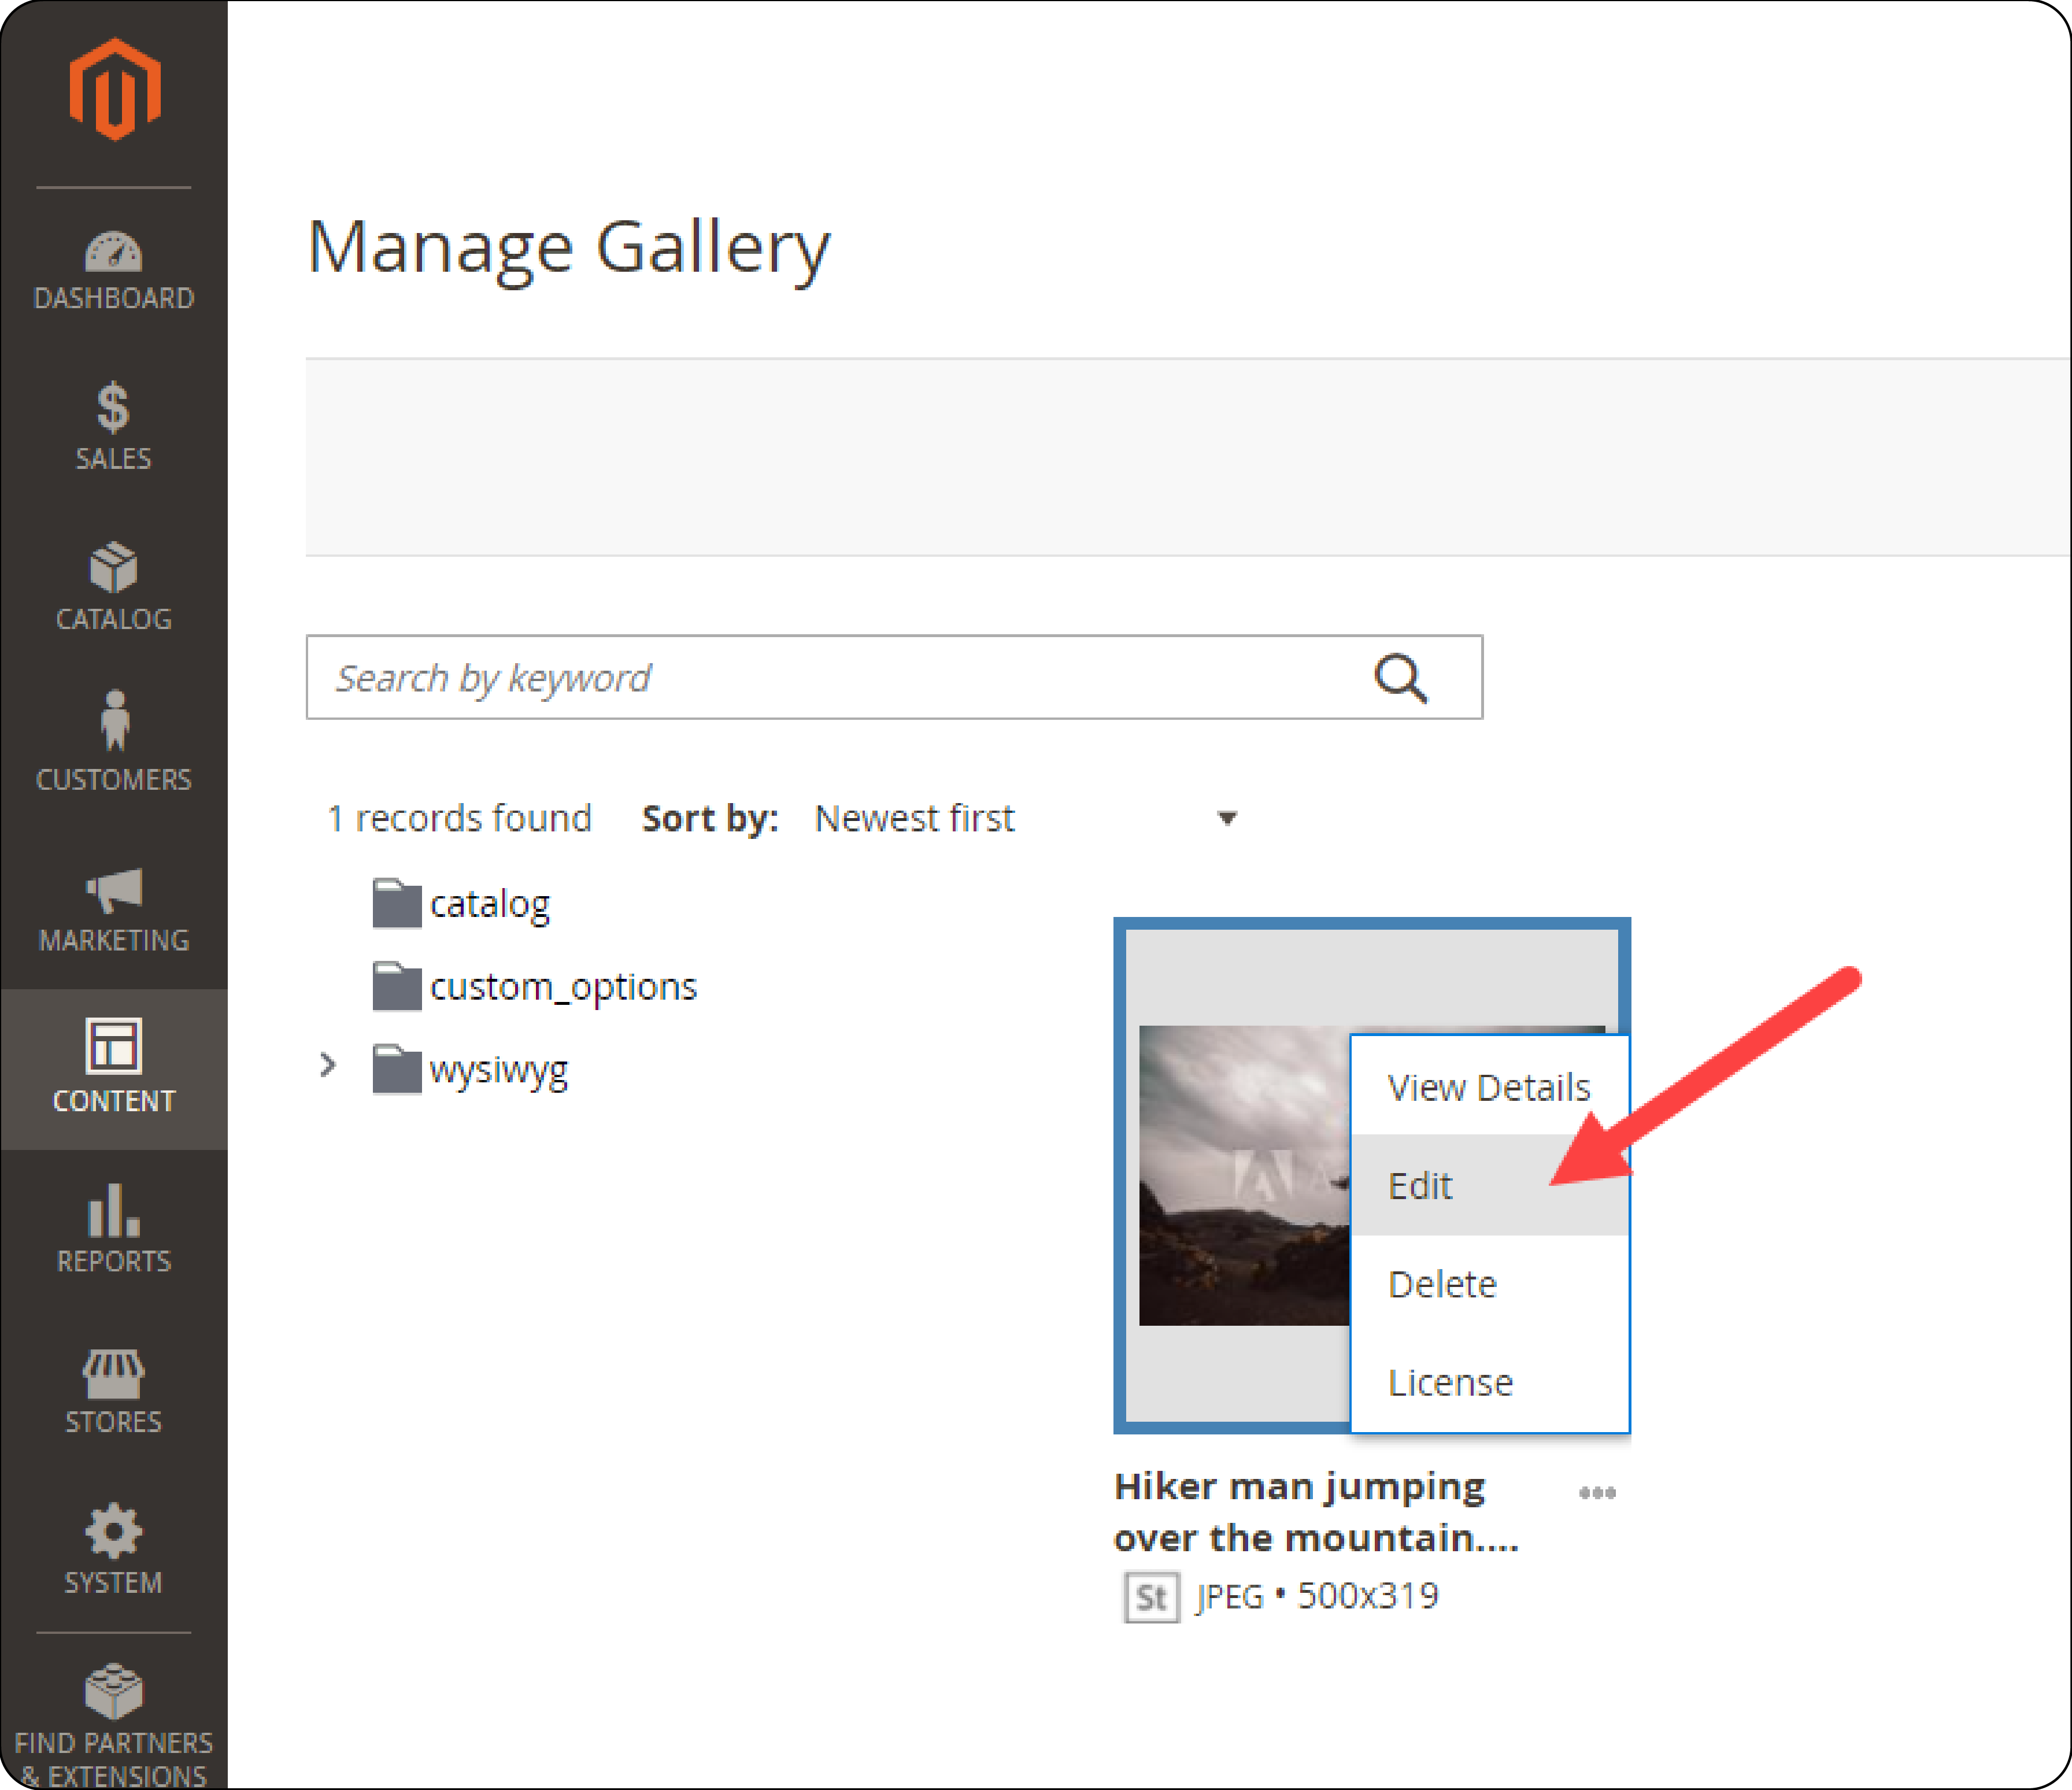
- To edit media files, locate the file in the media gallery, click on the three-dot icon, and choose the "Edit" option.
-
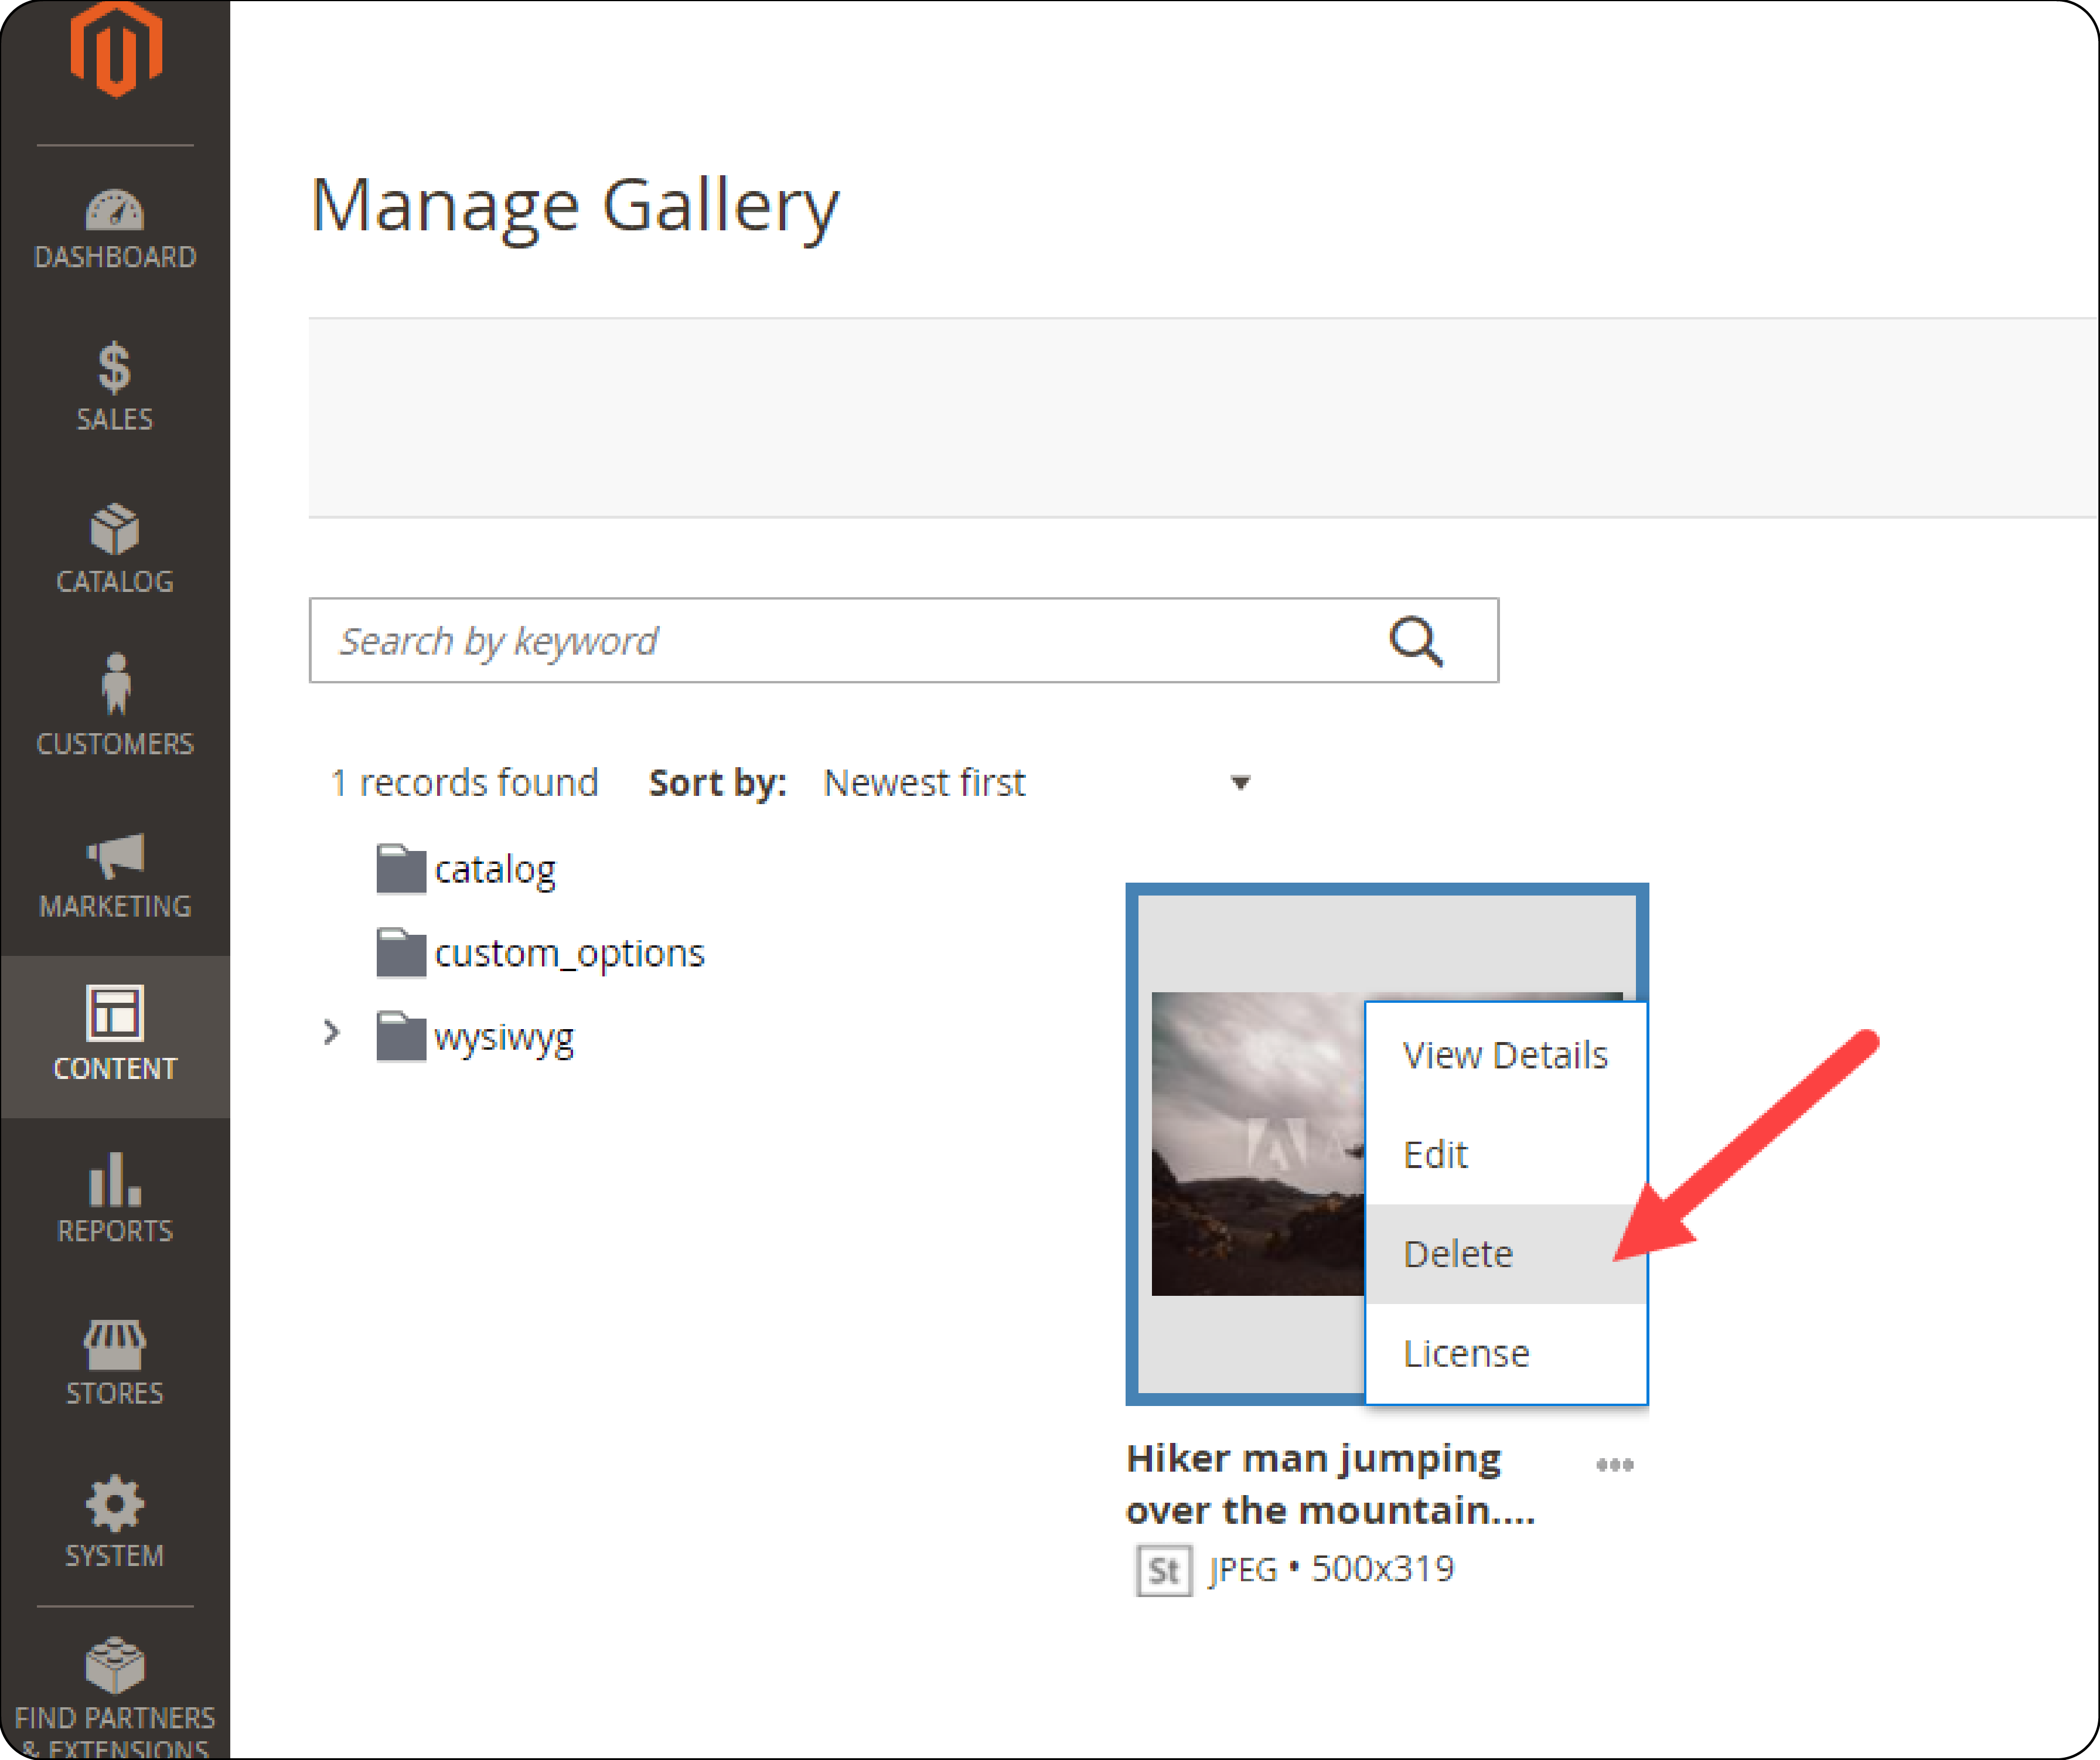
To delete a media file, select the file, click on the three-dot icon, and choose the "Delete" option.
-
Utilize the search function to find specific media files quickly. Enter keywords related to the media file you are looking for in the search bar.
Step 3: Bulk Image Configuration
-
Navigate to the Magento 2 Admin Panel and go to Stores > Settings > Configuration.
-
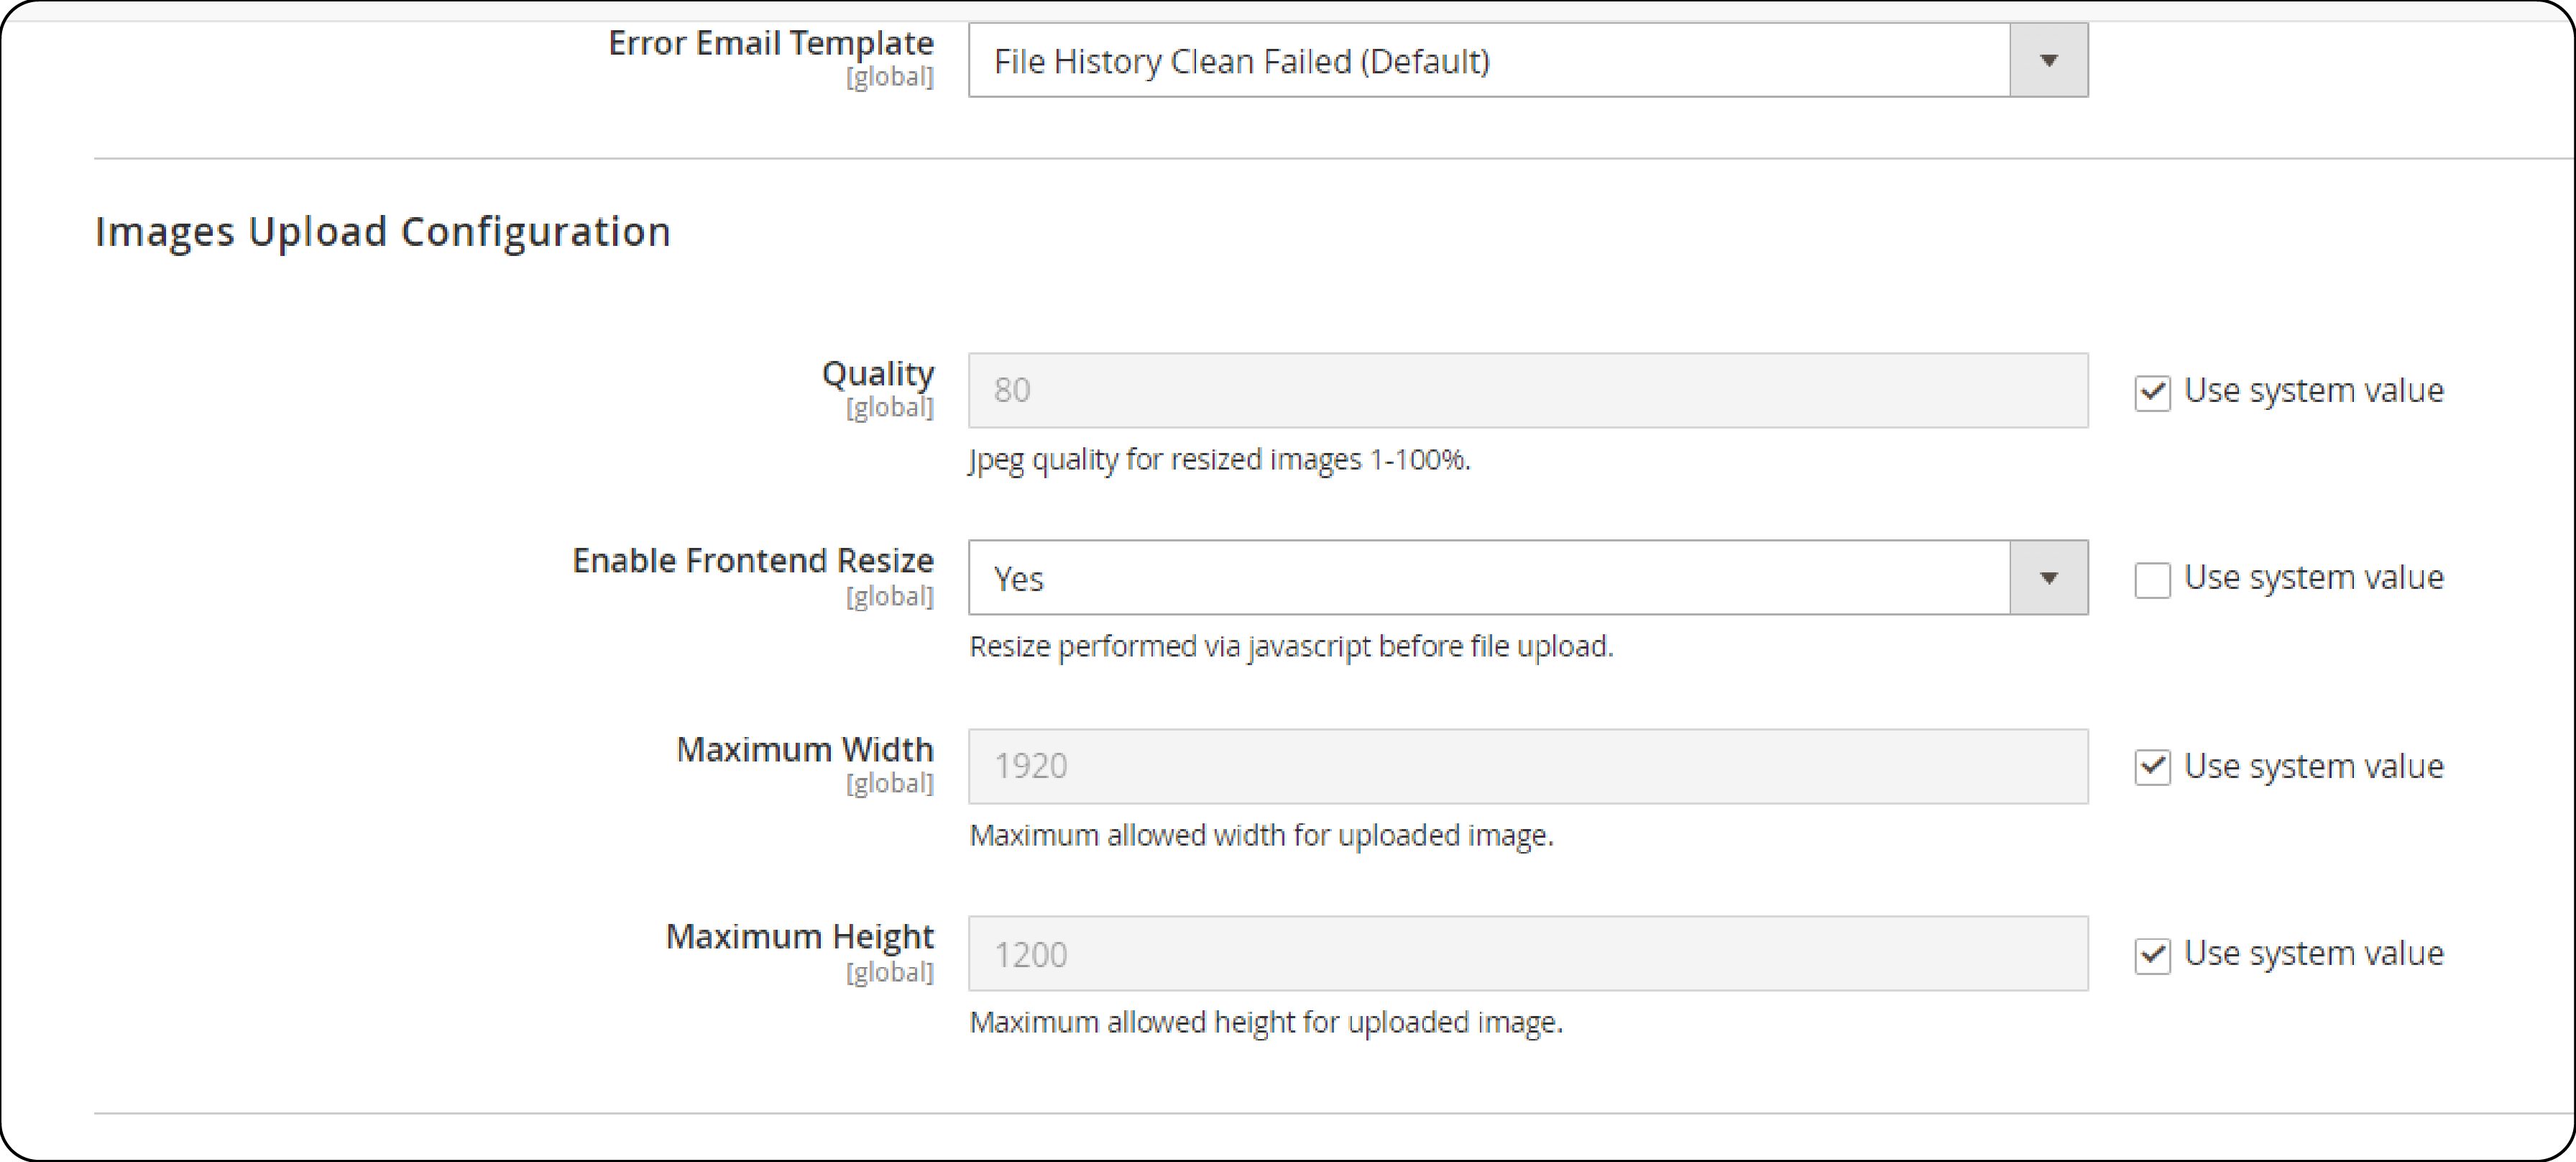
Under the Configuration settings, navigate to Advanced > System. Expand the Image Upload Configuration tab.
-
In the Quality field, insert your desired quality image (1-100%).
-
Choose Yes to enable frontend resize. It will resize the image before uploading the file using JavaScript.
-
Insert the maximum width (px) and height (px) for uploaded images.
-
Once you have configured the settings, click Save Config to save the changes.
Magento Media Gallery Extension Features
Magento 2 image gallery extensions can be used to optimize image optimization, lazy loading, and WebP image conversion. Here are some common features of Magento 2 image optimization extensions:
-
Image compression: Extensions can compress images to reduce their size without losing quality, which can help improve website performance.
-
Lazy loading: Lazy loading is a technique where gallery images are loaded only when they are needed. It can help reduce the initial page load time.
-
WebP image conversion: WebP is an image format that can help reduce image size while maintaining quality. Some extensions offer WebP image conversion as a feature.
-
Image resizing: Extensions can automatically resize images and videos to fit the required dimensions. It can help improve website performance.
Best Practices for Magento Media Gallery
1. Choose a Consistent Color Scheme
-
Match the colors in your media gallery with your store’s color scheme. It includes the background color of the gallery, borders, and navigation elements.
-
For example, a brand uses navy blue for the media gallery background and gold for image borders and buttons. It reinforces brand identity with color consistency.
2. Adjust Layout and Grid Style
-
Decide how images and videos are arranged on the product page. Different kinds of layouts, like grids, slideshows, or masonry styles, allow images of different size.
-
An e-commerce store uses a masonry layout for product and placeholder images and landscape shots for an aesthetic browsing experience.
3. Implement Brand Fonts
-
Use your brand’s fonts for any text in the media gallery, such as captions or buttons. It keeps the style uniform across your website and reinforces your brand identity.
-
For example, a site that uses its signature modern sans-serif font for all media gallery text shows uniformity across the website.
4. Customize Thumbnails
-
Thumbnails are the small preview images customers see before clicking on the full-size media. Make sure these are consistent in size and shape. You can also add effects like hover animations to make the gallery more interactive.
-
A tech gadget store that uses square thumbnails with a shadow hover effect makes the gallery organized and interactive.
5. Add Watermarks
- To protect your images and videos and to reinforce your brand, consider adding a Magento watermark. It could be your logo or brand name placed subtly on your media. It’s a way to claim ownership while maintaining a professional look.
6. Incorporate Brand Elements
- If your brand uses specific icons, motifs, banner sliders, or patterns, incorporate these elements into your media storage. It could be in the form of background patterns, icons for navigation buttons, or decorative borders around images.
FAQ
1.How do I organize my media files in Magento 2 media gallery?
Use folders, tags, and metadata within the Magento 2 Media Gallery to efficiently organize your images and videos, making management and retrieval straightforward.
2. Can I improve my website's loading speed with Magento 2 media gallery?
Yes, the Magento 2 media gallery is optimized for performance, enhancing the loading speed of media assets on both the backend and the storefront.
3. What are the steps to install the Magento 2 media gallery module?
To install the module, upload the module files to your server, run specific Magento setup commands (setup:upgrade, setup:di:compile, setup:static-content:deploy), and then flush the cache from the admin panel.
4. How can Magento 2 media gallery extensions enhance my store?
Extensions can offer additional features like image compression, lazy loading, WebP conversion, and automatic resizing.
5. What are some best practices for customizing my Magento 2 media gallery?
Ensure color scheme consistency with your brand, choose a user-friendly layout, use brand fonts, and customize thumbnails for uniformity.
Summary
The Magento 2 media gallery is a useful tool that helps store owners display their products in an organized and attractive manner. In this tutorial, we explored all the benefits, configuration steps, and best practices for Magento media gallery. Here is a quick summary of what we read:
-
Access High-Quality Images Easily: Direct integration with Adobe Stock opens up a world of premium images right from your backend.
-
Ensure Controlled Access: With permission settings, you maintain full control over who can manage your media assets.
-
Optimize for Every Device: Responsive design guarantees your media looks great on any screen, enhancing mobile friendliness.
-
Customization at Your Fingertips: The open-source nature of Magento 2 means the sky's the limit when it comes to customization.
Follow the above steps to optimize your Magento gallery and choose a managed Magento hosting provider to scale and grow your business.


