
How to Integrate Adobe Stock into Magento 2 Media Folder
Are you struggling to keep your store’s media files organized? The Magento 2 media folder is the primary place for managing all visual assets in your ecommerce. It helps you arrange product images, promotional content, and digital assets with ease.
This tutorial will cover how to set up the file to suit your needs.
Key Takeaways
-
What are the aspects of a media folder?
-
Importance of Magento media gallery for stores.
-
Key components of media storage in Magento.
-
Steps to add files to the directory file.
-
How to merge and set up stock images to boost your business's workflow.
-
Advanced tips improve image and video optimization for better performance.
What is the Magento 2 Media Folder?
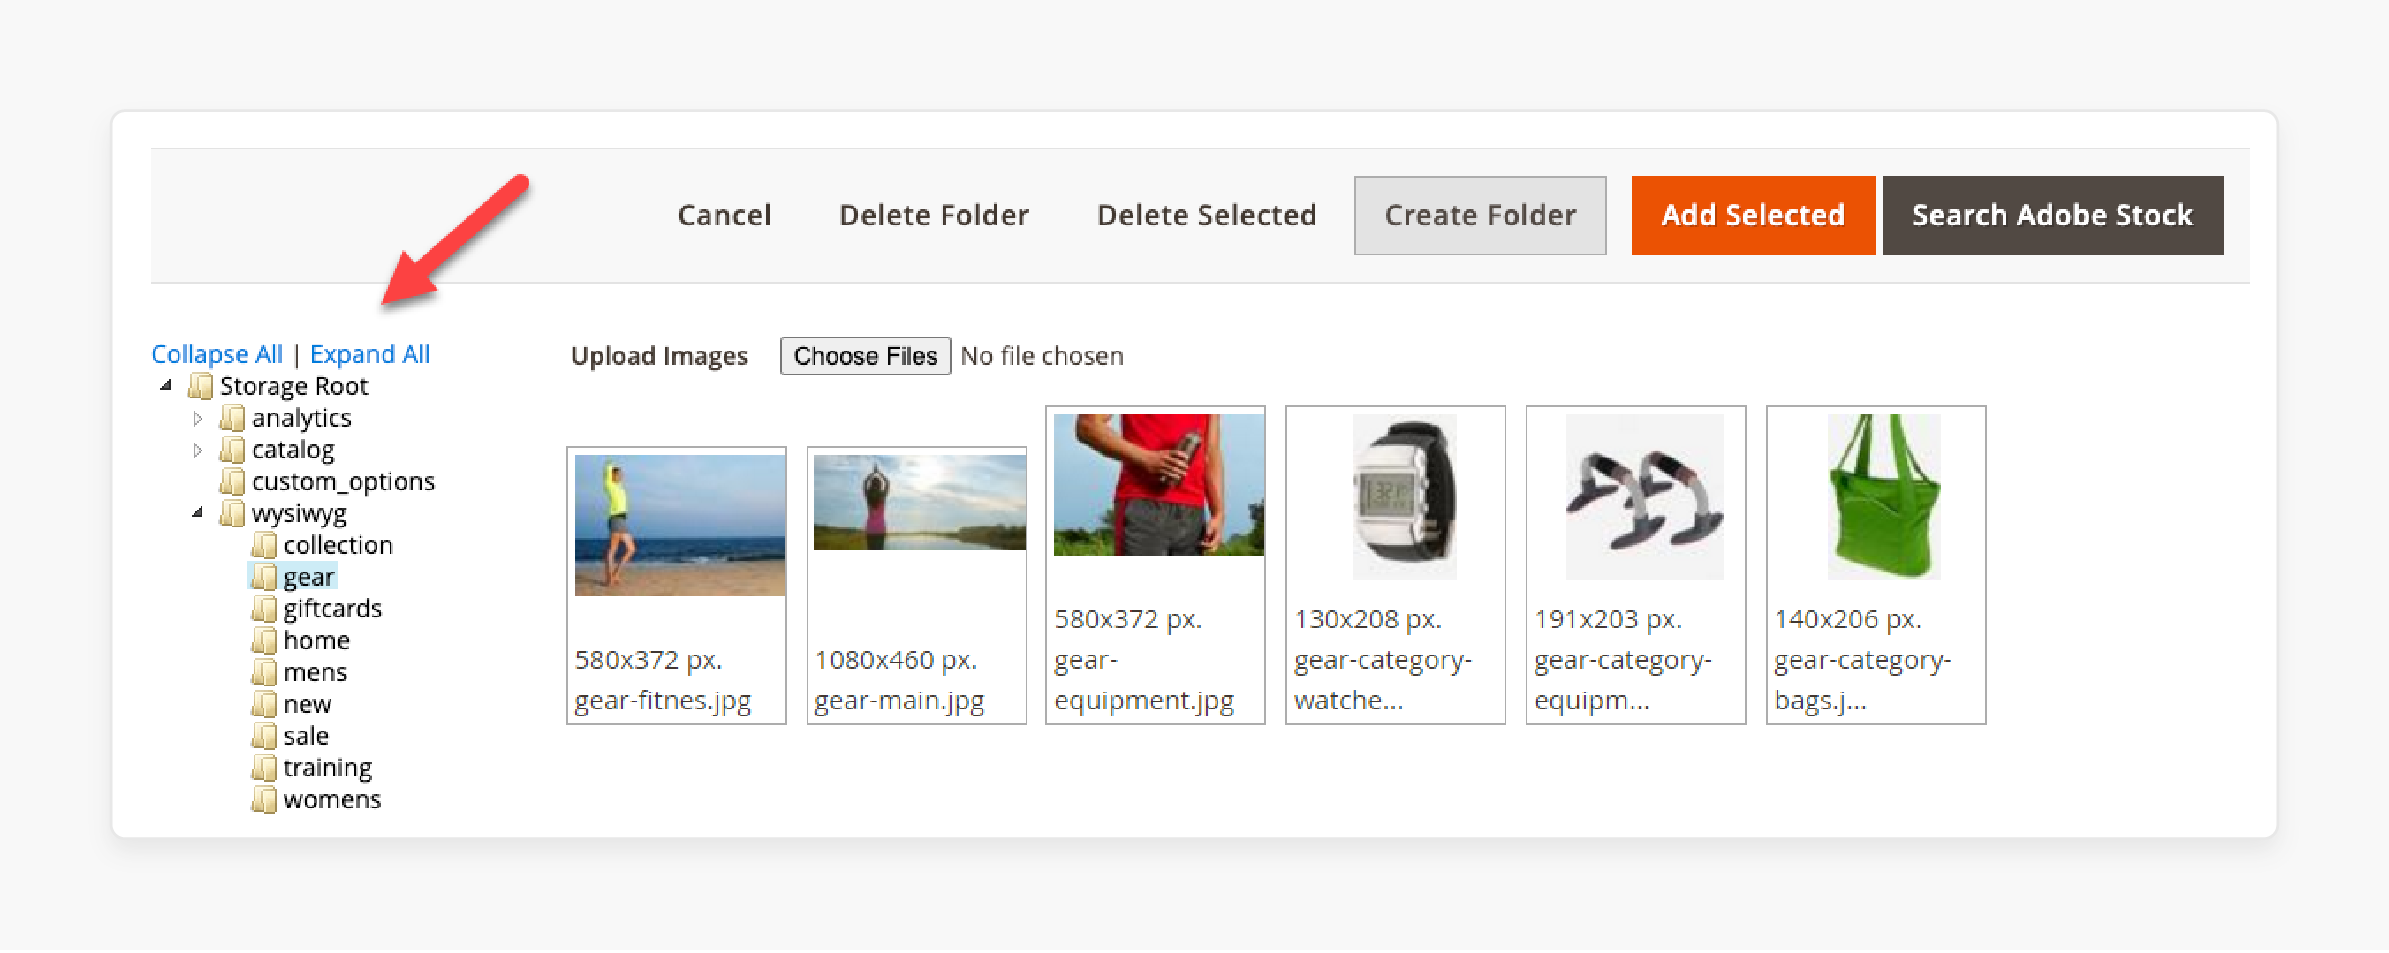
Magento 2 Media Folder is a central directory in the media storage system of a Magento store. It stores all media assets, including product images, videos, and banners.
The Magento 2 media folder is located in the media storage of the Magento backend. It supports tasks like sending images, organizing files, and managing assets. The default Magento media storage structure keeps files arranged and easy to find.
This media library helps merchants organize images easily and keeps workflows smooth. It helps manage the cache and improve user experience.
Importance of Magento Media Gallery Management
1. Efficient Media Organization
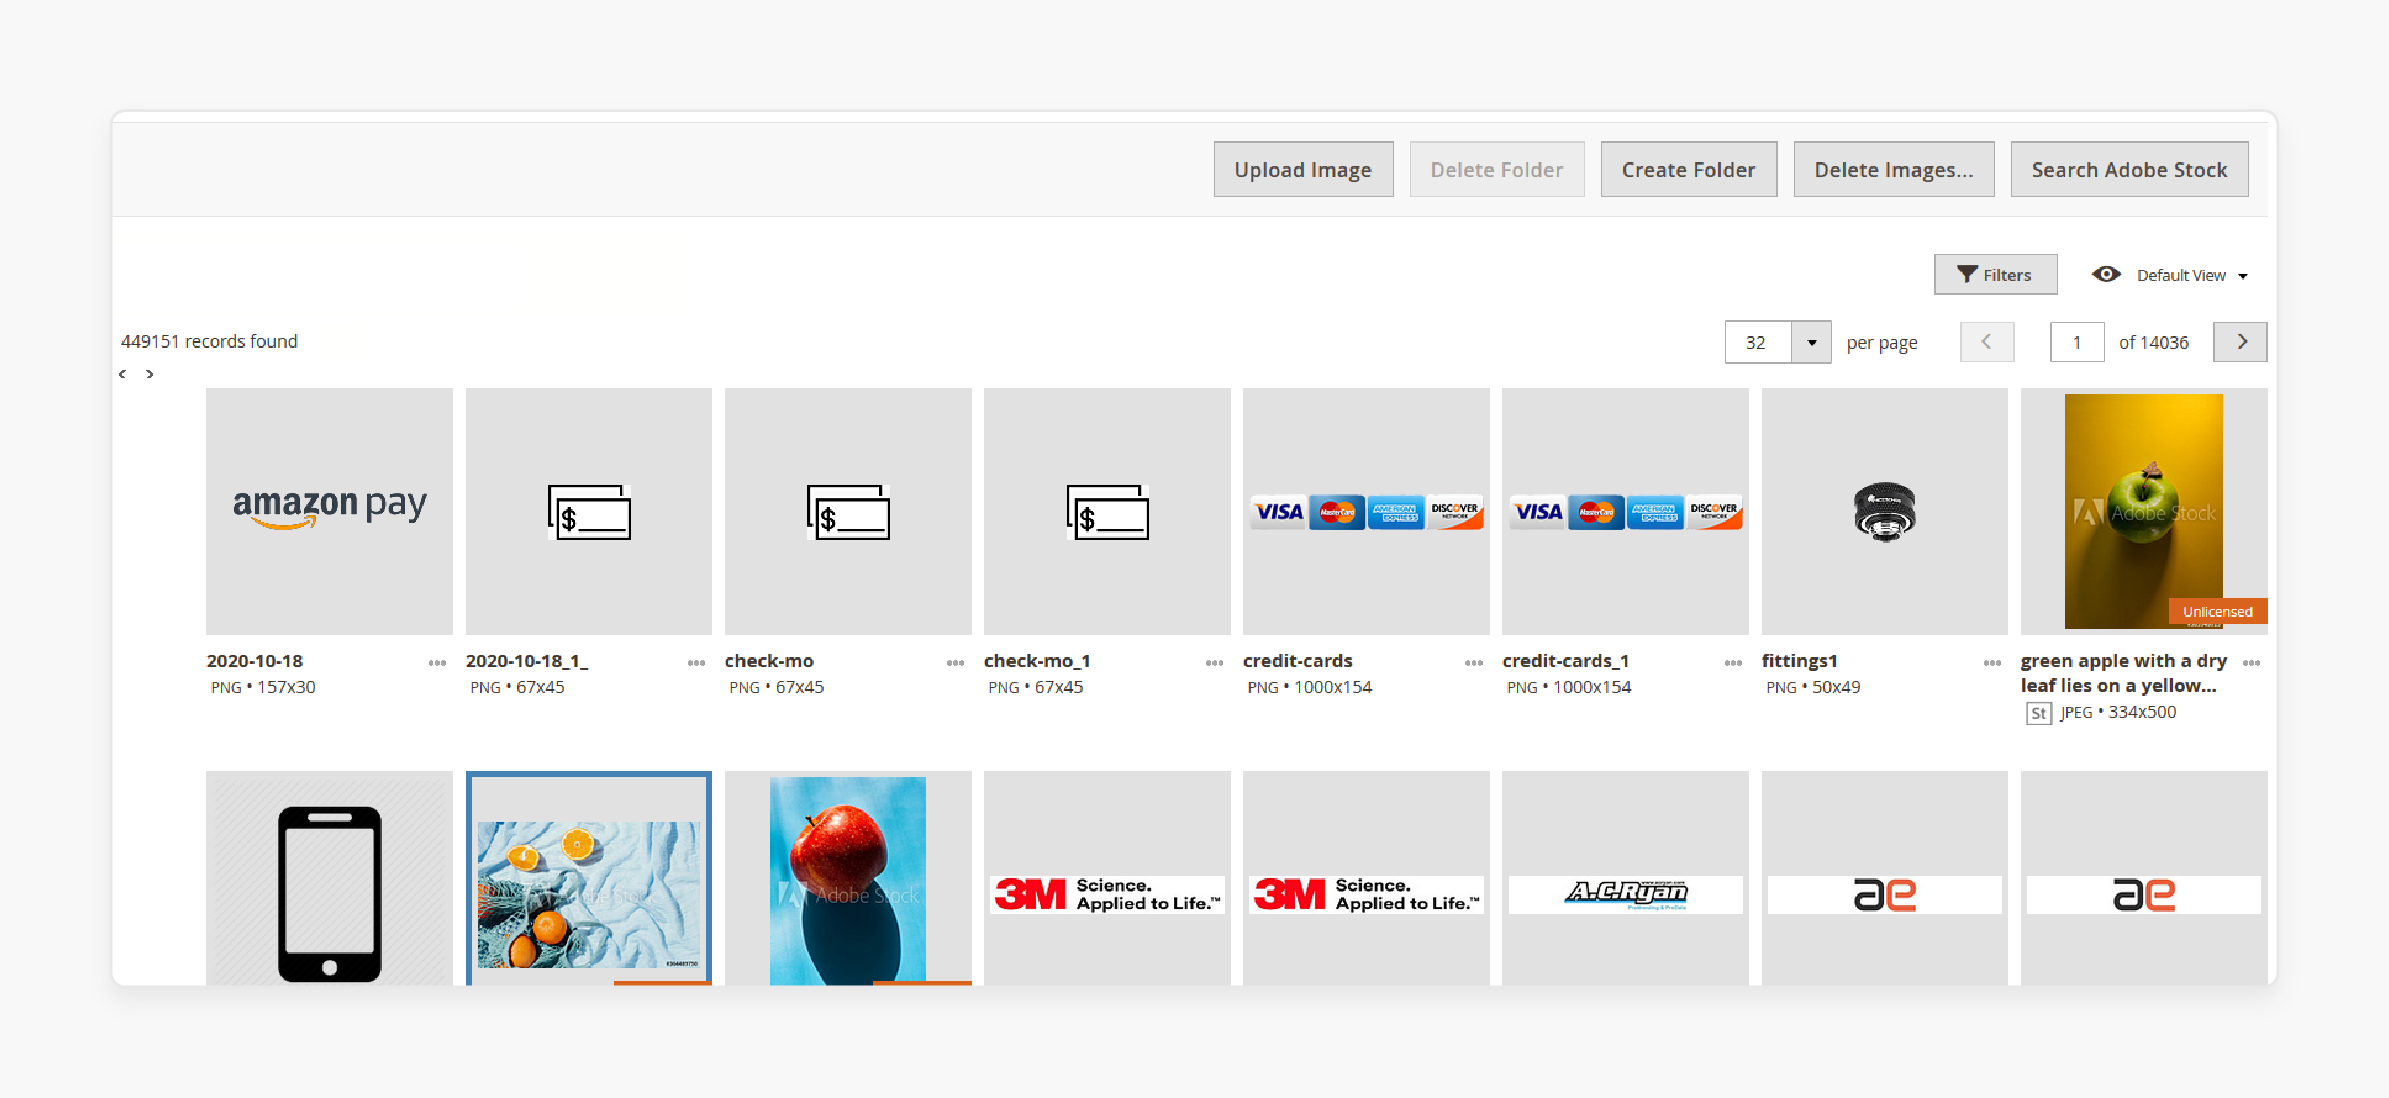
The Media Gallery serves as a single filesystem for all files. It includes product images, banners, and videos. For example, an online store selling clothes can use media_gallery_image_folders. It helps to group files into files like Men’s Wear or Seasonal Offers.
This makes it easy for Magento store owners to arrange files and save time when searching.
2. Boosts Site Performance
Proper upload configuration ensures images and videos load faster, improving site speed. For example, a tech retailer can reduce image size using tools. It includes TinyPNG before sending them. This boosts performance and makes browsing smoother for customers.
Features like media_storage_configuration help maintain a structured file system that delivers media quickly. Faster product preview times create a better shopping experience.
3. SEO Benefits
Improved file names and metadata improve your site’s search rankings. For instance, a beauty store might save an image as "organic-face-cream.jpeg" instead of "IMG12345". Adding alt text like "High-quality organic face cream for sensitive skin" makes images more accessible.
These updates provide the answer you're looking for when customers search for similar products.
4. Streamlines Workflows for Merchants
Features like the search box and three-dot icon simplify managing media for the admin. For instance, during a holiday sale, an admin can quickly remove outdated banners. He can also rename promotional images.
These tools bring much in workflow optimization, reducing manual work. This frees up time for merchants to focus on business growth.
5. Supports Visual Consistency
Arranged Magento store's media ensures consistent branding across your store. For example, a sportswear shop can maintain uniform visuals. They can use the same image layouts for all products.
With customization, merchants can ensure all visuals match their brand style. This consistency builds trust and creates a professional shopping experience.
6. Integration with Adobe Stock
Integrating stock images makes adding high-quality images easy. For example, a home décor store can source lifestyle images of sofas and add them directly to the media library. It is a fast way to make your store visually appealing. This eliminates the need for external sourcing. It keeps operations simple within the Magento platform.
7. Improves Customer Experience
Arranged files lead to better customer experiences. For example, a retailer selling laptops can use the preview feature. It helps display clear and fast-loading images. Features like enable frontend resize ensure images fit different devices perfectly.
These enhancements make shopping easier for customers. It also leads to higher trust and sales for your e-commerce store.
Key Components of the Media Folder in Magento
1. pub/media directory
The pub/media storage is the main file where all files are stored. It contains subfiles to keep files arranged. For example, product images, banners, and videos are saved in this storage. It acts as the central location for all files. It makes managing and optimizing your business's media operations easy.
2. catalog/product Folder
This file stores product-related images. For example, images of shoes, shirts, or electronics are saved in layouts like JPEG or PNG. It keeps product images separate from other files. This makes them easier to find, update, and manage.
3. wysiwyg Folder
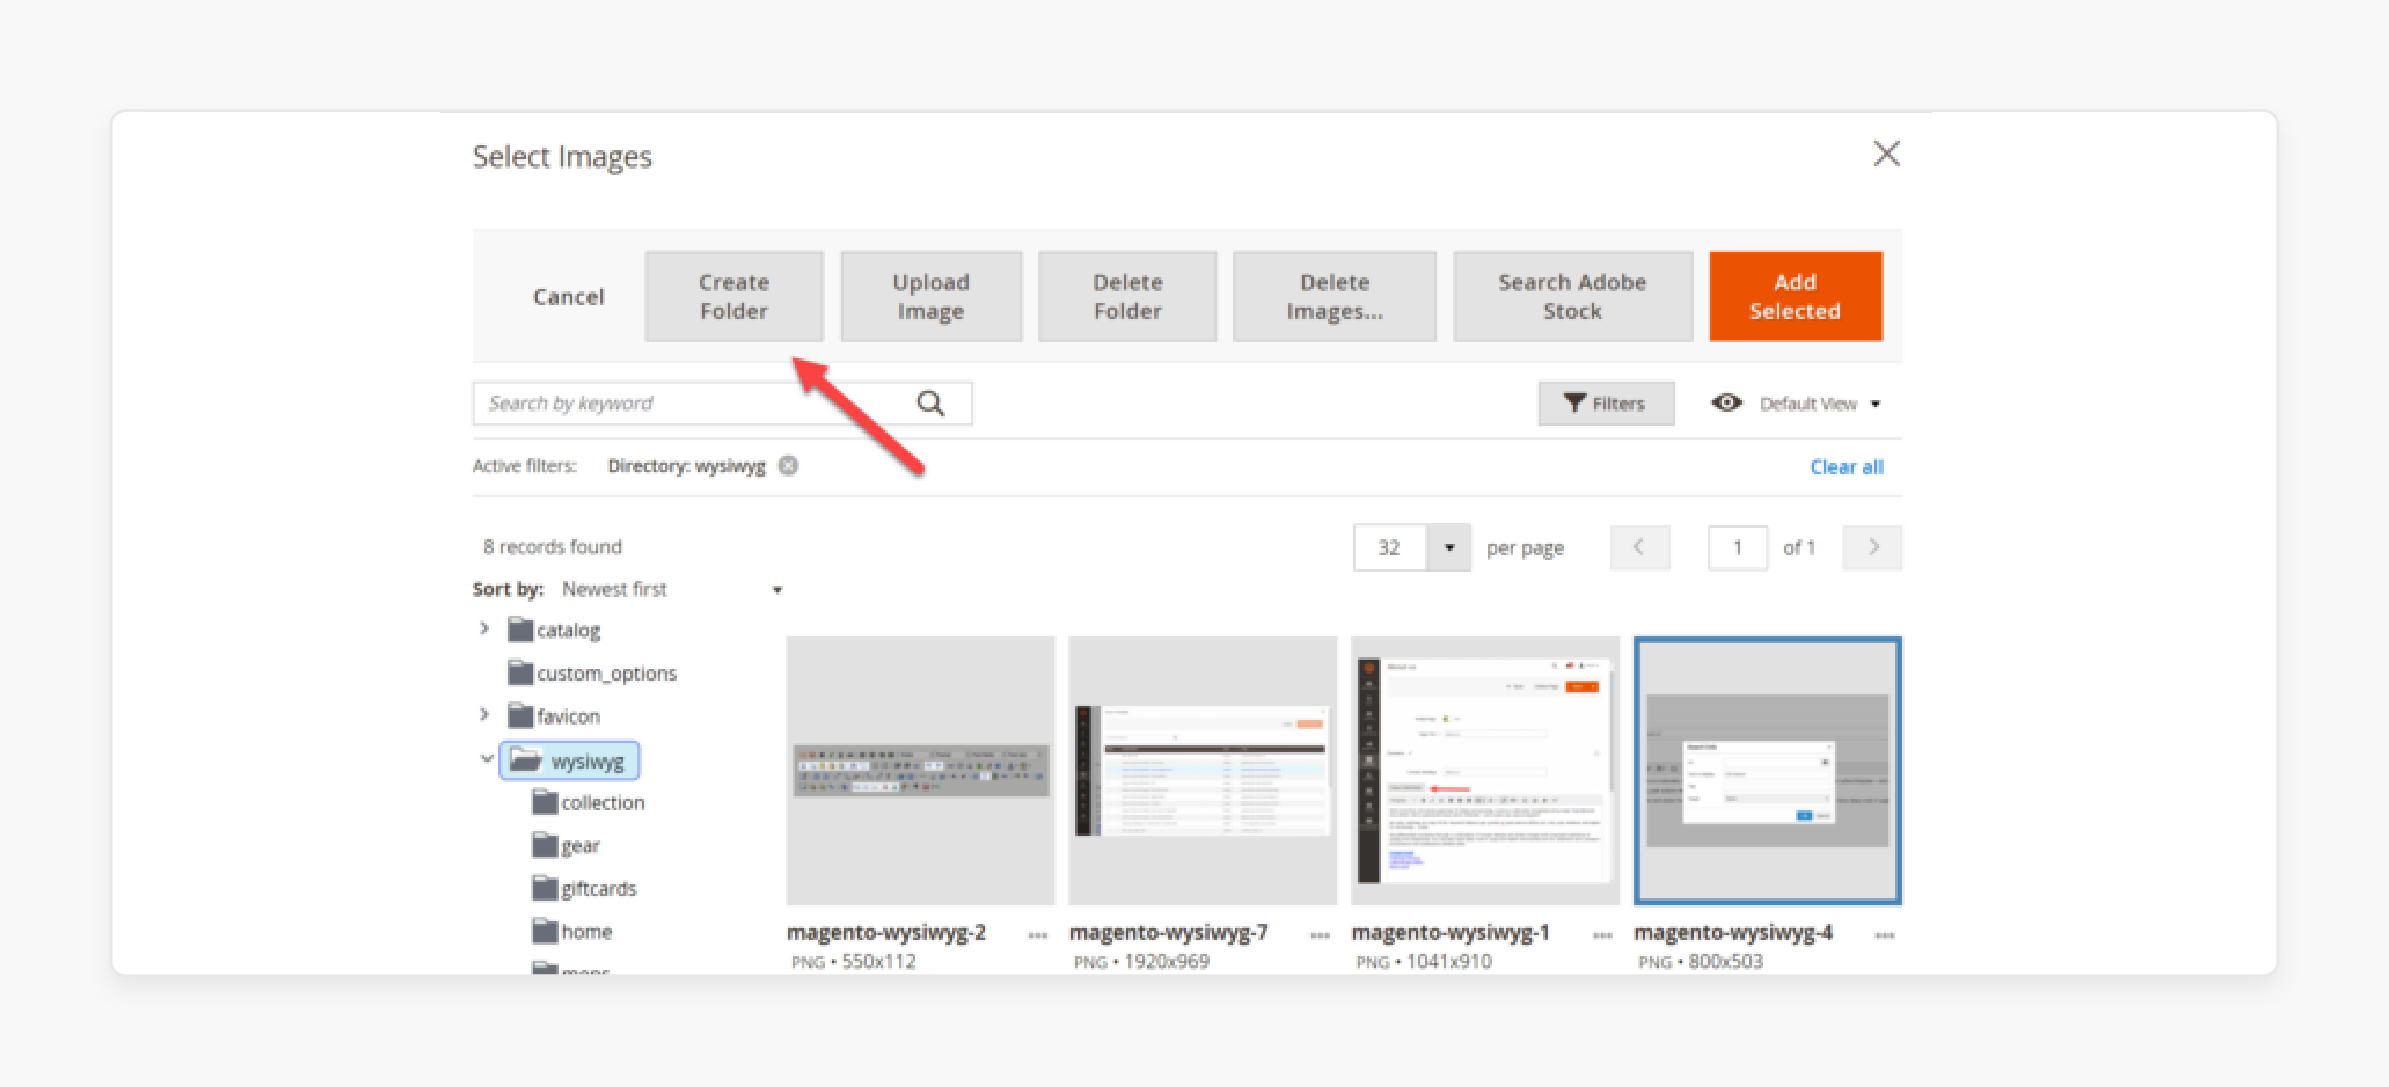
The Wysiwyg file holds files used in CMS pages and blocks. For example, banners, blog visuals, and static content images are stored here. It arranges non-product files. This ensures your CMS page designs remain consistent and easy to manage.
4. tmp Folder
The tmp file temporarily holds files during the sending process. For example, when you send a large image or video, it is stored here until the send process finishes. It ensures smooth sends by acting as a temporary storage location during file transfers.
5. theme Folder
The theme contains files related to your theme and design. For example, custom logos, background images, or branding visuals are stored here. It allows you to customize your appearance. It keeps design-specific files arranged and separate from other media.
6. media_storage_configuration
This component controls how files are stored and accessed. For example, it lets you connect external storage solutions or restrict access to specific files. It helps reduce server load and improve performance by allowing advanced storage configurations.
7. Temporary Cache Files
The media storage contains temporary cache files used for optimization. For example, resized product images for faster page load times are cached here. It improves site speed by preloading improved images. This makes browsing smoother for customers.
8. File Formats Supported
The media storage supports many file layouts to meet different needs. For example:
-
Images: JPEG, PNG, GIF.
-
Videos: MP4, AVI.
-
Documents: PDFs, Excel files.
It ensures compatibility with different types of media. This flexibility allows better product presentation and marketing materials.
9. Custom Files
Store owners can create custom files for specific projects or campaigns. For example, a file named "Holiday-Sale" can hold all banners and videos for seasonal promotions. It helps merchants group and arranges media assets efficiently by timeline or purpose.
10. Tools for Media Management
The Magento 2 file manager provides tools to make managing media easier. For example, the search bar helps you find files quickly, and bulk actions let you manage many files at once. These tools save time and help you keep your files arranged. They make file management efficient and hassle-free.
4 Steps to Add Files to Media Folder in Magento 2
Step 1: Open the Insert Image Popup
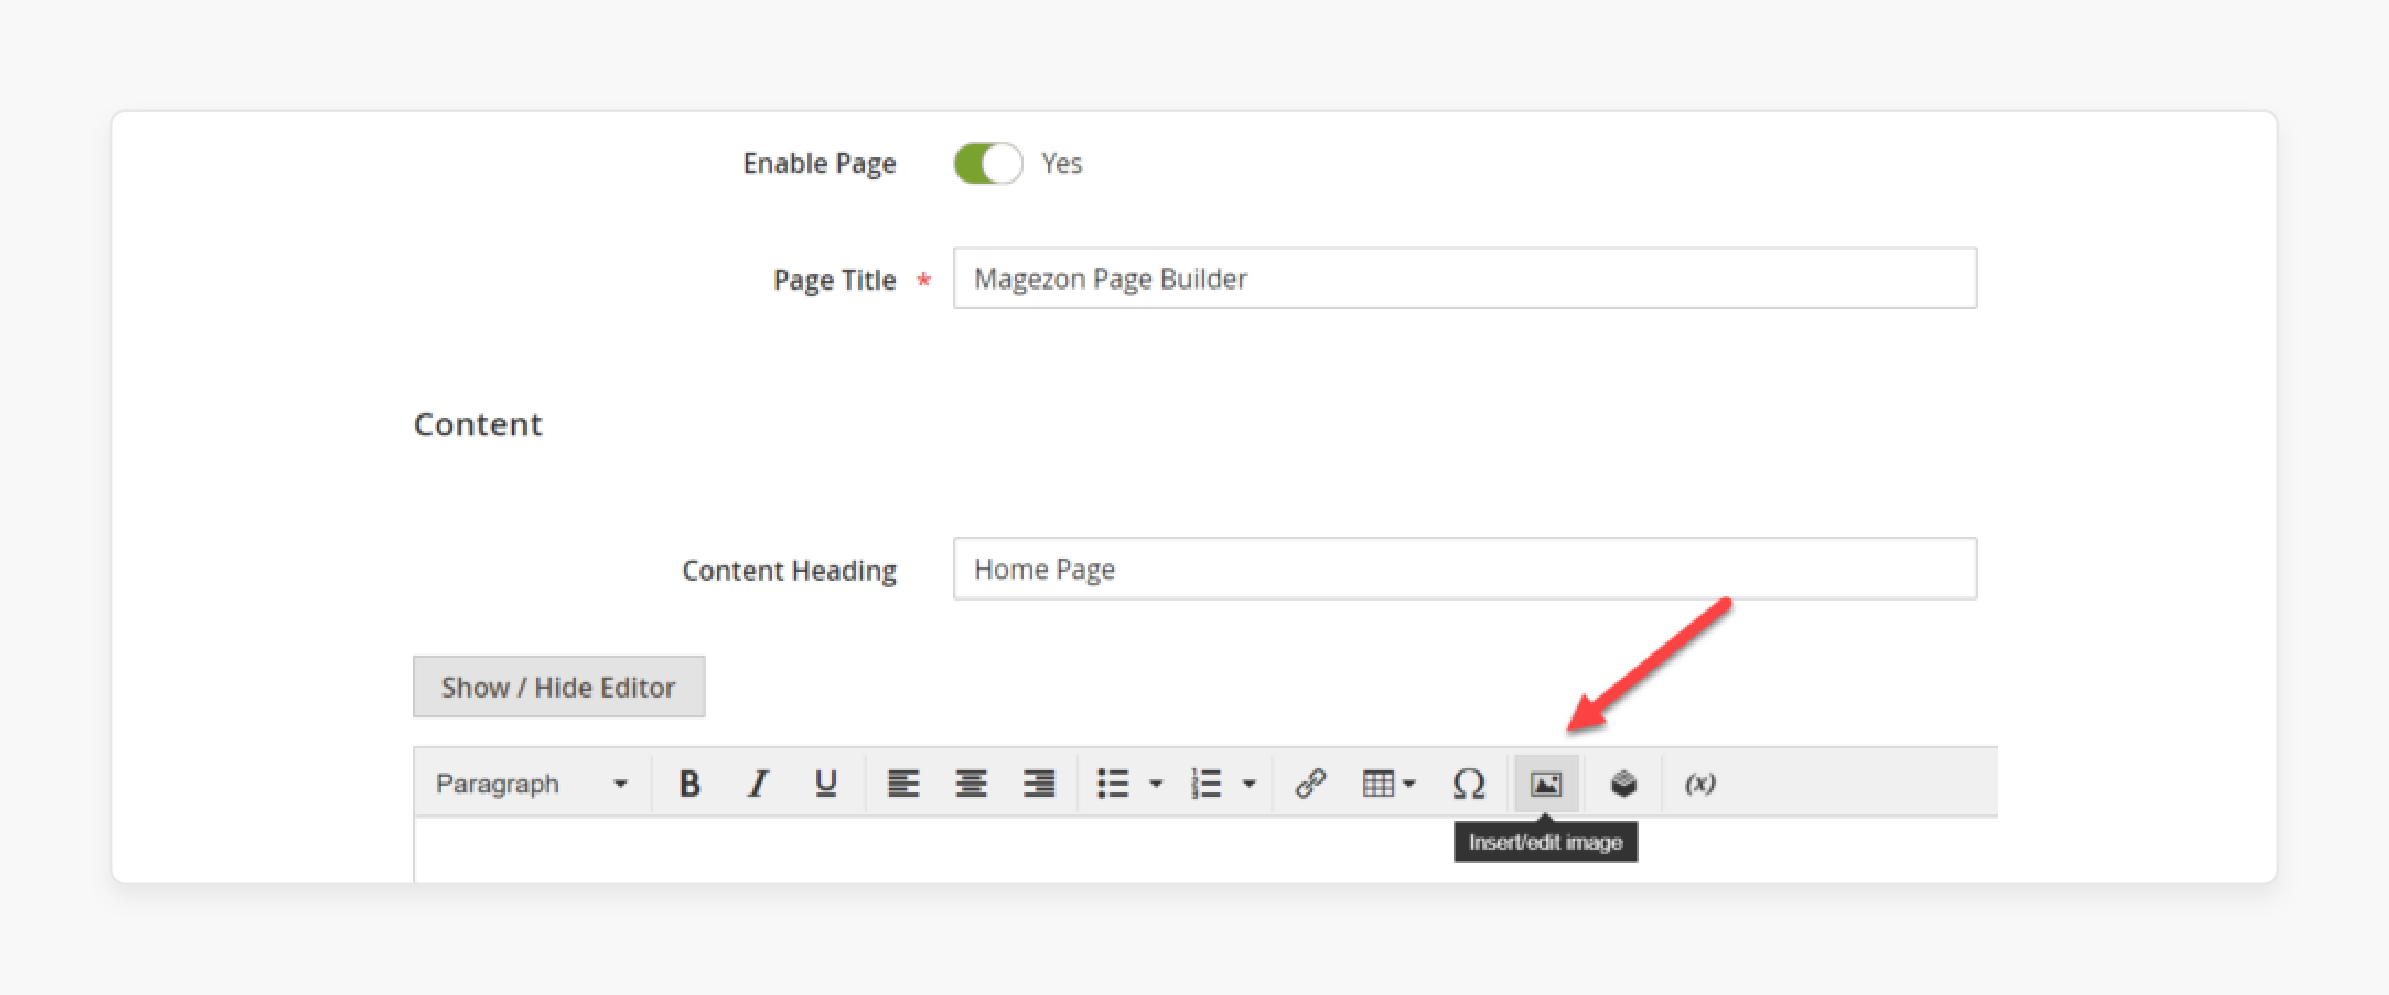
Click the Insert Image icon in the editor toolbar. This feature is a powerful tool for managing files.
Step 2: Access the Select Image Window
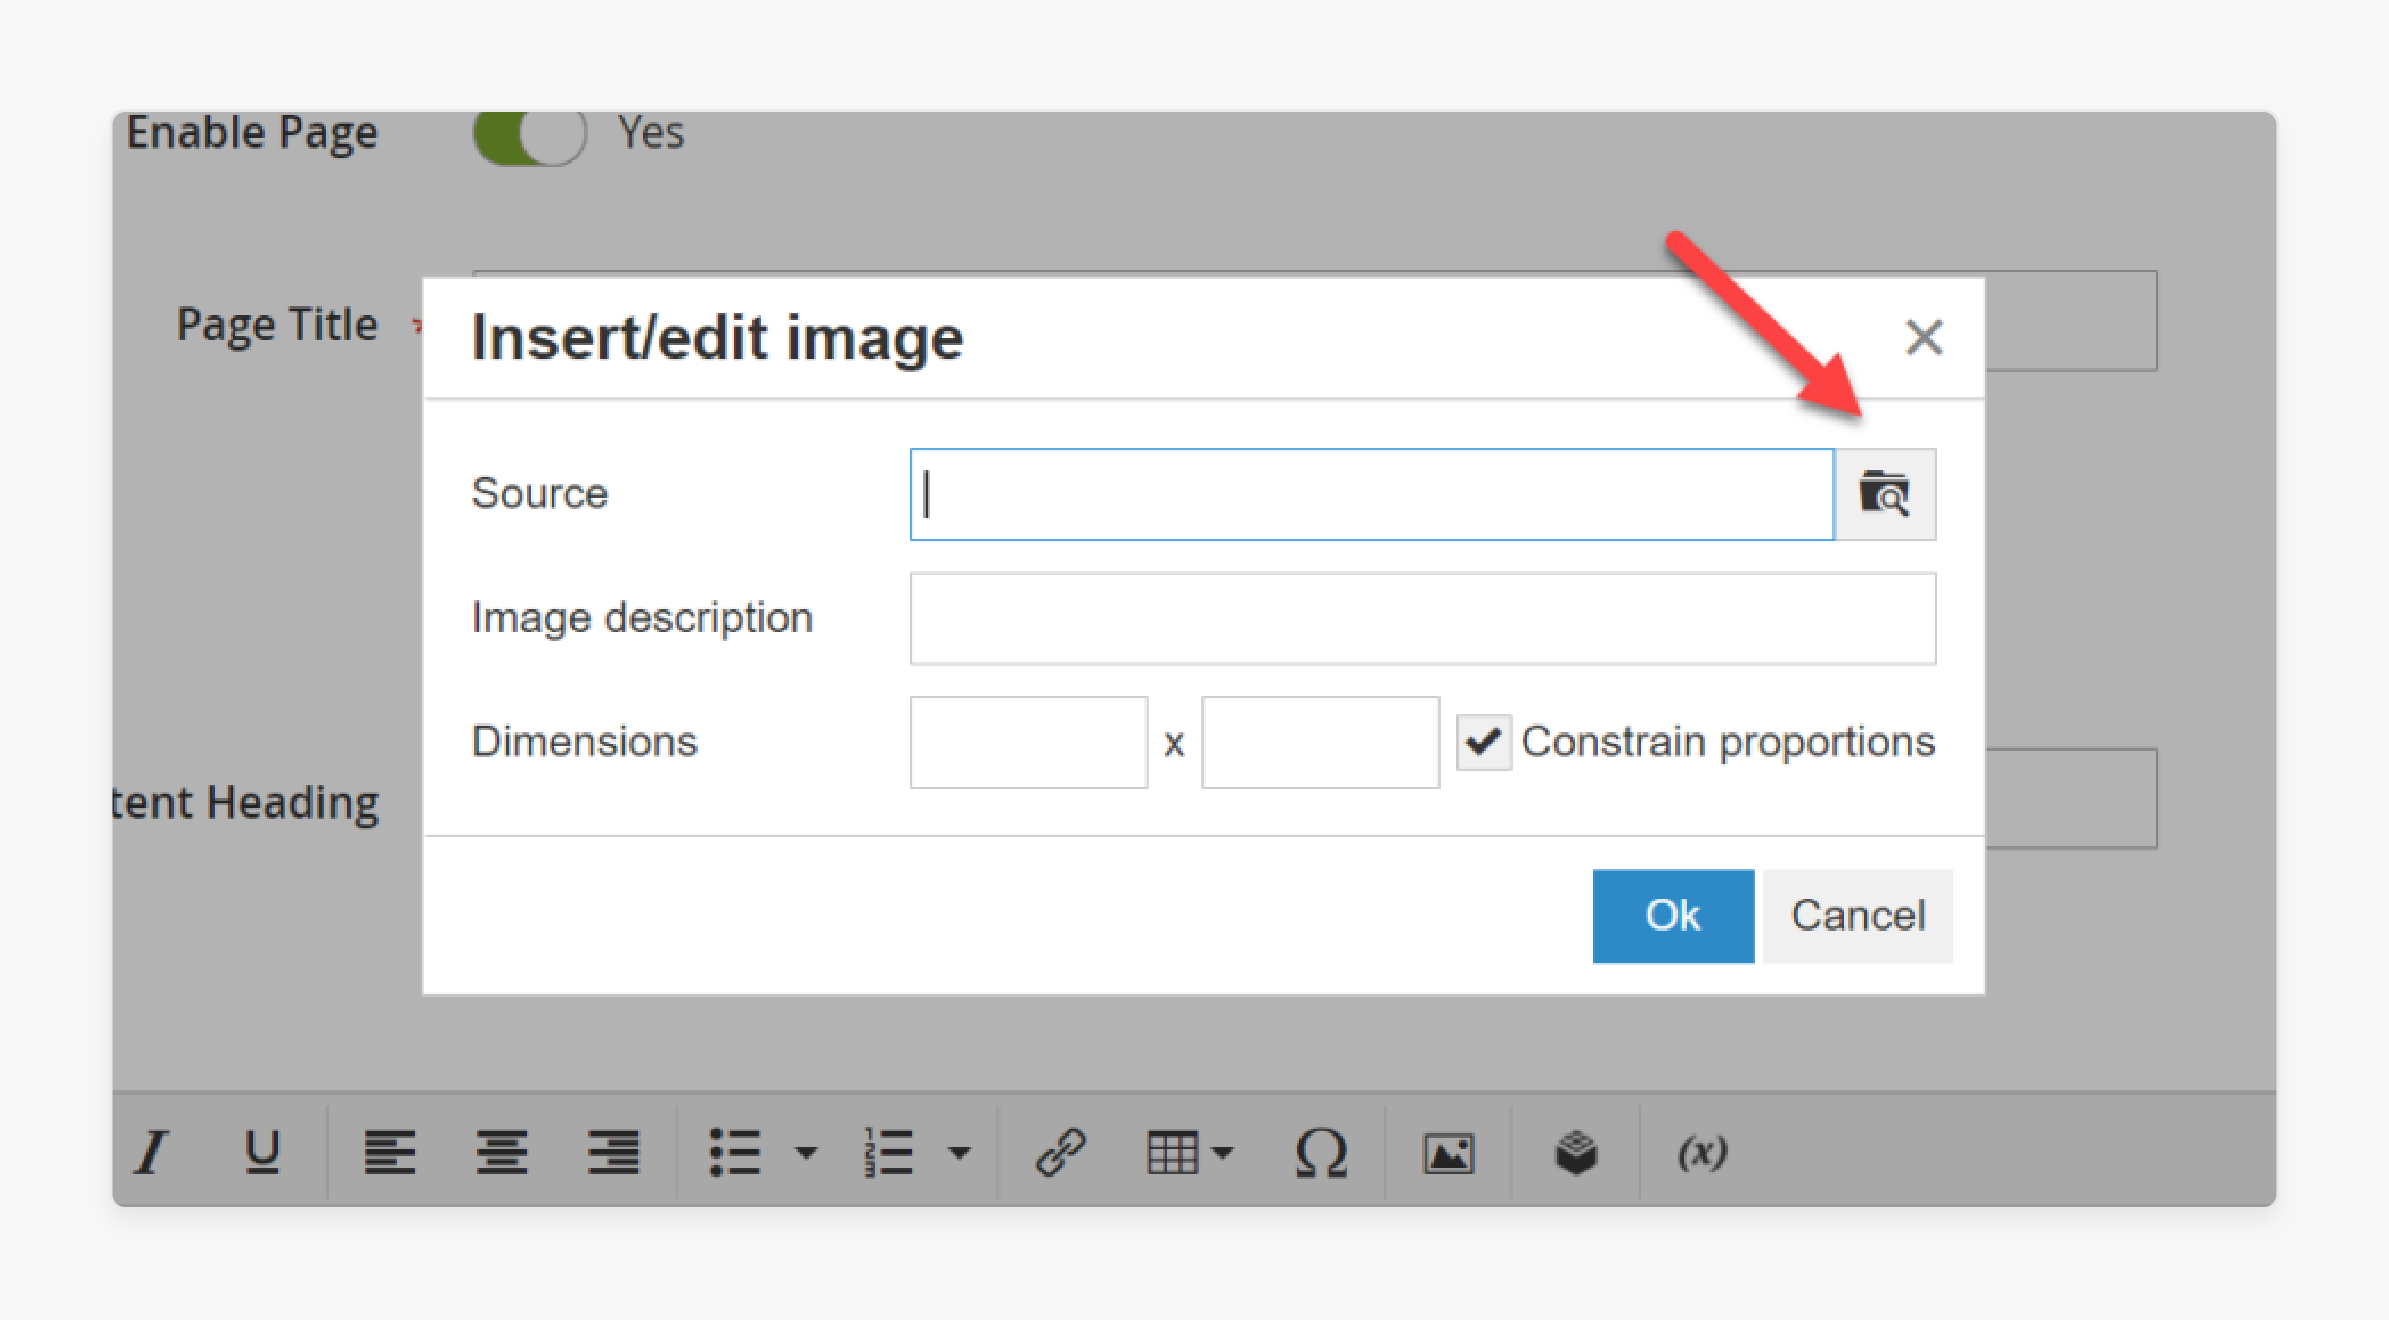
-
After the Insert Image popup appears, click the magnifying glass icon in the search box.
-
The Select Image window will open, showing the tools to manage files.
Step 3: Explore the Select Image Window
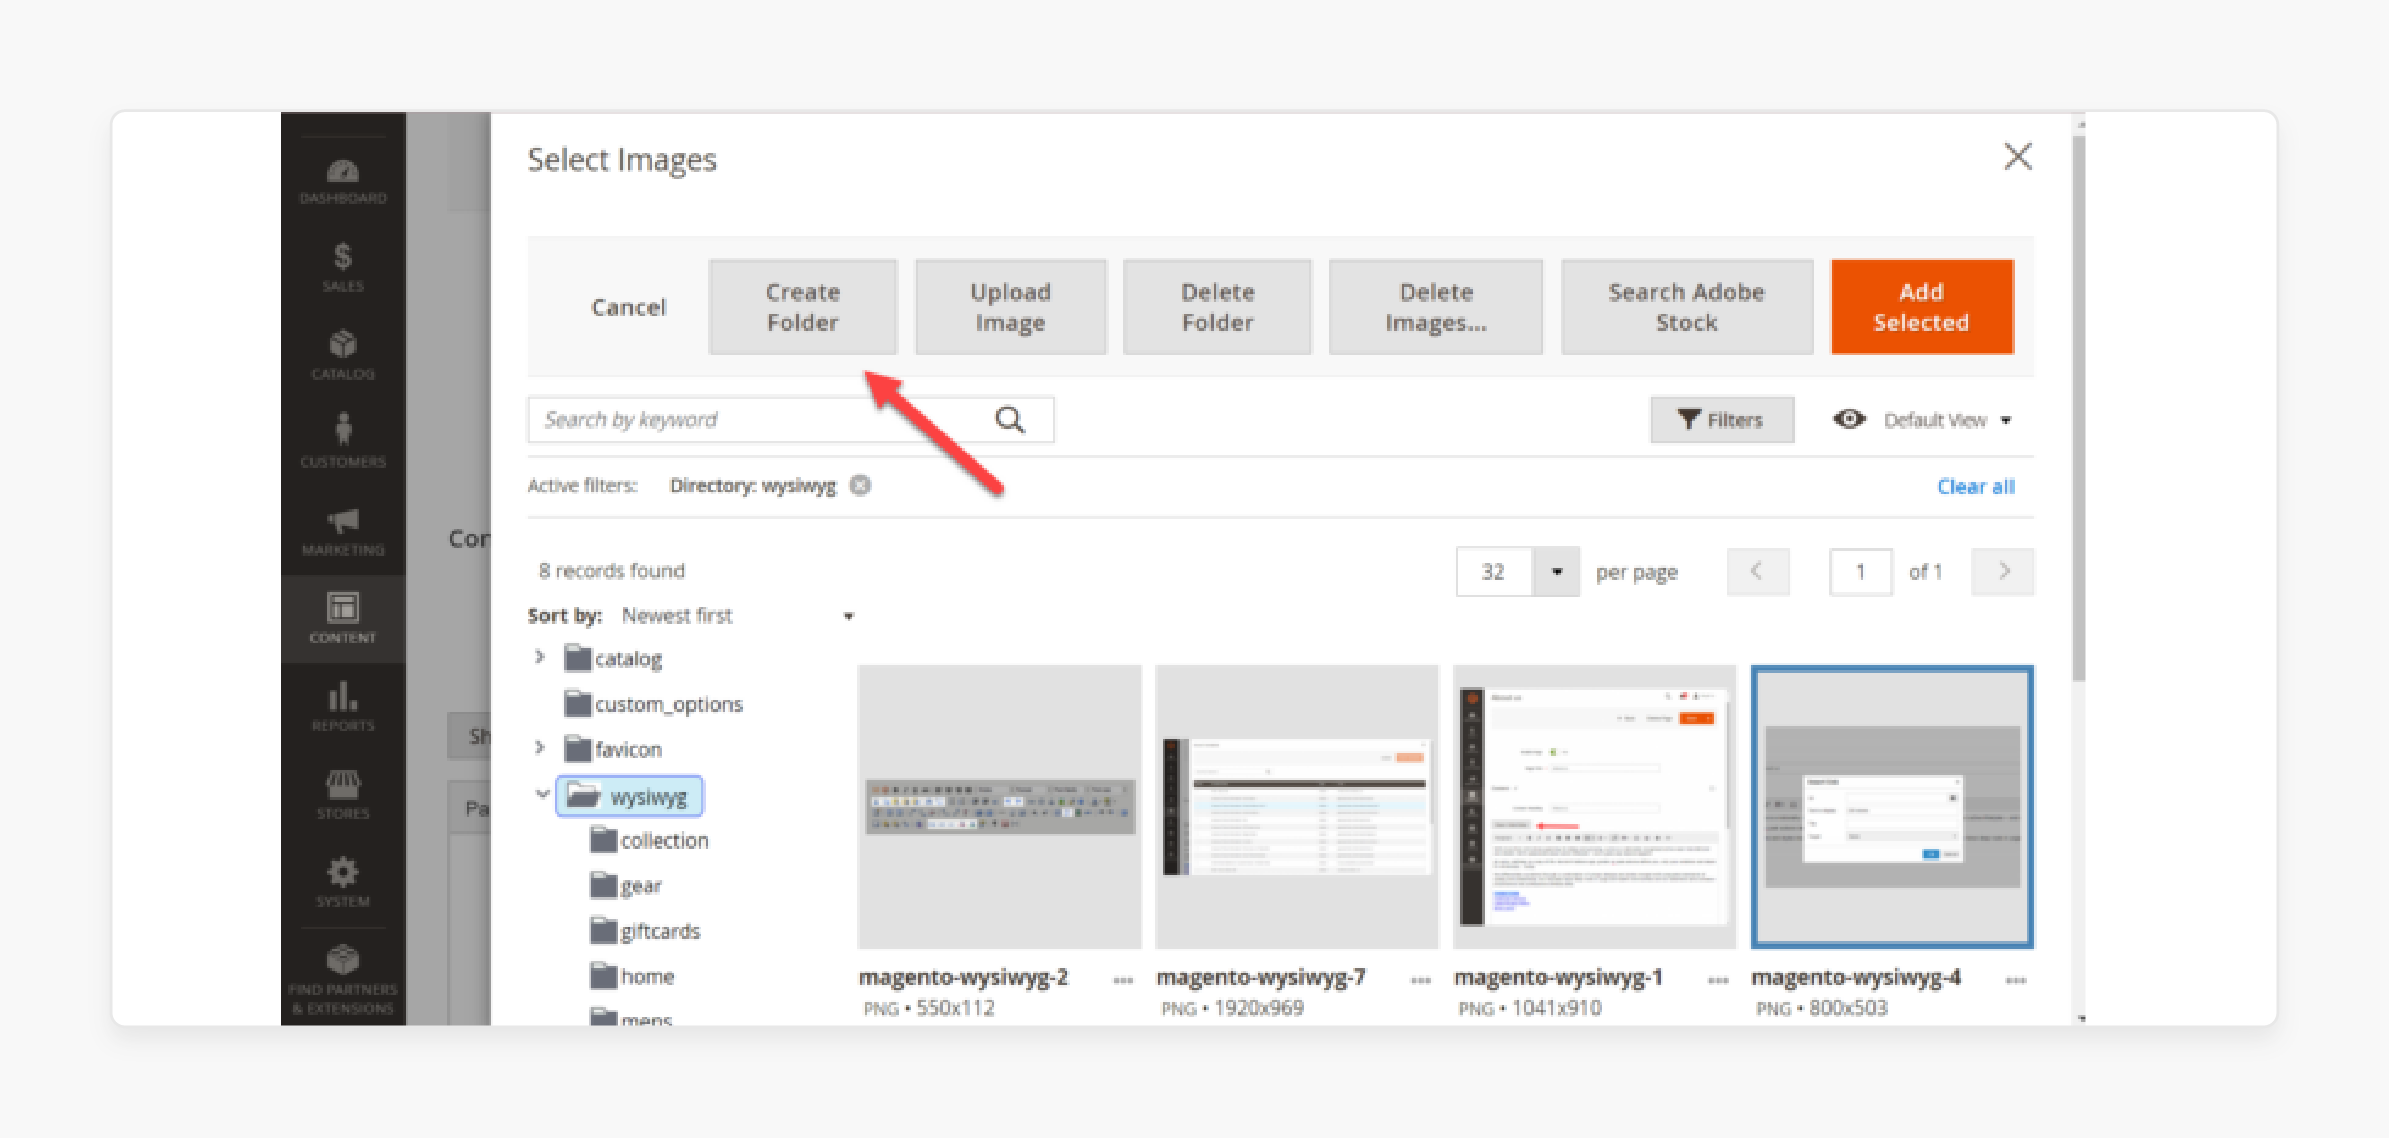
The Select Image window has three main areas:
-
File Tree (Left Side):
-
Shows a list of files in a hierarchy.
-
Use the Collapse All or Expand All buttons to show or hide files.
-
-
Upper Toolbar:
Includes these file management options:
-
Cancel: Closes the window.
-
Delete: Select a file and click this button to remove it.
-
Create: Let you create a new file for better organization.
-
Search Adobe Stock: Magento 2.3.4 allows integration with stock images to support image editing.
- Image Area (Middle Section): Displays all photos stored in the selected file.
Step 4: Upload Files
In the Image Area, click Choose Files to upload images from your computer. This step helps you efficiently organize your files.
How to Integrate and Configure Adobe Stock into Magento Media Folder
1. Set Up Adobe Integration
Step 1: Create an Account on Developer Console
Visit the Adobe Developer Console homepage and create an account. This account gives you access to APIs needed for integration.
Step 2: Create a New Project
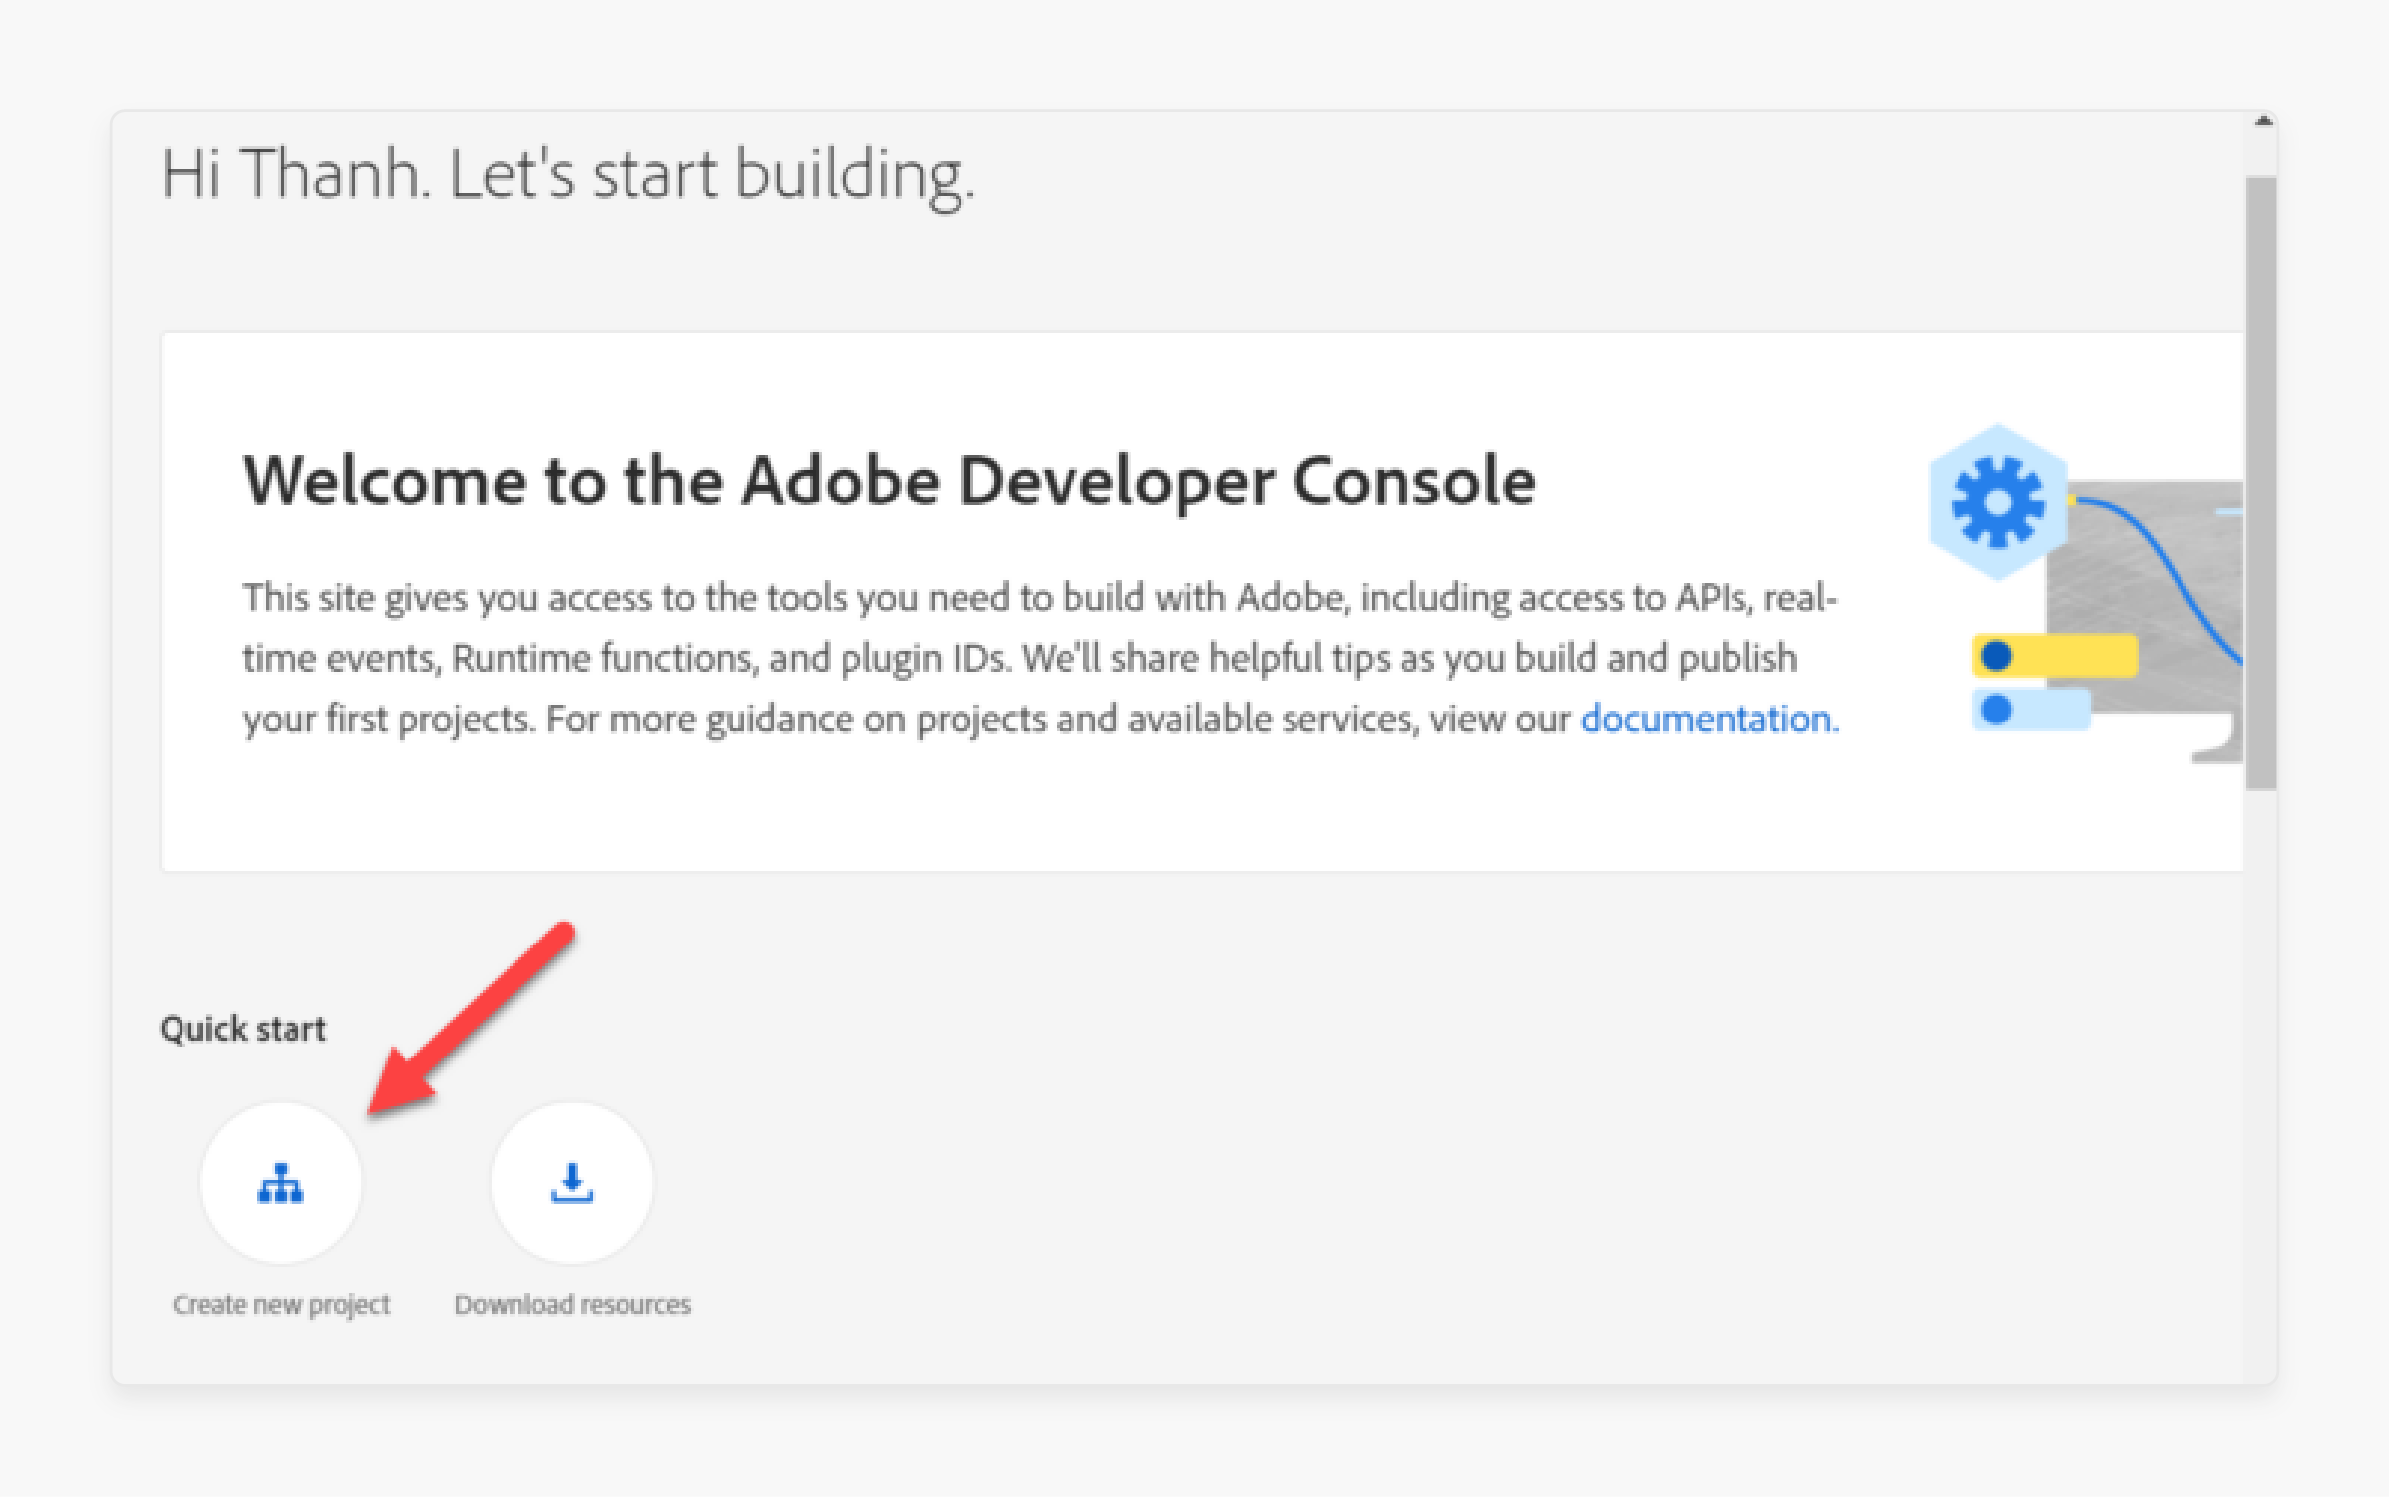
After registering, go to Quickstart and select Create new project. This creates a dedicated project for stock integration.
Step 3: Add an API
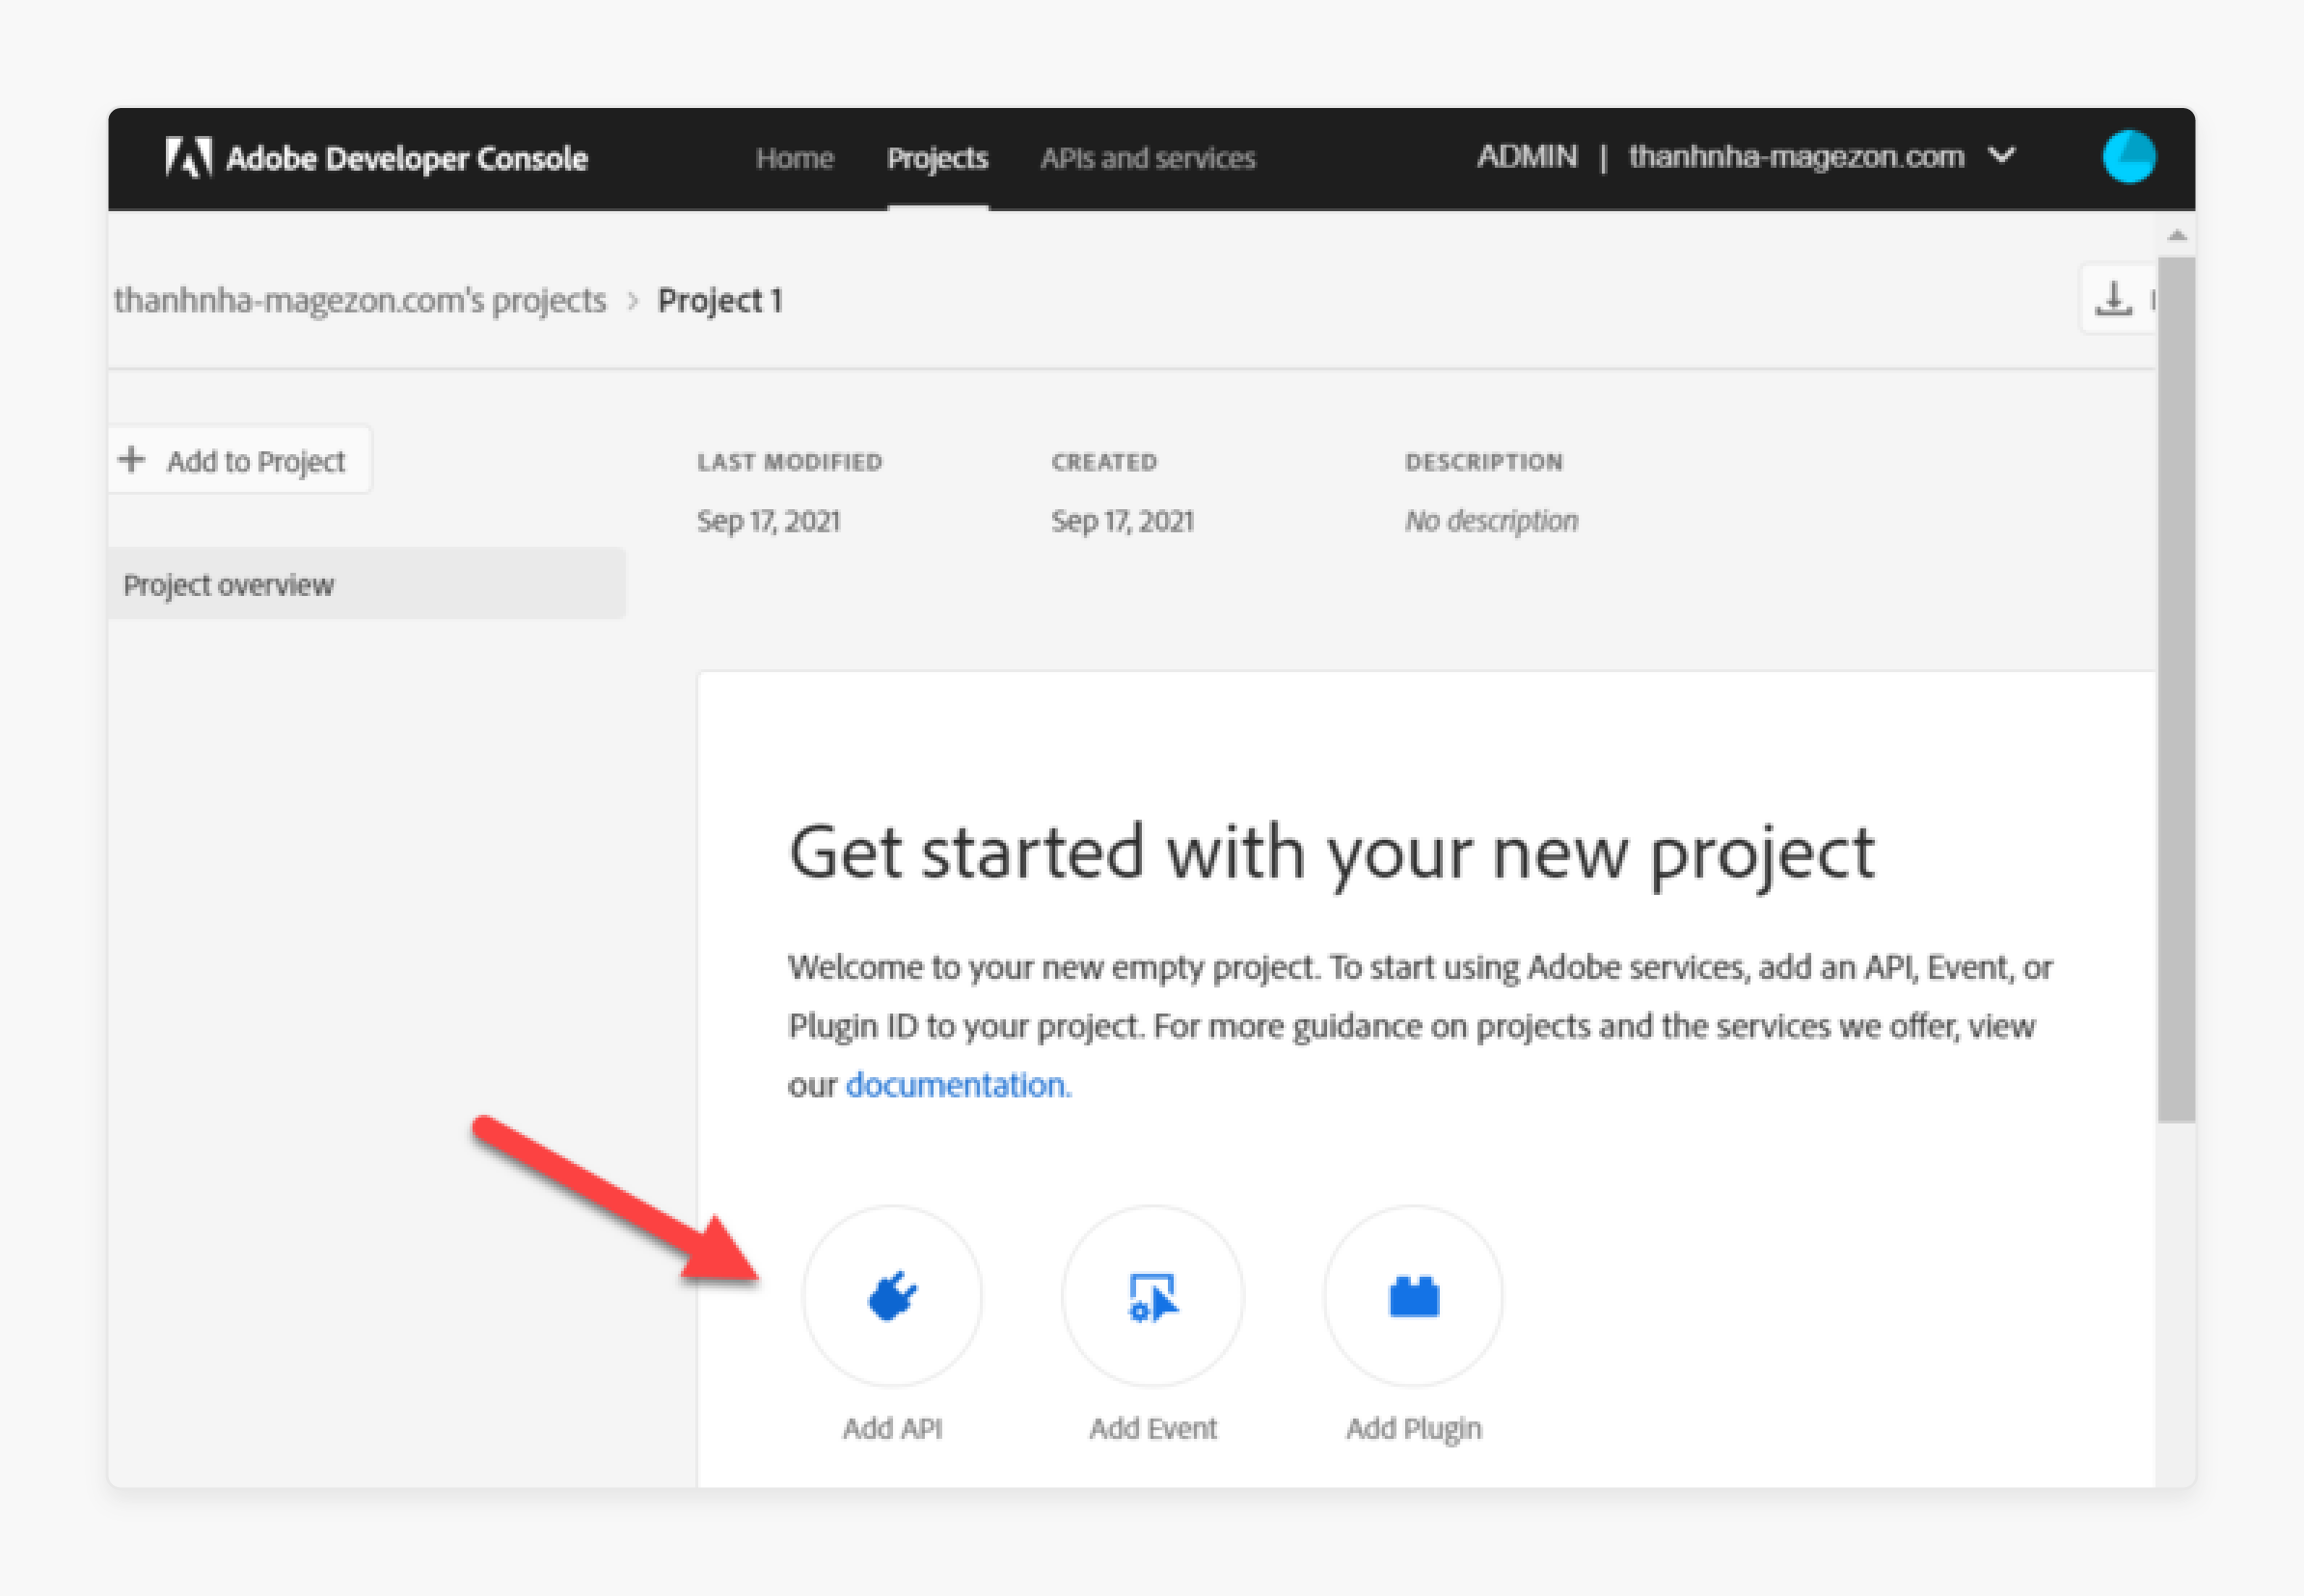
In the project, click Add API to include the stock images service.
Step 4: Select Adobe Stock API
Choose Adobe Stock from the list of available APIs and click Next. This will enable access to high-quality stock images.
Step 5: Set Up OAUTH 2.0 Web
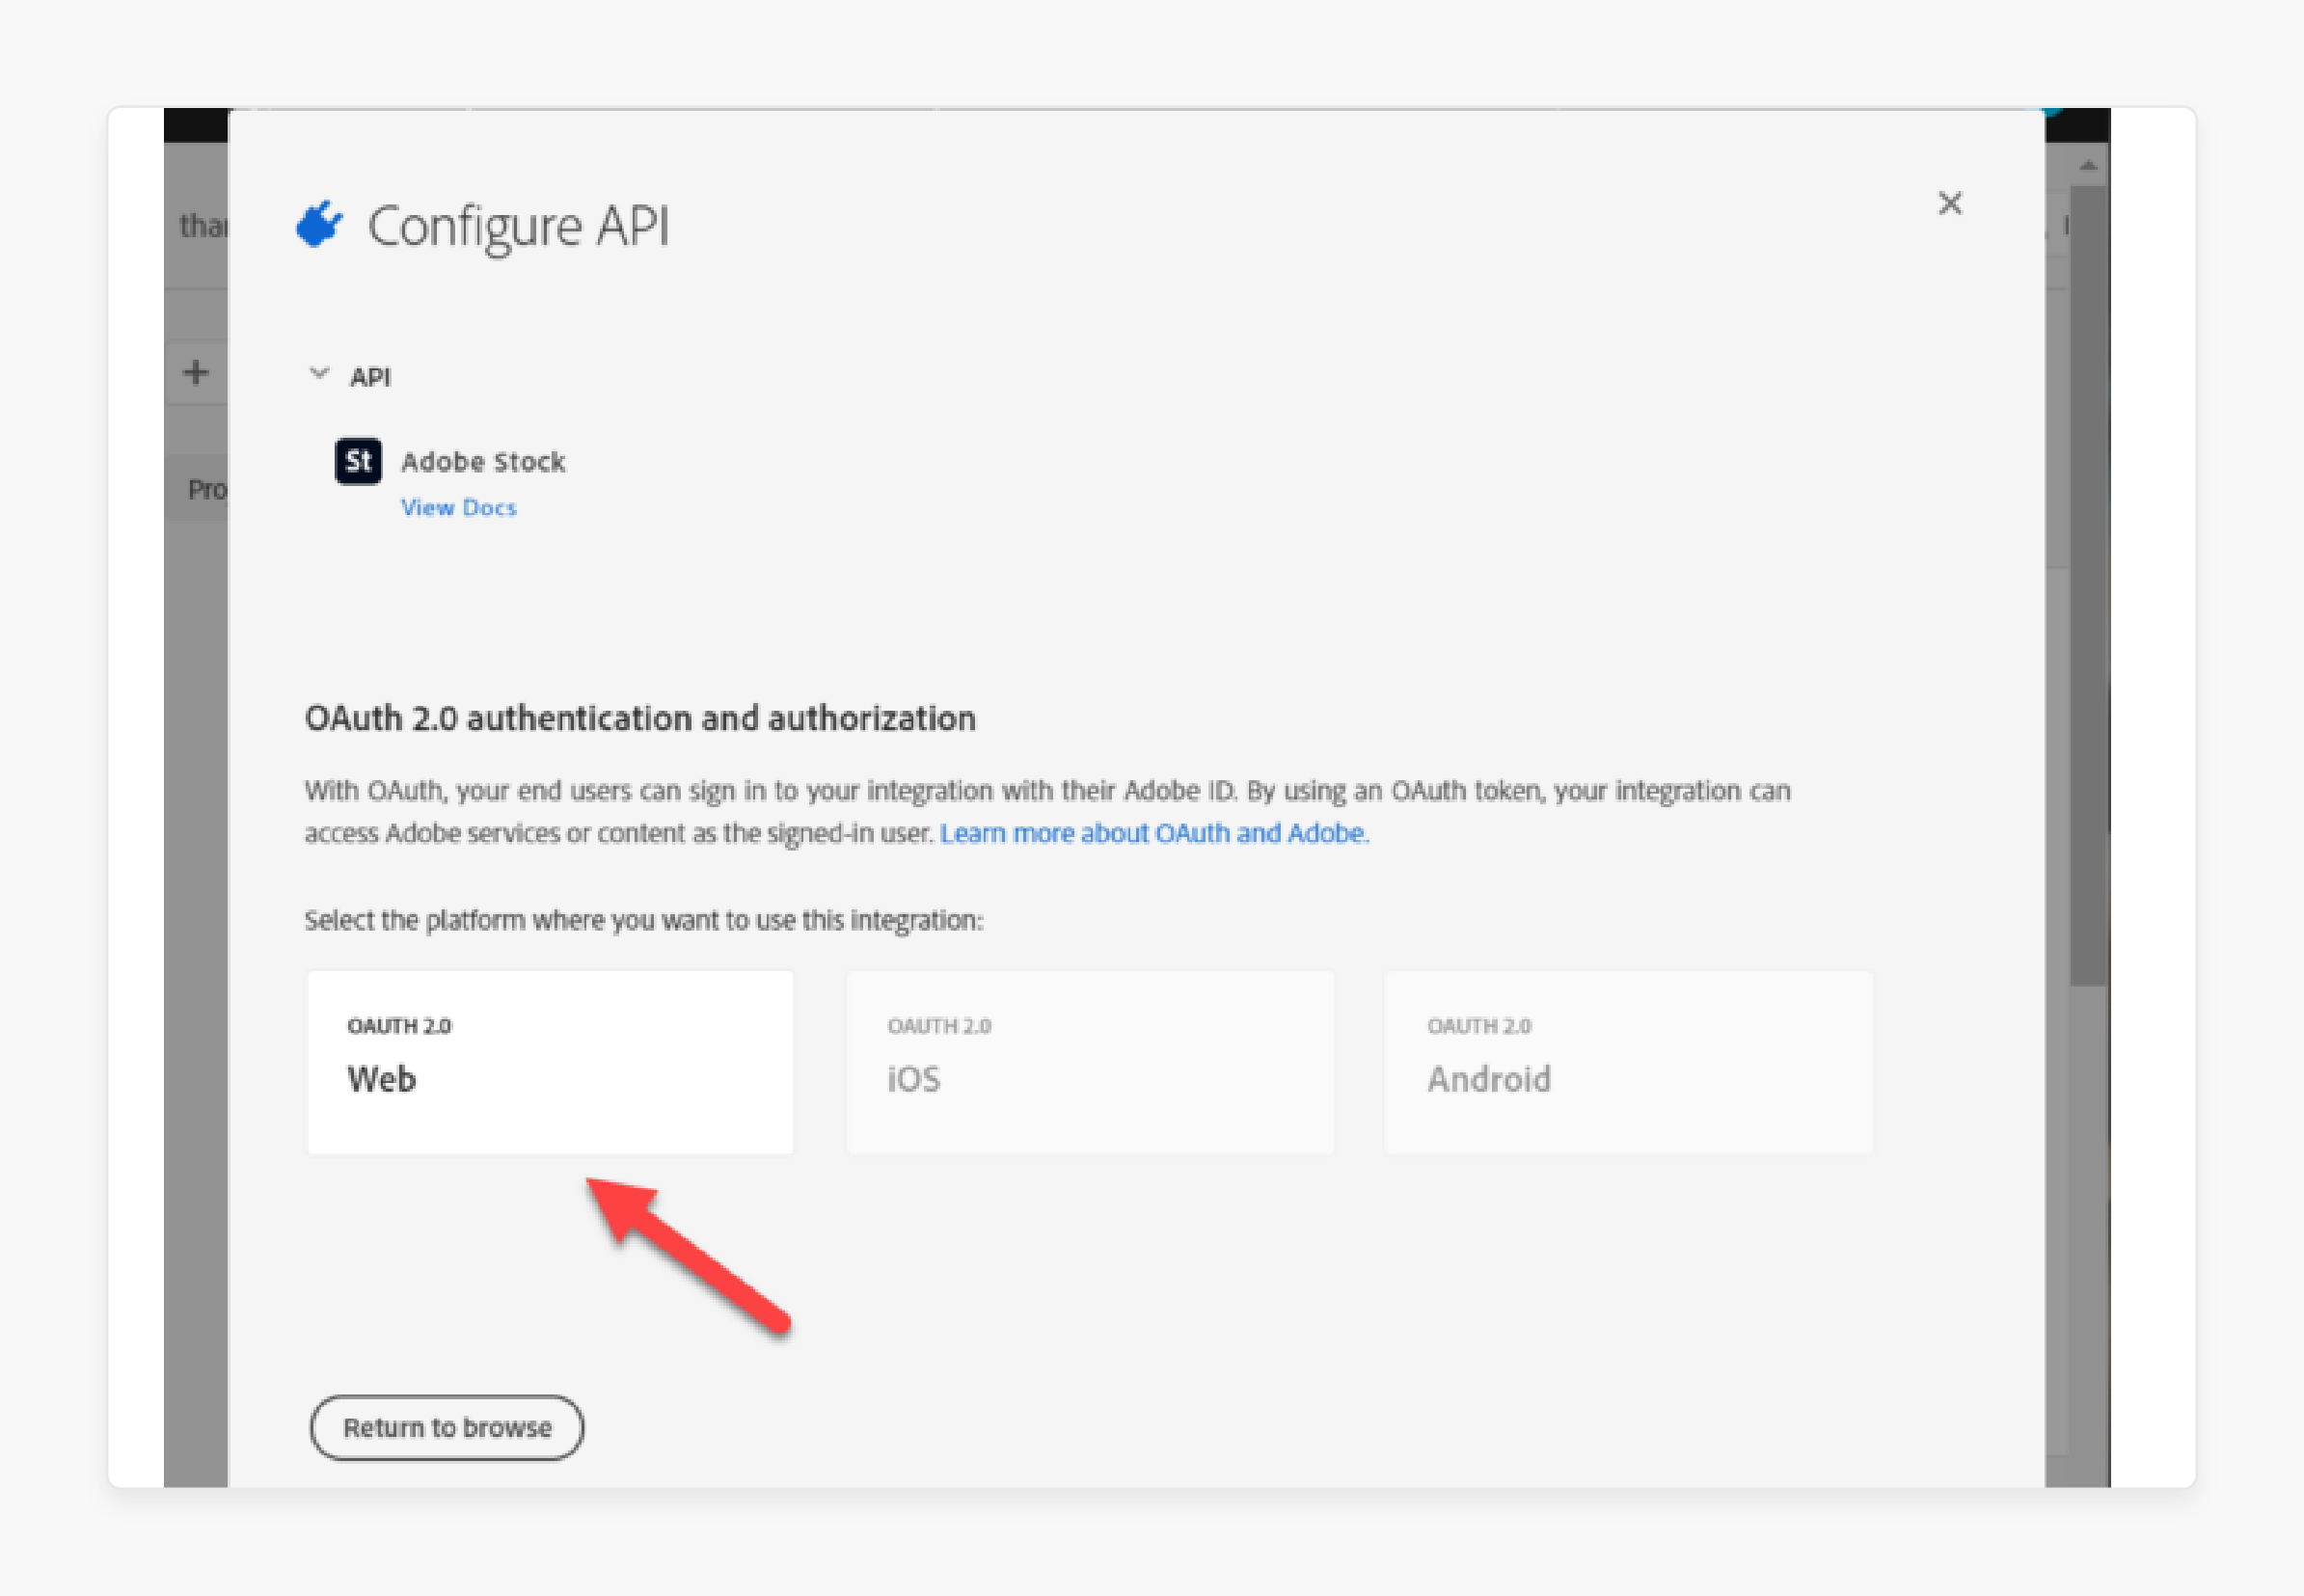
Select OAUTH 2.0 Web as the authentication method.
Step 6: Add Redirect URIs
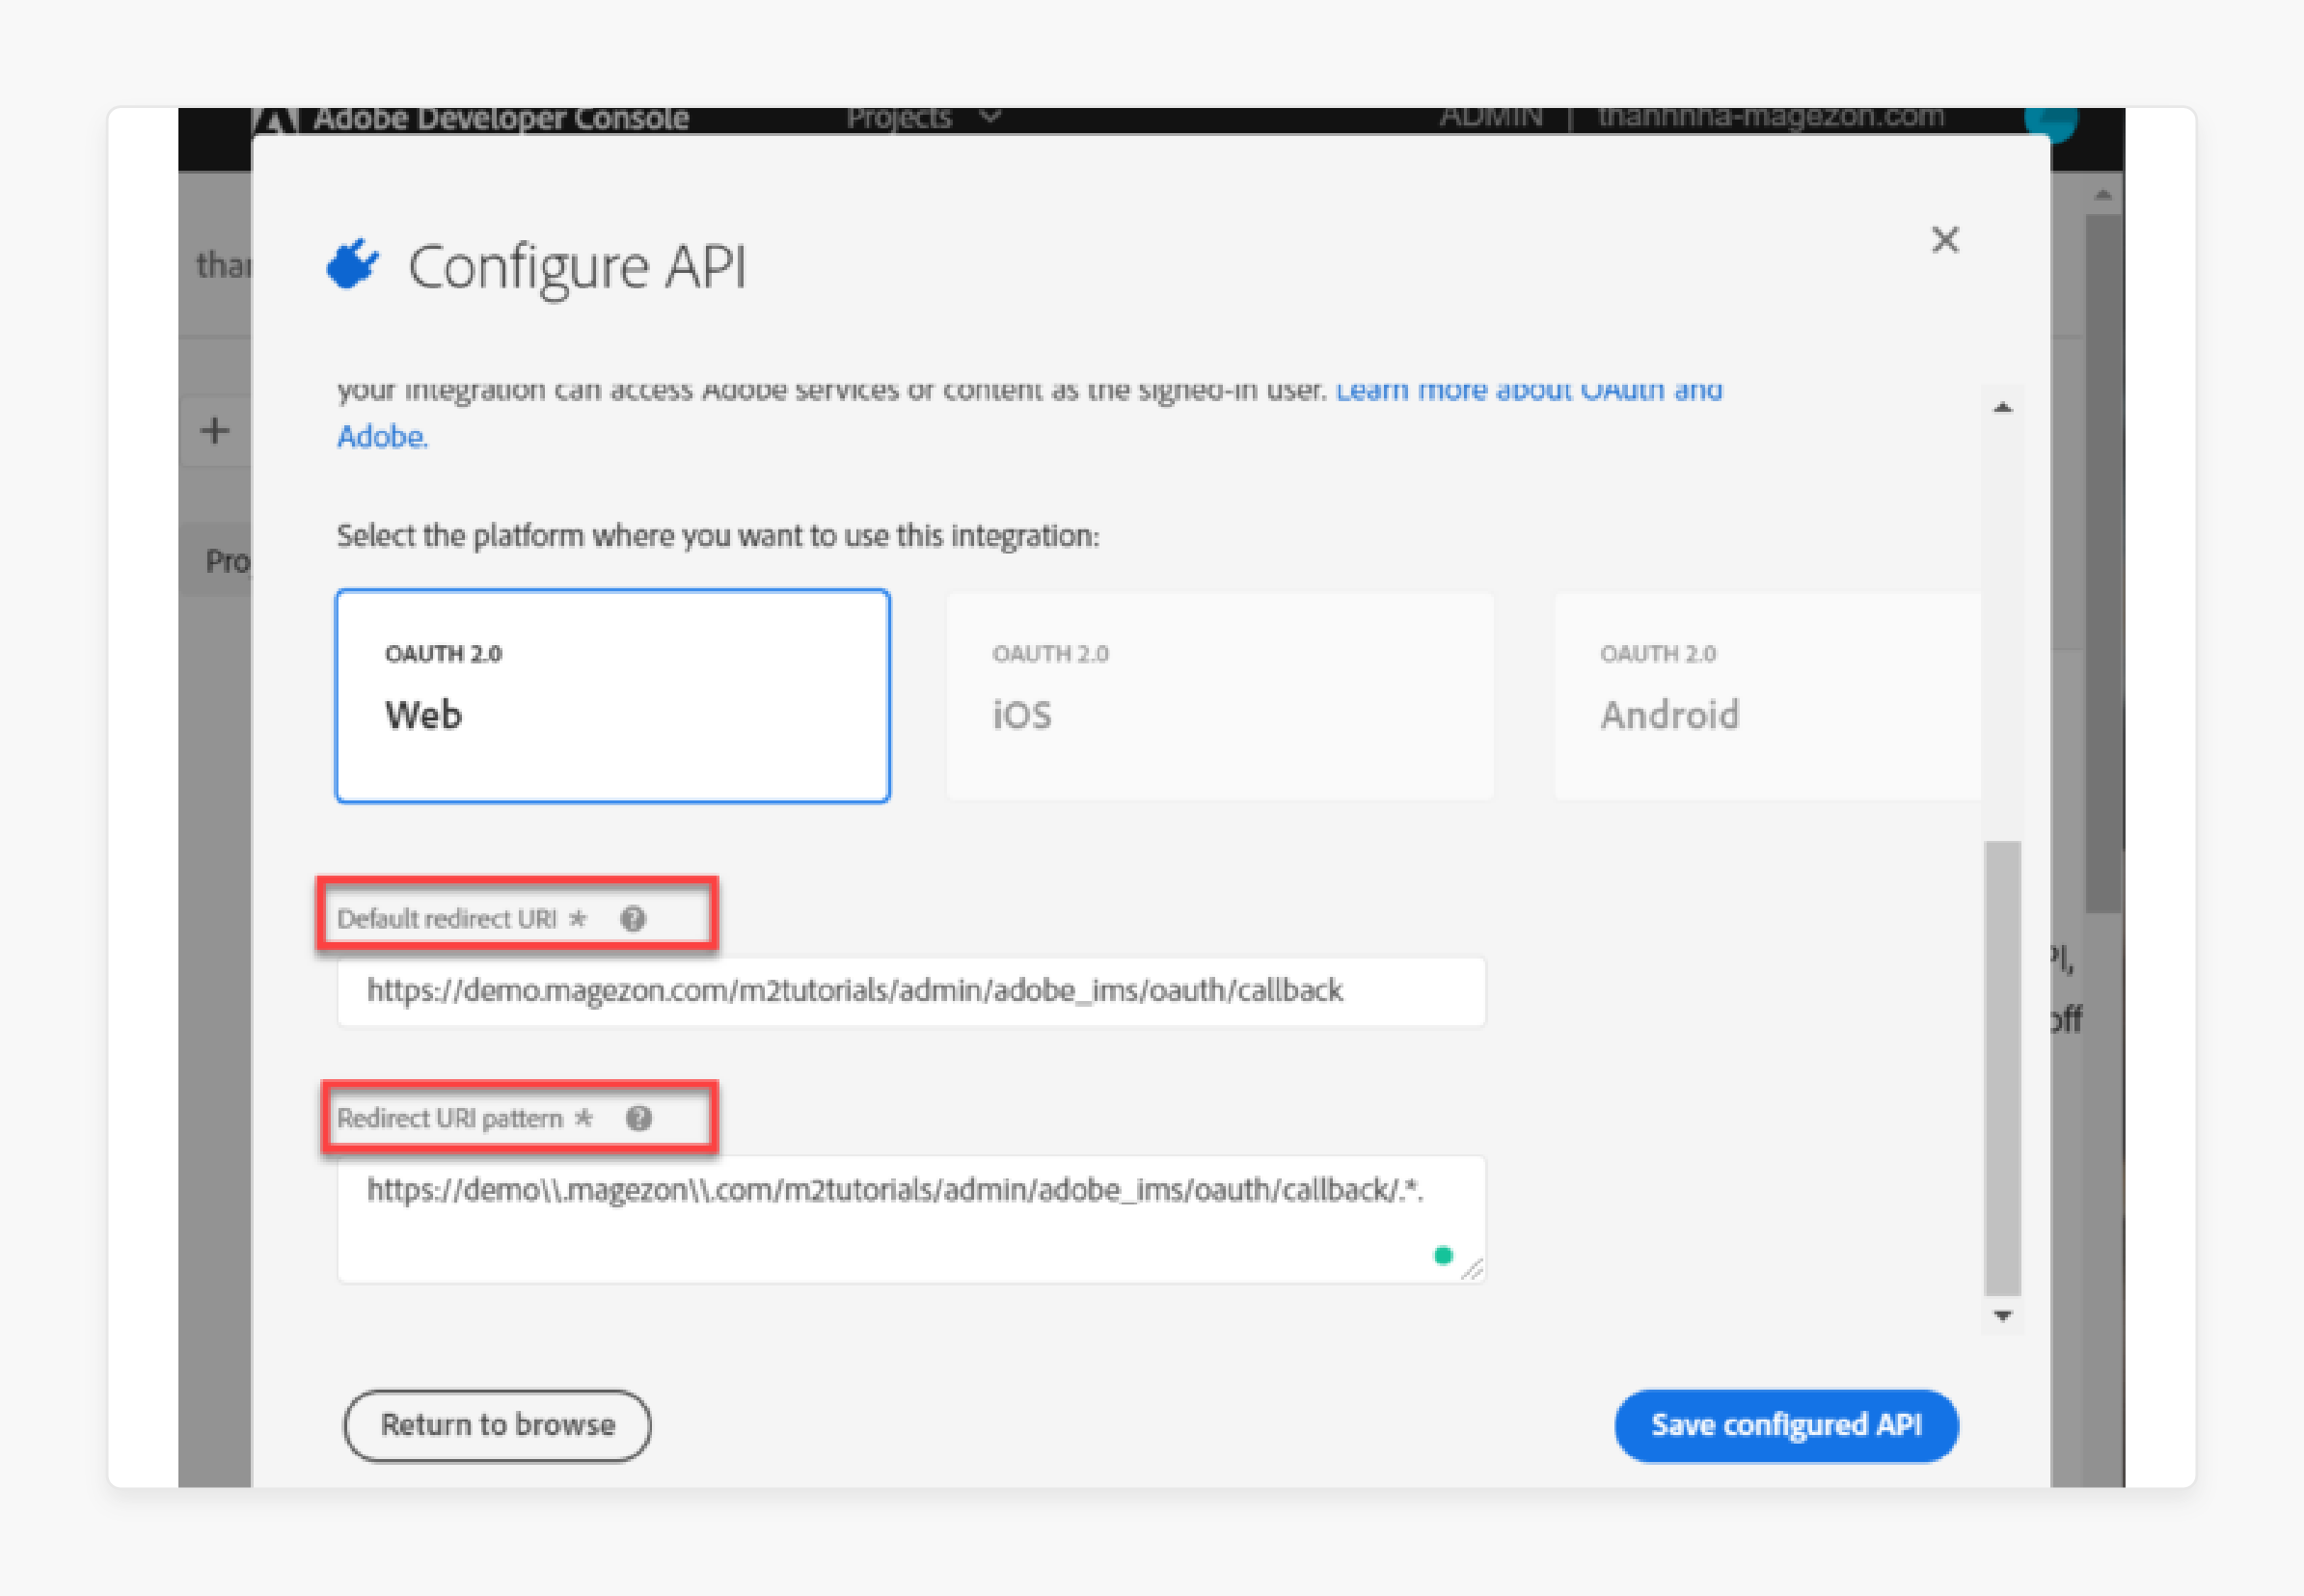
-
Default Redirect URI:
${HOST}/${ADMIN_URI}/adobe_ims/oauth/callback/. -
Redirect URI Pattern:
Add double backslashes (\\) before every dot (.).
Add .* to the end of the URI.
- Click Save Configured API to complete this step.
Step 7: Copy the API Key and Client Secret
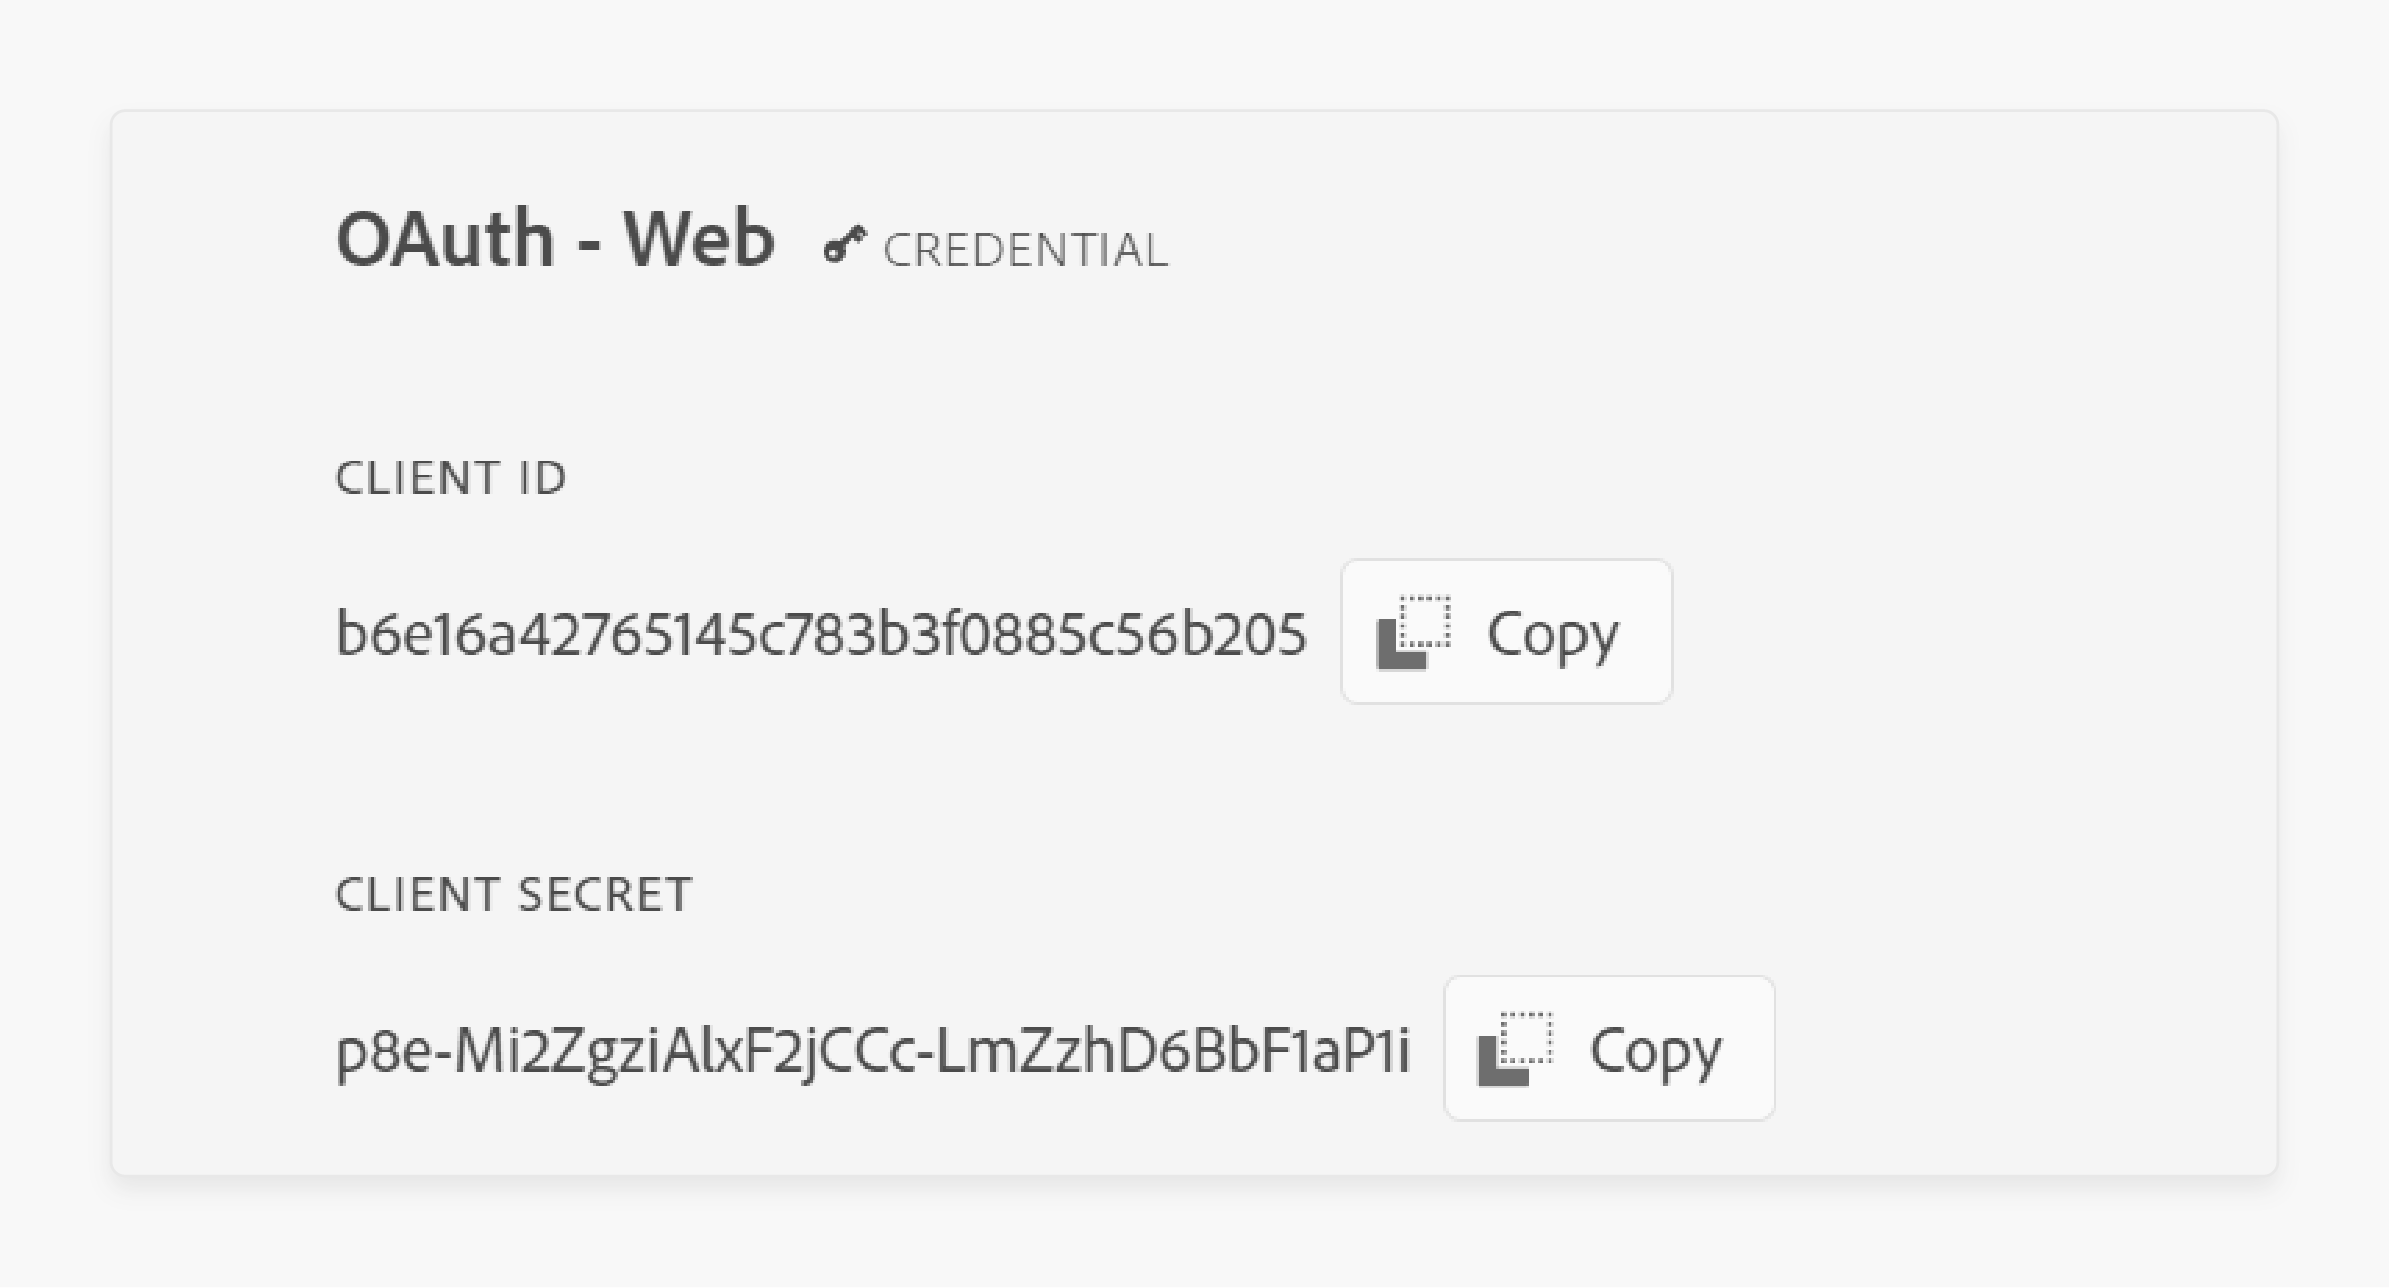
On the next page, copy the API Key (Client ID) and Client Secret. These will be used later for configuration in Magento.
2. Configure Adobe Stock Integration
Step 1: Open Magento Configuration
Go to Stores > Settings > Configuration to access the config menu.
Step 2: Open System Settings
In the Advanced tab, choose System. This section allows you to set up stock image settings.
Step 3: Set up Adobe Stock
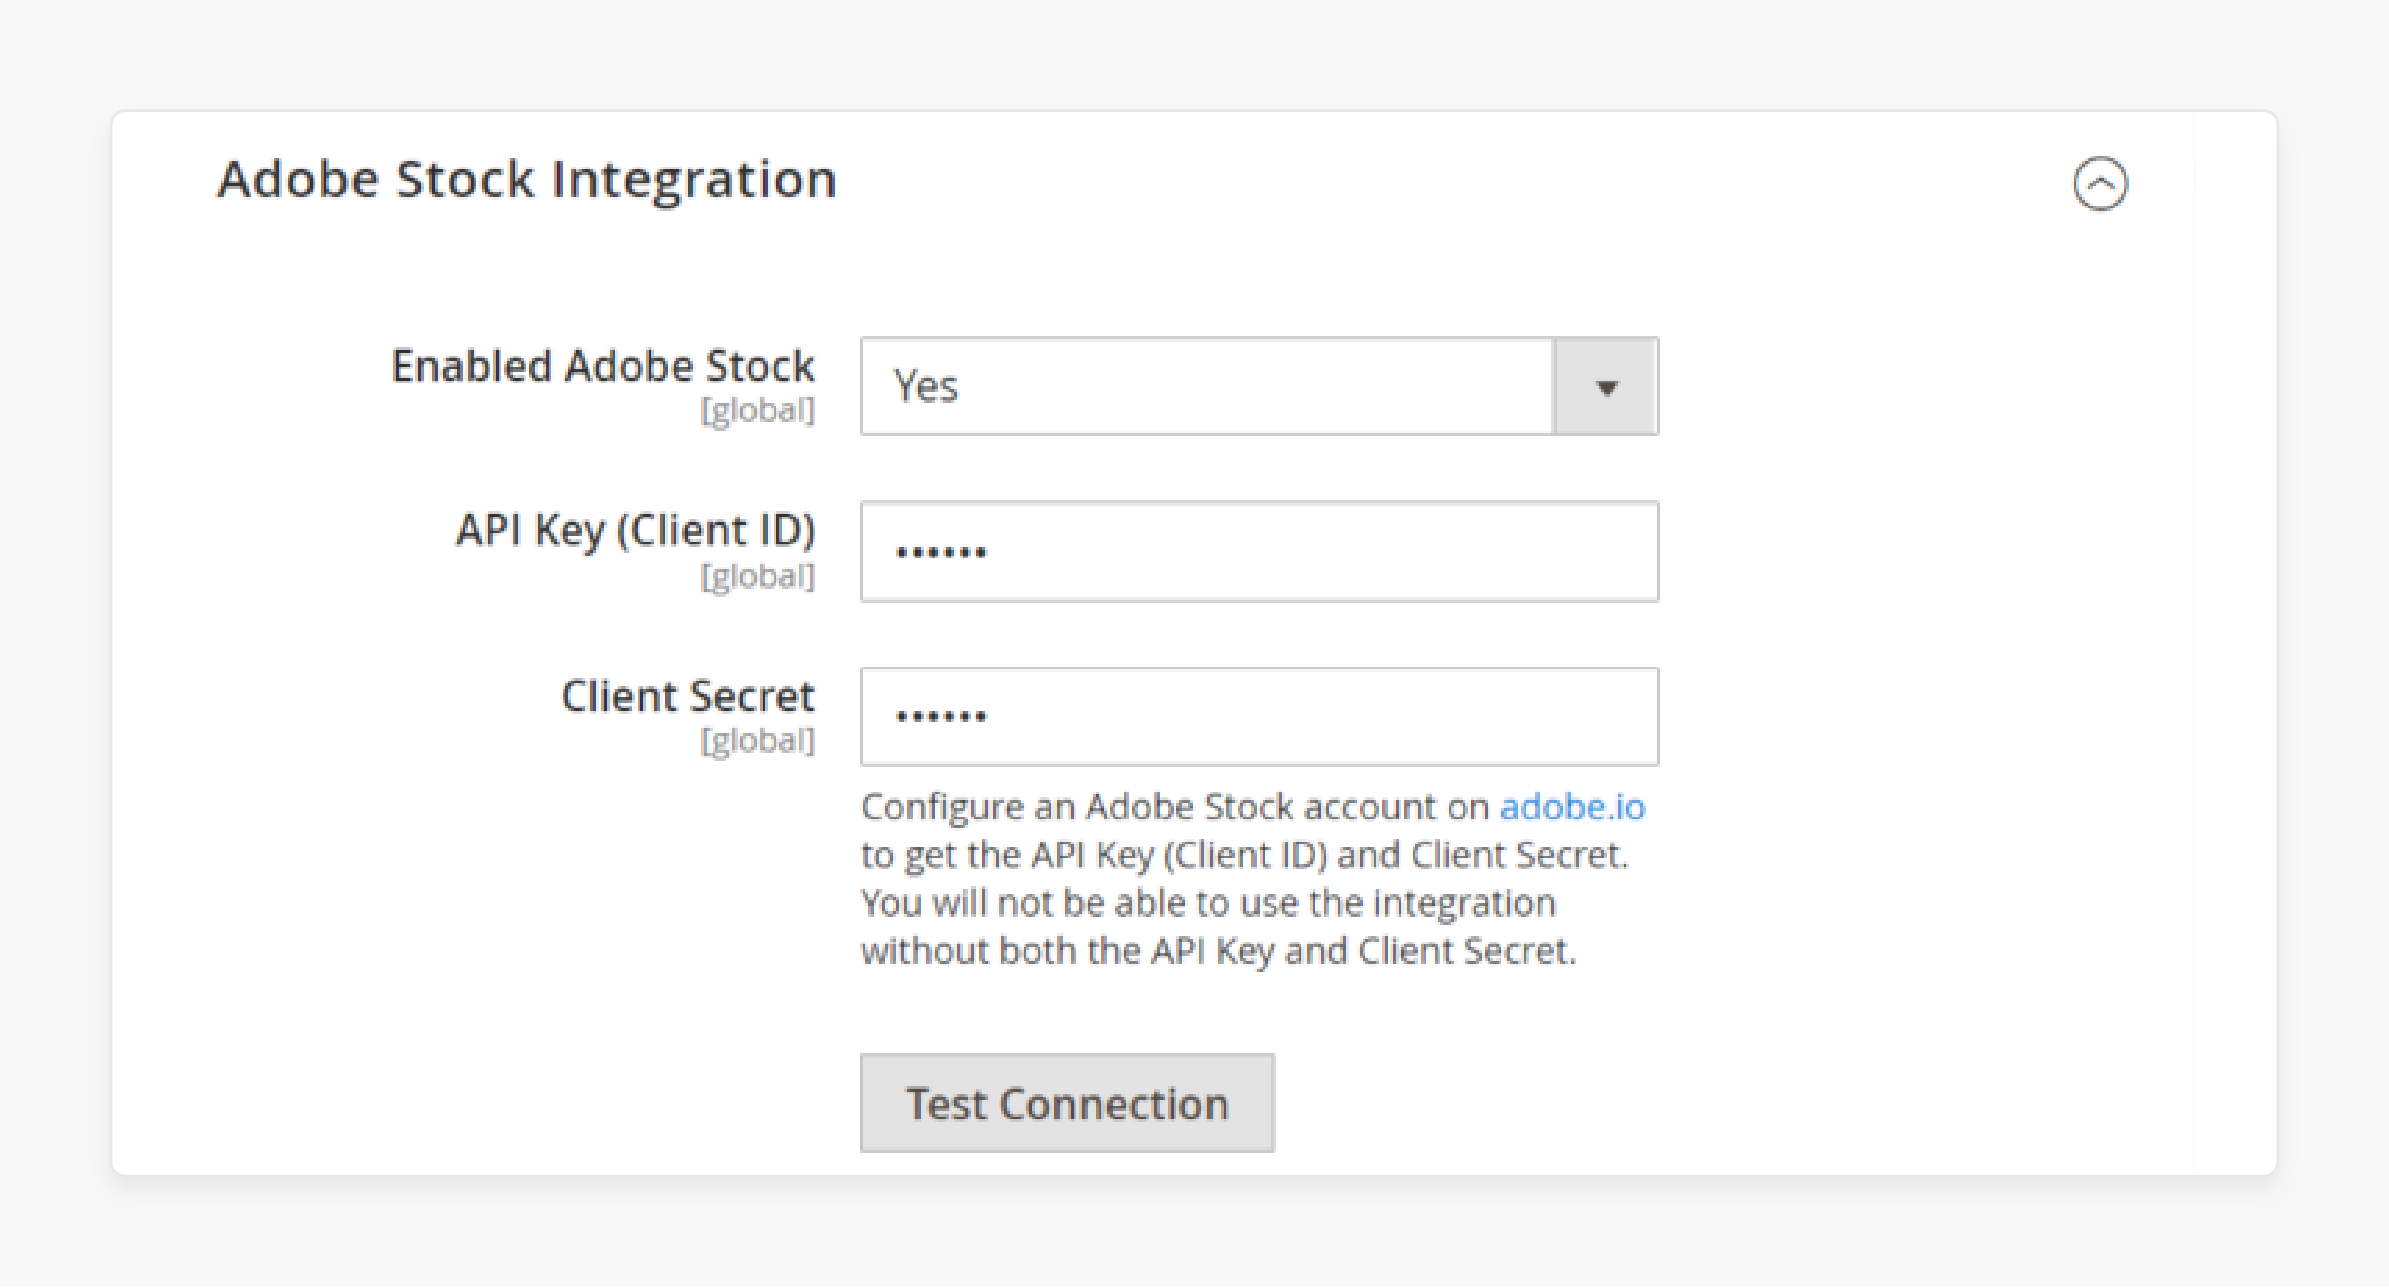
-
Scroll to the Stock integration and:
-
In Enabled Adobe Stock, select choose yes.
-
Paste the copied API Key and Client Secret into the respective fields.
-
-
Click Test Connection to verify the integration.
-
If the connection is successful, you will see a Connection Successful Message.
Step 4: Save Configurations
Click Save Config to save the settings.
3. Add Images from Adobe Stock
Step 1: Open a CMS Page
-
Open the CMS page where you want to insert images.
-
Click the Insert Image icon in the editor toolbar.
Step 2: Access Adobe Stock
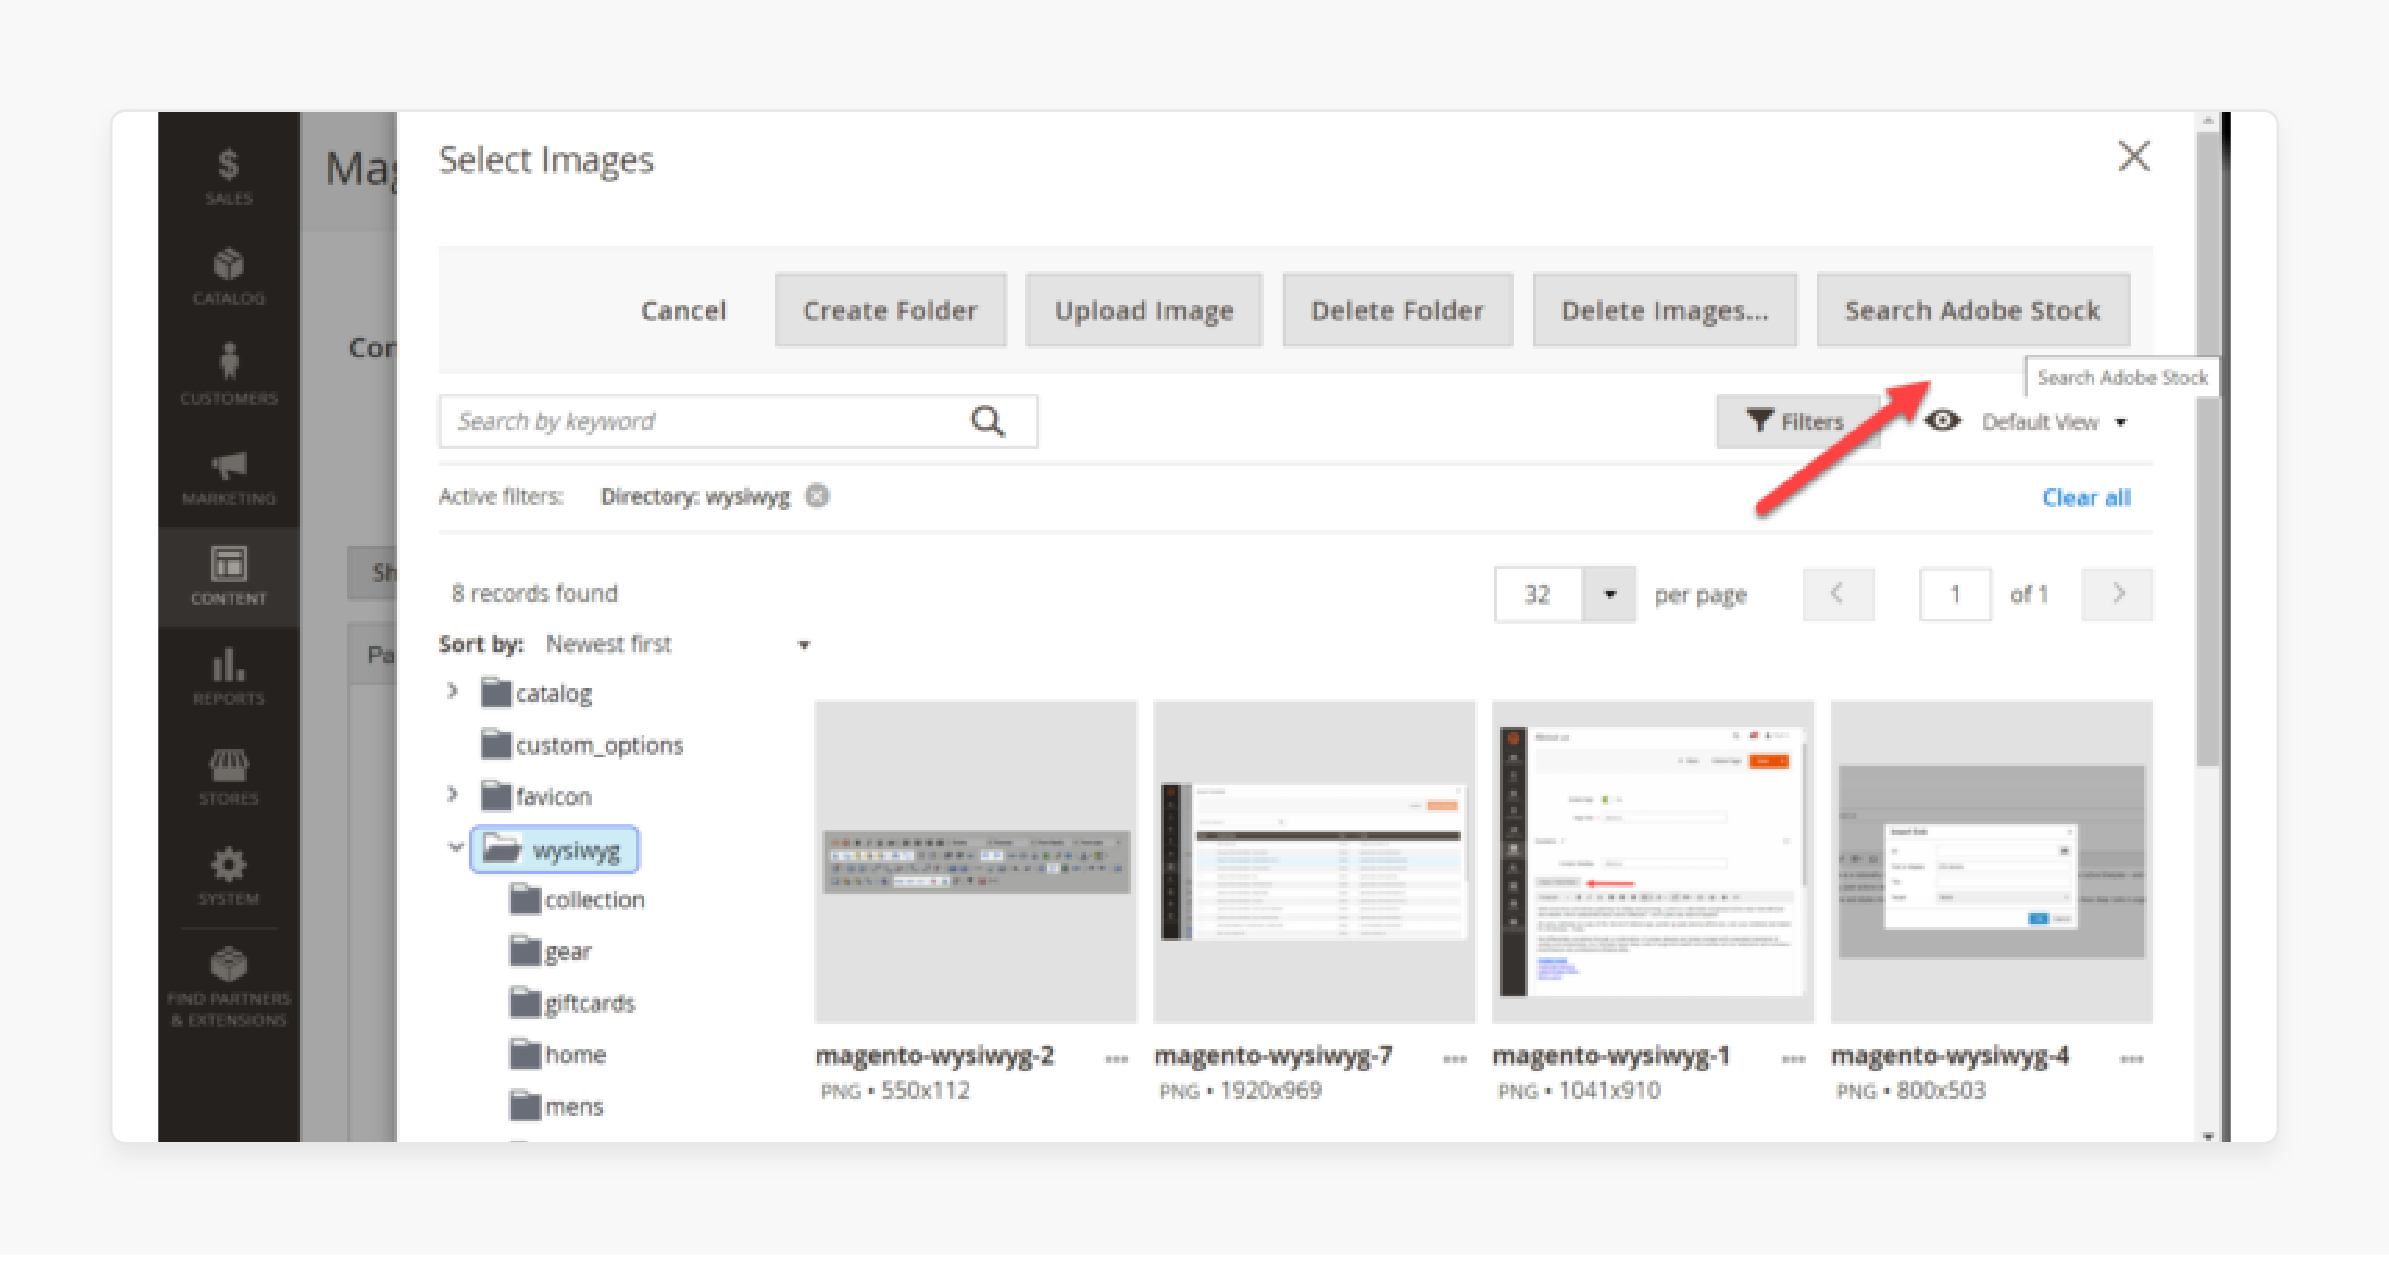
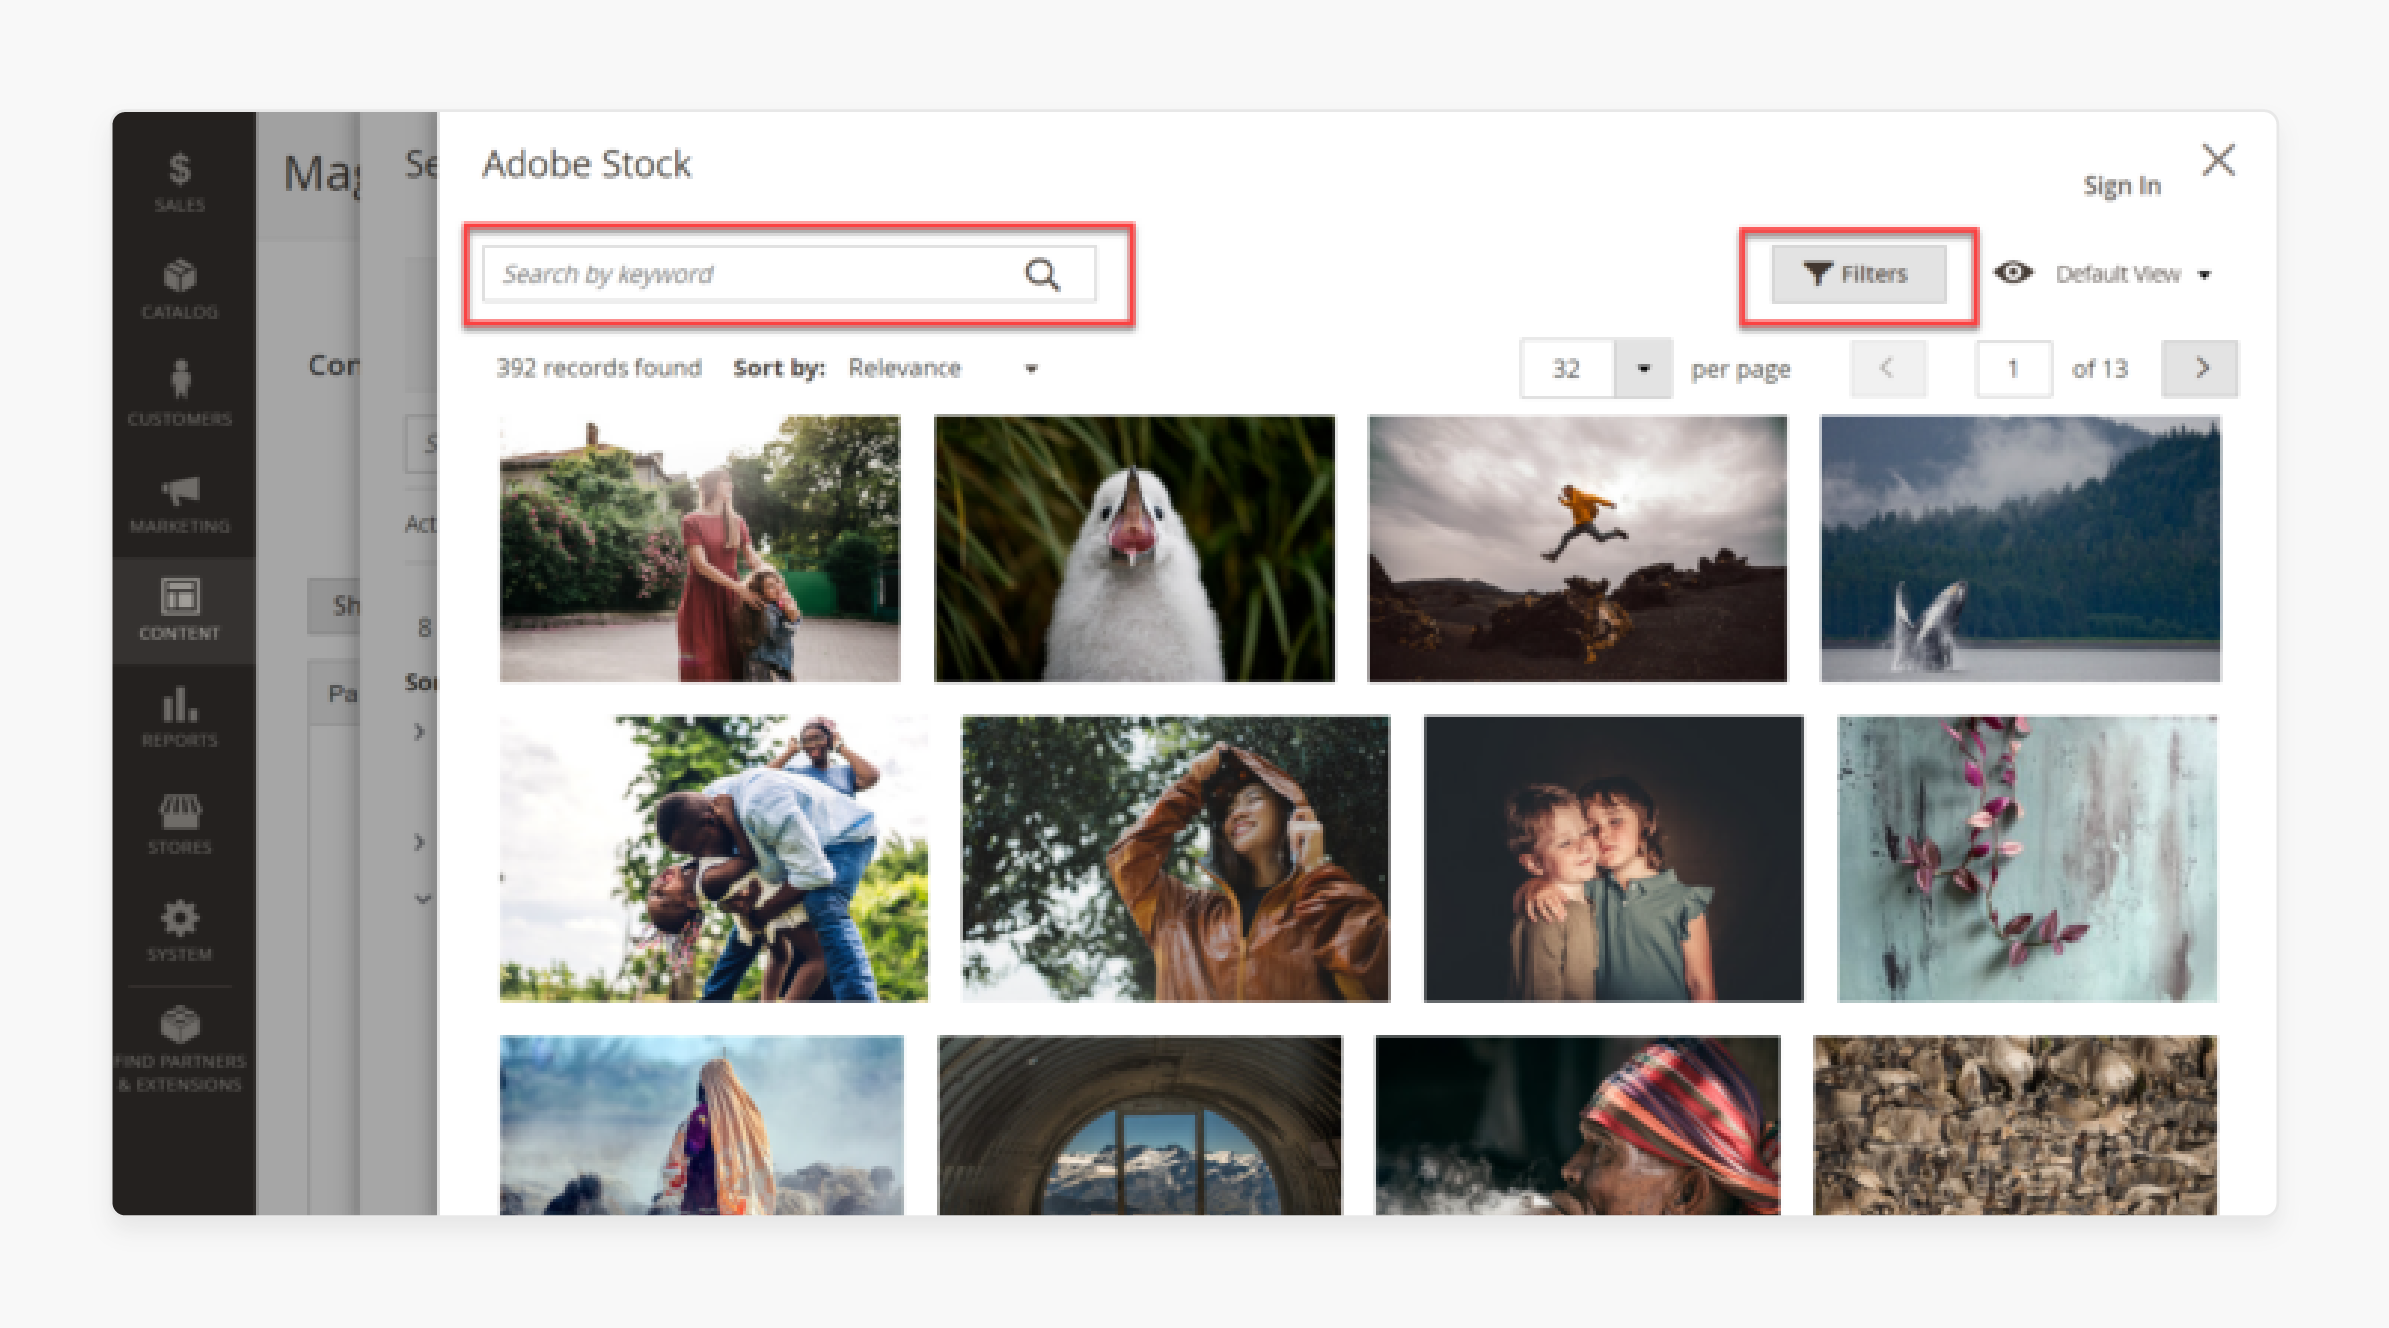
Click the Search icon and choose Search Adobe Stock. The stock images window will open, displaying available stock photos.
Step 3: Search and Filter Photos
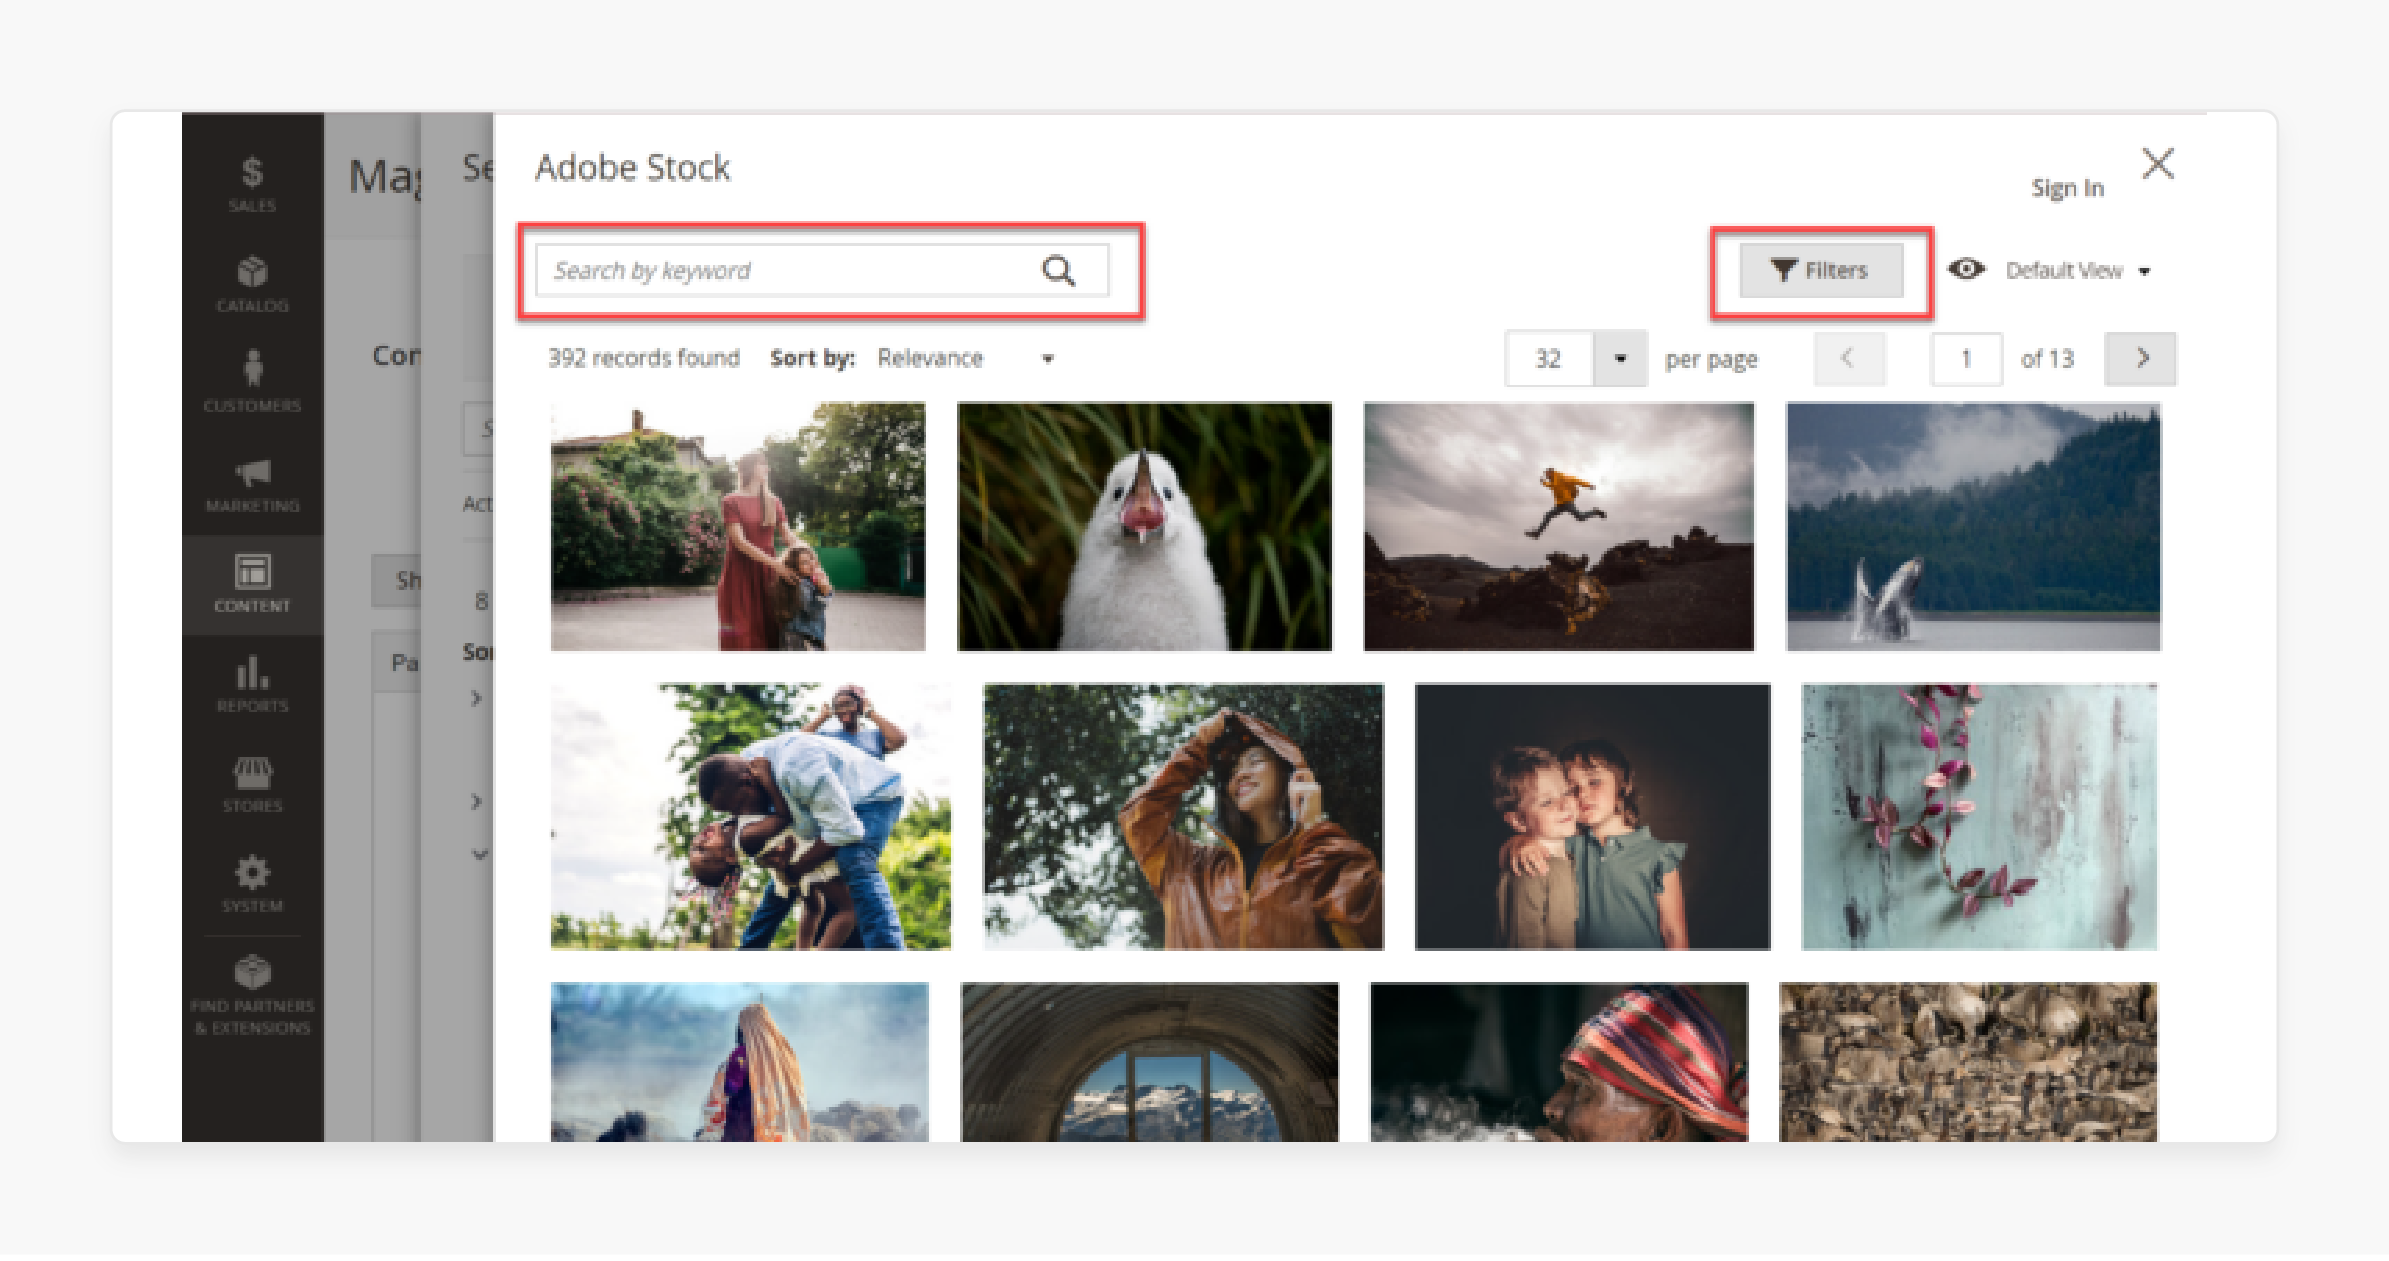
-
Use the Search box to find specific images by keyword.
-
Apply filters to refine your search using the allowed_resources options.
Advanced Tips for Magento Media File Management
| Tip | Details |
|---|---|
| Use a CDN | Add a CDN like Cloudflare to cache files. Improves speed and keeps Magento media storage is basic. |
| Set Correct Permissions | Use 755 for files and 644 for files. Protects files and helps readers follow secure practices. |
| Improve Images | Compress images with tools like TinyPNG. Reduces size while keeping quality to organize your images better. |
| Automate Backups | Schedule regular backups to prevent data loss. See the next part of the guide for backup steps. |
| Clean Up Files | Delete outdated media to free space and improve performance. Follow the guide to Magento for cleanup tips. |
| Enable Lazy Loading | Use JavaScript or plugins to load images on view. Speeds up pages and improves user experience. |
| Arrange with Files | Create files like Product Images or Promotions for simpler file management. Keeps media structured. |
| Choose Right Formats | Use JPEG for photos, PNG for logos, and WebP for speed. Balances quality and compression. |
| Use Adobe Stock | Add stock images for high-quality visuals. Provides a perfect blend of apple-esque design and usability. |
| Clear Cache | Use System > Cache Management to remove old cache files. Keeps media updated and improves store performance. |
FAQs
1. How does the Magento 2 directory improve media organization?
The Media storage uses a module-based system. It keeps files like images, banners, and CMS assets arranged. Each type of file is stored in specific files, such as catalog/product for product images. This structure saves time and makes files easy to manage.
2. What are the best practices for uploading images to the storage?
Always compress images using tools to reduce their size without lowering quality. Send files through the admin panel with clear names that describe their purpose. Group files into files for better structure. These best practices keep your media arranged and efficient.
3. Can a Magento 2 extension enhance storage file features?
Magento extensions add helpful features like bulk sending, resizing, and advanced search tools. These tools are useful for stores with large amounts of media. Add-ons like Media Gallery Pro align with best practices. It improves organization and saves time.
4. How can I secure the storage file from unauthorized access?
Set file permissions to 755 and file permissions to 644 to limit access. This allows only necessary operations while keeping files secure. Use a security module or server tools to monitor activity. These steps protect your media from unauthorized changes.
5. Why is file hierarchy important in the Magento media directory?
A clear file hierarchy makes finding and managing files easier. For example, creating files for Shoes, Accessories, or Seasonal Promotions keeps files arranged. Following best practices improves efficiency and prevents clutter.
6. How do I clean up unused files in the storage file?
Unused files take up space and reduce efficiency. Use built-in Magento tools to find and delete unused assets. Regular cleanups are a key part of keeping your media storage improved and easy to navigate.
Summary
The Magento 2 Media Folder stores all media files. Its structure is simple, offering a blend of Apple-esque and Microsoft efficiency. Each file has a clear URL, which makes the system feel like it is working. Consider the following importance-
-
Efficient Media Organization: Helps you find and manage images or videos faster.
-
Boosts Site Performance: Improves site speed and makes browsing smooth.
-
SEO Benefits: Improve search rankings and accessibility.
-
Integration with Stock Images: Removes the need for external sources.
Explore managed Magento hosting to streamline your Media Folder and boost store performance.


