Magento 2 Layout Overview: Layout and Template Customization
Wondering how customizing the layout page can enhance your e-commerce store? Magento 2 Layout controls how your online store's pages are organized and displayed.
This tutorial will cover how to define the look and functionality of your Magento 2 layout page.
Key Takeaways
- Insights into page blocks and how to customize them for your store's specific needs.
- Types of layout and component handles to customize pages.
- Tips to customize or enhance store layouts efficiently.
- Steps to customize the layout of a page for better page design.
- Techniques to control how elements are arranged and displayed.
- Common issues with key layout components and how they guide your page configuration.
-
How Does the Processing Order of Specific Layout File Types Work?
-
How to Create Custom Tags Within a Layout XML File in Magento Frontend Development?
-
How Does the Page-Type Layout Handle Files in Your Custom Theme?
-
Generic Structure of a Web Page Type Layout in Magento Module
-
6 Steps to Create Magento 2 Blocks, Page Layout Handles, and Template Files
-
Tips to Customize Adobe Commerce and Magento Open Source Themes Using Component Handles
-
5 Steps to Create a New Page in Magento 2 Admin with a New CMS Block
-
Common Magento Development Layout Configuration Issues and Solutions
-
How to Create a Layout with Parent Structural Block for Your Magento Store?
2 Methods to Configure a Set of Layout Instructions
There are two primary ways to customize the page layout:
Method 1: Modify layout files
Adjust the default.xml for global changes across all pages. Or target specific pages by editing page-specific XML files. For example, catalog_product_view.xml for product pages.
Method 2: Update templates
Use the page’s layout file to move, add, or remove elements as needed.
Note: To adjust the particular layout of an entire page, you need to modify the page layout files. Any other customizations should be done within the page configuration/generic layout files.
To apply layout changes across all pages, modify the default.xml file. For example, any layout changes made in app/code/Vendor/Module/view/frontend/layout/default.xml will be loaded on all pages.
For page-specific layout changes, use a layout file that corresponds to the page’s path. For instance, changes in app/code/Vendor/Module/view/frontend/layout/catalog_product_view.xml will only affect the product details page.
Use these instructions to:
- Move a page element to a different parent element.
- Add new content.
- Remove an existing page element.
- Adjust positions to fit your desired layout.
Magento 2 Module Instructions and Structure Reference
| Element | Key Attributes | Child Elements | Purpose |
|---|---|---|---|
<page> |
- layout={layout} - xsi:noNamespaceSchemaLocation |
- <html> - <head> - <body> - <update> |
Root element for page configuration |
<html> |
- name={arbitrary_name} - value={arbitrary_value} |
<attribute> |
Renders as HTML opening tag with specified attributes |
<head> |
none | - <title> - <meta> - <link> - <css> - <font> - <script> - <remove> - <attribute> |
Contains page head elements |
<body> |
none | - <block> - <container> - <move> - <attribute> - <referenceBlock> - <referenceContainer> - <action> |
Defines page body structure |
<title> |
none | none | Specifies page title |
<meta> |
- content - charset - http-equiv - name - scheme |
none | Defines meta information |
<link> |
- defer - charset - hreflang - media - rel - src_type - target |
none | Establishes resource relationships |
<script> |
- defer - async - charset - src - type |
none | Includes JavaScript resources |
How Does the Processing Order of Specific Layout File Types Work?
The layout files are processed in the following order:
- The base module file loads first, defining the essentials.
- The module area files follow for frontend or backend specifics.
- The collected layouts from modules load in sequence.
- The theme inheritance determines how custom themes override base settings.
- The order is based on the module sequence in the
app/etc/config.phpfile.
Note: If priorities are the same, they are sorted alphabetically by priority.
- The order of inherited themes is determined as:
[<parent_theme>, …, <parent1_theme>] <current_theme>.
- The theme order is repeated, starting from the last parent theme to the current theme.
- Add all layout files extended from the theme to the list.
- Override layout files in the list are replaced.
- Finally, all layout files from the list are merged together.
How to Create Custom Tags Within a Layout XML File in Magento Frontend Development?
| Tag Type | Attributes | Usage | Implementation Syntax |
|---|---|---|---|
<container> |
- name - htmlTag - htmlClass - htmlId - label |
Creates structural divisions for content organization | xml<container name="header.container" htmlTag="header" htmlClass="page-header"/> |
<block> |
- class - name - template - cacheable |
Renders specific UI elements and content blocks | xml<block class="Magento\Framework\View\Element\Template" name="custom.block" template="Module::template.phtml"/> |
<referenceContainer> |
- name - remove |
Modifies existing container elements | xml<referenceContainer name="content"><block name="new.block"/></referenceContainer> |
<referenceBlock> |
- name - remove - display |
References and modifies existing blocks | xml<referenceBlock name="product.info.sku" remove="true"/> |
<move> |
- element - destination - before/after |
Repositions elements within the layout | xml<move element="product.info" destination="content" after="product.image"/> |
<argument> |
- name - xsi:type - translate |
Passes data to blocks | xml<argument name="text" xsi:type="string">Custom Text</argument> |
<update> |
- handle | Includes additional layout handles | xml<update handle="default_head_blocks"/> |
How Does the Page-Type Layout Handle Files in Your Custom Theme?
Once the layouts are merged, the application performs validation.
The validation & error handling depends on the application mode in which your instance is running:
1. Developer mode
Both syntax and structure are validated in .xml and .xsd files. .xml files are checked against the XSD schema. If any validation fails, the process will halt with a hard failure.
2. Production or Default modes
The syntax is validated in .xml and .xsd files, but validation against the XSD schema is not performed. If validation fails, errors are logged in the var/log directory without throwing an exception.
Generic Structure of a Web Page Type Layout in Magento Module
| Element | Attributes | Child Elements | Description |
|---|---|---|---|
<layout> |
xsi:noNamespaceSchemaLocation="{path_to_schema}" | - <container> - <update> |
Mandatory root element |
<update> |
handle="{name_of_handle_to_include}" | none | Includes additional layout handles |
<container> |
- name="root" | - <block> - <container> - <referenceBlock> - <referenceContainer> |
Mandatory container element |
6 Steps to Create Magento 2 Blocks, Page Layout Handles, and Template Files
Step 1: Create a Controller
A controller handles the HTTP request and returns the page’s content.
- Create a Controller inside
app/codeto call the specific page XML file. - Declare the PageFactory and use it in the execute method to render the view.
Step 2: Create the Layout XML File
The layout file is an XML file that defines the structure of the page. It is located in the {module_root}/view/{area}/layout/ folder. The area can either be frontend or adminhtml.
Magento has a default XML file called default.xml, which applies to all pages within that area. For specific pages, the layout file name follows the format: {router_id}_{controller_name}_{action_name}.xml
Create a sample layout file for the HelloWorld module and do the following:
- Define the block with a class
<Vendor_Name>\HelloWorld\Block\Display. - Associate the block with the template file
your_file_name.phtml.
Step 3: Create the Block
Blocks in Magento contain the view logic. It should not contain any "HTML" or "CSS" but instead should focus on the business logic of the view.
- Create a new Block file.
Step 4: Create the Template File
The Template file is where the content is rendered. Magento uses PHTML files for templates.
- Create the Template file.
- Call the
your_function()method from the defined file to output "Hello World".
Note: This file will display the content rendered by the block.
Step 5: Flush Magento Cache
- After creating the block, layout, and template files, run the following commands:
php bin/magento cache:clean
php bin/magento cache:flush
- Clear the Magento cache and ensure the changes are made.
Step 6: Run a Test
- Navigate to the following URL in your browser to see the result:
http://your-magento-site.com/helloworld/index/display
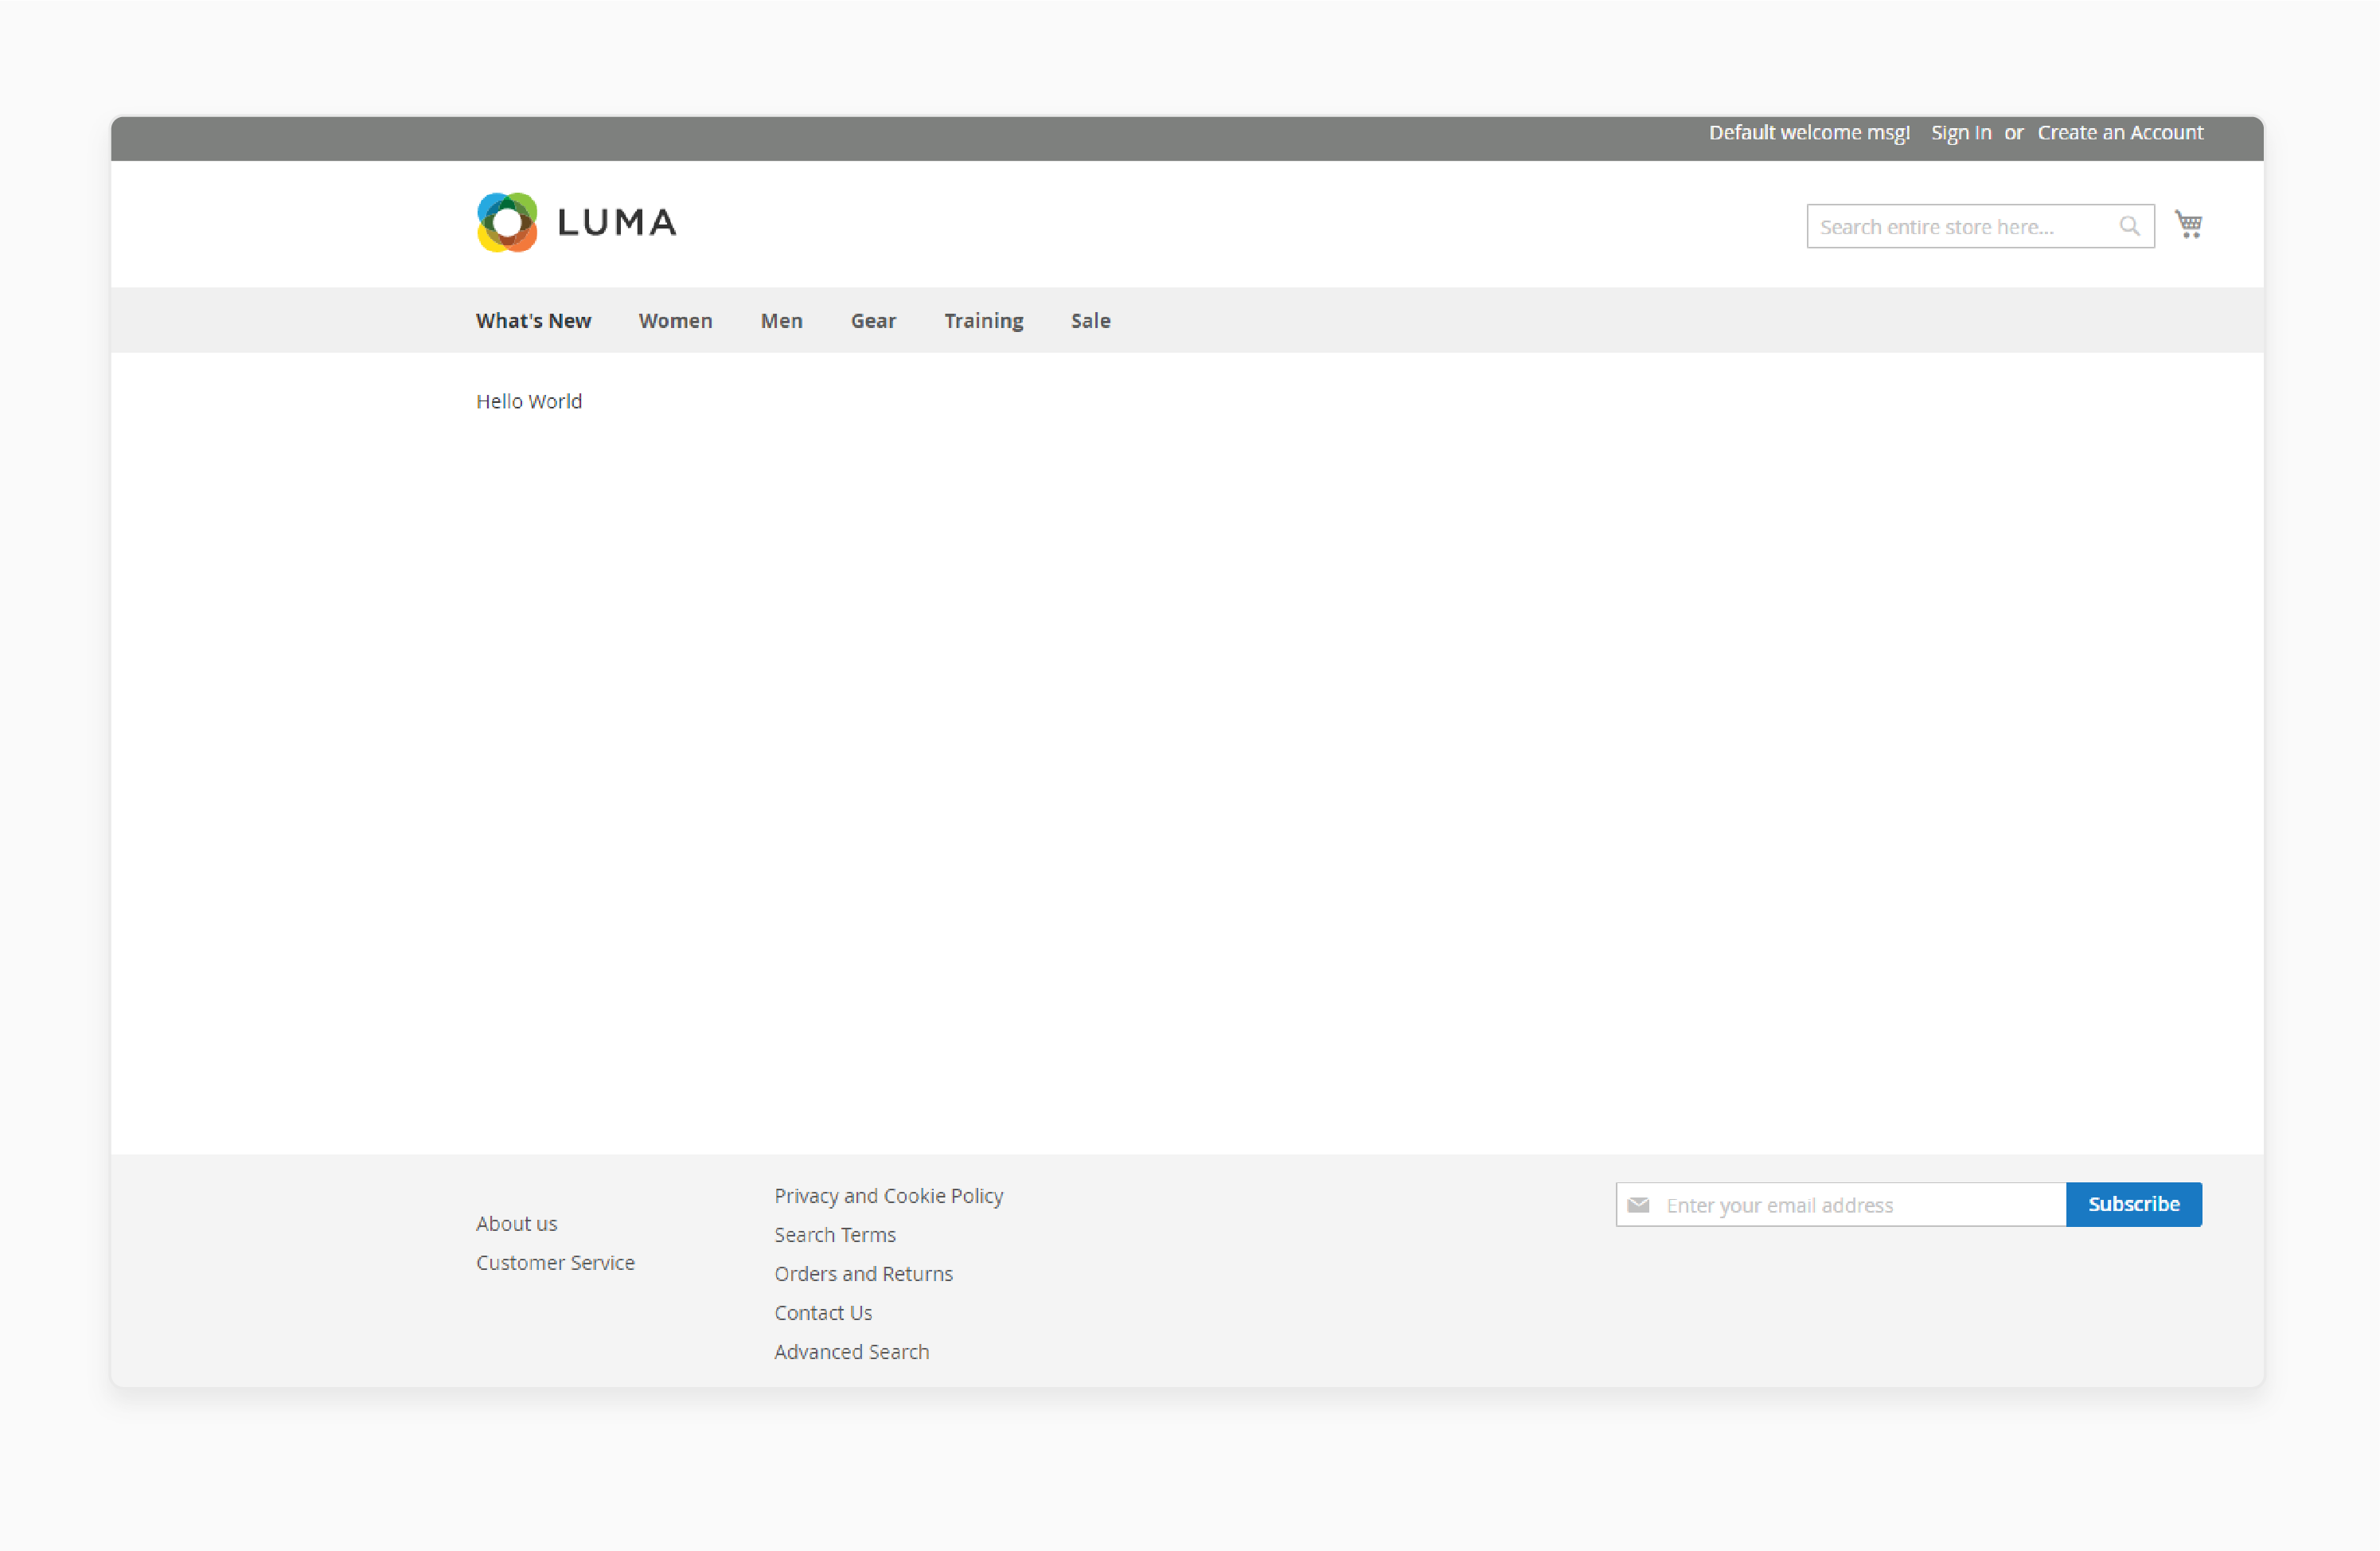
- The Hello World message will be displayed on the page.

Tips to Customize Adobe Commerce and Magento Open Source Themes Using Component Handles
| Layout Handle Type | Description | Example Usage | Key Components |
|---|---|---|---|
| Page-Type Handles | Correspond to full action names of controller actions | catalog_product_view |
- <referenceContainer> - <block> - <move> |
| Page Layout Handles | Identify specific pages with parameters | catalog_product_view_type_simple_id_123 |
- <update> - <referenceBlock> - <action> |
| Arbitrary Handles | Custom handles for reusable layout instructions | custom_sale_layout |
- <container> - <argument> - <block> |
| Default Handle | Applied to all pages as a base layout | default.xml |
- <head> - <body> - <attribute> |
| Category Handle | Specific to category pages | catalog_category_view |
- <referenceContainer> - <block> - <move> |
| Product Handle | Tailored for product detail pages | catalog_product_view |
- <referenceBlock> - <block> - <container> |
| Customer Group Handle | Customizations based on customer groups | customer_logged_in, customer_group_wholesale |
- <block> - <container> - <action> |
| Custom Module Handle | For module-specific layouts | module_custom_page |
- <update> - <referenceContainer> - <block> |
5 Steps to Create a New Page in Magento 2 Admin with a New CMS Block
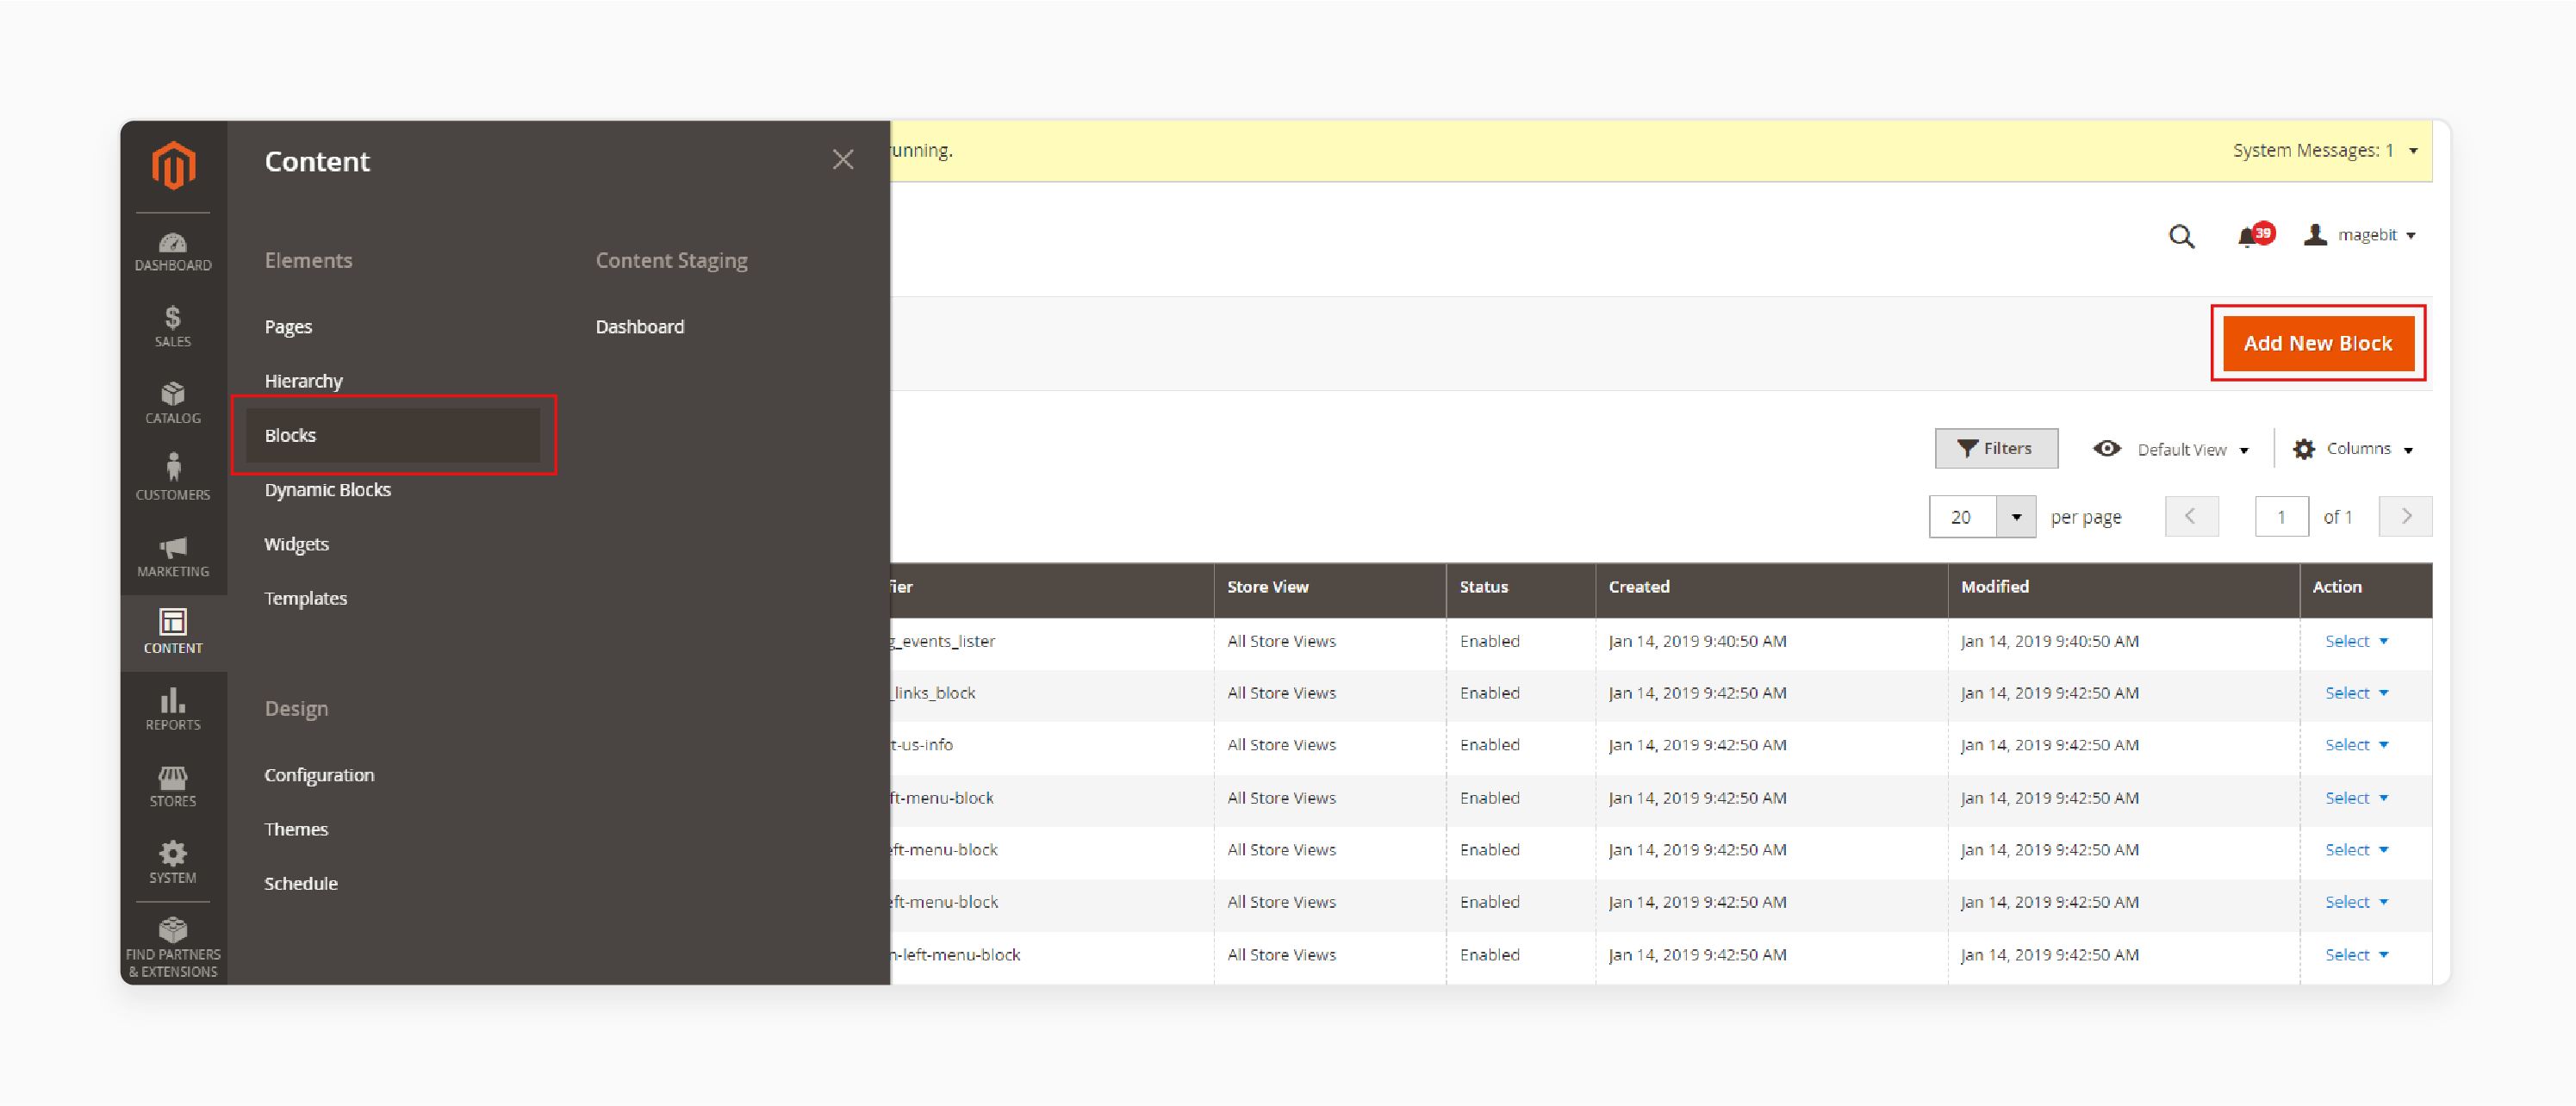
- In the Admin panel, navigate to Content > Elements > Blocks.

- Click the 'Add New Block' button at the top-right corner.
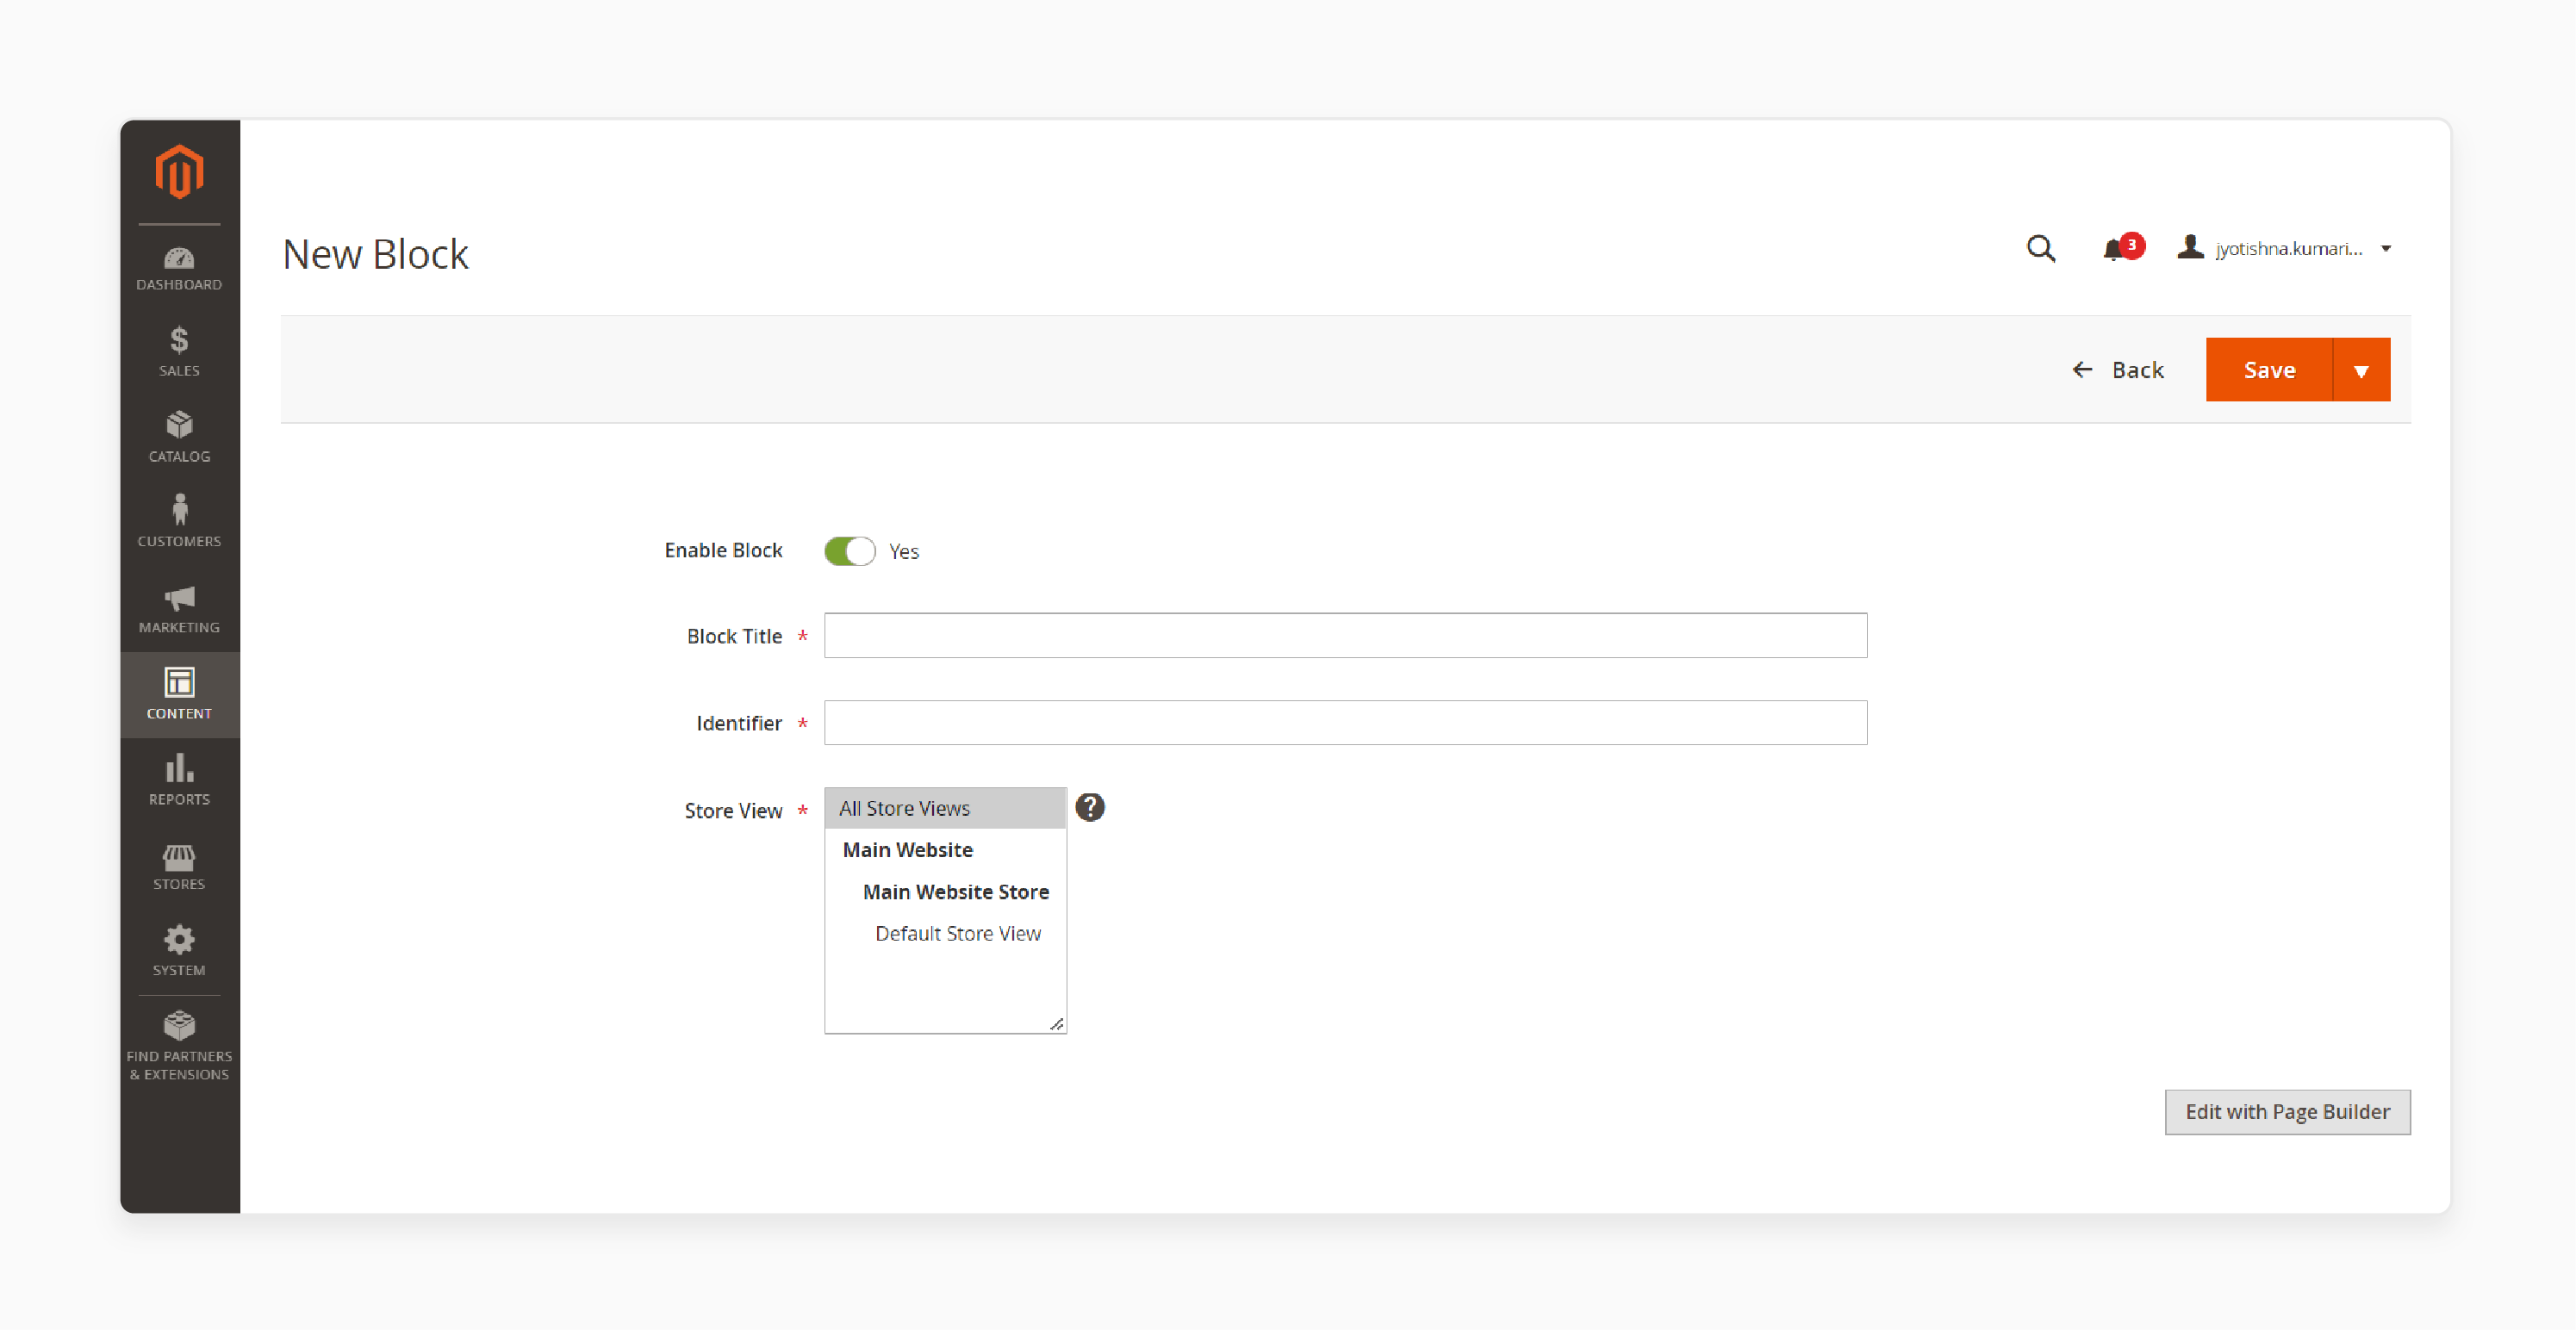
Check the general configuration settings below:
- Enable Block: If you wish to change the block’s default enabled status, set it to "No".
- Block Title: Enter the title for your new block.
Note: Provide an internal reference by assigning a Block Title.
- Identifier: Set a unique ID for the block.
Note: Use "lowercase characters" and "underscores" instead of spaces.
- Store View: Select the store view where you want the block to appear.

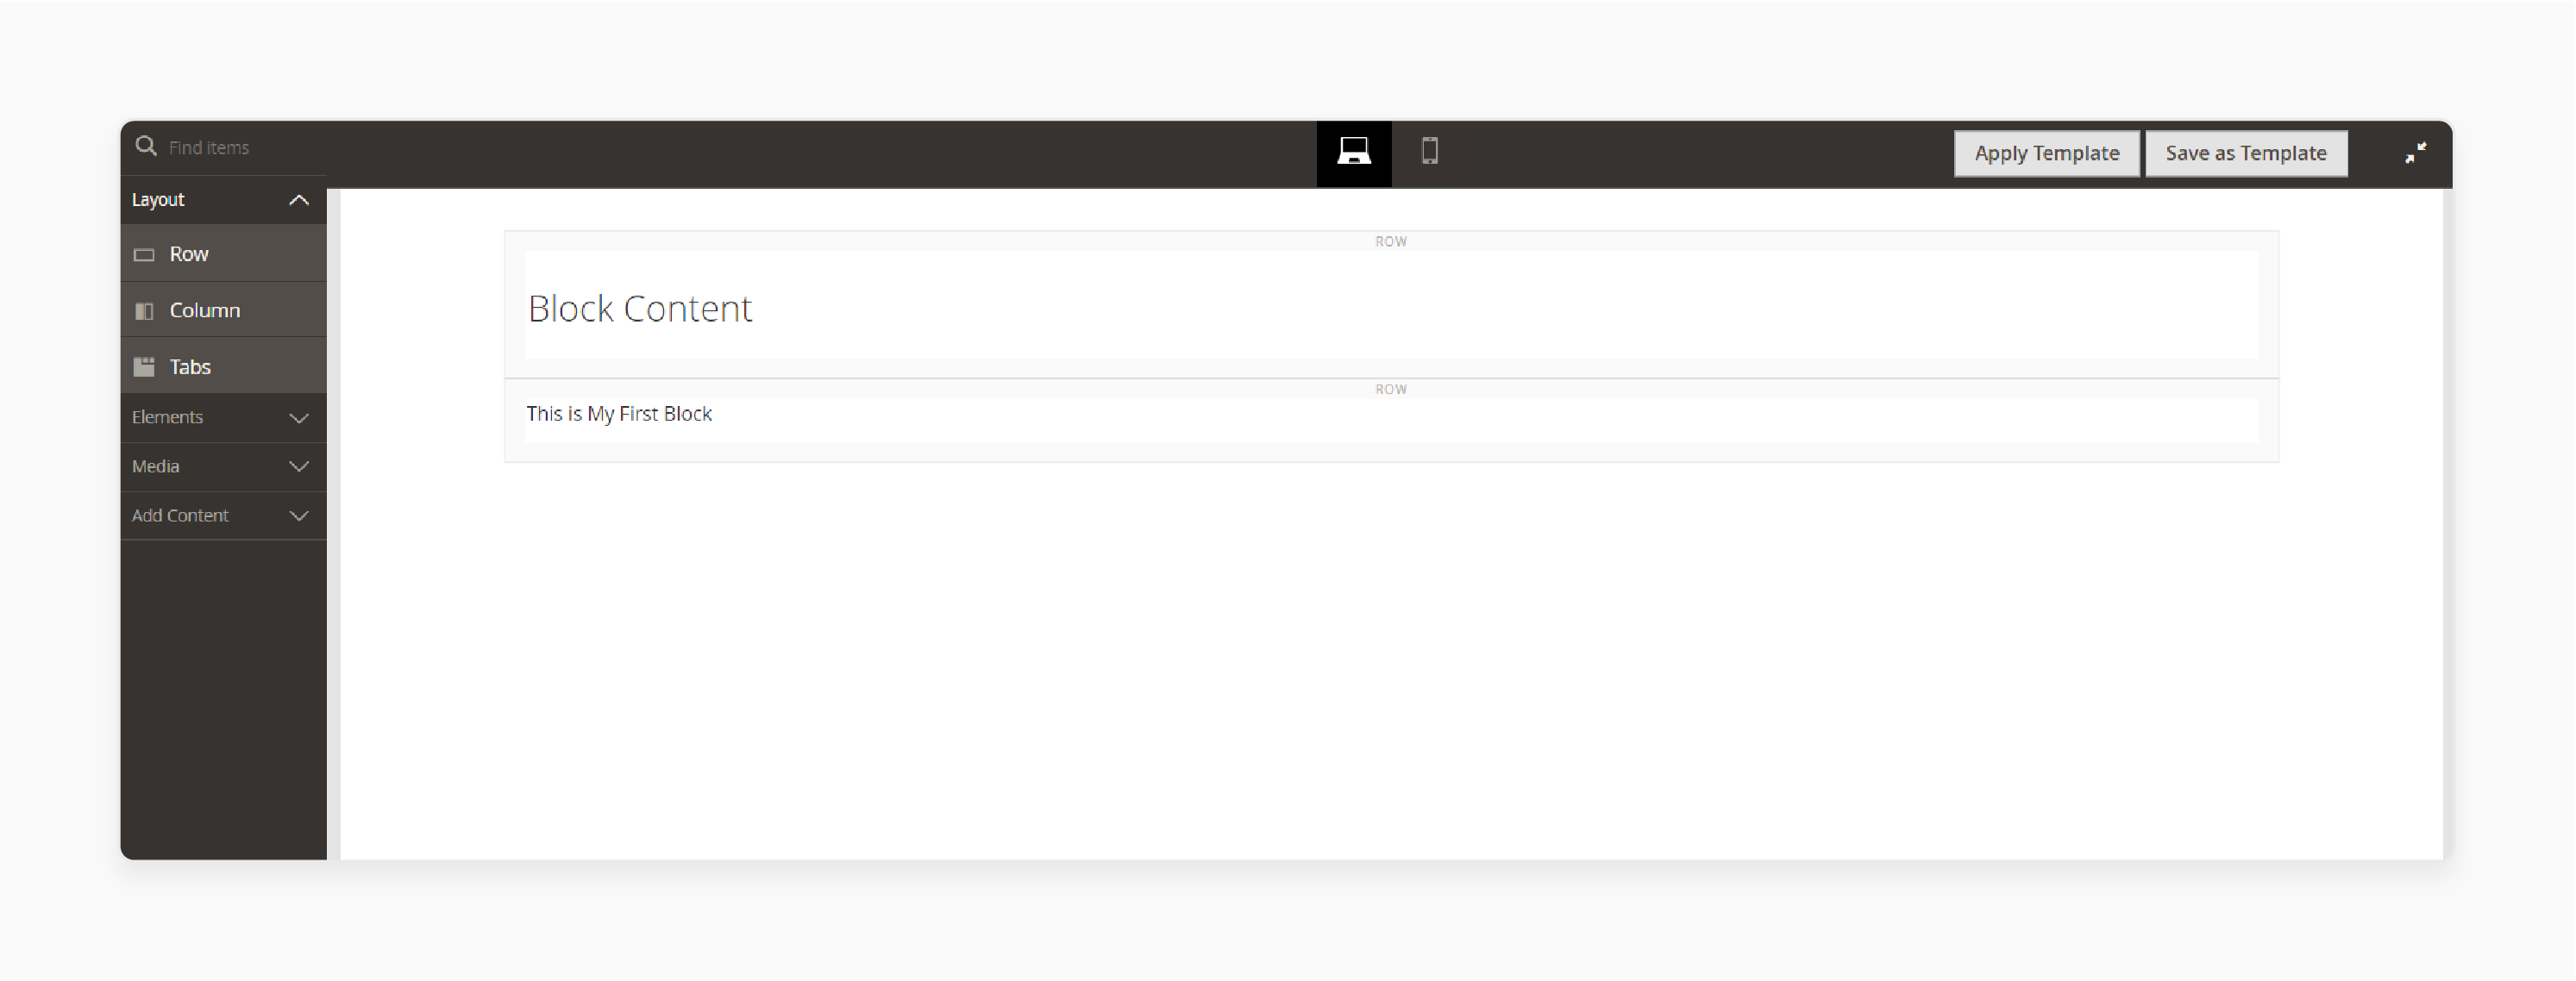
- Add content to the block using the content toolset displayed below.
- If 'Page Builder' is enabled, the content workspace will show the "Page Builder tools".

- After completing the block setup, click 'Save' and choose 'Save & Close'.
Common Magento Development Layout Configuration Issues and Solutions
| Issue Category | Problem Description | Solution | Impact on Performance |
|---|---|---|---|
| Cache Management | Pages not reflecting layout changes | - Clear the cache via bin/magento cache:clean. - Flush specific layout cache. - Enable developer mode. |
Immediate layout updates visible |
| JavaScript/CSS Integration | Slow page load times due to unoptimized resources | - Enable JS/CSS merging. - Implement minification. - Configure proper file combining. |
30-50% faster page loading |
| Full Page Cache Issues | Uncacheable blocks affecting performance | - Identify uncacheable blocks. - Fix cache headers. - Review X-Magento-Cache-Debug status. |
Improved page response time |
| Layout XML Syntax | Incorrect layout structure causing display issues | - Validate XML schema. - Check for proper nesting. - Ensure correct handle references. |
Prevents layout breaking |
| Theme Integration | Conflicts between custom and parent themes | - Use proper theme inheritance. - Follow layout override hierarchy. - Implement correct package relationships. |
Consistent theme rendering |
| ElasticSearch Configuration | Missing catalog results in layout | - Configure proper server settings. - Verify connection parameters. - Test search functionality. |
Enhanced search performance |
| URL Structure Issues | SEO-unfriendly layout paths | - Implement proper URL rewrites. - Configure SEO-friendly URLs. - Set up canonical tags. |
Improved search rankings |
| Responsive Design | Layout breaking on mobile devices | - Test it across devices. - Optimize responsive containers. - Implement proper media queries. |
Better mobile experience |
What are Blocks used for in Magento Layouts?
Blocks are a foundational building unit for layouts in Magento 2. They serve as containers that organize and display content on your store's pages. The actual rendering of block output occurs through templates to generate HTML for the footer. They connect your store's layout structure with its visual output. Each block works through a PHP block class that controls how content appears on the page. It allows dynamic content to be displayed on the frontend by:
- Acting as modular containers that separate business logic from presentation
- Enabling the reuse of content across different pages without duplication
- Allowing hierarchical organization through parent-child relationships
- Providing caching capabilities at individual block levels for better performance
- Supporting template-based rendering for consistent styling
Examples of blocks include:
- Content Block: Display products, banners, and text.
- Structural Blocks: Organize page sections like header and footer.
- Child Blocks: Smaller content units within larger blocks.
These blocks inherit the functionality of the parent block. It allows for a structured and modular page design.
The element will be added and passed from layout XML in the following format:
<block class="Vendor\Module\Block\ParentBlock" name="parent_block">
<block class="Vendor\Module\Block\ChildBlock" name="child_block" />
</block>
For example, a parent block might have multiple child blocks nested inside it. It displays related content or components.
In a layout file, block tags define where and how a block should be displayed. The block tags within a layout file are used to place the PHP block class into the page structure.
For instance:
<block class="Vendor\Module\Block\Example" name="example_block" template="Vendor_Module::example.phtml" />
This block tag references the PHP block class that contains the business logic. It links it to the appropriate template for rendering.
Default.XML vs. a Specific Page XML File in Magento
| Feature | default.xml | Specific Page XML |
|---|---|---|
| Scope | Applied globally to all pages | Targets individual page types or specific pages |
| Primary Purpose | Global elements like headers, footers, and navigation that appear on every page | Page-specific modifications like product layouts or category structures |
| Location | app/code/Vendor/Module/view/frontend/layout/default.xml |
app/code/Vendor/Module/view/frontend/layout/{specific_page}.xml |
| Load Priority | Loads first as the base configuration | Overrides default.xml settings for specific pages |
| Use Case | - Global header/footer - Common navigation elements - Site-wide scripts - Universal styling |
- Homepage: cms_index_index.xml - Category: catalog_category_view.xml - Product: catalog_product_view.xml - Cart: checkout_cart_index.xml - Checkout: checkout_index_index.xml - Login: customer_account_login.xml - Registration: customer_account_create.xml |
| Cache Impact | Affects full page cache globally | Cached individually per page type |
| Customization Level | Basic structural elements | Detailed page-specific modifications |
| Usage Flexibility | Can be used in any layout folder (Theme or Module) | Must be placed in the relevant module's layout directory |
| Performance Impact | Higher as loads on every page | Optimized for specific page types |
| XML Structure | xml<page xmlns:xsi="..."><body><referenceContainer name="header">...</body></page> |
xml<page layout="2columns-left" xmlns:xsi="..."><body>...</body></page> |
| Handle Types | Default handle only | Multiple handles possible (category, product, CMS) |
| Update Frequency | Less frequent, requires careful testing | Can be modified more freely for specific pages |
How to Create a Layout with Parent Structural Block for Your Magento Store?
The link between a PHP block and the layout is established using the block tag in the XML layout file. This tag points to the specific PHP block class. It contains the logic to prepare and pass data to the template. It determines how content is displayed on your page.
When you create a block:
- The system creates the object name of a class.
- Block tags within a layout define its position.
- The rendering of a particular block follows the template rules.
- One or more child blocks can be added as needed.
Each block is an object of this class and the corresponding layout file. It contains methods to handle data and perform actions related to the page's content. It processes logic before passing the data to the associated template for rendering.
The rendering of a particular block is triggered when Magento processes the block tags within the layout. Each block renders its output based on the PHP block class’s methods. They are then passed to the template for display.
Magento Layout XML Attributes Reference Table
| Attribute | Description | Accepted Values |
|---|---|---|
| name | Unique identifier for blocks/containers | - A-Z, a-z, 0-9 - Underscore (_) - Period (.) - Dash (-) - Must start with a letter - Case-sensitive |
| display | Controls element visibility | - true (default) - false |
| template | Specifies the template file path | Vendor_Module::path/to/template.phtml |
| class | PHP class for block implementation | Fully-qualified class names |
| htmlTag | Wrapper HTML element | - div - header - footer - main - aside - section - nav |
| htmlClass | CSS classes for wrapper | - Any valid HTML class names |
| htmlId | HTML ID for wrapper | - Any valid HTML ID |
| before | Positioning relative to siblings | - Element name - Dash (-) for first position |
| after | Positioning relative to siblings | - Element name - Dash (-) for last position |
| remove | Removes an element from the layout | - true - false (default) |
| cacheable | Controls block caching | - true (default) - false |
| translate | Enables string translation | - true - false |
| shared | Controls instance sharing | - true (default) - false |
| output | Controls root element output | - 1 (recommended) - 0 |
| label | Container description | Any descriptive text |
FAQs
1. How can a Magento developer create custom layouts?
A Magento developer can modify layout files in their theme directory. They should work within app/design/frontend/[Vendor]/[theme]. It keeps custom changes separate from core files. Start with simple layout updates, and then test each change on a development site first.
2. Where are configuration layout files located in the magento_theme module?
The base layout files live in vendor/magento/module-theme/view/frontend/layout. These files control your store's default layout settings. Remember not to edit these files directly. Copy only the necessary files to your theme directory to make your changes there.
3. What's the difference between 2 column and 3 column layout?
A 2 column layout splits content into the main area and a sidebar, which works well for product pages. The 3 column layout adds another sidebar, which fits category pages better. Both layouts support custom content blocks.
4. How do I choose between layout options for my store?
Pick layouts based on your content needs. Product pages work with 2 columns, and category pages fit 3 column layouts. This is because they balance product details with related information like upsells. 3-column layouts suit category pages by providing filtering options. For example, filtering options (left), product grid (center), and comparison tools (right). Check your theme's options first, and then test each layout design with your content.
5. How can the Magento community help with layouts?
The Magento community shares code examples and solutions. Join forums like Magento StackExchange to connect with other developers. Ask layout-specific questions and share your solutions.
6. How do layout changes affect mobile views?
Mobile views adjust layouts automatically. Columns stack on smaller screens, which makes content readable on phones. Test layout changes across different mobile devices to help prevent issues.
Summary
Magento 2 Layout uses XML files and templates to determine the placement of content, blocks, and design elements across your website. It helps store owners:
- Improve their store’s structure.
- Better manage their store's appearance.
- Customize layouts with different layout types to enhance user experience.
- Optimize pages for efficient loading and improved store performance.
- Achieve the right structure and design for their store.
Manage the structure and design of your store’s layout with managed Magento hosting.


