5-Step Guide to Magento 2 Install Language Pack
Want to expand your Magento store to reach global customers?
Magento 2 install language pack helps transform your store into a multilingual platform. Language packs translate interface elements, navigation, and core content into different languages.
This tutorial will cover the requirements and steps to install language packs for your Magento 2 store.
Key Takeaways
-
Install Magento 2 language packs for a multilingual store experience.
-
Expand your market reach with multiple language options for global customers.
-
Install language packs easily via Composer or manual methods.
-
Secure your store with proper file permissions and backup strategies.
-
Test language pack installation for accurate translations across your site.
-
Benefits of Installing Language Packs for Your Magento Store
-
Security Considerations During Magento 2 Language Pack Installation
What is a Magento 2 language pack?
“A Magento 2 language pack is a collection of translation files that convert your store's interface into different languages. The pack includes CSV files and PHP dictionaries stored in the app/i18n directory.”
These files translate various store elements:
-
Product descriptions and categories
-
Navigation menus and buttons
-
Shopping cart and checkout pages
-
Customer account sections
-
Admin panel interfaces
-
System messages and notifications
-
Email templates
Language packs work through Magento's i18n (internationalization) system. You can install multiple language packs to create a multi-language store. Each pack contains locale-specific translations for your store's text content.
The translation process happens automatically once you install a language pack. When customers select their preferred language, Magento displays related translations from the installed pack.
Language packs integrate directly with Magento's core system rather than using apps. The packs support both frontend and admin panel translations, allowing complete store localization.
Benefits of Installing Language Packs for Your Magento Store
| Aspect | Description |
|---|---|
| Global Market Access | Installing a Magento 2 language pack allows you to reach international markets. By offering content in multiple languages, you can communicate with a diverse audience. It expands your market reach. |
| Enhanced User Experience | Language packs improve the shopping experience by displaying content in customers' native languages. Familiarity builds trust and makes navigation intuitive, leading to higher satisfaction and engagement. |
| SEO Advantages | Multi-language stores benefit from improved search engine optimization. Localized content ranks better in regional searches, attracting more organic traffic. It boosts visibility in international search results. |
| Increased Conversion Rates | Customers buy more when checkout processes are simple. Language packs help reduce cart abandonment. Provide clear information in the customer's preferred language. |
| Brand Trust and Loyalty | Offering native language support shows commitment to customer needs. It enhances brand reputation and fosters loyalty, as customers feel valued and understood. It can lead to repeat business and referrals. |
| Competitive Edge | Language packs give you an edge over competitors who only offer single-language sites. They allow you to cater to various markets. It makes your store more appealing to international shoppers. |
Prerequisites of Magento 2 Language Pack Installation
1. System Requirements
-
PHP Version: Your server must run PHP 7.4 or higher. It supports the latest Magento 2 features and security updates.
-
Composer: Composer is essential for managing dependencies. It simplifies the installation of language packs and other Magento components.
-
Server Permissions: Set correct file permissions for the Magento directory. It allows the system to read and write necessary files during installation.
-
Database Access: Make sure you have access to your database. Back up your data to prevent loss during the installation process.
2. Store Configuration
-
Store Views: Create separate store views for each language. The setup allows you to manage translations for different regions effectively.
-
Locale Settings: Configure locale settings in the admin panel. Choose the language code that matches your desired translation.
-
Cache Management: Prepare to flush the Magento cache. Clearing the cache confirms new translations appear correctly on your site.
-
Backup Strategy: Implement a backup strategy for your store's data. Regular backups protect against data loss during updates.
3. Technical Knowledge
-
Command Line Skills: Basic command-line skills are necessary. You'll use commands like
composer requireto install language packs. -
Magento Admin Panel: Familiarity with the admin panel is critical. You'll configure store views and locale settings here.
-
Translation Files: Understand how translation files work. These files contain phrases for translation used across your store.
-
Customization Options: Know how to customize translations. You may need to adjust translations to fit your store's branding.
4. Development Environment
-
Local Setup: Set up a local development environment. Test installations locally before applying changes to your live store.
-
Version Control: Use version control systems like Git. Track changes and revert if necessary during installation.
-
Testing Procedures: Plan thorough testing procedures. Verify that translations display correctly across all store views.
HowGuide to Install Magento 2 Language Packs in 5 Steps?
Step 1: Download the Language Pack
-
Choose a Language Pack: Start by selecting a language pack that fits your needs. You can find these packs on the Magento Marketplace or third-party sites.
-
Download the Files: Download the language package files to your local system. These files typically include CSV files containing translation dictionaries.
-
Verify Compatibility: Check that the language pack is compatible with your Magento 2 version. It prevents potential conflicts during installation.
-
Backup Your Store: Create a backup of your store's data before proceeding. It protects against data loss if issues arise during installation.
-
Prepare for Installation: Make sure you have access to your Magento root directory and necessary permissions. It allows you to upload and configure files as needed.
Step 2: Installation via Composer
-
Access the Server: Log in to your Magento server using SSH. Navigate to the root directory where your Magento application is installed.
-
Run Composer Command: Use
composer requirefollowed by the language pack identifier. The command downloads and installs the language pack automatically. -
Update Magento Setup: Execute
php bin/magento setup:upgradeto update the system with new configurations. -
Deploy Static Content: Run
php bin/magento setup:static-content:deploy <language_code>. The command compiles and deploys static content for the new locale. -
Clear Cache: Finish by clearing cache with
php bin/magento cache:flush. The step guarantees all changes are applied correctly.
Step 3: Create a Store View

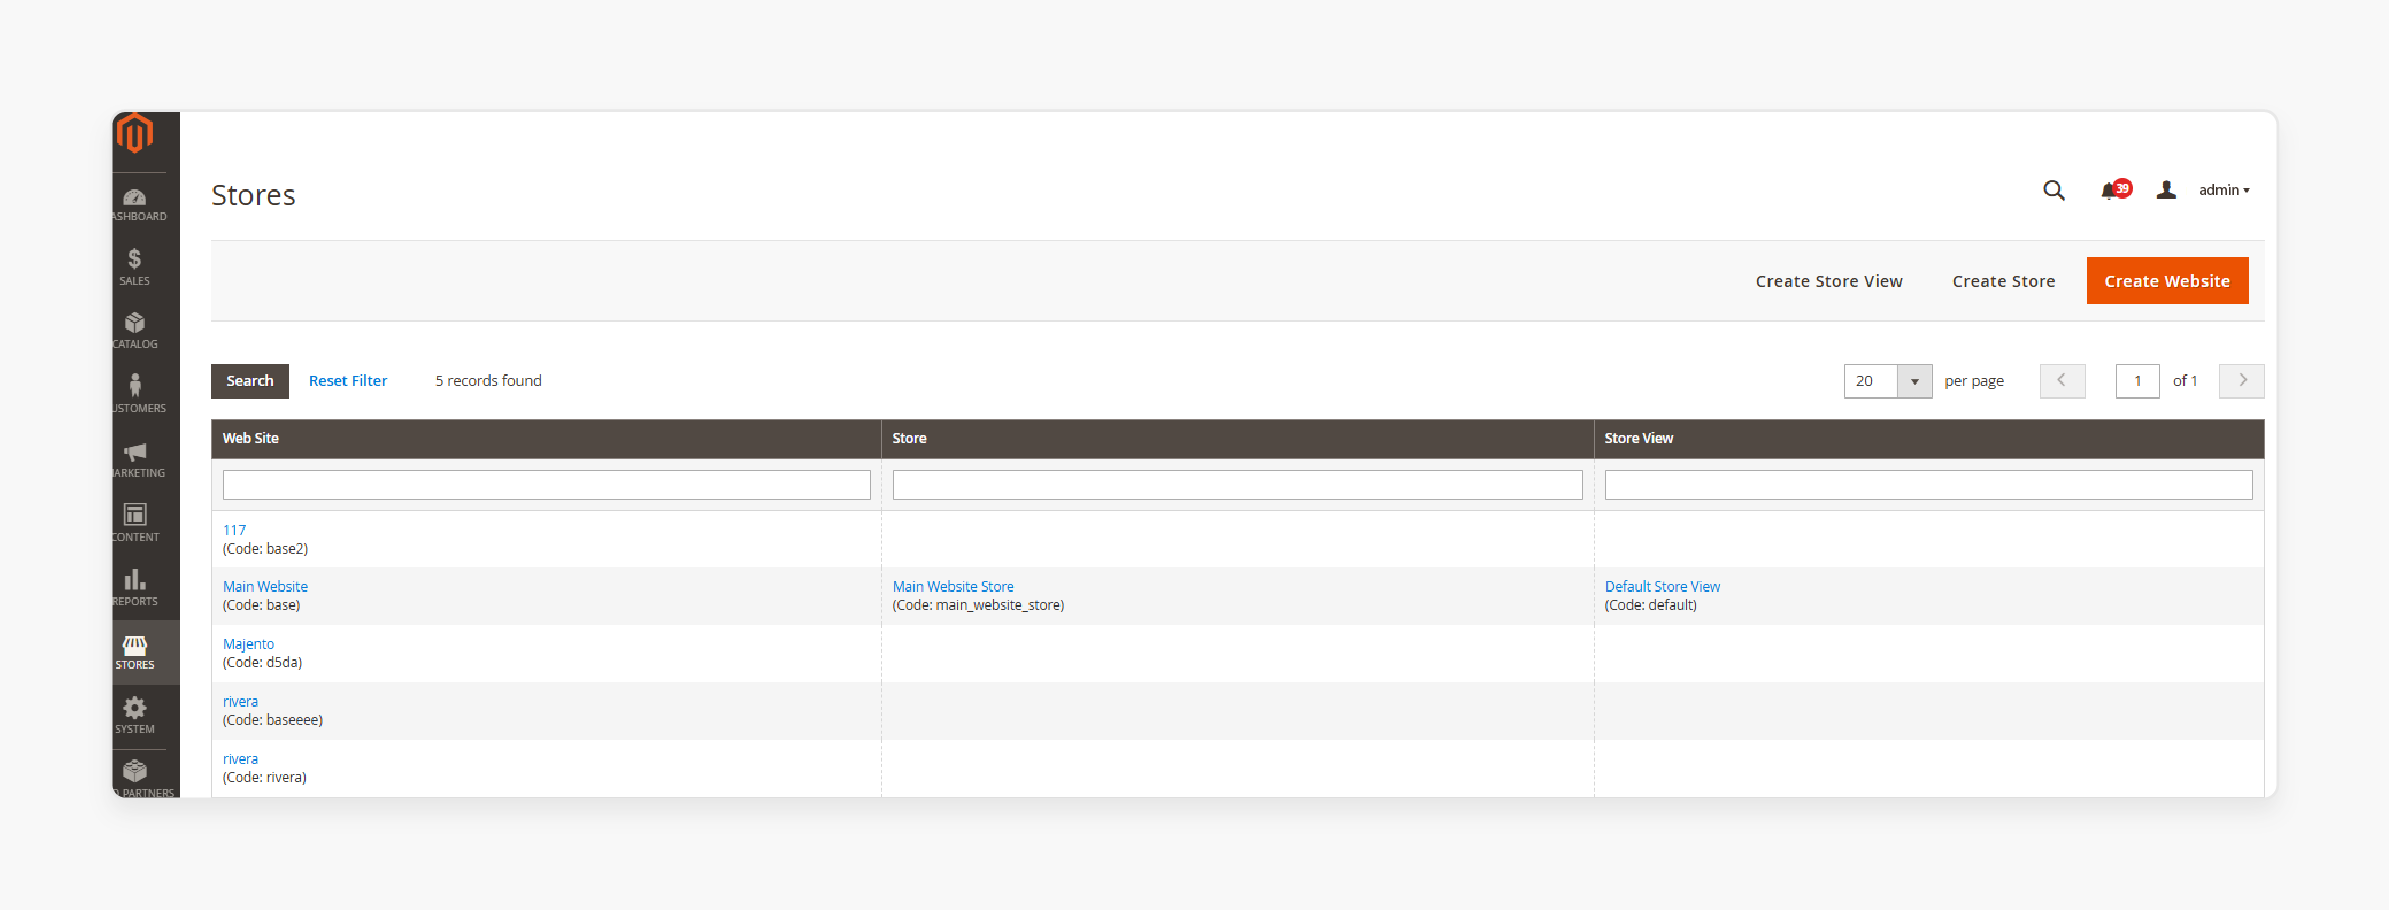
- Navigate to Admin Panel: Go to Stores > Settings > All Stores in your admin panel. It is where you manage store views.

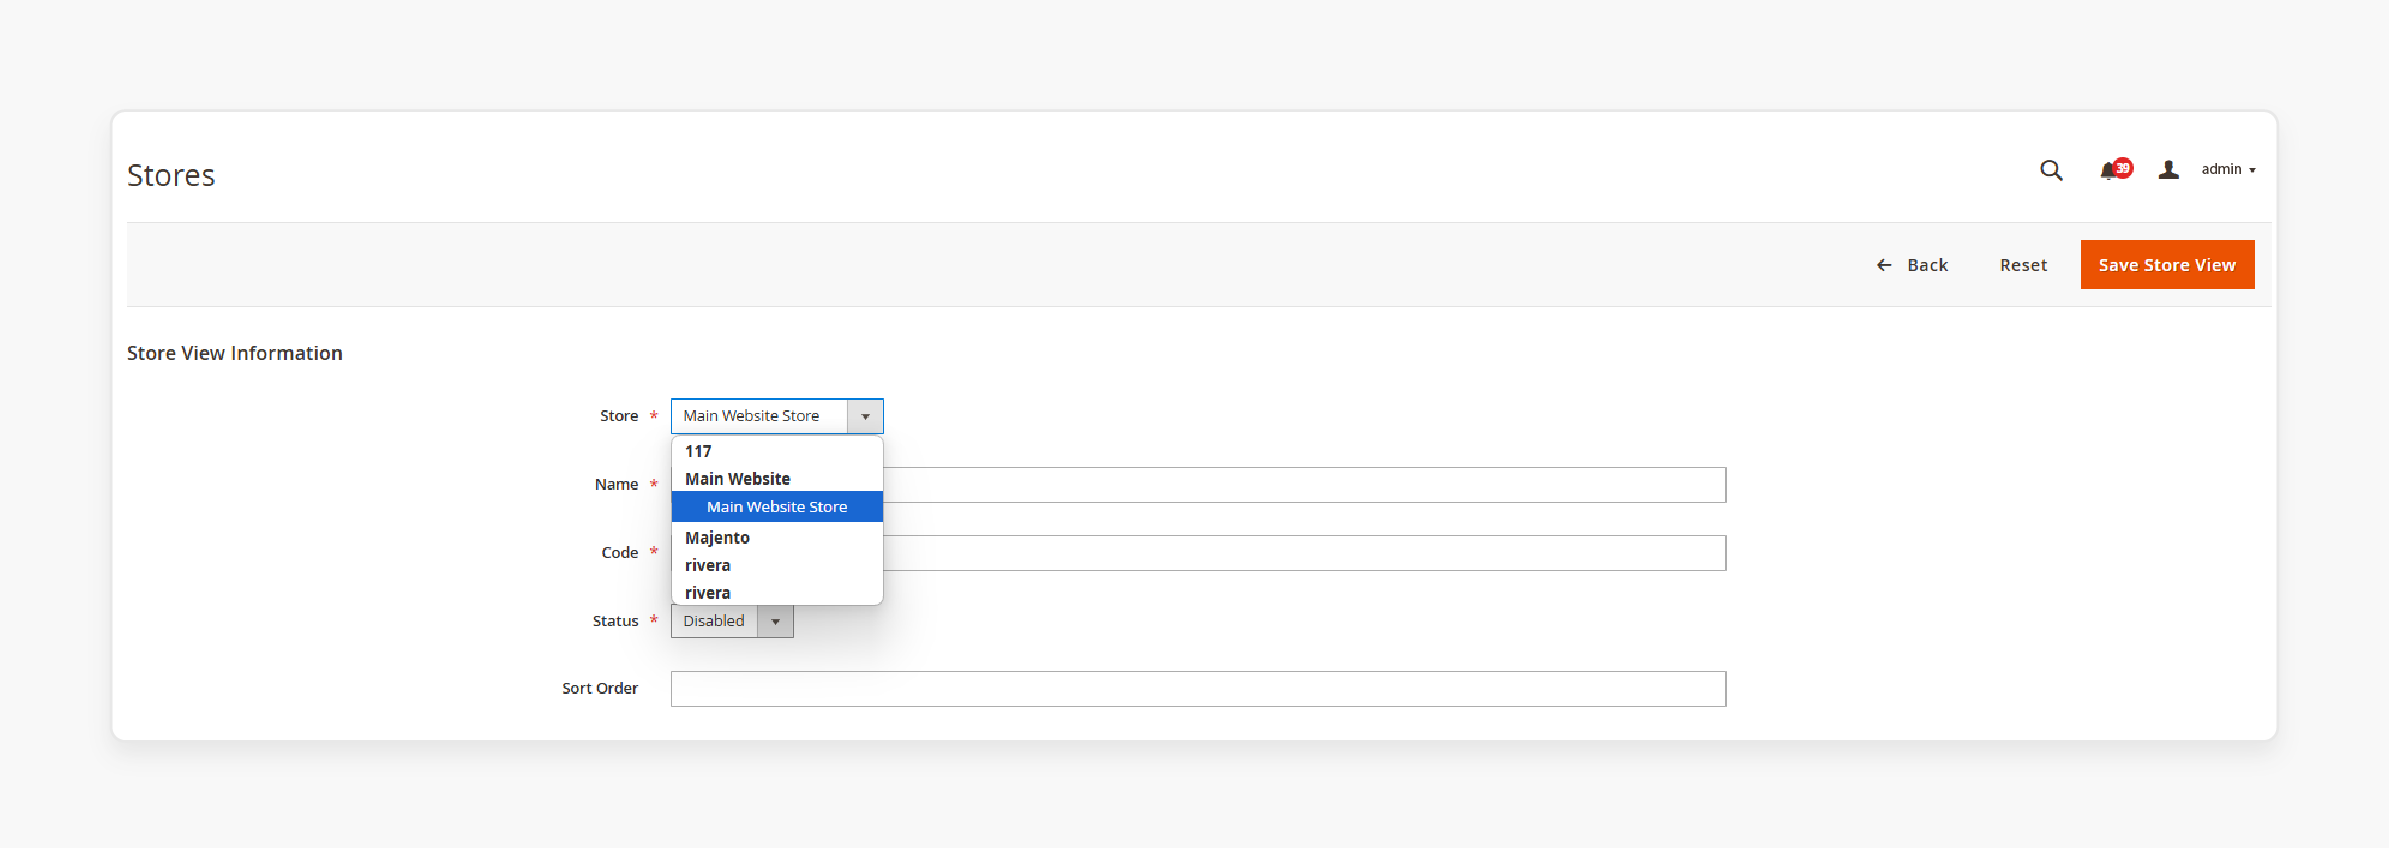
- Create New Store View: Click 'Create Store View' and fill in details like name, code, and status. Set the locale to match your new language pack.

-
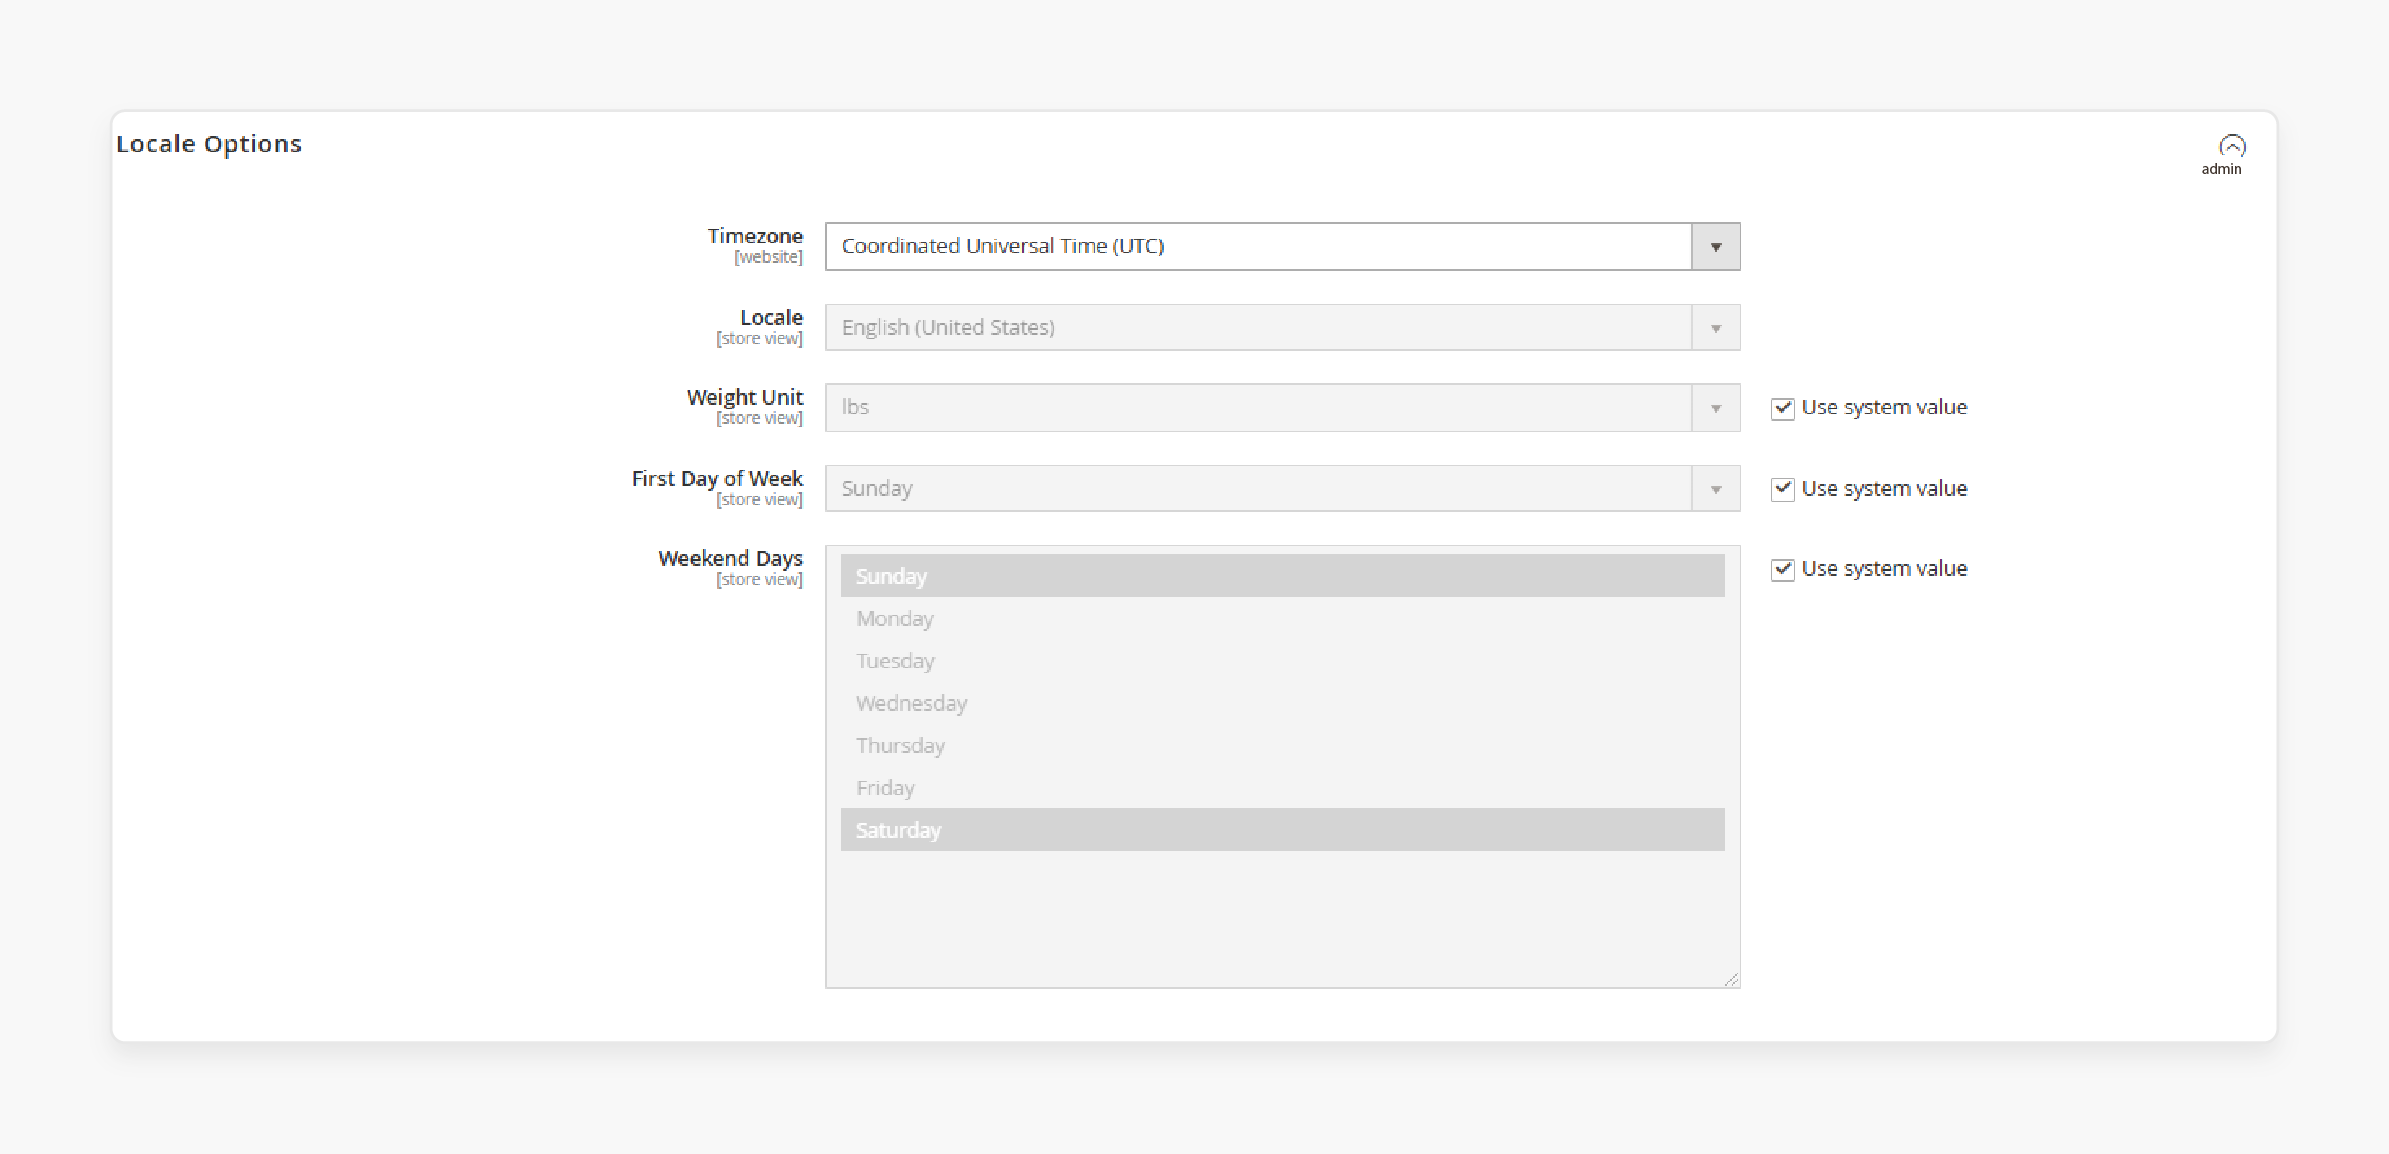
Configure Locale Options: Go to Stores > Configuration > General > Locale Options. Select your new language from the dropdown menu.
-
Save Changes: Click ‘Save Config’ after making selections. It applies your settings across the store view.
-
Test Store View: Verify that the new store view displays correctly in the chosen language. Check both the front end and admin panel for consistency.
Step 4: Manual Installation Method
-
Upload Files Manually: If not using Composer, upload CSV files directly to app/i18n directory. Make sure they follow Magento’s directory structure.
-
Register Language Pack: Create or update registration.php in app/code/<Vendor>/<Module>. The file registers your custom language pack with Magento.
-
Deploy Content Manually: Use CLI commands to deploy static content manually. It includes compiling translations for front-end use.
-
Flush Cache Again: Always clear the cache after manual changes. It helps reflect updates immediately on your site.
Step 5: Verify Installation
-
Check Frontend Display: Visit your store's front end to verify translations appear correctly. Look for translated navigation menus, buttons, and labels.
-
Review Admin Panel: Confirm that the admin panel elements are also translated. It includes system messages and configuration options.
-
Test Checkout Process: Run through a test purchase. Confirm if checkout pages are displayed in the correct language.
-
Adjust Custom Translations: Use inline translation tools for any untranslated elements. These tools allow you to customize translations directly from the admin panel.
Security Considerations During Magento 2 Language Pack Installation
1. Verify Source Authenticity
| Aspect | Description |
|---|---|
| Trusted Sources | Only download language packs from reputable sources like Magento Marketplace or verified developers. It reduces the risk of malicious code. |
| Check Reviews | Before downloading, read reviews and ratings. These provide insights into the reliability and safety of the language pack. |
| Version Compatibility | Make sure the language pack is compatible with your Magento 2 version. Incompatibility can cause security vulnerabilities. |
| License Agreement | Review the license agreement for any usage restrictions. It assures compliance with legal requirements. |
2. Secure File Permissions
| Aspect | Description |
|---|---|
| Set Permissions | Configure file permissions to limit access. Only authorized users should modify files in the root directory. |
| Use SSH | Access your server using SSH for secure file transfers. It encrypts data, preventing unauthorized access. |
| Regular Audits | Conduct regular audits of file permissions. It helps identify and rectify any unauthorized changes. |
| Backup Files | Always back up files before changing permissions. It allows you to restore them if issues occur. |
3. Data Backup Strategy
| Aspect | Description |
|---|---|
| Full Backup | Perform a full backup of your Magento 2 store before installation. It includes databases and files, enabling data recovery if needed. |
| Automated Backups | Set up automated backups at regular intervals. It minimizes data loss risks during unexpected events. |
| Test Restorations | Regularly test backup restorations to verify data integrity and recovery processes. |
4. Monitor System Activity
| Aspect | Description |
|---|---|
| Log Monitoring | Enable logging to track system activities during installation. It helps detect suspicious activities early on. |
| Alert Systems | Set up alert systems for unusual activities. Such includes failed login attempts or unauthorized access attempts. |
| Regular Reviews | Regularly review logs for anomalies that could indicate security breaches or system issues. |
| Access Control Logs | Keep detailed logs of who accesses the system and when. Maintain accountability and traceability. |
5. Update and Patch Management
| Aspect | Description |
|---|---|
| Regular Updates | Keep Magento 2 and all extensions updated to patch known vulnerabilities promptly. |
| Patch Testing | Test patches in a staging environment before applying them to your live store. It prevents disruptions. |
| Security Bulletins | Subscribe to Magento security bulletins for updates on new threats and patches. |
| Automated Patching Tools | Use automated patching tools to streamline patch deployment across your systems efficiently. |
FAQs
1. How does a language pack in Magento 2 differ from Shopify apps for translation?
A language pack in Magento 2 integrates directly with the core platform. Unlike Shopify apps, it changes the language across your entire ecommerce store. Magento's system modifies text content on your Magento platform without needing third-party tools. You can add more languages through the admin panel.
2. What are the steps to install language packages via a third-party provider?
Download the language package from the provider. Upload files to your application root directory. Instead of specifying a module location, place translation files in the i18n folder. Find in the code any placeholder text. Save the settings after installation completes.
3. How do I change the language for products and categories in multiple regions?
Navigate to store configuration. Click the 'use website' checkbox after the locale field. Select your target language for different text content. The system updates product names and translations for different text automatically. Click the 'save config' button.
4. Where can I find translation files for different text content in Magento 2 extensions?
Check the module or theme directory of your extensions. Several language packages exist in the dir__ folder. Modules and themes contain specific translation files. E.g., look under app/code for custom translations.
5. Can I create a multi-language Magento 2 website for multiple regions and markets?
Yes. Set up store views for each region. Translate words and phrases using language packs. Want to introduce new languages? Install them through the admin panel. Your online store can serve multiple markets effectively.
6. How do I manage content on my Magento 2 store across different languages?
Access the admin panel. Locate the files for different text content. Specify a module or theme for custom translations. A set of files controls translations for each language. Update product information for each locale.
7. What makes the Magento 2 platform better for international markets?
Magento 2 extensions support comprehensive language management. Unlike basic Shopify apps, Magento handles multiple regions natively. You can customize the phrases that the command generates. The system manages translations across your entire store.
Summary
Installing Magento 2 language pack provides store admins with multiple language choices. They can select their preferred language for store elements, menus, and buttons. Following are some key points to keep in mind while installing your language pack:
-
Back up your store data before installing any language pack. Create separate backups for your database and files to prevent data loss.
-
Download language packs only from the official Magento Marketplace. Verified sources protect your store from harmful code that could damage your site.
-
Set up different store views for each new language. Each store view needs its own locale settings and translations for proper function.
-
Clear your store's cache after installing the language pack. Cache clearing helps display new translations right away on your store.
-
Test all translations on a staging site first. Check every page and feature to catch any missing or incorrect translations.
-
Keep your language packs updated with your Magento version. Regular updates fix translation errors and add new phrases for better customer experience.
Managed Magento hosting enables error-free language pack configuration for your store.


