
Configure Magento 2 Install Extension Without Command Line
Looking to enhance your online store without configuring complex commands? Magento 2 install extension without command line enables you to add new features using simple file uploads.
This tutorial will cover the step-by-step process to install Magento 2 extensions without command line.
Key Takeaways
- Benefits of backing up your store and verifying extension compatibility.
- Prerequisites to configure new features directly from the admin panel.
- A range of installation methods, from enhancing user experience to boosting store performance.
- Steps to install Magento extension without command line access.
- Tips to add new features and improve your store's functionality within minutes.
- Best practices and troubleshooting procedures for store maintenance.
-
What is the Estimated Time for Installing Extensions on Your Magento Website?
-
Benefits of Installing Magento 2 Extensions for Ecommerce Businesses
-
How to Install a Magento 2 Extension Using Composer Update Command?
-
6 Steps to Install an Extension on Magento Site Using a Zip File
-
Common Magento2 Installation Errors and Solutions Without Using Command Line
What is the Estimated Time for Installing Extensions on Your Magento Website?
The initial Magento 2 setup takes about 10 minutes. However, making adjustments to your web server settings and integrating extensions take up to 2 hours.
Experienced users can add or remove extensions in just a few minutes. But, if you're new to Magento 2, it's best to allocate several hours or even a few days. It helps you handle any potential issues that might come up.
Experts often allow one to two business days to complete the entire installation. Refer to Magento tutorials and courses to maximize your use of the platform and its features.
Due to the complexity of the installation process, businesses prefer hiring expert developers. These professionals help build stores & install extensions efficiently, ensuring a smooth setup.
Benefits of Installing Magento 2 Extensions for Ecommerce Businesses
1. Enhanced Functionality
Magento extensions expand your store’s capabilities by:
- Integrating payment gateways like PayPal, Stripe, & Square to offer customers multiple payment options
- Adding advanced search features such as filtered navigation, autocomplete, and product suggestions
- Enhancing social media connectivity through automatic product sharing, social login, and review integration.
Each capability directly impacts sales by reducing cart abandonment and improving user experience.
2. Customization and Personalization
Extensions provide a wide range of options to customize your store. They cover areas like sales, SEO, checkout, shipping, and gift options. It allows you to tailor your Magento stores to meet specific business needs.
3. Time and Cost Savings
Extensions offer ready-made solutions for common e-commerce challenges. It eliminates the need to build features from scratch. It not only cuts down on development time but also reduces costs.
Magento 2 extensions save time and money by:
- Providing pre-built solutions that would take weeks to custom-develop
- Reducing development costs (custom features can cost "$5,000"-"$20,000")
- Offering immediate implementation compared to 2-3 months for custom development
- Including regular updates and maintenance from developers.
For example, a product label extension costing "$100" would take 40-50 hours to develop custom. It saves you approximately "$4,000" in development costs.
4. Improved Performance and Scalability
Extensions like caching tools can boost page load speeds and reduce server load. Other extensions focus on performance monitoring, helping you to identify & address potential issues. It enhances store performance as traffic grows.
Performance-focused extensions improve your store by:
- Implementing full-page caching to reduce load times from 3-4 seconds to under 1 second
- Optimizing images automatically to minimize bandwidth usage
- Implementing lazy loading to improve initial page load speed
- Providing real-time performance monitoring with specific metrics and alerts
These improvements directly impact sales, as each second of delay can reduce conversions by 7%.
5. SEO and Marketing Benefits
Many Magento extensions are designed to enhance visibility through:
- Automated meta tag generation based on product attributes
- Dynamic XML sitemap updates that ensure search engines find new products immediately
- Schema markup implementation for better rich snippets in search results
- URL optimization tools that follow SEO-friendly URLs and their best practices
- Integration with Google Search Console for direct performance monitoring
These features improve visibility, drive organic traffic, and enhance product marketing.
6. Integration Capabilities
Magento extensions enable seamless integration with third-party tools, such as:
- Accounting software
- CRM systems
- Email marketing
- Analytics platforms
These integrations automate workflows, simplify data exchange, and streamline operations.
Prerequisites for No-Command-Line Extension Installation
1. Switch to a Development Environment
Avoid installing extensions directly on the production environment. It helps you prevent disruptions.
2. Check Compatibility
Confirm that the extension is compatible with your Magento version. For example, Magento 2.3 and Magento 2.4.
3. Choose a Trusted Extension Provider
Always download extension files from reputable sources. It helps you avoid conflicts and ensure quality.
4. Back Up Your Store
Make sure to back up both your store’s files and database. Use the command below for a full backup:
php bin/magento setup:backup --code --media --db
5. Verify PHP Version
Ensure your PHP version meets the extension’s requirements. Check your version by running:
php -v
6. Understand Dependencies
Some extensions may rely on additional dependencies. Review the extension’s documentation for specific requirements.
7. Enable Maintenance Mode
Activate maintenance mode to prevent user access issues during installation. Use the following command:
php bin/magento maintenance:enable
8. FTP or File Manager Access
Have your FTP credentials or file manager access ready to upload the files if needed. Run the extension in a production environment to catch potential issues early. Keep the maintenance mode enabled to ensure a smooth installation & minimize potential issues.
5 Steps to Install Magento 2 Extensions Without SSH
- Go to
app/etc/and open theConfig.phpfile. - Add the necessary line of code for the extension.
- Access your database directly through phpMyAdmin or a similar tool.
- Locate the
setup_moduletable and insert the relevant record for the extension. - Complete the process by refreshing or flushing the cache in the Magento admin panel.
How to Install a Magento 2 Extension Using Composer Update Command?
1. Prerequisites
i. Back up Your Server: Use php bin/magento setup:backup --code --media --db or manually back up files.
ii. Set Pre-Install File Permissions: Adjust permissions based on your hosting setup.
iii. Enable Developer Mode: Activate developer mode for better error visibility.
iv. Enable Maintenance Mode: To prevent disruptions, enable maintenance mode using:
php bin/magento maintenance:enable
Note: Before starting, ensure that you have Composer installed on your system. You can download it from **https://getcomposer.org/download/**.
2. Obtain the Extension’s Composer Name and Version
i. Log in to your Magento Marketplace account.

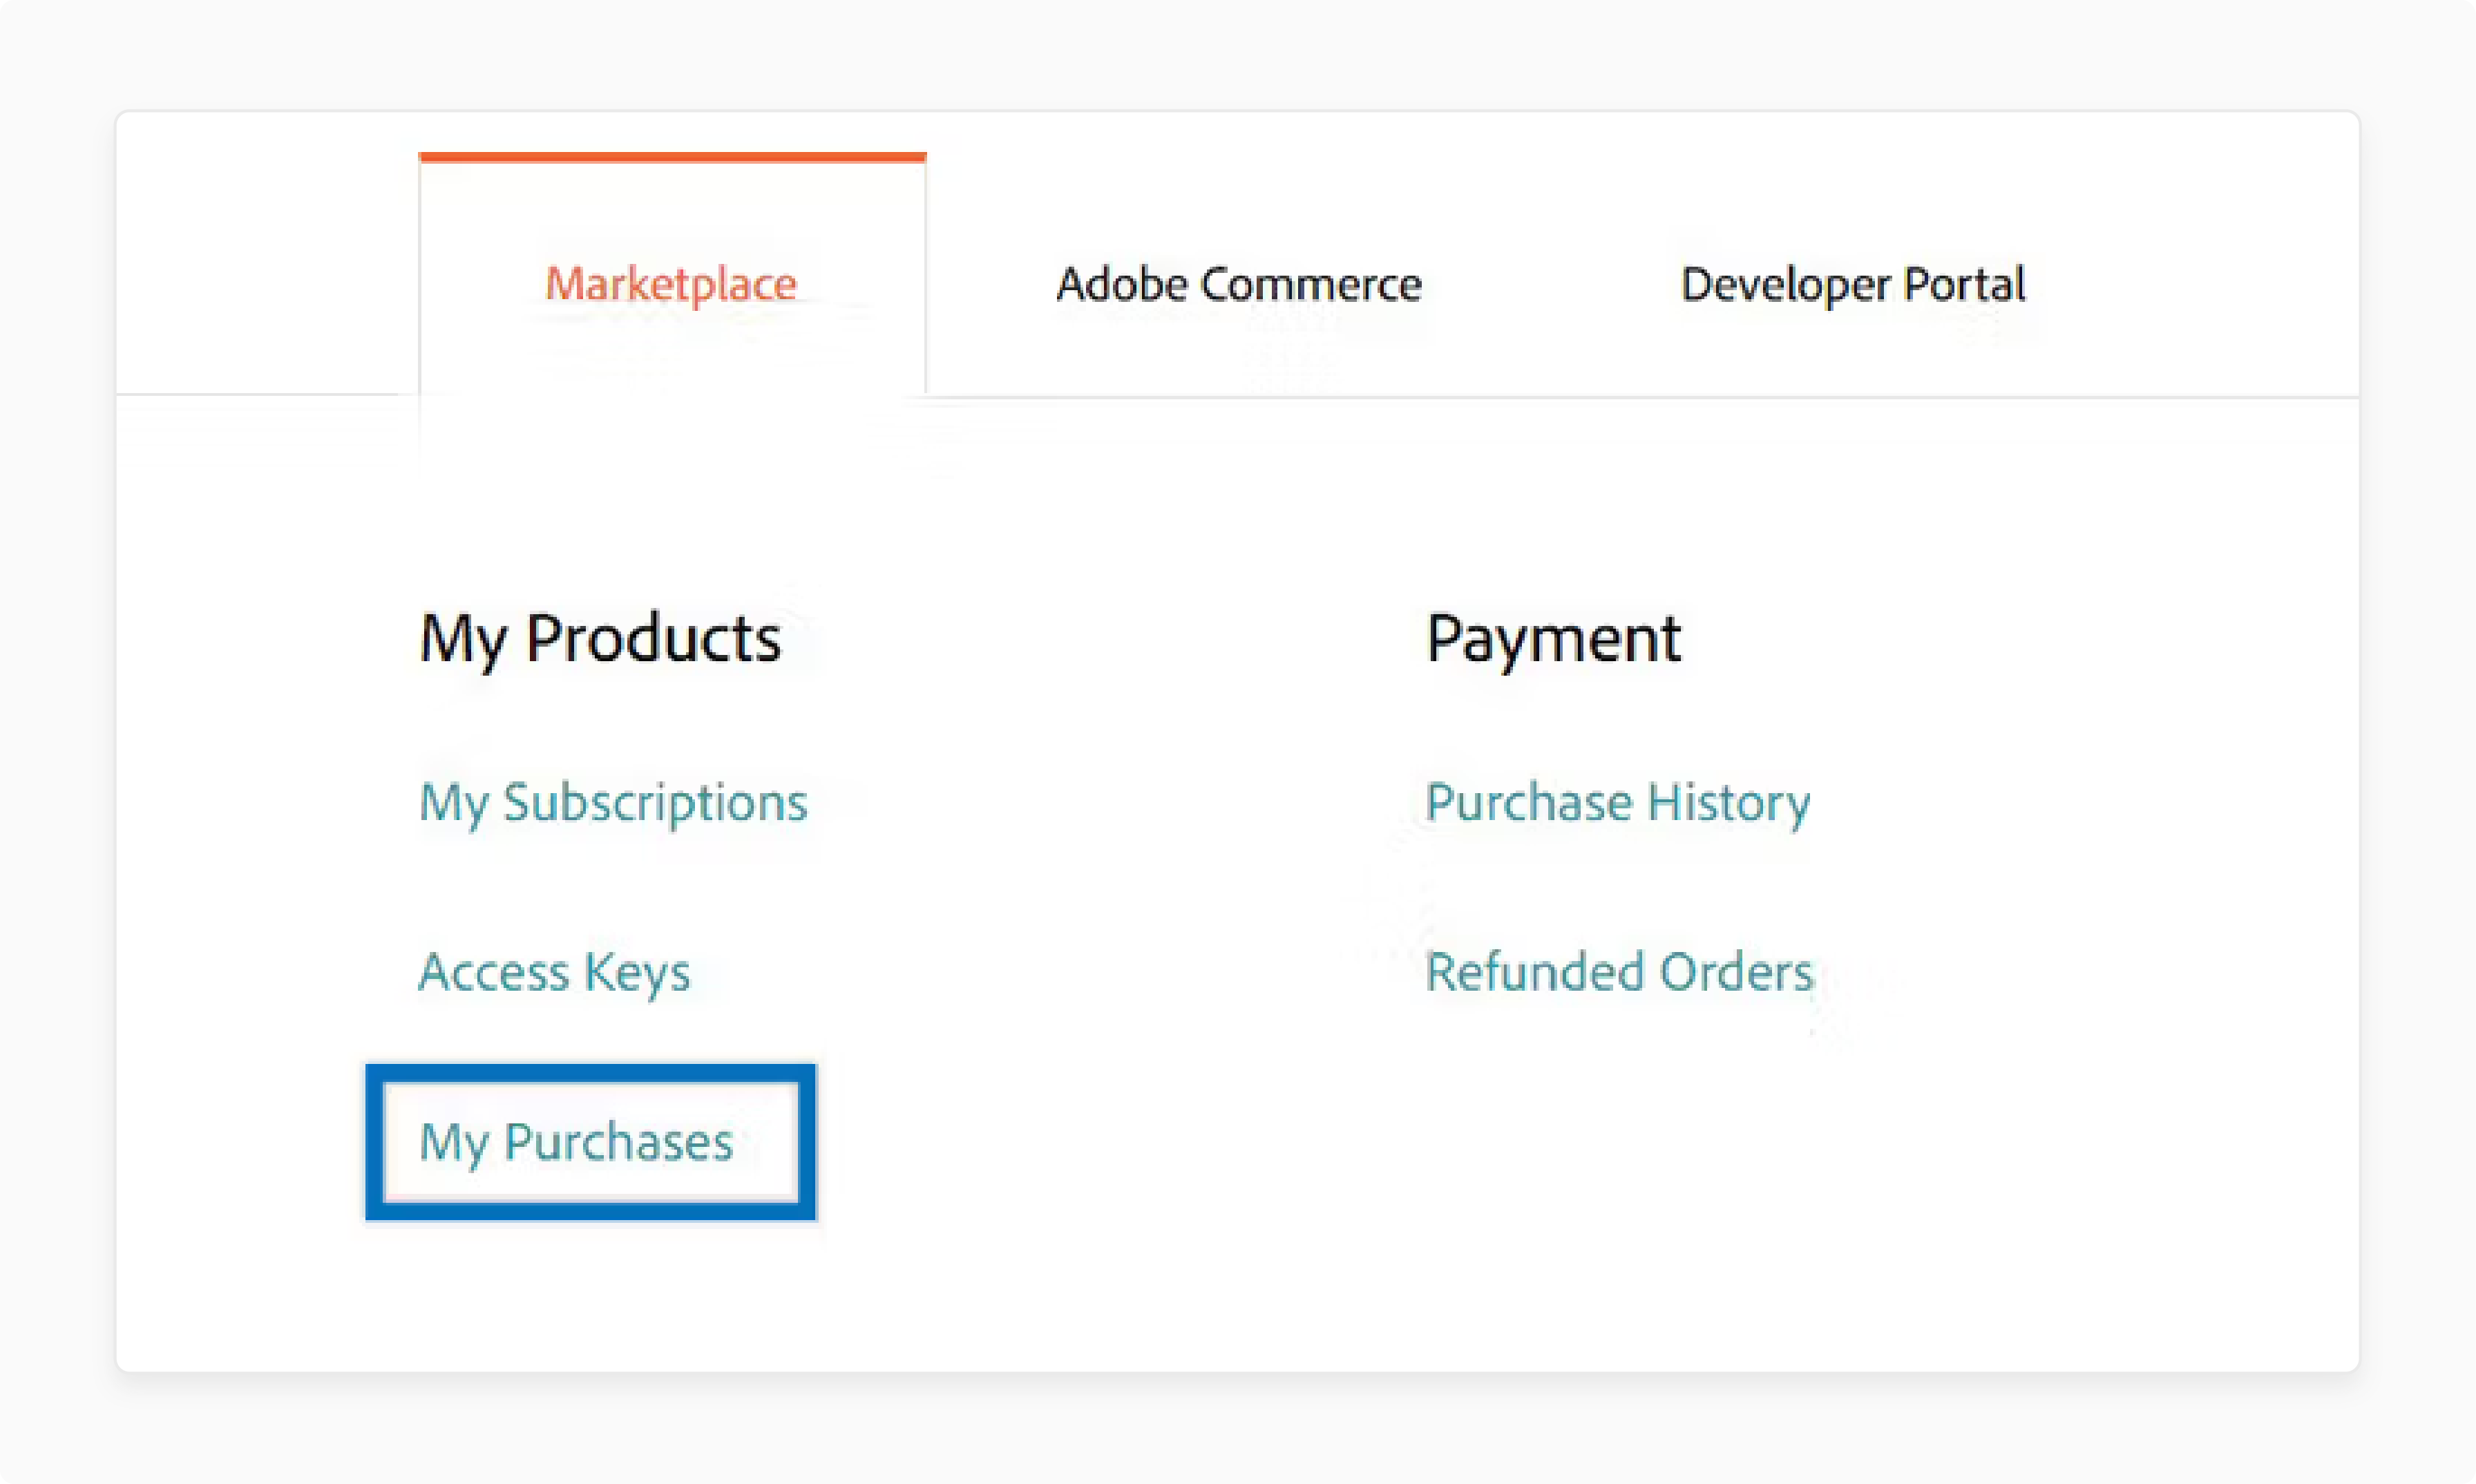
ii. Go to Marketplace > My Products and select "My Purchases".
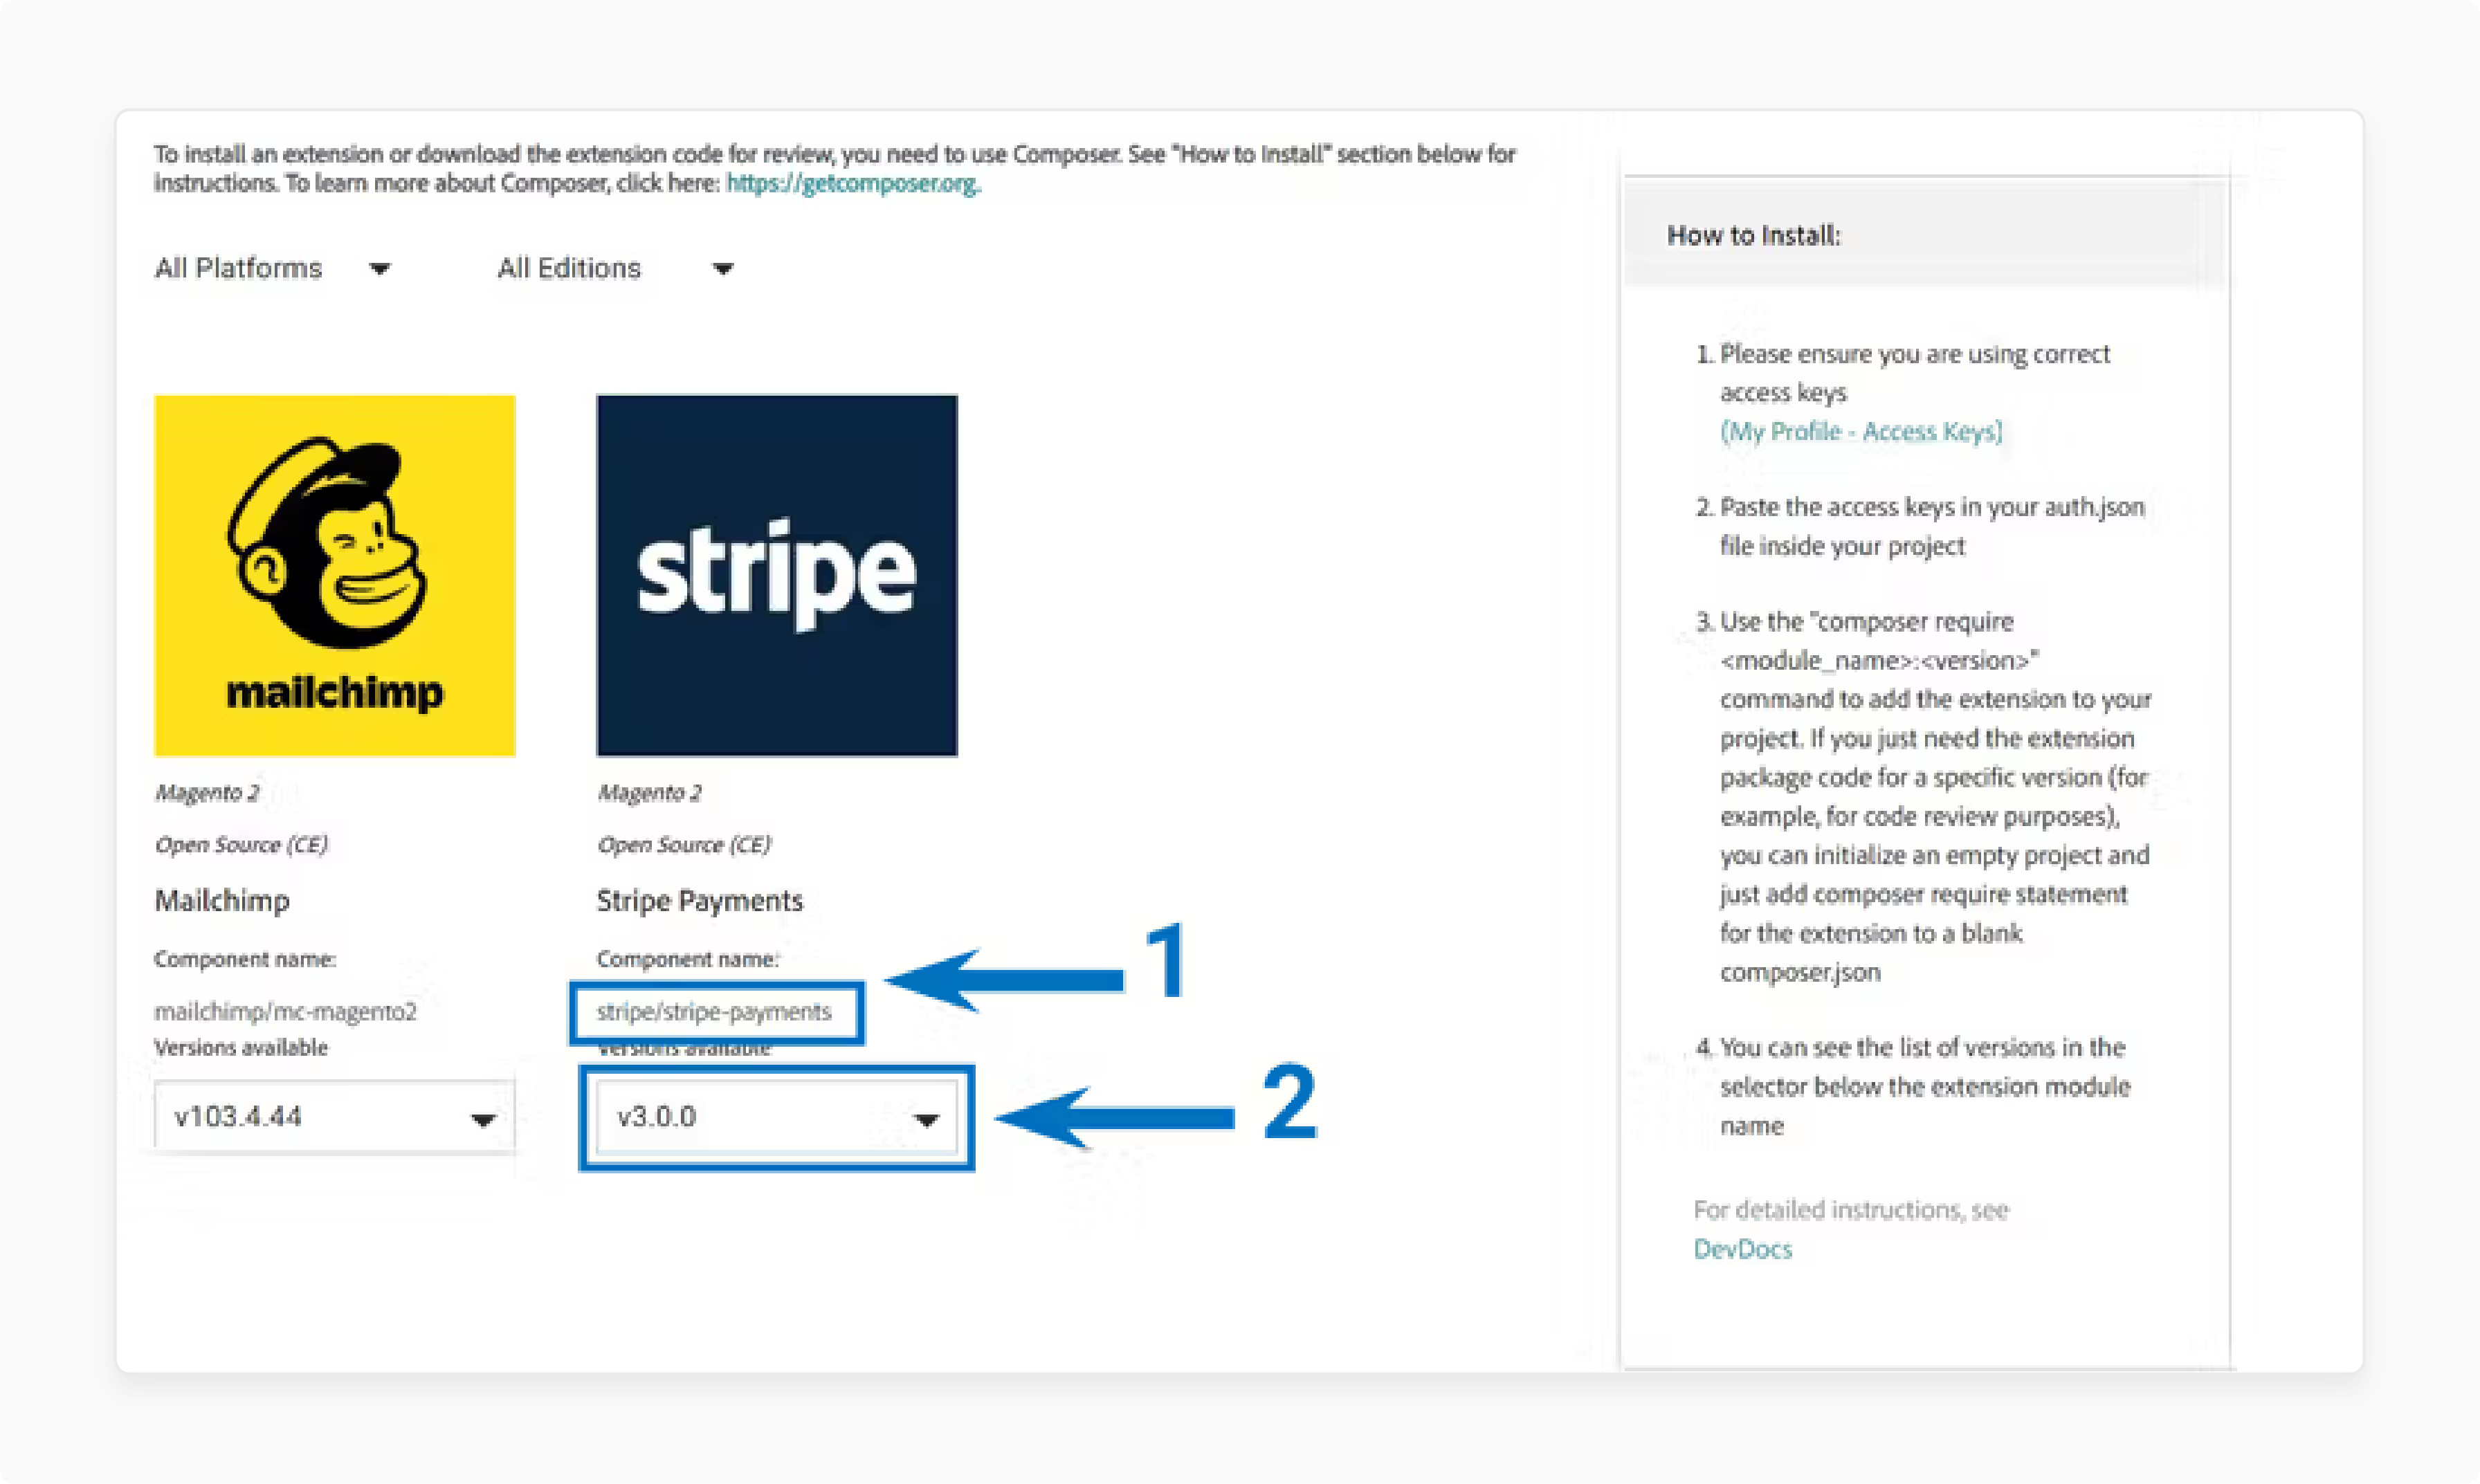
iii. Locate your Magento 2 extension, noting the "Component Name" and "Version".
3. Update the Magento composer.json File
i. Navigate to the Magento root directory in the command line. ii. Run the following command:
composer require <component-name>:<version>
Replace <component-name> and <version> with the actual values. For instance:
composer require <version_name>/magento2-google-tag-manager
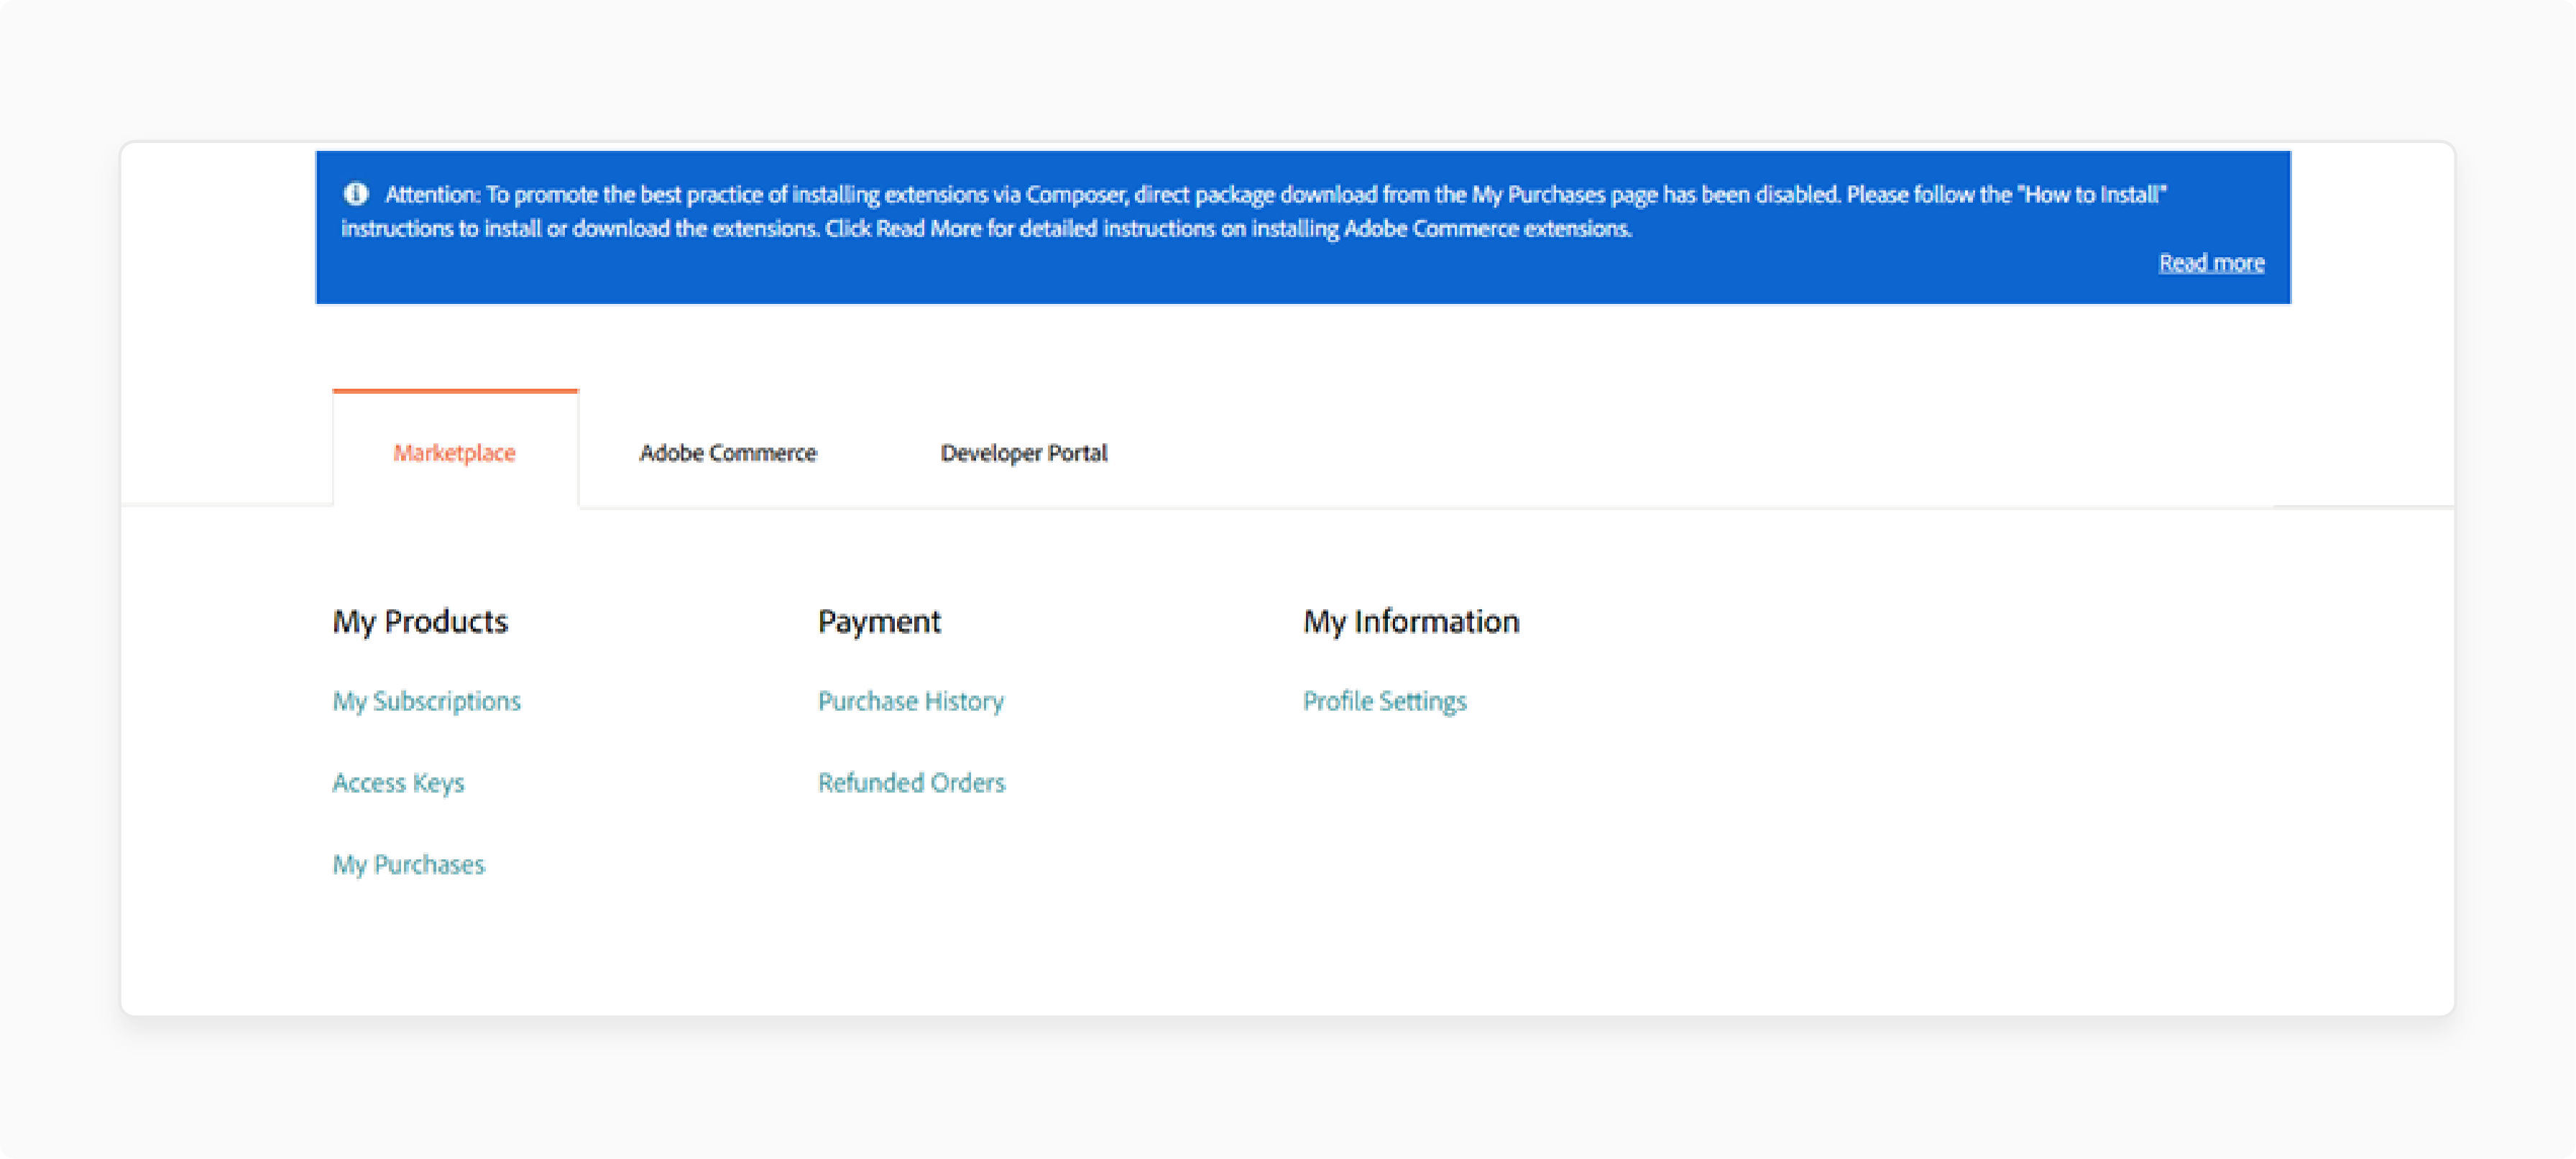
iii. Navigate to My Profile > Marketplace and select 'Access Keys'.
iv. Generate Keys (if none are available) and ensure they are enabled.
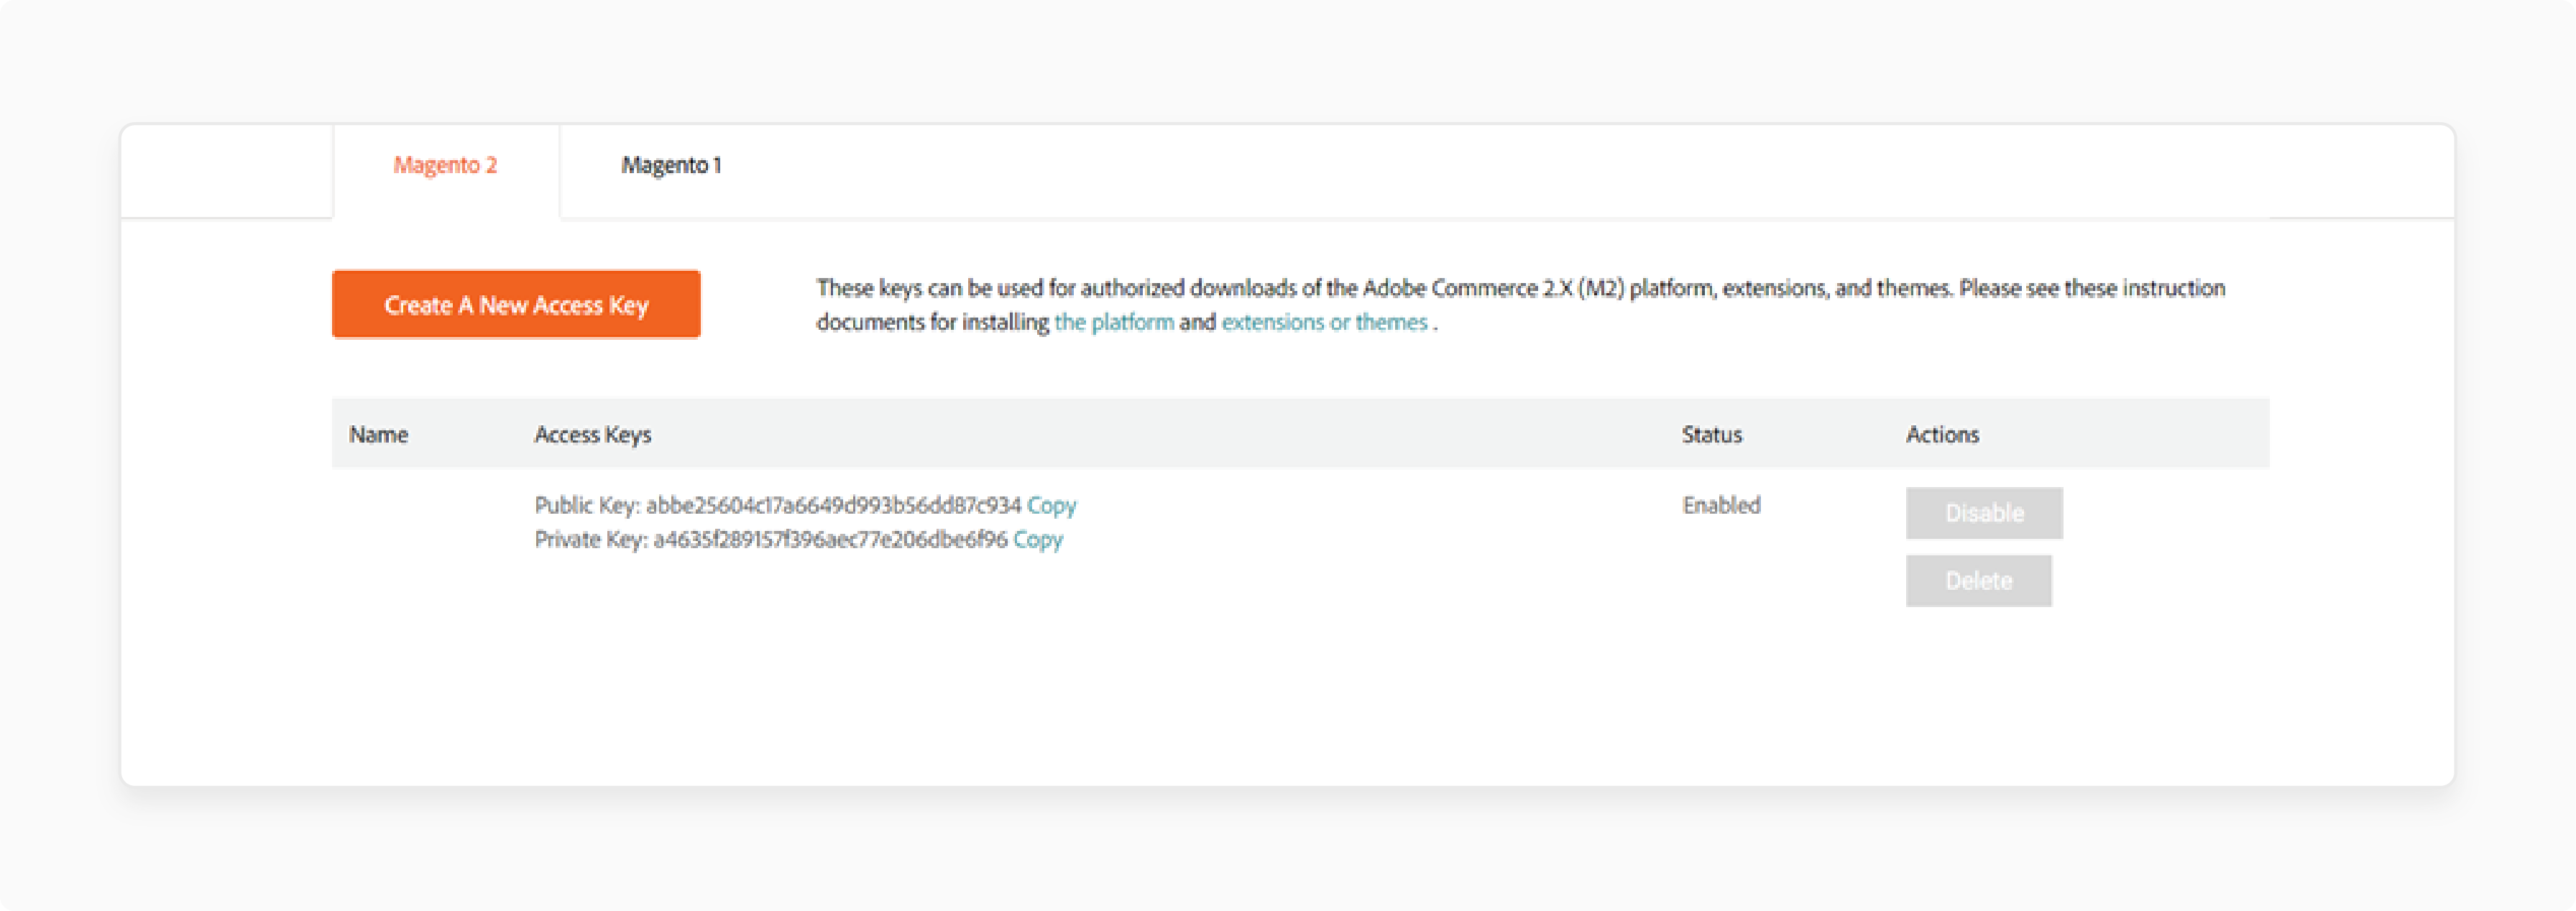
v. Copy the "public key" and paste it into the username field. vi. When prompted, type “Y” to save the credentials for future use.
Note: If prompted, enter your public key as the "username" and "private key" as the password.
vii. Allow the extension to install & then run composer update to complete the installation.
4. Register the Extension and Clear the Magento Cache
i. Run the following commands to complete the extension setup:
php bin/magento setup:upgrade
php bin/magento setup:di:compile
php bin/magento setup:static-content:deploy
ii. Clear the cache by executing:
php bin/magento cache:clean
php bin/magento cache:flush
5. Verify the Magento 2 Extension Status
i. To confirm the installation, check the module status:
php bin/magento module:status <VendorName>_<ComponentName>
ii. If the extension is disabled, enable it with:
php bin/magento module:enable <VendorName>_<ComponentName> --clear-static-content
6. Update Permissions and Disable Maintenance Mode
- Adjust file permissions for production as needed.
- Disable maintenance mode to restore site functionality of your online store:
php bin/magento maintenance:disable
6 Steps to Install an Extension on Magento Site Using a Zip File
- Extract the downloaded
.zipfile for the extension. - Use an FTP or SFTP client to connect to the server where your website source folder is stored. Examples include WinSCP, FileZilla, or Cyberduck.
- Navigate to the
upload > appfolder within the extracted files. - Upload these files to your Magento website’s root
appfolder using the ‘Merge’ upload mode.
Note: This mode will only add new files, preserving your existing setup.
- Connect to your Magento directory.
Note: You can do this by configuring the command line through SSH.
- Execute the following commands to easily install and configure the extension:
-
php bin/magento setup:upgrade- Installs the extension. -
php bin/magento setup:di:compile- Compiles the code. -
php bin/magento setup:static-content:deploy- Deploys static view files.
Best Practices for Adobe Commerce Blog Extension Management
| Practice Category | Best Practice | Implementation Details |
|---|---|---|
| Content Quality | - Content Strategy Planning - SEO Optimization - Multimedia Integration |
- Create an editorial calendar, focus on industry trends, maintain a posting schedule - Implement meta descriptions, canonical URLs, XML sitemaps, optimize permalinks - Include high-quality images, videos, and interactive elements |
| Technical Management | - Regular Maintenance - Backup Protocol - Compatibility checks |
Schedule updates, monitor performance metrics, optimize loading speeds - Create automated backups before updates, maintain version control - Verify extension compatibility with the Magento version, check for conflicts |
| User Engagement | - Comment Management - Social Integration - Mobile Optimization |
- Moderate discussions, respond to comments, encourage community interaction - Enable social sharing, integrate with social media platforms - Ensure responsive design, optimize for mobile reading experience |
| Performance | - Loading Speed - Analytics Integration |
- Optimize image sizes, implement caching, minimize HTTP requests - Track user behavior, monitor engagement metrics, analyze traffic patterns |
| Security | Access Control | Implement user roles, secure admin access, manage author permissions |
| Content Organization | - Category Structure - Archive Management |
- Create logical category hierarchies, implement an effective tagging system - Organize content chronologically, implement search functionality |
| Monetization | Product Integration | Link relevant products to blog posts, optimize conversion paths |
| Compliance | Legal Requirements | Maintain privacy policies, implement GDPR compliance, disclose sponsored content |
7 Steps to Install a Magento Extension Manually
- Obtain the extension as a compressed file (typically in
.zipor.tarformat). - Unzip the file and upload the code to the
/app/codedirectory on your server. - Access the command line in your Magento installation directory and run:
php bin/magento setup:upgrade
- Then deploy static content by running:
php bin/magento setup:static-content:deploy
- Log in to the Magento backend.
- Navigate to System > Cache Management and flush the cache.
- Go to Stores > Configuration > Advanced > Advanced and confirm the extension is enabled.
Note: These steps may vary based on the extension and environment. Always refer to the extension’s documentation for specific installation instructions.
3 Sources to Download the Extension in Magento 2
1. Magento Marketplace

Adobe Commerce's Magento Marketplace offers a variety of extensions from trusted providers. It helps you grow your business.
2. GitHub

You can install Magento extensions via the Composer commands. They are available on GitHub.
3. Third-Party Extension Providers
Some third-party providers offer downloadable source code and installation guidelines for purchased extensions. You can consider the composer's main resource repository, like Composer or Packagist.
5 Steps to Uninstall a Magento Extension with Composer
Step 1: Disable the Module
- Navigate to the root folder of your Magento 2 installation and run:
php bin/magento module:disable VendorName_ModuleName
Note: If there’s a version conflict, specify the PHP version:
php7.4 bin/magento module:disable VendorName_ModuleName
Step 2: Uninstall the Extension via Composer
- To completely uninstall, use:
composer remove [-r|--remove-data] <component-name>
Note: The --remove-data option deletes any database data or schema defined by the module's Uninstall class.
Step 3: Uninstall Extensions Installed via Zip/Archive
For extensions installed manually via zip:
- Disable the extension.
- Remove its directory from
app/code.
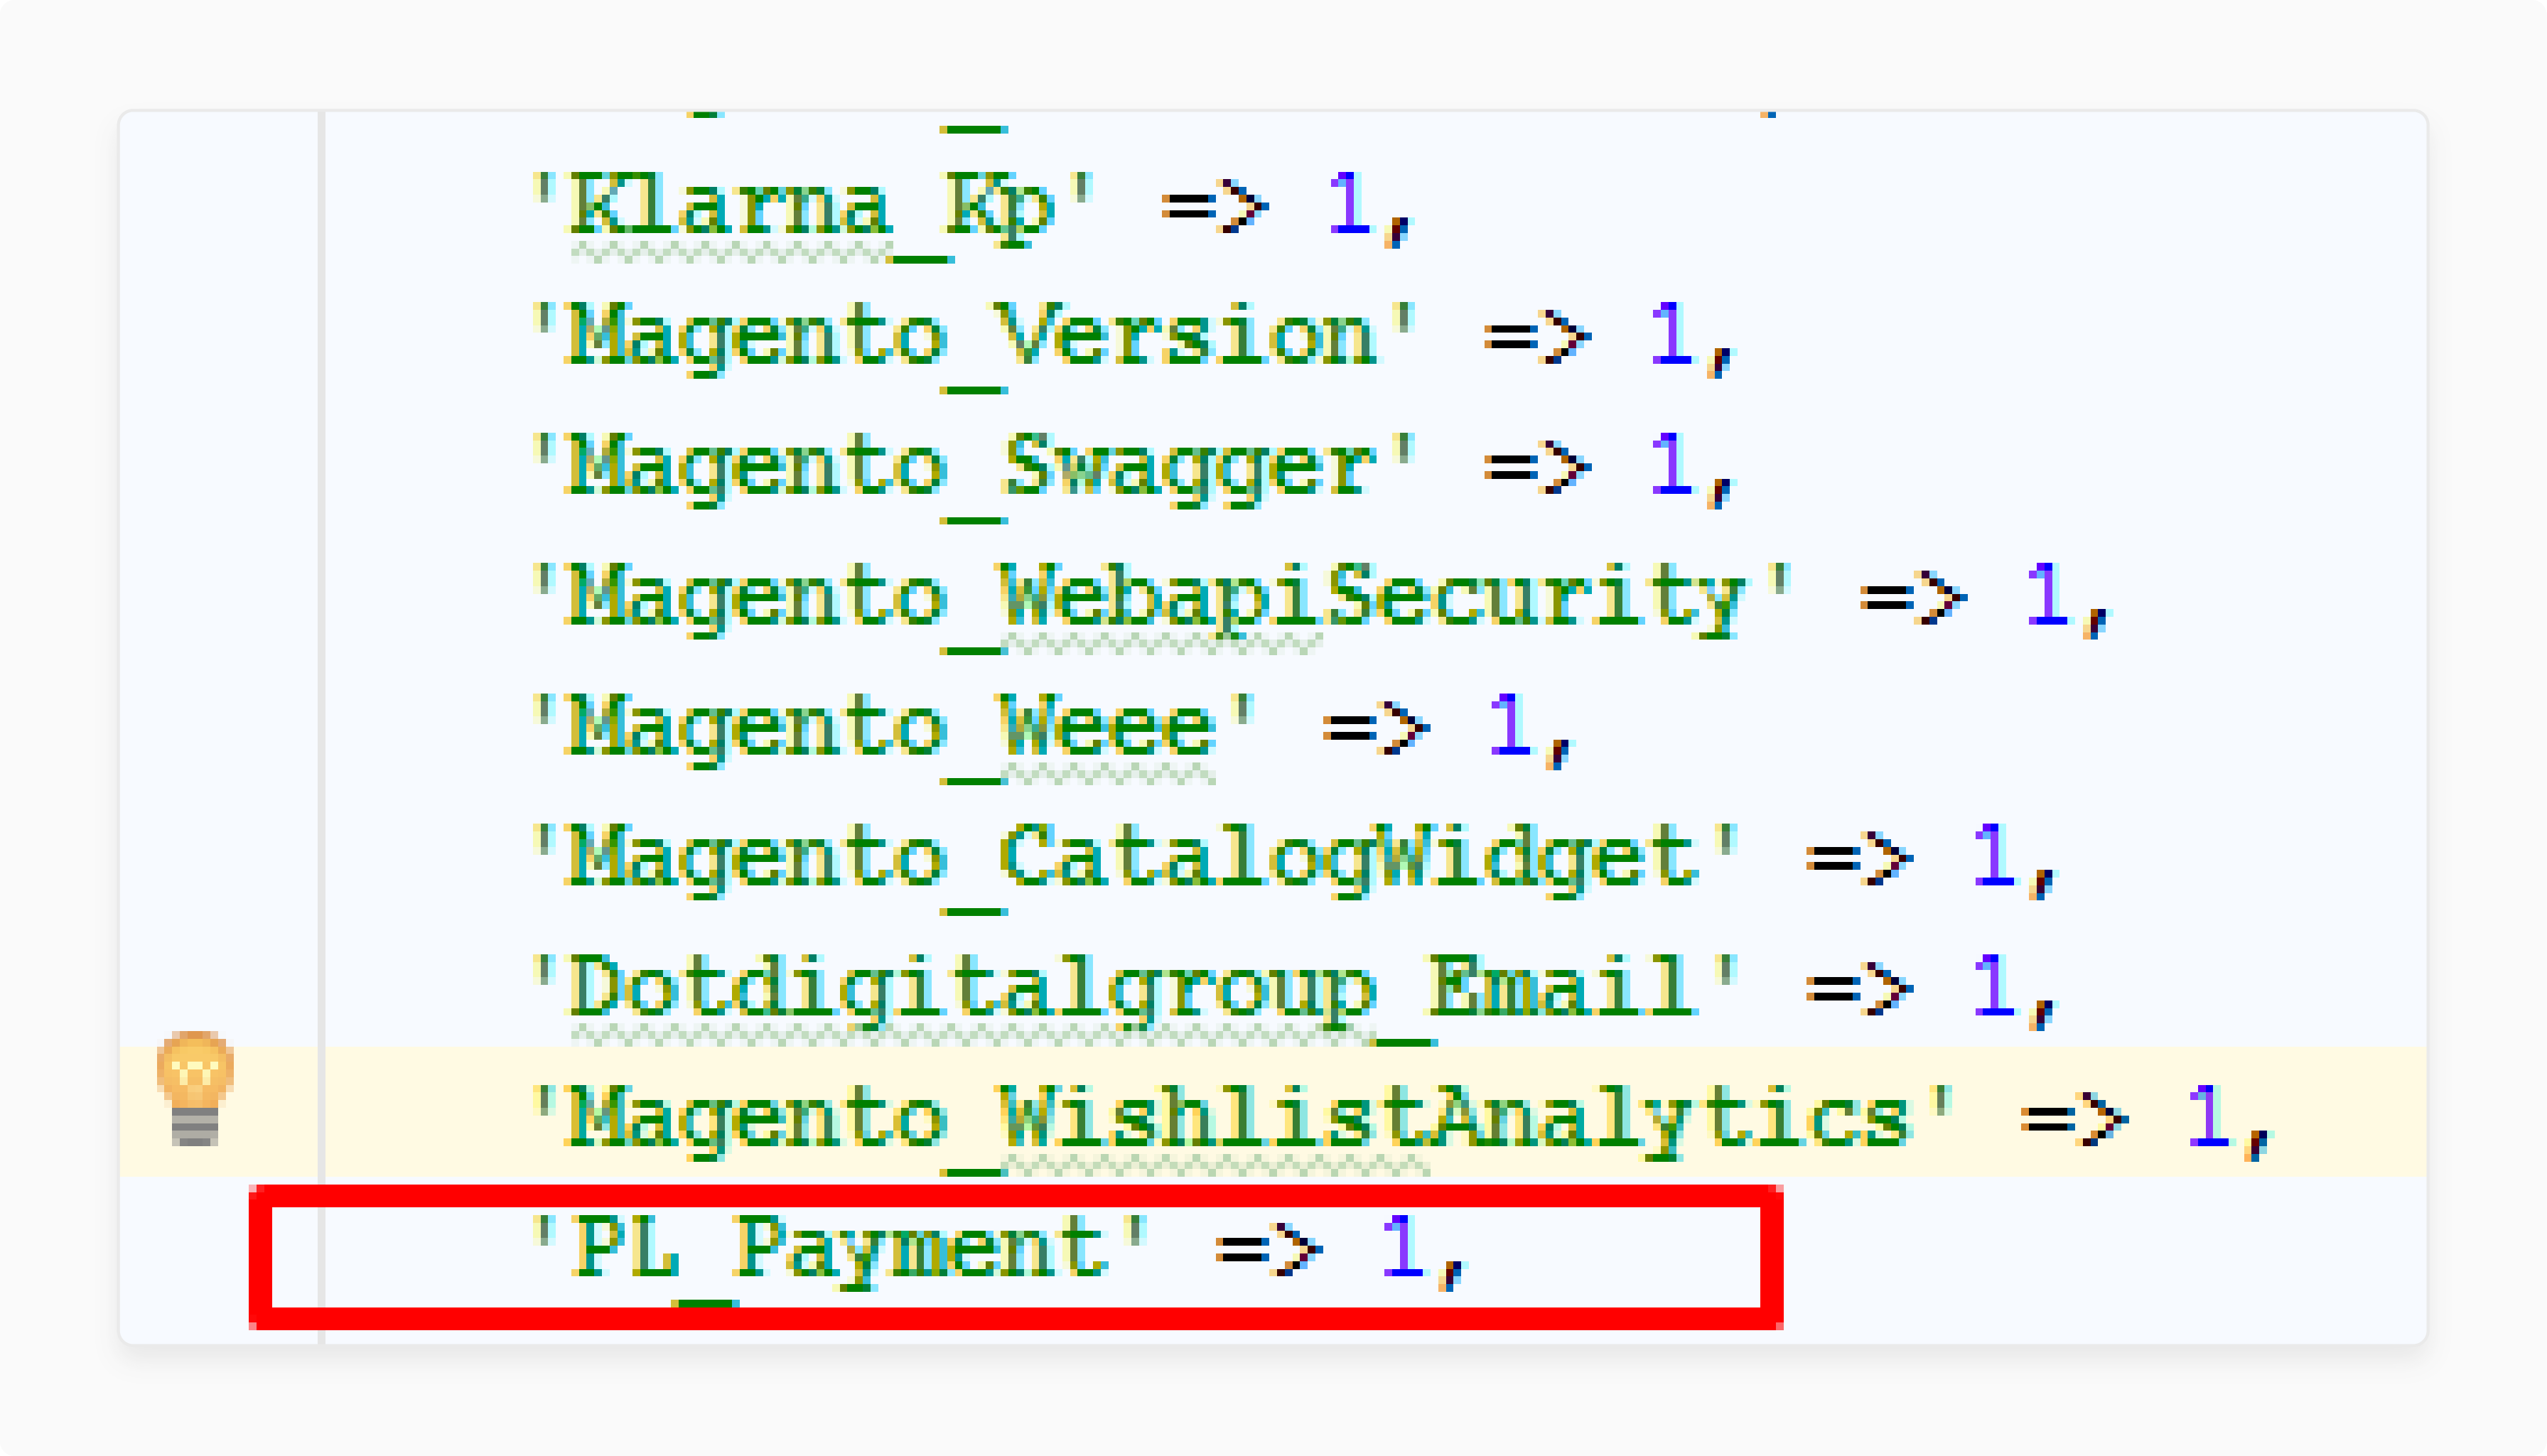
- Delete its record from the
setup_moduletable in the database.

Step 4: Uninstall the Module
- Connect to SSH and then navigate to the Magento root directory.
- Run this command:
php bin/magento module:uninstall [--backup-code] [--backup-media] [--backup-db] [-r|--remove-data] VendorName_ModuleName
Step 5: Finalize the Uninstallation
- Run the following commands to complete the process:
php bin/magento setup:upgrad
php bin/magento setup:di:compile
php bin/magento setup:static-content:deploy -f
Note: Check your store environment to ensure everything is working properly. If errors appear, consult the Magento logger for details.
Common Magento2 Installation Errors and Solutions Without Using Command Line
| Error Type | Common Symptoms | GUI-Based Solution | Prevention Tips |
|---|---|---|---|
| Cache Issues | Blank pages, outdated content | - Access System > Cache Management. - Select all cache types. - Click 'Flush Cache'. |
Enable cache only after successful installation. |
| Permission problems | Access denied messages, can't save files | Use FTP client (FileZilla/WinSCP) to set file permissions to "644" and folders to "755" | Back up permission settings before installation. |
| Database Errors | Installation freezes, connection timeout | - Check database credentials in the Magento admin panel. - Verify that the database exists. |
Create database backup through the hosting panel. |
| PHP Configuration | Extension won't install, compatibility errors | - Configure hosting control panel. - Verify that the PHP version matches the extension requirements. |
Keep the PHP version updated via the hosting dashboard. |
| Missing Dependencies | Extension fails to activate | Install required extensions first through Magento Marketplace. | Check extension requirements before purchase. |
| Theme Conflicts | Broken layout and missing styles | Switch to the default theme temporarily through the admin panel. | Test extension with default theme first. |
| Memory limits | Installation timeout errors | Increase memory limit through the hosting control panel. | Monitor resource usage through the admin dashboard. |
| File Structure | Missing or corrupted files | Use FTP to verify that the file structure matches the documentation. | Create regular backups through the admin panel. |
| Integration Issues | Third-party service connection fails | Verify API credentials in extension configuration. | Test in a development environment first. |
| Performance Impact | Slow loading after installation | Monitor system performance through the admin dashboard. | Conduct regular performance audits through admin tools. |
FAQs
1. What does "composer require" mean in Magento development?
Composer require is a command that downloads and installs extensions. It fetches the extension from Magento Marketplace. It adds the extension to your project files. The command also handles any dependencies automatically. Developers can use this standard method to add new modules.
2. Do I need to install the Setup Wizard before adding extensions?
No, the Setup Wizard comes pre-installed with Magento 2. You can access it through your admin panel. It helps manage your installation settings. The wizard guides you through configuration changes. It makes extension management easier for new users.
3. Can you explain the installation guide for Google Analytics?
Create your tracking account and then upload the extension files. Add your "tracking ID" in the admin panel & configure your preferred tracking options. As a final step, test the tracking on your storefront pages.
4. What commands do I need to run after installing extensions?
Clear your store cache first and delete the generated folders. Run the upgrade command and recompile your store files. Check your admin panel and verify the extension appears in settings to test the new features.
5. How can Magento 2 extensions take my store to new heights?
Magento 2 extensions add powerful features to your store that save you time and money. They improve customer experience and automate repetitive tasks. They boost your sales performance and help you compete with larger stores.
6. What steps should I follow during Magento development?
Work in development mode first to test extensions before going live. Keep regular backups of your files and document all your changes carefully. Follow Magento coding standards that allow you to use version control for your work.
7. What tools do I need to install for efficient extension management?
Install a reliable FTP client first to get a good code editor. Download file compression software and use database management tools. Have backup software ready so that your testing tools are always available.
Summary
Magento 2 install extension without command line helps you design a streamlined e-commerce platform. It allows you to:
- Add new features and improve your store's functionality within minutes.
- Build a user-friendly interface.
- Improve your store without SSH or complex commands.
- Enhance your Magento 2 store functionality with ease.
- Maintain your store's stability and performance.
Consider Magento optimised server to build your stores & install extensions without command line.


