
How to Optimize the Magento 2 H1 Tag for SEO for Category Page?
Looking to improve your Magento 2 H1 tag for better SEO? The Magento 2 H1 tag plays a key role in organizing content and improving search engine visibility.
This tutorial will cover how to cover the Magento 2 H1 tag effectively.
Key Takeaways
- Tips to implement H1 optimization on your Magento site.
- Benefits of optimizing your Magento store's SEO with proper heading structures.
- Steps to add, remove, and edit H1 tags in Magento.
- Insights into page hierarchy while improving your website's visibility in search results.
- Best practices for search engine visibility and optimization.
- Troubleshooting common issues for proper implementation across product pages and category pages.
-
Advanced Subcategory Page H1 Tag Optimization Techniques for Magento 2
-
10 Steps to Add SEO Category Headings in Magento Extension Files
-
Troubleshooting the Category H1 Tag Issues in Magento CMS Pages
-
How to Edit a Target Keyword in Magento Page Builder Heading?
What is an H1 Title Tag in Magento 2?
An H1 tag in Magento 2 is the primary HTML heading that appears as the main title of your webpage.
An H1 tag in Magento2 is often the first thing users see when they land on a category page or product page. The H1 tag's visual prominence depends on the theme's CSS styling.
Some themes may display banners, navigation menus, or promotional content above the H1. This tag does not affect the visual layout. It’s the digital storefront sign that tells both visitors and search engines what your page is all about. It’s vital for SEO as it signals to search engines the main topic of your page.
An optimized H1 tag serves several key purposes like:
- Signaling the primary topic of your page to search engines.
- Establishing a content hierarchy that makes it easier for both bots and users to navigate.
- Enhancing keyword relevancy to make your page more searchable.
Here is an example of how the H1 tag is wrapped in HTML:
<h1>Your Main Page Heading</h1>
Advanced Subcategory Page H1 Tag Optimization Techniques for Magento 2
| Optimization Aspect | Best Practice | Technical Implementation | Impact Level | SEO Impact |
|---|---|---|---|---|
| URL Structure | Use the /category/subcategory format (e.g., /electronics/smartphones). |
Modify catalog_category_view.xml. |
High | Improves crawlability and hierarchy understanding |
| H1 Format | Include both category and subcategory names (e.g., "Smartphone Electronics"). | Edit category_heading.phtml. |
Essential | Enhances topical relevance |
| Character Length | Keep between "30-60 characters". | Configure in the admin panel. | Medium | Ensures readability and indexing |
| Keyword Placement | Front-load primary keyword in H1. | Modify category attributes. | High | Increases keyword relevancy |
| Hierarchy Setup | Maintain a clear parent-child relationship in navigation. | Configure category structure. | Medium | Supports logical site structure |
| Meta tag Alignment | Match H1 with the meta title while keeping it unique. For example, Meta title: "Women's Summer Dresses - Free Shipping |
Brand Name" H1: "Women's Summer Dresses Collection" | Edit meta information template. | High |
| Content Structure | Place H1 above subcategory listings. | Modify category layout XML. | Essential | Improves user orientation |
| Mobile Optimization | Ensure H1 readability on smaller screens. | Update responsive CSS. | Medium | Enhances mobile SEO |
| Template Configuration | Use dynamic variables for automated H1 generation. | Edit category template files. | High | Maintains consistency |
| Duplicate Prevention | Implement canonical tags for similar subcategories. | Configure canonical URLs. | Essential | Prevents content dilution |
| Language Variants | Include language indicators for international stores. | Set store view settings. | Medium | Supports global SEO |
| Rich Snippet Integration | Align H1 with structured data markup. | Implement JSON-LD. | High | Enhances SERP presence |
H1 Page Title Tag SEO Benefits for Magento Commerce
1. Search Engine Understanding
- Helps Google understand your page's main topic
- Establishes content hierarchy
- Signals primary keywords naturally
For example, a properly optimized H1 helps establish topical authority when it aligns with the page's content hierarchy. Google compares H1 content with other on-page elements like meta title, URL, and content to validate topical relevance.
2. User Experience Benefits
i. For Visitors
- Instantly confirms they're in the right place
- Improves content scanability
- Enhances accessibility for screen readers
ii. For Search Engines
- Provides clear topical context
- Strengthens keyword relevancy
- Supports proper page indexing
3. Technical SEO Advantages
i. Structural Benefits
- Creates clear content hierarchy
- Improves crawlability
- Enhances overall site architecture
ii. Conversion Impact
- Helps qualify traffic
- Improves bounce rates
- Supports user navigation
For example, if a user searches "women's summer dresses" and sees that exact H1, they're more likely to stay.
10 Steps to Add SEO Category Headings in Magento Extension Files
-
Create a new directory for the module under
app/code/Module/SeoAddHeadingsToCategory. -
Create a
registration.phpfile inapp/code/HeavyDots/SeoAddHeadingsToCategory. -
Create a
module.xmlfile inapp/code/HeavyDots/SeoAddHeadingsToCategory/etc/. -
Create a file
InstallData.phpinapp/code/HeavyDots/SeoAddHeadingsToCategory/Setup/. -
Create
category_form.xmlinapp/code/HeavyDots/SeoAddHeadingsToCategory/view/adminhtml/ui_component/. -
Push the below code to the server and run:
php bin/magento setup:upgrade -
Once done, navigate to Catalog > Categories in the admin panel.
-
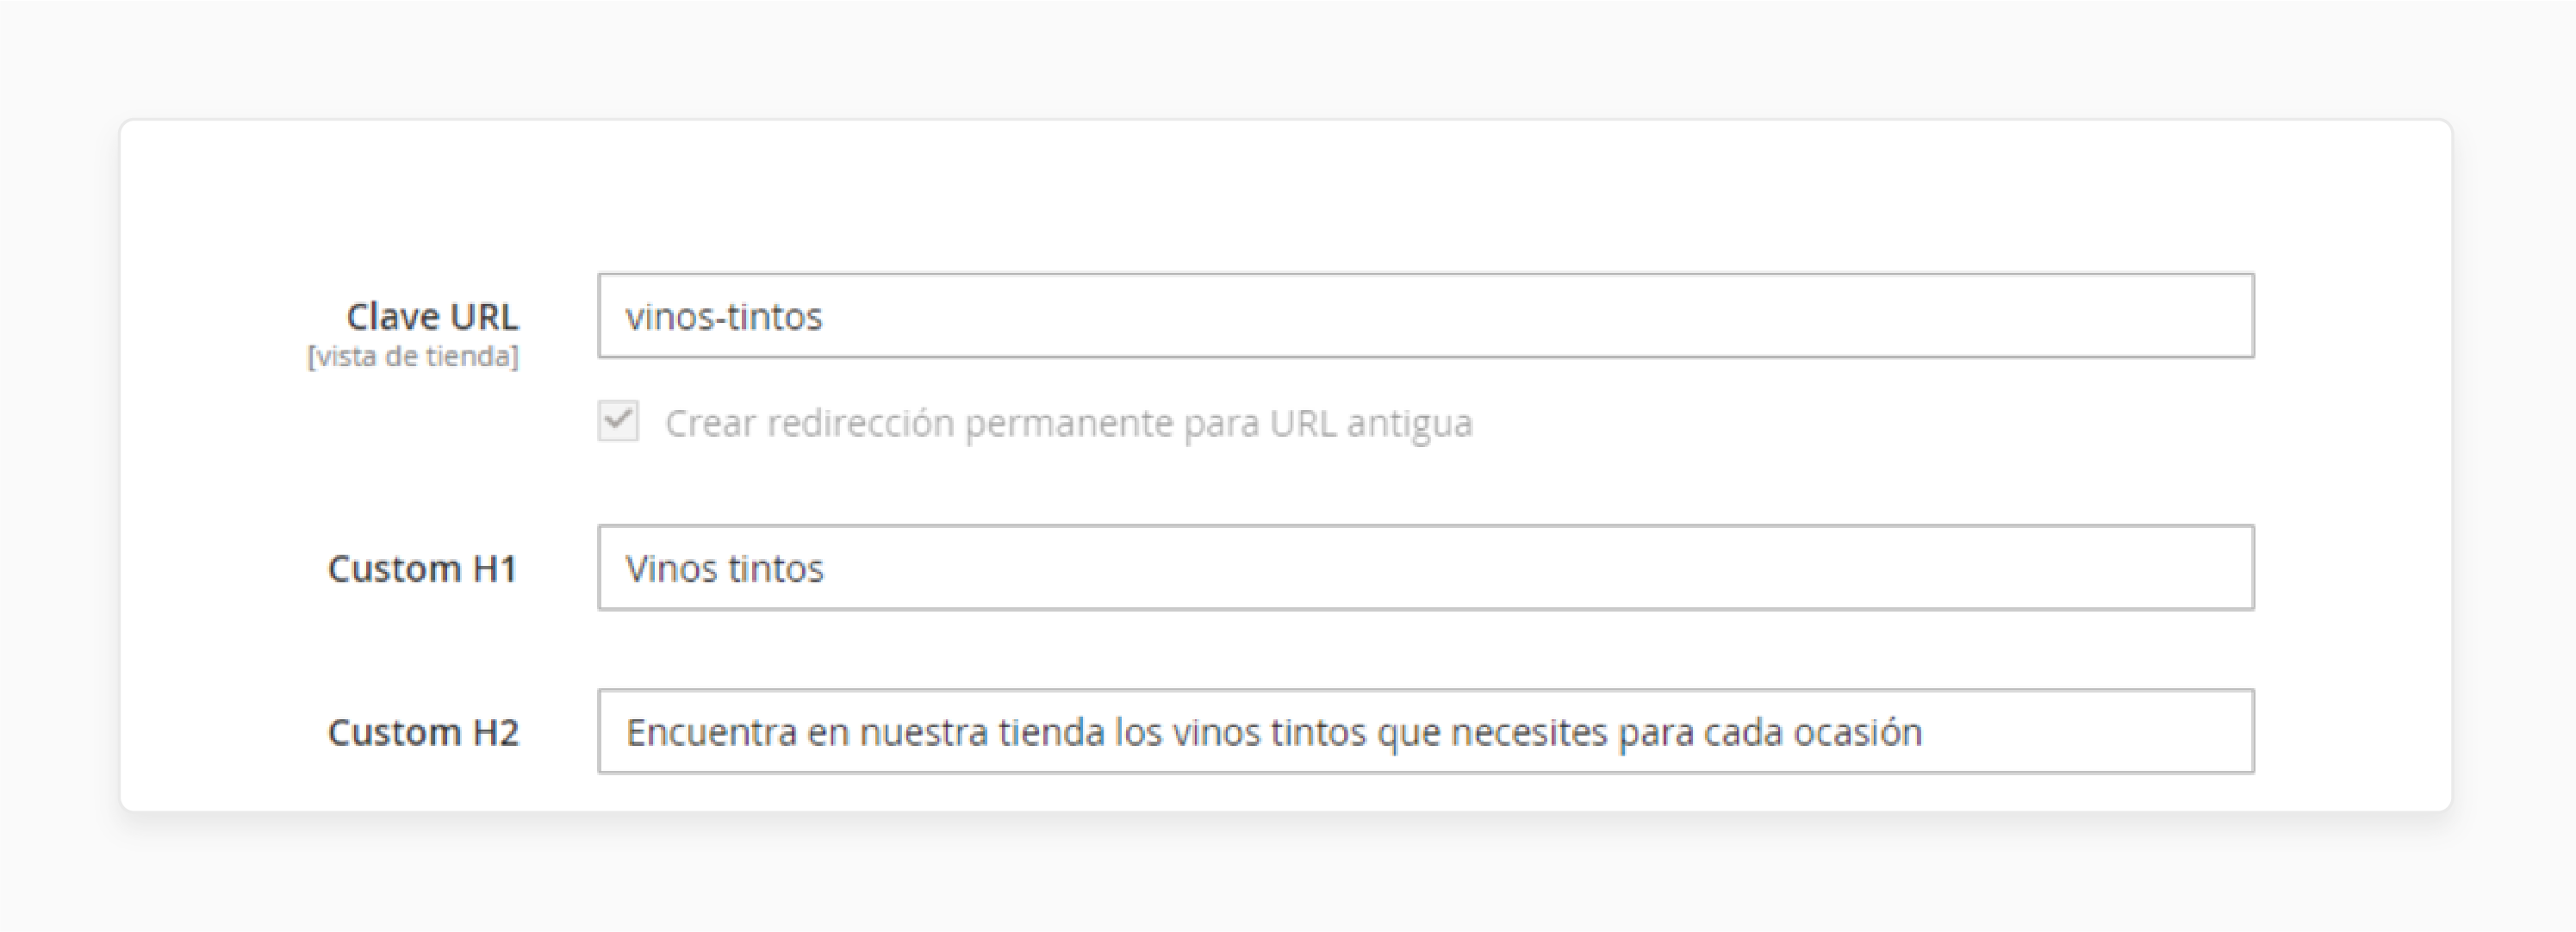
Select a category, and view the new fields under 'Search Engine Optimization'.
- Create a
title.phtmltemplate inapp/code/HeavyDots/SeoAddHeadingsToCategory/view/frontend/templates/. - Locate
catalog_category_view.xmlin your theme directory. Or create one if it doesn't exist.
Note: The custom H1 and H2 headings will be displayed on the frontend category page as per your custom template setup.
H1 Heading Page Tag Best Practices for Ecommerce Stores
| Best Practice | Implementation Guide | Technical Requirements | Impact Level |
|---|---|---|---|
| Character Length | Keep H1 tags between 30-60 characters | Edit via Magento admin or template files. | Essential |
| Uniqueness | Use one distinct H1 tag per page | Configure in catalog_category_view.xml. |
High |
| Keyword Placement | Include the primary keyword naturally in the first half | Modify category attributes. | Essential |
| Mobile Display | Ensure proper wrapping on smaller screens | Update responsive CSS settings. | Medium |
| Hierarchy Alignment | Match H1 with page content focus | Edit category_heading.phtml. |
High |
| Meta Title Correlation | Maintain similarity without duplication | Configure in SEO settings. | Essential |
| Content Relevance | Reflect actual page content accurately | Update via the admin panel. | High |
| Format Consistency | Maintain uniform style across similar pages | Set global template rules. | Medium |
| Dynamic Generation | Use variables for automated creation | Implement PHP variables. | High |
| Language Clarity | Use clear, descriptive language | Review content manually. | Essential |
| Brand Guidelines | Include brand name when relevant | Set naming conventions. | Medium |
| Category Specificity | Include category identifiers | Configure category attributes. | High |
Key Points About Using Magento Page Builder for H1 Headings
1. Content Heading Field
In the 'Magento's Content' section, there’s a "Content Heading" field. When text is added there, it automatically becomes the H1 heading at the top of the page. Instead, it’s recommended to use the Magento Page Builder Heading content type.
2. Frontend Customization
Using the "Content Heading" field restricts customization. For example, headings created in this field are always aligned to the left margin of the page. Customers don't get the option to center or adjust them. By using the Magento Home Page content type, you have greater control over positioning & design.
3. Styling Limitations
The appearance of headings in Magento is theme-dependent. It contains styles controlled by the theme’s style sheet. For example, the Luma theme.
4. Heading Element Position
To use the heading element:
- Navigate to the 'Elements' section in the left panel of the Magento Page Builder workspace.
- Drag this content type to the main stage on the right to start customizing your heading.
H1 vs. Title Tags in Magento E-commerce
| Aspect | H1 Tag | Title Tag | Implementation Notes |
|---|---|---|---|
| Visibility | Appears on webpage content | Shows in search results and the browser tab | Configure both in the Magento admin panel. |
| Character Length | 20-70 characters optimal | 45-65 characters recommended | Keep both concise for best results. |
| Primary Function | Describes page content for visitors | Attracts clicks from search results | Understand different purposes for different approaches. |
| keyword placement | Front-load primary keyword | Include brand + keyword | Edit via Content > Pages in Magento. |
| Display Location | Top of page content | SERP results and browser tabs | Modify in category_heading.phtml. |
| SEO Impact | Establishments page hierarchy | Influences click-through rates | Both are vital for ranking signals. |
| User Experience | Guides on-page navigation | Helps with search result selection | Optimize for respective audiences. |
| Format Example | "Women's Summer Dresses" | "Shop Women's Summer Dresses - Brand Name" | Customize per page type. |
| Mobile Display | Must be responsive | Truncates in mobile search | Test across devices. |
| Magento Default | Generated from category/product name | Uses meta title configuration | Can be customized in the backend. |
| Uniqueness | One per page required | Unique for each page | Set in catalog configuration. |
| Content Alignment | Must match page content | Should align with landing page | Maintain consistency. |
5 Steps to Add Magento Page Builder H1 Navigation Menu
- In the left panel under 'Layout', drag "Row" to the stage.
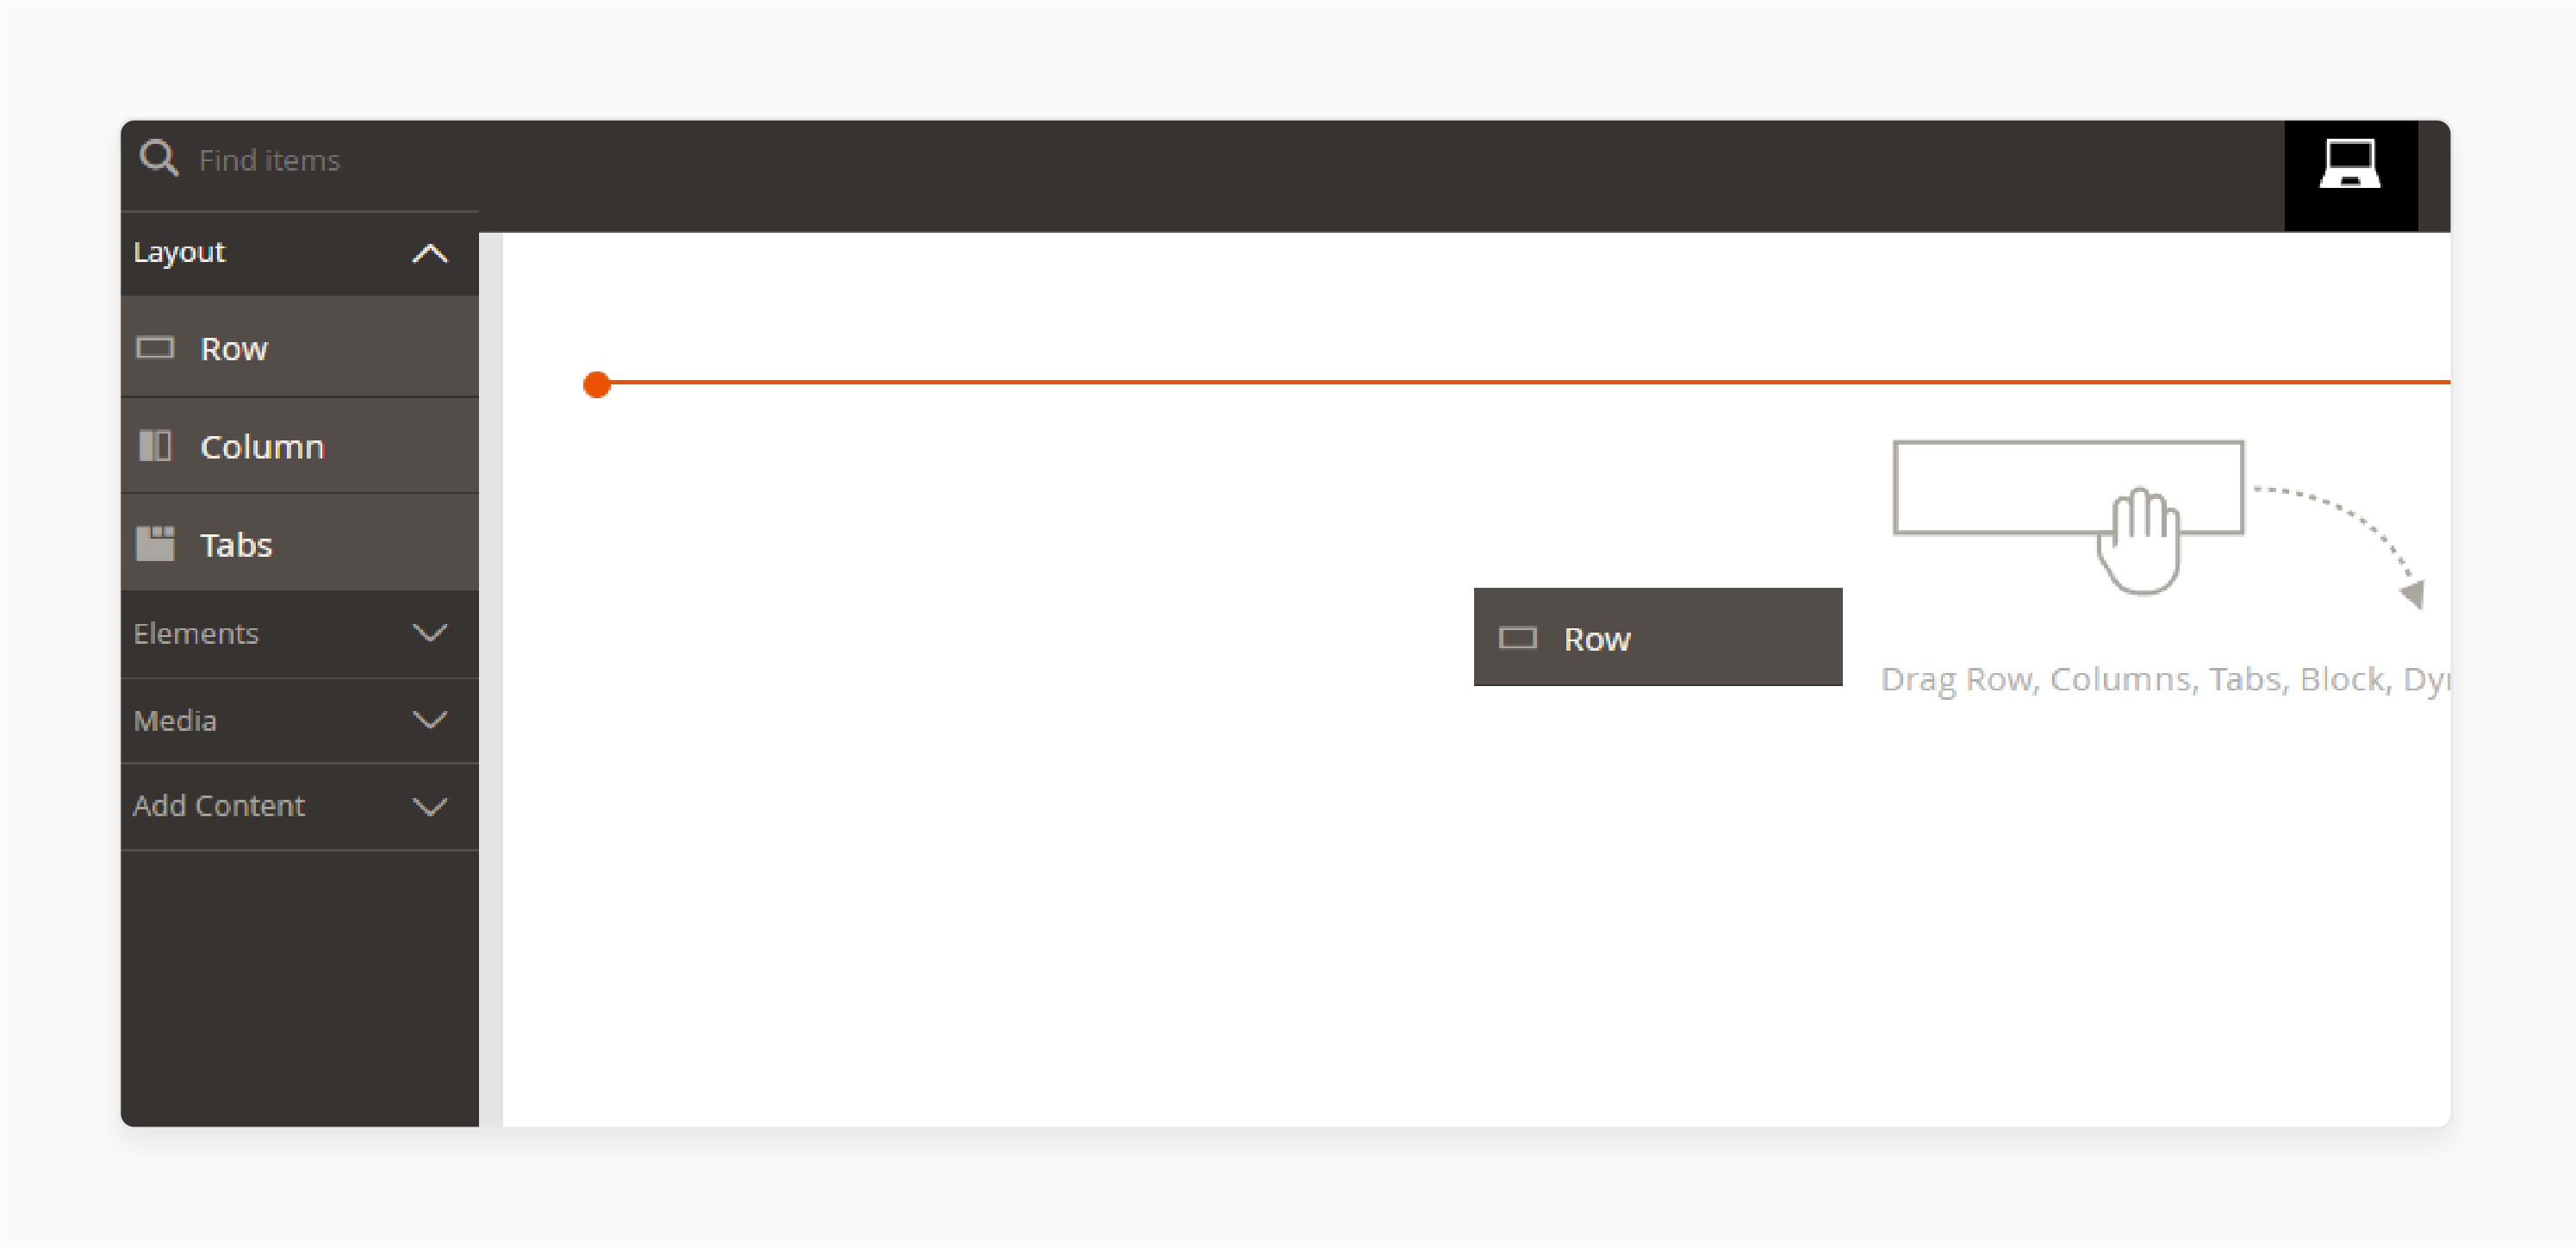
Check the example format below:

- Open the 'Elements' section on the left panel.
- Drag the "Heading" content type to the "Row".
- Drop it when the red guideline for the Row container appears.
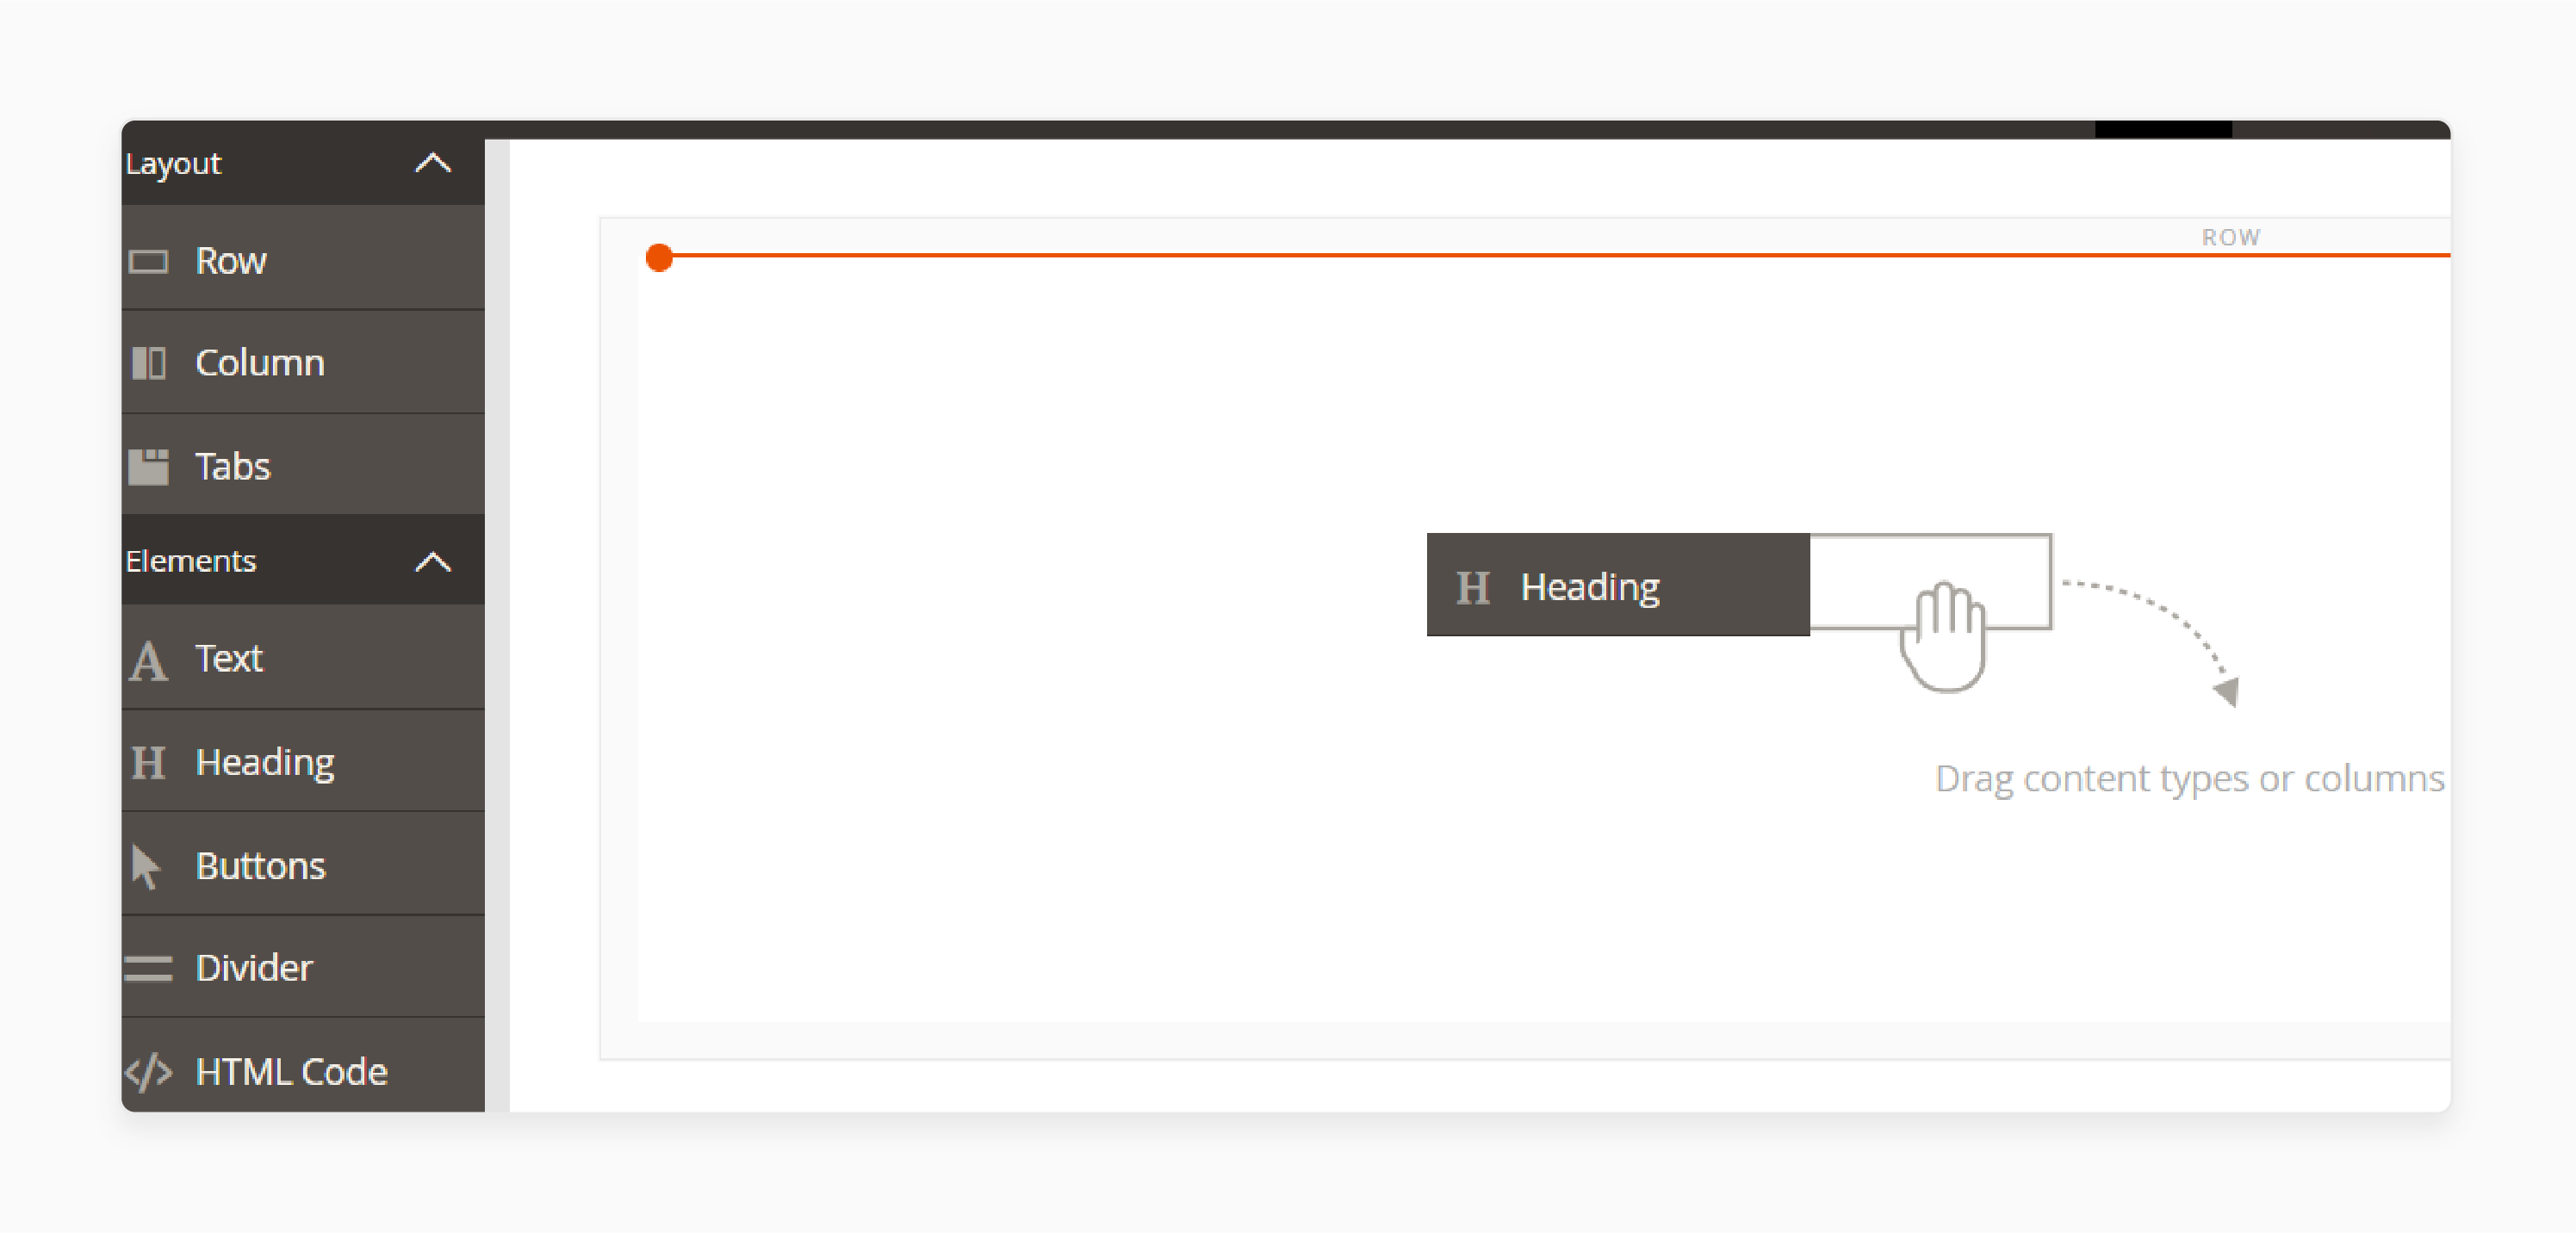
Check the example format below:

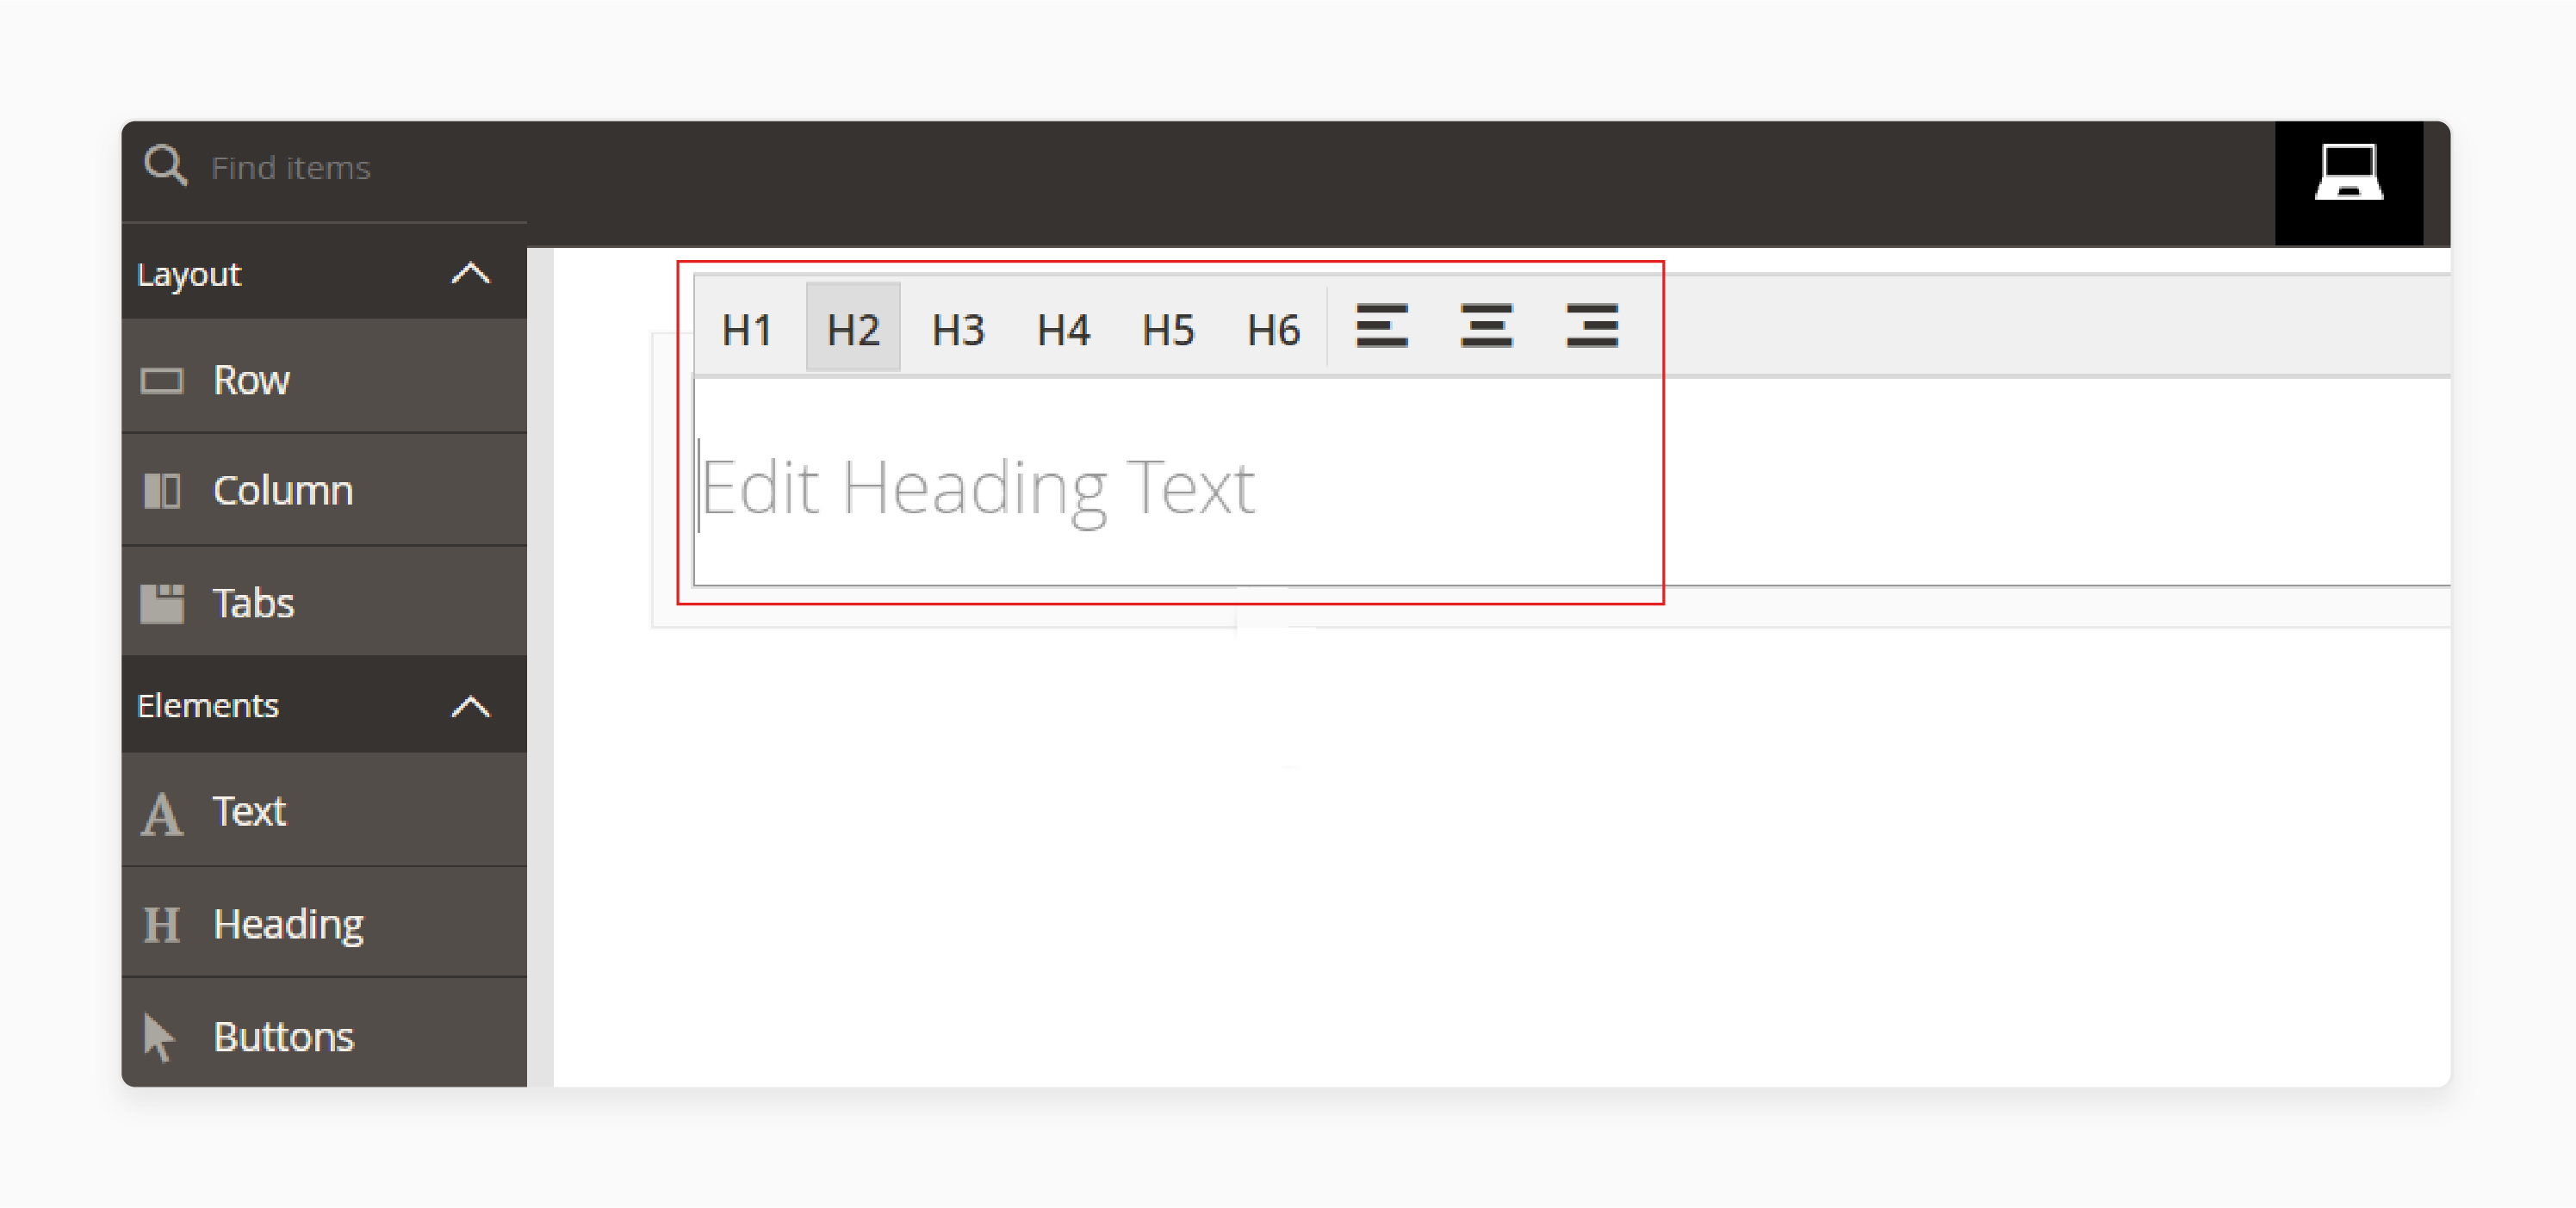
- The Heading editor appears on the stage with a toolbar, allowing you to:
- Enter and format text.
- Set the heading level ("H1"-"H6").
- Align text (left, center, right).
Troubleshooting the Category H1 Tag Issues in Magento CMS Pages
| Issue | Problem Description | Solution | Implementation Method | Priority Level |
|---|---|---|---|---|
| Duplicate H1 Tags | Multiple H1 tags appearing on category pages | Remove additional H1 tags from the template. | Edit category_heading.phtml. |
Essential |
| Missing Category H1 | No H1 tag on category pages | Add proper H1 structure to category template. | Modify catalog_category_view.xml. |
High |
| Default Category Name | H1 showing shortened navigation bar name | Create a custom field for full category H1. | Add a field in the admin panel. | Medium |
| Automated H1 Generation | Under-optimized H1 tags from default settings | Implement custom H1 field in backend | Configure via Admin > Content > Pages. | High |
| Subcategory Display | Incorrect hierarchy in category/subcategory pages | Format H1 to include both category and subcategory. | Update category template. | Medium |
| CMS Page Integration | H1 tags missing in CMS pages | Add H1 tag through admin panel. | Edit via Content > Static > Pages. | High |
| Mobile Responsiveness | H1 tags breaking on mobile view | Implement responsive CSS for headers. | Update theme CSS files. | Medium |
| Canonical Issues | Multiple URLs showing the same H1 | Set up proper canonical tags. | Configure in SEO settings. | Urgent |
| Header Hierarchy | Incorrect H1-H2 structure | Maintain proper heading hierarchy. | Edit template files. | High |
| Dynamic Content | H1 tags not updating with dynamic content | Implement dynamic H1 generation. | Modify PHP templates. | Medium |
Magento Page Builder Heading Customization Tools
The 'Header Settings' control provides additional customization options, such as:
| Tool | Description |
|---|---|
| Move | Move the heading container to a different location on the page. |
| label | Defines the name of the container, typically set to "Heading". |
| Settings | Opens the 'Edit Heading' page for additional customization. |
| Hide/Show | Toggles the visibility of the heading container. |
| Duplicate | Creates a copy of the heading container. |
| Remove | Deletes the heading container from the page. |
How to Edit a Target Keyword in Magento Page Builder Heading?
Click the "Settings" icon to access the 'Edit Heading' page for more customization options.
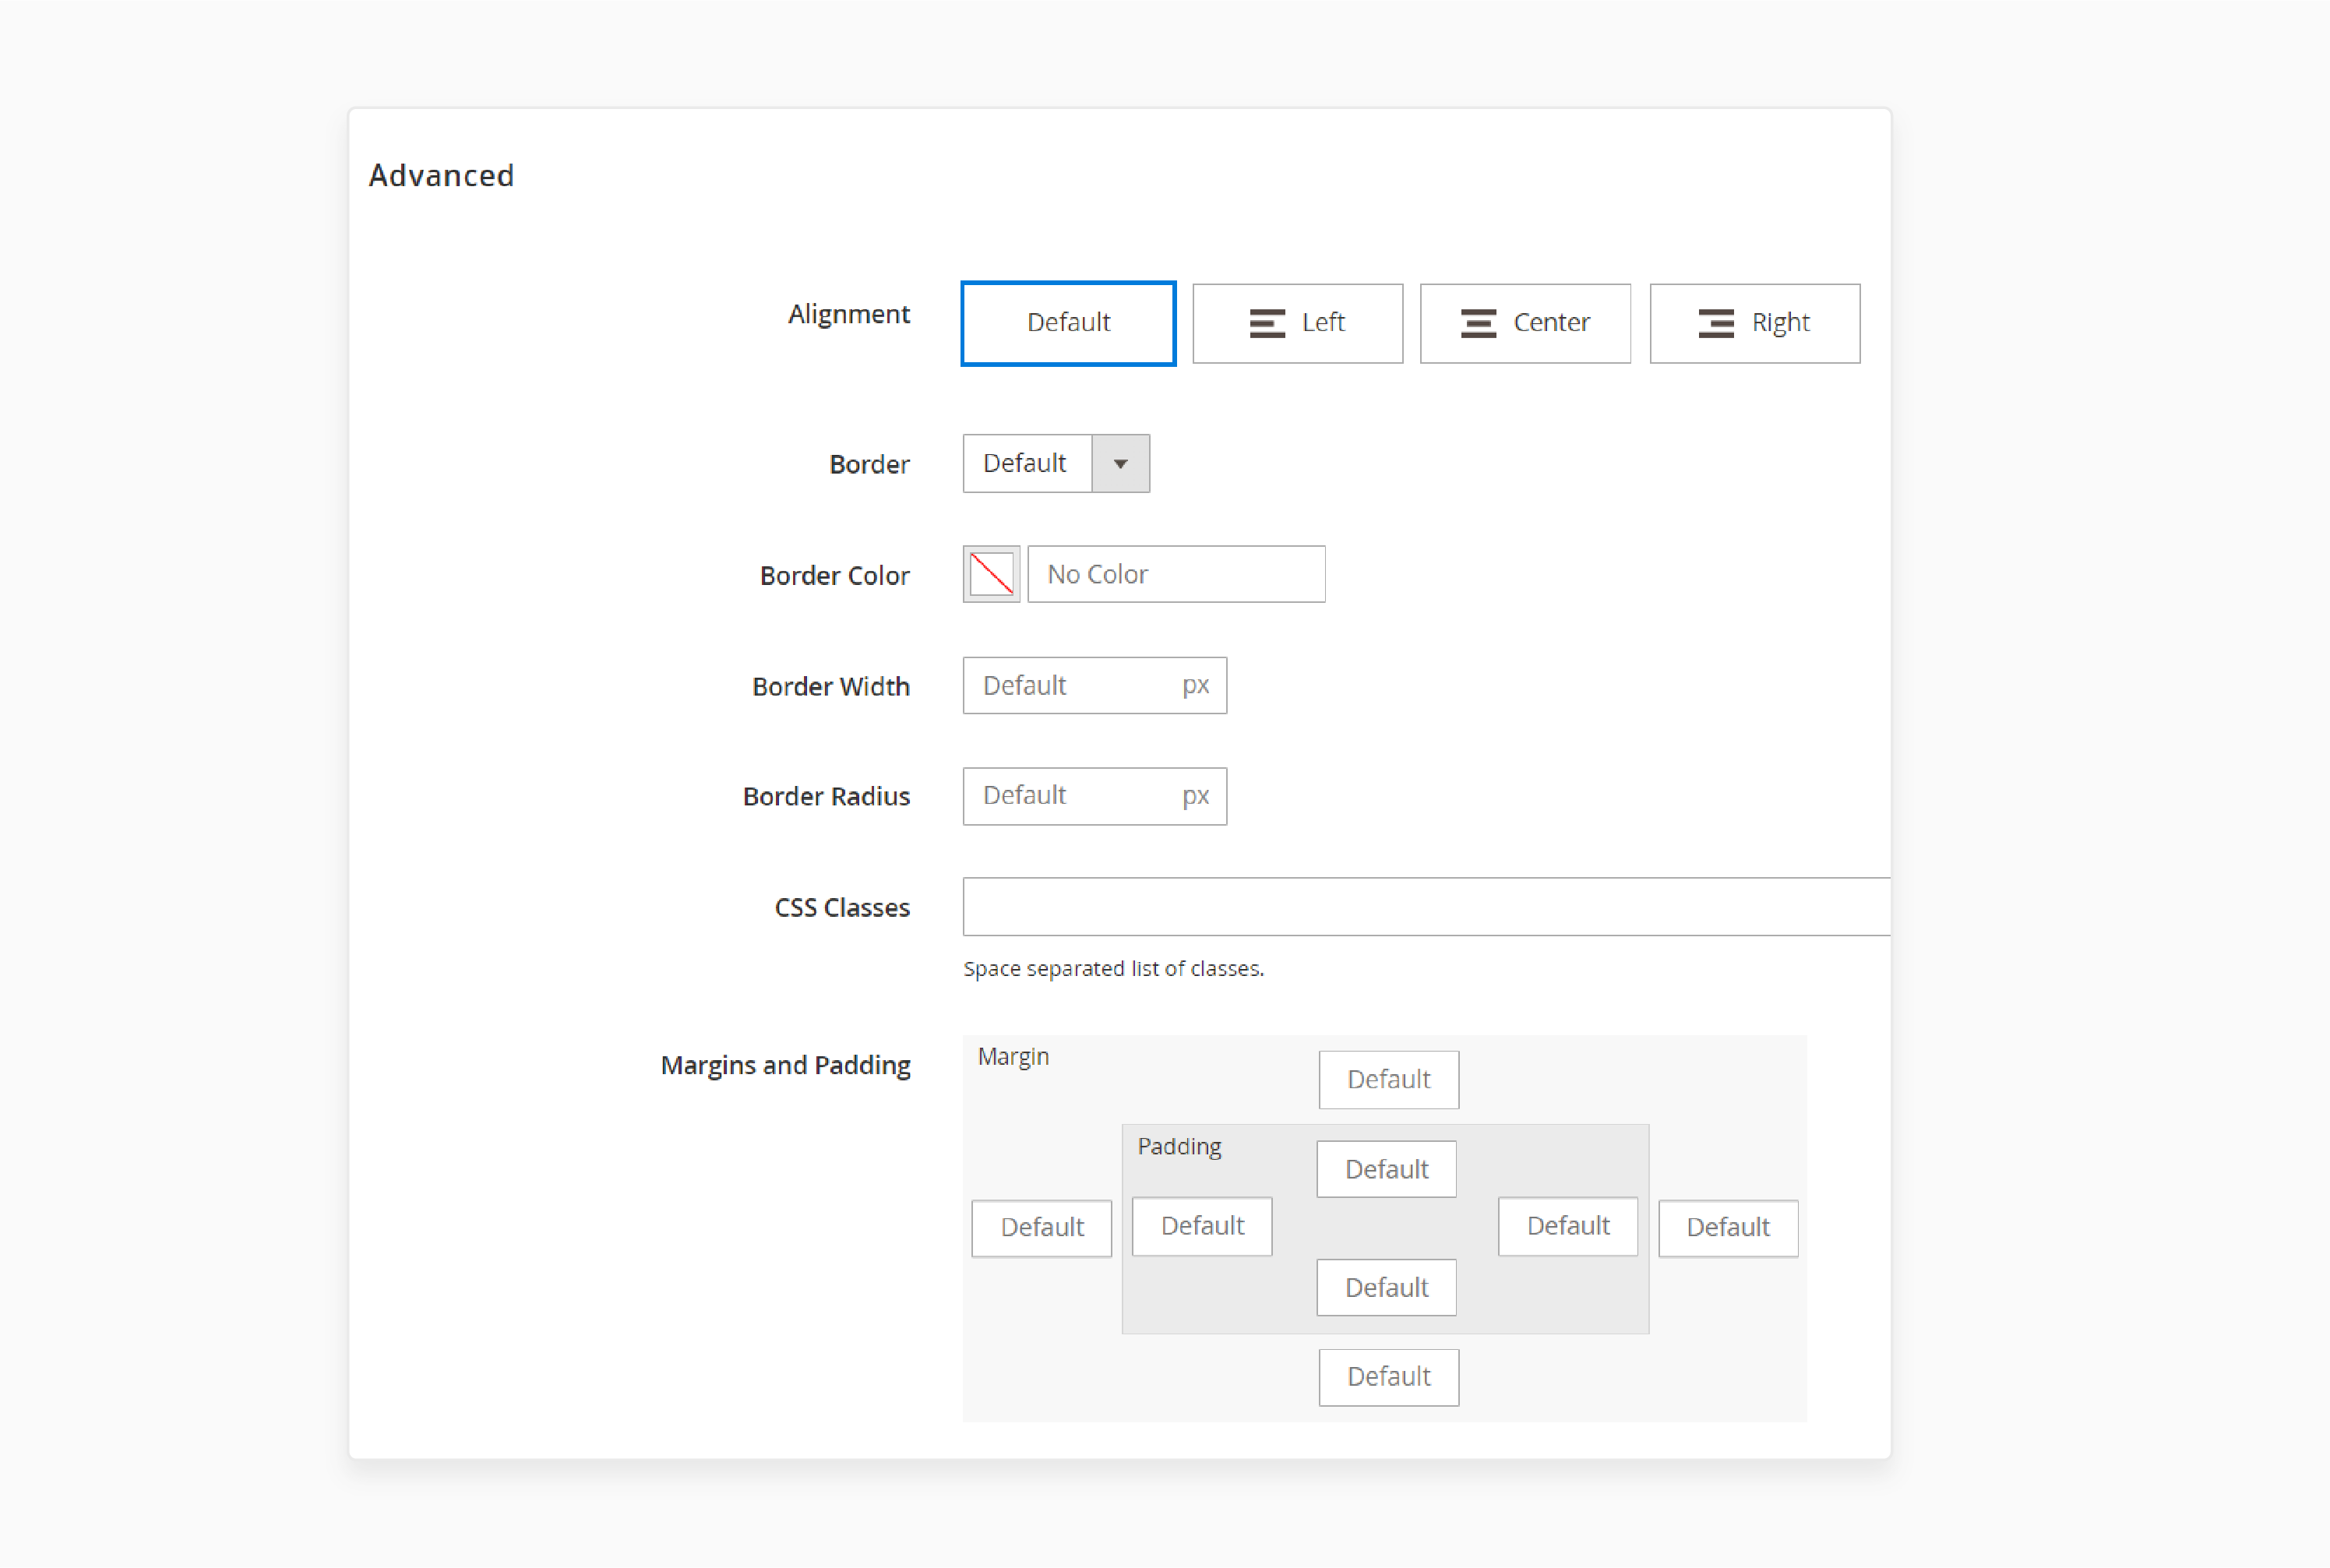
The ‘Advanced Settings’ section provides the following options:
i. Alignment
- Default: Follows the alignment defined by the current theme’s style sheet.
- Left: Aligns the heading to the left border of the container.
- Center: Centers the heading within the container.
- Right: Aligns the heading to the right border of the container.
ii. Border Style
- Choose from various border styles, including None, Dotted, Dashed, Solid, Double, and 3D styles. For example, "Groove", "Ridge", "Inset", & "Outset".
- Border color, width, and radius options allow further customization.
iii. Border Color
Use the color swatch or picker, or input a hex code to define the border color.
iv. Border Width
Set the border thickness on all sides. For example, a border width of "5px".
v. Border Radius
Add rounded corners to the heading container (in "pixels").
vi. CSS Classes
- Apply custom CSS classes to the heading container.
- Separate multiple class names with spaces.
vii. Margins and Padding
Define the heading container’s outer margins and inner padding.
Note: To configure the ‘Basic Settings’ section, check the options below:
- Heading Type: Select the level of the heading (H1-H6), with the default set to H2.
- Heading Text: Input the text for the heading. These settings can also be updated directly in the heading editor.
FAQs
1. How do I prevent duplicate content with H1 tags across Magento versions?
Different Magento versions handle H1 tags differently. Use unique H1 tags for each page and set proper meta descriptions for distinct pages. The current version offers built-in tools to manage this. You can browse different options in the admin panel. It helps maintain clean SEO standards.
2. Can I override the default H1 settings in my Magento store?
Yes, you can change default H1 settings through template modifications. The extension allows custom changes to your heading structure. Navigate to the SEO settings in your admin panel. Apply your changes using the provided toolbox options.
3. How do special offers and notifications affect my H1 tags?
Special offers should not share the main H1 tag. Create custom "H2" or "H3" tags for promotional content. It keeps your page hierarchy clean and organized. It helps maintain your SEO ranking with proper heading structure.
4. Will my H1 tags display correctly across different devices?
Modern Magento extensions support responsive design principles. Your H1 tags will adjust to all screen sizes. The extension for Magento 2 handles display scaling automatically. Test your pages across various devices regularly.
5. How do redirects impact my H1 tag structure?
Redirects should maintain a consistent "H1 tag hierarchy". Set up proper mapping for your redirected pages. Keep original H1 tags on new pages when possible. It helps preserve your SEO value.
6. Does the copyright © symbol affect H1 tag formatting?
No, copyright symbols should stay in the footer sections. Never include copyright text in H1 tags. Keep your H1 tags focused on-page topics. It maintains clean heading structures. Many SEO forums offer dedicated Magento sections. Look for threads about search engine optimization techniques.
Summary
The Magento 2 H1 tag extension simplifies H1 tag customization. It helps store owners and users:
- Ensure each category and product page has an optimized H1.
- Optimize Magento sites for strong SEO performance.
- Maintain their site structure while making heading changes.
- Create better heading hierarchies across all Magento 2 versions and themes.
- Manage H1 tags from the admin panel, improving both user experience & search rankings.
Manage the H1 tag with Magento hosting plans to boost page relevance, structure, and readability.


