How to Configure Magento 2 Google Tag Manager (GTM)
Magento 2 Google Tag Manager (GTM) provides Magento store owners a free solution to manage and deploy marketing tags. These tags help track various events throughout a customer's journey within the shopping funnel. It is easily managed via an online web interface.
This tutorial will cover how to set up Google Tag Manager in your Magento 2 store efficiently. It will also explore the benefits of using GTM to enhance your online store's performance.
Key Takeaways
-
Understand how GTM simplifies tag management and supports multiple analytics platforms, including Google Analytics.
-
Explore the Differences Between GTM and Google Analytics.
-
Learn how GTM benefits Magento 2 stores.
-
Explore the hierarchy of GTM and how they function to collect and transmit data effectively.
-
Configure GTM for Magento 2 and verify successful integration.
-
Discover tips for verifying and testing GTM on Magento 2 to ensure proper functionality and quality.
What is Google Tag Manager?

Google Tag Manager simplifies the management of tags essential for your marketing campaigns. It enables you to add tracking tags to your website. These tags serve multiple purposes, including measuring audience engagement and personalizing user experiences. It also helps you retarget visitors and facilitate search engine marketing initiatives.
Google Tag Manager directly transfers data and events to Google Analytics, as well as other third-party solutions. This functionality provides valuable insights into the performance of your website, products, and promotional efforts.
Connecting your Magento ecommerce store to Google Tag Manager requires two code snippets from GTM. This integration can be achieved without modifying any theme templates of your store. It is possible because of the availability of third-party Magento GTM modules.
Difference between Google Tag Manager and Google Analytics

Google Tag Manager functions primarily as a data collection tool. It captures user interactions on a website without conducting any analysis. It is a tag management system allowing data transfer to various analytics platforms. While commonly linked with Google Analytics, Google Tag Manager can integrate with other platforms, too. It includes Yandex. Metrica, AppsFlyer, and other analytics suites.
Google Analytics analyzes gathered data and generates reports detailing user actions. It produces conversion reports and conducts ecommerce sales analysis. It is also used to present engagement reports.
Note: Google Tag Manager solely supplies data for analysis in analytics platforms.
Benefits of Using Google Tag Manager for Magento 2
-
Cost-Effective Solution: Google Tag Manager is a free platform that helps you save on financial expenses.
-
Enhanced Website Performance: Google Tag Manager contributes to improving Magento website speed. It achieves this by managing and executing tracking codes on its servers. This tracking helps to prevent slowdowns that can occur when you insert code directly.
-
Efficient Tag Management: Google Tag Manager offers user-friendly tools for creating, implementing, and troubleshooting tracking tags. It ensures a seamless process of managing these codes.
-
Access Management: It supports different access levels, allowing for easy delegation of work on tracking tags. This delegation facilitates a smoother workflow and collaboration among team members.
-
Version Control: Google Tag Manager saves the version history of tracking tags. It effortlessly allows you to revert to a previous version if needed.
-
Seamless Integration: It integrates with various content management systems used in Magento 2. This integration streamlines the process and allows for a hassle-free experience.
-
Community Support: Users can benefit from a vast community of Tag Manager experts. These experts provide assistance and solutions to crucial queries. It enhances the support network for those facing challenges or seeking guidance.
How Does Google Tag Manager Work?
Google Tag Manager (GTM) integrates a container tag into your website. It allows direct alterations and debugging from the application. This container tag accommodates various third-party application tags, such as Facebook Pixel, Ads, Microsoft Bing, and others.
The GTM hierarchy consists of the following levels: GTM account, Container, Tracking tag, and Tag triggers.
1. GTM account
Each Gmail address can have multiple GTM accounts.
Note- If you're primarily managing tags for your website, one GTM account is typically sufficient.
2. GTM container
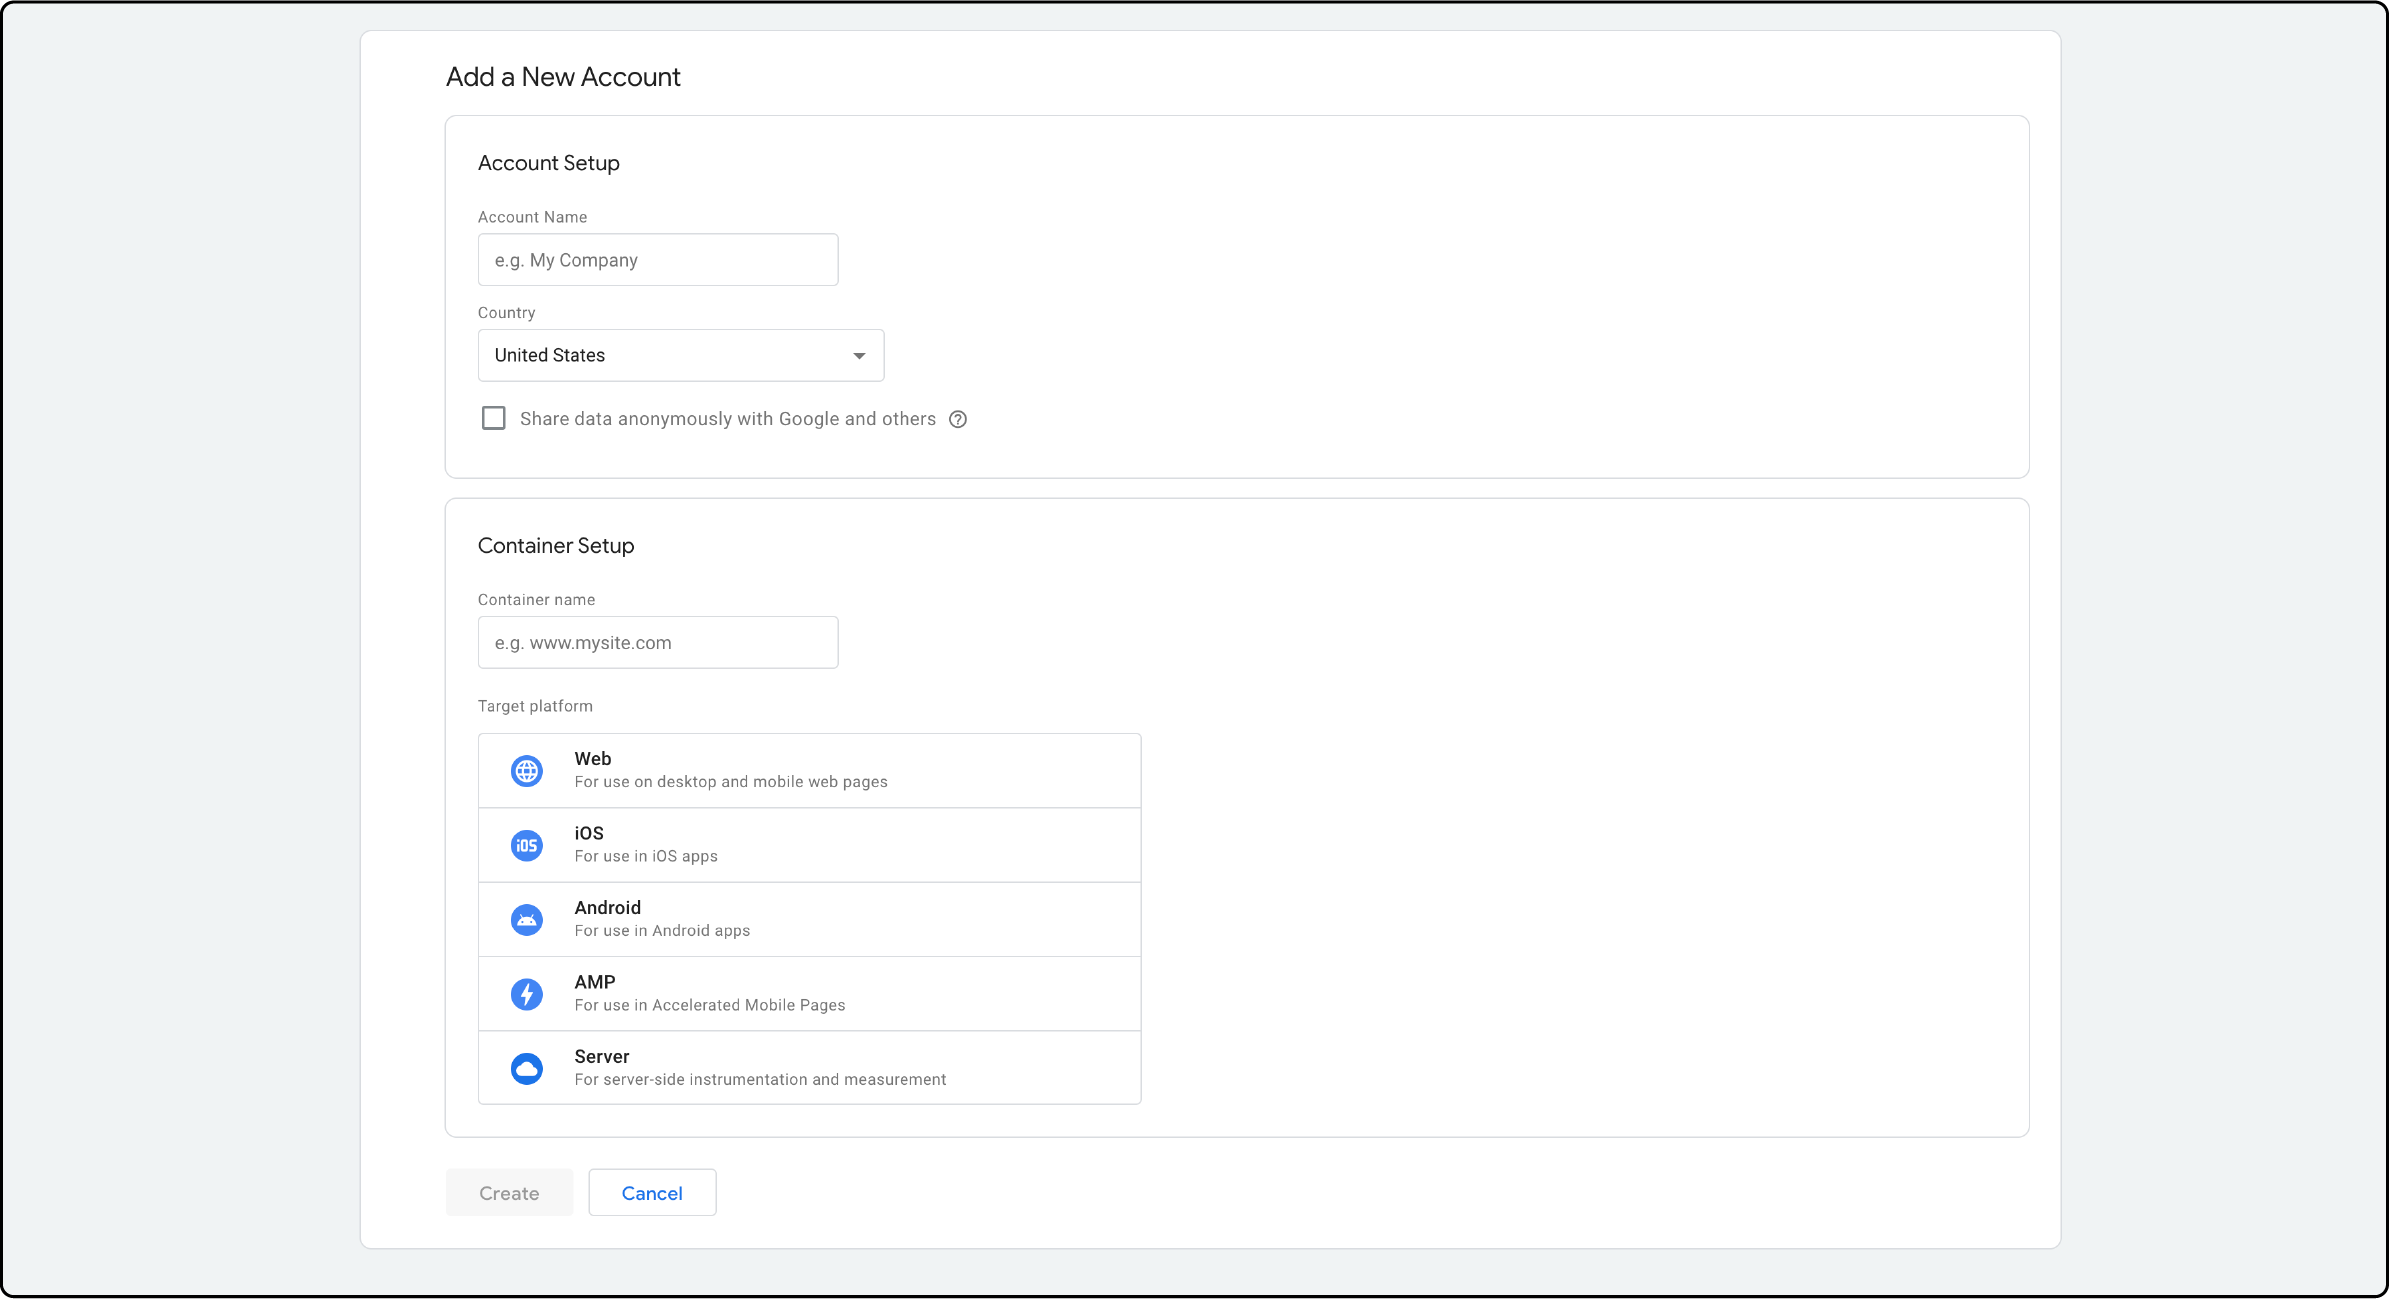
Within a GTM account, you create a container. It acts as a repository for tracking tags from a specific data source. Containers can be configured for various target platforms such as web pages, iOS apps, Android apps, AMP pages, or server-side.
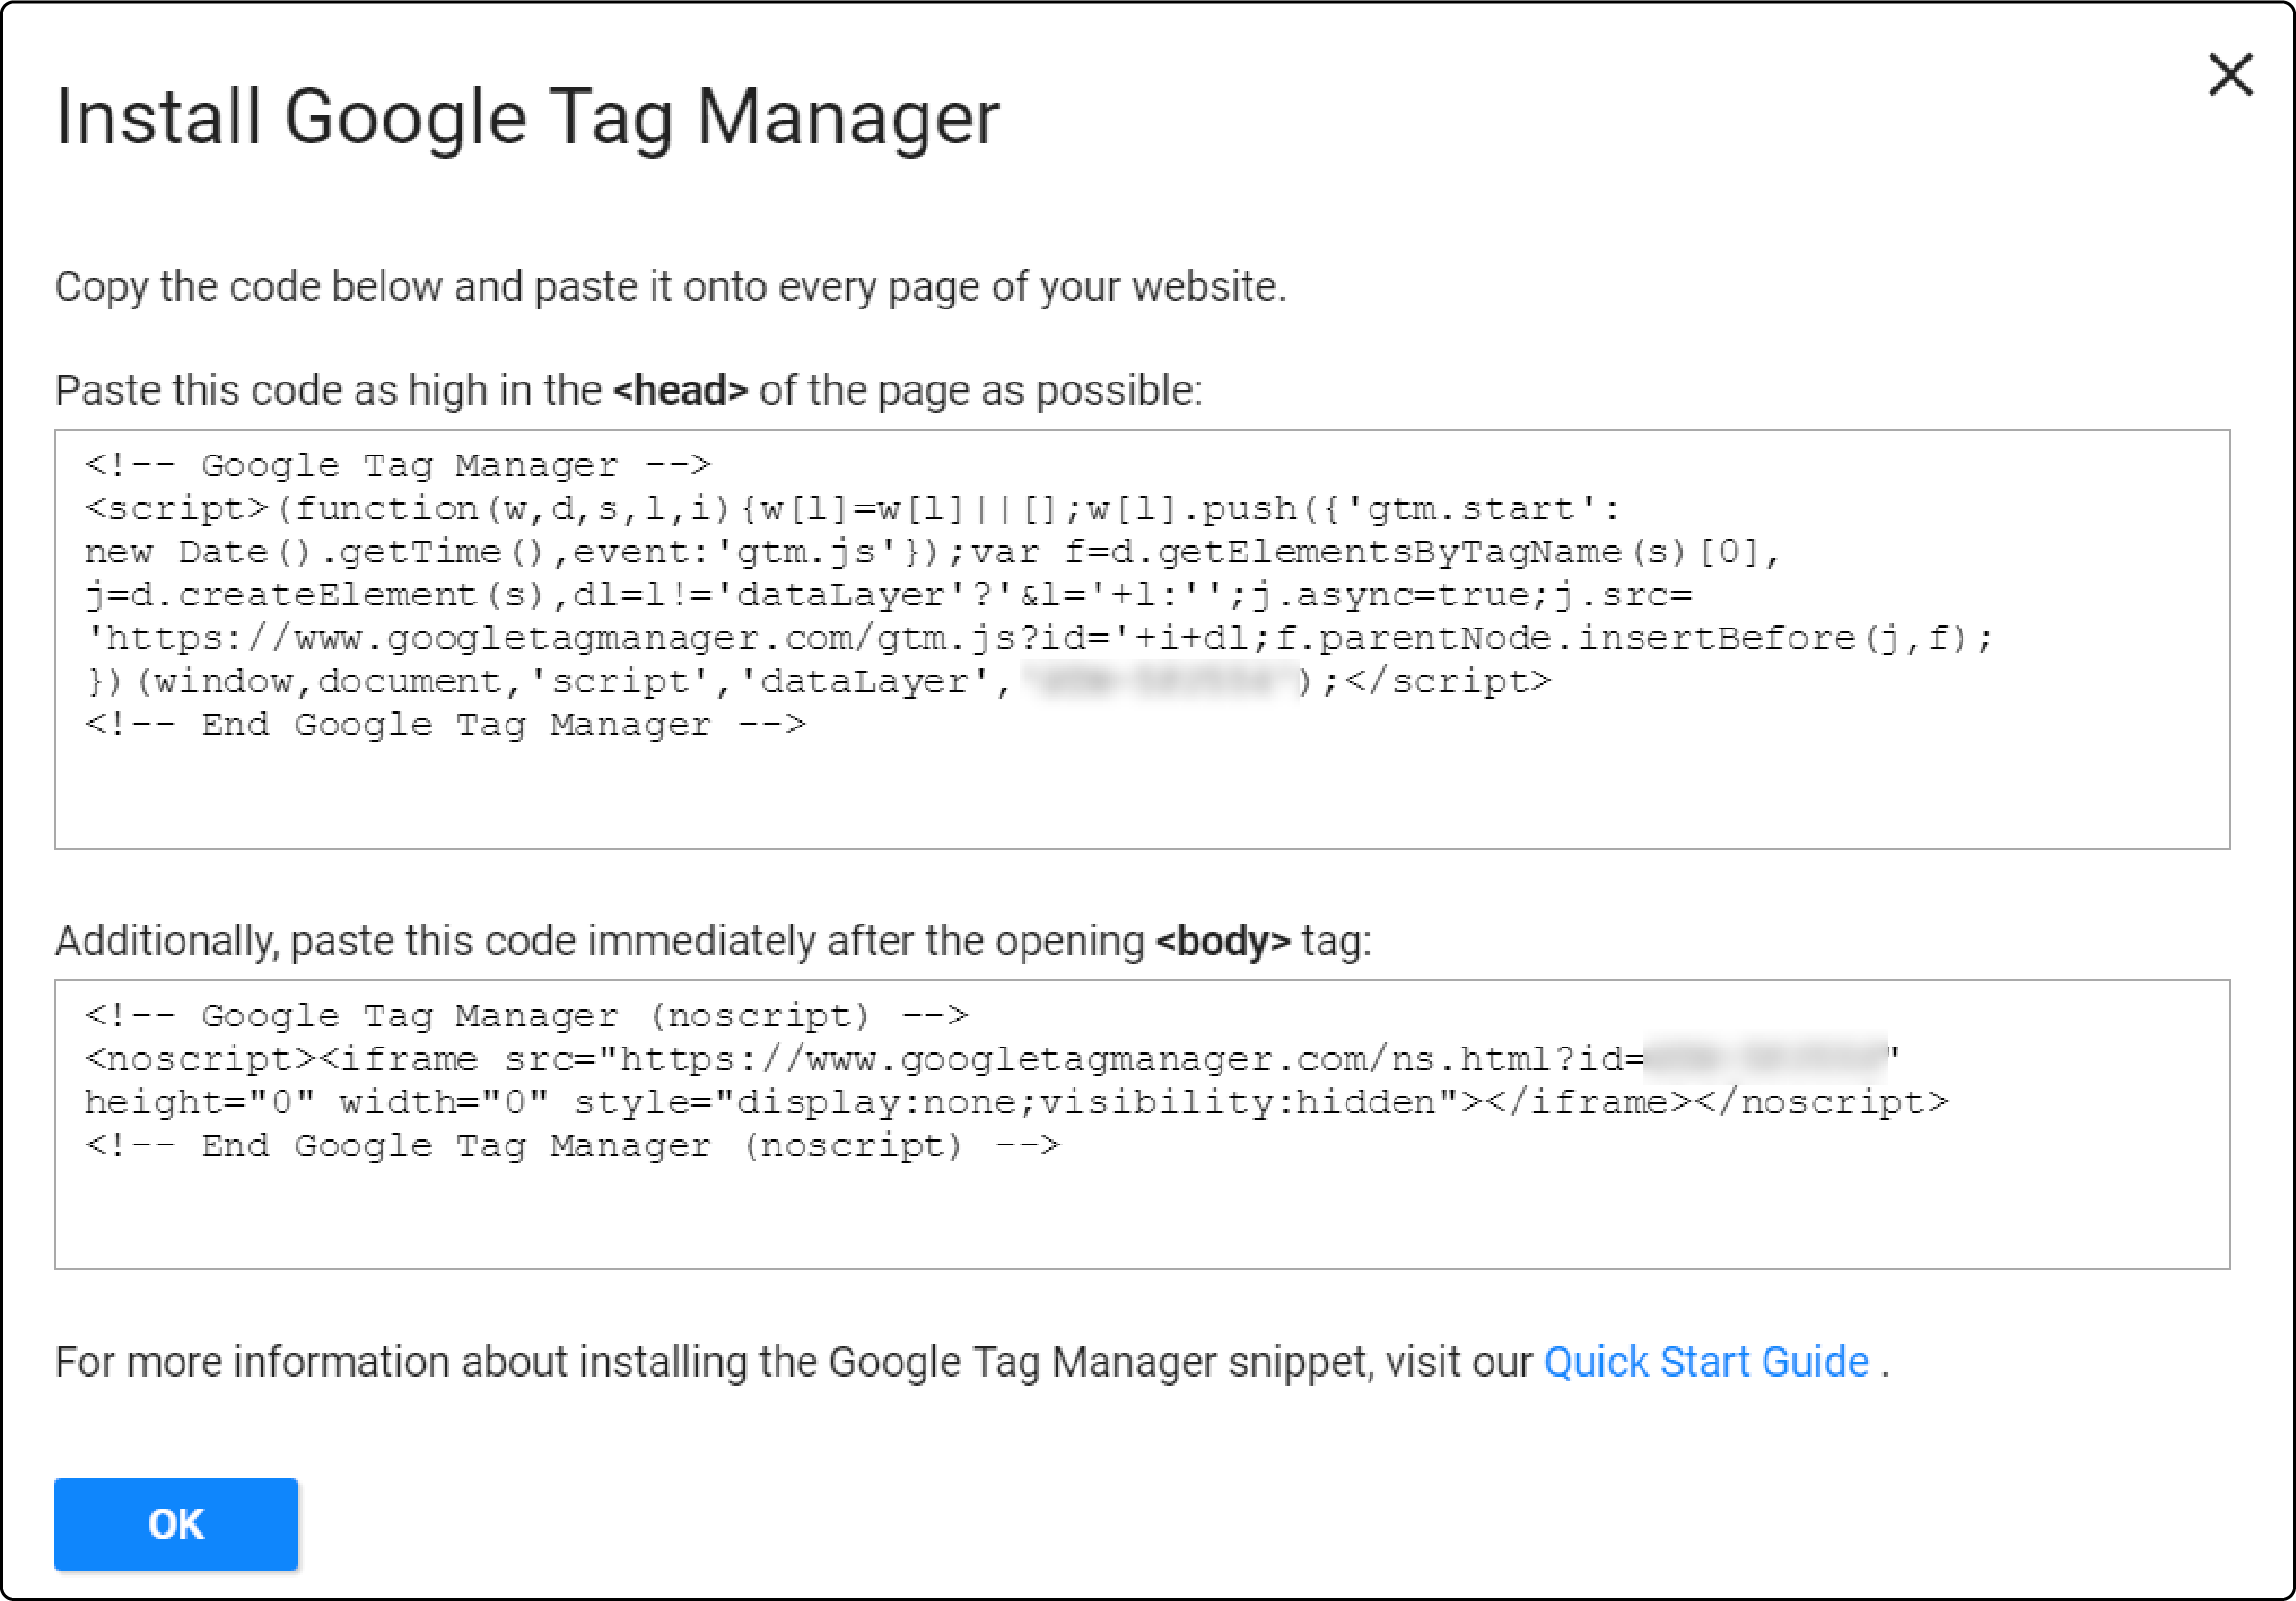
To install a container on your site, you must embed two container code snippets into the header and body sections of your site's HTML layout.
3. Tags
Once you have GTM code snippets integrated into your website's front end, you can configure tracking tags. Tags are set up within the Google Tag Manager interface. A tracking tag is a piece of code that transmits data when a specific event, like a user clicking a button, occurs.
These tags collect data using variables. GTM provides 44 built-in variables. You can also define custom variables using JavaScript and CSS.
4. Tag trigger
Tracking tags need to be triggered to transmit data. A trigger is a condition that activates a tag. For example, a trigger could be fired when a user clicks a button. Google Tag Manager provides different groups of triggers, including:
-
Page view: The trigger activates the tag when a page begins to load or has fully loaded.
-
Click: It fires an event when a user clicks on any element or link.
-
Interaction with users: This trigger allows you to track events like video views, page view depth, and form submissions.
-
Other: This category comprises an uncategorized set of triggers, such as a trigger for tracking JavaScript errors.
How to Configure Google Tag Manager for Magento 2 Store
Step 1: Create and Add Google Tag Manager Account (Admin)
-
Go to Google Tag Manager and click on Start for free.
-
Log in using your Gmail account to create your Google Tag Manager Account.
-
Enter your account name and country.

-
Configure the account container by setting the Container name and selecting the target platform.
-
Choose Web if you want to collect data from a website.
-
Finally, click on Create.
Step 2: Retrieve the GTM Code
The GTM code consists of two sections.
-
The first section should be pasted in the header section.
-
The second one needs to be inserted into the body section of your Magento 2 website.

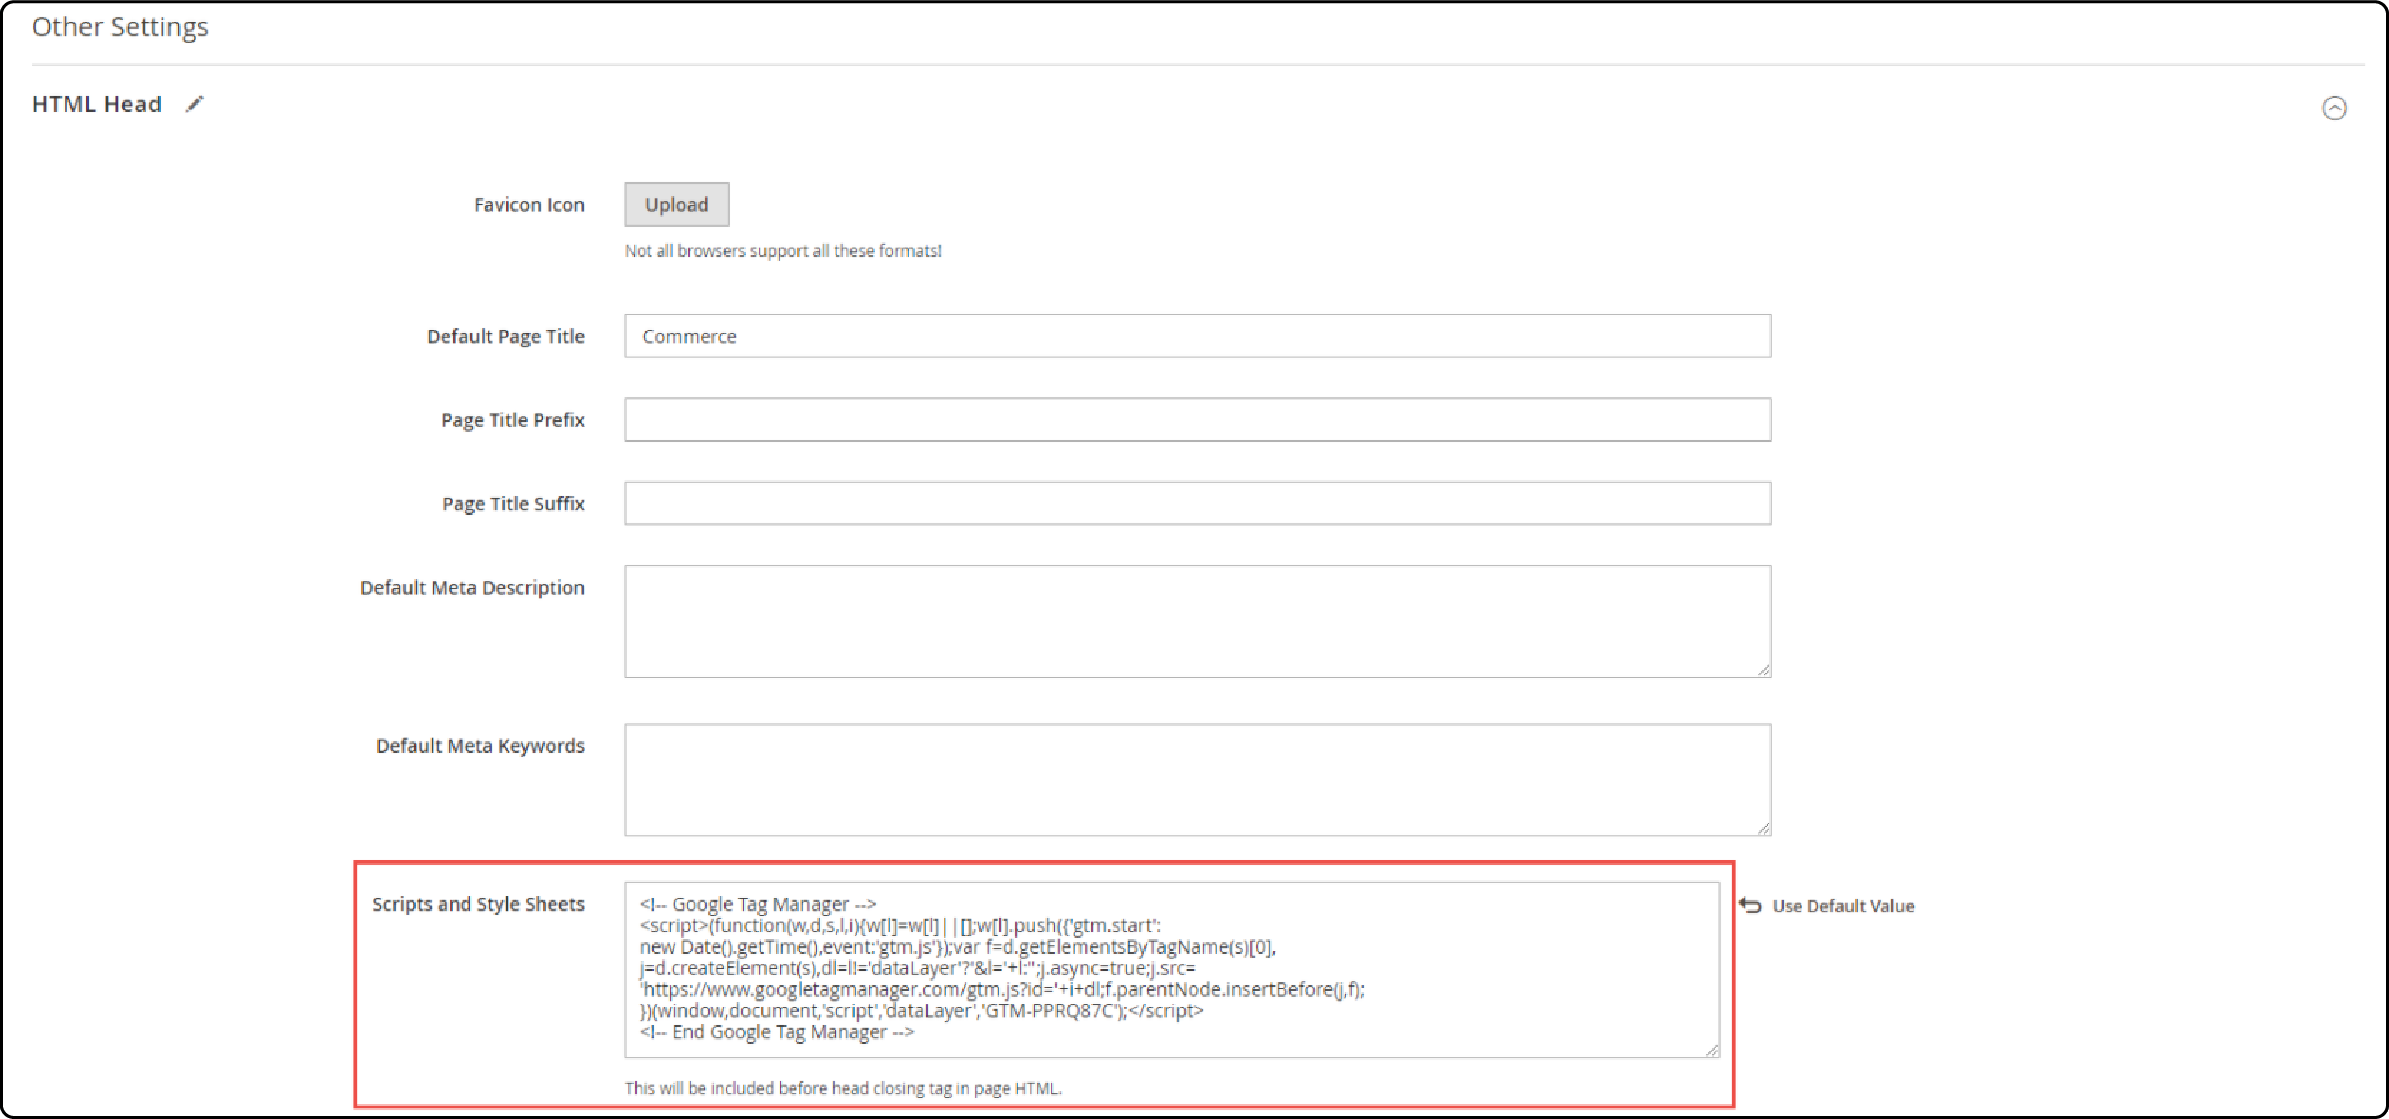
Step 3: Insert GTM code under Magento 2 HTML head section
-
Access your Magento Admin Panel.
-
Go to Content > Design > Configuration > Edit the Store View > Other Settings> HTML Head.
-
Paste the GTM code received for the
<head>tag in this section.

Step 4: Place the GTM code in the footer section
- Move to the Footer section and insert the GTM code for
<body>under Miscellaneous HTML.

- Save the configuration after pasting the code.
Step 5: Verify GTM from the front end
To ensure successful integration, inspect the front end of your Magento 2 site.
-
Open the homepage and press CTRL + U to view the source.
-
Find GTM to confirm that the code has been successfully added.
Tips for Verifying and Testing Google Tag Manager on Magento 2
1. GTM Code Inspection
Start by checking the GTM code on the front end of your website. Examine the page's source code to locate the GTM snippet and ensure it is correctly inserted.
2. Tag Verification
Verify that all tags are operating as intended. Test them on various customer-facing pages of your store to ensure that each tag triggers and sends information to its respective third-party platform.
Monitor the data collected by your tags to ensure its quality and relevance. It enables you to make necessary adjustments or optimizations as needed.
FAQs
1. How do I use GTM in Magento 2?
To use GTM in Magento 2, create a Google Tag Manager account. After creating an account, retrieve the GTM code and insert it into your Magento 2 store's HTML. This process involves placing specific code snippets in the header and body sections of your website's HTML layout.
2. How does Google Tag Manager benefit a Magento 2 website?
Google Tag Manager significantly benefits a Magento 2 website by providing a cost-effective tag management solution. It enhances Magento performance by handling tracking codes on its servers. It streamlines the process of managing tags and ensures version control.
3. What is the role of managing tags and triggers within GTM?
Managing tags and triggers in GTM is essential for collecting and transmitting data. Tags are pieces of code that collect data using various variables. Triggers are conditions that activate these tags. They work together to track user interactions and events on a website.
4. Can GTM integrate with other analytics platforms besides Google Analytics?
Yes, GTM is not limited to Google Analytics. It can integrate with other analytics platforms like Adobe Analytics, Facebook Pixel, and more. Google Tag Manager serves as a tag management system that enables data transfer to various analytics platforms. It is not solely limited to Google Analytics.
5. How does GTM aid in managing tags for a Magento 2 website?
GTM simplifies managing tags by providing a user-friendly interface for creating, implementing, and troubleshooting tracking tags. It also supports different access levels. Delegation of tag-related work among team members ensures a smoother workflow.
Summary
Magento 2 Google Tag Manager simplifies the management of marketing tags. It also helps track events within the customer journey without altering the store's theme templates. The tutorial covered setting up Google Tag Manager within Magento 2 for effective marketing tag management. We also listed the benefits and differences between GTM and Google Analytics.
Consider exploring reliable Magento server hosting to optimize the performance of your Magento 2 store.


