
Magento 2 Gift Wrapping Extension: Configure Gift Wrap Designs
Looking to enhance your customer's shopping experience with Magento 2? Magento 2 enable gift wrapping offers a gift wrap option at checkout.
This tutorial will cover the steps to enable and manage gift wrapping in Magento 2.
Key Takeaways
- Steps to configure and manage the gift wrap option.
- Steps to add and configure the wrap option to your store.
- Increase customer satisfaction and boost sales with gift-wrapping designs.
- Steps to show gift wrapping options at checkout.
- Steps to enable and add gift wrapping for order management with taxes.
- Troubleshooting tips with Magento 2 gift messages on checkout.
-
7 Steps To Enable Magento 2 Custom Gift Wrap On Product View Page
-
Troubleshooting Common Issues With Selected Gift Wrap Magento 2 Extensions
Why Enable Magento 2 Gift Wrapping Option In Your Store?
"Offering gift wrapping options in Magento 2 provide customers with a convenient way to purchase gifts directly from your online store."
Gift Wrapping feature is especially beneficial during holidays and special occasions. During holidays like Christmas, Valentine's Day, or Mother's Day, gift wrapping becomes valuable. Customers often appreciate the convenience of having gifts arrive already wrapped. This feature can be a decisive factor in choosing your store over competitors. Consider offering themed gift wrap options for different holidays. It makes your service even more attractive. It helps:
- Increase the average order value.
For example, if you offer gift wrapping at "$5" per item, a customer buying three gifts might add "$15" to their order total. Over time, it can boost your revenue, especially during peak gift-giving seasons.
- Create a more engaging shopping cart.
For instance, a customer might be more likely to complete a purchase if they can easily add gift wrapping. It saves them time and effort later.
- Boost sales through Magento personalization strategies.
For example, a customer might choose your store over a competitor. You can then offer the convenience of gift wrapping with personalized options.
How Does Gift Wrap Module For Magento 2 Work?
Customers often purchase items online as gifts for others. Shoppers often want the option to have their purchase wrapped or include a small greeting card. Magento gift wrapping can be applied to individual items or the entire order. In the Magento Commerce edition, you can also manage & customize gift-wrapping designs.
The ability to manage gift-wrapping designs keeps your offerings fresh and relevant. You can update designs seasonally or create special editions for holidays. This variety can encourage repeat customers to try new options. These can be used as a marketing tool to promote your store's attention to customer service.
For each design, you can set a unique price. You can also upload a thumbnail image. It appears as an option in the Magento shopping cart. When clicked, the thumbnail expands into a full-size image. During the checkout review, the design's price is displayed along with other totals in the 'Order Summary' section.
Before checkout, customers can view available gift options in their shopping cart. It allows them to decide if they want to add a gift message or a card. They can also choose from various gift-wrapping options. Each item can have its own message and wrapping option. A gift receipt or greeting card can also be added to the entire order.
7 Steps To Enable Magento 2 Custom Gift Wrap On Product View Page
- Log in to the admin panel and go to Stores > Settings > Configuration.
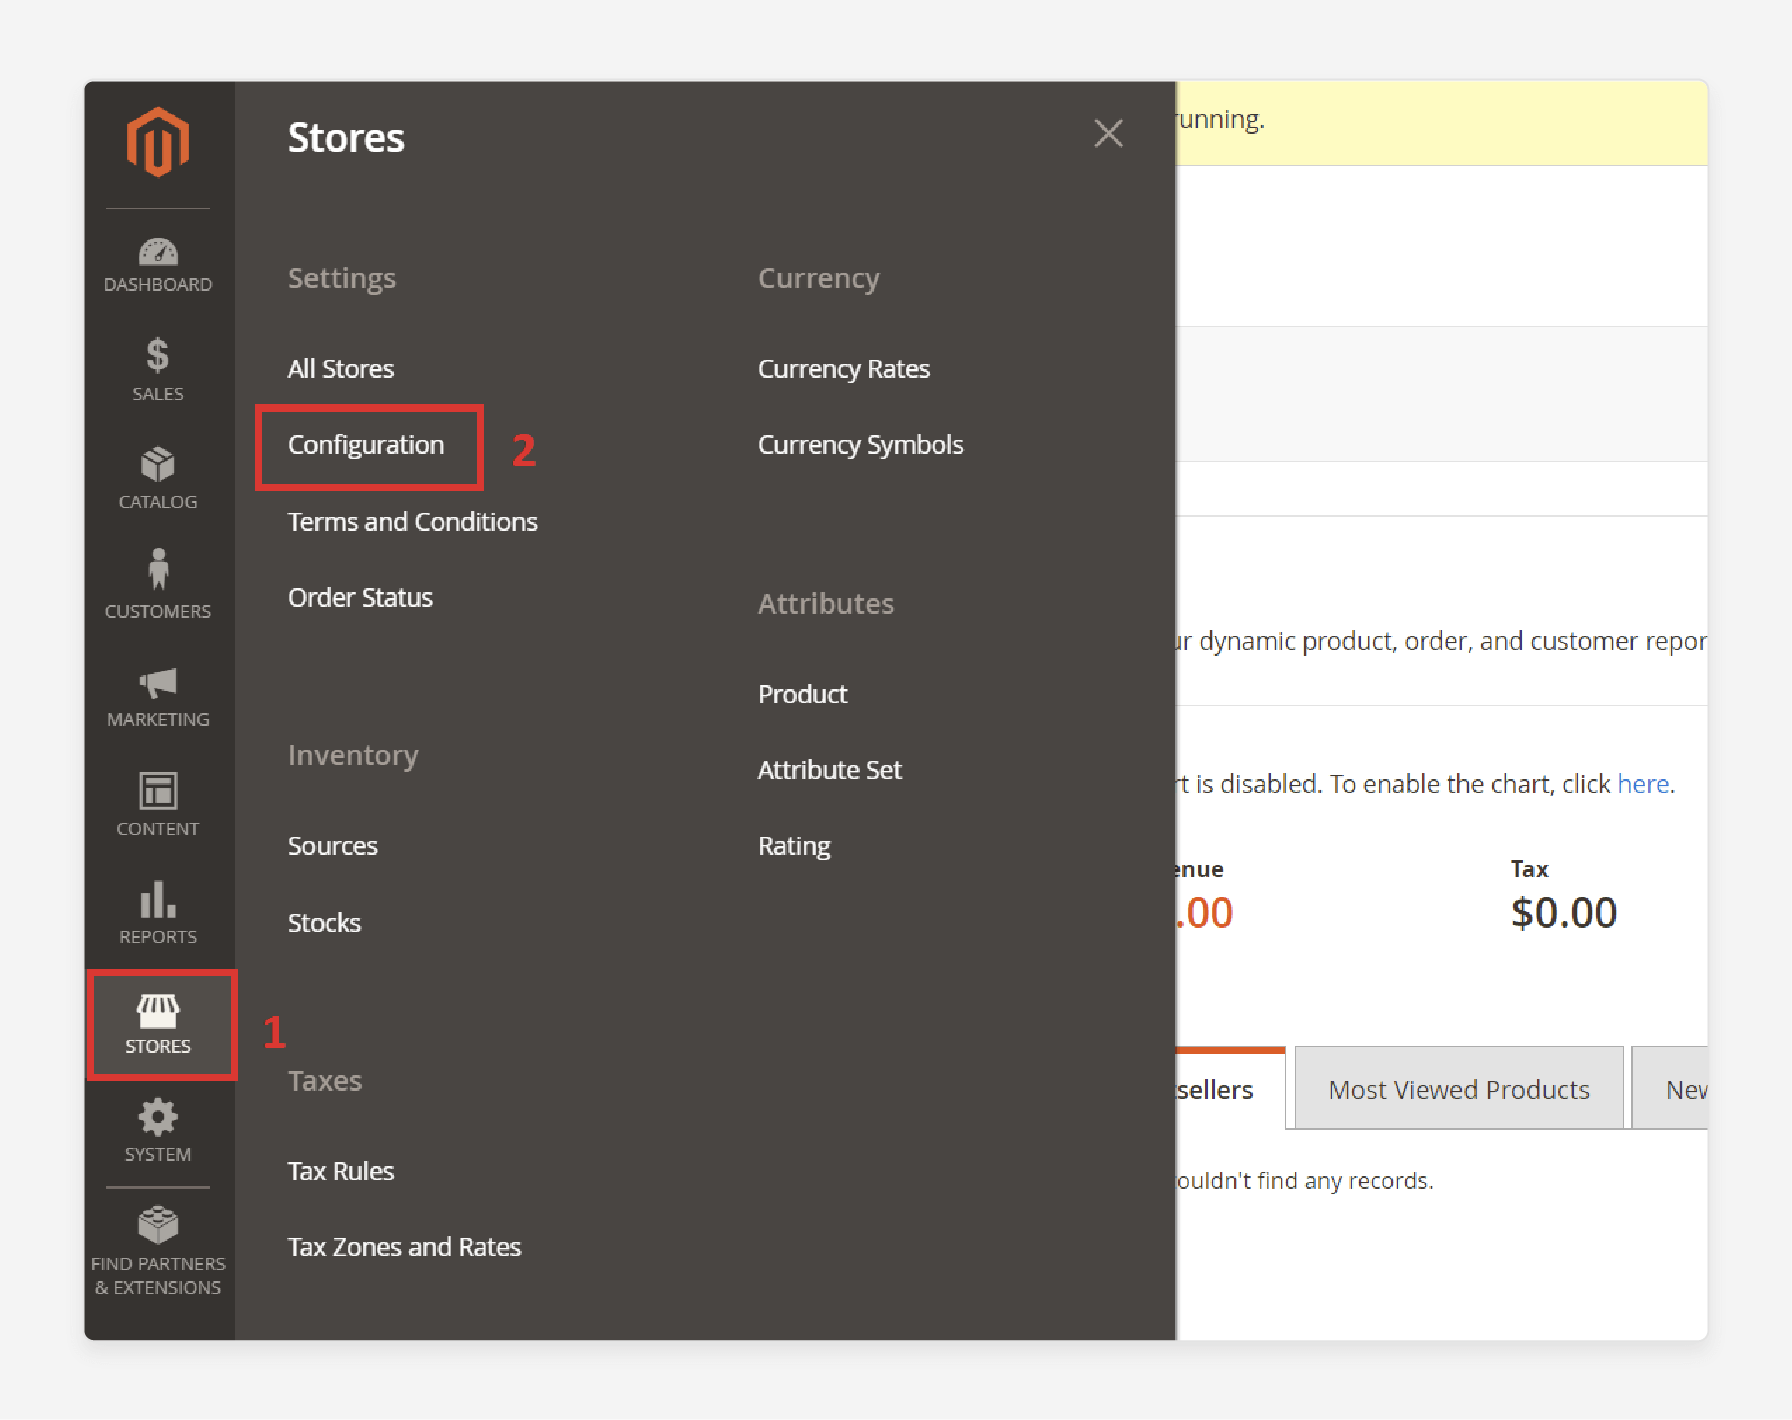
- On the left side, locate the Sales sub-category.
- Expand it and select Sales.
- Expand the 'Gift Options' section.
Note: Gift wrapping, greeting cards, and gift receipts are available only in the Commerce edition.
- The first two fields allow customers to add customized gift messages to their orders and products. To enable this feature:
- Allow Gift Messages on Order Level: Select "Yes". It permits a single gift message for the entire order. Choose "No" if you don't want to offer this option.
- Allow Gift Messages for Order Items: Select "Yes". It enables gift messages for individual items in the shopping cart. Choose "No" to disable this.
Note: Customers can add a gift message in the Gift Message section on the shopping cart page.
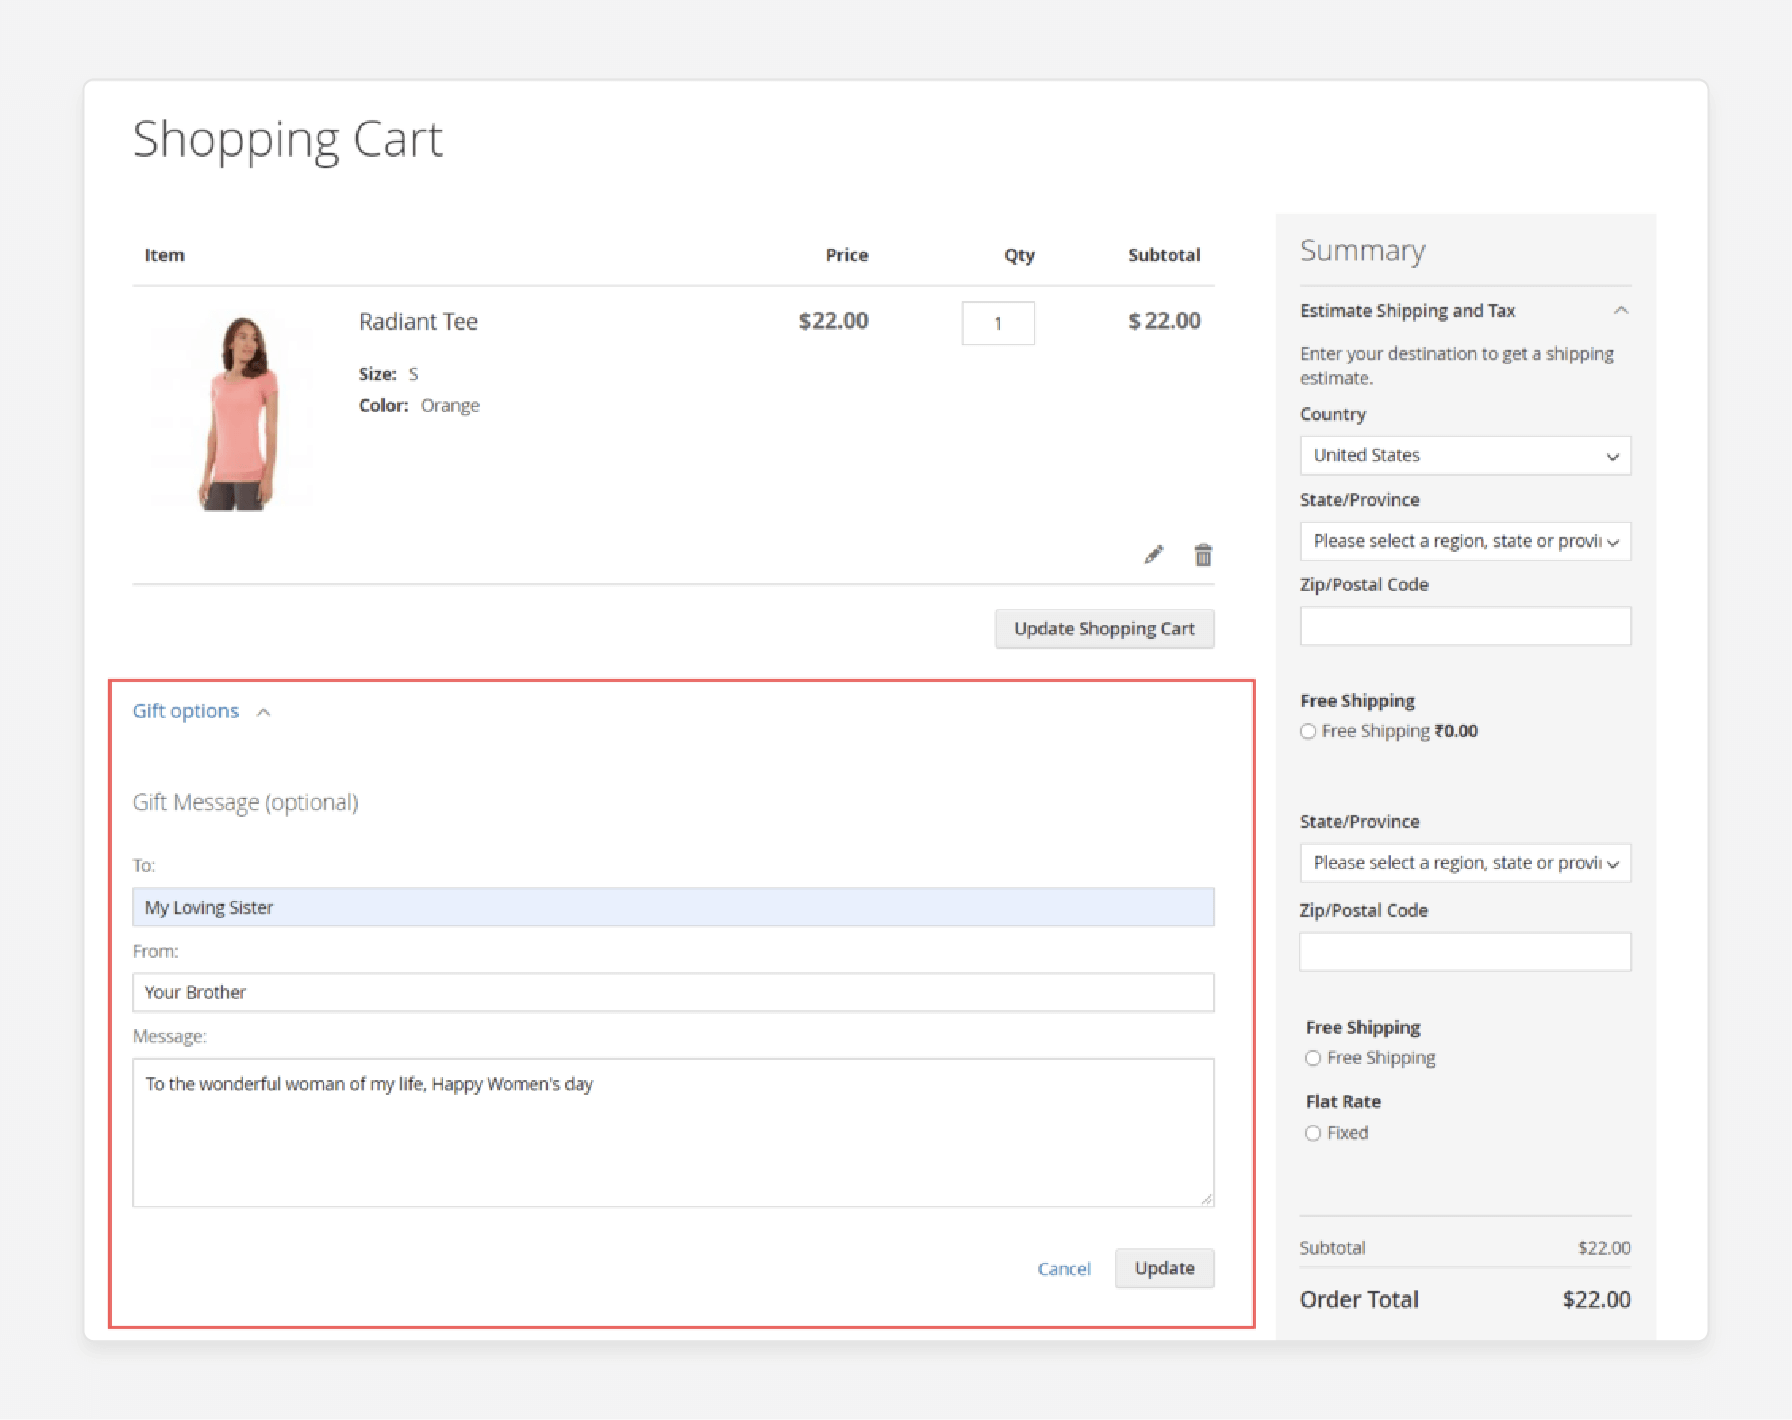
- The next two fields control the gift wrapping feature. Choose:
- Allow Gift Wrapping on Order Level: Set this option to "Yes". It enables gift wrapping for the entire order. Select "No" if you don't want this option.
- Allow Gift Wrapping for Order Items: Set this option to "Yes". It allows gift wrapping for individual items in the shopping cart. Select "No" if you prefer not to offer this.
- Allow Gift Receipt: Set this option to "Yes". Enable this if you want customers to have the option to include a gift receipt. If not, select "No".
- Allow Printed Card: Set this option to "Yes". It lets customers include a printed card. If not, select "No".
- Default Price for Printed Card: Enter the default price in the appropriate field.
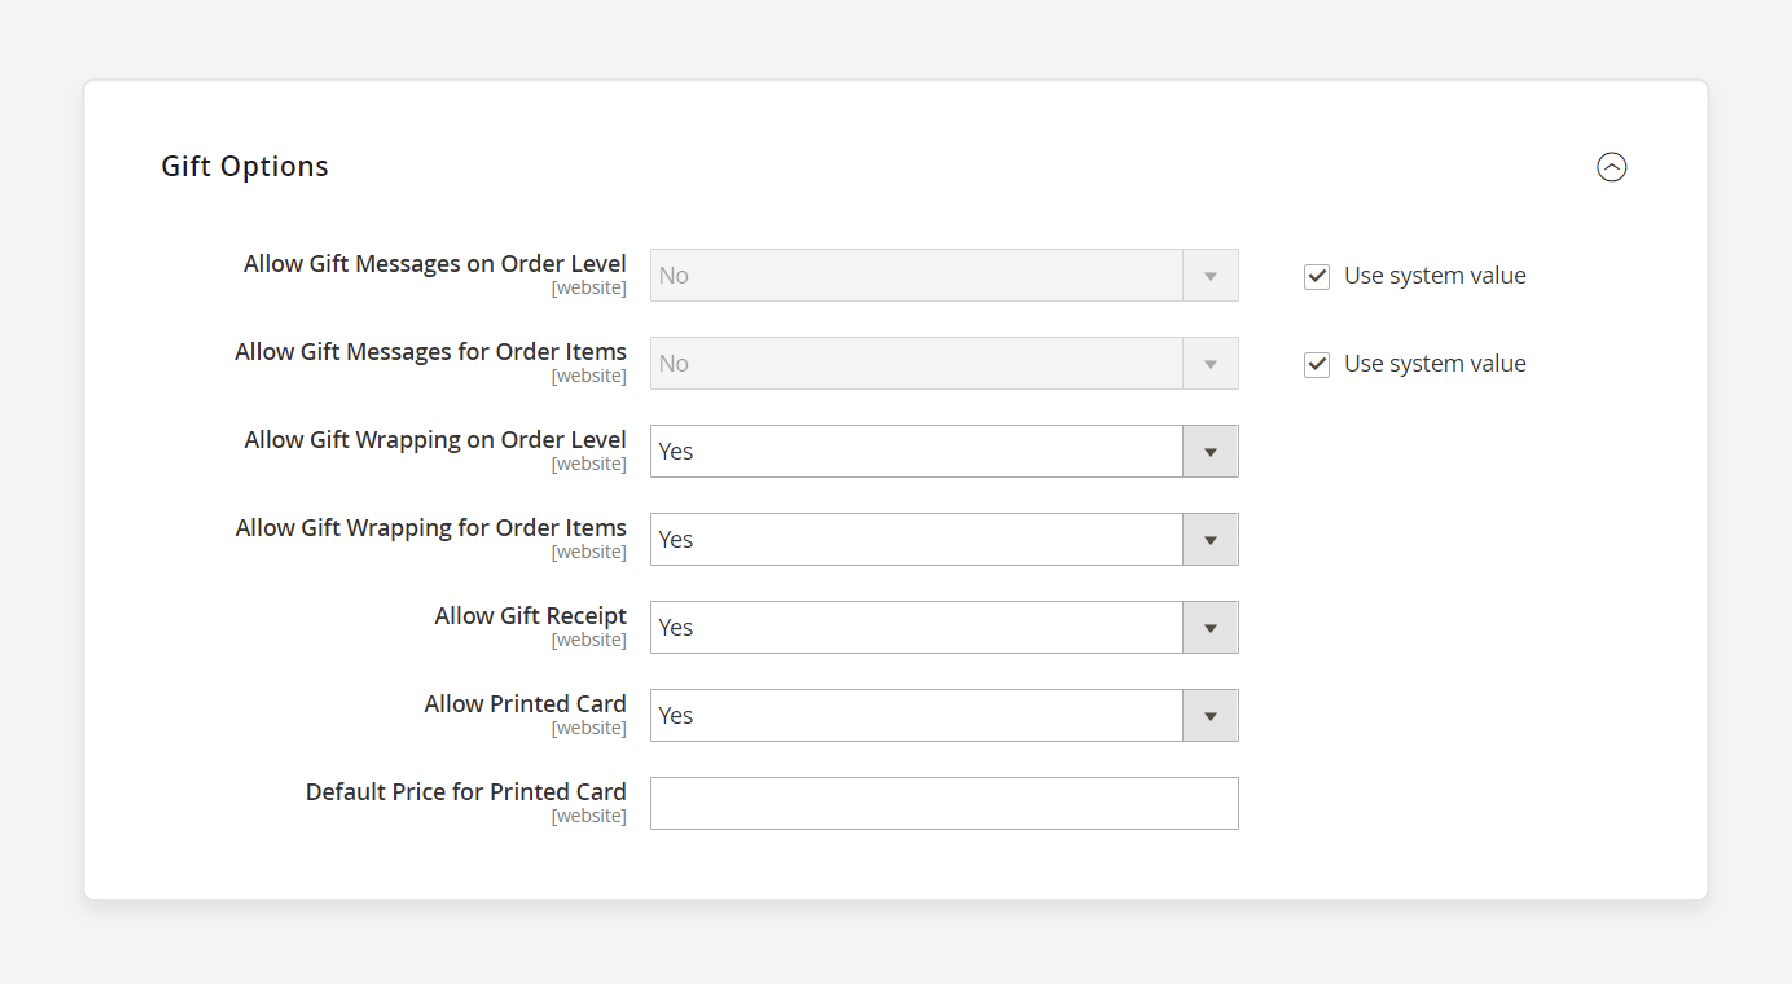
- After making your selections, click on the 'Save Config'.
4 Steps To Configure Magento 2 Gift Wrap Module
- Log in to your Magento admin panel.
- Go to Stores > GiftWrapper > Configuration.
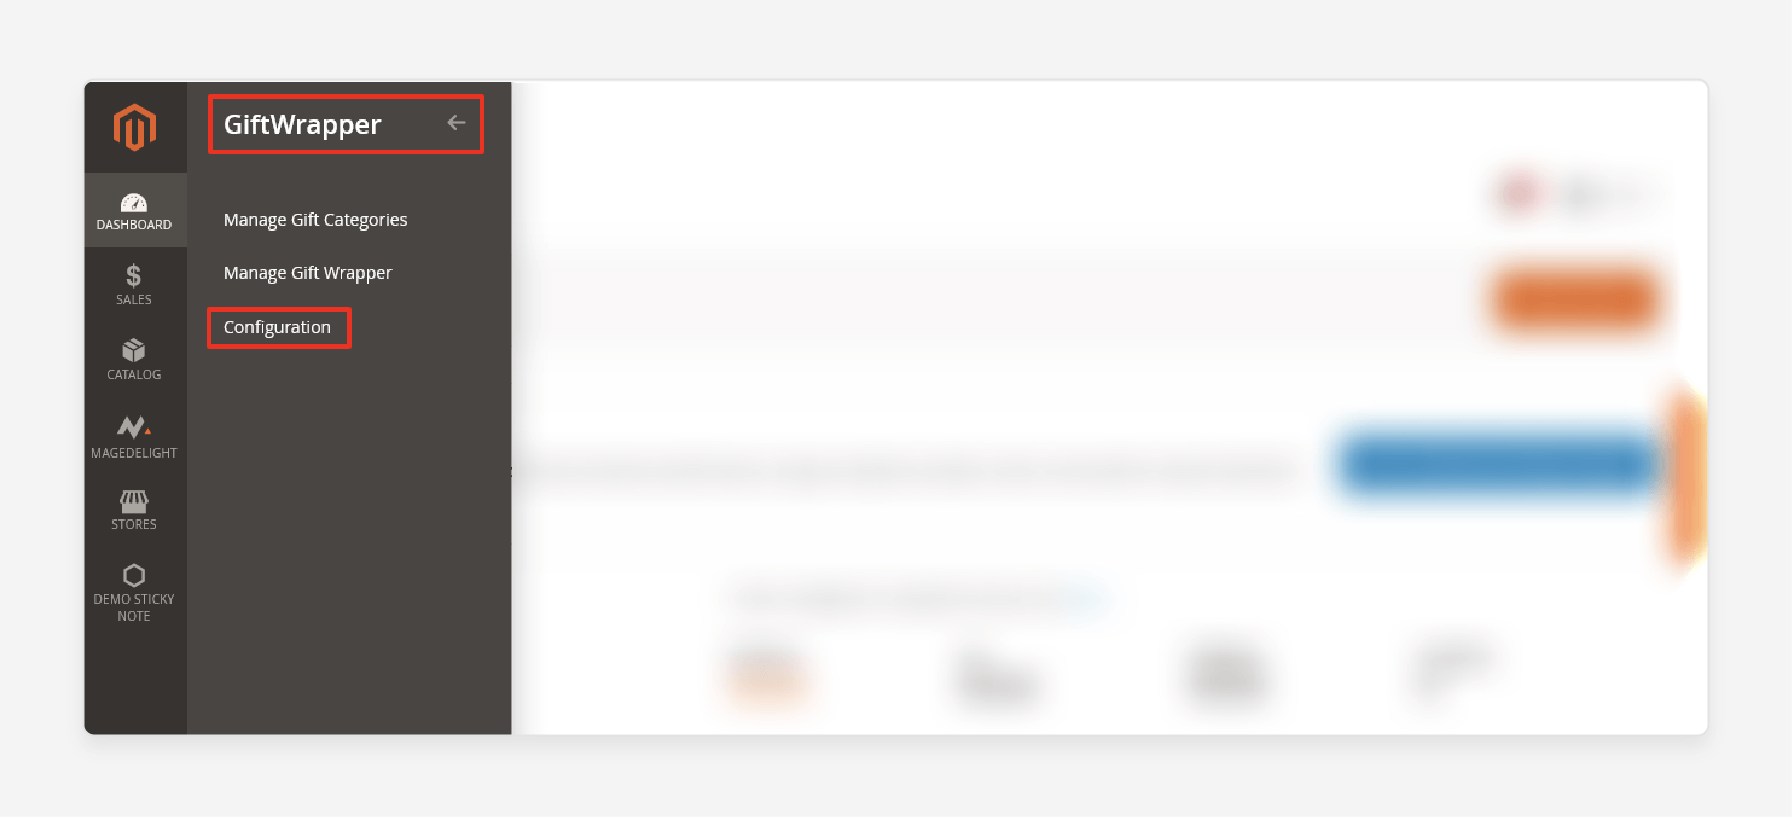
- Expand the 'General' section and follow these steps:
- Enabled: Set this option to "Yes".
- Giftwrapper Type: Choose "Product Specific" in this field.
- Allow giftwrapper on cart page: Set this option to "No".
- Allow giftwrapper on checkout page: Set this option to "Yes".
- Allow giftwrapper on product page: Set this option to "Yes".
- Add Giftwrapper Checkbox Label: Enter "Select a gift wrapper" in this field.
- Edit Giftwrapper Checkbox Label: Enter "Edit a gift wrapper" in this field.
- Giftwrapper Additional Info: Enter "Giftwrapper information" in this field.
- Giftwrapper Image Placeholder: Click on the 'Browse' button to upload an image in this field.
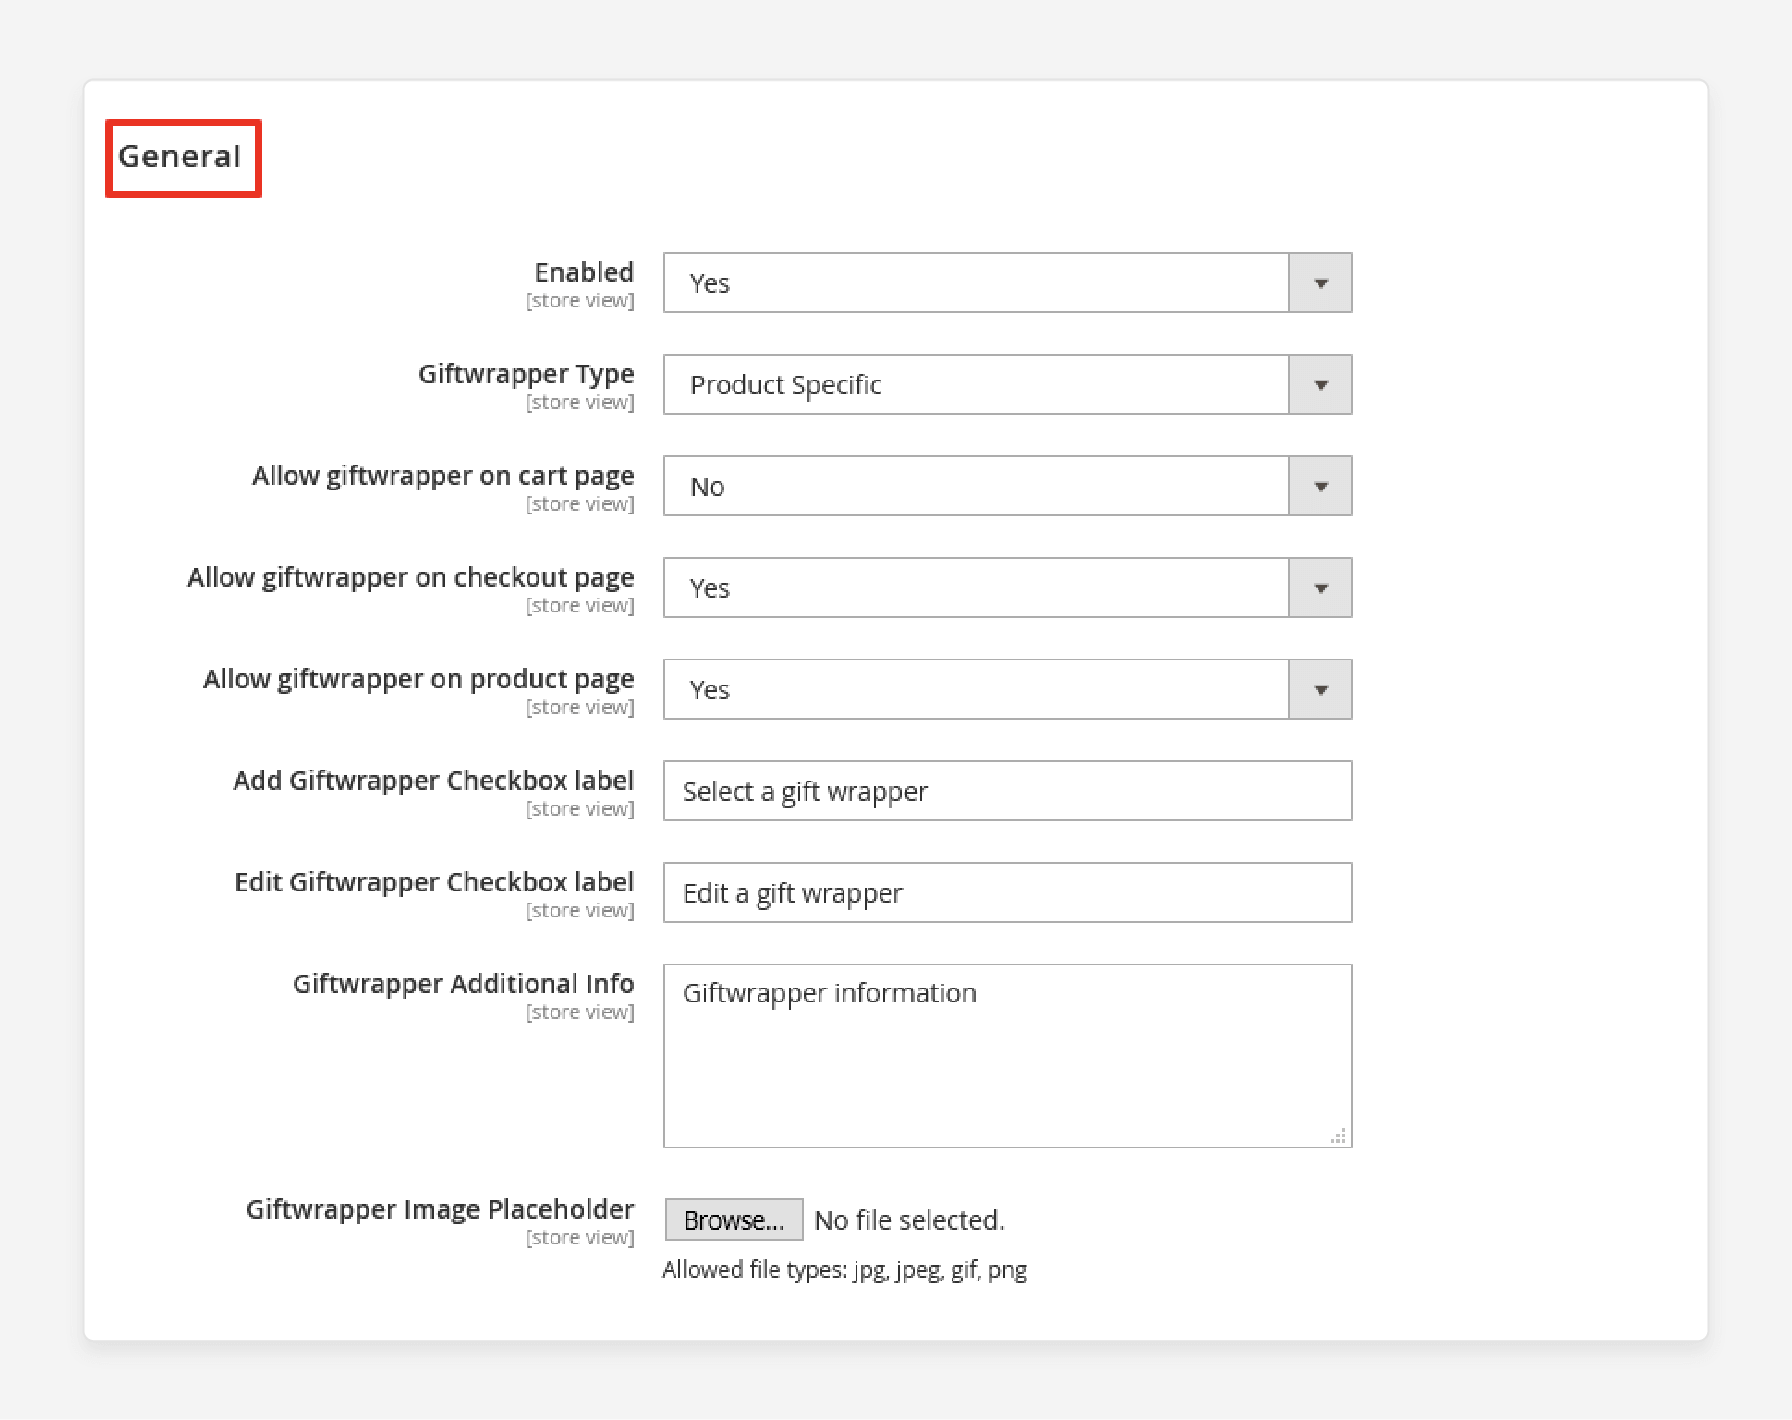
- Click on the 'Save Config' button to finalize the process.

3 Methods To Manage Magento 2 Gift Options And Design
Method 1: Add a New Gift Wrap Design
- Log in to the Magento Admin panel.
- Navigate to Stores > Other Settings > Gift Wrapping.
- Click on the 'Add Gift Wrapping' button located at the top-right corner.
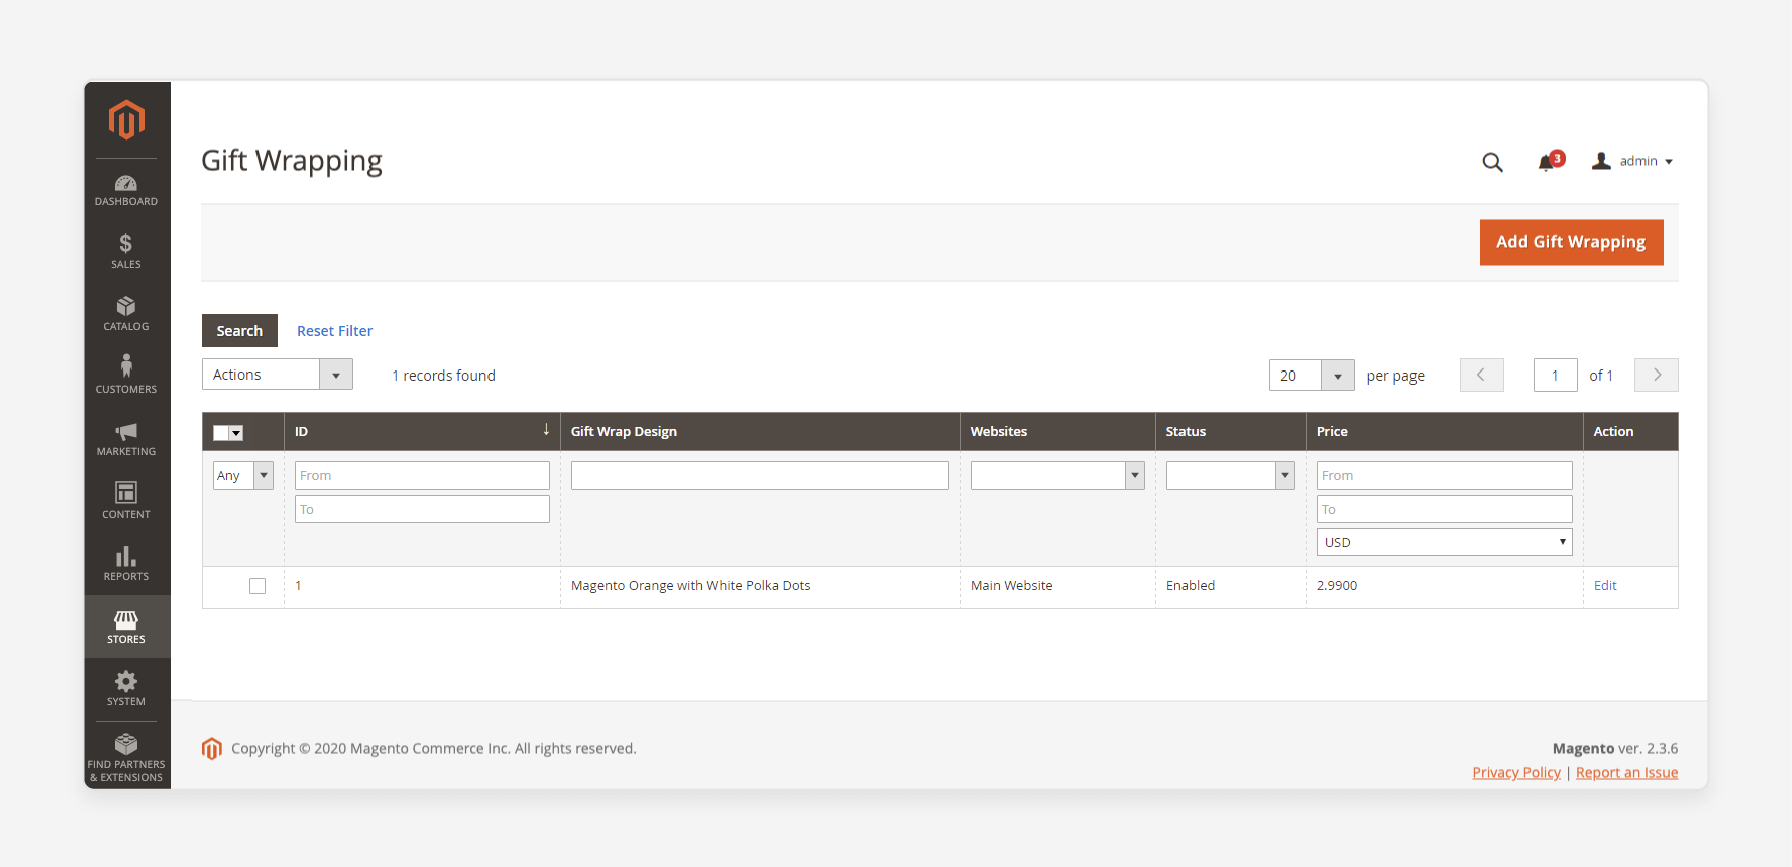
- Fill in the fields in the 'Gift Wrapping Information' section:
- Gift Wrapping Design: Enter a name that will be visible during the checkout process.
- Websites: Select the website(s) where the gift-wrapping design will be available.
- Status: Set this option to 'Enabled'. You can disable it later for seasonal options.
- Price: Decide on the price of the design and enter it in the field. It can be overridden at the product level.
- Image: Click on the 'Choose File' to upload a thumbnail for the design.
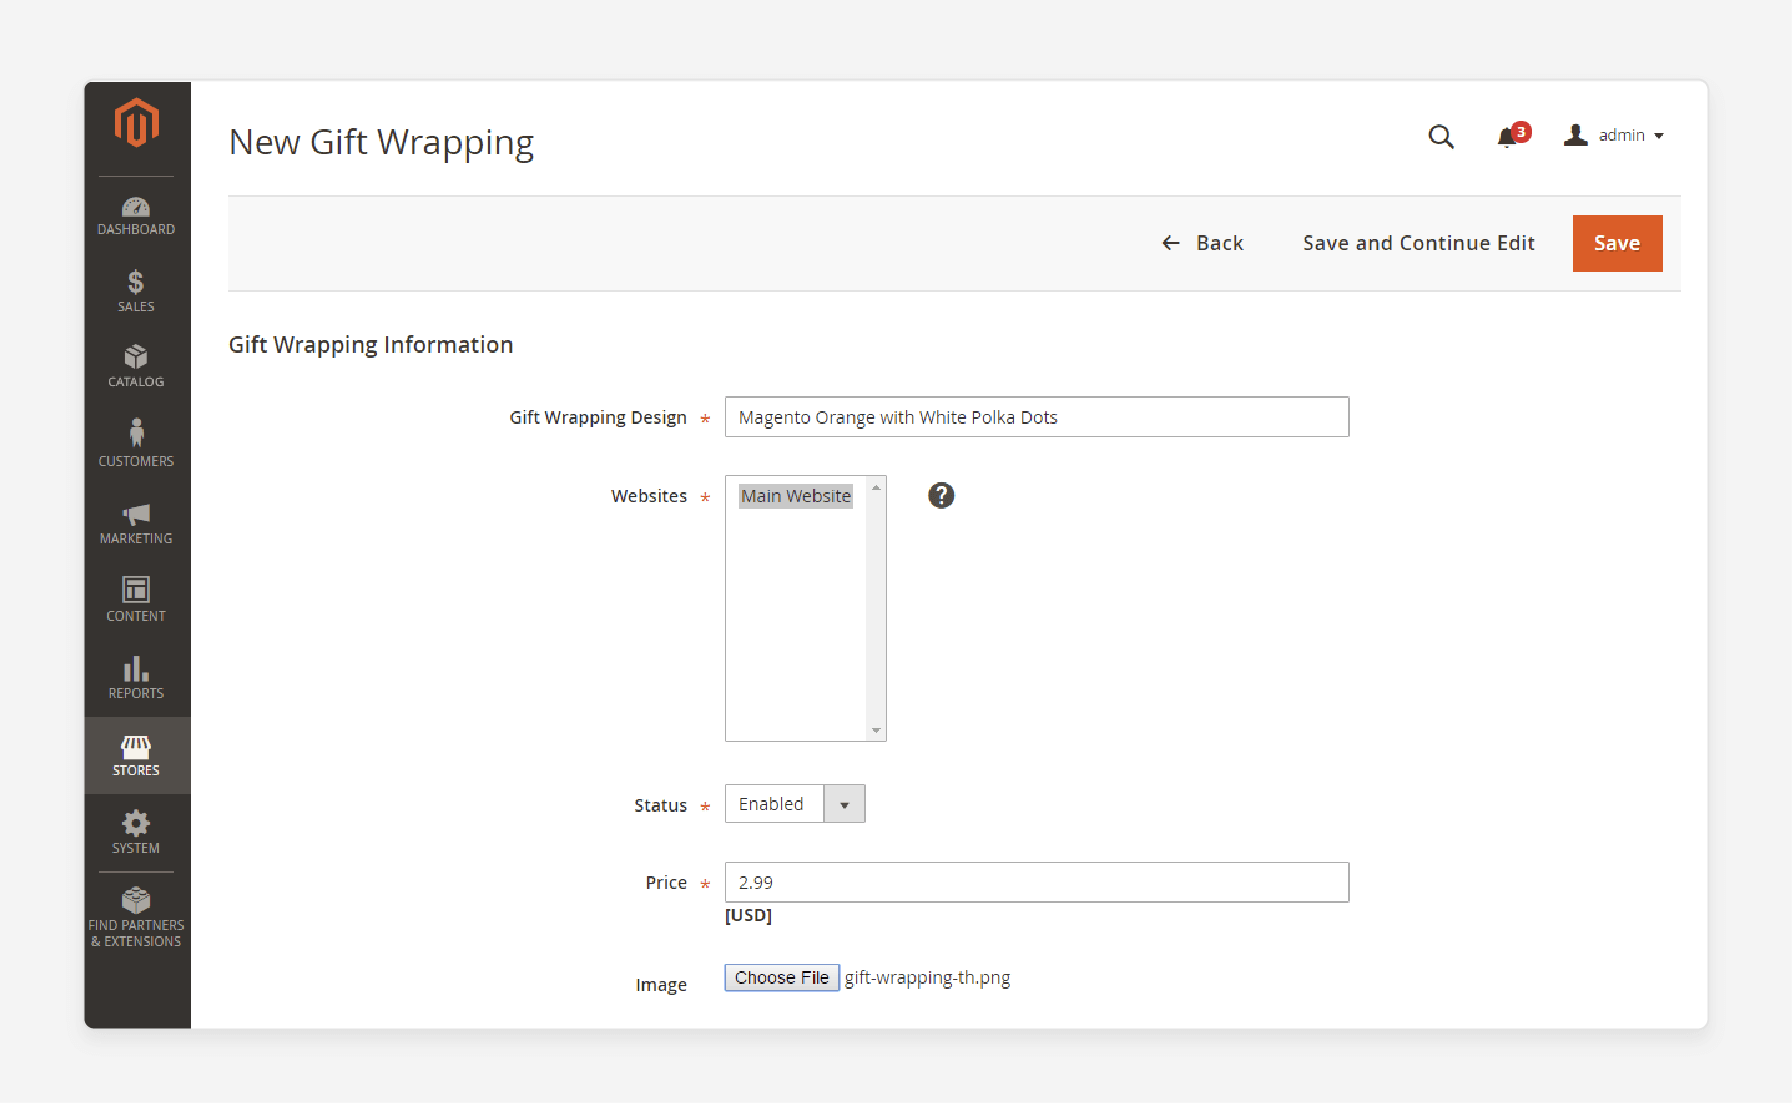
Note: Once saved, this thumbnail will appear in the Gift Wrapping Information.
- Click on the 'Save Config'.
Method 2: Edit a Gift-Wrapping Design
- Log in to the Admin panel.
- Navigate to Stores > Other Settings > Gift Wrapping.
- Locate the gift-wrapping design you want to edit in the list.
- Make the necessary changes to the fields mentioned above.
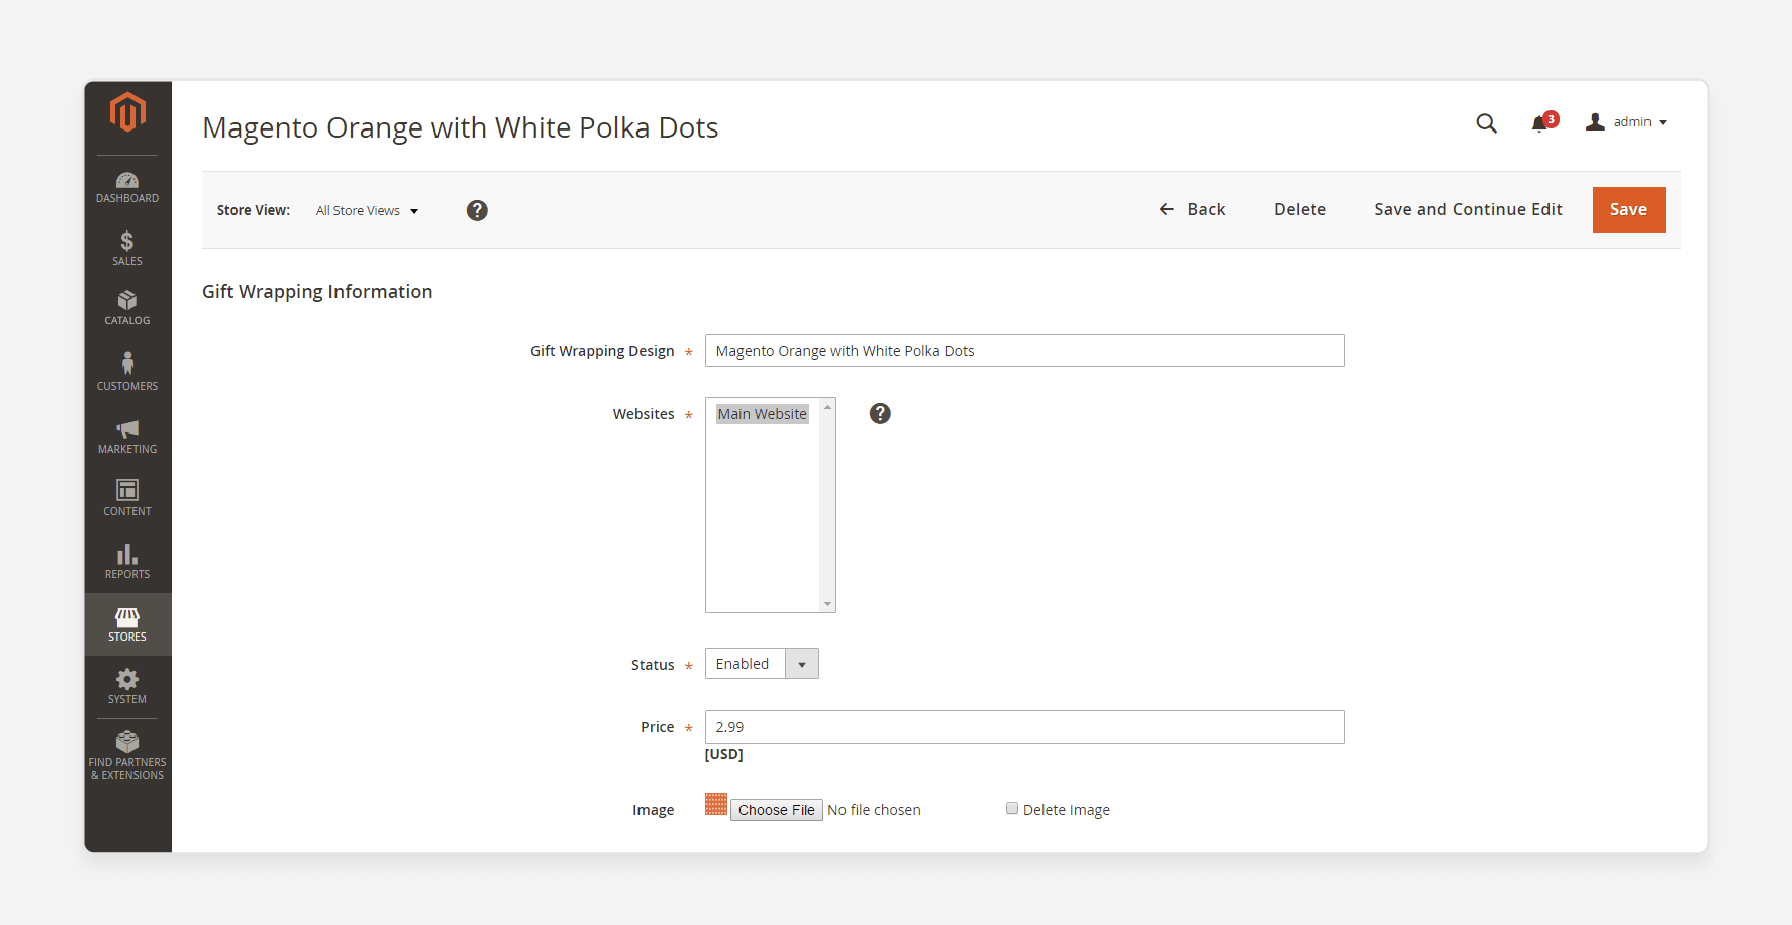
- Click on the 'Save' button after making your edits.
Method 3: Delete Gift-Wrapping Designs
To delete gift-wrapping designs, you can use one of the following approaches:
Approach 1: Delete a Single Gift-Wrapping Design
- Open the gift-wrapping design in edit mode.
- Click 'Delete' at the top of the page.
- Confirm by clicking 'OK'.
Approach 2: Delete Multiple Gift-Wrapping Designs
- In the 'Gift Wrapping' grid, select the checkbox for each design you want to delete.
- In the 'Actions' field, choose "Delete".
- Click 'Submit' to confirm.
5 Steps To Add New Gift Wrap Functions
- Log in to your admin panel.
- Navigate to Stores > GiftWrapper > Manage Gift Wrapper.
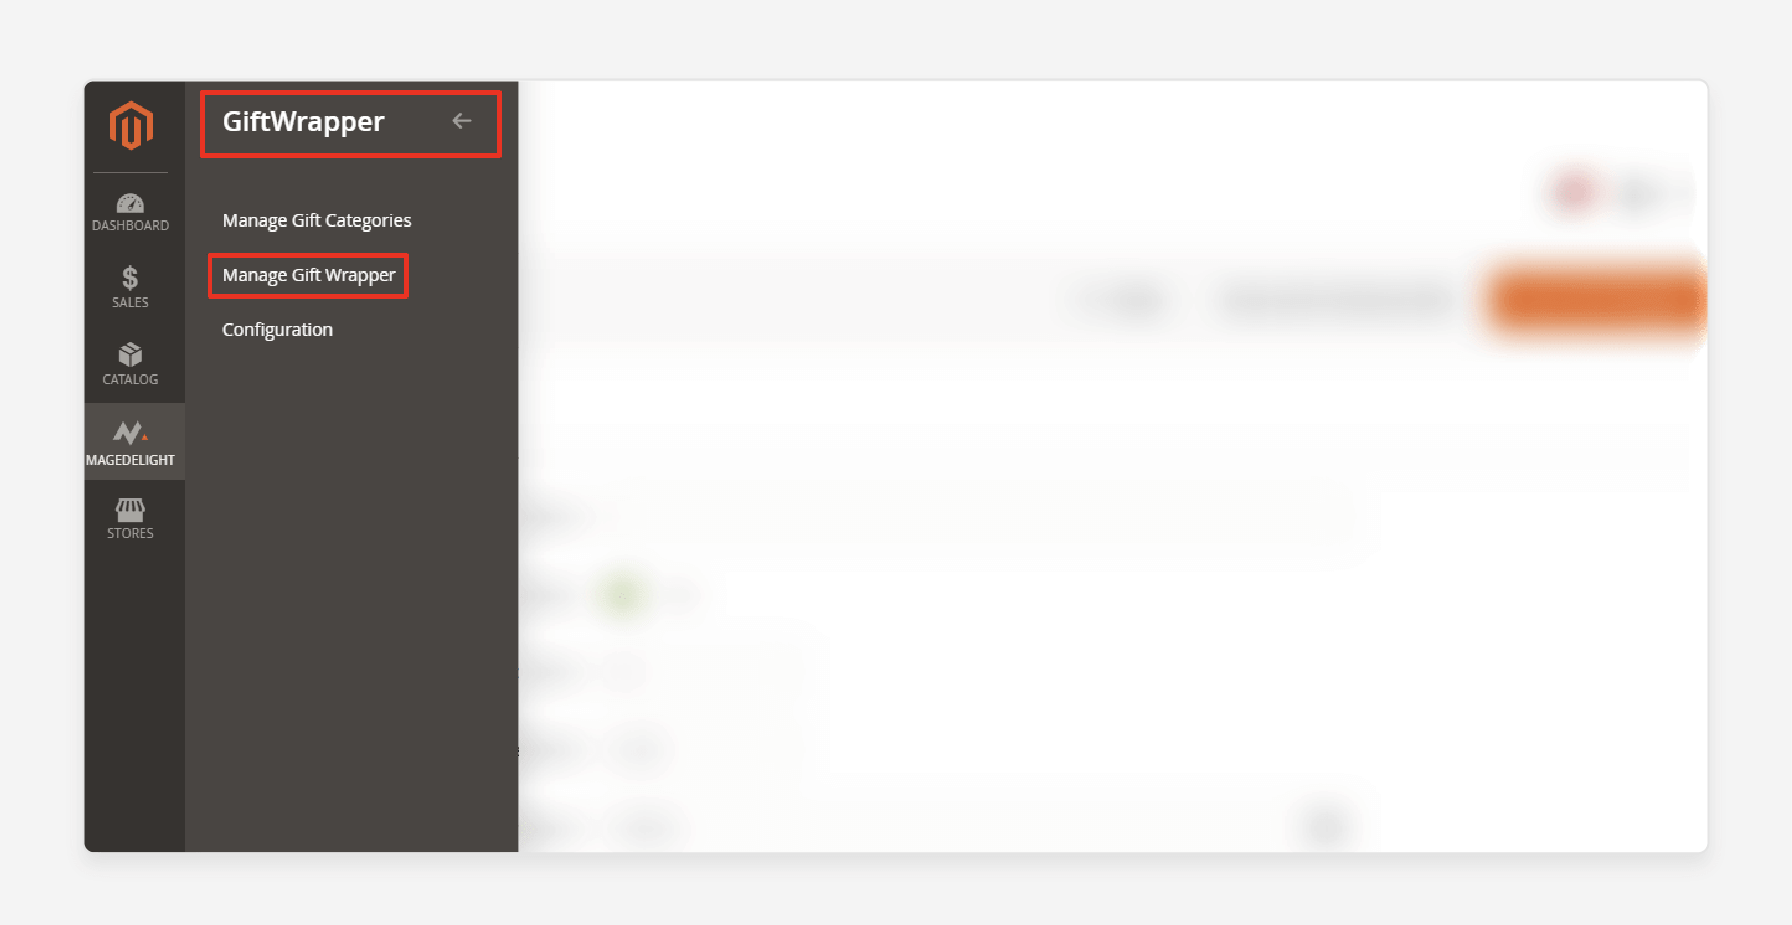
- Click on the 'Add New Giftwrapper' button located in the top-right corner.
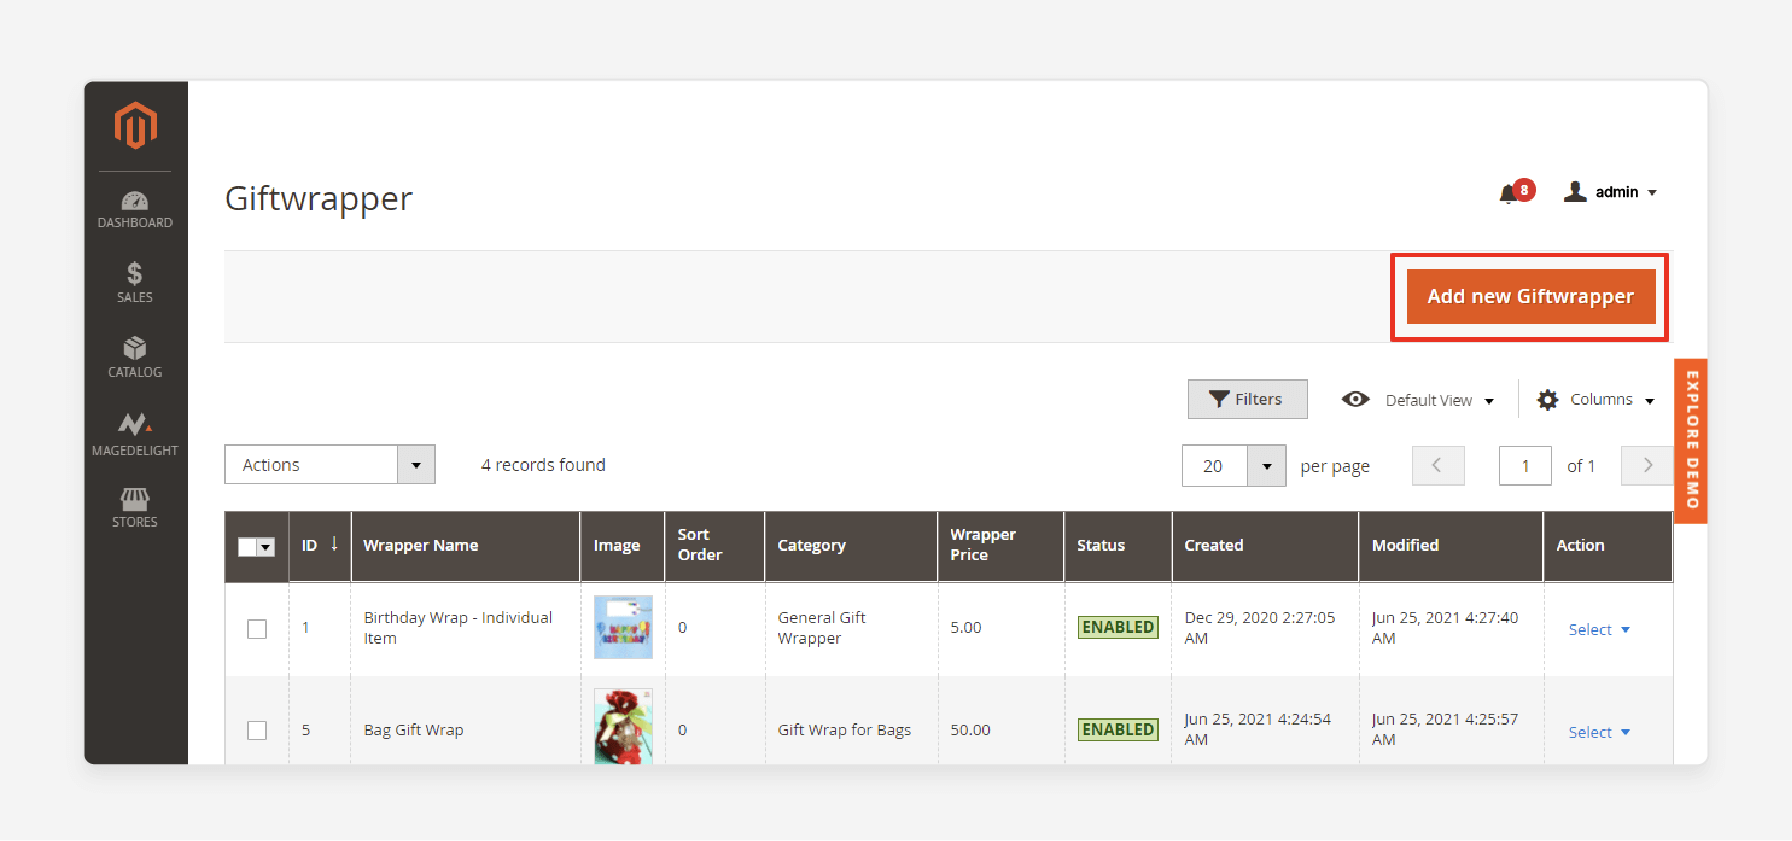
- Fill out the following fields of 'Giftwrapper Information':
- Giftwrapper Name: Enter a name for your gift wrap in this field.
- Status: Set this option to "Yes".
- Sort Order: Define the order in this field.
- Giftwrapper Price [USD]: Enter the new gift wrap option's price in this field.
- Giftwrapper Category: Choose a category in this field.
- Wrapper Images: Click on the 'Upload' button to select images in this field.
- Additional Instruction: This field is optional. However, you can add extra information about gift wrap.
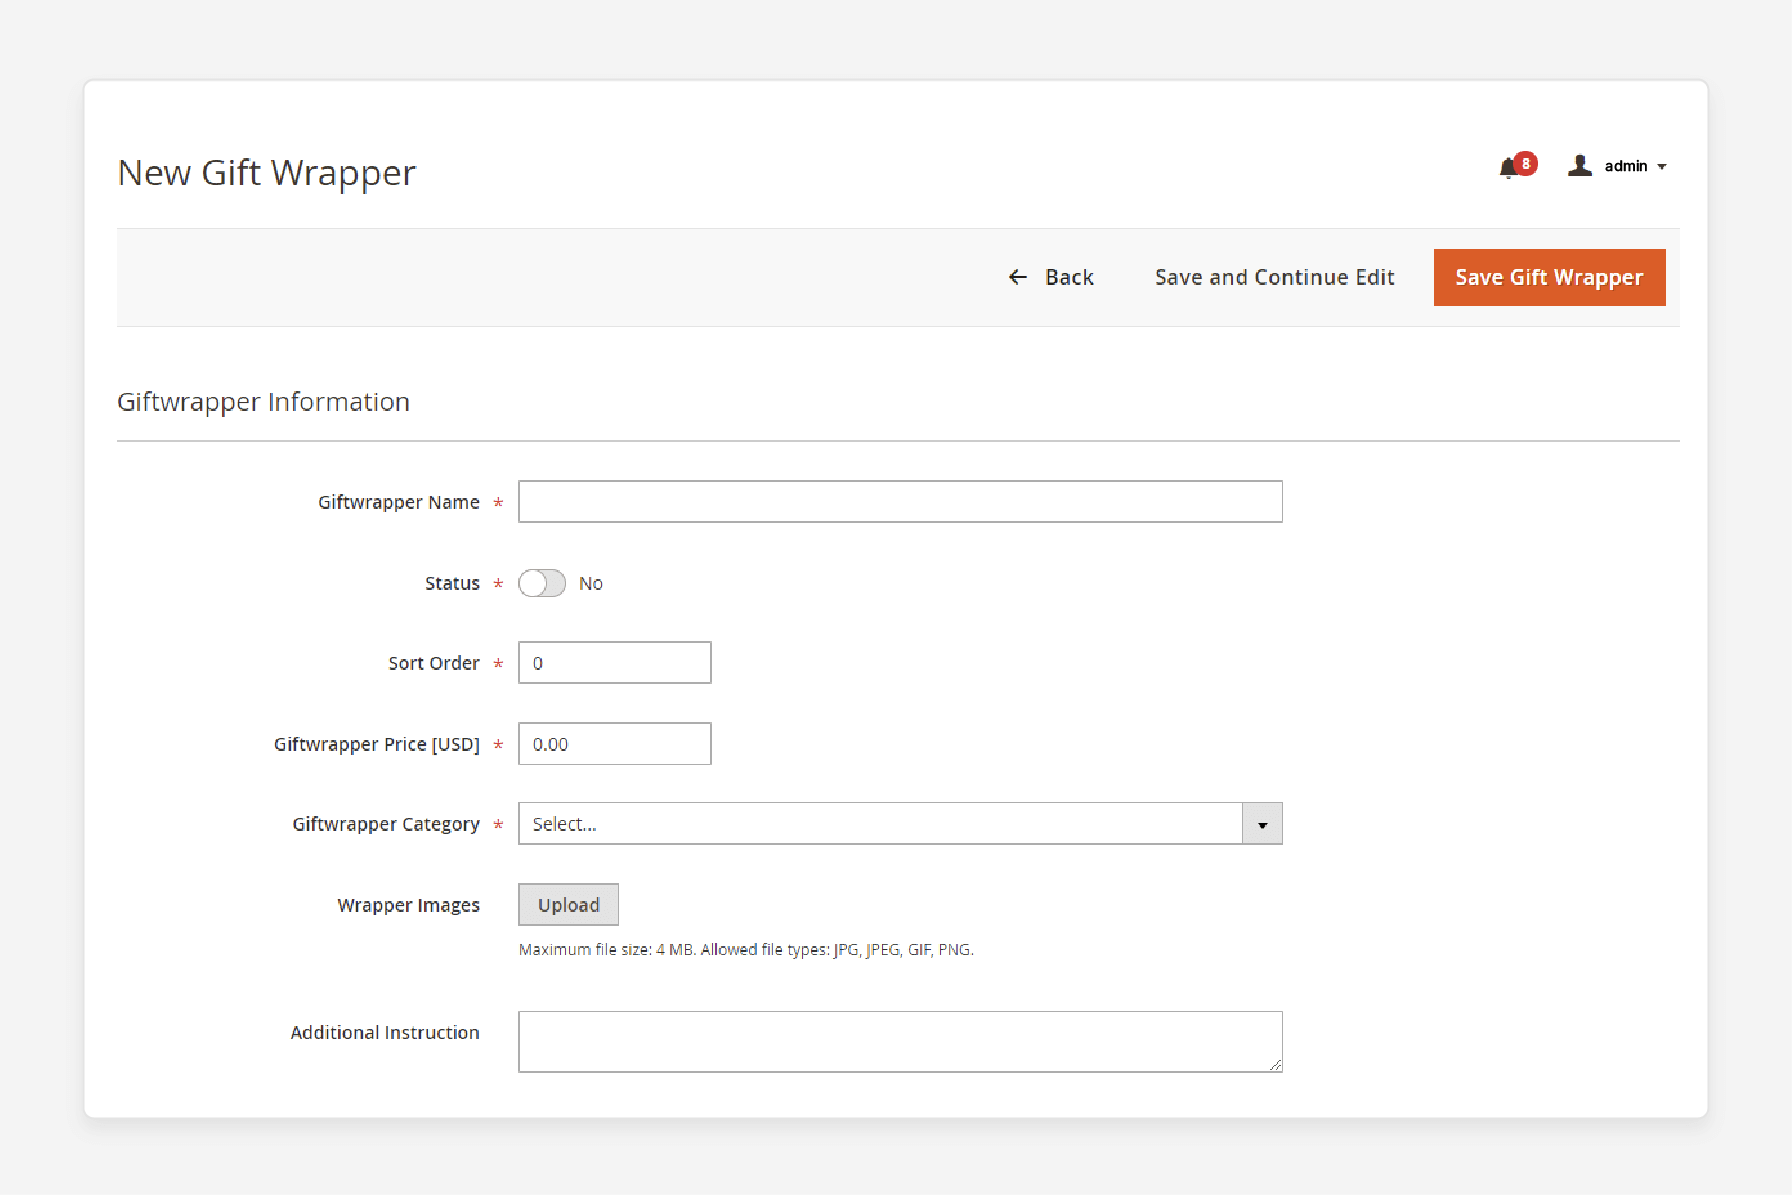
- Click on the 'Save Gift Wrapper' button in the top-right corner to complete the setup.

8 Steps To Add Magento 2 Gift Wrapping Taxes
- Log in to your admin panel.
- Navigate to Stores > Settings > Configuration.
- Expand the Sales sub-category on the left and select Tax.
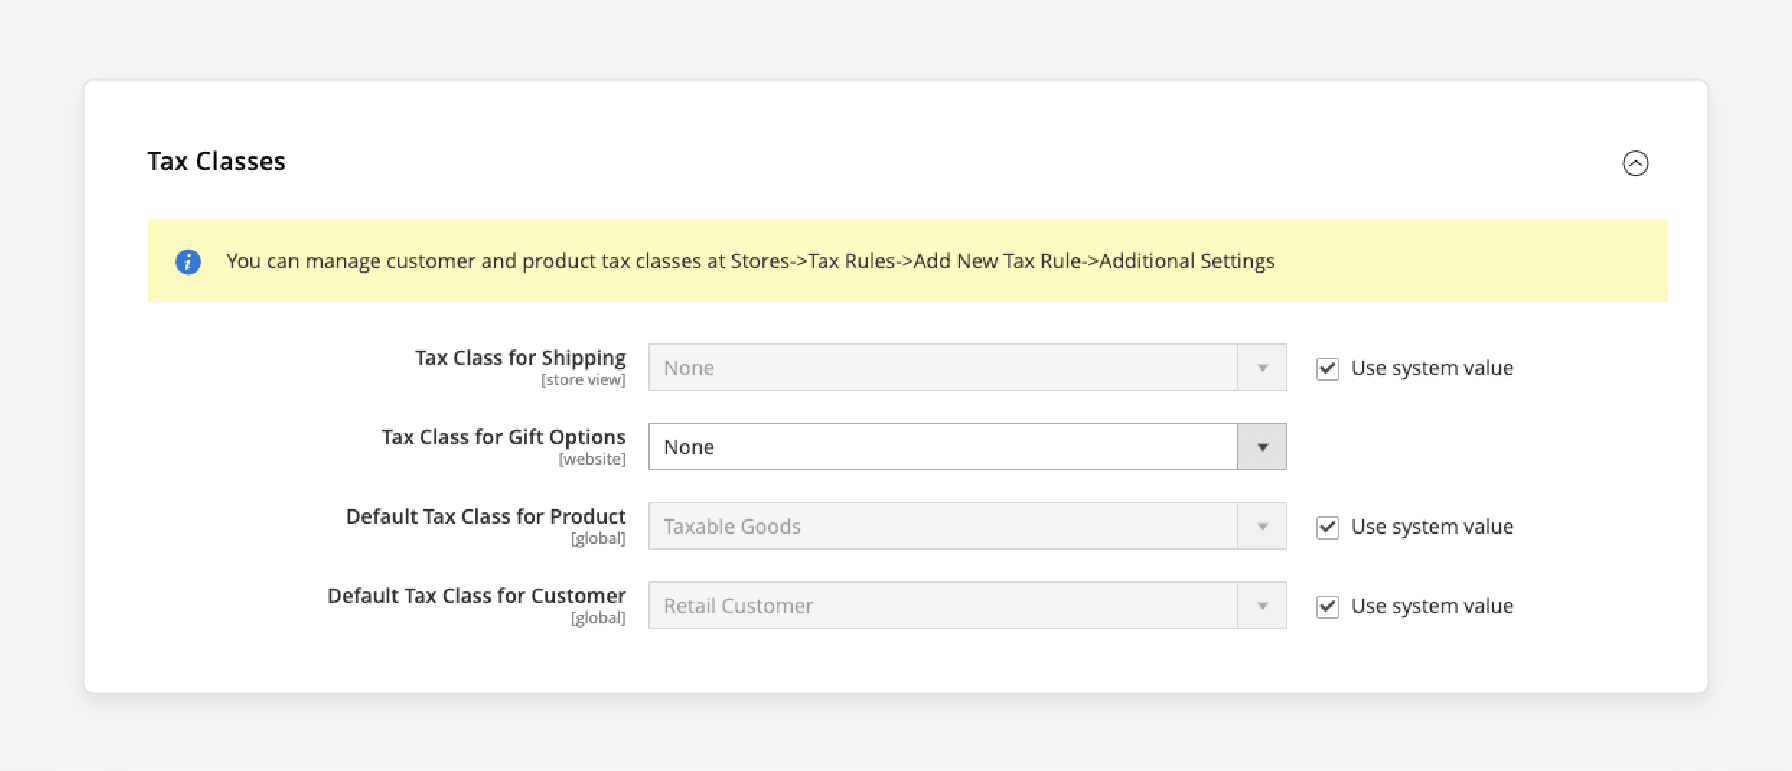
- Expand 'Tax Classes'.
- Choose the appropriate tax class for gift options in the 'Tax Class for Gift Options' field.
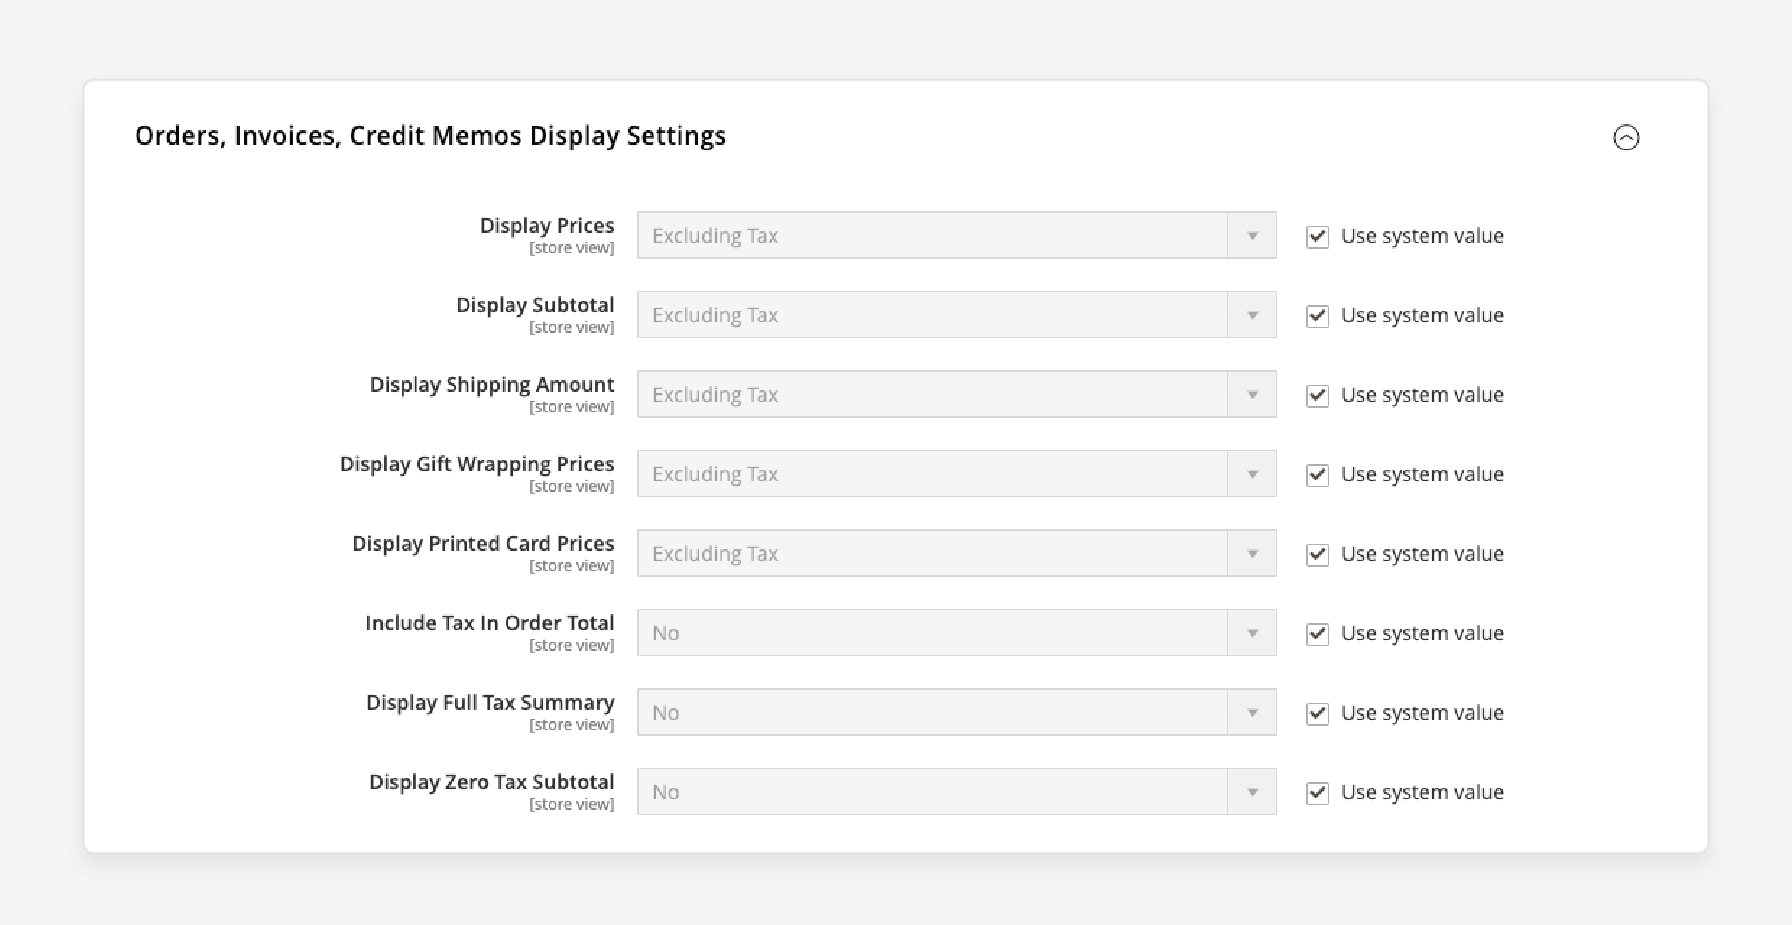
- Expand the 'Orders', 'Invoices', and 'Credit Memos Display Settings' sections.
- For 'Display Gift Wrapping Prices' & 'Display Printed Card Prices', choose:
- "Excluding Tax" to display the price without tax.
- "Including Tax" to display the price with tax.
- "Including and Excluding Tax" to show both options.
- Click on the 'Save Config' button.
Note: Gift wrapping and printed gift cards are part of your business. Taxes apply here. You can add tax to these services. You can then assign a tax class at either the website or global level.
Troubleshooting Common Issues With Selected Gift Wrap Magento 2 Extensions
| Issue | Solution |
|---|---|
| Gift wrap option not appearing in the Magento 2 store | - Ensure the extension is properly installed and enabled under Sales > Gift Options. - Clear Magento cache and reindex data. - Check if the gift wrap option is enabled for the specific product or category. For example, you can offer gift wrapping for clothing and accessories but not for bulky items like furniture. |
| Gift wrap price not added at checkout | - Double-check the pricing settings in the Gift Wrap Configuration. - Verify that the gift wrap price is set correctly for the selected gift wrap option. - Ensure that the customer selects the gift wrap option during checkout. |
| Gift message not saving with Magento 2 gift wrapping | - Verify that the Gift Message option is enabled in the product settings. - Check if the gift message field is properly configured in the extension settings. - Test the gift message functionality on different products and cart configurations. |
| Gift wrap designs not displaying correctly | - Ensure that the gift wrap design images are uploaded in the correct format and size. - Check if the image file paths are correctly set in the extension configuration. - Clear the Magento cache and flush the image cache. |
| Gift wrap option not available for certain products | - Verify that the gift wrap option is enabled for the specific product or category. - Check if any conflicting extensions or custom themes are interfering with the gift wrap functionality. - Test the gift wrap option on different products and attribute combinations. |
FAQs
1. Can I display the "Add Gift Wrap" button on specific store views when using a one-step checkout Amasty extension?
Yes, you can configure the gift wrap option to show on specific store views. Many Magento 2 extensions are compatible with the gift wrapping feature. You can usually control the visibility of the "Add Gift Wrap" button in your store configuration settings. It allows you to customize the display for different store views. You can do it even when using a one step checkout extension.
2. How can I enhance the customer experience with Magento 2 gift wrapping options?
Allow customers to choose gift wrap options for their purchases. You can offer a variety of gift wrap designs. Customers can choose one gift wrap style for their entire order. They can also choose different wraps for individual items. It allows customers to personalize their gifts easily during Magento checkout.
3. Can customers choose a gift wrap design and add a name for the gift?
Yes, with the Magento 2 gift wrap extension, customers can easily wrap their purchases. They can select from various gift wrap designs during checkout. They can also add a custom name for the gift. It makes it more personal and thoughtful. The default label is Add Gift Wrap. However, you can customize the label Add Gift Wrap. You can also add any other preferred text in the extension settings. It allows your customers to suit their style and add a special touch to their gift.
4. Can I use different gift wrap paper for each item in an order?
Magento 2 gift wrap is fully compatible. It uses different wrapping paper for each item in an order. This feature allows users to add gift messages at checkout. Customers can choose from a variety of gift wrap designs for each individual item. It ensures that every present is wrapped perfectly. The "Add Gift Wrap" option is conveniently located on the front of the label. It makes it easy for customers to select their preferred wrapping paper.
5. How can I control the display order of gift wrap options on my Magento 2 website?
If you want to showcase specific gift wrap options more prominently on your Magento 2 website, you can manage their display order. In the extension settings, you'll find a "Sort Order" field for each gift wrap option. The gift wrap with the lowest sort order will be displayed first. Adjust these values. Control which gift wrap options appear at the top of the list when customers are selecting their preferred wrapping. It allows you to highlight popular or seasonal gift wrap designs. It makes it easier for customers to find and choose the perfect wrapping for their gifts.
6. Can I set different prices for gift wrapping based on the product or order value?
You can set different prices for gift wrapping based on various factors. You can configure the gift wrap price to vary. It depends on the product, category, or order value. For instance, offer complimentary gift wrapping for orders above a certain value. Or charge a higher price for gift-wrapping luxury items. By customizing the gift wrap pricing rules, you can create a tiered pricing structure. Make sure it aligns with your business strategy. Also, ensure it enhances the perceived value of your gift-wrapping service.
Summary
"Magento 2 enable gift wrapping" offers different types of gift wrap options. It allows store owners to:
- Ensure a seamless experience for your customers.
- Offer gift wrapping services on their online store.
- Enhance customer satisfaction.
- Allow for personalized gift messages in checkout Magento.
- Increase sales by offering personalized options.
Manage gift-wrapping options on your Magento 2 store with Magento hosting plans.


