
How to Enable or Disable Magento 2 Demo Store Notice
Do you need help enabling or disabling your Magento 2 demo store notice? Magento 2 demo store notice prevents unintended transactions, helps in development, and provides legal protection.
In this tutorial, we will explore the purpose, key considerations, and steps to enable or disable the Magento 2 demo store notice.
Key Takeaways
-
Understand the purpose of the Demo Store Notice in Magento 2.
-
Explore different methods to implement the notice, including extensions and custom coding.
-
Key considerations of the Magento 2 demo store notice include visibility and legal compliance.
-
Gain insights into creating clear and informative demo store notices.
-
Follow simple steps to enable or disable the notice in the Magento 2 admin panel.
-
6 Steps to Enable or Disable the Demo Store Notice in Magento 2
-
Key Considerations When Implementing a Demo Store Notice in Magento 2
-
Guidelines for Creating Clear and Informative Demo Store Notices
What is Demo Store Notice in Magento 2?
Demo store notice is a feature that allows administrators to display a message to visitors. The message indicates that the website is a demo store and not live or fully operational for commercial purposes.
It typically appears at the top or bottom of the storefront. It serves as a reminder to users that they are browsing a demonstration site.
It helps prevent confusion among visitors who might mistake the demo site for a real online store. The notice also helps prevent frustration or even unintended purchases. Admins can customize the message displayed in the Demo Store Notice. They can fit it to their specific needs or provide additional information as necessary.
Purpose of a Demo Store Notice
1. Preventing Transactions
The demo notice usually includes a disclaimer to prevent users from making real purchases or transactions in the demo mode. It prevents accidental purchases. It also ensures that transactions only occur on the live, fully functional version of the website.
2. Development and Testing
A Demo Store Notice is particularly useful for:
-
Merchants who are still in the process of setting up their Magento store.
It allows them to showcase their progress without the risk of users thinking it is a live site. It provides a safe environment for testing and development.
3. Legal Protection
Including a notice can provide legal protection. It is useful in case someone tries to hold the site owner responsible for any issues or discrepancies encountered while browsing the demo site. It can help clarify that the demo site is for demonstration purposes only and not intended for actual use.
4. Setting Expectations
By clearly indicating that the site is a demo, you can set appropriate expectations for the customer. Users understand that the functionality they experience might be limited. It also lets users know that any purchases made or actions taken on the site are not genuine.
5. Professionalism
Displaying a Demo Store Notice demonstrates professionalism and transparency. It shows that the website owner is conscientious about providing clear information to visitors.
Ways to Implement a Demo Store Notice in Magento 2
1. Using Extensions
There are several extensions available in the Magento Marketplace. You can search for Demo Store Notice in the Magento Marketplace to find suitable extensions. They allow you to easily add a demo store notice to your Magento 2 website.
These extensions often come with customizable options, such as the ability to change the text of the notice or adjust its styling.
2. Custom Coding
If you prefer a more hands-on approach and have development experience. You can implement a demo store notice by adding custom code to your Magento 2 theme. You would typically create a new module or modify existing theme files. The steps involved include:
-
Create a new module or use an existing one.
-
Define a layout file to insert the notice into the desired location on your website.
-
Add the HTML markup and styling for the notice within a template file.
-
You can either make the notice dismissible or include settings to customize its appearance.
3. Modifying Theme Templates
Another approach is to modify your Magento 2 theme templates directly. You can edit the relevant .phtml files within your theme to add the HTML markup for the notice. The method is straightforward. It may not be as flexible or maintainable as using extensions or custom coding.
6 Steps to Enable or Disable the Demo Store Notice in Magento 2
-
Sign in to your Magento 2 admin panel.
-
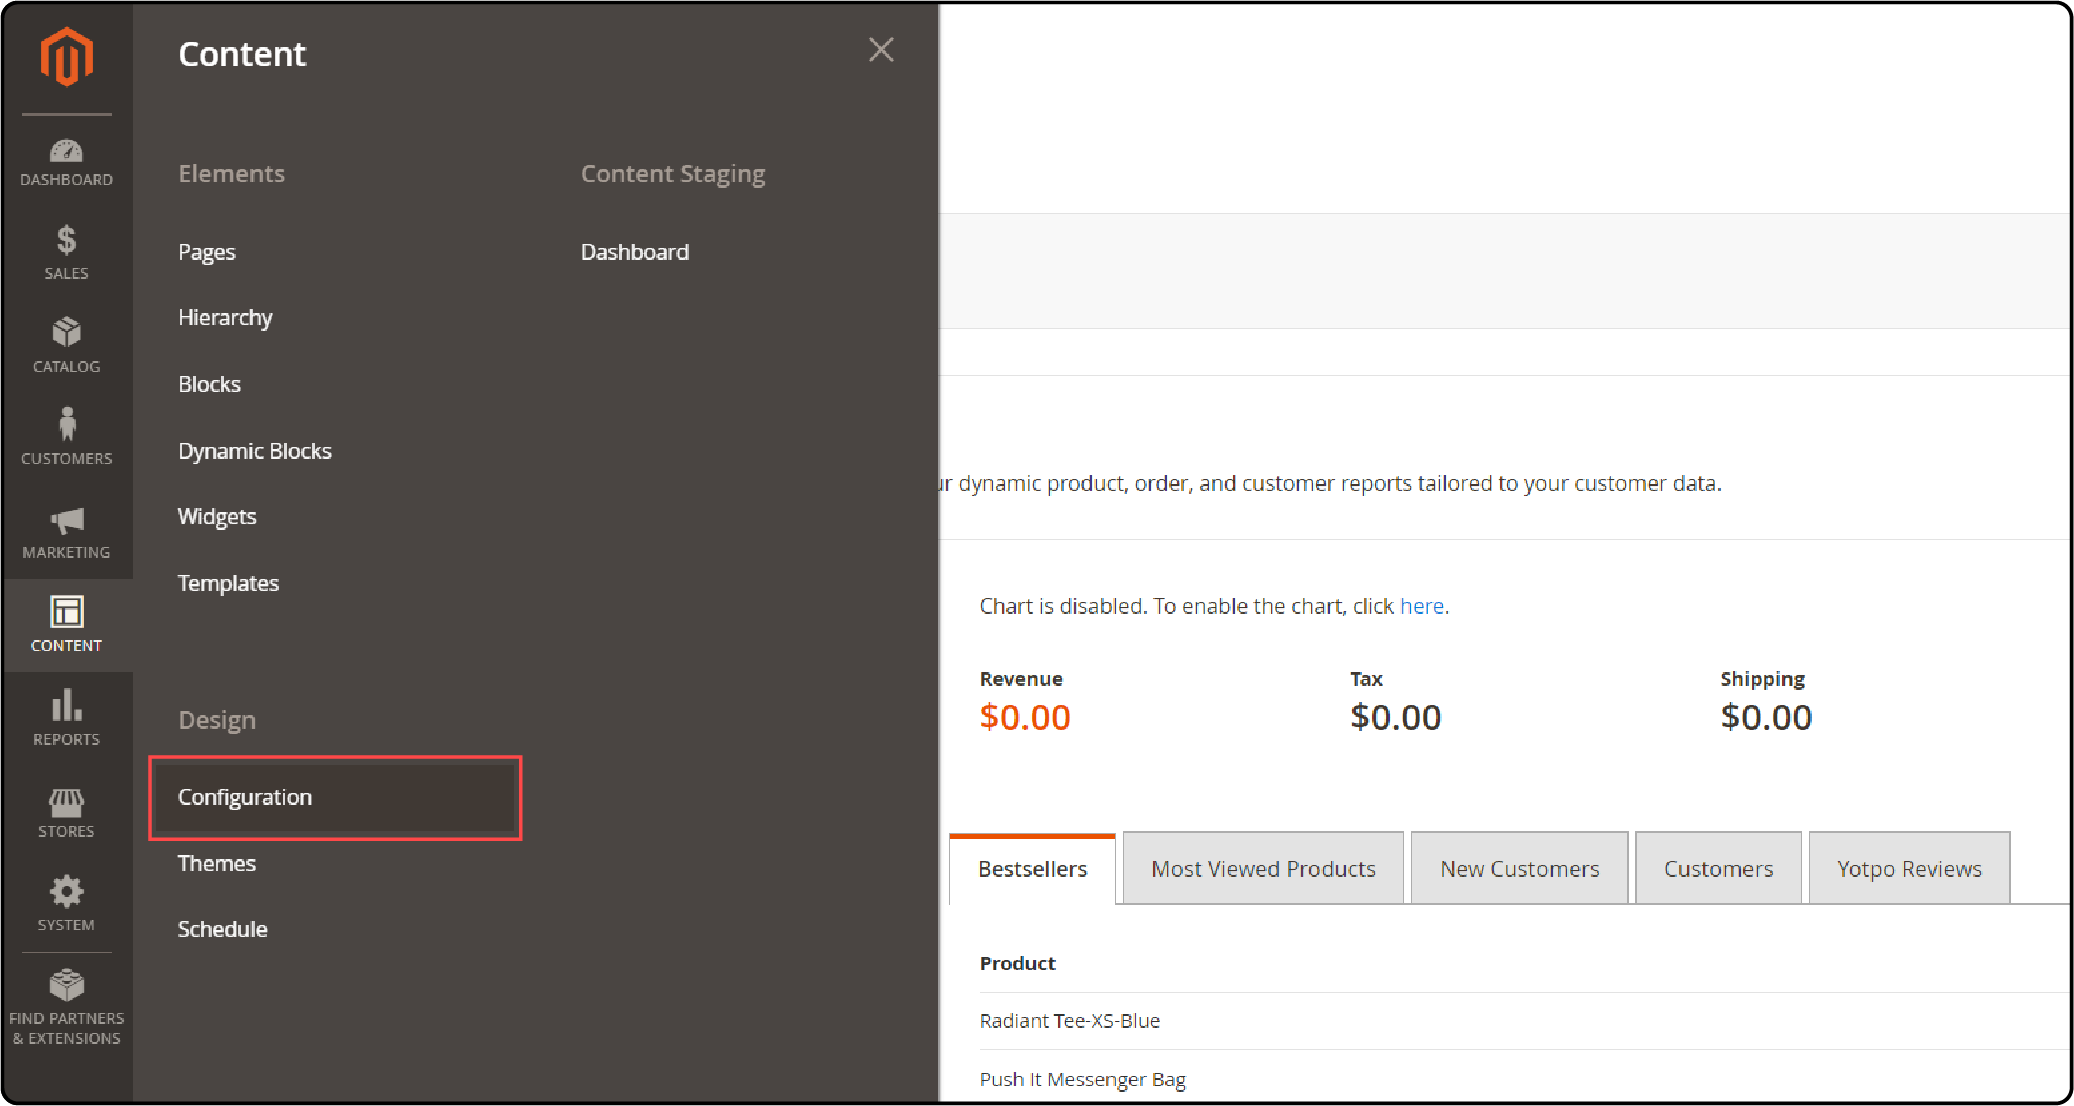
Navigate to Content -> Design -> Configuration.
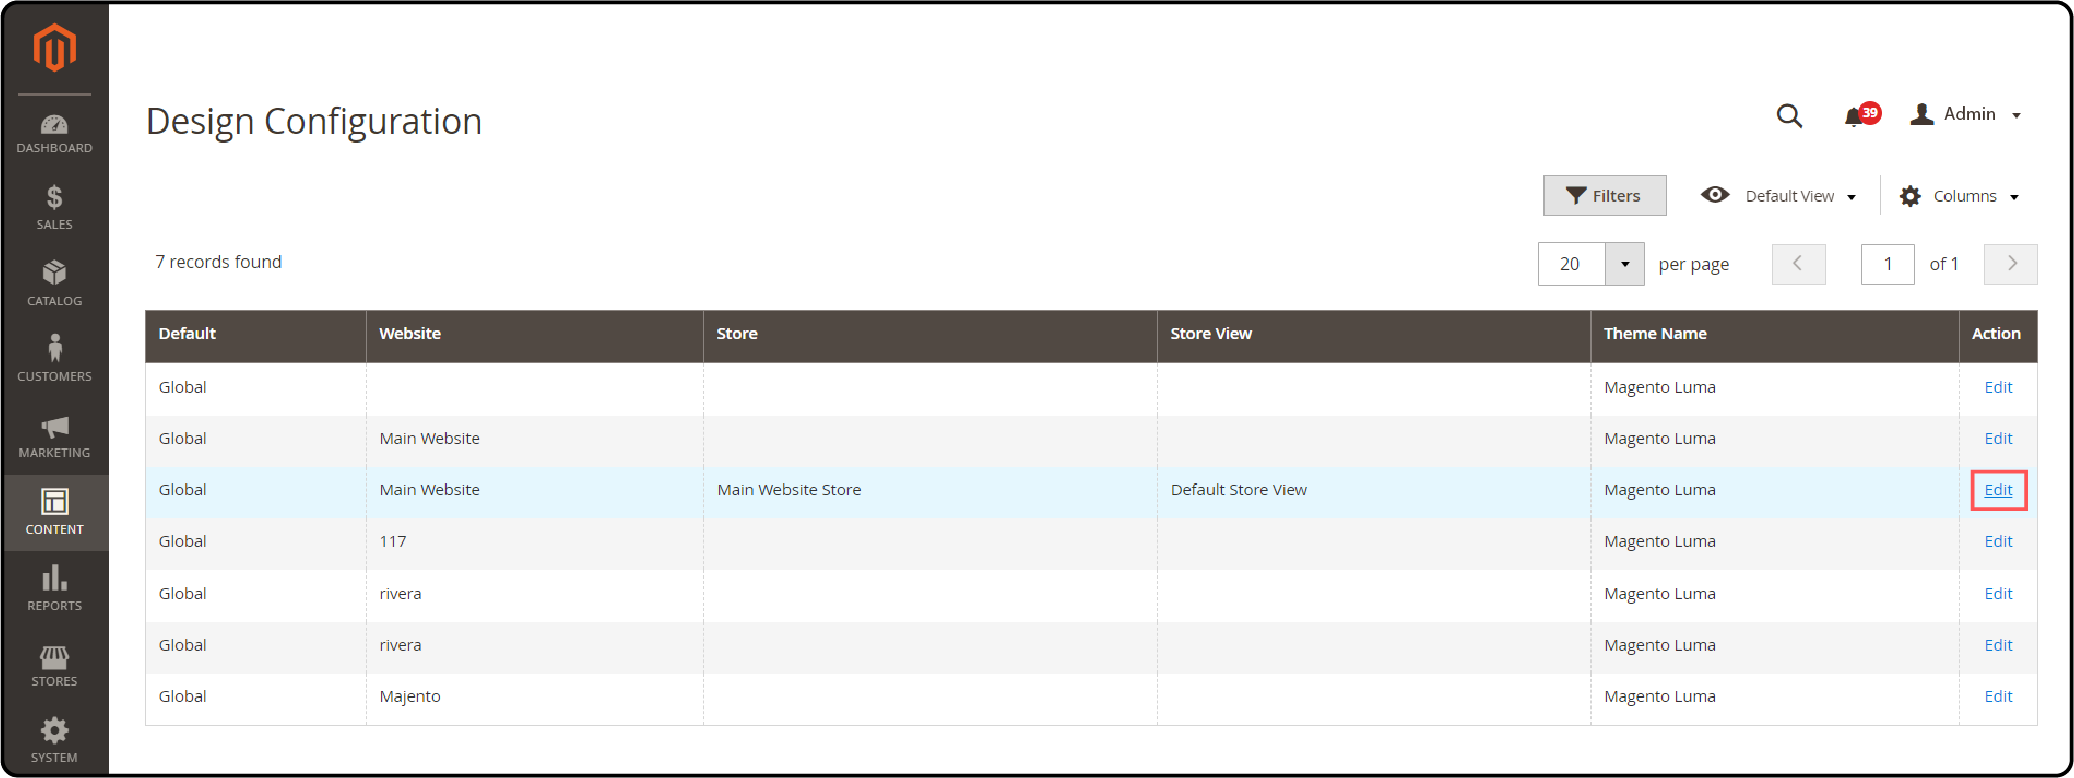
- In the grid, locate the store view you wish to configure in the grid and click on Edit in the Action column.
-
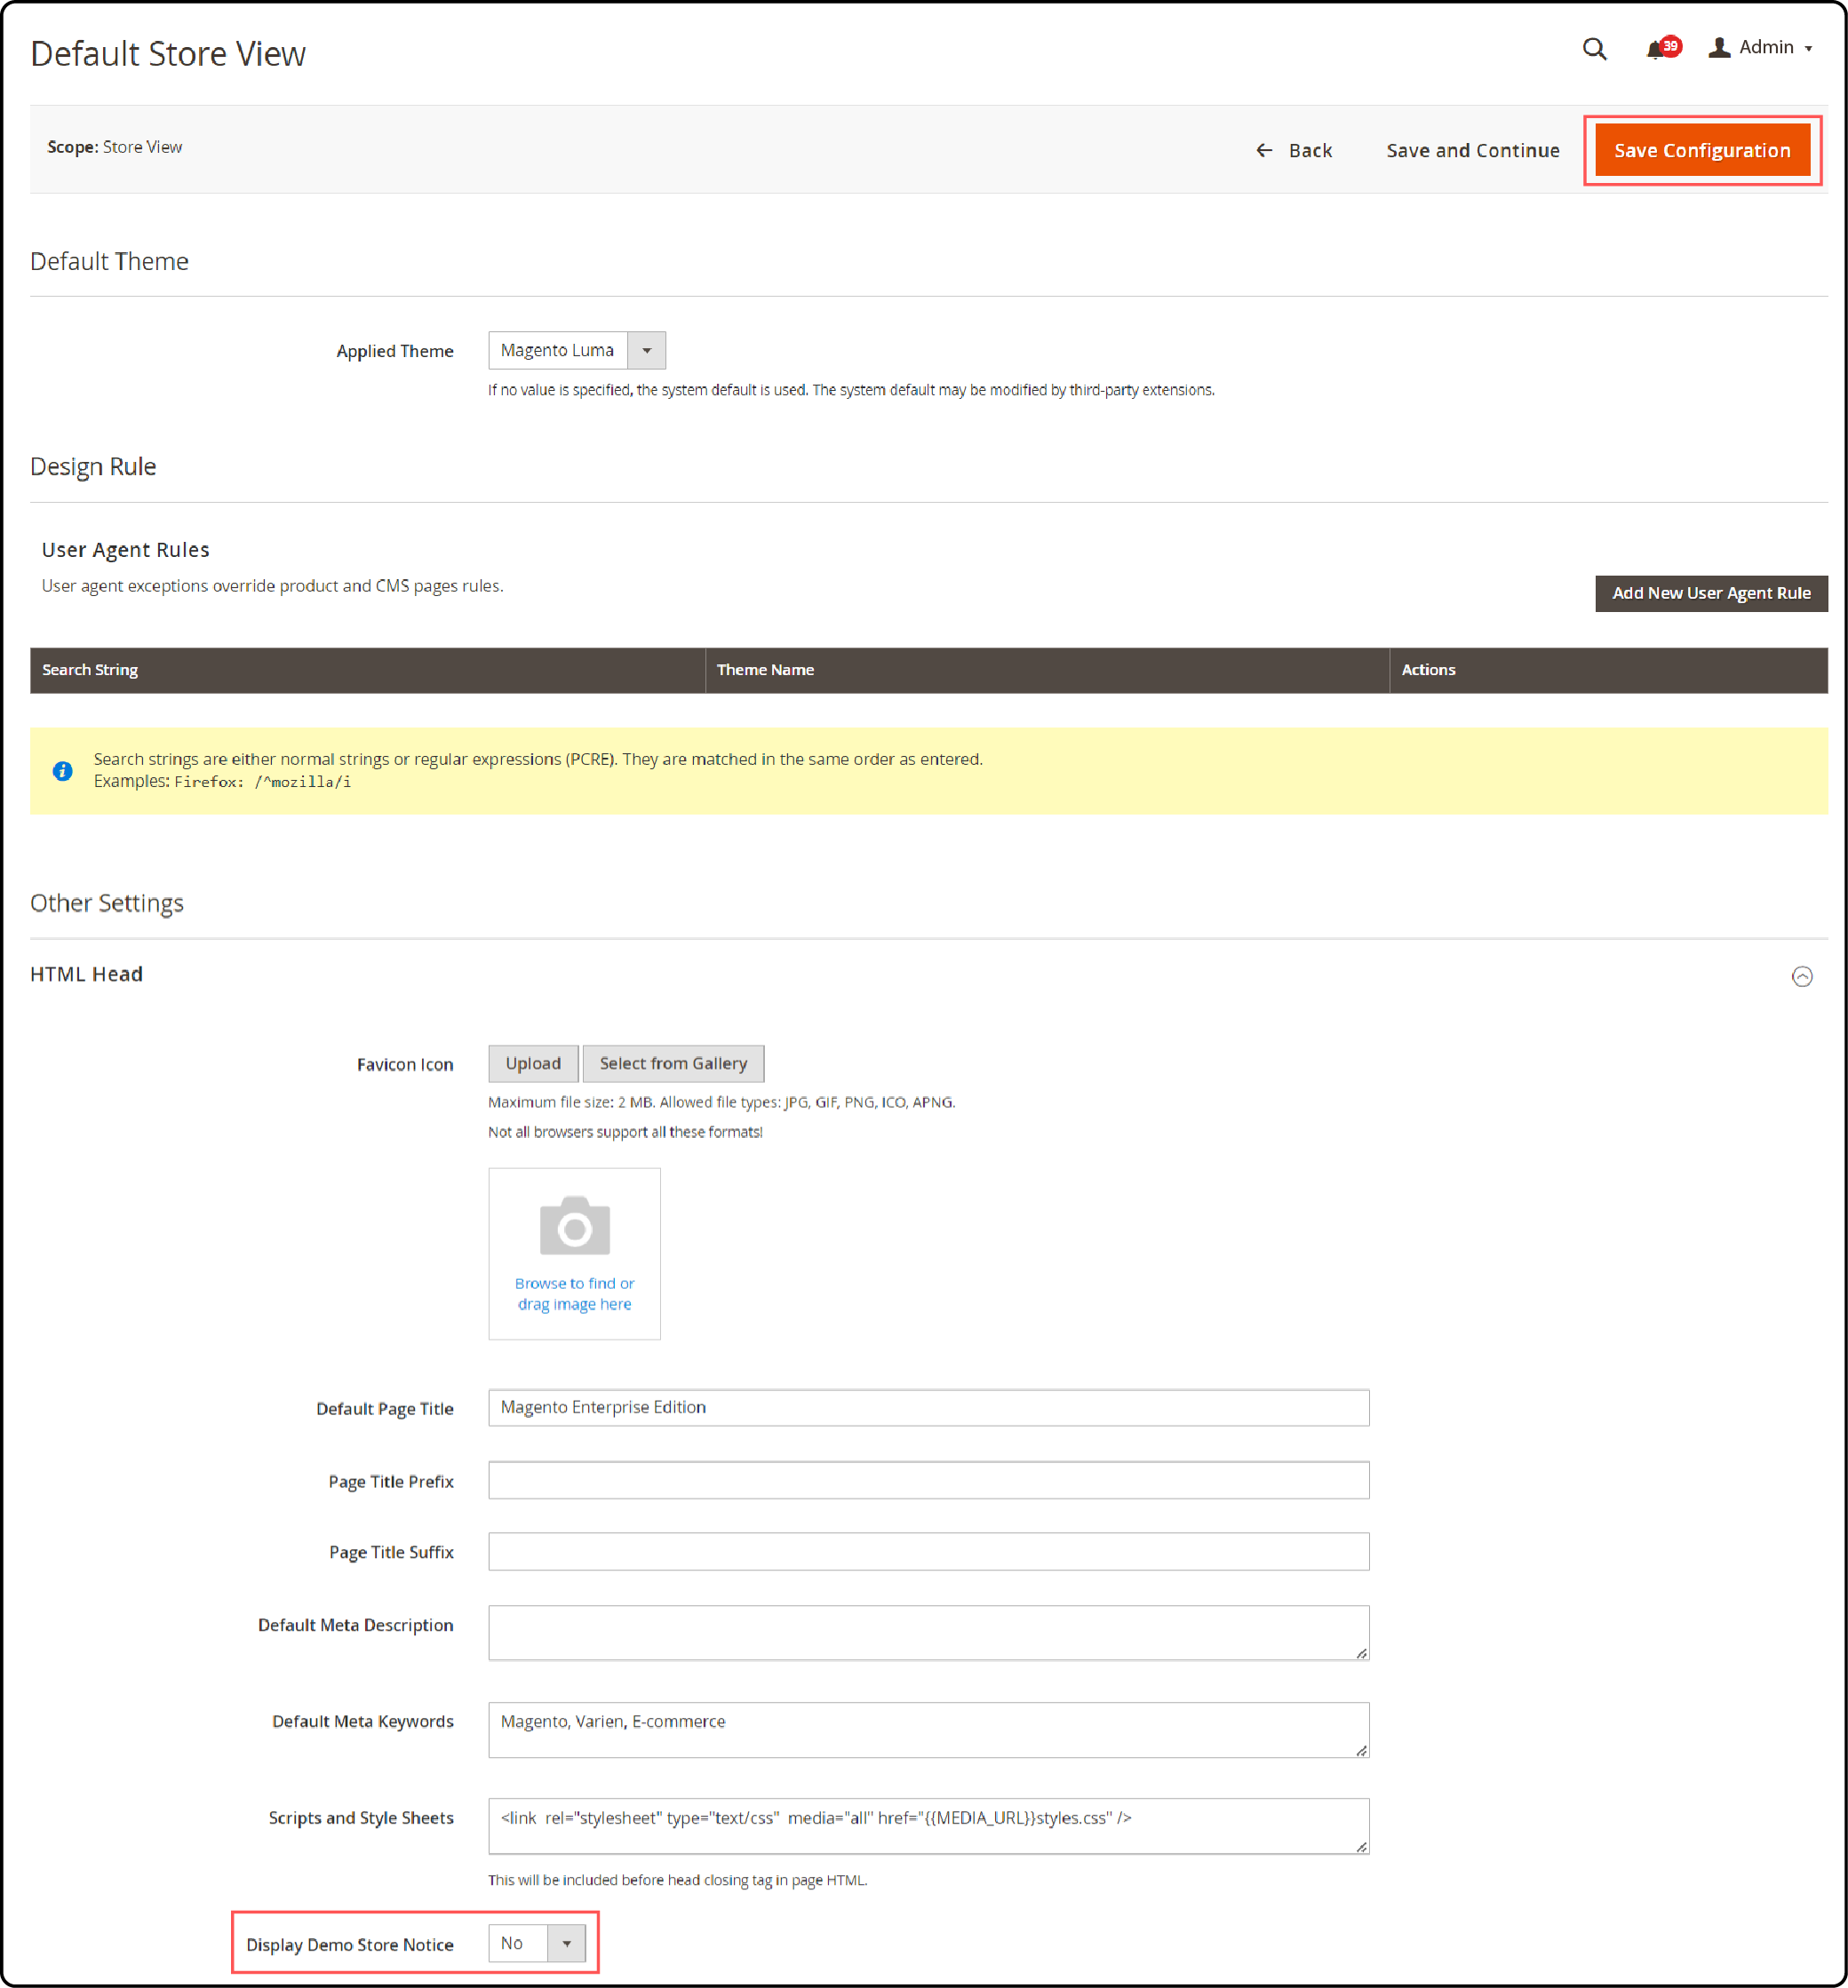
Expand the HTML Head section found under Other Settings.
-
Adjust the Display Demo Store Notice setting according to your preference.
-
Save the Configuration.
Key Considerations When Implementing a Demo Store Notice in Magento 2
1. Visibility
Make sure the demo store notice is prominently displayed on all pages of the website. It should be placed where visitors can easily see it. Consider placing it in an immediately noticeable location, such as the header, footer, or pop-up modal. It should stand out enough to catch visitors' attention without being overly intrusive.
2. Customization Options
Customize the content, design, and appearance of the notice. It should match with the branding and design of the website. It includes the ability to adjust the:
-
Text
-
Colors
-
Fonts
-
Styling.
It ensures consistency with the overall theme and creates a cohesive look.
3. Responsiveness
Ensure that the demo store notice is responsive. It should be displayed correctly on all devices and screen sizes. Test it across different resolutions, including:
-
Desktops
-
Laptops
-
Tablets
-
Smartphones.
It helps ensure optimal visibility and usability.
4. Accessibility
Design the notice with accessibility in mind. It helps ensure that it is readable and usable for all visitors, including those with disabilities. It includes:
-
Using sufficient color contrast
-
Providing alternative text for images
-
Ensuring keyboard navigation is possible.
5. Dismissal Options
Consider implementing functionality that allows users to dismiss the notice temporarily if they find it distracting. It could be achieved through a dismiss button. You could also implement a cookie-based mechanism that remembers the user's preference across sessions.
6. Legal Compliance
Ensure that the notice complies with relevant legal requirements, such as:
-
Data protection regulations (e.g., GDPR)
-
Consumer protection laws.
It may include providing links to:
-
Other legal documents.
7. Testing and Validation
Thoroughly test the demo store notice across different scenarios. It helps ensure that the notice functions as intended. It also ensures that the notice does not interfere with any other aspects of the website, such as:
-
Navigation
-
Third-party integrations.
8. Be Transparent
Be transparent about any data collection or tracking practices employed on the demo store. Inform users about how their information is handled. You should also reassure them of their privacy and security.
Guidelines for Creating Clear and Informative Demo Store Notices
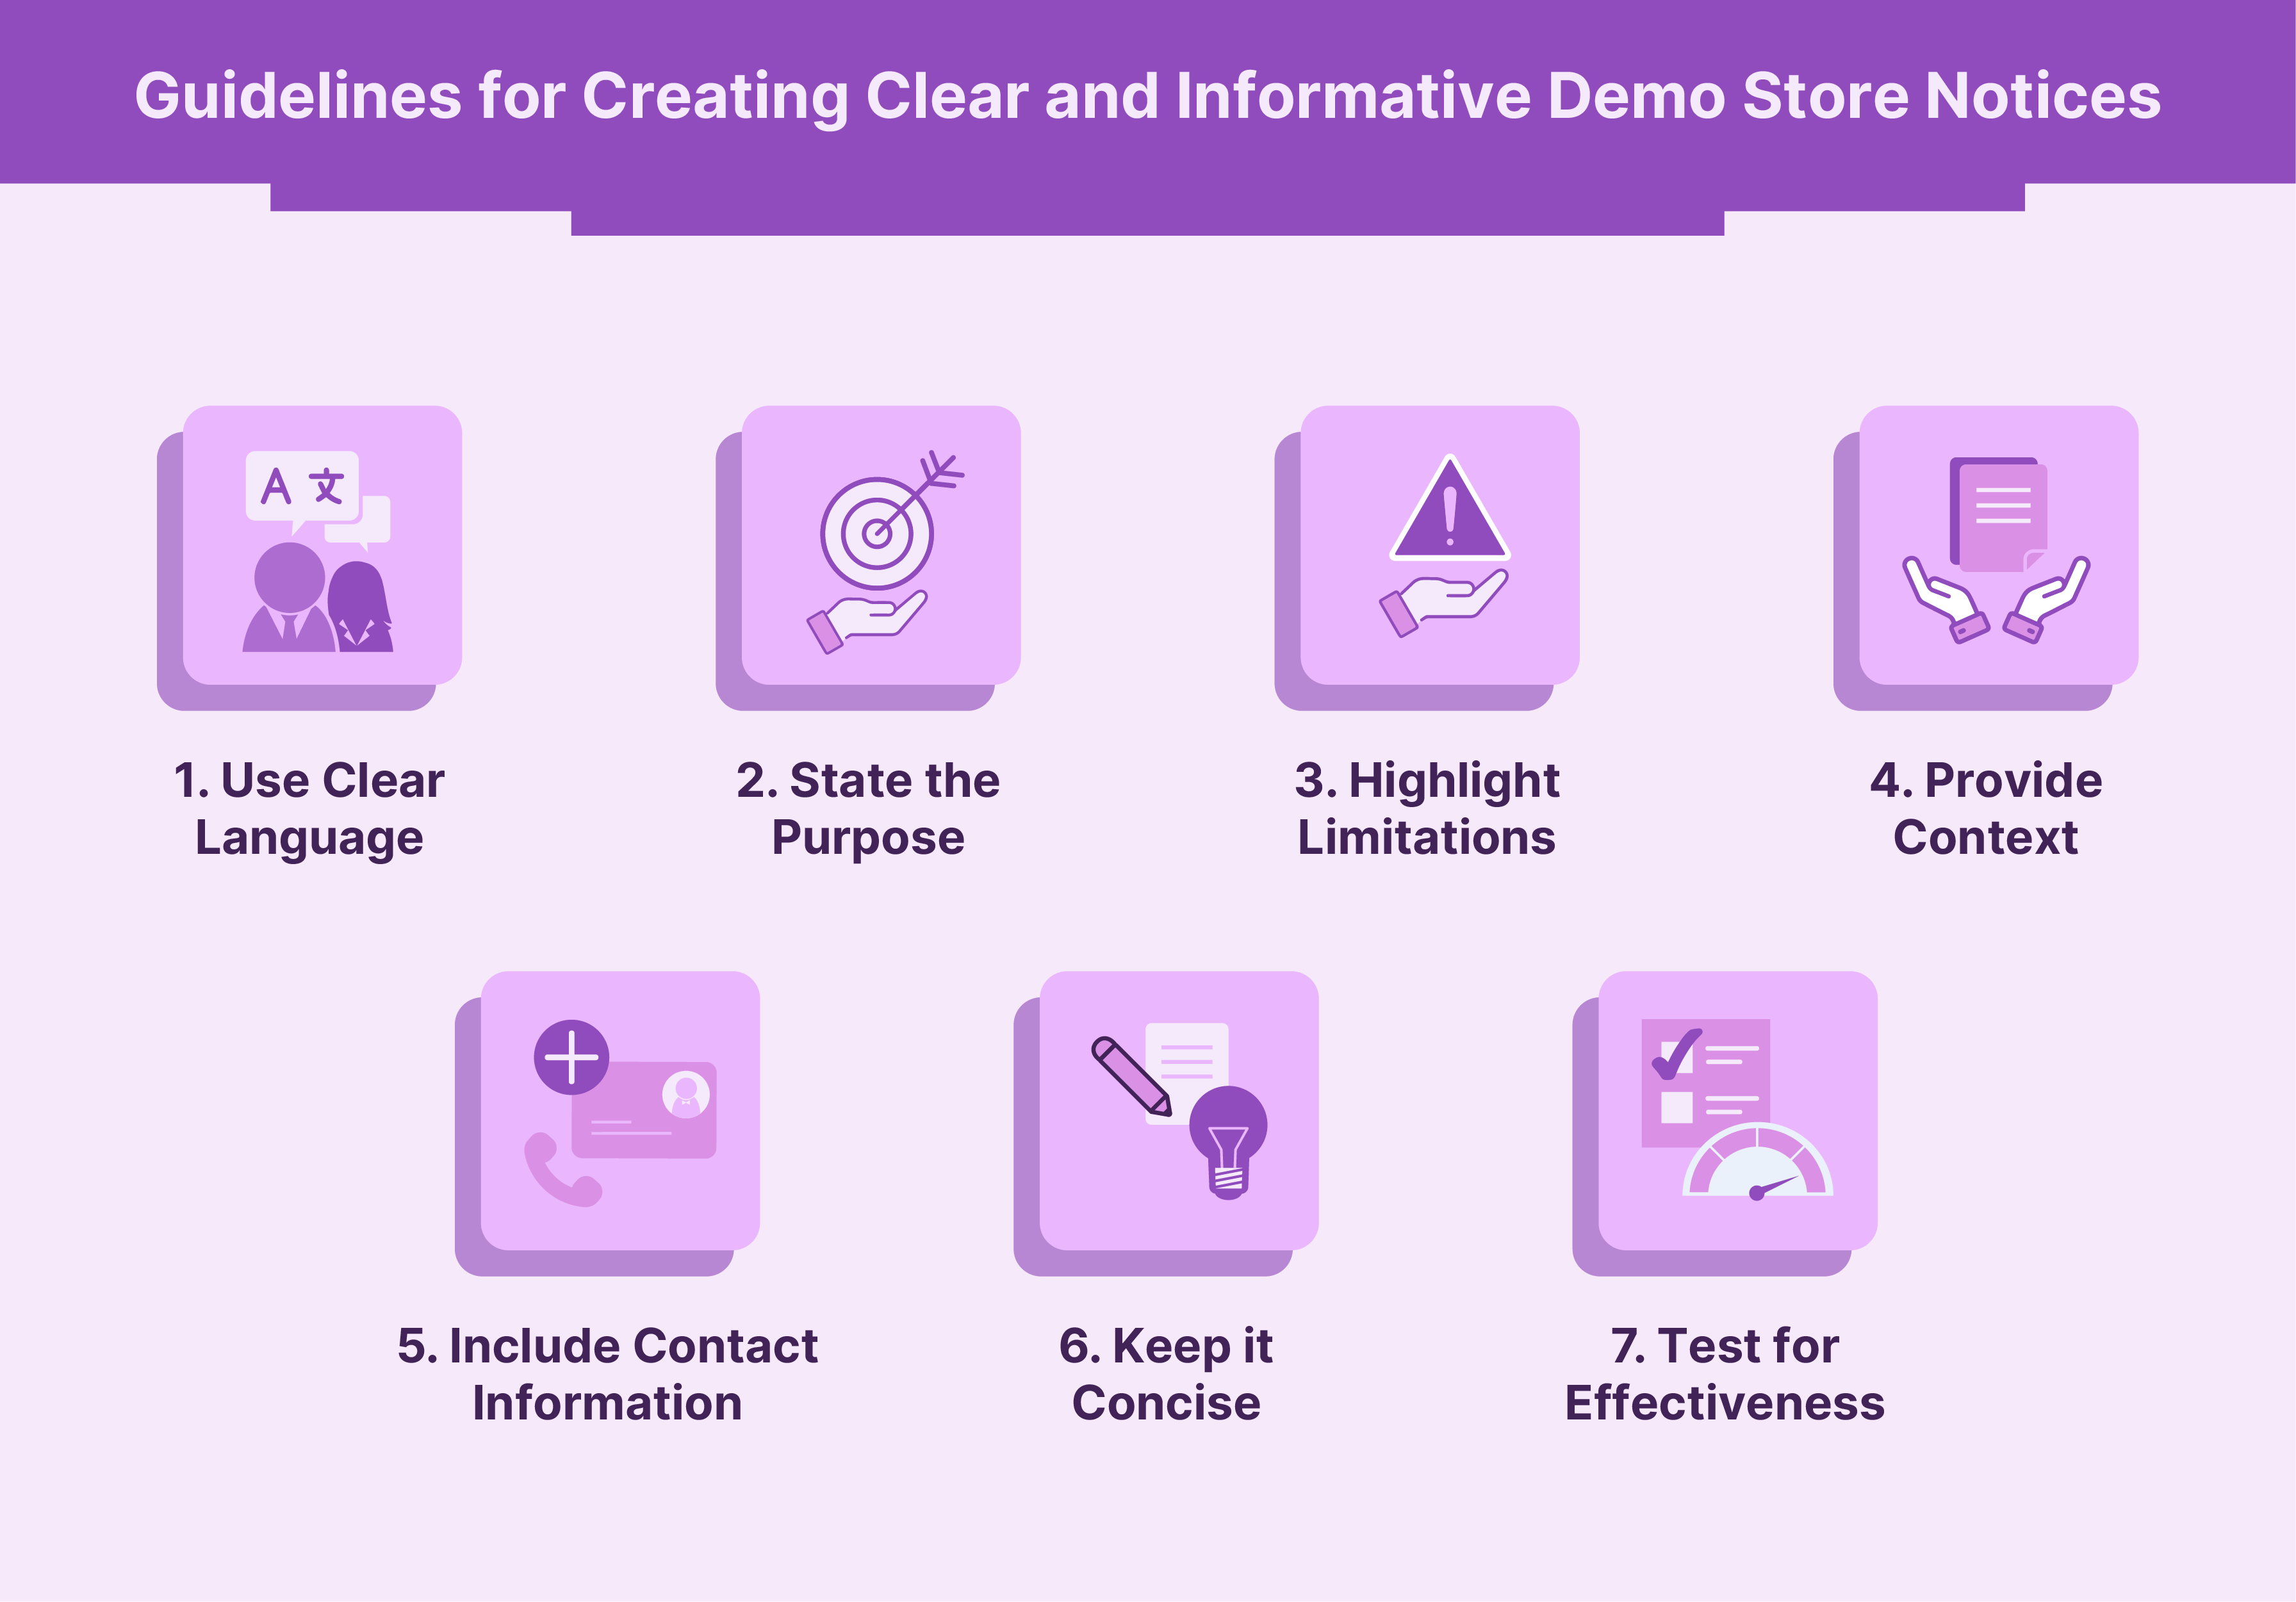
1. Use Clear Language
The notice should be written in simple, easy-to-understand language that clearly communicates the purpose of the demo store. Avoid technical jargon or overly complex wording that might confuse visitors.
2. State the Purpose
The notice should clearly convey that the website is a demo or test version and not live. Explain that it is intended for demonstration purposes only. It may not offer all features or services available on the live site.
3. Highlight Limitations
It should clearly outline any limitations or restrictions users may encounter while browsing the demo store. This may include the:
-
Inability to make real purchases
-
Limited access to certain features
-
Temporary data resets.
4. Provide Context
Offer some context about why the demo store exists and what users can expect to find on the site. You might mention that it is used for:
-
Testing new features
-
Showcasing products
-
Training purposes.
5. Include Contact Information
Provide contact information or links to support resources where users can get help or ask questions. It enhances the experience as they can get an answer if they have any concerns or encounter issues while using the demo store.
6. Keep it Concise
Keep the notice brief and to the point. It should focus on conveying essential information. It shouldn’t overwhelm users with unnecessary details.
7. Test for Effectiveness
Test the notice with real users. It helps ensure that the notice effectively communicates the intended message and addresses any potential confusion or concerns. Gather feedback and make adjustments as needed to improve clarity and usability.
FAQs
1. How do you customize the order of the Magento 2 Demo Store Notice?
To customize the order of the Magento 2 Demo Store Notice, you need to modify the layout files or templates. Locate the relevant XML file within your theme or module. Adjust the block's position using XML layout instructions.
2. How can I clear the cache for the Magento 2 Demo Store Notice?
You can clear the cache via the command line using bin/magento cache:clean or bin/magento cache:flush. You can also clear the cache from the admin panel by navigating to System > Tools > Cache Management.
3. Where can I find more help or guidance regarding Magento 2 customization?
For specific queries or detailed guidance, you can visit Magento Stack Exchange. It is a vibrant community where developers and enthusiasts share knowledge. They provide troubleshooting tips and best practices.
Summary
Magento 2 demo store notice serves as a reminder to visitors that they are browsing a demonstration site. The tutorial also uncovers several other points, including:
-
The Magento 2 demo store notice can be implemented using extensions and custom coding.
-
Key considerations of the Magento 2 demo store notice include visibility and customization options.
-
Guidelines for creating clear notices include using clear language and testing for effectiveness.
-
To enable or disable the notice in Magento 2, users can navigate to the admin panel and adjust the setting.
Looking for hassle-free management of your Magento 2 store, including enabling or disabling the demo store notice? Let the experts of managed Magento hosting handle the complexities.


