
How to Fix Magento 2 Customer Attribute Not Showing in Admin?
Struggling to display your custom customer attributes in the Magento 2 admin panel? The problem with 'Magento 2 customer attribute not showing in admin' often stems from incorrect configuration or implementation of custom attributes in the Magento 2 ecosystem.
This tutorial will cover the solutions to resolve 'Magento 2 customer attributes not showing in admin' problems.
Key Takeaways
- Common issues and causes, including incorrect attribute settings and caching issues.
- Advanced fixes for customizing customer registration forms to enhance customer experience.
- Practical solutions for attribute visibility issues.
- Insights into how attributes in the admin can slow down your workflow.
- Best practices for custom attribute management.
- Preventive measures to ensure your customer attributes are visible & correctly managed.
-
Common Causes of Magento 2 Customer Custom Product Attribute Display Issues
-
How to Fix Customer Entity Not Saving Value in the Magento 2 Admin Panel?
-
4 Steps to Add Customer Attribute Parameters Programmatically in Magento 2
-
Advanced Fixes and Considerations for Creating Custom Customer Attributes in Magento 2
-
4 Steps to Add Custom Attributes to Customer Forms Programmatically in Magento 2
-
System-Level Display Solutions for Customer Text Attributes within Magento 2
-
12 Steps to Modify the Customer Attribute Extension Programmatically in Magento 2
-
Preventive Measures and Maintenance for Better Customer Engagement
Use Cases for Customer Attribute Properties in Magento 2
1. Personalized Marketing
Customer attributes enable you to send personalized product recommendations/special discounts via email. They also allow you to gather unique customer data and customize marketing campaigns.
For instance, adding an attribute like "favorite product category" helps identify customer preferences.
2. Enhanced Customer Segmentation
Magento’s customer segmentation tools can provide more personalized shopping experiences. Custom attributes are useful for grouping customers based on distinct traits, such as:
- Purchase history
- Preferred shopping habits
With this data, admins can create targeted advertisements to improve customer satisfaction & loyalty.
3. Customized Attributes in Product Listings
Customer attributes can be used to refine product listings and enhance their relevance. They allow you to personalize product visibility & create more targeted shopping experiences dynamically.
For example, you can associate customer demographics like age groups/location with specific product categories.
4. Improved Checkout Process
By adding custom attributes during checkout, you can improve the order fulfillment process. For example, you can add:
- Preferred delivery time
- Special instructions
These attributes let customers provide additional details that can enhance order accuracy & speed. They also help you add a personal touch to the overall shopping experience.
Common Causes of Magento 2 Customer Custom Product Attribute Display Issues
| Issue | Cause | Solution |
|---|---|---|
| Form Configuration Missing | Customer attributes don't show unless configured for 'Customer Registration'/'Customer Account Edit' forms | Add adminhtml_customer to the used_in_forms array in attribute configuration. |
| Database Entry Issues | Missing entries in the customer_eav_attribute table |
Set is_used_in_grid, is_visible_in_grid, is_filterable_in_grid to 1. |
| Grid Display Problems | Attribute values missing in the customer grid despite the configuration | Verify that the attribute type matches the intended display (e.g., boolean for yes/no switches). |
| Frontend Form Mismatch | Attributes visible in the admin but not in the customer account | Ensure proper template integration and data fetching from the database. |
| Save Functionality | Attributes visible but not getting saved in the database | Set "system => 0" in attribute parameters and verify eav_entity_attribute entries. |
| Cache Configuration | Stale cache preventing attribute display | Run setup:upgrade and clear the cache after attribute changes. |
| XML Configuration | Missing or incorrect UI component configuration | Add proper customer_form.xml with the correct fieldset configuration. |
| Attribute Properties | Incorrect attribute scope or visibility settings | Configure 'Display' in the backend 'Customer Detail Page' settings appropriately. |
How to Fix Customer Entity Not Saving Value in the Magento 2 Admin Panel?
Sometimes, a customer attribute is created using a Setup Patch Data file. If the customer attribute data isn't stored in the eav_entity_attribute table, the values might fail to save.
Despite not seeing any errors in the logs, you may find that the customer attribute records exist in tables like:
-
eav_attribute -
customer_eav_attribute -
customer_form_attribute
It can be time-consuming to trace manually, but there's a solution. You can specify two additional parameters when creating the customer attribute:
-
attribute_set_id -
attribute_group_id
These parameters help ensure that the customer attribute is correctly saved and displayed in the Magento 2 admin panel.
Note:
- Attribute Set ID: Specifies the default attribute set for the customer entity.
- Attribute Group ID: Defines the default group for the attribute.
- Used in Forms: The attribute is added to both the adminhtml_customer & customer_account_edit forms. They help ensure visibility and functionality.
Best Practices for Using Customer Management Attributes
| Category | Best Practice | Implementation Details |
|---|---|---|
| Attribute Creation | Strategic Naming Convention | - Use descriptive attribute codes (e.g., customer_preference_shipping). - Maintain consistent naming patterns. - Avoid special characters in attribute codes. |
| Performance Optimization | Resource Management | - Limit custom customer attributes to vital data. - Use appropriate input types for data collection. - Index only filterable attributes. |
| Security Measures | Data Protection | - Implement proper validation rules. - Set appropriate admin roles for attribute management. - Encrypt sensitive customer data attributes. |
| Frontend Integration | User Experience | - Optimize customer registration form layout. - Group related attributes in logical sets. - Implement progressive form filling. |
| Backend Management | Admin Workflow | - Create attribute sets for different customer segments. - Configure grid columns for efficient customer management. - Set up automated attribute value validation. |
| Deployment Strategy | Testing Protocol | - Use a staging environment for attribute testing. - Implement version control for attribute configurations. - Maintain deployment documentation. |
| Maintenance | Regular Audits | - Schedule periodic attribute reviews. - Clean up unused customer attributes. - Monitor attribute performance impact. |
| Documentation | Knowledge Base | - Document attribute dependencies. - Maintain attribute configuration guides. - Create troubleshooting protocols. |
4 Steps to Add Customer Attribute Parameters Programmatically in Magento 2
Step 1: Create the Module Structure
- Set up a custom module.
Note: A basic module structure includes the registration.php and module.xml files for initial configuration.
2. In the app/code directory, create folders for your module’s namespace and name.
For example, use Vendor/CustomerAttribute.
- Add
registration.phpto register the module with Magento. - The
module.xmldefines basic module settings.
Step 2: Define the InstallData.php File
- Add an
InstallData.phpfile to the Setup folder.
Note: This file is where you will define the properties of the customer attribute.
- Use Magento’s ModuleDataSetupInterface and EavSetup classes to configure the attribute’s settings.
For example:
- Data Type: Select an appropriate data type, such as "text", "integer", or "date".
- Input Type: Choose whether the input will be a "text field", "dropdown", or "date picker".
- Forms: Specify the forms where the attribute will appear. For example, in the "admin area", "registration", or "customer account forms".
Step 3: Define and Configure the Attribute Code
- Within the InstallData.php file, write the code to define.
- Then, save your customer attribute to the database.
Step 4: Deploy the Attribute
Once you have written the code, deploy it by running the following command:
php bin/magento setup:upgrade
Note: This command will install your new customer attribute in the Magento database.
Advanced Fixes and Considerations for Creating Custom Customer Attributes in Magento 2
| Issue Category | Problem | Advanced Solution |
|---|---|---|
| Database Integration | Missing entries in the customer_eav_attribute table | - Insert attribute records with is_used_in_grid=1. - Set is_visible_in_grid and is_filterable_in_grid flags. - Verify attribute_id mapping in eav_attribute table. |
| Form Configuration | Attributes not displaying in admin forms | - Add 'adminhtml_customer' to the used_in_forms array. - Configure customer_form.xml in view/base/ui_component. - Set proper form element types. |
| Cache Management | Stale attribute data | - Run setup:upgrade after attribute changes. - Clear cache and reindex customer_grid. - Verify cache configuration in env.php. |
| Module Conflicts | Extension compatibility issues | - Check third-party module interference. - Verify theme compatibility with attributes. - Review system logs for conflict errors. |
| Backend Models | Attribute value-saving issues | - Implement proper backend models for custom types. - Configure the correct attribute scope. - Set appropriate system flags. |
| Grid Display | Attributes missing from the customer grid | - Configure UI component XML properly. - Set correct column definitions. - Verify attribute visibility settings. |
| Performance | Slow attribute loading | - Optimize attribute indexing. - Limit unnecessary customer attributes. - Configure efficient grid filtering. |
4 Steps to Add Custom Attributes to Customer Forms Programmatically in Magento 2
Step 1: Admin Forms Configuration
In the ' InstallData.php ' file, set the appropriate visibility within the attribute’s properties. The user_defined and visible parameters control the attribute's visibility in customer profiles. It enables admins to view and edit the attribute. Customers can also interact with the new attribute based on its intended use.
Store owners can make them visible on specific forms, such as the following:
- Admin customer edit form
- Customer-facing forms like "registration"
Step 2: Frontend Forms Configuration
For customer-facing forms, the attribute needs to be included in the frontend forms. Use the used_in_forms parameter to specify where the attribute should appear. For example, on the:
- Registration pages
- Account edit pages
Step 3: Customization
Customization options for customer attributes vary, from simple text fields to complex inputs. For example:
- Dropdowns
- Date pickers
To add a dropdown input type, follow these steps:
- Define the specific options available for customers to select.
- Implement conditional display logic to show specific attributes based on previous choices.
Note: It improves the user experience and makes data collection more personalized.
Step 4: Testing and Deploying
Run the following CLI commands to register the custom attribute in your database:
php bin/magento setup:upgrade
php bin/magento setup:di:compile
php bin/magento cache:flush
Note: These commands will install the attribute, regenerate dependency injections, & clear cache files. They ensure the new attribute is available on both backend and frontend forms.
System-Level Display Solutions for Customer Text Attributes within Magento 2
| System Component | Technical Issue | Developer Solution |
|---|---|---|
| File System | Generated code conflicts | - Clear generated code directory. - Rebuild dependency injection. - Verify file permissions. |
| Database Layer | EAV schema misalignment | - Verify attribute table integrity. - Check foreign key constraints. - Update attribute metadata. |
| Codebase | Module configuration errors | - Update the module.xml sequence. - Verify dependency injection. - Check plugin configurations. |
| UI Components | Form rendering issues | - Debug UI component XML. - Check data provider class. - Verify layout updates. |
| Backend Models | Data persistence problems | - Implement proper backend model. - Configure source model. - Set up attribute backend type. |
| Cache System | Cache invalidation | - Clear specific cache types. - Rebuild indexes. - Update cache configuration. |
12 Steps to Modify the Customer Attribute Extension Programmatically in Magento 2
- Access Magento 2 Swagger (add “swagger” to the URL).
- Locate the
IntegrationAdminTokento grant administrative permissions.
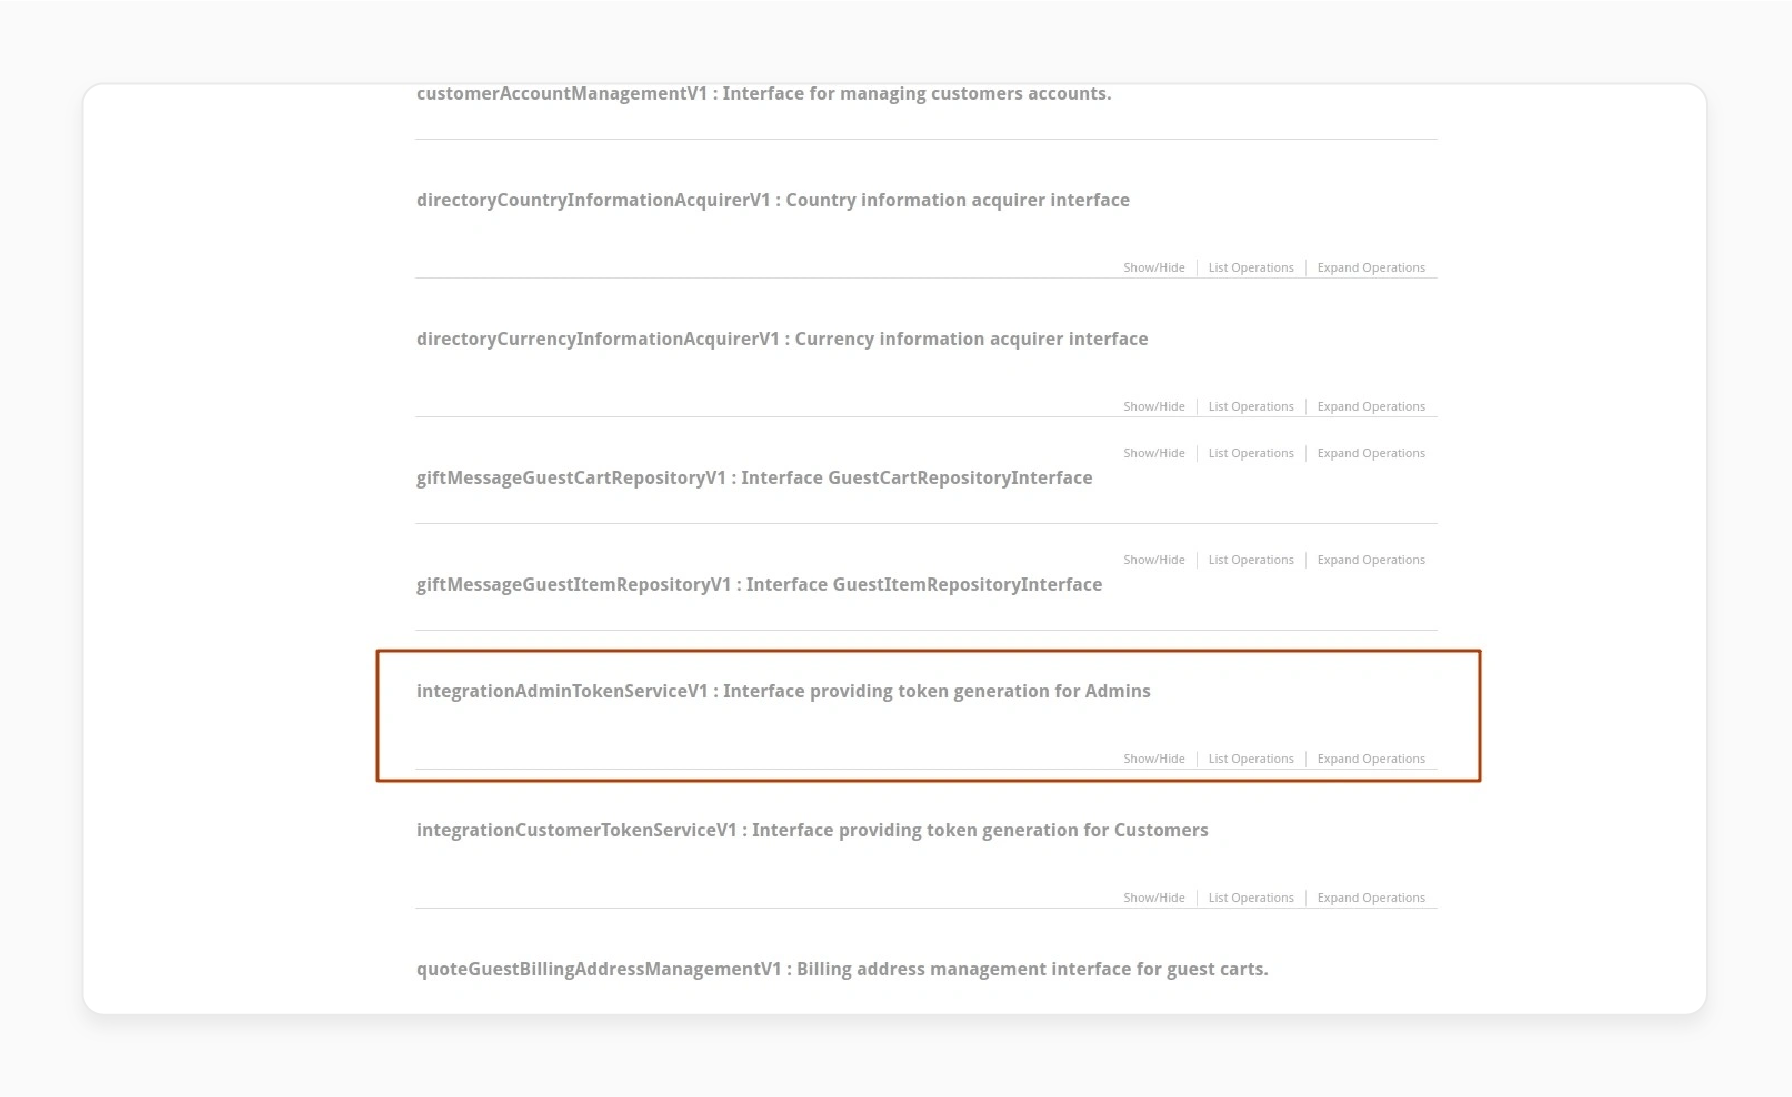
- Use your backend credentials to log in through the Swagger UI for authentication.
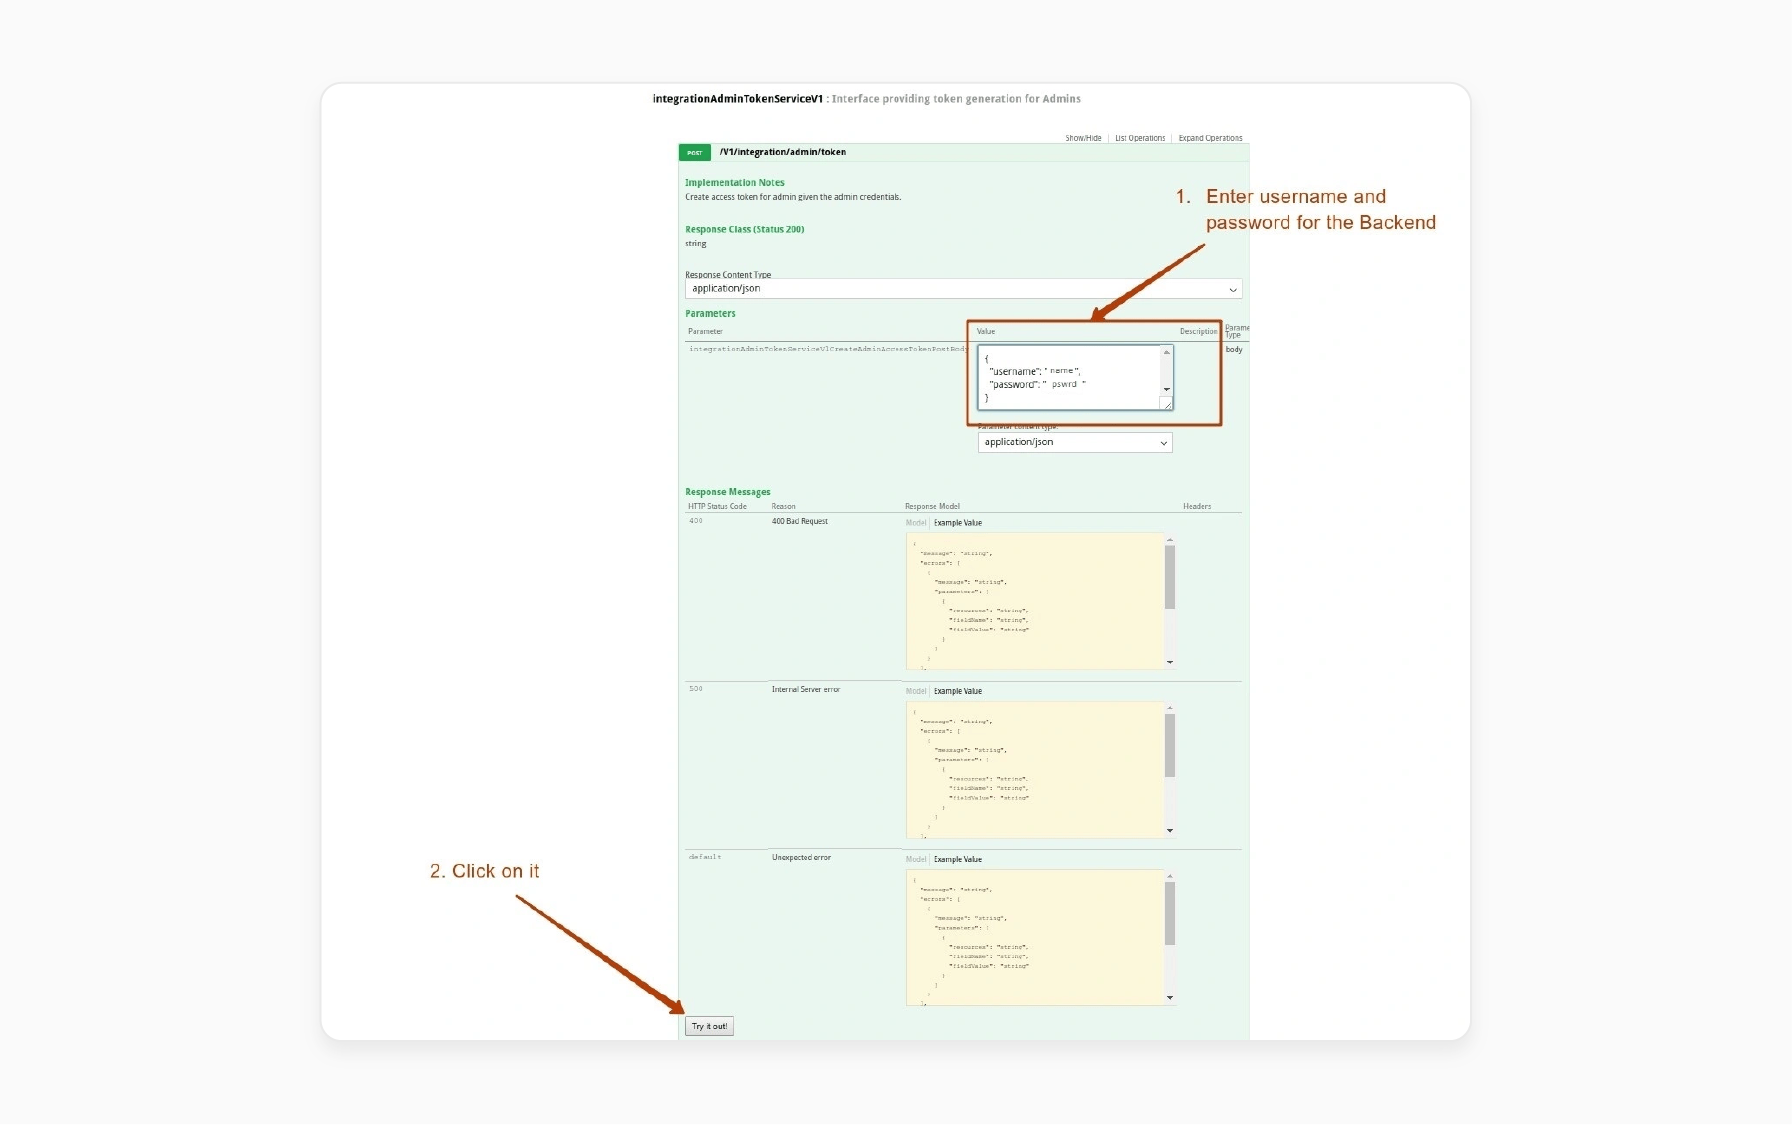
- Once logged in, generate and retrieve your "API key".
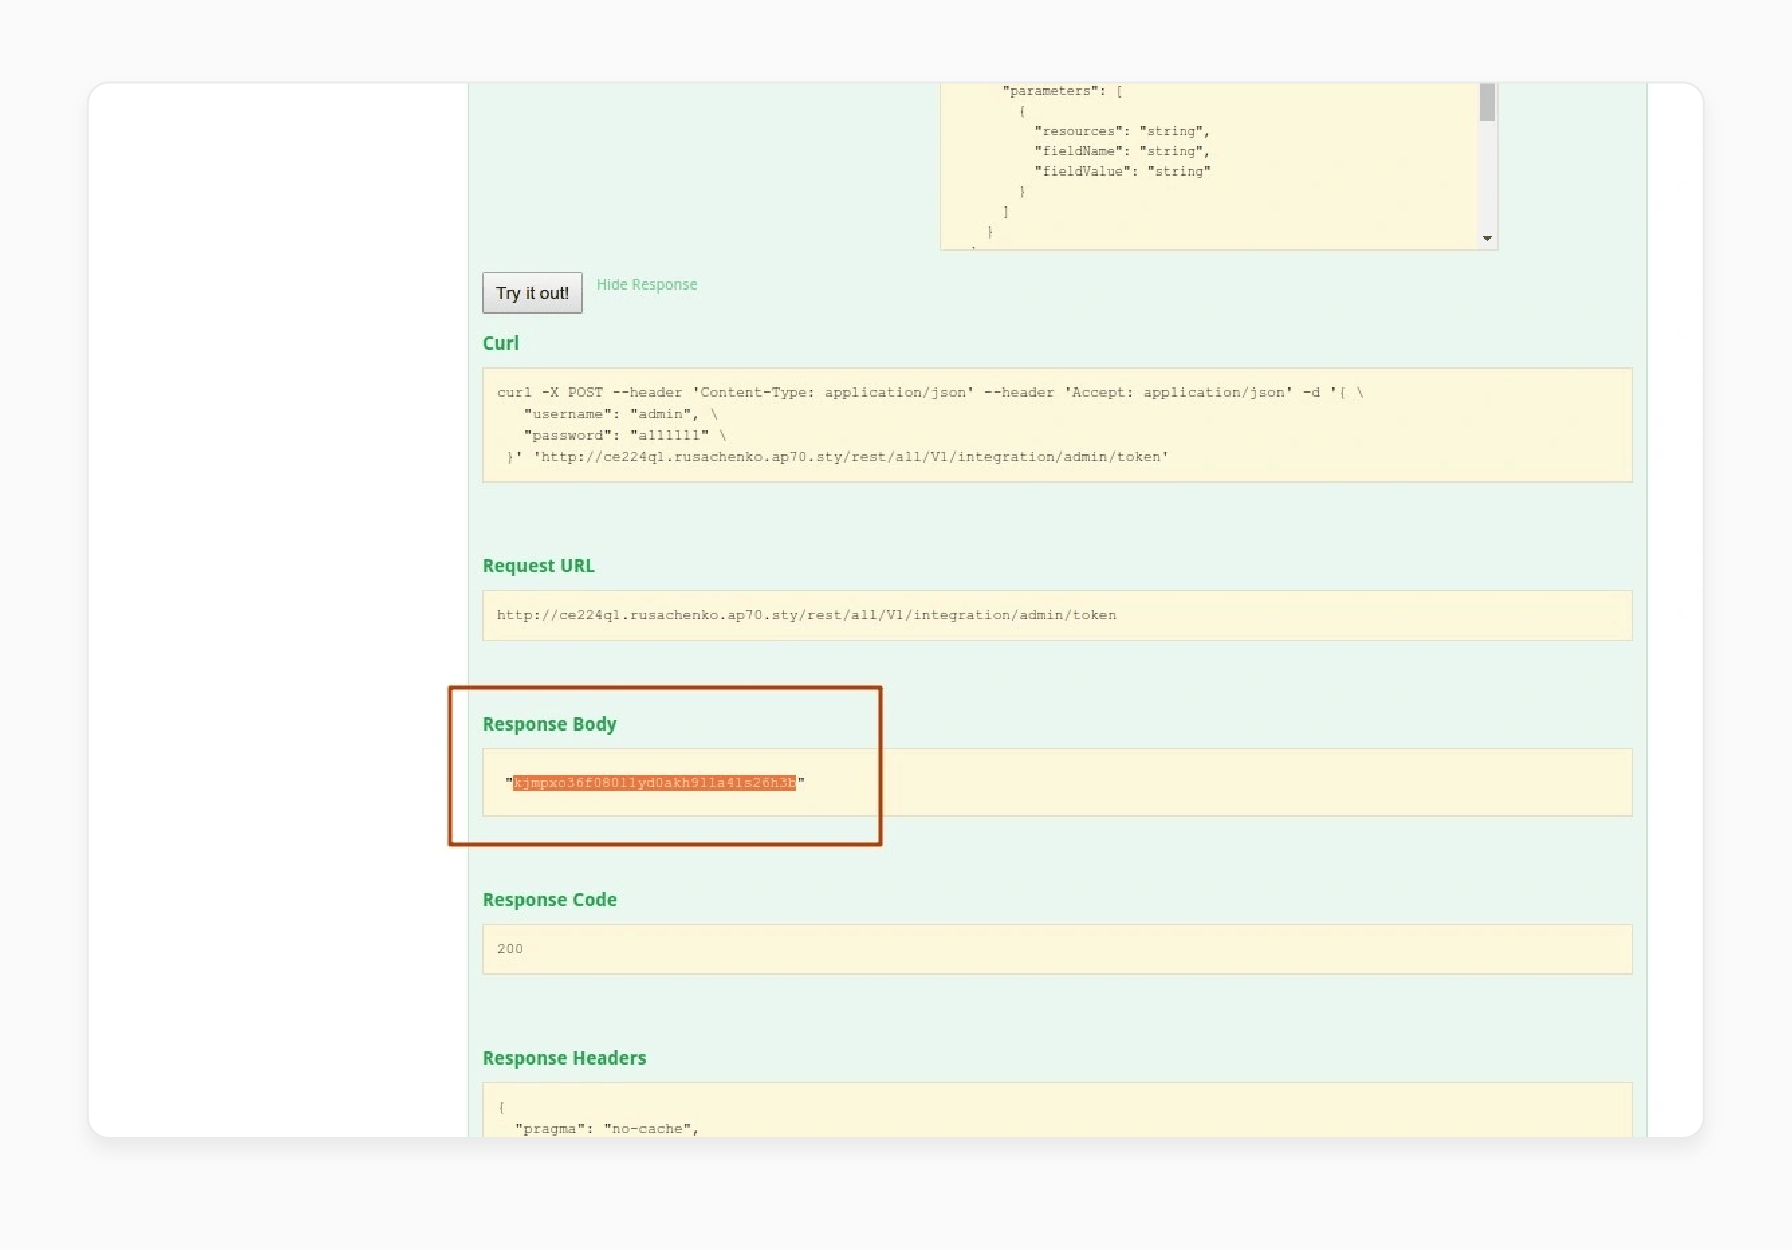
- With administrative permissions in place, you can edit customer attributes.
- To do this, locate
customerCustomerRepositoryV1and select the customer ID. - Click "Try it out" to retrieve the customer data.
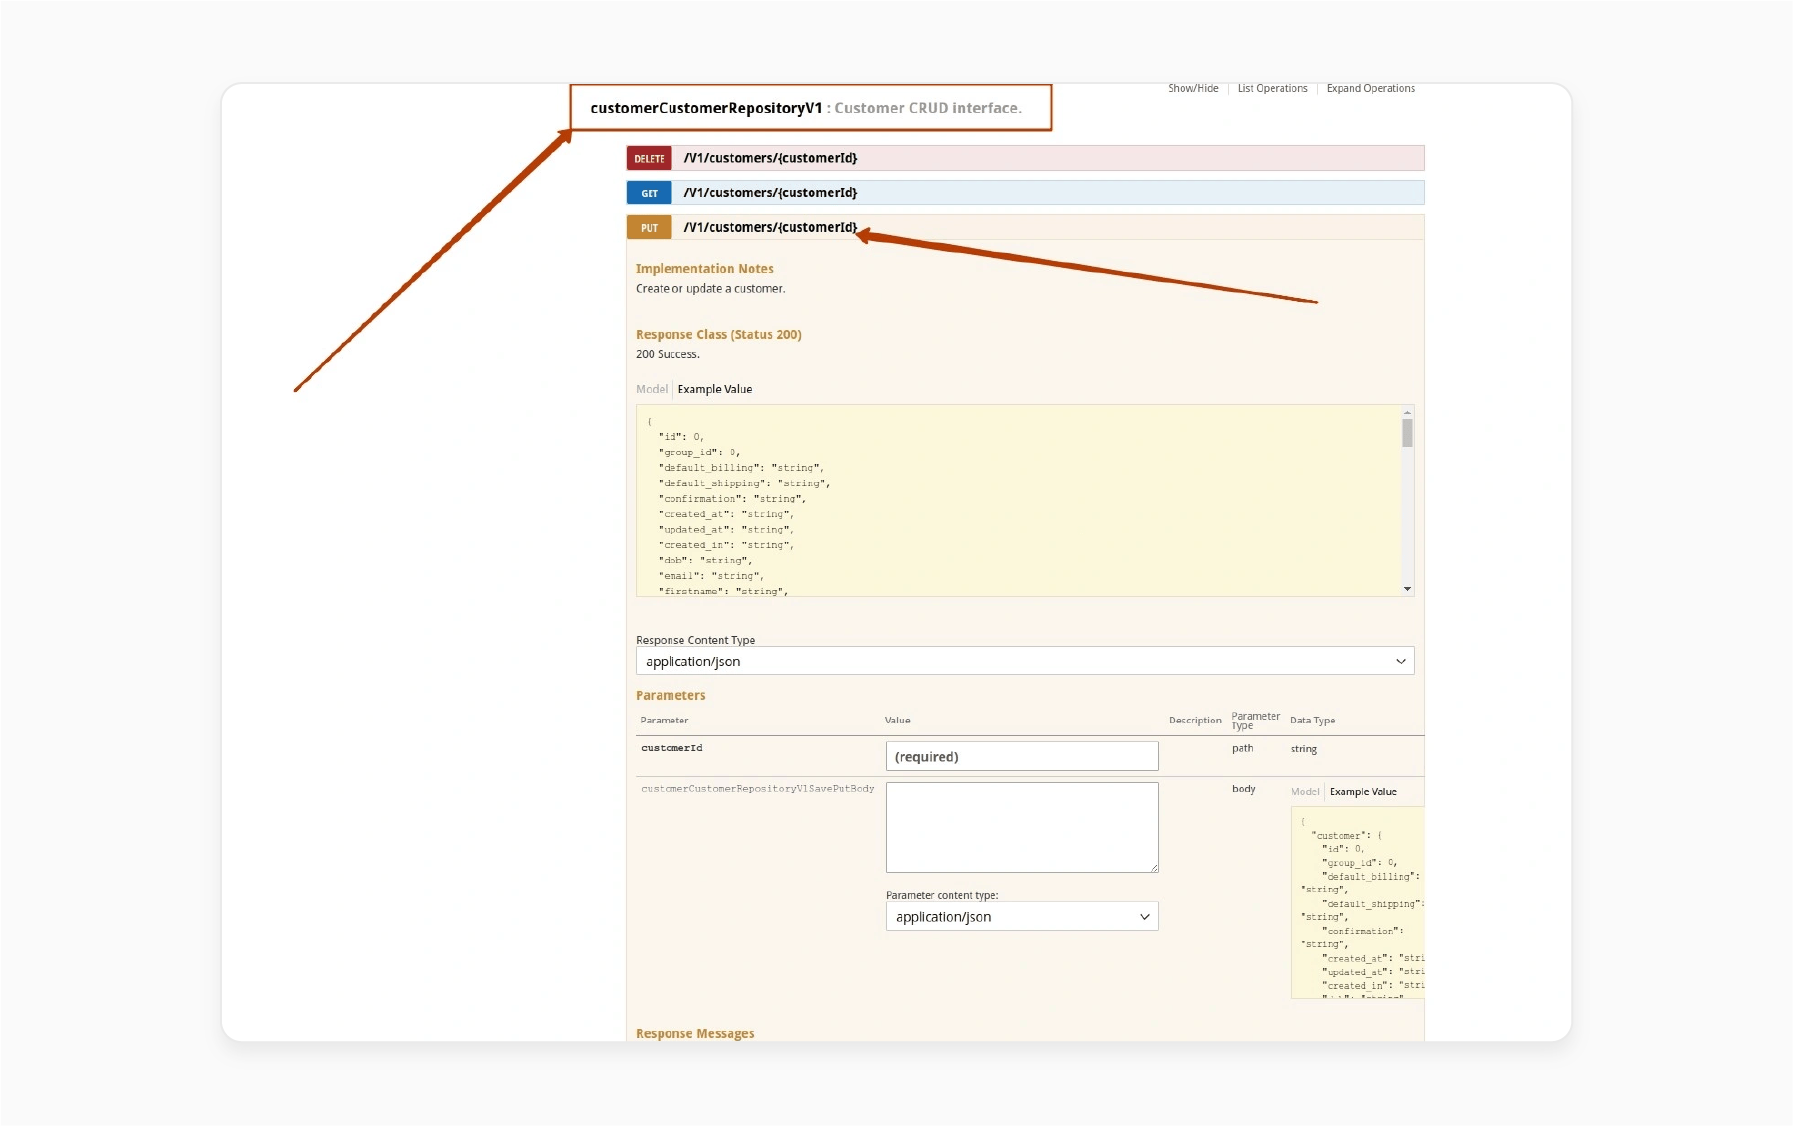
- To find a customer, open the 'Get' tab and input the Customer ID.
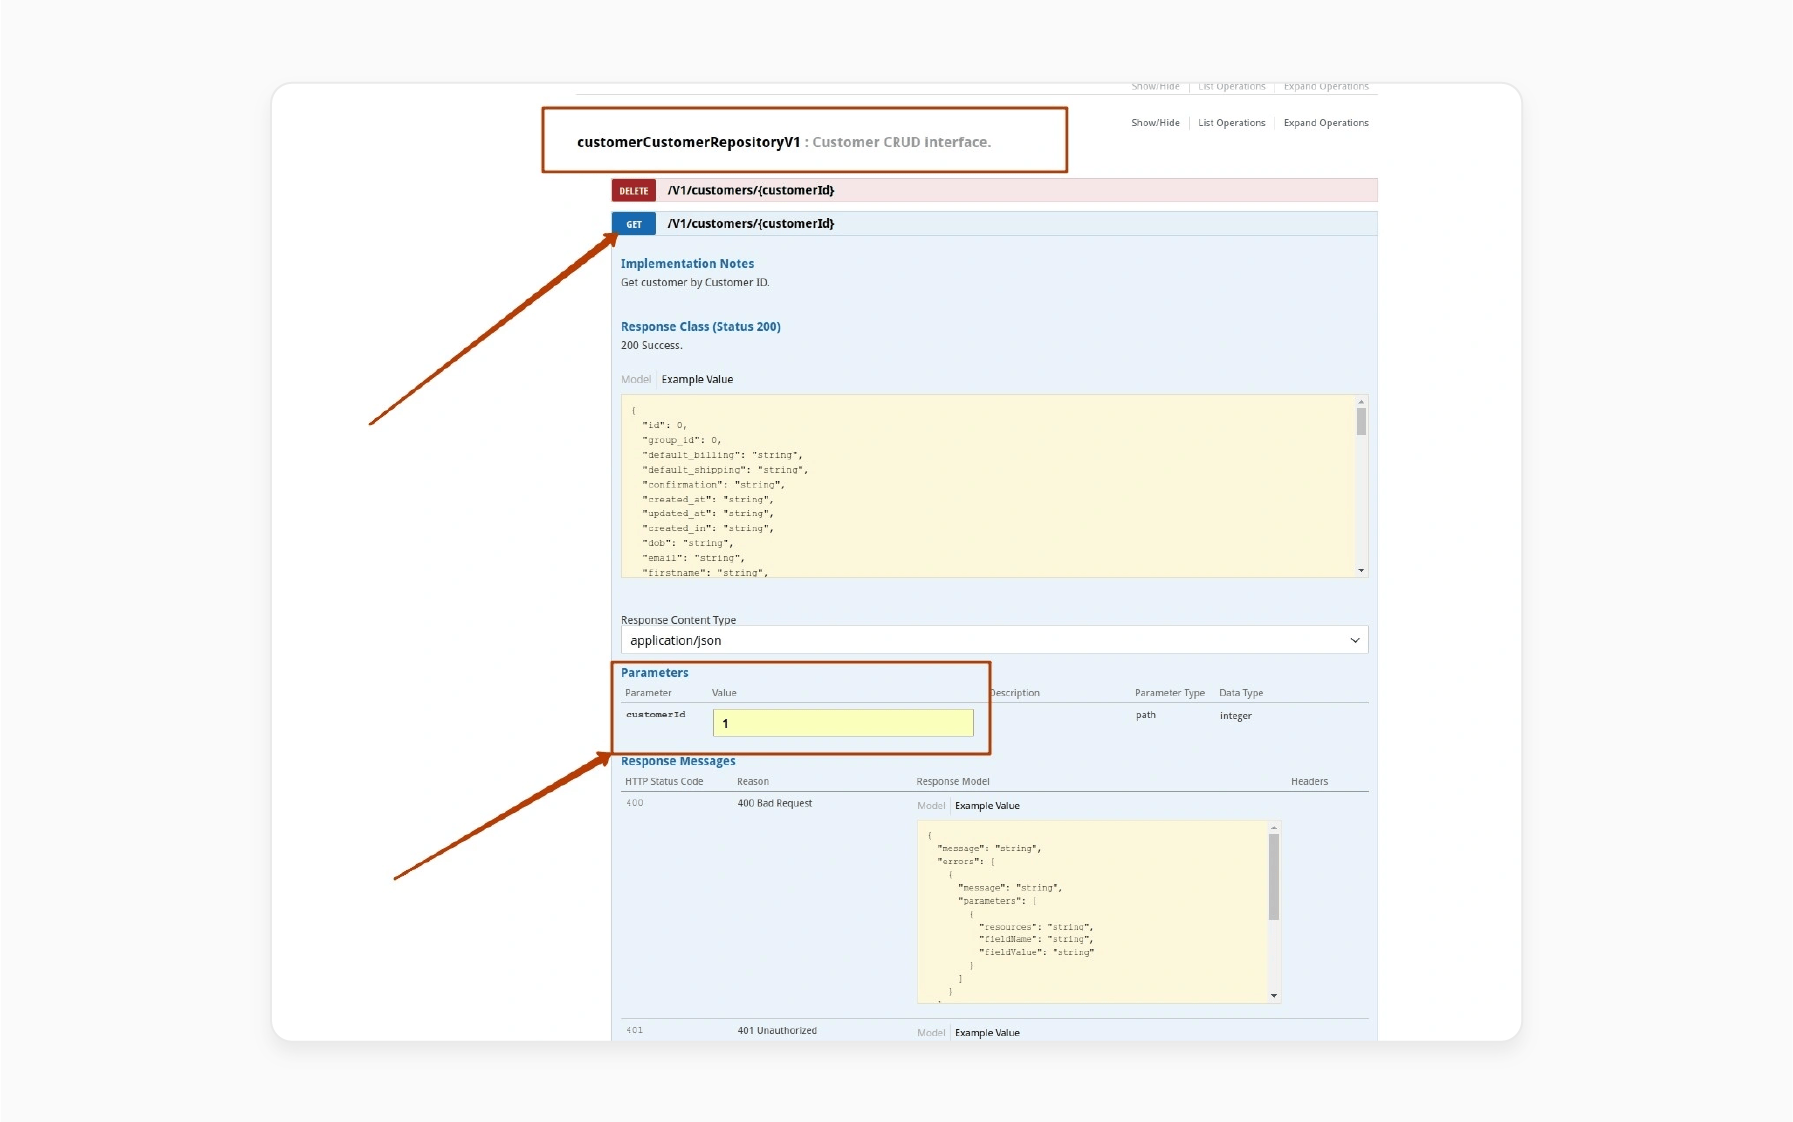
- Click "Try it out" to get the customer’s ‘Response body’.
- Copy the data and proceed to the next step.
- Navigate to
/V1/customers/{customerId}, paste the customer data, and verify the details.
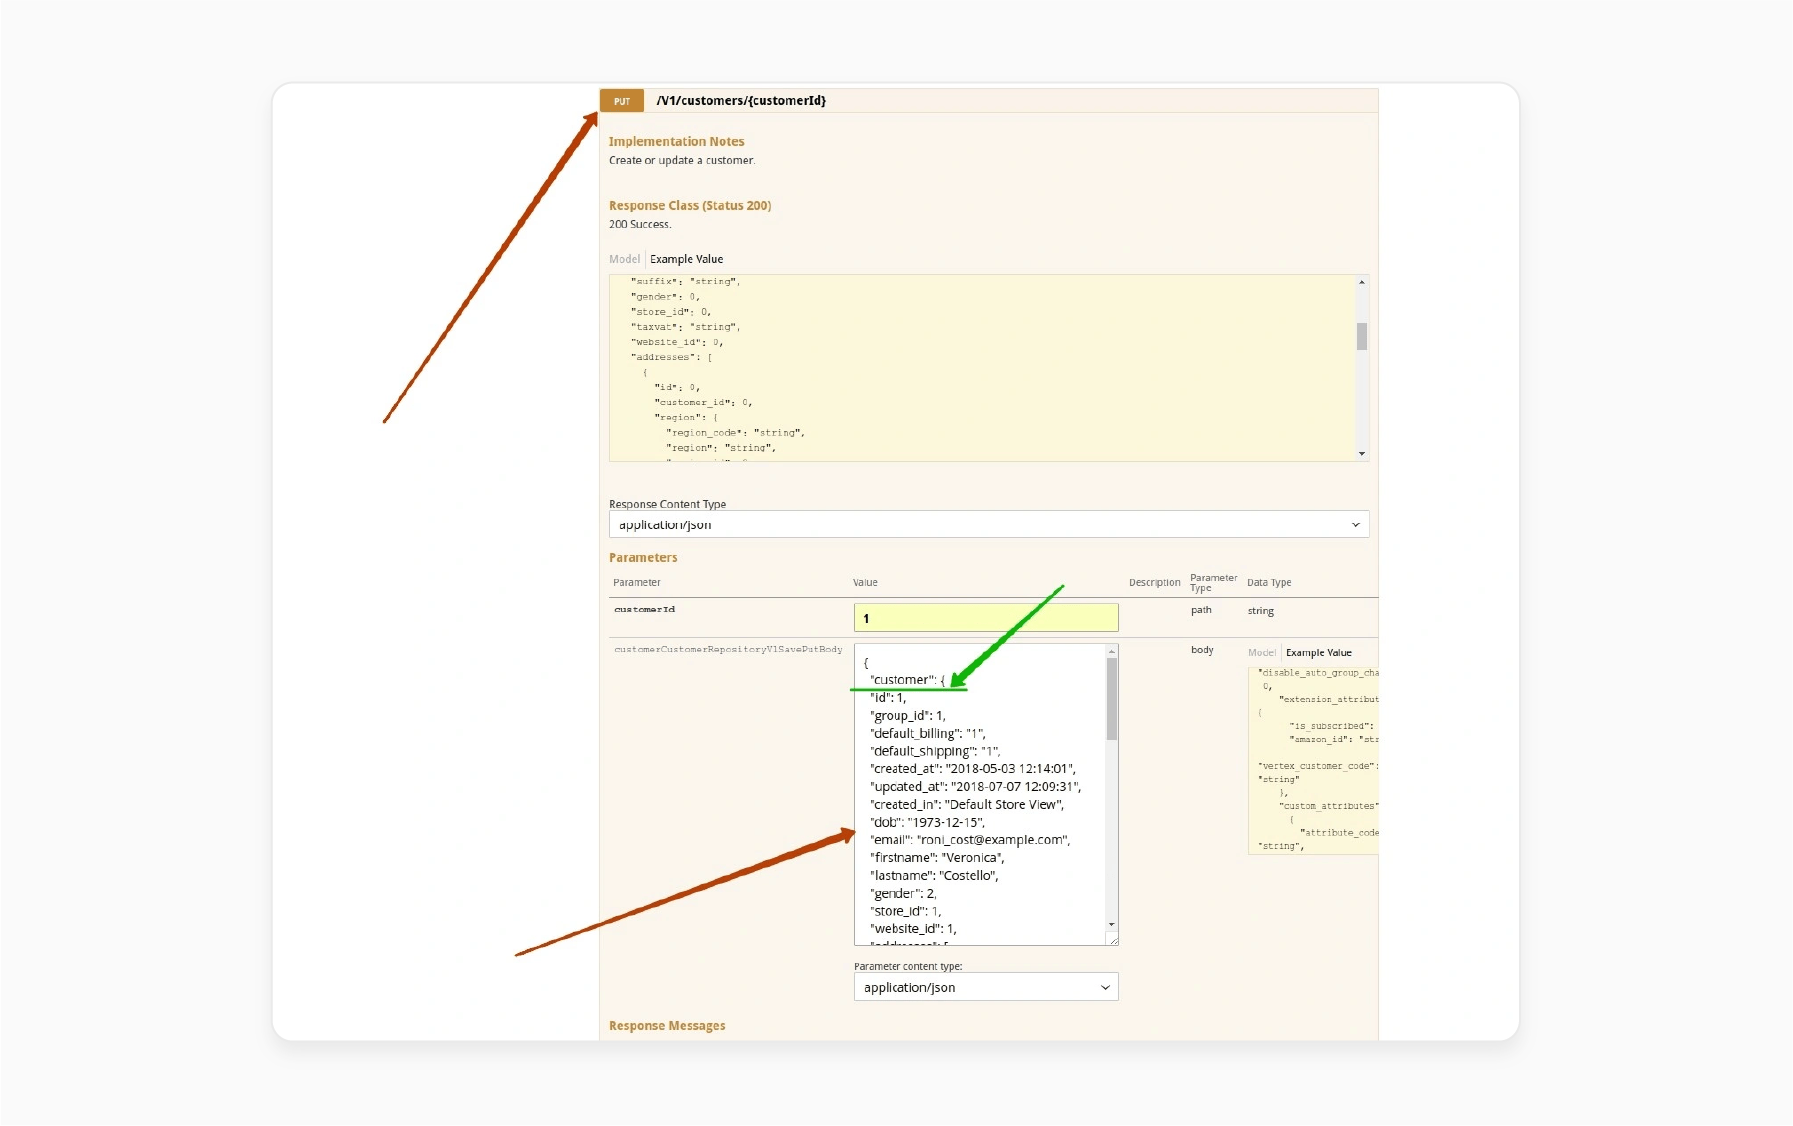
- Make sure to include "customer" in the highlighted area (marked in 'green').
Preventive Measures and Maintenance for Better Customer Engagement
| Maintenance Category | Action Items | Implementation Strategy | Frequency |
|---|---|---|---|
| Attribute Audit | - Review customer attribute usage. - Monitor attribute performance. - Check for redundant attributes. |
- Generate attribute usage reports. - Analyze customer data patterns. - Remove unused customer attributes. |
Monthly |
| Data Integrity | - Validate customer attribute data. - Check for incomplete profiles. - Monitor data quality. |
- Run database integrity checks. - Clean invalid customer data. - Update attribute validation rules. |
Bi-weekly |
| Performance Optimization | - Monitor attribute load times. - Check indexing efficiency. - Analyze customer grid performance. |
- Optimize database queries. - Schedule regular reindexing. - Clean customer grid data. |
Weekly |
| Backup Strategy | - Database backups. - Attribute configuration backups. - Customer data exports |
- Automate backup scheduling. - Conduct version control for configurations. - Implement regular data snapshots. |
Daily |
| Update Protocol | - Test attribute updates. - Verify frontend display. - Check admin panel functionality. |
- Use a staging environment. - Run automated tests. - Document change impacts. |
Per Update |
| Security Measures | - Audit attribute permissions. - Check data encryption. - Monitor access logs. |
- Update access controls. - Implement encryption standards. - Regular security reviews. |
Weekly |
| Customer Experience | - Track attribute usage patterns. - Monitor form completion rates. - Analyze customer feedback. |
- Collect usage analytics. - Survey customer satisfaction. - Optimize form layouts. |
Monthly |
FAQs
1. How does PHP impact customer attribute configurations?
PHP manages complex attribute-creation processes. It enables dynamic attribute generation through strong programming techniques. Developers can leverage advanced scripting methods to create custom attributes. Proper php implementation determines attribute functionality and rendering capabilities in Magento 2.
2. How do I modify the display order of customer attributes?
Use the sort_order property to control the position of attributes. It ensures that each attribute appears in a specific place within forms. Setting lower sort_order values displays the attribute earlier. It improves customer interaction during account edits.
3. How does customer account edit interact with custom attributes?
Customer attributes are added to the customer account edit form via Magento’s EAV system. You can configure these attributes through EavSetupFactory. You can also define where and how these attributes will be displayed. The attribute set and group control the attribute visibility.
4. What is the role of public function in attribute setup?
The public function in the attribute setup defines actions. For example, you can add or modify customer attributes. This function interacts with ModuleContextInterface and EavSetupFactory to add attributes to customer entities. It ensures that attributes are properly added to the database schema.
5. How do I assign an attribute to a specific attribute group?
To assign an attribute to a specific group, use var AttributesetFactory and AttributeGroupId. It links the customer attribute to the desired group in the attribute_set. You can define the group in the InstallData.php setup file. It allows for easy management within the admin panel.
6. What does the varchar data type represent in Magento?
Varchar represents variable-length character string attributes. It stores text-based customer information flexibly and supports dynamic data collection mechanisms. String-based configurations enable custom attribute creation and provide versatile data storage options.
7. How do modulecontextinterface and attributeset interact?
ModuleContextInterface manages module-level attribute configurations, while AttributesetId identifies specific attribute collection groups. They coordinate complex attribute initialization processes & support attribute management across different Magento modules.
Summary
The 'Magento 2 customer attributes not showing in admin' problem can affect how you manage customer data and update customer profiles. Fixing this issue allows store owners to:
- Collect specific data from customers during registration or account editing.
- Add custom attributes during customer registration or edit them in the customer account.
- Gather personalized information from customers.
- Manage customer information and improve their store's functionality.
- Ensure smooth management of customer data and improve the overall customer experience.
Consider Magento optimized server to manage customer attributes effectively in the admin area.


