
How to Configure Magento 2 Contact Form Redirect After Submit?
Want to improve the user experience on your Magento 2 contact form? By setting up a Magento 2 Contact Form Redirect After Submit, you can guide users to a specific page after they submit their form. This tutorial covers how to configure the Magento 2 contact form redirect after submission.
Key Takeaways
-
Overview of Magento Contact Form Redirect After Submit
-
Key Reasons to Use Magento 2 Contact Form Redirect After Submit
-
How to Configure Contact Form Redirect After Submit in Magento Stores
-
Magento 2 Contact Form Redirect After Submit Best Practices
-
Troubleshooting Magento 2 Contact Form Redirect After Submit Issues
-
Steps to Configure Magento 2 Contact Form Redirect After Submit
-
Best Practices for Magento Contact Us Page Redirect After Submit
-
How to Customize the Magento 2 Contact Form Redirect After Submit
-
How to Test Your Magento 2 Contact Form Redirect After Submit?
-
Troubleshooting Magento 2 Contact Form Redirect After Submit Problems
What is Magento Contact Form Redirect After Submit?
Magento 2 Contact Form Redirect After Submit lets store owners redirect customers to a specific page after form submission. You can send them to a thank you page, product page, or any other URL.
It improves the user experience by guiding customers to the next step. You can control the redirect URL and set a delay before the redirect happens. To keep customers on the same page, just enter “/” in the settings. This feature makes form submissions more seamless.
You can also use conditional logic for custom redirects based on user input. By installing the Smart Conditional Logic plugin, you can set conditions for redirects. For example, if a customer selects “Computer,” they can be redirected to a relevant page. Set both the condition and action to create this logic. It gives customers a more personalized experience, sending them to content that matches their needs.
Why Use Magento 2 Contact Us Form Redirect After Submit?
| Reason | Explanation |
|---|---|
| Improved User Experience | Redirecting users after form submission creates a smoother process. It guides them to the next step. Customers don’t have to guess what to do next. It keeps them engaged. It makes the experience more seamless. |
| Customized Post-Submission Flow | You can personalize the post-submission experience. For example, redirect users to a thank you page or product page. It makes the experience more relevant. It increases user satisfaction. It keeps customers interested in your site. |
| Increased Conversion Rates | Redirects can boost conversions. Send users to a promotion page or related products after submission. It encourages them to take further action. A clear call to action can lead to sales. It helps turn leads into buyers. |
| Clear Call-to-Action | Redirecting users lets you set a strong call-to-action. After submission, users are shown what to do next. They can sign up for a newsletter or view products. It keeps them focused. It drives users toward your goals. |
| Improved Tracking and Analytics | Redirects help you track form submission performance. You can see where users go after submission. This data helps optimize your strategies. It shows what customers are interested in. You can use this information to make better decisions. |
| Boosted Engagement | Redirects can increase engagement. Users stay on your site longer if directed to the right content. They might browse more products or read more. It keeps them involved. More engagement leads to more opportunities for conversion. |
| Better Brand Consistency | Redirects ensure brand consistency. You can customize the post-submission page to match your brand’s tone. It strengthens your brand’s identity. A cohesive experience builds trust. It makes your site feel more professional. |
| Faster Customer Support | Redirects streamline customer service. For example, send users with specific issues to a Magento support page. It reduces confusion. It helps users find answers quickly. It improves the customer support process. |
| Automation of Processes | Redirects automate post-submission actions. You don’t have to handle each form submission manually. It saves time and effort. Users get the right follow-up automatically. Automation helps improve efficiency. |
Steps to Configure Magento 2 Contact Form Redirect After Submit
1. Install Form Builder
Before you start, make sure you have Form Builder installed. You’ll need this to create and manage your forms.
2. Create a Form
Once Form Builder is installed, create a form through the backend. Ensure the form is ready for configuration.
3. Open Form Settings
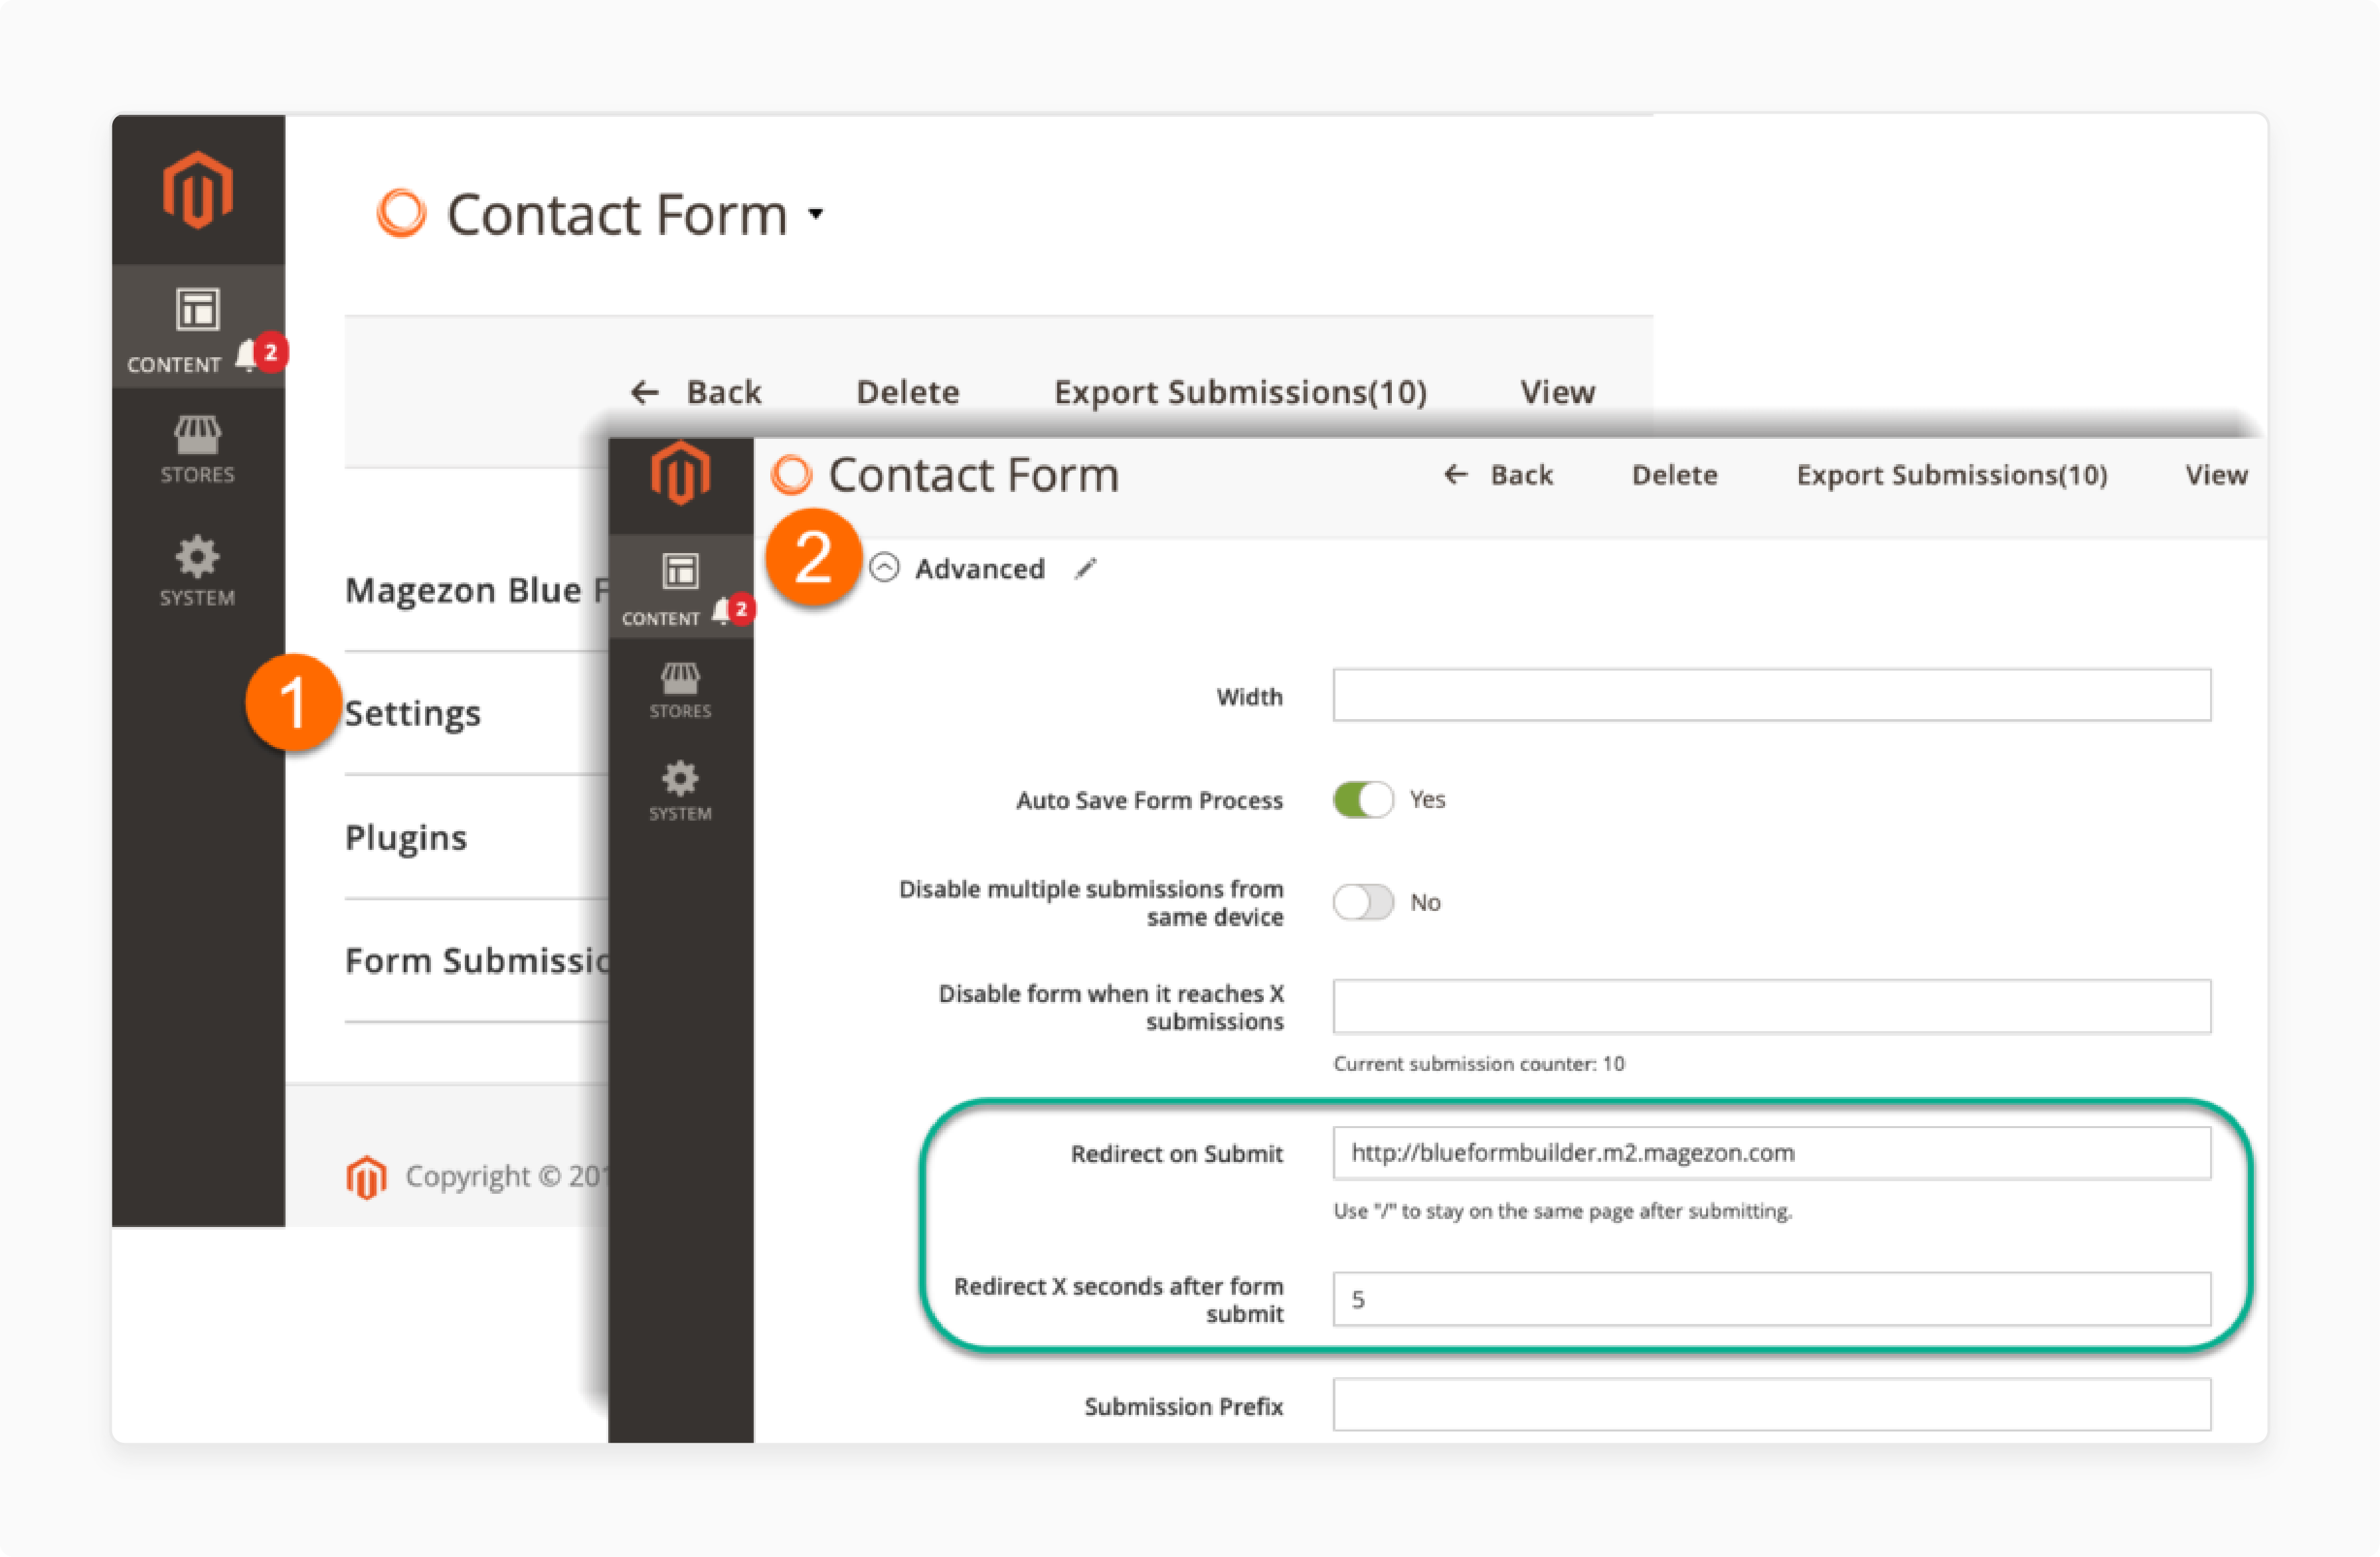
Go to the Magento backend and open the form you want to configure. Then, navigate to Settings > Advanced.
4. Set Redirect URL
In the Redirect on Submit field, enter the page URL where you want customers to be redirected after form submission. To keep users on the same page, use “/”.
5. Set Redirect Delay
In the Redirect X seconds after form submit field, decide how many seconds to wait before redirecting customers.
6. Save Settings
After entering the redirect details, remember to save your settings.
7. Configure Footer Content for Success Message
To make the footer content appear in the success message, fill out both the Redirect on Submit and Redirect X seconds after form submit fields.
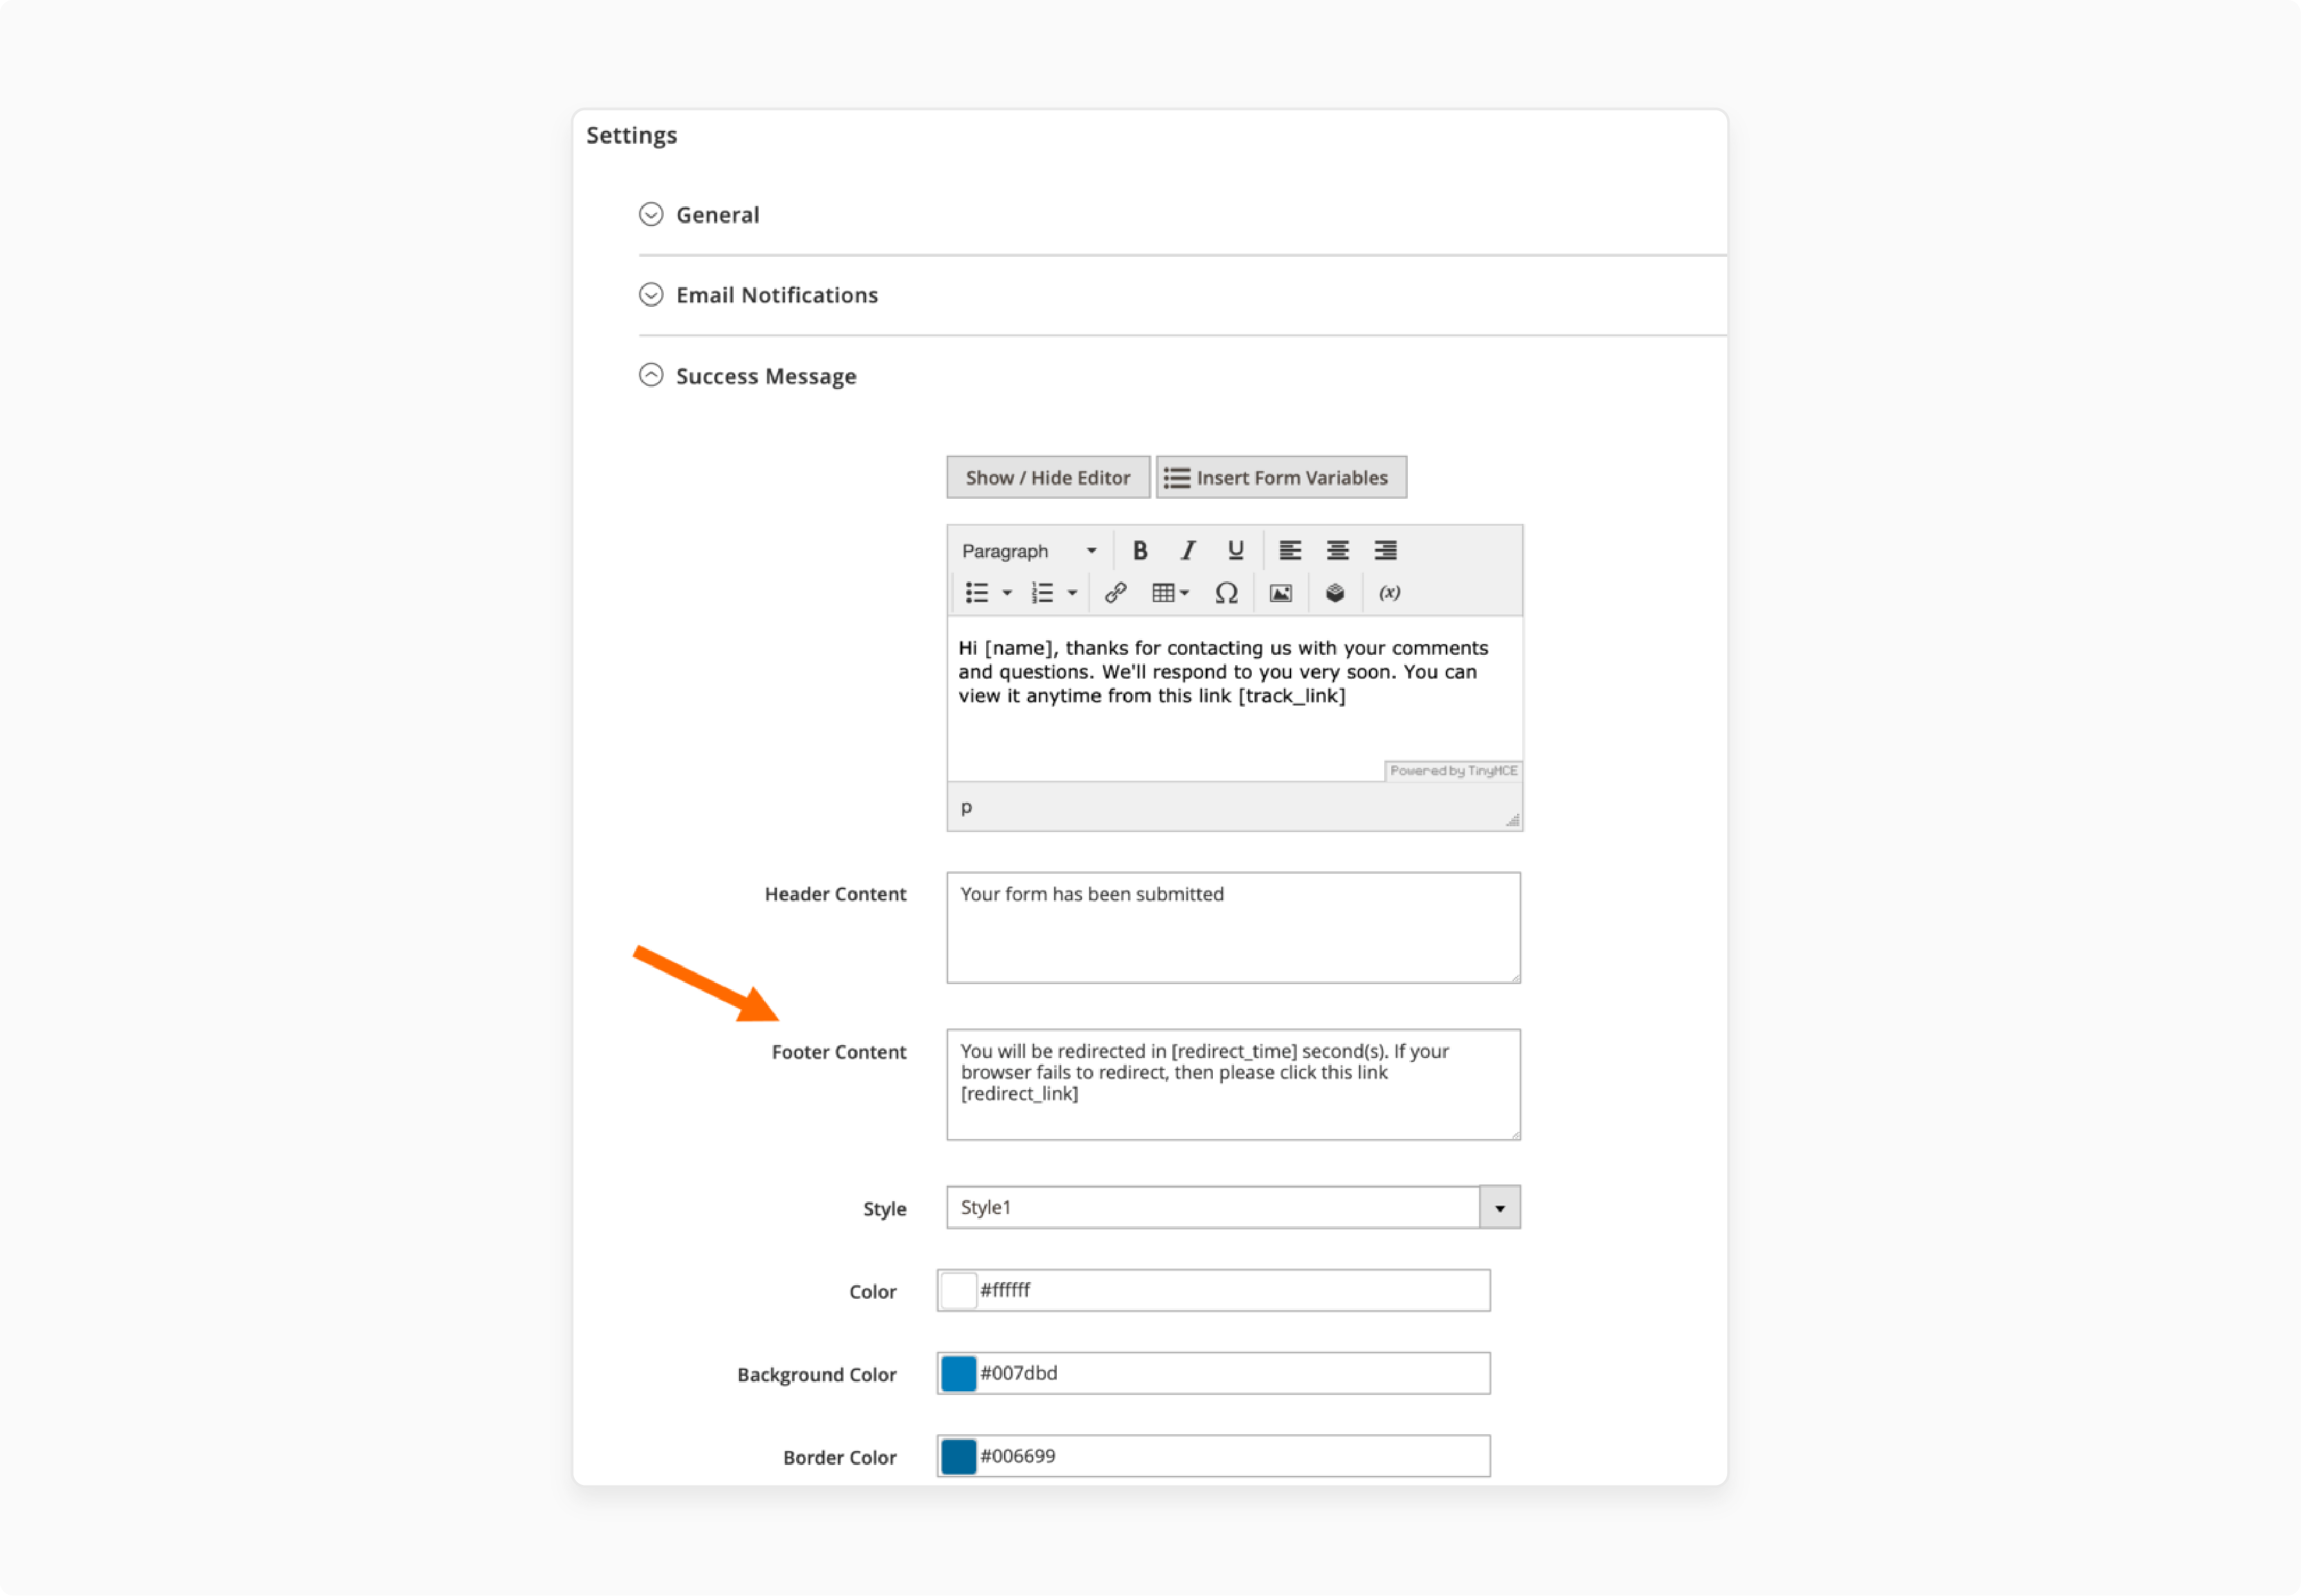
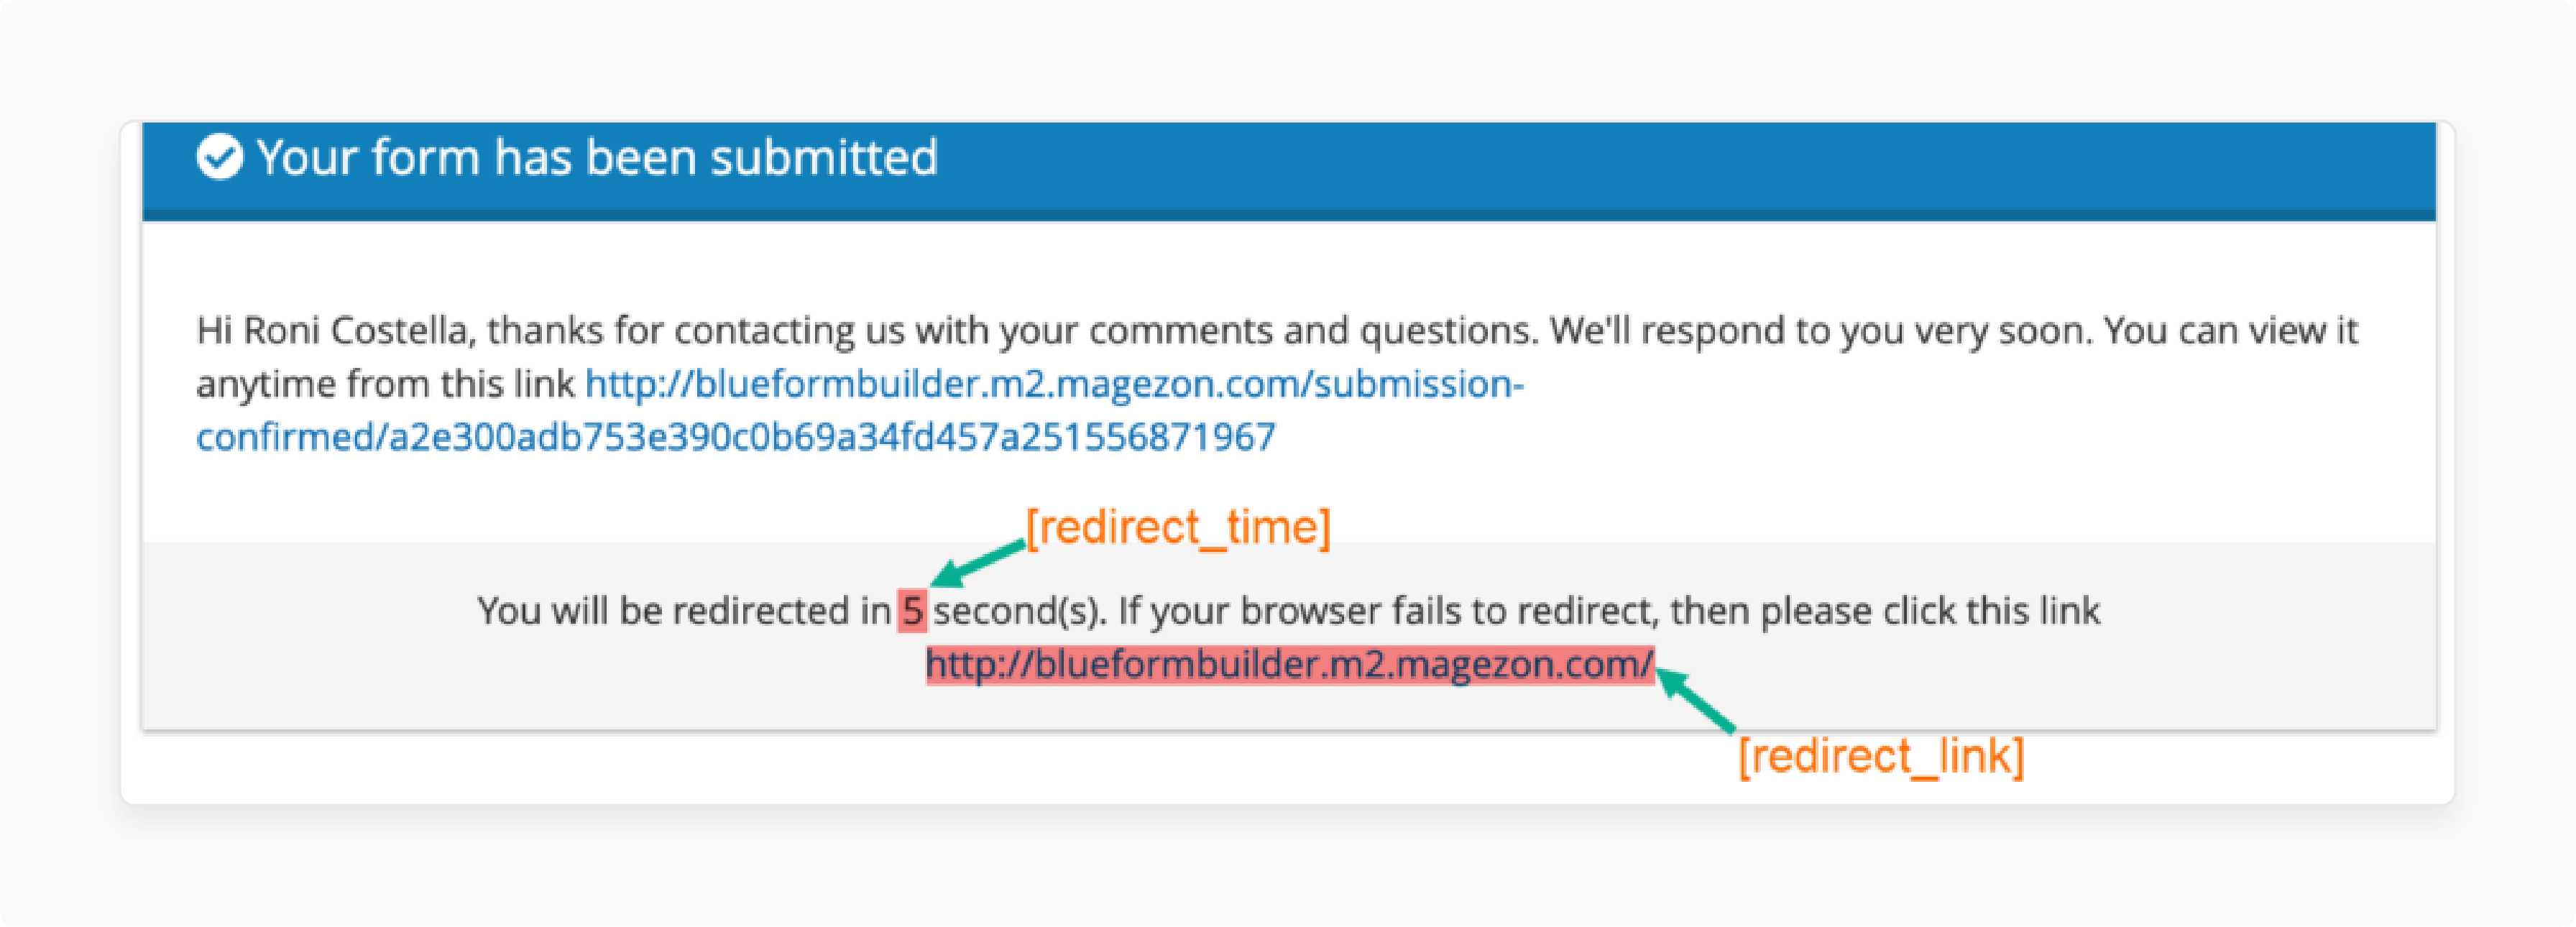
The footer will display a countdown if you use the [redirect_time] variable and the redirect link if you use [redirect_link].
8. Use Smart Conditional Logic for Redirects
For more advanced redirects, install the Smart Conditional Logic plugin. It allows redirects based on user input.
9. Set Conditional Logic
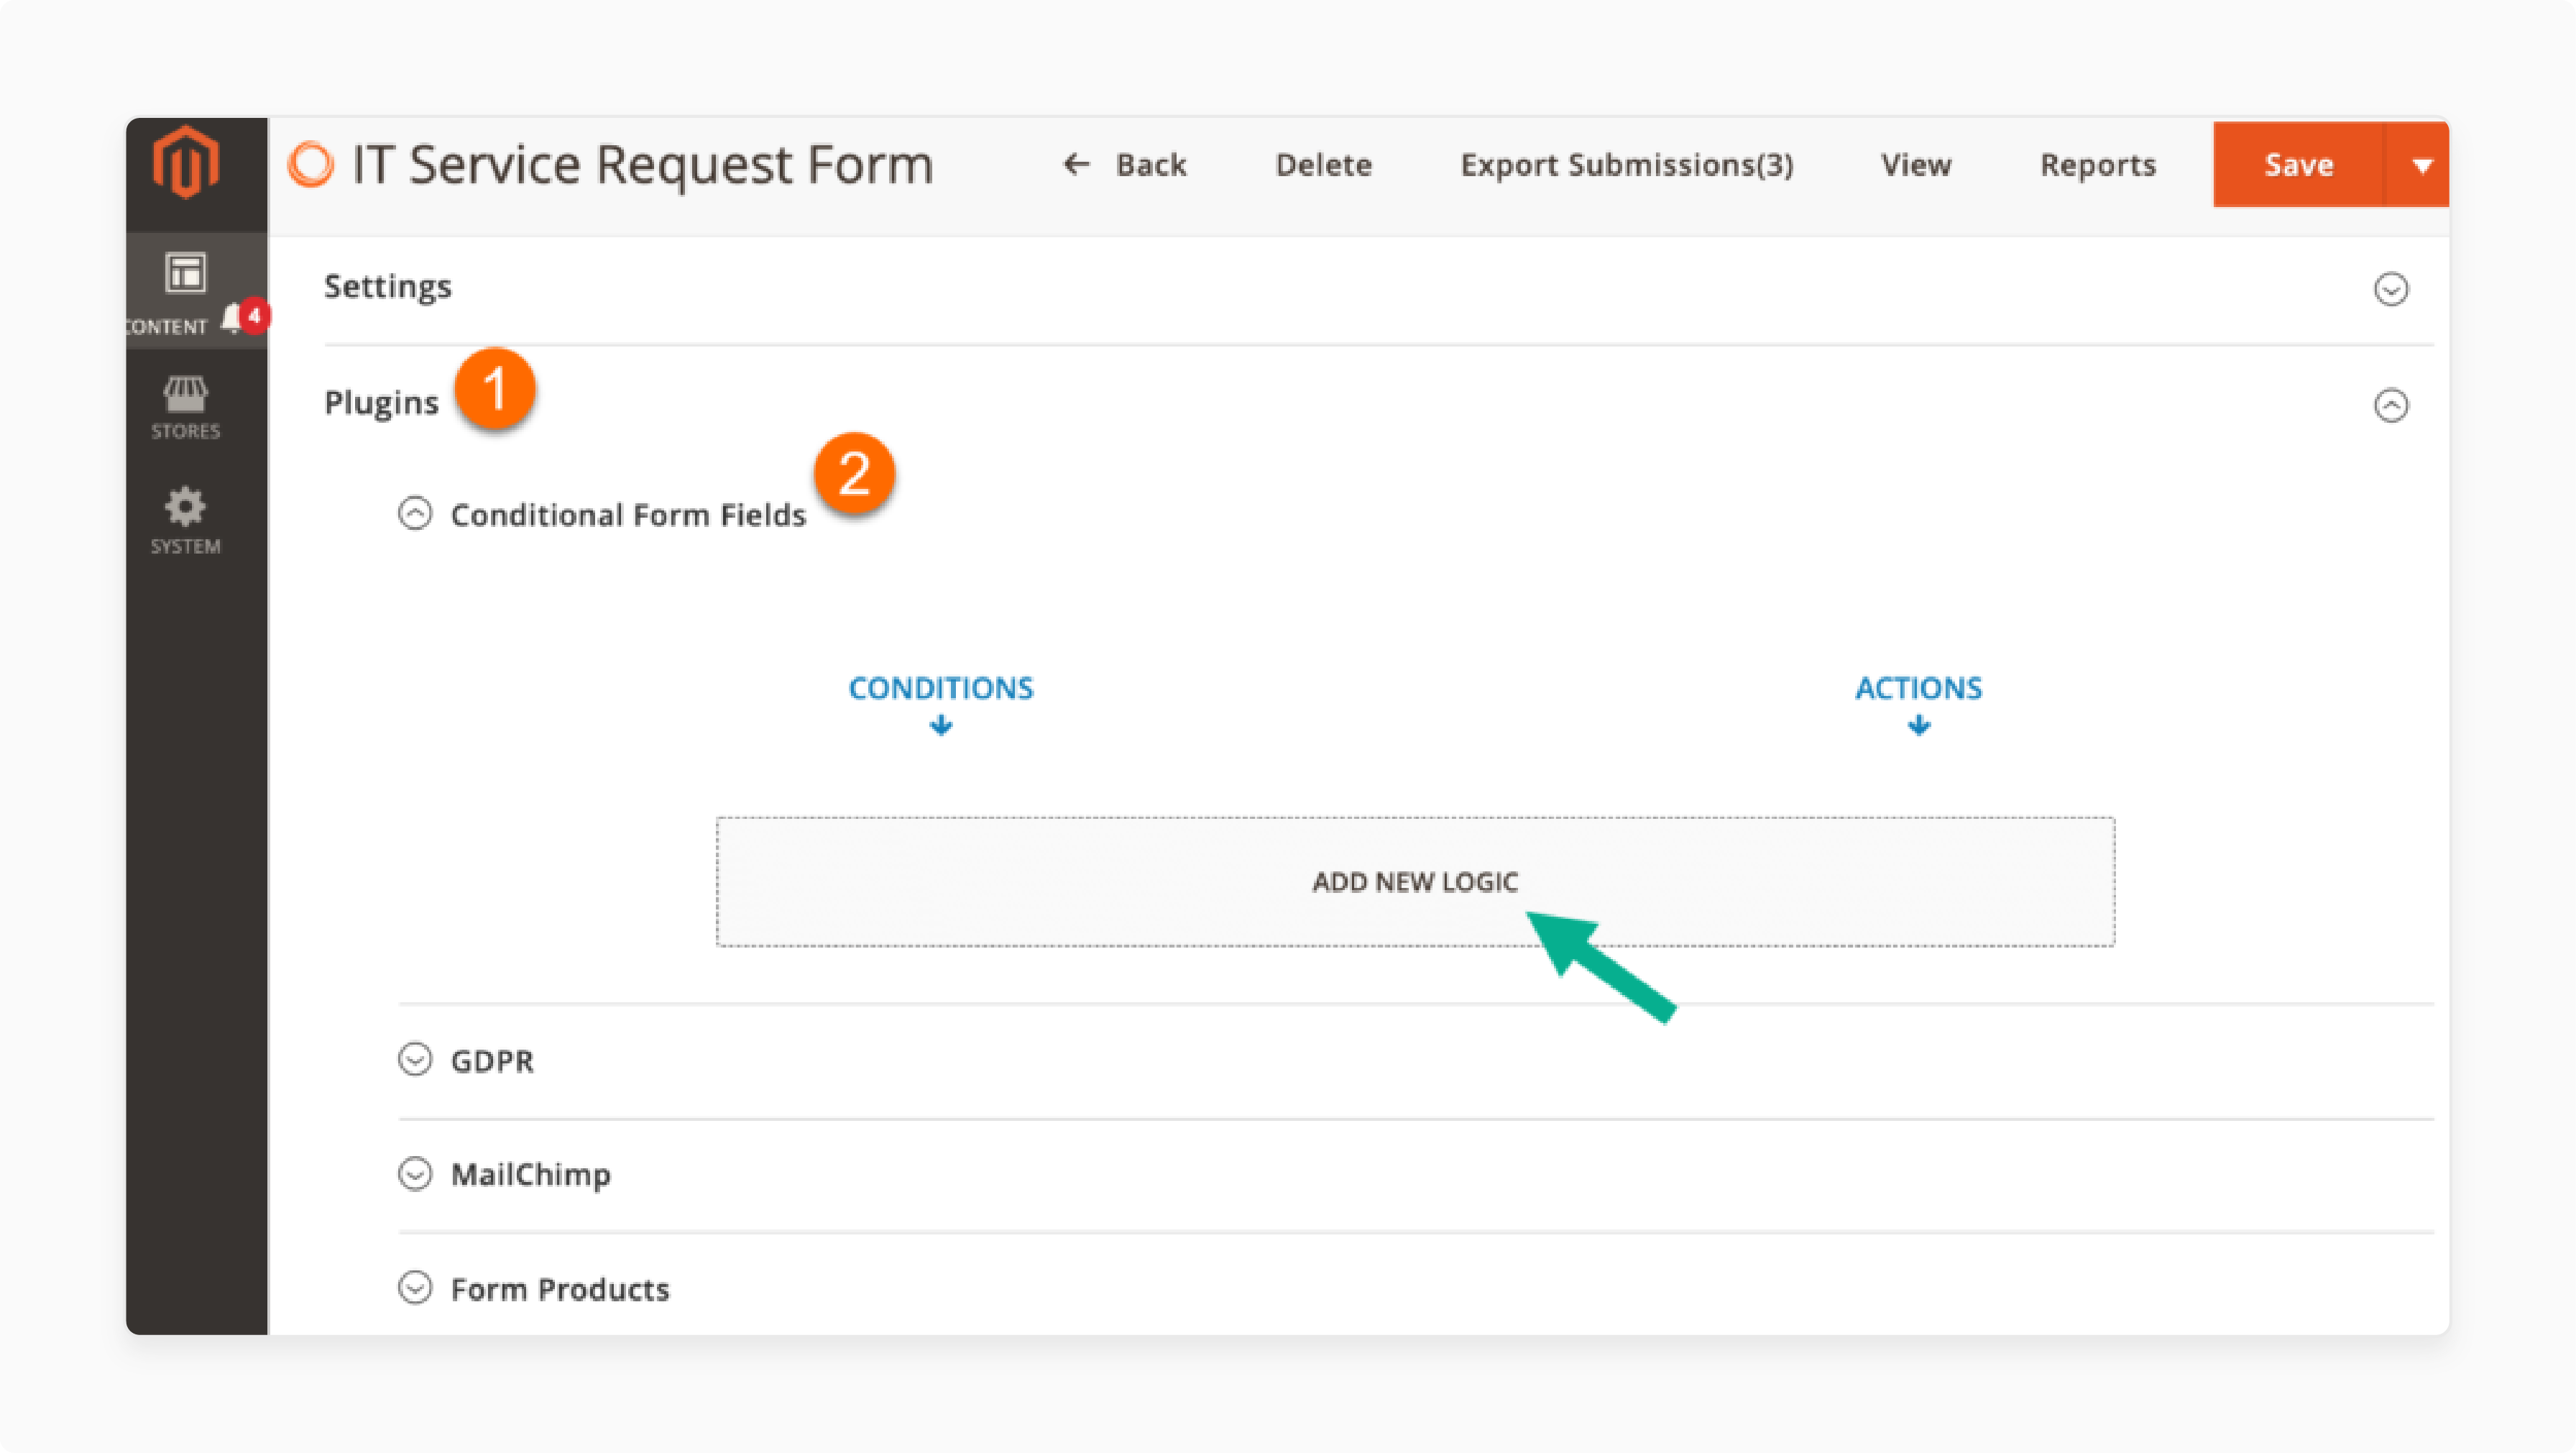
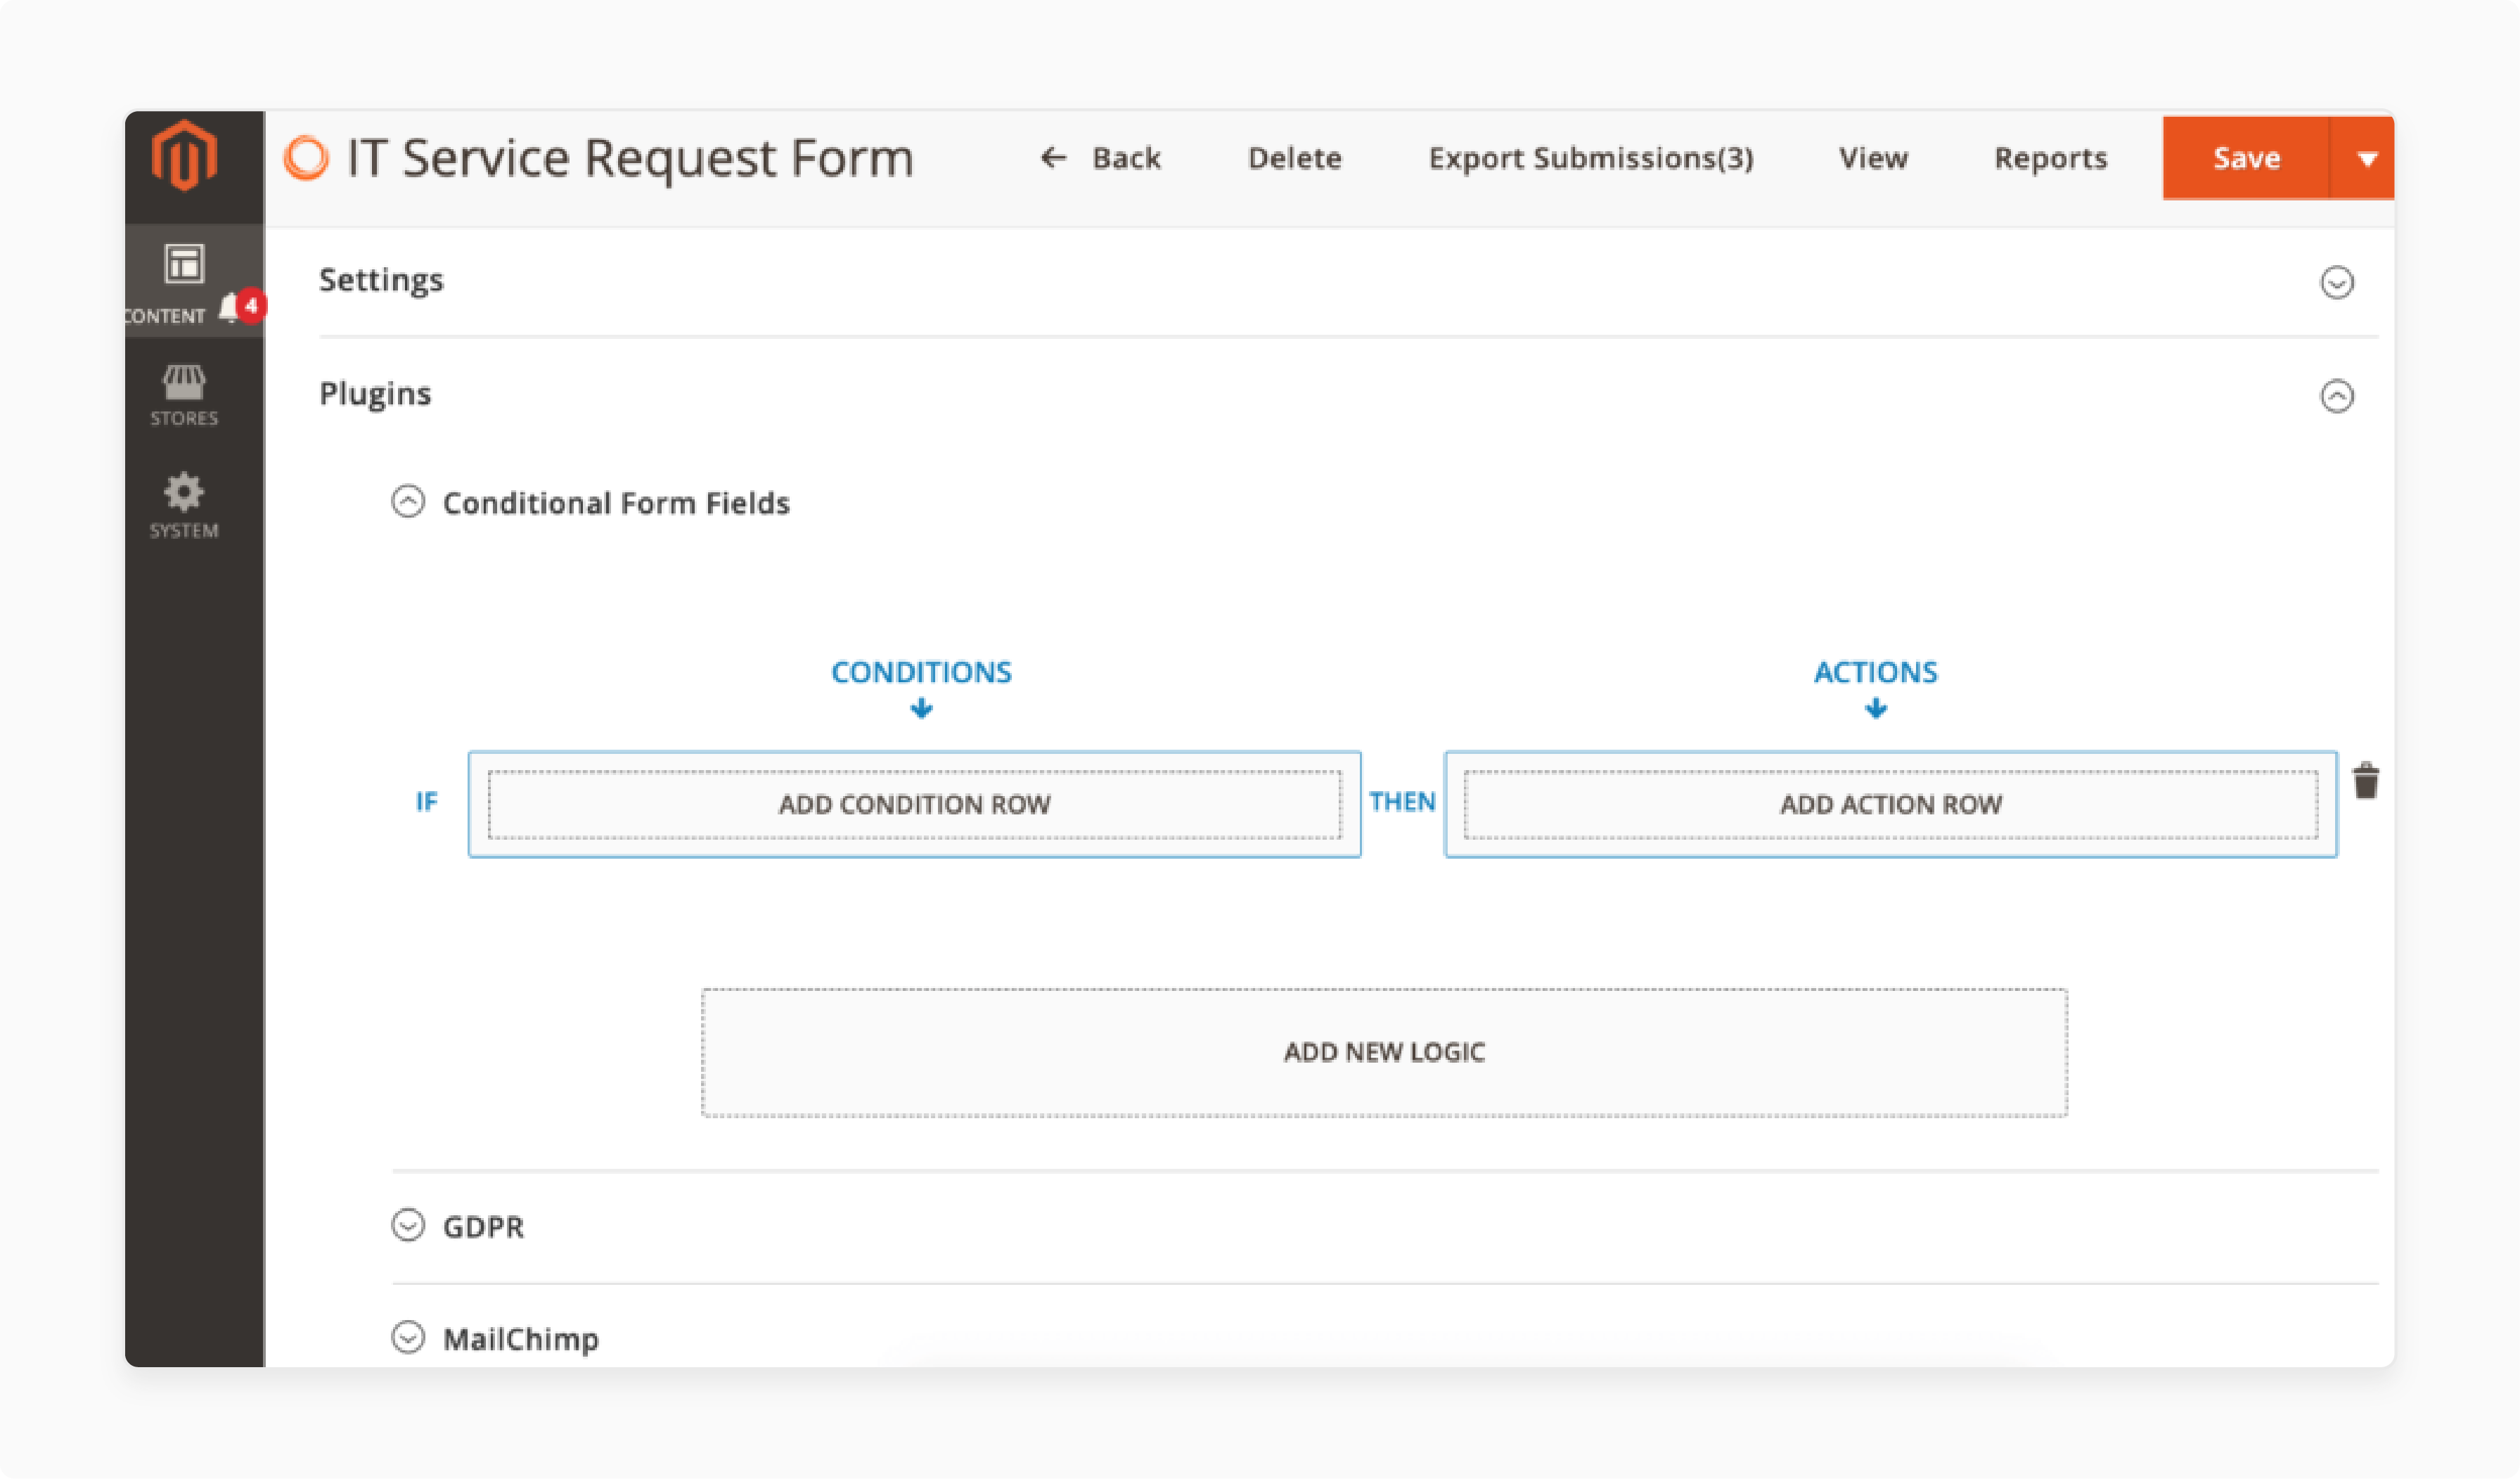
Open the Plugin tab and select Conditional Form Fields. Click “ADD NEW LOGIC” to start creating your logic.
10. Define Condition for Redirect
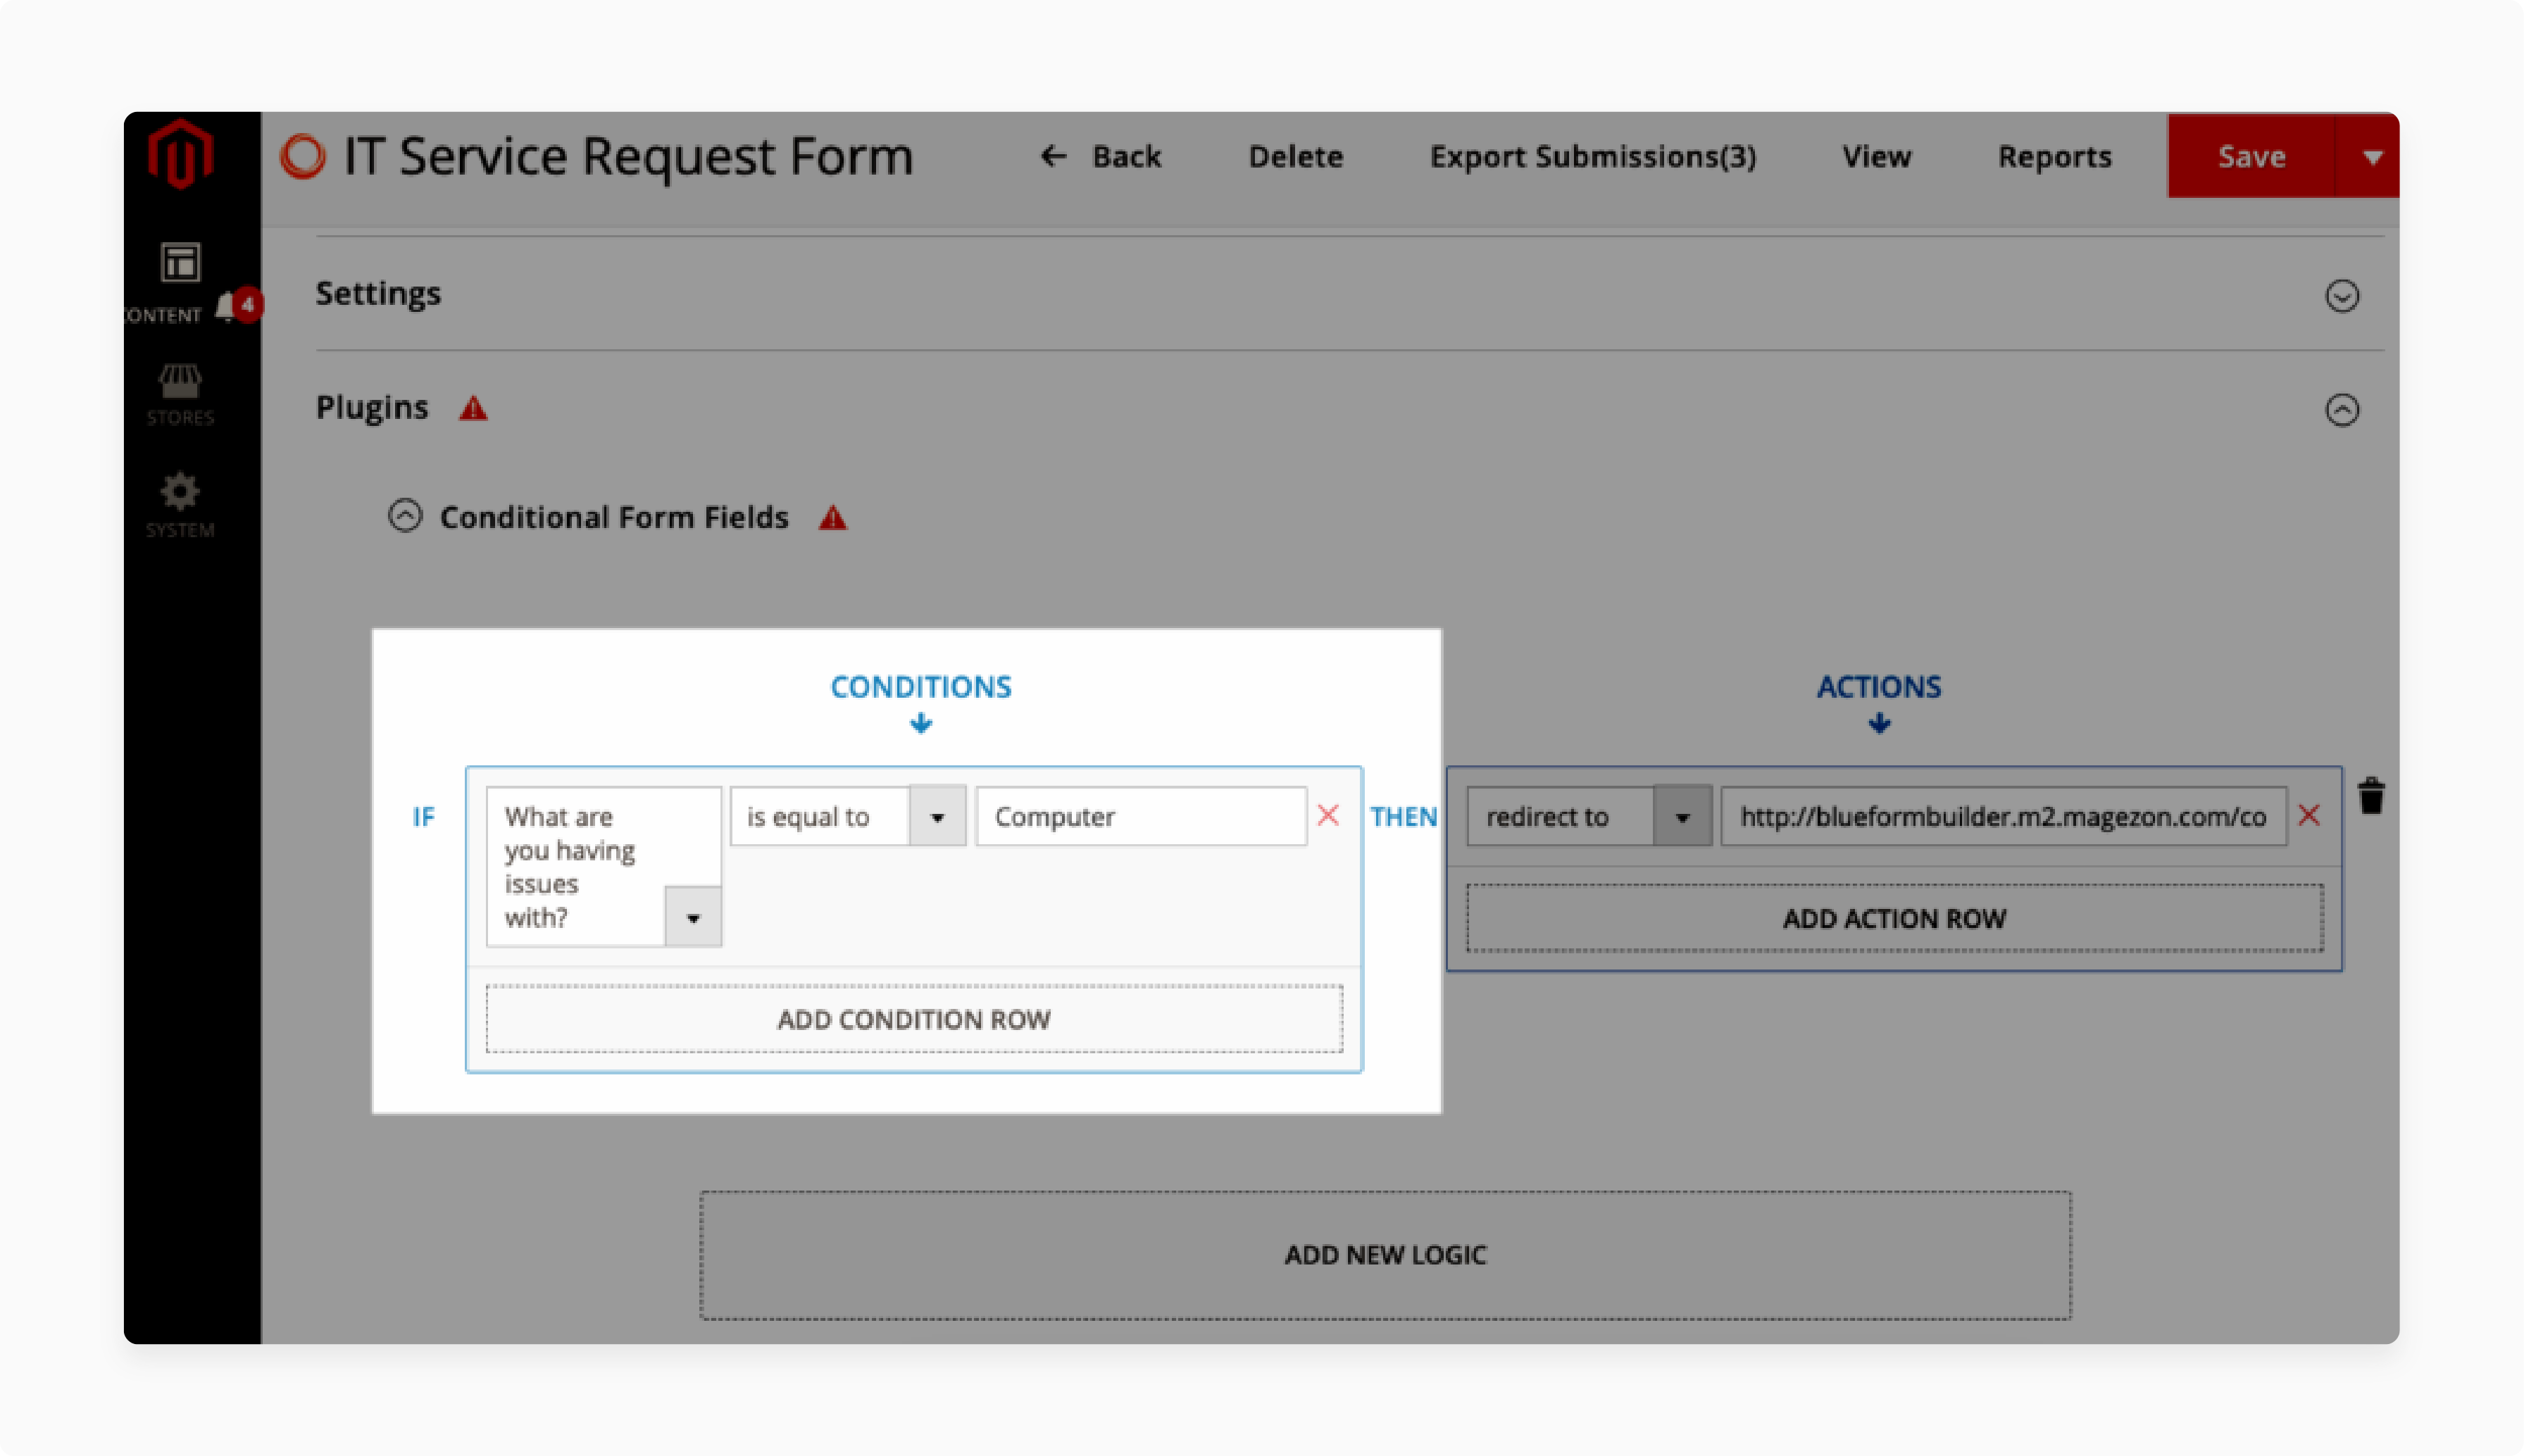
For example, if the form has a "What are you having issues with?" field with 4 options, set the condition like this:
- Choose “What are you having issues with?” from the dropdown.
- Select “is equal to” and enter the value, like “Computer”.
11. Set Redirect Action
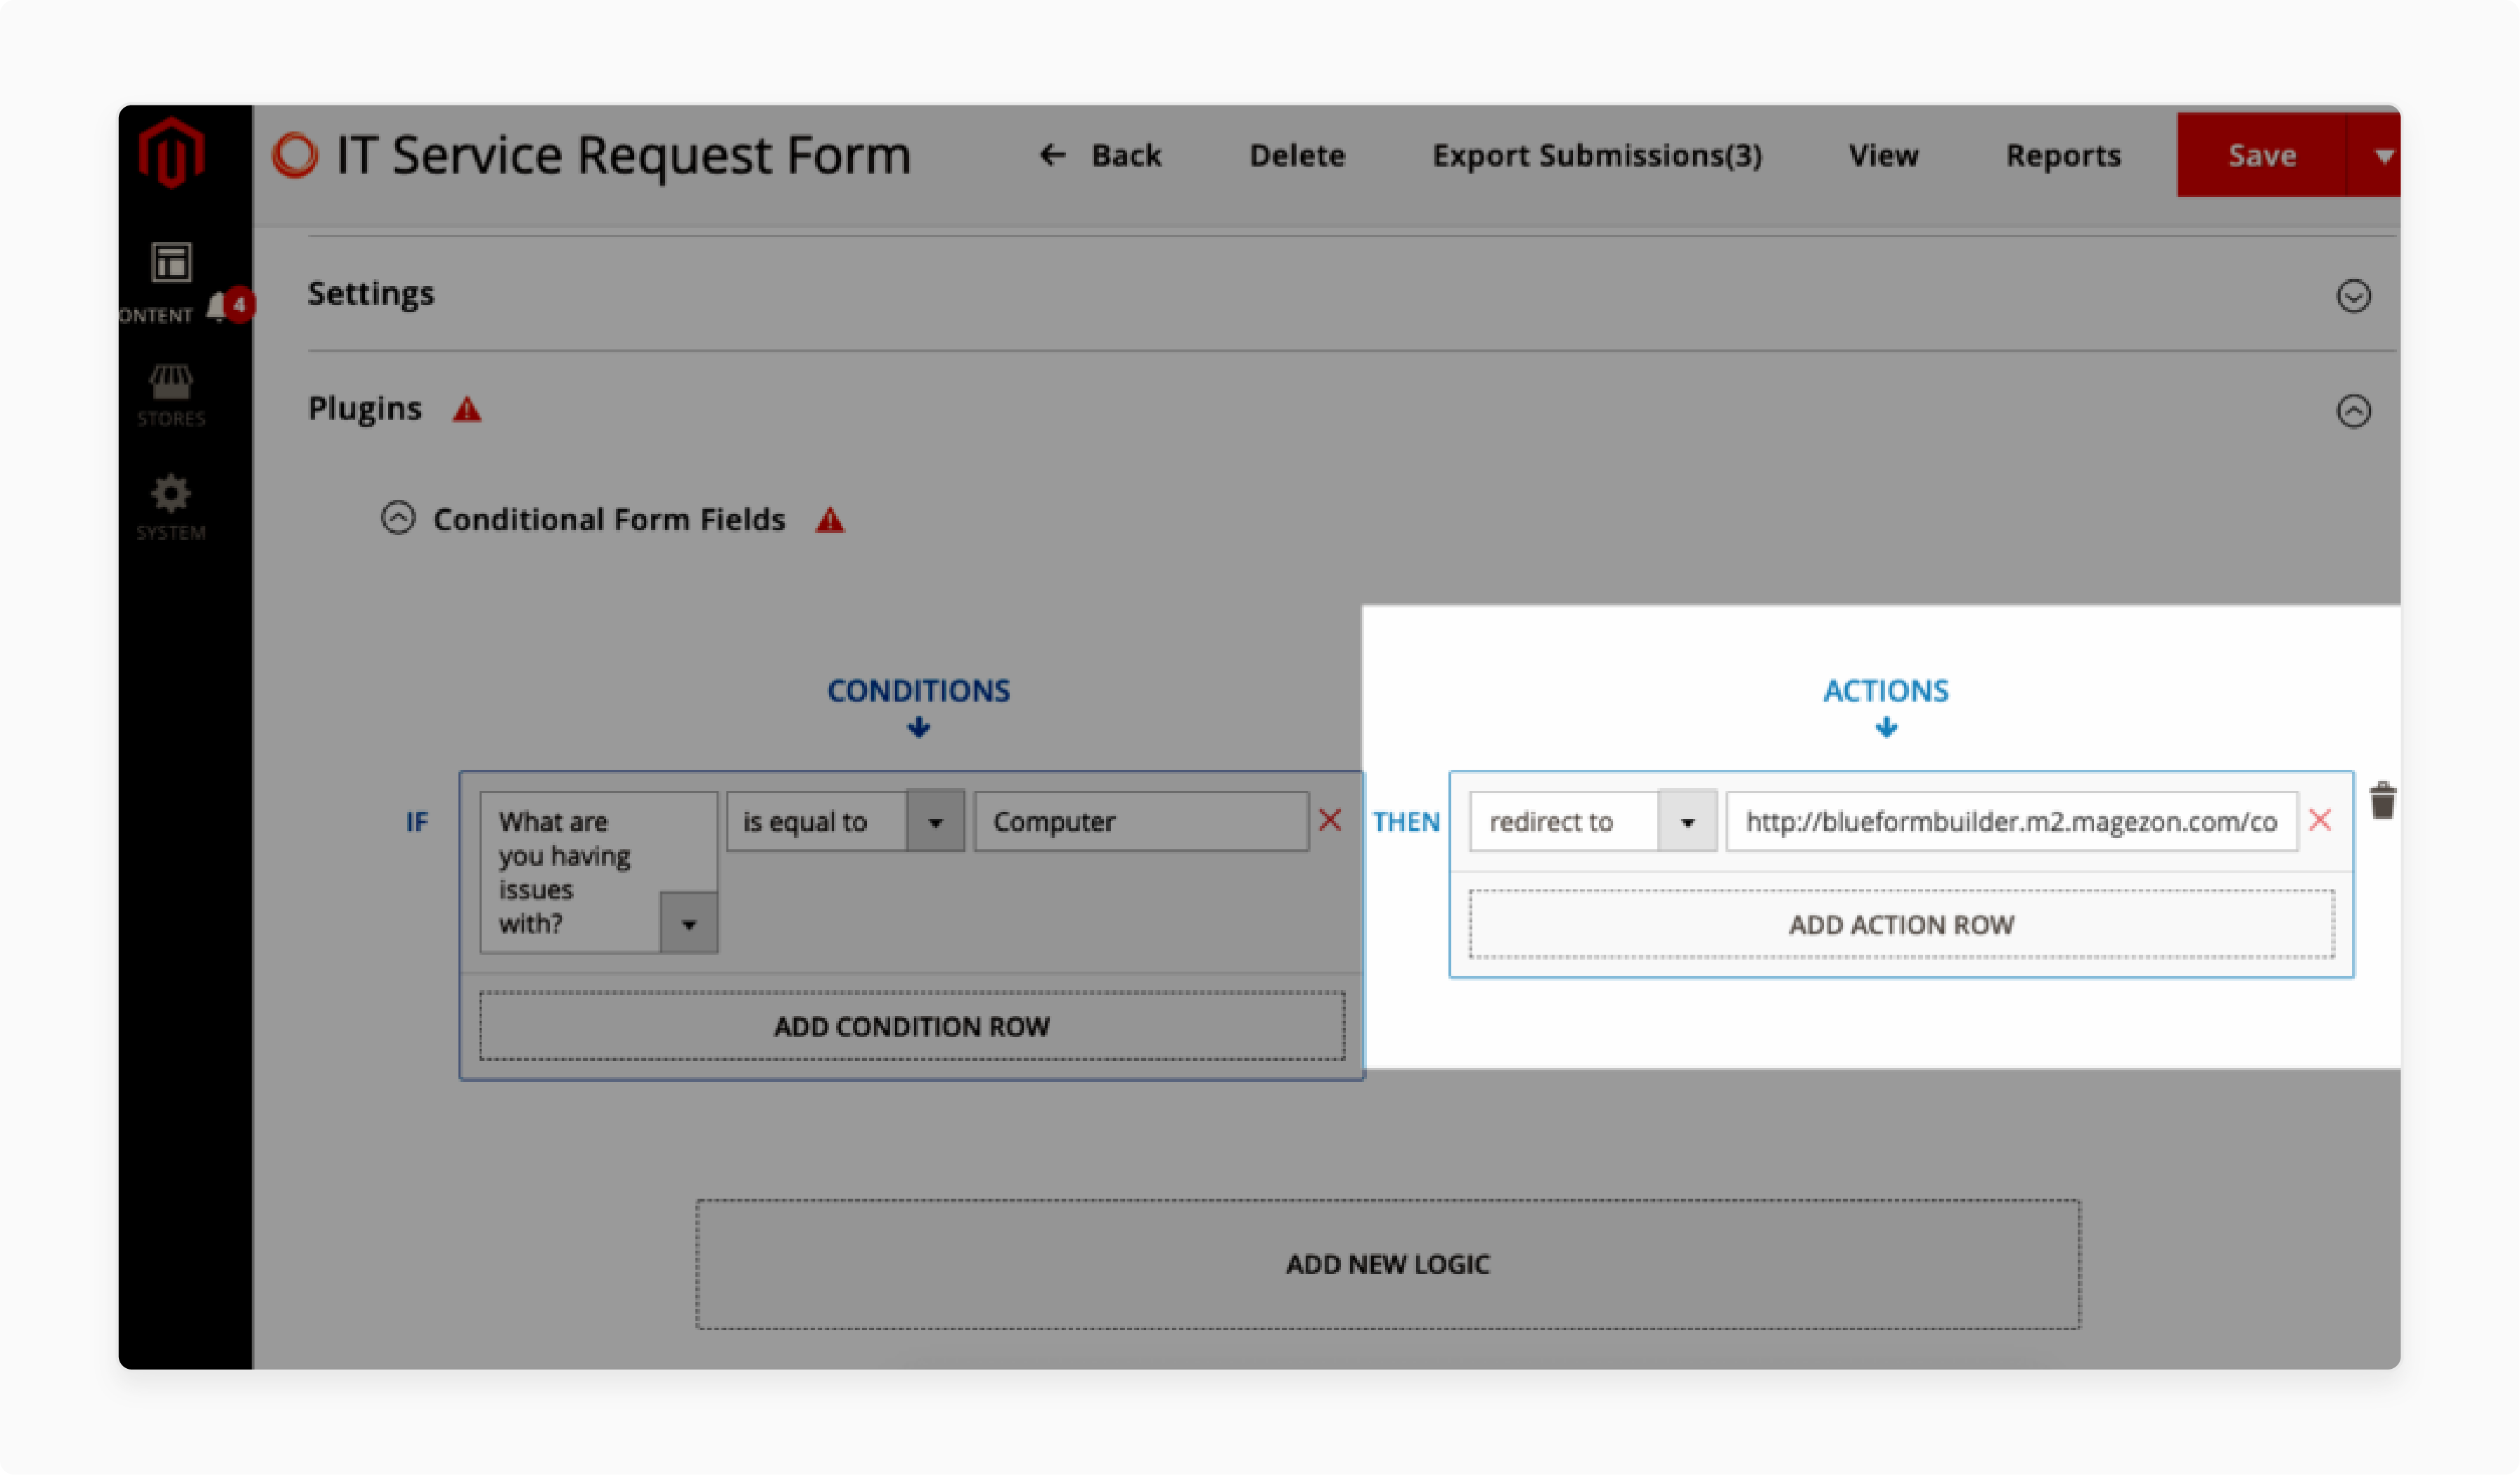
Next, click “ADD ACTION ROW”. Choose “redirect to” as the action and enter the redirect URL.
12. Save and Test
Once the logic is set, don’t forget to save it. Test the form by submitting it to ensure the redirect works as expected.
Best Practices for Magento Contact Us Page Redirect After Submit
1. Set a Clear Redirect URL
Choose a relevant redirect URL for your users. After submission, send them to a thank you page or product page. It helps them understand what happens next. Avoid irrelevant or confusing URLs. Keep the URL simple and easy to follow. A clear redirect improves the user experience.
2. Use a Short Delay Before Redirect
Add a small delay before redirecting users. A 2-3 second delay is enough to show the confirmation message. It gives users time to see the success message. Don’t make the delay too long. A brief pause makes the process feel natural and smooth.
3. Include a Thank You or Confirmation Message
Always show a thank you message after submission. It confirms that the form was successfully submitted. A message like “Thank you for your submission” helps reassure users. It’s also a good place to add a call-to-action. A confirmation message builds trust and keeps users engaged.
4. Test Redirects Thoroughly
Test redirects before going live. Check that the URL is correct and the delay works as expected. Test on multiple browsers and devices. Ensure the redirect works properly after every update. Testing ensures a smooth experience for users.
5. Leverage Conditional Logic for Custom Redirects
Use conditional logic for custom redirects. For example, if a user selects "Product Inquiry," send them to a relevant product page. It makes the process more personalized. Set clear conditions and actions for each scenario. Custom redirects increase engagement by providing users with relevant content.
6. Keep Redirect Links Simple and Relevant
Ensure redirect links are short and relevant. Long URLs can be confusing. Keep the link clear and easy to understand. The redirect page should relate to the form submission, like a thank you page or a follow-up page. It keeps the experience simple and effective.
7. Monitor and Analyze Redirect Performance
Regularly monitor the performance of your redirects. Use Magento analytics tools to track how often users follow the redirects. Analyze whether users engage with the redirected content. Adjust your strategy based on performance data. Consistent monitoring helps improve the user experience.
8. Ensure Mobile Compatibility
Make sure redirects work well on mobile devices. Many users will access forms from smartphones. Test the redirect on mobile to ensure it’s easy to navigate. The redirect page should be responsive and optimized for all screen sizes. A mobile-friendly redirect ensures a positive experience for all users.
9. Limit Redirects to Avoid Confusion
Don’t overuse redirects. Too many redirects can confuse users. Stick to a single, clear redirect for each form. Multiple redirects can feel disjointed and frustrating. A simple, direct path keeps the process clear and user-friendly.
How to Customize the Magento 2 Contact Form Redirect After Submit
1. Install the Necessary Plugins
-
Install the Form Builder plugin.
-
Install the Smart Conditional Logic plugin for advanced redirects.
-
Ensure both plugins are updated and compatible.
-
Install via the Magento admin panel or FTP.
-
Enable and configure the plugins in the settings.
2. Configure Basic Redirect Settings
-
Open the Contact Form in the admin panel.
-
Go to Settings > Advanced.
-
Enter the redirect URL in the Redirect on Submit field.
-
Use “/” if you want users to stay on the same page.
-
Set a delay in the Redirect X seconds after form submit field.
3. Customize Footer Content for Redirect
-
Go to Settings > Success Message.
-
Add the [redirect_time] variable for a countdown.
-
Add the [redirect_link] variable for the redirect URL.
-
Make the success message clear.
-
Guide users through the redirection process in the message.
4. Set Up Conditional Redirect Logic
-
Open the Plugin tab and go to Conditional Form Fields.
-
Click ADD NEW LOGIC.
-
Choose the field to base the redirect on (e.g., “What are you having issues with?”).
-
Set the condition (e.g., “is equal to”) and value (e.g., “Computer”).
-
Choose the action to redirect to a specific page.
5. Test and Validate the Redirects
-
Test the form with different inputs.
-
Ensure the redirect works correctly.
-
Check if the delay and success message display properly.
-
Test the redirect on mobile devices.
-
Adjust settings based on test results for a smooth experience.
How to Test Your Magento 2 Contact Form Redirect After Submit?
1. Submit the Form
-
Open your Magento 2 contact form on the frontend.
-
Fill in the required fields with test data.
-
Submit the form to trigger the redirect.
-
Ensure the form is successfully submitted before proceeding.
2. Check the Redirect URL
-
After submission, verify the page you are redirected to.
-
Ensure the redirect URL matches the one set in the Redirect on Submit field.
-
If you used conditional logic, ensure the URL changes based on user input.
3. Test the Redirect Delay
-
If you set a delay in the Redirect X seconds after form submit field, verify it.
-
Check if the page redirects after the set delay (e.g., 2-3 seconds).
-
Ensure the delay feels natural and does not interrupt the user experience.
4. Review the Success Message
-
Look at the success message that appears after form submission.
-
Ensure the [redirect_time] and [redirect_link] variables are displayed correctly.
-
Verify that the message clearly guides users through the redirection process.
5. Test Across Different Devices
-
Test the redirect on multiple devices (desktop, tablet, mobile).
-
Check that the page redirects correctly on all devices.
-
Ensure the form and success message are mobile-friendly and responsive.
6. Test with Different User Inputs
-
Use different test cases based on user input (e.g., choosing other options in conditional fields).
-
Ensure the redirect logic works as expected for each case.
-
Check if users are directed to the correct page according to their input.
7. Review Analytics and Logs
-
Use analytics tools to track redirect performance.
-
Check server logs for any errors related to form submission or redirection.
-
Monitor user behavior after redirection to ensure the process is effective.
8. Make Adjustments if Necessary
-
If the redirect doesn’t work as expected, review your settings.
-
Ensure the redirect URL, delay, and logic are correctly configured.
-
Test again after making any necessary adjustments.
Troubleshooting Magento 2 Contact Form Redirect After Submit Problems
| Problem | Solution |
|---|---|
| Redirect URL is incorrect | Check the Redirect on Submit field in the admin panel. Ensure the URL is entered correctly. Make sure there are no extra spaces or typos. If you're using conditional logic, verify the URL based on user input. Test the URL directly to ensure it works. |
| Redirect delay is not working | Verify the Redirect X seconds after form submit setting. Ensure the delay time is not set to zero. Test with different delay times to see if the problem persists. Make sure no other conflicting settings are causing issues. Clear the cache and try again. |
| Success message is not displaying | Ensure the Footer Content is configured under the success message settings. Check if the [redirect_time] and [redirect_link] variables are added. If the message is missing, verify that the success message is not set to “None.” Recheck the form settings. |
| Conditional logic is not triggering correctly | Double-check the conditions set under Conditional Form Fields. Ensure the field values and conditions are set up properly. Test each possible form selection to ensure logic is applied as expected. If necessary, reconfigure the condition-action pairs. |
| Redirect does not work on mobile devices | Make sure the redirect page is mobile-responsive. Test the form on different mobile devices to see if the issue is device-specific. Ensure the form fields and success message display correctly on smaller screens. Clear the cache and test again on mobile. |
| Form submission not being recorded | Check if the Magento form is properly integrated with your database. Verify there are no errors in the form submission process. Ensure the form action and method are correctly configured. Test the form with different browsers and clear the cache. |
FAQs
1. How can I use AJAX submit in Magento 2 Contact Form?
To enable ajax submit, use the ajaxSubmit function. It allows the form to submit without reloading the page. It uses var request to handle the form data. The page stays static, and users won’t be redirected until the form is processed.
2. Can I redirect users to the previous page after form submission?
Yes, you can configure the form to redirect to the previous page. Use the controller to capture the previous page URL. After form submission, a PHP echo can output the redirect command. It helps guide users back to where they came from.
3. How can I redirect to a specific page after submitting the form?
In the redirect on submit field, enter the page URL where you want users to go. If needed, use PHP echo to set dynamic URLs. It will take users to the desired page after submitting. Ensure the URL is correct for smooth redirection.
4. Can I use a modal window for the redirect message?
Yes, you can use a modal to display a confirmation message after submission. Customize the form’s div container to show the modal. It gives users a smooth transition instead of redirecting them directly. The modal with dedicated Magento hosting, provides more control over the user experience.
5. How do I handle form submission in Magento 2 using PHP?
In Magento, form using PHP handles form data by processing it through controllers. You can pass var request to manage user inputs. After processing, use PHP echo to redirect users to the desired URL. It allows flexibility in redirecting or showing messages based on the form input.
Summary
Configuring the Magento 2 Contact form Redirect after Submit improves user experience and drives conversions. It provides the flexibility to personalize the post-submission flow for customers. Key benefits are:
-
Improved User Experience: Helps users navigate to the next step seamlessly.
-
Customized Flow: Personalizes the post-submission experience.
-
Increased Conversions: Redirects can guide customers to relevant promotions or products.
-
Better Analytics: Helps track and improve performance based on user actions.
Consider managed Magento hosting to optimize form submission of Magento stores.


