
Complete Guide to Customizing Magento 2 Contact Form
The Magento 2 contact form lets customers easily contact the website owner or support team for inquiries or assistance. The default Magento 2 contact form may not always meet every business's needs. This is where the customization of the Magento 2 contact form becomes essential. We will guide you in customizing your Magento contact form in easy steps.
Key Takeaways
-
The Magento 2 contact form is a key communication channel for customers to reach out with inquiries, feedback, or assistance.
-
Customization of the Magento 2 form is essential to cater to the unique needs of every business, enhancing user experience.
-
This guide provides a step-by-step process to easily customize the Magento 2 contact form, ensuring it aligns with business requirements.
-
Tailoring your Magento 2 contact form can boost efficiency in customer interactions and pave the way for improved customer service.
-
Leverage Magento 2's customization options to modify the contact form's layout, design, fields, and email notifications.
Why is a Contact Us form important for a Magento store?
A Contact Us form is a communication channel between an online store and its customers. With a well-designed contact form on a Magento store, customer inquiries can be swiftly managed, creating better user experiences.
Using Magento 2 contact form fields that are industry-specific and relevant to your services can enable you to gather precise customer insights. A responsive contact page boasting a compelling design can enhance the overall aesthetic of your website, boosting customer trust and website traffic.
-
Incorporating an Email validation extension ensures that the form submission is from genuine users. It decreases spam and increases the overall efficiency of handling inquiries. Utilizing a form builder allows for easy customization and styling of your contact form, catering it to fit the design of your online store.
-
Furthermore, a contact form Magento extension can offer features such as automated notification upon form submission, ensuring no customer inquiry goes unnoticed. The Magento 2 Contact Form plays a significant role in the web design of effective and customer-centric Magento online stores.
4 Steps to Configure Magento 2 Contact Us Form
1. Access the admin panel of your Magento 2 website
-
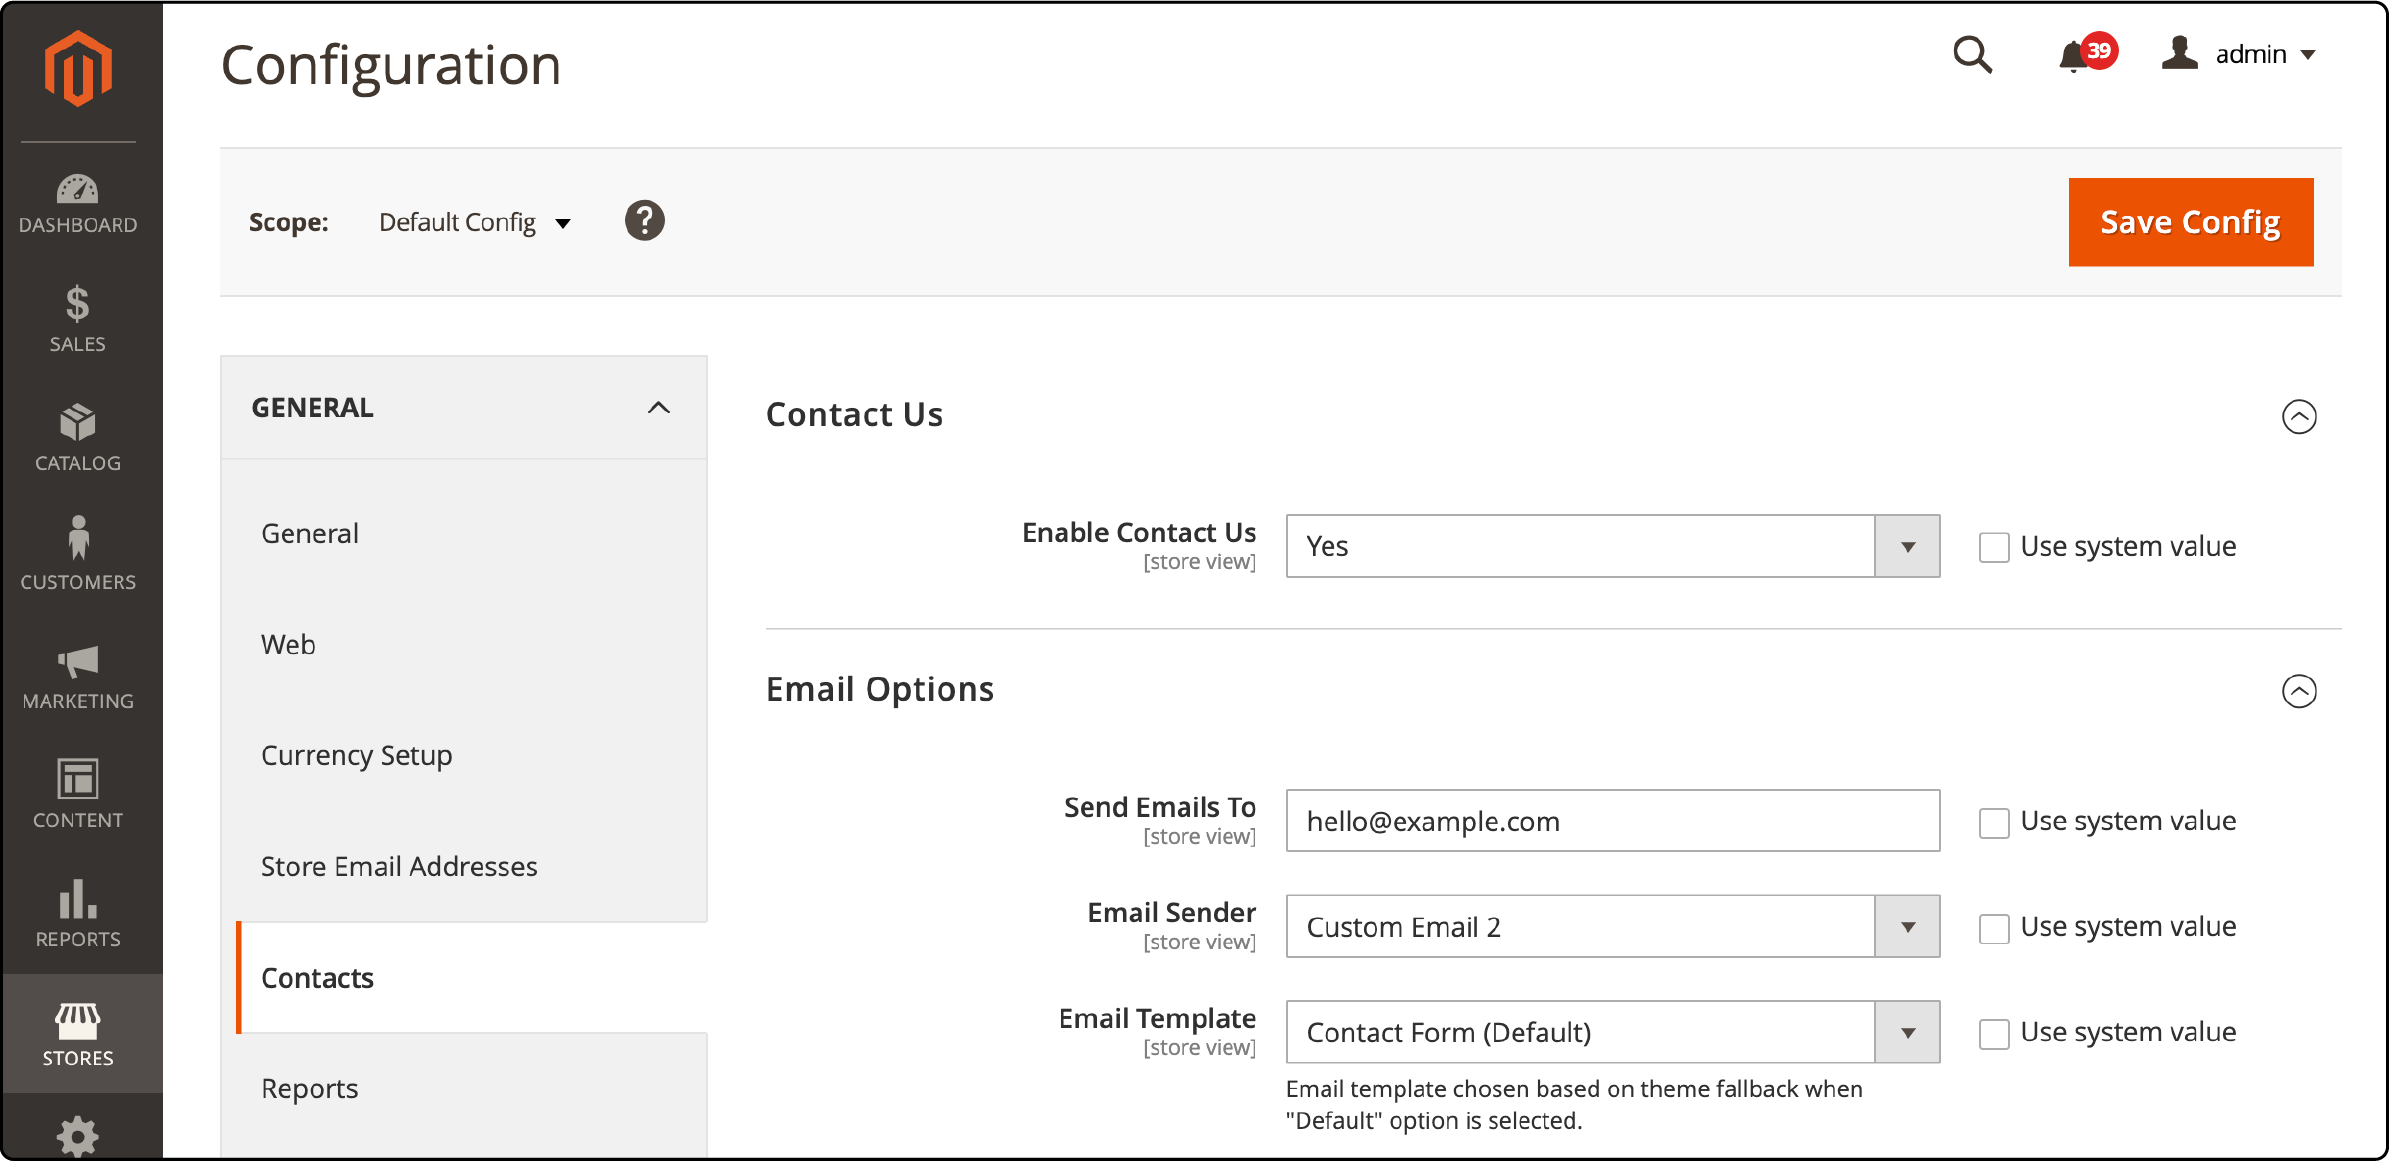
To access the configuration settings, go to the Admin sidebar and click "Stores."
-
From there, navigate to "Settings" and select "Configuration".
-
In the left panel, locate the "General" section and choose "Contacts".
2. Configure the Contact Us form
You can now customize the Contact Us form, as well as set up the Contact email address according to your preferences.
Enlarge the Contact Us section and enable the Contact Us option by setting it to "Yes."

Navigate to the Email Options section and follow these steps:
-
To specify the recipient of messages from the Contact Us form, input the email address in the 'Send Emails To' field.
-
Choose the store identity displayed as the message's sender from the Contact Us form, such as "Custom Email 2".
-
Select the email template that will be used for messages sent from the Contact Us form.

Once you have completed all the necessary steps, click on the "Save Config" button.
3. Customize/Change Contact Us form
The Contact Us form also serves as a valuable means to share important information with your customers. By following these steps, you can effortlessly incorporate this content.
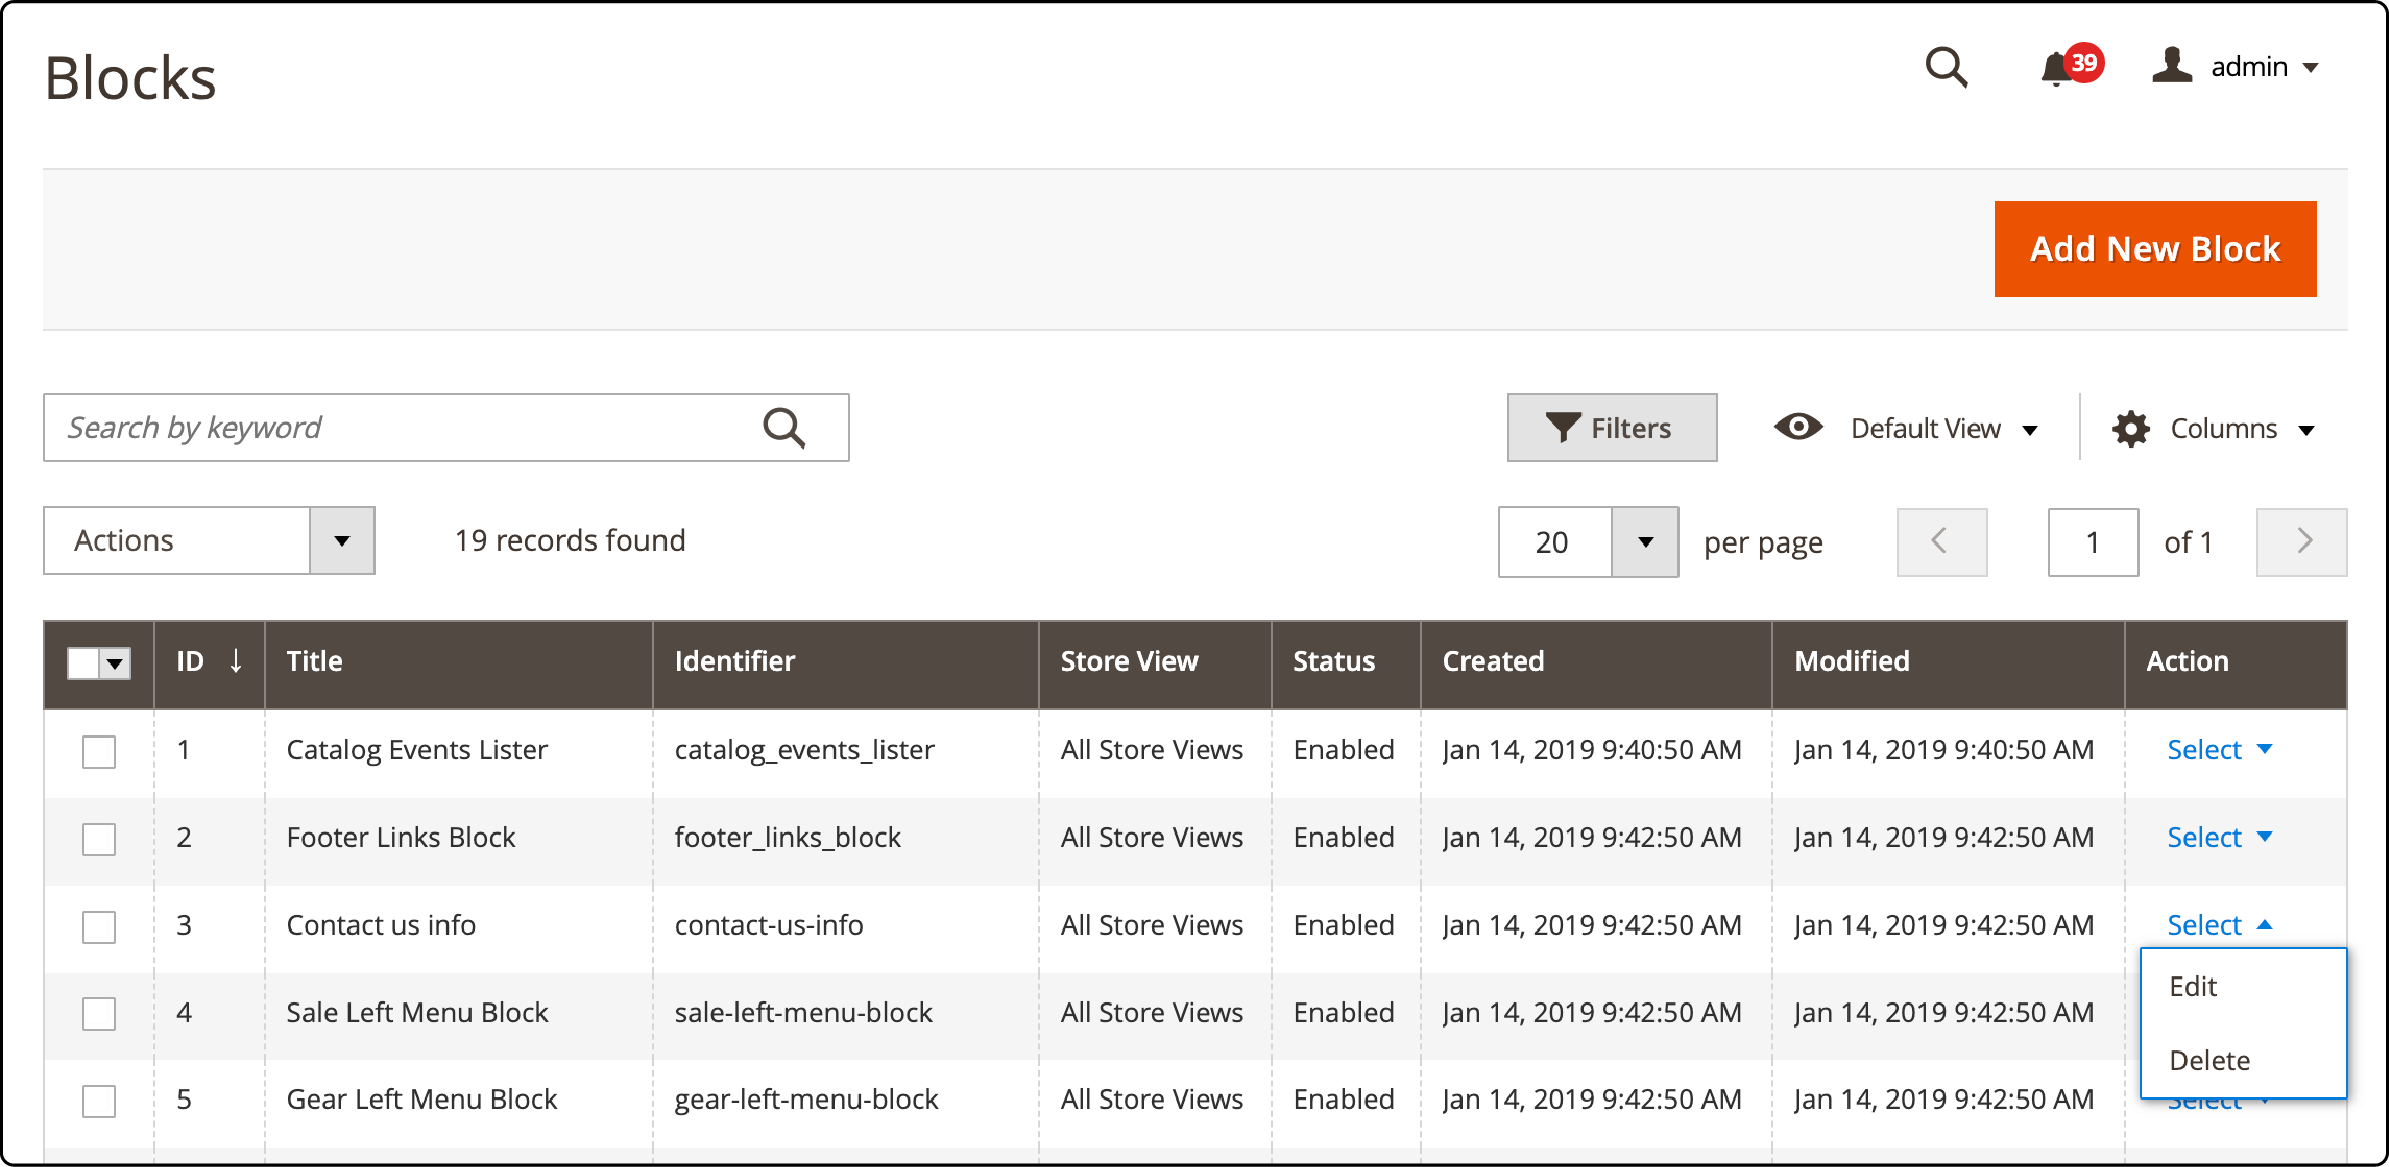
To access the Content section, go to the Admin sidebar and click on it. Next, navigate to the Blocks option under Elements. Locate the Contact Us Info block from the available list. Then open it in Edit mode.
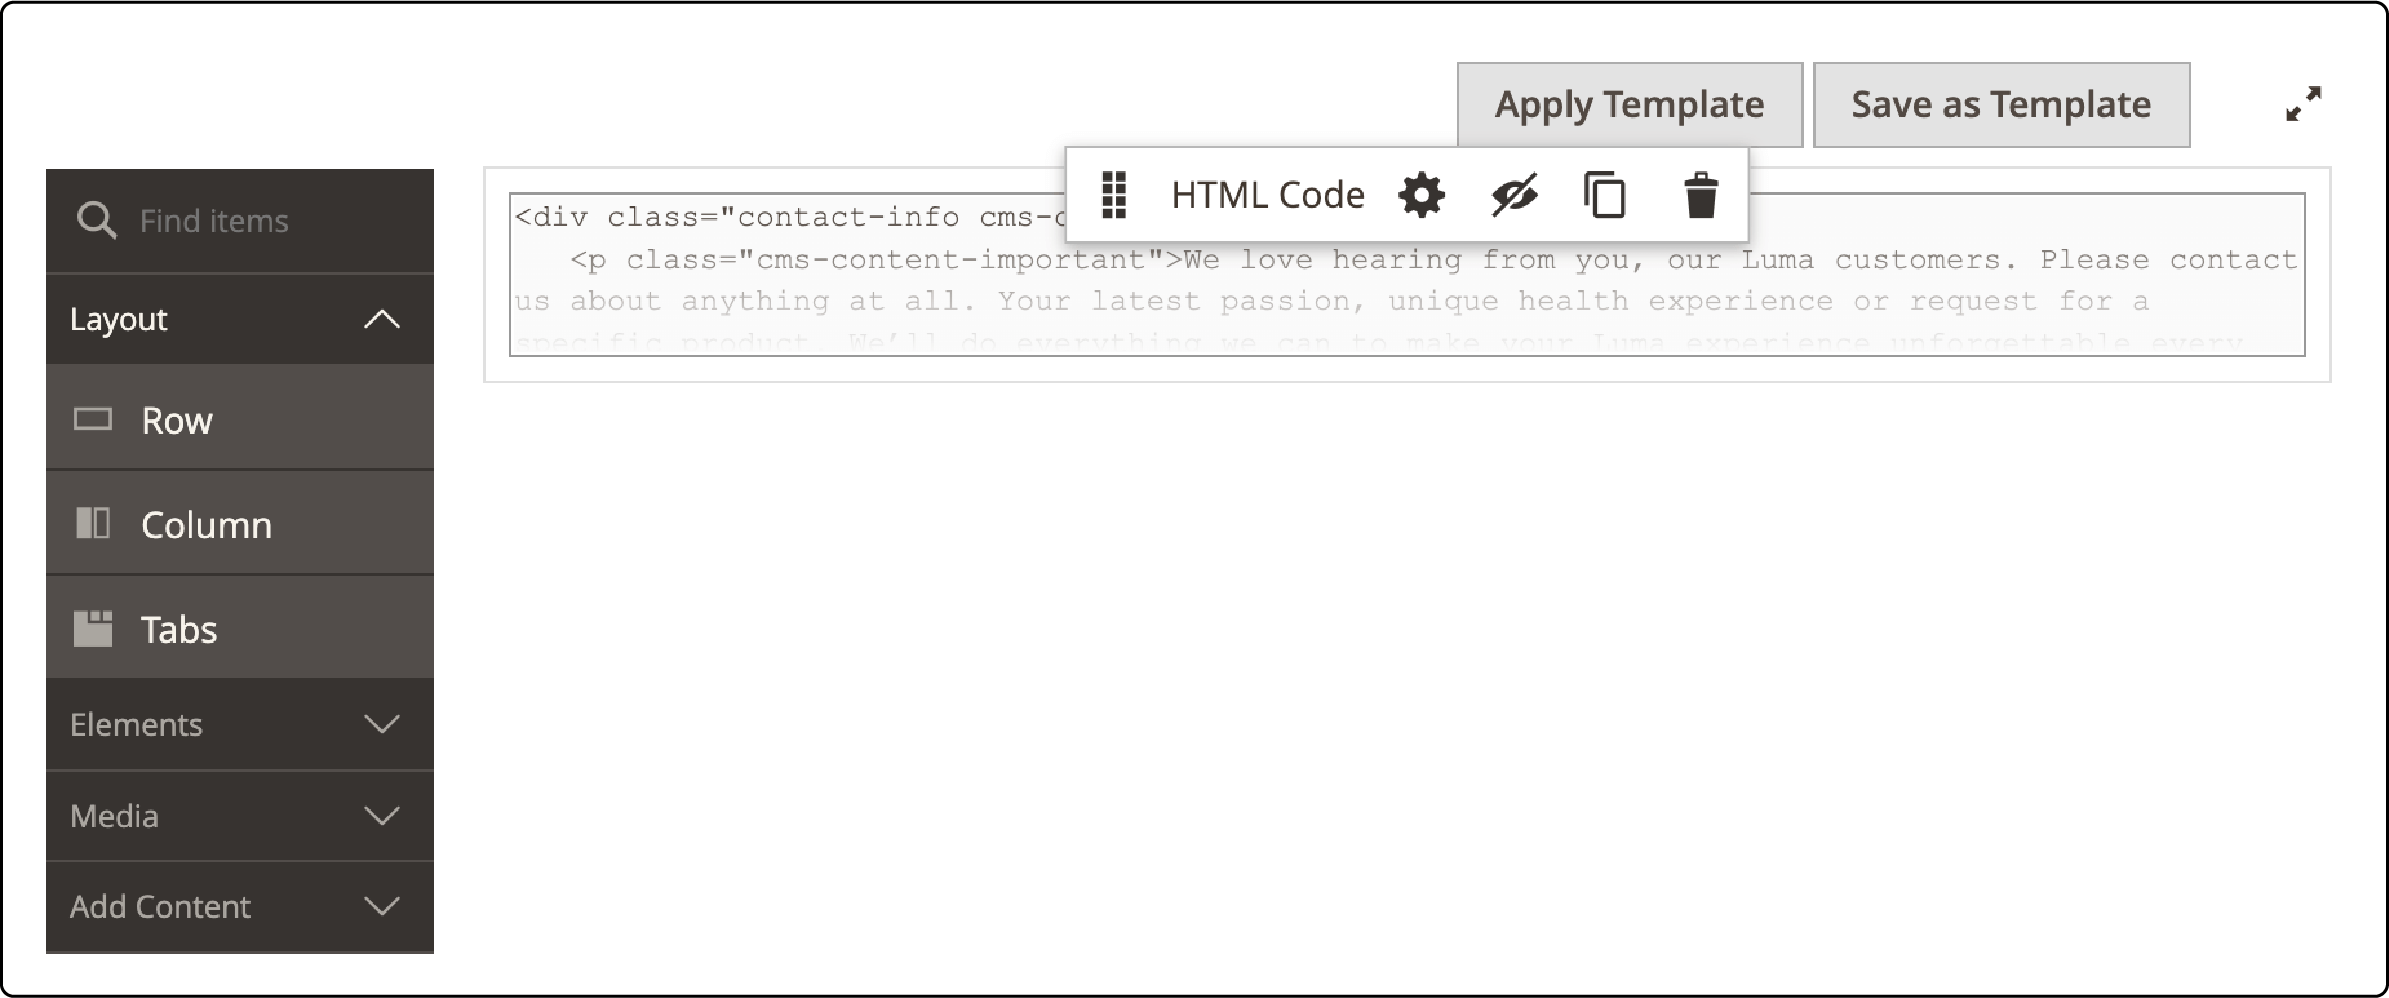
Go to the Content field and make any required modifications. Use the formatting options in the editor toolbar to style the text, and include images and links. Toggle the Show / Hide Editor button to directly edit the HTML.
4. Check the result
Once you have finished setting everything up, click the "Save Block" button to complete the process.
9 Steps to Edit Fields of the Magento 2 Contact Us Form Programmatically
- First, you should create a file called module.xml in the directory app/code/
/ /etc. Inside this file, you need to insert the provided code snippet:
<config xmlns:xsi="http://www.w3.org/2001/XMLSchema-instance"
xsi:noNamespaceSchemaLocation="urn:magento:framework:Module/etc/module.xsd">
<module name="Module_Name" setup_version="1.0.1">
</module>
</config>
- Afterward, you can register this modification in app/code/
/ by creating a file called registration.php. To do this, input the following code:
<?php
\Magento\Framework\Component\ComponentRegistrar::register(
\Magento\Framework\Component\ComponentRegistrar::MODULE,
'Module_Name',
__DIR__
);
- To add a new field to your contact form, follow these steps:
-
Locate the form.phtml file in the vendor/magento/module-contact/view/frontend/templates directory.
-
Copy the file.
-
Navigate to the app/code/
/ /view/frontend/templates directory. -
Paste the copied file into this directory.
-
Open the file and make the necessary modifications to add the new field to your contact form.
Please refer to the provided code for guidance:
<div class="field subject required">
<label class="label" for="subject"><span><?php /*
@escapeNotVerified */ echo __('Subject') ?>
</span></label>
<div class="control">
<input name="subject" id="subject" title="<?php /*
@escapeNotVerified */ echo __('Subject') ?>
" value="" class="input-text" type="text" data-validate="{required:true}"
</div>
</div>
- To override the previous form.phtml file with the new one, create a file called contact_index_index.xml in the directory app/code/
/ /view/frontend/layout. In this file, you should insert the provided code patch:
<?xml version="1.0"?>
<page xmlns:xsi="http://www.w3.org/2001/XMLSchema-instance" layout="1column"
xsi:noNamespaceSchemaLocation="urn:magento:framework:View/Layout/etc/page_configuration.xsd">
   <body>
      <referenceBlock name="contactForm" remove="true"/>
       <referenceContainer name="content">
           <block class="Magento\Contact\Block\ContactForm" name="customContactForm"
template="Module_Name::form.phtml" />
       </referenceContainer>
   </body>
</page>
-
Once you're prepared, navigate to your Admin Panel and then go to Marketing. From there, you can find the Email Templates section.
-
You'll find the Add New Template button when the window pops up. Give it a click.
-
Clicking on it will bring you to the page for creating a New Template. From there, select the Contact Form template from the dropdown menu and then click on the Load Template button.
-
Please come up with a name for your new template and input it into the designated Template Name field.
Copy and insert the extra code into the Template Content section:
trans "Subject: %subject" subject=$data.subject
trans "Name: %name" name=$data.name
trans "Email: %email" email=$data.email
trans "Phone Number: %telephone" telephone=$data.telephone
trans "Comment: %comment" comment=$data.comment
The field you added to the form.phtml file should have the same name as Data.subject. Now, proceed by selecting the option labeled Save Template.
- To set your email template in the Email Options section, navigate to Stores, Configuration, and General > Contacts. Once there, choose your preferred email template and save the changes.
How to Change Email Template for the Magento Contact Form
-
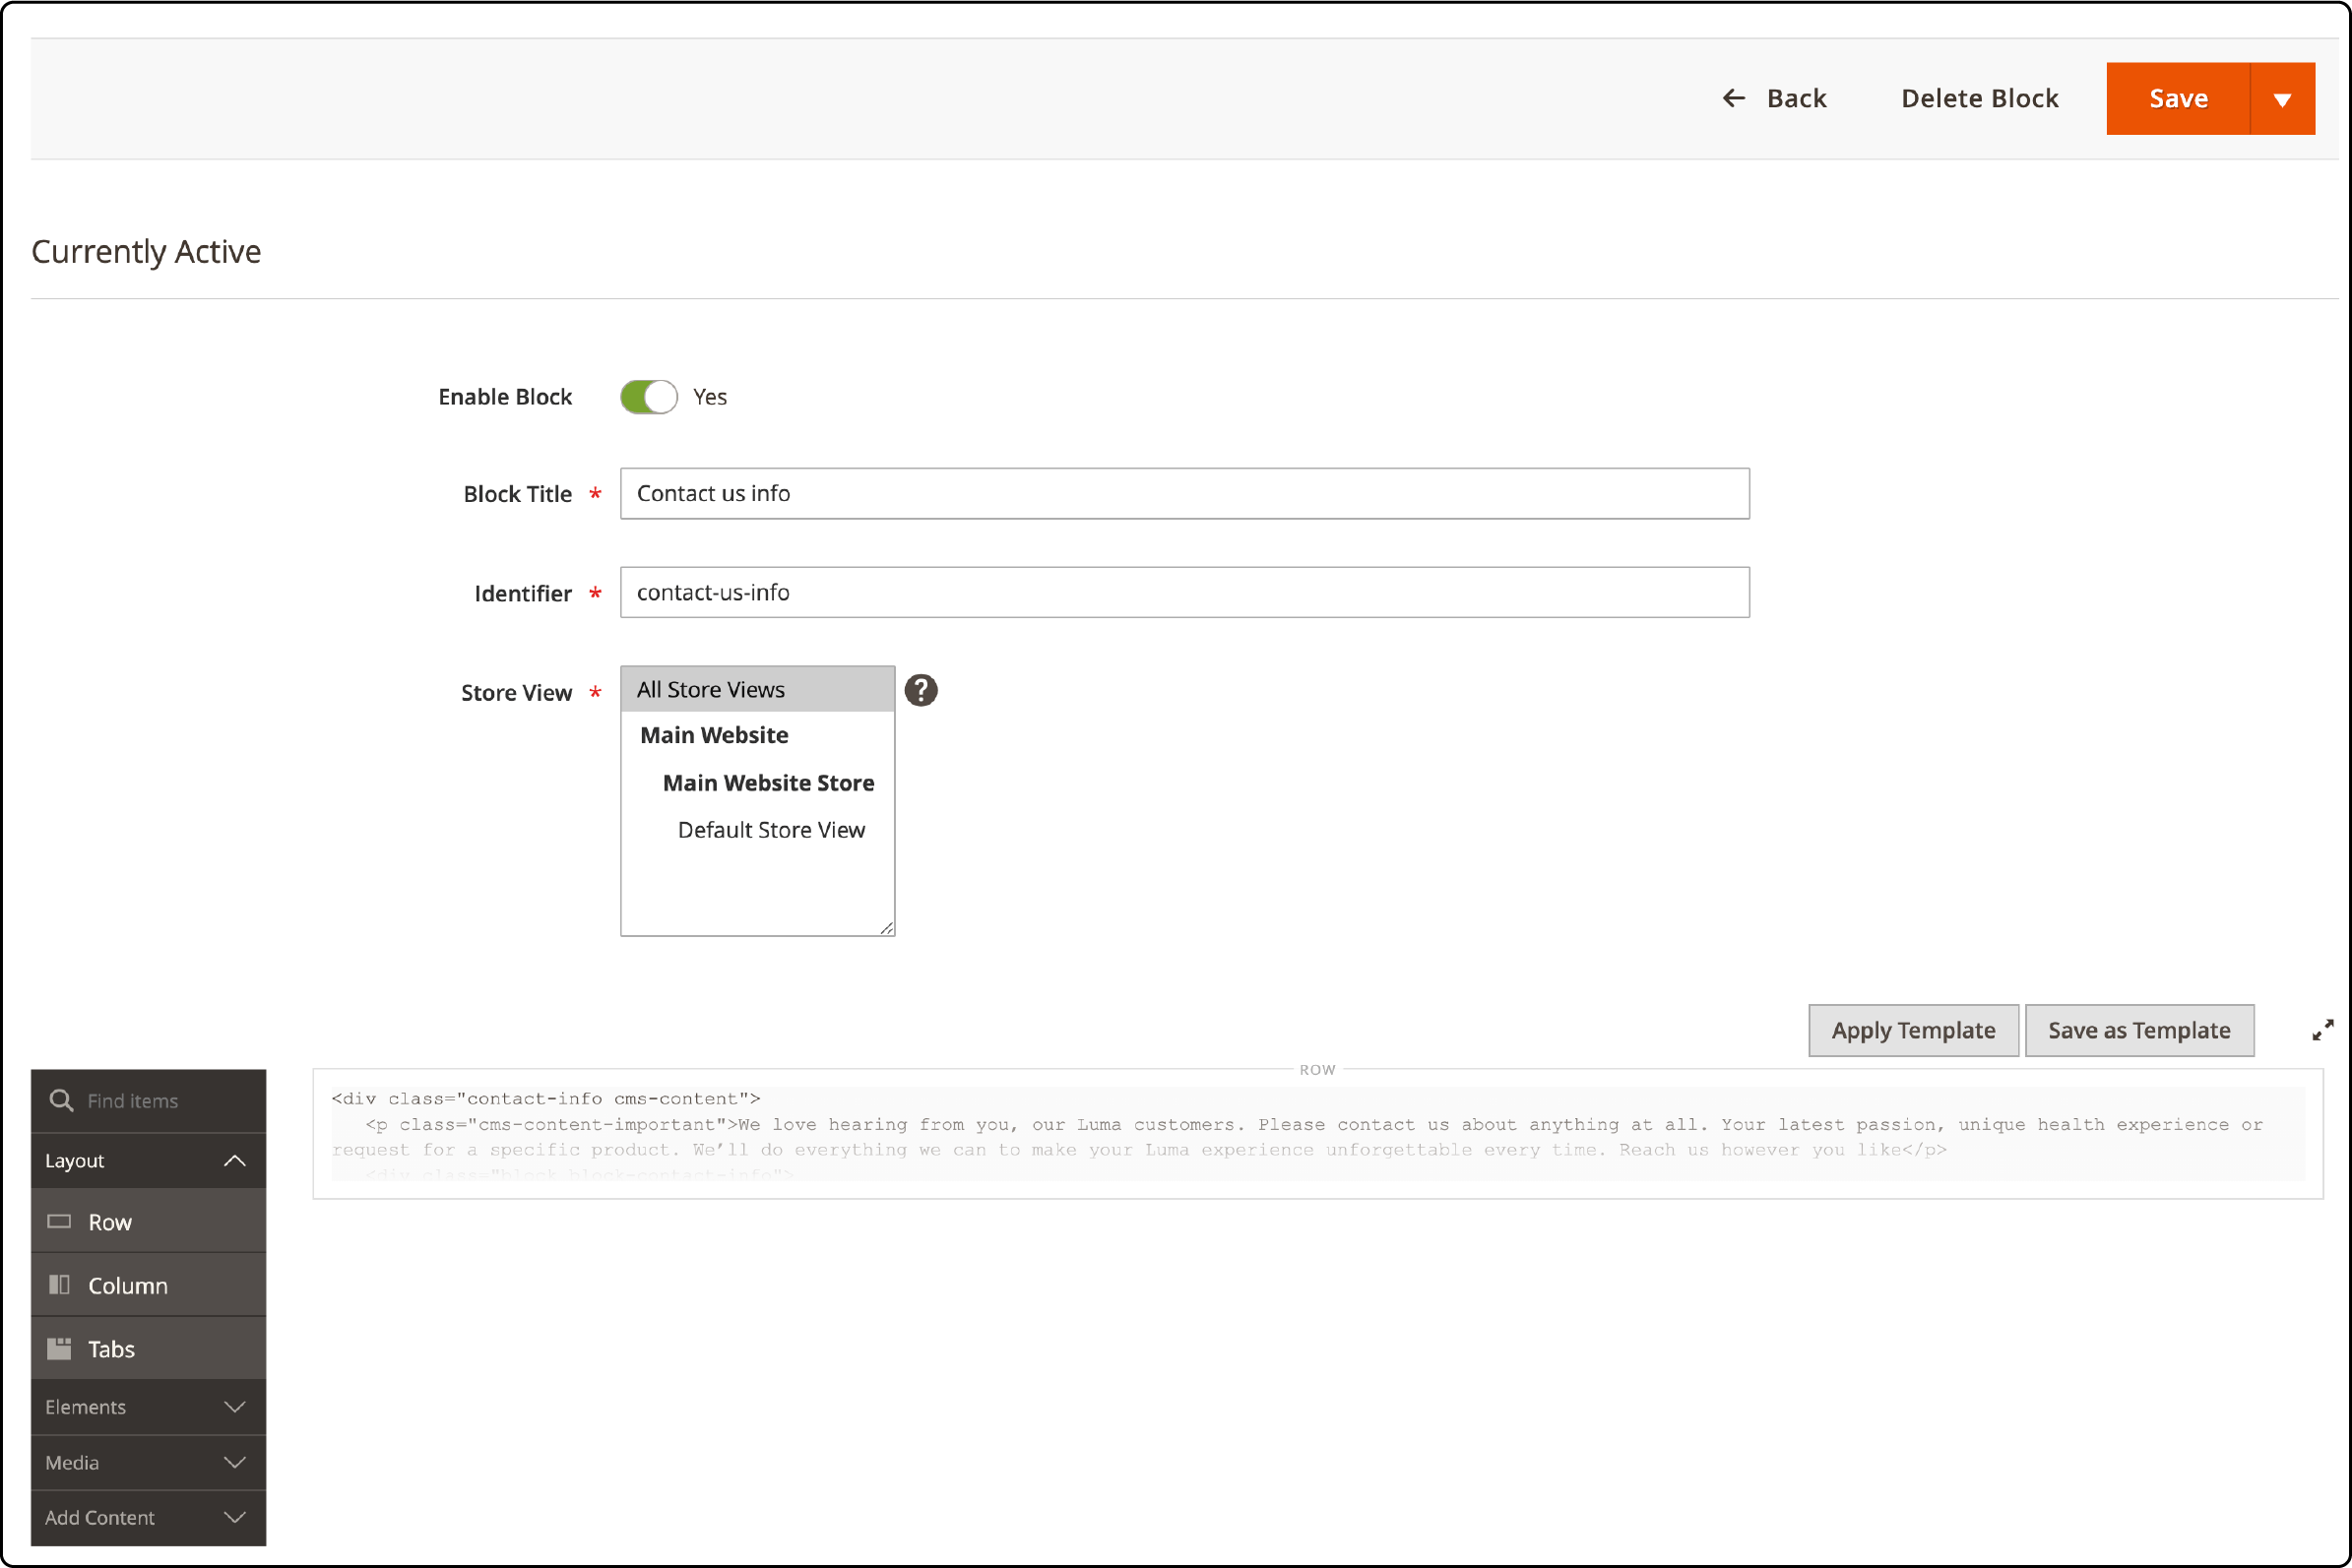
Go to the Content section and click on Block.
-
Locate the Contact Info section and choose the Edit option from the drop-down menu.

- Please input your content into the designated box and save the block.
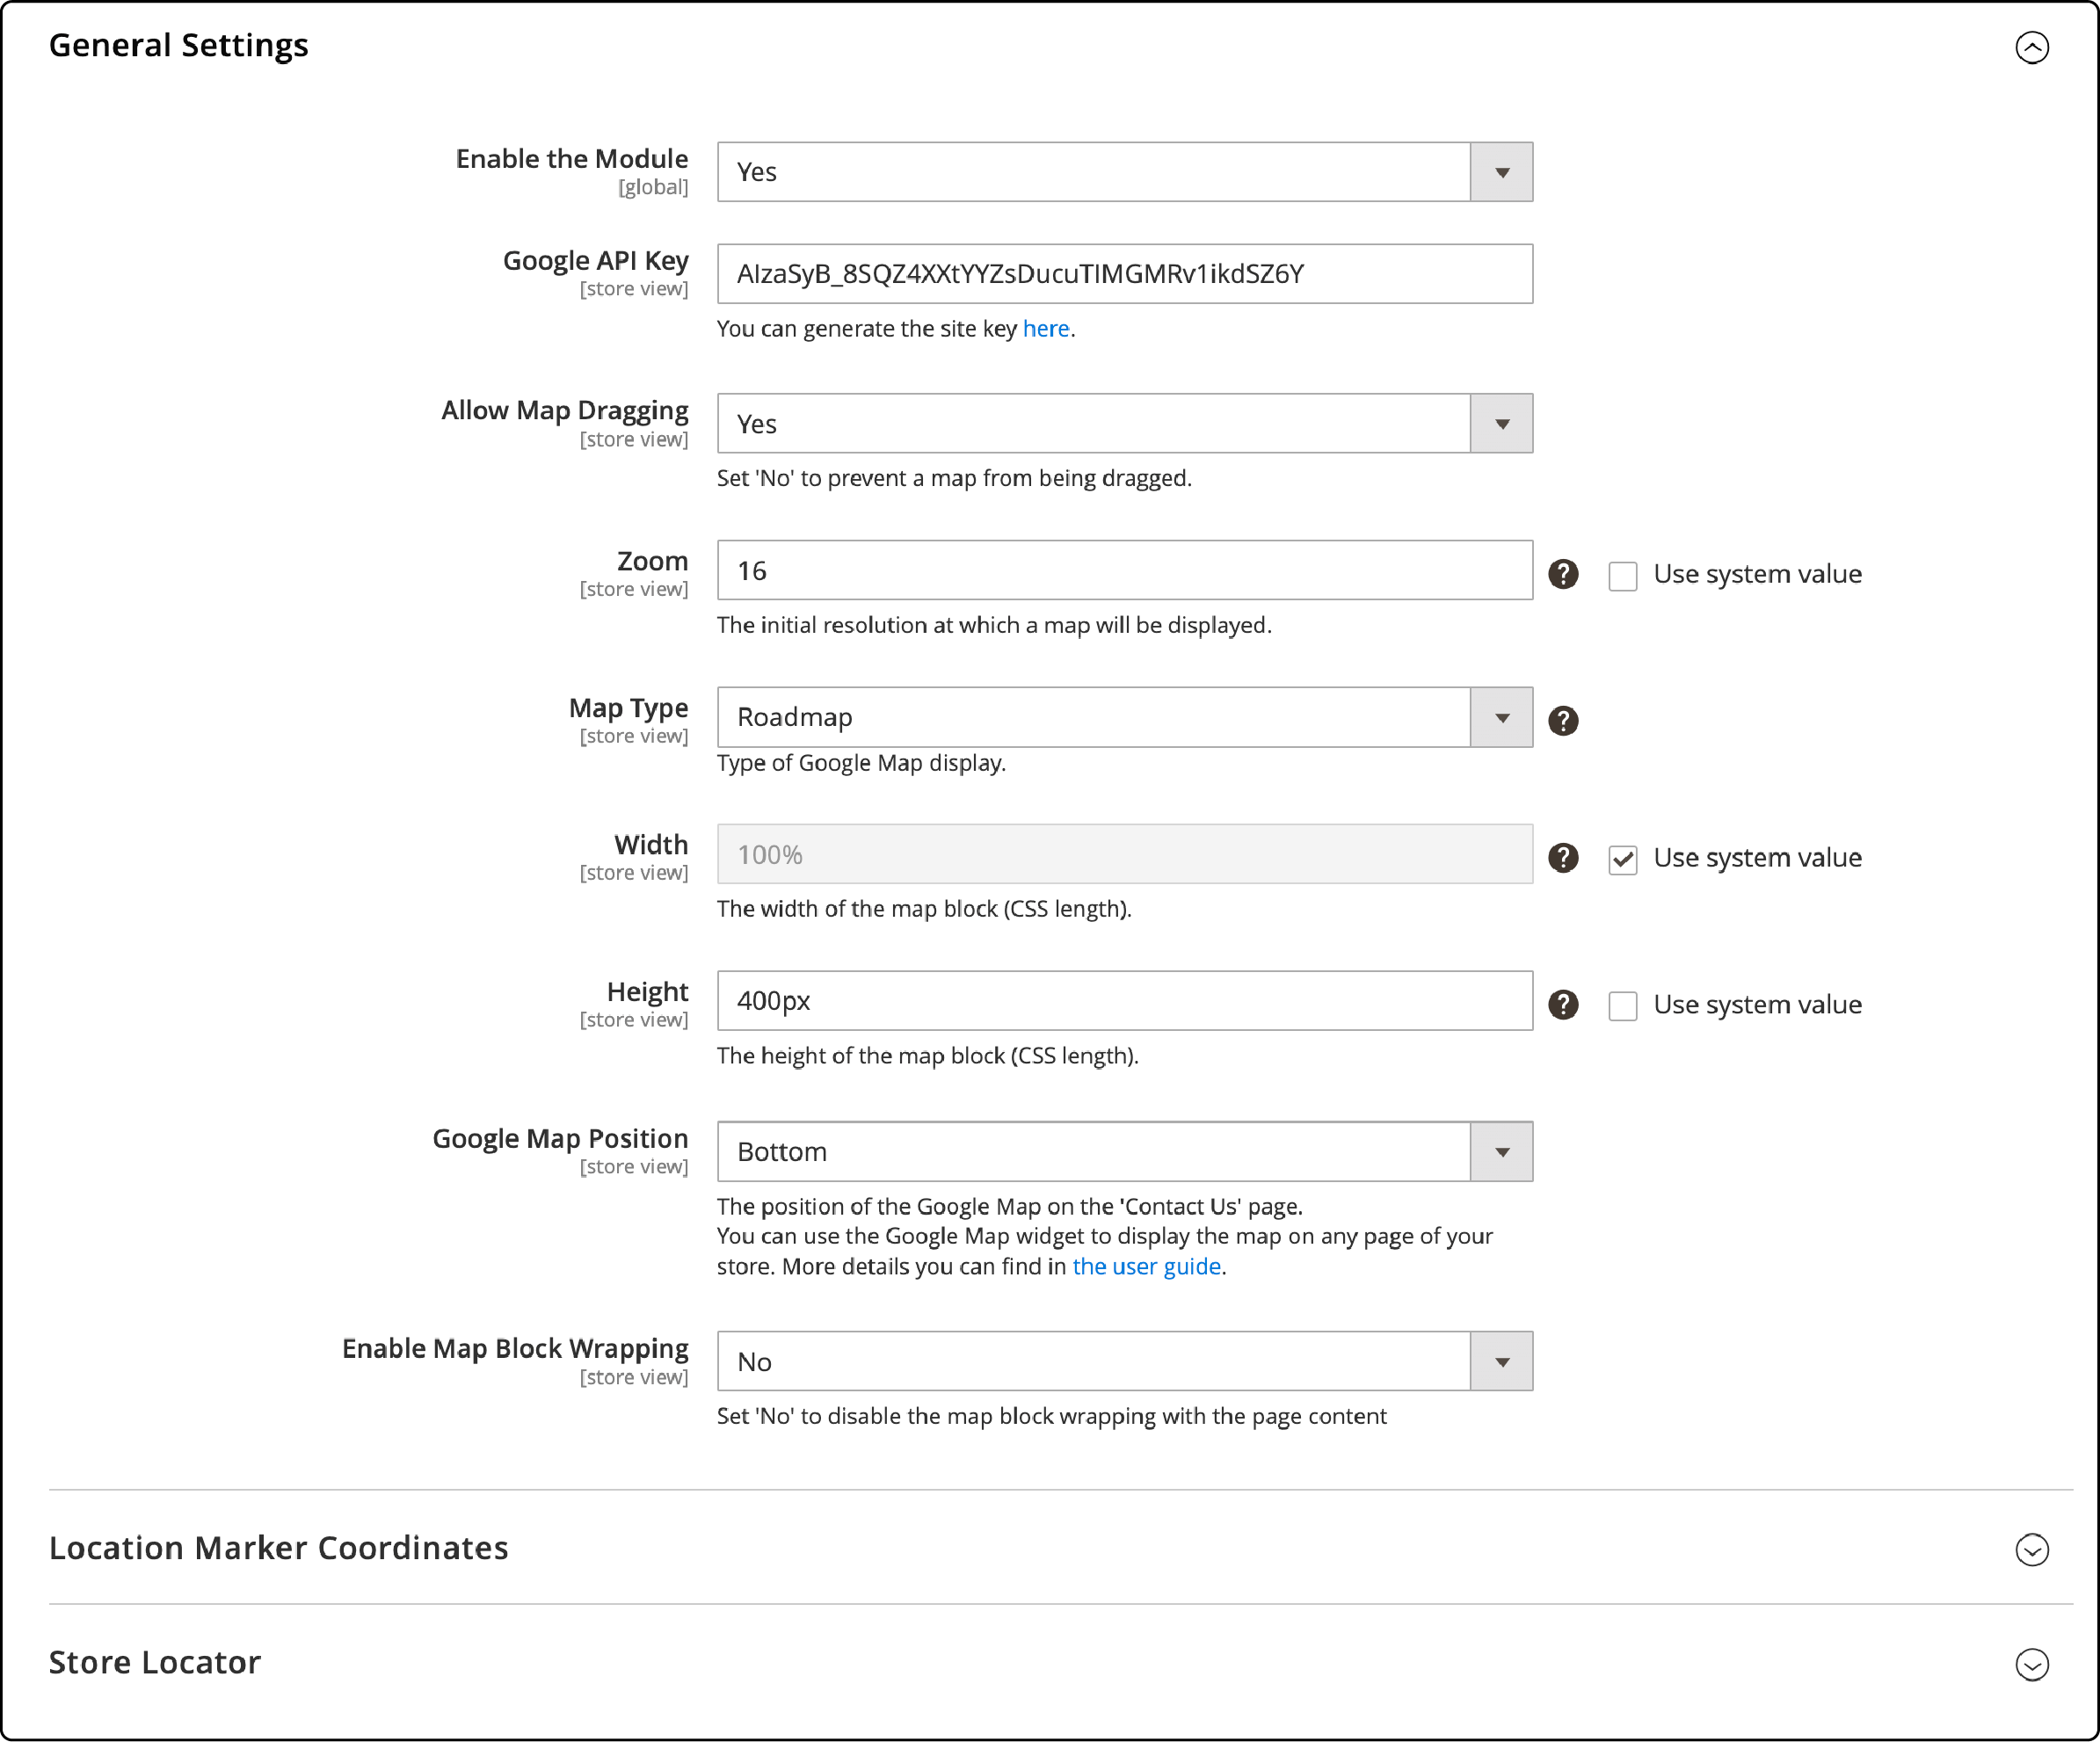
How to enable Google Maps the on Contact Us page
To include Google Map on the "Contact Us" page, simply go to the "Stores" section in the Magento admin panel.
From there, navigate to the "Configuration" page and find the "Extensions" tab.
Under "Google Map", select "General Settings" and adjust the fields as needed.
How to enable CAPTCHA in Magento 2 Custom Form
CAPTCHA is a useful tool that safeguards your store against spam. To enable it, navigate to the Stores > Configuration section.

Click on Customer Configuration located under the Customers tab.
Locate the CAPTCHA section on the page and select "Yes" from the dropdown menu labeled "Enable CAPTCHA on Storefront."
If the contact form is not functioning properly, please review all the settings mentioned in the Admin Panel.
If everything is set up correctly, but the form is still not functioning, navigate to the template/contact/form.phtml file. Look for this section of code within that file:
getFormAction(); ?>" id="contactForm" method="post">
Substitute the given text with the following:
getUrl('contacts/index/post'); ?>" id="contactForm" method="post">
Typically, these modifications tend to resolve issues.
FAQs
1. How can I personalize the Magento 2 contact forms for a better user experience?
Magento 2 allows customization of contact forms to enhance user experience. You can customize forms from the backend, including adding fields for comments, queries, or product inquiries. You can also style the forms to match your site's themes.
2. Can I change the email sender for the contact form responses?
Yes, indeed. You can modify the email sender for the contact form responses within the Magento 2 backend. This way, you can manage responses from a dedicated inbox, ensuring timely replies to customer queries.
3. Are there any tips to improve the SEO of my Magento 2 CMS pages?
Optimizing your CMS pages with SEO-friendly titles and descriptions is a great start. Including keywords in your blog posts, product descriptions, and image tags can boost your site's visibility.
Regularly updating content, such as news and articles, also enhances SEO. Additionally, Magento hosting your CMS can greatly enhance your site's speed, a key factor for search engine rankings.
4. How do I add a contact form link to the footer of my Magento 2 website?
To add a contact form link to your Magento 2 site's footer, navigate to the 'Content' section in the backend. Select 'Configuration,' then 'Design,' then 'Footer.' Under the 'Footer' section, you can insert the contact form link.
5. Why is my Magento 2 contact form not displaying on the front end?
If your Magento 2 contact form isn't displaying on the frontend, check if the contact form is enabled and correctly configured on the backend. If the issue persists, it might be a theme or JavaScript conflict. Consulting with Magento experts or forums may provide further solutions.
6. How do I display specific categories on a CMS page in Magento 2?
To display specific categories on a Magento 2 CMS page, navigate to the backend and select 'CMS.' Here, you can create or select an existing page.
Utilize the 'Insert Widget' option and choose 'Catalog Category Link'. Then, select your desired category. Ensure your theme supports this feature for it to work correctly.
7. What versions of products can be displayed on our company's Magento 2 contact form?
In any Magento 2 version, you can include a dedicated section in your contact form that allows customers to select or enter the product version they're inquiring about. This ensures that all customer queries are relevant and precise, facilitating timely and efficient responses from your company.
Summary
The Magento 2 contact form improves customer communication and helps collect valuable data for marketing and customer service purposes. Proper configuration and utilization can streamline customer inquiries and enhance the shopping experience on your Magento 2 website. Opt for managed Magento hosting to optimize your website's performance. This ensures smoother user experiences and maximizes the effectiveness of your Magento 2 contact form.


