
How to Create and Manage Magento 2 CMS Pages with Widgets?
Looking to enhance your website’s content and design with ease? Magento 2 CMS Pages help you manage static pages like the home page, privacy policy, or landing pages.
This tutorial will cover how to create, edit, and manage Magento 2 CMS pages.
Key Takeaways
- Steps to add new pages using widgets.
- Methods to display static content (e.g., the home page, privacy policies, or custom landing pages).
- Insights into optimizing for SEO to improve your online store's performance.
- Advanced content management options to enhance your ecommerce platform's customer experience.
- Tips for adding widgets, optimizing pages for SEO, and ensuring better usability.
- Troubleshooting common issues when managing the static content of your store.
-
Techniques to Optimize Performance When Adding CMS Pages in Magento 2 Admin Panel
-
Advanced CMS Customization for Creating Custom Static Pages in the Magento 2 Backend
-
Advanced Configuration for Automating and Creating Magento 2 CMS Page Import Jobs
-
CMS Best Practices for Managing E-commerce Content Pages in Magento 2
-
Troubleshooting Common CMS Page Content Element Issues in the Magento 2 Ecommerce Platform
Benefits of Creating New Pages with CMS Blocks and Widgets
1. Dynamic Content Integration
- Widget support for real-time content updates
- Custom variables for store-wide information
- Blocks of reusable content across multiple pages
- Real-time inventory levels through dynamic product widgets
- Personalized product recommendations based on browsing history
- Live social media feeds and customer reviews
- Interactive forms with conditional logic
- Dynamic content integration like product sliders, testimonials, or banners
2. Multi-Store Management
- Different versions for different markets
- Language-specific content handling
- Store-specific promotions and messaging
- Content synchronization between stores
- Translation management workflows
- Store-specific content scheduling
- Global content updates with local exceptions
3. Content Types Supported
- Rich text and HTML
- Custom XML layouts
- Media integration (images, videos)
- Interactive elements through widgets
- Dynamic product displays
- Magento 2 custom forms and contact information
4. Marketing Benefits
- Targeted landing pages
- Magento A/B testing for different content versions
- Seasonal campaign pages
- Banners, pop-ups, or promotions to drive sales directly through CMS pages
5. SEO Advantages
- Custom metadata for each page
- URL key optimization
- Content hierarchy management
- Properly designed CMS pages for better control over SEO optimization for your store
6. User Experience
- Mobile-responsive layouts
- Fast loading times
- Consistent branding across pages
- Customized pages for a smoother, more engaging user journey
7. Technical Capabilities
- Custom design updates
- Schedule-based content changes
- Advanced XML customization
- Integration with Magento Page Builder
- Content versioning and rollback options
- Advanced customization with minimal technical knowledge
Key Attributes for Magento CMS Pages
| Attributes | Description | Format | Example |
|---|---|---|---|
creation_time |
Creation date | yy/mm/dd | 17/05/10 |
title |
Page title text | Any text | Sample page title |
identifier |
URL key | Lowercase, numbers, underscores, dashes | sample_page_url |
store_view_code |
Store view assignment | Comma-separated codes or 'All' | All, default |
is_active |
Page status | 0 or 1 | 1 |
content_heading |
Content header | Any text | Sample content heading |
content |
Main content | Text with HTML | <p>Hello, world</p> |
page_layout |
Page structure | 1column, 2columns-left, 2columns-right, 3columns | 2 columns-left |
meta_title |
SEO title | Any text | Sample page meta title |
meta_keywords |
SEO keywords | Comma-separated terms | sample, meta, keywords |
meta_description |
SEO description | Any text | Sample description |
layout_update_xml |
Custom XML | Valid XML code | <referenceContainer...> |
custom_theme |
Theme selection | Theme path | Default theme/Magento Luma theme |
custom_root_template |
Layout template | 1column, 2columns-left, 2columns-right, 3columns | 3 columns |
custom_theme_from |
Theme start date | mm/dd/yy | 3/2/19 |
custom_theme_to |
Theme end date | mm/dd/yy | 3/29/19 |
4 Methods to Create CMS Pages in Magento 2
Method 1: Add a new CMS Page in Magento 2
- Log in to the Magento Admin Panel.
- Go to Content > Elements > Pages.
- Click 'Add New Page'.
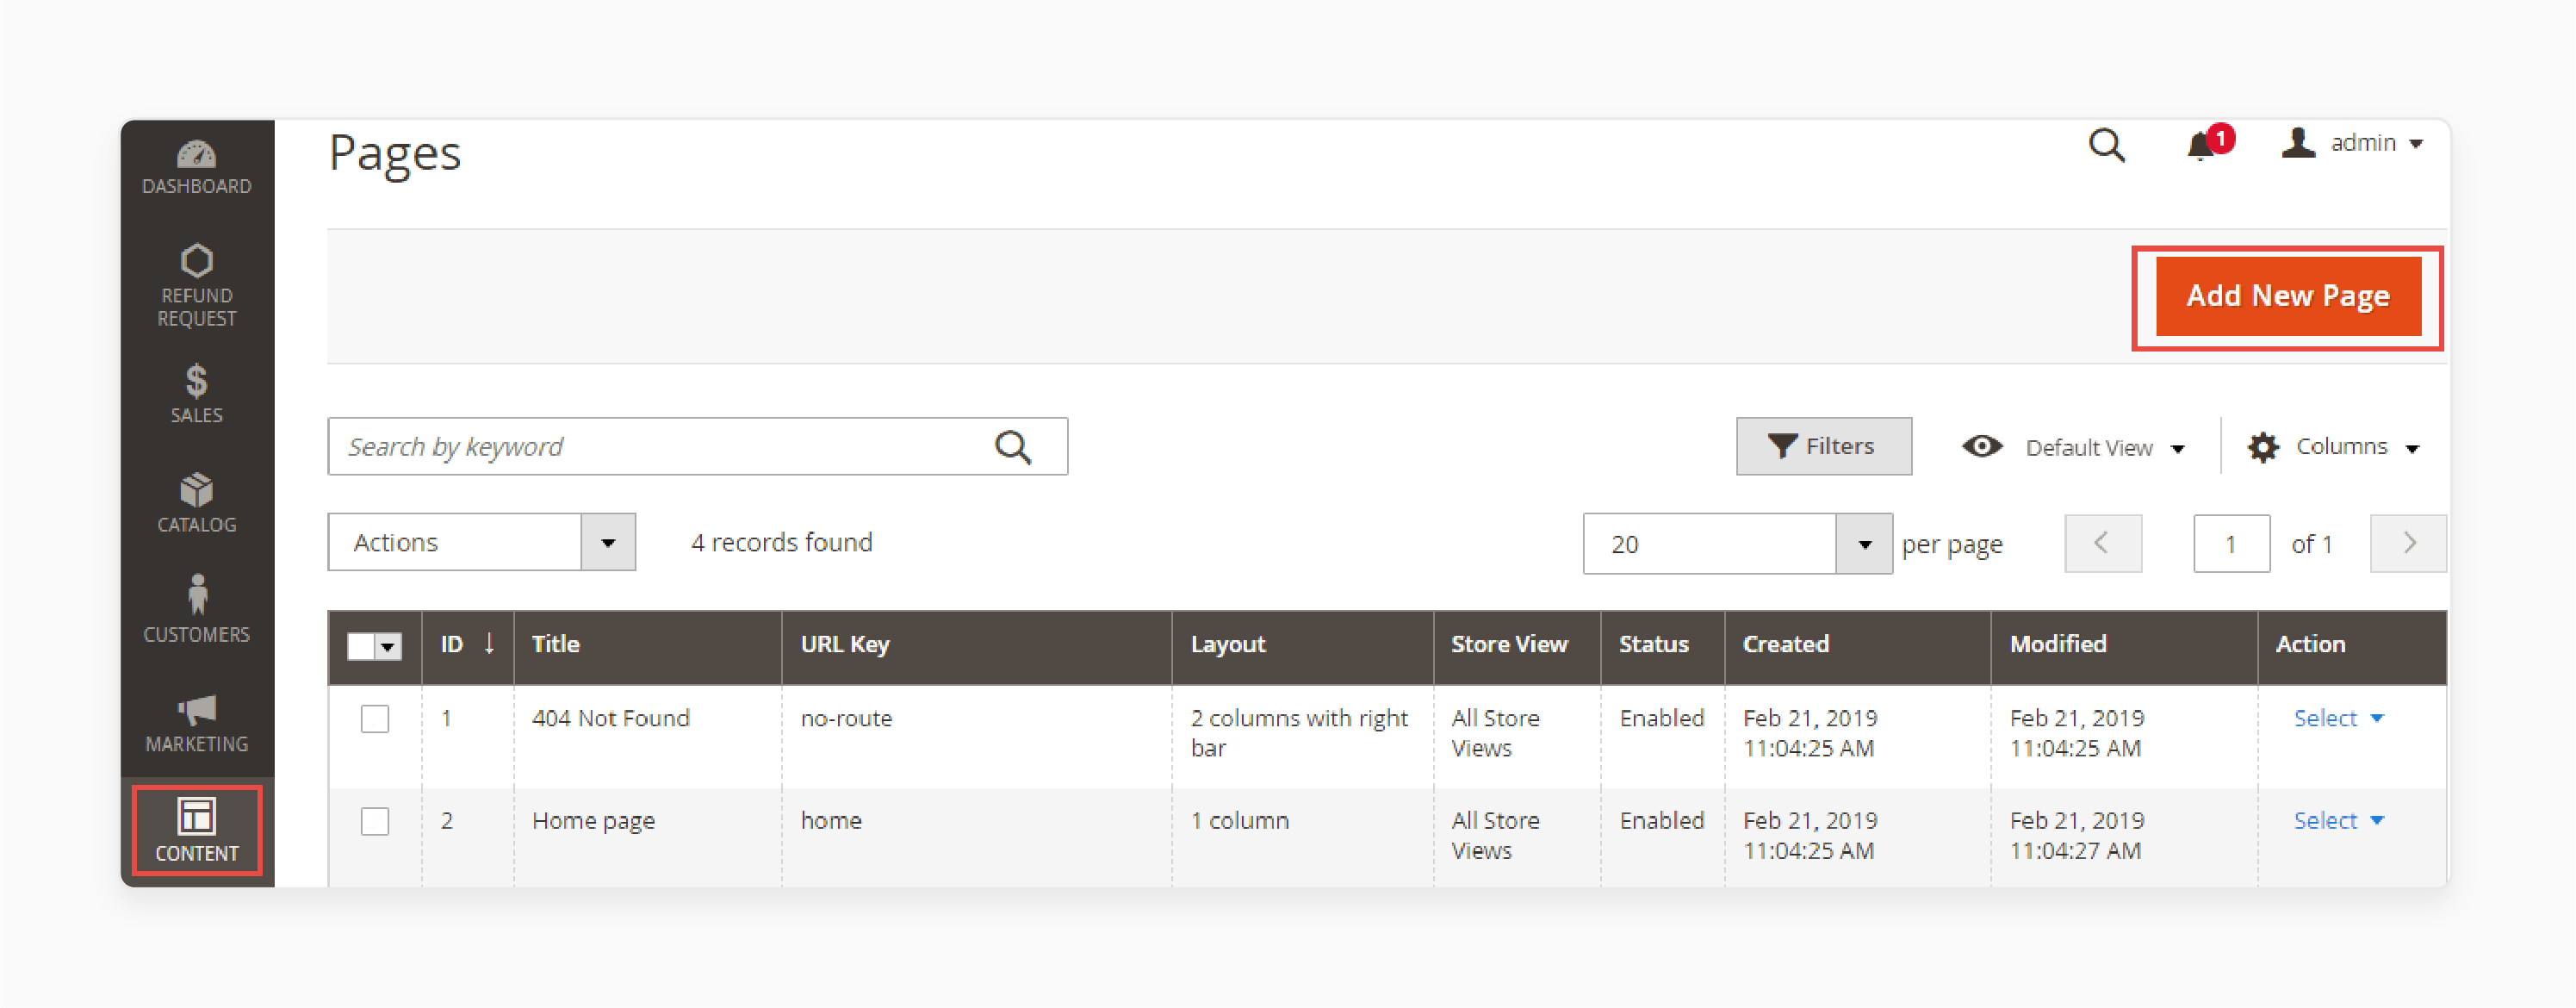
- Enter the 'Page Title' and the metadata, which will appear in the browser's title bar and tab.

- Provide a 'URL Key' for the page. This key will be added to the base URL to create the page's unique address.
Note: Use only lowercase characters and hyphens, avoiding spaces.
- In the 'Store View' list, select the store view where the page will be displayed.
- If the page is not ready to go live, set its status to "Disable".
Note: Remember to update the status to "Enable" when the page is ready for publishing.
- Click 'Save and Continue Edit' to store your changes.
- Expand the Content section.
- Add the main heading under 'Content Heading'.
- Use the 'Show / Hide Editor' option to add or edit the text using the WYSIWYG editor in Magento 2.

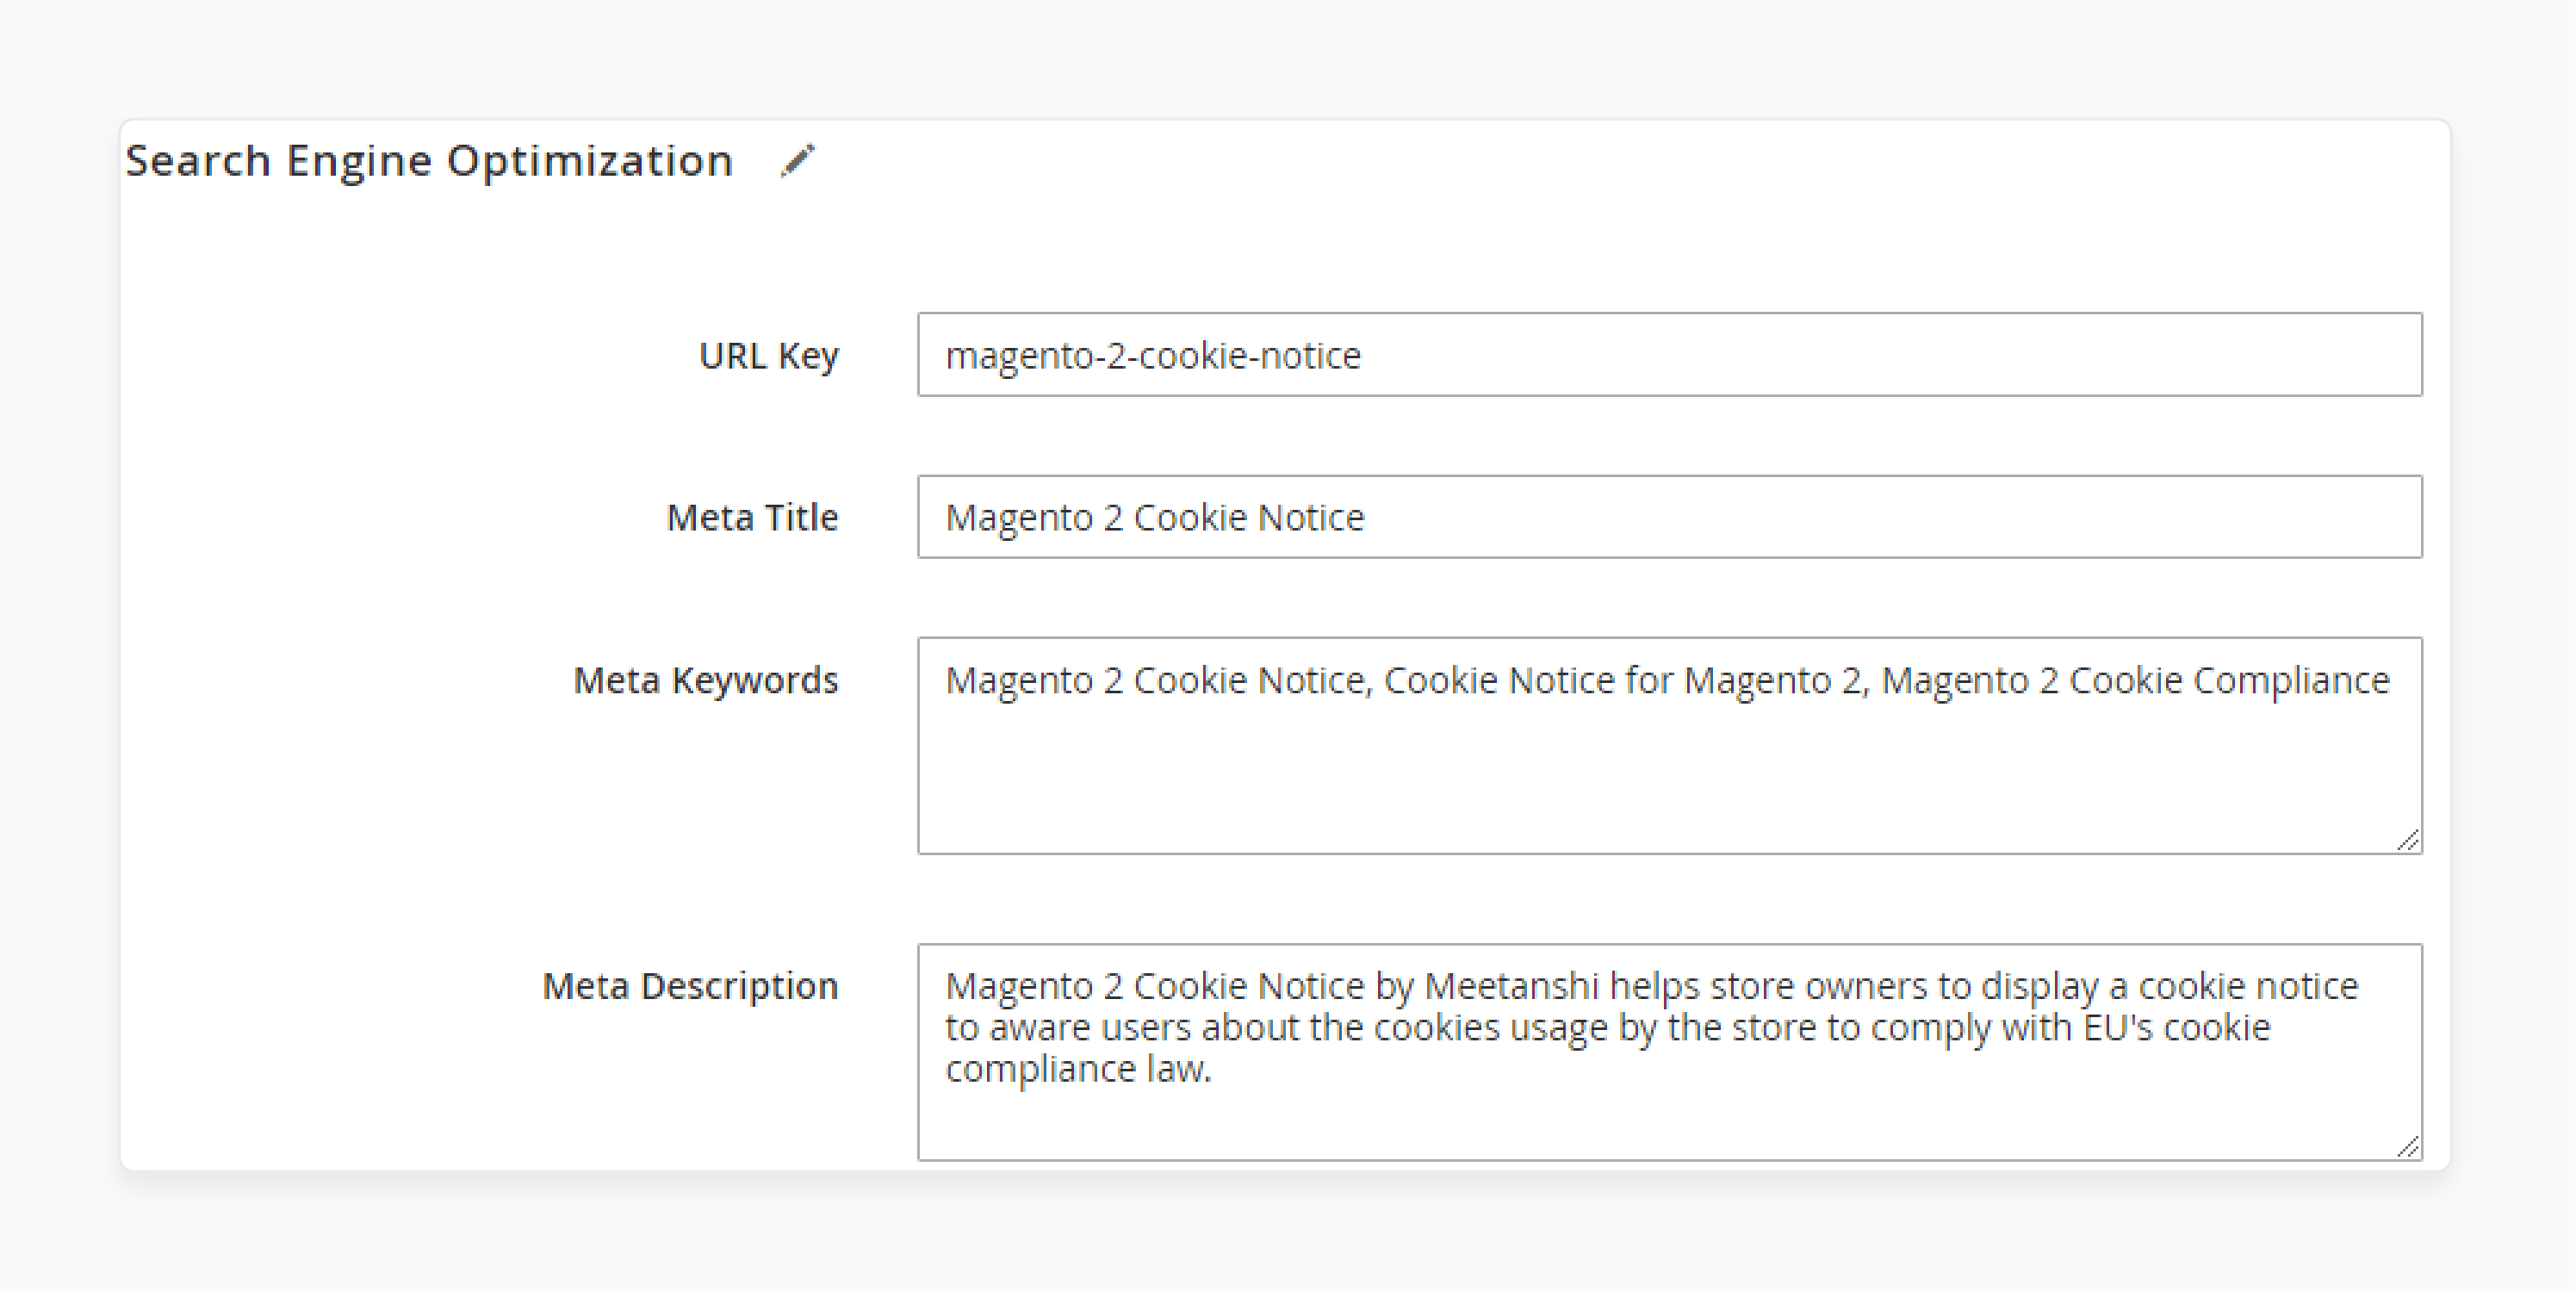
- Expand the Search Engine Optimization section.
- Fill in details such as the 'URL Key', 'Meta Title', 'Meta Keywords', and 'Meta Description'.
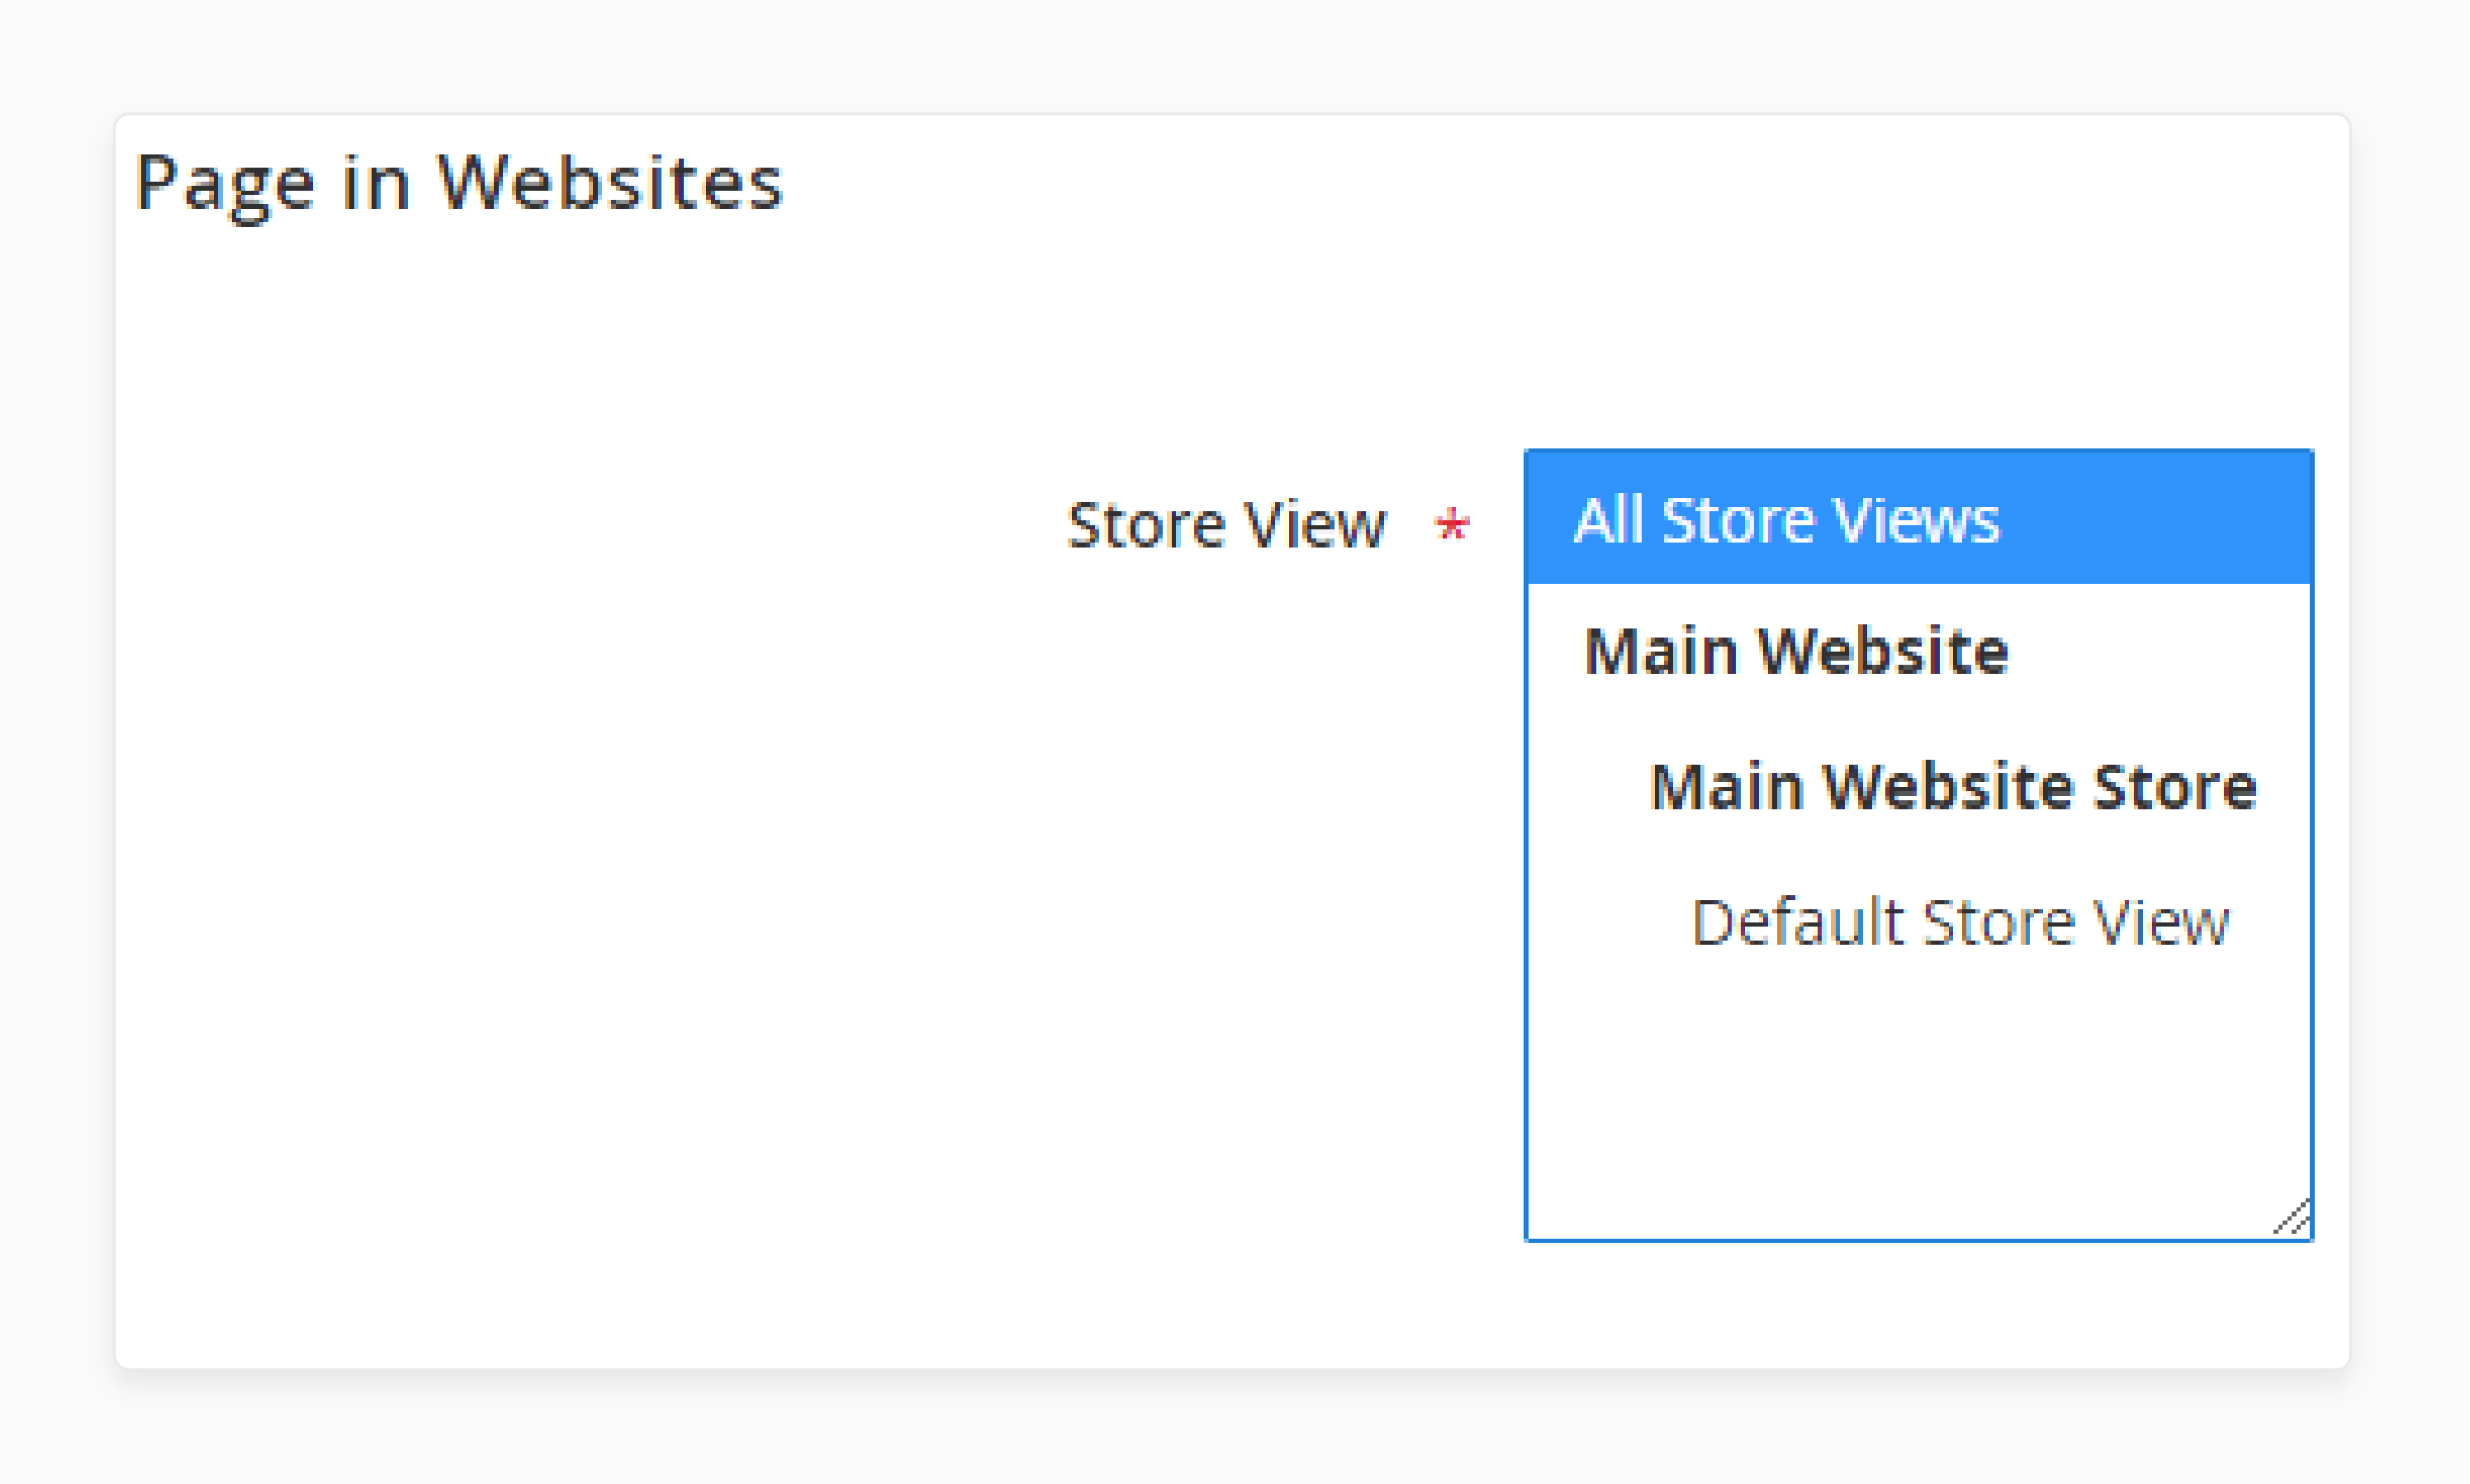
- Expand the 'Pages in Websites' section.
- Choose the appropriate "Store View" where the page will appear.
- Expand the Design section.
- Select the 'Page Layout' and optionally add "Layout Update XML".
- Under this field, choose a layout from the dropdown options:
- 1 Column
- 2 Columns with Left Bar
- 2 Columns with Right Bar
- 3 Columns
- Use the ‘Custom Design Update’ section to set temporary designs and further customize the page.
- Choose a new theme or layout from the dropdown menus.
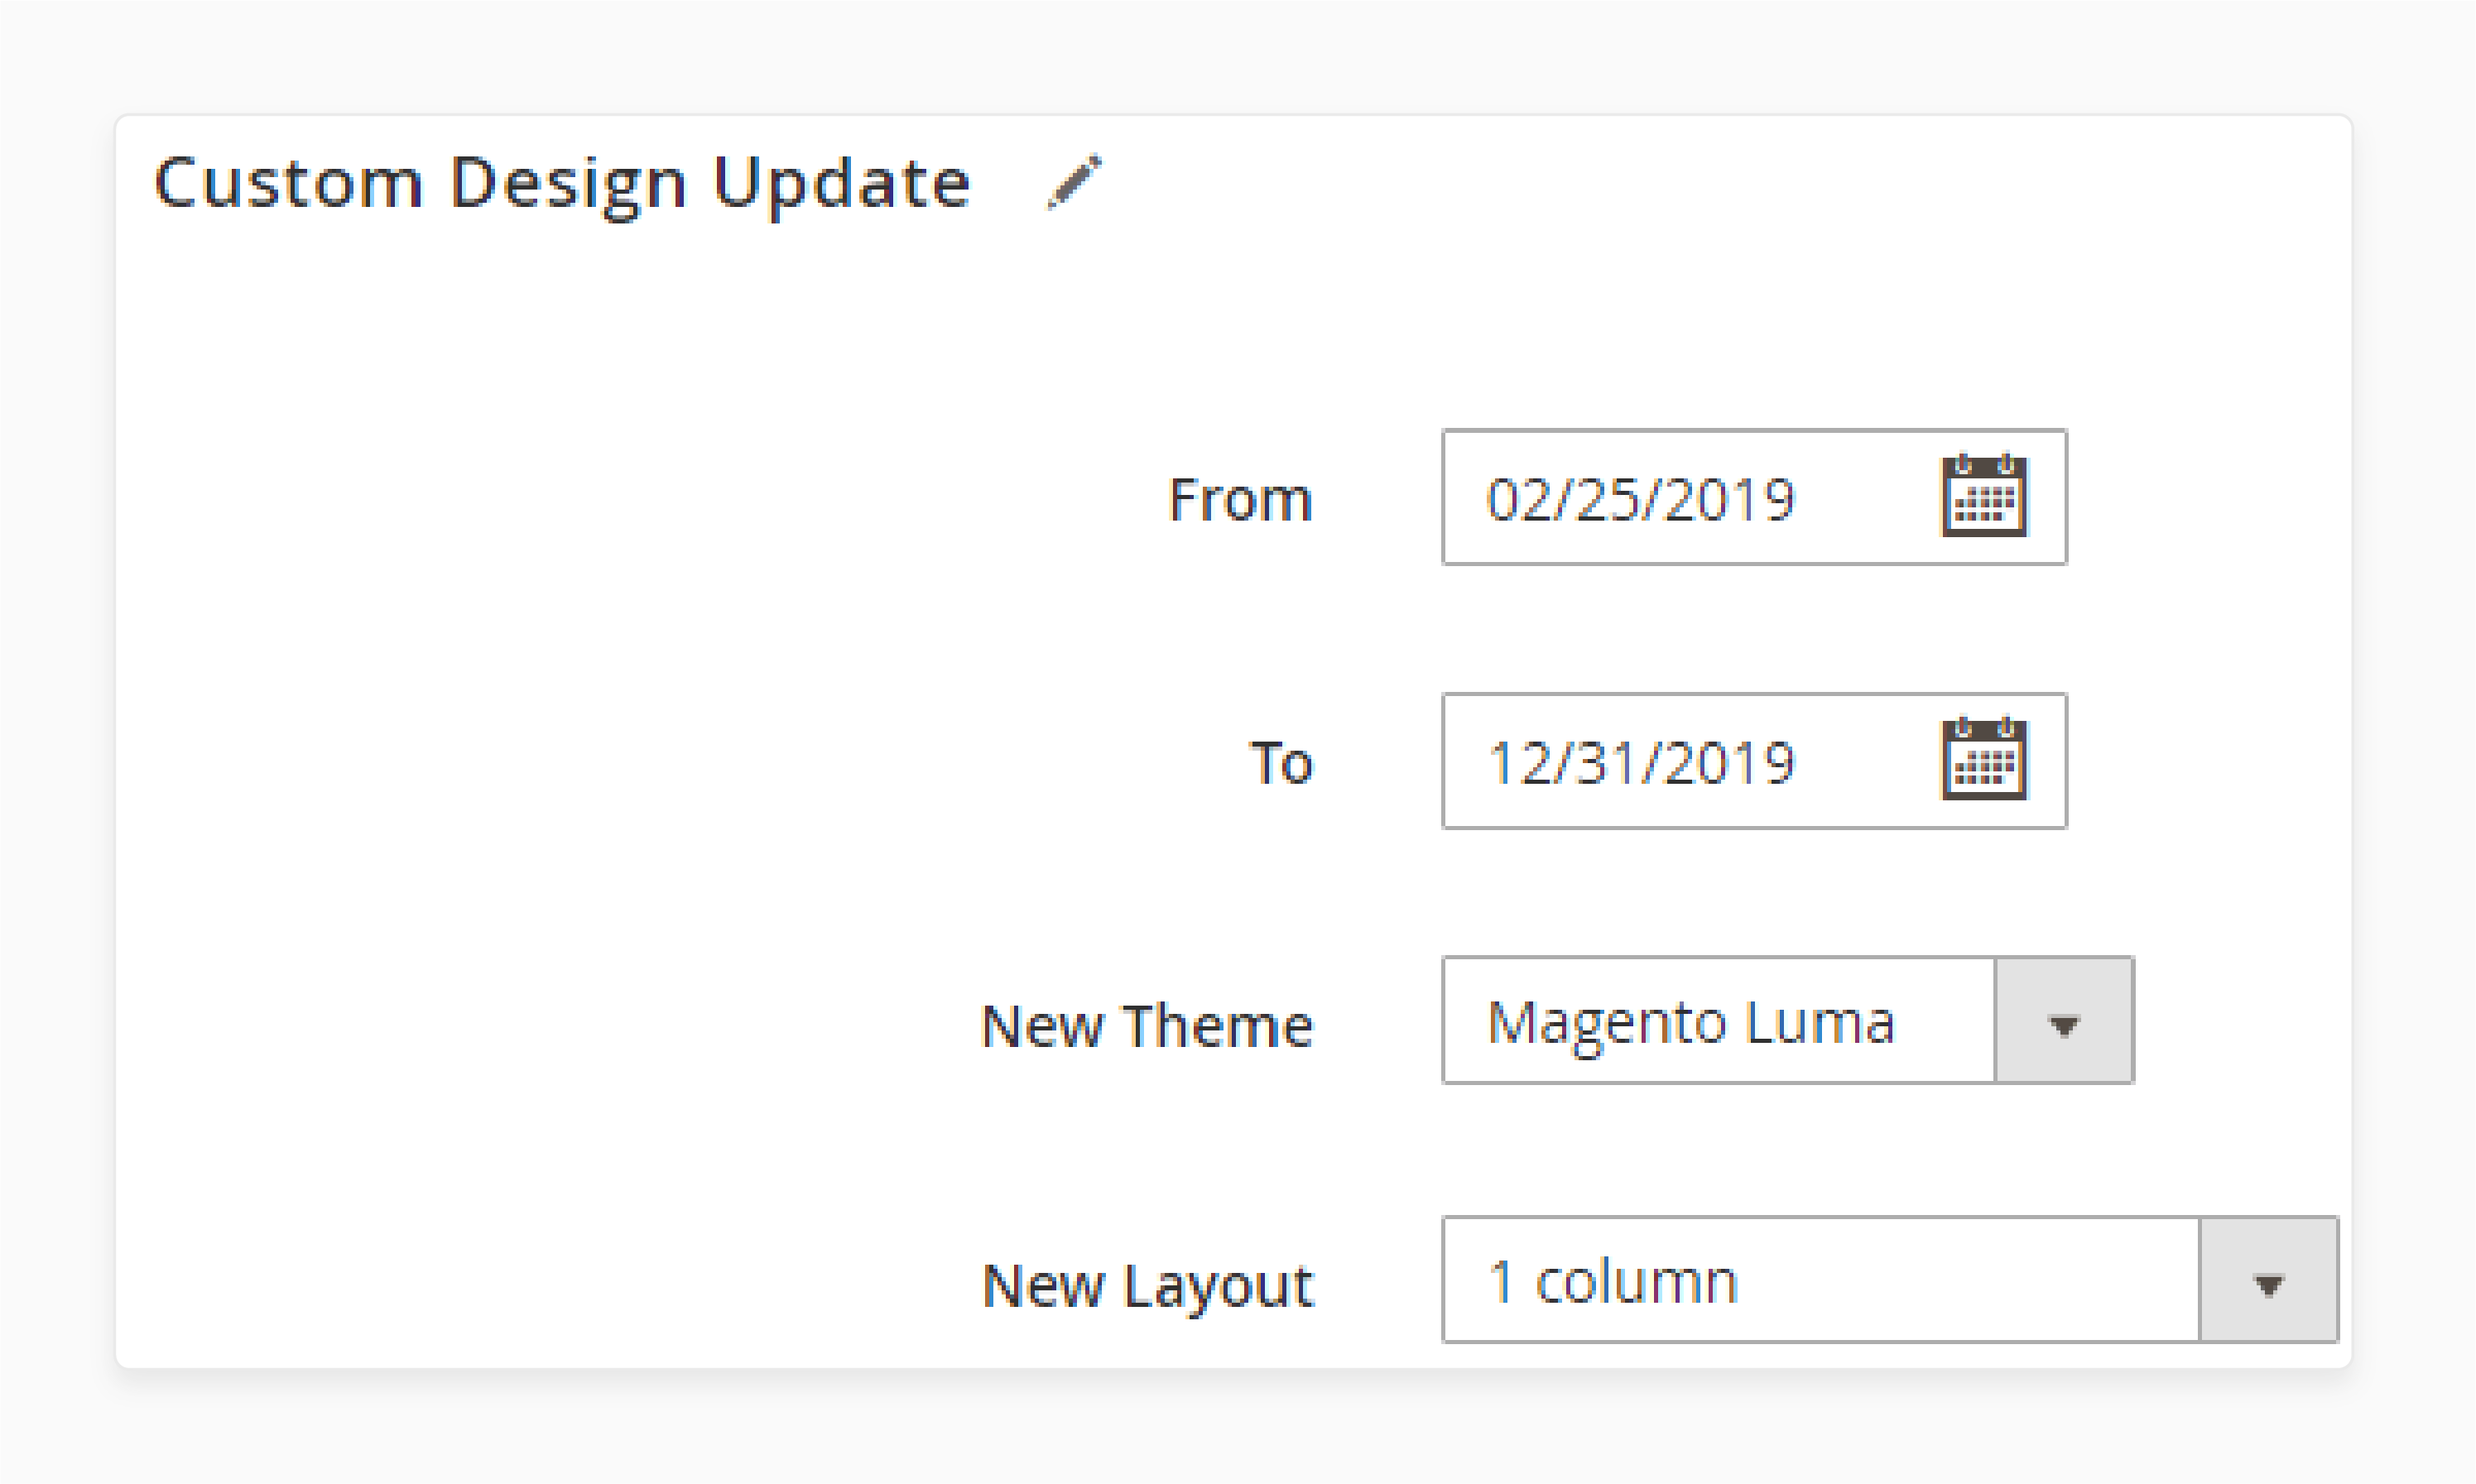
- Change the "theme", "layout", or "style".
- Set a specific time period for the design (e.g., "holidays" or "sales").
- To check the settings and formatting, click the 'Preview' link in the upper-right corner.
- Return to the 'Page Information' tab and set the 'Status' to "Enabled".
- Click on the 'Save Page' button to store your settings.
- Clear your store’s cache to ensure the changes are visible.
Method 2: Create a New Block using Magento 2 CMS Blocks
- Navigate to Content > Elements > Blocks.
- Click 'Add New Block'.
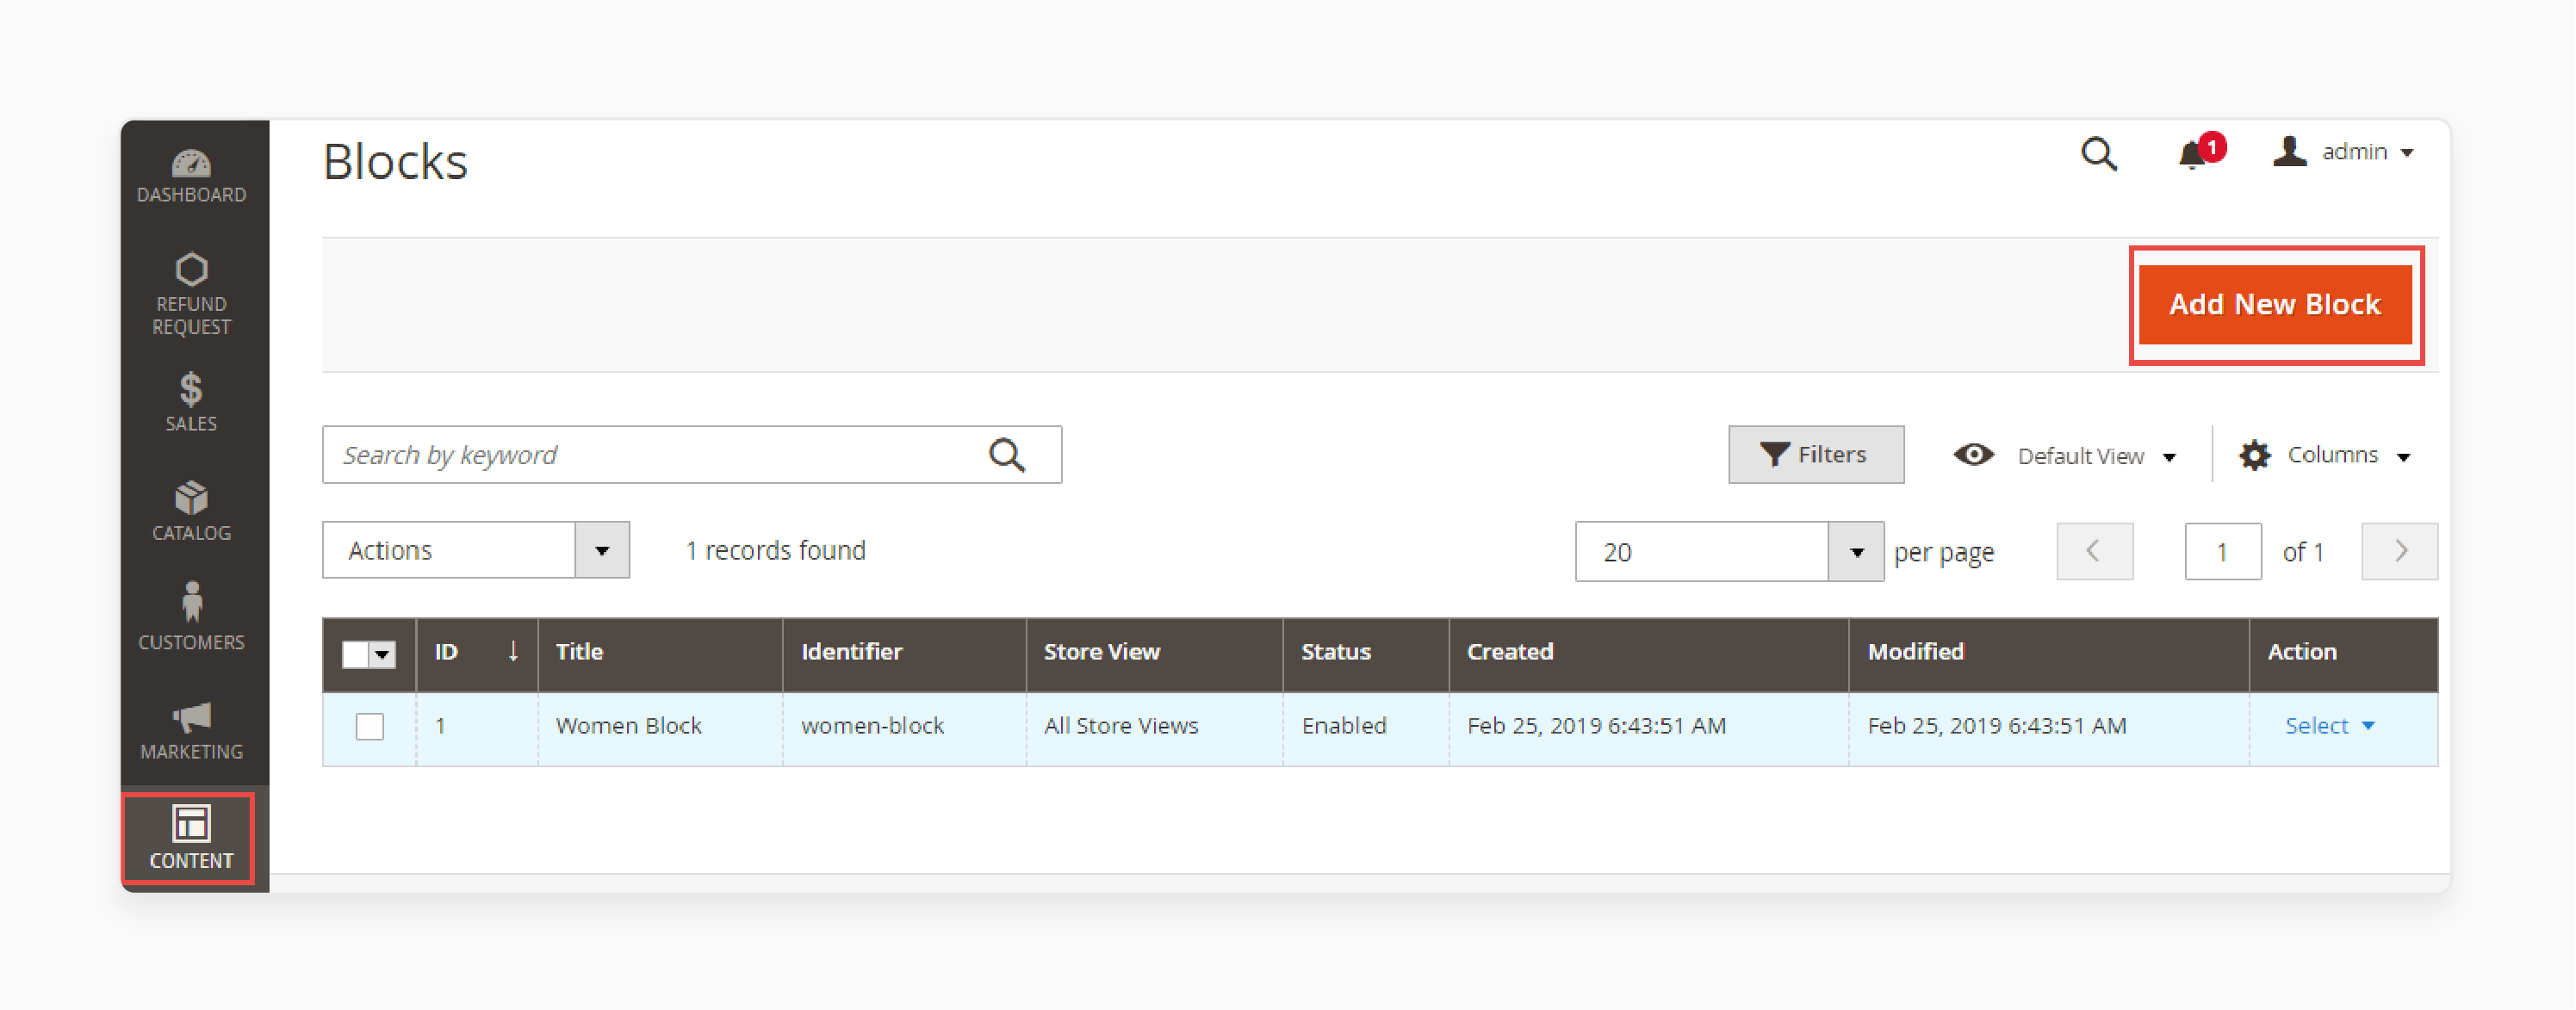
- Enable the block and provide a 'Block Title'.
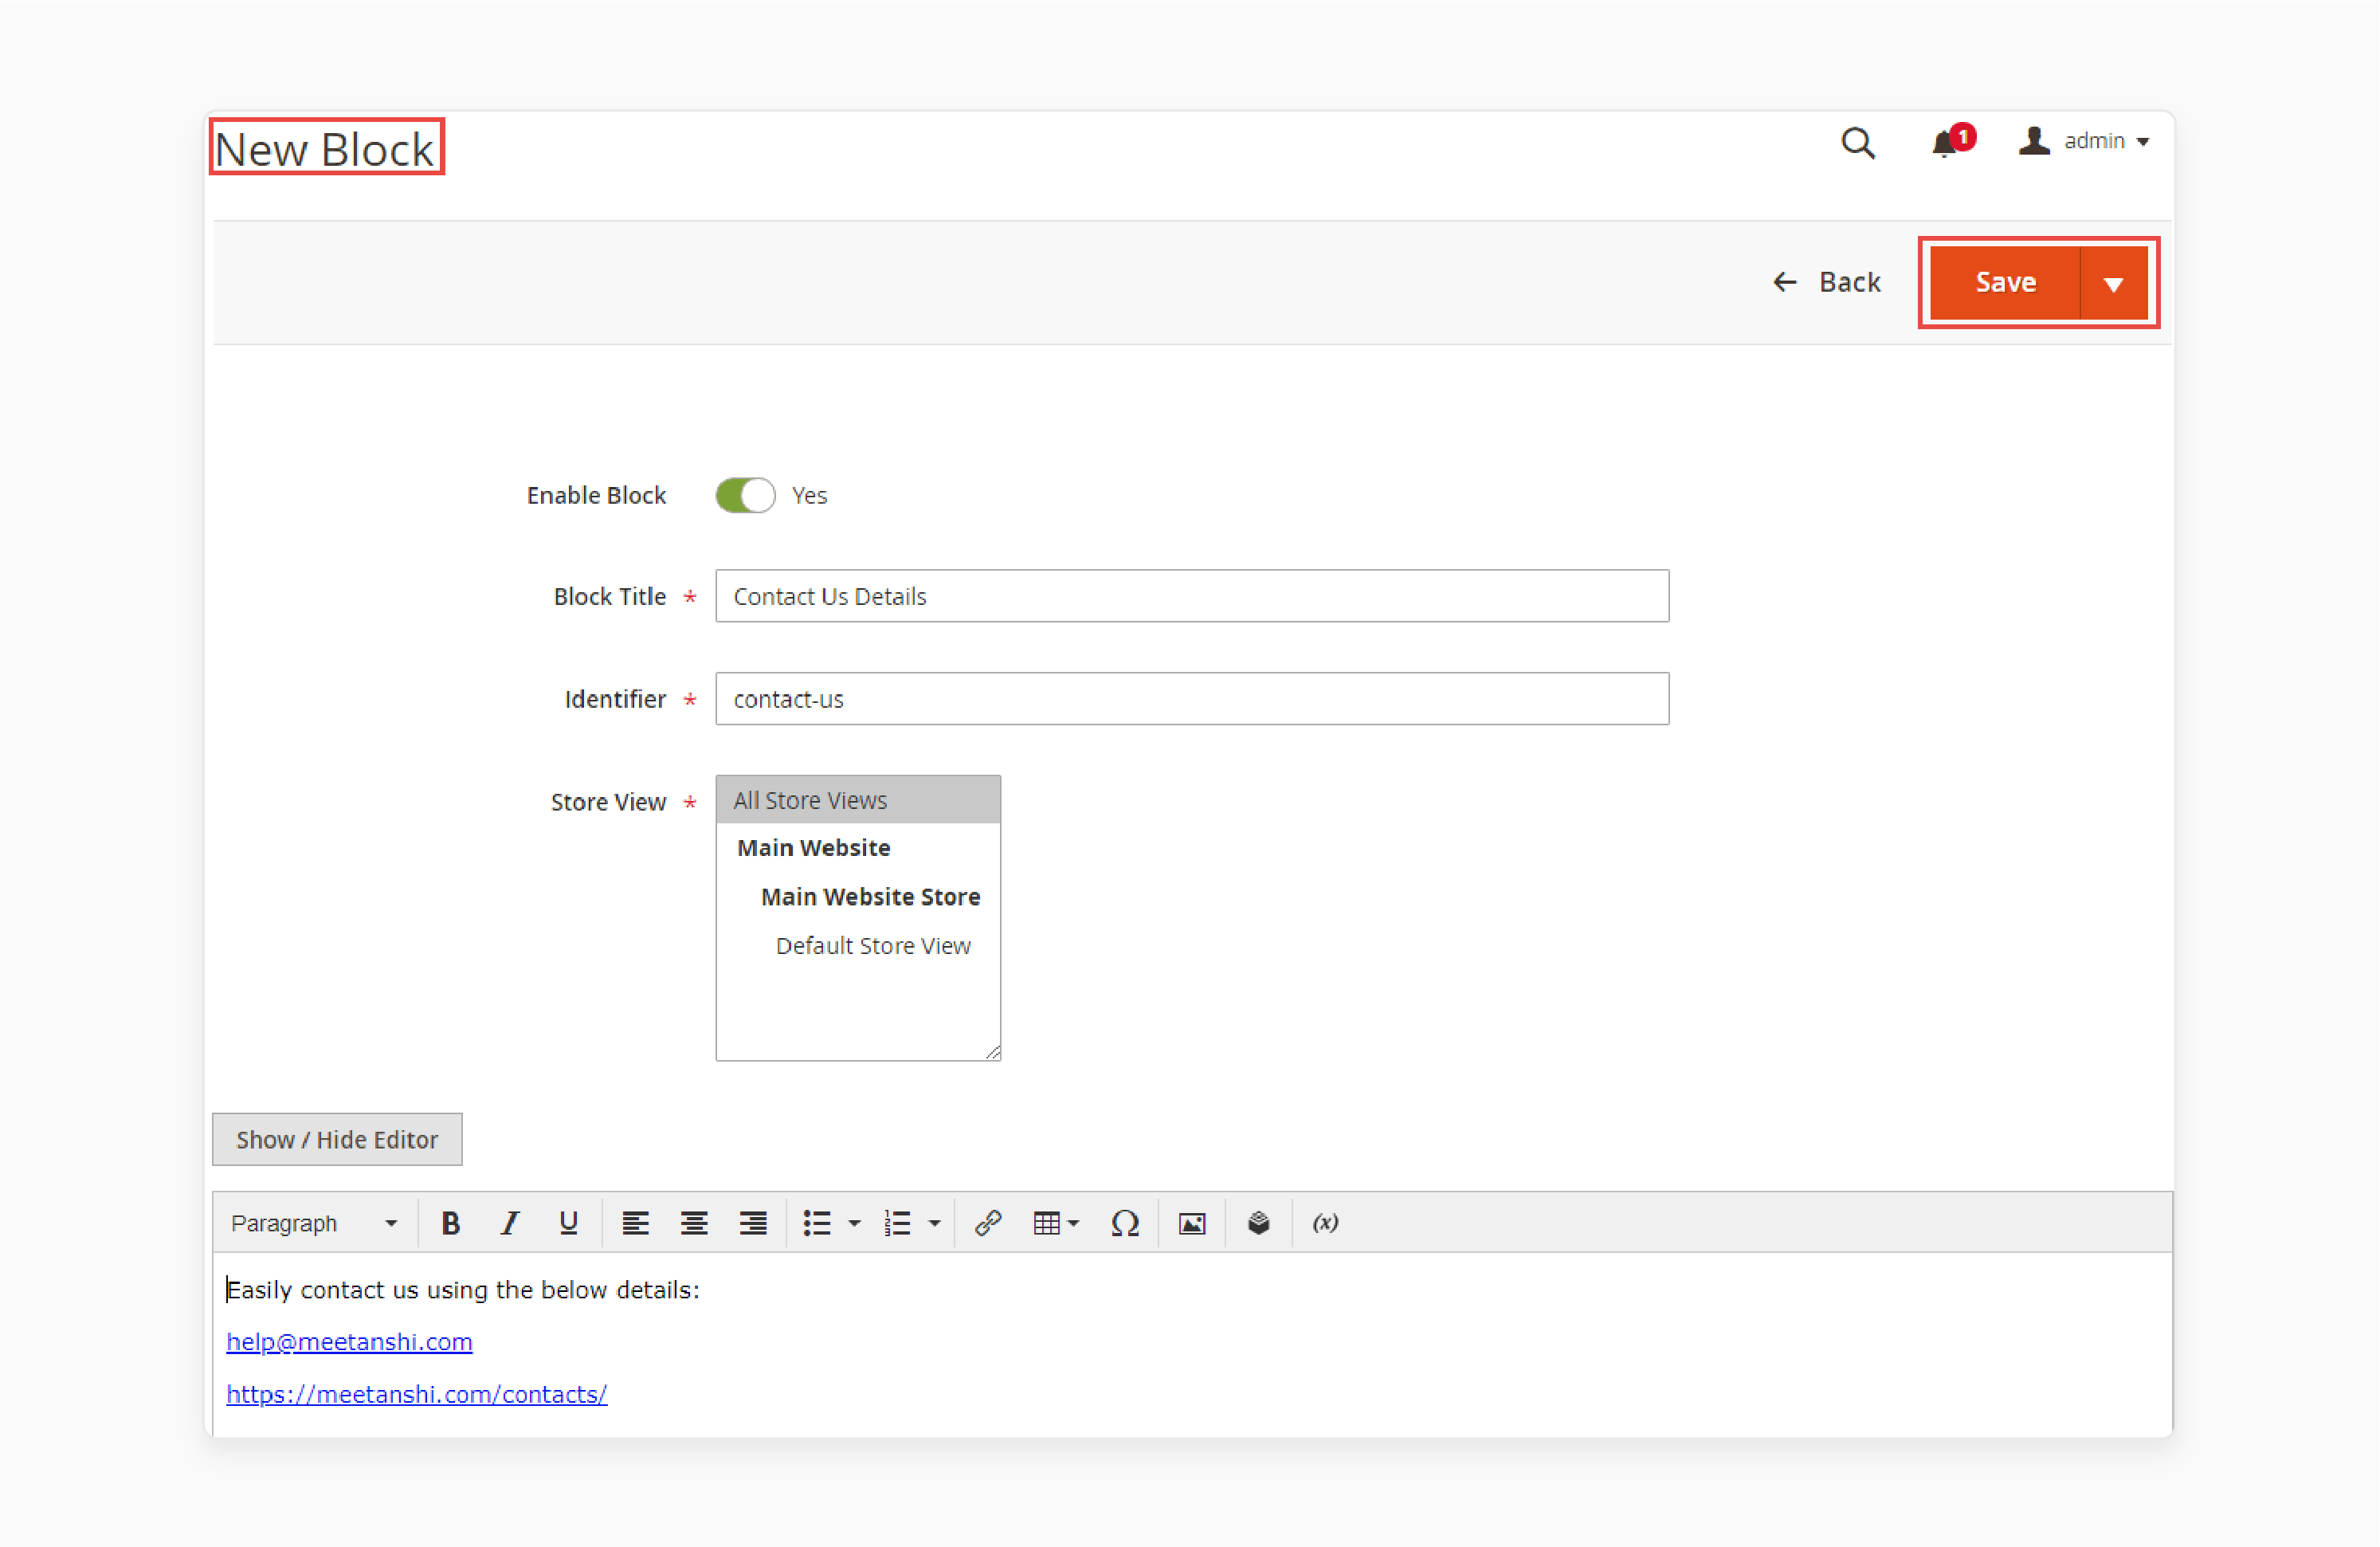
- Enter a unique "Identifier" (lowercase, without spaces; use underscores instead).
- Select the 'Store View' for the block.
- Add content to the block (e.g., "text", "links", "images", or "tables").
- Click on the 'Save' button to save the block configuration.
- Clear your store’s cache to ensure the changes are visible.
Method 3: Create a New Widget using Magento 2 CMS
- Navigate to Content > Elements > Widgets.
- Click 'Add New Widget'.
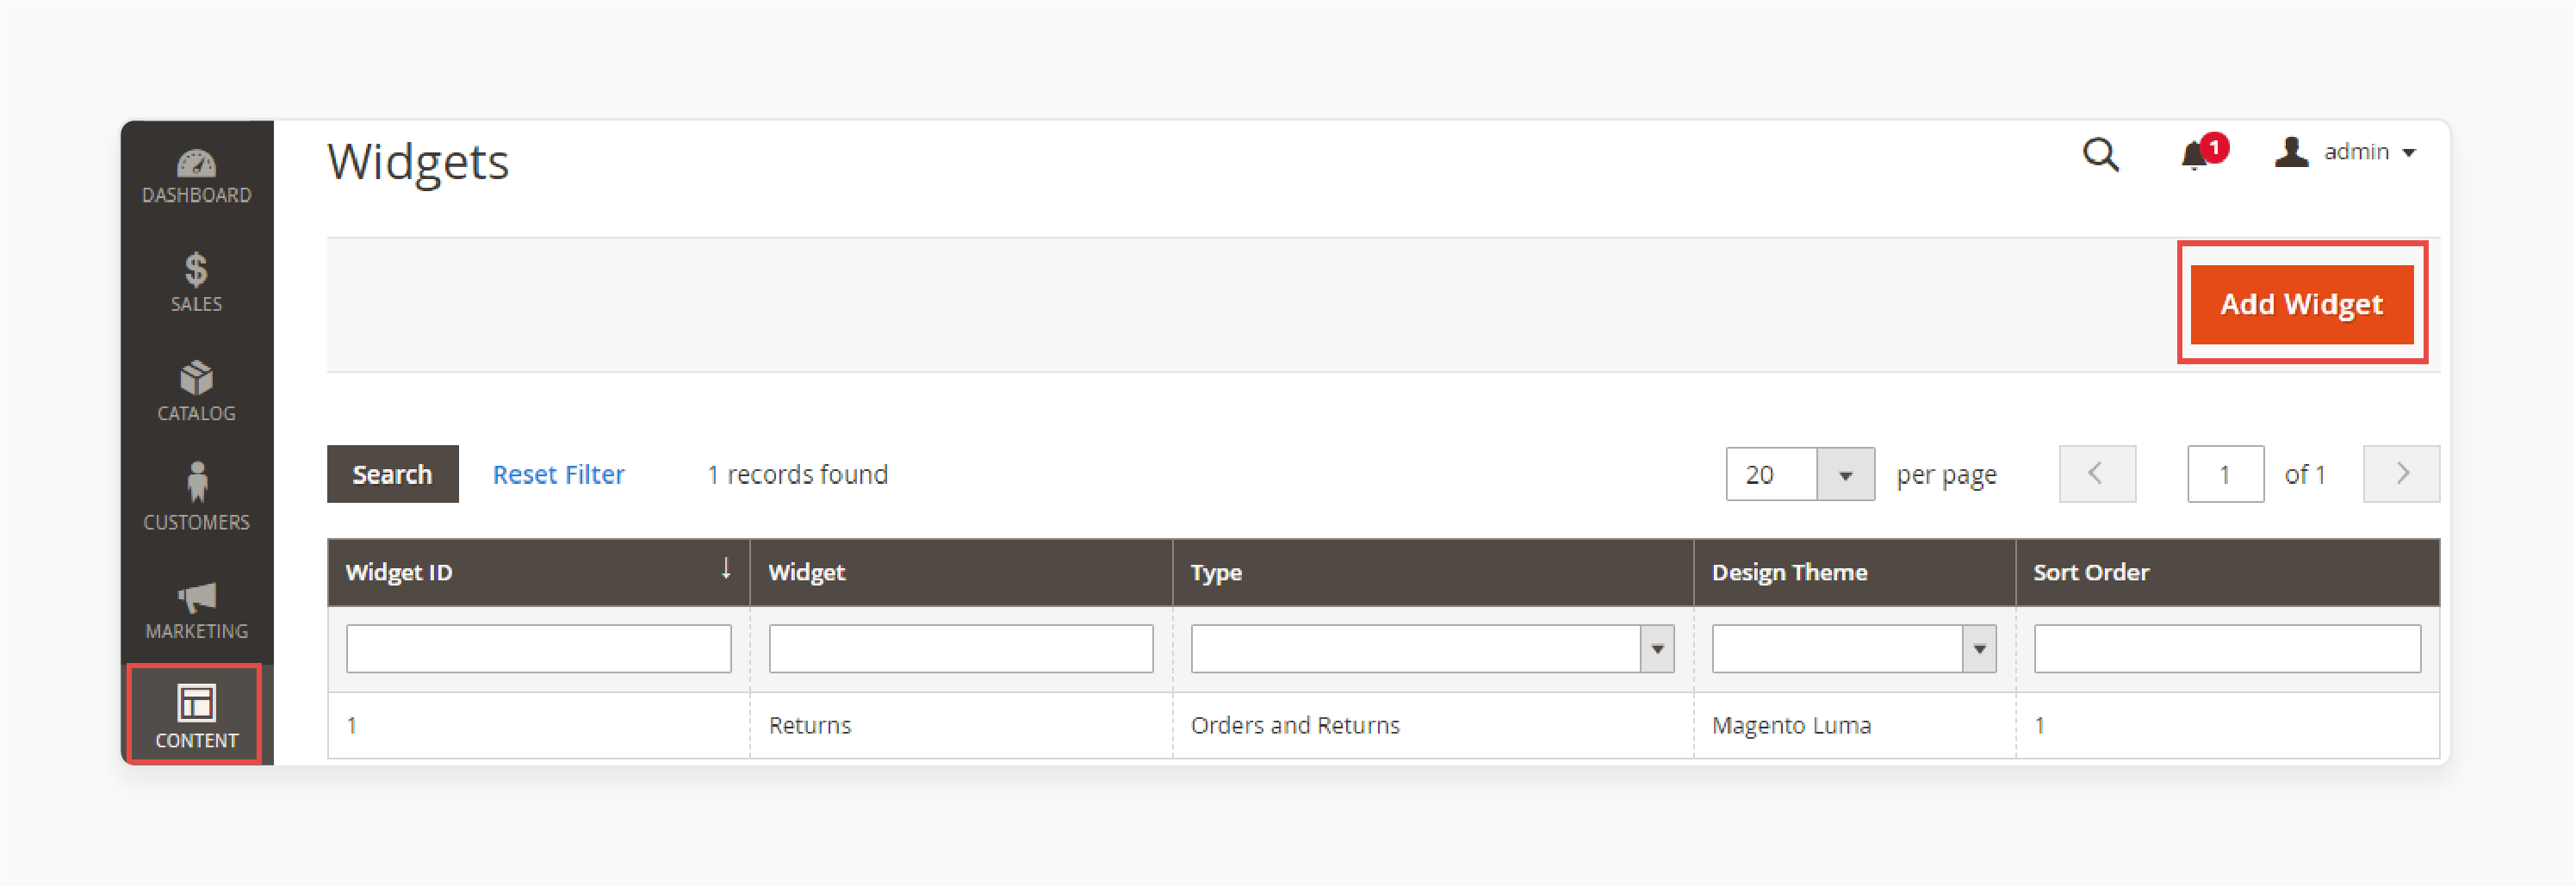
- Select the 'Widget Type' and the 'Design Theme'.
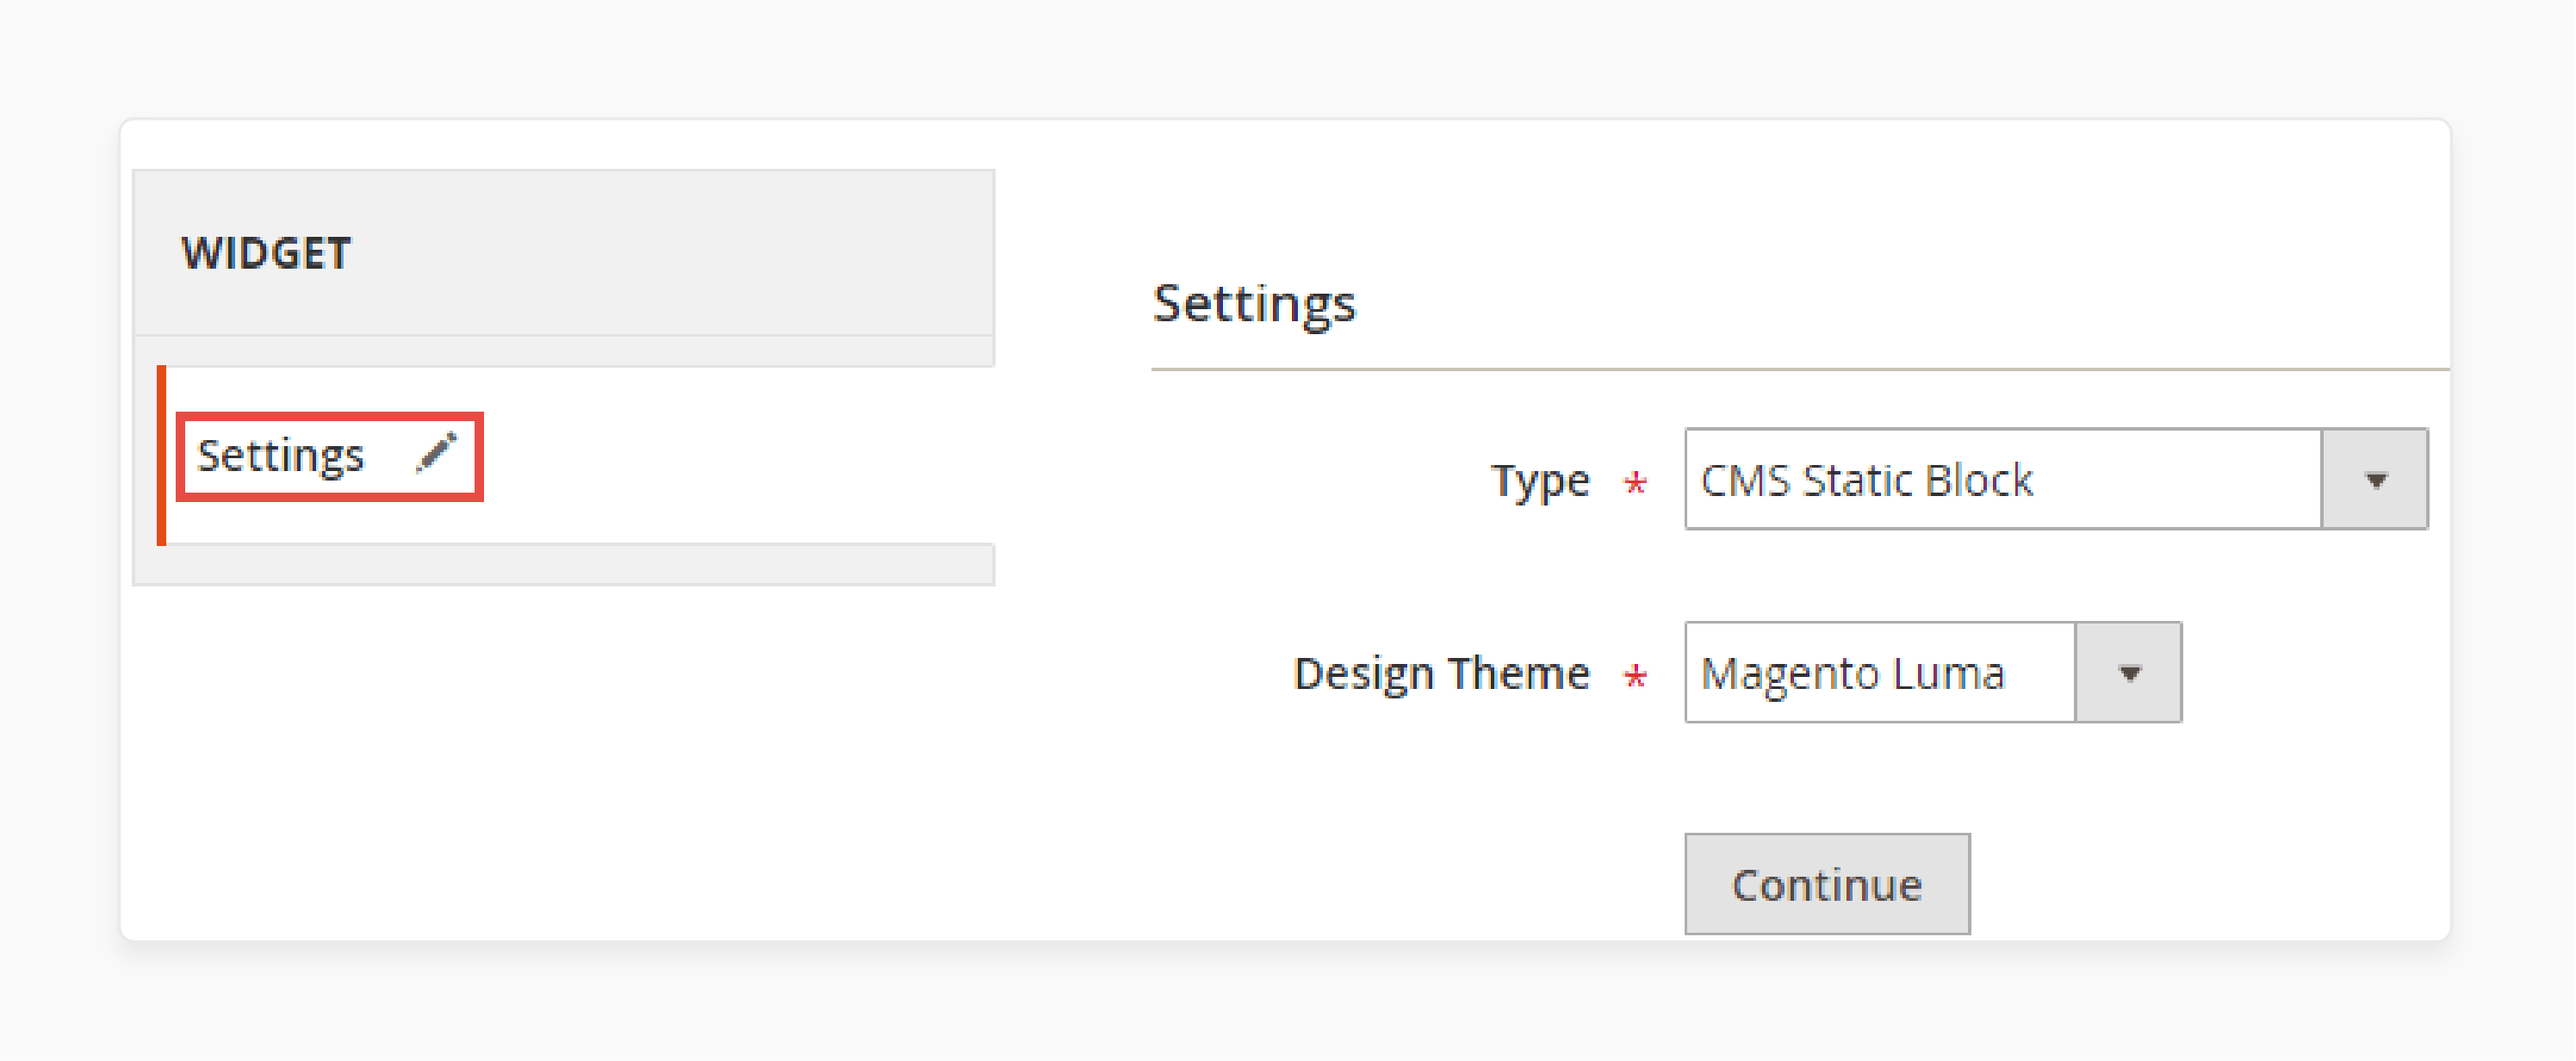
- Click on the 'Continue' button.
- Add a 'Widget Title' and assign it to specific 'Store Views'.
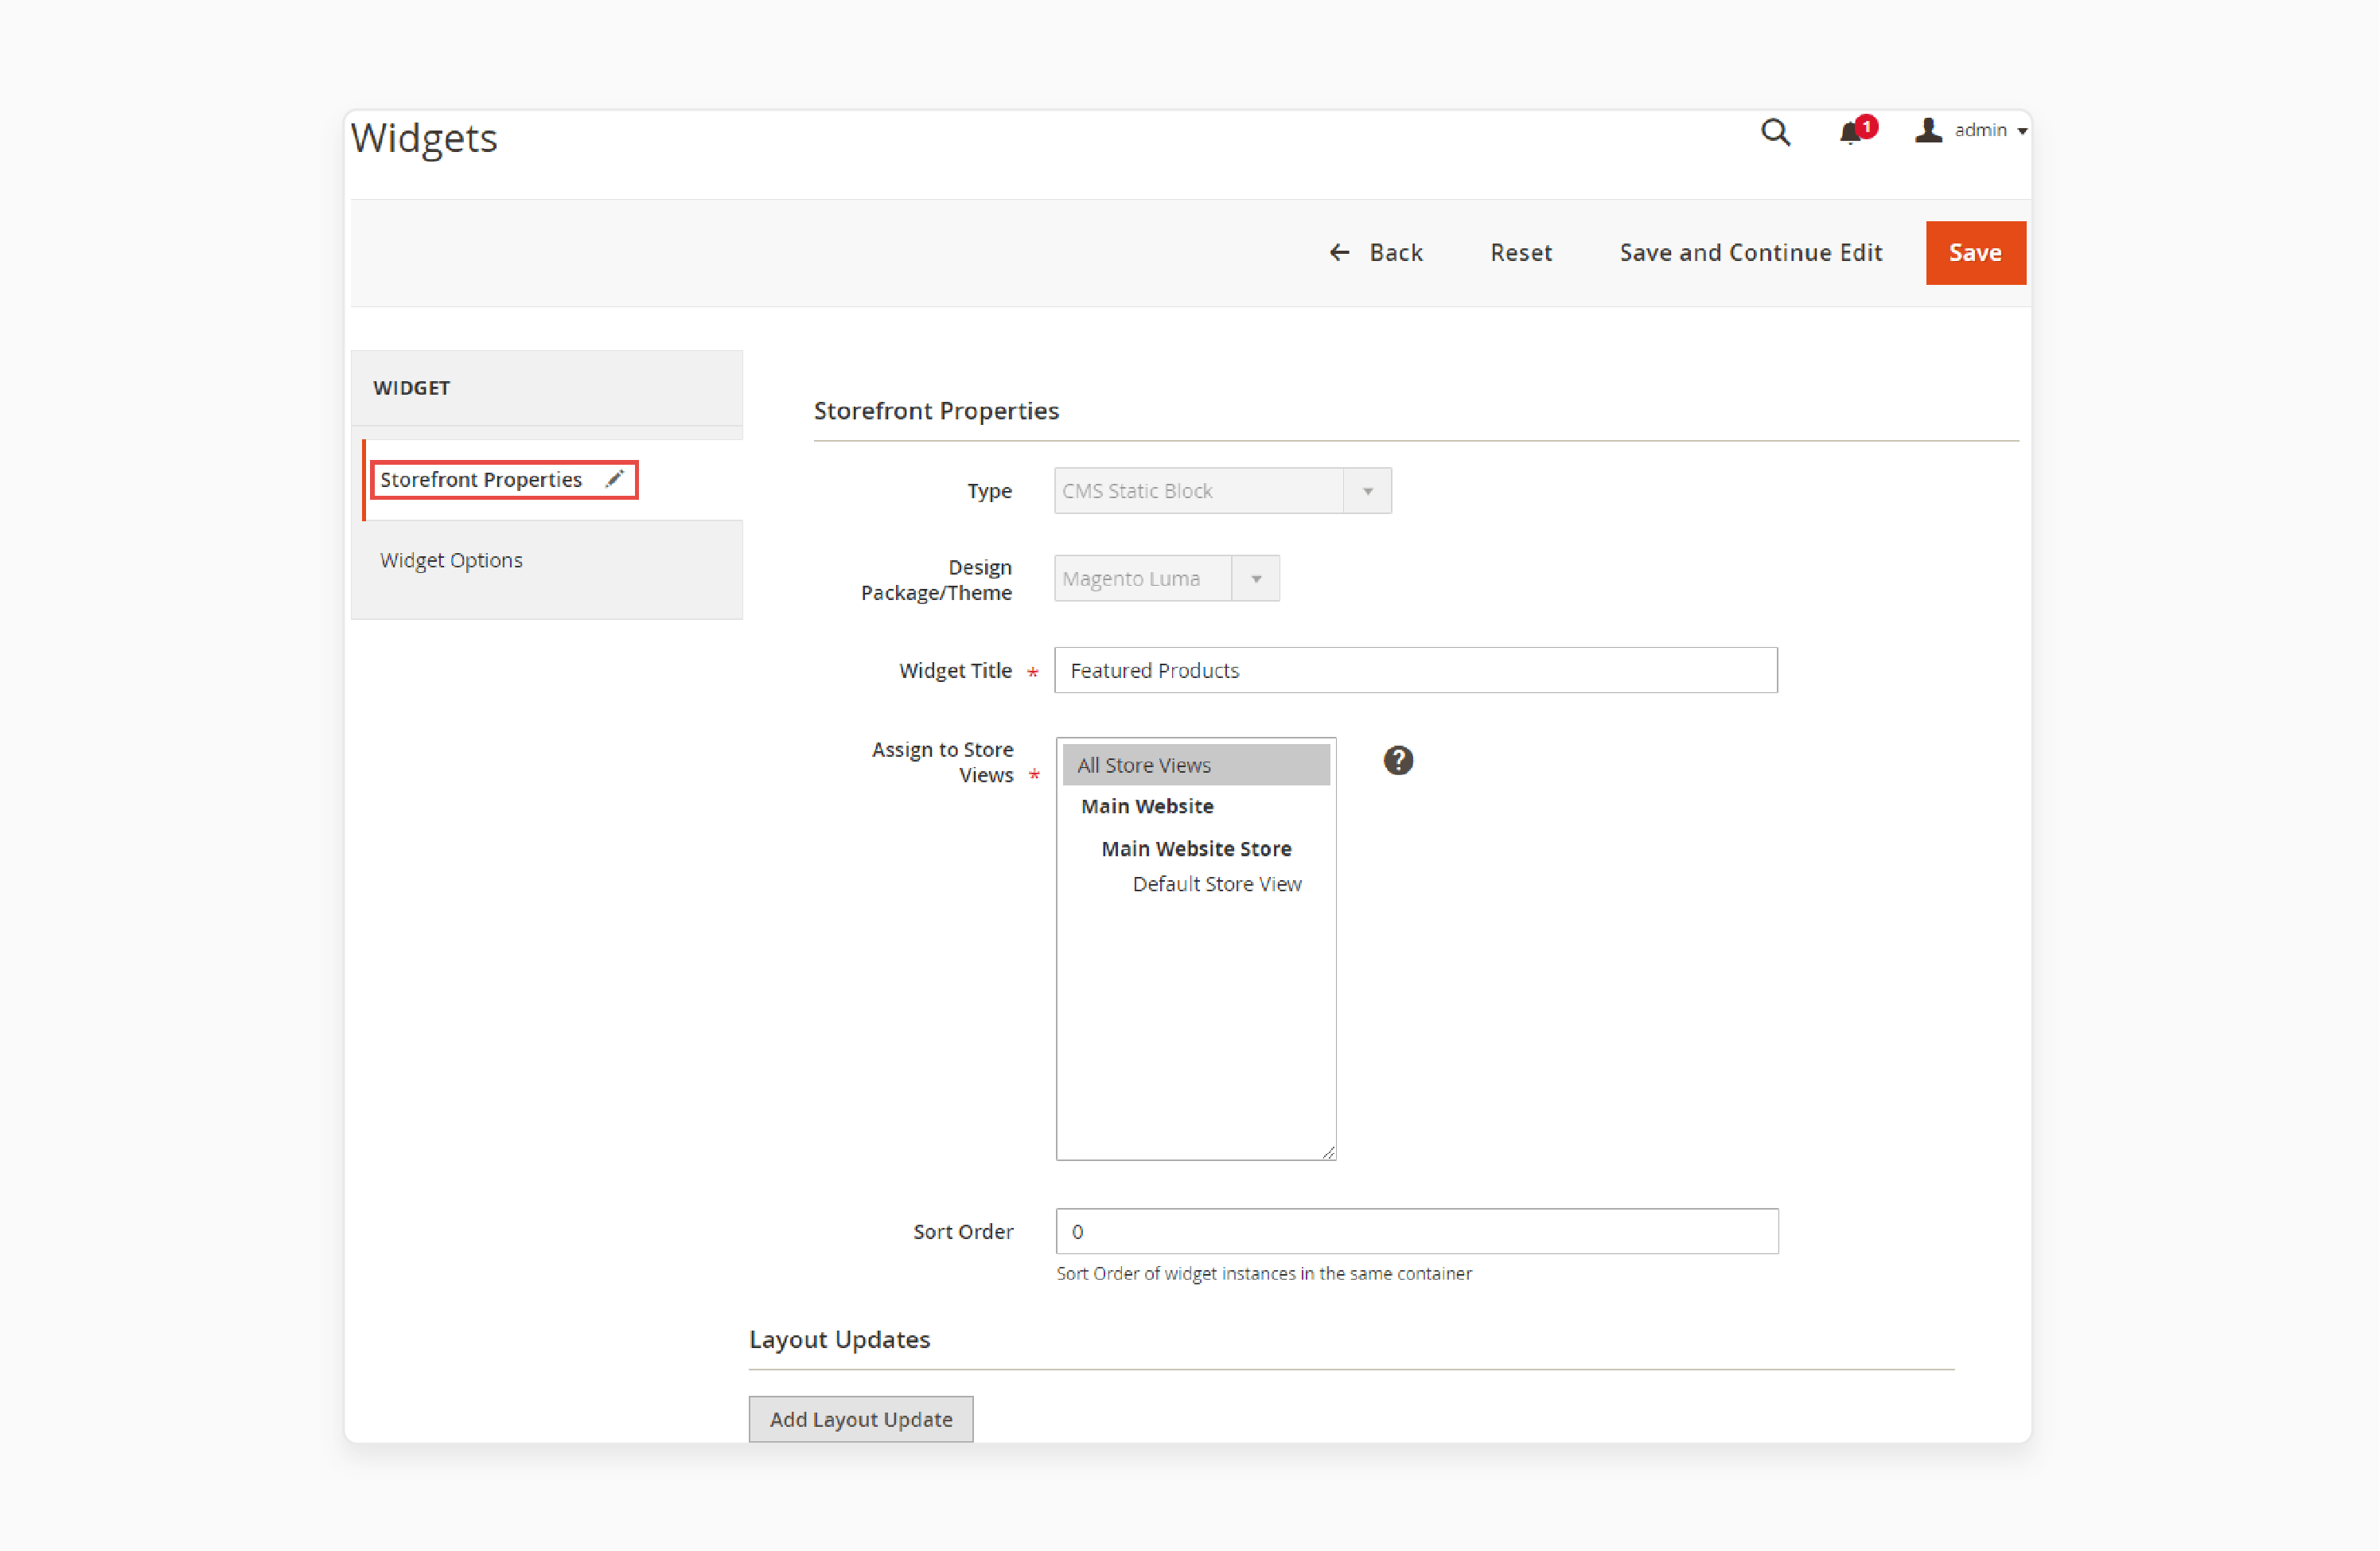
- Enter the 'Sort Order' (use 0 for the top position).
- Use the 'Add Layout Update' button to specify where the widget should appear.
- Choose a location in the 'Display On' dropdown (e.g., product or category pages).
- Set the 'Page', 'Container', and 'Template' for widget placement.

- Under Widget Options, select the desired block.
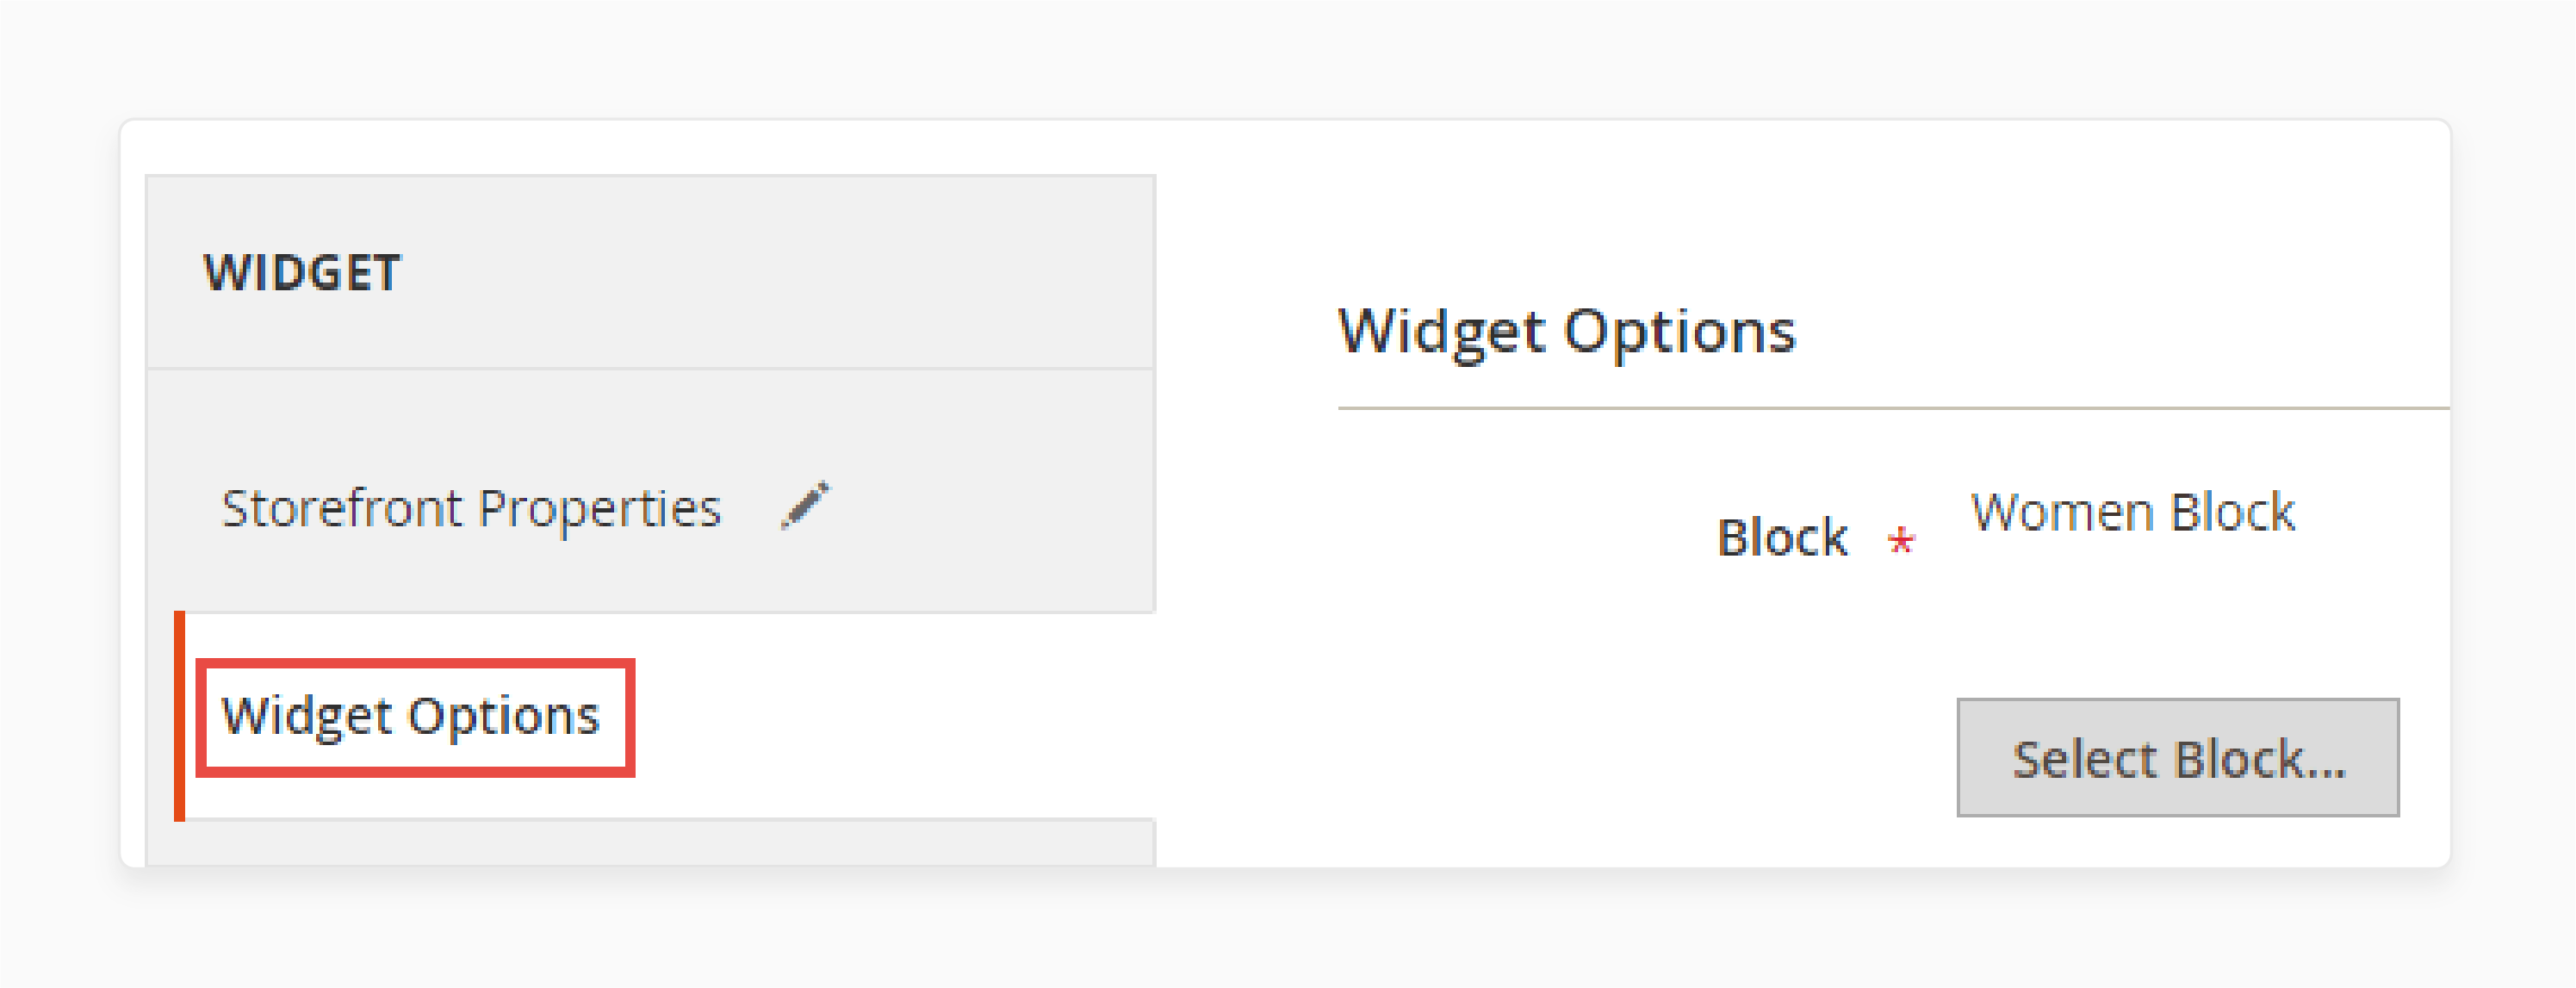
- Click 'Save and Continue Edit' to finalize settings, then save the configuration.
- Clear your store’s cache to ensure the changes are visible.
Method 4: Assign a Homepage in Magento CMS Pages and Blocks
- Complete the steps to create the new page.
- In the Admin Panel, navigate to Stores > Settings > Configuration.
- Under General, select "Web" from the left panel.
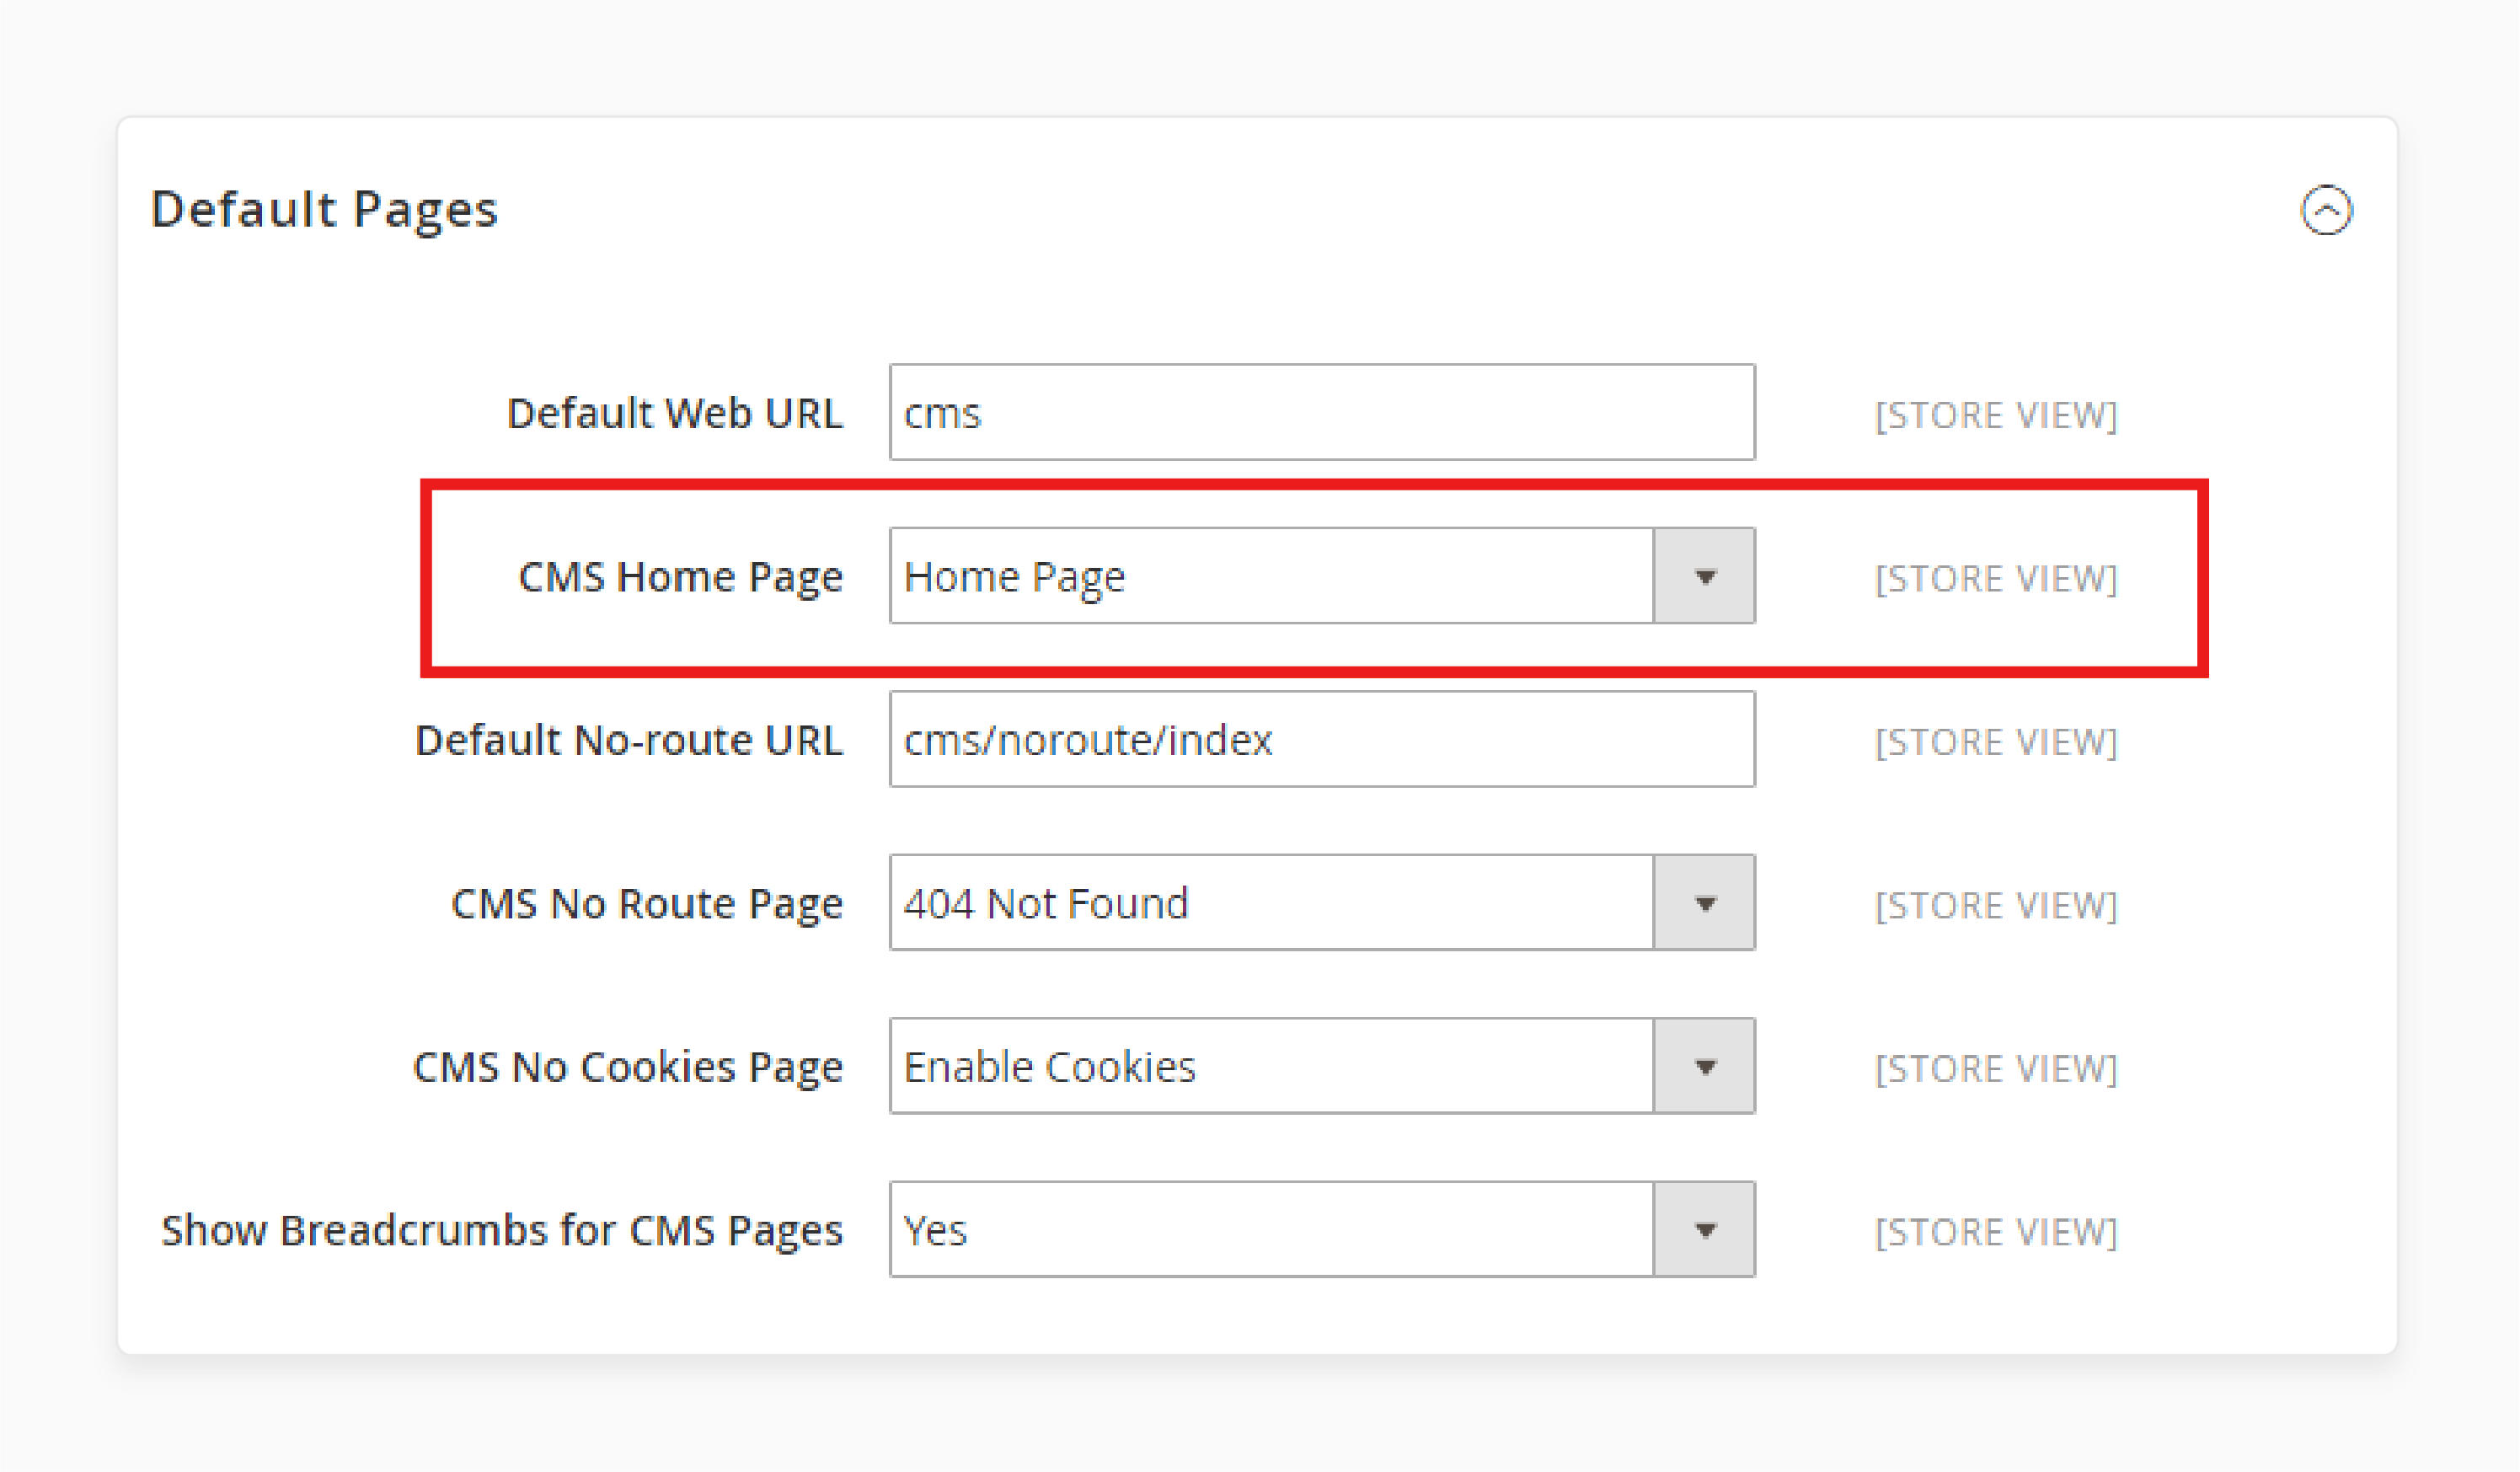
- Expand the 'Default Pages' section in the Expansion Selector.
- Check the configuration steps below:
-
Default Web URL: Enter the relative path to the folder containing the landing page. By default, cms points to a page from the Commerce content management system. You can use other types of landing pages, like a blog (e.g.,
magento/blog).
Note: For a specific store view, uncheck the "Use system value" checkbox or any other settings you want to change.
-
CMS Home Page: Set it to the page you want as the store’s homepage. Other created pages can also be used, such as:
- Welcome to the Exclusive Online Store
- Rewards Points
- About Us
- Customer Service
- Enable Cookies
- Privacy Policy
- Access Denied
-
Default No-route URL: Enter the relative path for the page that will be shown when a 404 error occurs. The default value is
cms/index/noRoute. -
CMS No Route Page: Set it to the page displayed for a 404 error.
-
CMS No Cookies Page: Set it to the page shown when cookies are disabled in the browser. It explains how to enable cookies. The default is "Enable Cookies".
-
Show Breadcrumbs for CMS Pages: If you want breadcrumbs on all CMS pages, set it to "Yes".
- Click 'Save Config' when done.
- In the 'CMS Page' field, select the newly created page as the Home Page.
- Save the configuration.
- Clear the cache by clicking the Cache Management link in the system message.
Techniques to Optimize Performance When Adding CMS Pages in Magento 2 Admin Panel
| Optimization Area | Implementation | Performance Impact |
|---|---|---|
| Caching Configuration | - Enable Magento Full Page Cache (TTL: 86400). - Implement Varnish Caching for large stores. - Configure cache warming schedules. |
- Improved server load performance and response time - Enhanced page delivery speed - Prevention of cache misses |
| Image Handling | - Enable lazy loading. - Compress images without quality loss. - Convert to WebP format. |
- Increased initial page load time - Size reduction - Better compression ratio |
| Mobile Optimization | - Implement responsive design. - Use hardware acceleration for animations. - Create separate CSS files for mobile. |
- Consistent performance across devices - Smoother mobile experience - Faster mobile page loading |
| JavaScript Management | - Enable deferred loading. - Implement JS bundling. - Minify JS files. |
- Faster content rendering - Reduced HTTP requests - Smaller file sizes |
| Content Delivery | - Implement CDN integration with Magento. - Use Progressive JPEG loading. - Enable CSS optimization. |
- Faster global content delivery - Better perceived performance - Reduced style processing time |
| Performance Monitoring | - Regular cache monitoring. - Performance benchmarking. - User experience tracking. |
- Maintenance of optimal performance - Identification of bottlenecks - Validation of optimization efforts |
6 Steps to Edit an Existing CMS Page in Magento Admin Panel
- Navigate to Content > Pages in the Admin Panel to view the list of existing pages.
- You can use the 'Search function' or the 'Filters button' to quickly locate the page you want to edit.
- Directly from the main screen, you can:
- Change the "Page Title".
- Update the "URL".
- Adjust the "Layout".
- Make the page "visible" or "hidden".

- In the 'Action' column, click "Select" to see additional options.

- Choose from the available actions, such as editing or duplicating the page.
- Check multiple pages and use the 'dropdown menu' to apply actions like:
- Enabling pages
- Disabling pages
- Deleting pages
Advanced CMS Customization for Creating Custom Static Pages in the Magento 2 Backend
| Customization Type | Implementation Method | Technical Details | Impact on CMS Pages |
|---|---|---|---|
| XML Layout Structure | Custom XML File Creation | Create file: cms_page_view_id_<identifier>.xml in layout folder |
Defines unique page structures and content placement |
| Layout Options | Built-in Layouts | - Empty layout - 1 column - 2 columns (left/right bar) - 3 columns |
Provides a foundation for content organization |
| Custom Design Updates | Admin Panel Configuration | Apply through the 'Custom Design Update' field | Enables temporary or scheduled design changes |
| Dynamic Content Blocks | Widget Integration | Place in XML layout or content area | Creates reusable content components |
| Theme Customization | Frontend/Backend theming | Modify in app/design/frontend/ directory |
Controls visual presentation and styling |
| Container Management | XML References | <referenceContainer> tags in layout files |
Manages content block positioning |
| Custom CSS/JS | Asset Integration | Add in Magento theme's web directory | Enhances page functionality and styling |
| Layout Handles | URL-Based Configuration | Format: cms_page_view_selectable_[url-key] |
Enables page-specific layouts |
| Block Placement | XML Block Declaration | Define through <block> elements |
Controls content module positioning |
| Admin Interface | Backend Theme Updates | Customize through admin theme XML | Improves content management workflow |
6 Steps to Import CMS Pages to Magento 2
Step 1: Create a New Import Job
- Navigate to System > Improved Import/Export > Import Jobs.
- Click 'Add New Job' to create a new import task.
Step 2: Configure General Settings
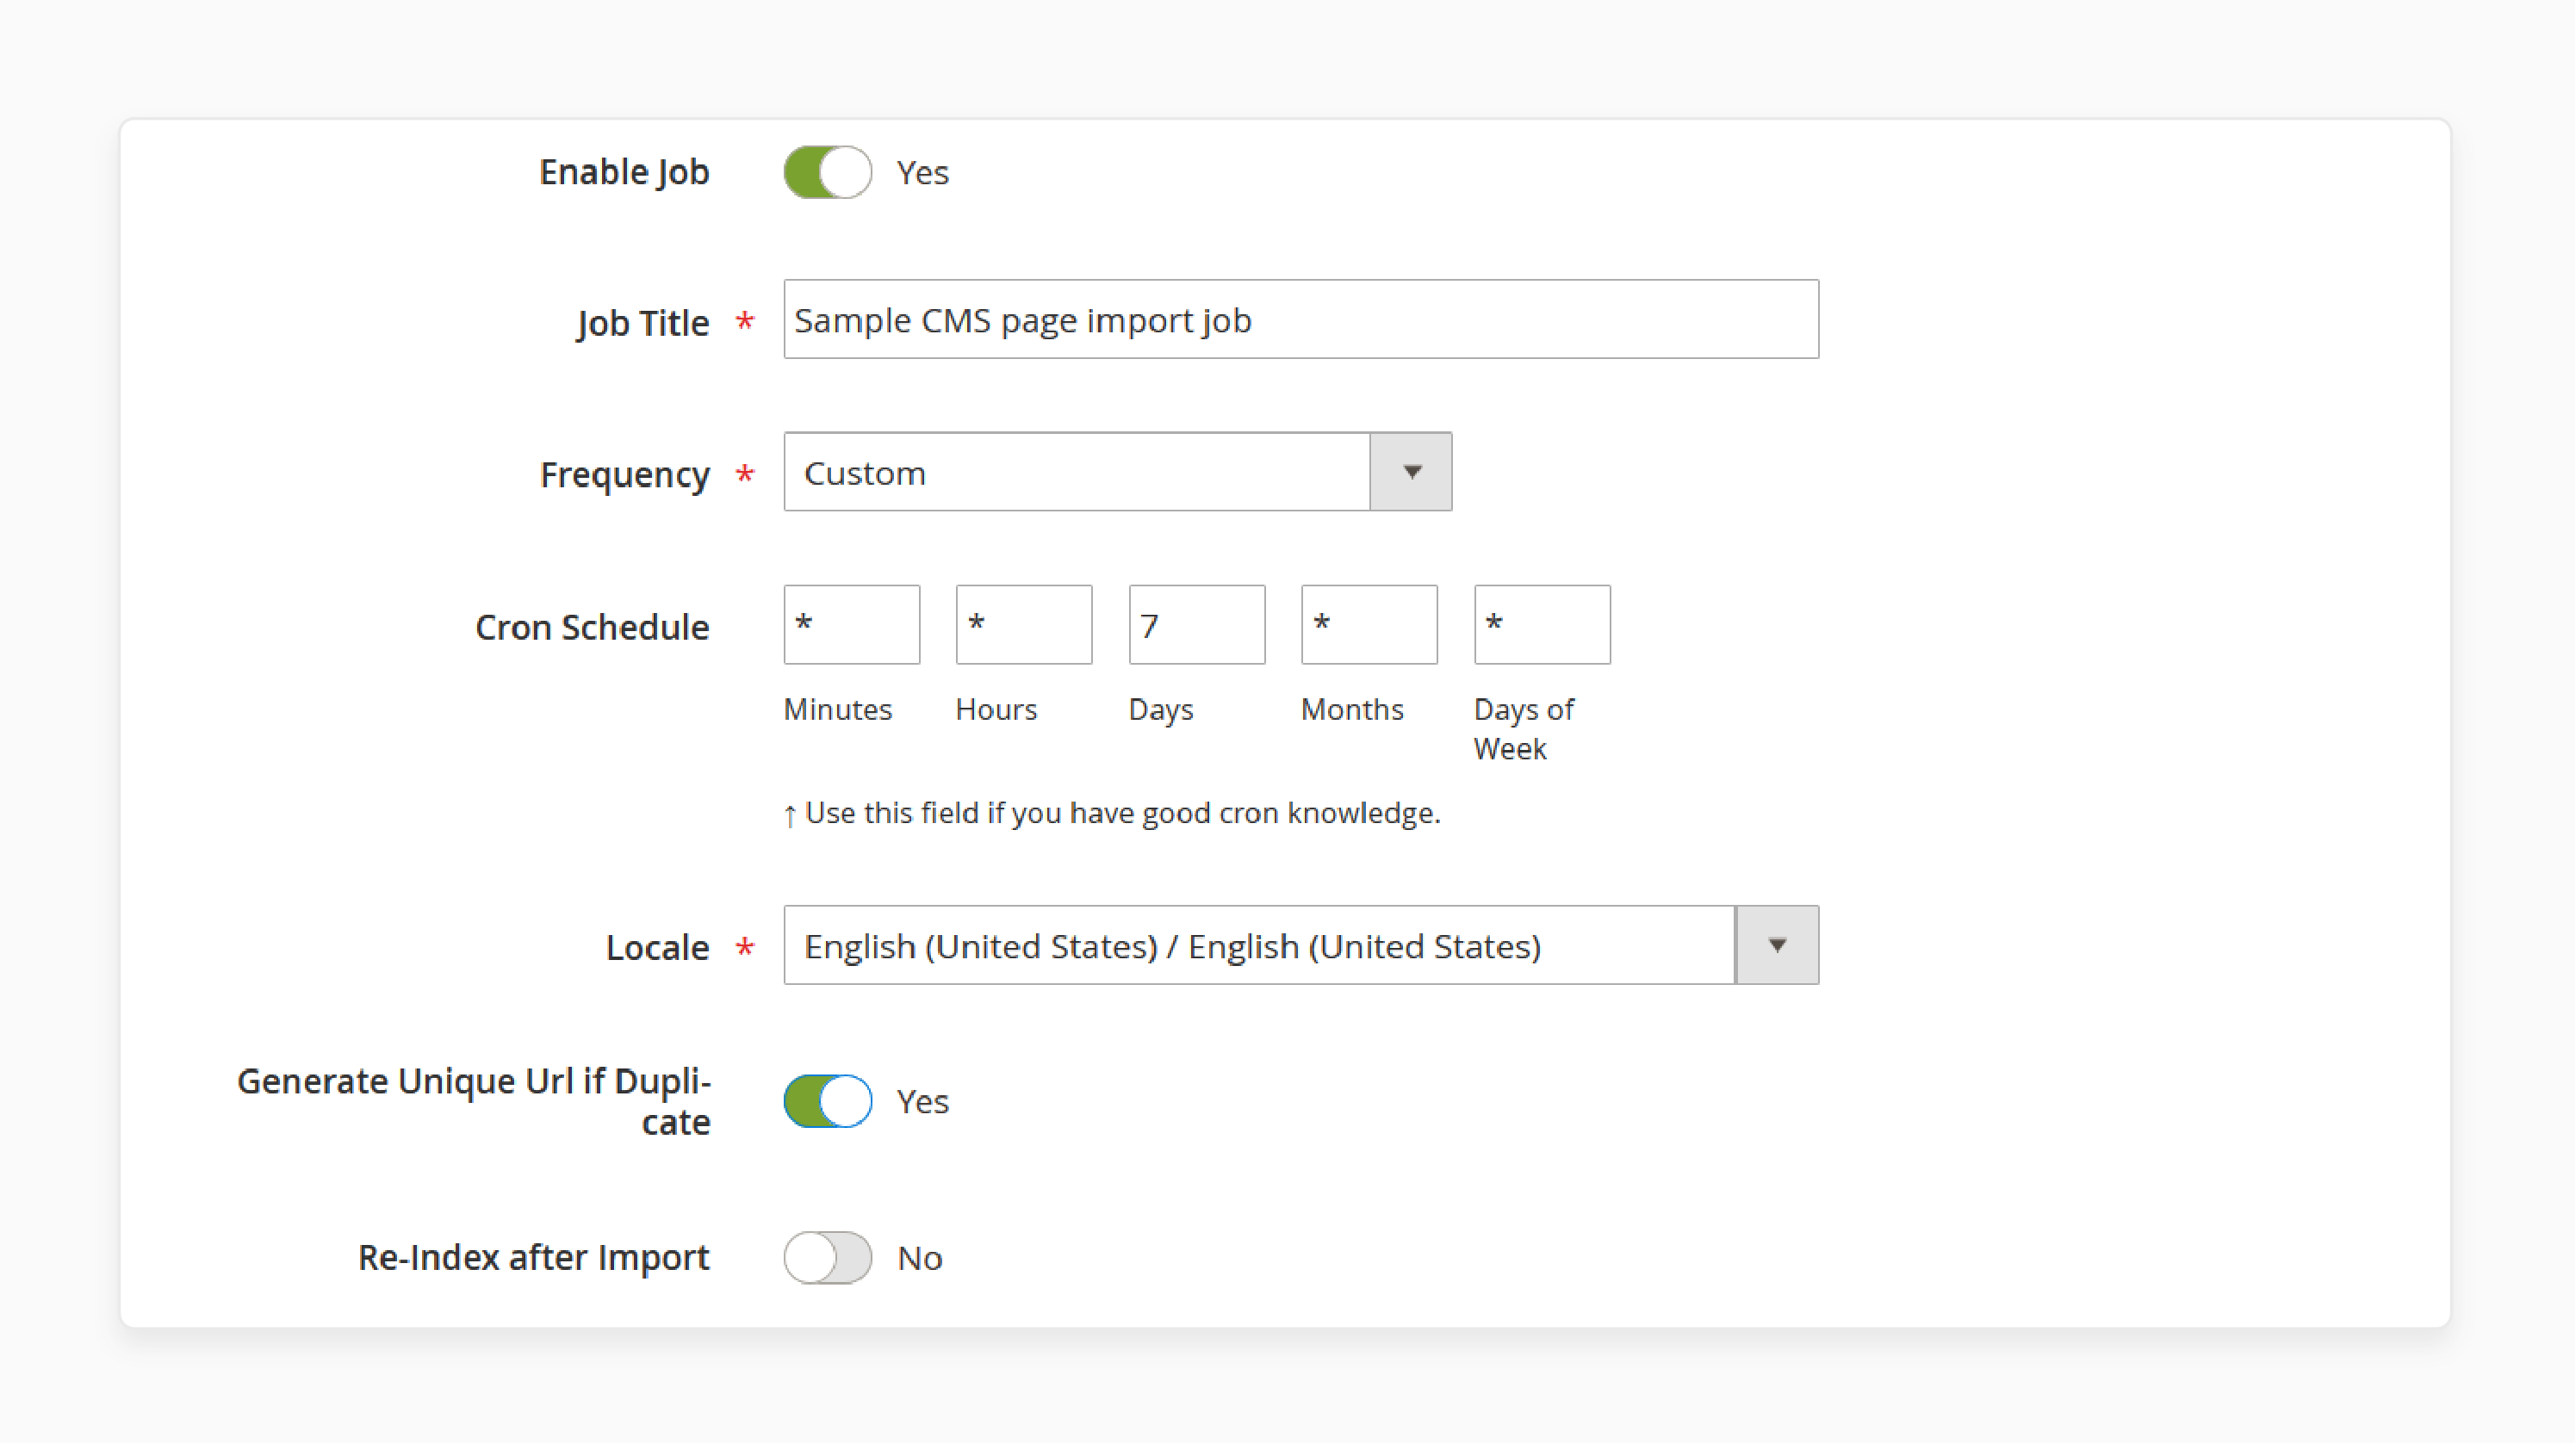
Under the General Settings tab:
-
Enable Job: Enable this field.
-
Job Title: Assign a "title" to the job.
-
Cron Schedule: Set a "schedule" if you plan to automate recurring imports.
-
Locale: Select the preferred language (locale).
-
Enable or disable options like:
- Unique URL generation
- Re-index after import
- Email notifications
Step 3: Set Import Settings
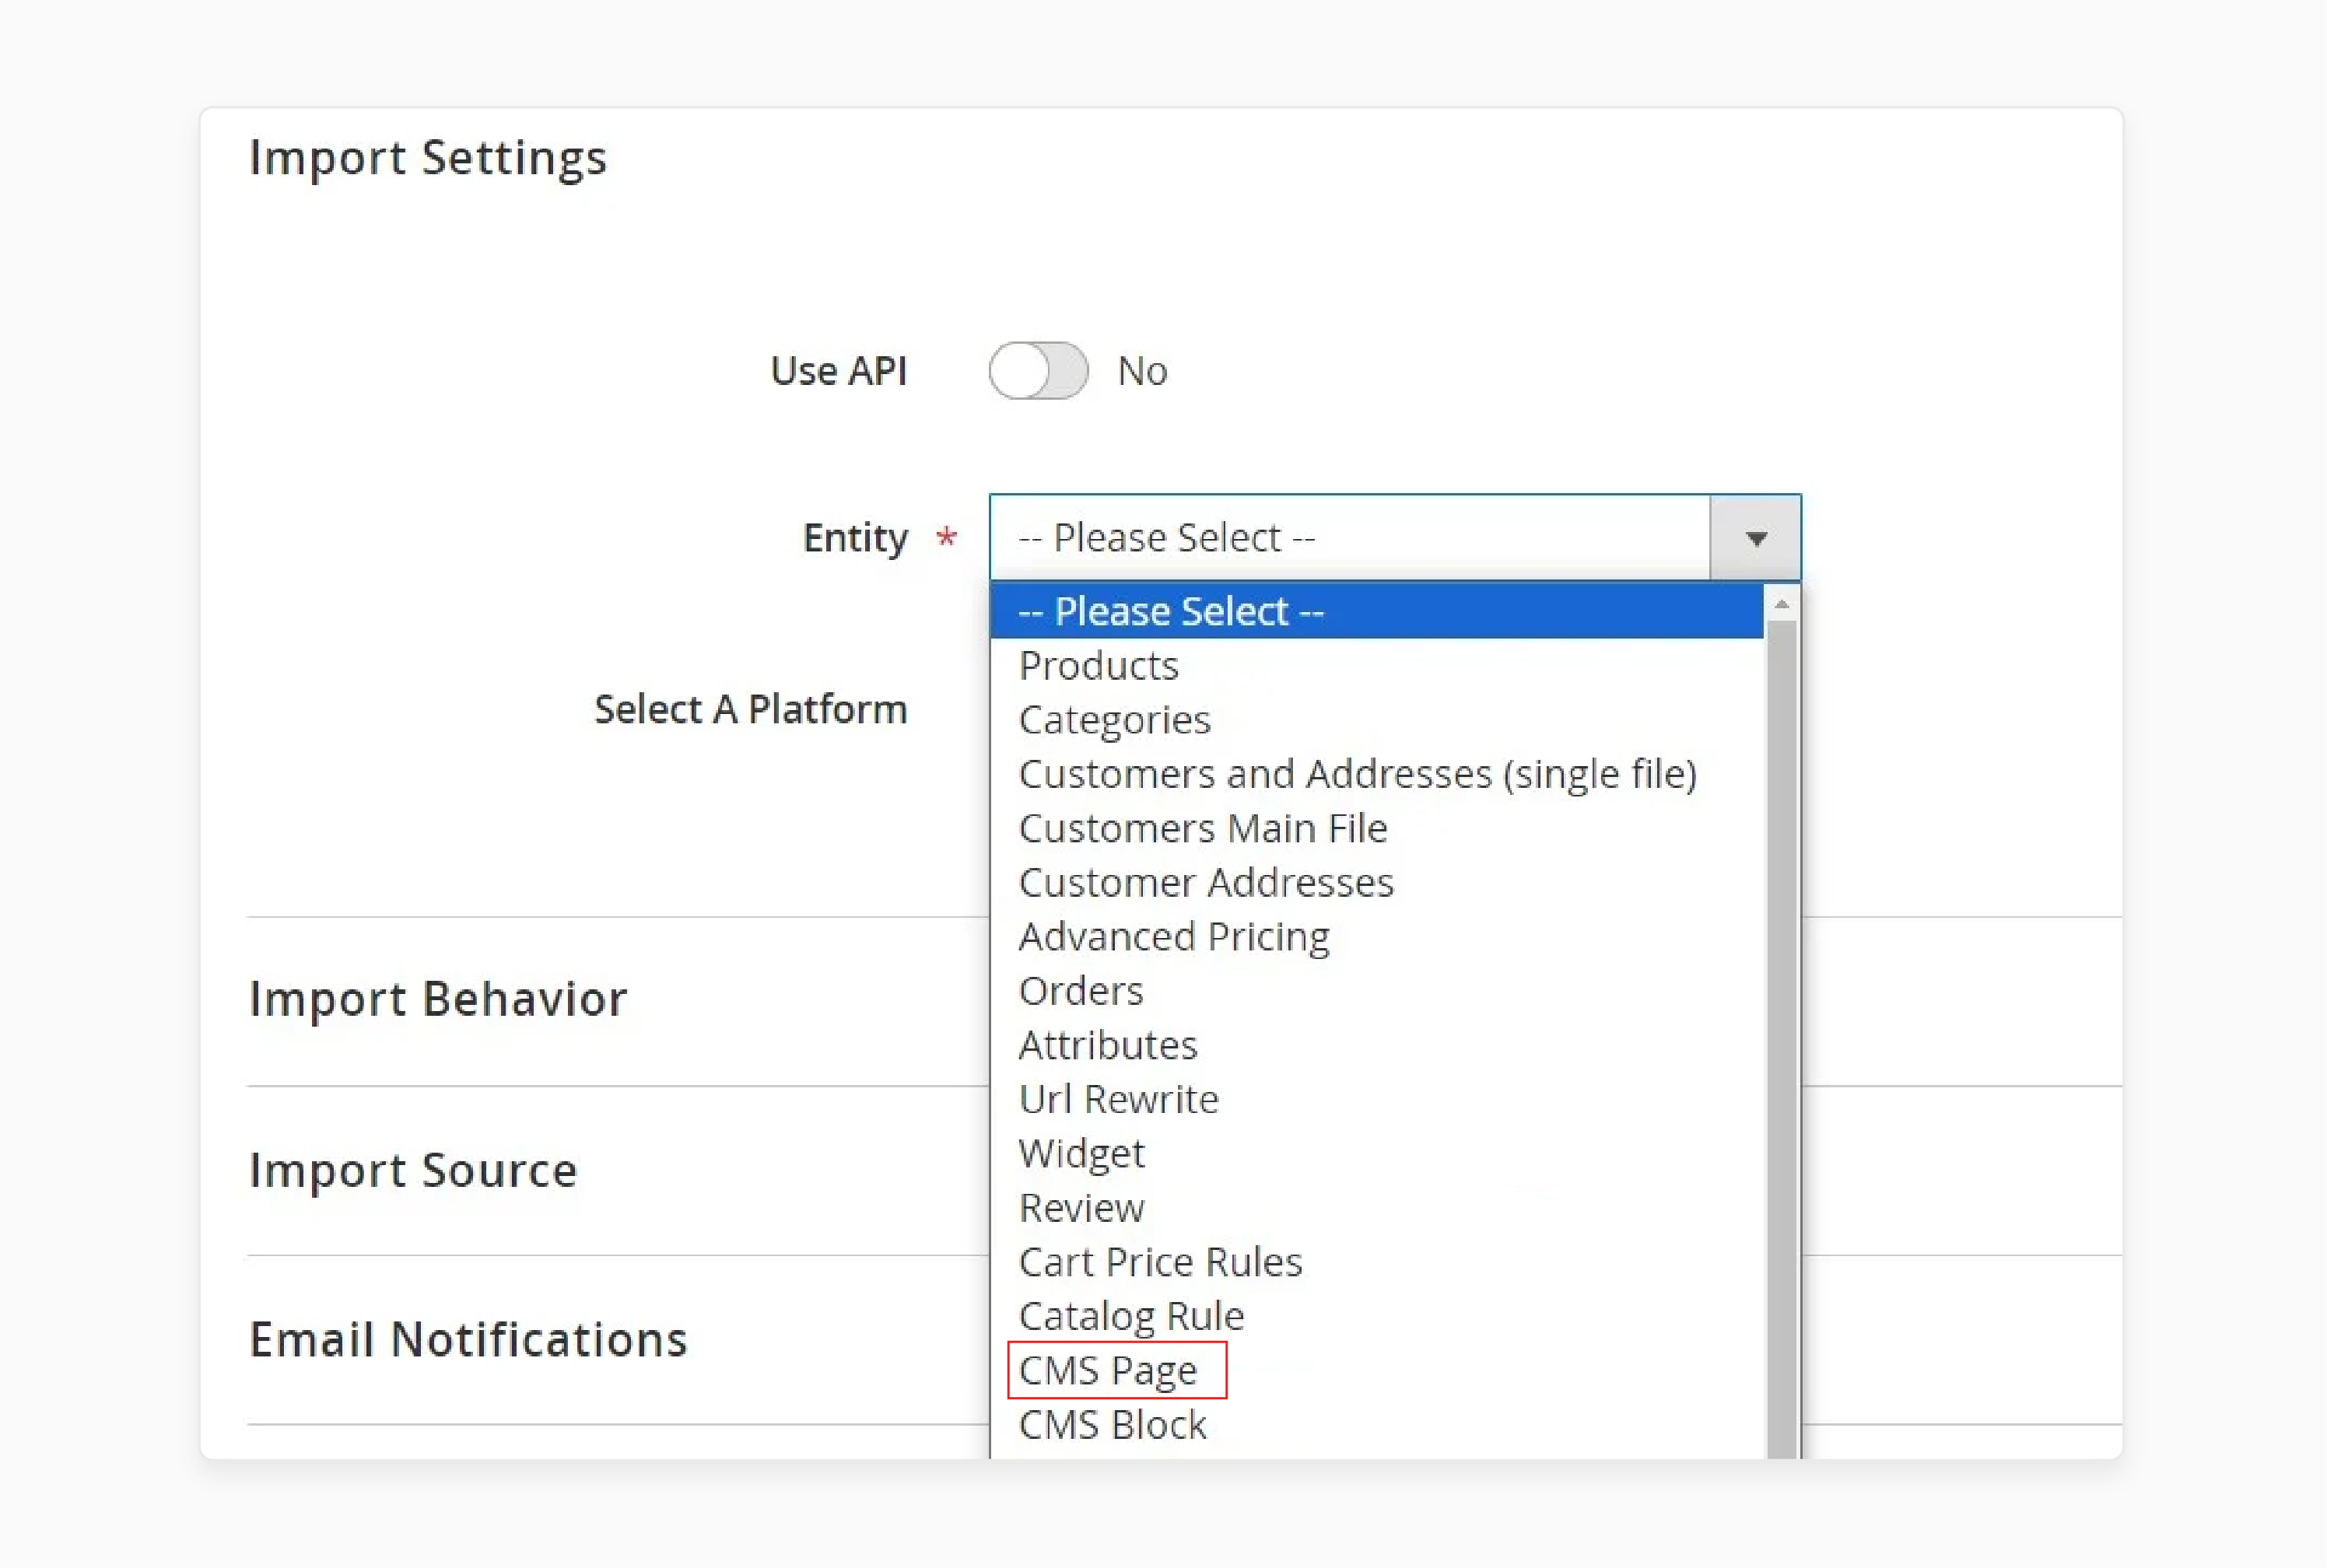
- Go to the Import Settings section.
- Choose "CMS Page" as the import entity.
- Enable or disable API synchronization as needed.
- Select the platform from which you're importing data.
- Apply a mapping preset to align external designations with Magento 2's standards.
Step 4: Define Import Behavior
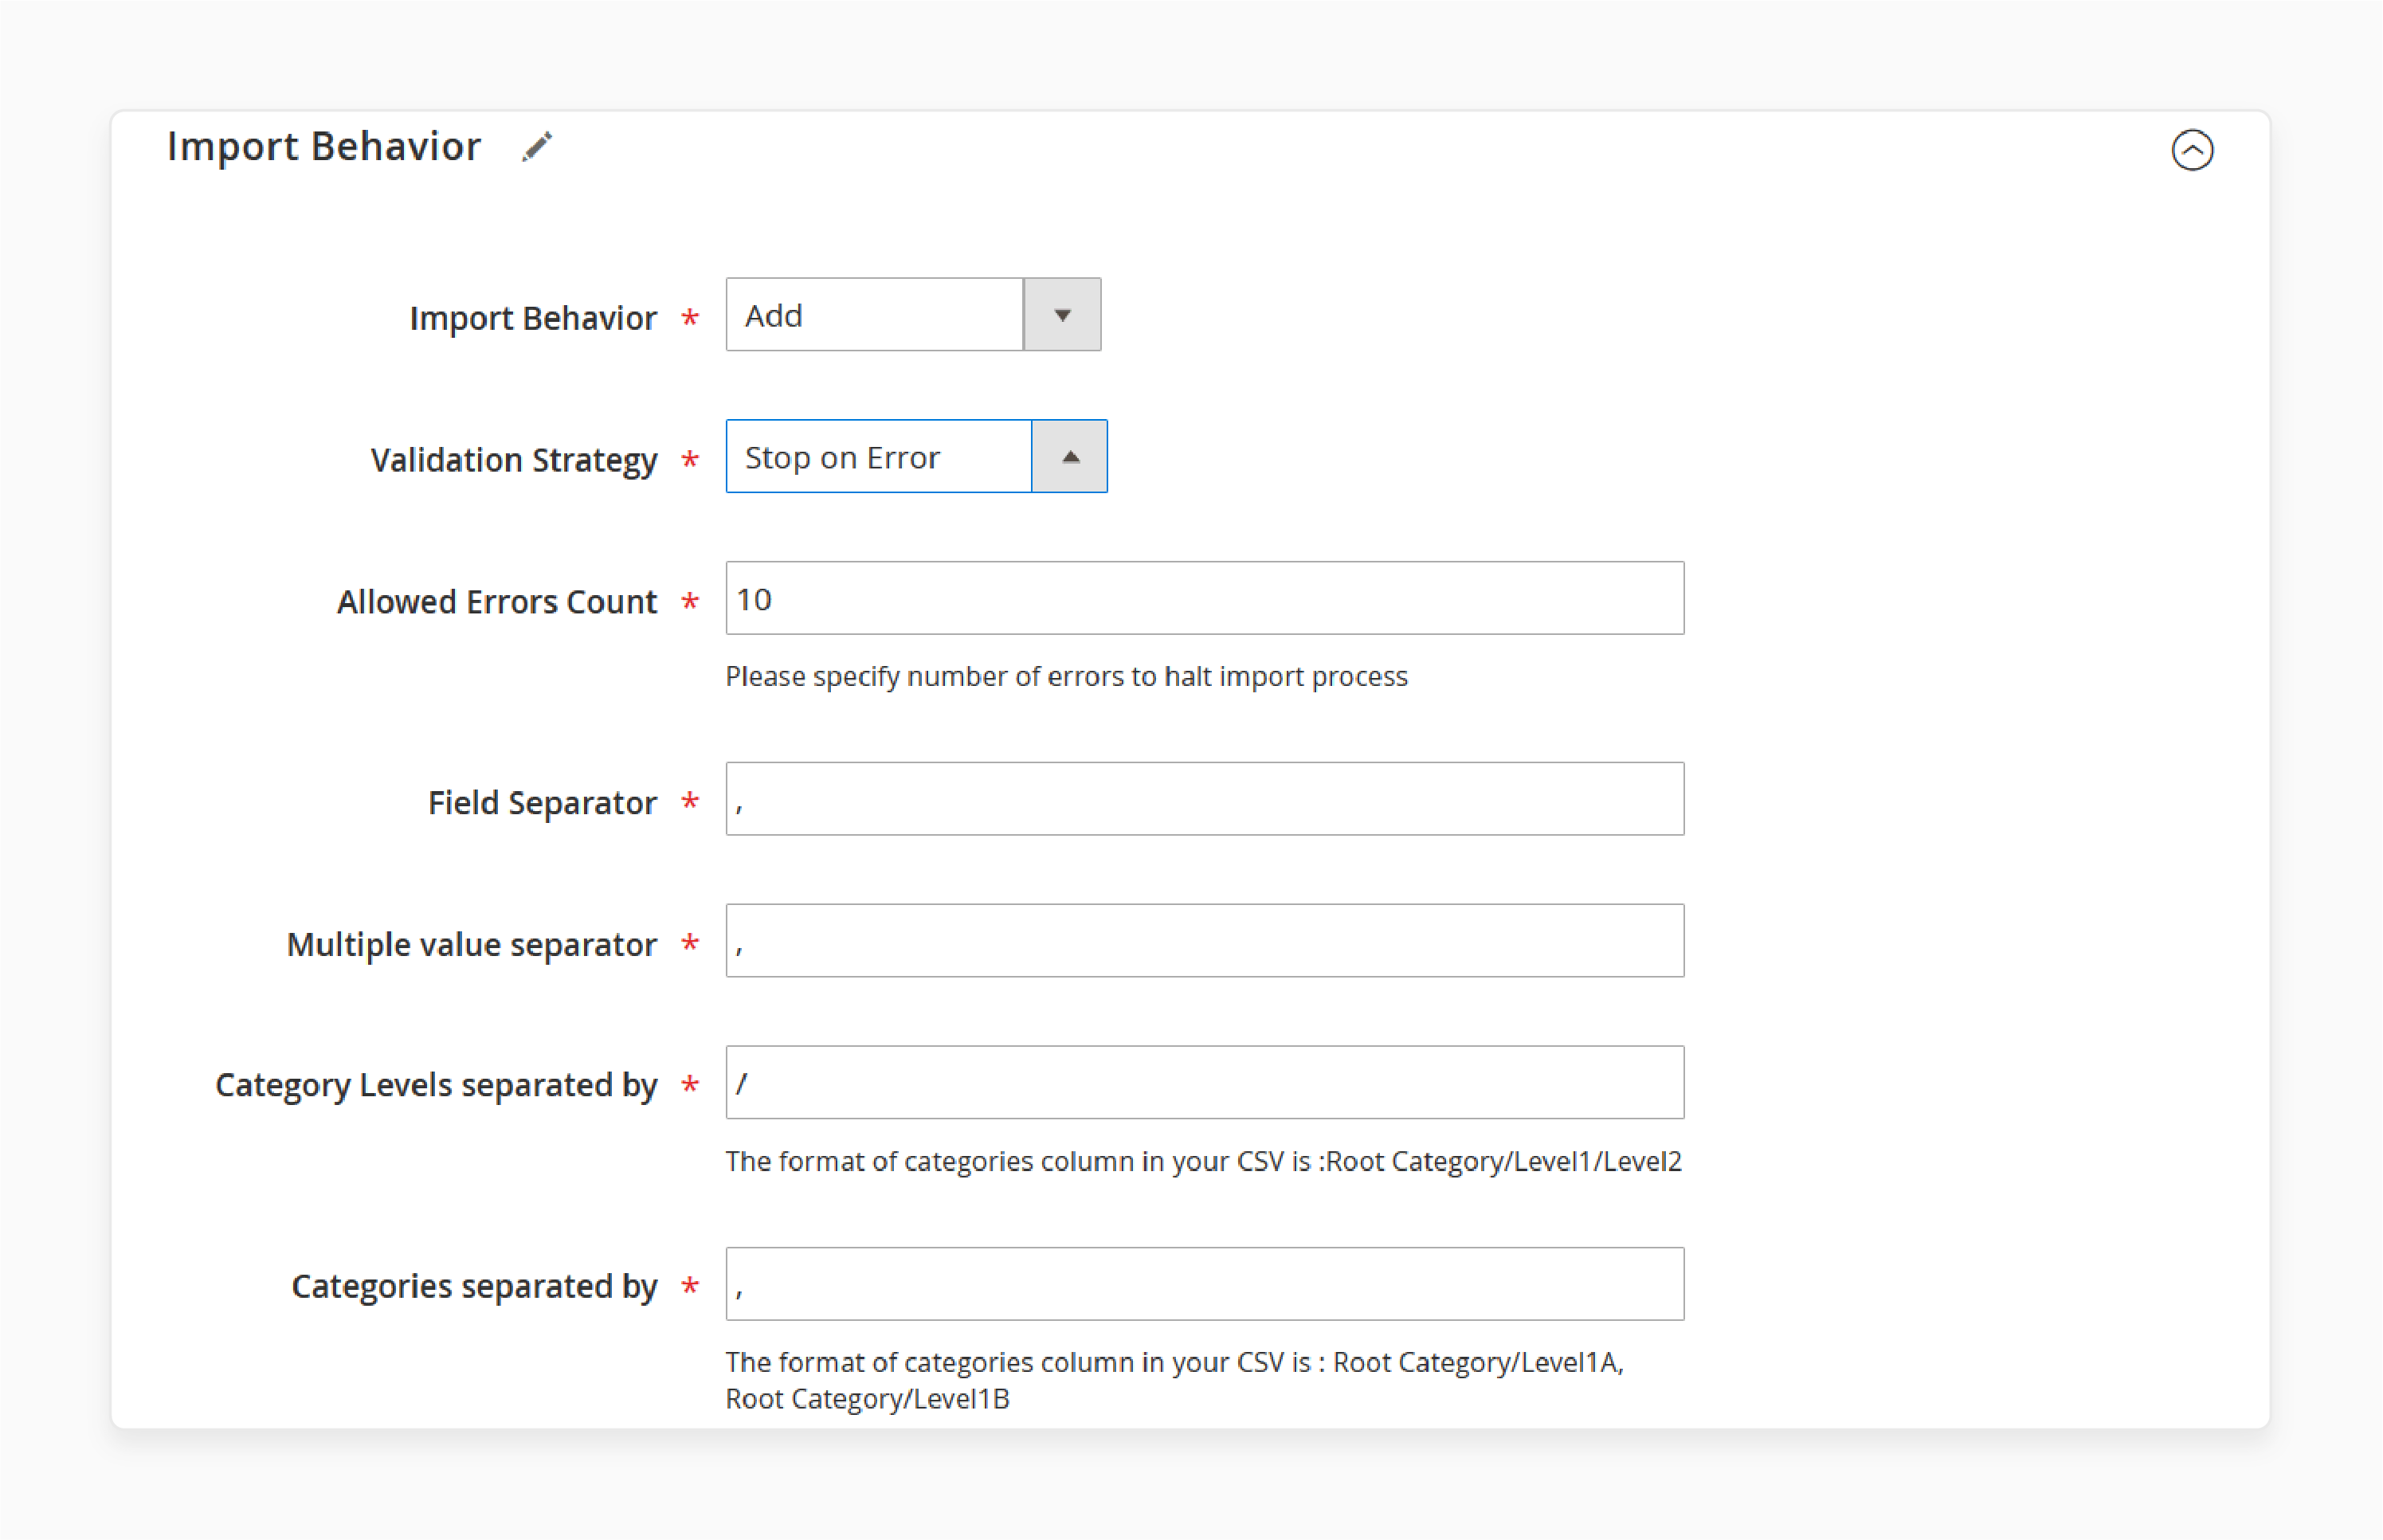
- Go to the 'Import Behavior' tab.
- Choose one of the following import methods:
- Add/Update: Add new data or update existing records.
- Replace: Overwrite existing data entirely.
- Delete: Remove selected data.
- Specify a "validation strategy", "error limits", and "data separators".
Step 5: Specify the Import Source
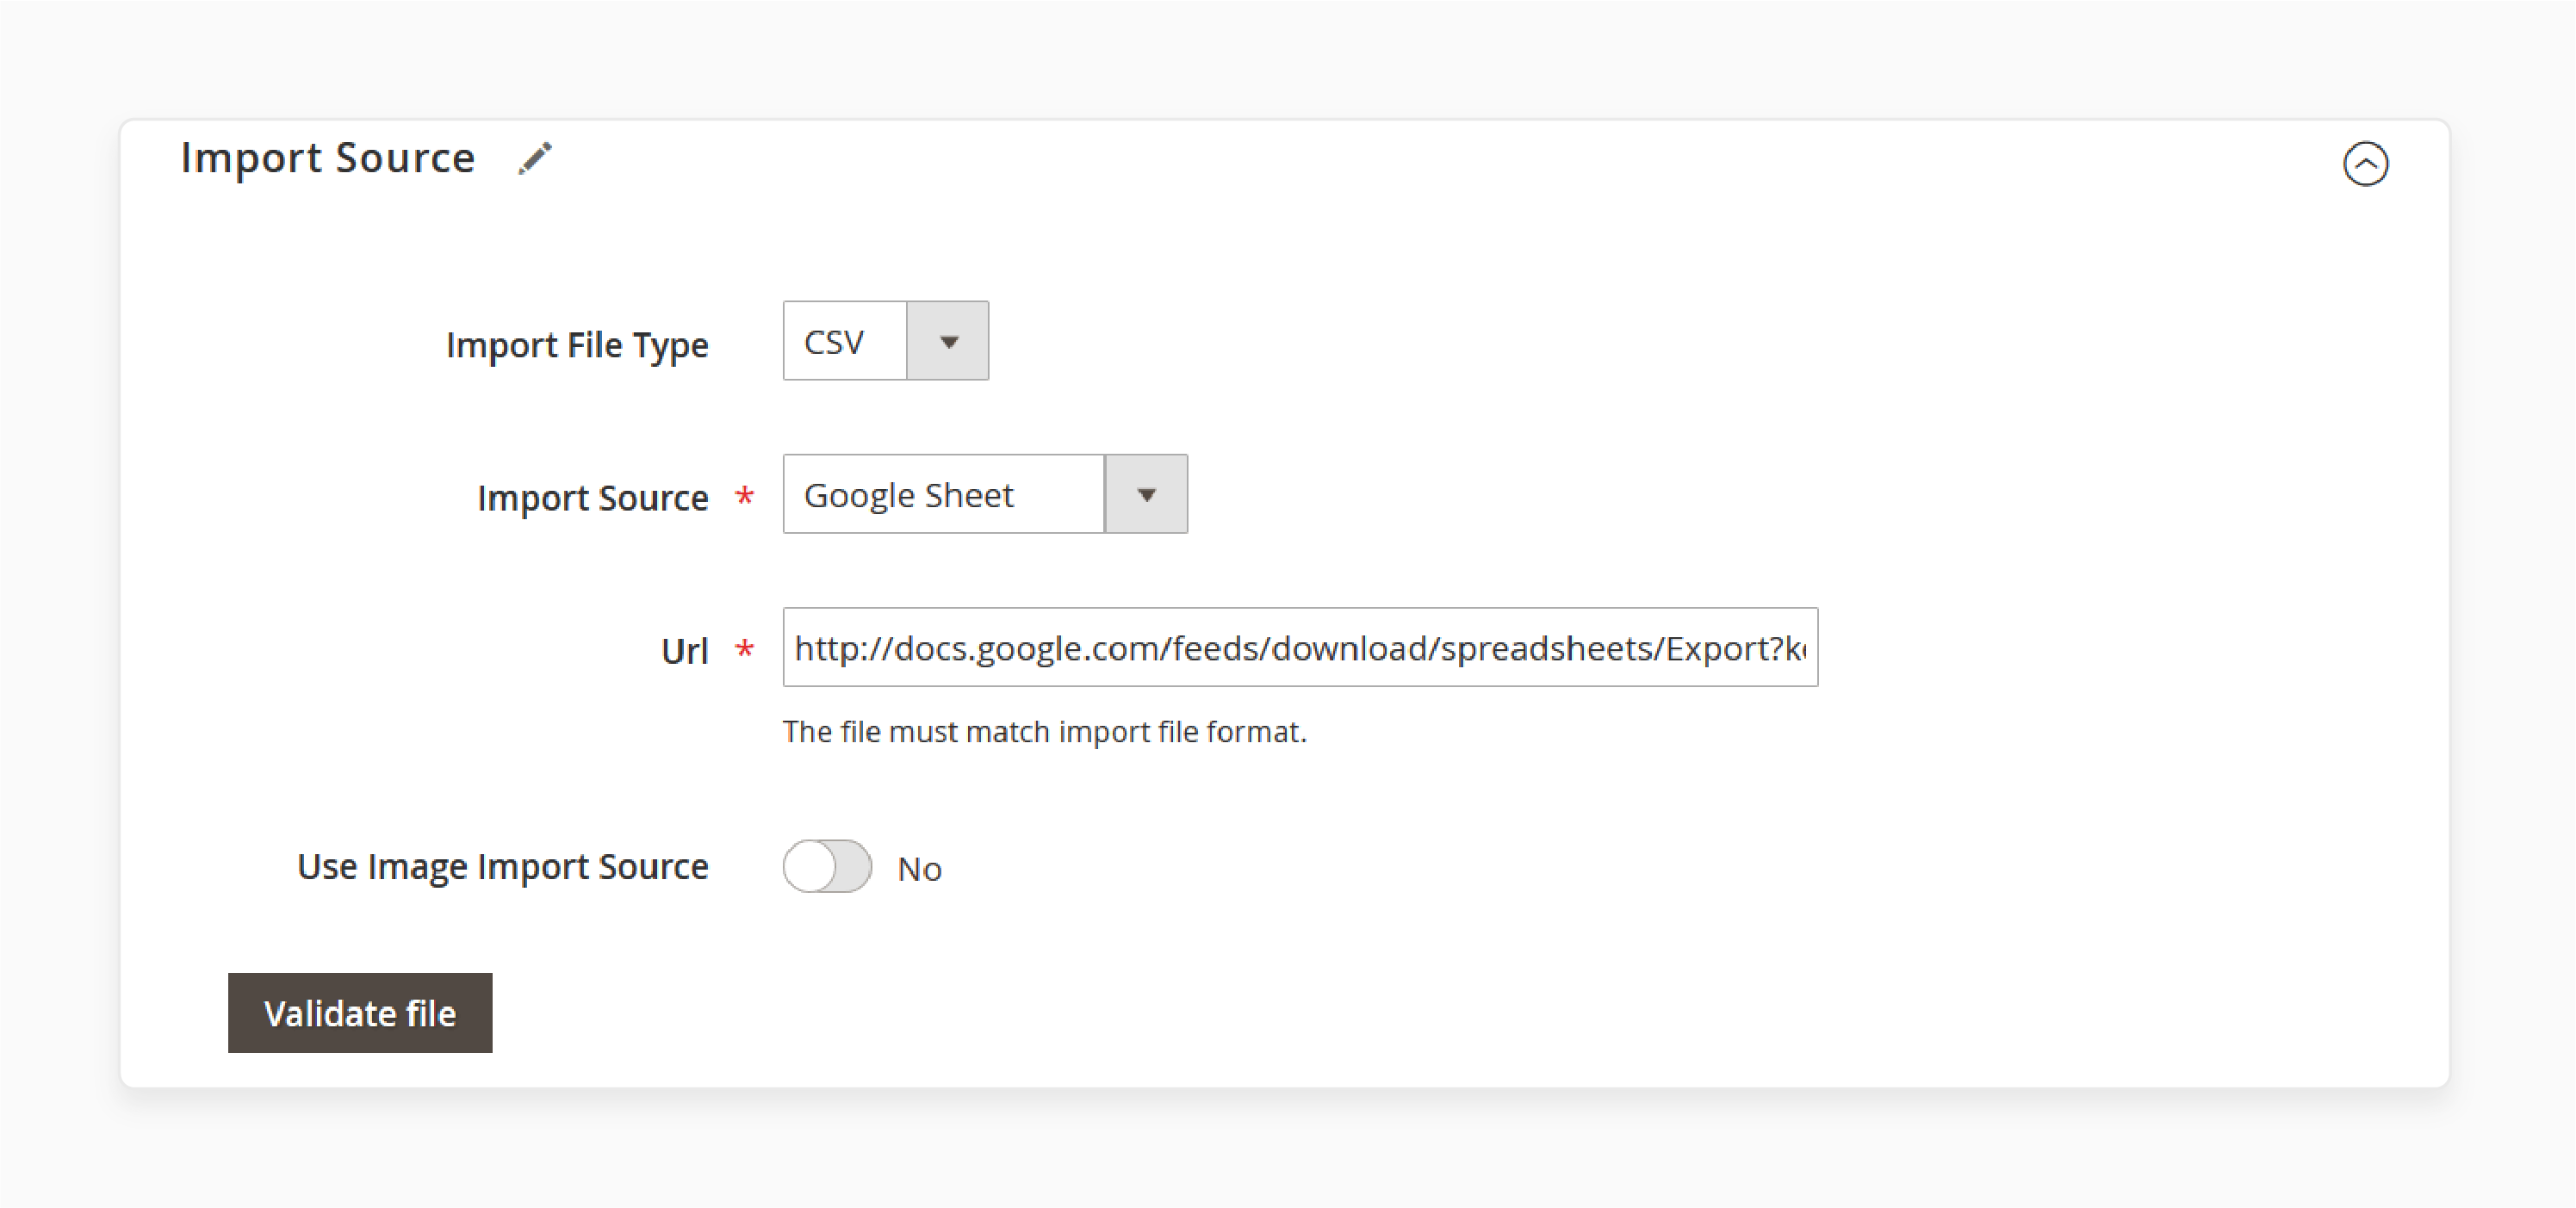
Under the 'Import Source' tab:
-
Select the file type (e.g., "CSV").
-
Specify the source of your import file:
- Server
- URL
- Google Sheets
- Direct Upload
- Dropbox
Step 6: Run the Import
- Once all configurations are complete, click 'Save & Run' in the top-right corner.
- The Import Magento 2 CMS Page module will process and import the CMS pages into Magento 2.
Note: Pages created using Page Builder follow the same attribute formatting. The content is stored in the ‘content’ column. It shares the same structure as CMS pages created manually.
9 Steps to Export CMS Pages from Magento 2
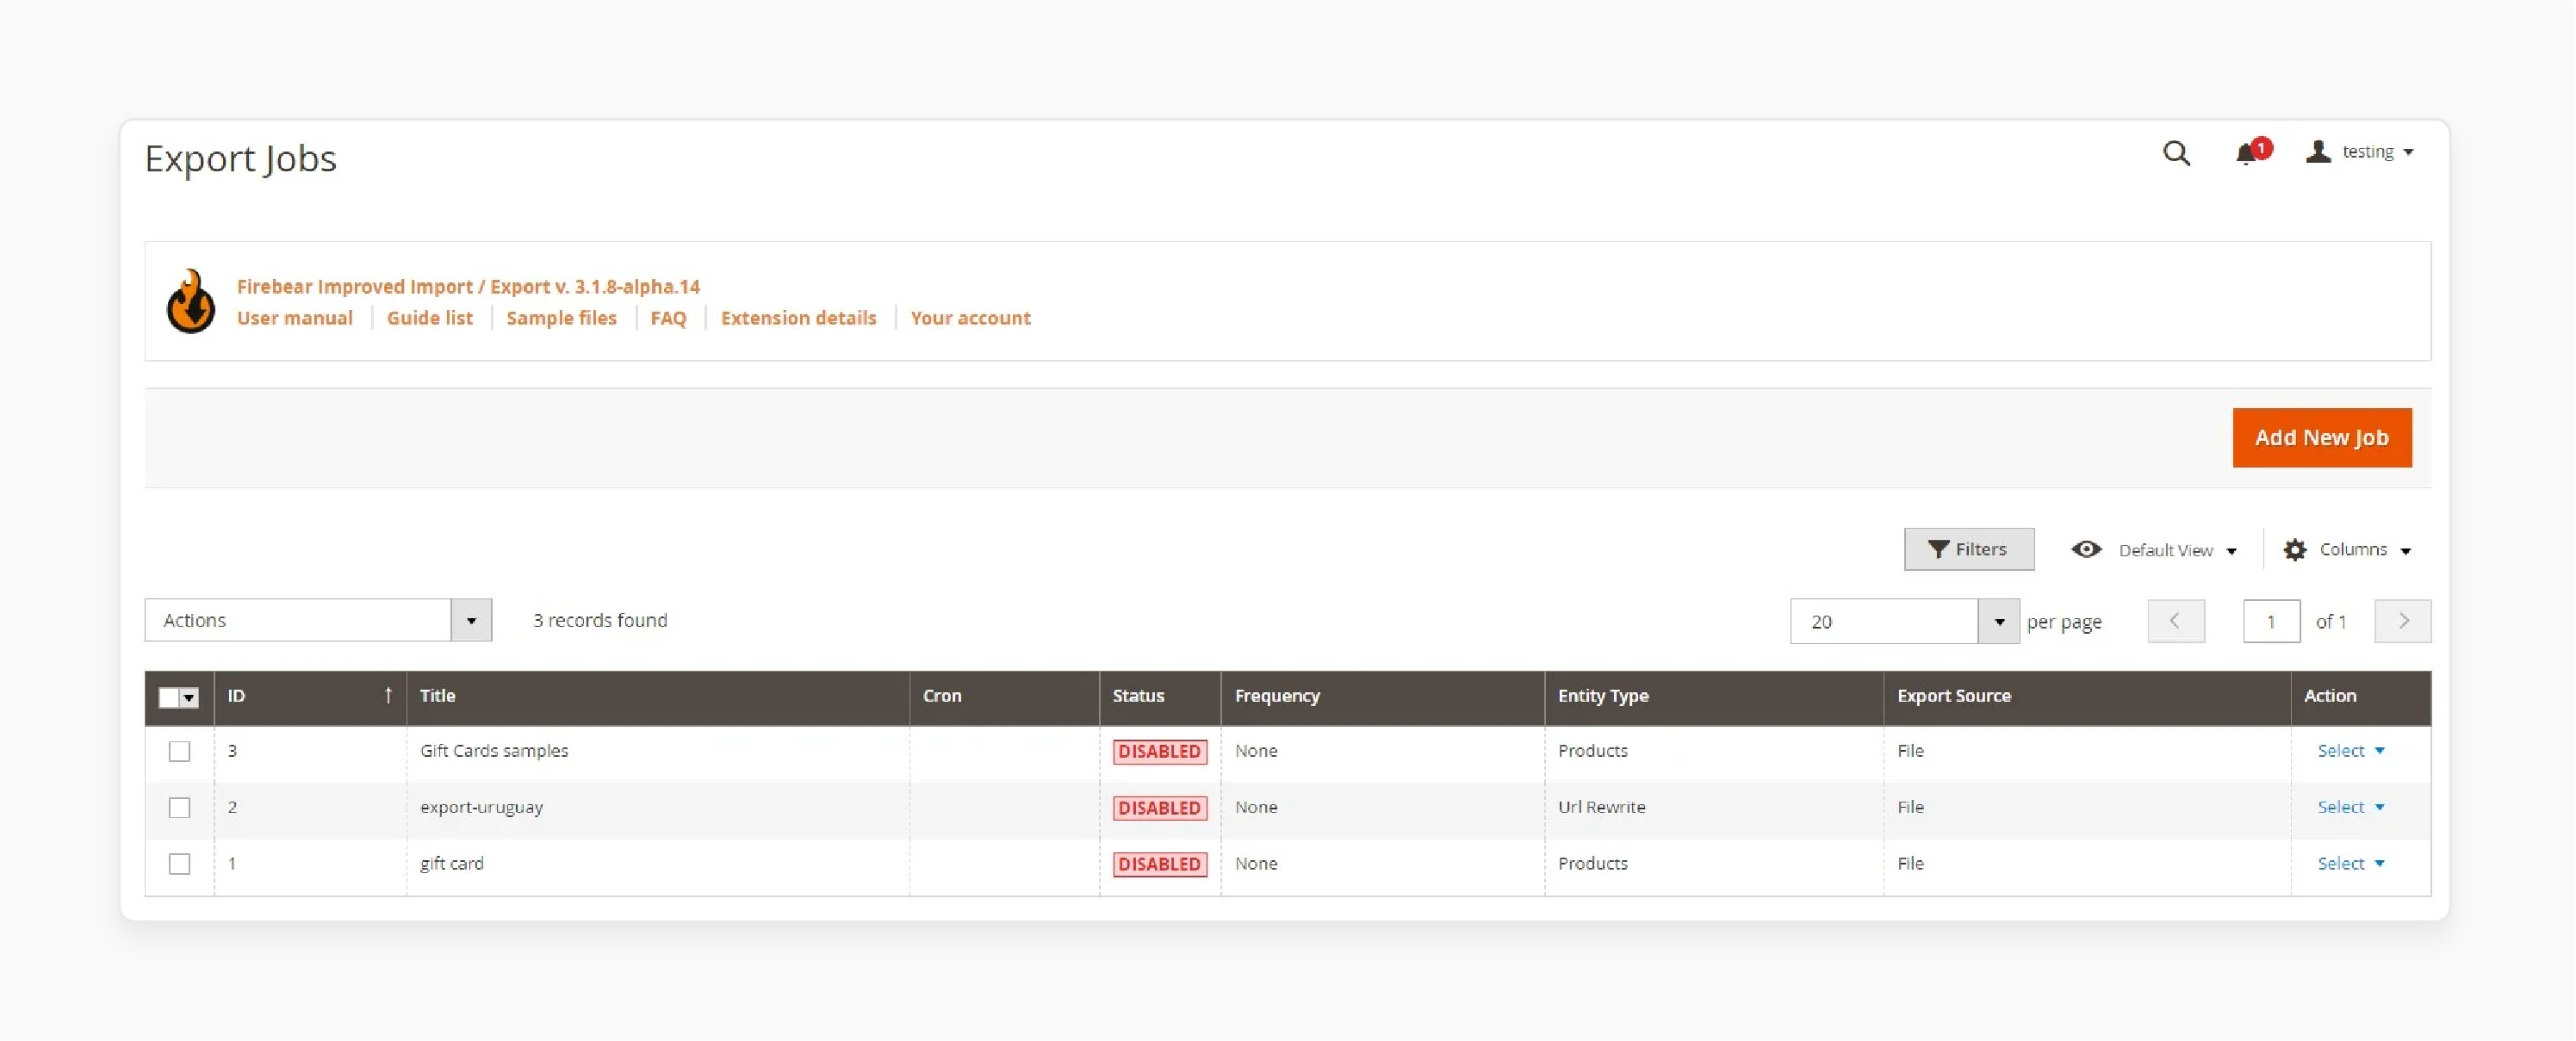
- Navigate to System > Improved Import/Export > Export Jobs.
- Click 'Add New Job' to create a new export task.
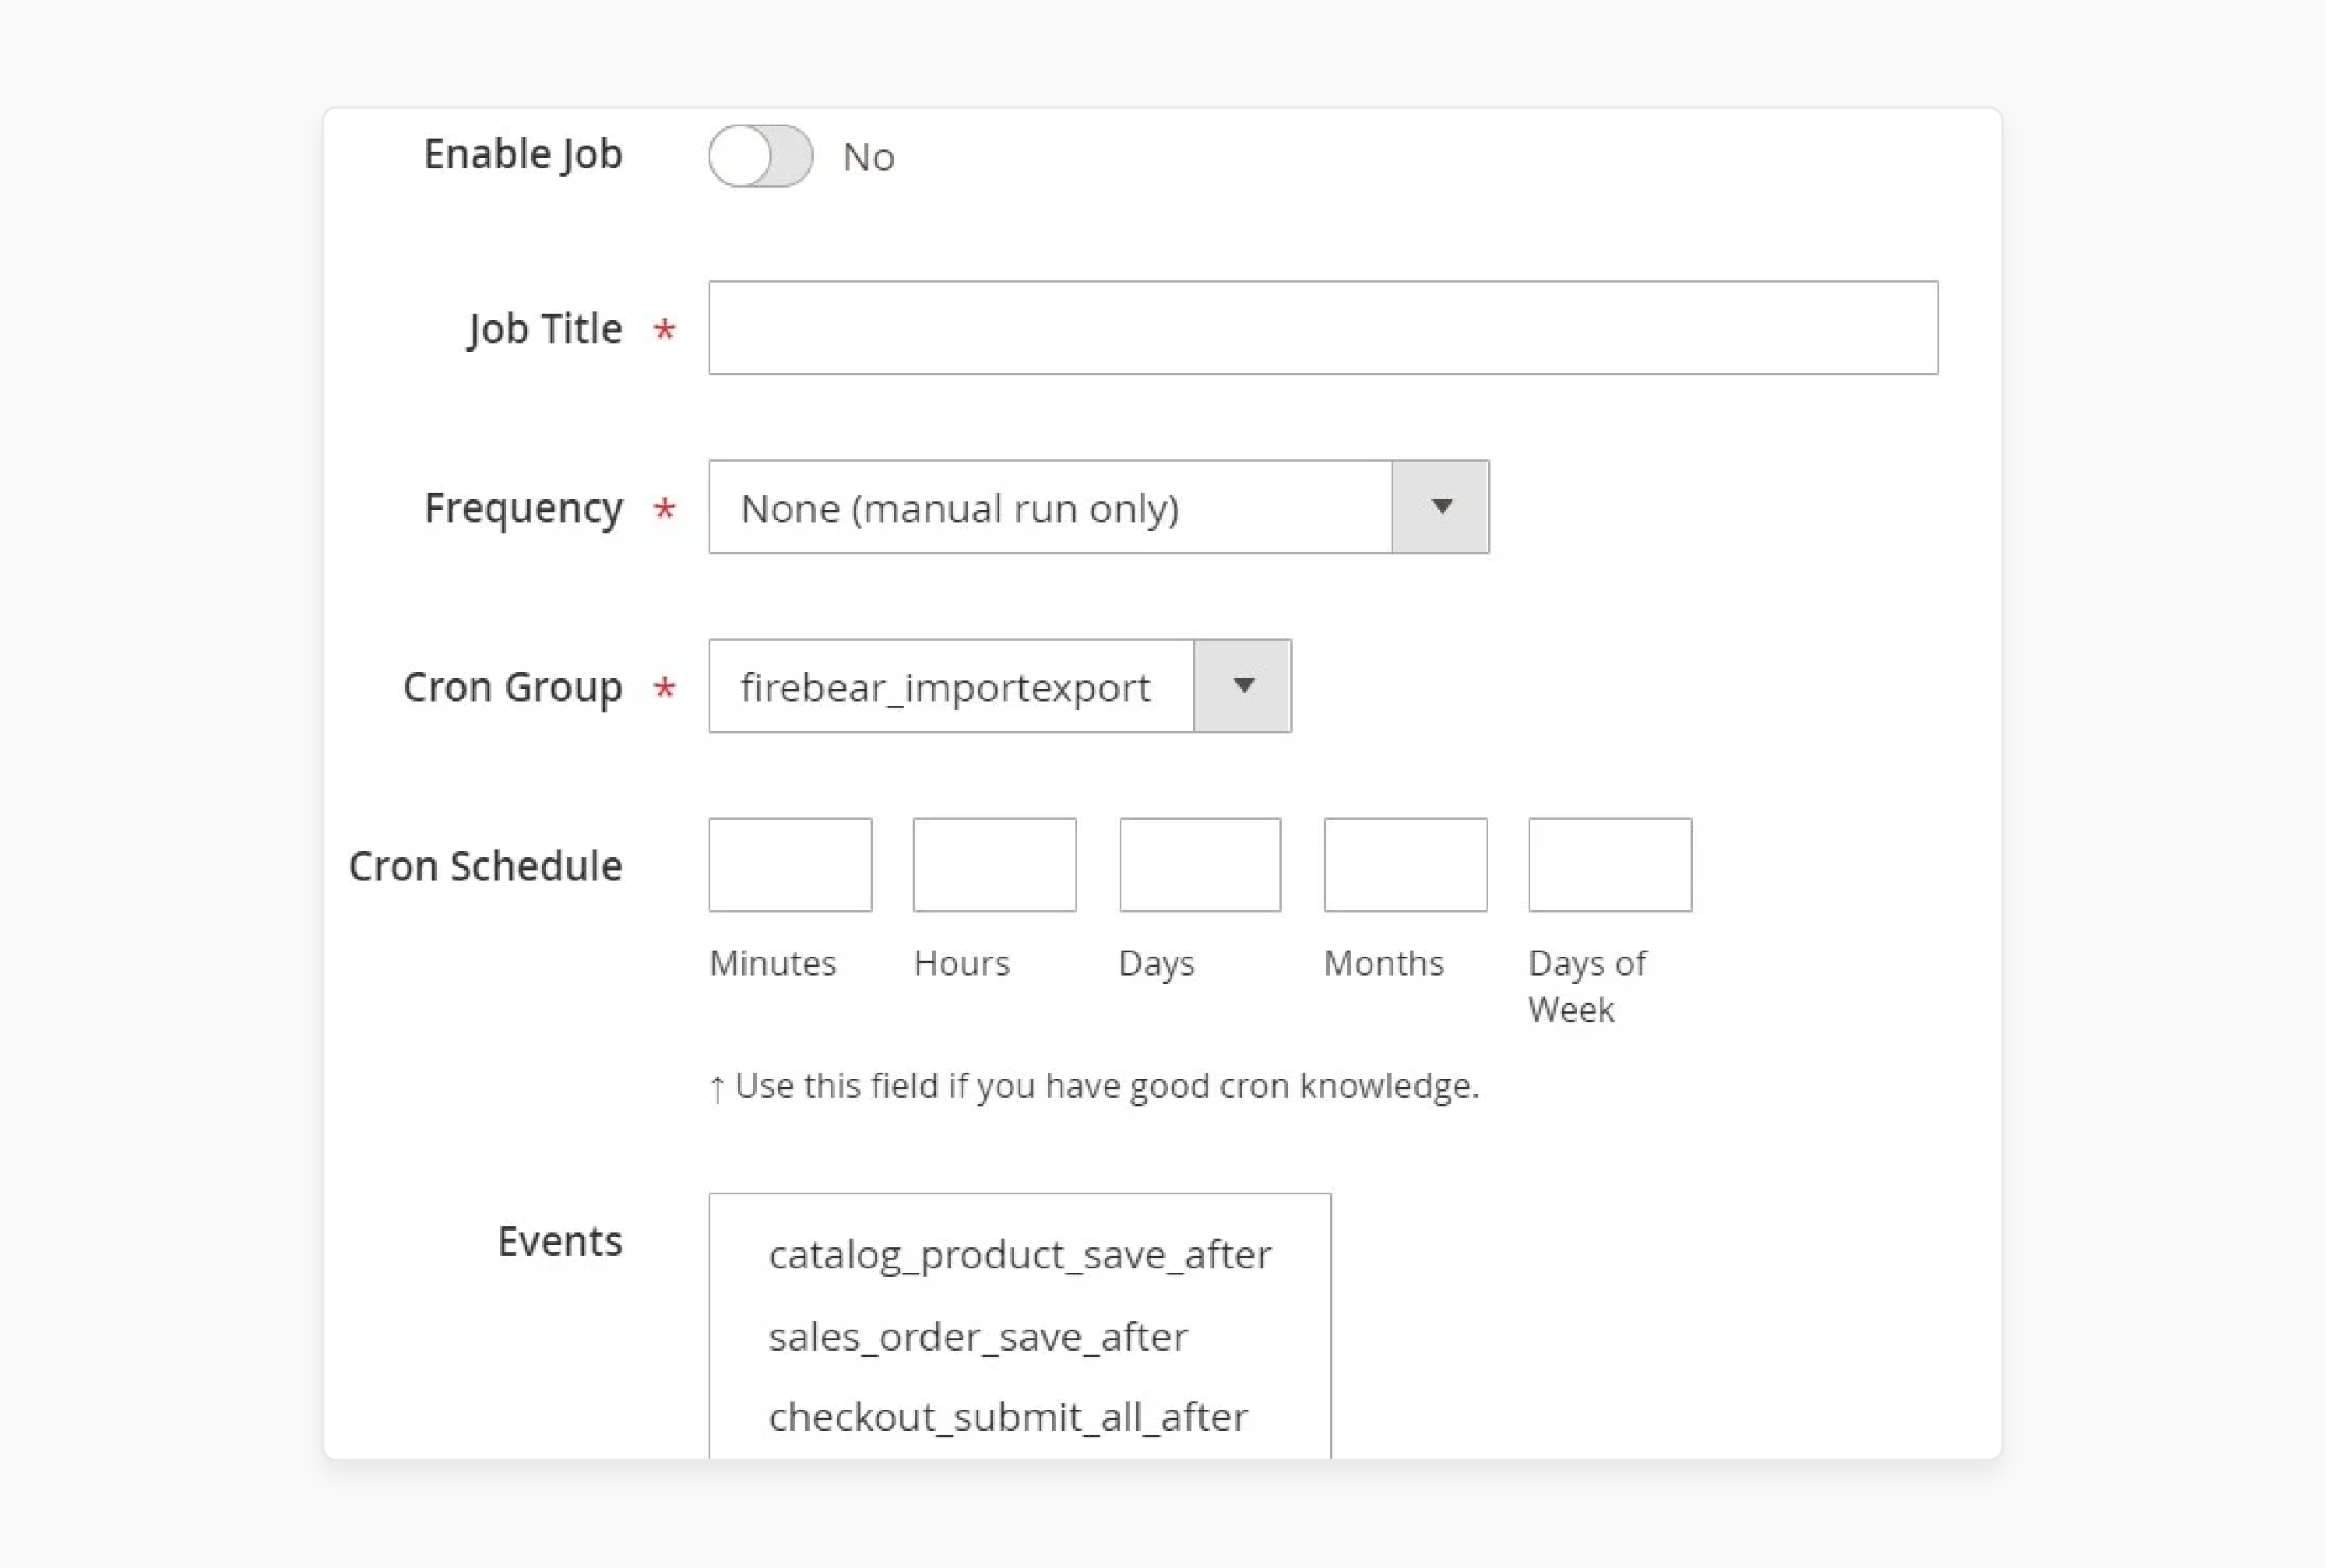
- Under the 'General Settings' tab:
- Enable the "export job".
- Provide a "title" for the task.
- Set a "frequency" for the export process or leave it blank for a one-time operation.
- Select a "file language" and configure additional attribute separation if needed.
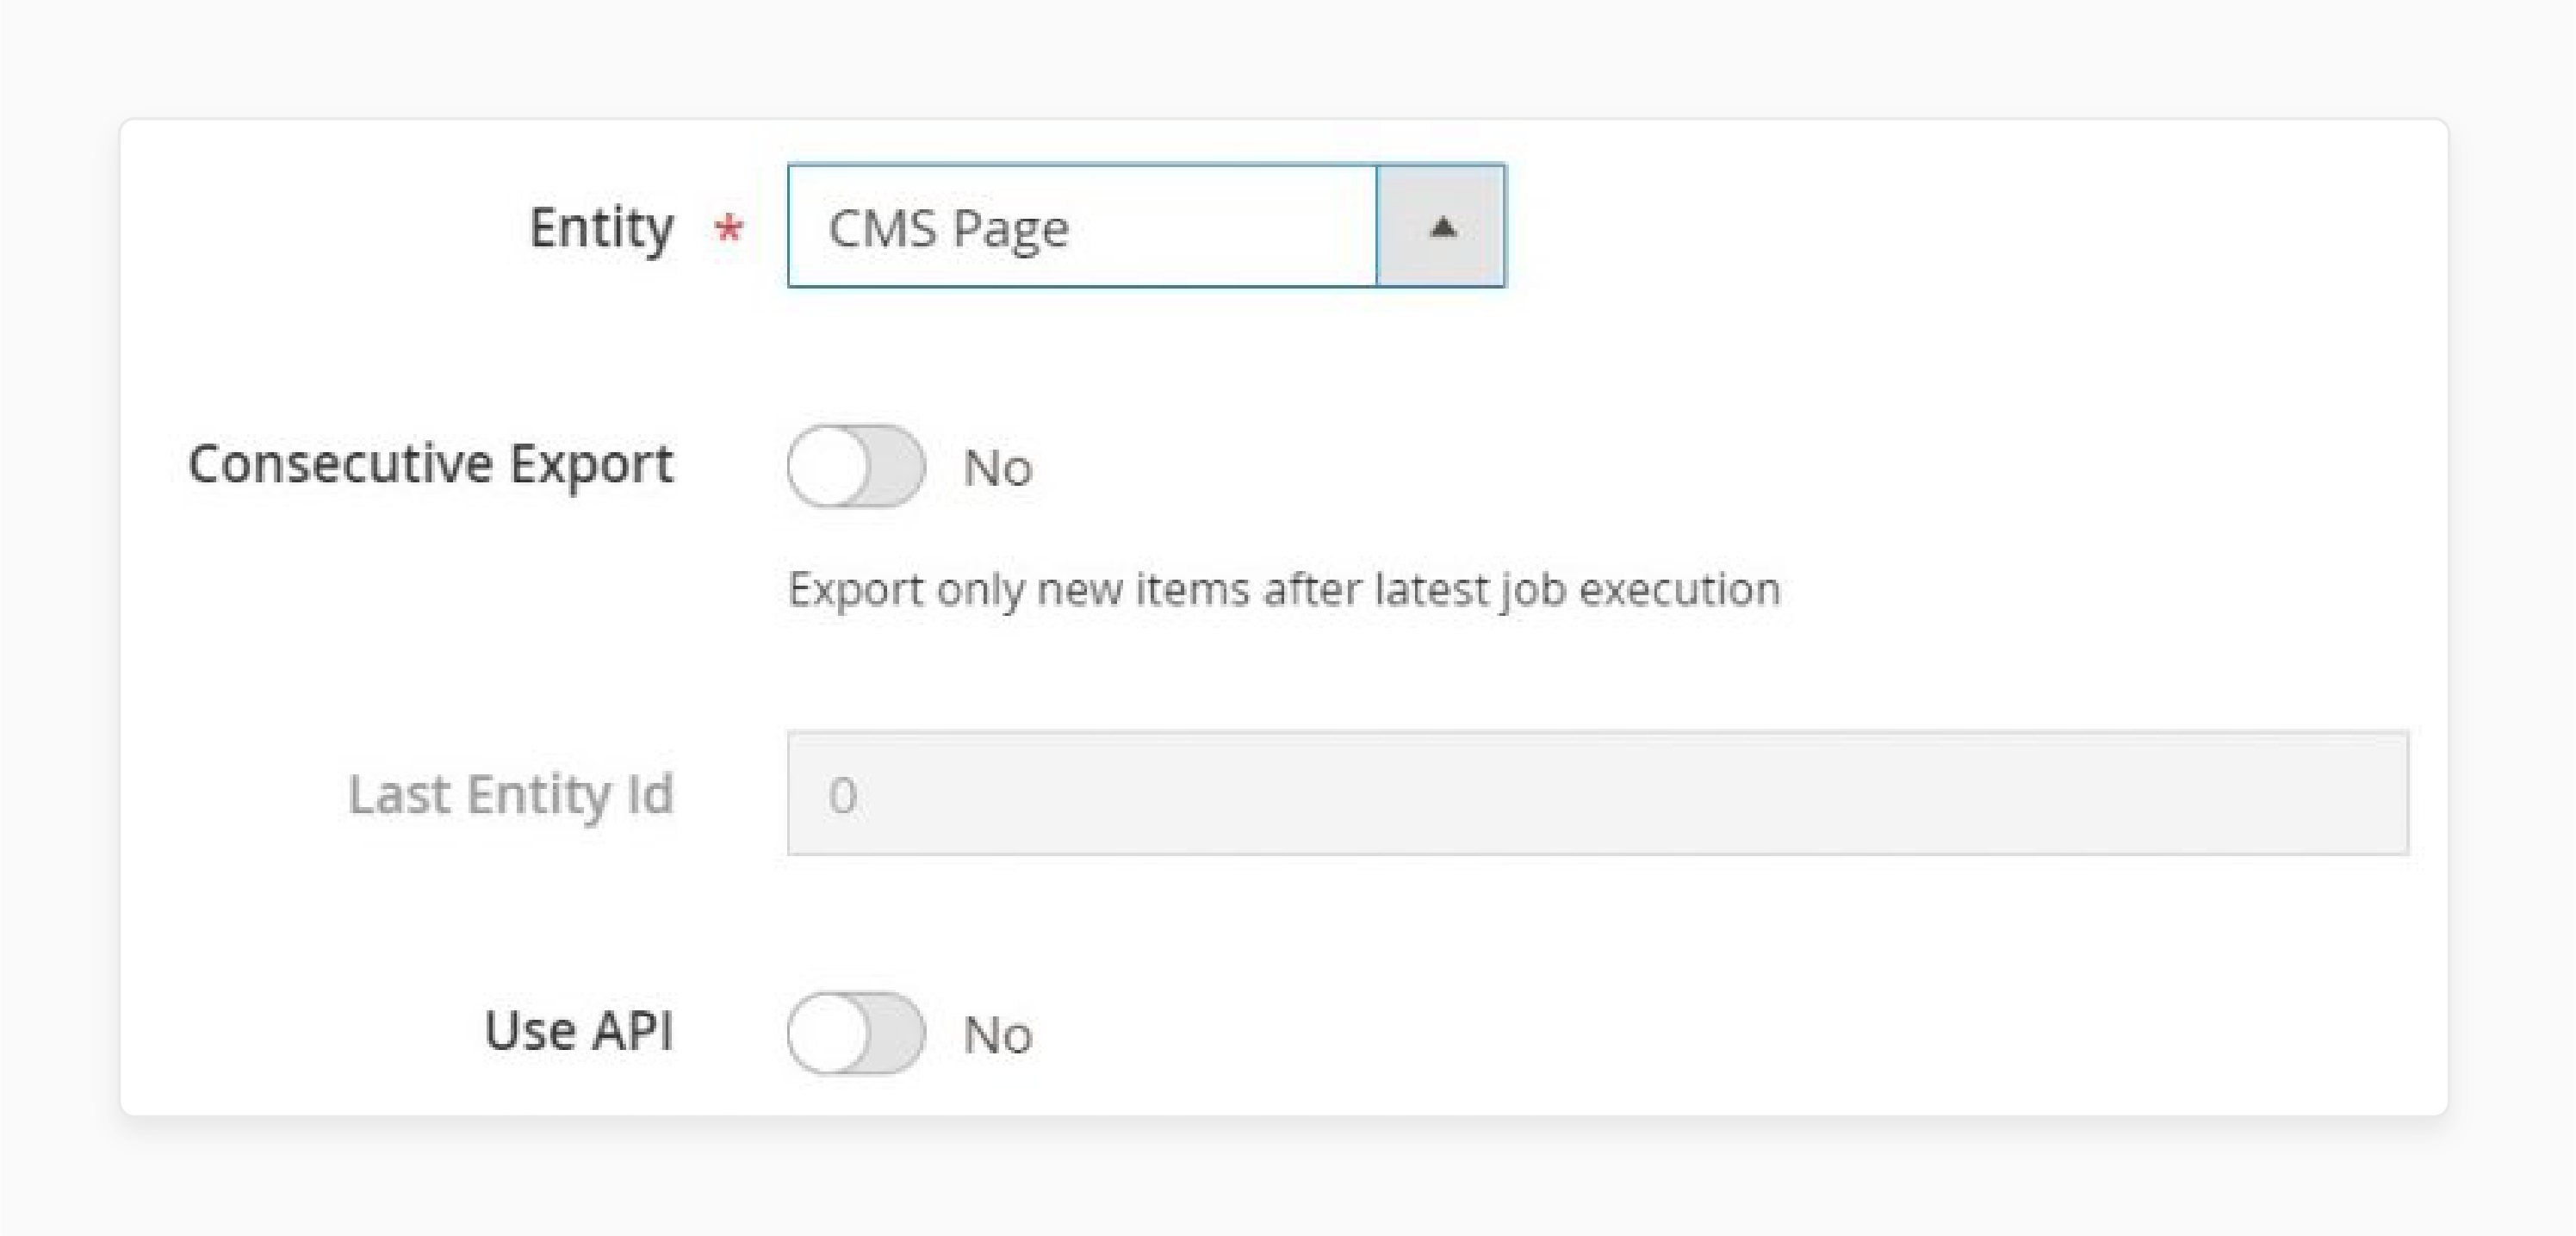
- In the 'Export Settings' tab:
- Choose ‘Magento 2 CMS Pages’ as the entity to export.
- Enable the Consecutive Export option if required.
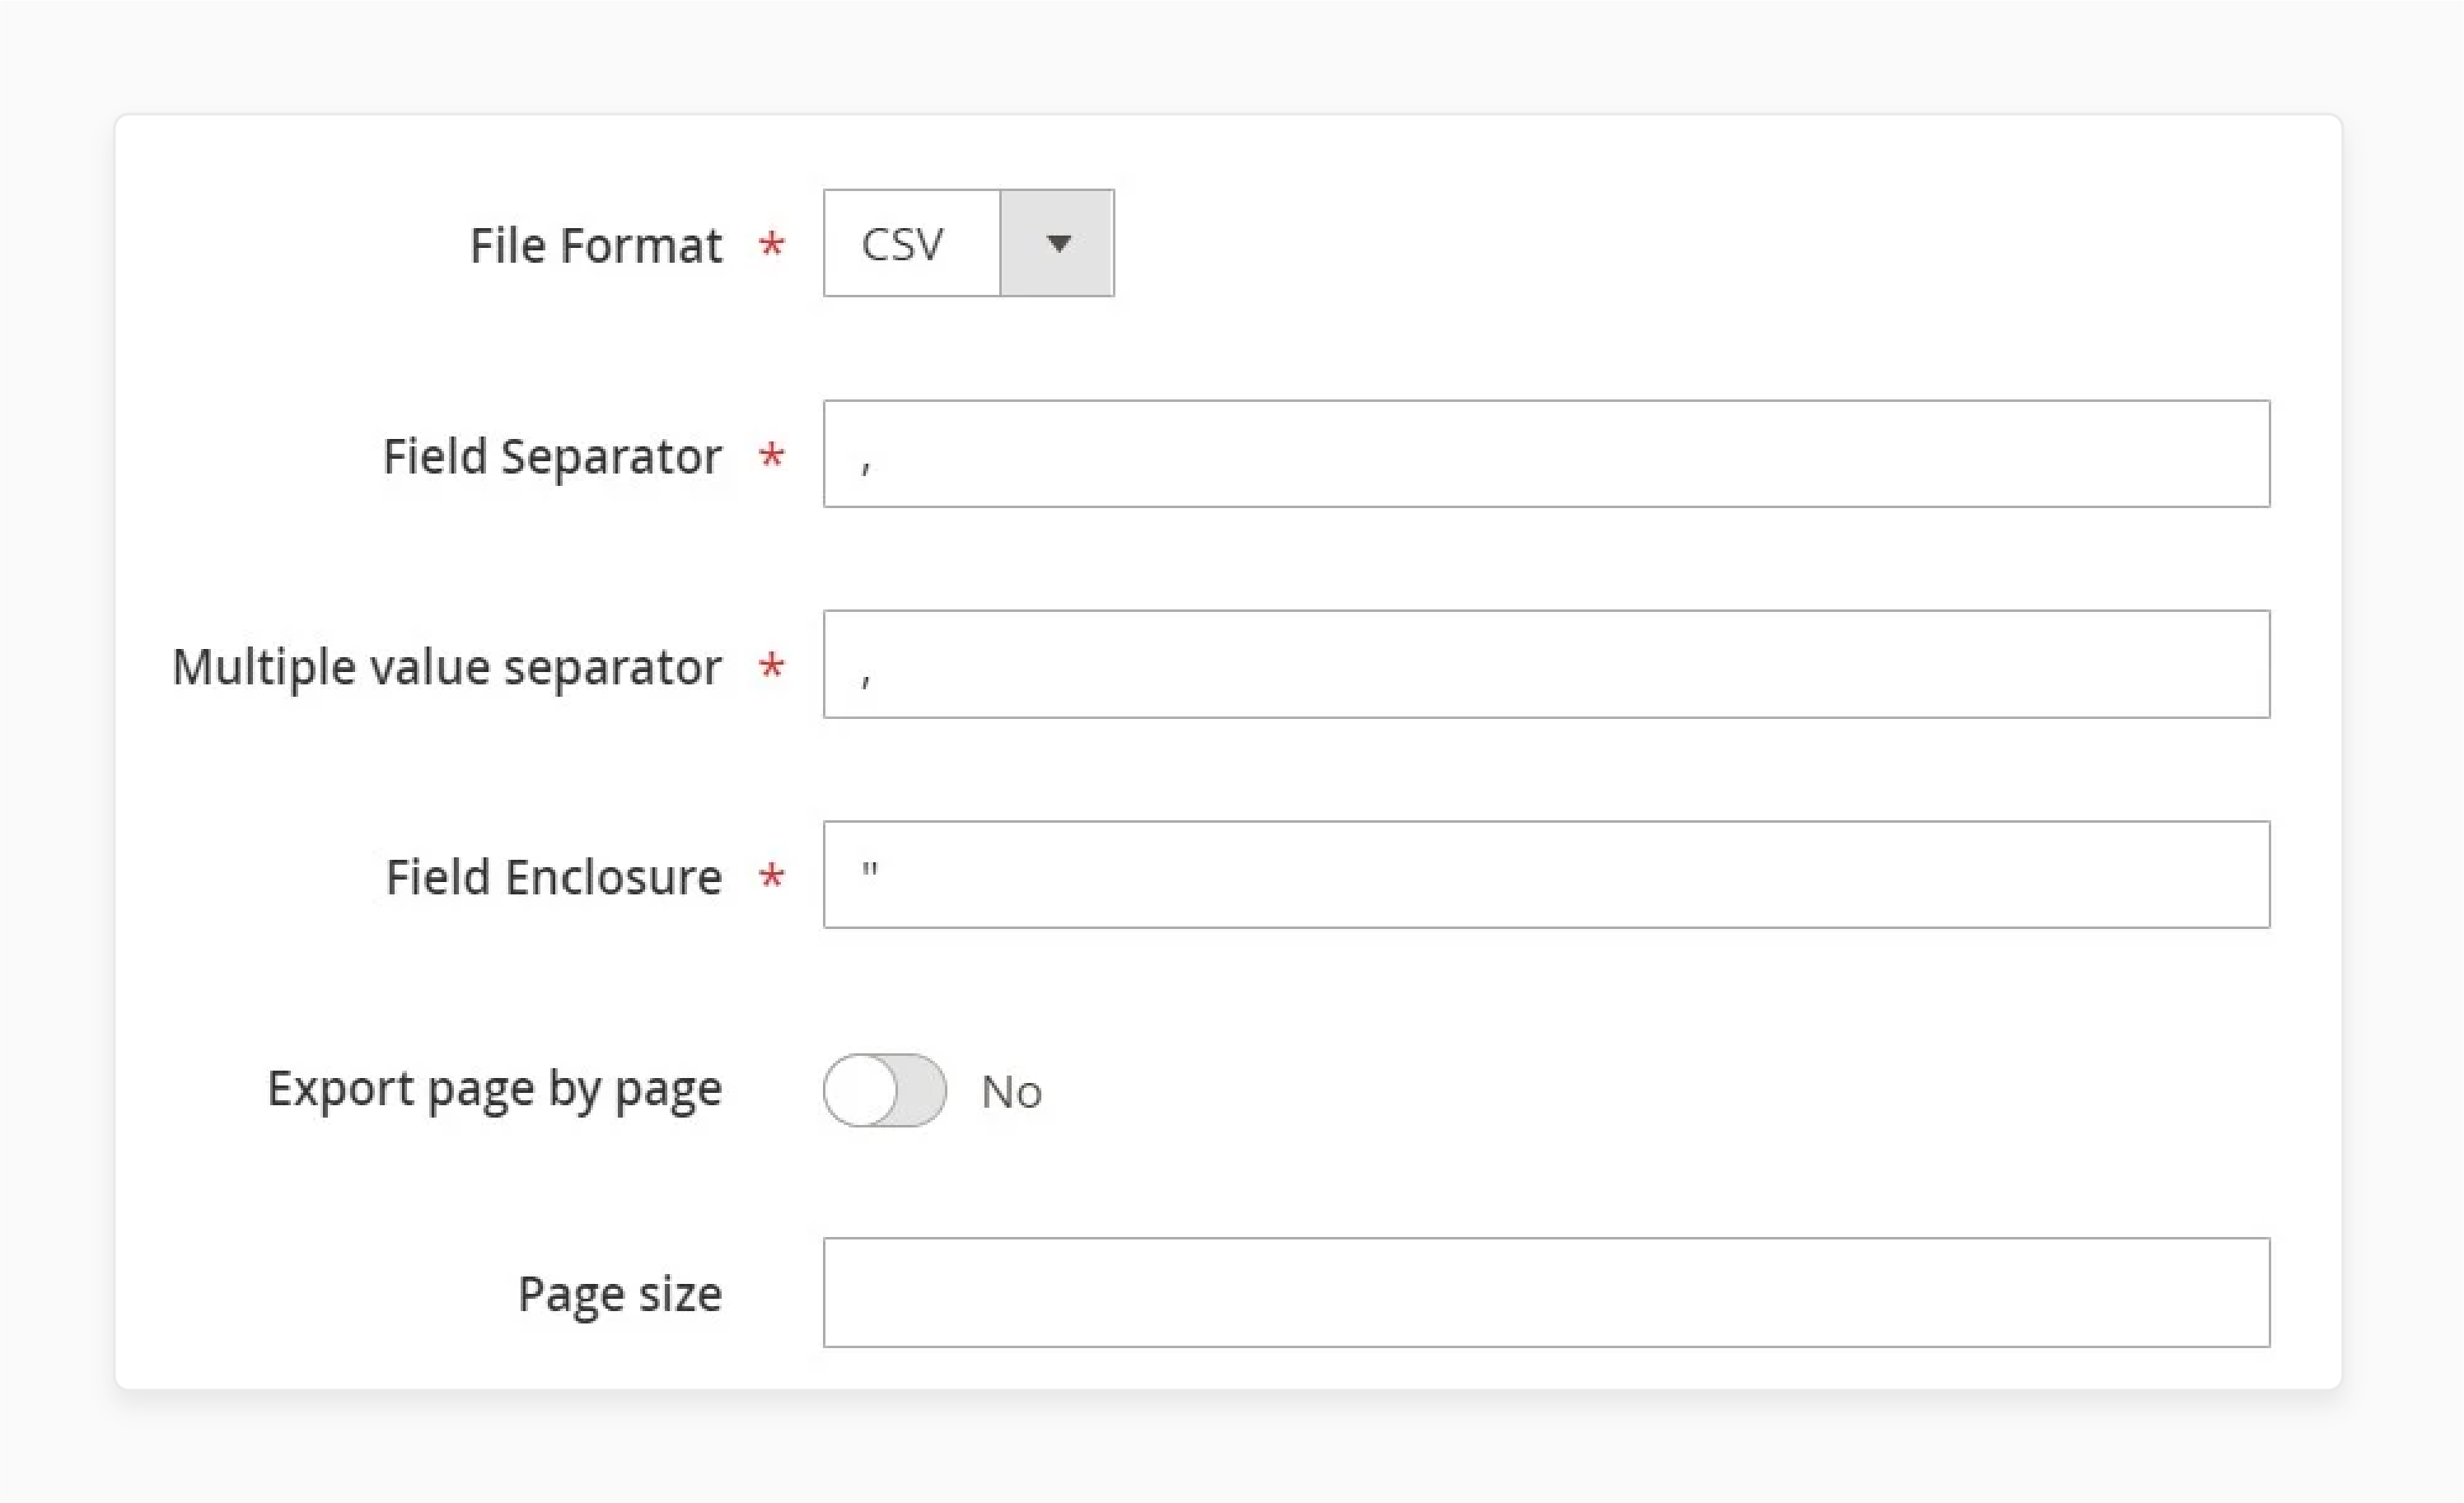
- Under the 'Export Behavior' tab:
- Select the file format (e.g., "CSV").
- Specify separators for the exported data.
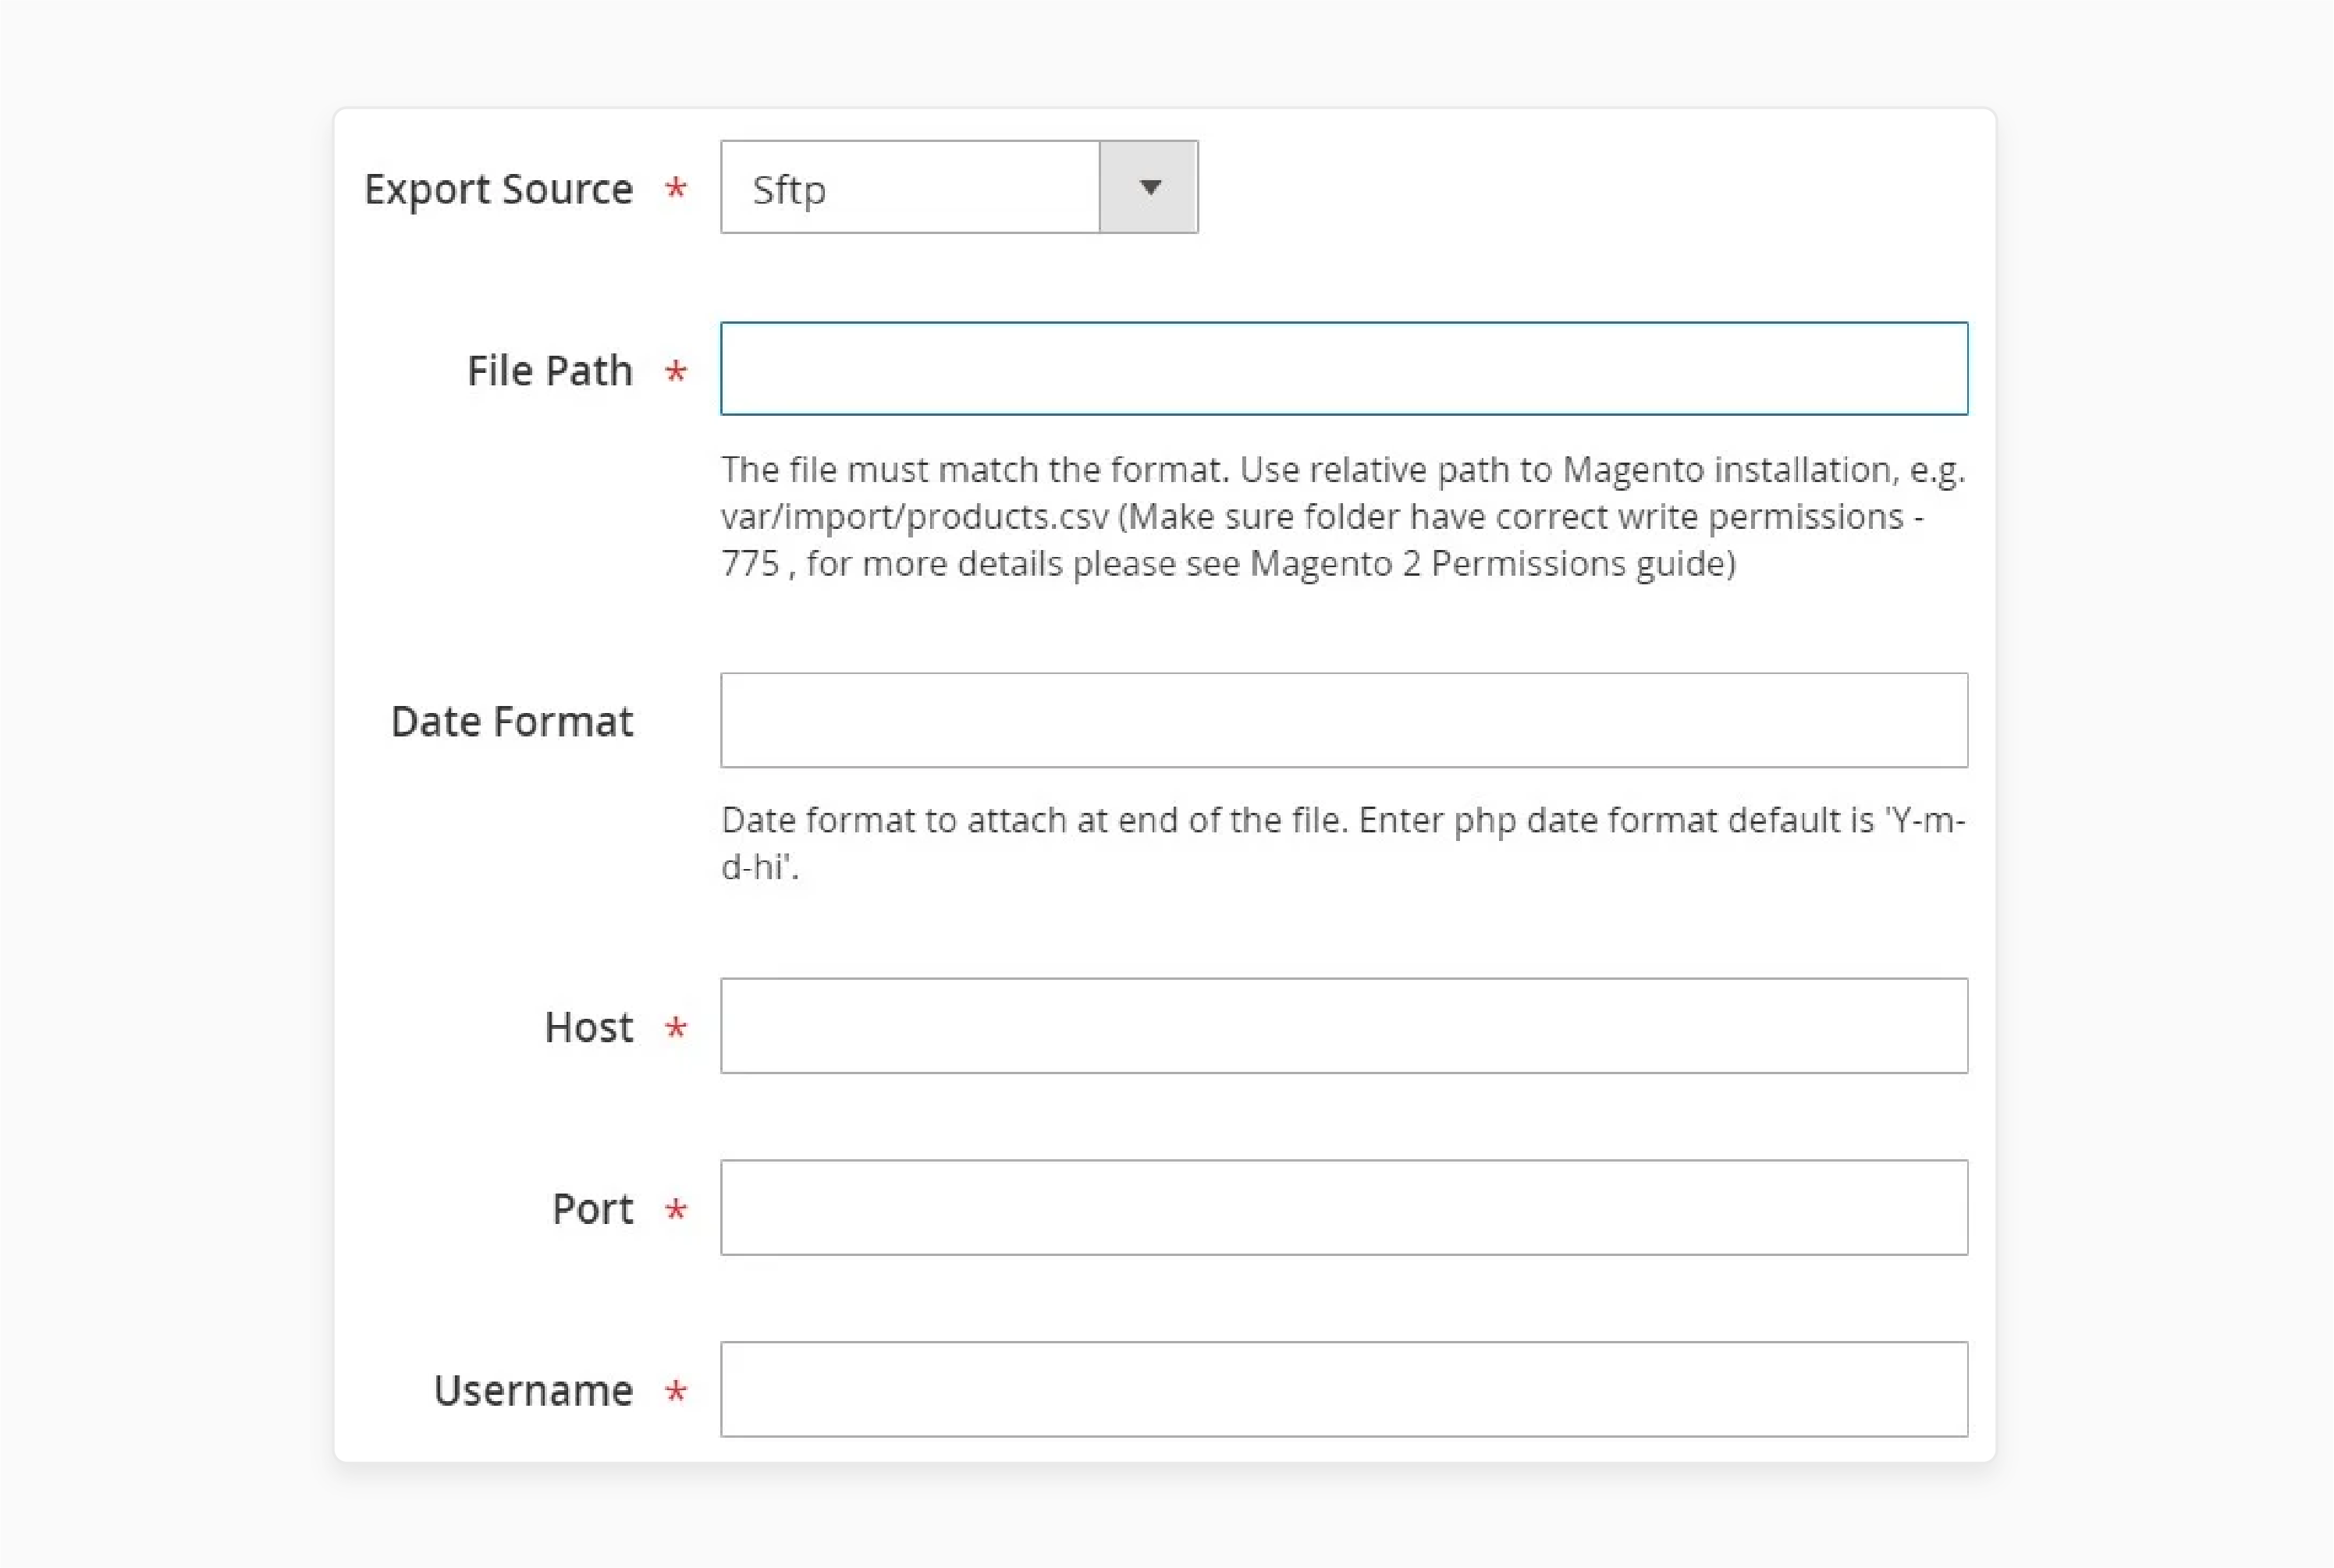
- Go to the 'Export Source' tab:
- Choose the export destination: FTP, SFTP, or a data file.
- For FTP/SFTP, verify the connection to ensure proper transfer.
- If the receiving system has unique attribute requirements, use the mapping feature to align the data structure.
- Apply filters to refine the exported data for specific needs.
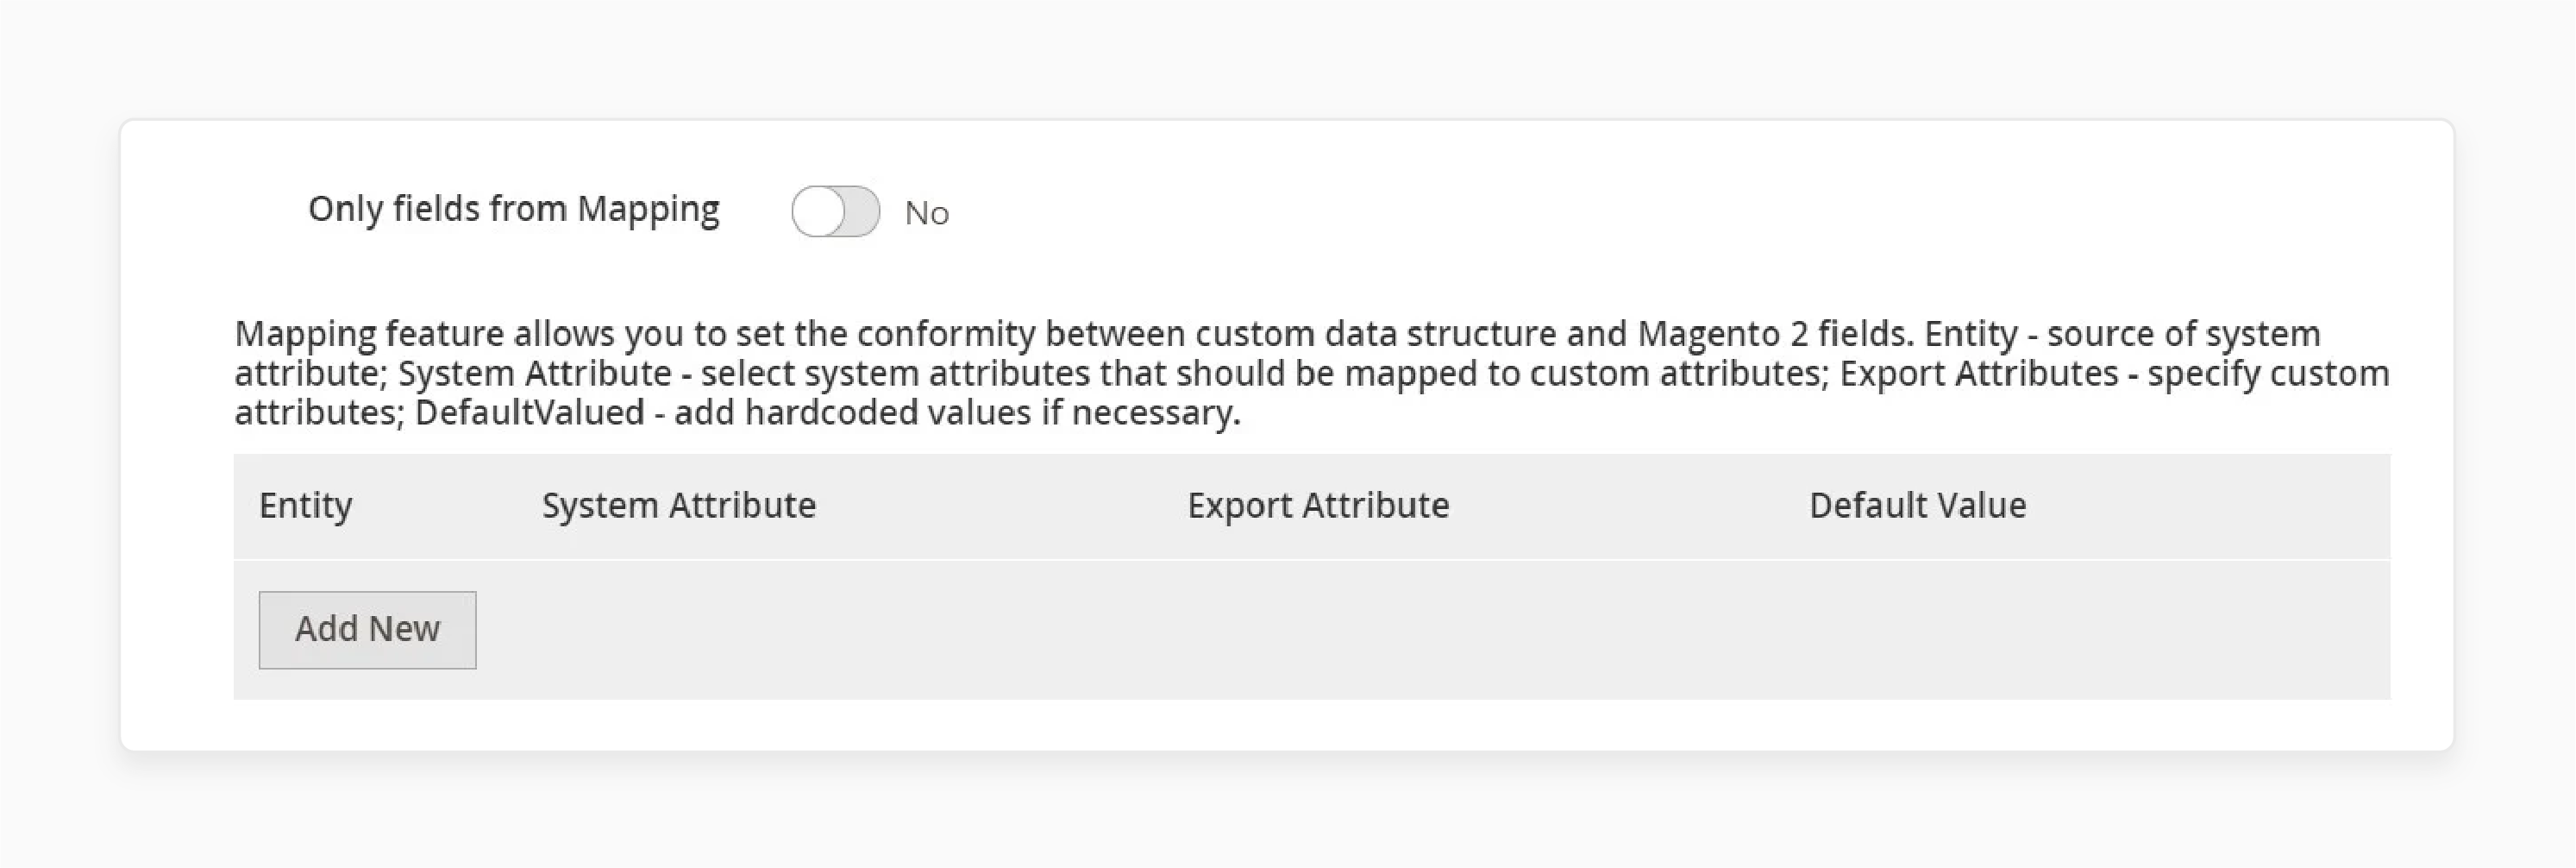
- Click 'Save & Run' in the top-right corner to begin the export process.
Advanced Configuration for Automating and Creating Magento 2 CMS Page Import Jobs
| Configuration Area | Setting | Description | Best Practice |
|---|---|---|---|
| Basic Setup | - Page Hierarchy - Store View Assignment - URL Structure |
- Configure parent-child relationships between CMS pages. - Define page visibility across stores. - Set unique identifiers for pages. |
- Enable hierarchy functionality for better content organization. - Use 'All' for global content and specific codes for targeted content. - Use lowercase with hyphens for SEO-friendly URLs. |
| SEO Configuration | - Meta Information - Canonical Tags - XML Sitemap |
- Title, keywords, description - Duplicate content management - Search engine indexing |
- Include target keywords naturally in meta fields. - Enable for both product and category pages. - Include sensitive CMS pages in the sitemap. |
| Content Management System | - Custom Variables - Widget Integration - Page Layout |
- Dynamic content insertion - Interactive elements - Content structure |
- Create reusable content blocks for consistent messaging. - Use the Insert Widget button for dynamic content placement. - Choose an appropriate template based on content needs. |
| Automation Settings | - Schedule - Data Validation - Import Rules |
- Automated imports - Content verification - Content mapping |
- Set a cron schedule in Magento for regular content updates. - Enable pre-import validation to prevent errors. - Define clear mapping rules for consistent imports. |
| Advanced Features | - Multi-store Import - Version Control - Custom Design |
- Content distribution - Content tracking - Theme integration |
- Configure store-specific content variations. - Enable content versioning for change management. - Set theme-specific layouts and updates. |
CMS Best Practices for Managing E-commerce Content Pages in Magento 2
| Management Area | Best Practice | Implementation Strategy | Expected Outcome |
|---|---|---|---|
| Organization | Hierarchical Structure | - Logical page categories - Consistent naming conventions - Folder-based organization |
Improved content findability and management |
| Version Control | Content Tracking | - Revision history - Change documentation - Backup version maintenance |
Secure content management and easy rollbacks |
| Security | Access Management | - Role-based permissions - Regular security audits - Content approval workflows |
Protected content and controlled access |
| Backup Strategy | Automated Systems | - Daily automated backups - Multiple backup locations - Quick recovery procedures |
Data security and business continuity |
| SEO Implementation | Search Optimization | - Optimized meta-descriptions - Strategic keyword placement - Image alt tags |
Improved search visibility |
| Conversion Focus | User Experience | - Clear CTAs - Magento A/B testing - Conversion tracking |
Higher conversion rates |
| Content Personalization | Customer Segmentation | - Group-specific content - Dynamic pricing displays - Targeted promotions |
Enhanced user engagement |
| Mobile Strategy | Responsive Design | - Mobile-first approach - Speed optimization - Touch-friendly elements |
Better mobile user experience |
| Content Updates | Maintenance Schedule | - Regular content audits - Scheduled updates - Performance monitoring |
Fresh and relevant content |
| Import/Export | Data Management | - Automated imports - Regular exports - Data validation |
Efficient content management |
Troubleshooting Common CMS Page Content Element Issues in the Magento 2 Ecommerce Platform
| Issue Category | Problem Description | Solution | Impact |
|---|---|---|---|
| Content Saving | Content won't save within CMS pages | - Check mod_security logs for blocked saves. - Verify no suspicious MySQL injections. - Adjust server security settings. |
Ensures content updates are preserved |
| Widget Updates | Widget content not refreshing | - Clear the Magento 2 cache after widget updates. - Verify widget configuration. - Check product visibility settings. |
Maintains dynamic content accuracy |
| Performance | Slow-loading CMS pages | - Enable flat categories. - Optimize JavaScript/CSS. - Use lightweight themes. |
Improves user experience |
| Cache Management | Content updates not visible | - Clear specific cache types. - Run the cache:flush command. - Verify cache settings. |
Ensures content freshness |
| Content Display | Layout and formatting issues | - Check XML layout updates. - Verify theme compatibility. - Review block positioning. |
Maintains visual consistency |
| SEO Elements | Under-optimized content | - Implement proper meta tags. - Add rich snippets. - Optimize content structure. |
Improves search visibility |
| Mobile Responsiveness | Content display issues on mobile | - Use responsive design patterns. - Test across devices. - Optimize image sizing. |
Ensures multi-device compatibility |
| Content Hierarchy | Disorganized page structure | - Implement logical page categories. - Use consistent naming conventions. - Maintain clear navigation. |
Improves content findability |
| Static Content | Default page issues | - Verify core content pages. - Check page permissions. - Update default templates. |
Maintains essential pages |
| Content Blocks | Block placement problems | - Review XML widget definitions. - Check block visibility settings. - Verify store view assignments. |
Ensures proper content positioning |
FAQs
-
Why do I get a 404 Not Found error for Magento CMS pages?
A "404 Not Found" error occurs when the CMS page URL is missing. Check if the page is published and the URL key is valid. If necessary, update or re-index the URL key.
-
How do I use blocks of content effectively in Magento 2 CMS?
Yes, you can display parts of your catalog using widgets or blocks. The Content Tab allows you to edit CMS page content. Add them via this tab or directly in your layout. It improves navigation and engagement. Then, use it to add text, images, or widgets. Finally, access it from the page and add or edit options in the admin panel.
3. Why do I need to create customer groups in Magento 2 CMS?
Customer groups help you easily manage personalized content and promotions. They can also be used to customize experiences and target marketing efforts. It allows you to increase the conversion rate.
4. What causes a 503 Service Unavailable error while managing Magento CMS pages?
A "503 Service Unavailable" error means the site is in maintenance. Enable cookies, clear the cache, and check server logs. It allows you to identify and resolve the issue.
5. How can I resolve configuration issues in Magento 2 CMS?
Use the CMS pages and admin tools. Each section allows you to configure specific settings.
6. How can I easily find CMS content options in Magento?
In Magento, navigate to the content tab. At the top right corner of the screen, click "Add New." This section allows you to select various CMS pages. You can use them to create new content or edit existing pages.
-
Where can I manage content in the Magento Admin Panel?
To manage content in Magento, open the content tab. In the top right corner of the screen, you’ll see options to add or edit CMS pages. The section provides the ability to create new blocks or pages. You can use them to develop and organize content easily in the Magento Admin Panel.
Summary
Magento 2 CMS Pages simplify content creation. They help you:
- Maintain a professional look across your online store.
- Enable enhanced customization without technical expertise.
- Manage your site content using widgets and custom design updates.
- Enhance the flexibility of your design.
- Ensure your store stays user-friendly and professional.
- Improve customer satisfaction by providing a drag-and-drop interface.
Build and maintain your online store's CMS pages with managed Magento hosting.


