
6-Step Guide to Configure Magento 2 CMS Page Hierarchy
Want to effectively organize your Magento store's content pages?
Magento 2 CMS page hierarchy arranges content pages in a tree-like structure. You can create organized sections and manage parent-child relationships via a hierarchy setup.
This tutorial will cover how to maximize the Magento 2 CMS page management feature.
Key Takeaways
-
Magento 2 CMS Page Hierarchy uses nodes to group related content.
-
Custom URLs improve SEO and provide a more organized navigation experience.
-
Metadata settings like First, Next/Previous, etc, enhance SEO.
-
Pagination controls are available to improve navigation through content.
-
Import/Export features allow easy transfer of page hierarchy data between stores.
What is Magento 2 CMS Page Hierarchy?
“Magento 2 CMS page hierarchy organizes content in a tree-like structure. The system works through nodes that connect related content pages. Each node acts like a digital folder for storing pages.”
Parent nodes hold child nodes and content pages together. You can link a single page to multiple nodes. The hierarchy creates clear navigation paths for customers. Store owners can add pagination and menu controls. The structure helps organize large amounts of content. For example, a privacy policy section can contain multiple related pages. The navigation menu appears on the left side of the pages.
Pages maintain parent-child or neighbor relationships within nodes. The system supports both simple and complex content arrangements. The feature works right in your admin panel for easy management.
Main Features of Magento 2 CMS Page Hierarchy
1. Node Management
-
Create hierarchy nodes for group-related content pages. Each node serves as a container for organizing multiple pages.
-
Add pages to nodes through a simple checkbox selection. Pages can belong to multiple nodes for flexible organization.
-
Set parent-child relationships between nodes for structured navigation. The system maintains clear relationships between content pieces.
-
Configure node metadata for improved SEO performance. Each node can have unique meta titles and descriptions.
-
Manage node permissions and visibility settings. Control who can view and edit specific sections.
2. Navigation Structure
-
Build menu layouts with numbered or non-numbered formats. Choose the format that best fits your content style.
-
Set maximum depth levels for organized navigation. Control how deep your menu structure can go.
-
Create custom URL keys for better SEO results. URLs maintain consistency within the hierarchy.
-
Link nodes across different sections of your store. Connect related content across categories.
-
Add pagination controls for long content sections. Help users navigate through extensive content easily.
3. Content Organization
-
Group related pages under parent nodes. Keep similar content together for easy access.
-
Use widgets to display hierarchy menus anywhere. Place navigation menus in any content block.
-
Set up automatic menu updates as content changes. Menus stay current without manual updates.
-
Create logical paths between related content pieces. Users can find connected information quickly.
-
Organize privacy policy pages and legal content. Keep important pages properly structured.
4. Menu Configuration
-
Choose between different menu display formats. Adapt the layout to your store's design.
-
Set custom sorting orders for pages and nodes. Control how content appears in navigation.
-
Add frame skip options for better browsing. Users can jump between content sections easily.
-
Configure menu depth settings per section. Different areas can have varying menu structures.
-
Implement custom menu styles through the admin panel. Match menus to your store's theme.
5. Import/Export Capabilities
-
Transfer page hierarchy data between stores. Move structures to new installations quickly.
-
Export hierarchy settings for backup purposes. Keep safe copies of your content organization.
-
Import pre-configured hierarchy structures. Save time when setting up new stores.
-
Update multiple nodes through bulk import. Make large-scale changes efficiently.
-
Maintain consistency across multiple store views. Keep navigation uniform across languages.
Magento 2 CMS Page Hierarchy CSV Attributes
| Attribute Name | Reference | Values | Value Example |
|---|---|---|---|
| node_id | The main identifier for each page hierarchy node. It must be unique for each node. Used to link nodes together. | Numbers only. Must start from 1. Each value must be unique. | 1 |
| parent_node_id | Links child nodes to parent nodes. Creates the hierarchy structure. Shows which node sits above the current node. | Numbers only. Empty for top-level nodes. Must match existing node_id. | 2 |
| identifier | Creates URL-friendly names for nodes. Forms part of the page URL. It must be unique across nodes. | Letters, numbers, underscores. No spaces allowed. Keep it short and clear. | about_us |
| label | Display name is shown in menus. Names the node for customers. Used in navigation menus. | Any text. Keep it short and clear. Use proper capitalization. | Our Company |
| menu_layout | Controls where menus appear. Sets menu position on the page. Affects the navigation display. | 'content', 'left', 'right'. Leave empty for the default setting. | left |
| menu_visibility | Controls node visibility in menus. Determines if node shows in navigation. | 0 = hidden, 1 = visible. Controls display status. | 1 |
| pager_visibility | Enables pagination for node content. Controls page number display. | 0 = off, 1 = on. Affects content navigation. | 1 |
| pager_frame | Sets the number of visible page links. Controls pagination display length. | Numbers only. Recommended range: 3-10. | 5 |
| meta_first_last | Controls first/last page metadata. Helps with SEO optimization. | 0 = disabled, 1 = enabled. Affects page headers. | 1 |
| meta_next_previous | Manages next/previous link metadata. Improves content navigation. | 0 = disabled, 1 = enabled. Affects link structure. | 1 |
| sort_order | Sets display order within the parent node. Controls menu item position. | Numbers only. Lower numbers appear first. | 10 |
| request_url | Full URL path to node. Includes parent node paths. | Text with forward slashes. It must match the hierarchy. | about/team |
| scope | Sets store view assignment. Controls where node appears. | Store view codes. Multiple values allowed. | default |
How to Configure Magento 2 CMS Page Hierarchy?
Step 1: Magento Admin Panel Configuration
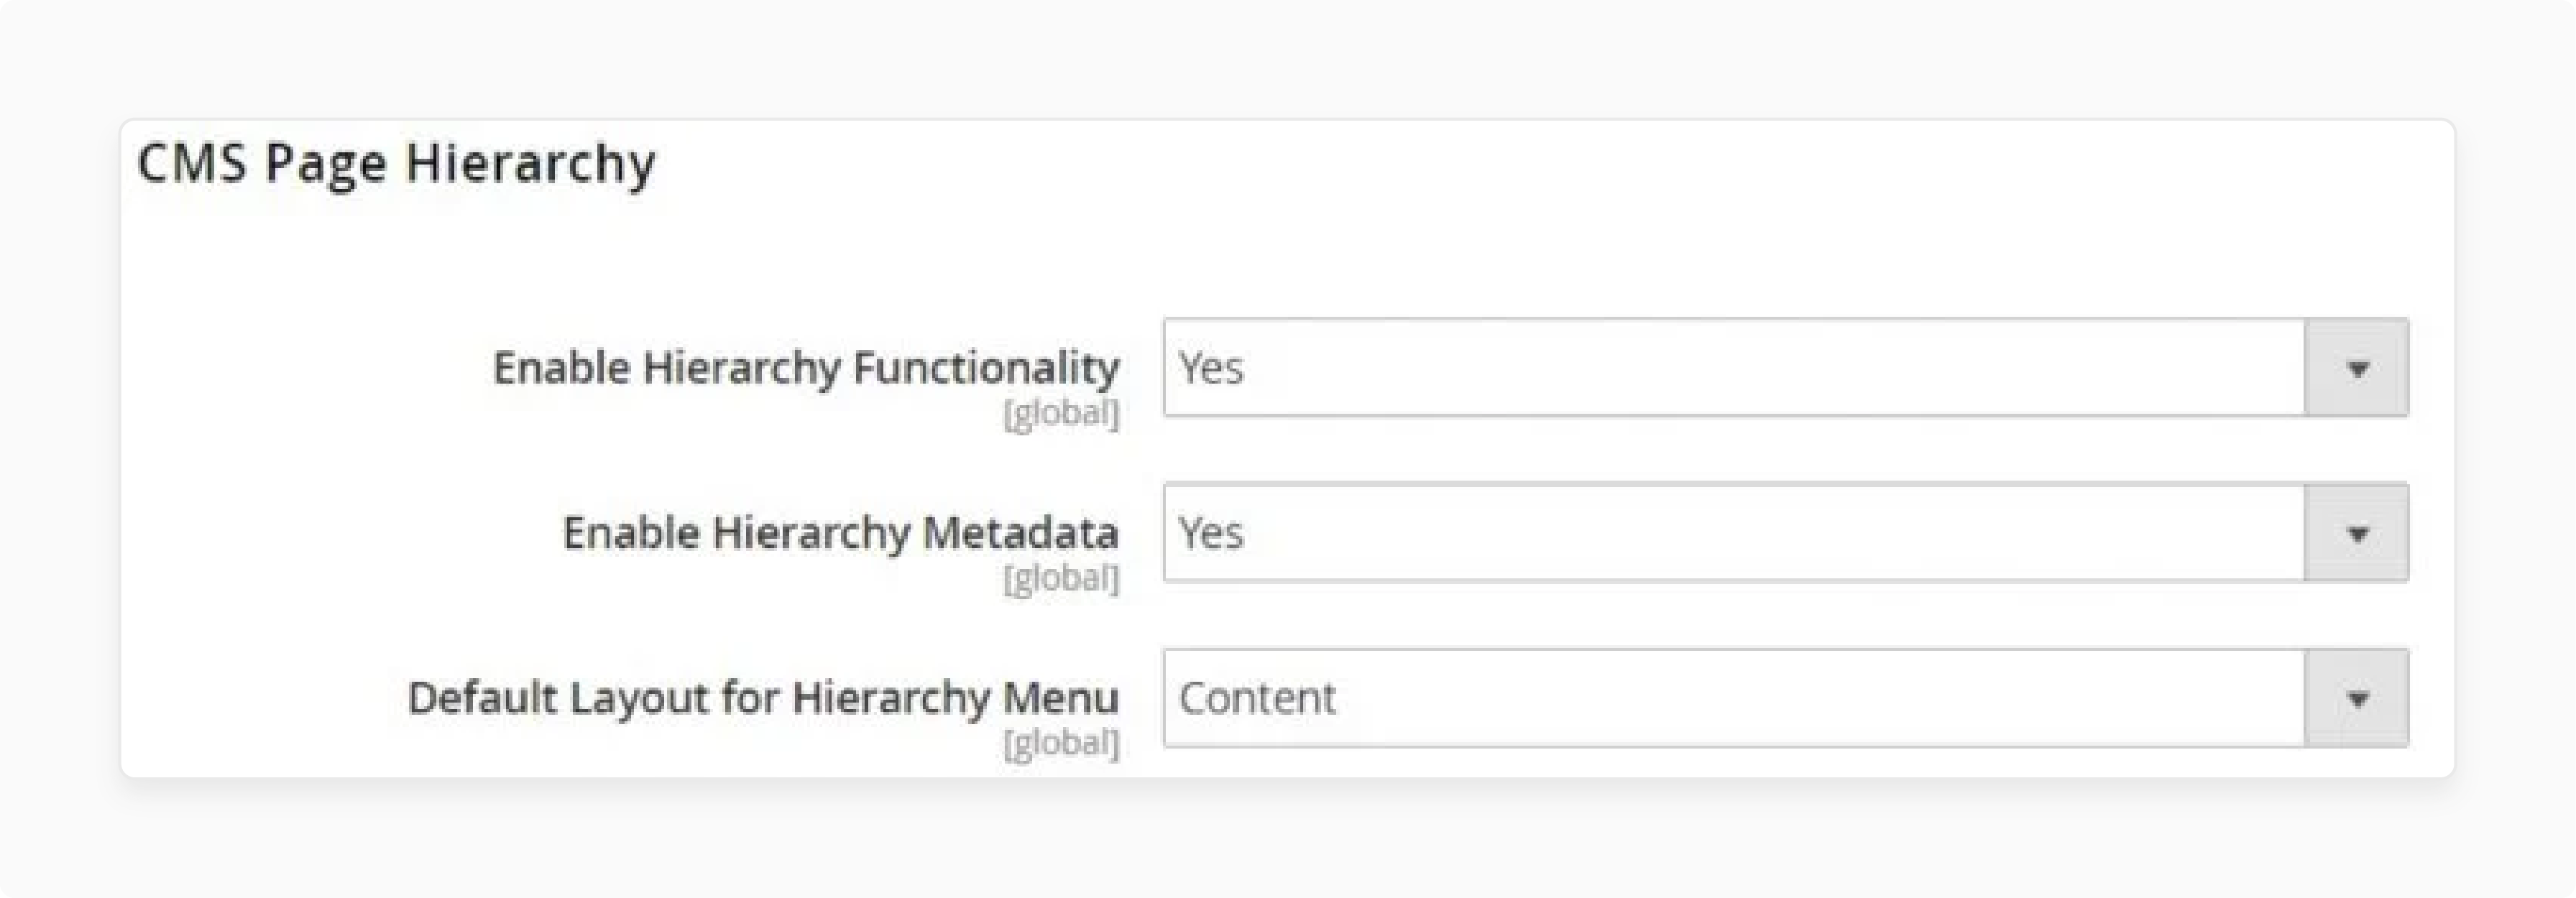
-
Access the Magento 2 admin panel.
-
Navigate to Stores > Settings > Configuration.
-
Select Content Management under the General section.
-
Expand the CMS Page Hierarchy tab.
-
Enable the hierarchy functionality.
-
Turn on hierarchy metadata.
-
Choose a default layout for the hierarchy menu.
-
Save your changes.
Step 2: Adding a Node to the Hierarchy
- Go to Content > Elements > Hierarchy in the admin panel.
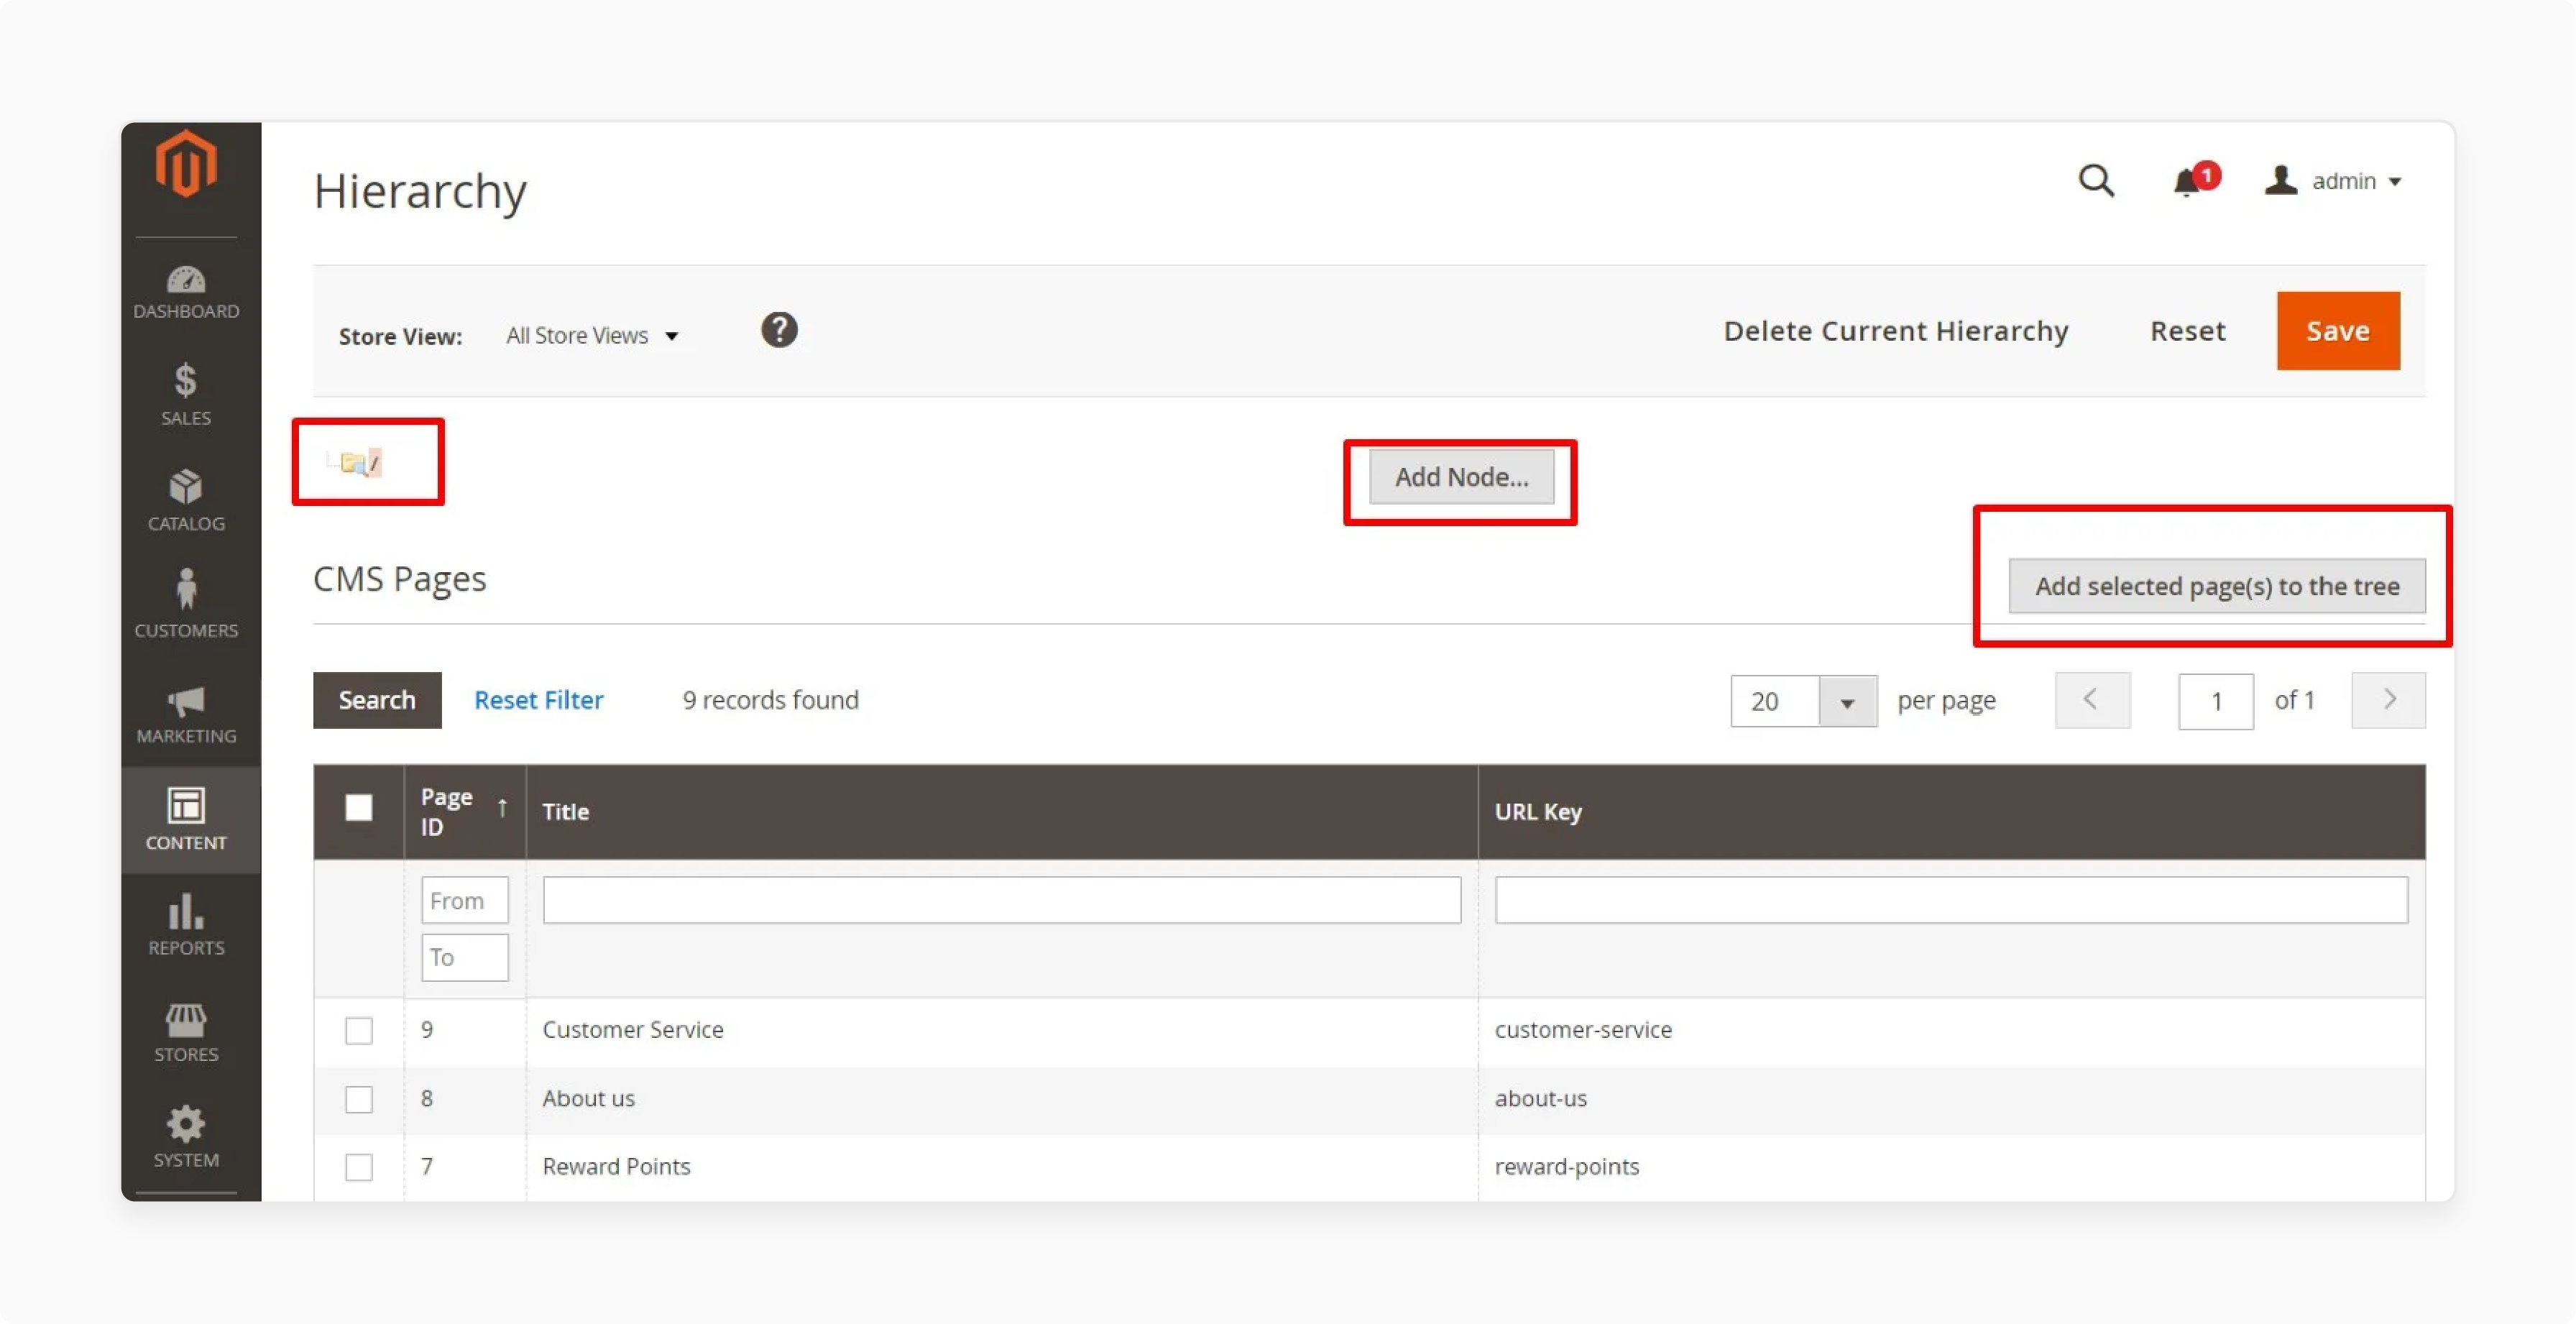
- Click the Add Node button above the page grid.
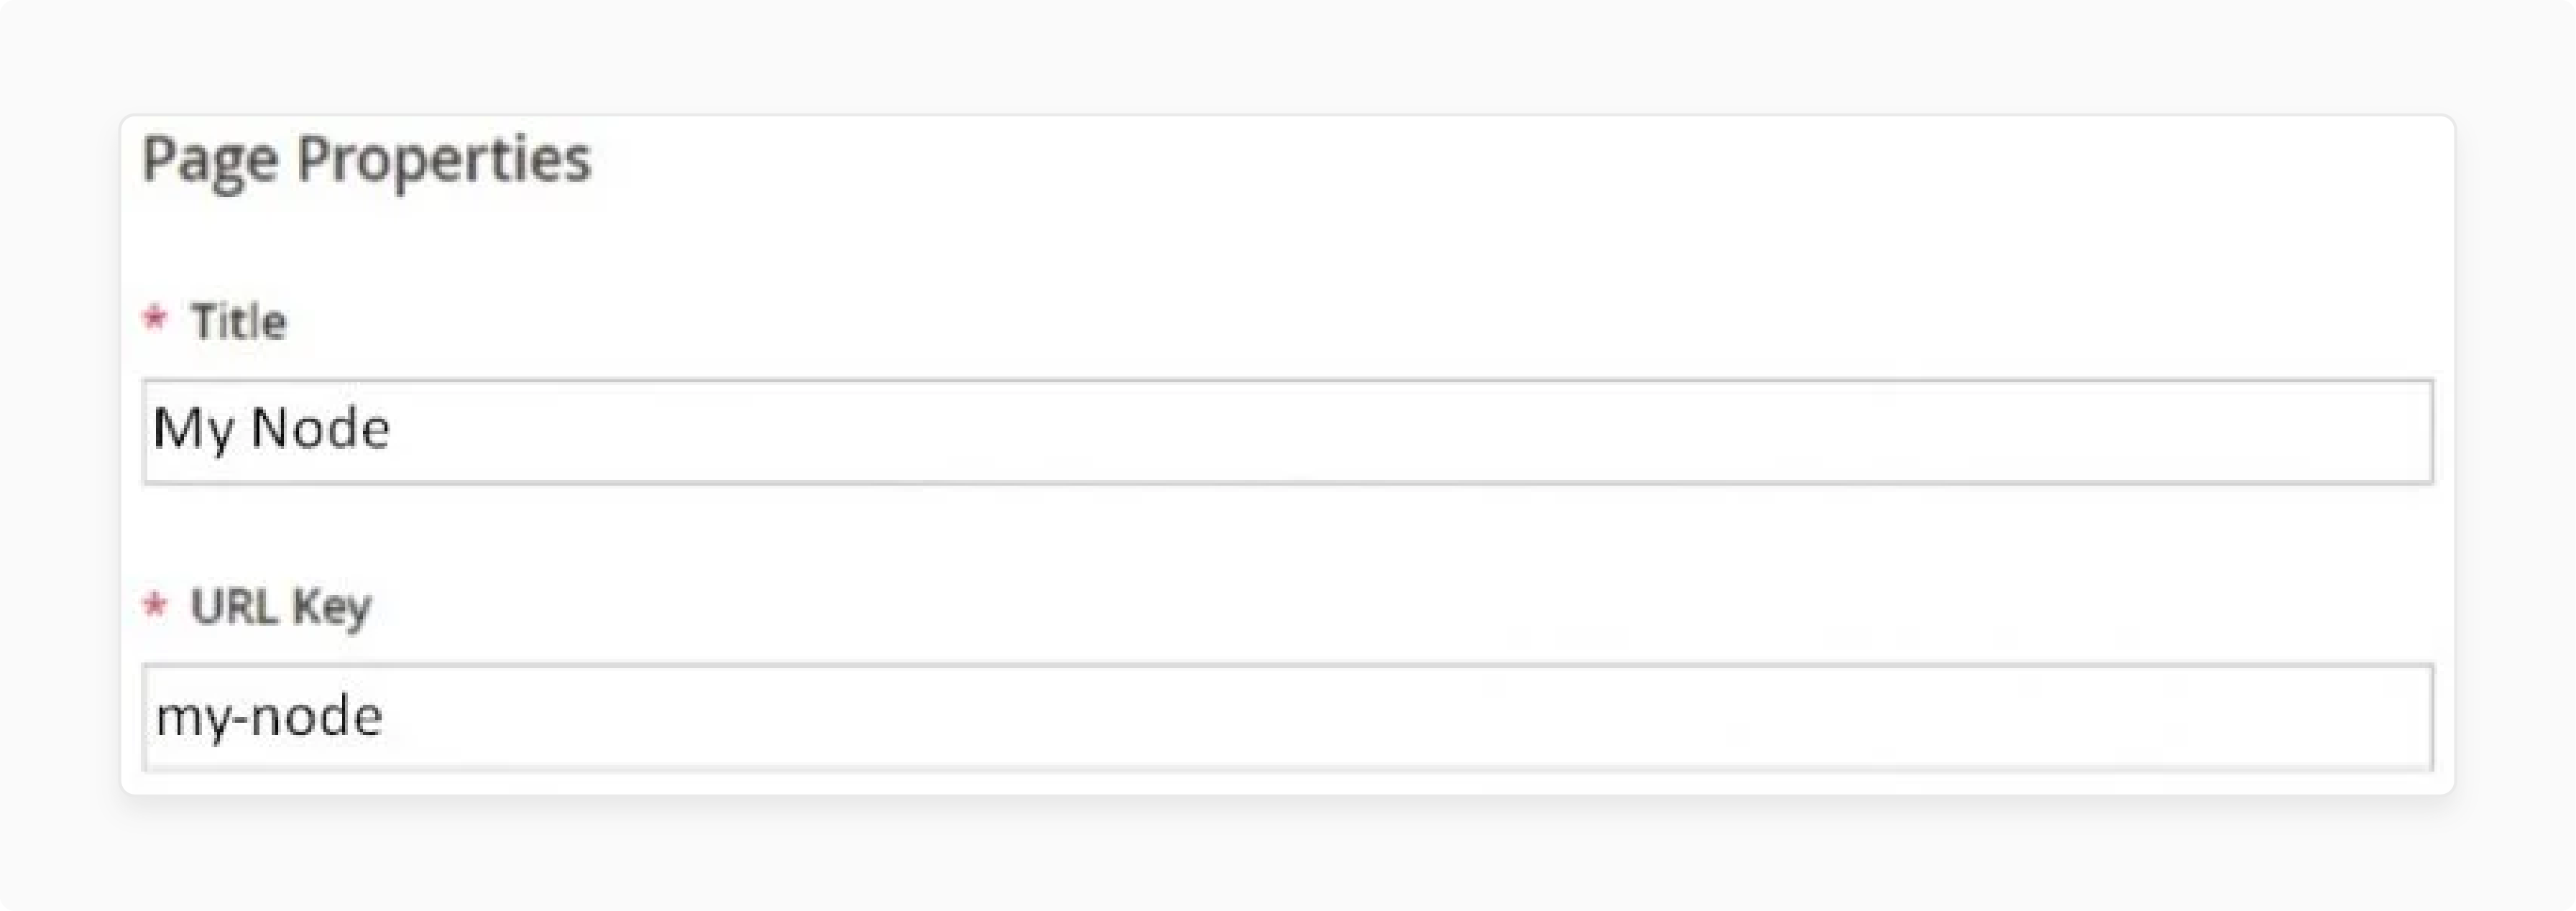
- Set a title for your node under Page Properties.
- Enter a URL key using lowercase letters and hyphens.
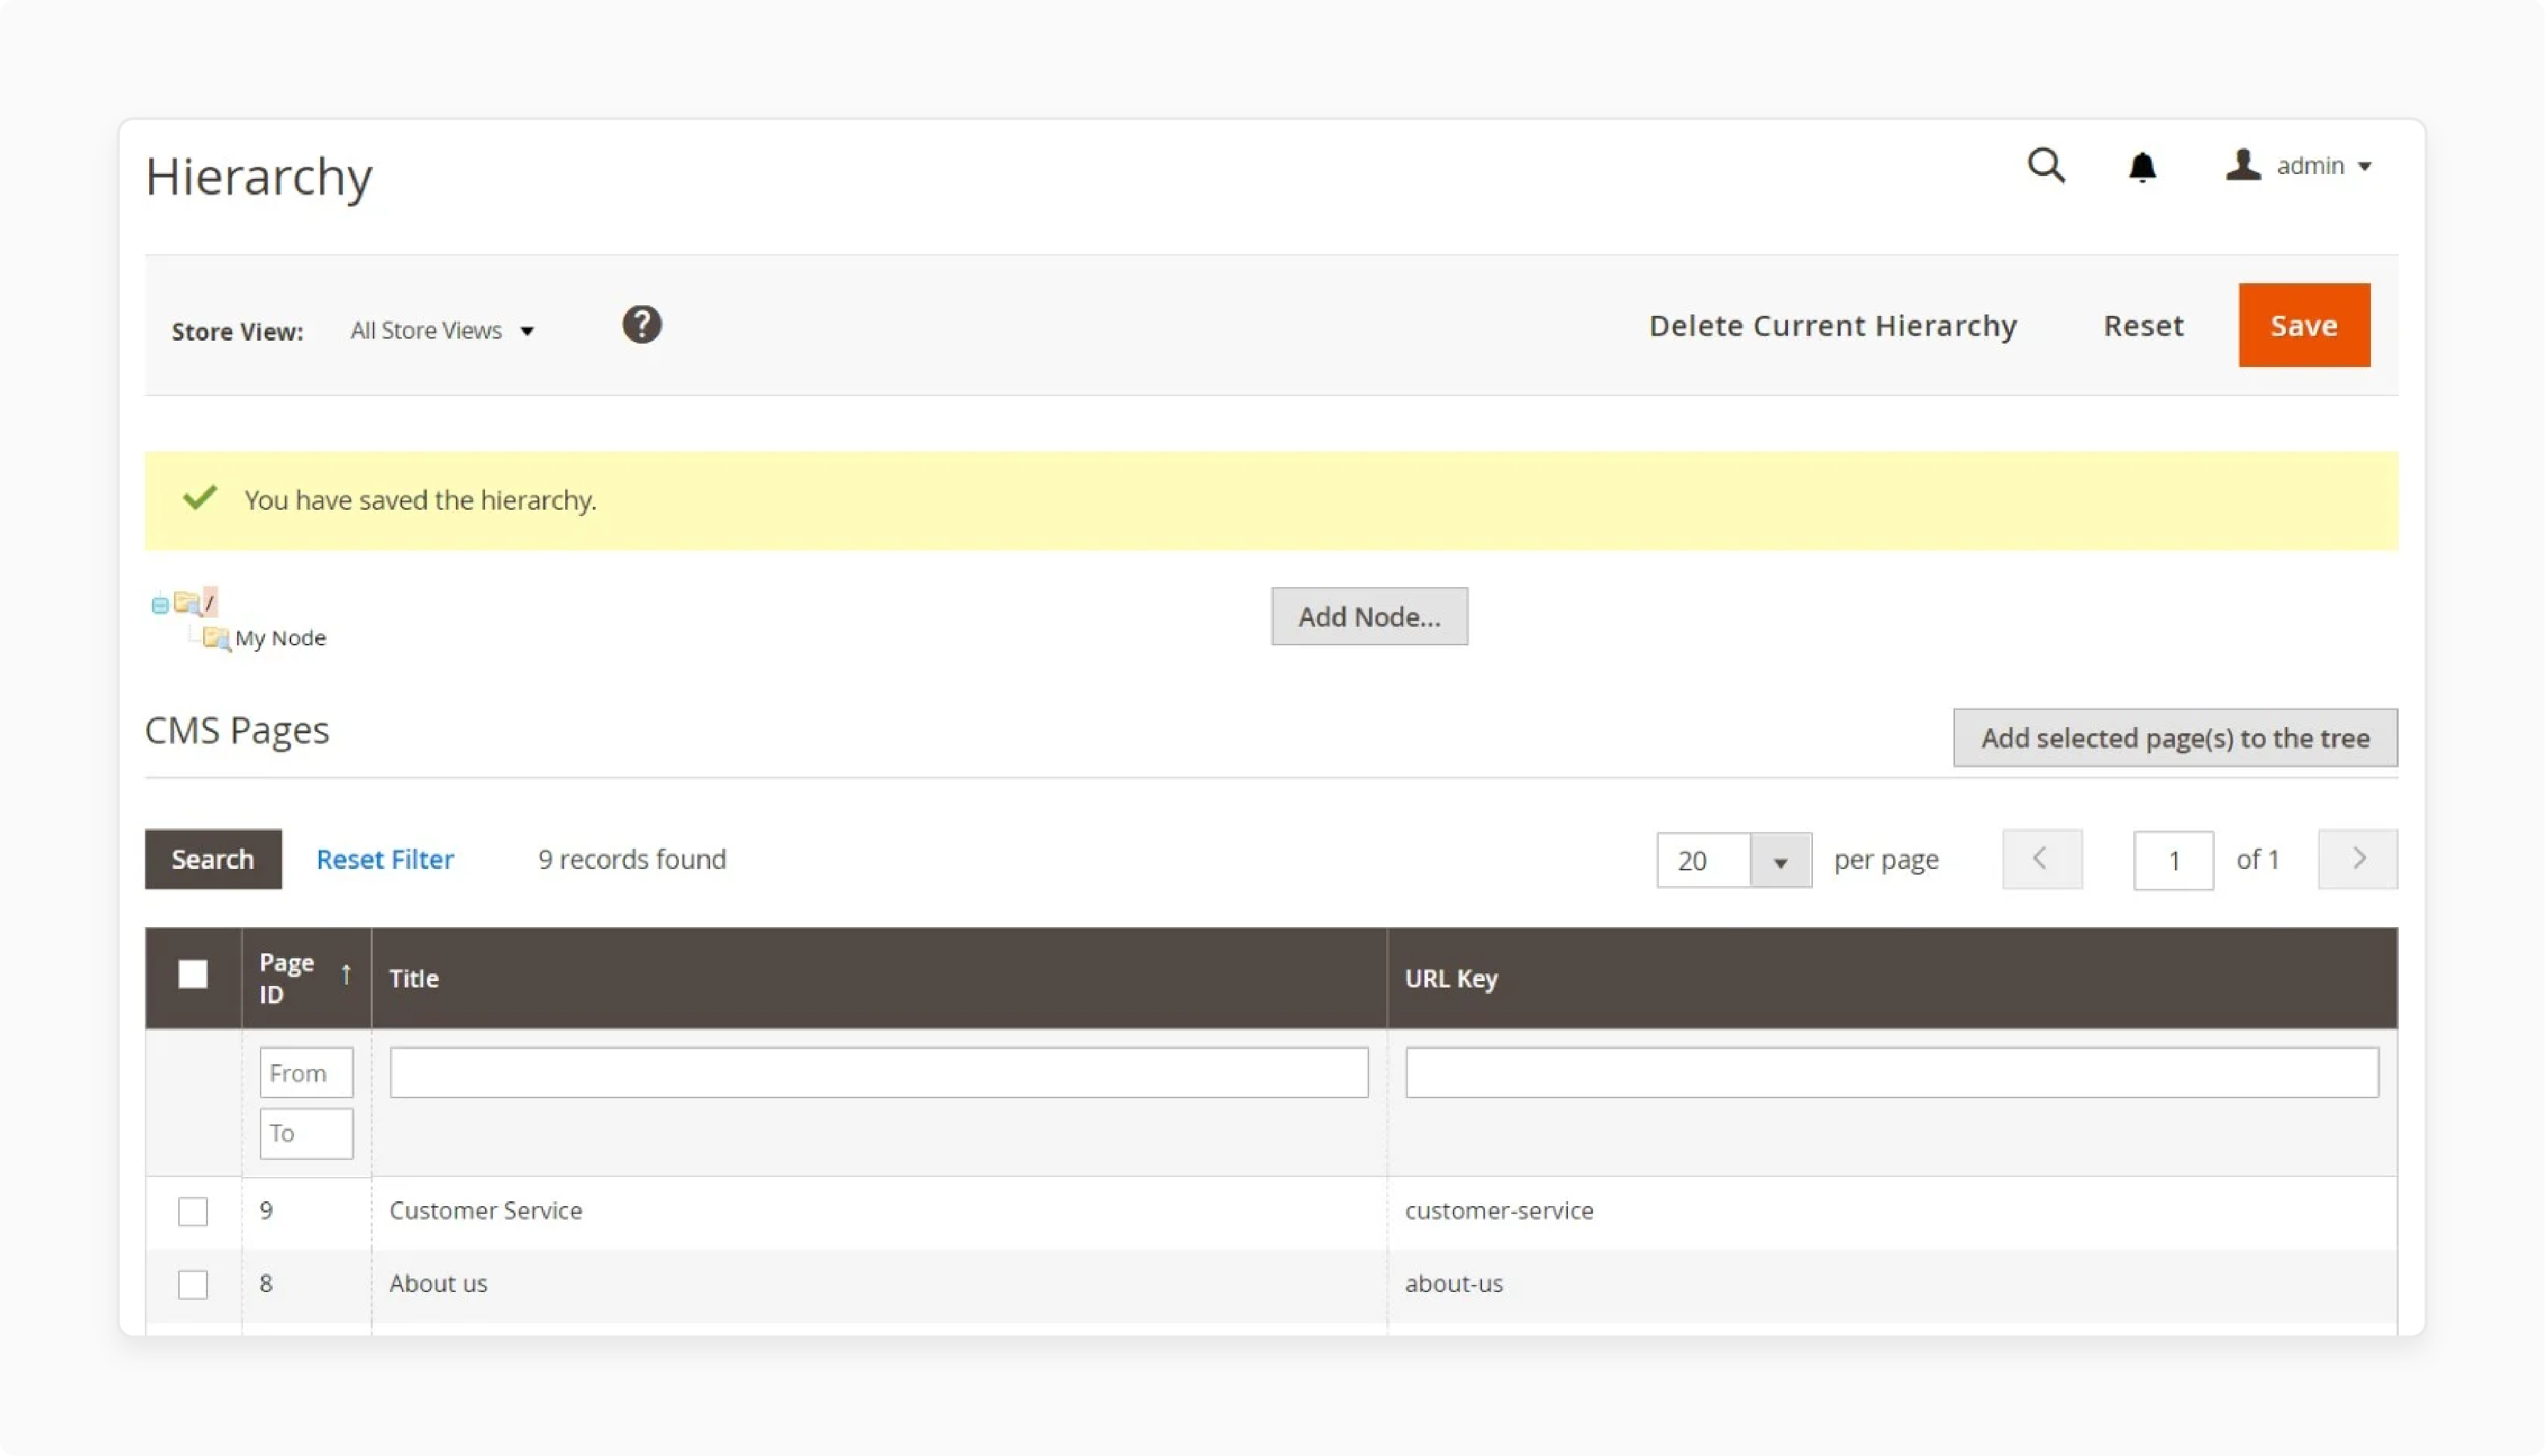
- Save the node to add it to the hierarchy tree.
Explanation: Nodes help create logical content groups in your store. You can use them to organize product information or company pages. For example, create a "Company Info" node for the About Us, History, and Team pages.
Step 3: Adding Pages to a Node
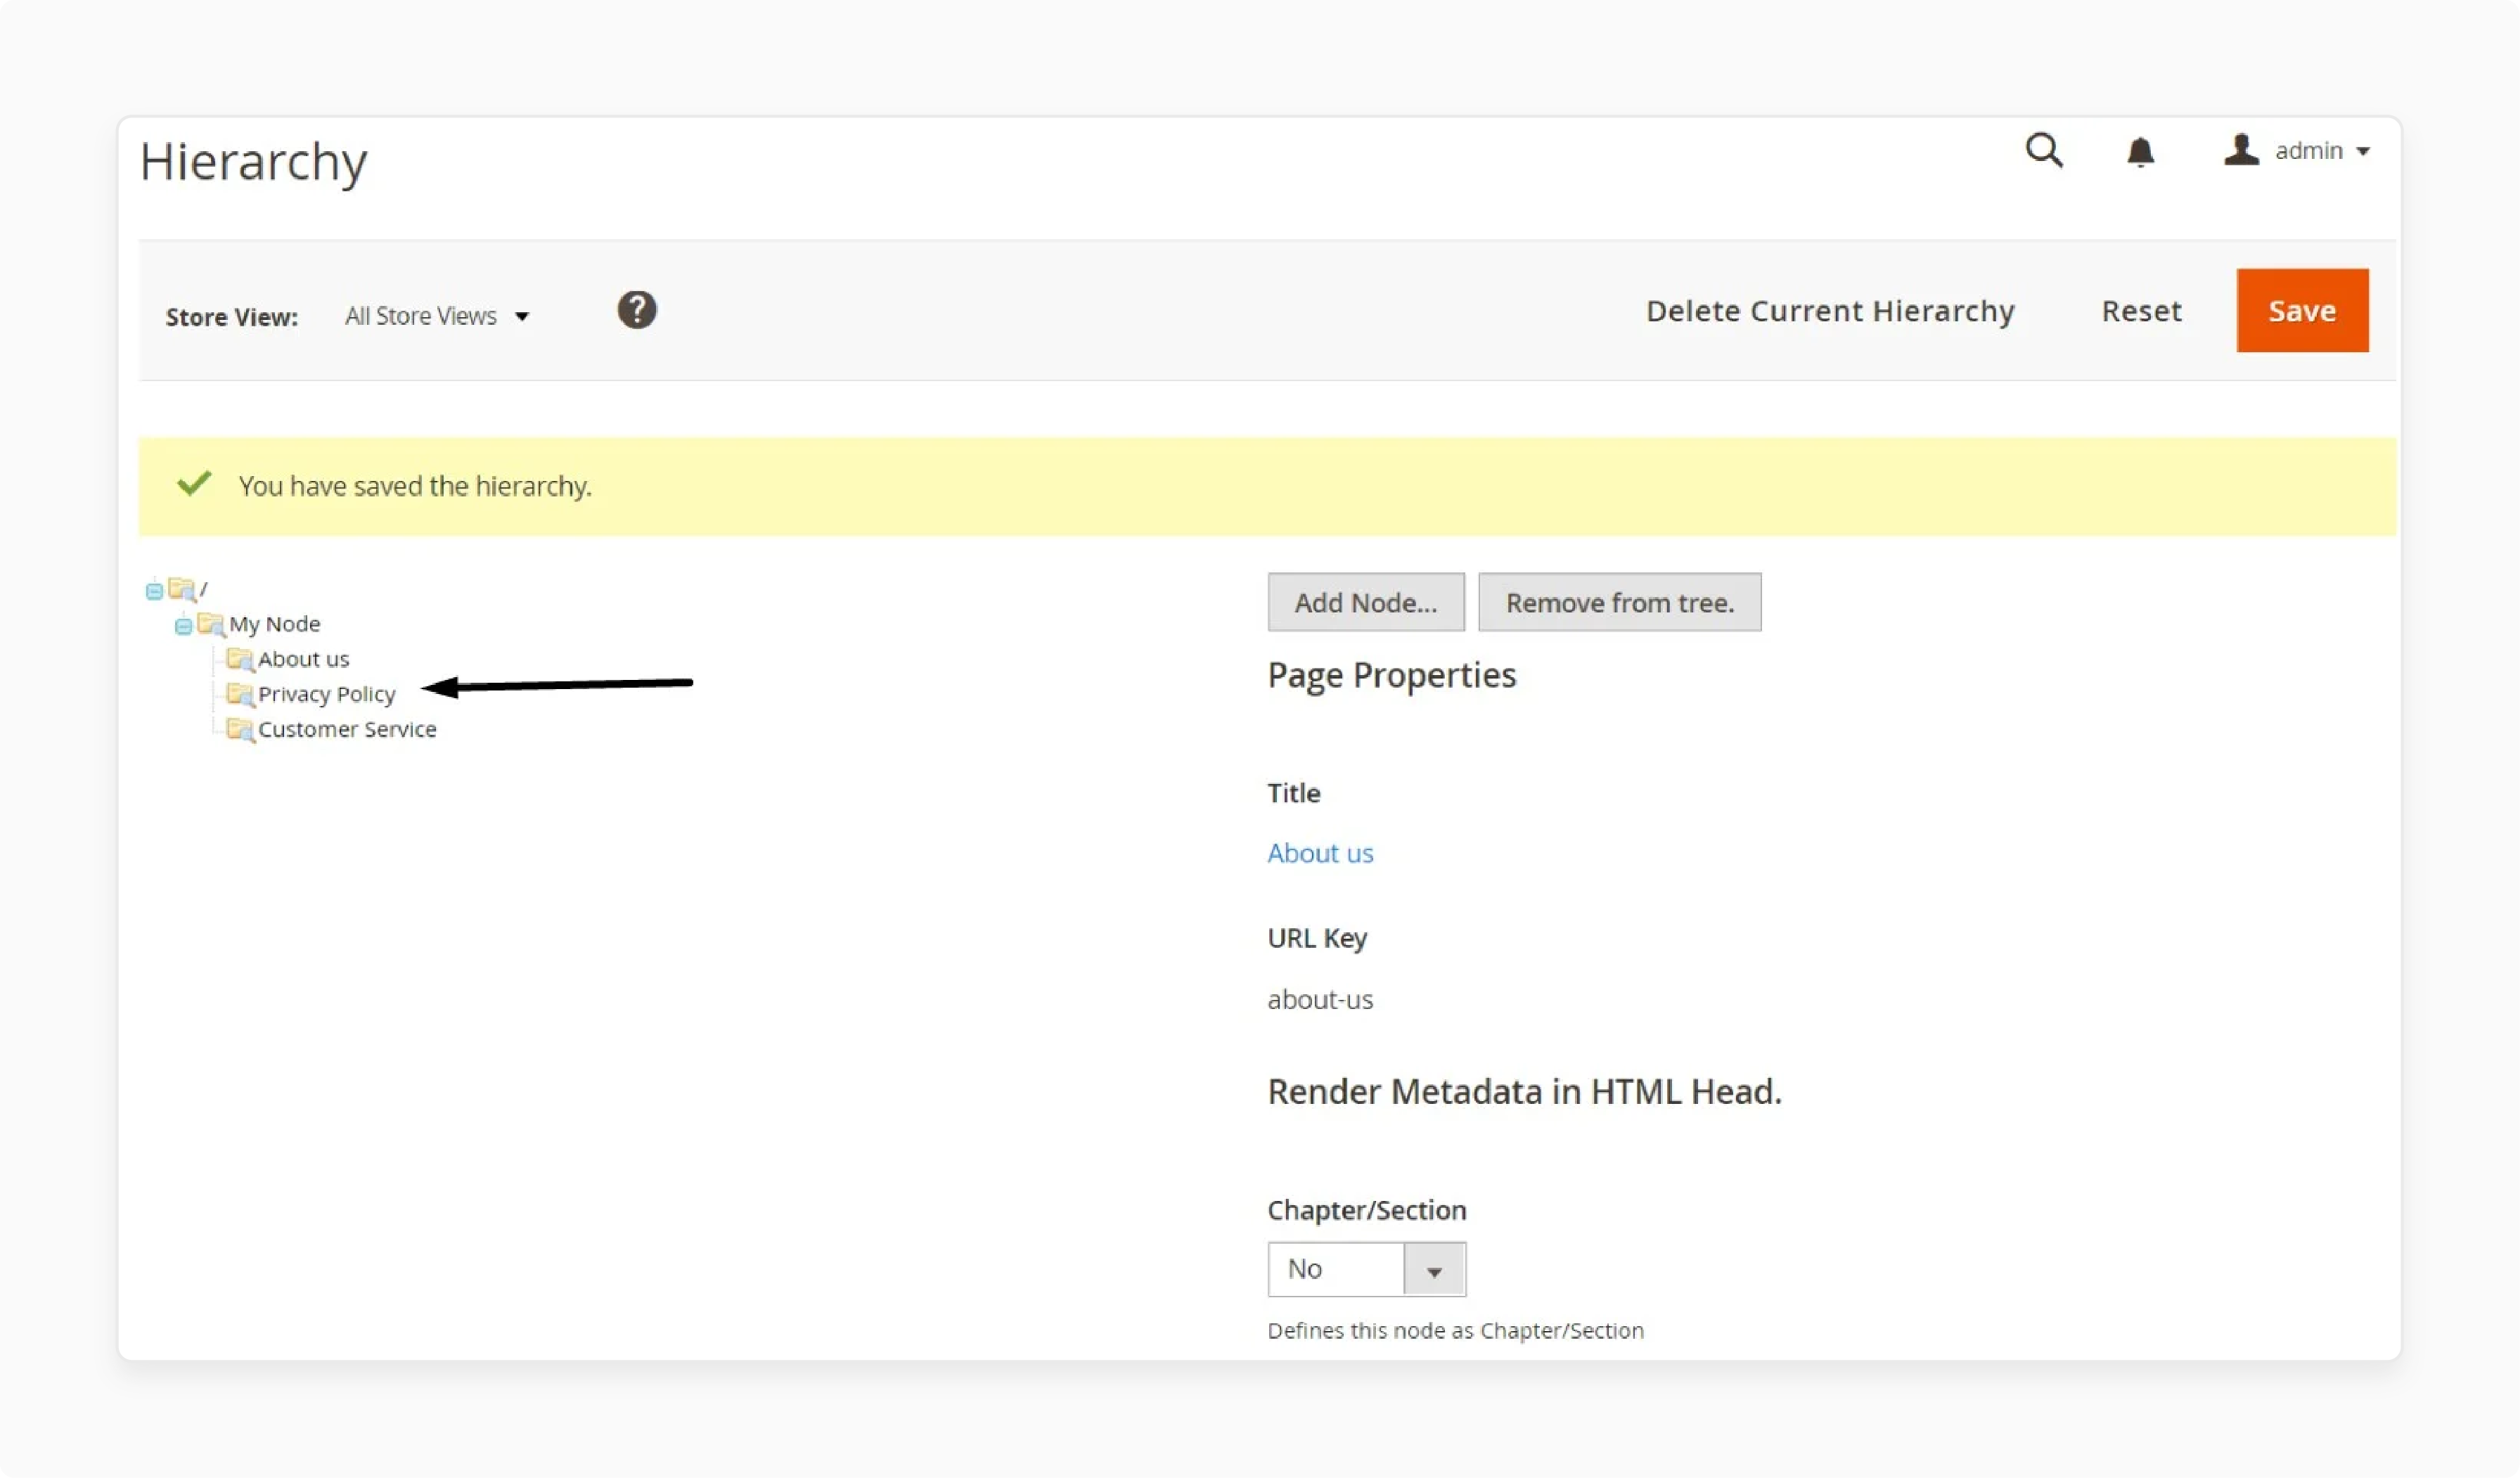
-
Click the node in the hierarchy tree to edit it.
-
Scroll down to the CMS pages section.
-
Check the boxes next to the pages you want to add.
-
Click Add Selected Page(s) to Tree to update the hierarchy.
Explanation: You can add multiple pages to a single node. The feature helps group related content together. For instance, add all blog posts about a specific product to one node.
Step 4: Configuring Node Structure and Metadata
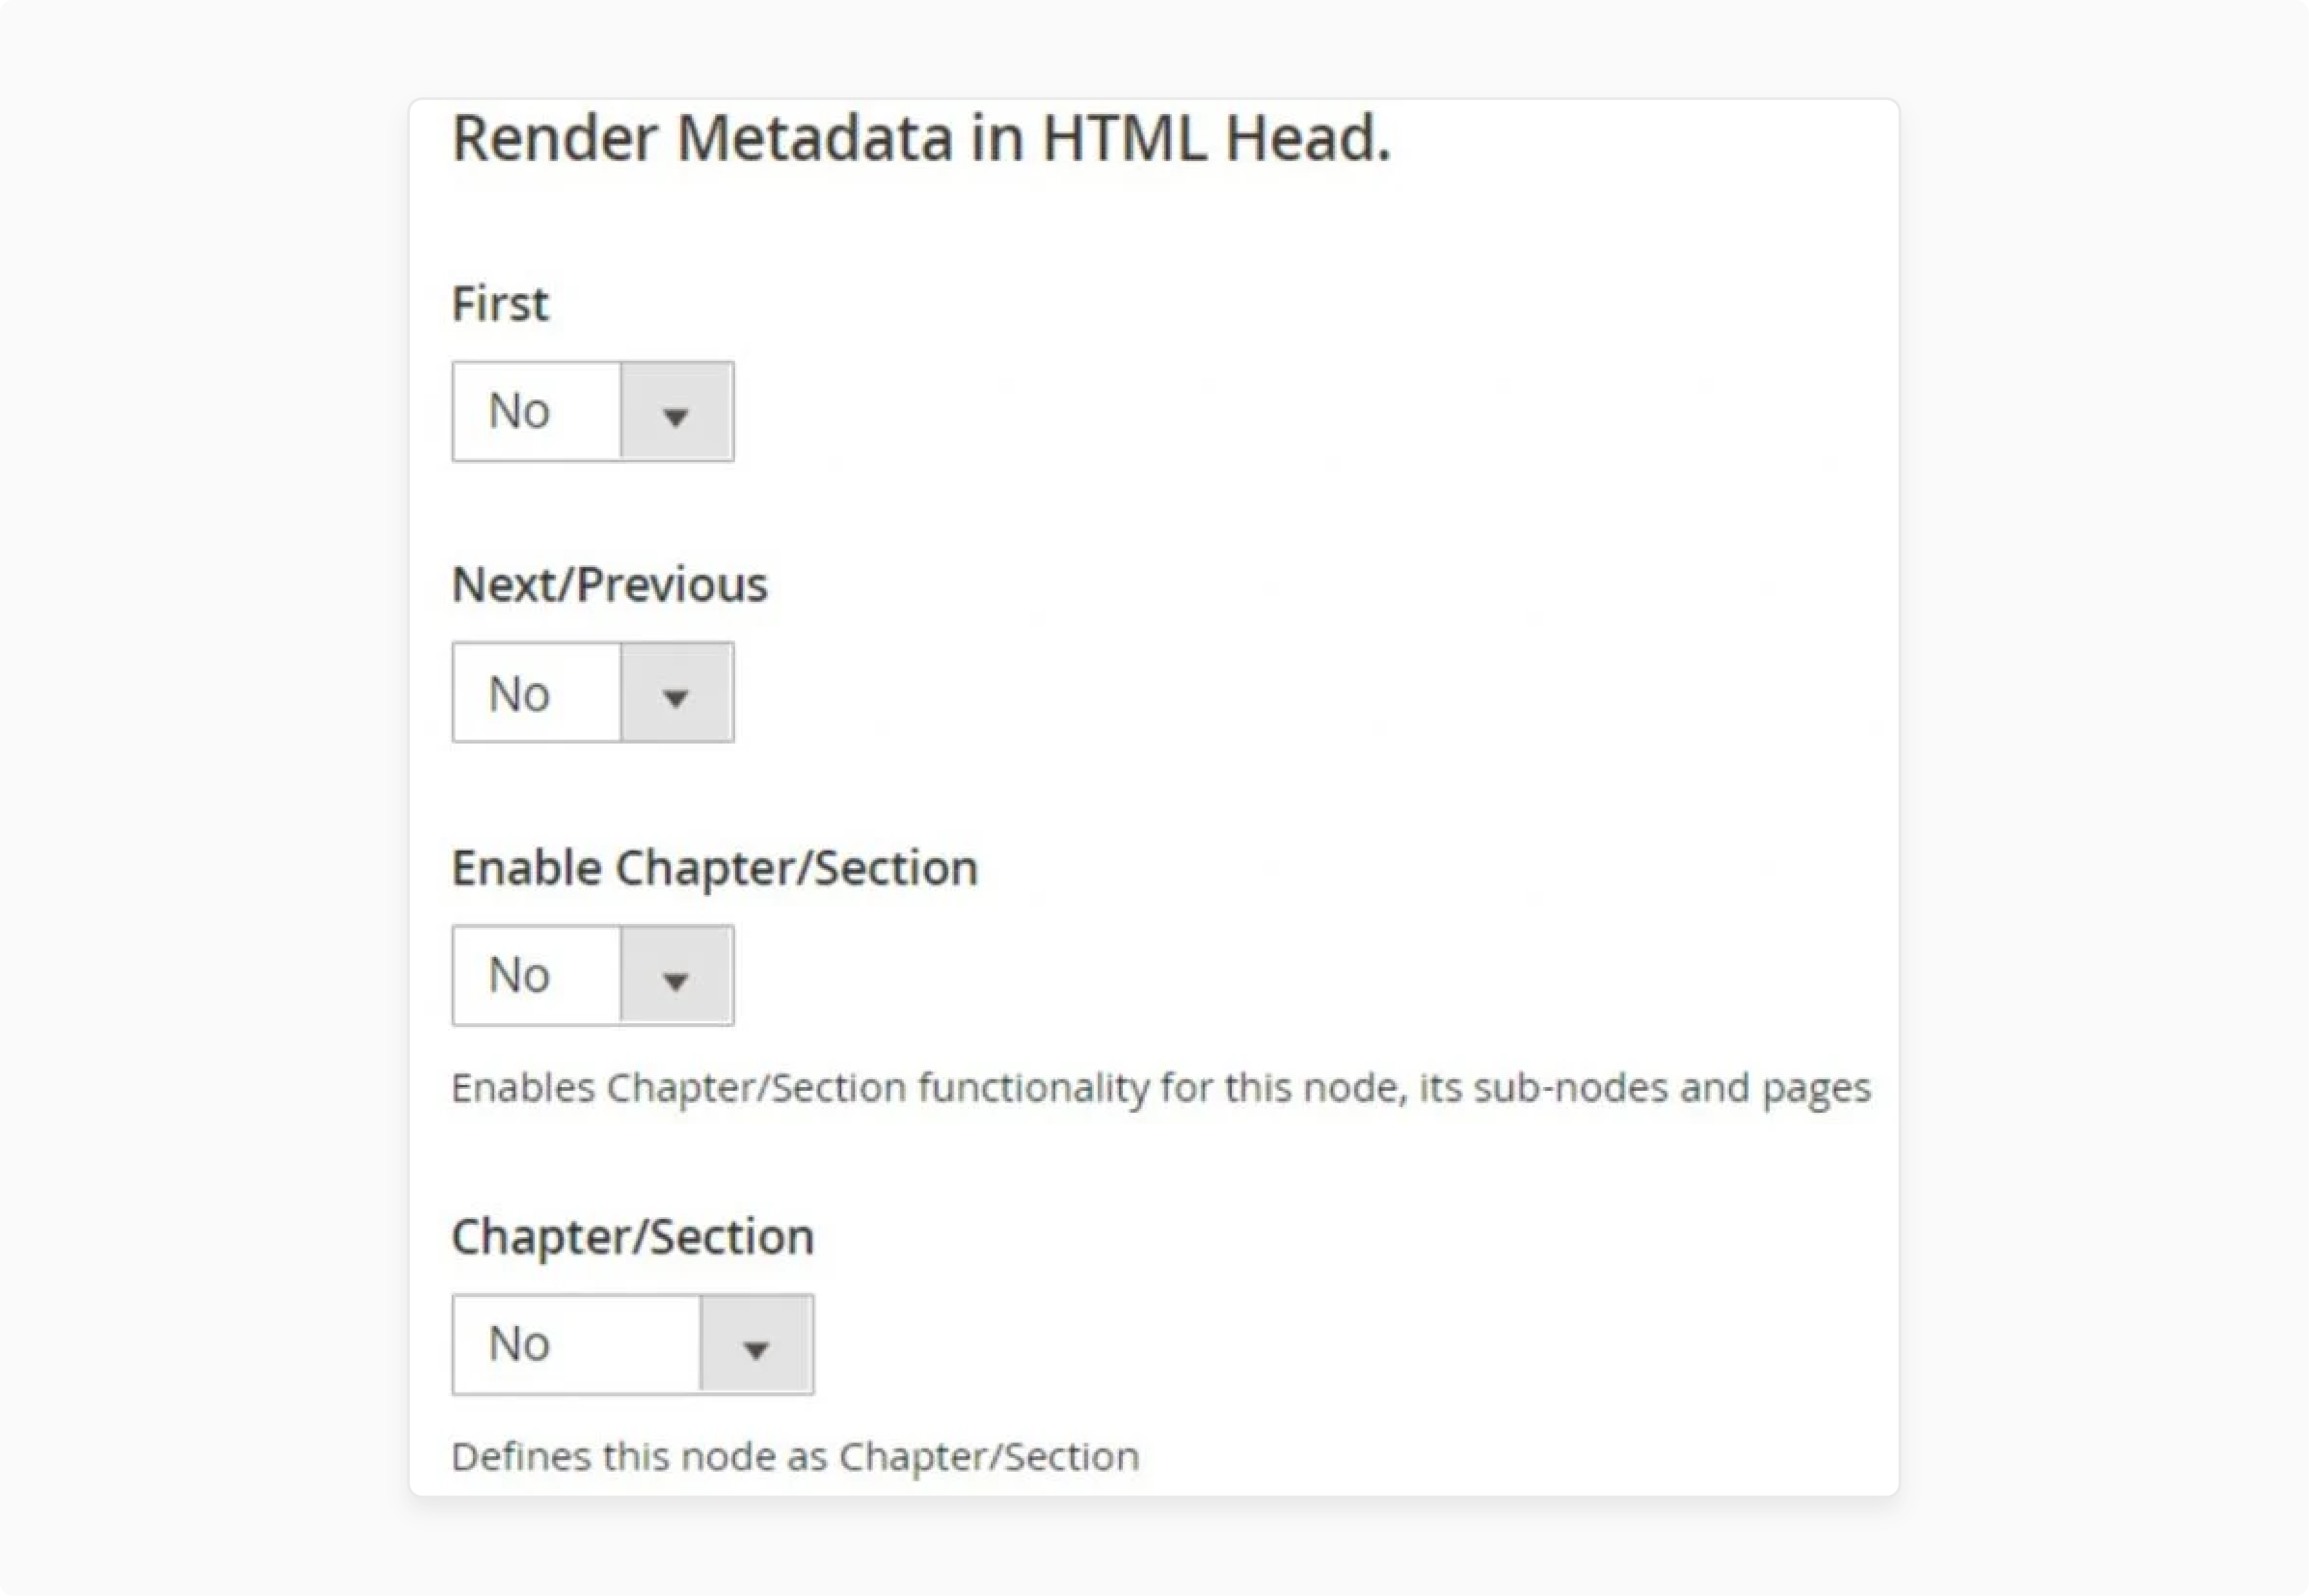
-
Click the node at the top of the hierarchy.
-
Go to the Render Metadata in the HTML Head section.
-
Set options for First, Next/Previous, and Enable Chapter/Section.
-
Choose Chapter, Section, or Both for the Chapter/Section option.
Explanation: Proper metadata configuration improves SEO and user navigation. You can set up your content like a book structure. The approach works well for extensive product documentation or user guides.
Step 5: Setting Up Pagination Controls
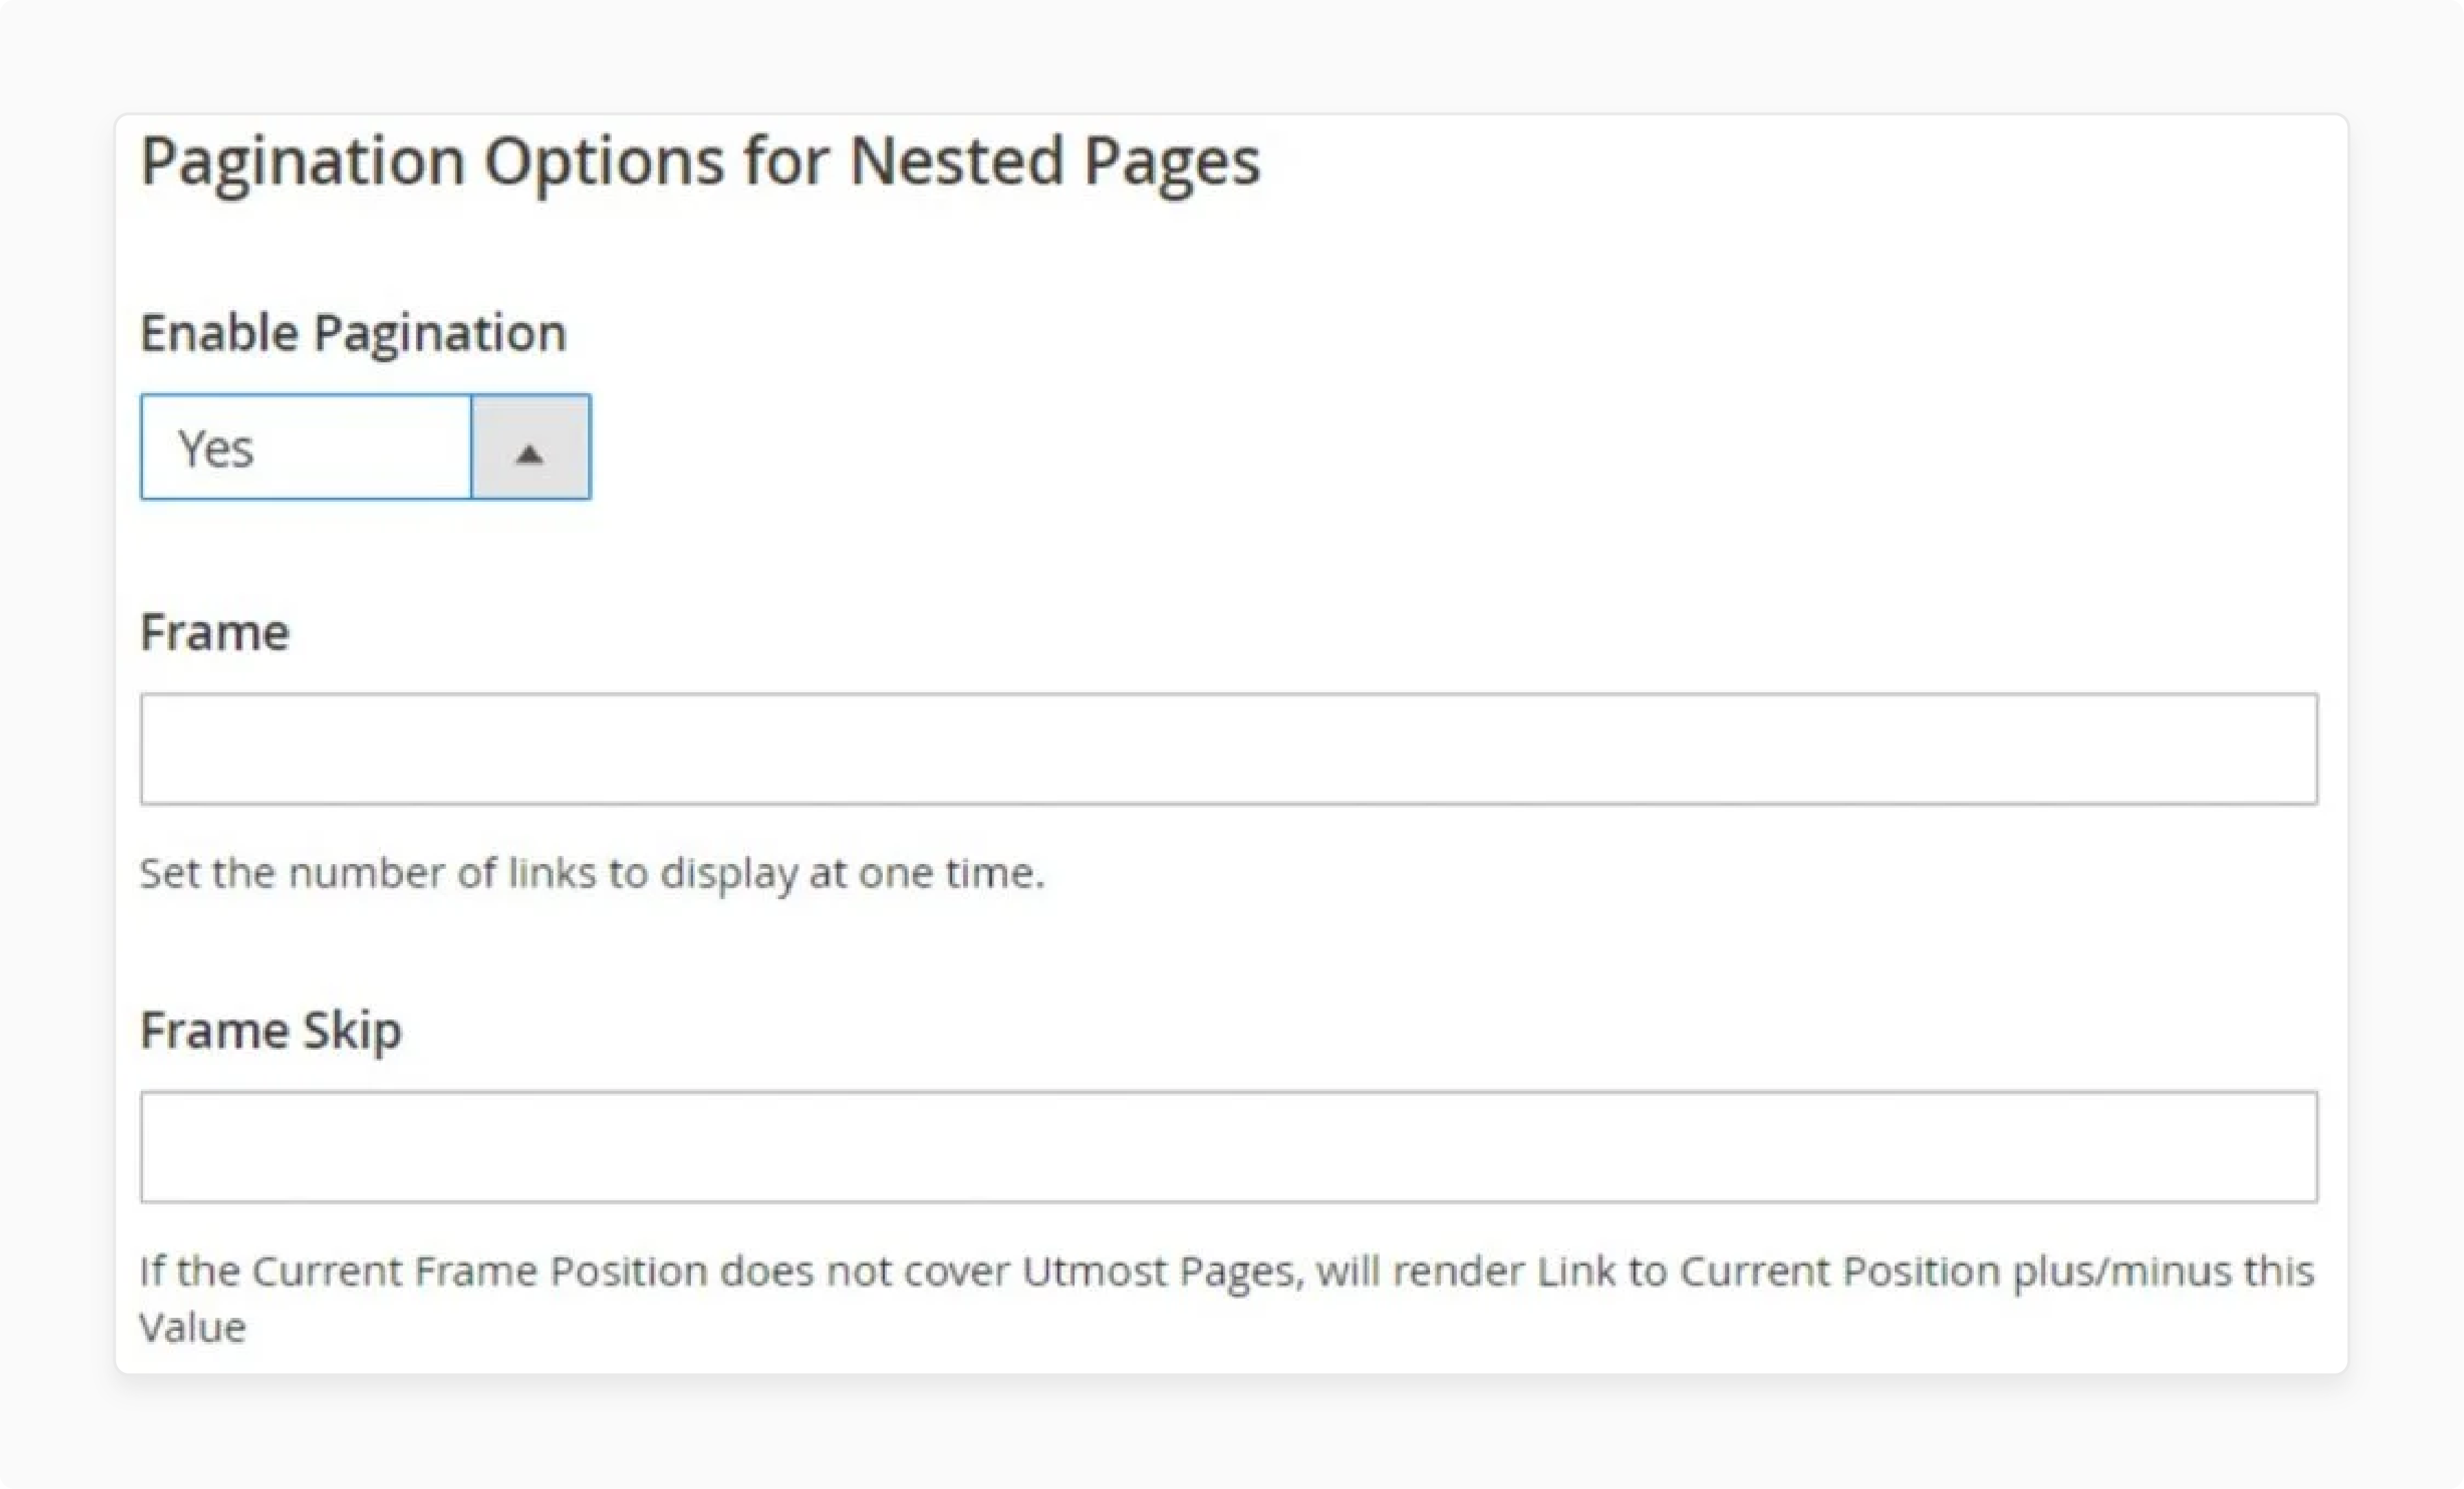
-
Navigate to Pagination Options for Nested Pages.
-
Enable pagination by setting the option to Yes.
-
Set the number of page links in the Frame field.
-
Enter a number in Frame Skip for additional navigation options.
Explanation: Pagination controls help users navigate through long content sections. They are useful for product catalogs or extensive blog archives. You can customize the number of visible page links.
Step 6: Configuring Menu Layout
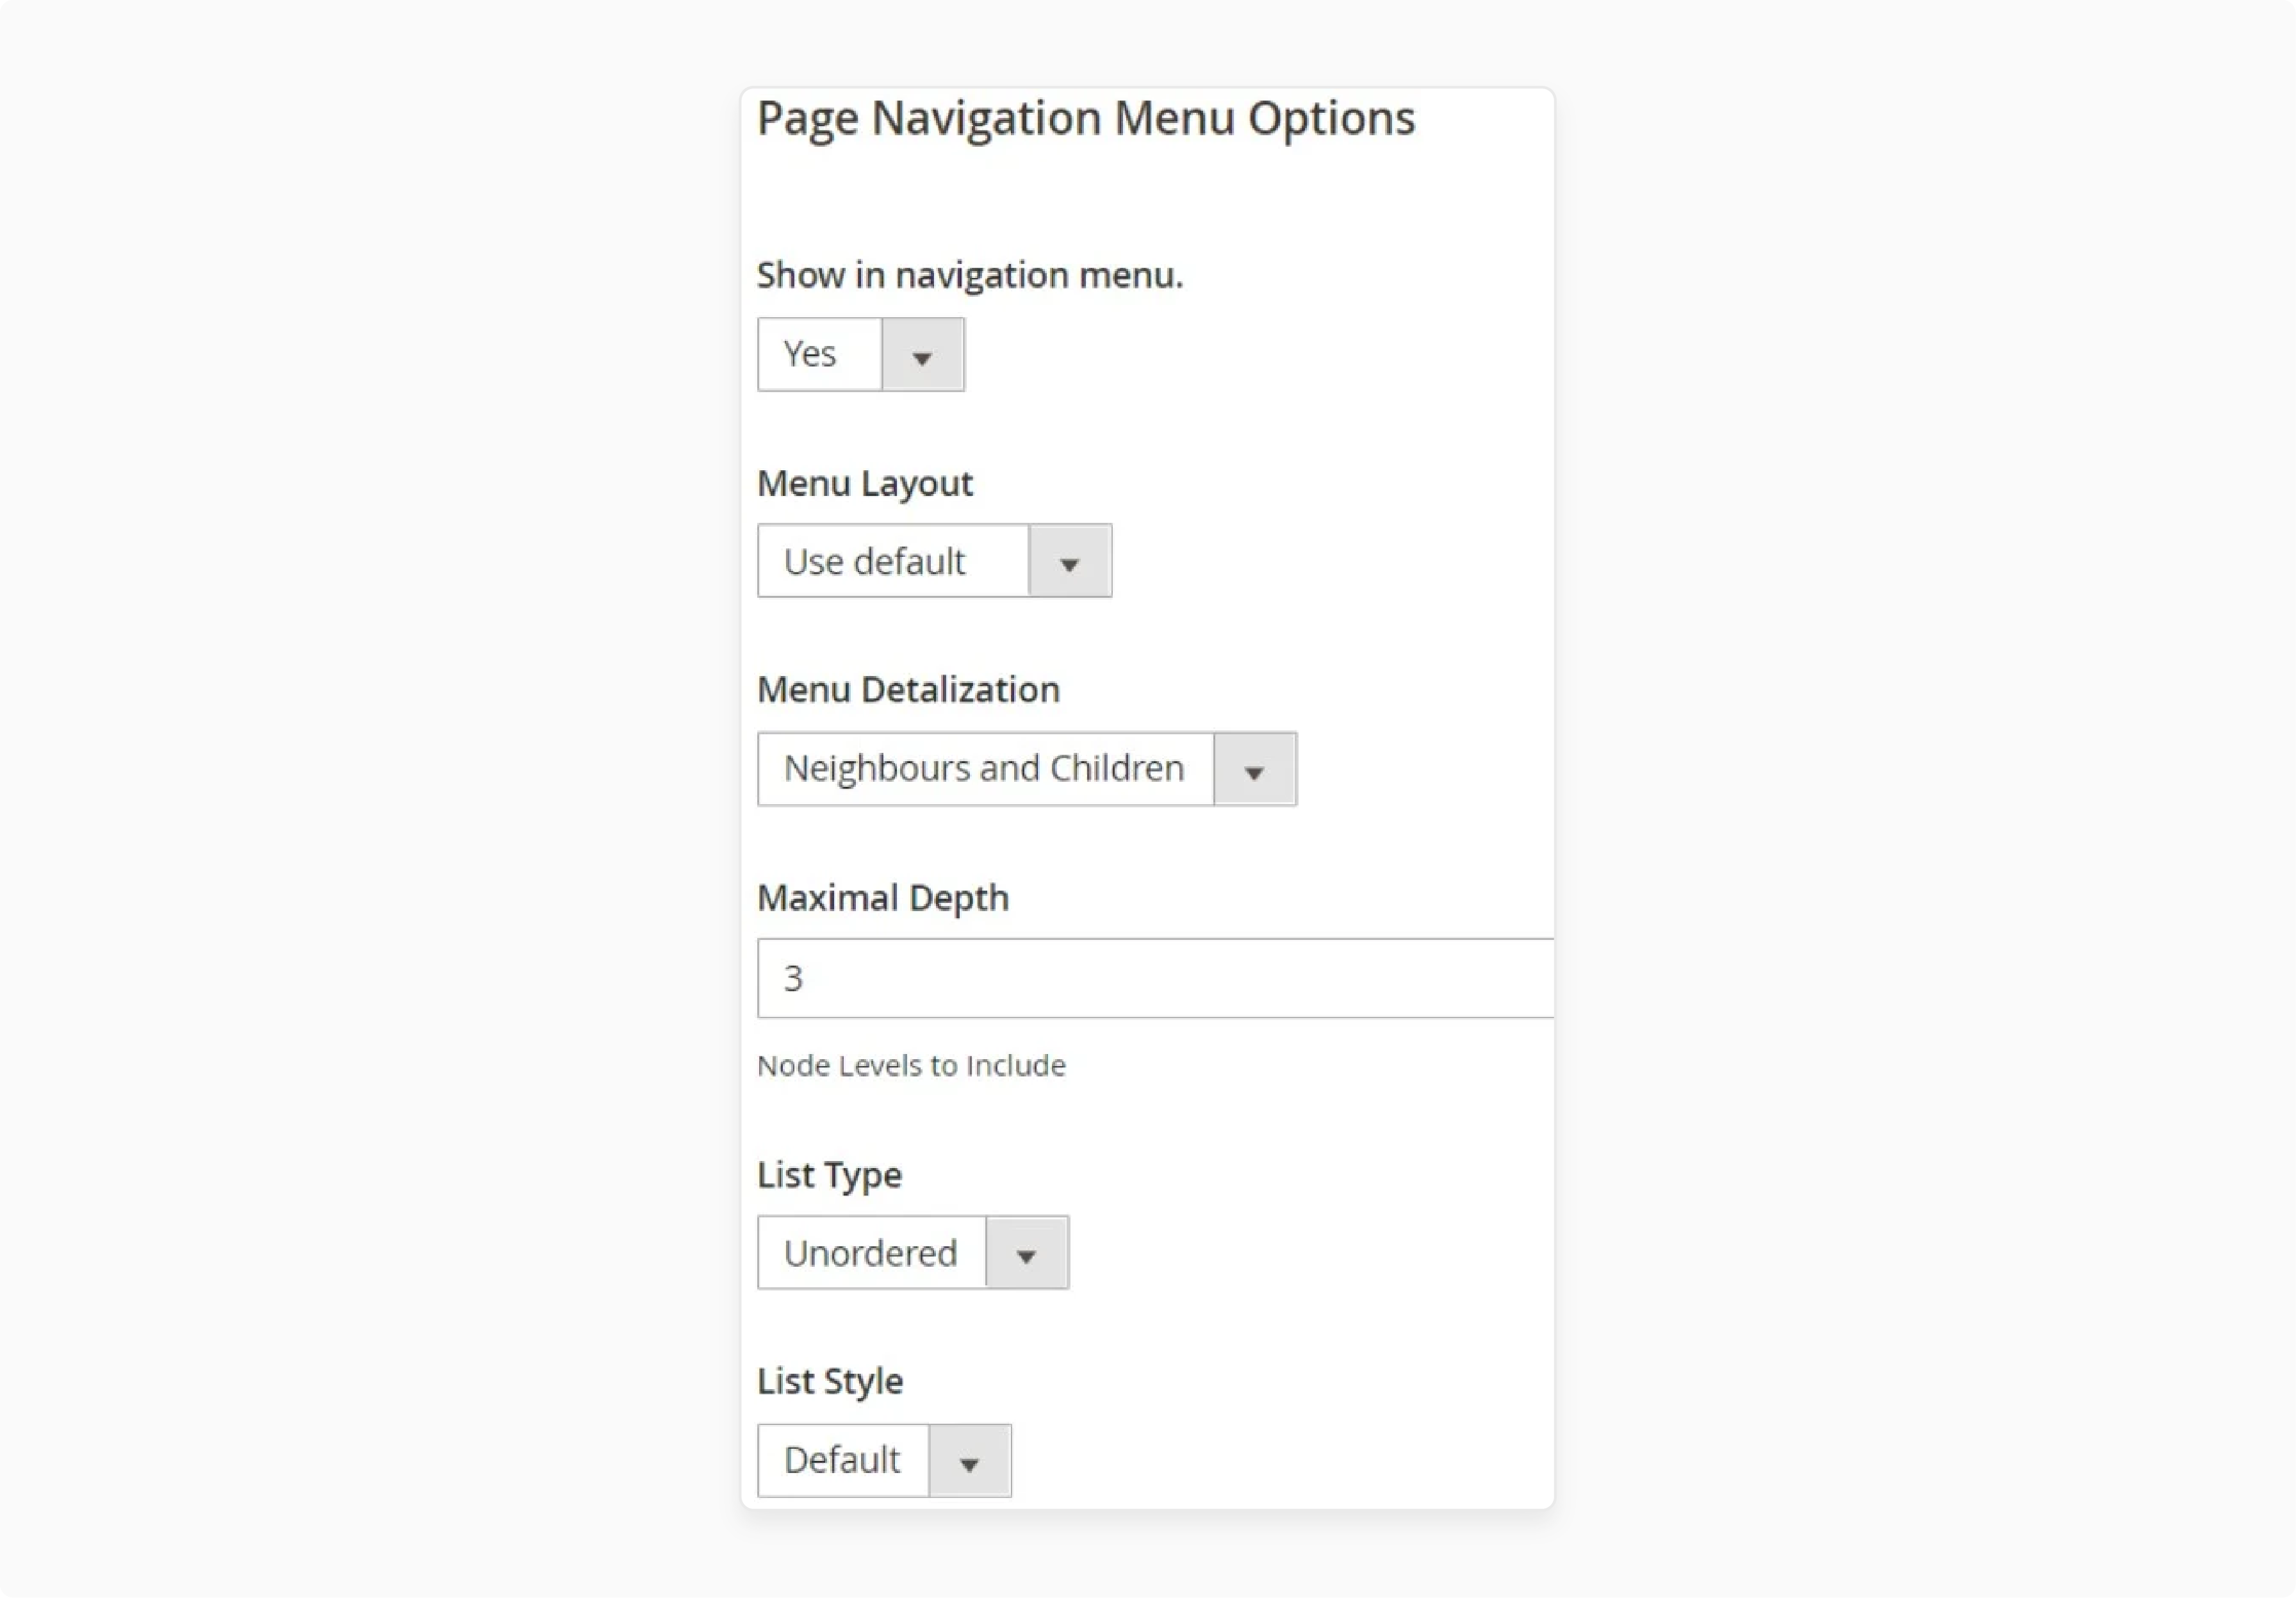
-
Go to Page Navigation Menu Options.
-
Set Show in Navigation Menu to Yes.
-
Choose a Menu Layout option (Content, Left Column, Right Column).
-
Set Menu Detalization to Only Children or Neighbours and Children.
-
Specify the Maximal Depth for menu levels.
Explanation: The menu layout settings control how your hierarchy appears to users. You can create deep, multi-level menus or simple, flat structures. These options let you tailor the navigation to your specific content needs.
Steps to Import & Export Magento 2 CMS Page Hierarchy
1. Magento 2 CMS Page Hierarchy Import
Step 1: Navigate to the Import Jobs section.
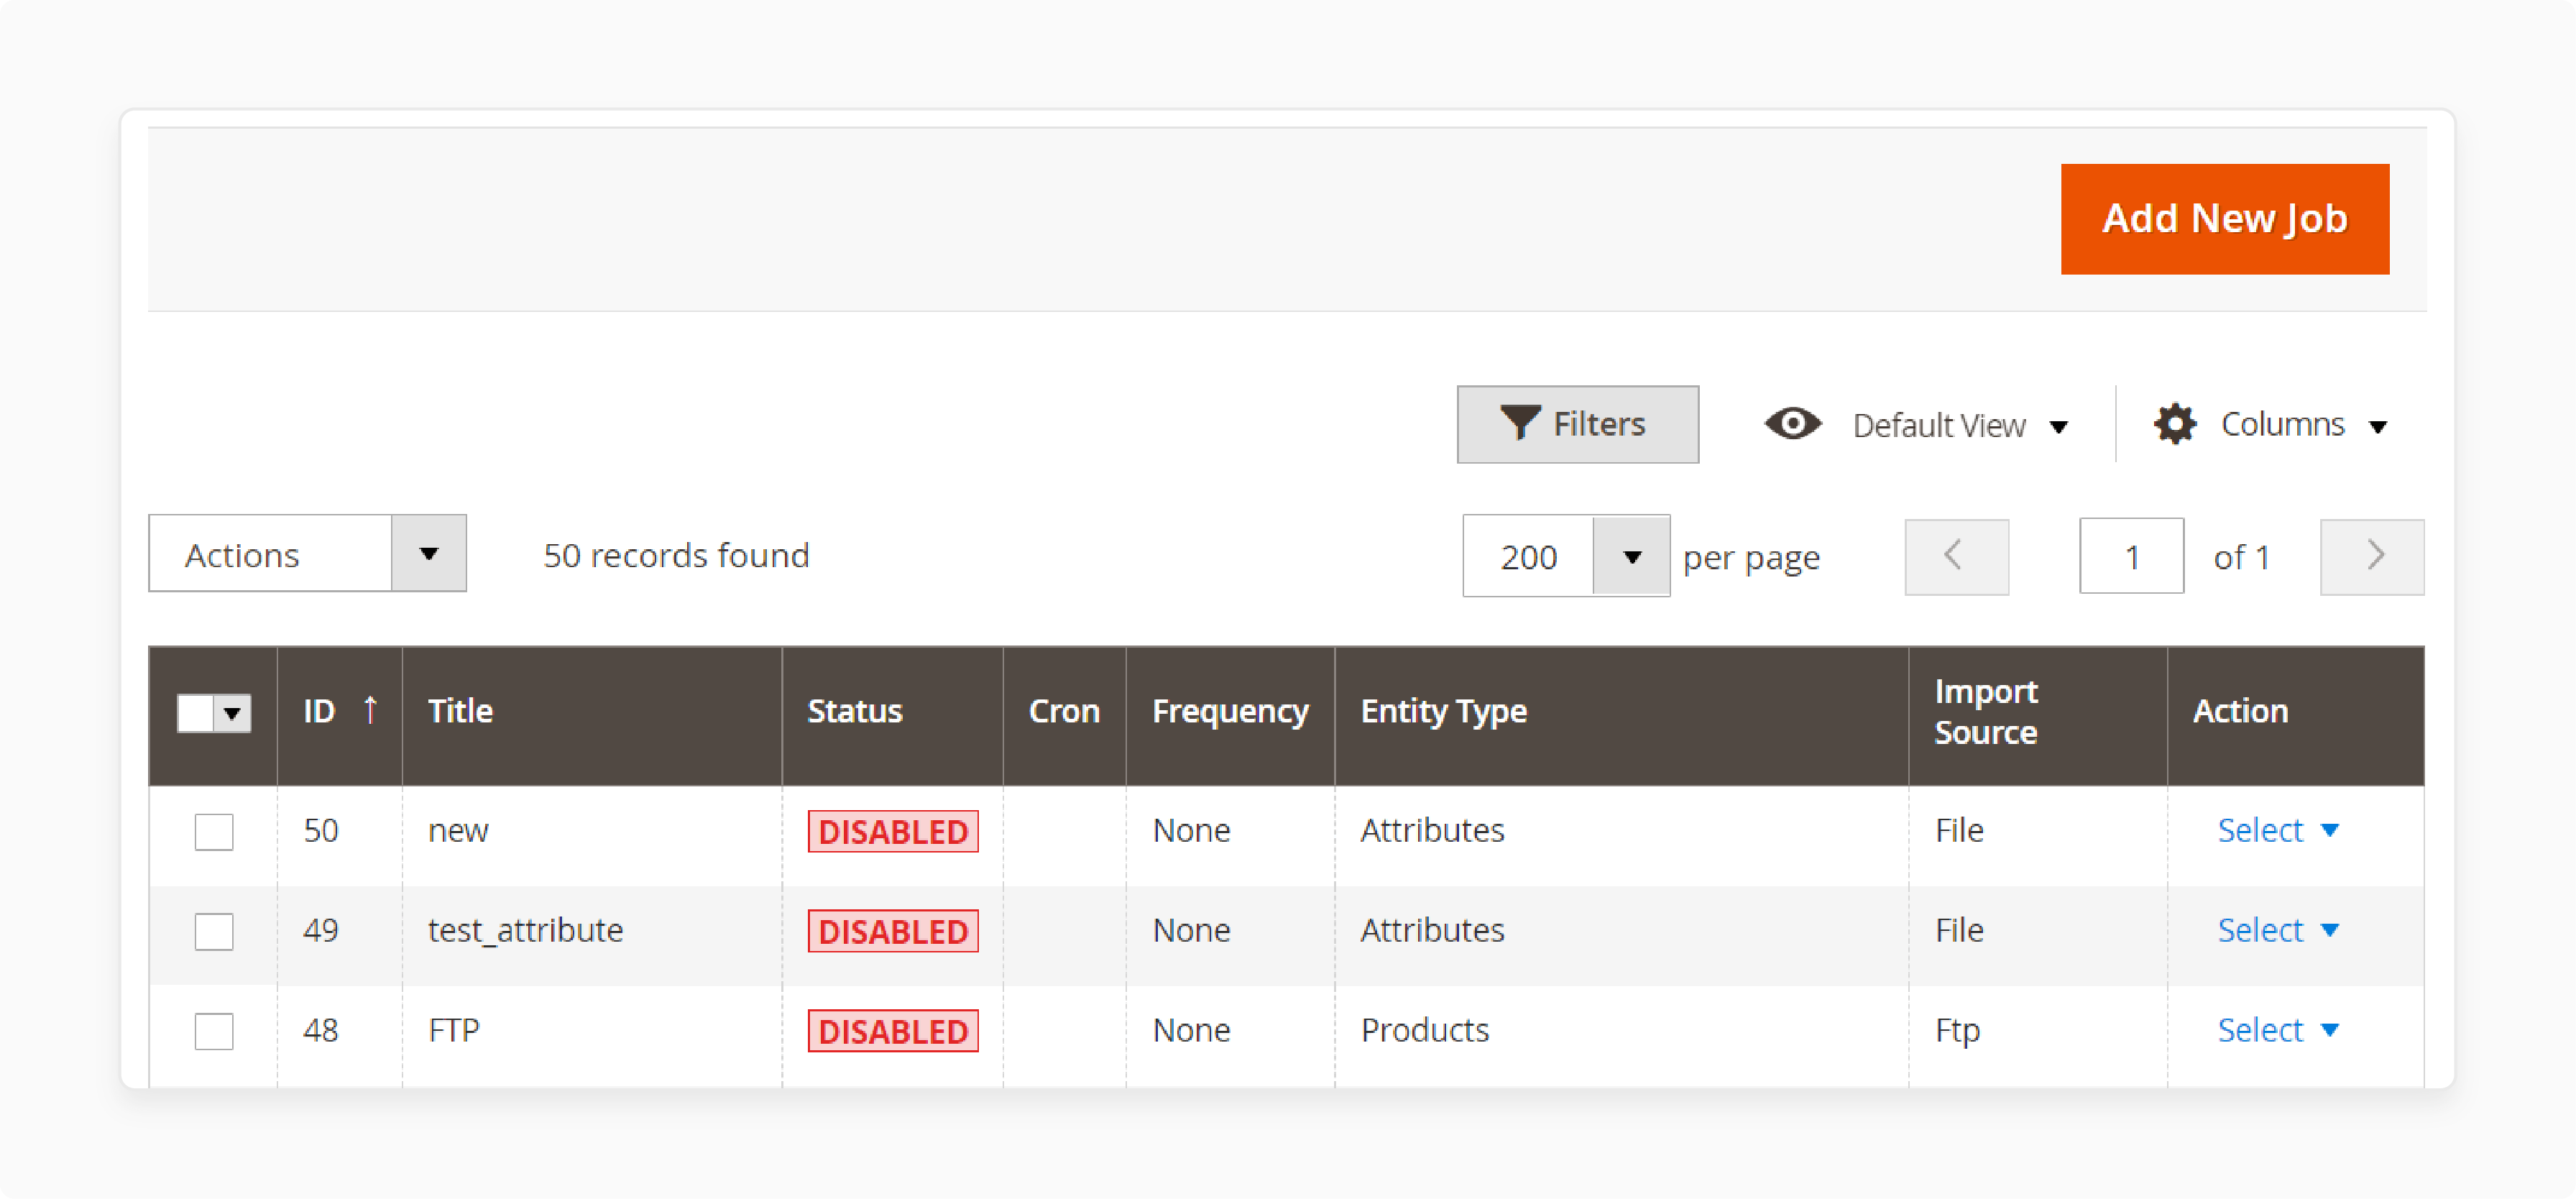
Go to System > Improved Import/Export > Import Jobs. Click Add New Job to create a new job and import the page hierarchy.
Step 2: Select Data Type.
Under General Settings, choose Page Hierarchy from the Entity drop-down menu. It confirms that the right type of data is selected for import.
Step 3: Configure the Job Settings.
In the Import Settings section, choose the file format (CSV, XML, etc.) and configure other settings like import behavior and data source.
Step 4: Save and Run the Job.
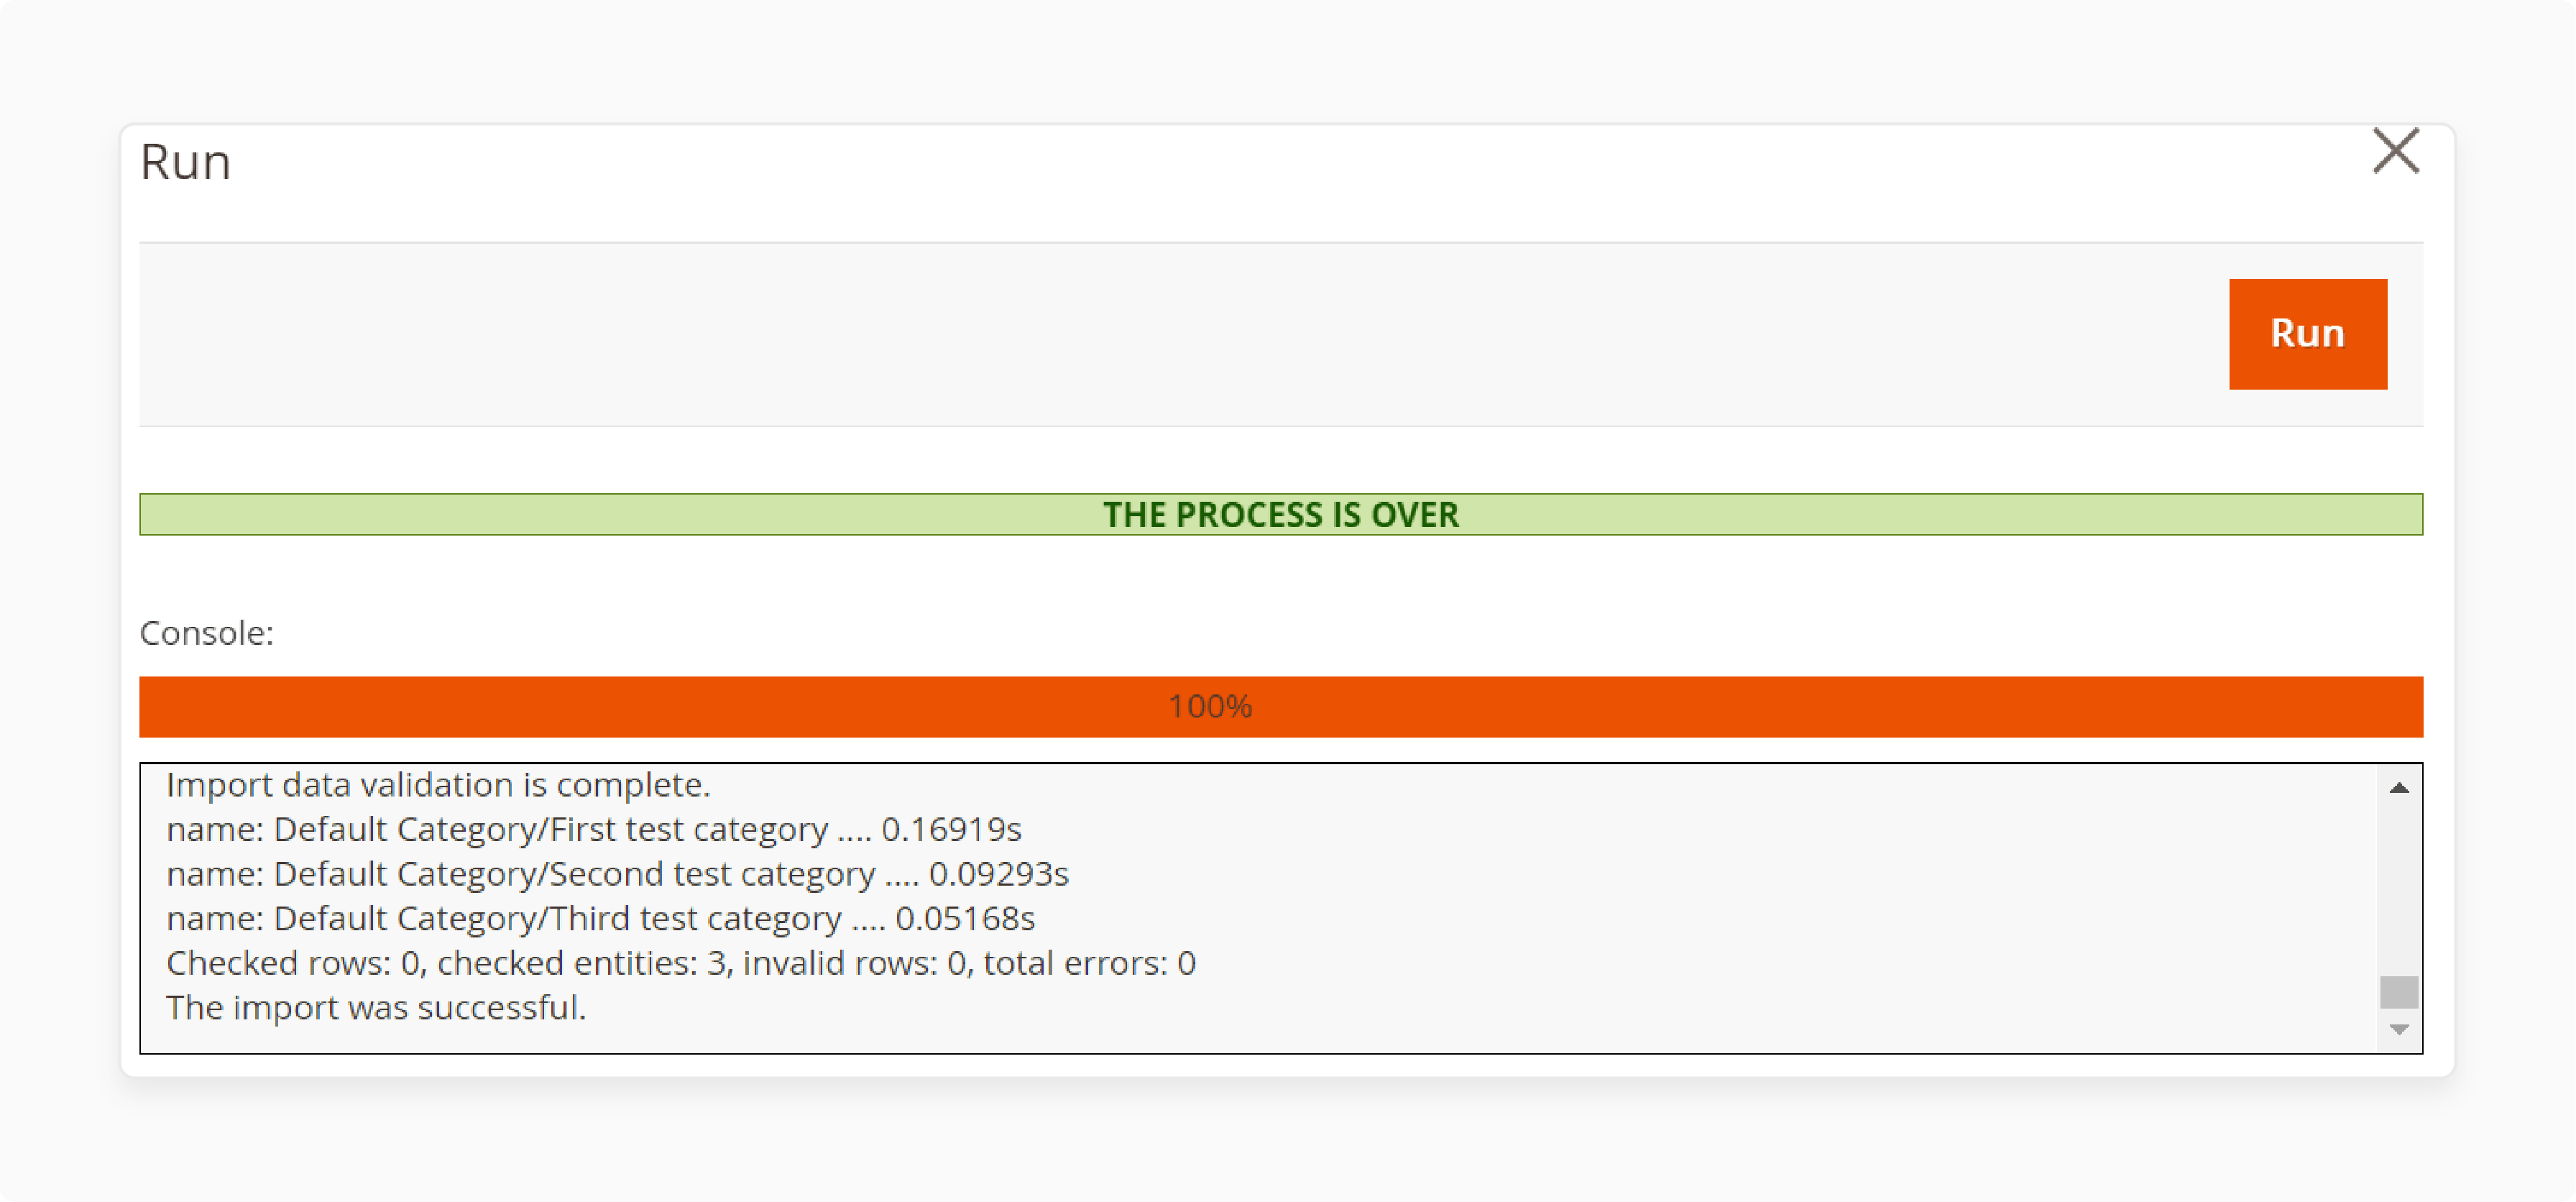
After configuring the job, save it and hit Run to start the import. The process transfers the page hierarchy data to your Magento 2 store.
Step 5: Monitor the Import Progress.
Check the status of the import job to confirm if all pages have been successfully imported. Adjust any settings as needed for future imports.
2. Magento 2 CMS Page Hierarchy Export
Step 1: Go to Export Jobs.
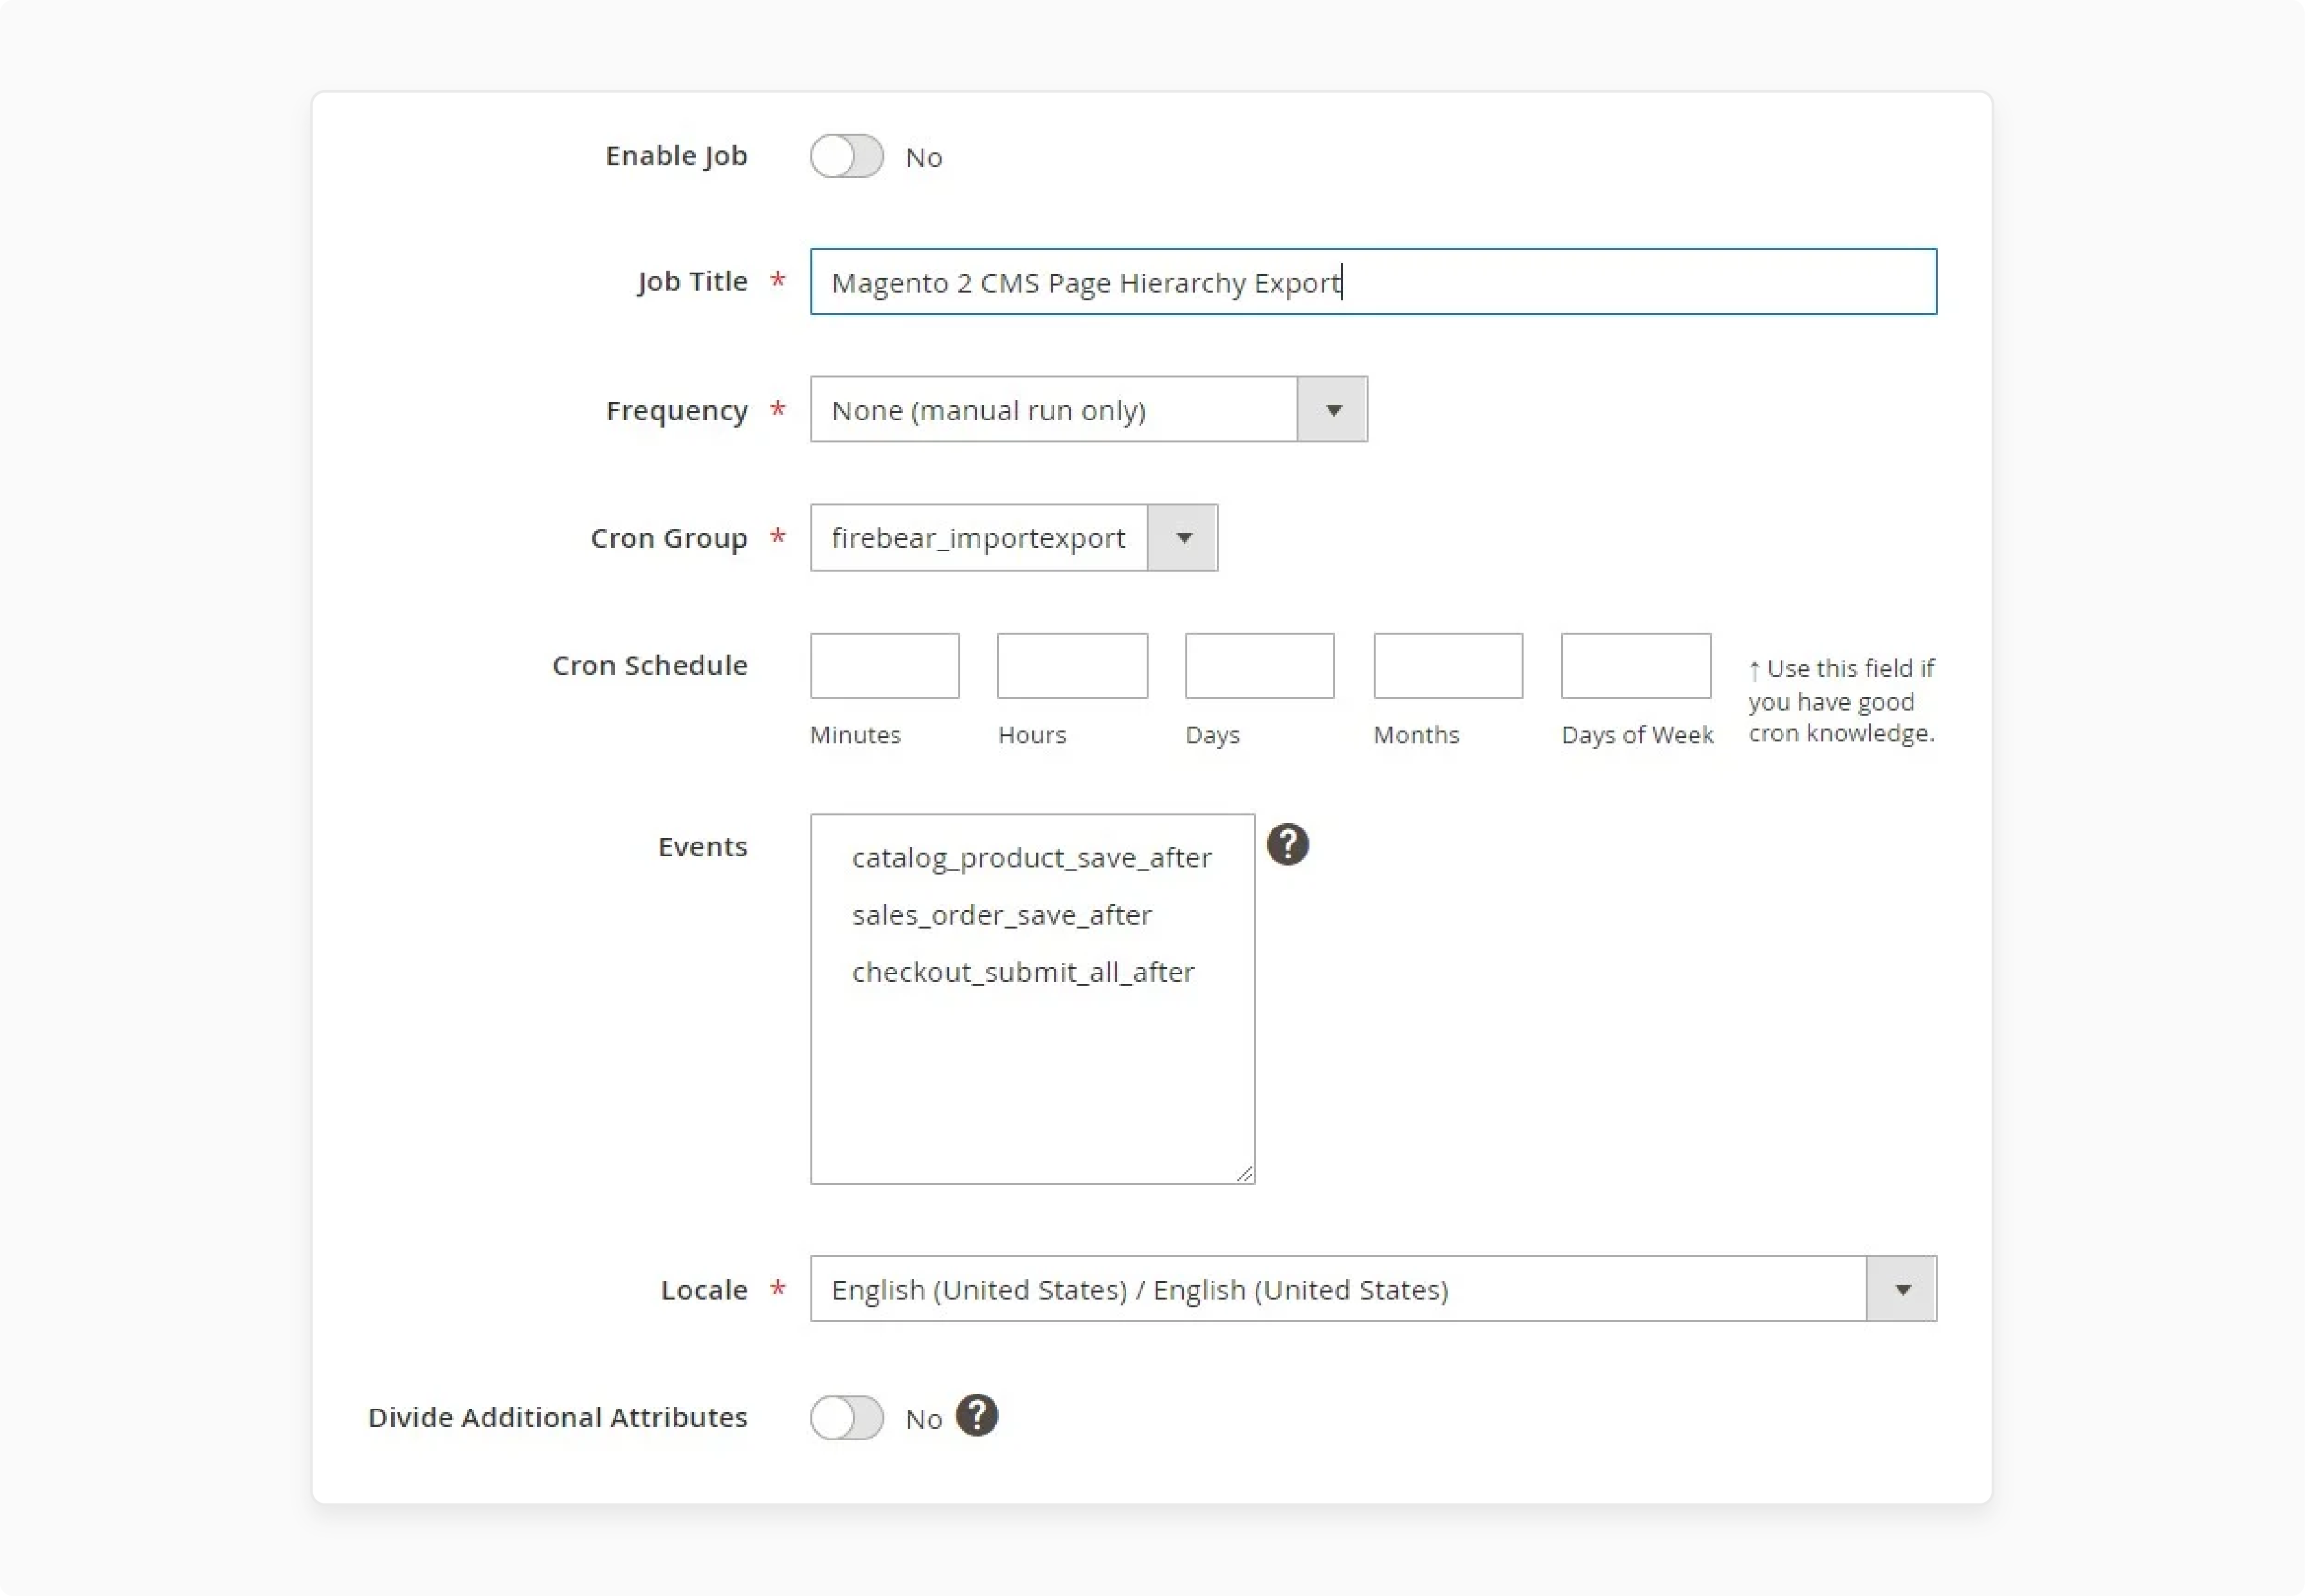
Access System > Improved Import/Export > Export Jobs. Click Add New Job to create a new export job for your page hierarchy.
Step 2: Select Export Settings.
Choose Page Hierarchy as the entity and select the file format for export. Depending on your requirements, you can use CSV, XML, or JSON formats.
Step 3: Configure Export Profile.
Set up the export profile to specify any additional parameters, such as filtering by specific pages or nodes.
Step 4: Save and Run the Export Job.
After configuring the settings, save the job and click Run to start the export process. The system will generate the file with your CMS page hierarchy.
Step 5: Check the Export File.
Once the export is complete, review the file for accuracy. The file can now be used to transfer the hierarchy data to another Magento 2 store.
FAQs
1. How do I create a CMS hierarchy node link in a content block or page?
Use the widget tool to place hierarchy links in any content block. Select the hierarchy node link option when adding a widget. Choose your target node from the menu. The widget creates navigation paths between related content pages. You can add multiple links to build comprehensive navigation structures.
2. What is the maximum depth of menu levels in the page hierarchy system?
The page hierarchy system lets you set the maximum number of levels. You determine the depth through admin settings. Menu options can be numbered or not numbered. The system uses parent-child relationships to organize content pages. Different sections can have varying menu depths.
3. How does Adobe Commerce handle content page associations in hierarchy nodes?
Adobe Commerce and Magento Open Source let content pages associate with multiple nodes. A single content page might connect to several hierarchy sections. The system is based on nodes that contain other nodes. Pages maintain relationships while staying organized.
4. Can third-party import/export tools handle Magento Enterprise page hierarchies?
Yes, third-party export Magento 2 extensions support page hierarchy transfers. You need to transfer hierarchy data between stores. These tools help regularly publish large amounts of content. They maintain all node relationships during import/export operations.
5. How do I create a node with simple navigation in Magento Community?
Navigate to Content > Elements > Hierarchy. Click 'Add Node' and enter basic details. The system provides the ability to organize subpages. You can identify related pieces of content through parent-child relationships. The frontend displays organized navigation menus.
6. How do I add pages to the node using the widget tool?
First, find articles you want to add. Check the checkbox of each page to include. Use the widget tool to link and place content. The system formats numeric navigation automatically. You can easily skip ahead between different hierarchy sections.
Summary
Magento 2 CMS Page Hierarchy depends on nodes as the building blocks. Nodes group related pages and create a clear structure for your content. Below are the key highlights from the tutorial about Magento 2 CMS Page hierarchy:
-
Custom URL keys improve SEO and navigation. Use lowercase letters and hyphens for clear, search-friendly URLs.
-
Metadata settings boost SEO and user experience. Configure options like First, Next/Previous, and Chapter/Section for better content organization.
-
Pagination controls help users browse long content sections. Adjust the Frame and Frame Skip settings to fit your content needs.
-
Menu layout affects how users interact with your content. Choose between Content, Left Column, or Right Column placement for optimal navigation.
-
Import and export features save time during setup. Use CSV files to transfer page hierarchy data between stores quickly.
Consider managed Magento hosting services for expert-led CMS Page attribute setup.


