
Magento 2 Change Email Header Template In 6 Steps
Want to customize your Magento 2 email header template? Magento 2 allows you to change the default email header template to match your brand. It can be done in the Magento admin panel.
This tutorial will cover how to customize and change the email header template in Magento 2.
Key Takeaways
-
Learn to customize your Magento 2 email header template.
-
Discover how to match your email header to your brand.
-
Follow step-by-step instructions to change the email header.
-
Find out how to preview and save your customized template.
-
Get code-related tips on adding logos, colors, and styles.
-
Explore best practices for email header design and consistency.
What is an Email Header Template in Magento 2?
“An email header template in Magento 2 is the top section of your email. It includes your store's logo, signature, contact information, etc.”
The header appears in all transactional emails sent to customers. You can customize this template to match your brand. It involves editing the HTML and CSS in the Magento admin panel.
By customizing the email header template, you ensure consistency and professionalism. Customization can include adding your logo, changing colors, and inserting variables for dynamic content like store contact details.
How to Change Email Header Template in Magento 2?
1. Load the Default Template
- Go to the Magento admin panel.
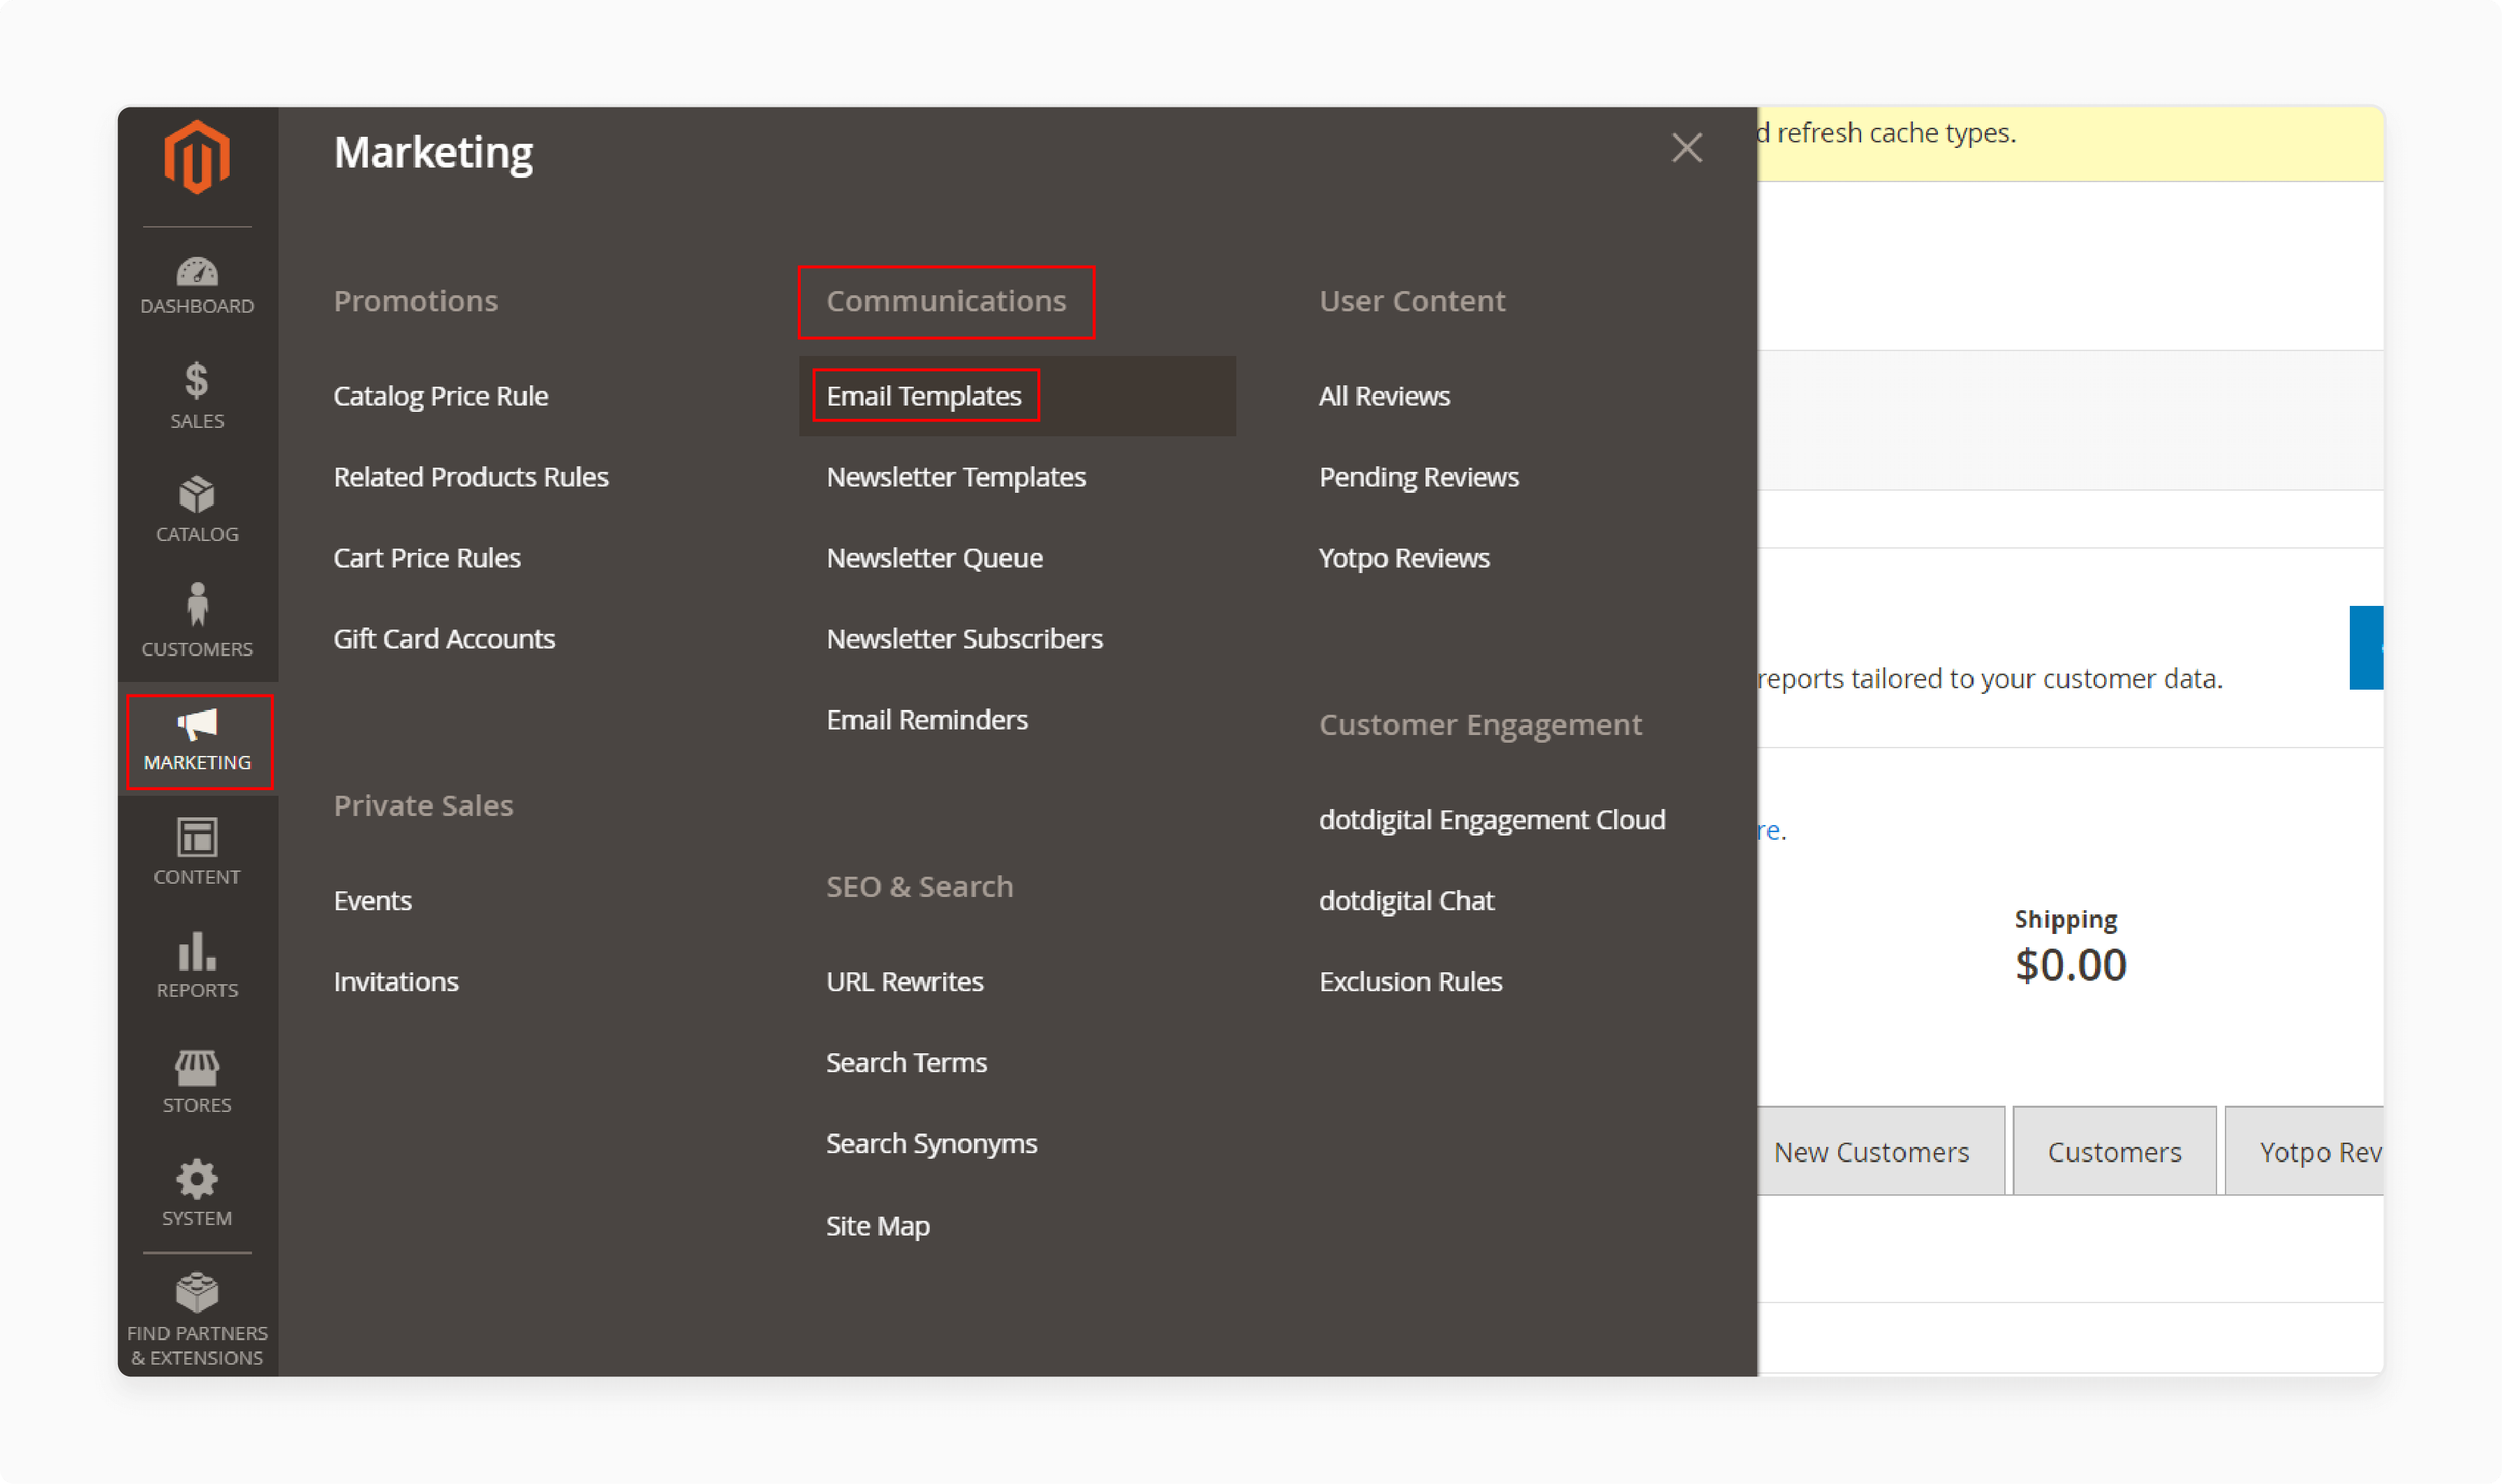
- Navigate to Marketing > Communications > Email Templates.
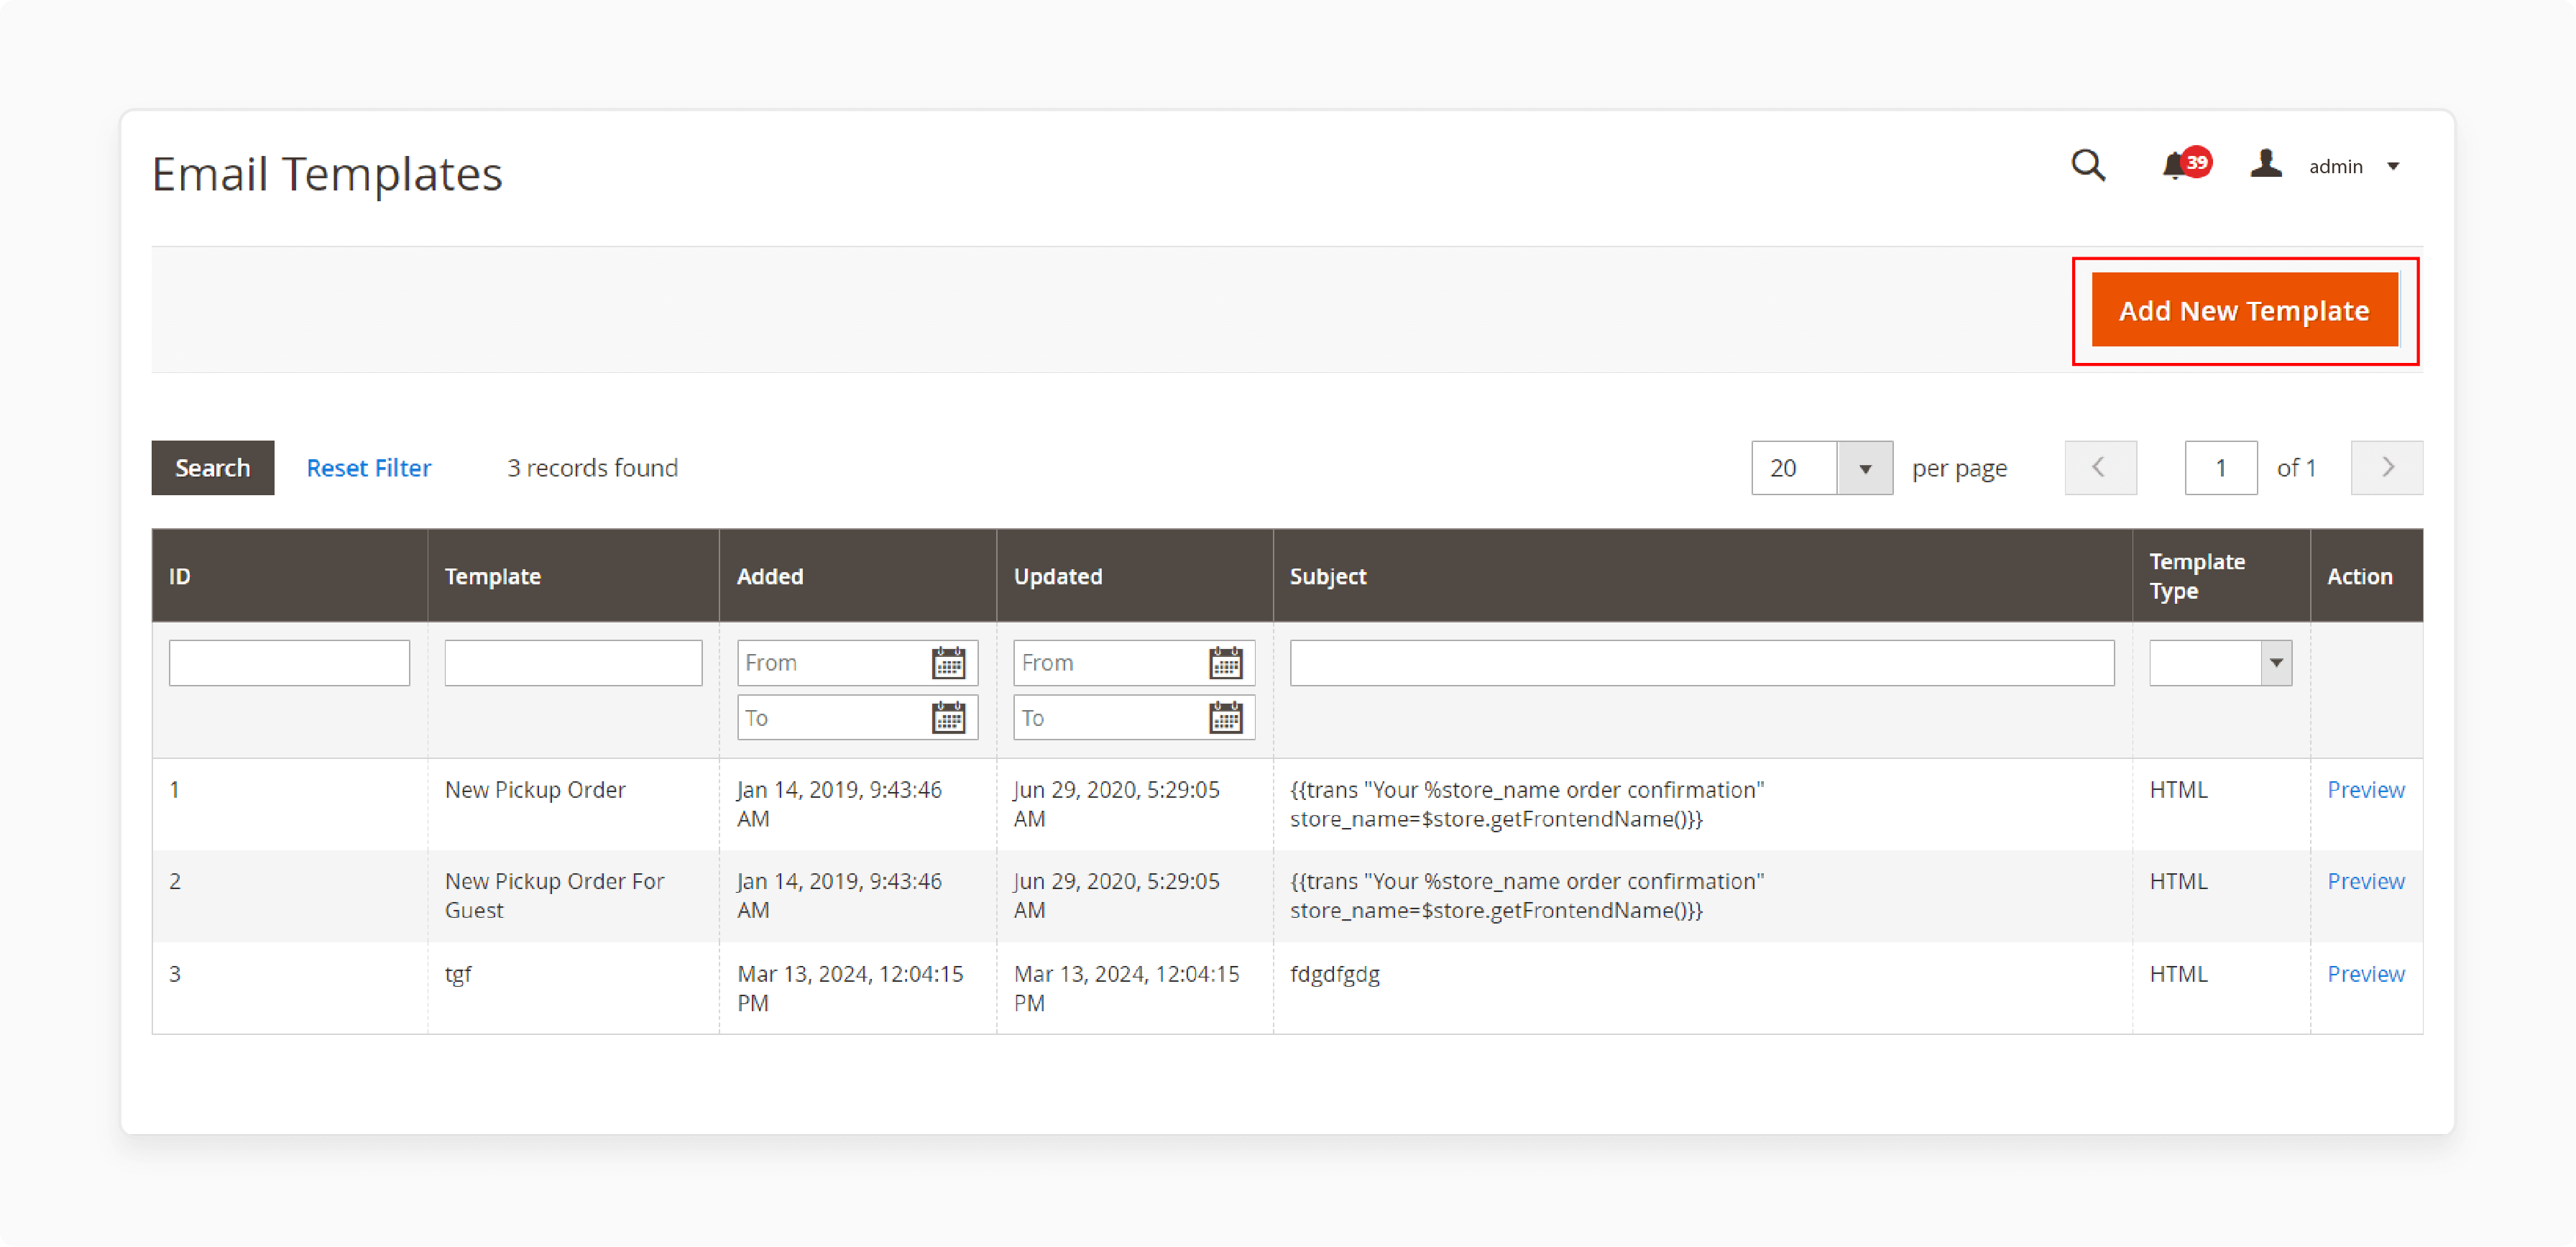
- Click Add New Template.
- In the Load default template section, select Magento_Email > Header.
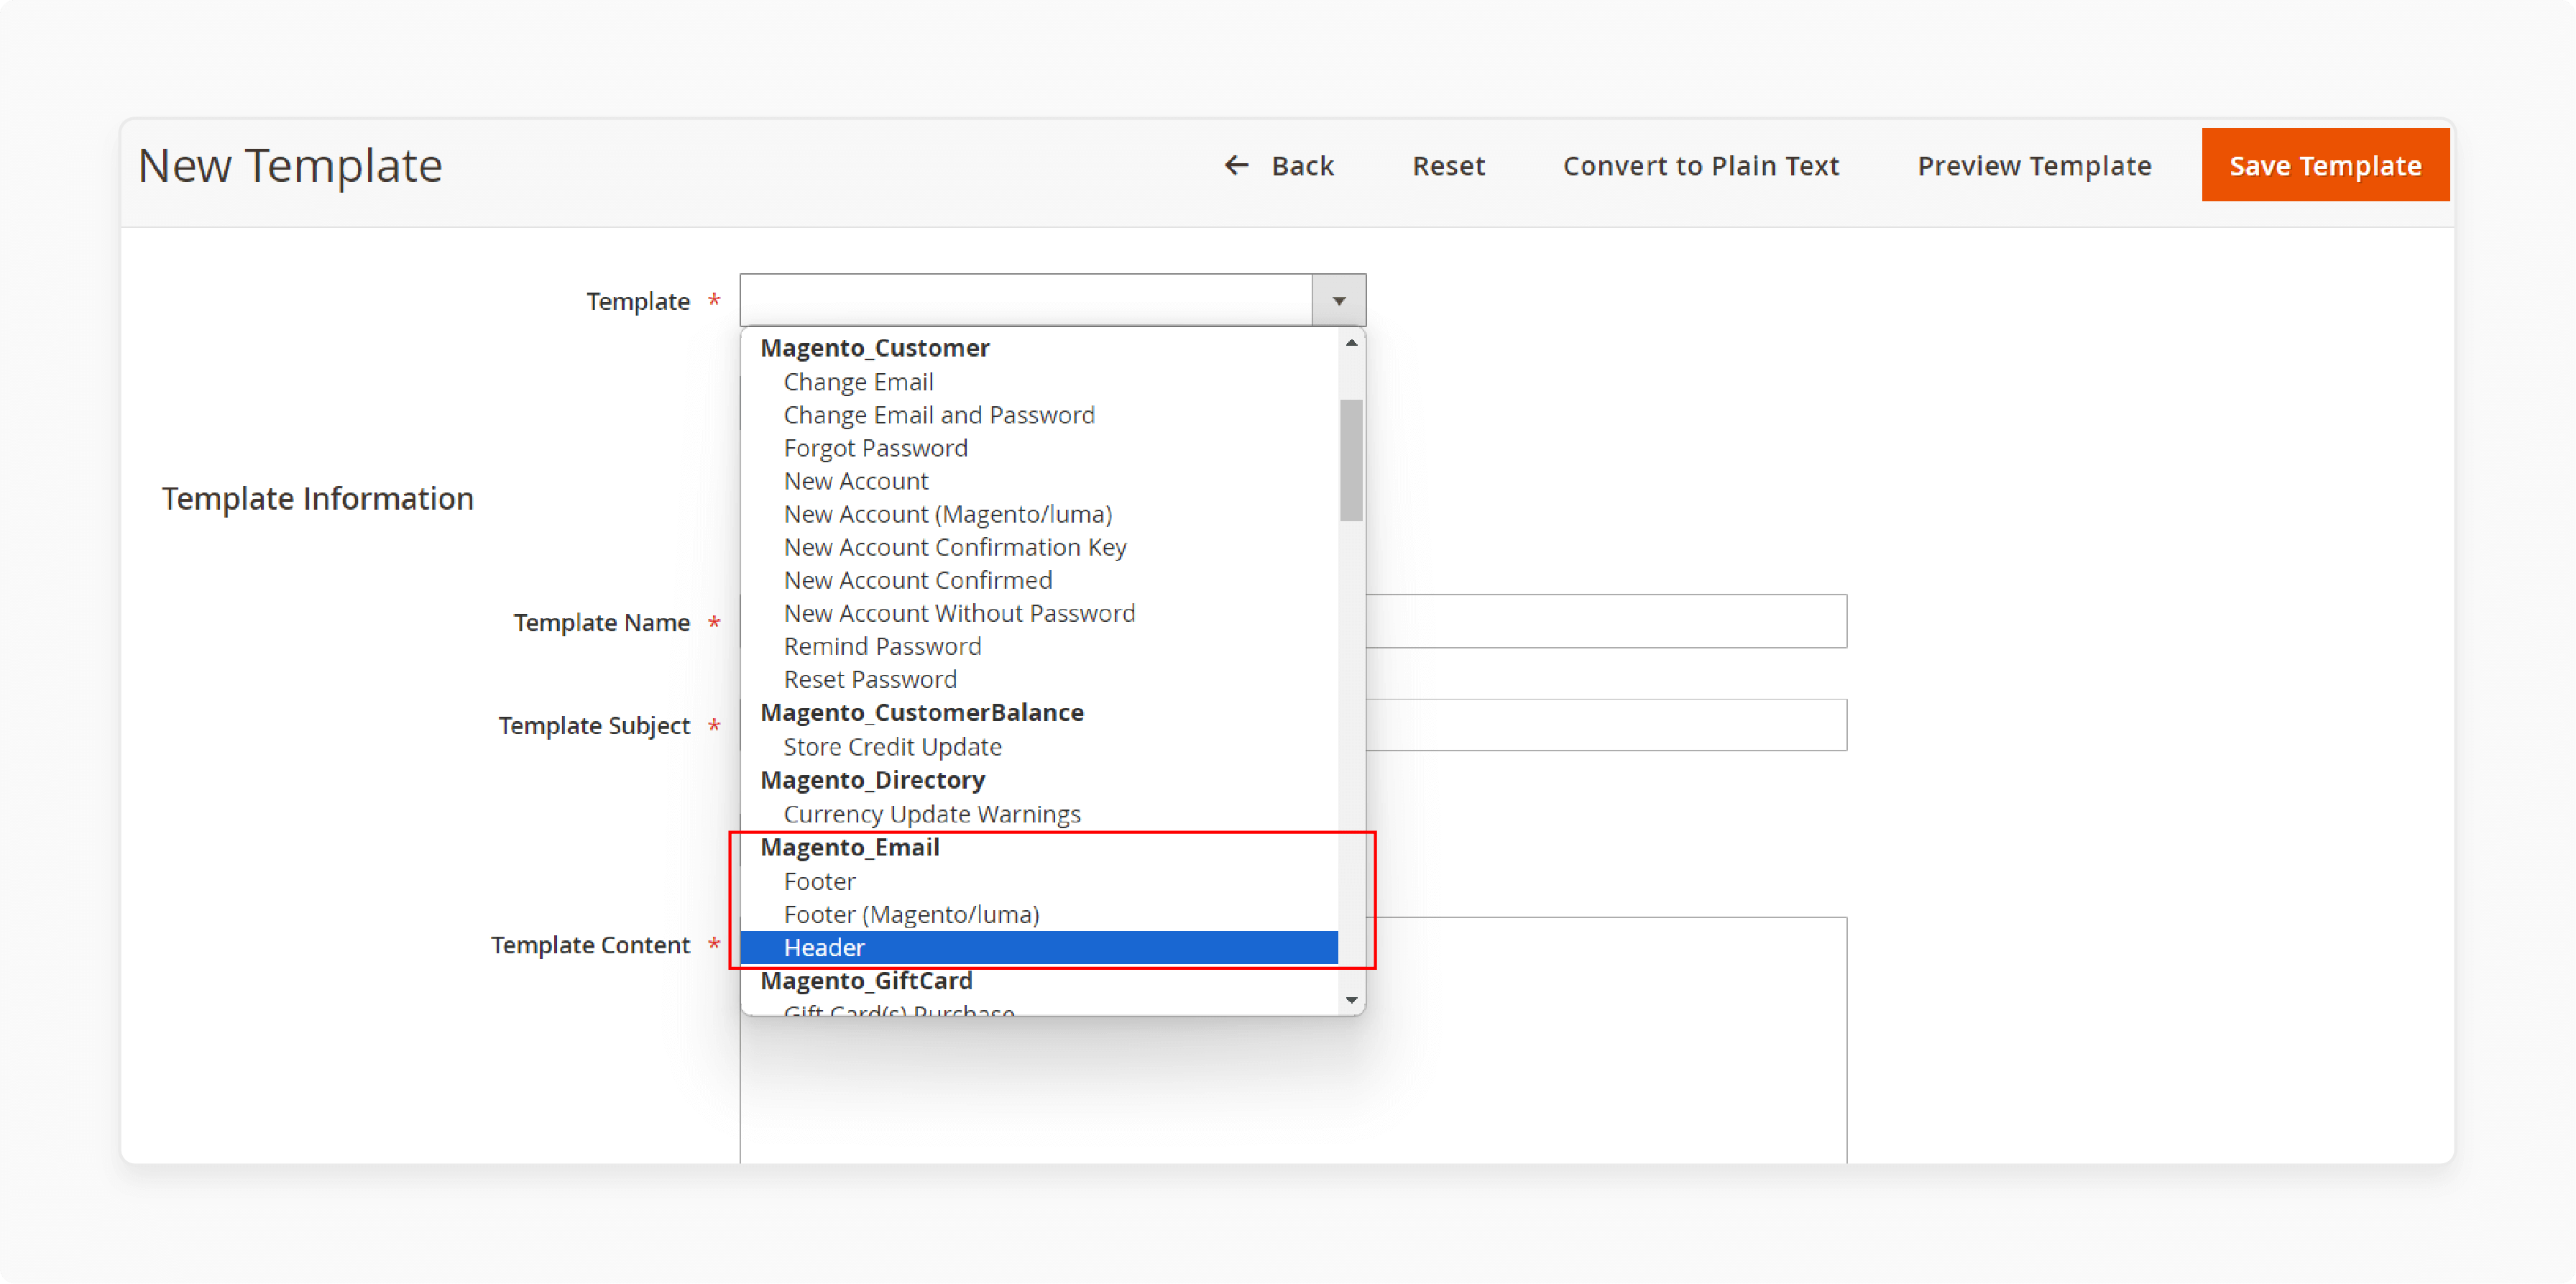
- Click Load Template to load the default template.
2. Customize the Template
-
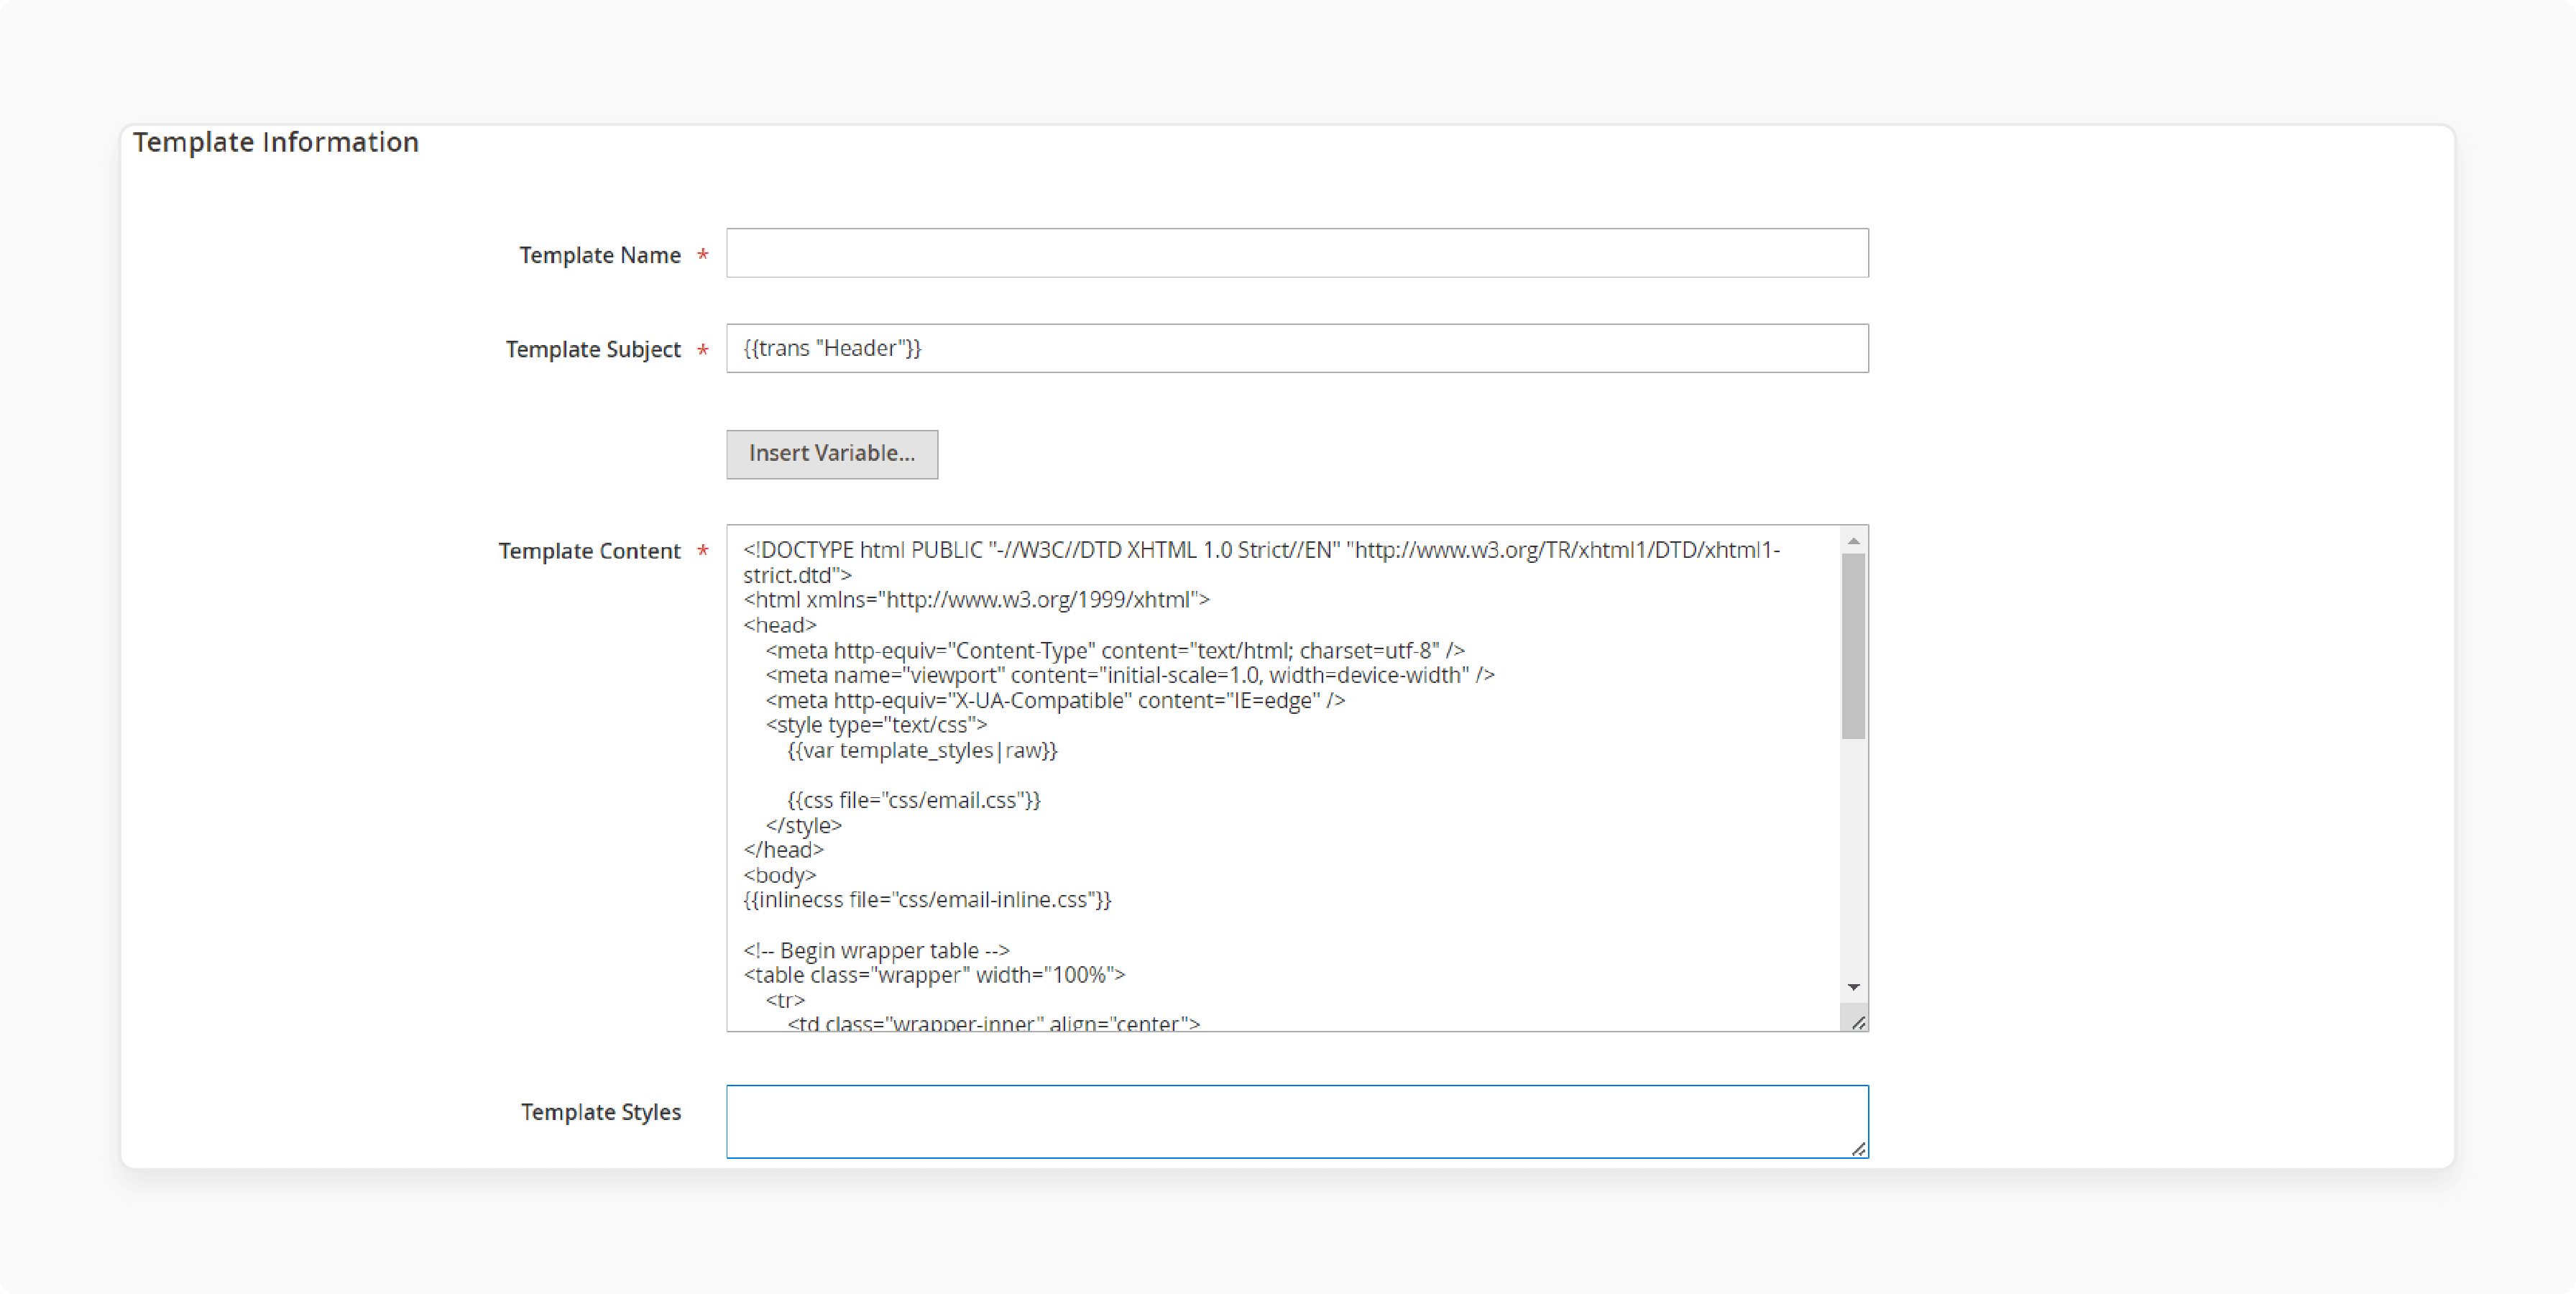
Enter a name for your custom email header template.
-
Enter a subject for the template to help organize it.
-
Modify the HTML content in the "Template Content" box as needed.
-
To insert a variable, place the cursor in the code and click "Insert Variable."
-
Select the variable you want to insert.
3. Apply Styles
-
Enter any CSS declarations in the Template Styles box to format the header.
-
Use inline CSS to ensure styles are applied correctly in email clients.
-
Add styles for elements like the logo, text, and links.
-
Preview the template to see how the styles look.
-
Adjust the CSS as needed for a polished look.
4. Save the Template
-
Click "Save Template" to save your custom email header template.
-
Your template now appears in the list of available email templates.
-
You can edit the template later if needed.
-
Use the "Preview Template" option to review changes before saving.
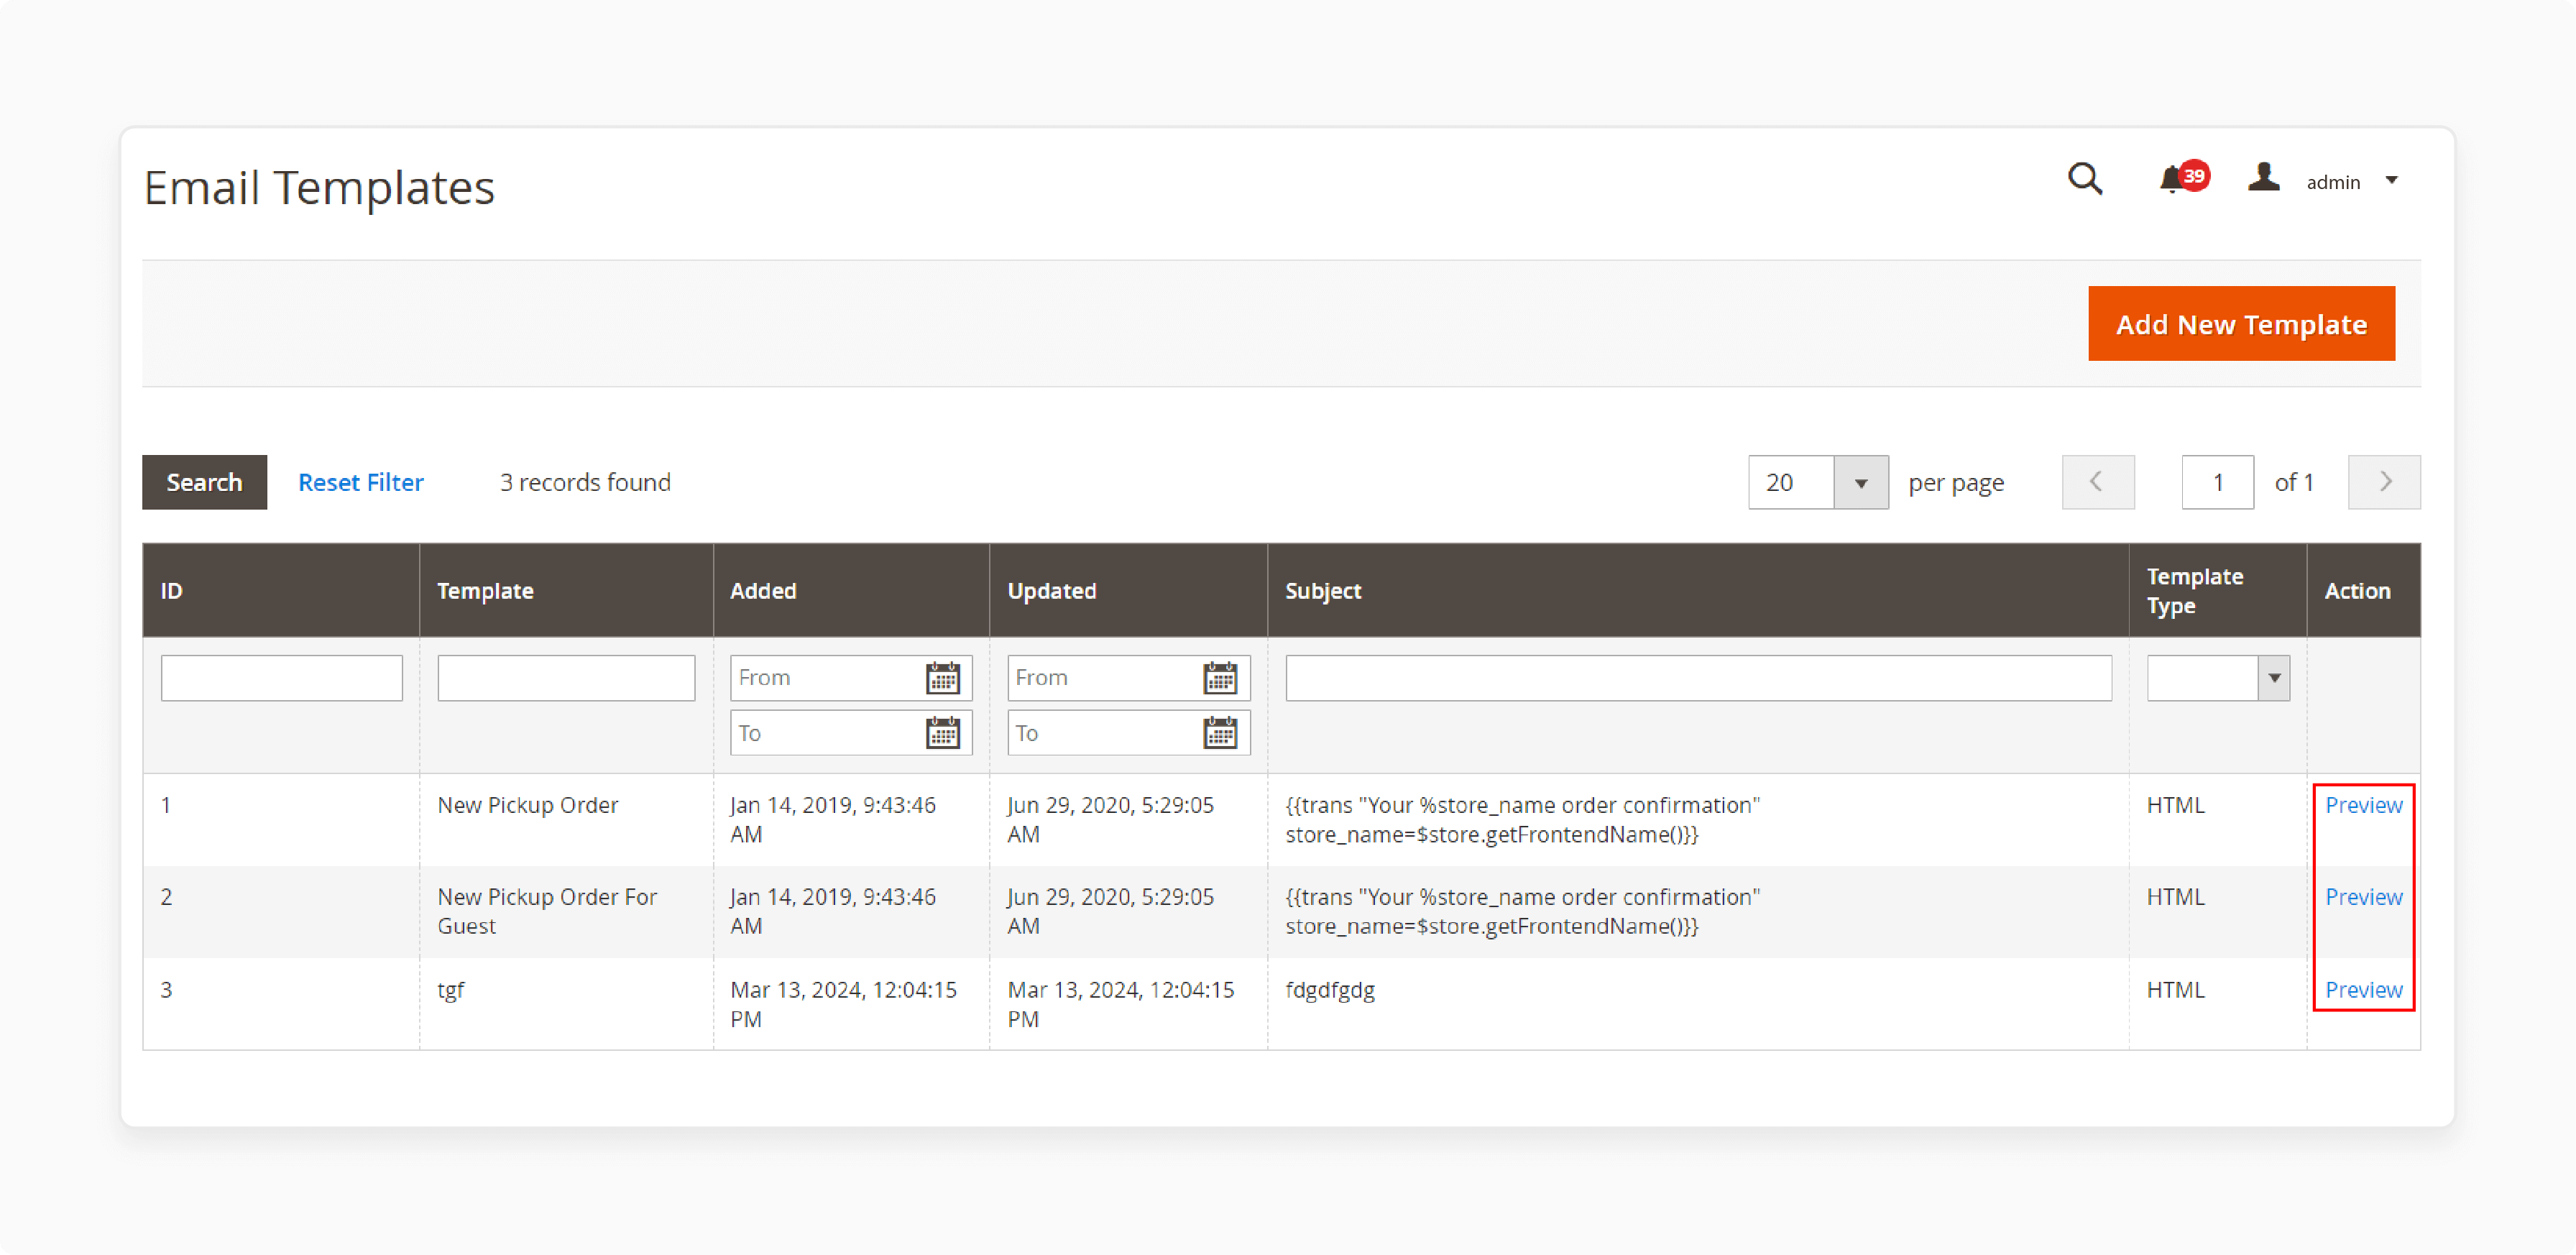
- Ensure all changes are saved correctly.
5. Update the Configuration
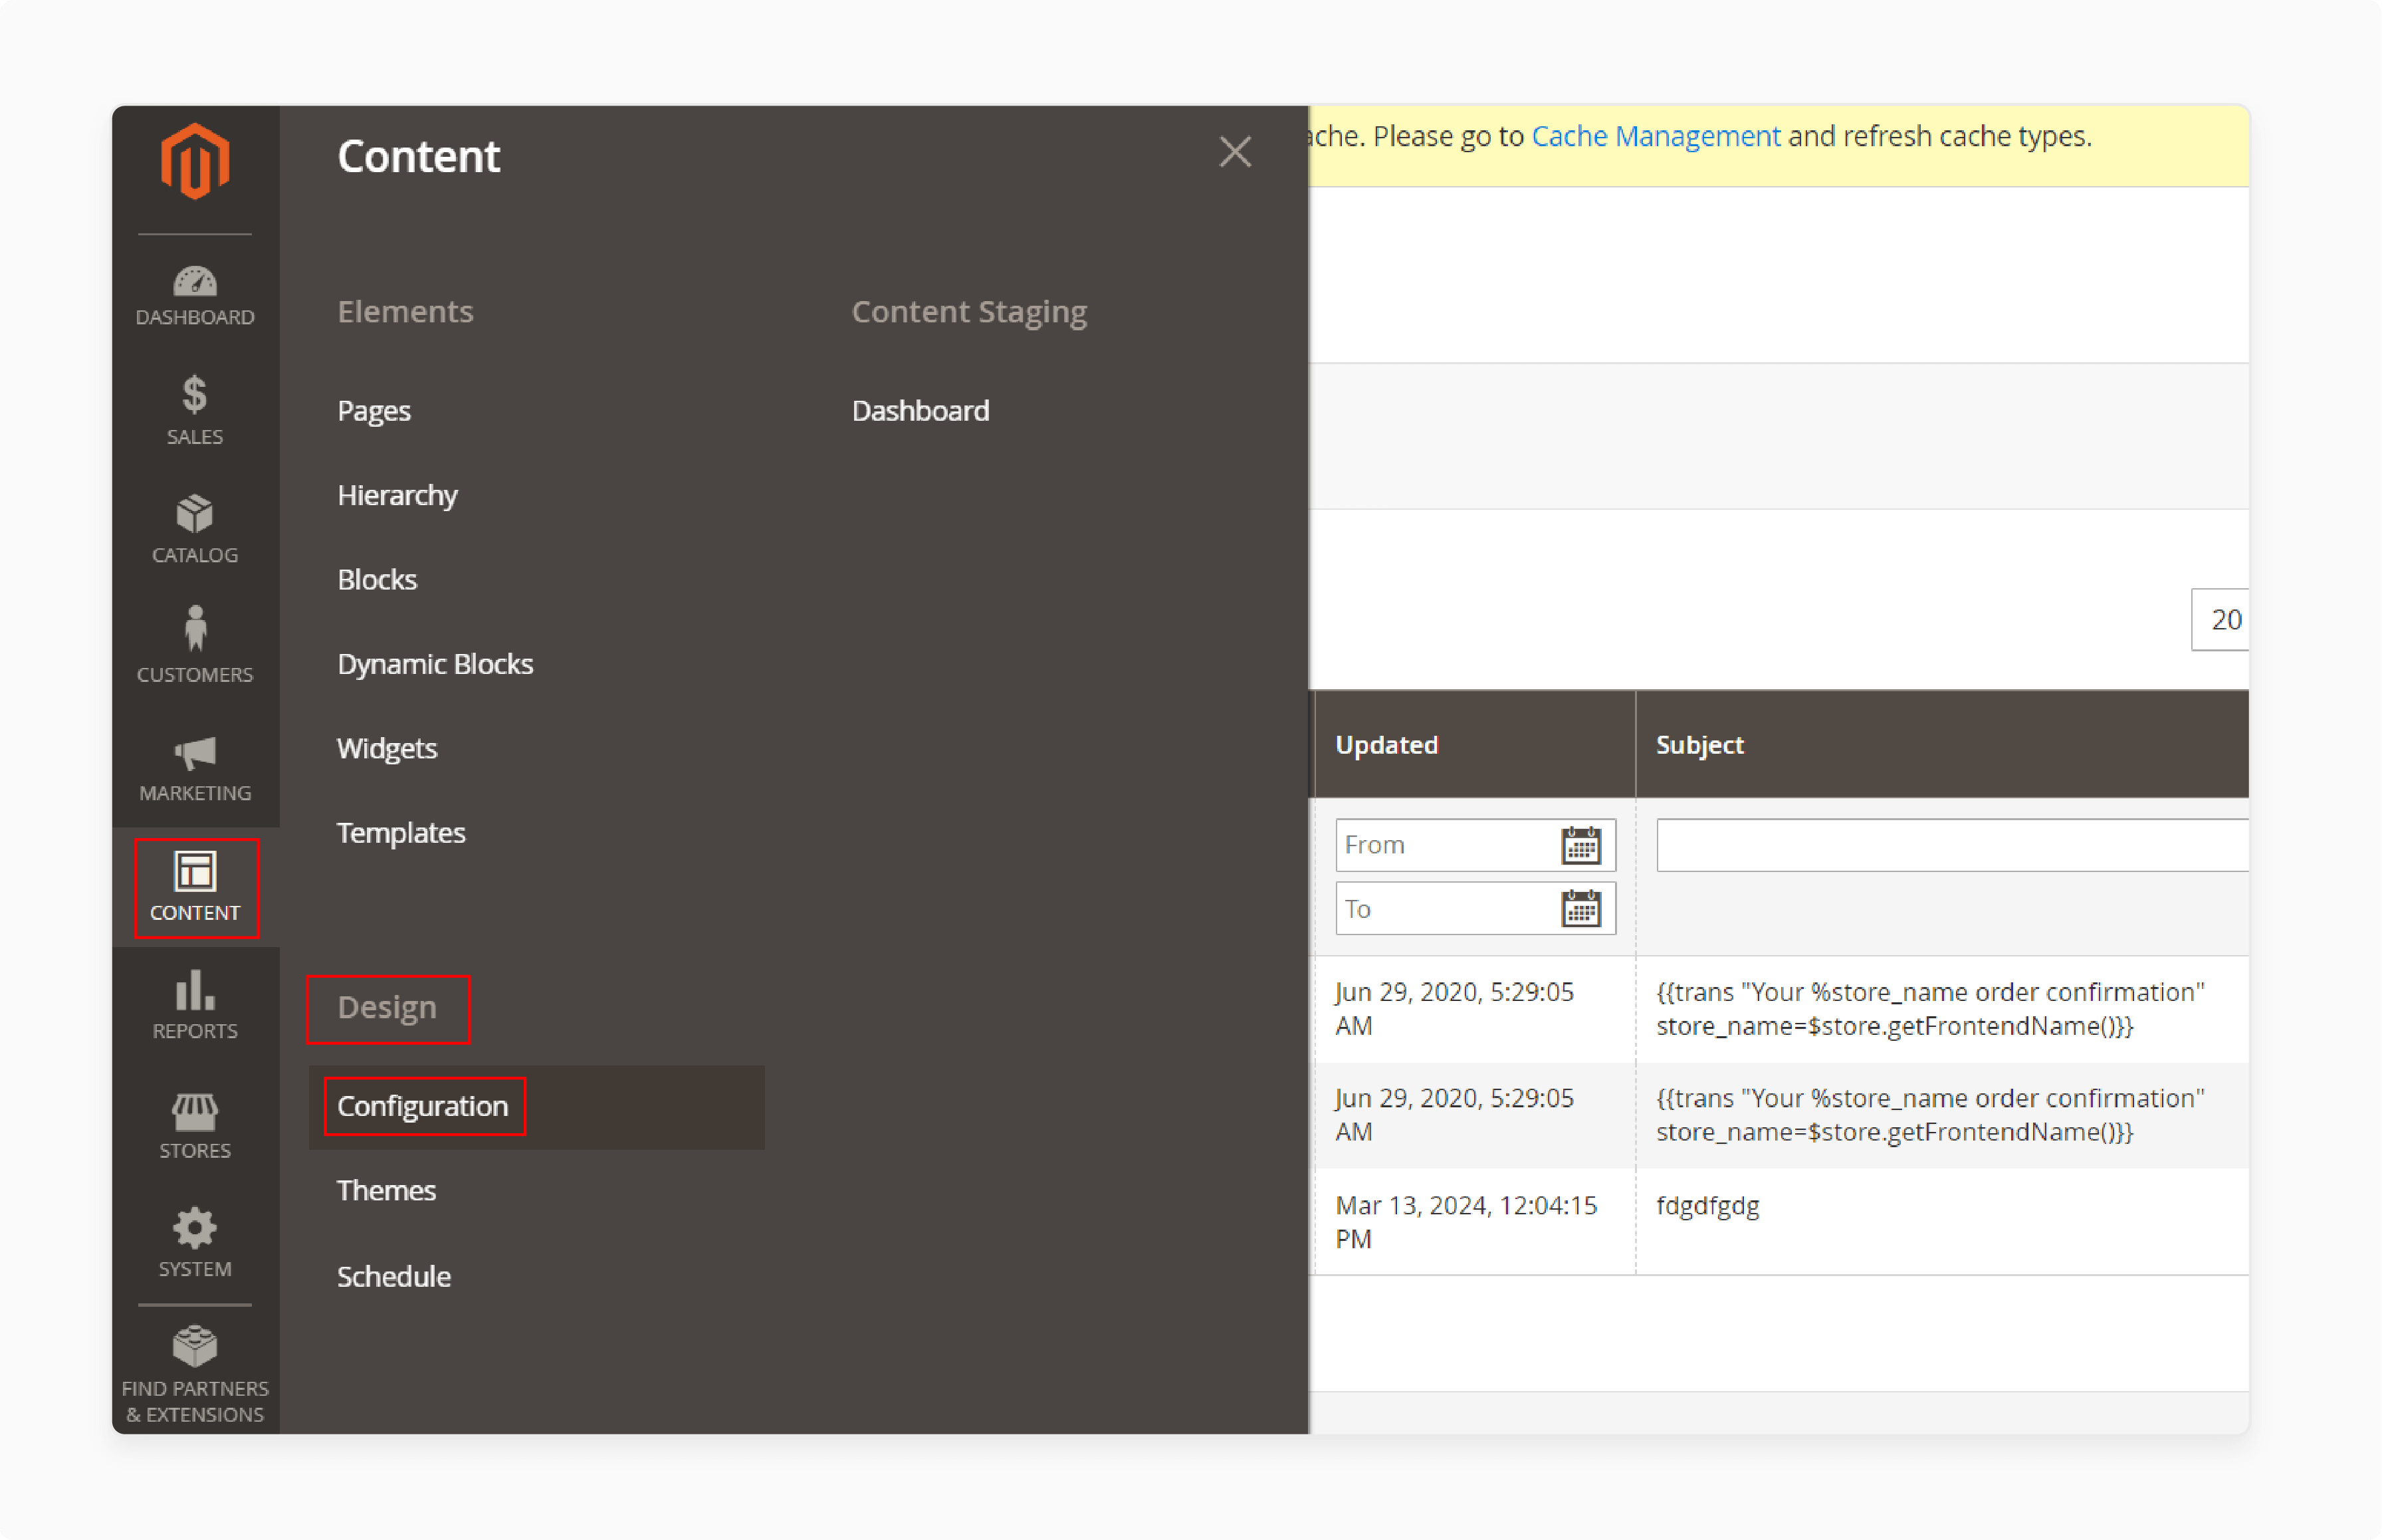
- Go to Content > Design > Configuration in the admin panel.
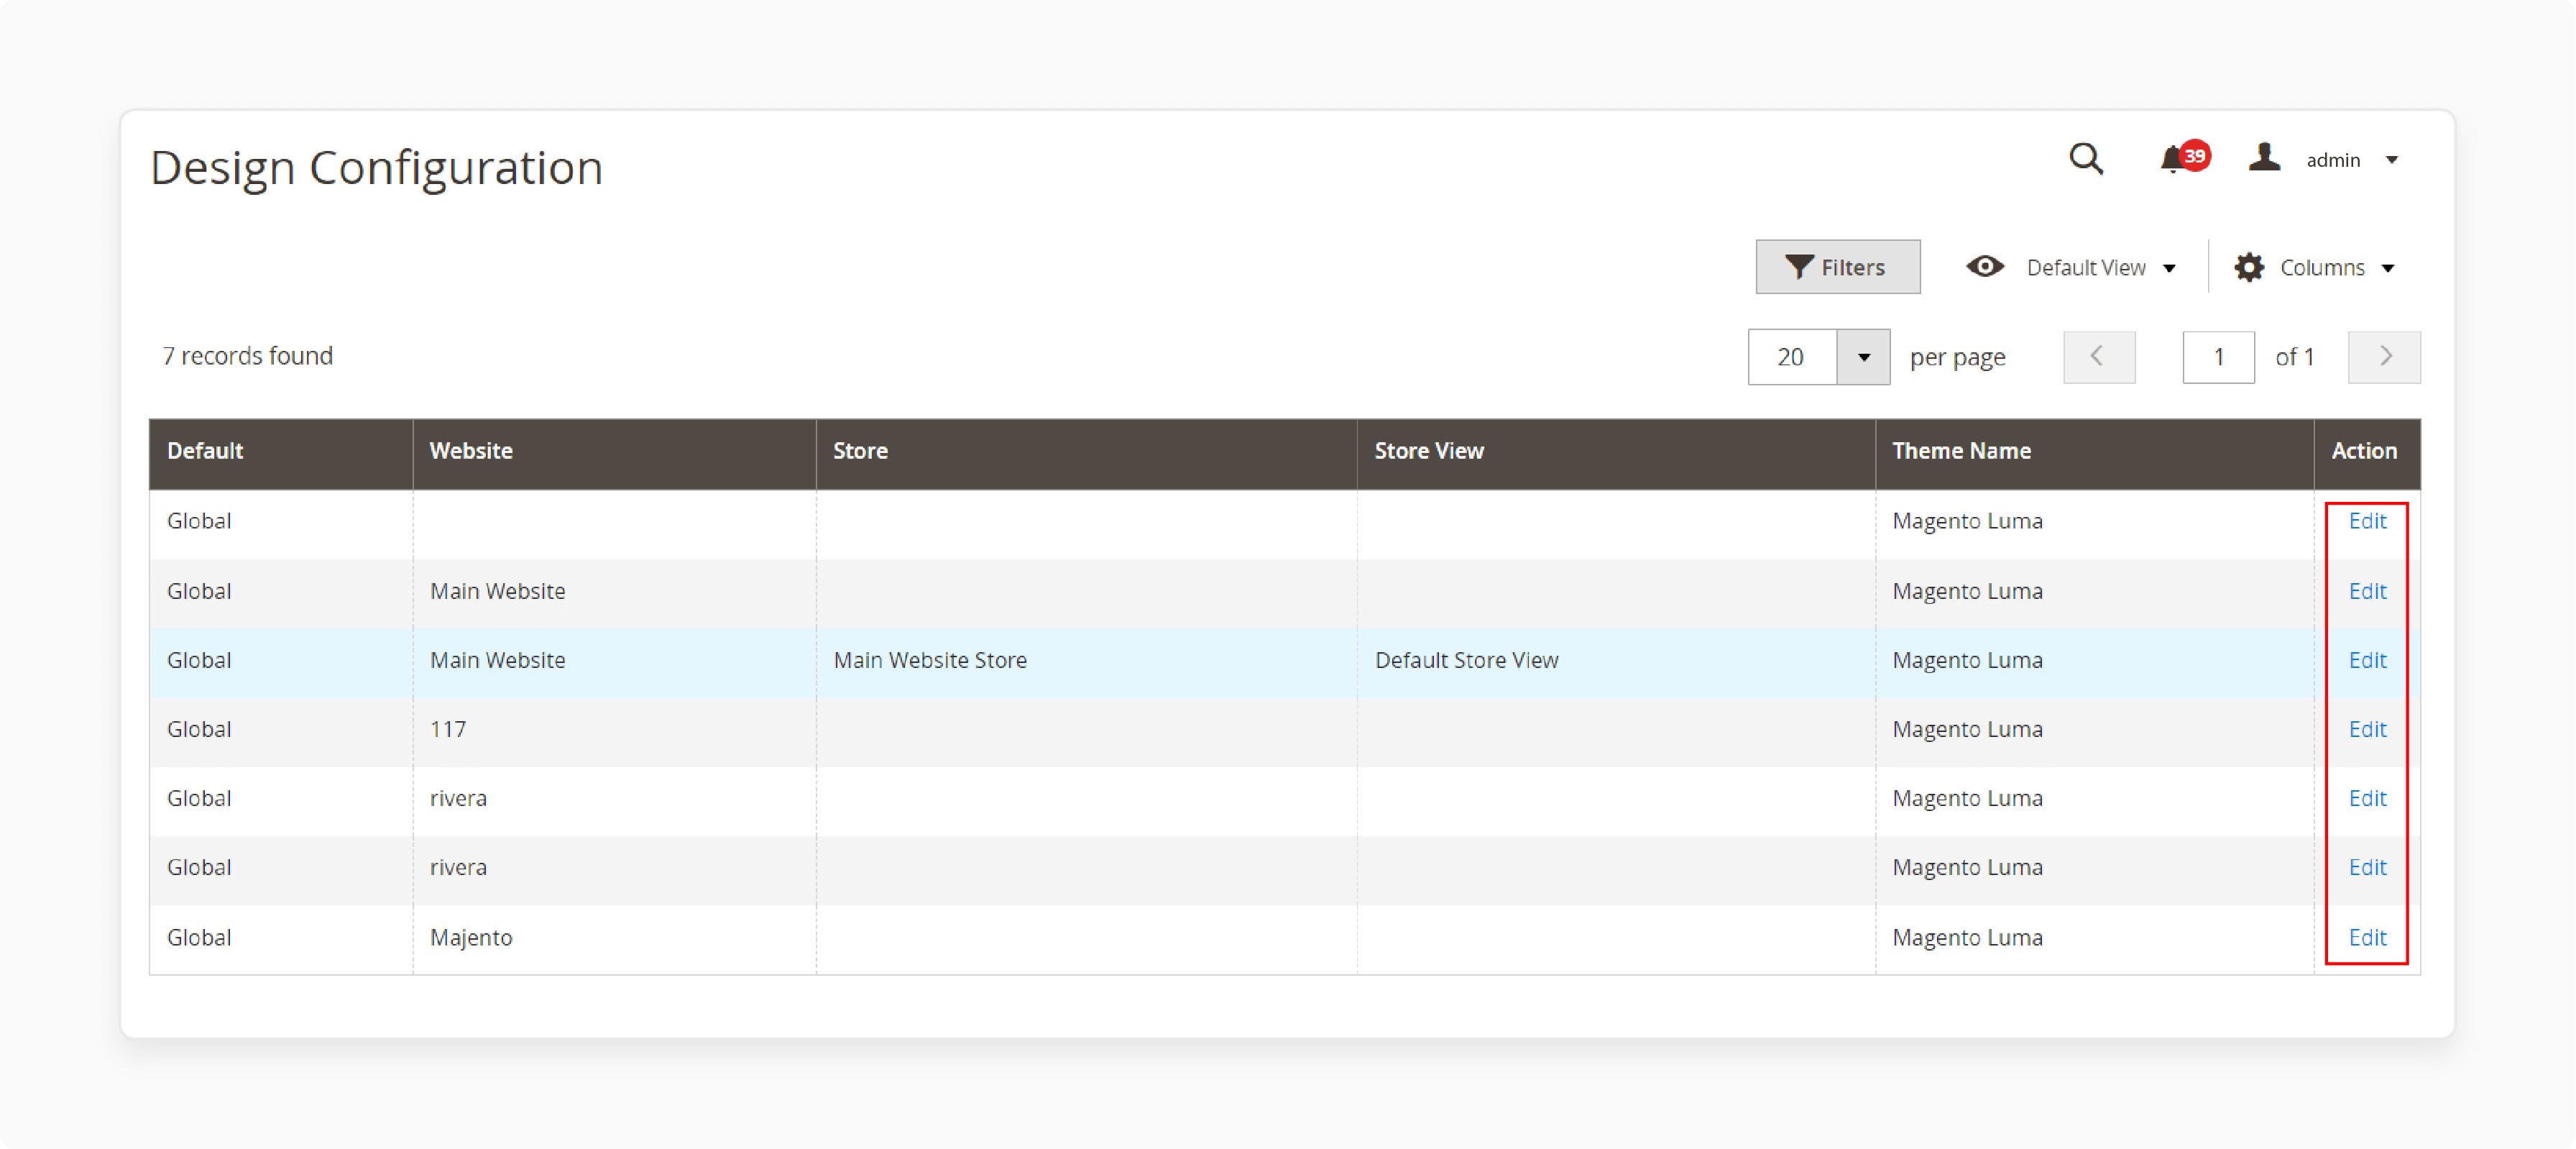
- Find the store view you want to configure and click "Edit."
- Scroll down to the "Transactional Emails" section.
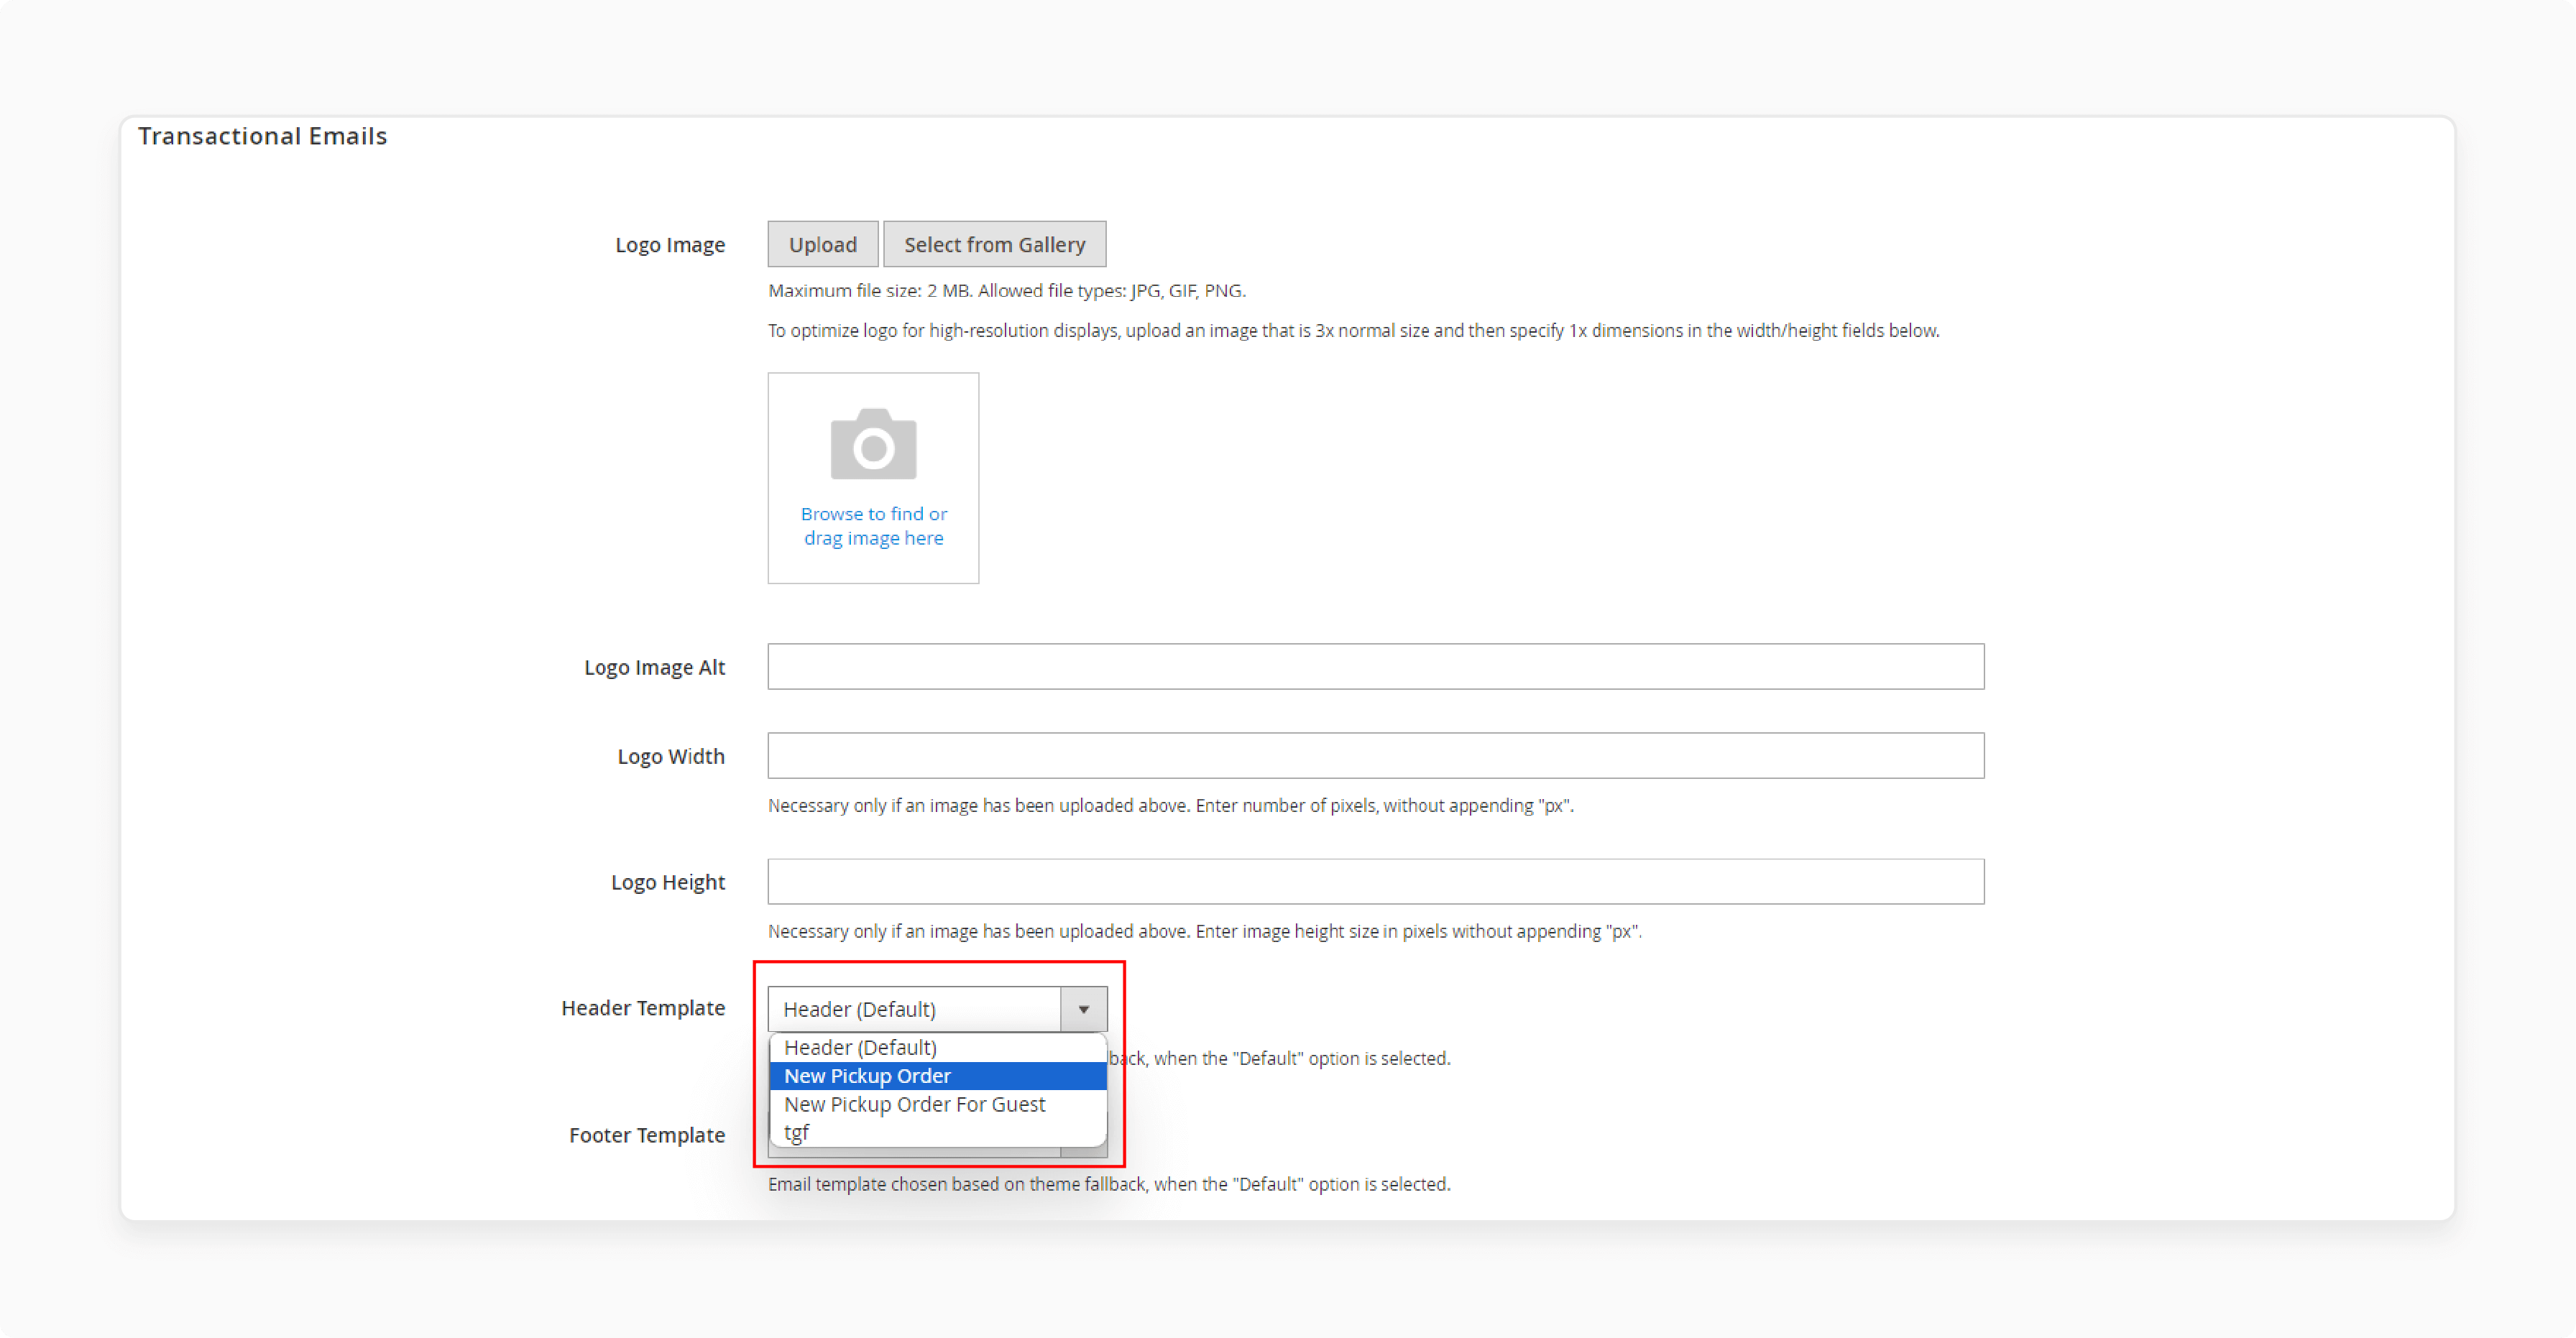
- Select your custom header template as the default for email notifications.
- Click "Save Config" to apply the changes.
6. Test the Template
-
Send a test email to ensure the header looks correct.
-
Check different email clients to ensure compatibility.
-
Make sure all variables display the correct information.
-
Verify that the styles are applied as expected.
-
Adjust the template if any issues are found.
-
Once satisfied with the template, deploy it for all transactional emails.
Example HTML/CSS Code for Customizing Header Templates
1. Basic Structure of the Header Template
To customize the email header template in Magento 2, you start by loading the default template. The basic structure includes the HTML and CSS needed for the header.
<!DOCTYPE html PUBLIC "-//W3C//DTD XHTML 1.0 Strict//EN" "http://www.w3.org/TR/xhtml1/DTD/xhtml1-strict.dtd">

<html xmlns="http://www.w3.org/1999/xhtml">

<head>

    <meta http-equiv="Content-Type" content="text/html; charset=utf-8" />

    <meta name="viewport" content="initial-scale=1.0, width=device-width" />

    <meta http-equiv="X-UA-Compatible" content="IE=edge" />

    <style type="text/css">

        {{var template_styles|raw}}

        {{css file="css/email.css"}}

    </style>

</head>

<body>

    {{inlinecss file="css/email-inline.css"}}

    <table class="wrapper" width="100%">

        <tr>

            <td class="wrapper-inner" align="center">

                <table class="main" align="center">

                    <tr>

                        <td class="header">

                            <a class="logo" href="{{store url}}">

                                <img src="{{var logo_url}}" alt="{{var logo_alt}}" width="180" height="52" border="0" />

                            </a>

                        </td>

                    </tr>

                </table>

            </td>

        </tr>

    </table>

</body>

</html>
-
The code sets up the basic structure of the email header.
-
It includes the store logo and a link to the store's homepage.
-
The CSS file
email.cssis included to style the header.
2. Adding Custom Styles
To ensure the email header matches your store's branding, you can add custom CSS styles. Place these styles in the Template Styles box in the Magento admin panel.
<style type="text/css">

    .header {

        background-color: #f4f4f4;

        padding: 20px;

    }

    .logo img {

        width: 200px;

        height: auto;

    }

</style>
-
The code changes the background color of the header.
-
It also adjusts the size of the logo.
-
The
paddingproperty adds space around the header content.
3. Inserting Variables
You can insert variables to dynamically display store information. It makes the email header more personalized.
<td class="header">

    <a class="logo" href="{{store url}}">

        <img src="{{var logo_url}}" alt="{{var logo_alt}}" width="200" height="auto" border="0" />

    </a>

    <p>{{config path="general/store_information/name"}}</p>

    <p>{{config path="general/store_information/phone"}}</p>

</td>
-
The code adds the store name and phone number to the header.
-
Use the
Insert Variablebutton in the admin panel to add these variables. -
The variables pull information from the store configuration.
4. Preview and Save
Once you have customized the header template, you can preview and save it. It ensures that the changes look correct before applying them.
<!-- Preview Template -->

<button onclick="previewTemplate()">Preview Template</button>

<!-- Save Template -->

<button onclick="saveTemplate()">Save Template</button>
-
Click the
Preview Templatebutton to see how the header looks. -
Make any necessary adjustments based on the preview.
-
Click the
Save Templatebutton to save your changes.
Best Email Header Design & Brand Consistency Tips
1. Use a Consistent Logo
Your logo is often the first thing customers see. Ensure it is clear and properly sized. Use the same logo across all email templates. It reinforces your brand identity.
For example, if your logo is 200px wide in your emails, keep it the same in all communications.
<a class="logo" href="{{store url}}">

    <img src="{{var logo_url}}" alt="{{var logo_alt}}" width="200" height="auto" border="0" />

</a>
2. Maintain a Uniform Color Scheme
Choose colors that match your brand's palette. Use these colors consistently in your email headers. It creates a cohesive look.
For instance, if your brand colors are blue and white, use these colors in the header background and text.
<style type="text/css">

    .header {

        background-color: #0044cc;

        color: #ffffff;

        padding: 20px;
    }
</style>
3. Include Contact Information
Adding contact details in the header makes it easy for customers to reach you. Include your phone number and email address. It builds trust and accessibility.
For example, place the store's phone number next to the logo.
<p>{{config path="general/store_information/phone"}}</p>
4. Optimize for Mobile
Ensure your email headers are mobile-friendly. Use responsive design techniques. Test your emails on various devices.
For example, use percentage-based widths for images and tables.
<style type="text/css">

    .header img {

        width: 100%;

        max-width: 200px;

        height: auto;

    }

</style>
5. Personalize with Variables
Use Magento's variables to personalize your email headers. Insert dynamic content like customer names or order details. It makes your emails more engaging.
For instance, include the customer's name in the greeting.
<p>Hello, {{var customer_name}}!</p>
6. Test and Preview
Always preview your email headers before sending. Use Magento's preview feature to check how it looks. Send test emails to different email clients. It ensures your follow-up emails display the headers correctly everywhere.
For example, preview the template in Gmail and Outlook.
<button onclick="previewTemplate()">Preview Template</button>
FAQs
1. Where are email templates stored in Magento 2?
Email templates are stored in the Magento 2 admin panel. You can find them under Marketing > Communications > Email Templates. Here, you'll see a list of predefined and custom templates. You can edit existing templates or create new ones. Custom templates are saved in the database for easy management.
2. How do I customize email templates in Magento 2?
To customize email templates in Magento 2, go to Marketing > Communications > Email Templates. Click "Add New Template" and select a template to load. Edit the template content and styles, including the email header and footer. You can insert custom variables and modify the HTML. Preview and save your custom template. Apply it in the configuration settings for different email types.
3. How can I edit the header and footer of Magento 2 emails?
To edit the header and footer, create custom email templates. Load the default header or footer template. Customize the content and styles as needed. Save the new template and apply it in Content > Design > Configuration. Select your custom header and footer templates for transactional emails.
4. Can I use custom variables in Magento 2 email templates?
Yes, you can use custom variables in Magento 2 email templates. Create custom variables in Stores > Other Settings > Custom Variables. In the email template editor, click "Insert Variable" to add them. Custom variables allow for dynamic content in your emails, enhancing email marketing efforts.
5. How do I create a new order confirmation template in Magento 2?
To create a new order confirmation template, go to Email Templates. Click "Add New Template" and select the order confirmation template. Customize the content, subject, and layout as needed. Save the template. Apply it in Stores > Configuration > Sales > Sales Emails. Choose your custom template for the New Order Confirmation.
6. Where can I preview Magento 2 email templates before sending?
You can preview Magento 2 email templates in the admin panel. While editing a template, click "Preview Template" to see it. It shows how the email will look to customers. Always preview before saving to ensure correct formatting and content.
7. How do I add a custom logo to Magento 2 email templates?
To add a custom logo, edit the email header template. Upload your logo to the Magento 2 media folder. In the header template, update the image source URL. You can customize the logo size using CSS styles. Save the template and apply it to your transactional emails. It ensures your logo and store information are consistent across all emails.
Summary
Changing the Magento 2 email header template can help align your transactional emails to your brand’s identity. Here’s a quick summary of the key considerations:
-
Load the default template from the admin panel. Edit the HTML content and styles as needed.
-
It includes the store's logo and contact information. Customize to match your brand's consistency and professionalism.
-
Load the default template and edit the content. Apply CSS styles and save the custom template.
-
Edit HTML to include the store logo. Add CSS to style the header and logo.
-
Use a consistent logo and color scheme. Include contact information and optimize for mobile.
-
Preview the template to check the changes. Save the template and update the configuration.
For consistent and reliable support with your store-related queries, consider opting for Managed Magento Hosting services.


