
How To Add Magento 2 Banner Slider Using CMS and Extensions?
Are you tired of banners that fail to grab customers' attention? Magento 2 Banner slider helps improve your store's look and engage customers with sliders.
This tutorial explains how to add and customize banner sliders in Magento 2. It also discusses the different types of banners, their benefits, and methods for adding them using CMS pages and extensions.
Key Takeaway
-
Magento 2 banners visually promote campaigns and engage customers.
-
Various banner types exist, including static, dynamic, and slider banners.
-
Banner sliders enhance visual appeal, display promotions, and are easily customizable.
-
Add a banner slider using Magento CMS, extensions, or custom code.
-
Banner sliders improve store aesthetics and functionality.
What is a Banner in Magento 2?
Banners in Magento 2 are visual tools to display promotional campaigns. They help store owners add special offers or discounts to attract customers. Magento 2 provides a dashboard to easily create and manage banners."
Using a Magento 2 banner extension, store owners can schedule banners or display specific types. The default Magento setup allows banners on a product page, homepage, or any CMS block. Banners help improve visual appeal and increase engagement in the Magento store.
Using the image insert tool, you can add banners to your store using a responsive banner slider. The Magento banner manager allows you to control image settings and design and ensures that every banner is displayed attractively on desktops or mobiles.
What are the Types of banners and their applications?
1. Static Banners
-
Static banners display fixed content, including text or images. Store owners can add banners using HTML or the page builder. This banner type is ideal for promotions that require no changes.
-
Use case: Highlight fixed messages, such as store policies or introductions.
2. Dynamic Banners
-
Dynamic banners update content based on customer activity. They use analytics to show relevant offers. This banner module helps deliver personalized experiences to improve engagement in your Magento online store.
-
Use case: Personalize offers based on customer behavior.
3. Promotion Banners
-
Promotion banners highlight discounts or special promotions on Magento 2. They are an effective way to display specific banners during sales. To improve visibility, add the banner to product or category pages.
-
Use case: Announce sales or special offers.
4. Image Sliders
-
Image sliders rotate multiple banner images on your landing page. A Magento slider provides flexibility with mobile image support. Use a banner slider module to improve the store's visual appeal.
-
Use case: Rotate banners showcasing new arrivals or collections.
5. Responsive Banners
-
Responsive banners adapt to different devices, ensuring that every banner is displayed perfectly on desktops and mobiles. This type uses image functionality to create an attractive banner for all users.
-
Use case: Reach users across devices, ensuring consistent design.
6. Interactive Banners
-
Interactive banners engage users with clickable elements or videos. This way of showcasing content increases interaction. Use the Magento 2 module to add dynamic elements to your store.
-
Use case: Encourage clicks or video views for better engagement.
7. Custom Banners
-
Custom banners allow tailored designs using the CMS or HTML. Store owners can create banners with the advanced Magento builder. It provides complete control over sliders and layouts.
-
Use case: Build unique banners with personalized branding.
8. Scheduled Banners
-
Scheduled banners appear based on preset dates. This extension allows you to automate promotions. In your Magento 2 store, you can add banners to show time-sensitive deals without manual updates.
-
Use case: Automate time-based promotions like flash sales.
9. Banner Ads
-
Banner ads promote external services or products. Store owners use them to monetize traffic. Use the image slider to insert your banner seamlessly across pages.
-
Use case: Monetize your store by promoting external brands.
10. Call-to-Action Banners
-
Call-to-action banners encourage specific actions such as signups or purchases. Once the banner is created, customers will see clear buttons. Manage banners in Magento to track performance efficiently.
-
Use case: Drive customer actions such as signing up or purchasing.
What are the Benefits of Adding a Banner Slider?
1. Improves Visual Appeal
-
A banner slider enhances your store's design with dynamic visuals. It allows store owners to add banners in Magento 2 and keep the website attractive and engaging for visitors.
-
Example: You can add a banner in Magento 2 to display a rotating gallery of your best-selling products
2. Displays Multiple Promotions
-
A banner slider lets you display banners for various campaigns. You can highlight more than one banner to promote special offers, product launches, or announcements effectively.
-
Example: You can feature one banner for a holiday sale and another for a product launch, all displayed seamlessly in rotation.
3. Enhances User Engagement
-
Sliders grab attention with rotating visuals and animations. Once you've created your banner, use it to captivate visitors and encourage interactions. It will improve the store's engagement rate.
-
Example: You can create a banner highlighting a limited-time offer. It will encourage clicks and interactions.
4. Simplifies Banner Management
-
Magento sliders allow store owners to manage the banner with ease. Its features include installation and configuration. It makes it simple to update or replace banners when needed.
-
Example: The slider's installation and configuration tools allow you to update a seasonal banner for a new promotion without technical expertise.
5. Offers Easy Customization
-
Sliders are easy to edit with page builder tools. It ensures that every banner is displayed as designed and fits your branding and promotional goals.
-
Example: You can customize a banner to show a product collection with unique branding. It ensures consistency with your store's visual identity.
How to Add a Magento 2 Banner Slider in Two Ways?
1. Using Magento CMS Page for Adding Banners
1. Access the Admin Panel
-
Go to your Magento 2 dashboard and log in.
-
Navigate to Content > Pages to access Magento CMS pages.
-
Choose the page where the banner should be displayed.
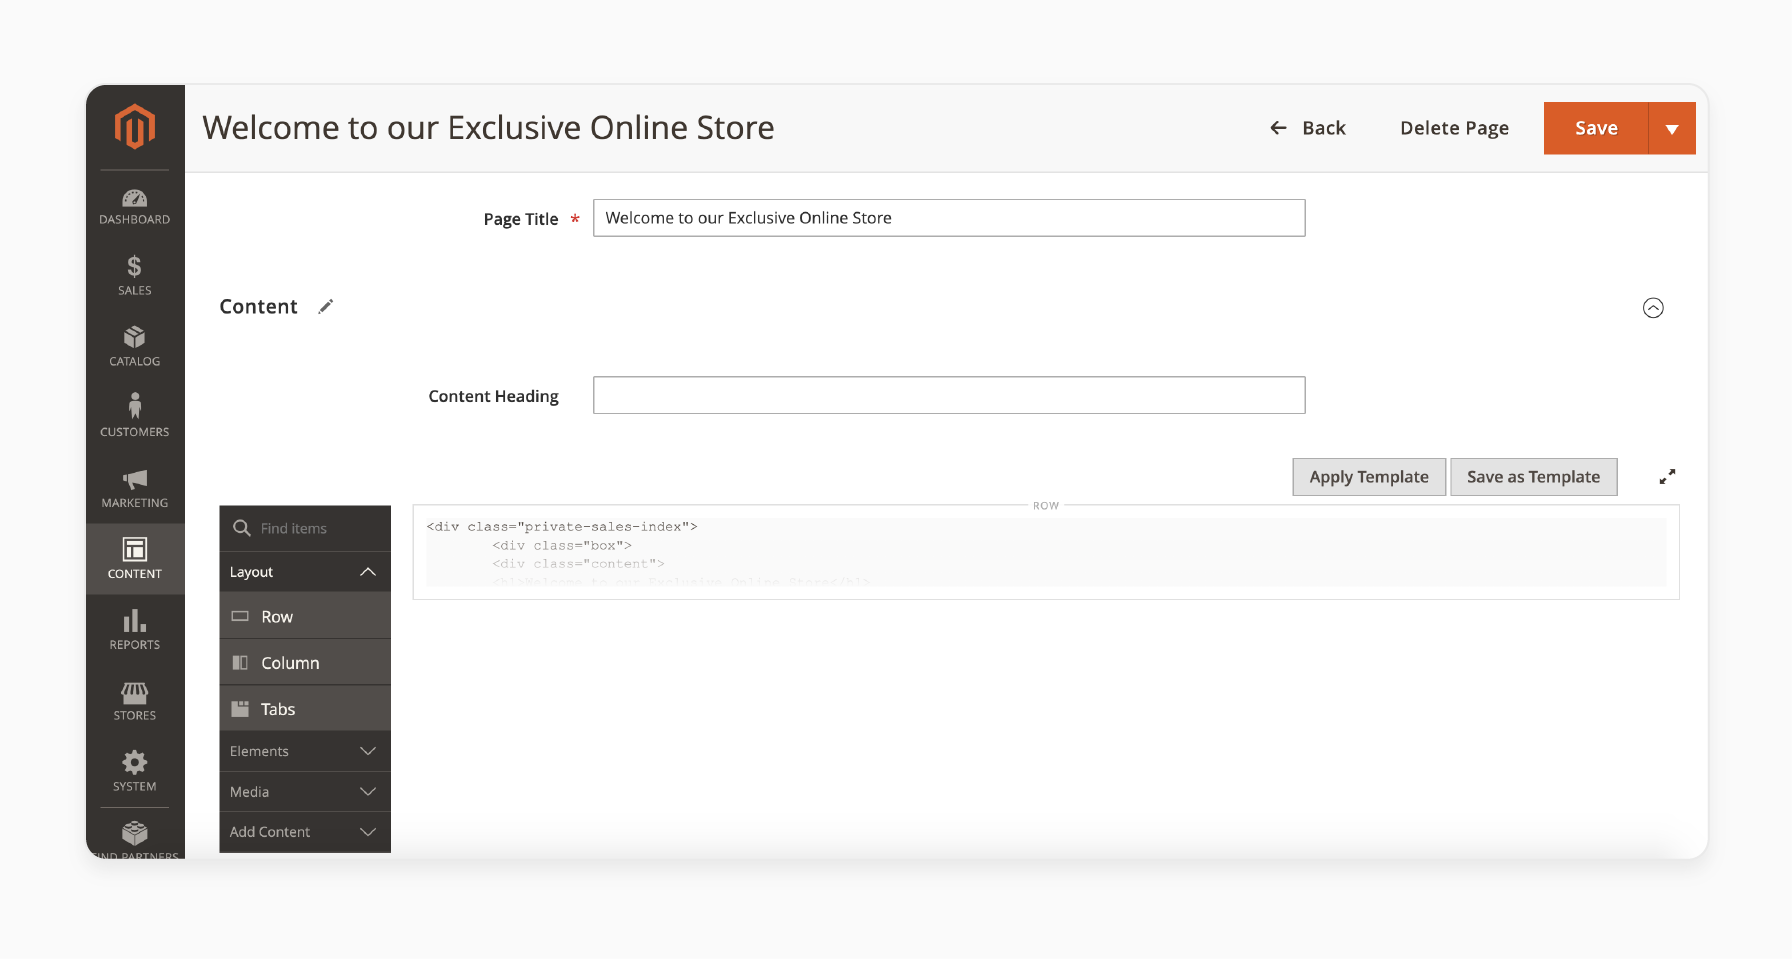
2. Edit the Content Page
- Select the Content page and click Edit with Page Builder.
-
Use the HTML block or a widget to add the slider.
-
Ensure the banner is displayed in the desired location.
3. Insert the Banner Slider
-
Use the image insert tool to upload your banner images.
-
Add multiple images to create a banner slider module.
-
Set the slider's layout and design for optimal display.
4. Customize the Banner
-
Modify the image functionality and settings as needed.
-
You can adjust the slider's speed, transitions, and mobile image compatibility. It will give you control over the slider's behavior and responsiveness.
5. Save and Preview the Page
-
Save the changes to the content page and preview the updates.
-
Ensure the attractive banner aligns with your store's design.
-
Confirm that customers will see the slider on the page.
2. Adding Banners Using Extensions
1. Choose a Banner Slider Extension
-
Select a reliable Magento 2 module for banner sliders.
-
Ensure the extension allows advanced features such as scheduling and custom designs.
2. Install and Configure the Extension
-
Complete the extension's installation and configuration in your Magento store. For guidance, refer to the documentation provided by the extension developer.
-
Verify the setup to ensure the banner should be displayed correctly.
3. Add and Manage Banners
-
Access the extension settings in the Magento admin panel.
-
Allow store owners to create and customize one banner or multiple banners.
-
Use tools such as the image slider to organize banners.
4. Customize the Slider Design
-
Edit banners with the extension's edit with a page builder or a similar tool.
-
Adjust settings for mobile image responsiveness and animations.
-
Create an attractive banner layout to enhance your store's appeal.
5. Set Display Rules
-
Define where the banner is to show (e.g., Magento 2 landing page or product pages).
-
Use features to schedule banners for specific events or promotions.
-
Ensure customers will see the banner at the right time and location.
6. Test and Optimize
-
Preview the banner slider on your site to ensure proper display.
-
Use analytics to track banner performance and make improvements.
How To Display Banners Using Blocks and Widgets in Your Magento Store?
1. Create a CMS Block
-
Go to Admin Panel > Content > Blocks and click Add New Block.
-
Enter a block title and identifier for easy management.
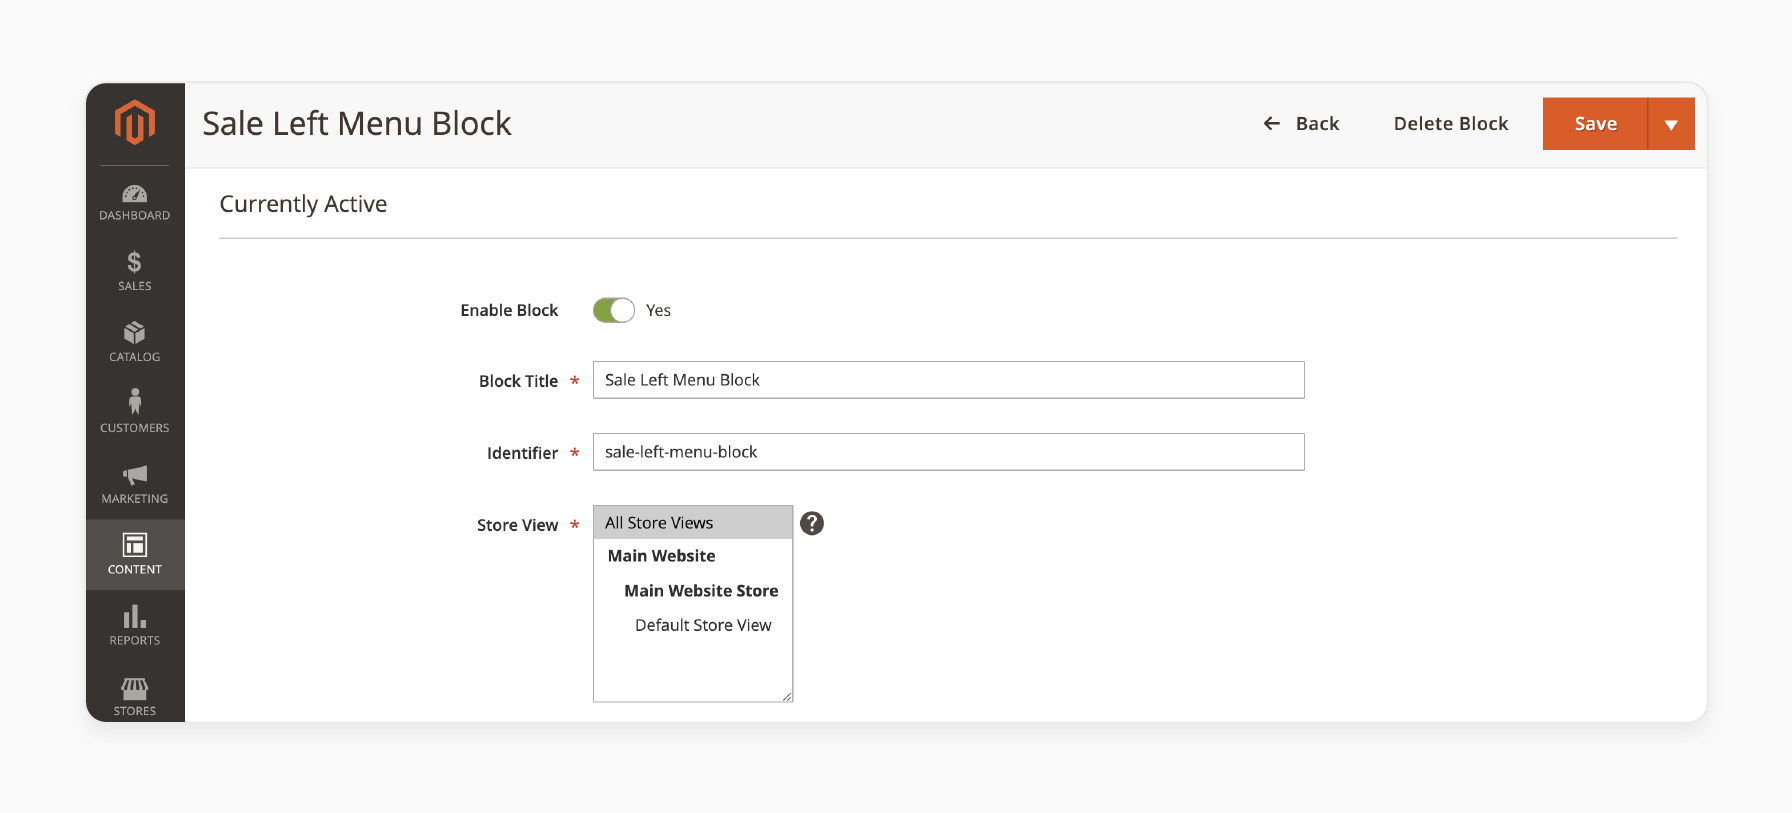
- Add banner content using the HTML editor or image insert tool.
2. Design the Banner
-
Upload a banner image and set its size and position.
-
Customize the image functionality for desktop and mobile views.
-
Add links or text for a more attractive banner.
3. Use a Widget to Display the Block
-
Go to Admin Panel > Content > Widgets and click Add Widget.
-
Choose a widget type, such as "CMS Static Block."
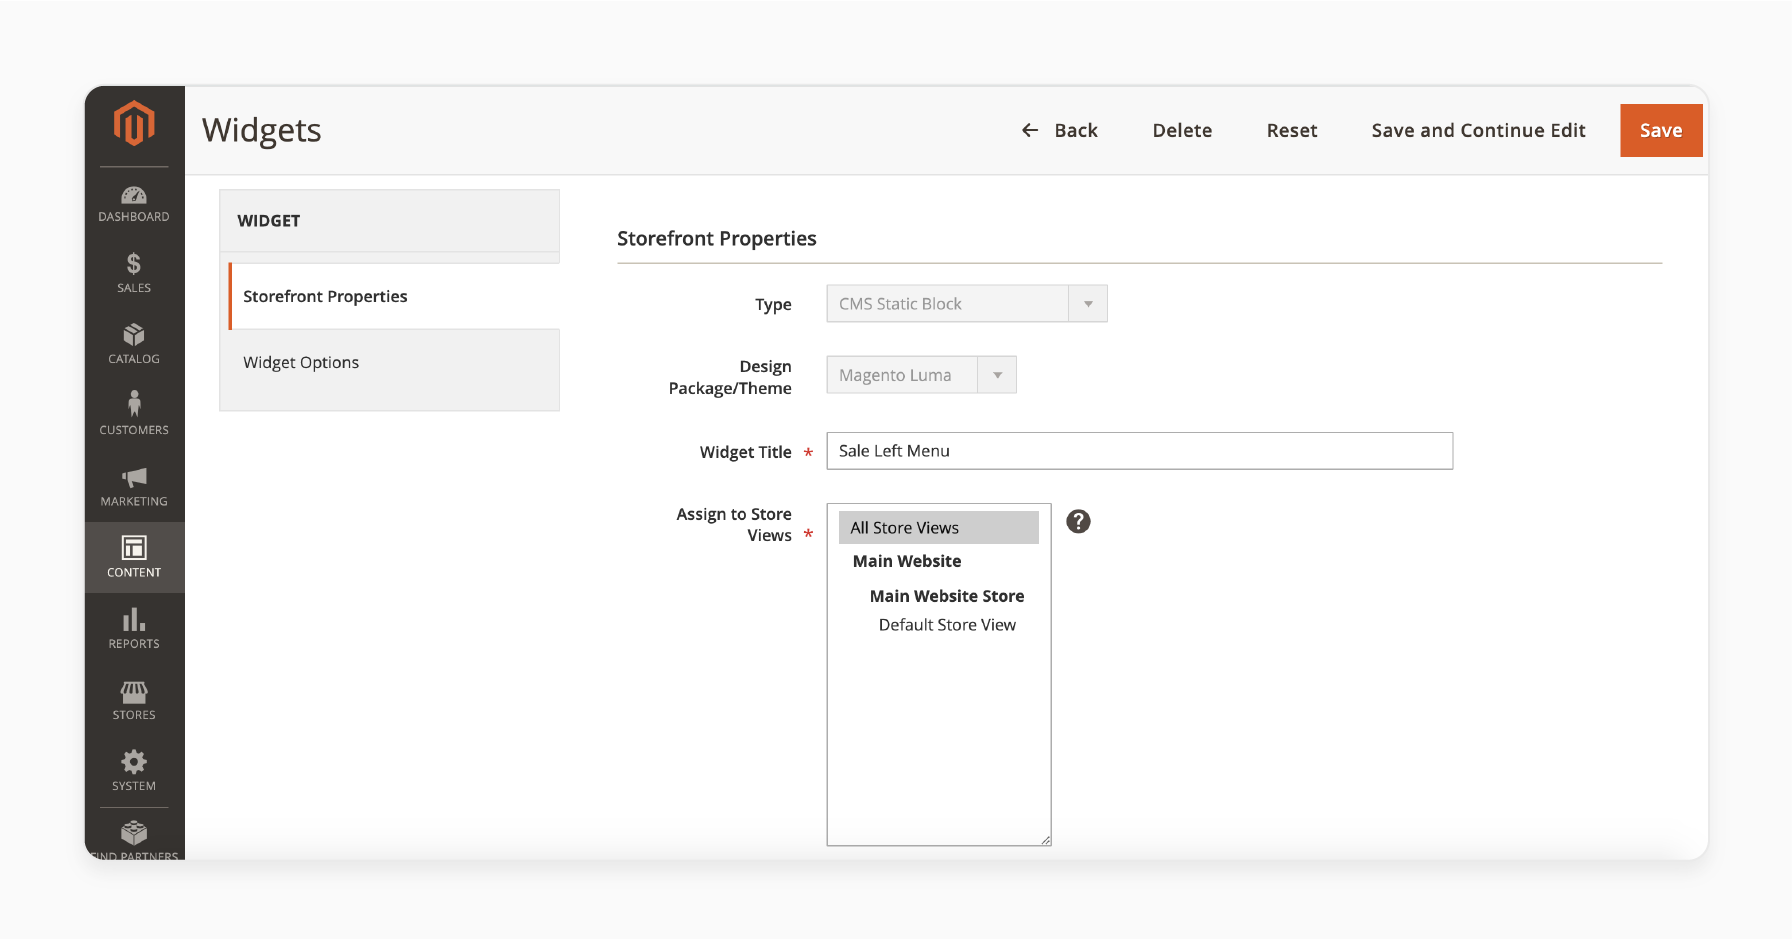
- Assign the block you created earlier to the widget.
4. Assign the Widget to a Page
-
Define where the banner should be displayed, such as a Magento product page or category page.
-
Set display settings such as layout updates and positions.
5. Customize Display Options
-
Use the widget's settings to control the banner's visibility.
-
Schedule banners to show for specific promotions or events.
-
Combine blocks and widgets to manage multiple banners effectively.
6. Preview and Save
-
Save the block and widget settings.
-
Preview the banner to confirm its placement and design.
How To Display Banners Across Magento Store Views?
Step 1: Create a Banner Image or HTML Code
Make sure you have the banner image or HTML code ready.
-
Image: Ensure that the banner image is uploaded to the Magento media folder. You can also use a URL for an image hosted elsewhere.
-
HTML: If you're using HTML to display the banner, make sure it's coded correctly for your needs.
Step 2: Navigate to the Admin Panel
-
Log in to your Magento Admin Panel.
-
Go to Content > Blocks or Widgets (depending on your preference and how you want to display the banner).
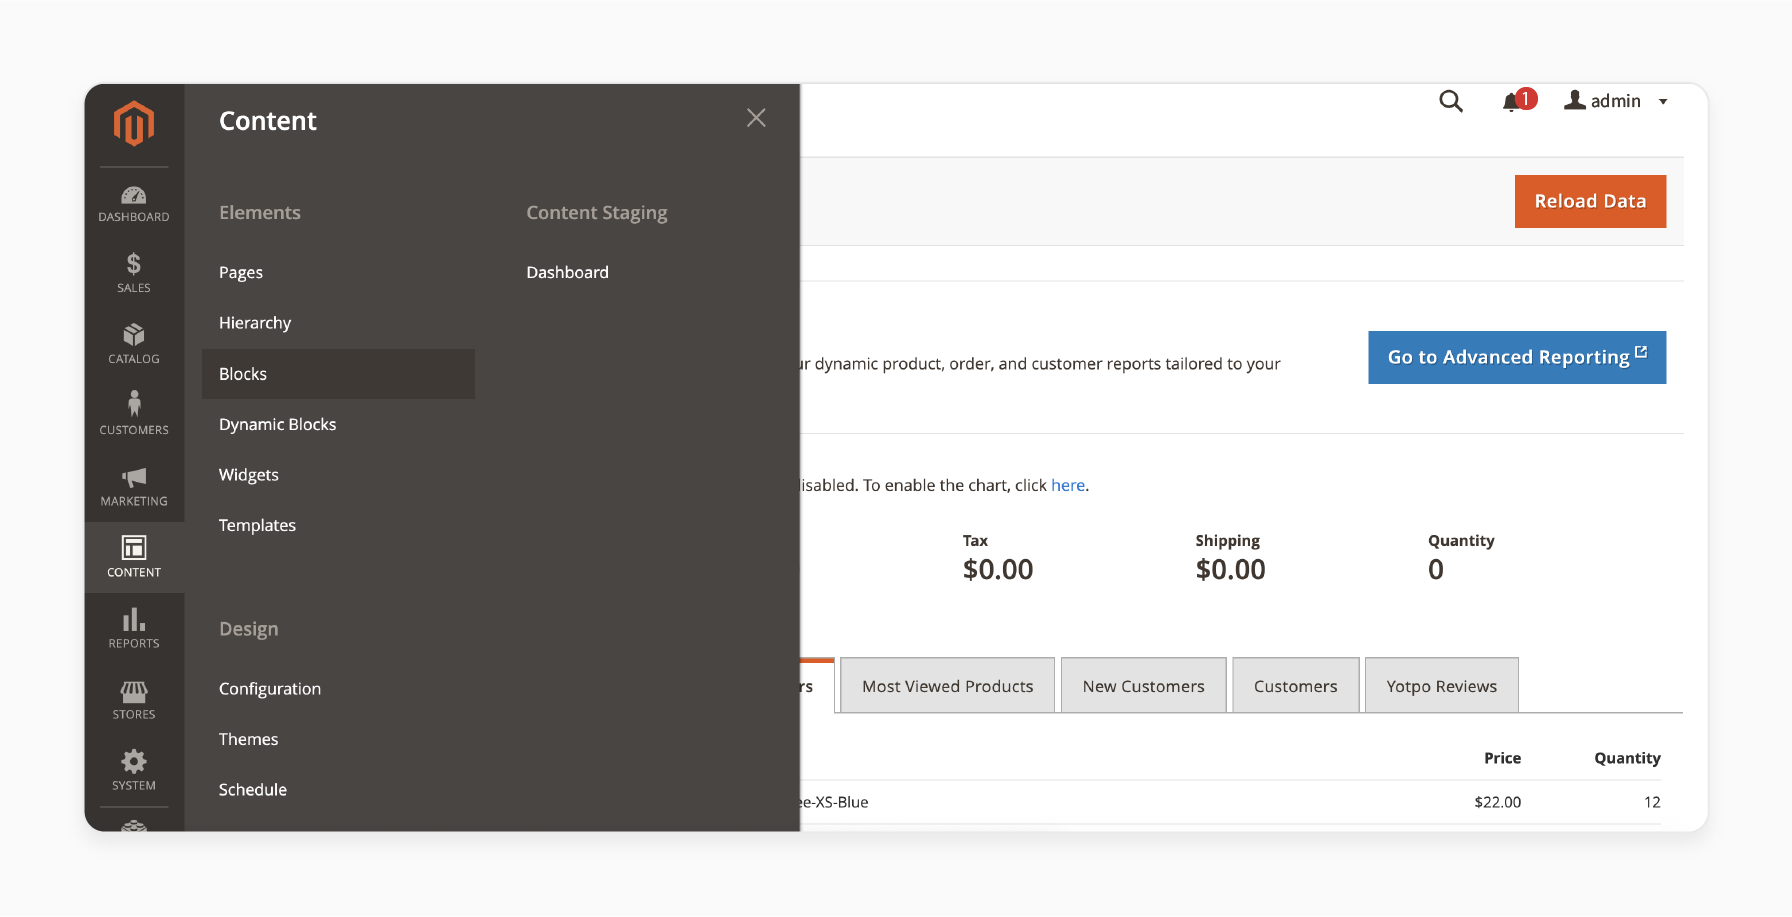
Step 3: Create a New Banner Block or Widget
If you're using Blocks:
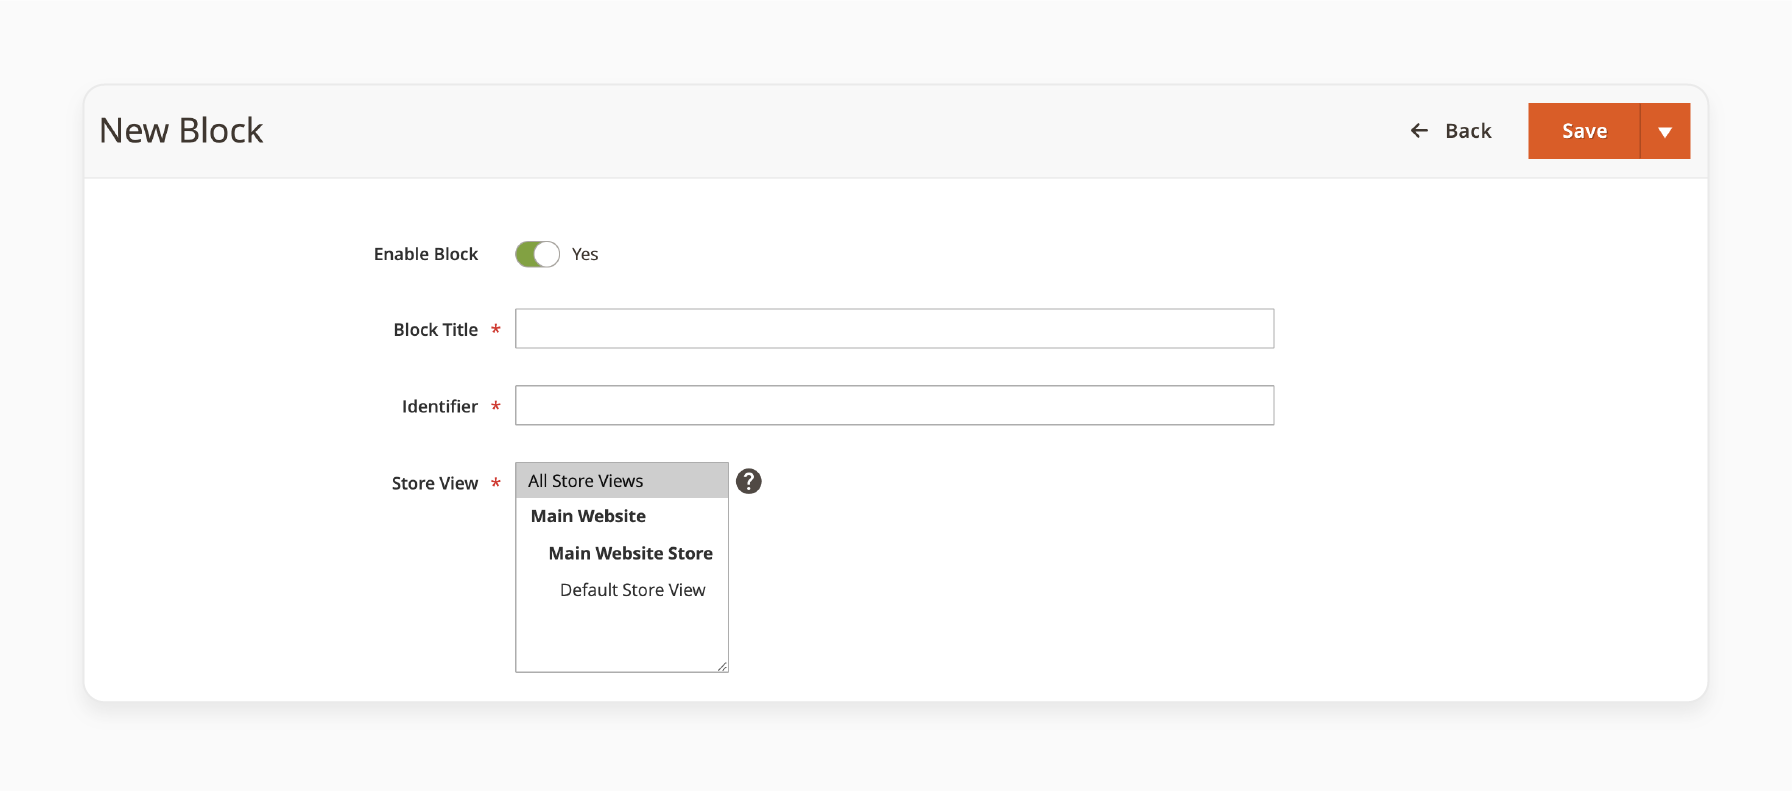
- Under Content, click Blocks and then click Add New Block.
-
Fill in the necessary information:
-
Block Title: Give the block a clear title.
-
Identifier: Use a unique identifier for the banner (e.g.,
header-banner). -
Content: Insert the banner image or HTML code here.
-
-
Under the Store View section (usually at the top or in the sidebar), choose the store views where you want the banner to appear. You can select multiple store views or just one.
-
Save Block when you're done.
If you're using Widgets:
-
Under Content, click Widgets and then Add Widget.
-
Select Widget Type (for banners, you might choose CMS Static Block or another relevant option).
-
Configure the widget and set its display options. You will be able to select the store views where you want the banner to show.
-
Save the Widget once you've finished configuring the settings.
Step 4: Assign the Banner to Specific Store Views
-
When creating the block or widget, you'll see an option to Store Views. Magento allows you to select which store views the block or widget will appear in.
-
You can select the corresponding store view if you want to target a specific store view (for example, a French-language version of your store).
-
If you have multiple store views (such as different languages, regions, or customer groups), ensure to select each relevant store view. You can also create different banners for different store views if needed.
Step 5: Place the Banner in the Right Position
To display the banner at the desired location on your site, you need to define the position of the block or widget:
-
If you're using Blocks, you can place them in specific CMS pages, templates, or layouts or assign them to specific pages based on the store view.
-
If you use Widgets, Magento allows you to choose where the widget displays on the page (e.g., the Magento header, footer, or sidebar).
Step 6: Clear Cache and Test the Banner
Once you have assigned the banner to the correct store views:
-
Go to System > Cache Management in the Admin Panel.
-
Clear the cache to ensure your changes take effect immediately.
-
Visit your store and test to make sure the banner appears on the right store view (e.g., for different languages or regions).
Step 7: Adjust as Needed
-
If the banner needs to be customized for specific store views (for example, using a different banner image or message for a region), you can edit the block or widget for that specific store view.
-
You can also adjust the display schedule or design elements (such as size, colors, etc.) based on the preferences of each store view.
How to Customize and Control Banner Display in Magento 2?
Step 1: Create a Banner Block or Widget
Magento 2 provides two main ways to display banners: using blocks and widgets.
Creating a Banner Block:
-
Log in to the Magento Admin Panel.
-
Navigate to Content > Blocks.
-
Click Add New Block.
-
In the Block Title field, enter a name for the banner (e.g., "Seasonal Sale Banner").
-
In the Identifier field, enter a unique identifier (e.g.,
banner-seasonal-sale). -
In the Content field, insert the banner's HTML, image, or text. You can customize the content by adding images and using the editor.
-
In the Store View section, select the store view(s) where the banner should appear. You can select multiple store views if necessary.
-
Click Save Block.
Creating a Banner Widget:
-
Navigate to Content > Widgets.
-
Click Add Widget.
-
In the Widget Type dropdown, select CMS Static Block.
-
Choose the Design Theme you are using.
-
Under Widget Options, choose the CMS Static Block you created earlier.
-
You can configure display settings, such as Layout Updates, to specify where you want the banner to appear on the page (e.g., in the header, footer, or sidebar).
-
In the Store View section, select the store view(s) for which this banner will be displayed.
-
Click Save Widget.
Step 2: Customize Banner Appearance
-
CSS Customization: If you need additional styling for the banner, you can edit the block or widget's HTML and add custom CSS to your theme.
-
Banner Size: Ensure the image is optimized for the banner space where it will be displayed. You can adjust the width and height by modifying the HTML or adding CSS.
-
Add Call-to-Action (CTA): Include buttons or links with clear calls to action (e.g., "Shop Now", "Learn More").
Step 3: Control Banner Display Based on Conditions
Magento 2 allows you to control when and where banners appear. You can use features such as scheduling and targeting specific customer segments.
Scheduling Banners:
-
When editing a banner block, you can schedule it by setting a Start Date and End Date. It is helpful for time-sensitive promotions like seasonal sales or flash deals.
-
Go to Content > Blocks, select the block, and fill in the Start Date and End Date fields.
-
The banner will automatically appear and disappear based on the dates set.
Targeting Specific Customer Groups or Segments:
-
You can use Magento's Customer Segments feature to show the banner only to specific customer groups (e.g., wholesale customers or registered users).
-
Go to Customers > Customer Groups and create or modify the customer groups.
-
When creating or editing the banner widget, use the Display Conditions options to target specific customer groups, store views, or even particular pages.
Step 4: Position the Banner on the Page
Banners can be displayed in various places in your store. Magento 2 offers flexibility in positioning:
-
Using Widgets:
- After creating the widget, select Layout Updates to determine. You can choose where the banner should appear by selecting Layout Updates. For example, choose Header, Footer, Sidebar, or a custom location, such as the landing page.
-
Content Pages:
-
If you prefer to display the banner on a content page, go to Content > Pages, select a page, and add the block or widget to the content.
-
Use the Insert Widget button in the page content editor to place the banner in the desired position.
-
Step 5: Clear Cache and Test
Once the banner is set up and customized, follow these steps:
- Clear Cache: Go to System > Cache Management, select all cache types, and click Flush Cache Storage.

- Test on Different Devices: Ensure that the banner displays properly on different devices (desktop, tablet, mobile). Make sure the design is responsive.
Step 6: Monitor and Adjust
-
Keep monitoring the banner's performance. If you're using it for promotions, check its effectiveness in terms of customer engagement.
-
Adjust the banner content or position based on feedback and analytics. You can change images, wording, or CTA buttons as needed.
FAQs
1. How can I use a carousel in Magento 2 for banners?
A carousel allows rotating banners for better visibility. Use a Magento 2 banner slider extension to create dynamic carousels and highlight offers or promo banners effectively on your eCommerce store.
2. Which tools help to quickly create a banner slider in Magento 2?
Extensions such as Magezon Page Builder allow you to create sliders easily. These tools provide drag-and-drop functionality to customize and display banners on your Magento 2 store.
3. How do promo banners enhance eCommerce stores?
Promo banners help highlight special deals, discounts, or events. Adding these banners to key pages like the homepage or category pages can boost engagement and conversions in an eCommerce store.
4. Can I add banners in Magento using Magezon Page Builder?
Yes, you can add a banner in Magento using Magezon Page Builder. This tool simplifies the process of designing and placing banners with advanced customization options.
5. How do I optimize a Magento banner slider for mobile devices?
To optimize a Magento banner slider, ensure banners are responsive. Adjust dimensions using tools like Magezon Page Builder and test on multiple devices to enhance the mobile experience.
6. What are the benefits of adding promo banners with a carousel?
Adding promo banners in a carousel format improves engagement by dynamically displaying multiple promotions. It's an effective way to showcase offers and attract attention to your eCommerce site.
Summary
Magento 2 banner sliders offer several advantages to enhance the visual appeal and engagement of online stores.
-
Banner sliders allow for the creation of visually appealing rotating banners with images and animations.
-
Sliders enhance engagement by encouraging clicks and interactions.
-
Banner management is simplified with installation and configuration tools.
-
Sliders offer easy customization options with page builder tools.
-
Banners improve customer engagement by grabbing attention and promoting interactions.
Improve your online store with managed Magento Hosting and easily add banner sliders.


