
Magento 2 Amazon Integration: Configure Amazon Connector
Looking to simplify your eCommerce operations? Magento 2 Amazon Integration makes it easy to manage Magento stores with Amazon.
This tutorial will cover the extensions, advanced solutions, and steps to set up the Magento 2 Amazon Integration.
Key Takeaways
- Set up and manage products from Amazon while module configuration.
- Features of importing orders from Amazon store to Magento 2 store.
- Steps to set up and configure Amazon store with Magento 2 store integration.
- Best practices for imported orders from the Magento 2 store.
- Troubleshooting tips for importing the orders from the Amazon store.
- Manage orders received on your Amazon platform using tools like Amazon Pay.
- Connect your Magento 2 store to import the orders from Amazon.
-
5 Steps To Manage Amazon Account Right From Your Magento Admin Panel
-
5 Steps To Create/Get Amazon Connector Extension Credentials
-
How Does Magento 2 Amazon Integration Affect Order Management?
-
How To Integrate Amazon With Magento Amazon While Module Configuration?
-
Troubleshooting Common Issues With Amazon Integration For Magento
Advanced Features of Magento Amazon Integration
1. Multi-Account Support
Magento with Amazon integration connects multiple Amazon accounts to your Magento 2 store. It is particularly useful for businesses that have multiple Amazon seller accounts. Businesses can switch between different languages or multiple brands. You can also manage multiple Amazon marketplaces from a single dashboard.
With this, you can:
- Manage multiple Amazon accounts from a single dashboard.
- Manage orders from multiple Amazon accounts in a single dashboard.
- Synchronize inventory levels across multiple Amazon accounts.
For example, a company selling electronics might have separate Amazon accounts for consumer and business products. It allows them to manage inventory, pricing, and orders for both accounts from a single Magento dashboard. It saves time and reduces the risk of errors.
2. Bulk Product Upload
Magento 2 integration allows you to upload products in bulk to Amazon. It is useful for businesses that have a large product catalog. Also, it is beneficial for those who want to save time uploading products to the Amazon store.
With this, you can:
- Upload products in bulk to Amazon, saving you time and effort.
- Increase product visibility on Amazon by uploading products in bulk.
- Manage products in bulk, making it easier to update product information and pricing.
Merchants to create a CSV file with product details. It can be uploaded to Amazon via the Magento interface. It is valuable for seasonal businesses or those with frequently changing inventory.
For instance, a fashion retailer could upload their entire new season collection at once. It includes hundreds of SKUs with variations in size and color.
3. Shipment Tracking
Amazon Magento 2 integration allows you to track shipments from Amazon. It is used to provide a seamless shipping experience for their customers.
With this, you can:
- Provide customers with accurate and up-to-date shipment tracking information.
- Reduce support queries related to shipment tracking and delivery.
- Simplify logistics and shipping operations by tracking shipments from Amazon.
Customers can track their orders directly from your website. It reduces the need for customer service inquiries. Moreover, it enables proactive communication. You can set up automated emails to customers when their order ships or is delivered. It enhances the post-purchase experience, increasing repeat business.
4. Streamline Business Growth
Amazon Magento integration can help businesses grow. It provides an efficient way to manage Amazon sales and operations.
With this, you can:
- Increase sales on Amazon by providing a seamless shopping experience for customers.
- Reduce costs by streamlining logistics and shipping operations.
5 Steps To Install Amazon Connector For Magento 2
- Extract the zip folder on your system.
- Locate the
srcfolder containing anappfolder. - Transfer the
appfolder to the Magento 2 root directory on the server, as shown below.
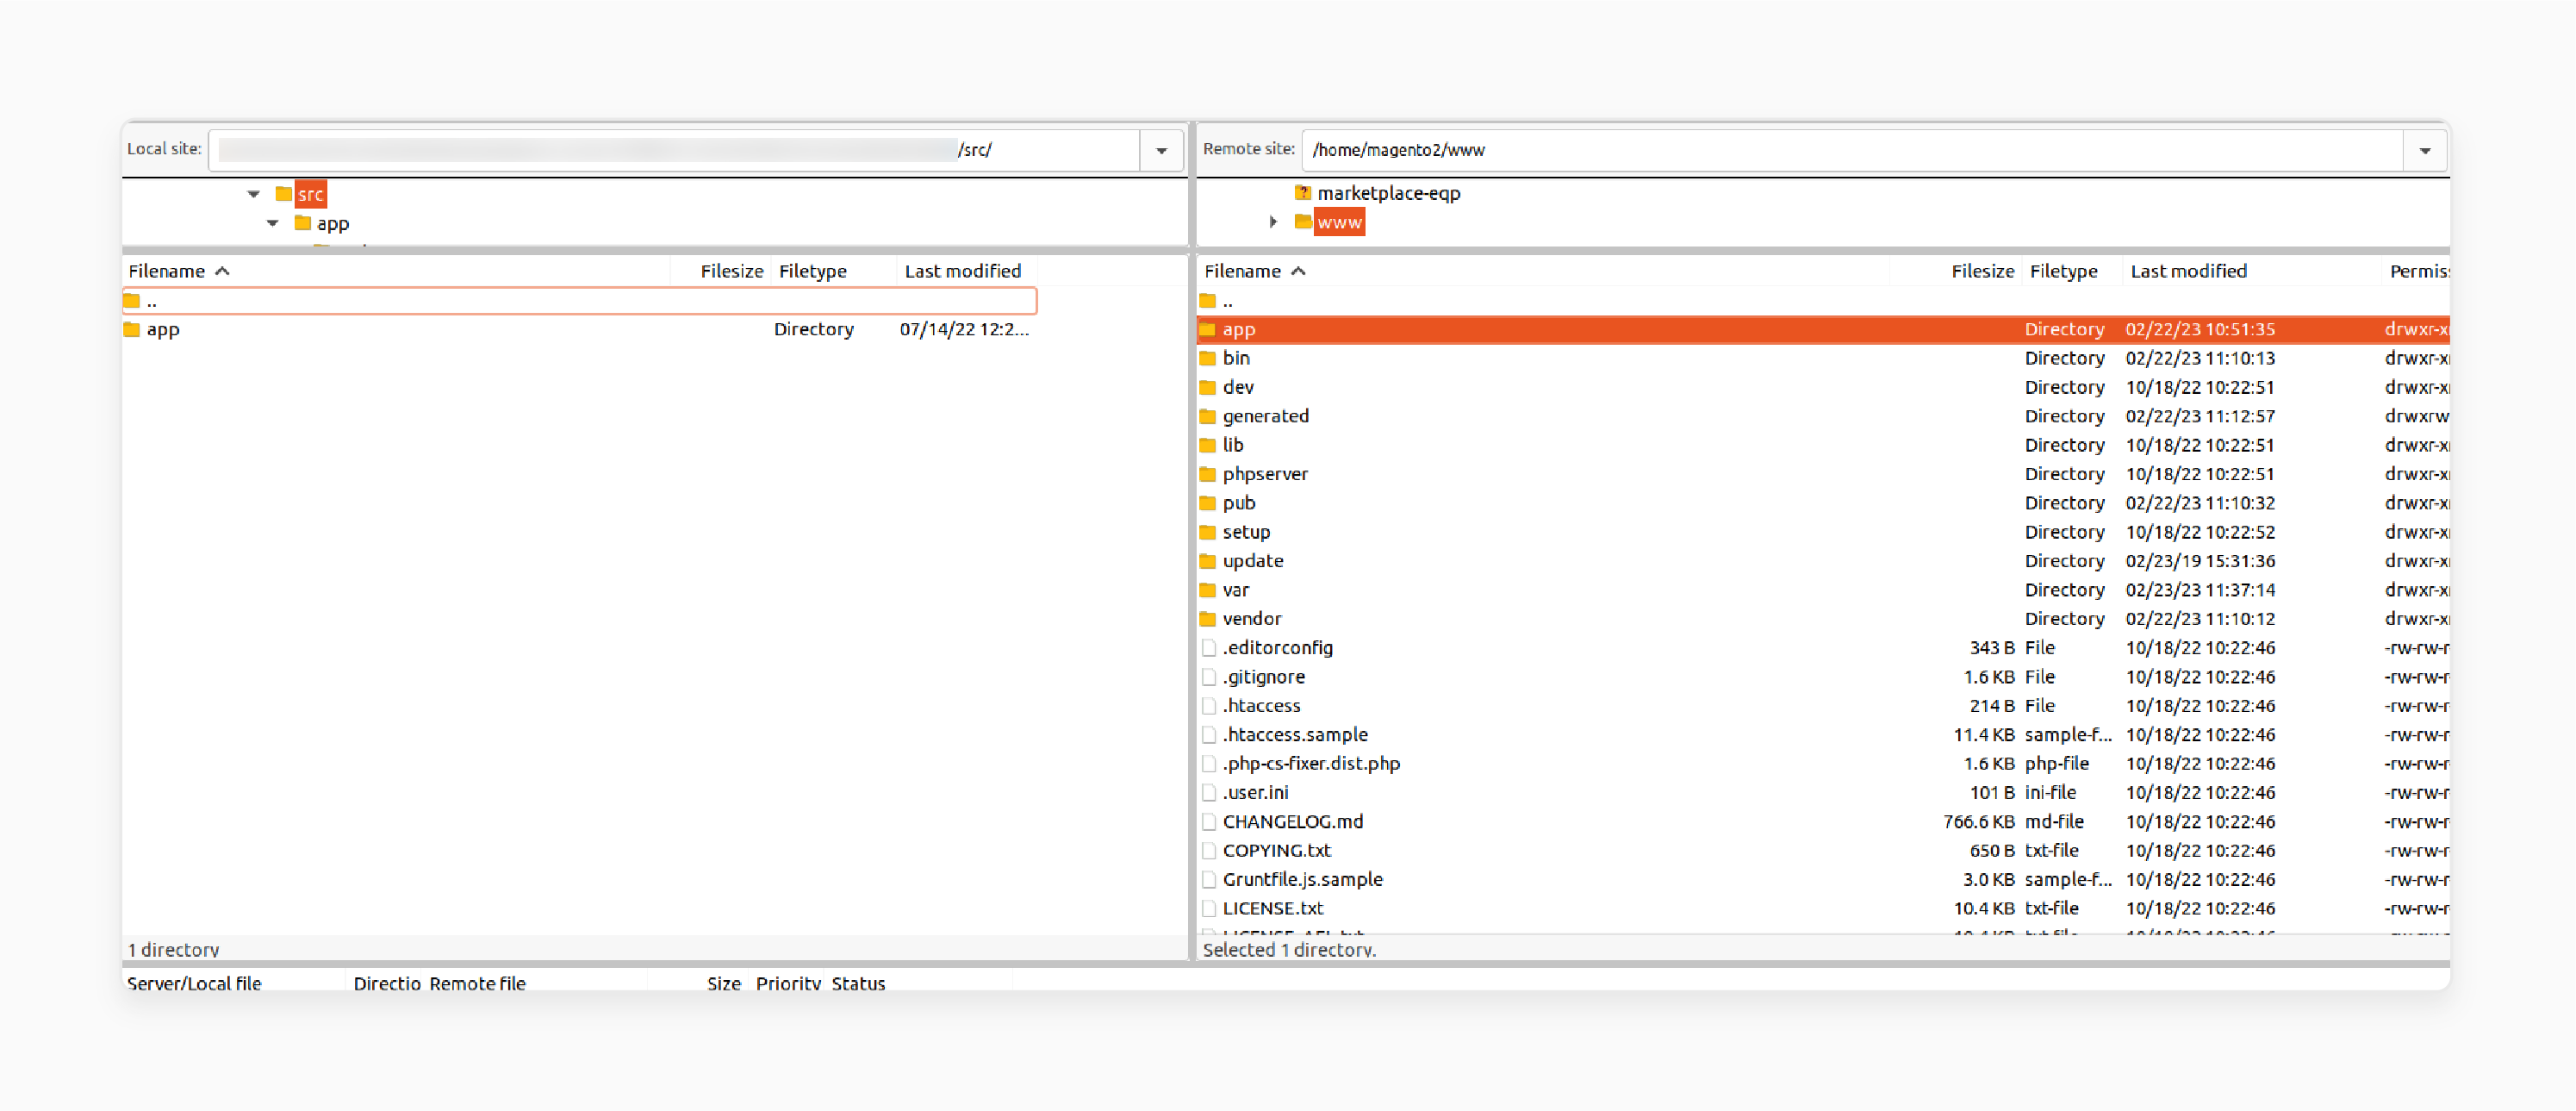
After transferring the folder, run the commands below in the Magento 2 root directory:
php bin/magento setup:upgrade
php bin/magento setup:di:compile
php bin/magento setup:static-content:deploy
composer require guzzlehttp/guzzle:*
composer require league/csv:^9.5
composer require spatie/array-to-xml:*
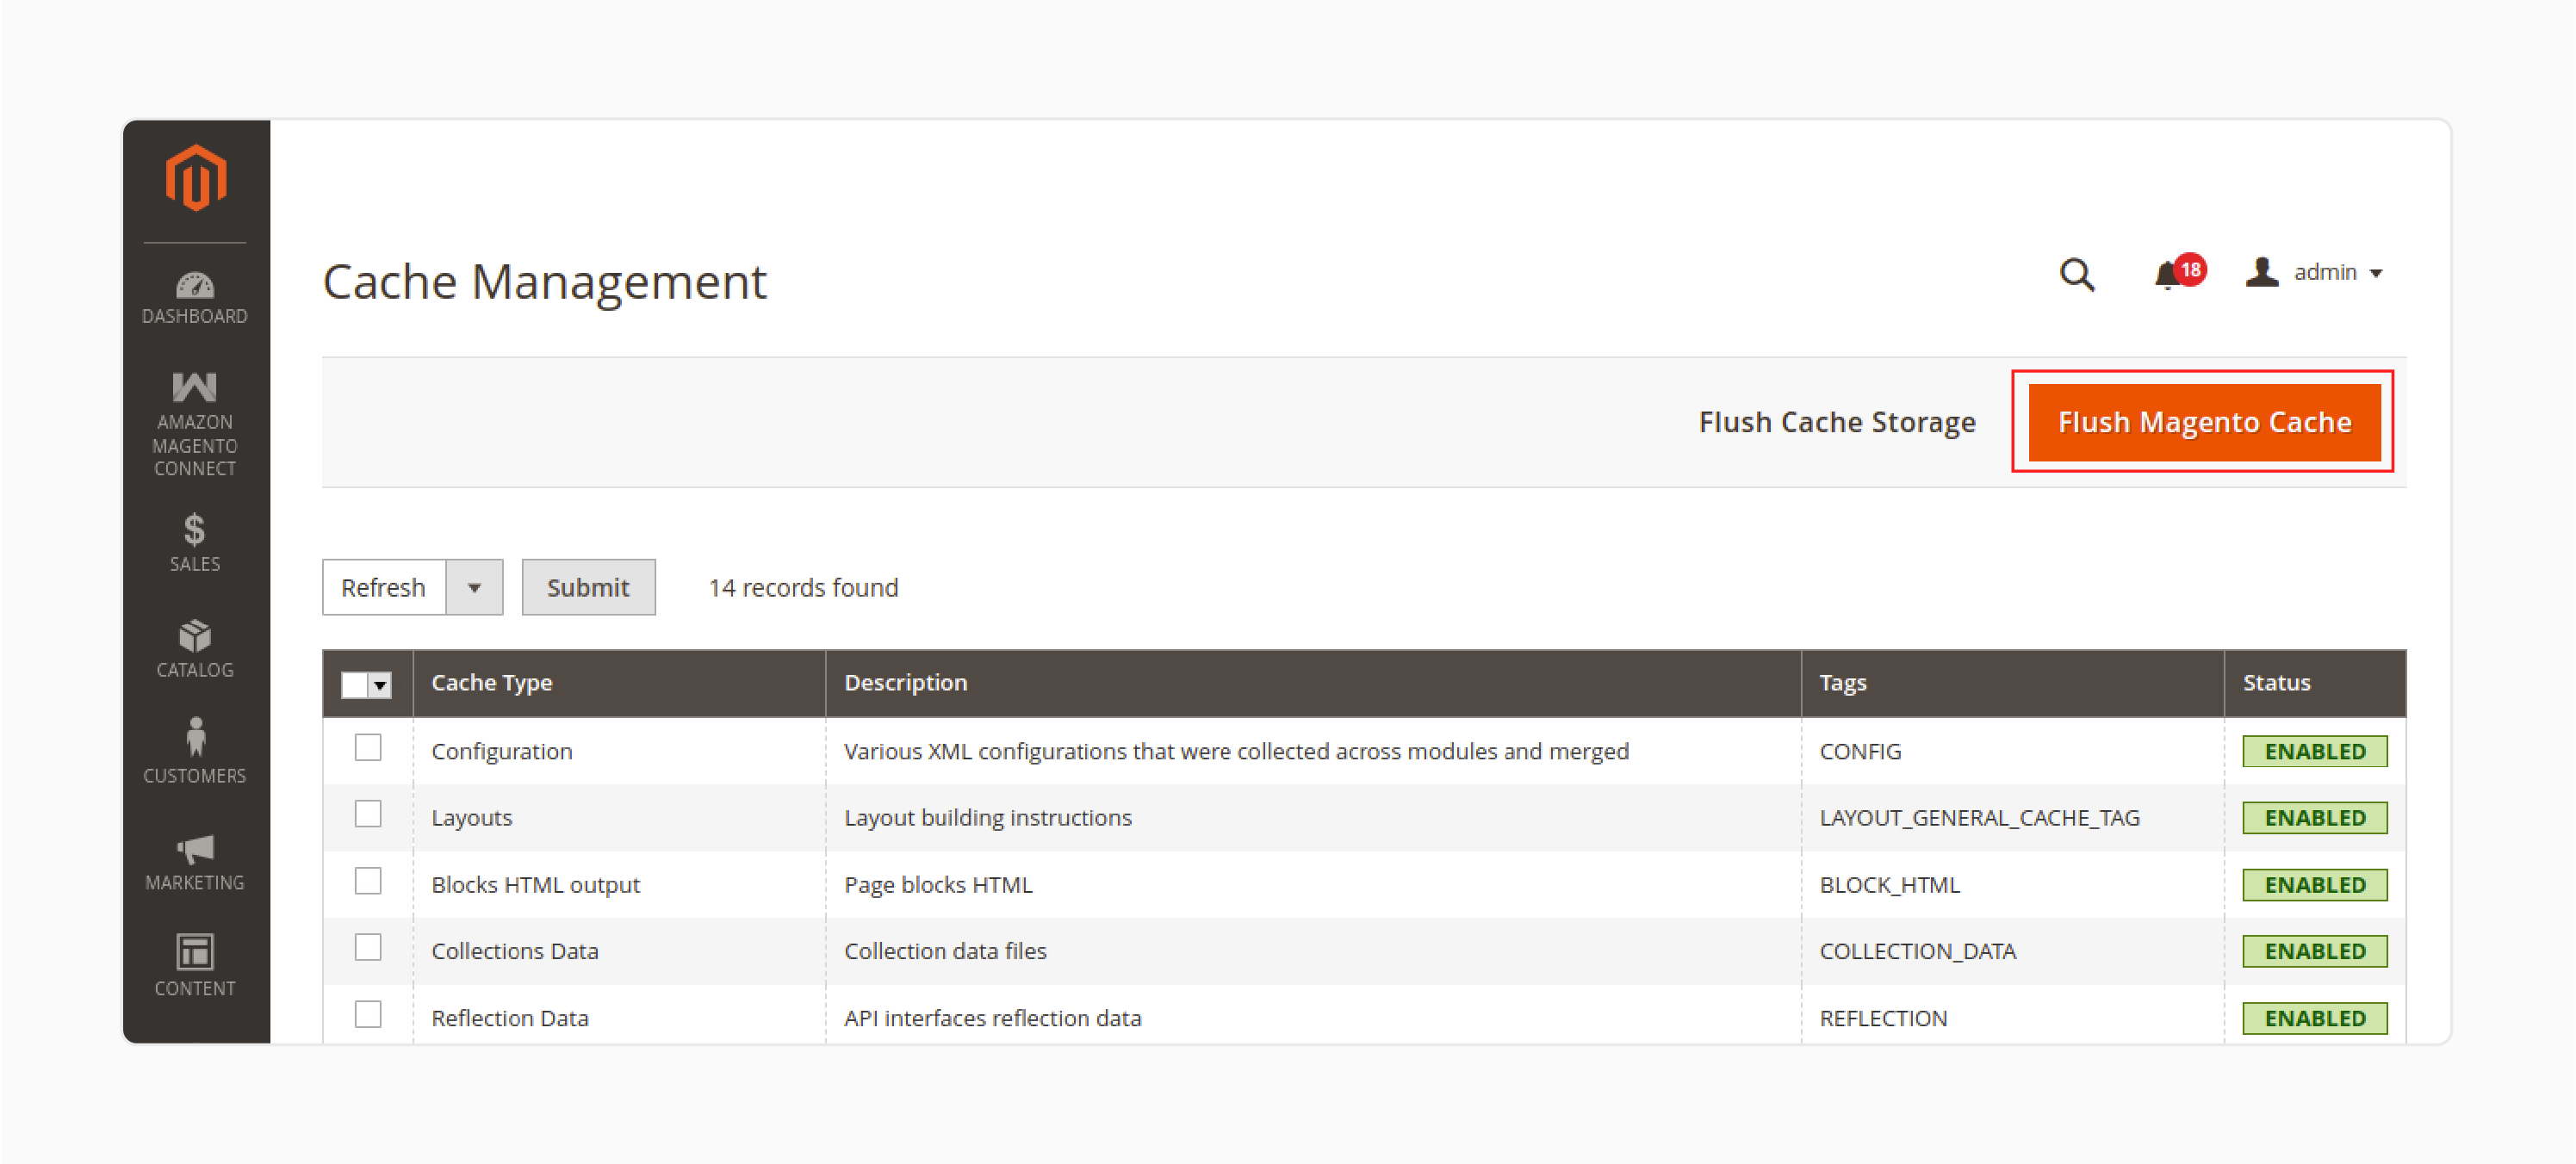
- Navigate to System > Cache Management.
- Flush the Magento cache from the Adobe Commerce admin panel.
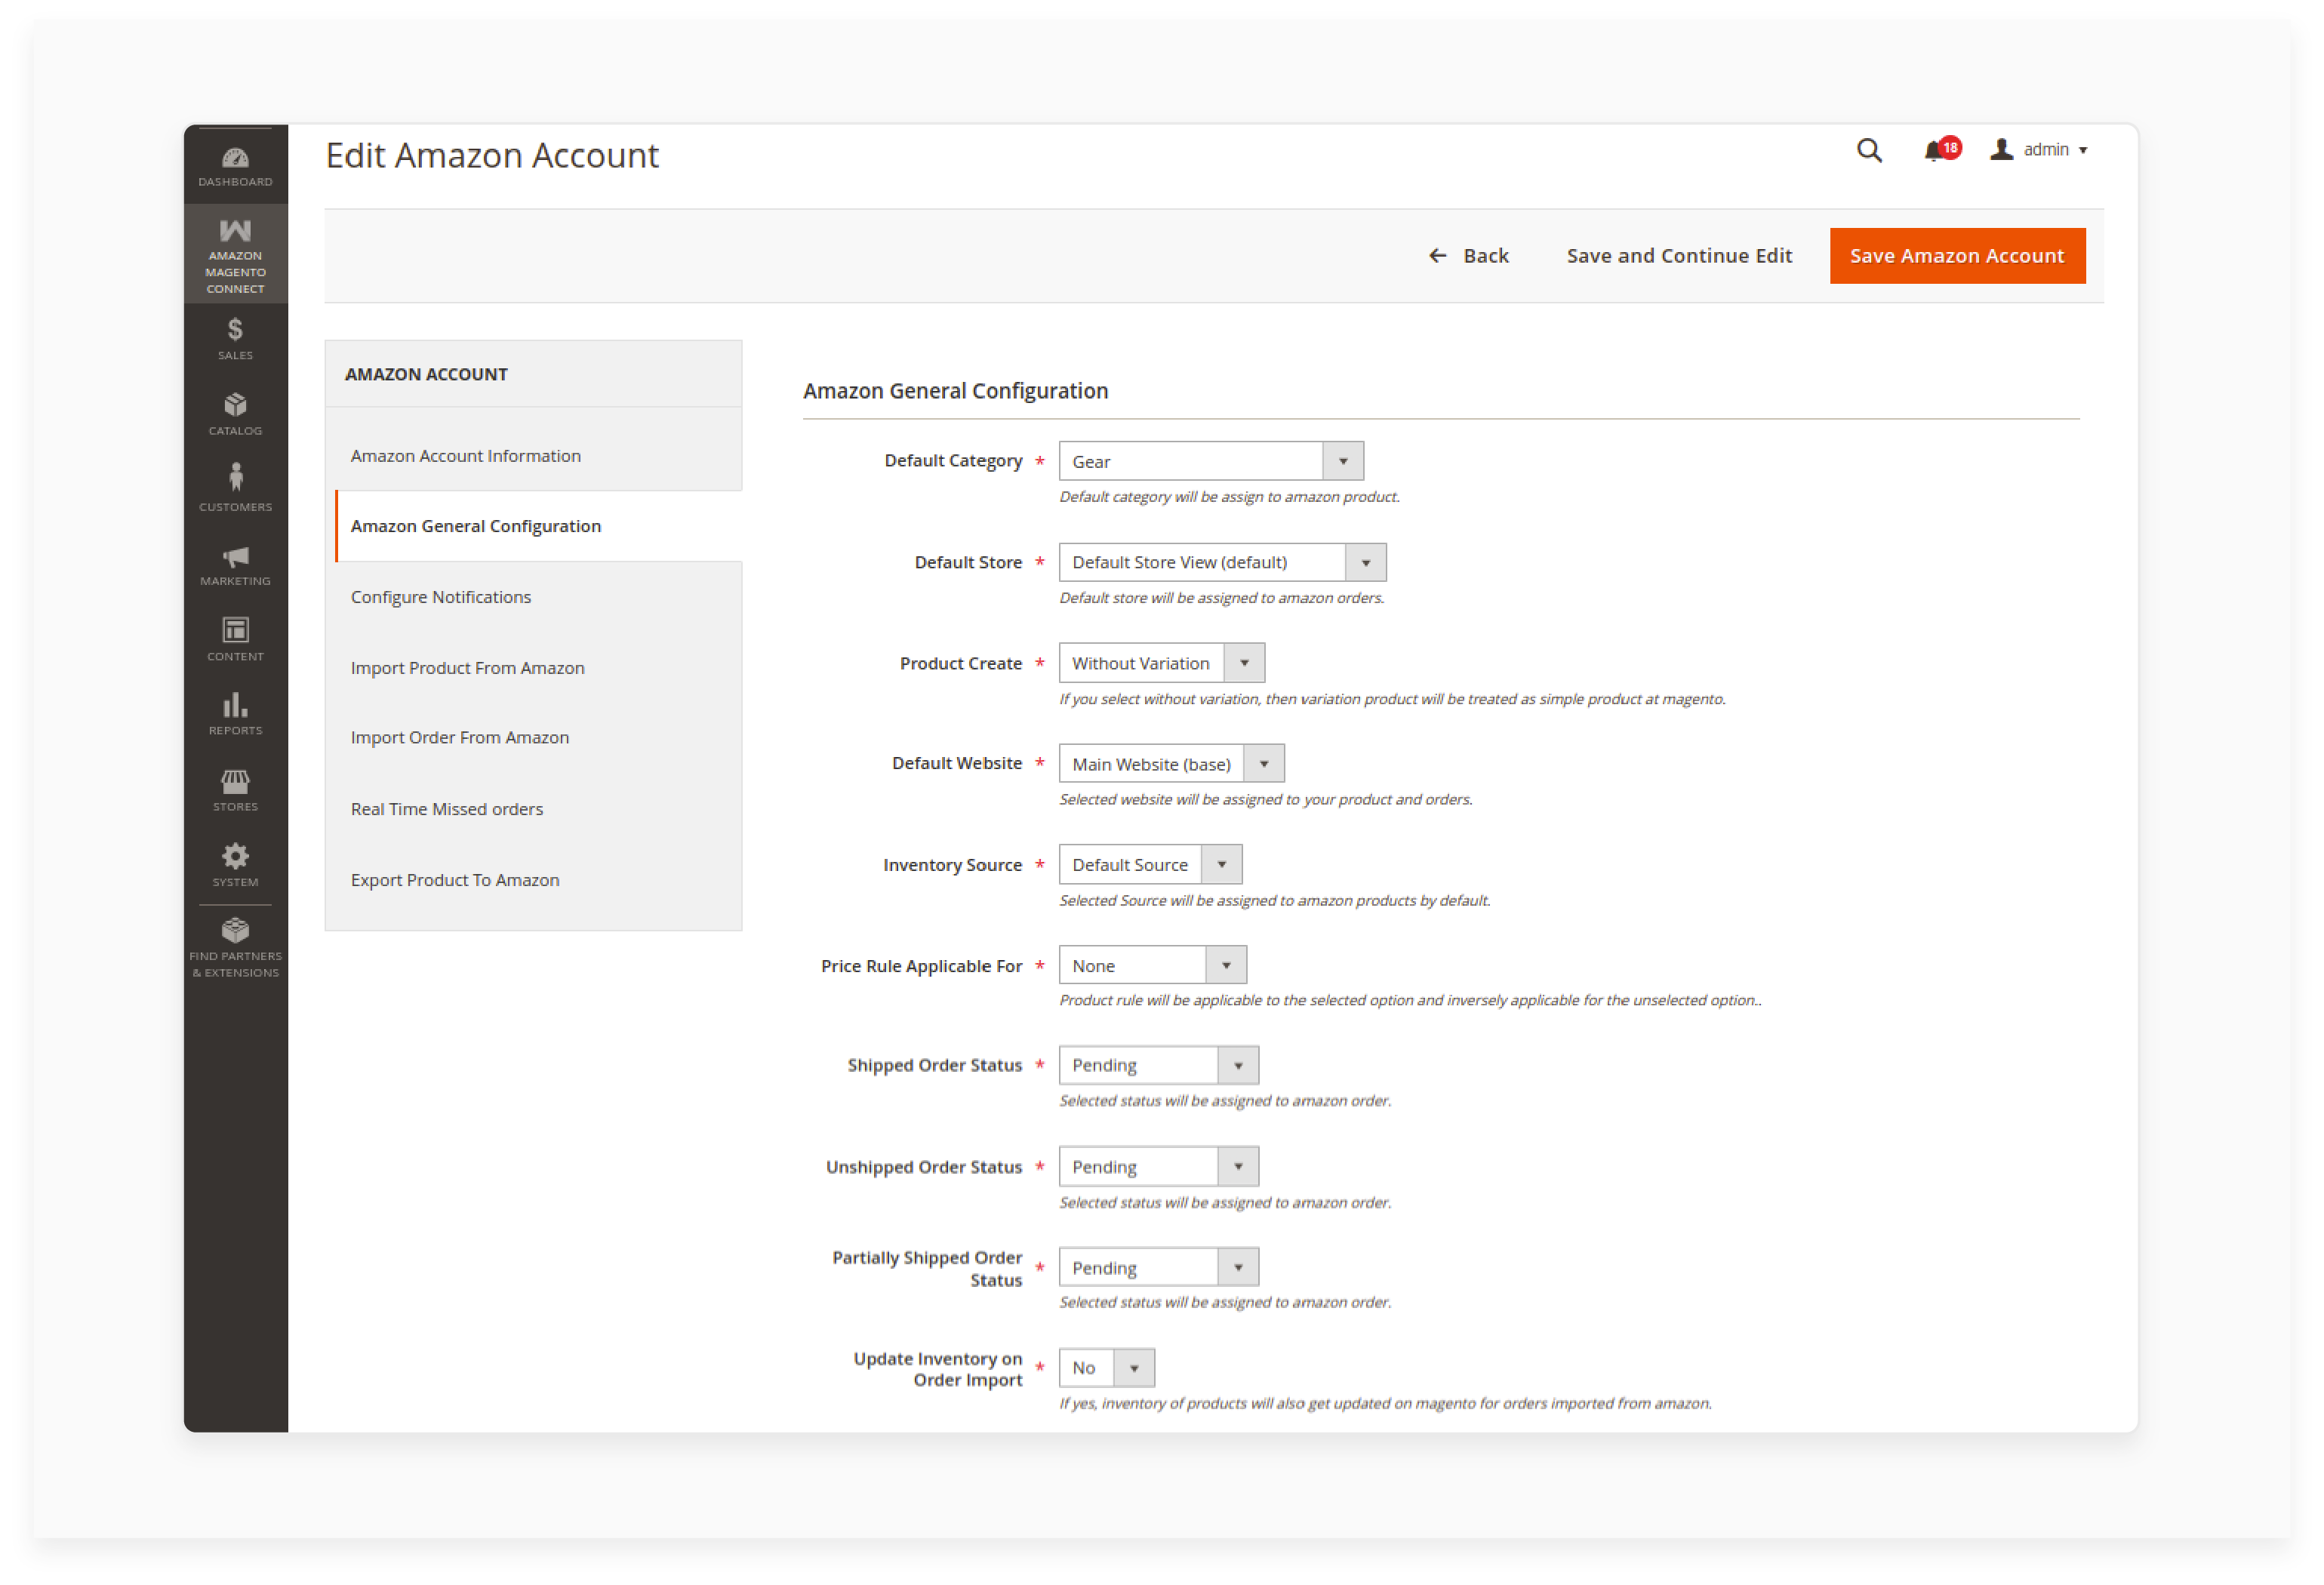
General Configuration For Magento And Amazon
- Default Category: Select the "default category" in the Magento 2 store to assign to Amazon products.
- Default Store View: Choose the "default store view" in Magento 2 for order syncing.
- Product Create: Choose the product creation type, either "with variation" or "without variation".
- Default Website: Select the "default website".
- Inventory Source: Select the source that will be assigned to Amazon products by default. By default, it is "Default Source".
- Price Rule Applicable For: Choose the product sync type, either "Import" or "Export", to apply the Amazon Price Rule. If selected for Import Products, it will work in reverse for Export Products and vice versa.
Note: If "Amazon Price Rule Applicable For" is set to Import Products, the price of imported products will "increase by 10". Conversely, the price of exported products will "decrease by 10".
- Shipped Order Status: Select the "order status" for Amazon orders in Magento.
- Unshipped Order Status: Choose the "order status" for Amazon orders in Magento.
- Partially Shipped Order Status: Select the "order status" for partially shipped Amazon orders in Magento.
- Update Inventory on Order Import: If set to "Yes", the inventory of products in Magento will update for orders imported from Amazon.
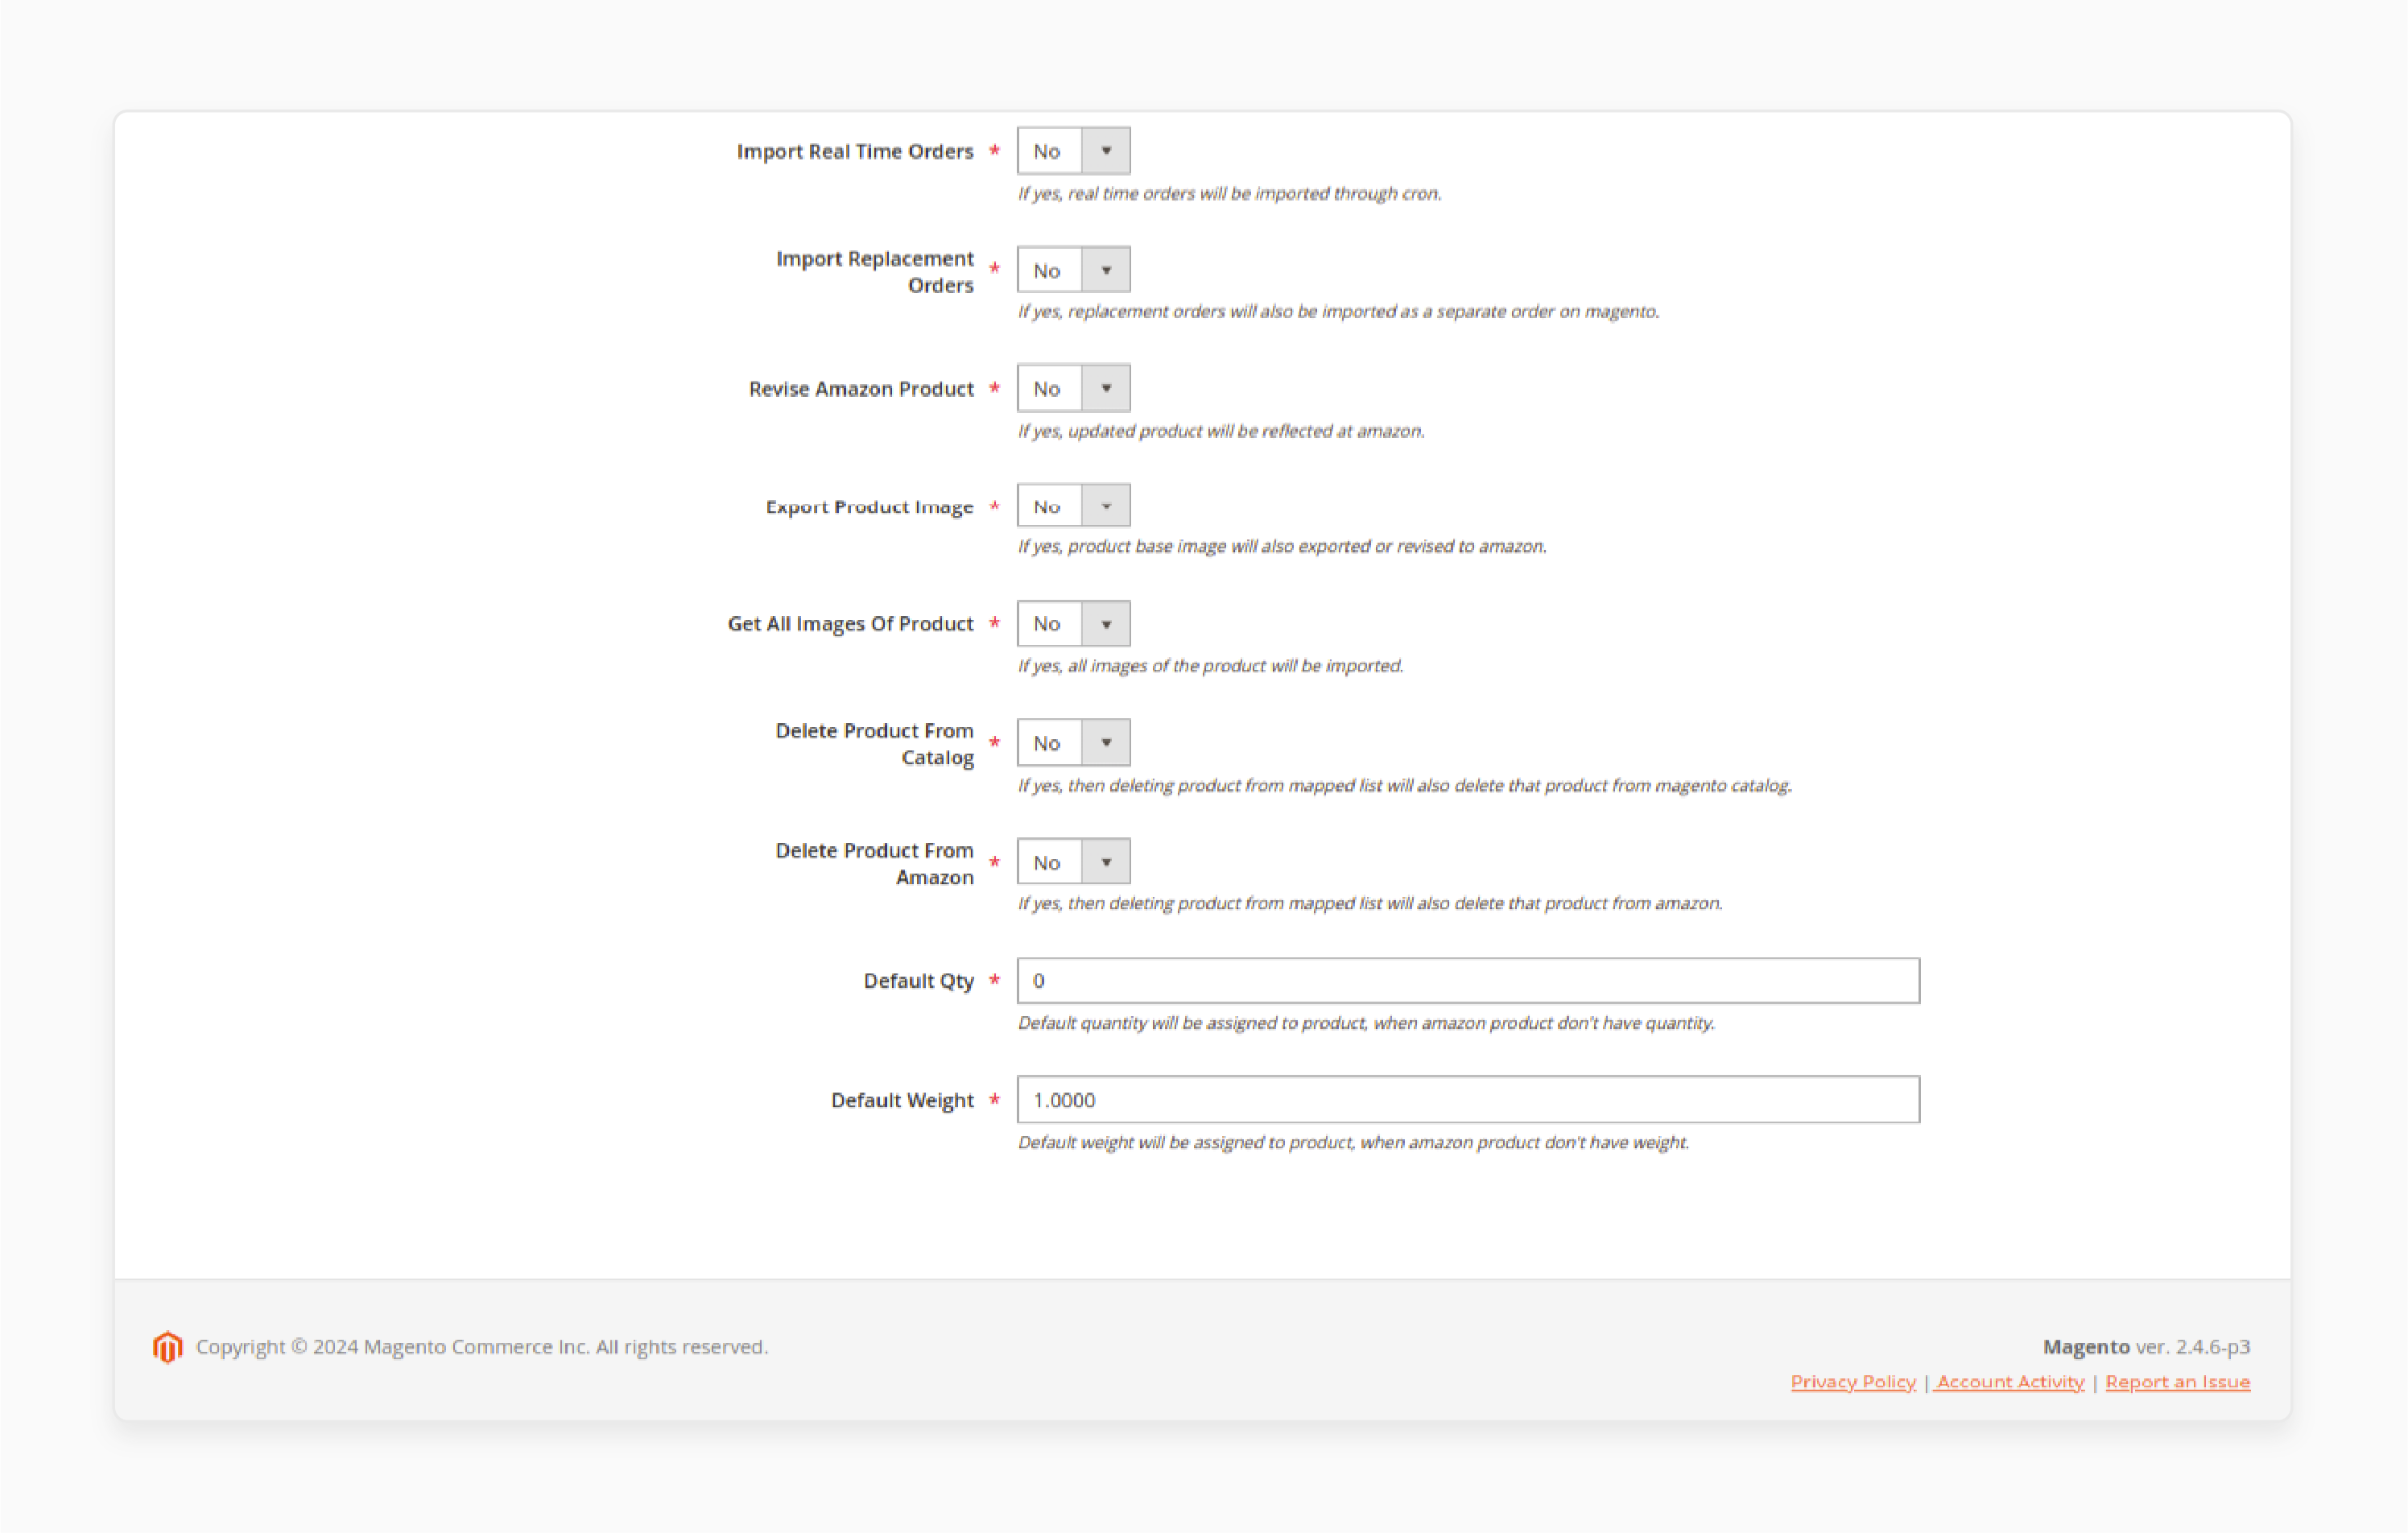
- Import Real Time Orders: If set to "Yes", real-time orders will be imported through cron.
- Import Replacement Orders: If set to "Yes", replacement orders will be imported as a separate order on Magento.
- Revise Amazon Product: If set to "Yes", any changes in the product price and quantity in Magento 2 will reflect on the Amazon store. Changes in the Amazon store will not reflect in Adobe Commerce. Select No to disable product updating on Amazon.
- Export Product Image: If set to "Yes", the product base image will be exported or updated on Amazon.
- Get All Images Of Product: If set to "Yes", all images of the product will be fetched. If set to No, only one image will be fetched.
- Delete Product From Catalog: If set to "Yes", the product will also be deleted from the Magento catalog.
- Delete Product From Amazon: If set to "Yes", the product will also be deleted from Amazon.
- Default Qty: Assign a "default quantity" to the product when the Amazon product lacks quantity.
- Default Weight: Assign a "default weight" to the product when the Amazon product lacks weight.
To configure Notification, follow the steps below:
- Grant Selling Partner API permission to write to your SQS queue.
Note: Refer to Amazon documentation for guidance.
- Enter the queue name in the field of Amazon Account Information > SQS Queue Name.
- Click on the 'Create Destination' button to create a destination.
- Click on the 'Create Subscription' button to create a subscription.
5 Steps To Manage Amazon Account Right From Your Magento Admin Panel
After successfully configuring the system, the admin can add Amazon account credentials.
- Navigate to Amazon Magento Connect > Manage Amazon Accounts.
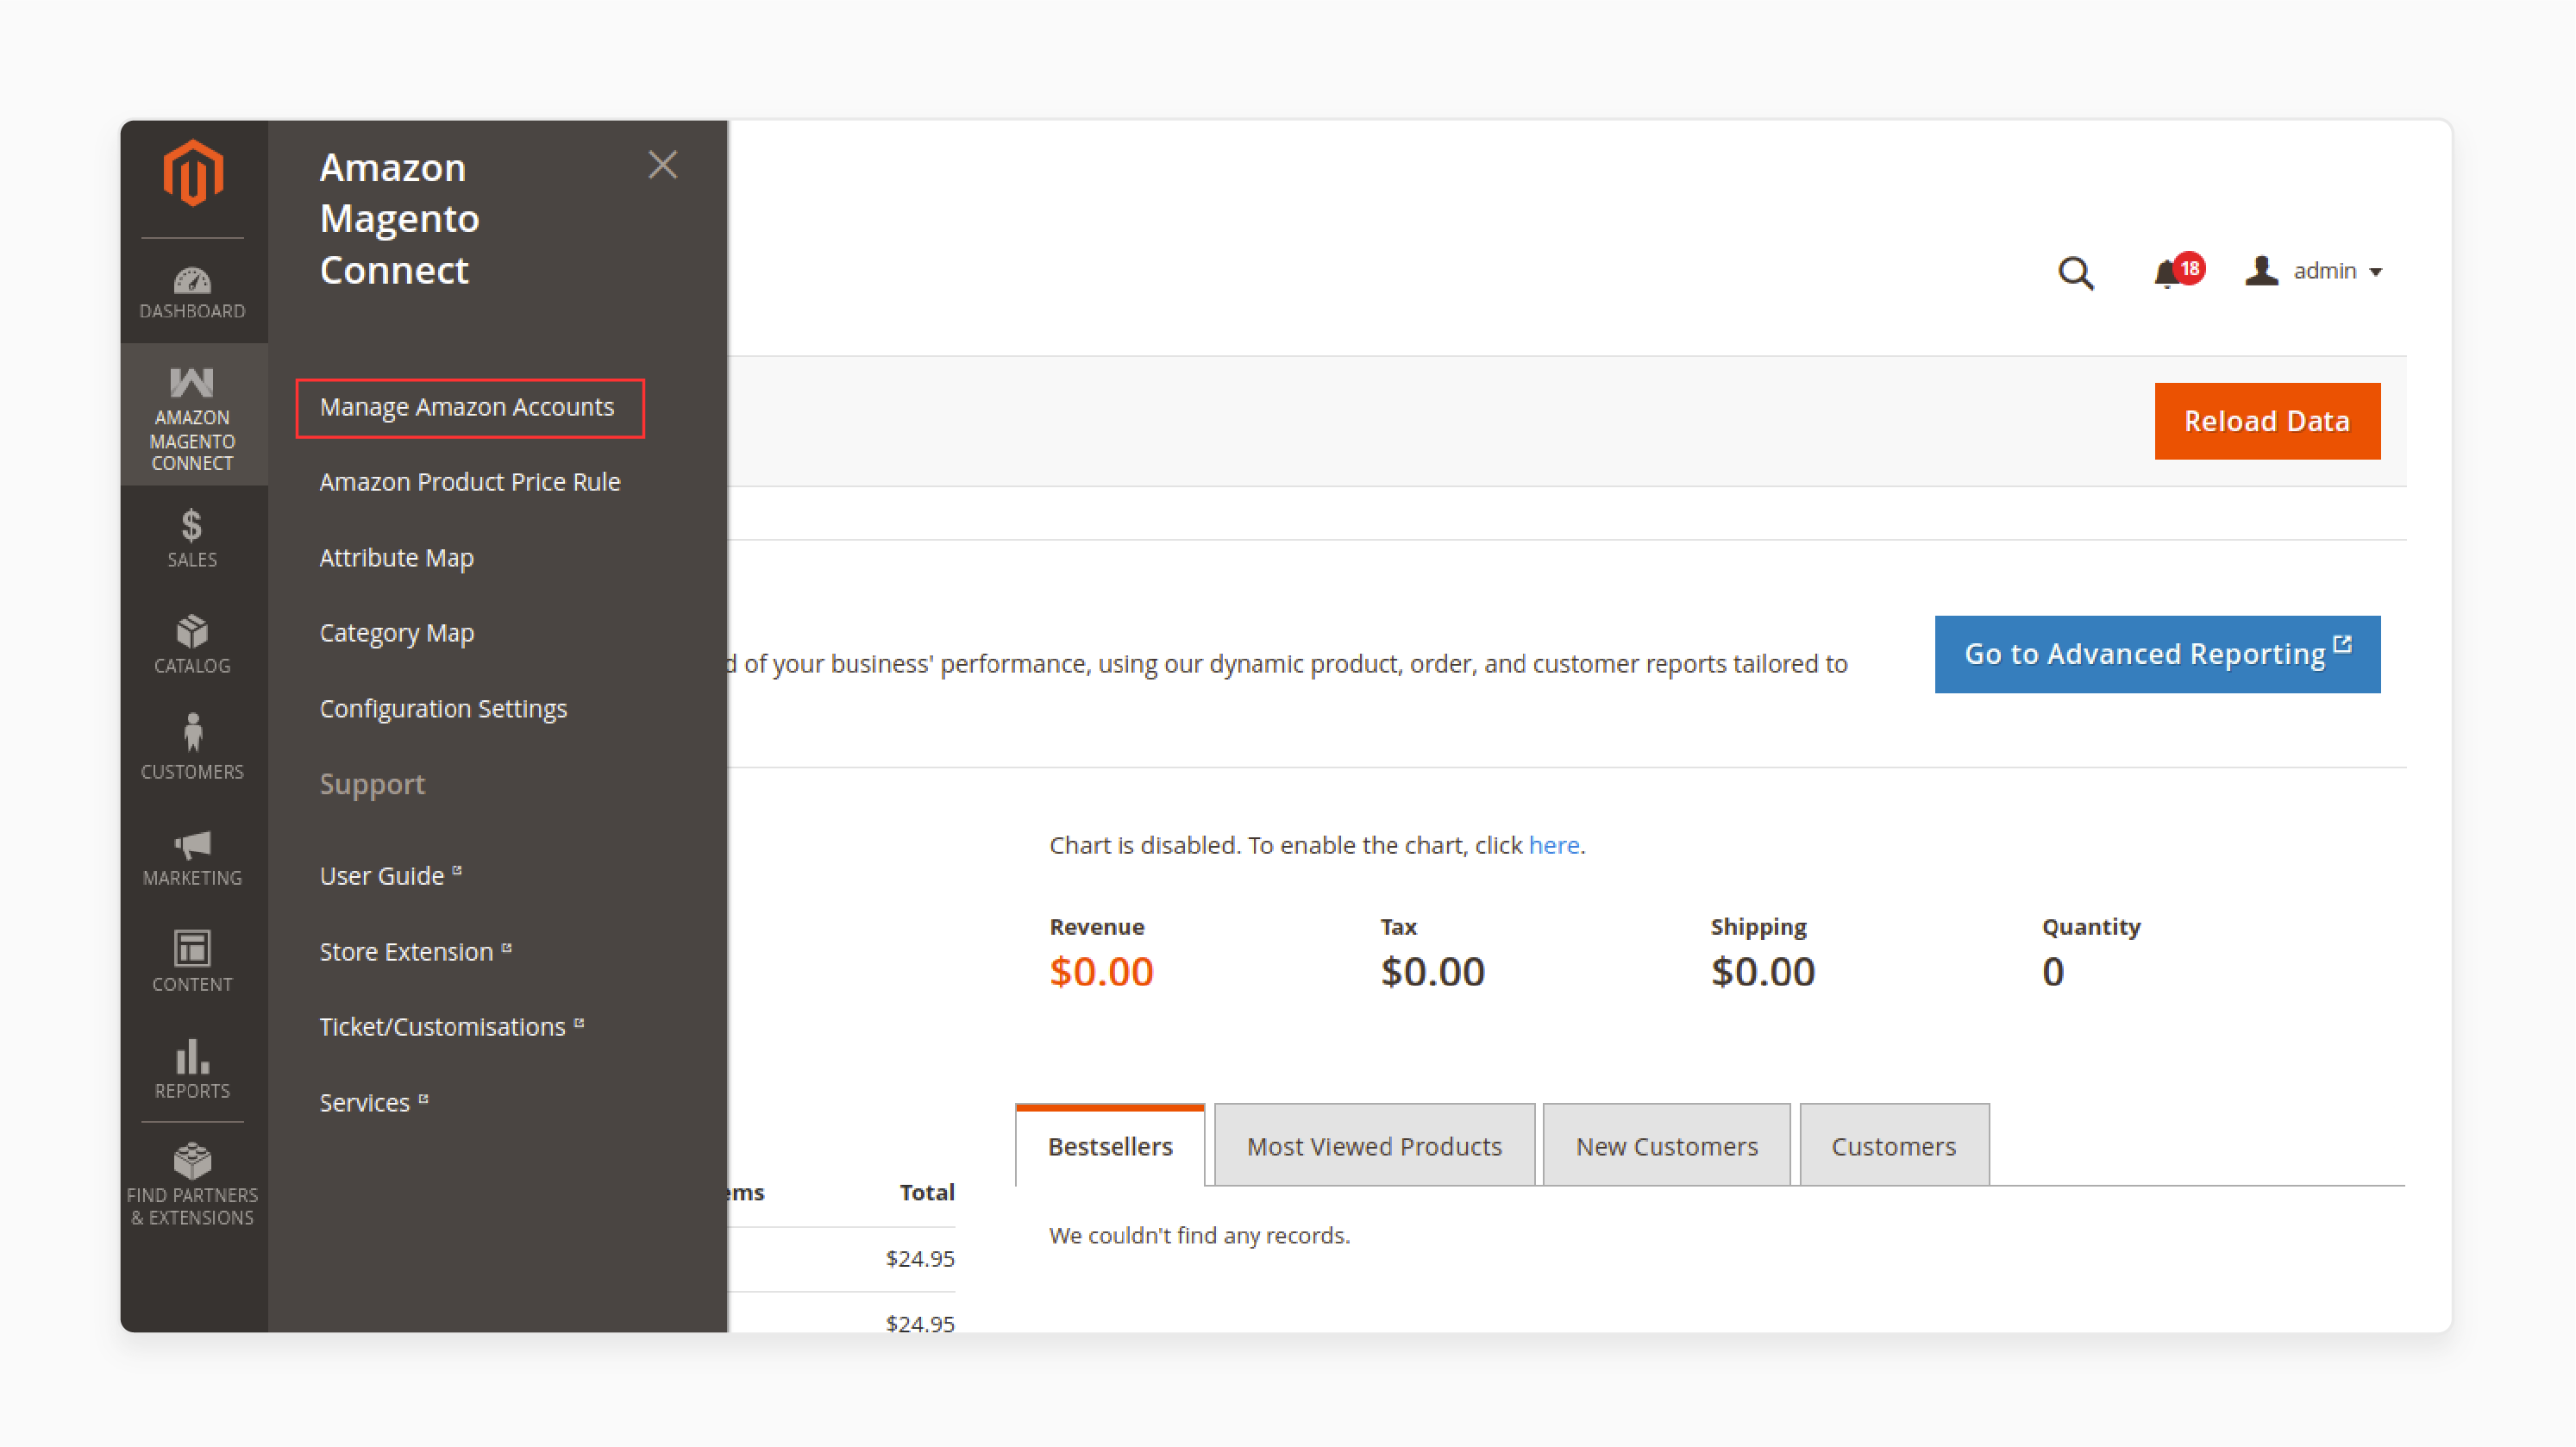
Note: You can manage and add Amazon accounts.
- Upon clicking on 'Manage Amazon Accounts', a page will open with a list of Amazon accounts.
For example:
- Store Name
- Amazon Marketplace
- Seller ID
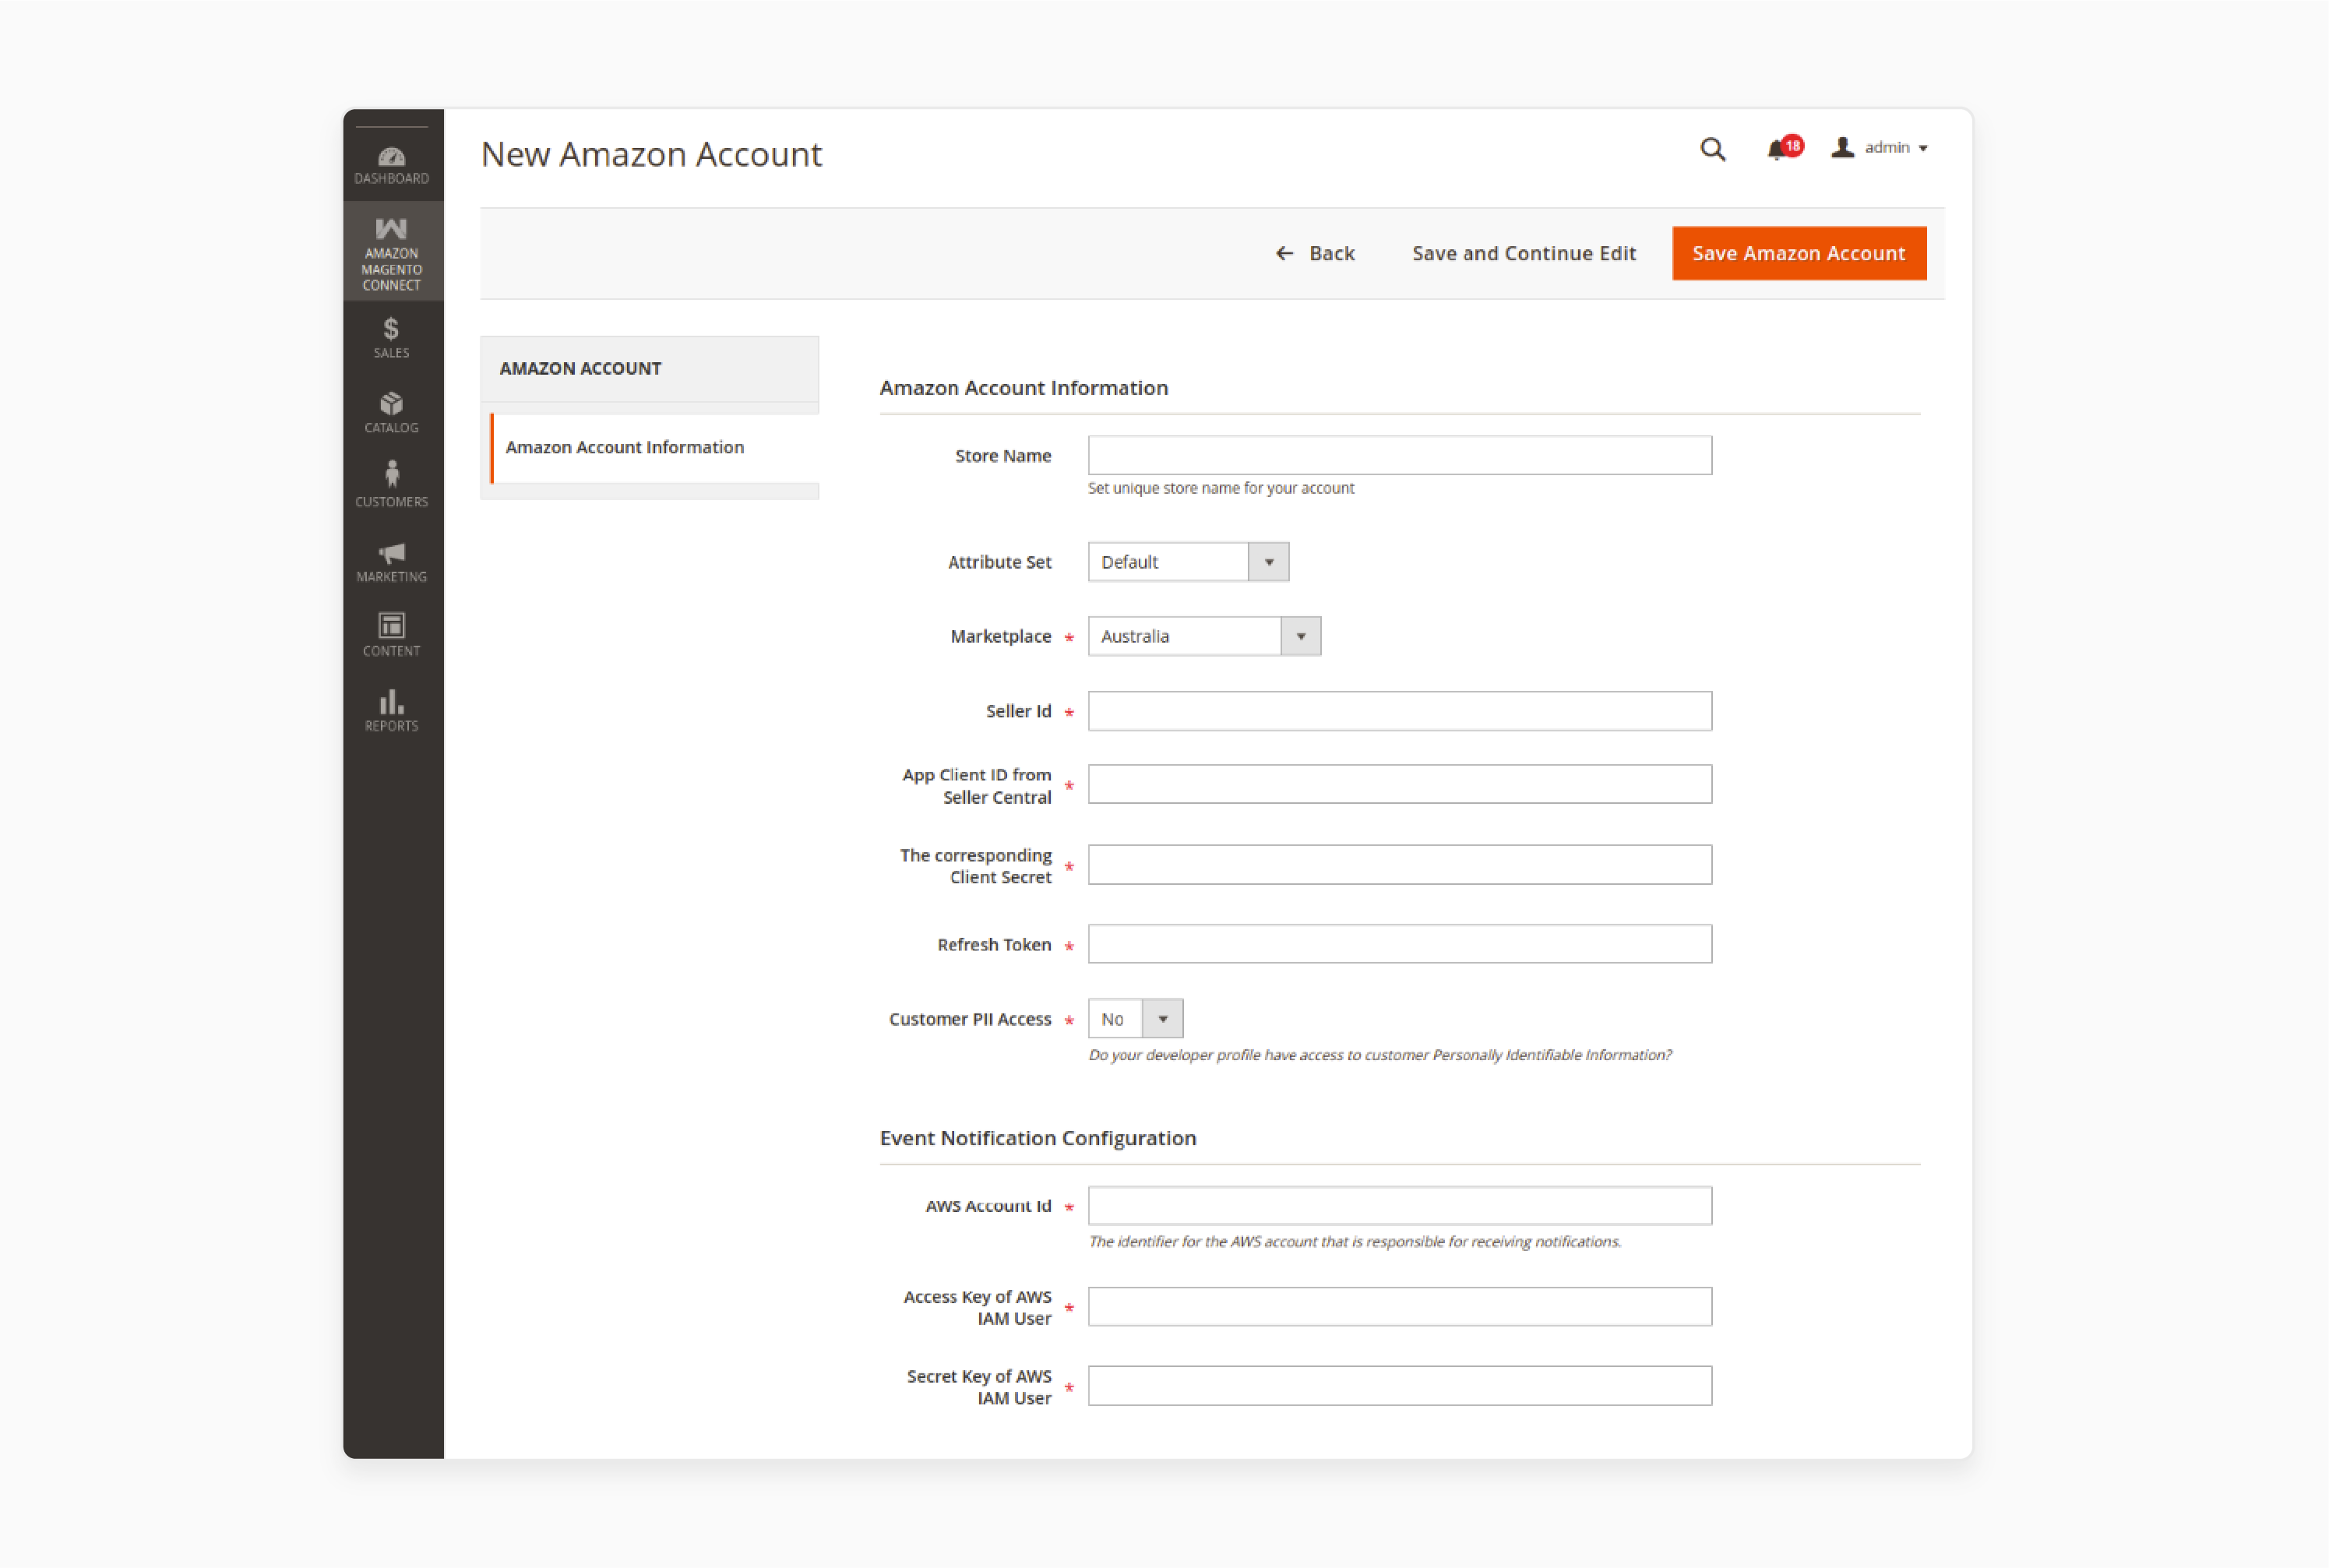
- On this page, the admin can:
- Edit: Modify the Amazon account details.
- Delete: Remove an existing Amazon account from the list.
- Add Amazon Seller Account: Create a new Amazon account.
- Click on 'Add Amazon Seller Account' for the admin to visit the New Amazon Account page.
Here, the admin will enter:
- Store Name: Enter the store name.
Note: This cannot be changed once saved in the Magento store.
- Attribute Set: Select the "attribute set" for the imported product.
- Marketplace: Choose the "marketplace" from the drop-down list.
- Seller ID (Merchant Token): Enter the "Seller ID" from Seller Central.
- App Client ID: Enter the "App Client ID" from Seller Central.
- Client Secret: Enter the corresponding "Client Secret".
- Refresh Token: Enter the "Refresh Token" received from Amazon Seller Central.
- Customer PII Access: Select "yes" or "no" if your developer profile has access to customer Personally Identifiable Information.
- AWS Account ID: Enter the "AWS Account ID" of the user.
- AWS IAM User Access Key: Enter the "access key" of the AWS IAM user.
- AWS IAM User Secret Key: Enter the "secret key" of the AWS IAM user.
- Click on the 'Save and Continue Edit' button.
2 Best Magento 2 Amazon Integration Extensions
1. Amazon Connector Extension for Magento 2 by Webkul
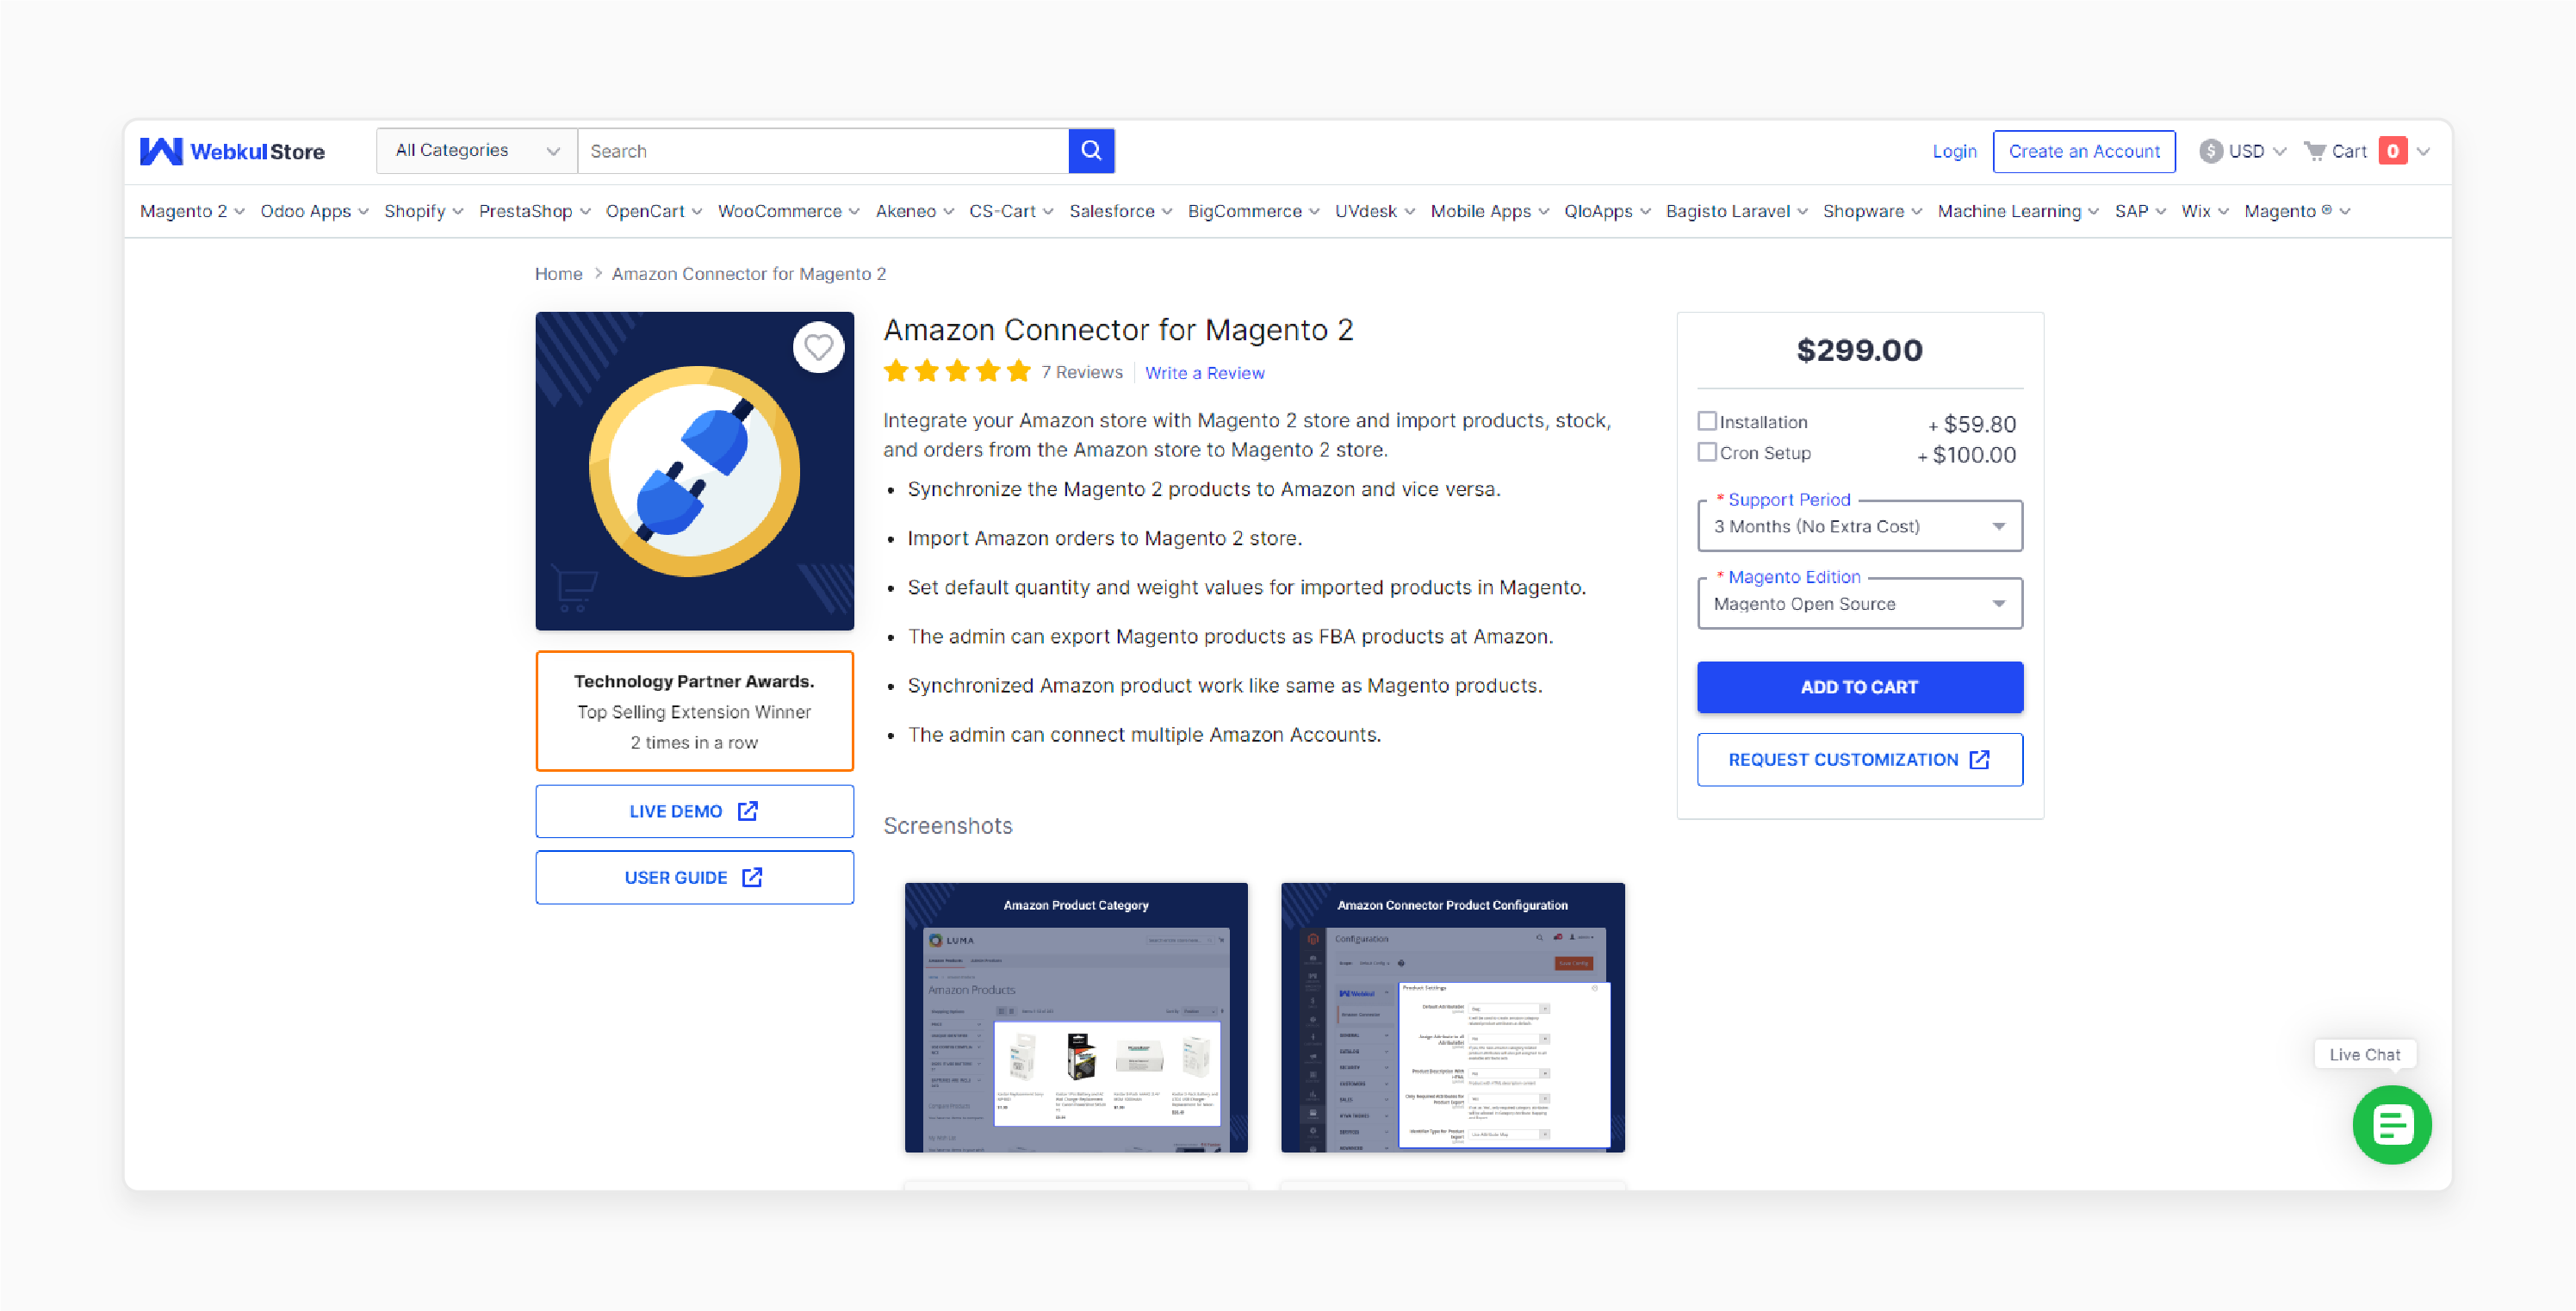
Webkul Amazon Connector Extension for Magento 2 integrates your Amazon store with Magento 2. You can import products, stock, and orders from Amazon into your Magento 2 store.
Features
- Synchronize products between Magento 2 and Amazon seamlessly.
- Set default quantity and weight values for products imported into Magento.
- Export Magento products as FBA products on Amazon.
- Synchronized Amazon products function the same as Magento products.
- Connect multiple Amazon accounts through the admin panel.
Pricing
- Magento Open Source Edition + 3-Month Free Support + Installation + Cron Setup- $458.80
- Adobe Commerce (on-premise) Edition + 6-Month Support + Installation + Cron Setup- $1,156.80
- Adobe Commerce (cloud) Edition + 12-Month Support + Installation + Cron Setup- $1,216.60
2. Magento Amazon Extension by CedCommerce
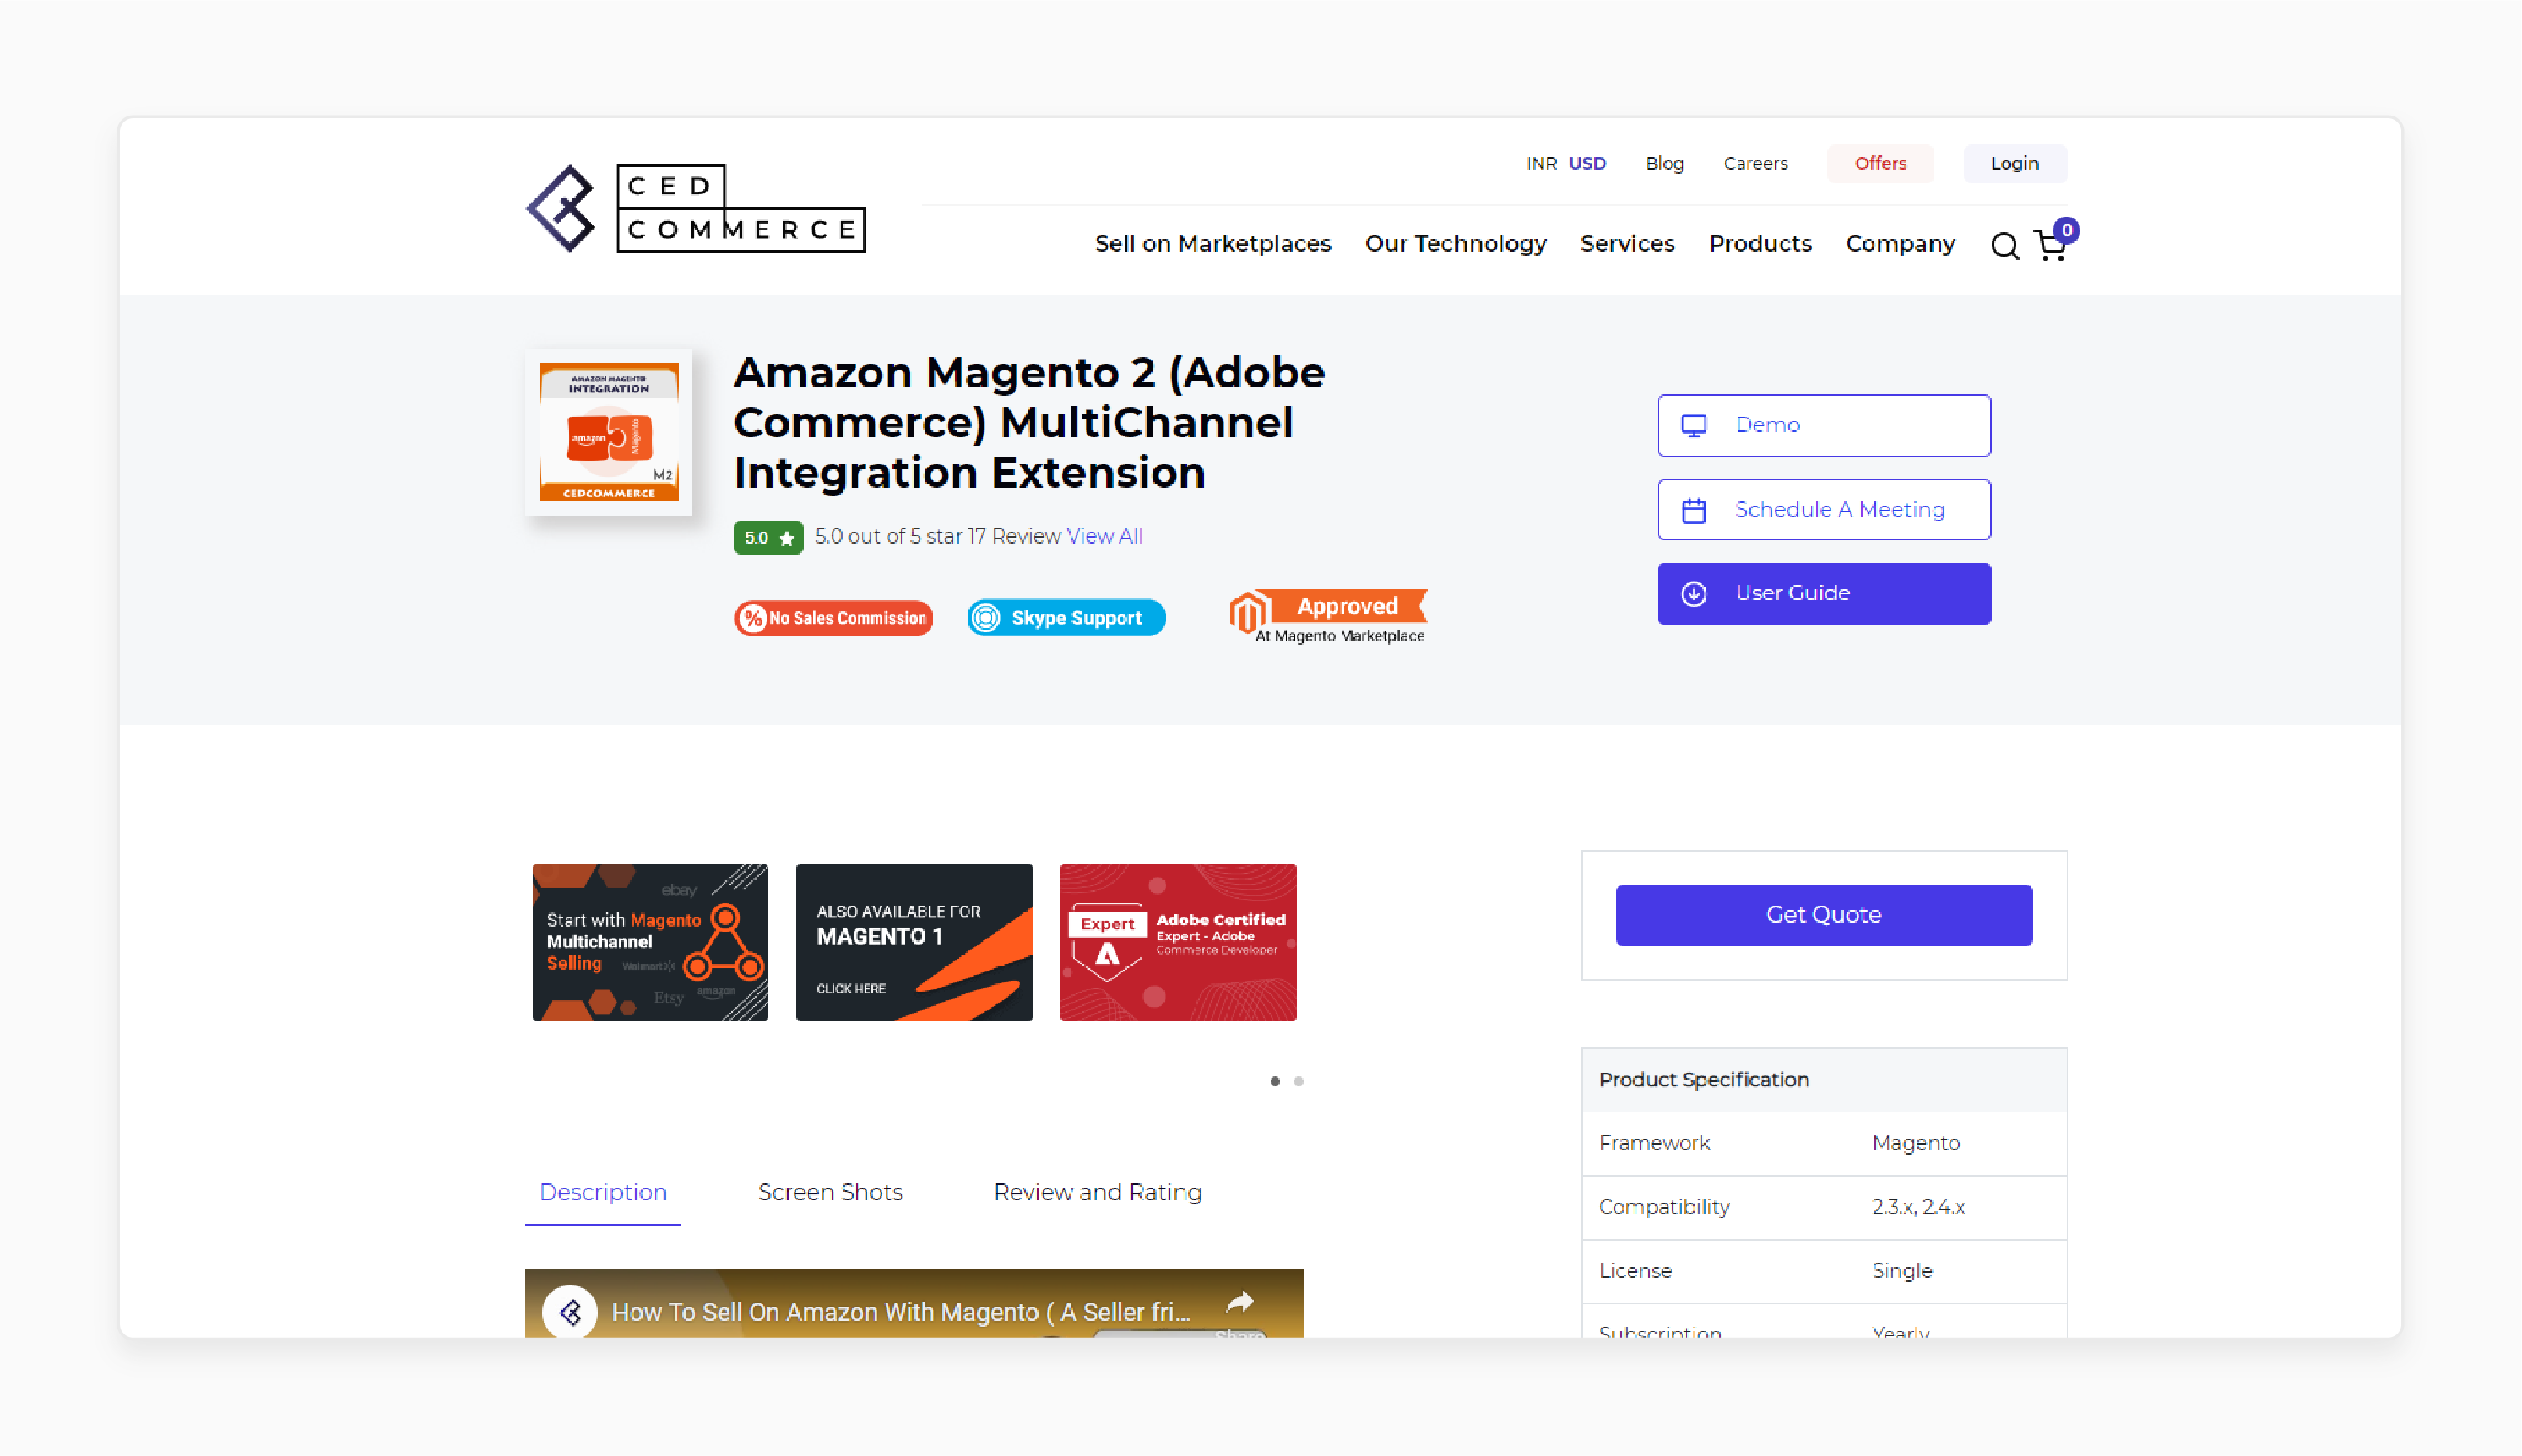
CedCommerce Magento Amazon Extension offers support and proper management of Amazon product feeds. They automatically update at regular intervals.
Features
- Connect and manage products and orders from multiple accounts simultaneously.
- Avoid manual listing of products one by one on the Amazon marketplace.
- Achieve real-time data updates to eliminate the possibility of errors.
- Improve conversion rates and sales with better product visibility.
- Track and sync order shipments between Amazon and Magento.
- Validate product information according to Amazon standards to reduce errors.
- Automate order importing and management with innovative eCommerce features.
- Map diverse categories and attributes from Magento to Amazon.
- Ensure products are categorized correctly and visible to the right audience on Amazon.
- Automatically fetch orders from Amazon to Magento using the cron scheduler.
- Maintain coordination between Amazon and Adobe Commerce store selling.
- Provide the option to store Personally Identifiable Information (PII) from Amazon.
- Decide whether to store customer information. For example, name, address, phone number, and email.
- Organize products in your store using product profiles.
- Map and upload profiles and associated products in bulk to Amazon.
Pricing
- Community Edition + Installation + Multi Account- $1,899.00
- Enterprise Edition + Installation + Multi Account- $2,399.00
- Cloud (ECE) Edition + Installation + Multi Account- $2,699.00
5 Steps To Create/Get Amazon Connector Extension Credentials
You must register as a Selling Partner API developer before registering your application. The registration process varies slightly based on the application type.
For private seller applications (available only to your organization and self-authorized), follow these steps:
Step 1: Register as a developer
- Sign in to your Amazon Seller Central Account.
Note: Use the credentials you want to associate with your developer account.
- Navigate to Partner Network > Develop Apps.
Note: Here, the Developer Central page appears.
- If you haven't completed a Developer Profile, choose 'Proceed to Developer Profile'. Otherwise, choose 'View Profile'.
- Complete the developer registration form.
Now, follow the below steps:
- Enter your 'Contact Information'.
- From the Data Access dropdown, select 'Private Developer: I build application(s) that integrate my own company with Amazon Services APIs'.
- Select the relevant 'Roles' for your organization.
Note: Refer to Roles in the Selling Partner API for more information.
- Enter your 'Use Cases' and 'Security Controls'.
- Confirm that you have read and agree to the agreement and policies.
- Select 'Register'.
- Amazon will evaluate your information and may request additional details or documentation.
Note:
By default, select the roles:
- Brand Analytics
- Product Listing
- Pricing
- Amazon Fulfillment
- Buyer Communication
- Buyer Solicitation
- Selling Partner Insights
- Finance and Accounting
- Inventory and Order Tracking
To import buyer information and shipping addresses, you need access to Personally Identifiable Information (PII) and approval for roles. For example:
- Direct-to-Consumer Shipping
- Tax Remittance
- Tax Invoicing
Step 2: Check the Status of Your Developer Registration
After submitting your registration request, Amazon will review your information. It will then approve or deny your request. If denied, address the reasons provided and resubmit your Developer Profile.
To check the status, follow these steps:
- Sign in to 'Seller Central' with the credentials used for developer registration.
- Navigate to 'Develop Apps'.
- On the 'Developer Central page', follow the instructions in the "Your developer registration is under review" banner.
Note: The banner will update to reflect the status of your application.
Step 3: Register Your Application
Registering your application varies slightly based on the application type. For private seller applications (available only to your organization and self-authorized), follow these steps:
- Sign in to 'Seller Central' using the credentials used for developer registration.
- Navigate to Partner Network > Develop Apps.
Note: Here, the Developer Central page appears.
- Click on the 'Add new app client' button.
Note: Here, the App registration page appears.
- Complete the form to register your application.
Step 4: View Application Information and Credentials
Follow these steps to view information about your application and your Login with Amazon (LWA) credentials.
- Sign in to 'Seller Central' using the credentials used for developer registration.
- Navigate to Partner Network > Develop Apps.
Note: The Developer Central page displays information about your application(s).
- Click 'View' under LWA credentials for the desired application.
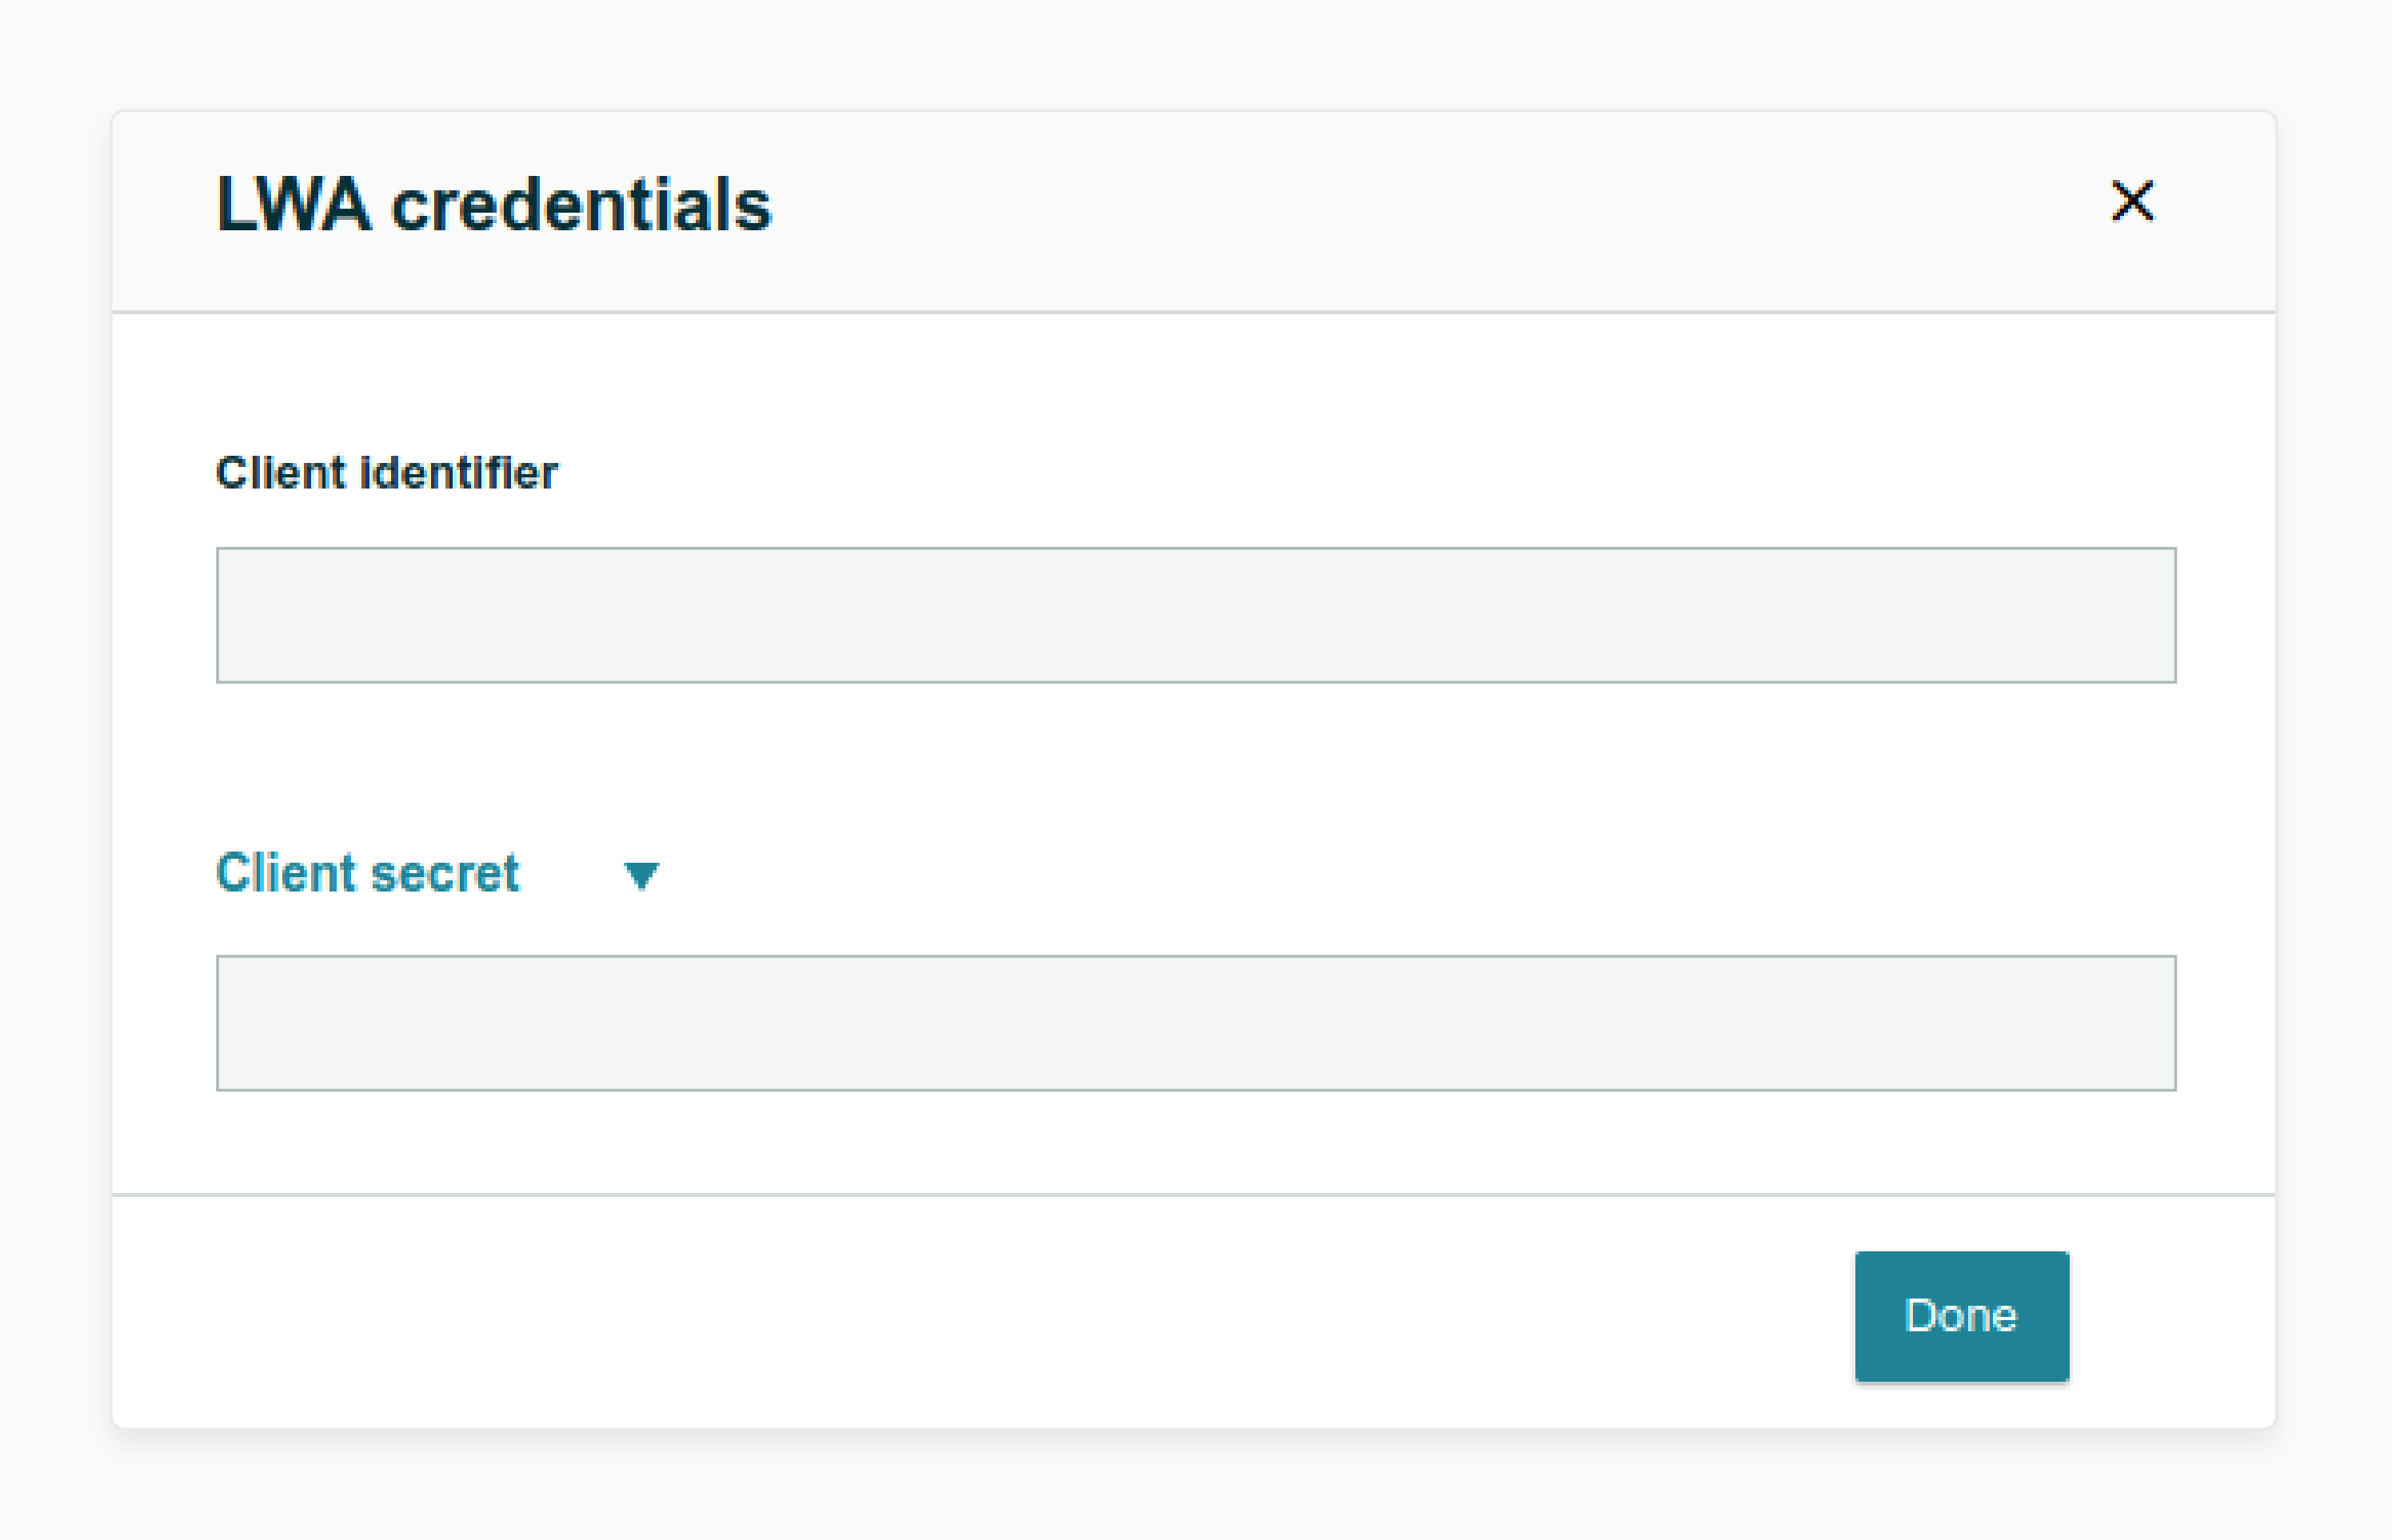
Note: Your LWA client identifier and client secret will appear. These are needed for module configurations.
Step 5: Self-Authorize Your Application (Seller Application)
For private applications (available only to your organization), you can self-authorize them to access your account information. You can register yourself as a developer and register your application.
- Sign in to 'Seller Central' using the credentials used for developer registration.
- Navigate to Partner Network > Develop Apps.
Note: The Developer Central page appears.
- On the Developer Central page, select the arrow next to 'Edit App'.
Note: You need to do this for the application you want to authorize.
- Select 'Authorize'.
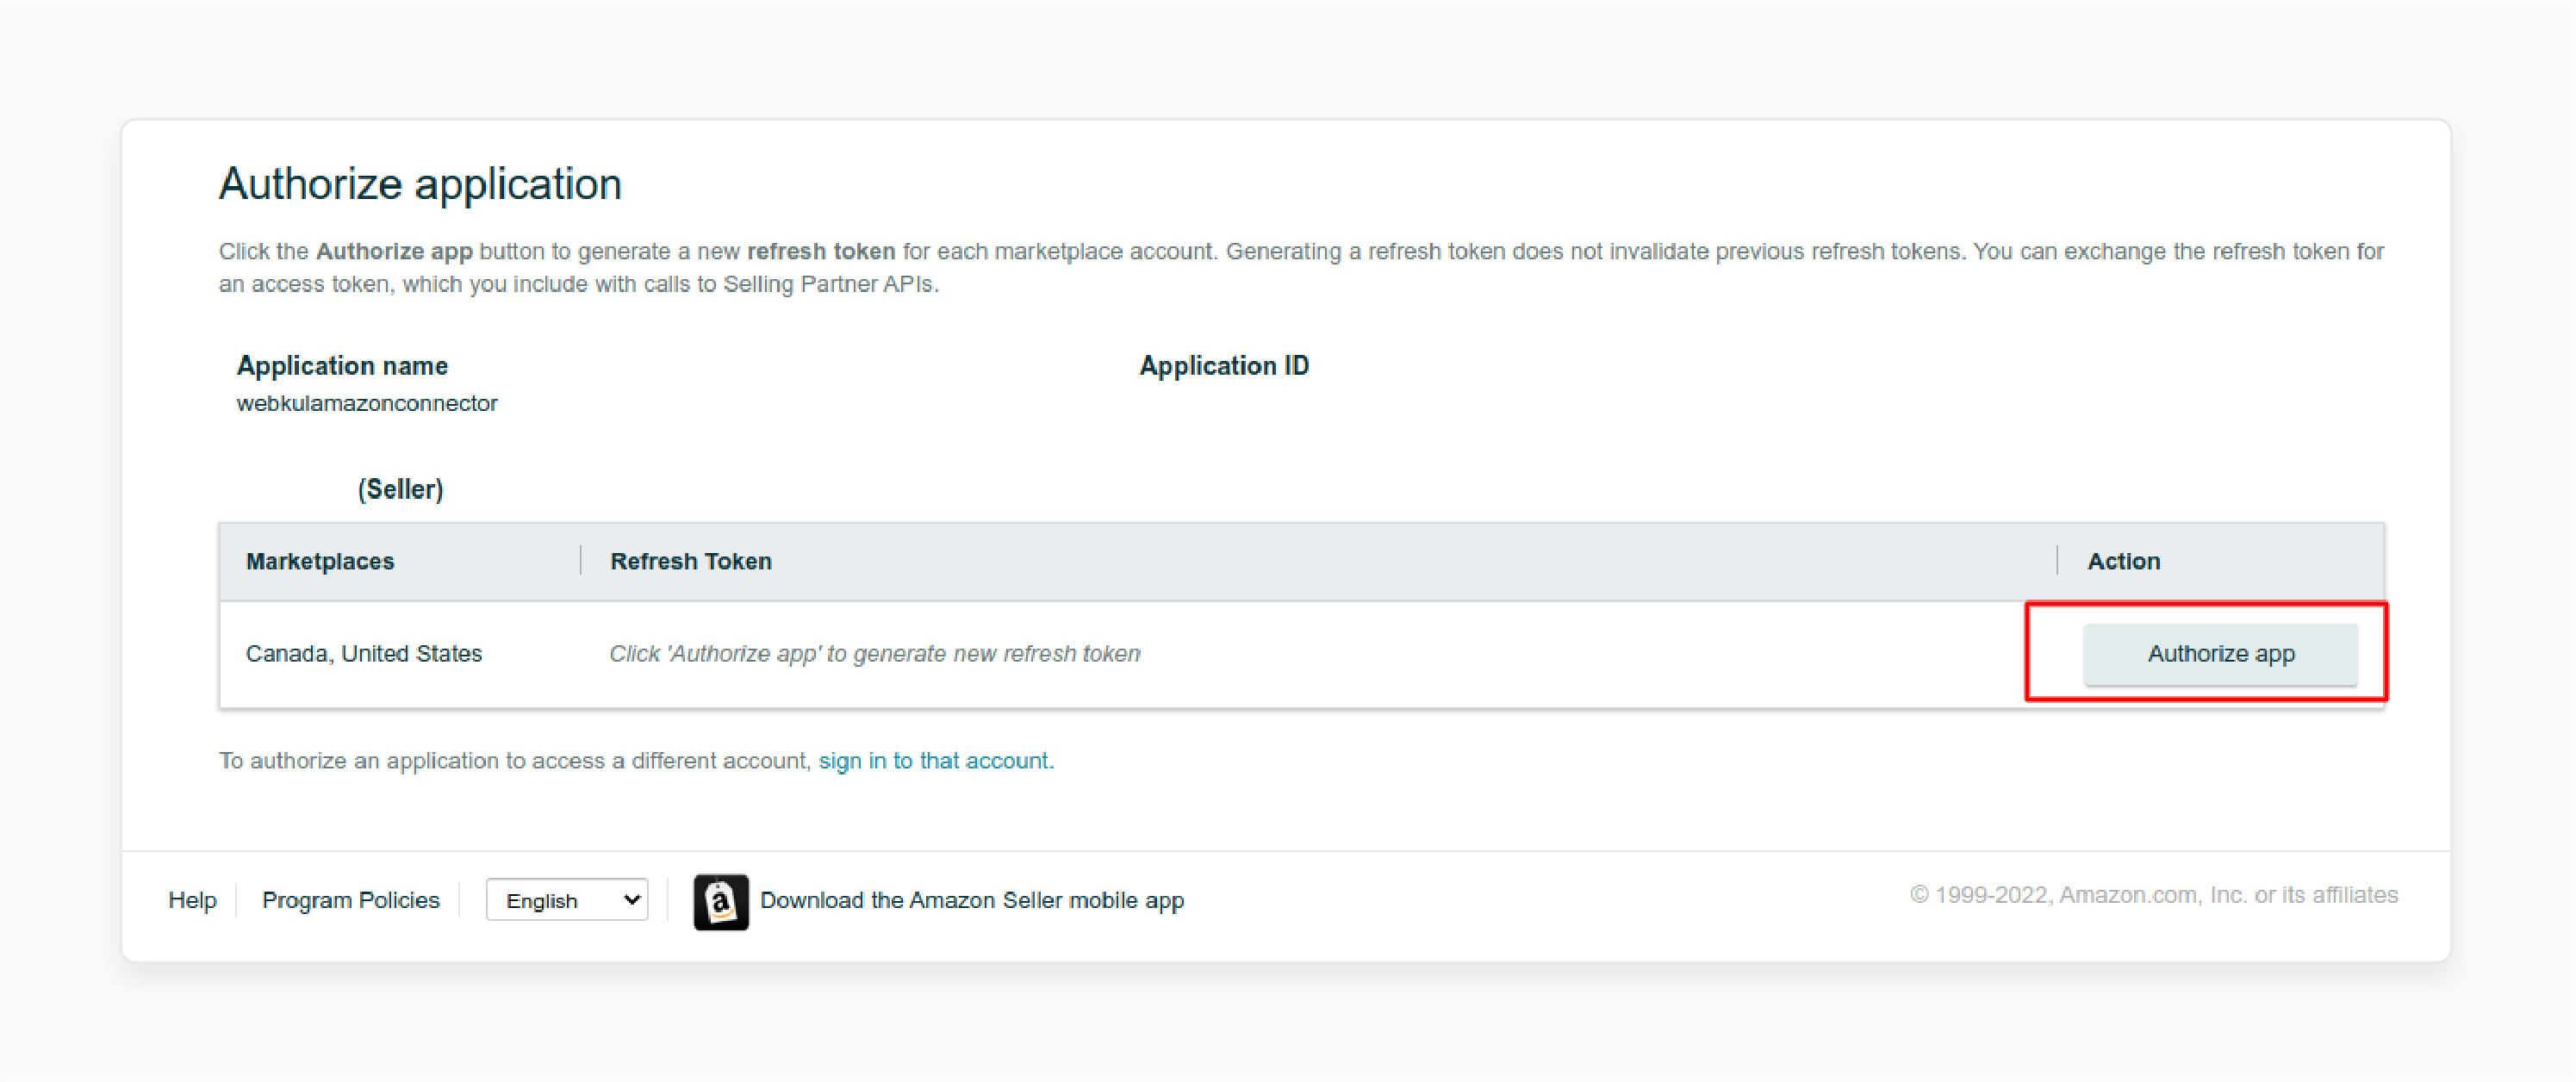
- Choose 'Authorize app' on the Authorize application page. You need to do this for each selling partner account that you want your application to access.
Note: The Marketplaces column indicates active marketplaces for each account.
- A Login with Amazon (LWA) refresh token appears each time you choose 'Authorize app'.
- Keep this LWA refresh token, as it will be used in module configuration.
Note:
- If your selling partner account is merged with accounts in other regions, you will see an Authorize app button for each of your merged accounts.
- Generating a new refresh token does not invalidate previous refresh tokens. Keep the token safe for module configuration.
How Does Magento 2 Amazon Integration Affect Order Management?
| Order Management Feature | Magento 2 Amazon Integration |
|---|---|
| Order Synchronization | Automatically synchronize orders between Magento 2 and Amazon. |
| Order Fulfillment | Fulfill orders from both platforms in a single dashboard. |
| Order Tracking | Track orders and shipments across both platforms. |
| Order Cancellation | Cancel orders and update inventory levels in real-time. |
| Refund and Return Management | Manage refunds and returns across both platforms. |
| Manual Integration | Manually integrate Magento 2 and Amazon using APIs and coding. |
| Third-party extensions | Use third-party extensions to integrate Magento 2 and Amazon. |
| Native Integration | Use Magento 2's native integration with Amazon to connect the two platforms. |
How To Integrate Amazon With Magento Amazon While Module Configuration?
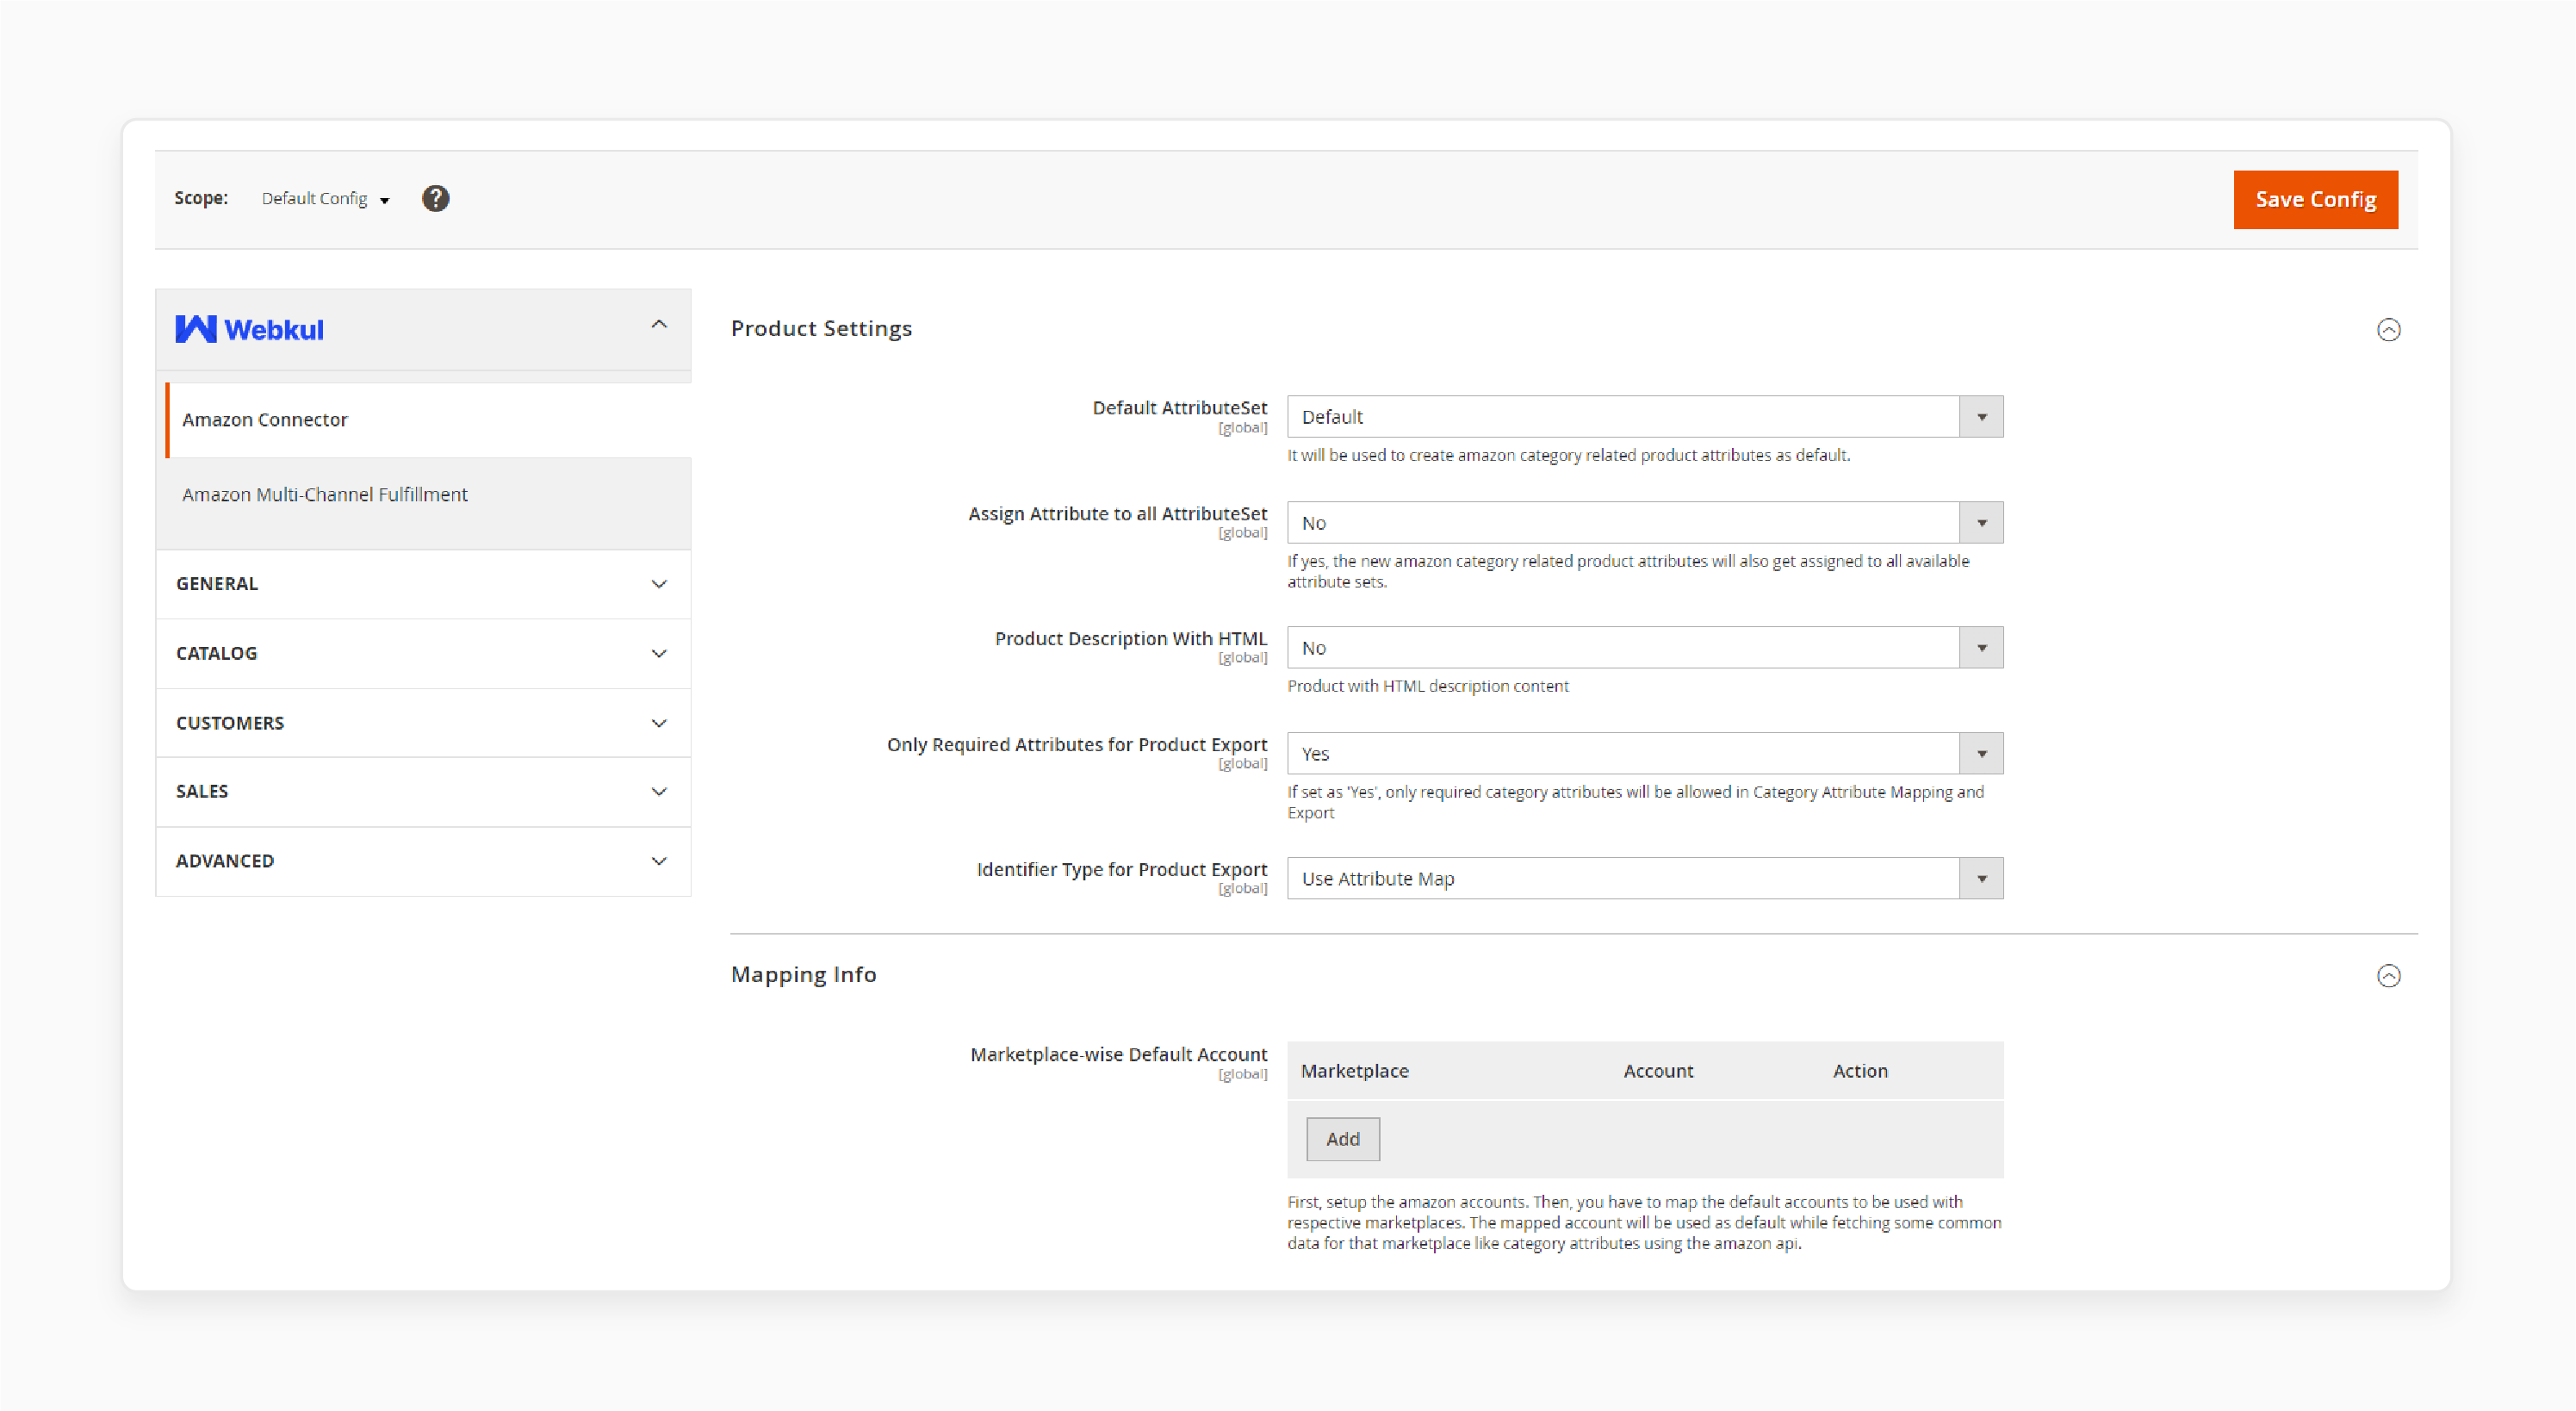
- Navigate to Store > Configuration > Amazon Connector.
Check the example below to configure product settings:
- Default Attribute Set: Used to create Amazon category-related product attributes by default.
- Assign Attribute to all AttributeSet: If set to "Yes," new Amazon category-related product attributes will be assigned to all available attribute sets.
- Product Description With HTML: Allows products to include HTML description content**.**
- Only Required Attributes for Product Export: If set to "Yes," only required category attributes will be allowed in 'Category Attribute Mapping and Export'.
- Identifier Type for Product Export: Choose an identifier type for product export.
- Marketplace-wise Default Account: Select the default account for each marketplace by tapping the 'Add button' as needed.
Note: First, set up the Amazon accounts. Then, map the default accounts to their respective marketplaces. The mapped account will be used as the default for fetching common data. For example, category attributes, using the Amazon API.
Troubleshooting Common Issues With Amazon Integration For Magento
| Issue | Solution |
|---|---|
| Product Sync Errors | - Check your category mapping and product data to ensure accuracy. - Verify your product titles, descriptions, and images are consistent across both platforms. - Ensure that your product variations and options are properly configured. |
| Order Import Failures | - Verify your API connection and settings to ensure a stable connection. - Check that your Amazon seller account is properly linked to your Magento store. - Ensure that your order import settings are correctly configured. Examples include order status and payment methods. |
| Inventory Discrepancies | - Set up real-time sync and regular checks to ensure inventory levels are accurate. - Implement an inventory management system. - Track and update inventory levels across both platforms. - Use Amazon's Fulfillment by Amazon (FBA) service. - Streamline inventory management and shipping. |
| Payment Processing Errors | - Verify that your payment processing settings are correctly configured. - Ensure that your payment gateway is compatible with Amazon's payment processing system. - Check that your payment processing fees are correctly calculated and applied. |
| Shipping and Fulfillment Errors | - Verify that your shipping settings are correctly configured. - Ensure that your shipping carriers and rates are properly set up. - Use Amazon's shipping and fulfillment services to streamline shipping and delivery. |
FAQs
1. How to handle product quantity updates when I import products from Amazon to my Magento 2 store?
When you import products from Amazon, the integration syncs the quantity that exists in Magento with the Amazon inventory. Amazon connector performs real-time updates. So, changes in quantity occur in Magento 2 store after every sale or inventory adjustment. It ensures accurate stock levels across both platforms as you sell on Amazon. Manage how the integration handles scenarios where products exist in Magento but not on Amazon or vice versa.
2. Can I import and export products from my Magento store to Amazon?
An admin can export the Magento store products to Amazon. This process is different from importing products from the Amazon store. When exporting, send product data stored in Magento 2 database to the Amazon seller panel. It allows you to list your existing Magento products on Amazon's marketplace. The export process involves selecting the products you want to list. You can then map your Magento attributes to Amazon's requirements. After this, you can push the data through the integration. However, importing products from Amazon brings new items into your Magento catalog. Both processes are essential for maintaining a synchronized inventory across platforms. Examples include Amazon and your Magento online store.
3. Can a Magento Amazon plugin handle integration with other marketplaces like eBay?
Many Magento Amazon plugins focus on integration between Magento 2 to Amazon. Some advanced extensions do offer multi-marketplace support. Examples include Amazon and eBay. These plugins allow you to map categories on Amazon imported to Magento. However, each marketplace has its own unique requirements and attributes. Choose a plugin that specifically offers multi-channel capabilities. Ensure proper category mapping and attribute synchronization across all platforms.
4. How to use Amazon Web Services to handle quantity discrepancies between platforms?
Quantity synchronization is essential to integrate Amazon stores with the Magento 2 platform. Use Amazon Web Services (AWS) to facilitate real-time updates for your Magento 2 store. When orders are received on your Amazon seller account, it automatically adjusts the quantity on the Amazon store to its Magento 2 inventory. Similarly, orders in your Magento store will update the Amazon stock levels. This two-way sync helps prevent overselling. Regularly audit your inventory across both platforms to ensure accuracy. You can buffer quantities using the Magento Amazon connectors. It helps to prevent discrepancies between the two systems.
Summary
Magento 2 Amazon Integration syncs product listings, orders, and inventory between Amazon and Magento 2. It helps users to:
- Manage products, orders, and inventory across both platforms with ease.
- Manage both stores from a single platform.
- Sync data to reduce errors.
- Boost sales with integrated management.
- Streamline your eCommerce operations.
Integrate your Magento 2 store with Amazon with managed Magento hosting for integrated e-commerce solutions.


