
Magento 2 Add Shipping Carrier: Features and Common Issues
Are you looking to enhance your store's shipping options? Magento 2 Add Shipping Carrier lets you add flexible shipping methods to your store. It helps to give customers more delivery options.
This tutorial will cover how to set up and customize a shipping carrier for stores.
Key Takeaways
-
Create custom delivery options tailored to your business.
-
Integrate popular carriers like UPS, FedEx, and DHL.
-
Steps to set up free delivery options and configure handling fees.
-
Enable custom tracking and automate carrier selection.
-
Address common issues when adding shipping carriers.
-
4 Steps to Create a New Custom Shipping Carrier in Magento 2
-
7 Steps to Add a Custom Shipping Carrier Tracker in Magento 2
-
Common Issues When Trying to Add Shipping Carrier in Magento
What is Magento 2 Add Shipping Carrier?
Magento 2 Add Shipping Carrier is a core functionality. It allows store owners to integrate and manage different shipping providers.
Magento 2 Add Shipping Carrier allows you to connect external carriers. It includes UPS, FedEx, or USPS to your online stores. This gives your customers more dispatch options to choose from. You can set up Magento 2 shipping carriers to calculate shipping charges. It is based on weight, size, and destination and streamlines the dispatch process. You can also configure options like flat-rate shipping or table-rate shipping.
Magento makes it easy to add a custom shipper and manage it through a shipping setup.
Understanding Magento 2 Add Shipping Carrier Features
1. Carrier Integration
Magento integrates multiple shipping carriers for businesses. It helps store owners offer different delivery options based on their business and customer needs. For example, a business selling electronics uses UPS for local U.S. shipping. It allows customers to pick the best option based on where they live.
2. Real-Time Shipping Charges
With Magento 2 shipping methods, you can show real-time dispatch rates during payment. The system calculates the dispatch cost based on the customer's location. For example, a customer in California may see a different dispatch fee than one in New York. It depends on their address and selected dispatch method. They choose the dispatch options and the size of the order.
3. Custom Dispatch Rates and Methods
Store owners can create custom fees to fit their business needs. It includes options like flat rate dispatch or rate table dispatch. For example, a small business selling handmade jewelry sets a flat rate dispatch fee of $5 for U.S. customers. This can be based on weight, size, or location. Magento automatically applies this fixed rate, making shipping simple for customers.
4. International Shipping Support
Magento allows businesses to offer international shipping with carriers. It lets merchants serve customers across the globe. They help to calculate shipping charges and handle international logistics. For example, a business selling outdoor equipment uses DHL to ship to Europe. When a customer from Germany checks out, Magento automatically calculates shipping fees.
5. Shipping Carrier Customization
You can configure each carrier to match your needs. It includes customizing delivery options, like adding free dispatch methods and setting delivery speeds. For example, a bookstore offers free dispatch on orders over $50. The stores set up the dispatch method, which automatically applies during payment.
6. Automated Carrier Selection
Magento automatically estimates dispatch methods and selects the best carrier. It is based on factors like location and order size. This makes payment faster for customers. For example, a store selling gadgets uses FedEx for urgent orders and USPS for regular ones. Adobe Commerce selects the best carrier for each order, streamlining the payment process.
7. Free Shipping Integration
You can easily set up free dispatch for orders that meet a limited purchase amount or as part of a promotion. The feature can boost customer satisfaction and drive higher sales. For example, a home goods store offers free dispatch on orders over $100. When a customer’s order reaches this amount, Adobe applies the delivery option. It encourages customers to add more to their cart.
8. Tracking and Notifications
Once shippers are set up, Magento 2 can send automatic tracking information to customers. It helps them to track their order status and improves transparency. This reduces customer inquiries. After the order is shipped, the customer receives an email with a tracking number. It also allows the customer to follow the shipment until it arrives.
List of Top 5 Shipping Carriers in Magento 2
1. UPS (United Parcel Service)
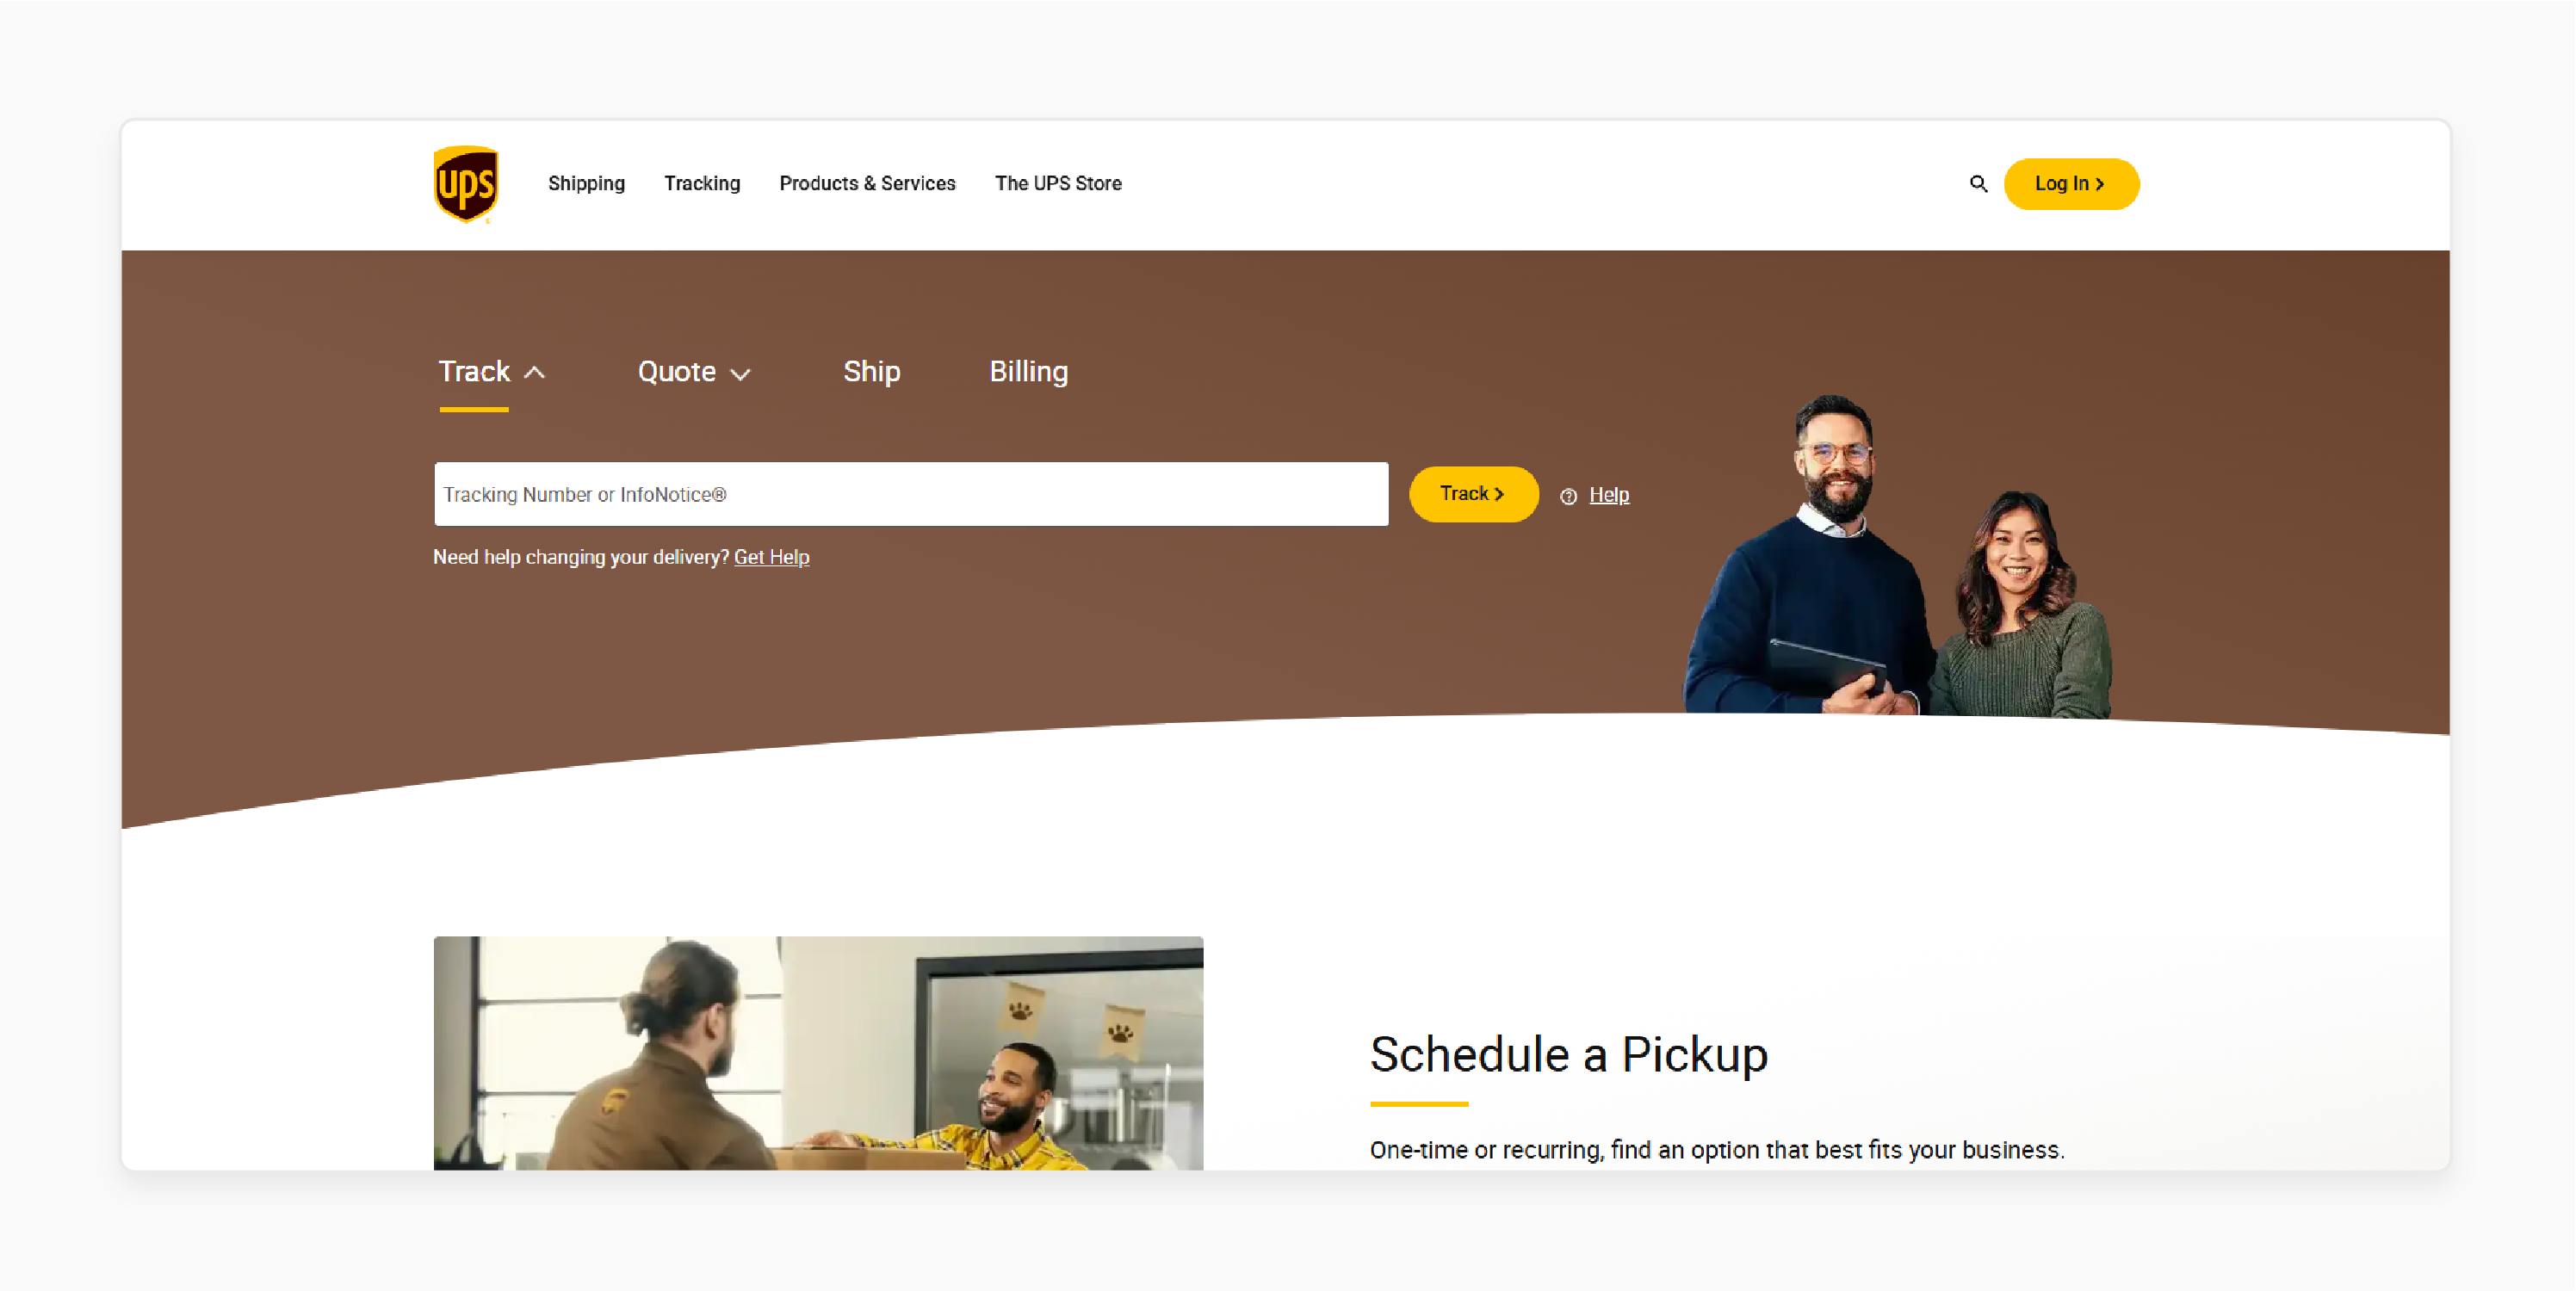
UPS is a well-known global carrier offering various delivery options. Businesses trust it for both domestic and international dispatch services. Merchants can easily integrate UPS.
Key Services:
-
Reliable shipping method in Magento for global delivery.
-
Fast and efficient international delivery service.
2. FedEx
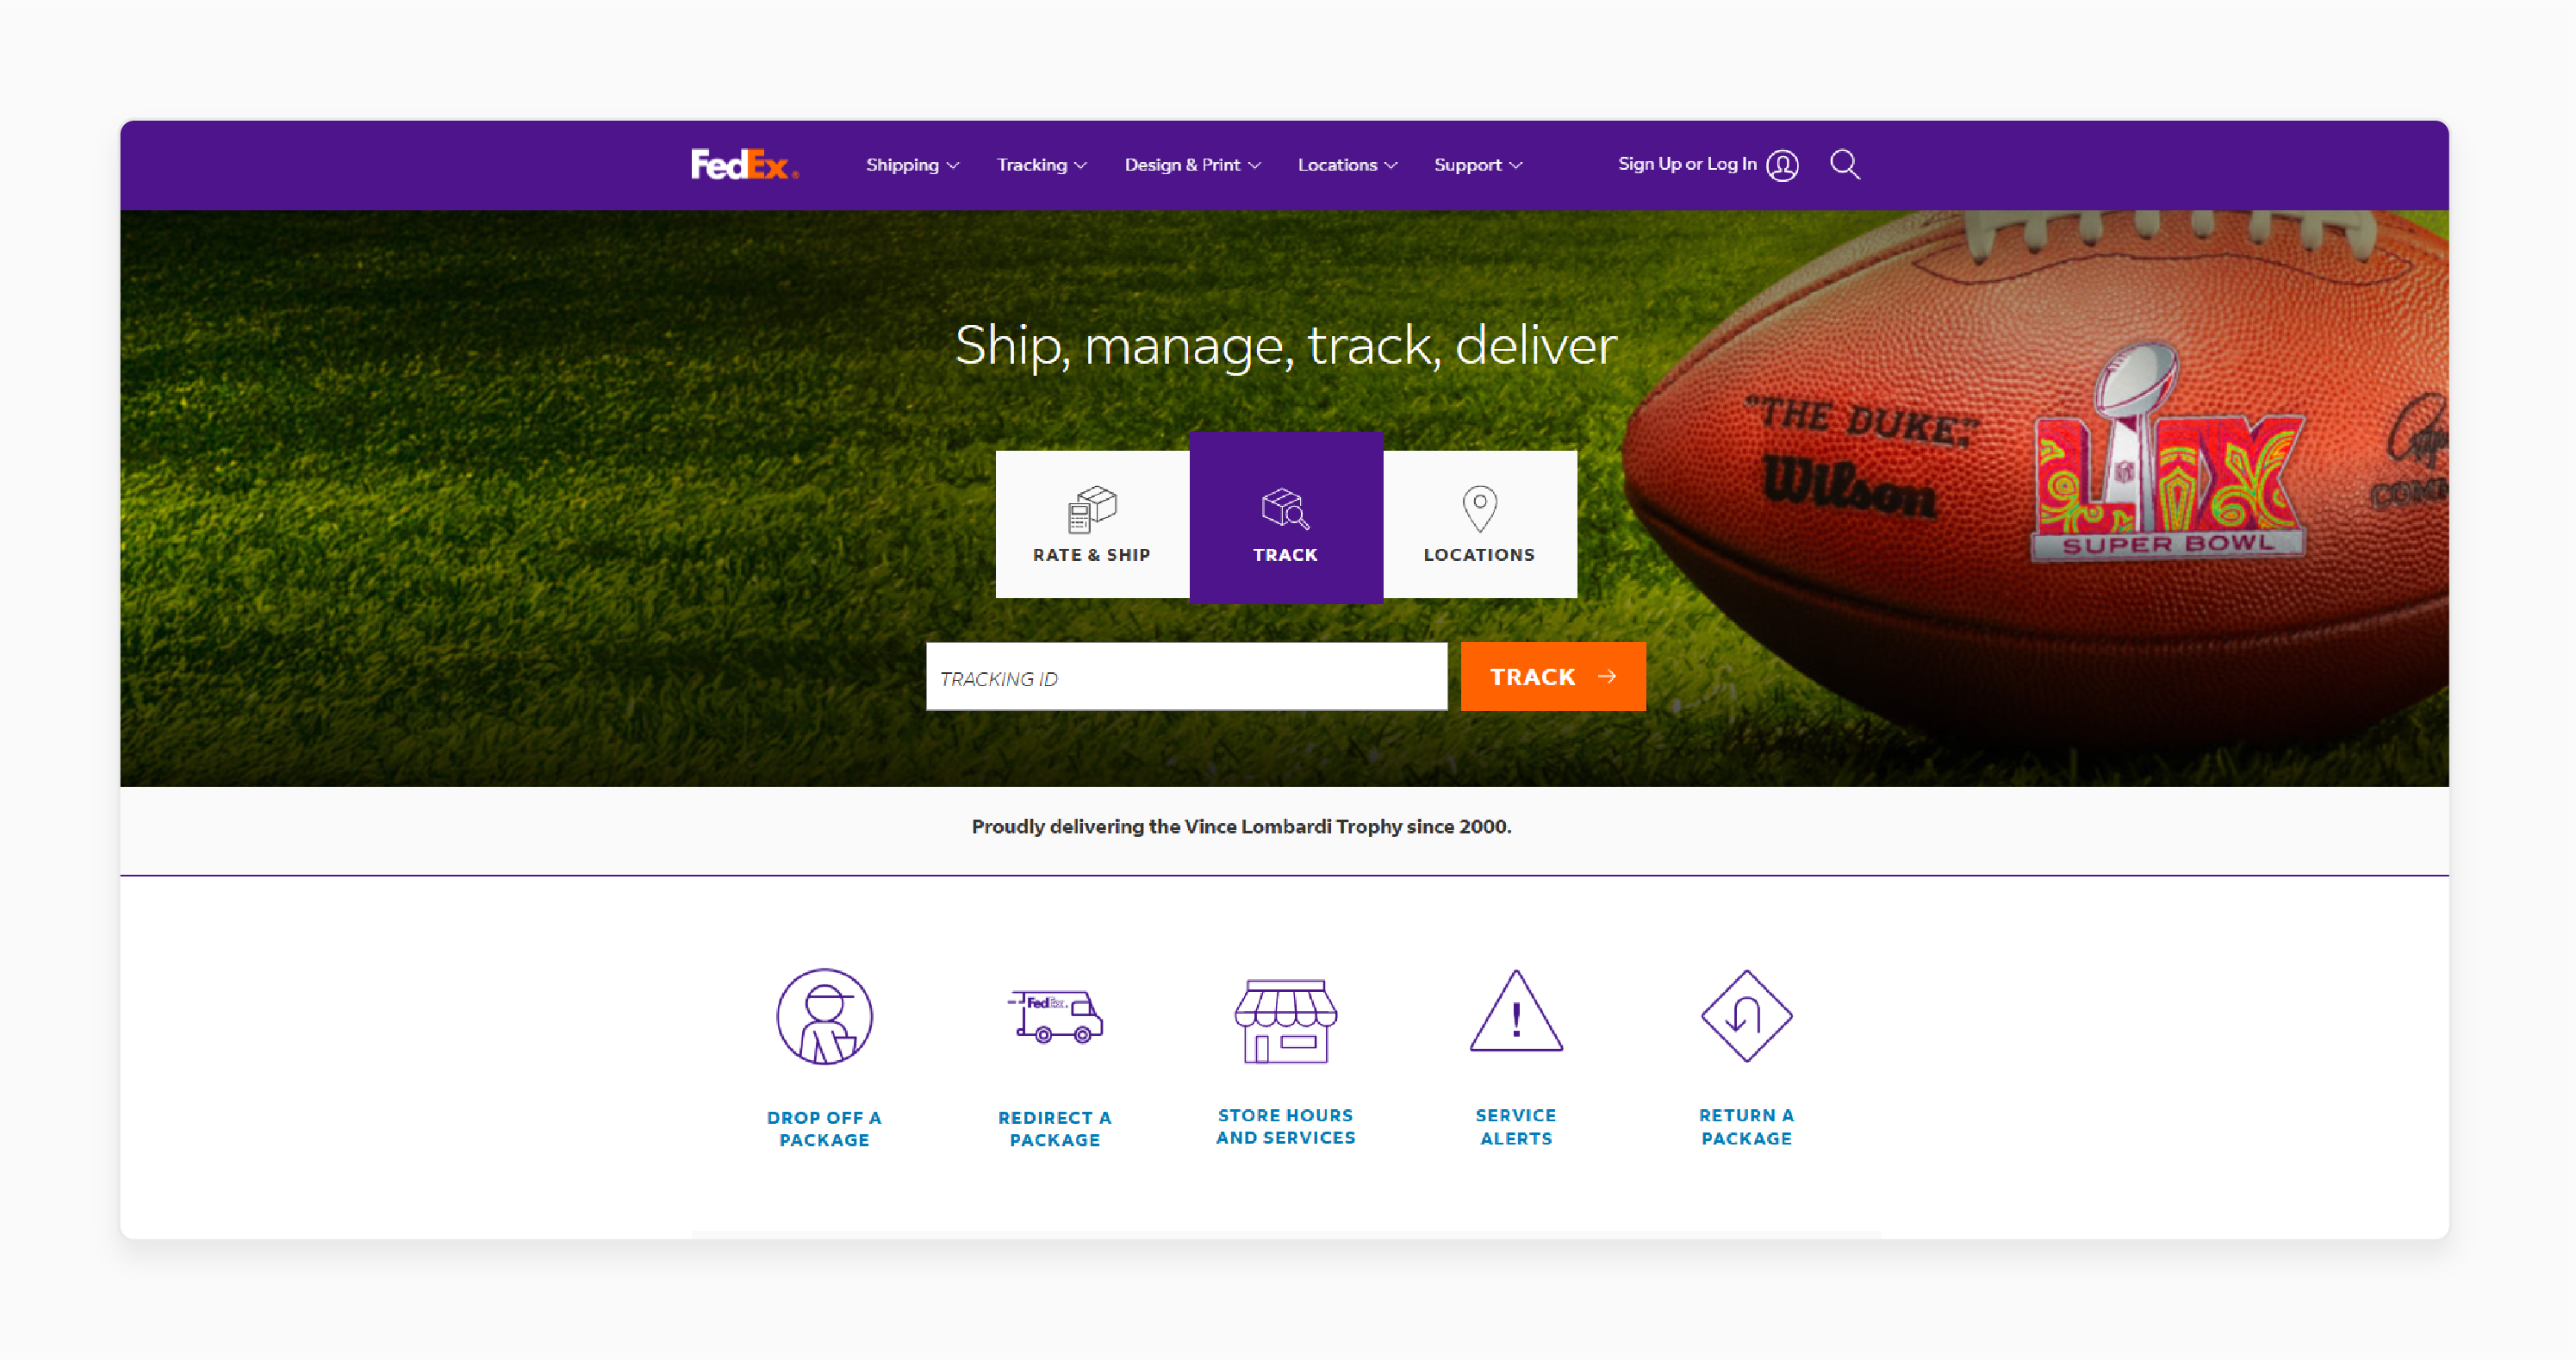
FedEx is recognized for its fast and dependable dispatch methods. It offers delivery solutions for businesses needing quick shipments. Integration with Magento allows store owners to configure dispatch options.
Key Services:
-
Delivery options for urgent shipments.
-
Detailed tracking and custom dispatch fees for international orders.
3. DHL
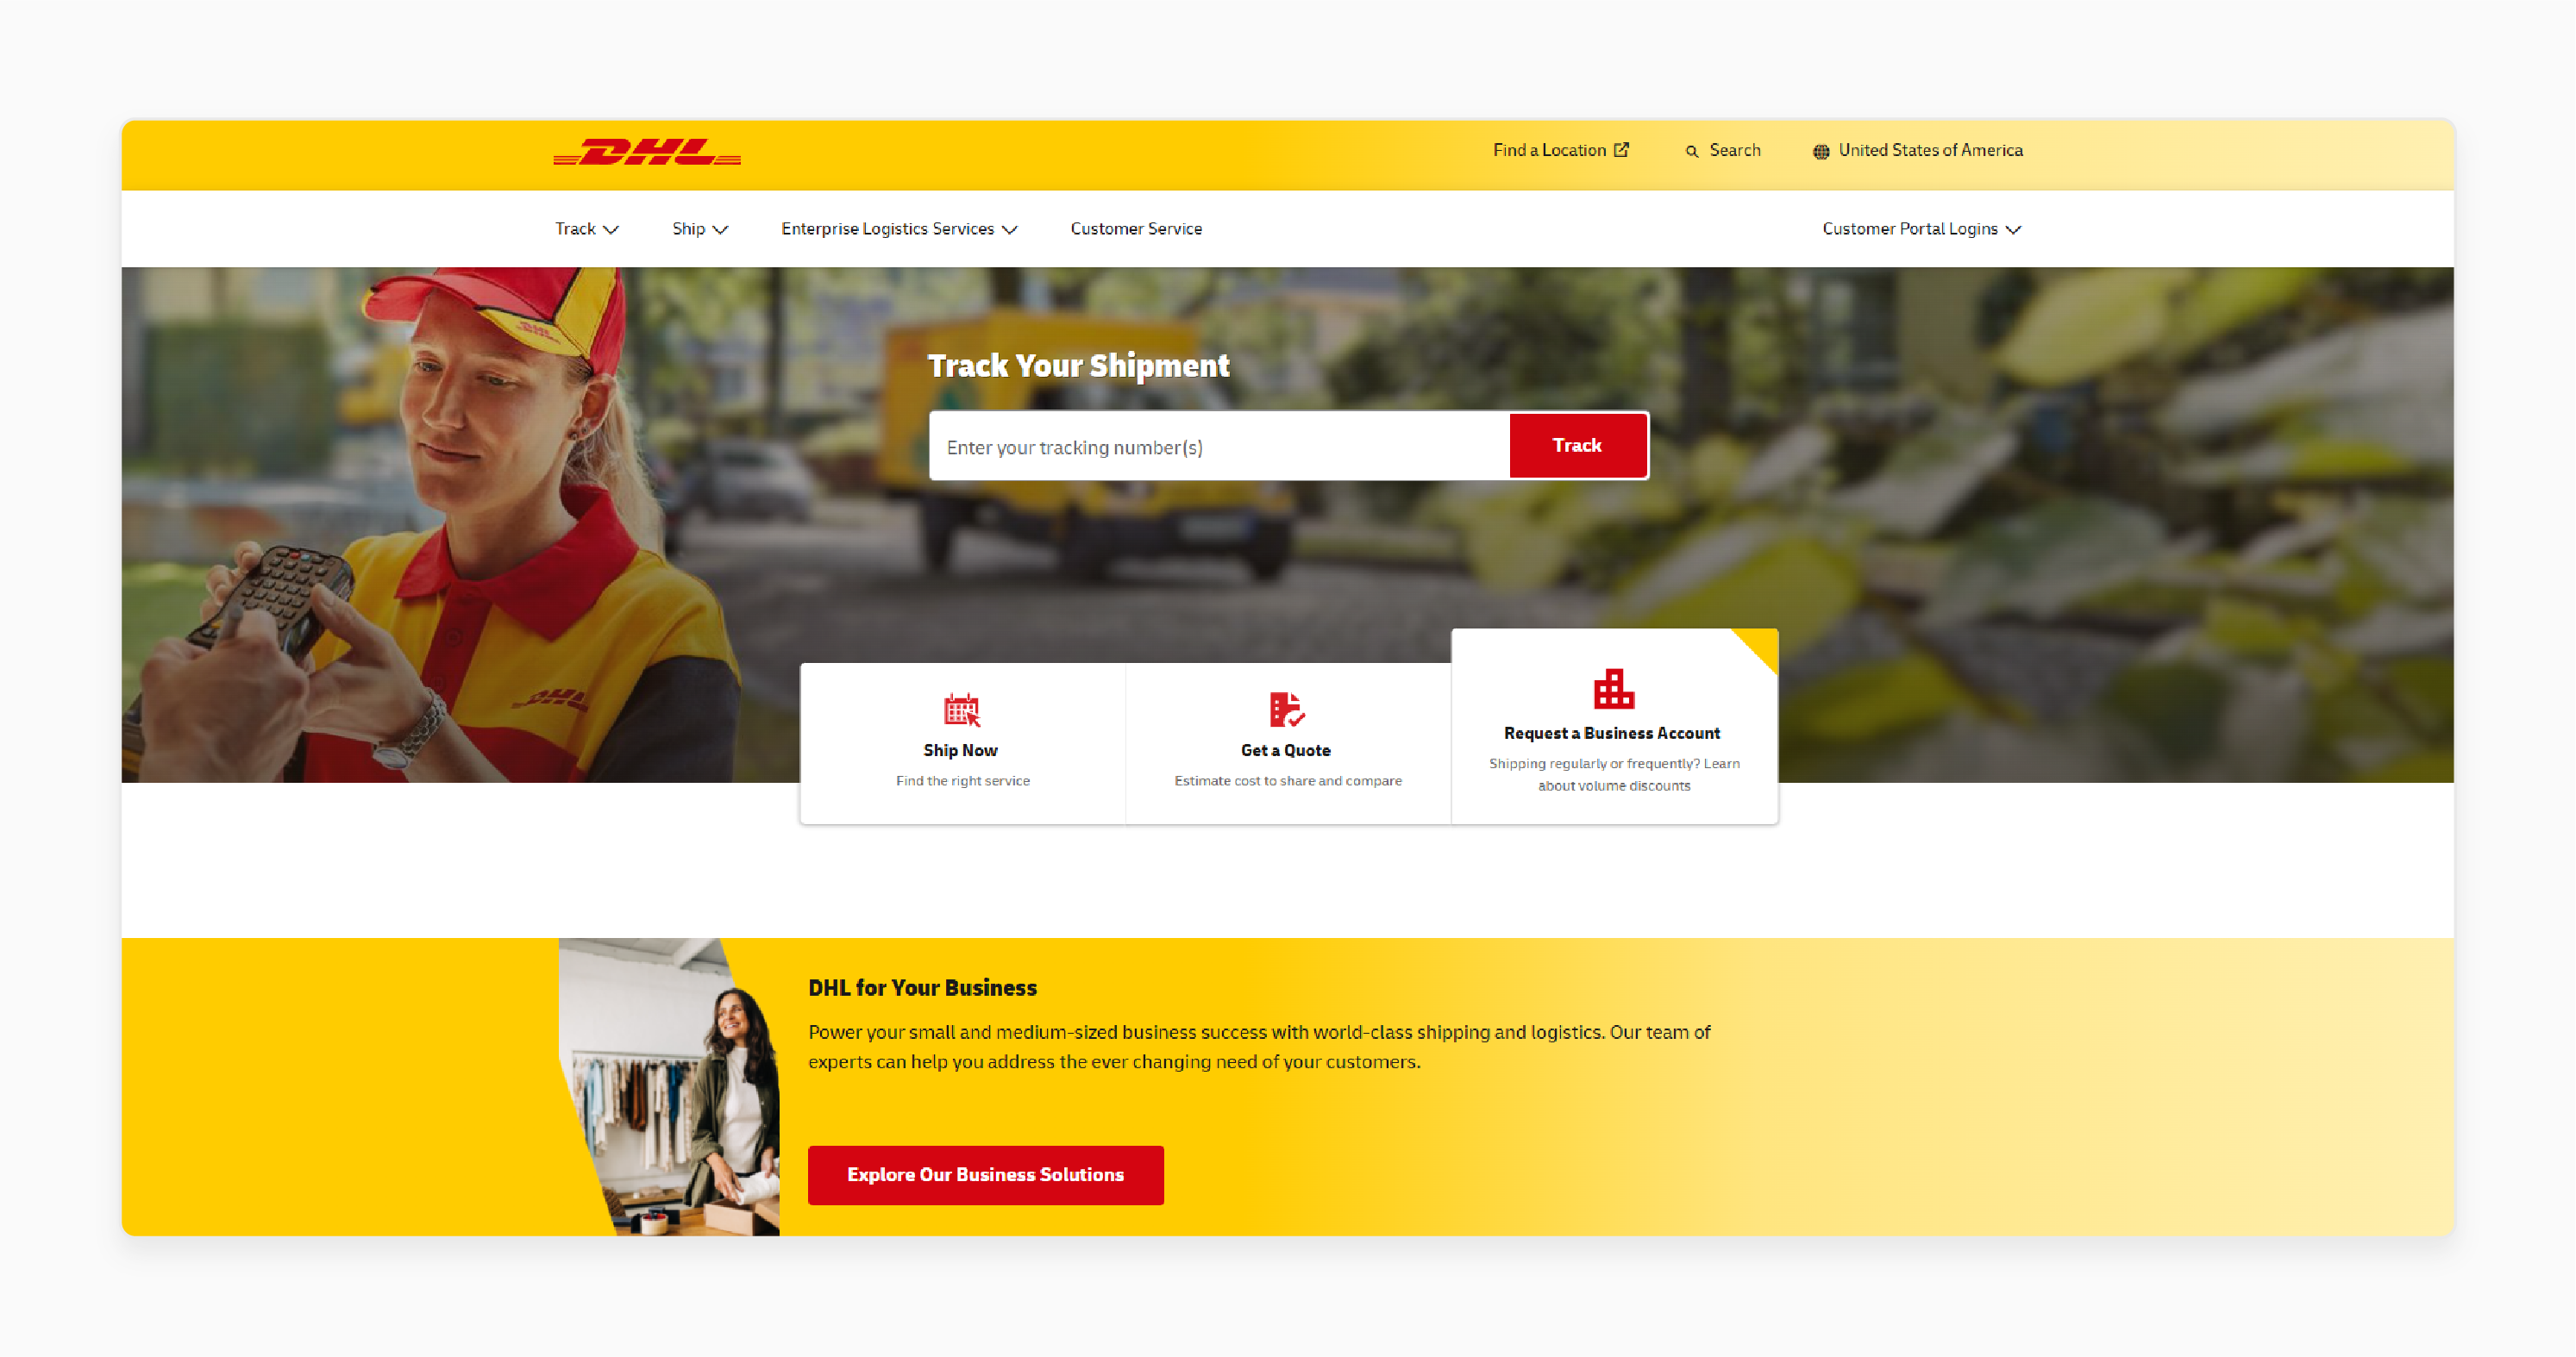
DHL specializes in international shipping, making it ideal for businesses with global customers. With Magento 2, DHL integration helps businesses ship quickly.
Key Services:
-
Handling complex international shipping rules.
-
Fast and reliable global delivery service.
4. USPS (United States Postal Service)
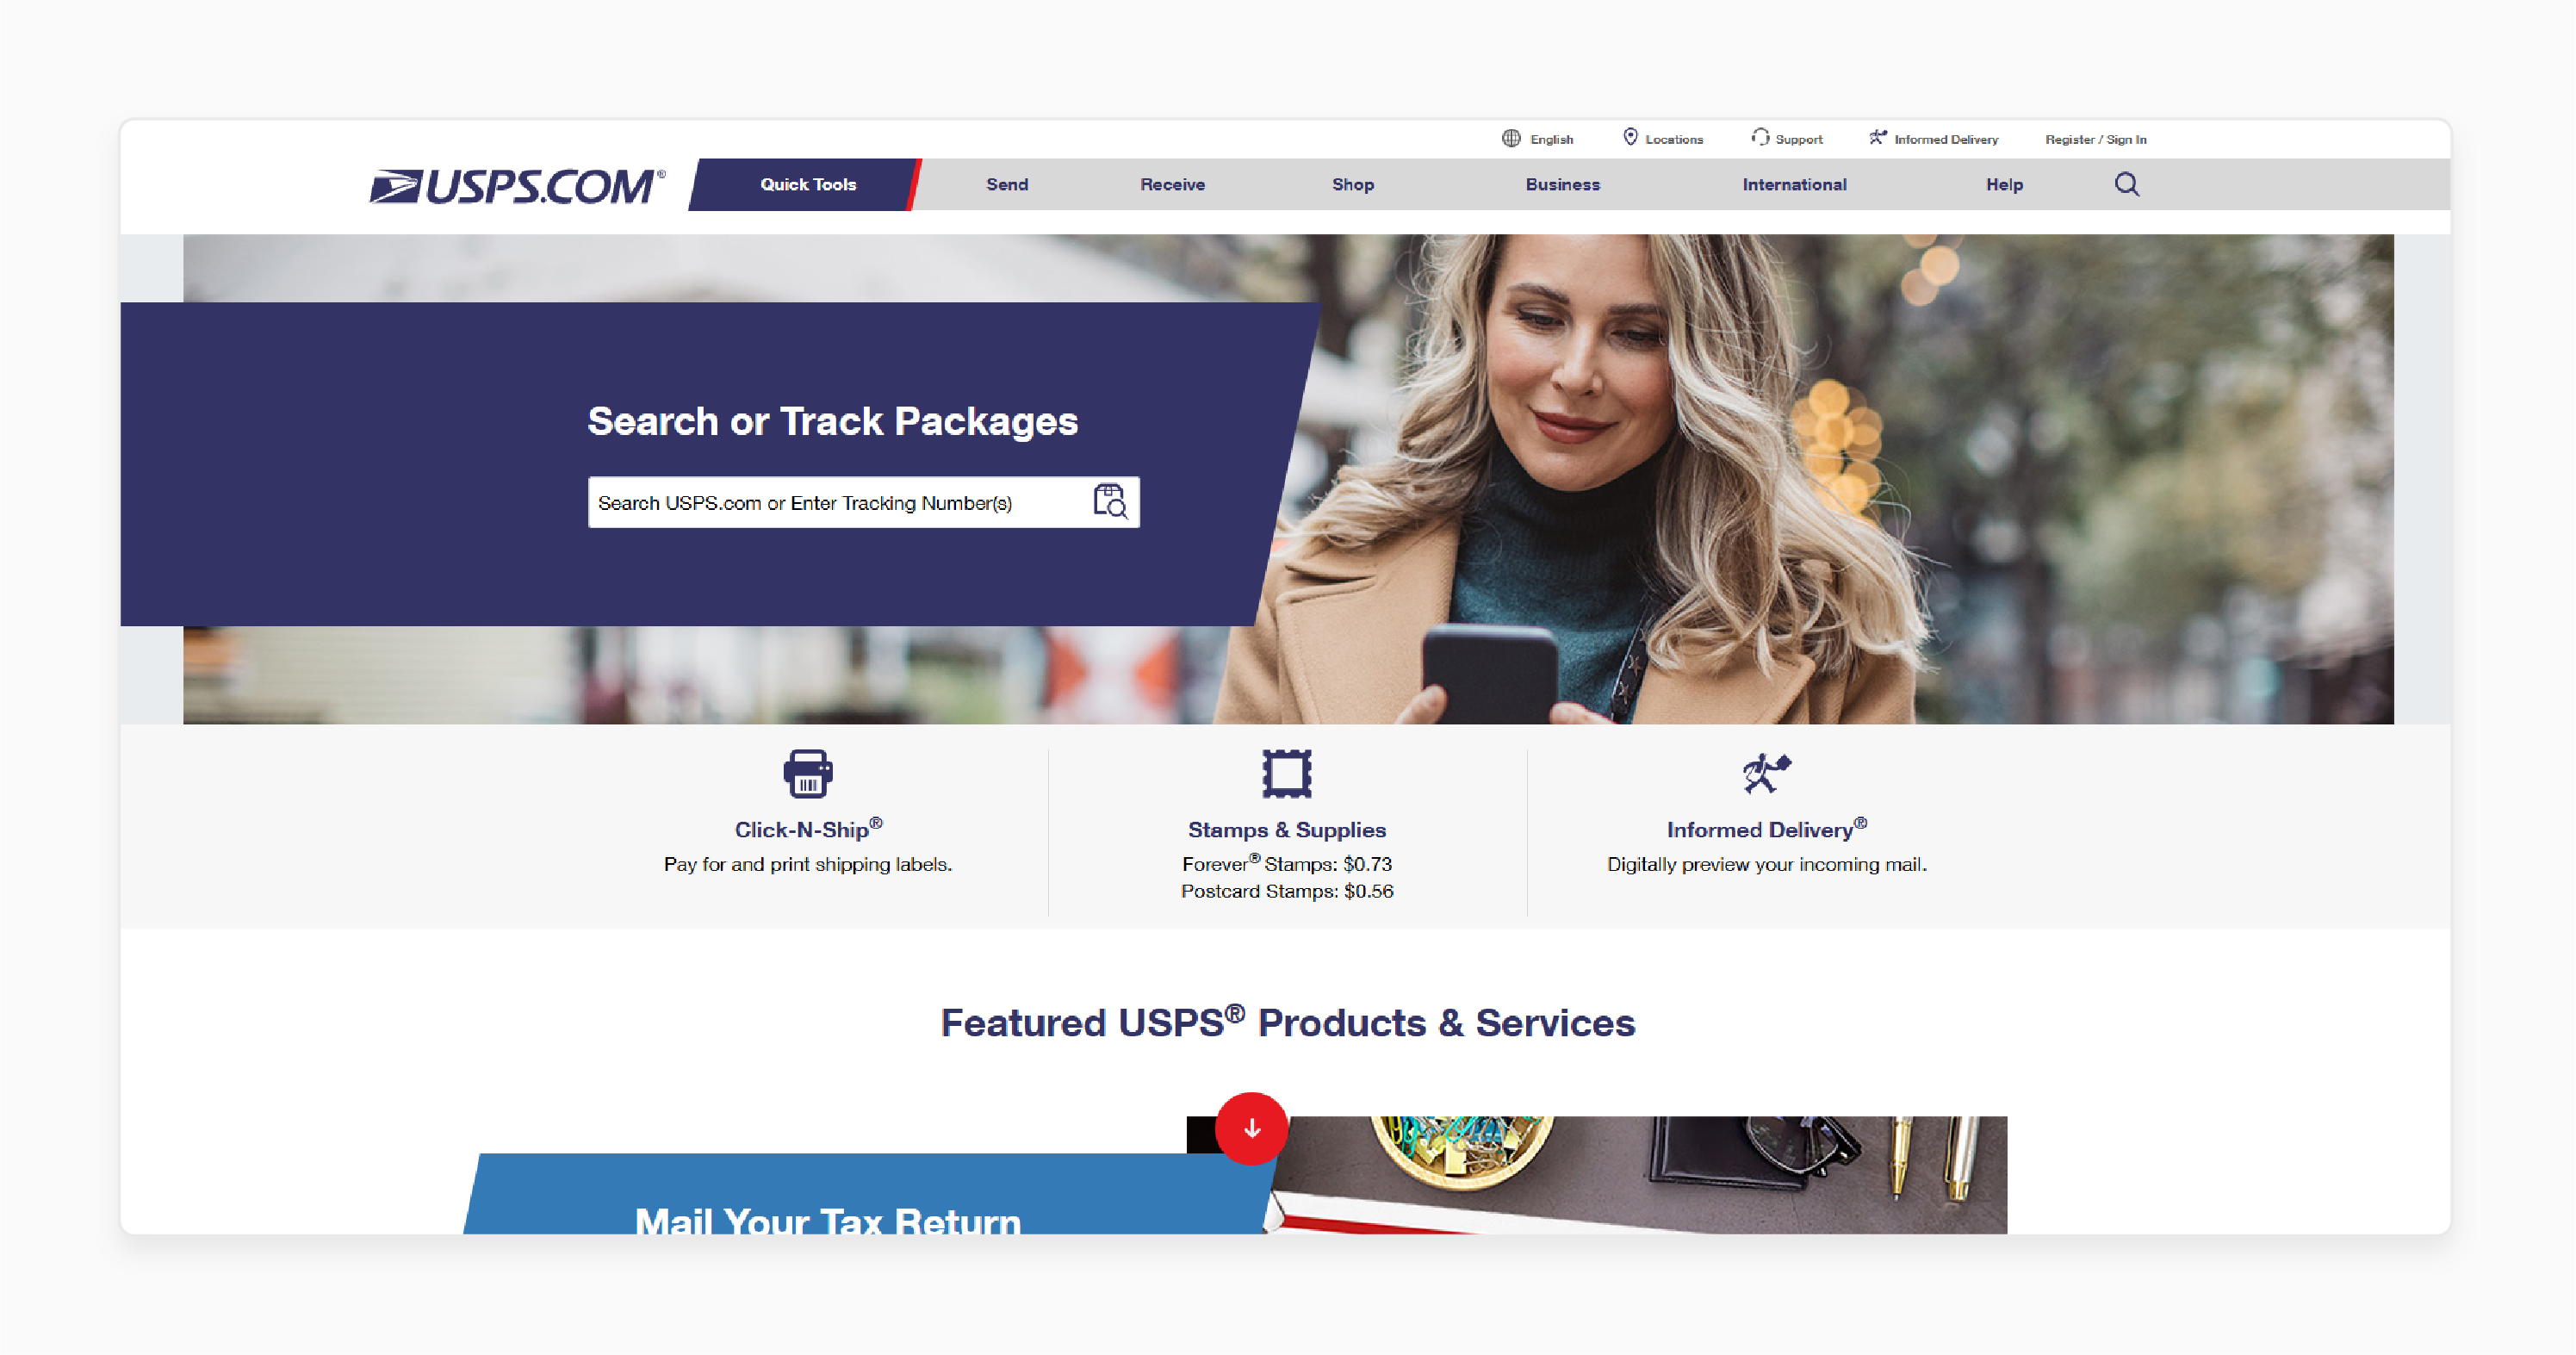
USPS is a popular and cost-effective choice for shipping within the U.S. It offers a wide variety of options for business shipping. Magento 2 integration makes it easy for businesses to manage their domestic deliveries.
Key Services:
-
Flat rate dispatch methods for small businesses.
-
Reliable and affordable dispatch service for U.S. deliveries.
5. Canada Post
Canada Post is the primary postal service in Canada. It is a reliable option for Canadian businesses. It offers various shipping methods. This includes rate table dispatch, which is ideal for both domestic and international deliveries.
Key Services:
-
Affordable shipping charges within Canada.
-
Easy integration for creating custom delivery options.
4 Steps to Create a New Custom Shipping Carrier in Magento 2
Step 1: Create a New Module
Create a new unit in Magento 2. The module will define the custom dispatch option. Start by creating two files:
-
Create the registration.php File: It registers your module in Magento.
-
Create the module.xml File: It declares the module and its dependencies.
Step 2: Create the Configuration Files
Create the system.xml and config.xml files. These files define the settings for your new dispatch carrier.
-
File system.xml: The file declares the settings for your shipping module options:
-
Enabled
-
Title
-
Method Name
-
Shipping Charge
-
Ship to Applicable Countries
-
Ship to Specific Countries
-
Show Method if Not Applicable
-
Sort Order
-
-
File config.xml: It holds default values for your custom delivery module configuration.
Step 3: Create the Carrier Model
The next step is to set up the carrier, which defines how dispatch fees are calculated. Set up the carrier unit file to define the custom delivery option.
Step 4: Enable the Module
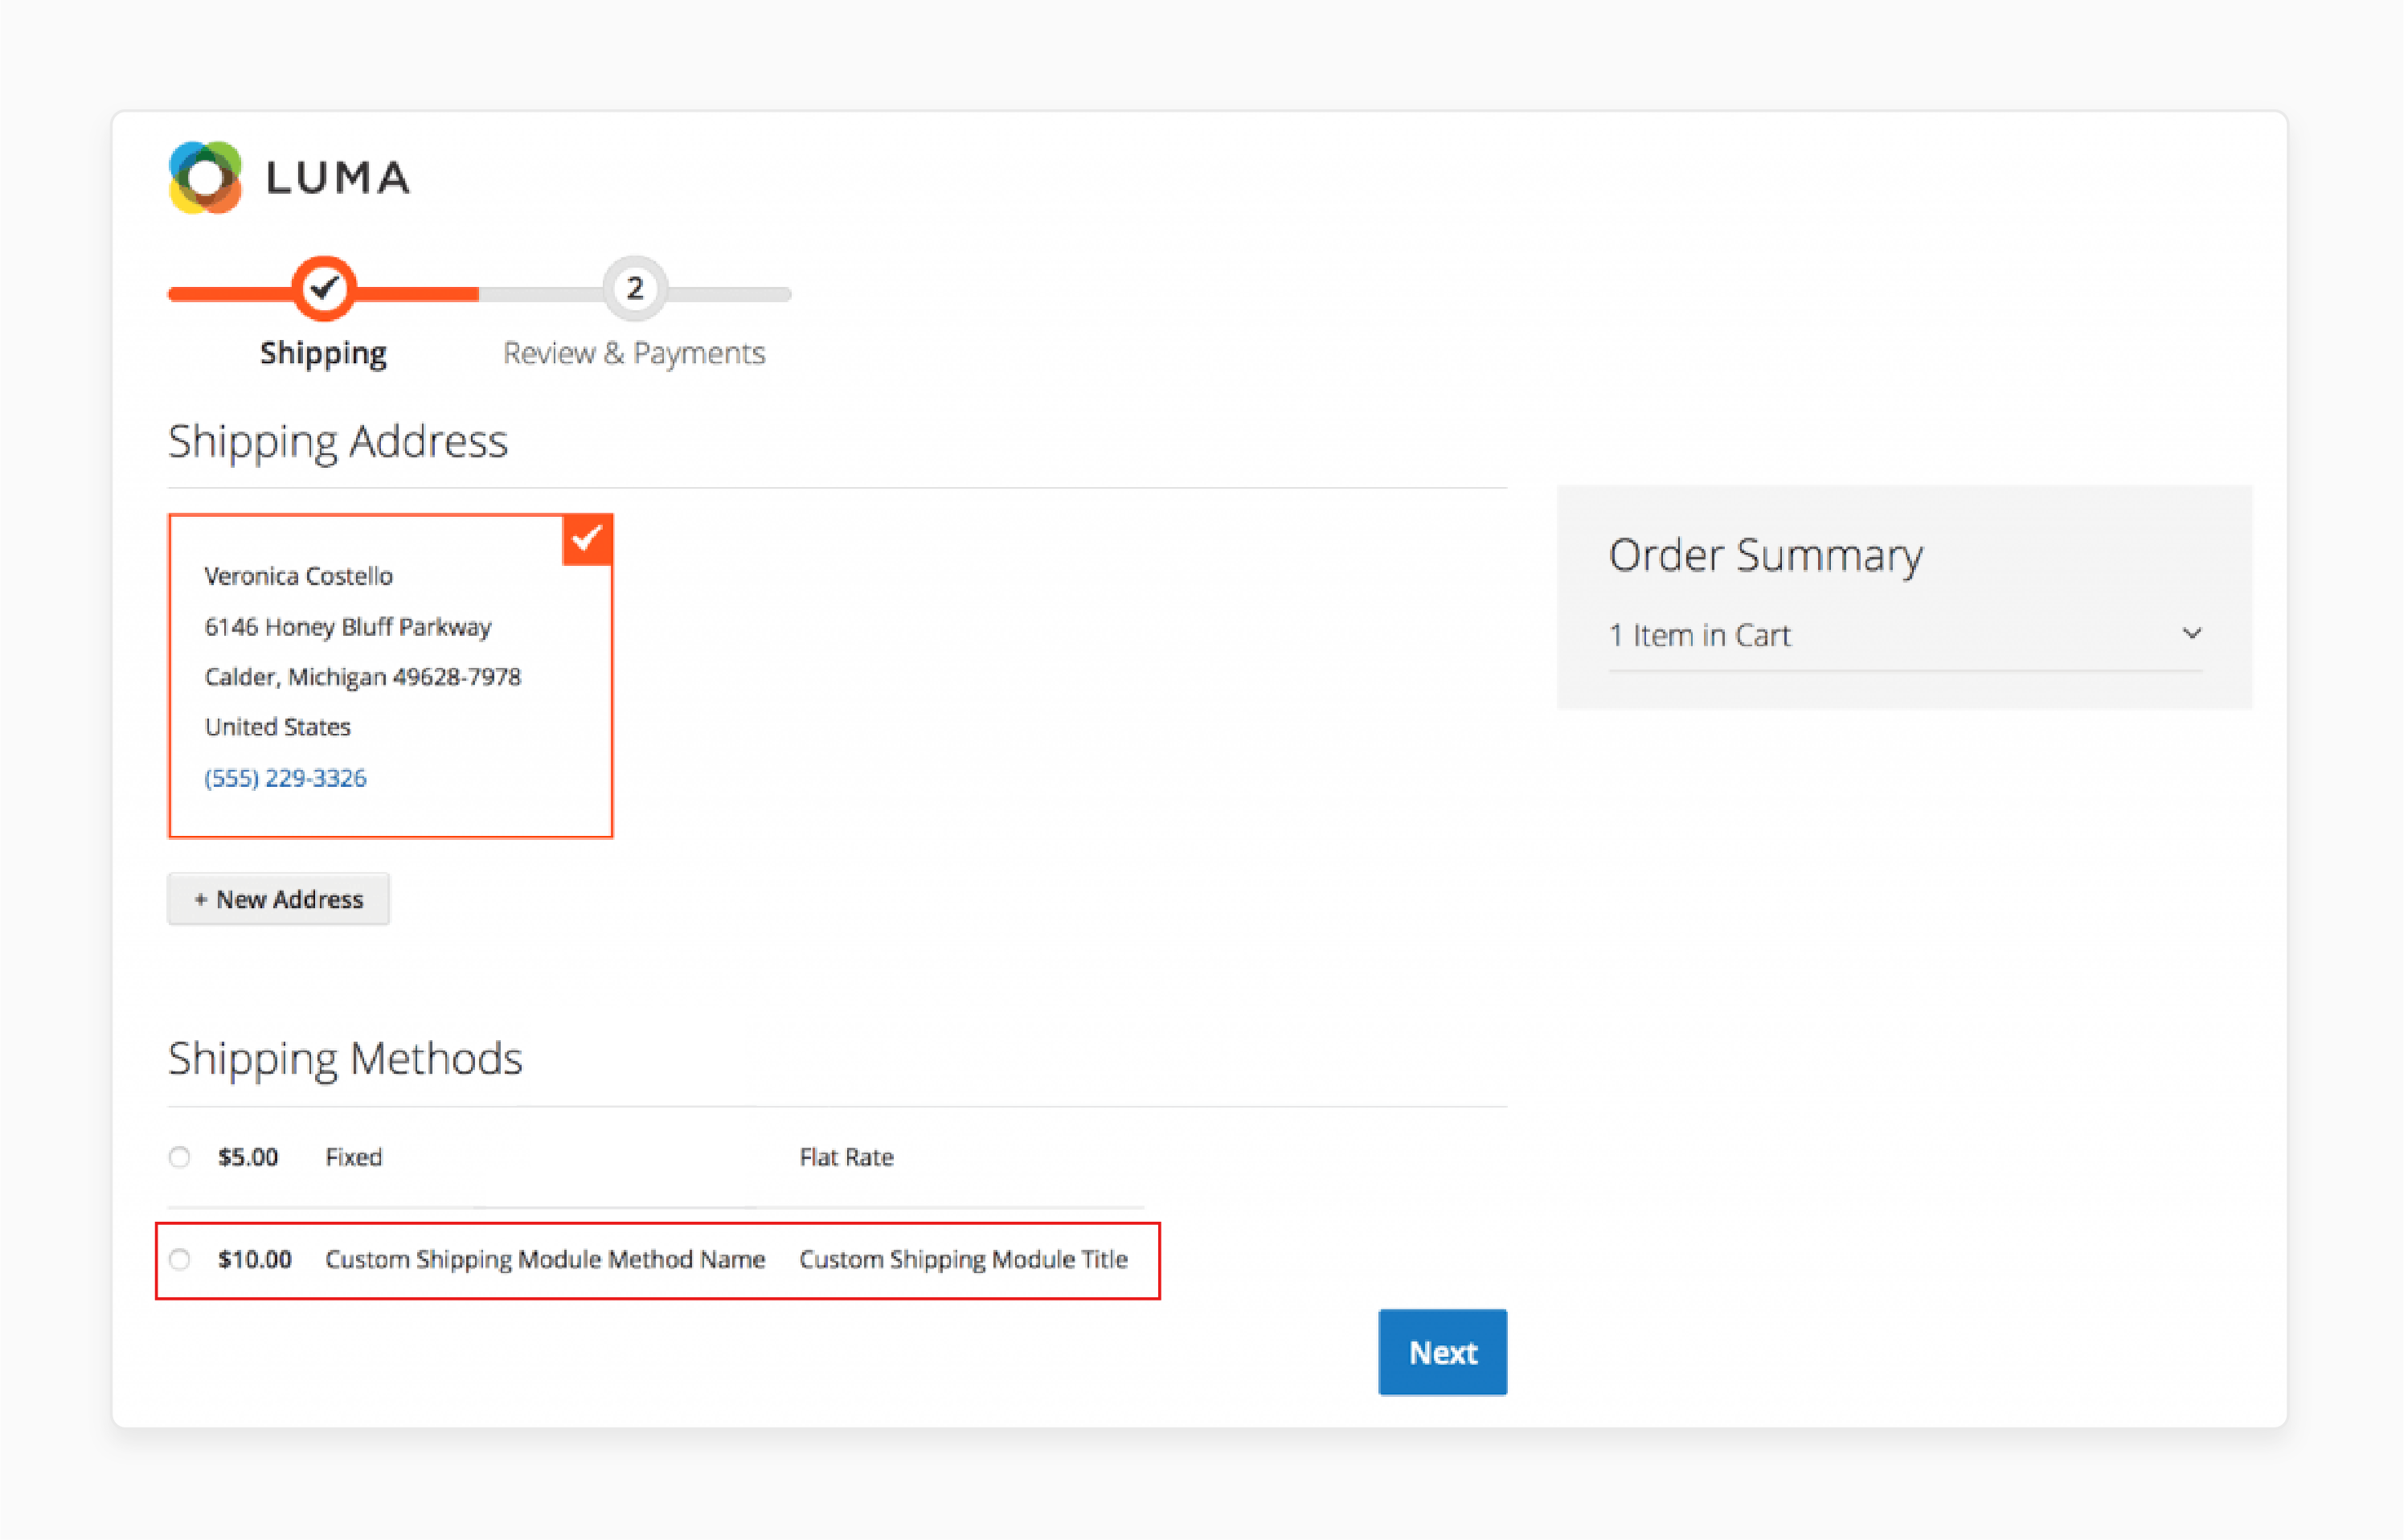
- After everything is set up, use the command in the terminal to activate your module:
php bin/magento setup:upgrade
- Once the module is enabled, your recent shipper will be available on the checkout page.
How to Configure Magento 2 Shipping Carriers?
Step 1: Dimensional Weight Shipment (DHL Shipping)
Dimensional weight shipping calculates the dispatch fee. It is based on the size (volume and weight) of the package. Steps to configure DHL shipping:
- Enable DHL for Checkout: Make sure DHL shipping shows up during the payment process.
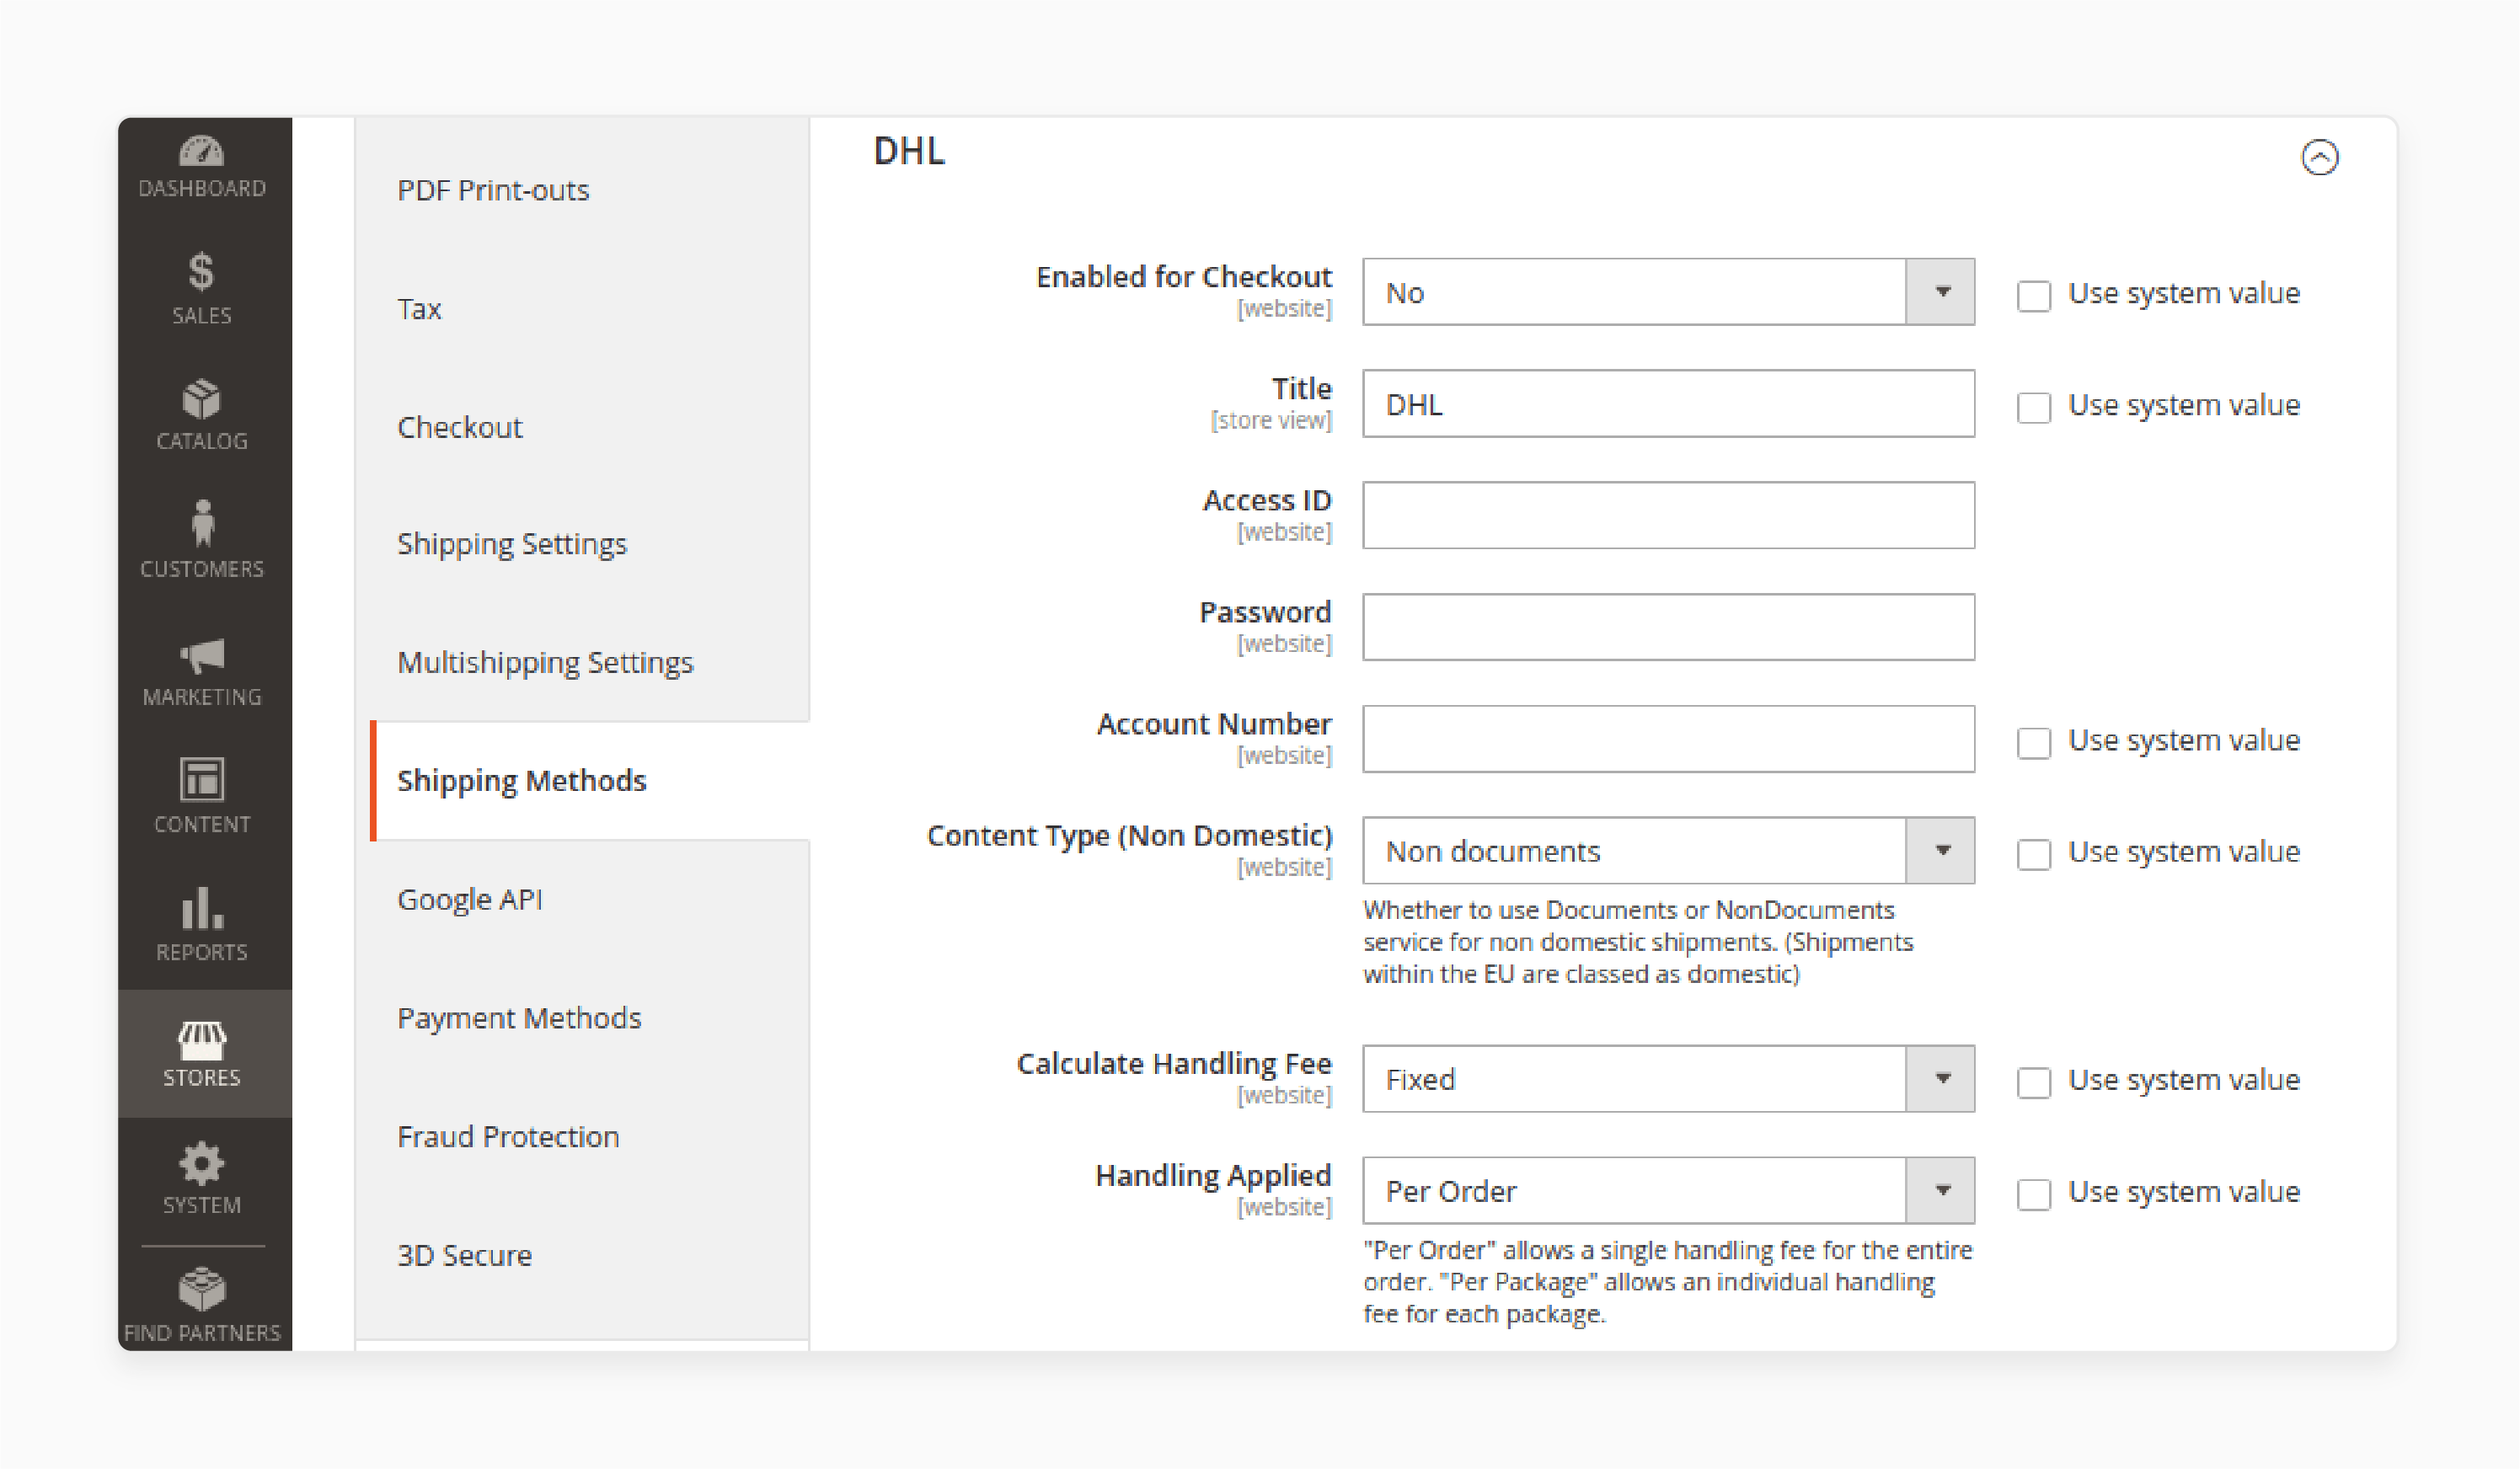
- Enter Shipping Method Details: Set a Title and add your DHL Access ID, Password, and Account Number (from your DHL shipper account).
- Set Content-Type: Choose the right content type, like Non-Domestic.
- Configure Handling Fees: Set up the shipping charges and handling fees.
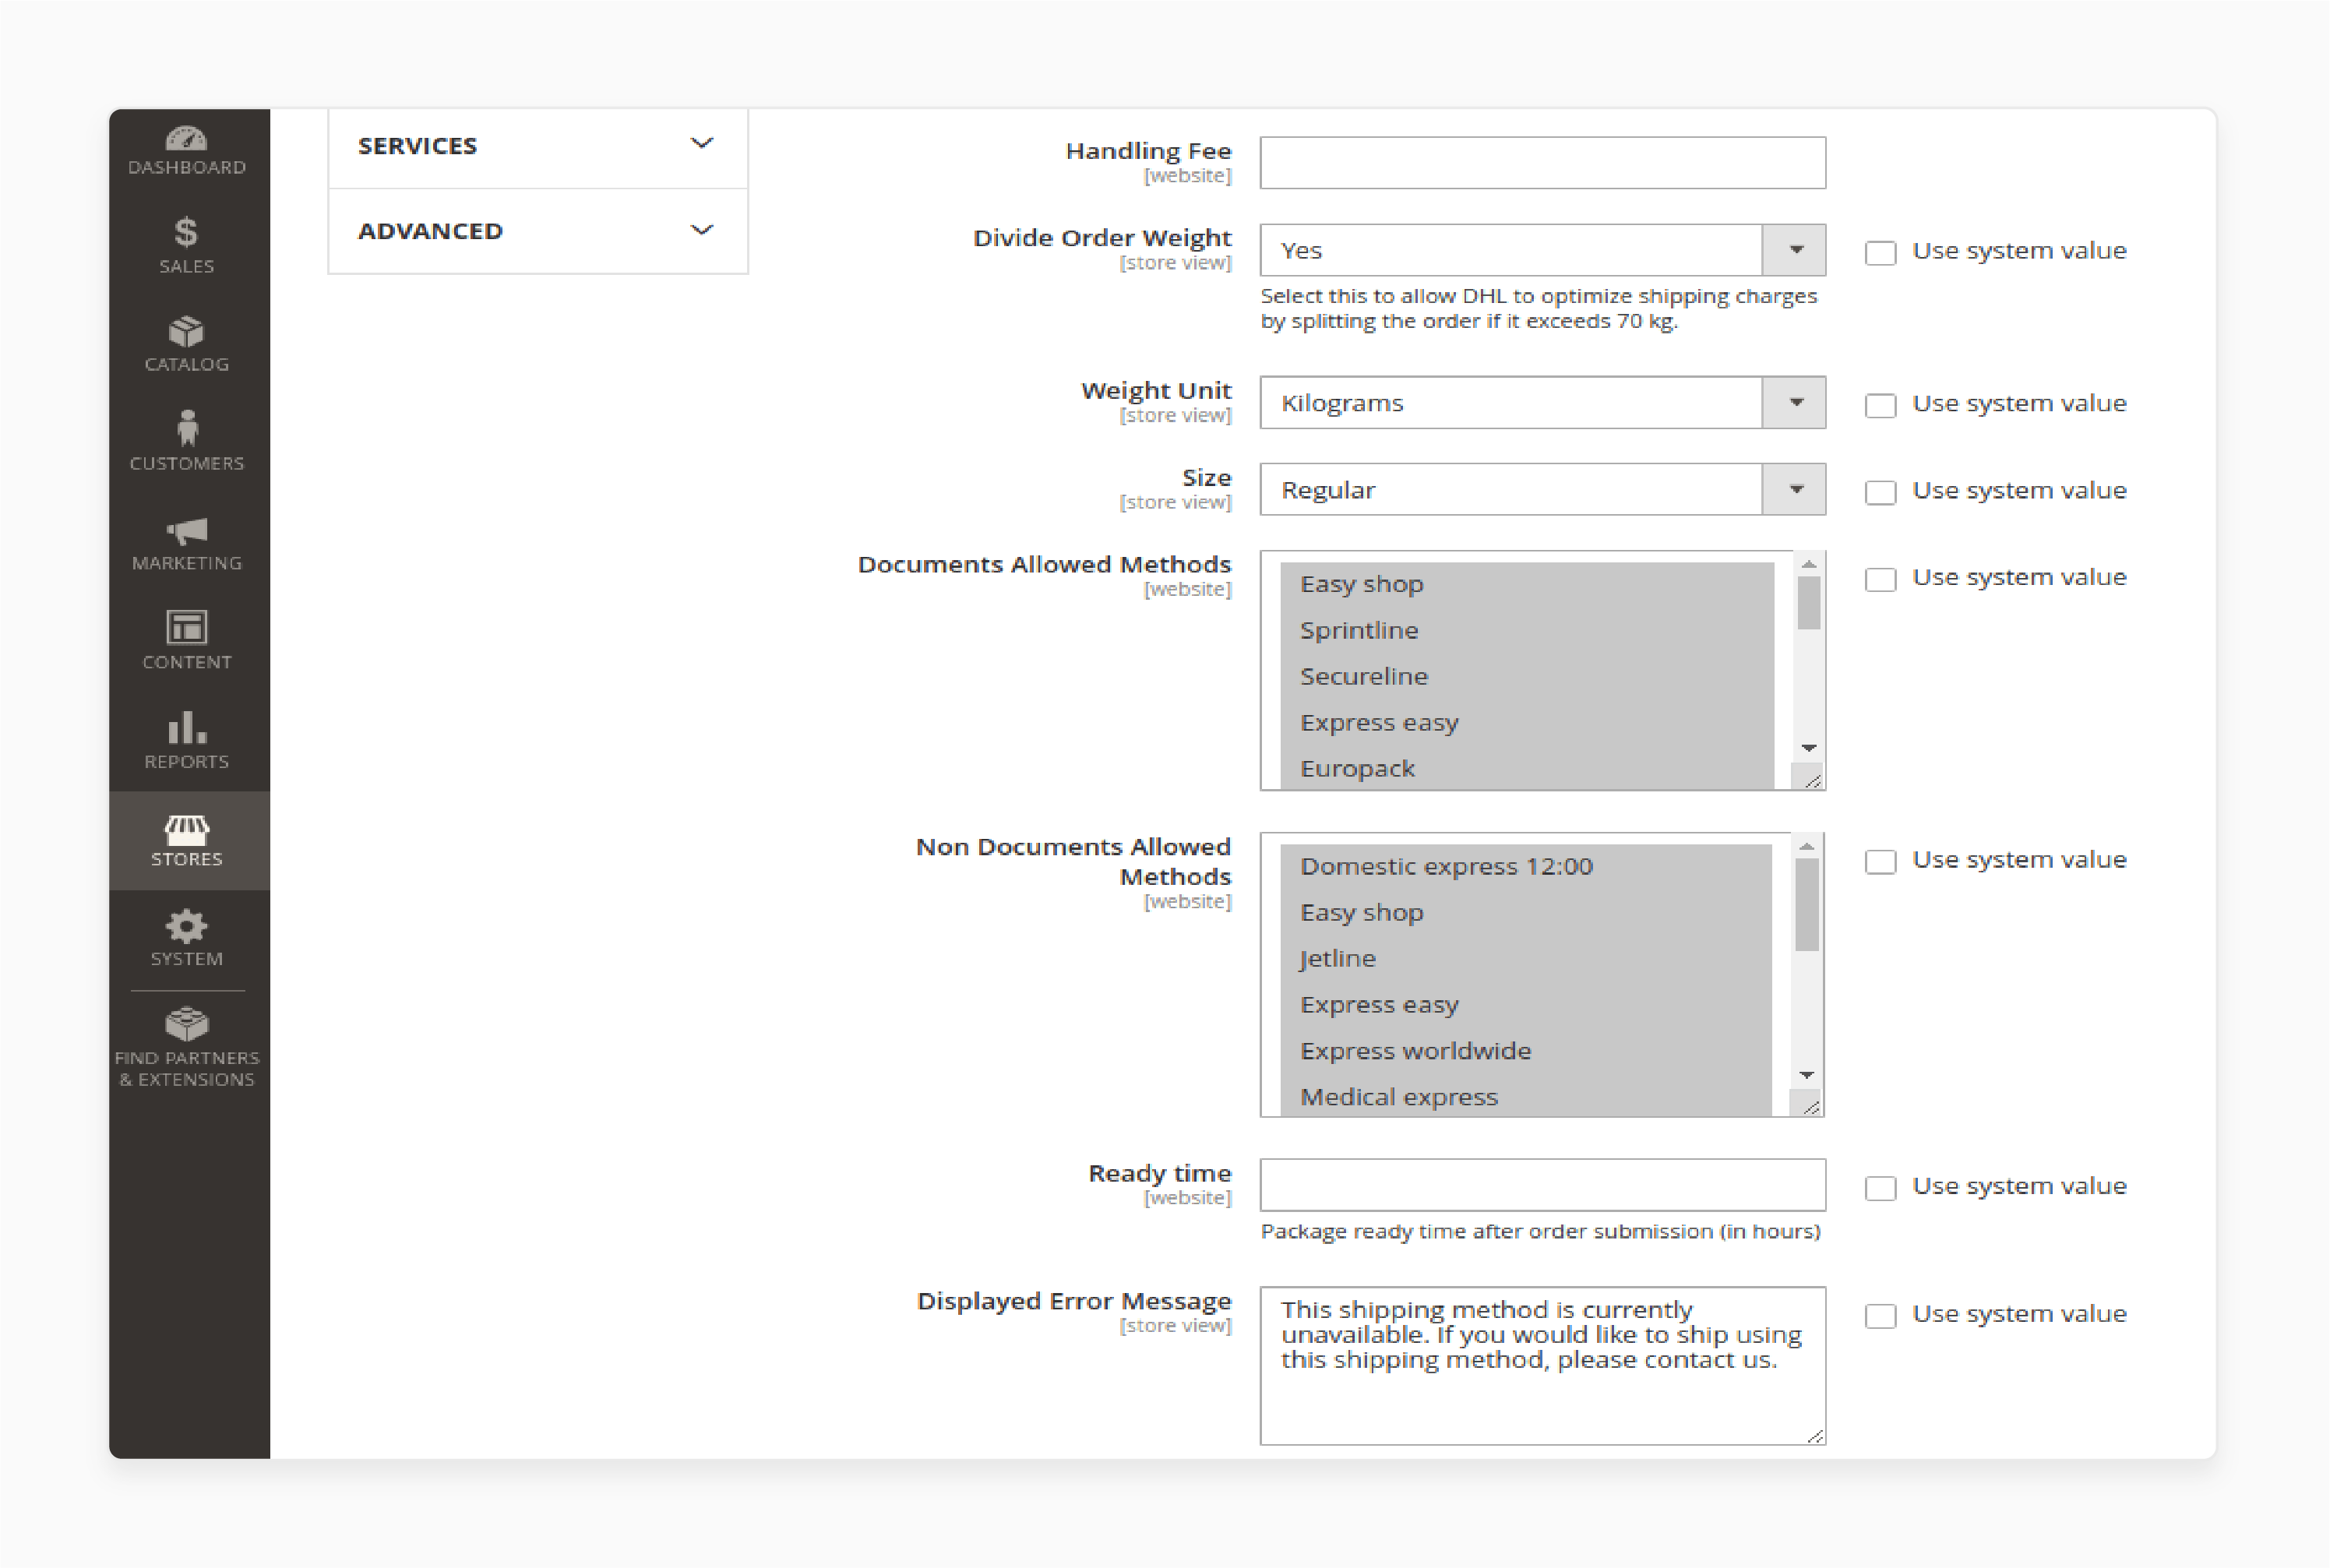
- Enable Order Weight Division: Choose Yes in the Divide Order Weight field. It helps to split the weight into smaller units for better dispatch cost accuracy.
- Select Weight Units and Size: Choose the correct weight measurement units. They are and set the size of the package.
- Configure Allowed Methods: Select the Documents Allowed Methods and Non-Documents Allowed Methods.
- Set Ready Time: Specify when the package will be ready for pickup after the order is submitted.
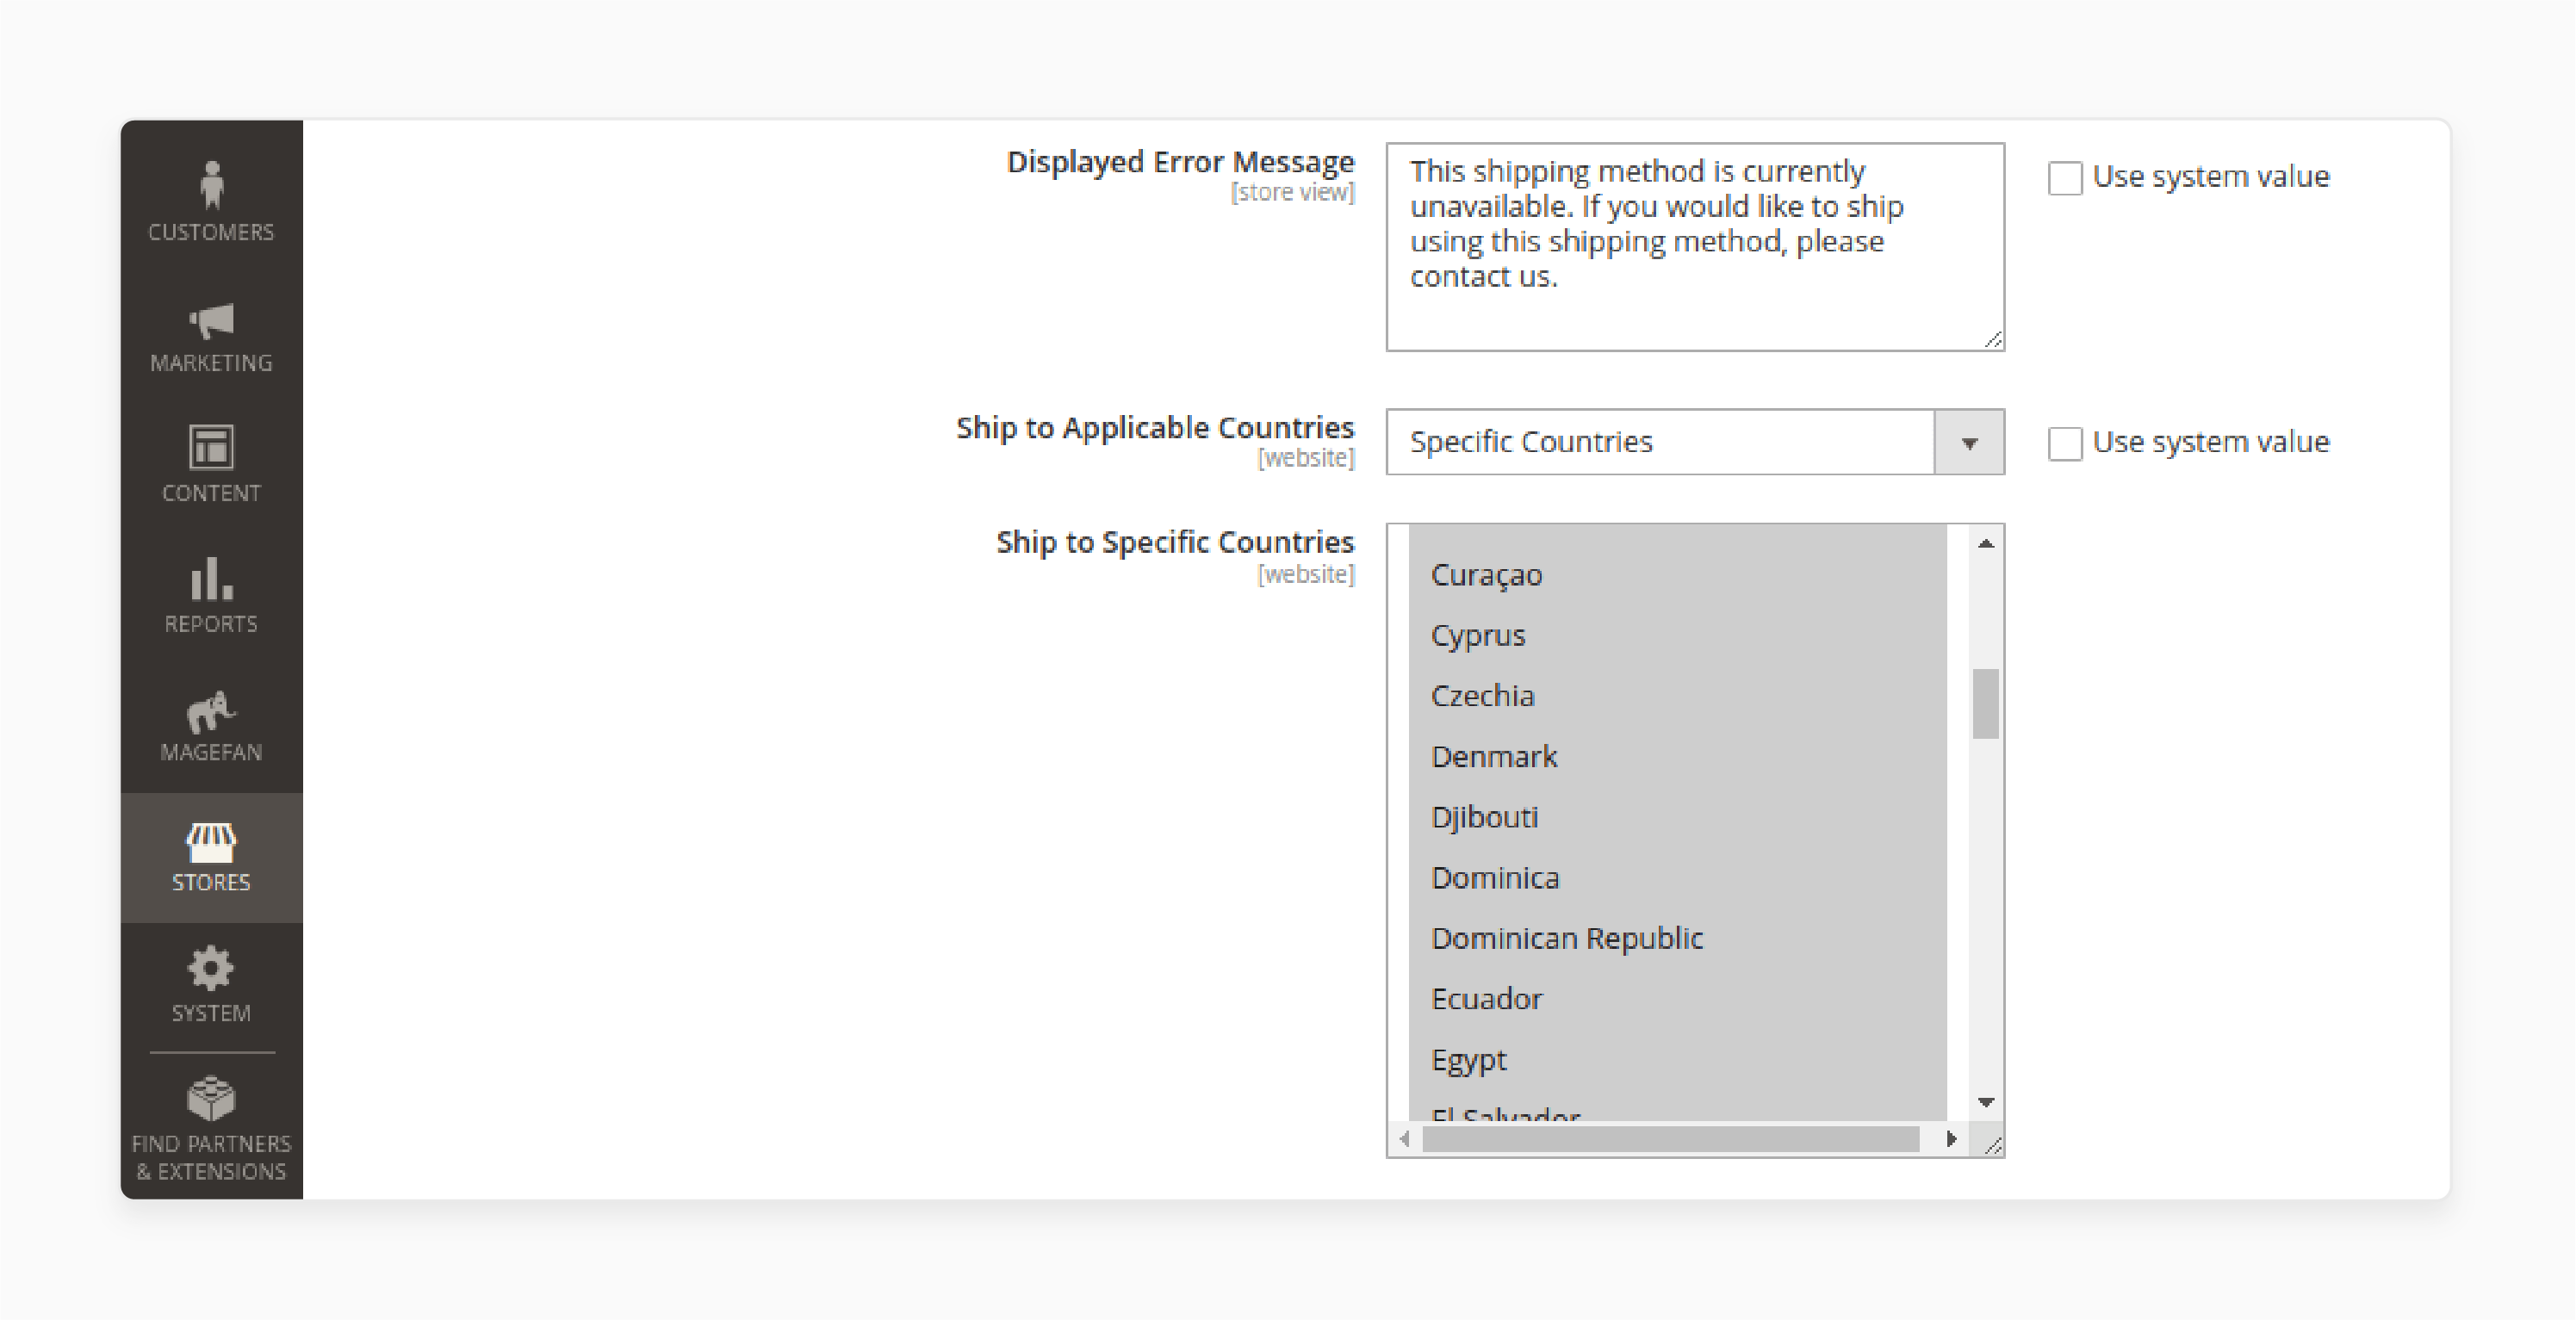
- Display Error Message: Add a Displayed Error Message to inform customers if DHL shipping is unavailable.
- Set Free Shipping: Choose the shipping method for free dispatch offers.
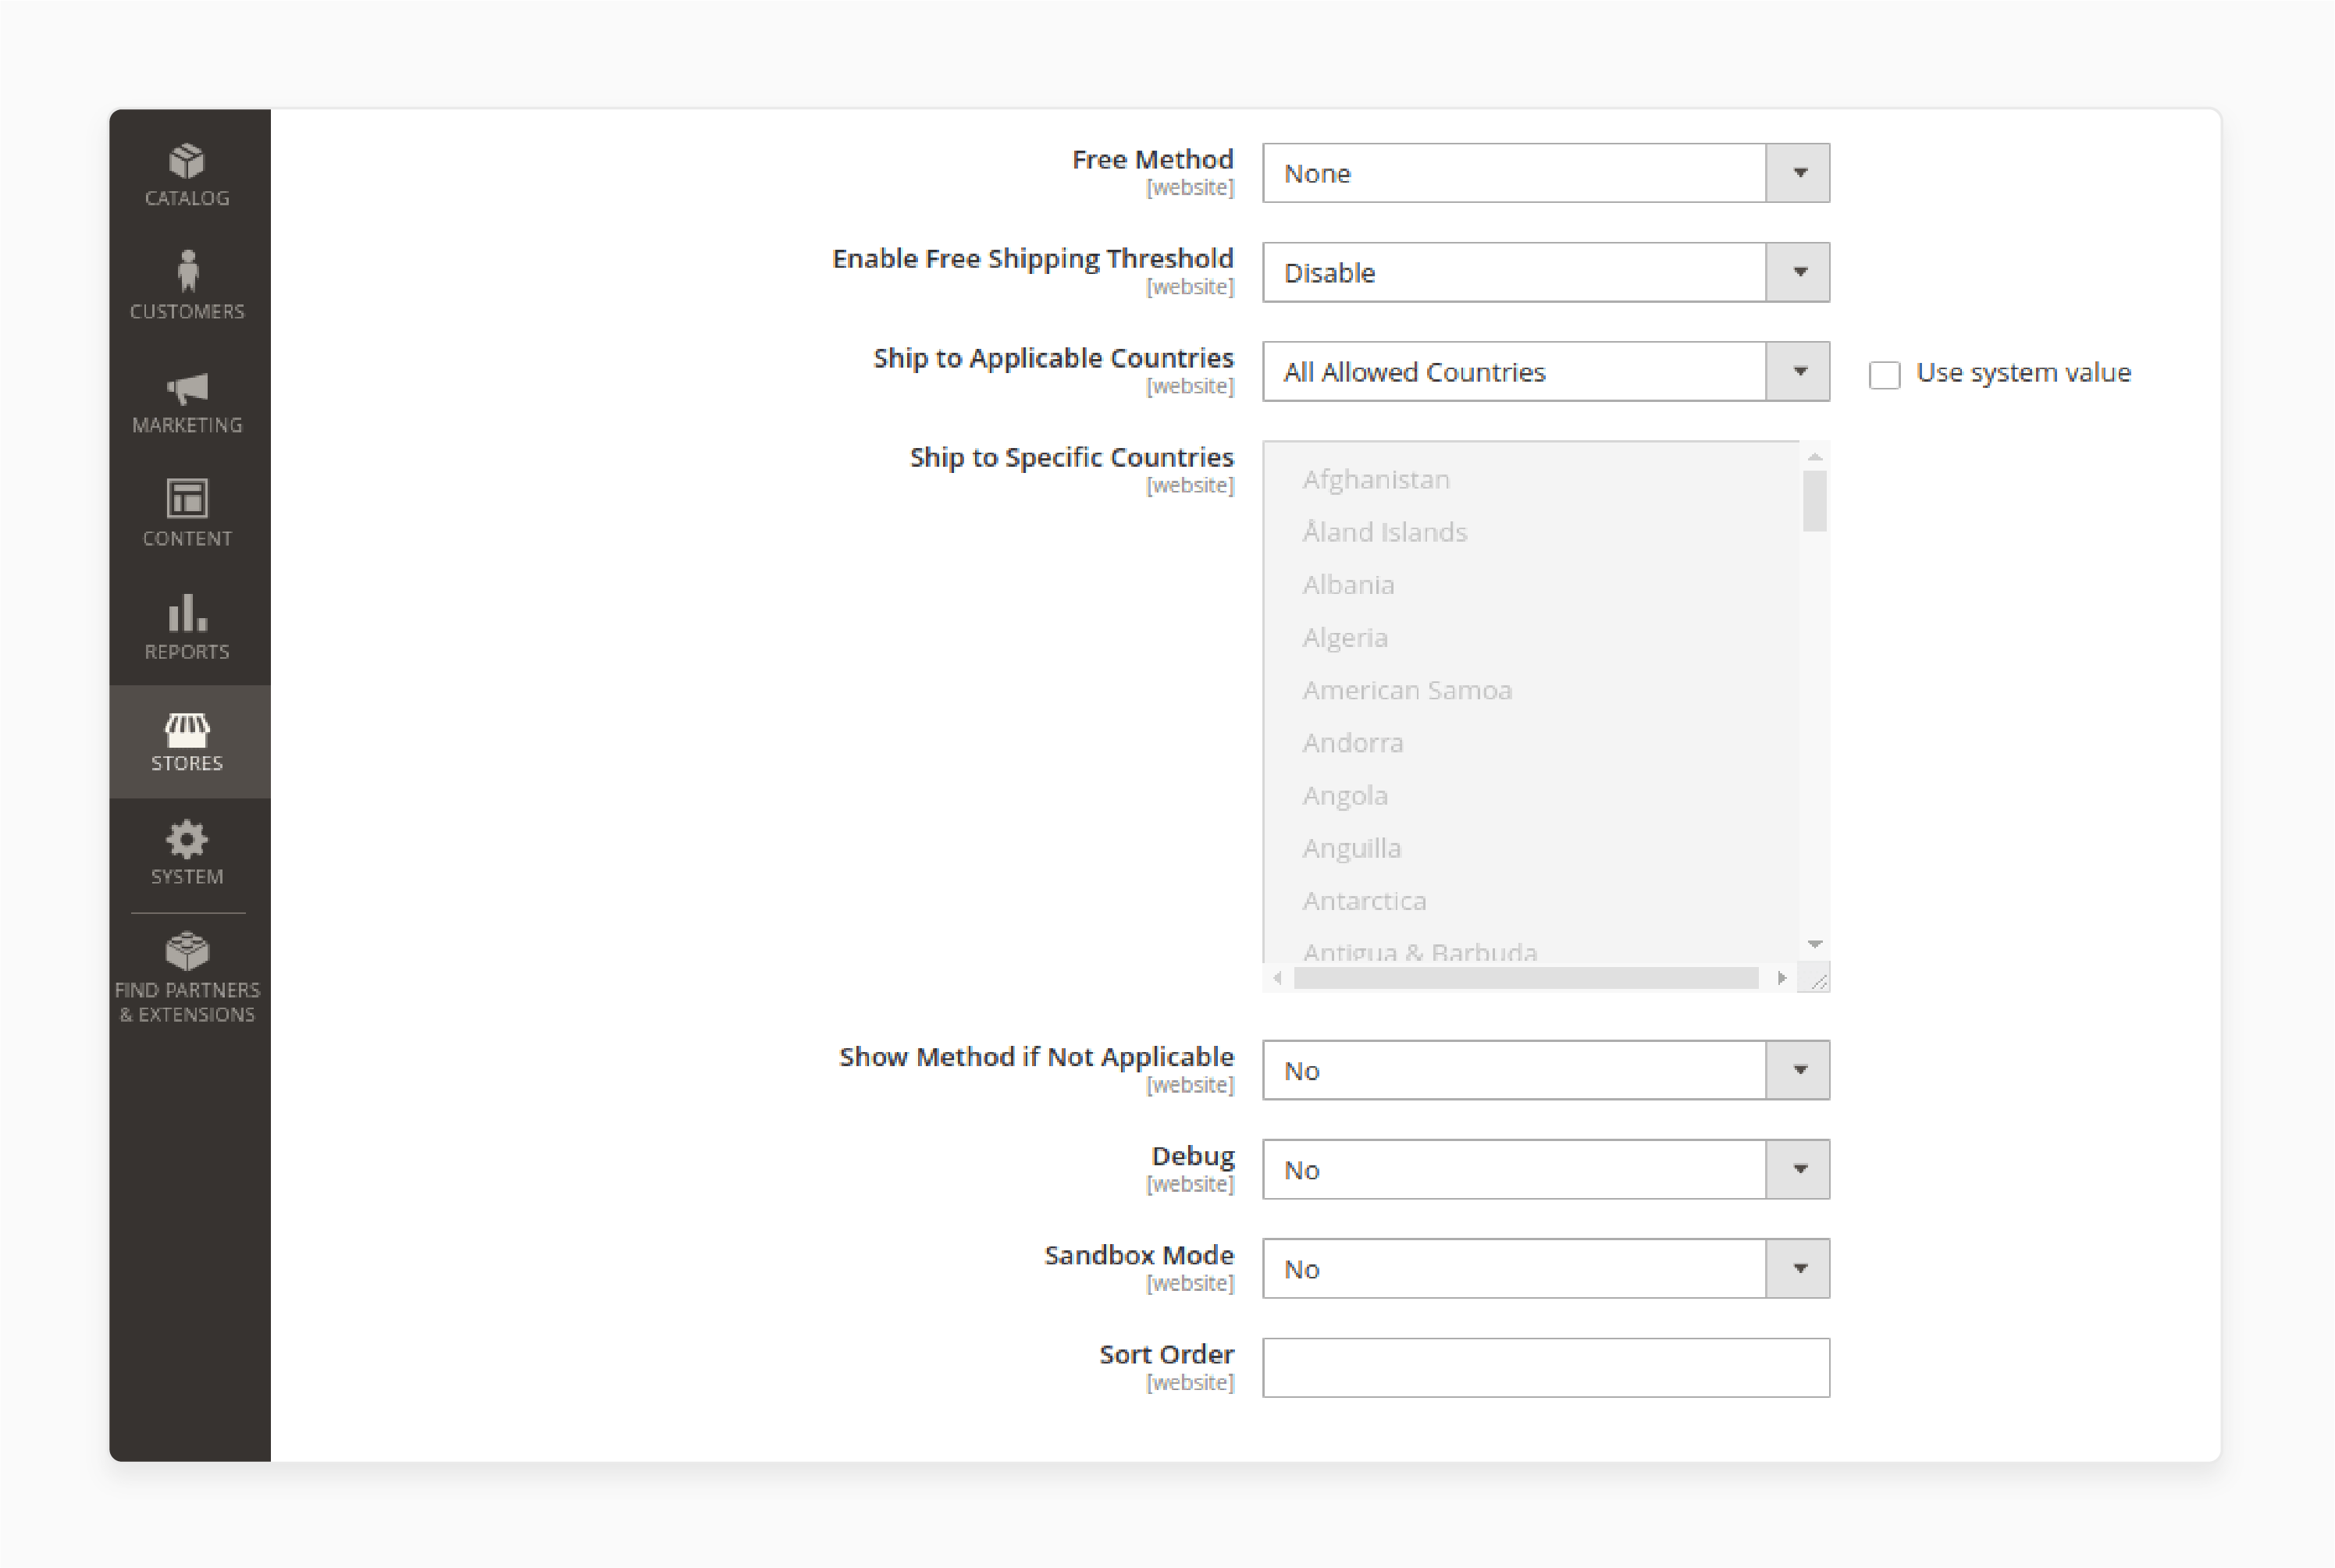
- Enable Free Dispatch Threshold: Allow free DHL dispatch for orders. It helps to meet the shipping threshold.
- Configure Applicable Countries: Set the applicable countries for shipping and visibility and sort orders using unavailable methods.
- Enable Debug: Turn on Debug to create a log file for error information.
- Enable Sandbox Mode: Activate Sandbox Mode to test DHL transactions.
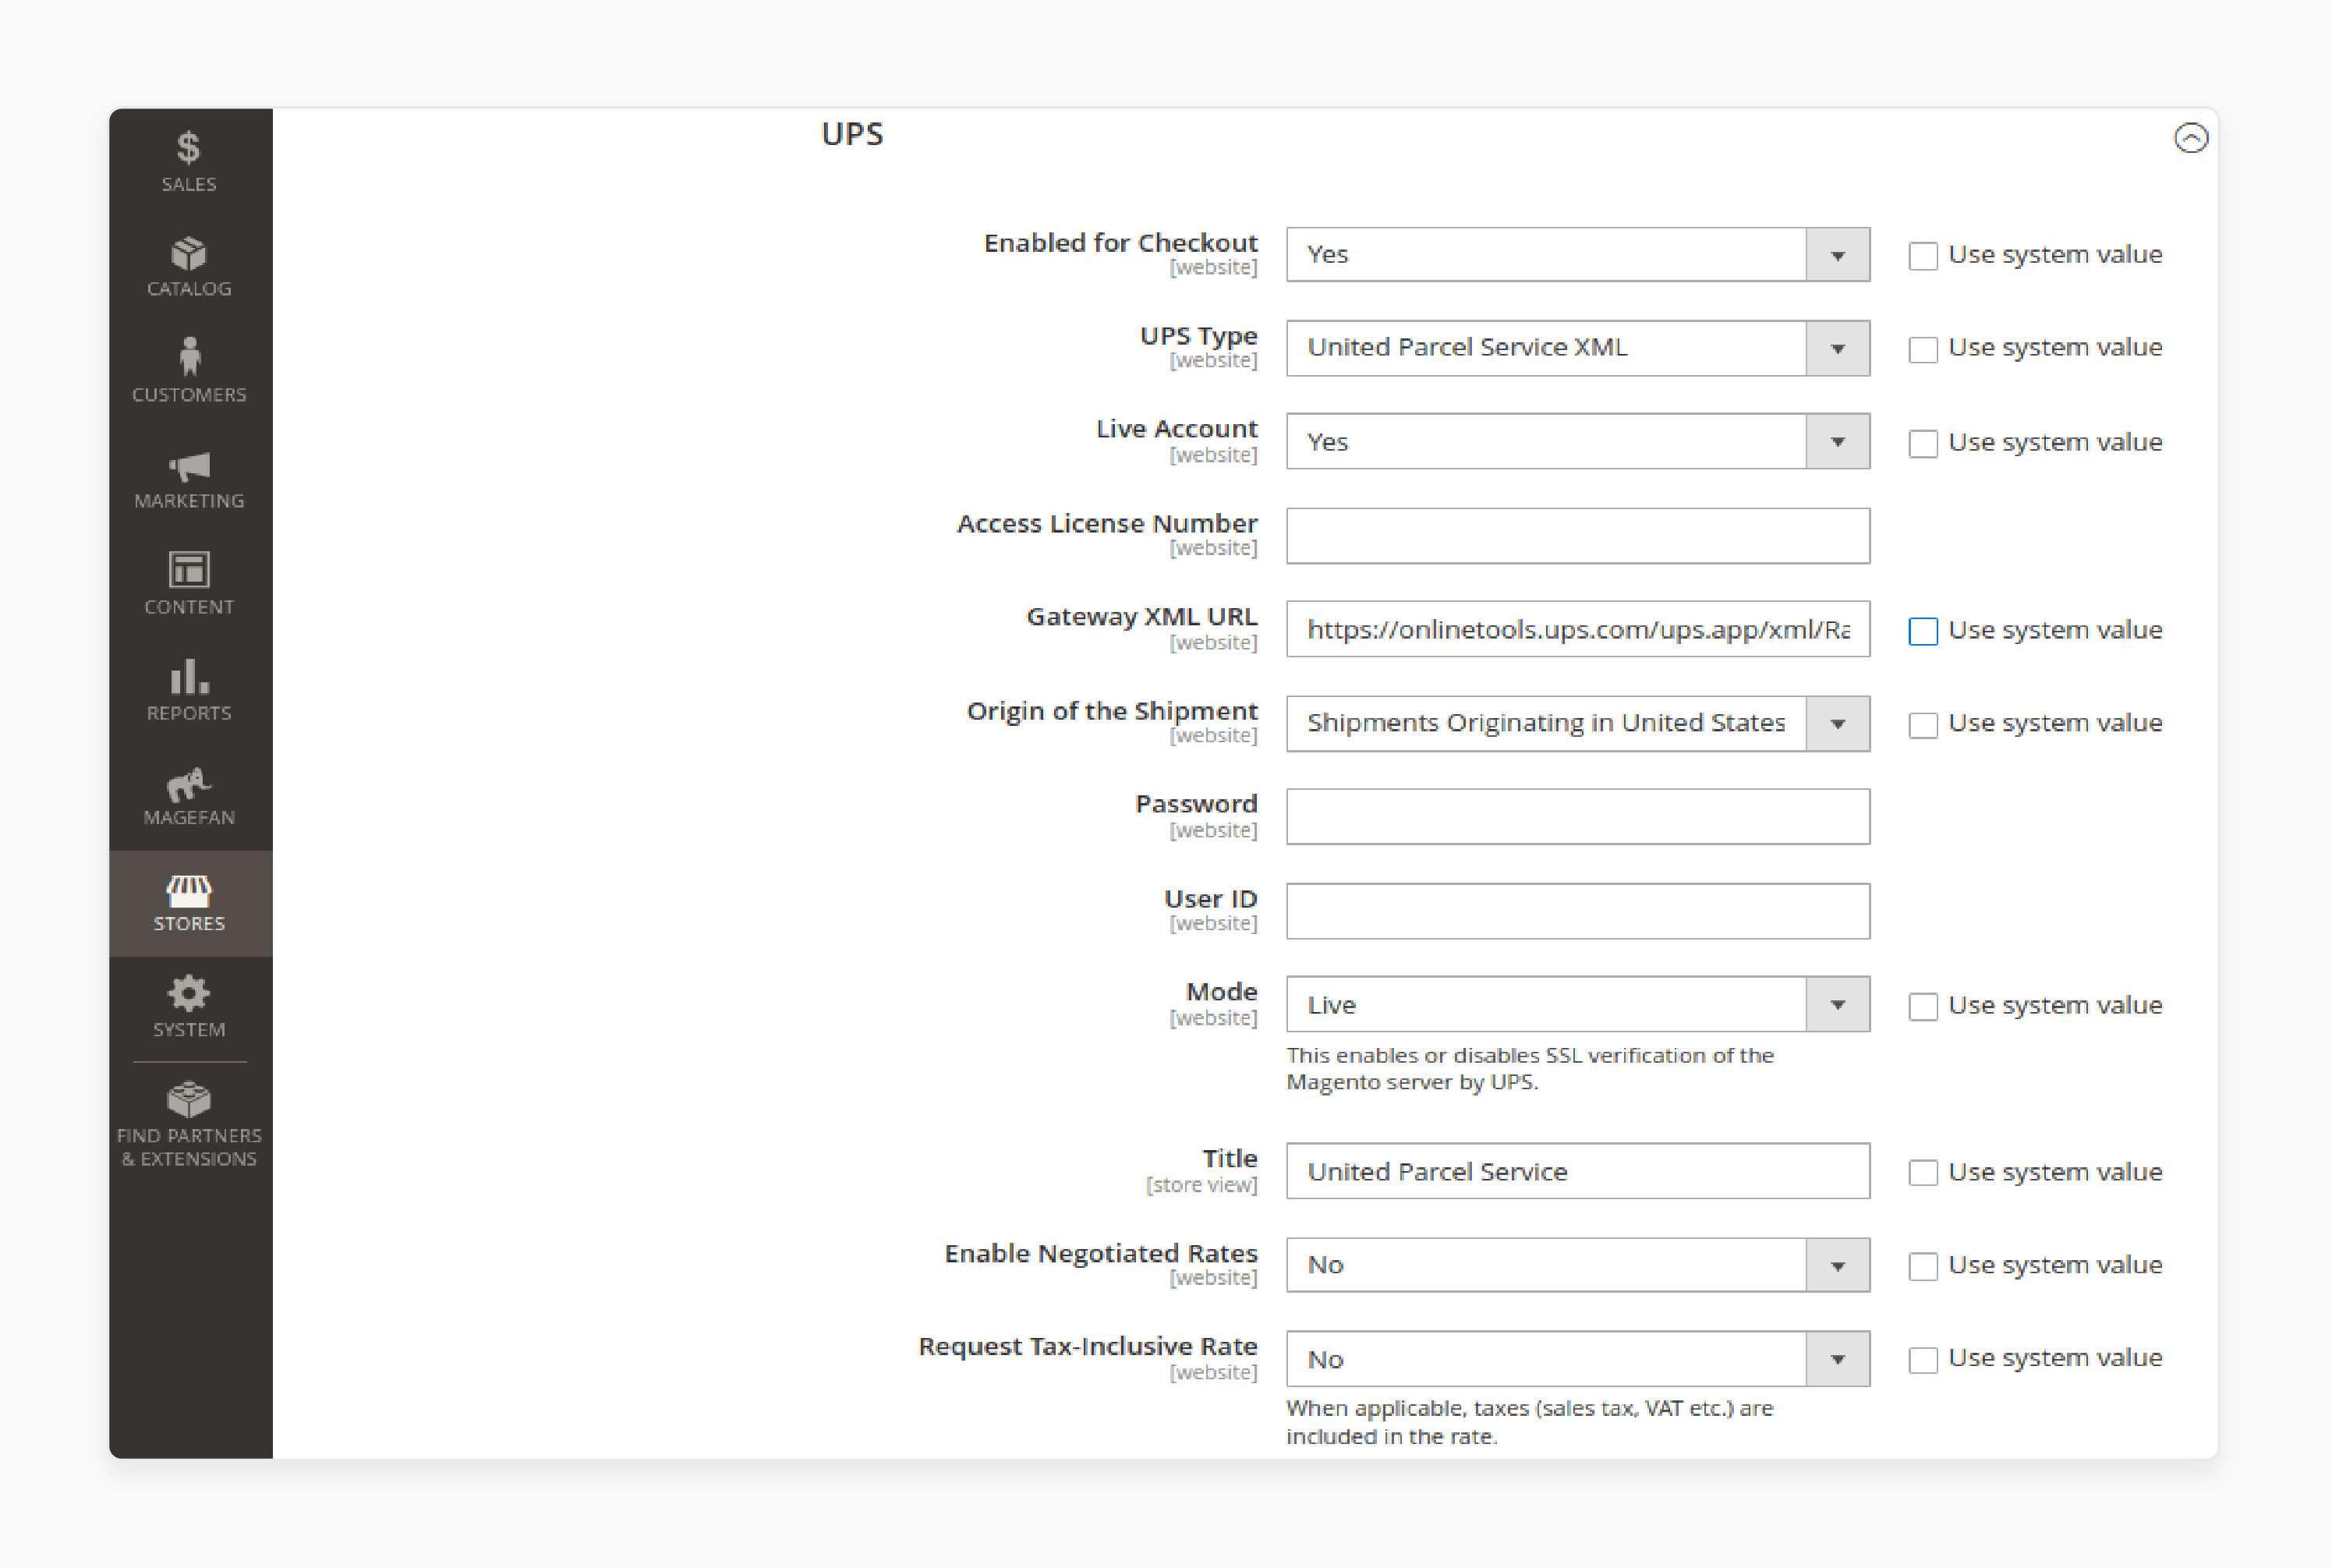
Step 2: UPS Carrier Configuration
- Choose UPS Type: Select either United Parcel Service or United Parcel Service XML.
-
If Using UPS XML:
-
Enter the Access License Number, Password, and User ID from your UPS account.
-
Specify the Gateway XML URL.
-
Choose the Origin of the Shipment.
-
Set the Mode to Live for secure connections.
-
Enable Negotiated Rates if available.
-
Choose whether to include tax-inclusive rates by selecting the Request Tax-Inclusive Rate box.
-
Add the Shipper Number and Tracking XML URL.
-
-
Set the Title: Enter the shipping method title that will appear on the front end.
-
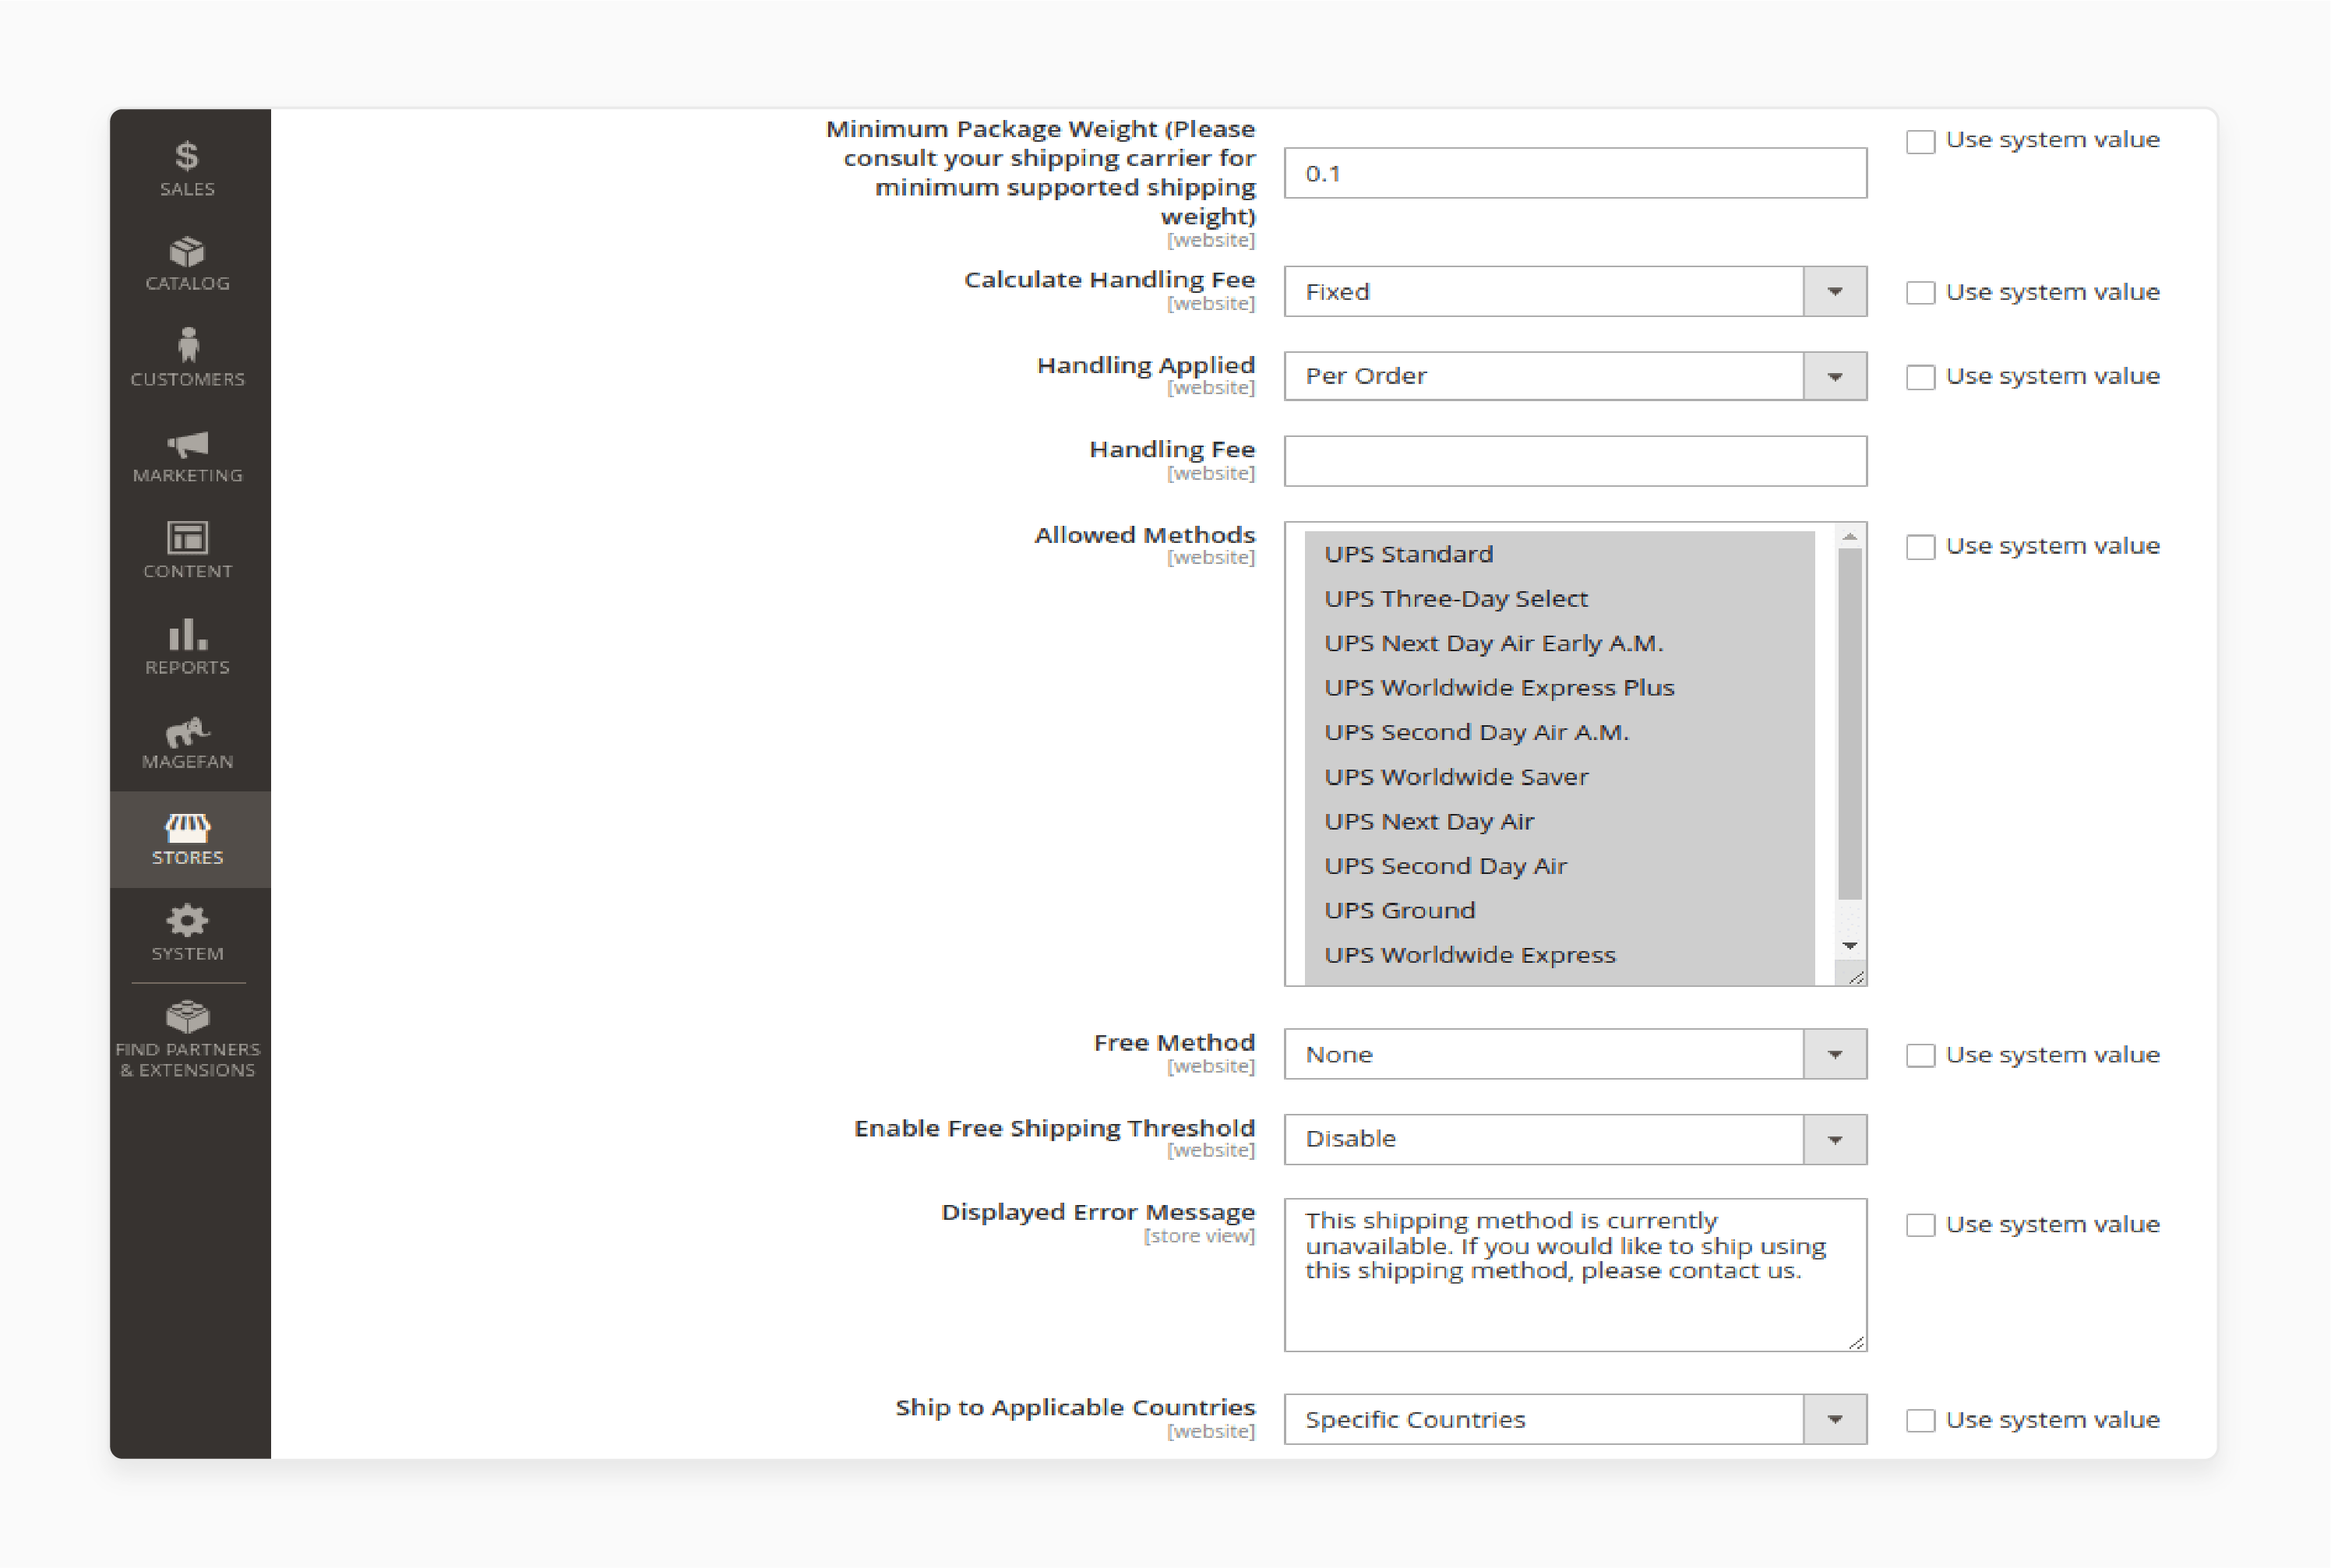
Set Container Description: Provide the details for your container.
-
Handling Fees and Allowed Methods: Set handling fees. Select allowed methods and configure country restrictions.
Step 3: USPS Carrier Configuration
USPS is a reliable carrier for both domestic and international shipments. Follow the steps on how to set it up:
- Enable USPS: Turn on USPS shipping, set its Title, and fill in the necessary fields.
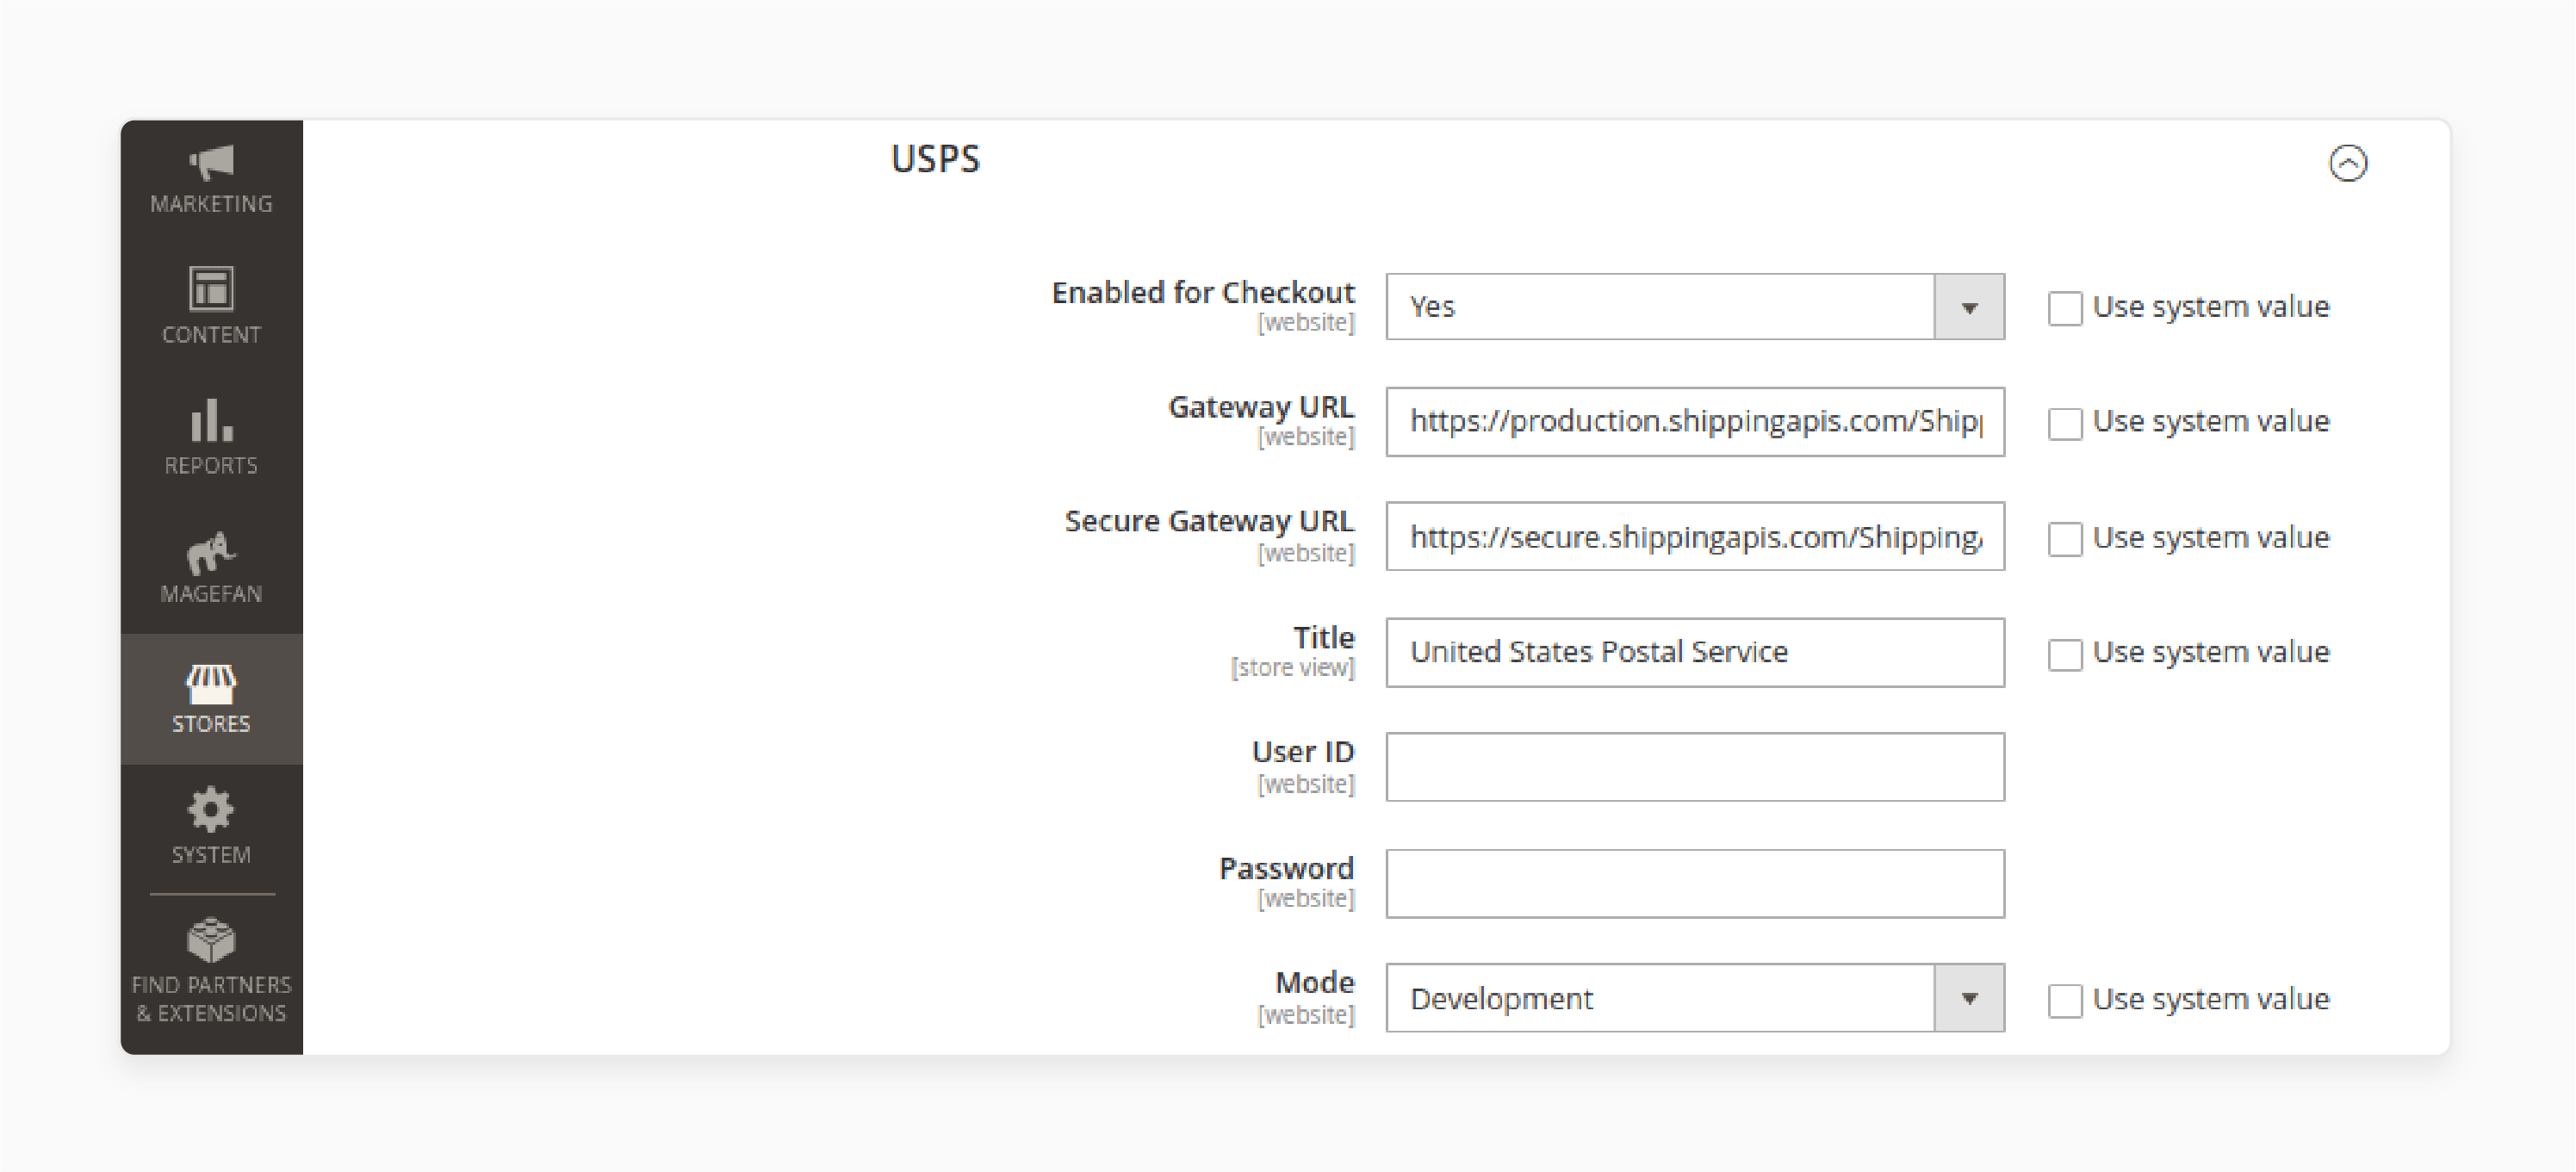
- Enter USPS Credentials: Provide the User ID and Password from your USPS account.
- Add Gateway URLs: Use the preset Gateway URL for USPS and leave it unchanged.
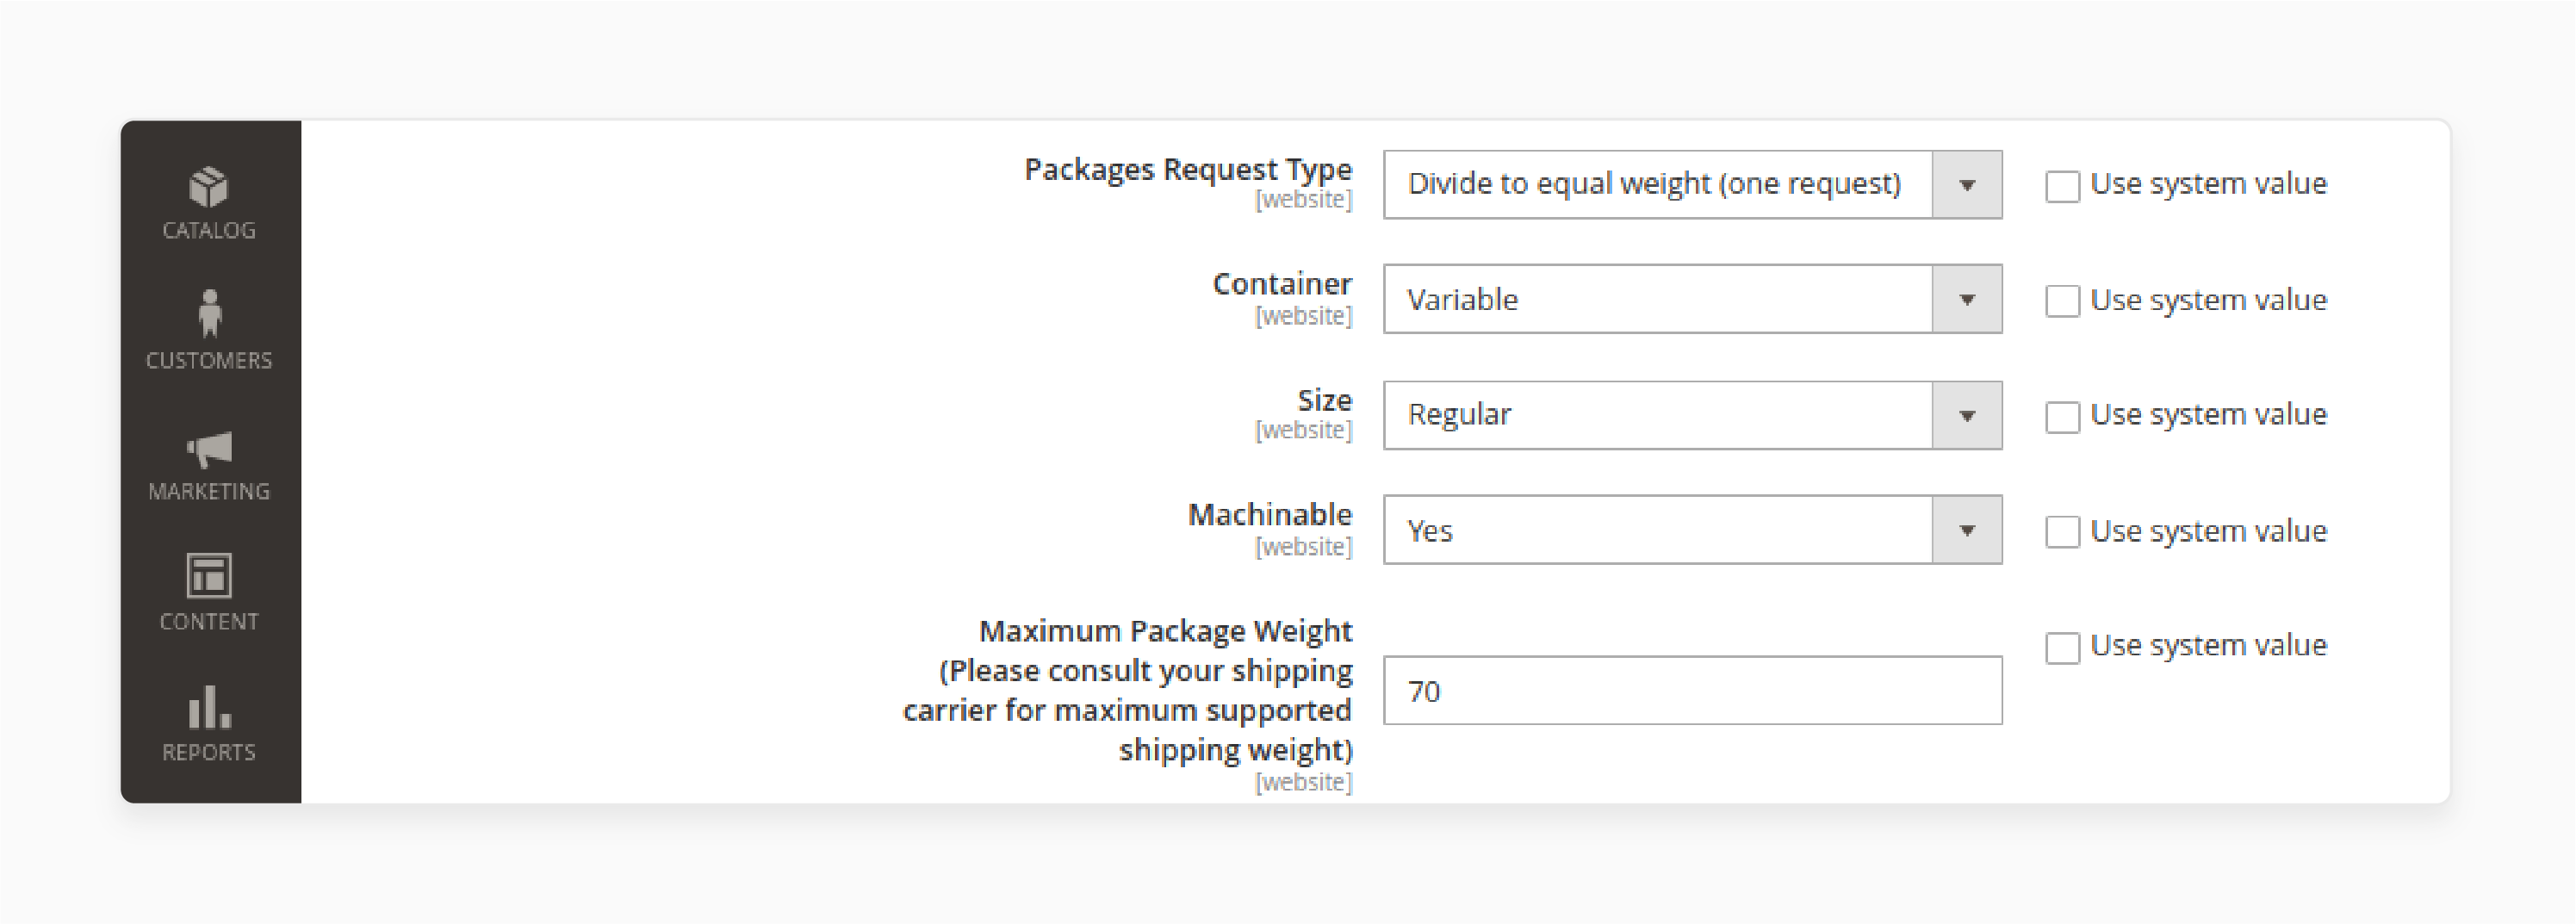
- Package Description: Fill out the following packaging details:
-
Packages Request Type
-
Container Type
-
Size
-
Machinable (if applicable)
-
Maximum Package Weight
- Set Handling Fee: Enter the handling fee, shipping methods, and country restrictions.
Step 4: FedEx Carrier Configuration
-
Enable FedEx: Turn on FedEx and set its Title.
-
Enter FedEx Credentials: Provide your FedEx Account ID, Meter Number, Key, and Password.
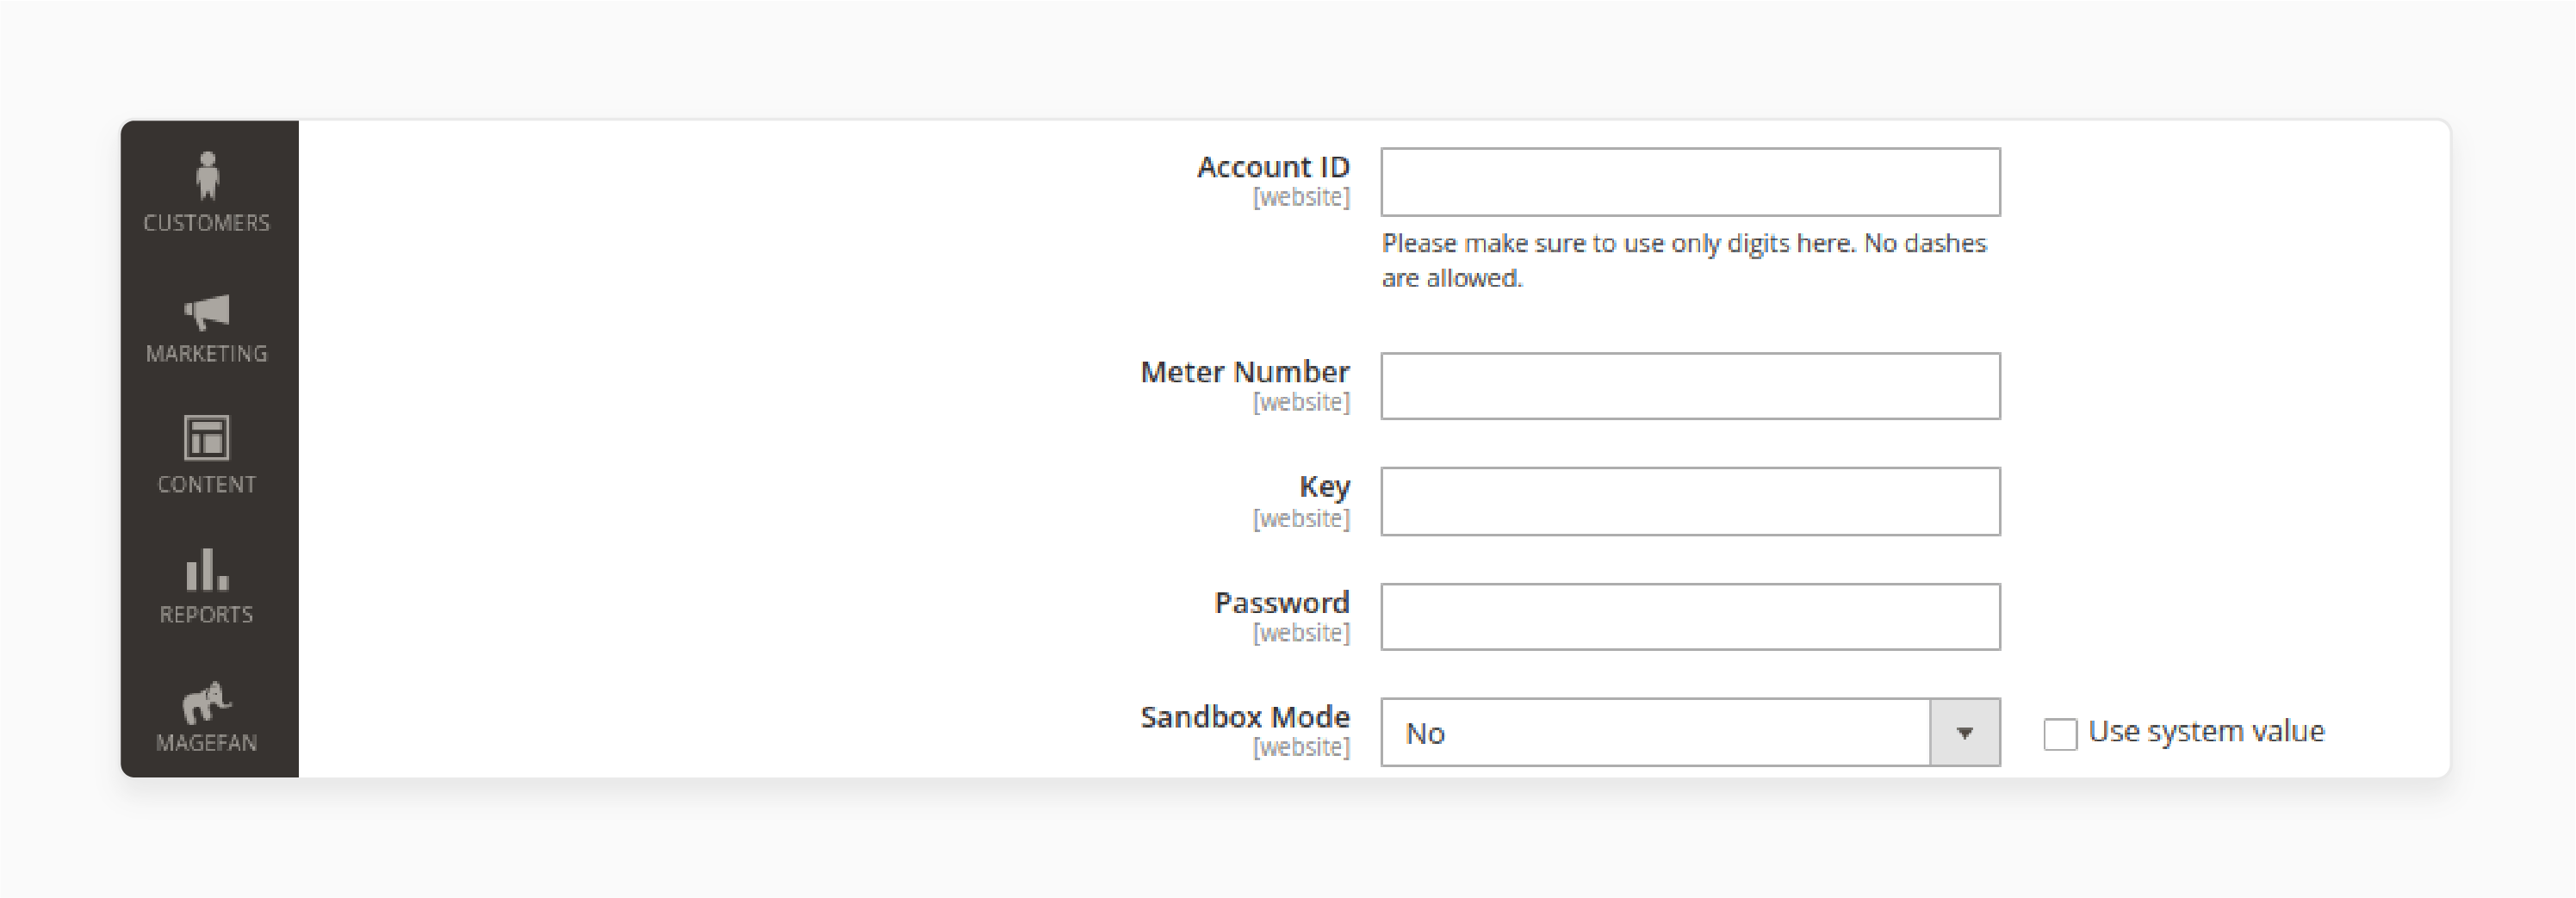
- Enable Sandbox Mode (Optional): Enable Sandbox Mode. It helps to test FedEx shipping before going live.
- Package Description: Enter the packaging and weight details for your shipments.
- Handling Fee and Methods: Set handling fees and choose allowed shipping methods. It defines country restrictions.
Step 5. General Configuration for All Shipping Methods
Once you have configured the shipping methods, make sure to:
-
Save Settings: After completing the setup, save your changes.
-
Offer Various Shipping Methods: By providing a variety of shipping methods, you give customers more options. It can lead to higher conversion rates.
7 Steps to Add a Custom Shipping Carrier Tracker in Magento 2
Step 1: Access Shipping Method Configuration
-
Go to Admin > Stores > Configuration > Sales > Sales > Shipping Methods.
-
In the Tracking Link section, enter the URL of the carrier tracker. It should accept the tracking number as a URL parameter. This is part of the Magento 2 shipping methods setup.
Step 2: Add a New Shipping Method
-
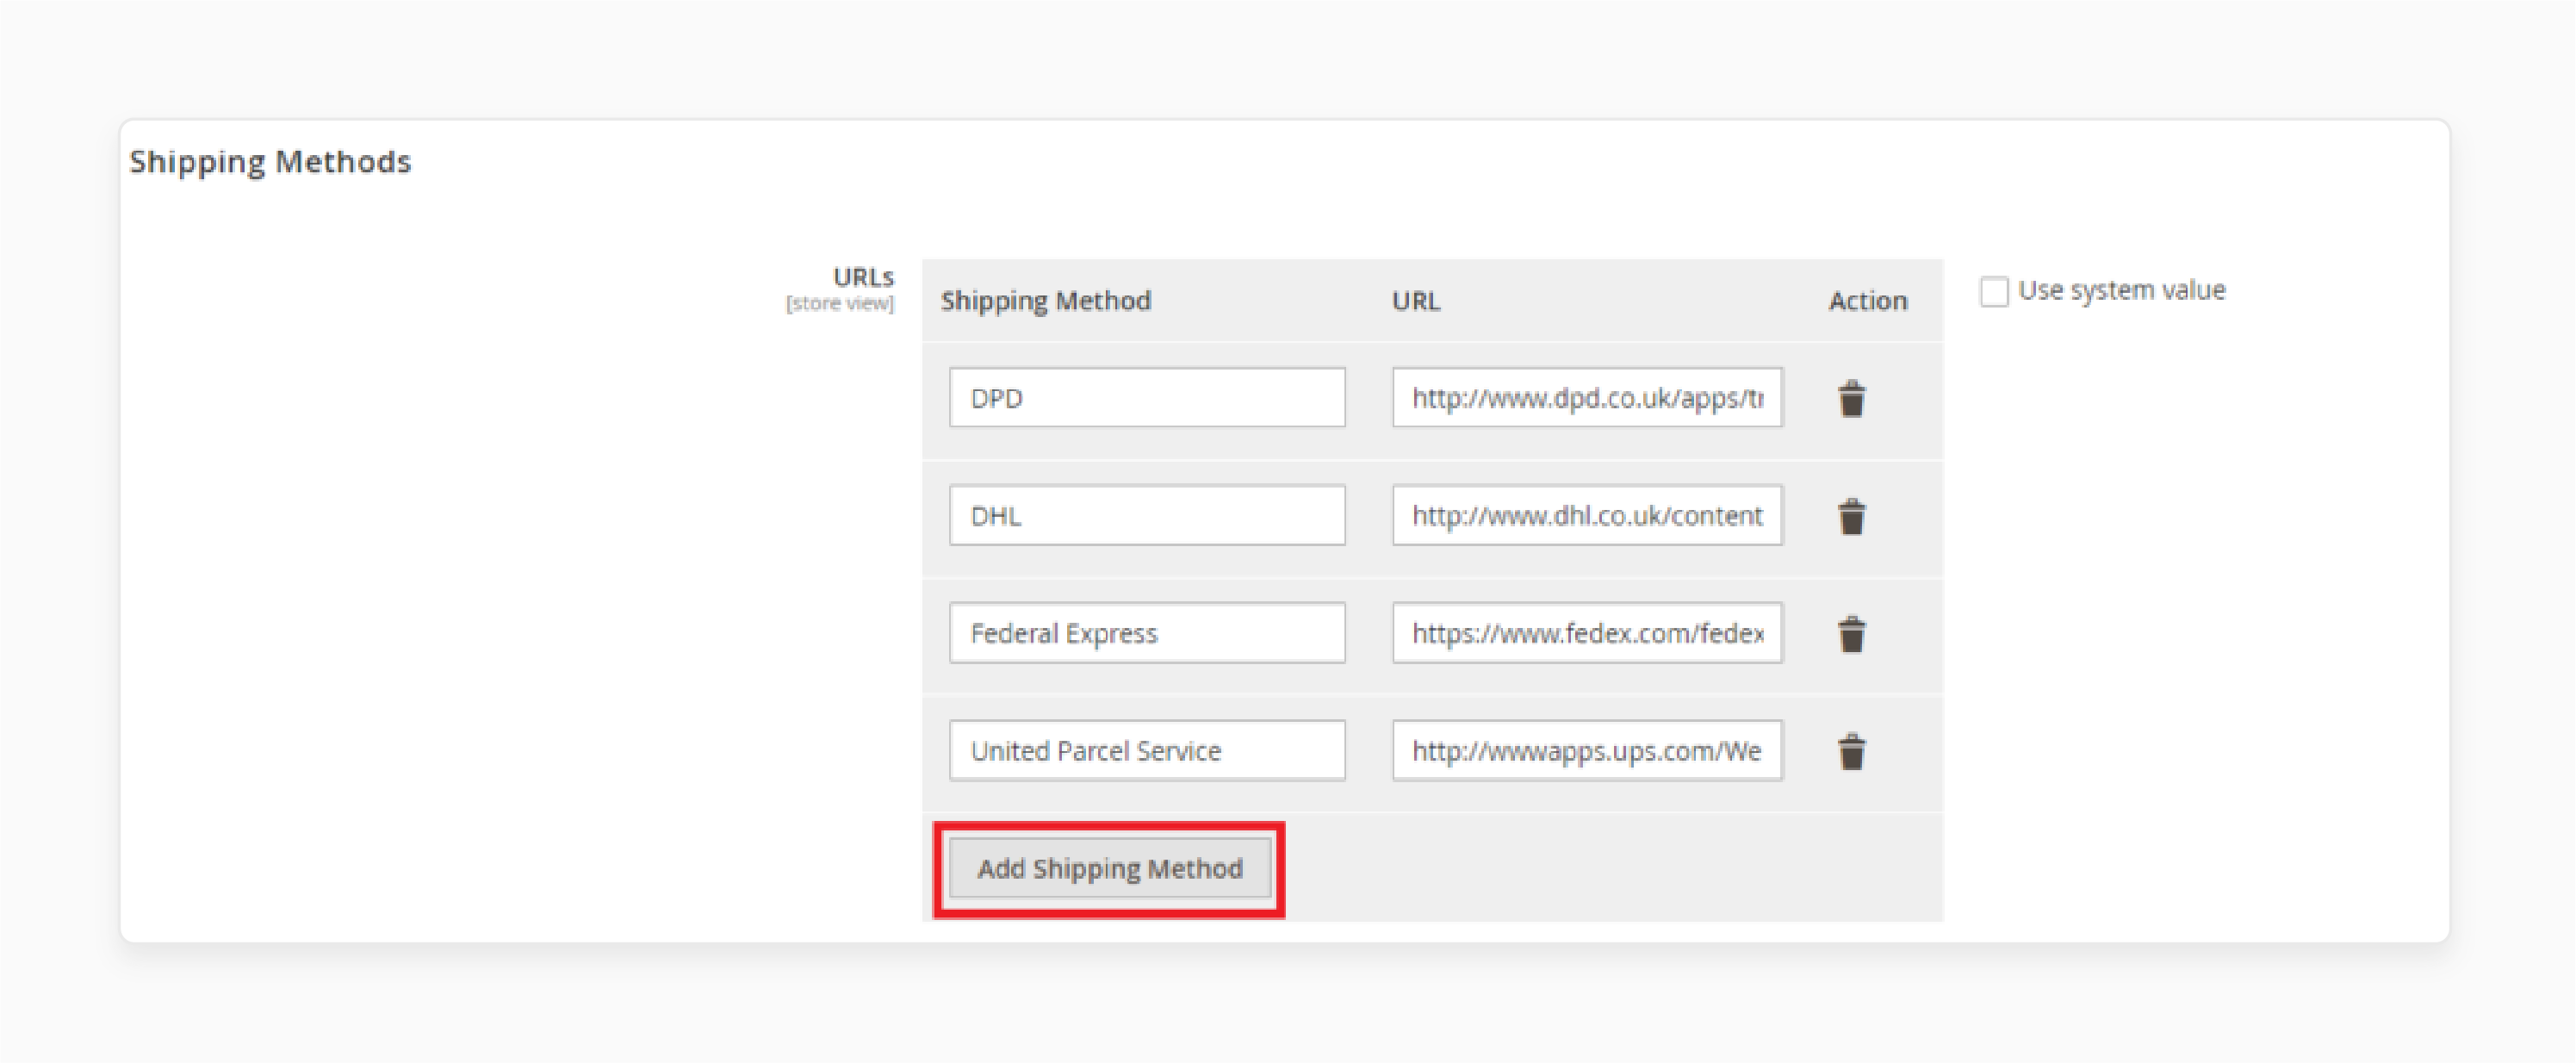
Click on Add Shipping Method to configure dispatch options.
-
Enter the shipping method name and tracking URL for the carrier.
Step 3: Define the Carrier Tracker URL
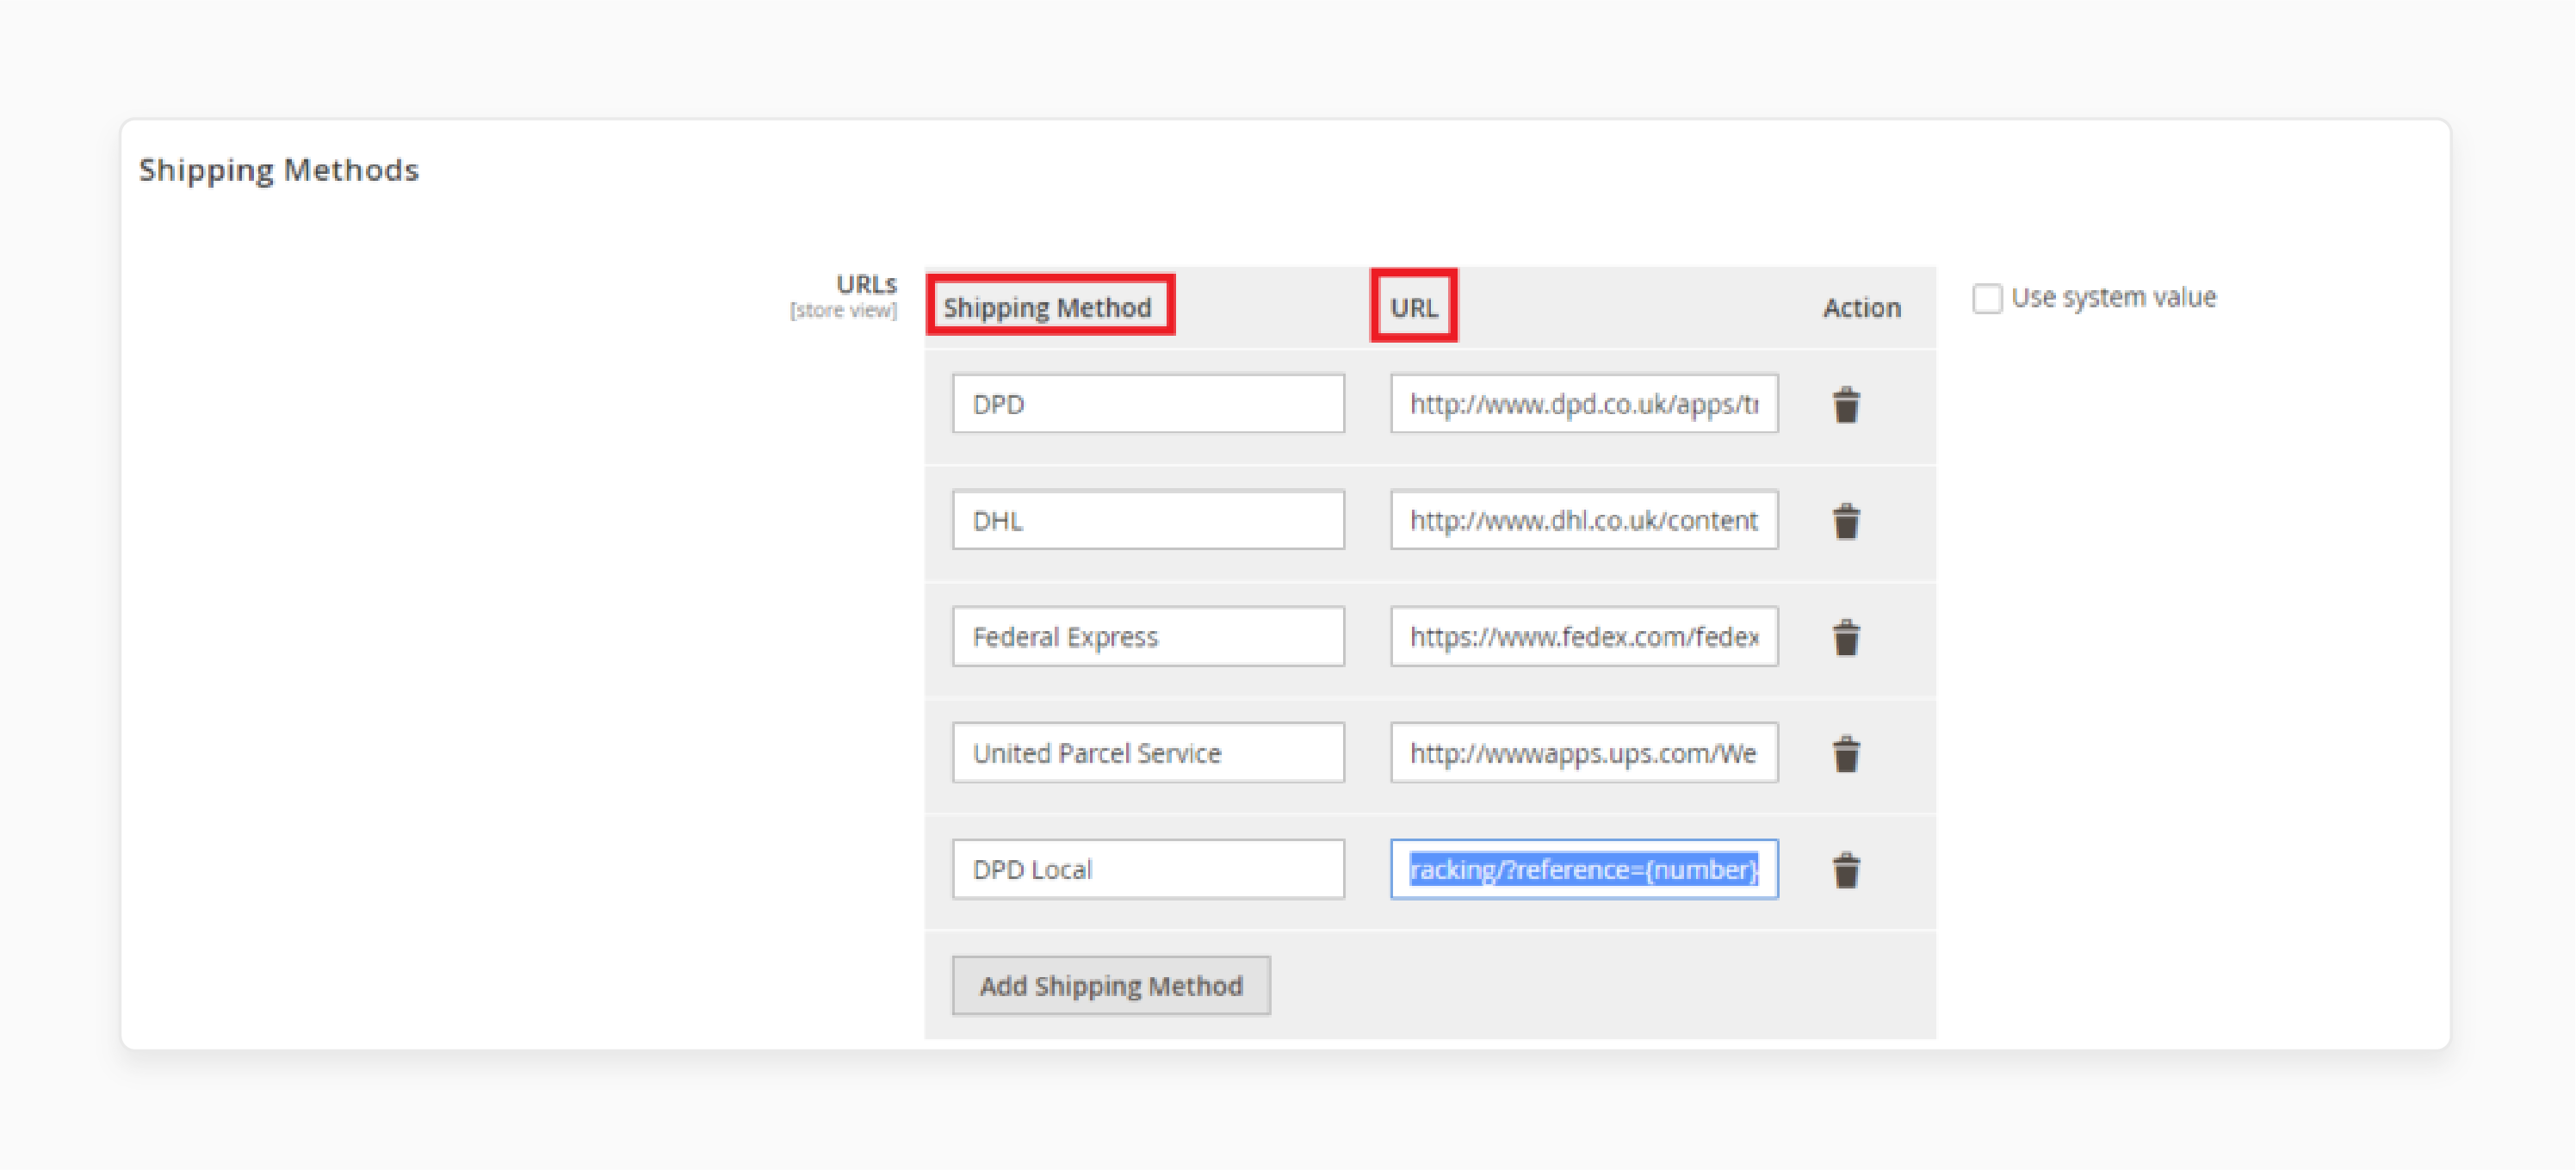
- For example, if you're using DPD Local, enter the following tracking URL:
http://www.dpd.co.uk/apps/tracking/?reference={number}
- Magento will replace {number} with the tracking number from the order automatically.
Step 4: Add the Custom Carrier
-
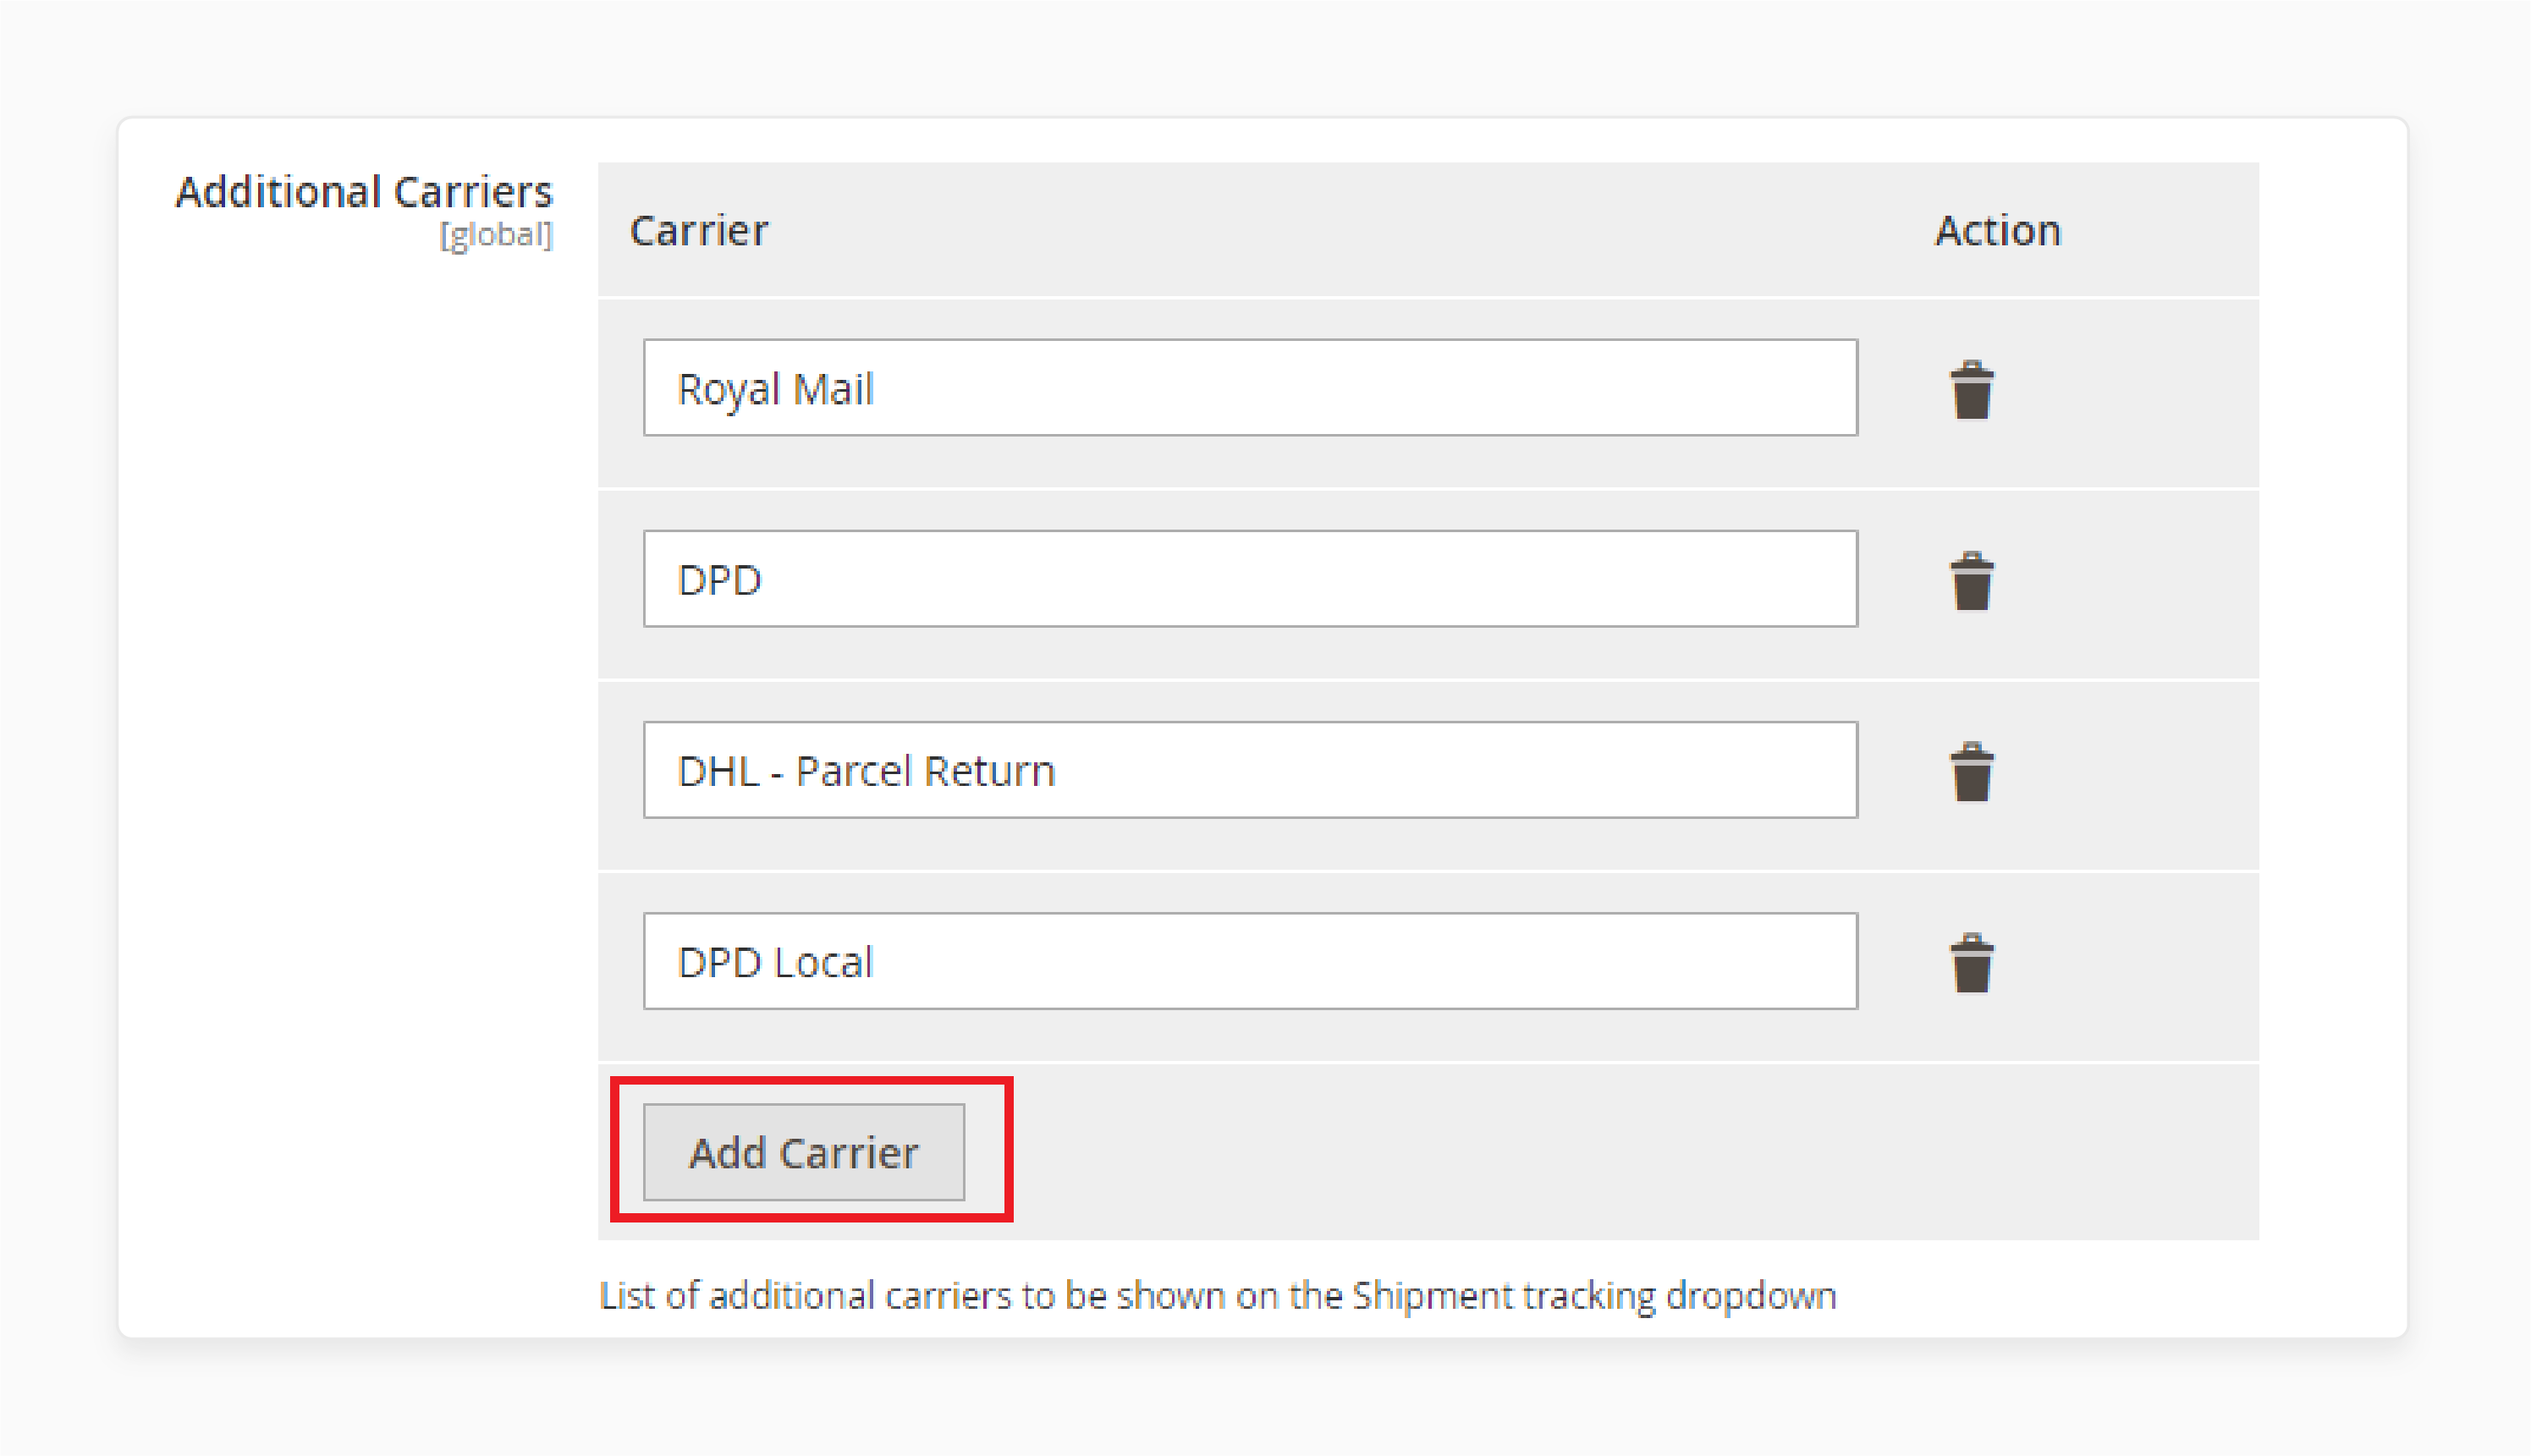
In the Additional Carriers section, click Add Carrier.
-
Enter DPD Local as the carrier name. This carrier will now appear in the dropdown list when tracking numbers are added to orders in Adobe shipping.
Step 5: Create Shipment for an Order

-
Go to Sales > Orders and create a shipment for the order.
-
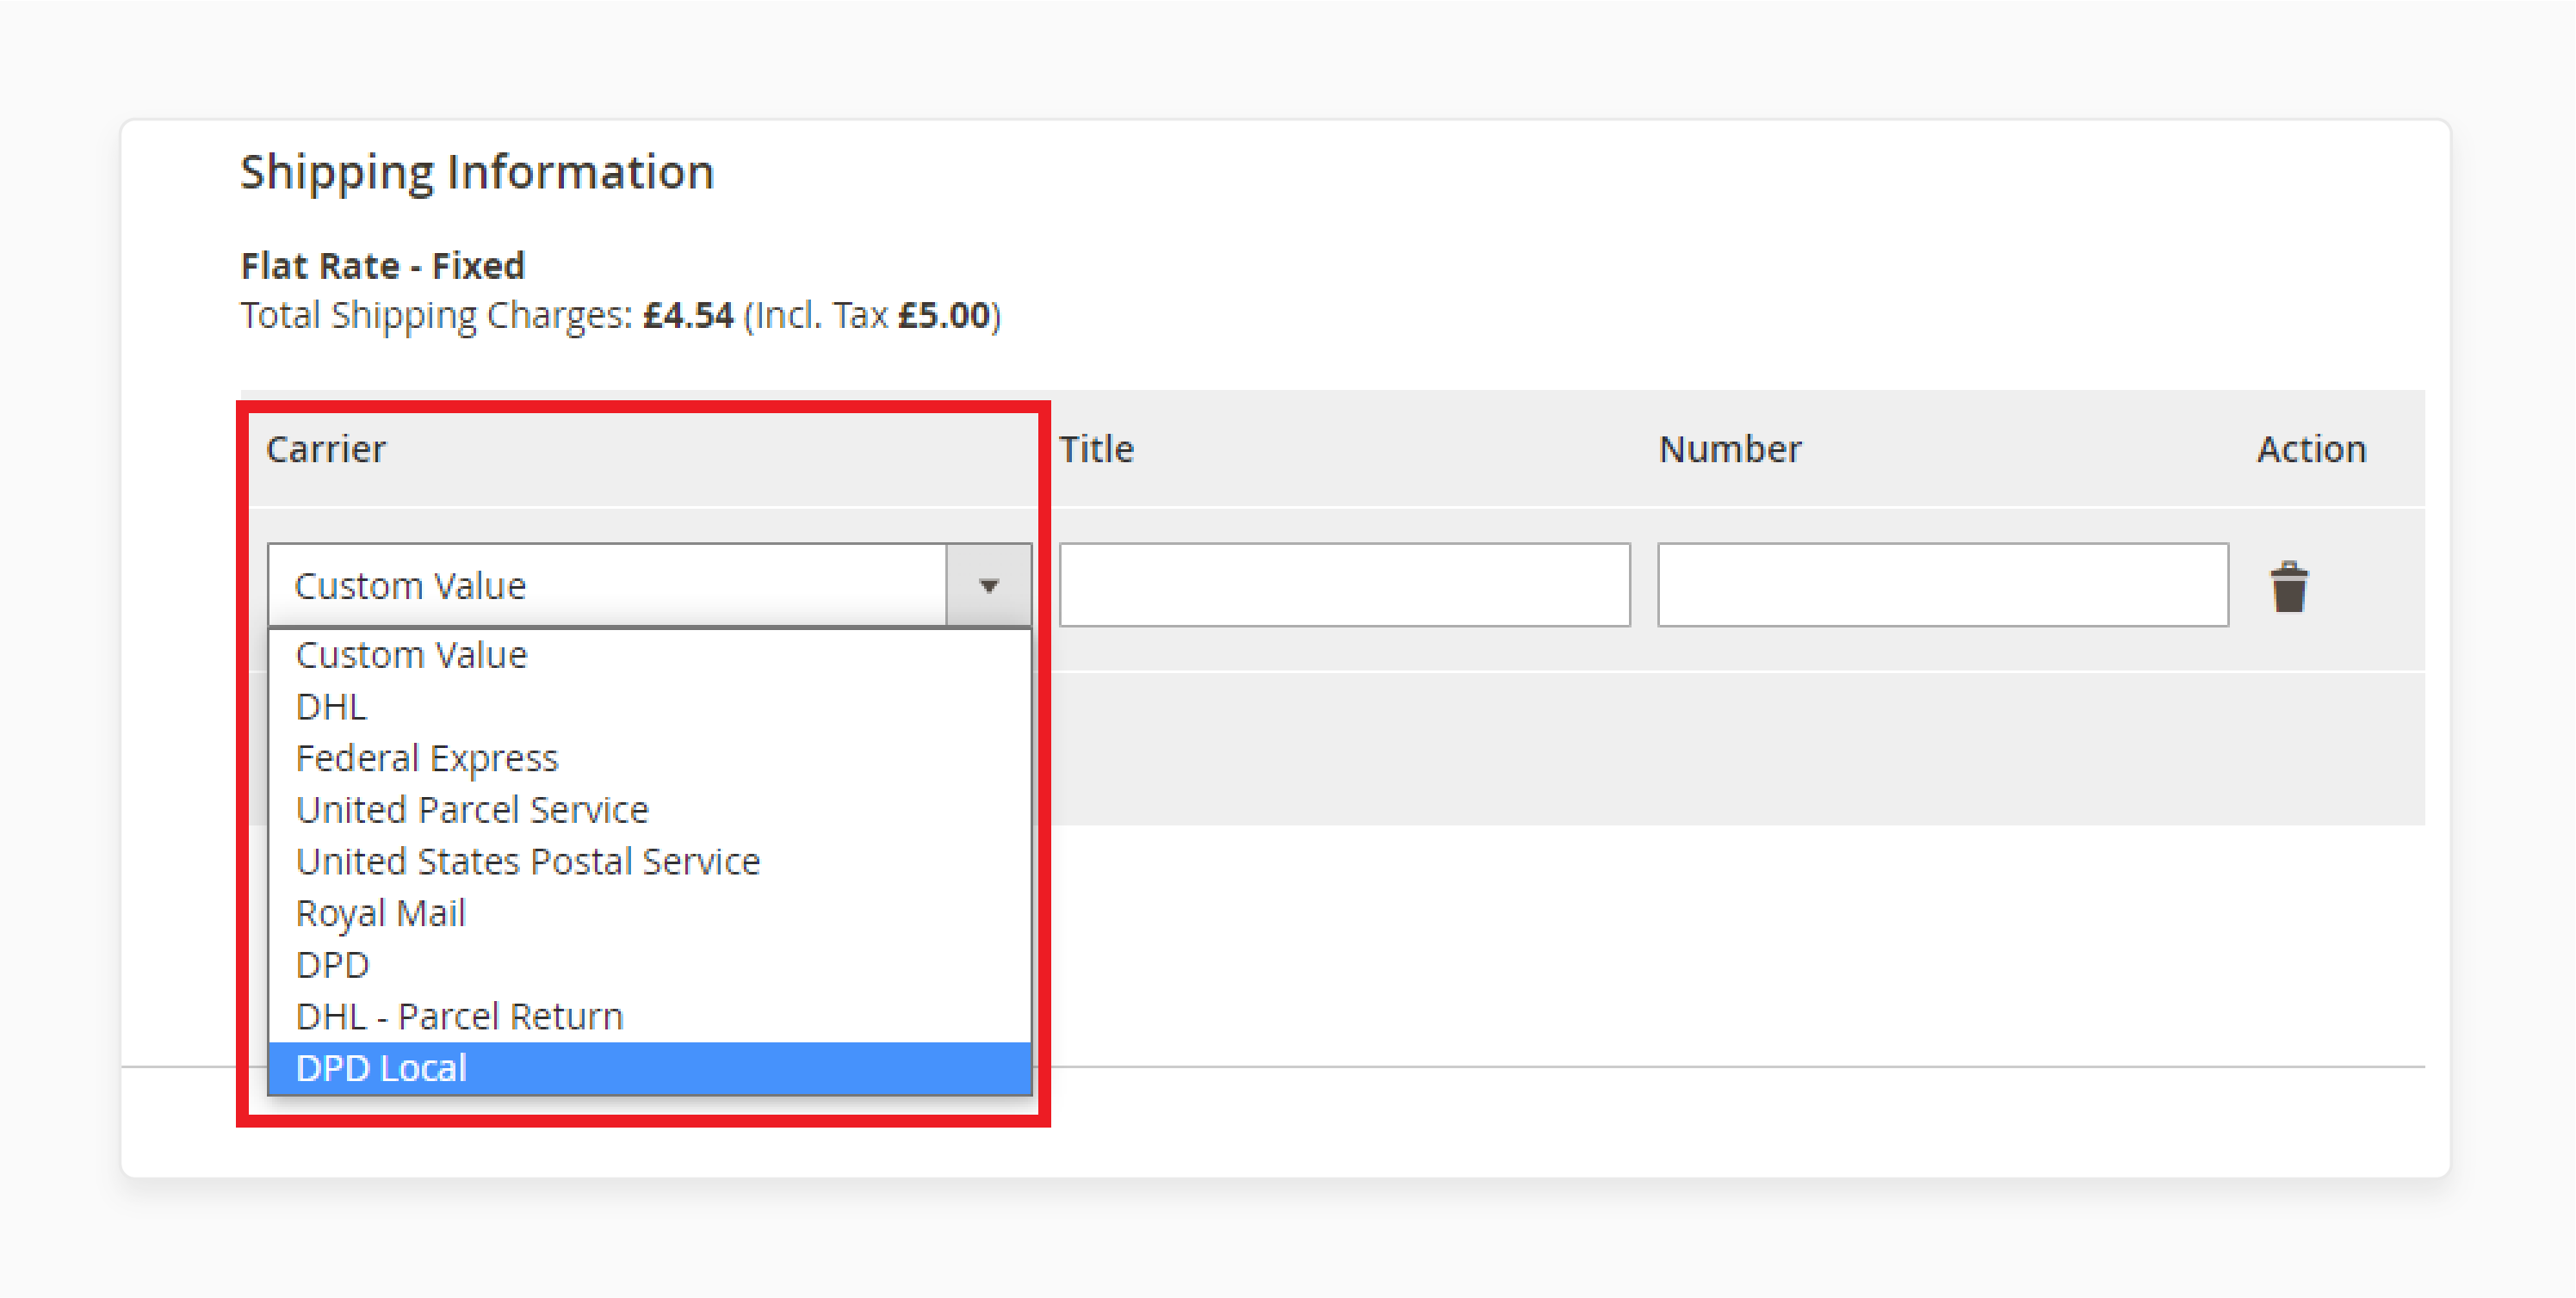
Click Add Tracking Number under Shipping Information.
Step 6: Select the Carrier and Add the Tracking Number
-
In the carrier dropdown list, select DPD Local.
-
The carrier title will appear automatically, as set in shipping methods.
Step 7: Enter the Tracking Number and Create the Shipment
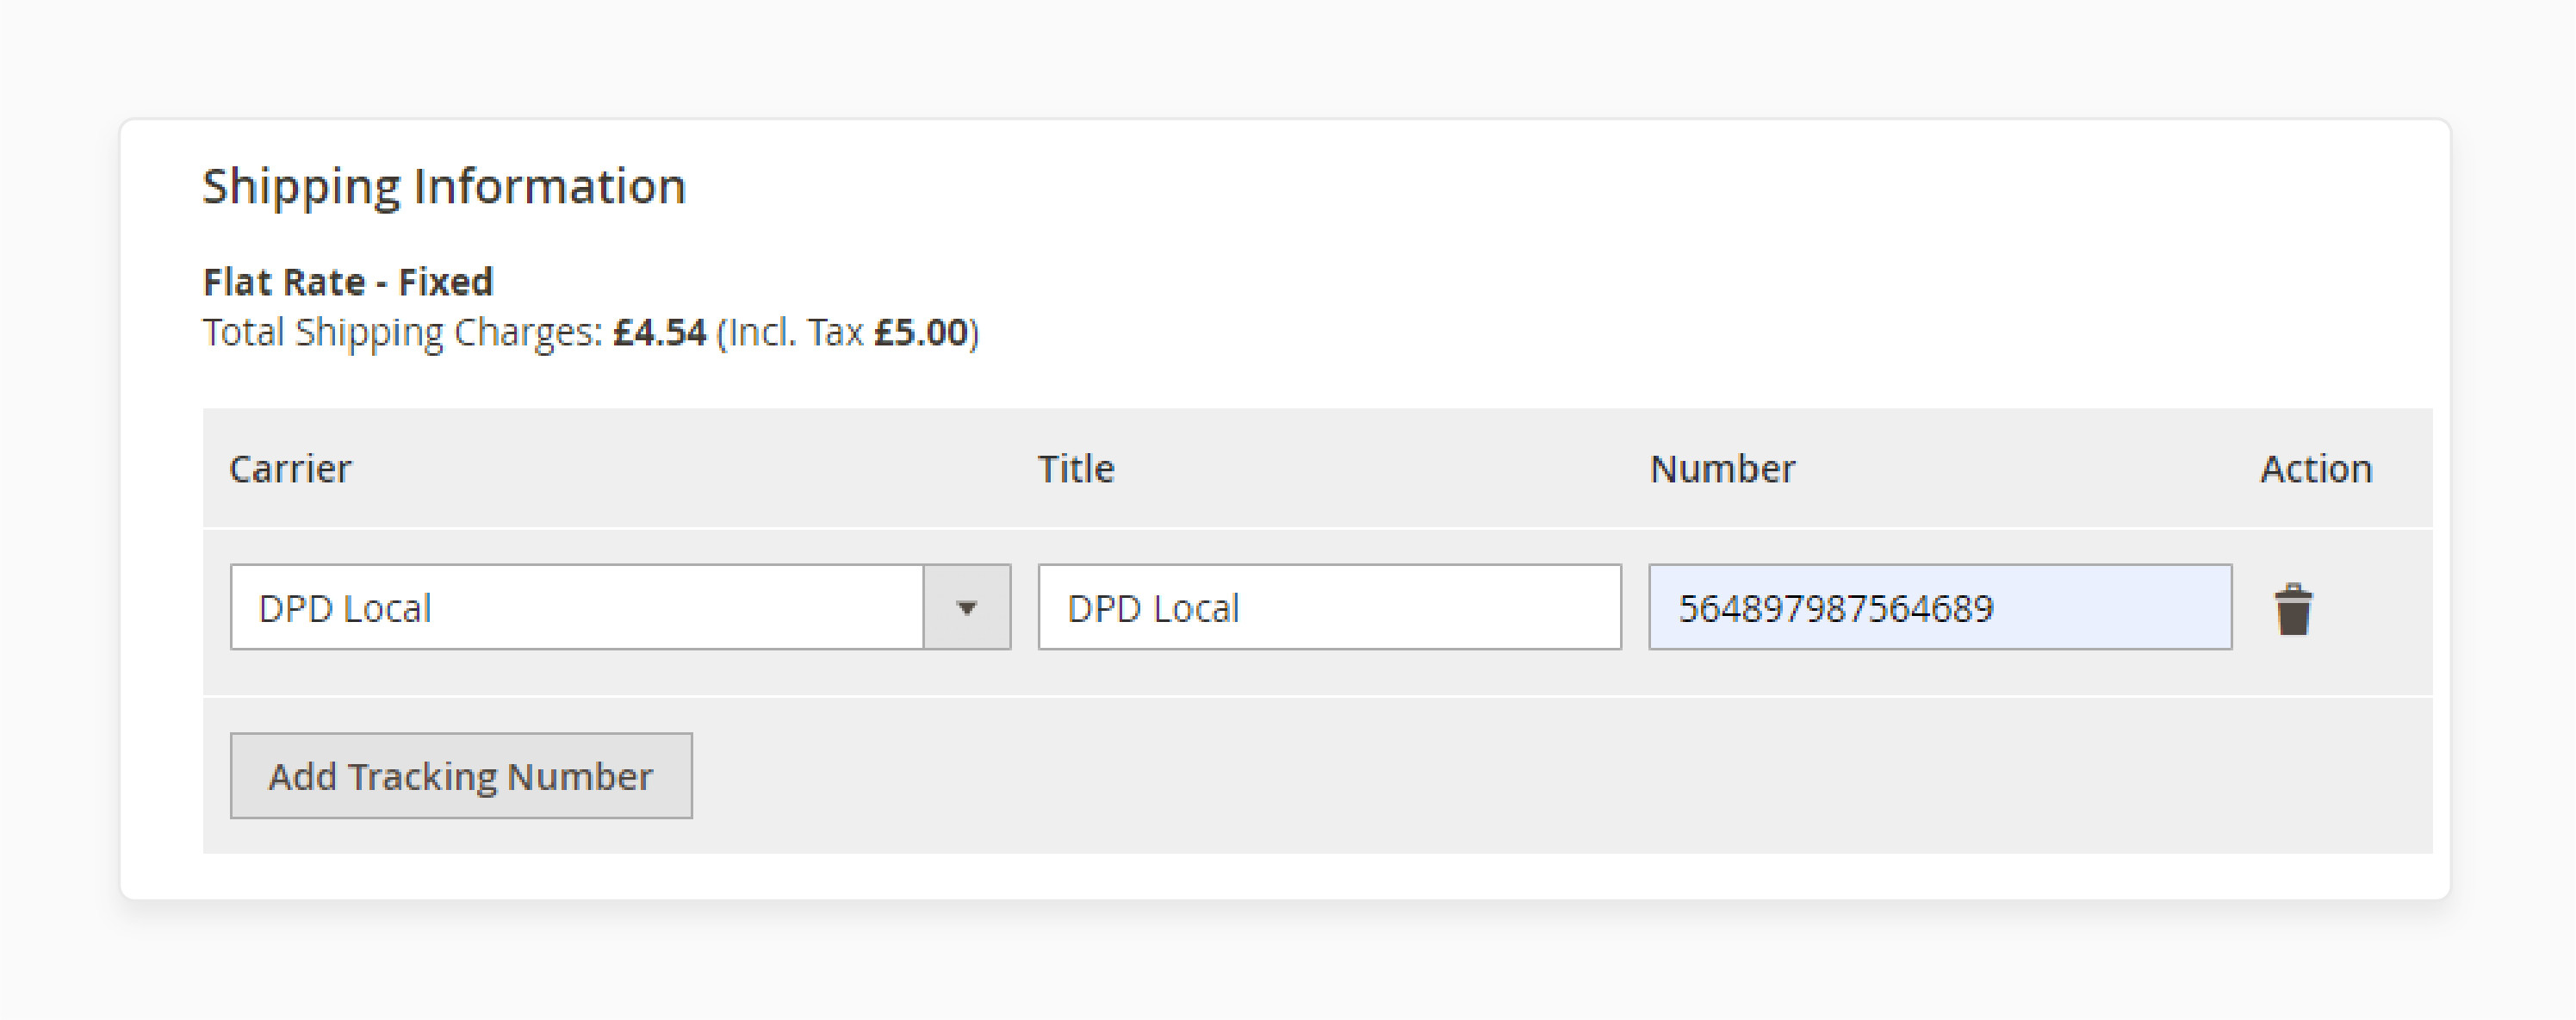
Enter the tracking number and click Create Shipment to complete the process.
Common Issues When Trying to Add Shipping Carrier in Magento
| Issues | Cause | Solution |
|---|---|---|
| API Integration Issues | Incorrect API credentials issues between Magento and the carrier’s API. | Check and make sure the API credentials are correct. Ensure the connection to the shipper’s API server works. |
| Shipping Labels Issues | Misconfigured dispatch module model settings or issues with the carrier’s system. | Ensure the module options and the dispatch are set correctly. Check the carrier’s system and update Magento 2 to provide shipping modules if necessary. |
| Rates Not Displaying | Incorrect setup of Magento dispatch methods or missing shipping origin address. | Verify the dispatch options settings. Ensure the correct shipping origin address is entered. Check dispatch and tax settings. |
| Carrier Not Updating | Cache or index issues or Magento 2's configuration settings are not refreshed. | Clear Magento cache, reindex data, and refresh the configuring carriers settings. |
| Carrier Not Appearing | Incorrect shipping method settings or availability restrictions. | Enable the dispatch module model. Check the visibility conditions for the shipping method and ensure it's available for the right countries. |
| Shipping Issues | Errors in the code for custom shipping methods or missing settings. | Check and fix the code for the custom delivery. Ensure the settings are correct in the backend. |
| Method Conflict | Overlapping or conflicting shipping rules. | Review the shipping policy to make sure no shipping methods conflict. |
| Free Shipping Issues | The free method is not set up correctly, or the limit order value is not met. | Review the enable the dispatch setup. Ensure the free dispatch threshold is correctly applied. |
FAQs
1. How do I add a new shipping carrier in Magento 2?
To add a new shipper, go to delivery settings in the admin panel. You can choose from the available dispatch options, such as UPS, or create a dispatch method. If you want to use a custom carrier, enter the carrier’s details and configure it.
2. Can I customize the default shipping choices in Adobe?
You can change the default dispatch method. Go to the shipping setup and select a new method, like UPS or flat-rate shipping.
3. How can I calculate handling fees?
You can calculate handling fees under delivery settings. Set rules based on weight, order value, or shipping destination. It automatically adds handling fees during payment.
4. How does Magento 2 handle different shipping methods for various products?
Magento lets you set dispatch rules for distinct products. This means that each product can have its own shipping method. This ensures the best option is used for each product.
5. How do I track the performance of my shipping carriers in Magento 2?
To track how your carriers are performing, use Magento reports in delivery settings. These show details on dispatch fees in dispatch. It helps you make adjustments if needed.
Summary
Magento 2 Add Shipping Carrier lets store owners customize carriers. The feature allows you to choose from different shipping methods for your business. By creating a custom shipper, you can offer a range of delivery options. Consider the following features:
-
Carrier Integration: Connects with many carriers, offering more choices.
-
Live Dispatch Fee: Shows live dispatch costs at payment based on location.
-
Free Delivery Integration: It lets you offer free dispatch for orders over a set amount.
Explore Magento hosting services and easily add a shipping carrier to improve your store’s delivery options.


