Magento 2 Add Facebook Pixel Code
Unsure about how to add Facebook Pixel code to your Magento 2 store? Facebook Pixel is used on 11.1-17.6% of websites and helps businesses optimize Facebook Ads by tracking user actions. This article will guide you all about adding Facebook Pixel to Magento 2.
Key Takeaways:
-
Explore how Magento Facebook pixel tracks visitors on your Magento 2 store to optimize ad campaigns.
-
Learn about the manual method to add code and use an extension alternatively for a simpler approach.
-
Know how to check and verify if the pixel is working correctly with Facebook Events Manager tools and browser extensions.
-
Test and troubleshoot after set up to guarantee the Pixel tracks the desired customer actions on your Magento 2 store.
What is Facebook Pixel?
The Facebook Pixel is a snippet of JavaScript code you place on your Magento 2 store's website. This code tracks various customer actions, such as:
- Adding products to the cart
- Making purchases
- Browsing specific product pages
The Facebook Pixel facilitates the collection of customer website behavior data, which is subsequently transmitted to your Facebook advertising account. This data empowers you to construct targeted advertising campaigns specifically geared toward individuals who have undertaken predefined actions on your website
For example, you can create an ad offering a discount code specifically targeting customers. People who added products to their cart in the last 30 days but didn't purchase. Alternatively, you could cross-sell related products to people who recently made a purchase. Targeting people who already expressed interest in your products generally results in higher conversion rates.
Facebook Pixel allows you to:
1. Target the right audience
Create Facebook ads targeted towards specific customer segments based on their actions on your website.
2. Optimize ad campaigns
Track the effectiveness of your ad campaigns and make adjustments to improve performance.
3. Measure campaign results
See how your ads are driving conversions on your Magento 2 store.
4. Retarget website visitors
Reach out to people who have already shown interest in your products or services with targeted ads.
Setting Up Facebook Pixel in Magento 2
Manual Code Installation
Step 1: Create Your Facebook Pixel
-
Log in to your Facebook Business Manager account.
-
In the left pane, click All tools.
-
Navigate to the Events Manager section. You can also search for it.
-
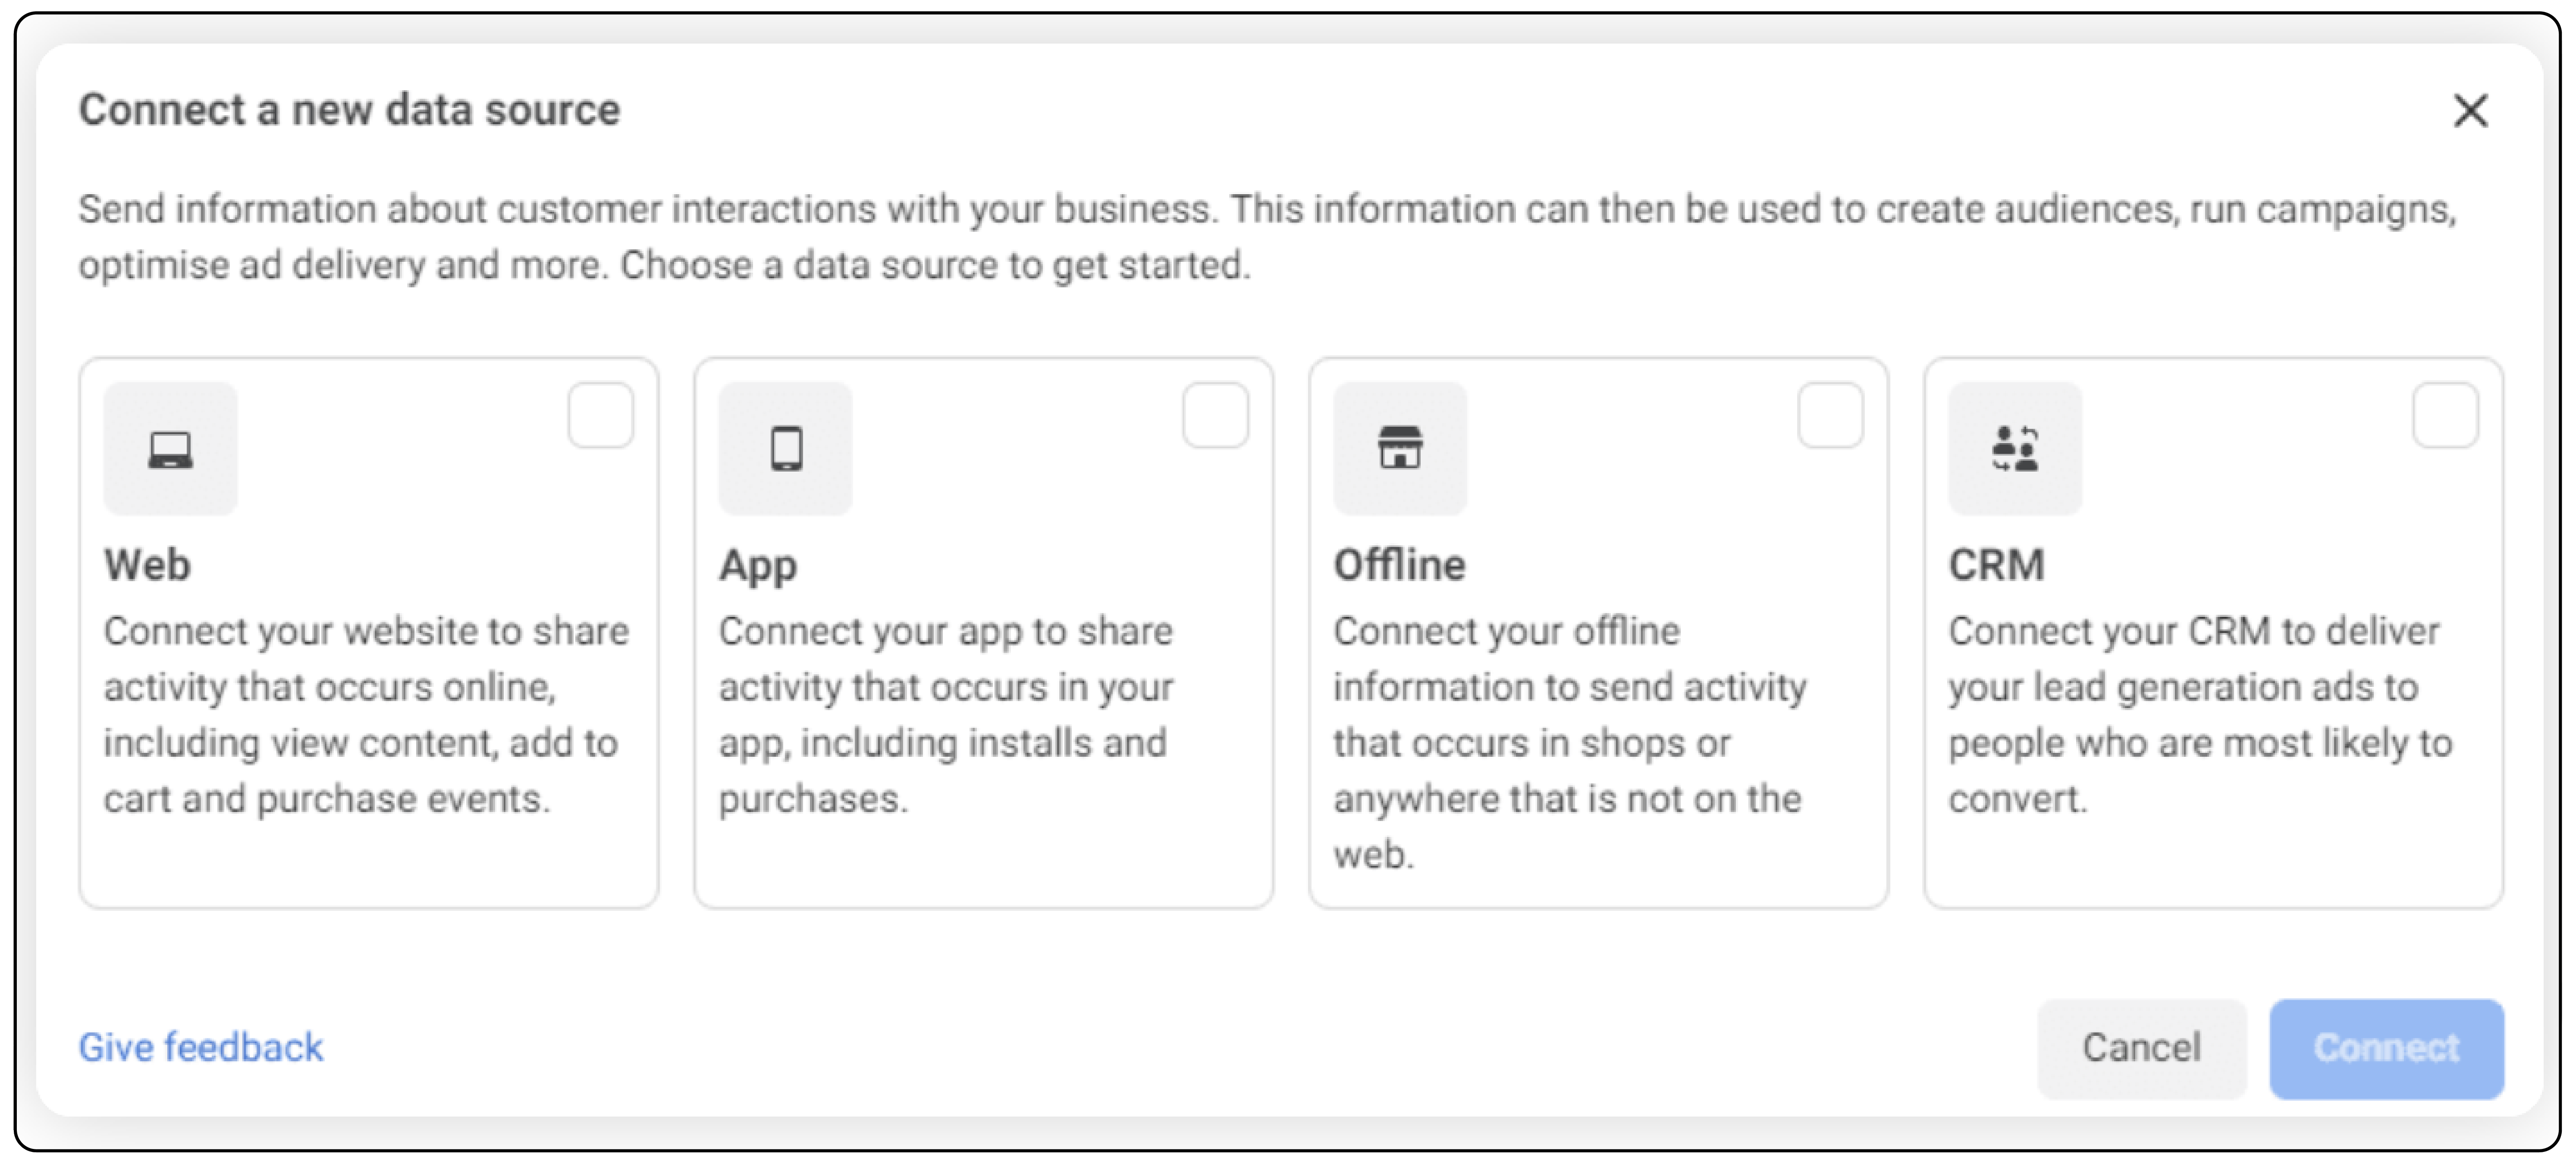
Click Connect a Data Source and choose Web.

-
Follow the prompts to create a new pixel or select an existing one.
-
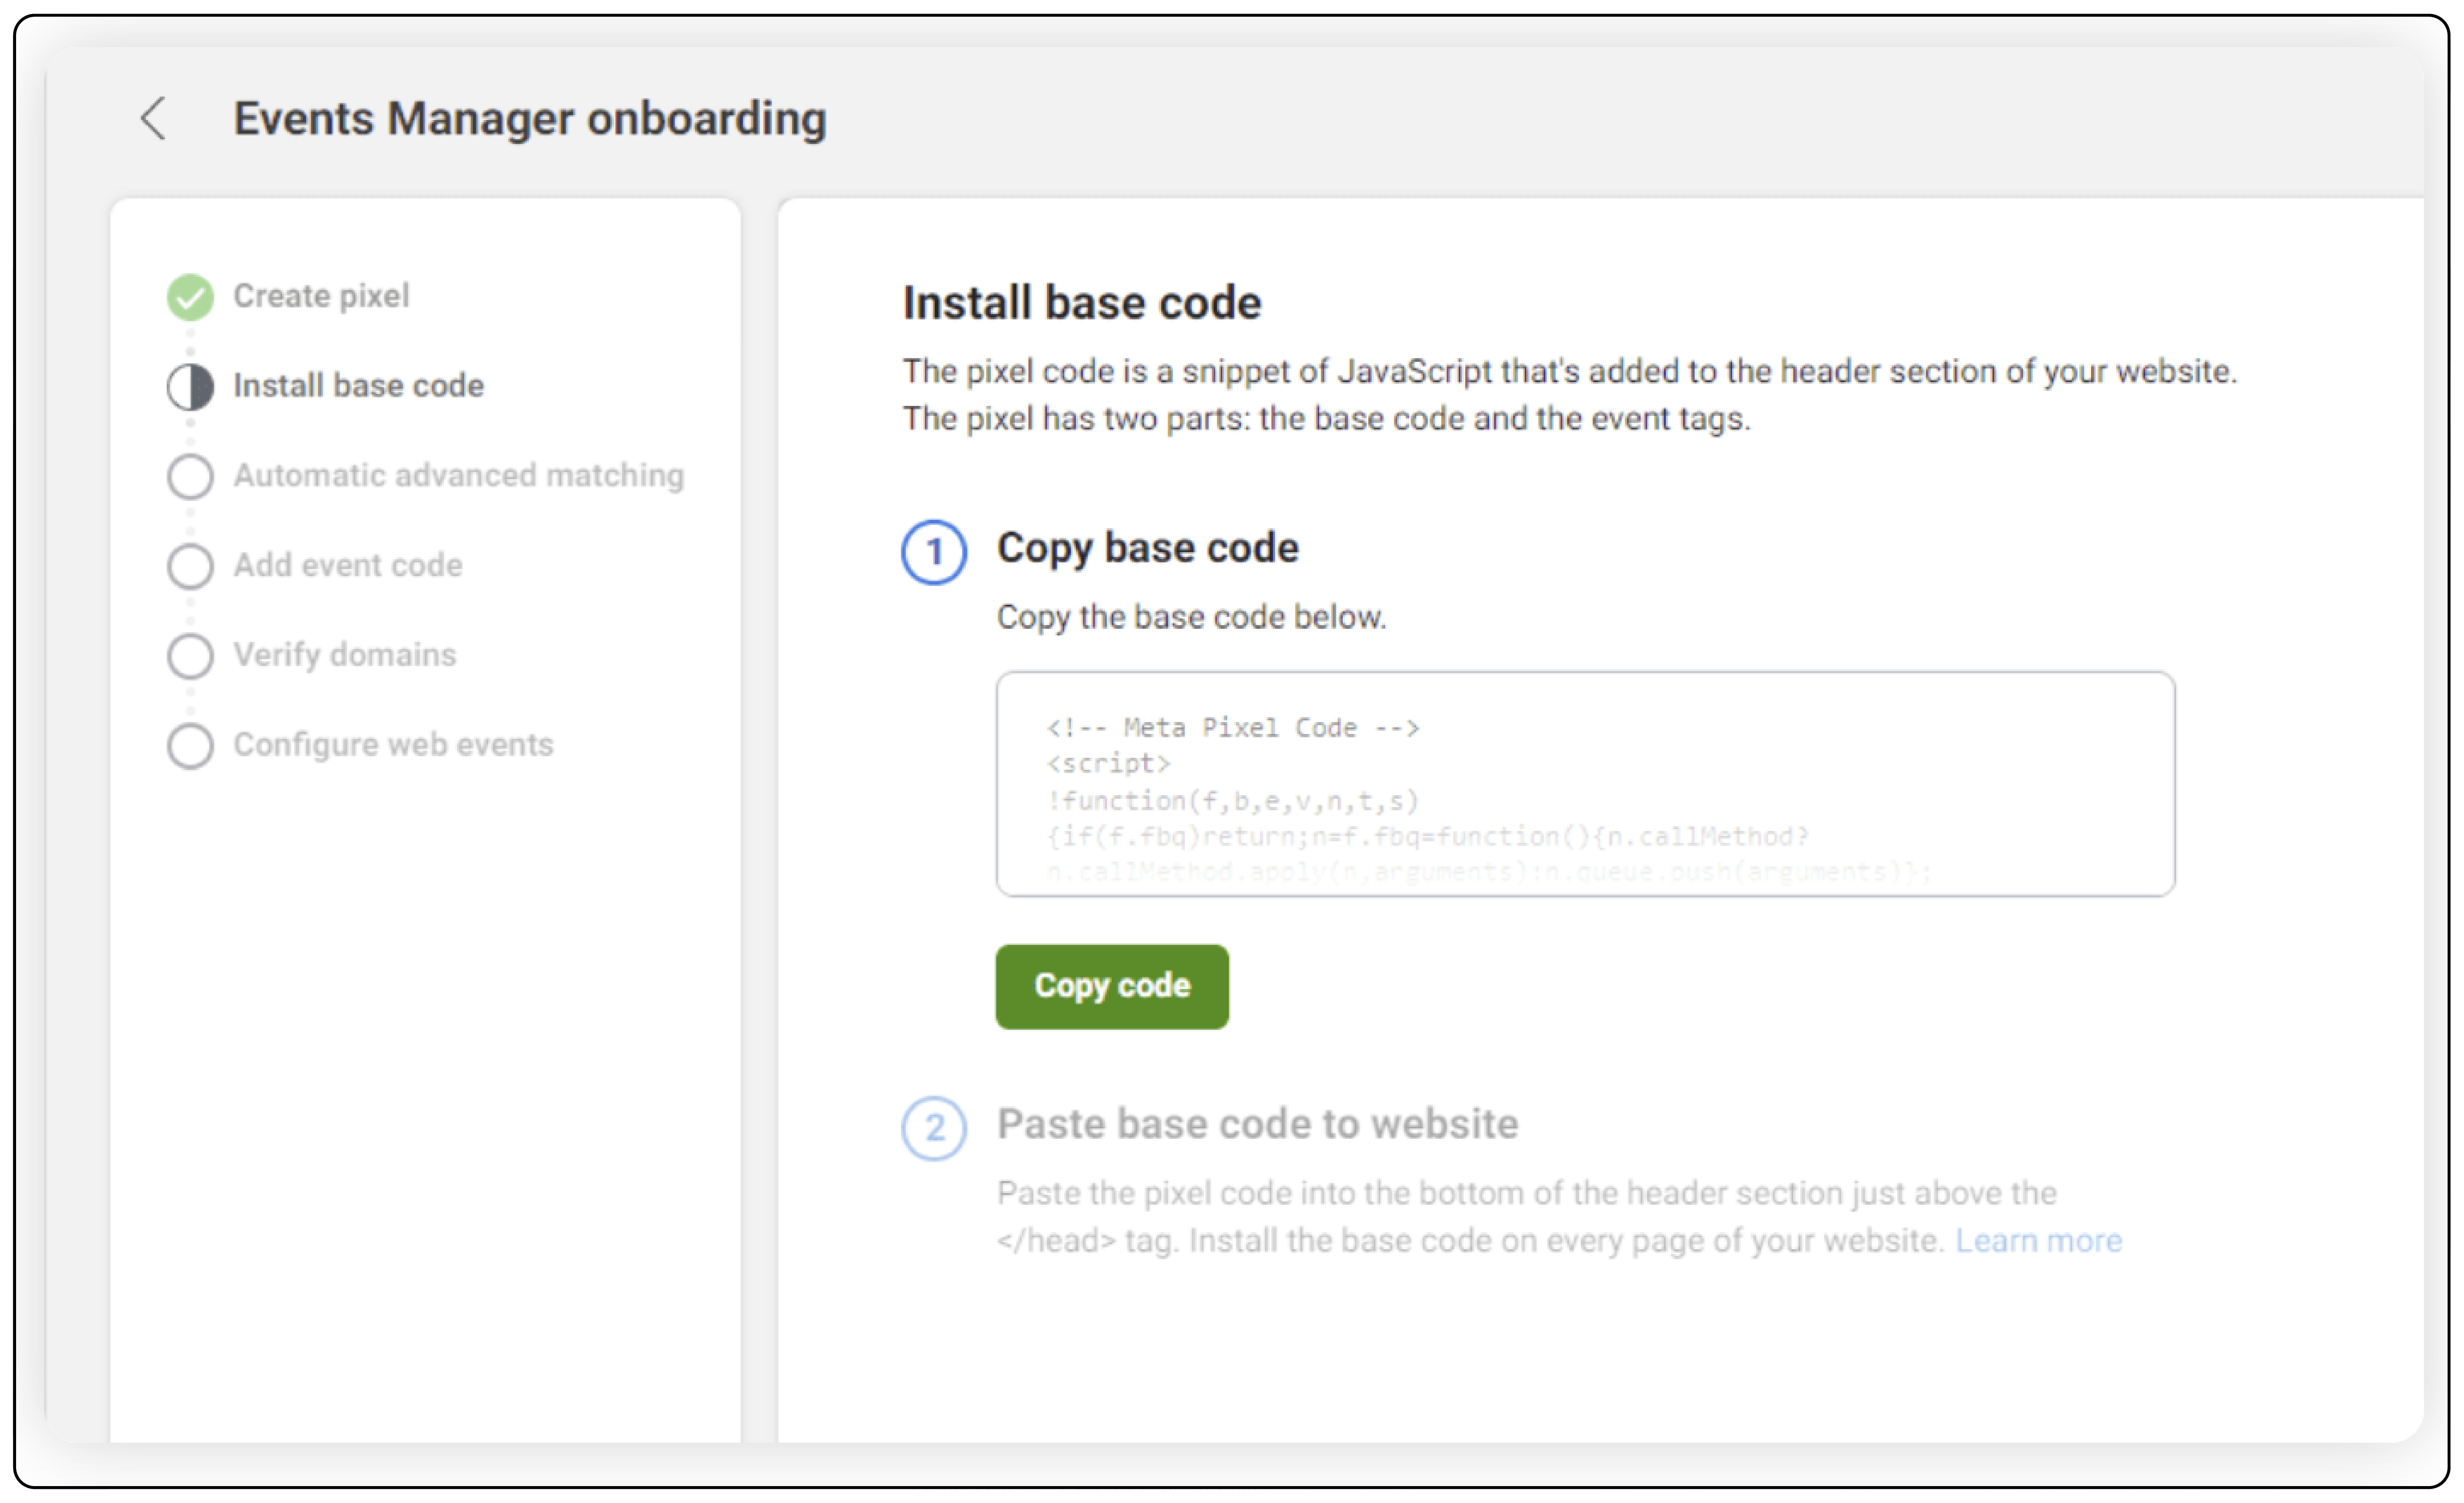
After completing the setup, you'll receive a snippet of JavaScript code, also known as the Facebook Pixel code. Note down the Facebook Pixel ID within this code.
Step 2: Access your Magento 2 admin panel and navigate to content management
In the left-hand side navigation menu, locate the Content section and click on Design Config.
Step 3: Select Your Store View
A list of store views will be displayed. Choose the store view where you want to add the Facebook Pixel code.
Step 4: Edit HTML Head Section
Under the General settings for the chosen store view, locate the HTML Head section. Click on the Edit button.
Step 5: Paste the Facebook Pixel Code
In the Scripts & Style Sheets text area, carefully paste the entire Facebook Pixel code you copied from your Facebook Ads Manager. Ensure the Facebook Pixel ID is included within the code.

Step 6: Save the Configuration
Once you've pasted the code, click the Save Configuration button to apply the changes.
Step 7: Clear Magento Cache
To ensure the changes take effect immediately, clear your Magento cache. You can find a cache management option within your Magento 2 admin panel.
Pixel integration with Google Tag Manager Extension
If you host your website on Magento 2, we recommend the Magento 2 Google Tag Manager extension.
Google Tag Manager extension is a viable tool to help you add a Facebook pixel quickly as it seamlessly integrates into the module. Following are the instructional steps for configuring.
Step 1: Choose a Facebook Pixel Extension
Several reputable extensions offer integration with Google Tag Manager. Popular options include Mageplaza Facebook Pixel Integration, Beeketing Pixel, and Cdiscount Pixel by Webkul.
Step 2: Install and Configure the Extension
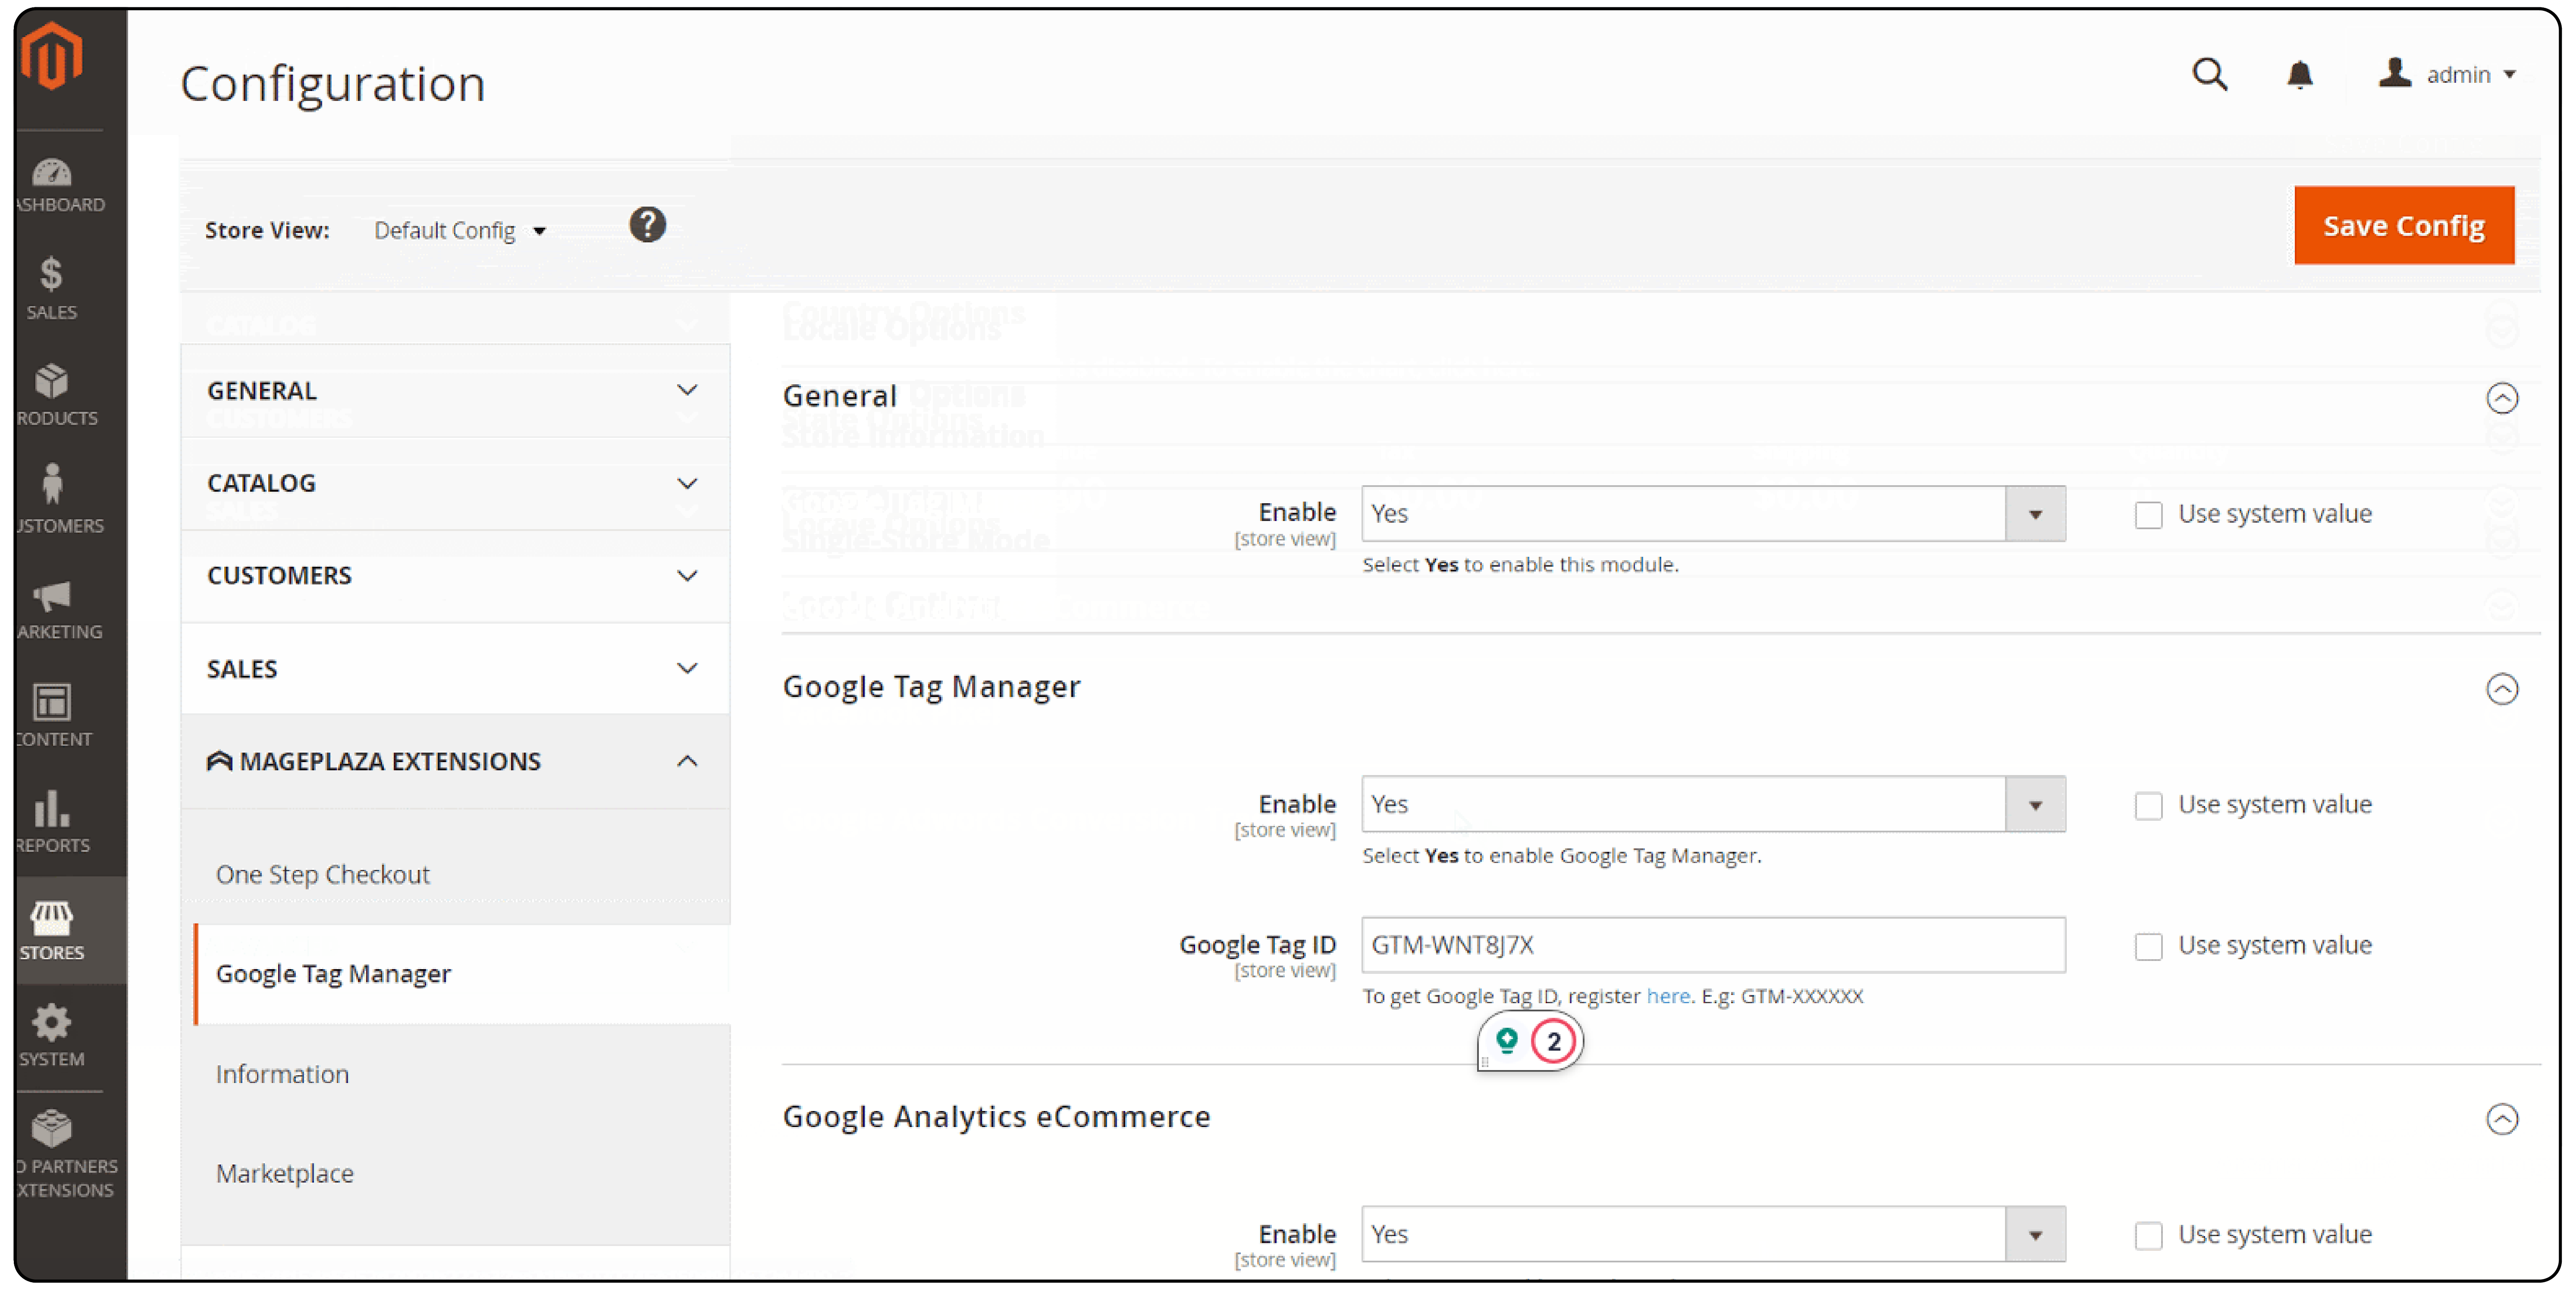
After installation, log in to your admin account and go to Stores > Configuration > Extensions > Google Tag Manager > Settings.

Step 3: Get the Container ID
Go to your Google Tag Manager account and get the Container ID

Step 4: Enabling the Module
In the general configuration pane, provide the ID you got from the Google Tag ID field. Select Yes to enable the module.

Step 5: Select the ID variable
Based on Product ID or Product SKU, select the ID variable.
Step 6: Save the configuration
Enter the Pixel ID correctly and save the configuration.

Configure Pixel Events and Parameters
Choose which customer actions on your Magento store you want to track. These are called "pixel events" and include options like "Add to Cart," "View Content," and "Purchase." You can configure additional parameters for each event, providing more specific details about the customer action.
Test and Verify Pixel Implementation
Use the Facebook Pixel Helper extension for Google Chrome to verify that Facebook Pixel is installed correctly. Whichever method you choose, ensure you test the Facebook Pixel functionality after implementation.
Testing and Troubleshooting Pixel Implementation
Tools available in Facebook Events Manager allow you to verify if the pixel is firing correctly and tracking the desired events.
1. Basic Verification
-
Use the Facebook Pixel Helper Chrome extension to verify if the Pixel is installed correctly on your website. It will show if the Pixel code is present, firing events, and has any errors.
-
Test events manually. Trigger specific Pixel events like "Add to Cart" on your website and see if they register in the Facebook Events Manager.
2. Event Testing
-
Go through your planned conversion events purchases, signups, etc and ensure the Pixel captures them accurately.
-
Use Facebook's test tools like the Conversion API Tester to simulate events and diagnose issues.
3. Troubleshooting
Identify the Problem
- Analyze the Pixel Helper results and Events Manager data to pinpoint issues like missing events, duplicate events, or incorrect data.
- Consider factors like ad blocker usage or website loading delays that might affect Pixel functionality.
Debug and Fix
- Review your Pixel code implementation for errors or typos.
- Check if the Pixel is firing before the relevant event happens on your website (e.g., firing "Purchase" before the checkout is complete).
- Ensure you're using the correct Pixel ID for your Facebook Ads account.
- Utilize Facebook's troubleshooting guides and resources for assistance with specific issues.
Advanced Pixel Techniques
For more advanced users, Facebook Pixel offers additional features like:
1. Custom Audiences
Create targeted audiences based on specific customer actions or behaviors on your Magento 2 store.
2. Lookalike Audiences
Reach new customers who are similar to your existing customers based on their Facebook data.
3. Conversion Optimization
Use Facebook Pixel data to optimize your website for better conversions.
Use Cases of Businesses Using Pixel for Facebook Ads
Here are some examples of how businesses can leverage Facebook Pixel for their ad campaigns:
1. Remarketing
Regain website visitors' attention who haven't converted yet. This could be someone who abandoned their cart, browsed a specific product category, or downloaded a white paper. Leverage Pixel data to create targeted Facebook Ads reminding them of your offerings and enticing them to convert.
2. Conversion Tracking
Track conversions on your website, such as purchases, signups, or downloads. Pixel data helps you understand which ads drive the most valuable actions, allowing for campaign optimization.
3. Increased ROI
Pleo tracks people who clicked on their Facebook Ads with Pixel. It helps to measure conversions. The company had to boost customer acquisition efficiency and reduce the per-signup cost. With automation and shopping campaigns, using pixel as one of the products they minimized the overall cost to 22%.
Seltzer Goods increased revenue by 785% in just 30 days by leveraging Facebook Ads. The campaign utilized the "See, Think, Do" Facebook Ad strategy, targeting cold audiences and optimizing for conversions. By implementing the Facebook Pixel and utilizing interest-based and lookalike audiences, the campaign achieved significant results, including a 61% lift in purchases and a 42% increase in new buyers.
Maximizing Campaign Performance with Pixel Data
By utilizing the data collected by Facebook Pixel, you can significantly improve the performance of your campaigns. Here's how:
1. Target the right audience
Use pixel data to create highly targeted Facebook ad campaigns. The campaigns reach people most likely to be interested in your products or services.
2. Optimize your ads
Analyze how different ad creatives and targeting options perform based on pixel data.
3. Track campaign results
See how your Facebook ad campaigns are driving conversions on your Magento 2 store. You can then adjust your budget allocation based on the effectiveness of each campaign.
4. Create dynamic product ads
Utilize pixel data to showcase personalized Facebook ads. These ads will feature the products that website visitors have previously viewed or added to their carts.
Ensuring Compliance and Privacy Considerations
It's important to be aware of data privacy regulations like GDPR (General Data Protection Regulation) and CCPA (California). These regulations dictate how businesses can collect, store, and use customer data. Here are some key points to remember:
1. Transparency
Inform your website visitors about how you use cookies and track their data with Facebook Pixel. You can achieve this by having a clear privacy policy on your Magento 2 store.
2. User Consent
Depending on your location, you might need to obtain explicit consent from users before collecting data through Facebook Pixel.
FAQs
1. Do I need a developer to add Facebook Pixel to my Magento 2 store?
While you can manually install the Facebook Pixel code yourself, it's not recommended unless you have some technical knowledge. Using a dedicated Facebook Pixel extension is a simpler and more reliable option.
2. What are some popular Facebook Pixel extensions for Magento 2?
Several reputable extensions are available, including Mageplaza Facebook Pixel Integration, Beeketing Pixel, and Cdiscount Pixel by Webkul.
3. What pixel events should I track on my Magento 2 store?
Essential events to track include "Add to Cart," "View Content," "Purchase," and "Initiate Checkout". Depending on your business goals, you can track additional events like "Add to Wishlist" or "Search."
4. Can I track Facebook and Instagram ad performance with Facebook Pixel?
Yes, Facebook Pixel can track the effectiveness of your ad campaigns across both Facebook and Instagram, which are owned by Meta.
5. How to check if my Facebook Pixel is working correctly?
Use the Facebook Events Manager tool to test your pixel and see if it's firing the desired events on your Magento 2 store.
Summary
We covered how to add Facebook Pixel code to your Magento 2 store with this concise guide. Here's what you need to know:
-
Understanding Facebook Pixel: It's a piece of code that tracks customer actions for better ad targeting.
-
Setting Up Pixel on Magento 2
-
Manual Installation: Add Pixel code to your website's HTML head section.
-
Extension Integration: Use Magento 2 extensions for an easier setup.
- Testing and Troubleshooting: Ensure proper setup using tools like Facebook Pixel Helper.
- Use Cases: See how businesses use Pixel for remarketing and conversion tracking, like Pleo's ad performance tracking.
- Compliance and Privacy: Follow GDPR for user consent and data transparency.
Integrating Facebook Pixel into Magento 2 helps businesses understand their customers better and improves ad effectiveness.
Explore Managed Magento Hosting plans to leverage Facebook Pixel for better ad targeting and conversions!


