Integrating Zopim Magento 2 in your E-Store
Want to enhance your Magento 2 store's customer support and analytics? Use Zopim Magento 2 integration. It is a live chat and customer engagement extension. It allows real-time communication with your customers. You can gather valuable insight into their behavior. This tutorial will guide you through the easy steps of integrating Zopim into your Magento 2 store.
Key Takeaways
-
Learn to integrate Zopim into Magento 2 in 3 simple steps.
-
Understand Zopim's benefits, like instant support and advanced Magento analytics.
-
Explore how Zopim boosts e-commerce by fostering trust and satisfaction.
-
Discover its streamlined installation process and free Lite version.
-
Explore seamless integration with Magento 2 without compatibility issues.
What is Magento Zopim Chat?
Zopim or a Zendesk Chat combines online marketing, live chat support, and web analytics.
It boosts Magento e-commerce experiences by offering instant advice and support to customers. It also features advanced analytics for better marketing strategies. It also offers a free Lite version for small online stores.
Why Use Zopim in Magento 2?
| Reasons | Explanations |
|---|---|
| Instant Customer Support | Zopim live chat provides instant assistance to customers browsing your website. It allows them to quickly resolve queries or concerns without leaving the page. |
| Enhanced E-commerce Experience | Integrating Zopim into your website enhances the overall e-commerce experience. It offers real-time communication, fostering trust and increasing customer satisfaction. |
| Streamlined Installation Process | The installation process for Zopim is straightforward and user-friendly. It's easy for website owners to implement and manage without requiring extensive technical knowledge. |
| Advanced Analytics | Zopim's dashboard provides advanced Magento analytics. It allows you to gain valuable insights into customer behavior and preferences. This data can be used to optimize marketing strategies and improve sales. |
| Free Lite Version | It offers a free Lite version. It's suitable for small online stores, providing essential live chat functionality without the need for a significant financial investment. |
| Seamless Integration | It seamlessly integrates with Magento 2. It ensures smooth communication between your website and the live chat platform. There are no compatibility issues or disruptions to your online store's operation. |
3 Steps to Integrate Zopim Magento 2
1. Get the Zopim Code
-
Visit
https://dashboard.zopim.com/ -
Login to your Zopim account
-
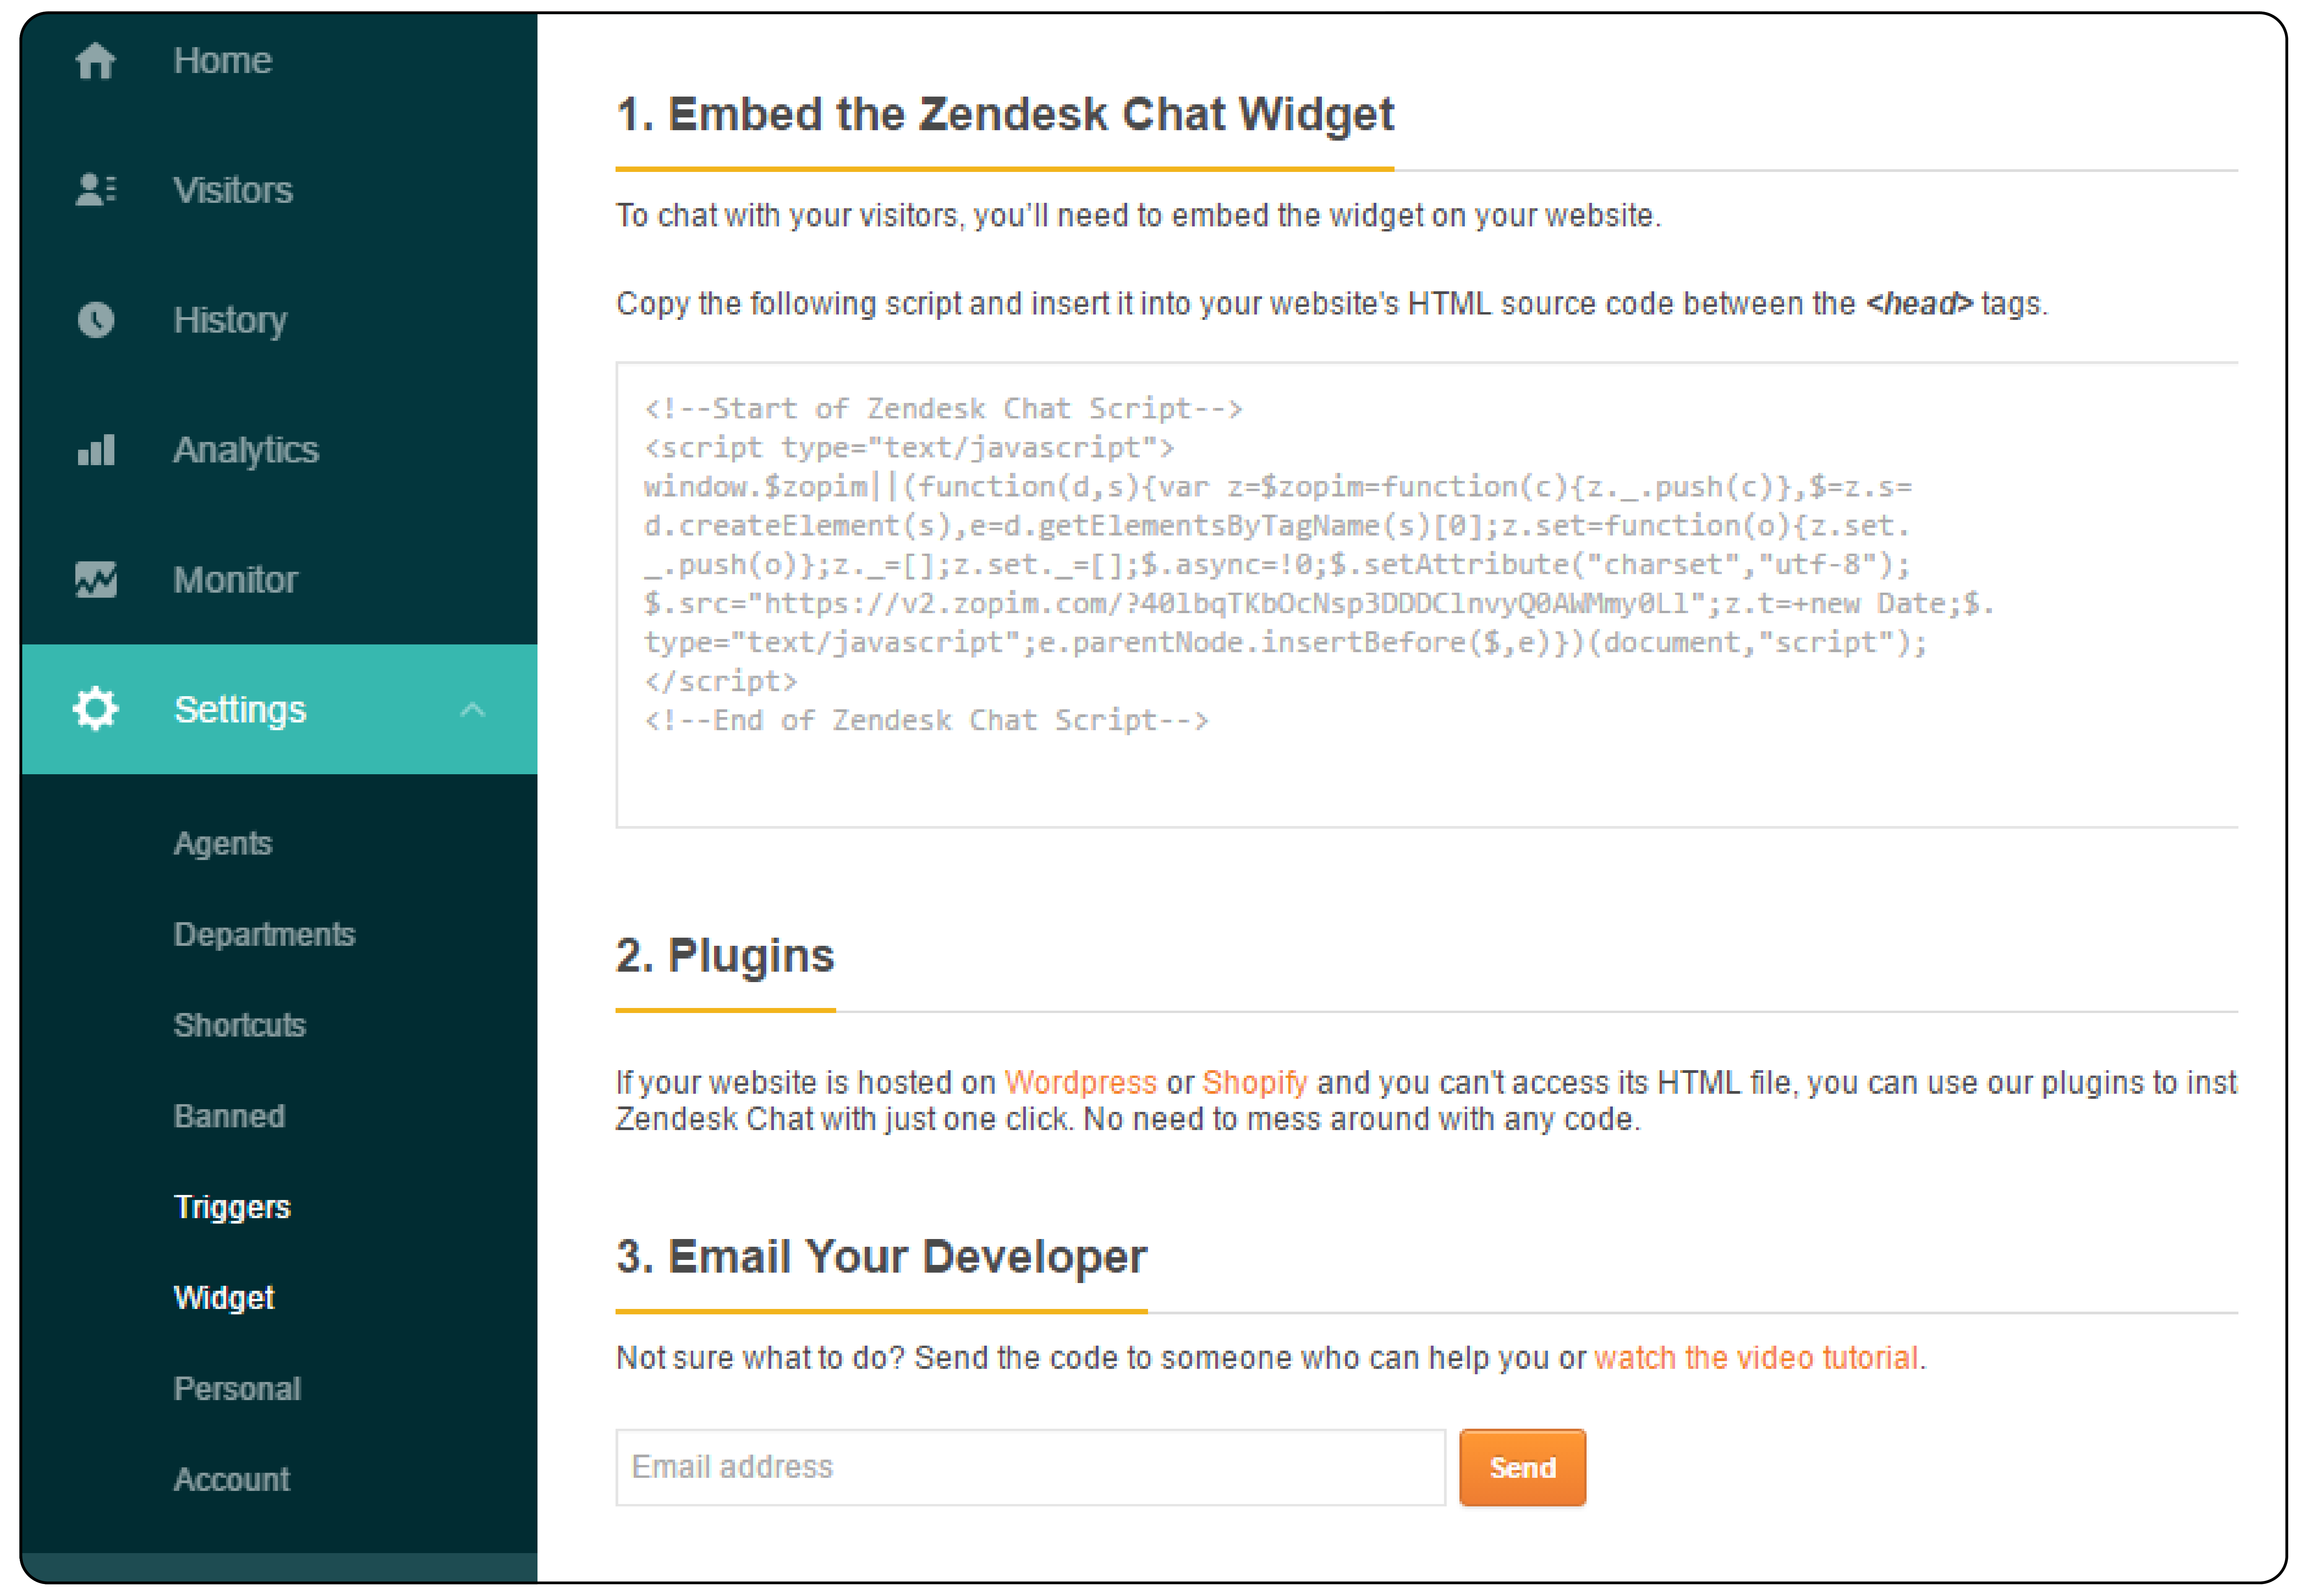
In Settings, select Widget
-
Copy the displayed embed code.

2. Integrate Zopim into your Magento 2 Store
Magento 2.0
-
On the Magento Admin sidebar, click Stores. Under Settings, select Configuration.
-
In the left panel, under General, select Design.
-
For multiple stores or views, select the right Store View in the top-left corner to apply changes. Next, uncheck the boxes next to each field to enter new values.
-
Open the Footer section.
-
Paste the copied code into the Miscellaneous HTML field.
Magento 2.1
- From Magento 2.1, the path has changed. Now, it is located under Content > Configuration. Then, select your current theme and go to Footer.
3. Save Configuration
-
Click on "Save Configuration"
-
Clear Magento Cache: see flush cache instructions here.
FAQs
1. How do I install Zendesk Chat for Magento 2?
First, make sure you have administrative access to your Magento and Zendesk accounts. Next, download the Magento 2 Zendesk chat extension from the Magento Marketplace. Then, follow the extension's installation guide. It provides a step-by-step installation process.
2. Can I log in to Zendesk Chat directly from Magento 2?
Yes, you can integrate Zendesk Chat in Magento 2. Use the script provided in the installation guide. After integration, log in through Magento's admin panel. This feature simplifies live chat support management from your store's backend.
3. What are the steps of integrating Zopim in Magento 2?
The process involves copying a script from your Zopim account. Then, insert this script into your Magento 2 store's HTML. Detailed steps can be found in the Zopim integration section. This section is located on the Magento 2 configuration page under Content > Configuration > Footer.
4. How do I place the chat widget on my store after installing Zendesk chat for Magento?
After installing the Zendesk Chat extension, the chat widget will appear on your store automatically. You can customize its position. You can also customize its appearance through the Zendesk dashboard. This is done under the 'Widget' settings.
5. In what order should I integrate Zopim in Magento 2 if I am also planning to install other extensions?
For smooth operation, start by installing core functionality extensions. Then, integrate Zopim in Magento 2. This order ensures compatibility. It also simplifies troubleshooting in case of conflicts with the live chat functionality. Dedicated Magento hosting also helps you include any extensions.
Summary
Enhance your store's capabilities with integrated Zopim Magento 2. It optimizes customer support and analytics. Store owners can get benefits from:
-
Instant customer support
-
Enhanced e-commerce experience
-
Simplified installation process
-
Advanced analytics insights
Want to optimize communication and engagement with your customers? Consider managed Magento hosting for the full benefits of Zopim integration in your Magento 2 store.


