
How To Use Magento 2: A Guide To Admin Panel And Store Setup
Looking to learn how to use Magento 2 effectively? Magento 2, an open-source platform, helps you build a feature-rich ecommerce store.
This tutorial will cover the step-by-step guide on setting up, managing, and customizing your Magento 2 environment.
Key Takeaways
- Insights into using the Magento admin panel and troubleshooting common issues.
- Basics of Magento 2 for all levels of expertise.
- Steps for installation, configuration, and customization.
- Regular updates, security checks, & template customizations to ensure your store performs optimally.
- Navigate the admin panel, manage products, & optimize your website for better sales performance.
- Best practices and additional resources to help you make the most of Magento 2.
-
Order Management And Performance Optimization In Magento Websites
-
Magento 2 Tutorial For Beginners: Setting Up Your Adobe Commerce Store
6 Steps To Use The Magento Server On A VPS
Step 1: Accessing Your Magento 2 Platform
- Open a web browser.
- Visit
https://[your-VPS-hostname]/admin/(replace[your-VPS-hostname]with the actual hostname of your VPS). - You will be directed to the Magento 2 admin login page.
i. In the 'Username' field, enter
admin. ii. In the 'Password' field, enter the password set during the installation.
Step 2: Configuring Your Store
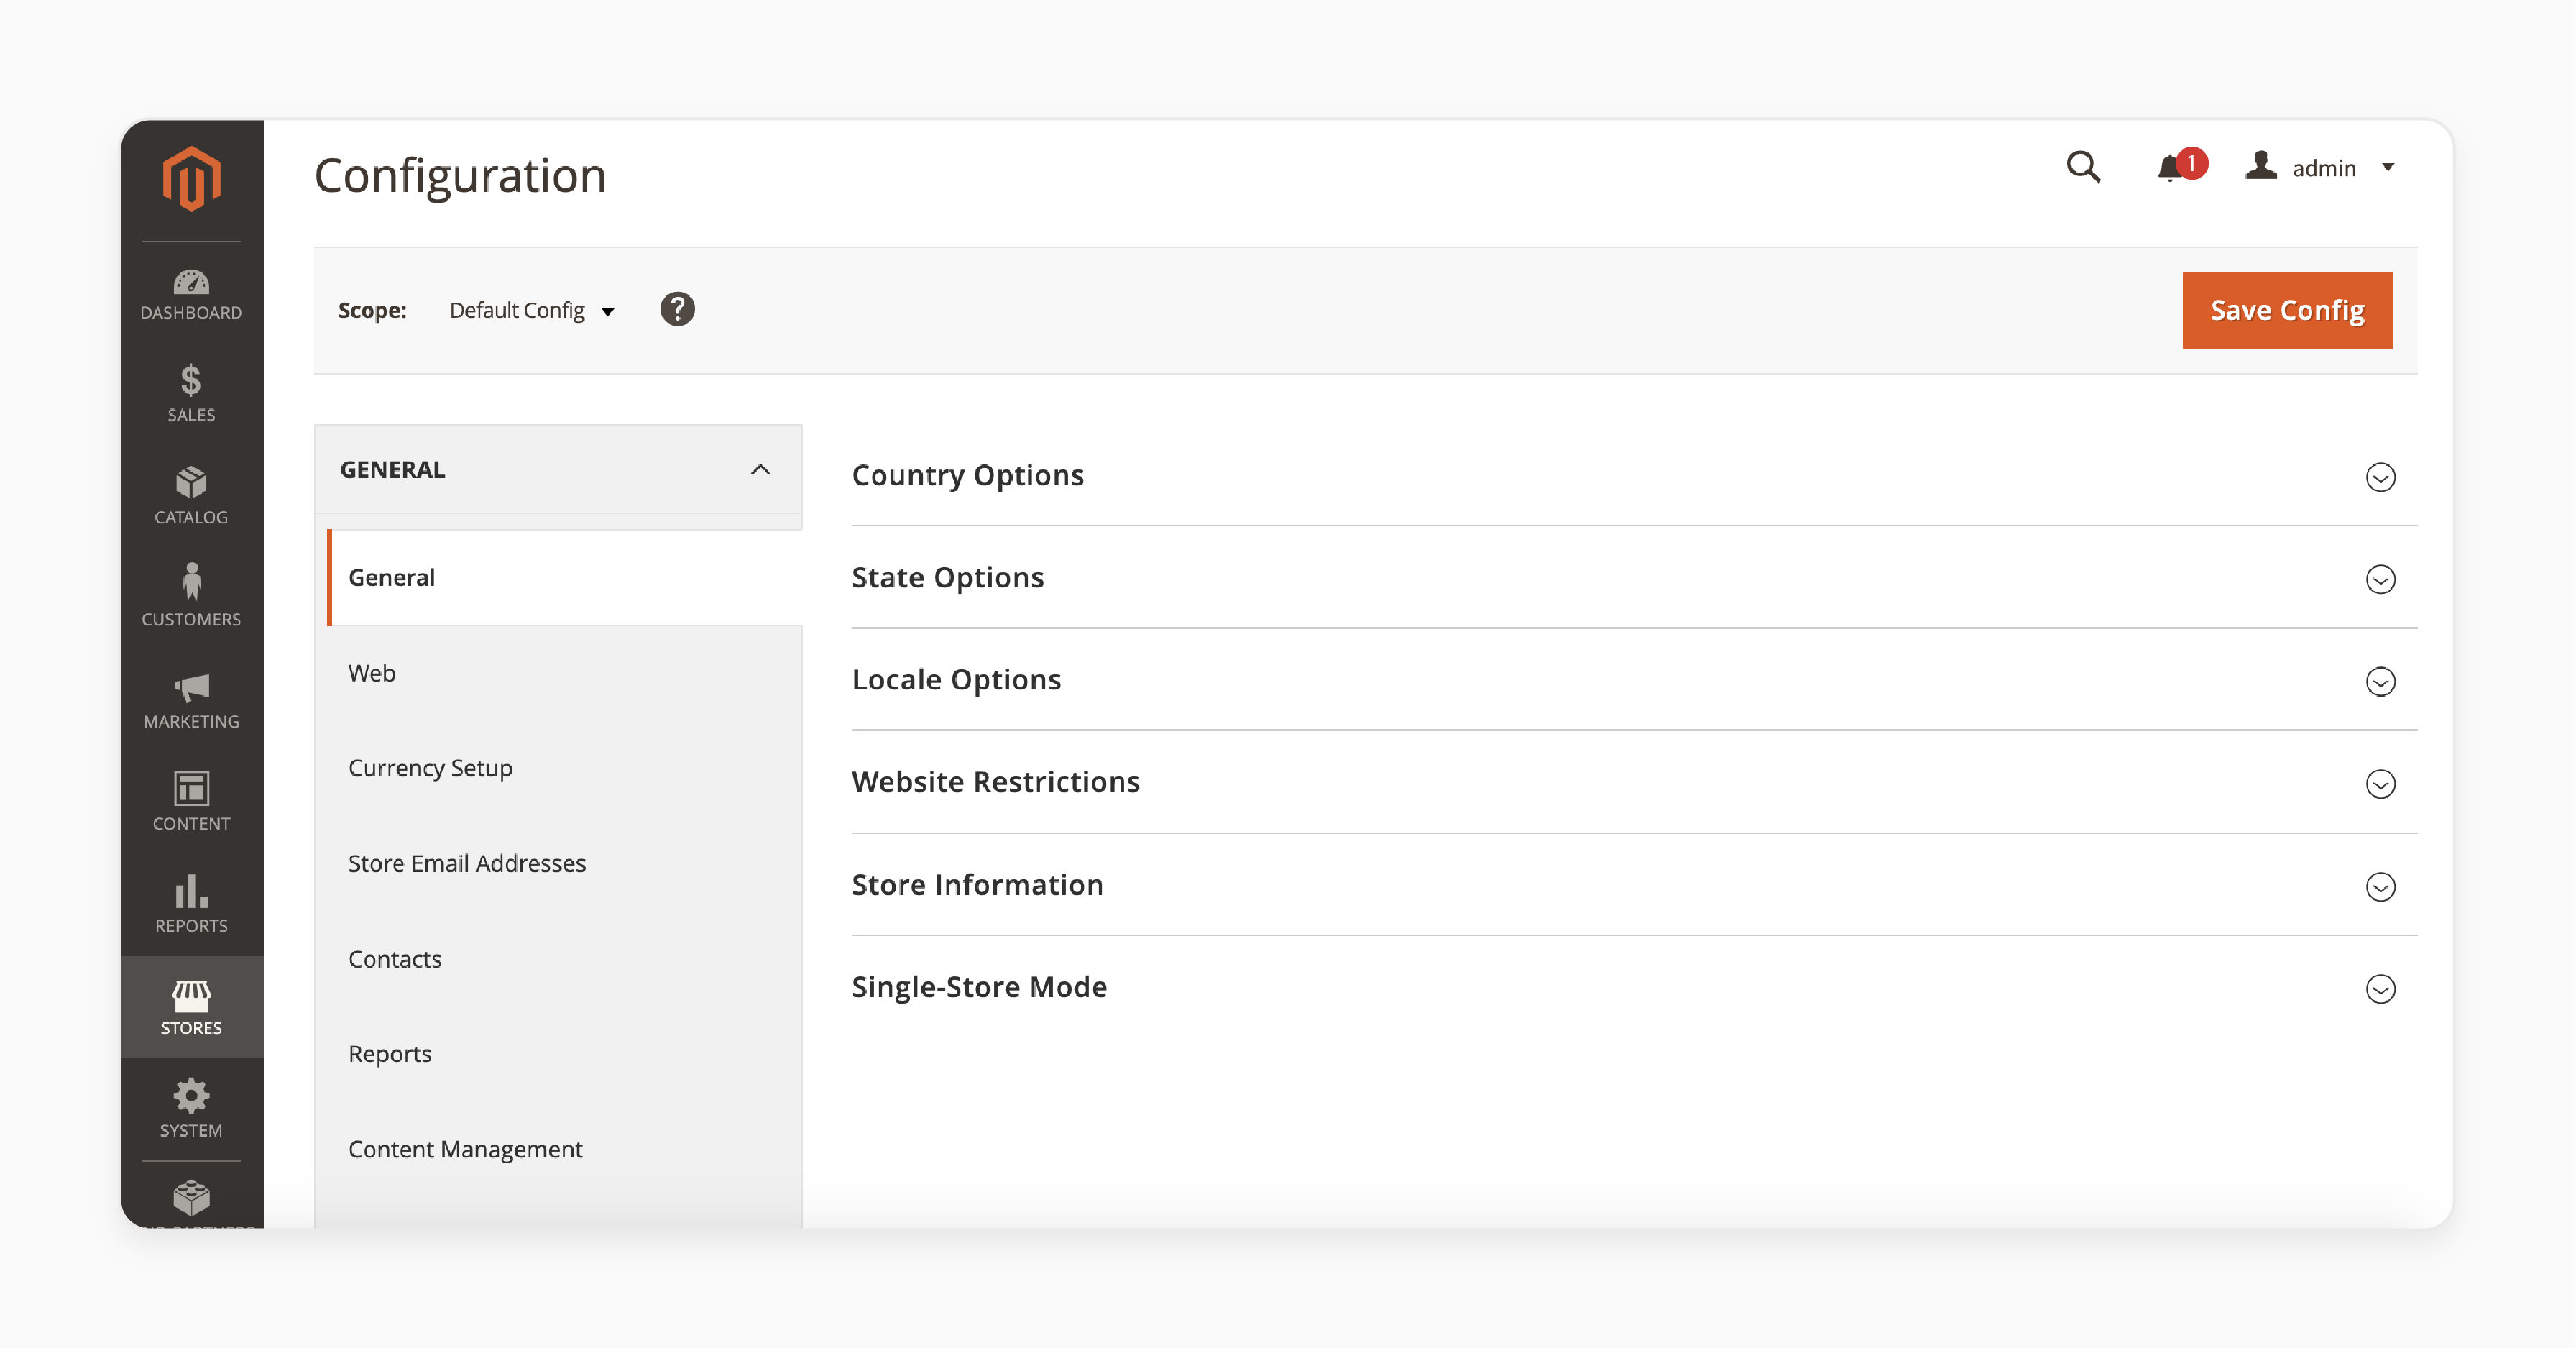
- Navigate to Stores > Configuration in the Magento admin panel.
- Customize your store details, such as store name, address, and default language.
Step 3: Customizing Your Store's Design
- Go to Content > Design Configuration to choose and customize a theme.
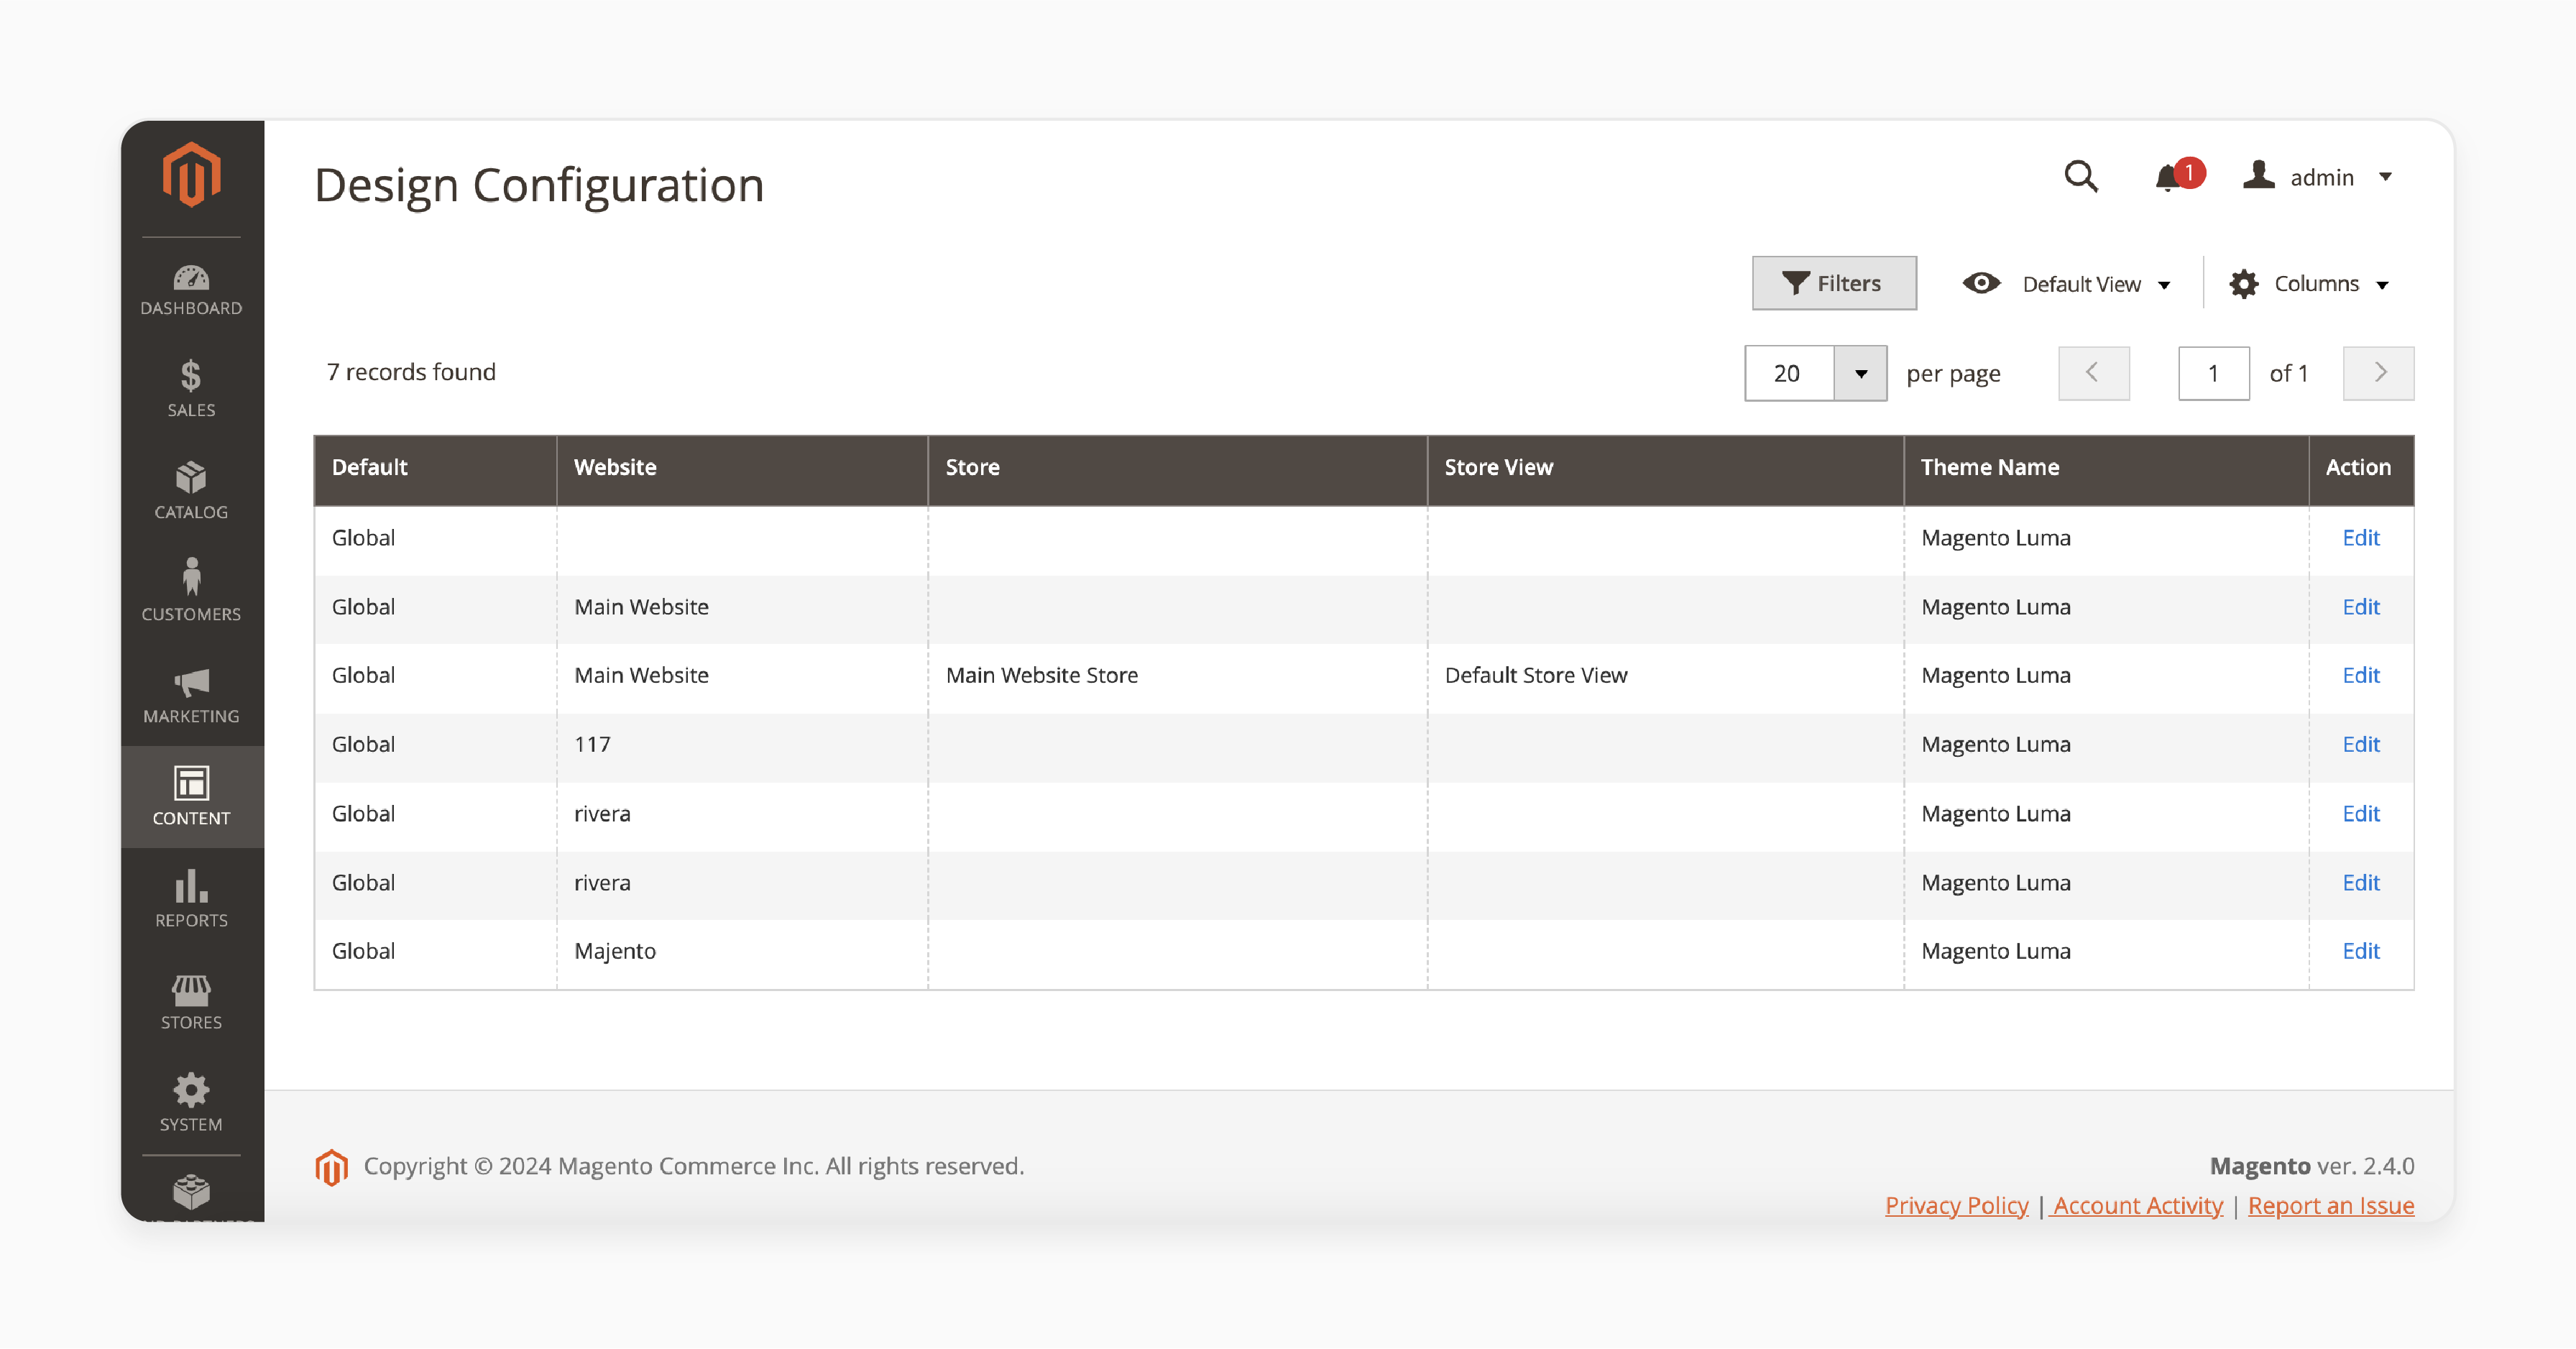
- For advanced customization, you can add custom CSS and JavaScript.
Step 4: Adding Products
- Navigate to Catalog > Products in the admin panel.
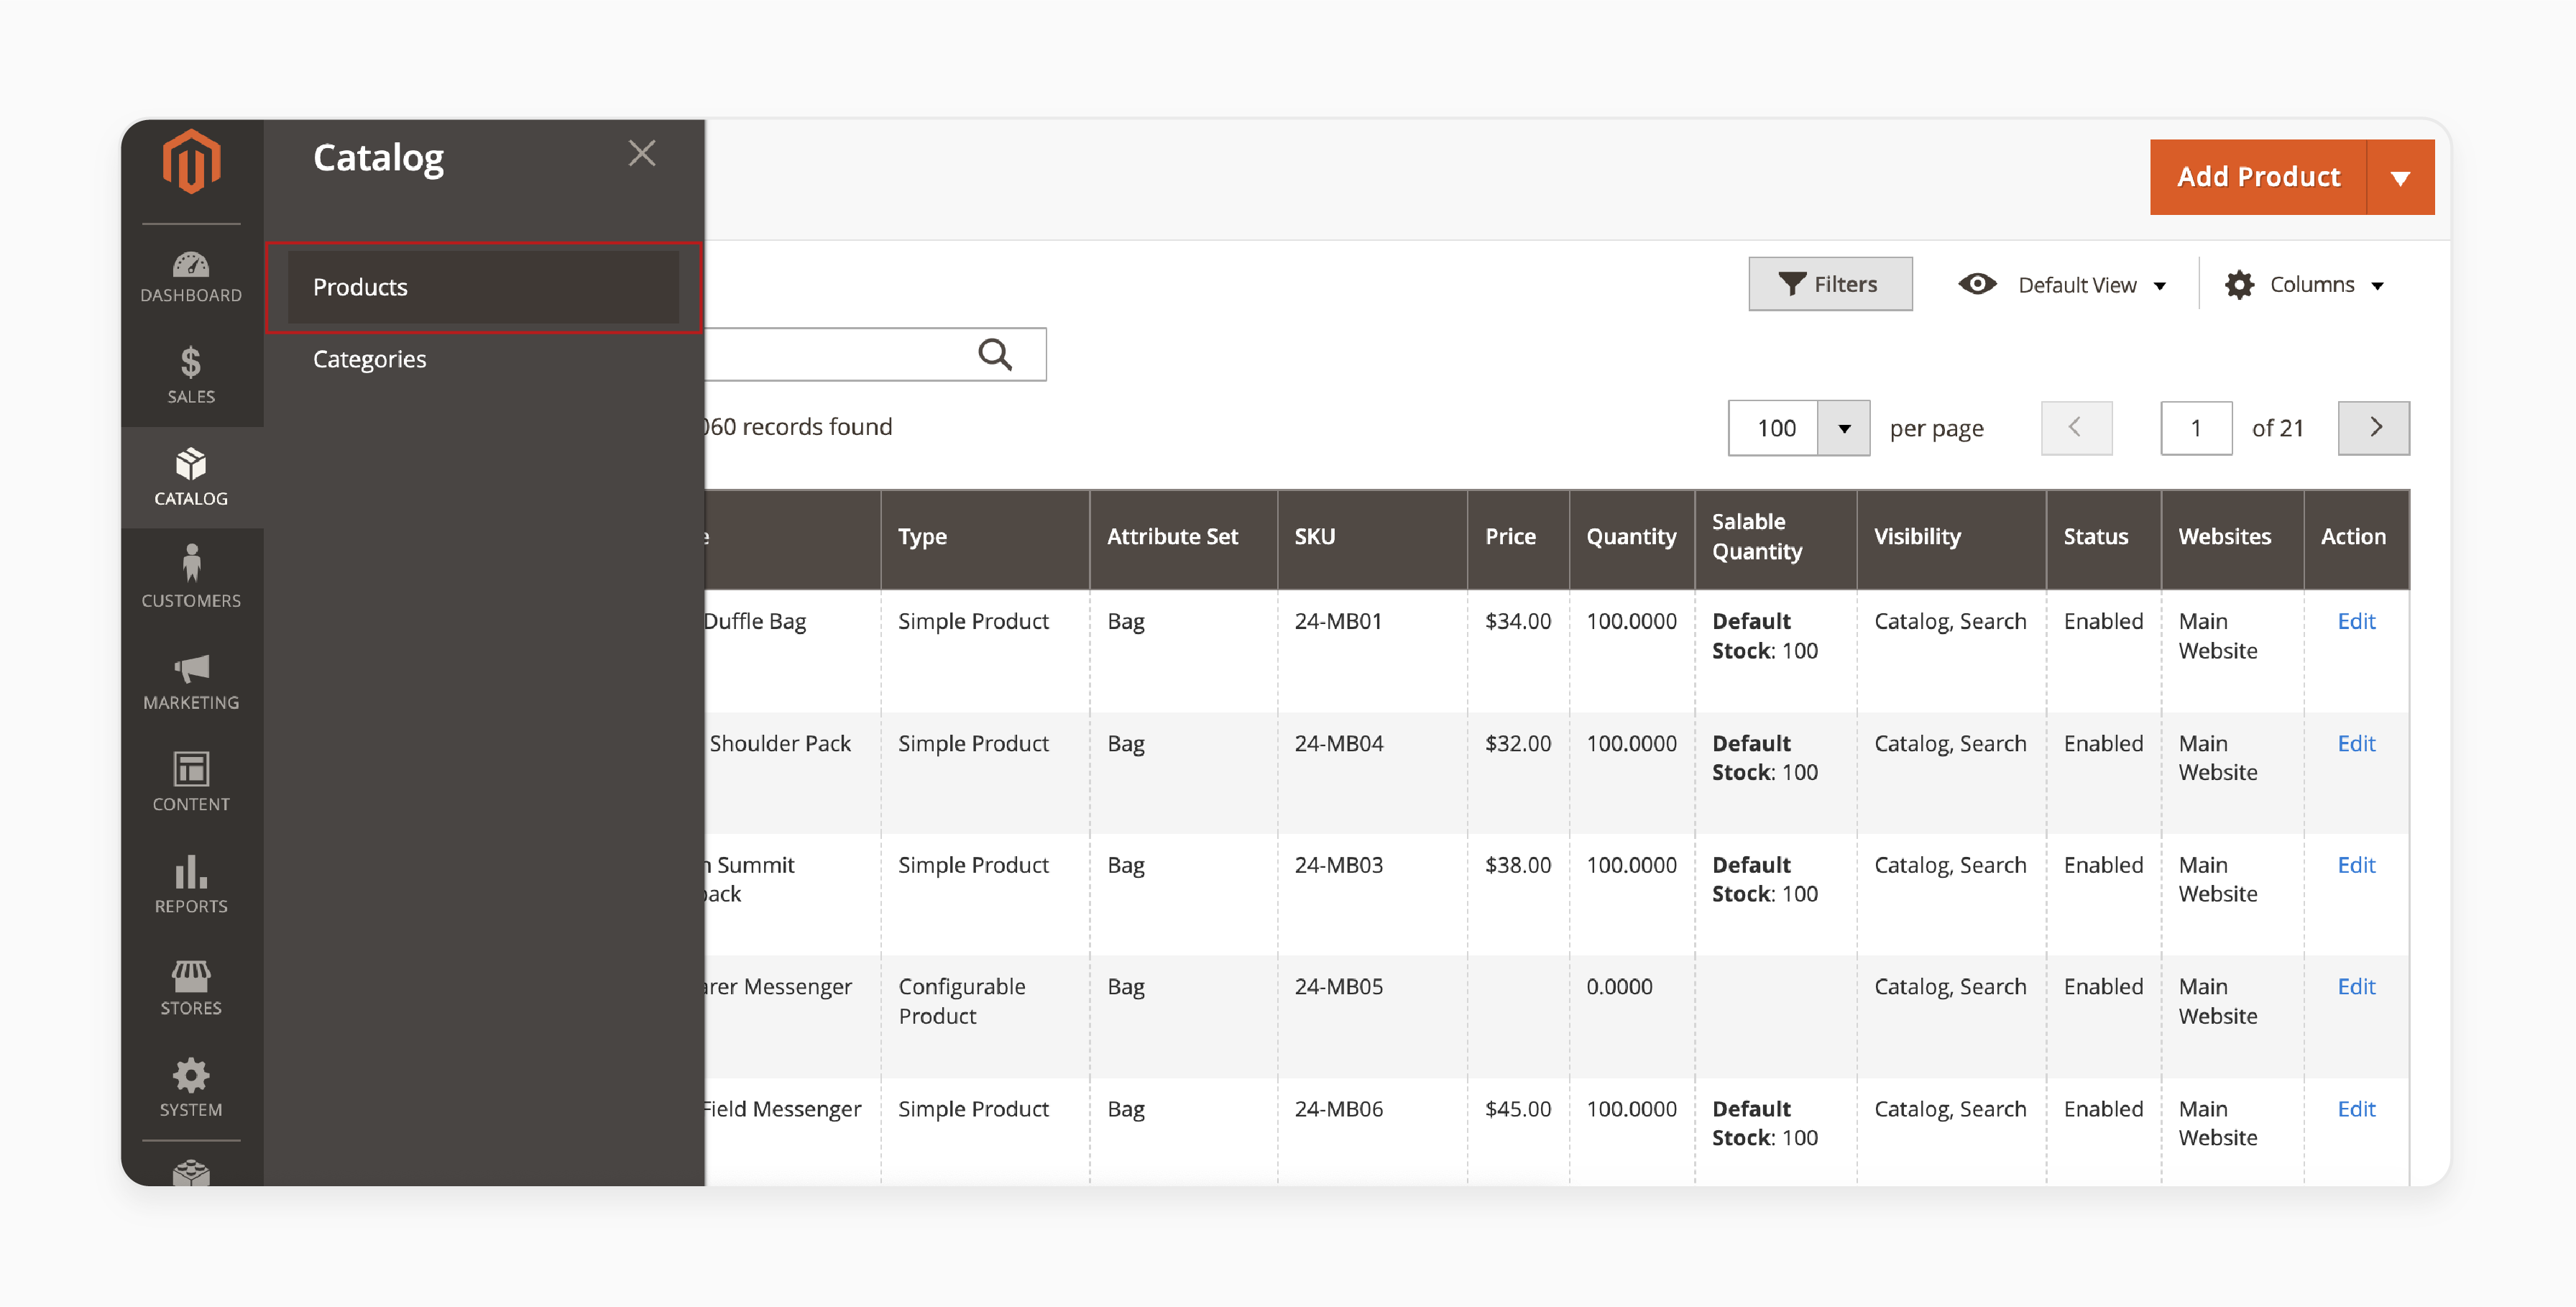
- Add new products with descriptions, images, pricing, and other relevant details.
- Organize products into categories by going to Catalog > Categories.
Step 5: Setting Up Payment and Shipping
- Set up payment methods by going to Stores > Configuration > Sales > Payment Methods.
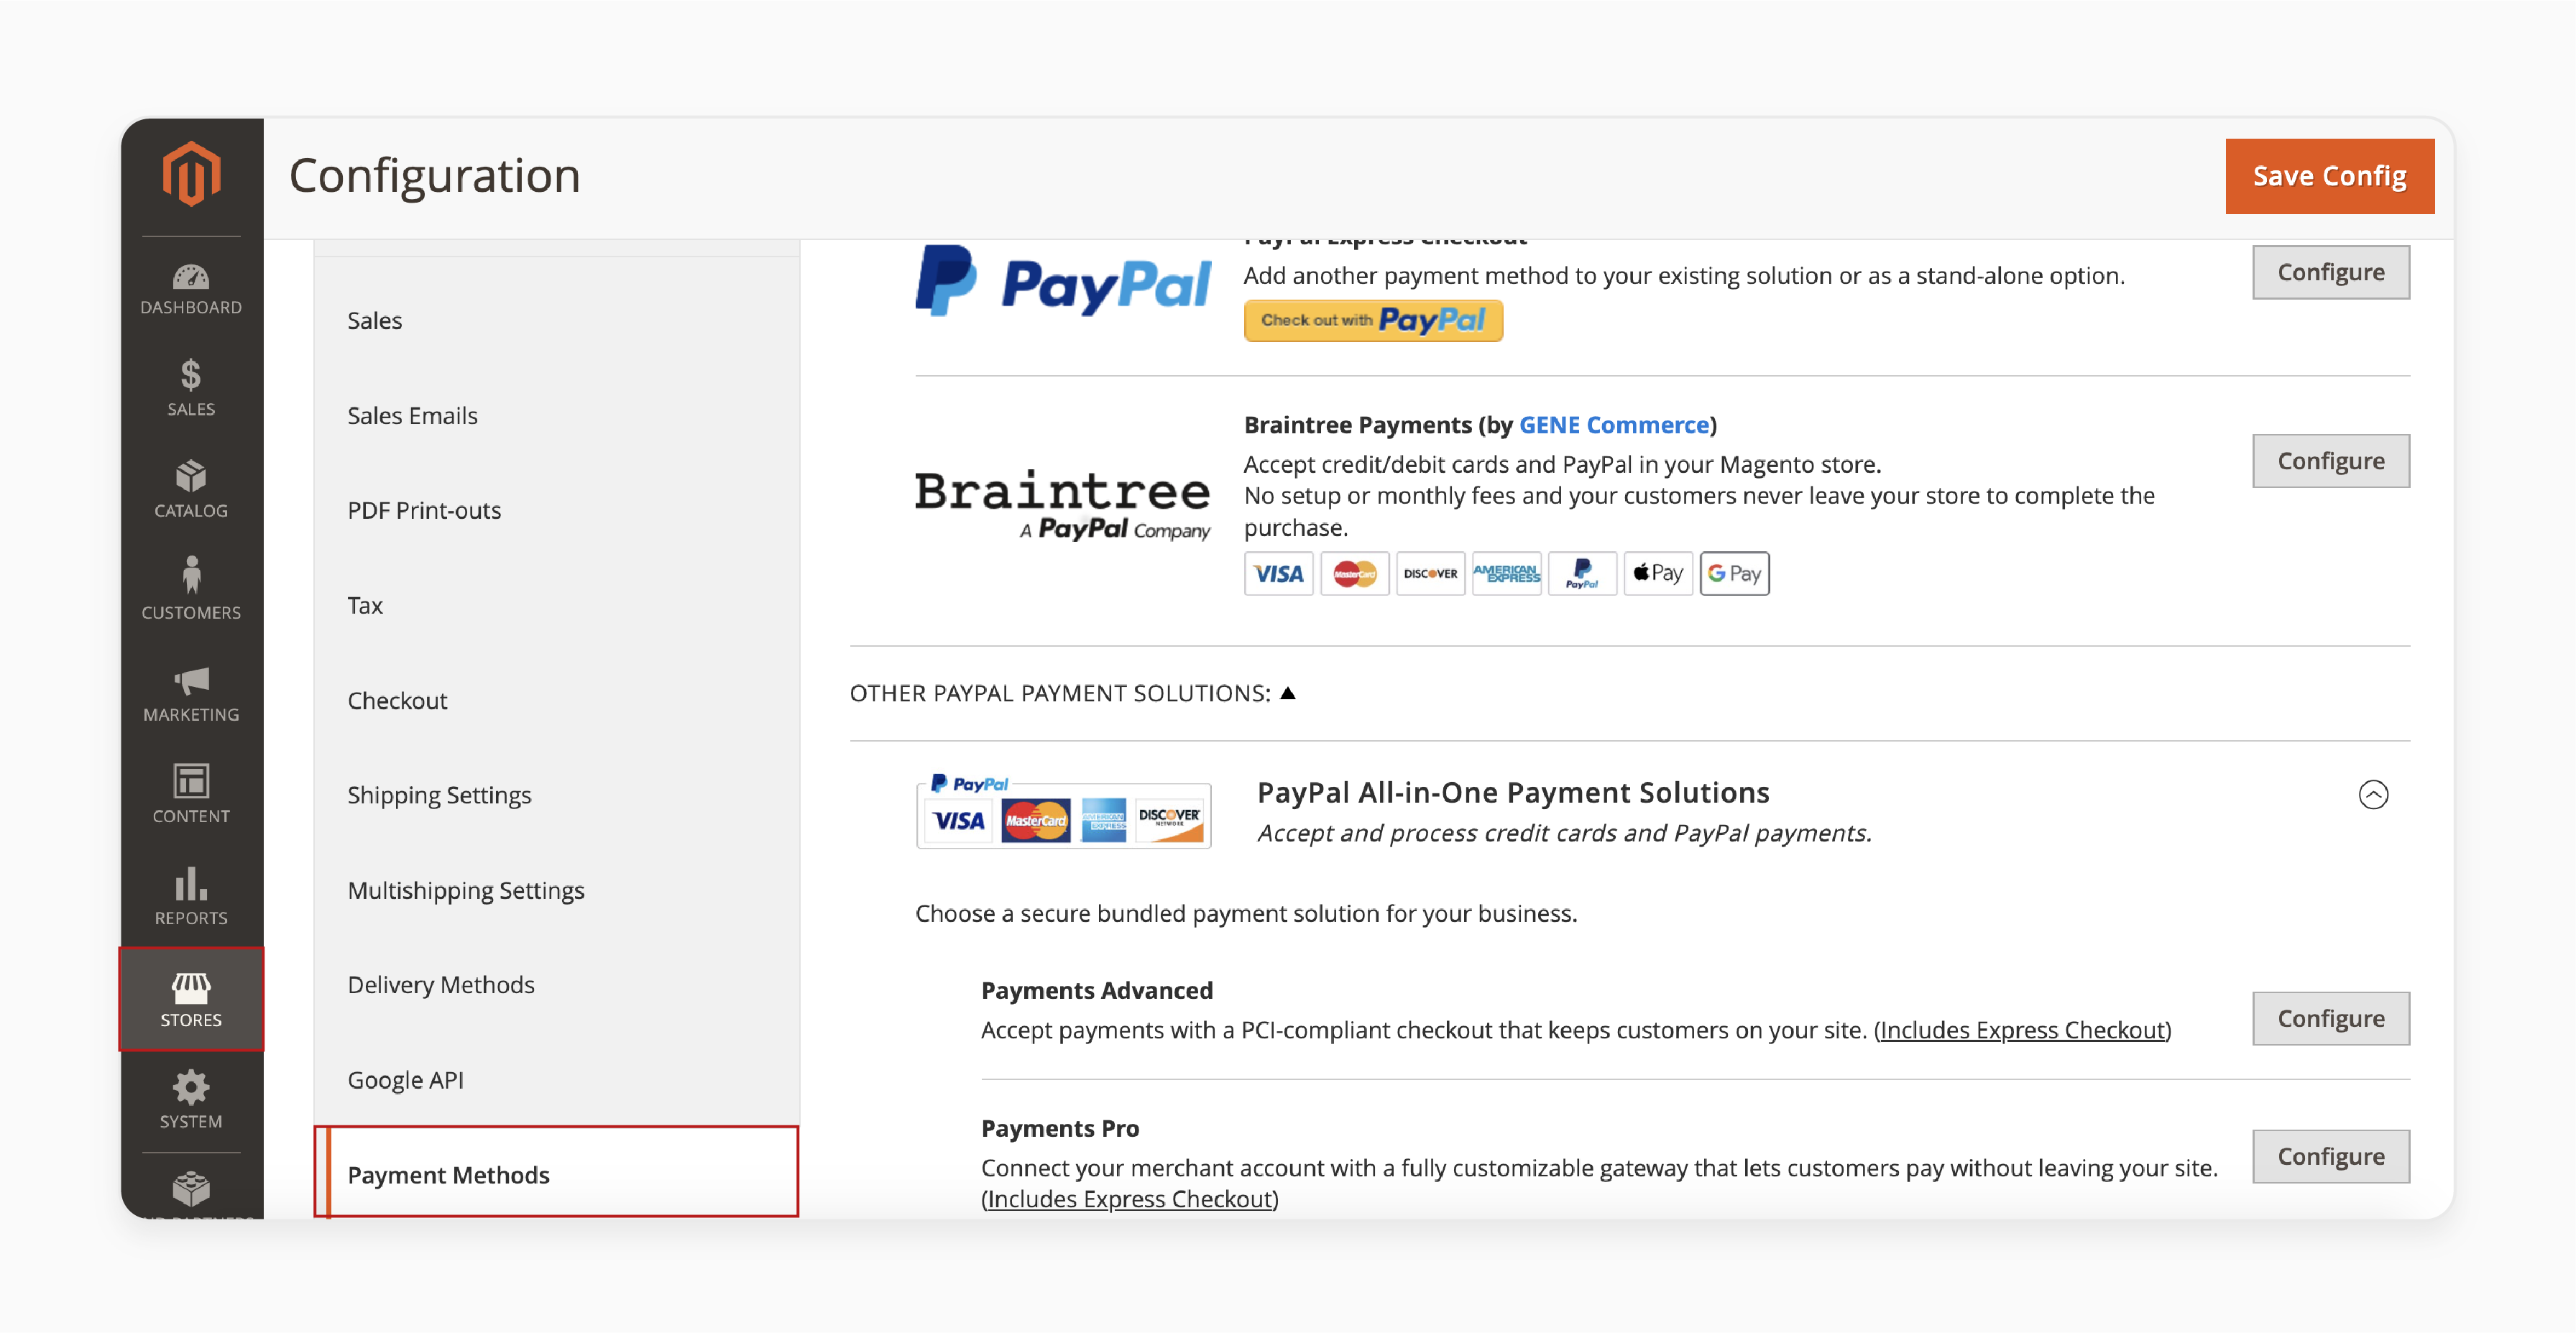
- Configure shipping methods and rates under Stores > Configuration > Sales > Shipping Settings.
Step 6: Customizing Magento with Extensions
- Visit the Magento Marketplace to browse and install extensions for additional functionality.
- Install extensions either via the Web Setup Wizard in the admin panel. Or manually using Composer by running:
php8.2 ~/htdocs/YOUR-DOMAIN/bin/magento
Note: For specific plugins, you may need to edit vhost files. This is because this template uses CloudPanel with an NGINX web server.
Frontend And Backend Management Of Magento Open Source
| Phase | Steps | Key Points |
|---|---|---|
| Foundation | 1. Install Magento 2 using Composer. 2. Configure the store settings. 3. Set up multiple websites/store views. |
- Install via Composer for Magento installation. - Optimize for different regions and languages. - Implement a custom theme for brand identity. |
| Inventory Management | 1. Connect to real inventory. 2. Set up Advanced MSI. 3. Configure the stock notifications. |
- Integrate with multiple warehouses. - Implement just-in-time inventory strategies - Use AI for predictive stock management. |
| Team and Security | 1. Set user permissions. 2. Implement the security measures. 3. Ensure GDPR compliance. |
- Use "Advanced Permissions" for granular control. - Implement a two-factor authentication. - Regularly conduct security audits. |
| Content and Catalog | 1. Create a category structure. 2. Upload and optimize products. 3. Develop CMS pages. |
- Use SEO-friendly URLs for categories. - Implement rich product attributes. - Leverage Page Builder for dynamic content. |
| Search and Navigation | 1. Configure Elasticsearch. 2. Optimize filtering options. 3. Create an intuitive menu. |
- Implement natural language processing. - Use machine learning for personalized search results. - Create dynamic mega menus. |
| Payment and Shipping | 1. Set up payment gateways. 2. Configure shipping methods. 3. Implement tax rules. |
- Offer multiple payment options, including cryptocurrencies. - Use real-time shipping rate calculations. - Automate tax compliance across regions. |
| Marketing and Promotions | 1. Develop pricing strategies. 2. Implement email marketing. 3. Leverage customer reviews. |
- Use AI for dynamic pricing. - Implement marketing automation workflows. - Integrate social proof and user-generated content. |
| SEO and Analytics | 1. Optimize on-page SEO. 2. Set up Google Analytics. 3. Monitor and improve performance. |
- Implement schema markup for rich snippets. - Use advanced analytics for customer journey mapping. - Leverage A/B testing for continuous improvement. |
| Revenue Management | 1. Analyze the business metrics. 2. Manage the order documentation. 3. Minimize losses and returns. |
- Implement predictive analytics for forecasting. - Automate invoice and shipment processes. - Use machine learning for fraud detection. |
10 Steps To Navigate The Magento 2 Admin Panel
Step 1: Access the Magento Dashboard Section
- Upon logging in as an admin, you will come across the Magento Admin Dashboard.
- The dashboard provides a summary of the following:
- Sales data such as total lifetime sales and average order value.
- Recent orders, including customer names, items ordered, and order values.
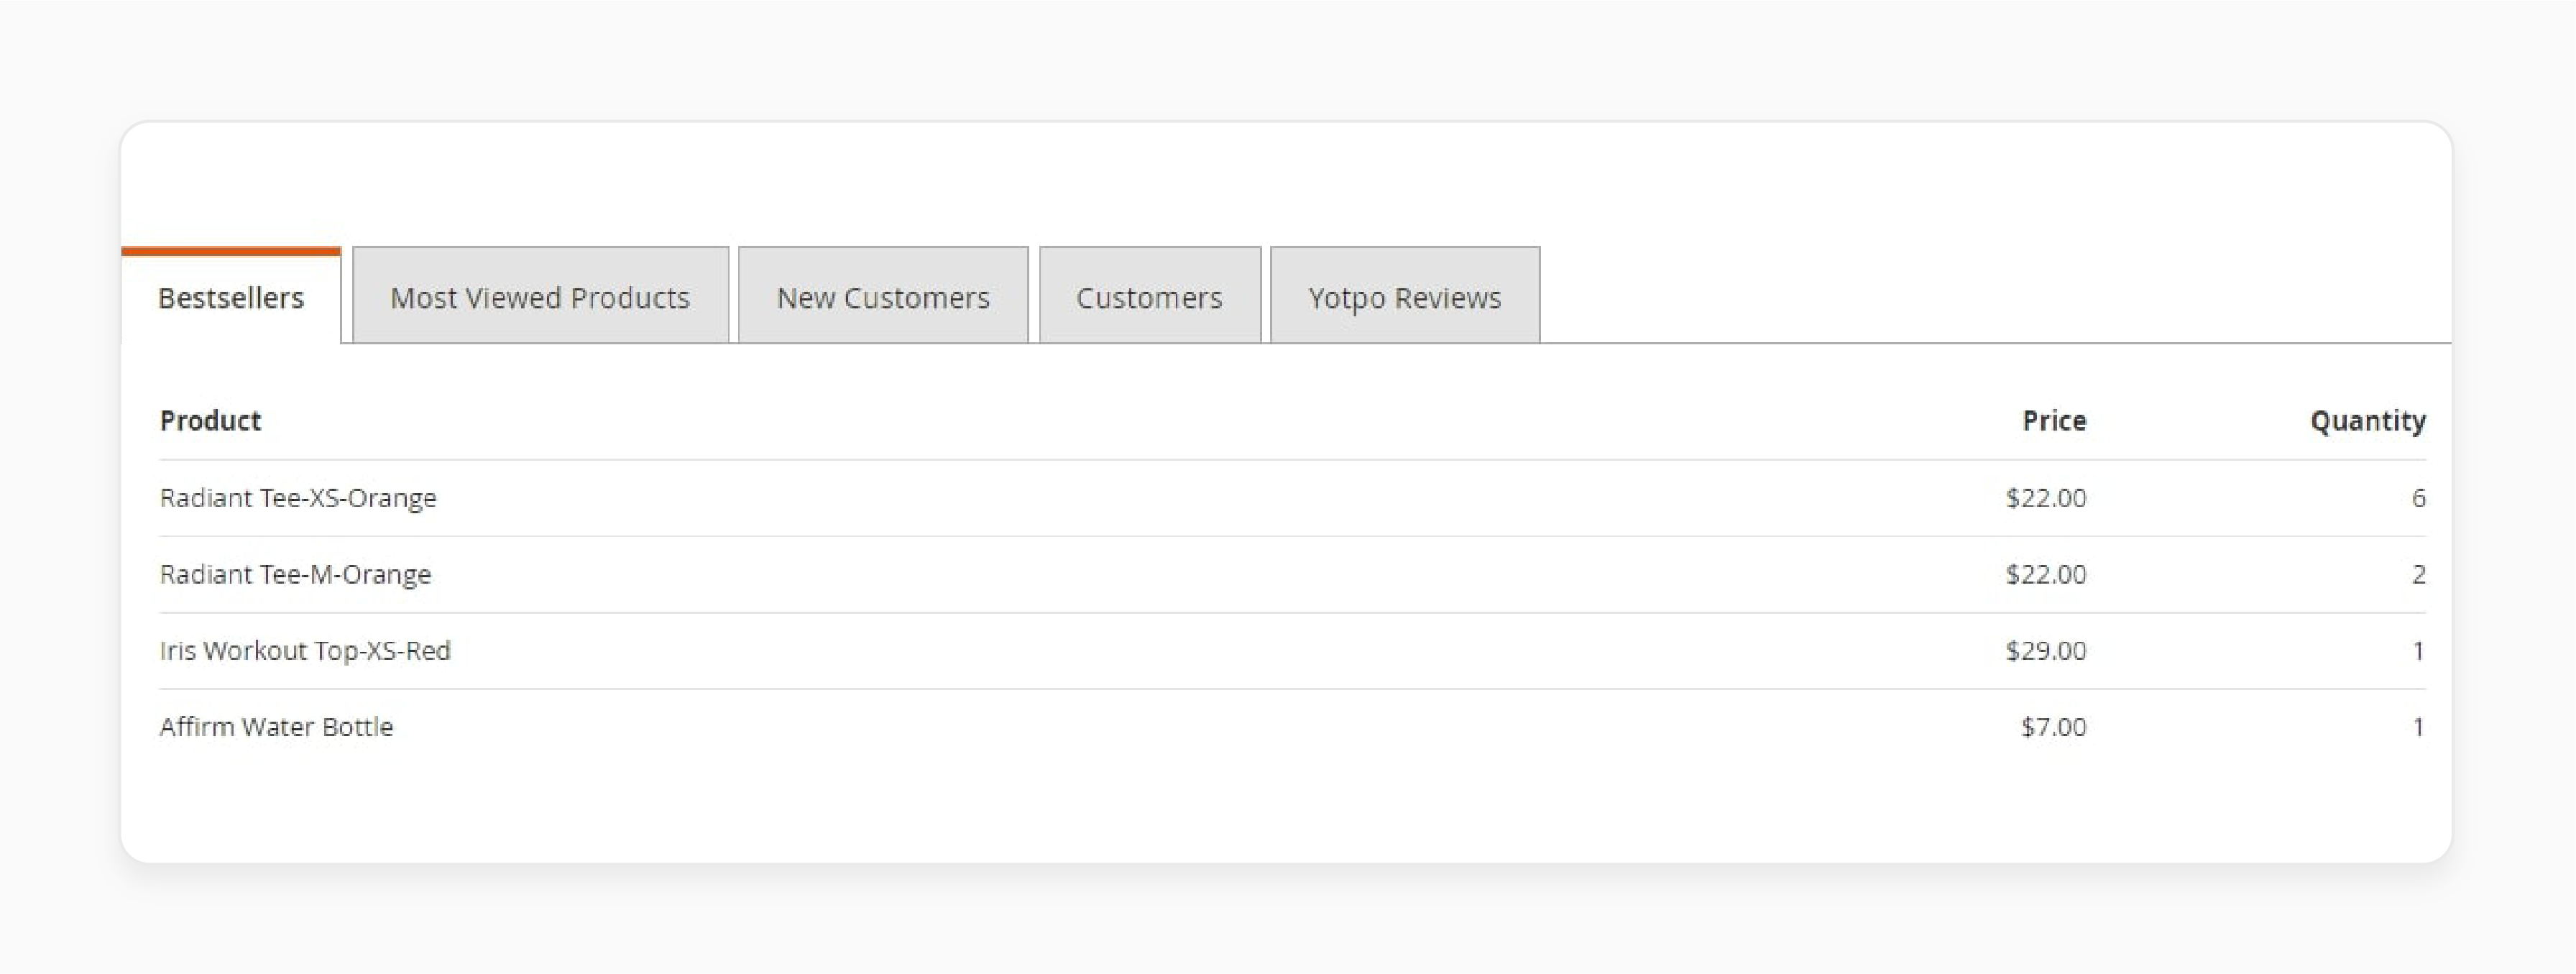
- In the middle, five tabs give quick access to:
- Top-selling products, most popular items, new customers, and Yotpo reviews.
To enable charts:
i. Navigate to Stores > Settings > Configuration. ii. Select Admin under the 'Advanced' tab. iii. Enable charts by selecting "Yes". iv. Click on the 'Save Config' button. v. Clear the cache. vi. The dashboard will now display bar charts showing the order and amount data for your selected timeframe.
Step 2: Explore the Sales Tab
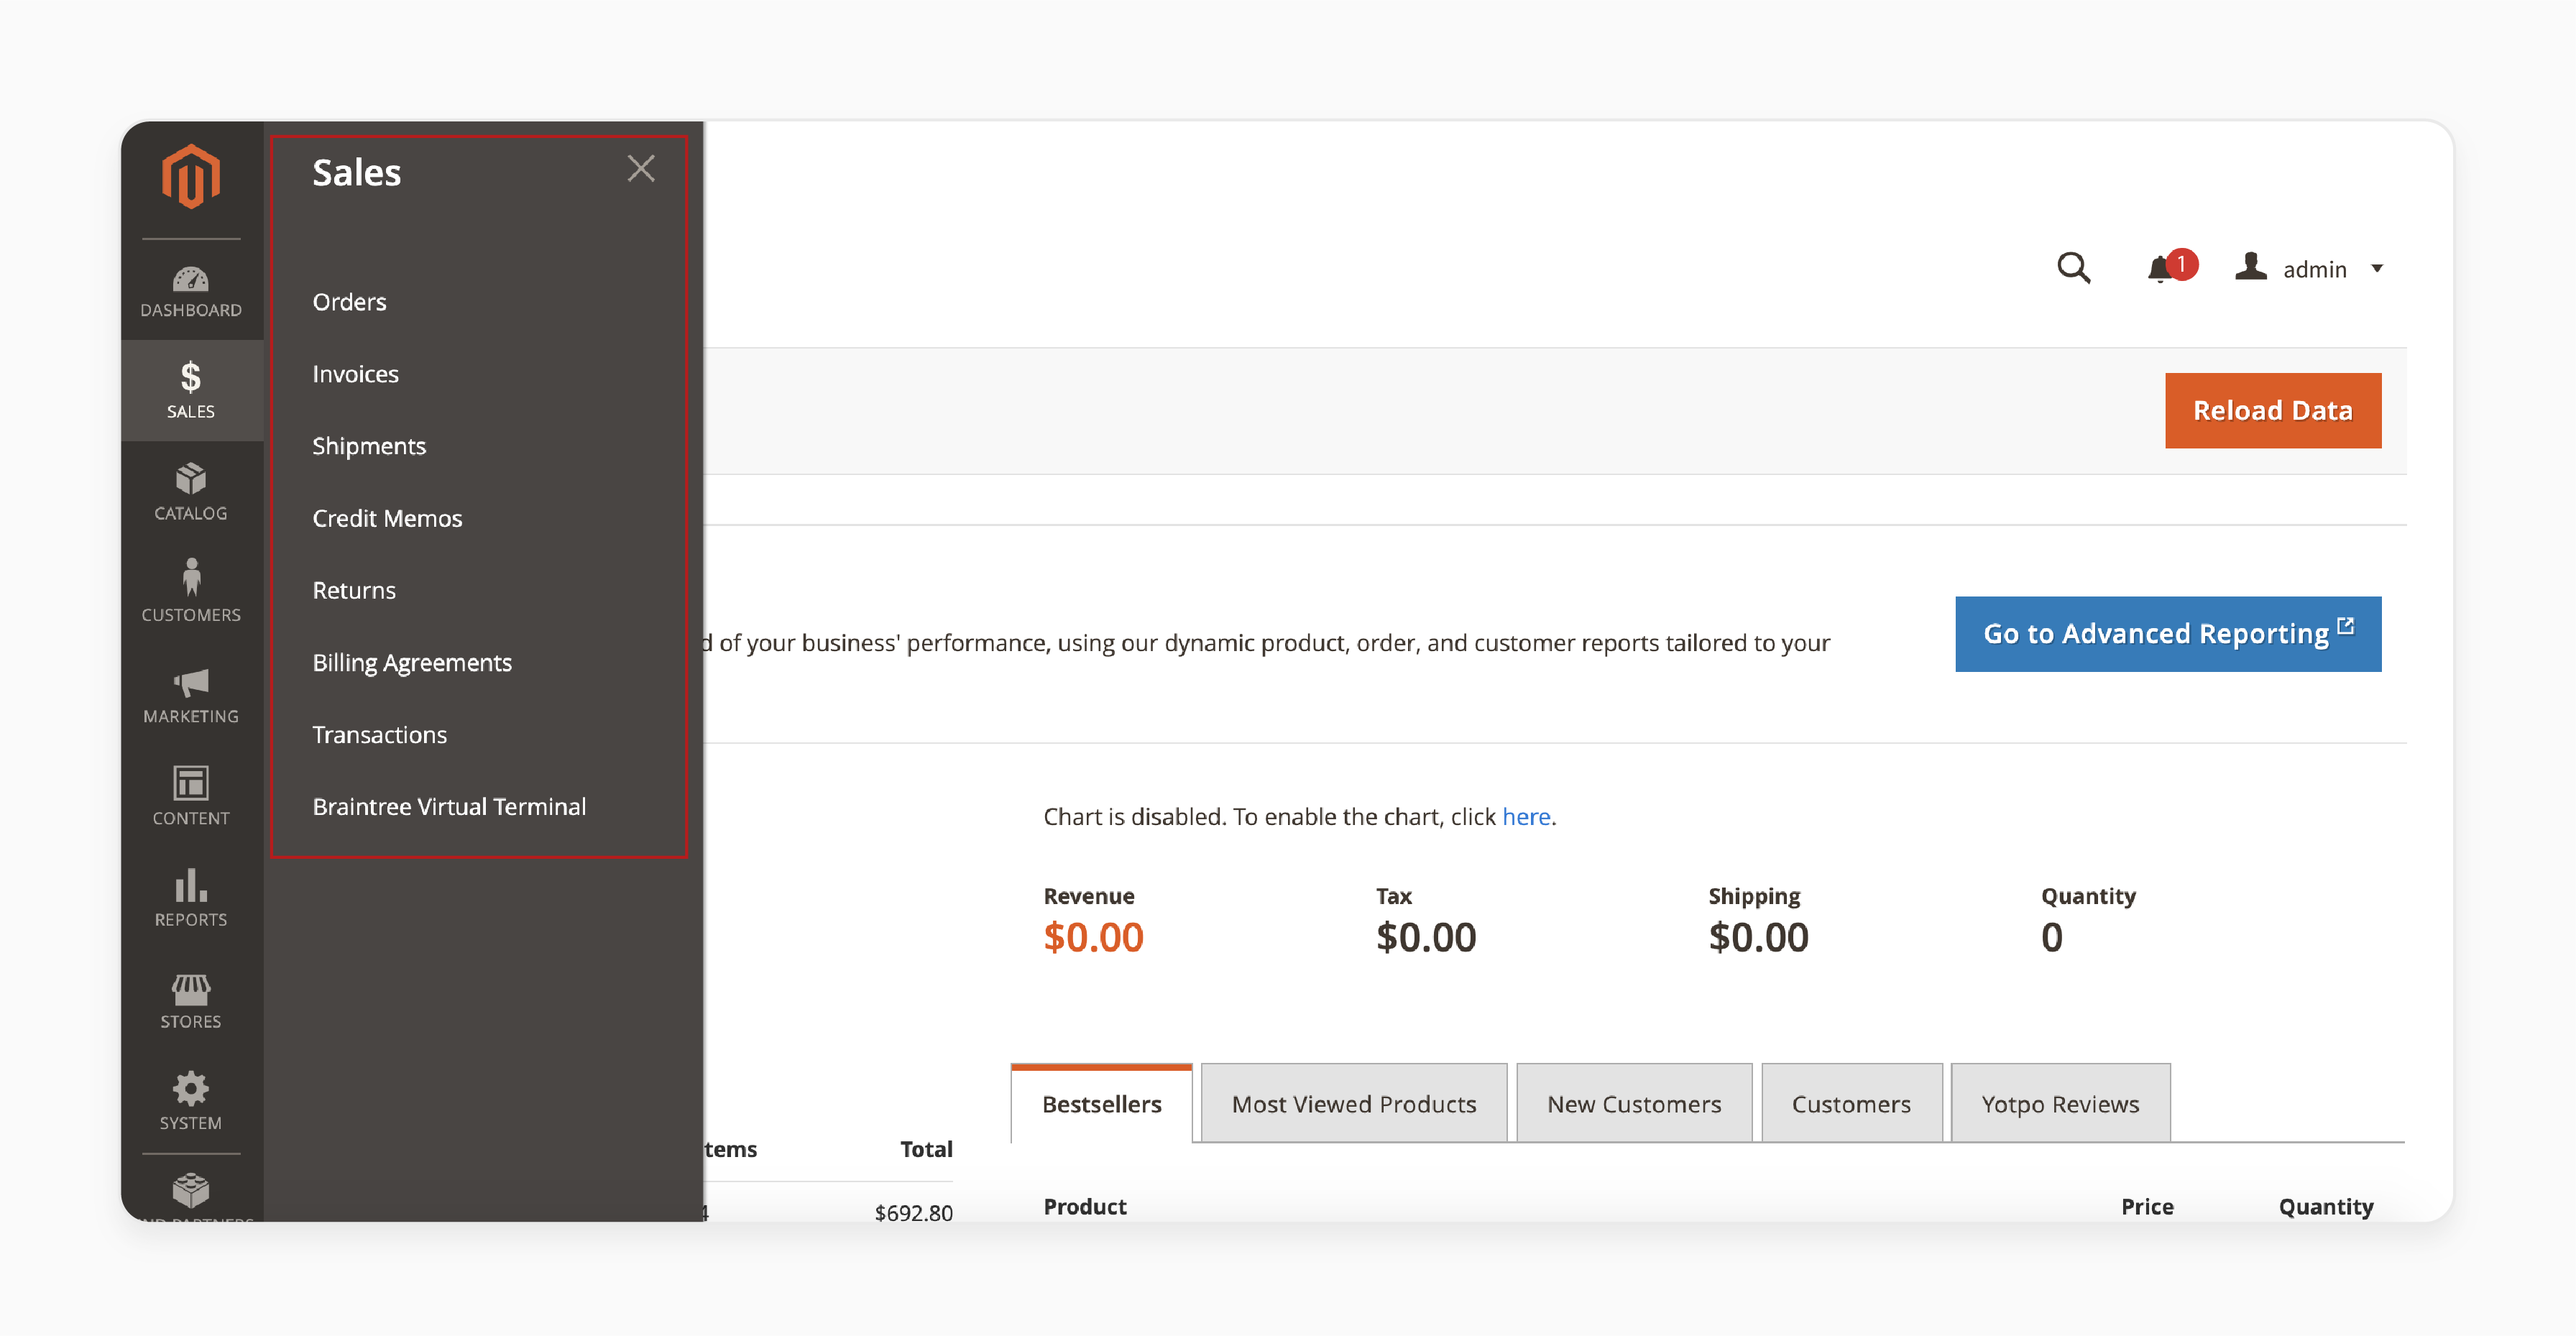
- The Sales Tab manages all order processing details. Examples include orders, invoices, shipments, and credit memos.
- In the 'Orders' section, view and customize the order grid, which includes essential order details.
- The 'Invoices' section enables automatic invoice or shipment creation based on payment methods.
- The 'Shipments' section allows you to track delivery, generate PDF shipments, and print shipping labels.
- In the 'Credit Memos' section, generate PDFs and view details. Examples include refunded amounts and order status.
- The 'Billing Agreements' section tracks billing agreements with customers.
- The 'Transactions' section shows transaction details, including open and closed transactions.
Step 3: Manage Products in the Catalog Tab
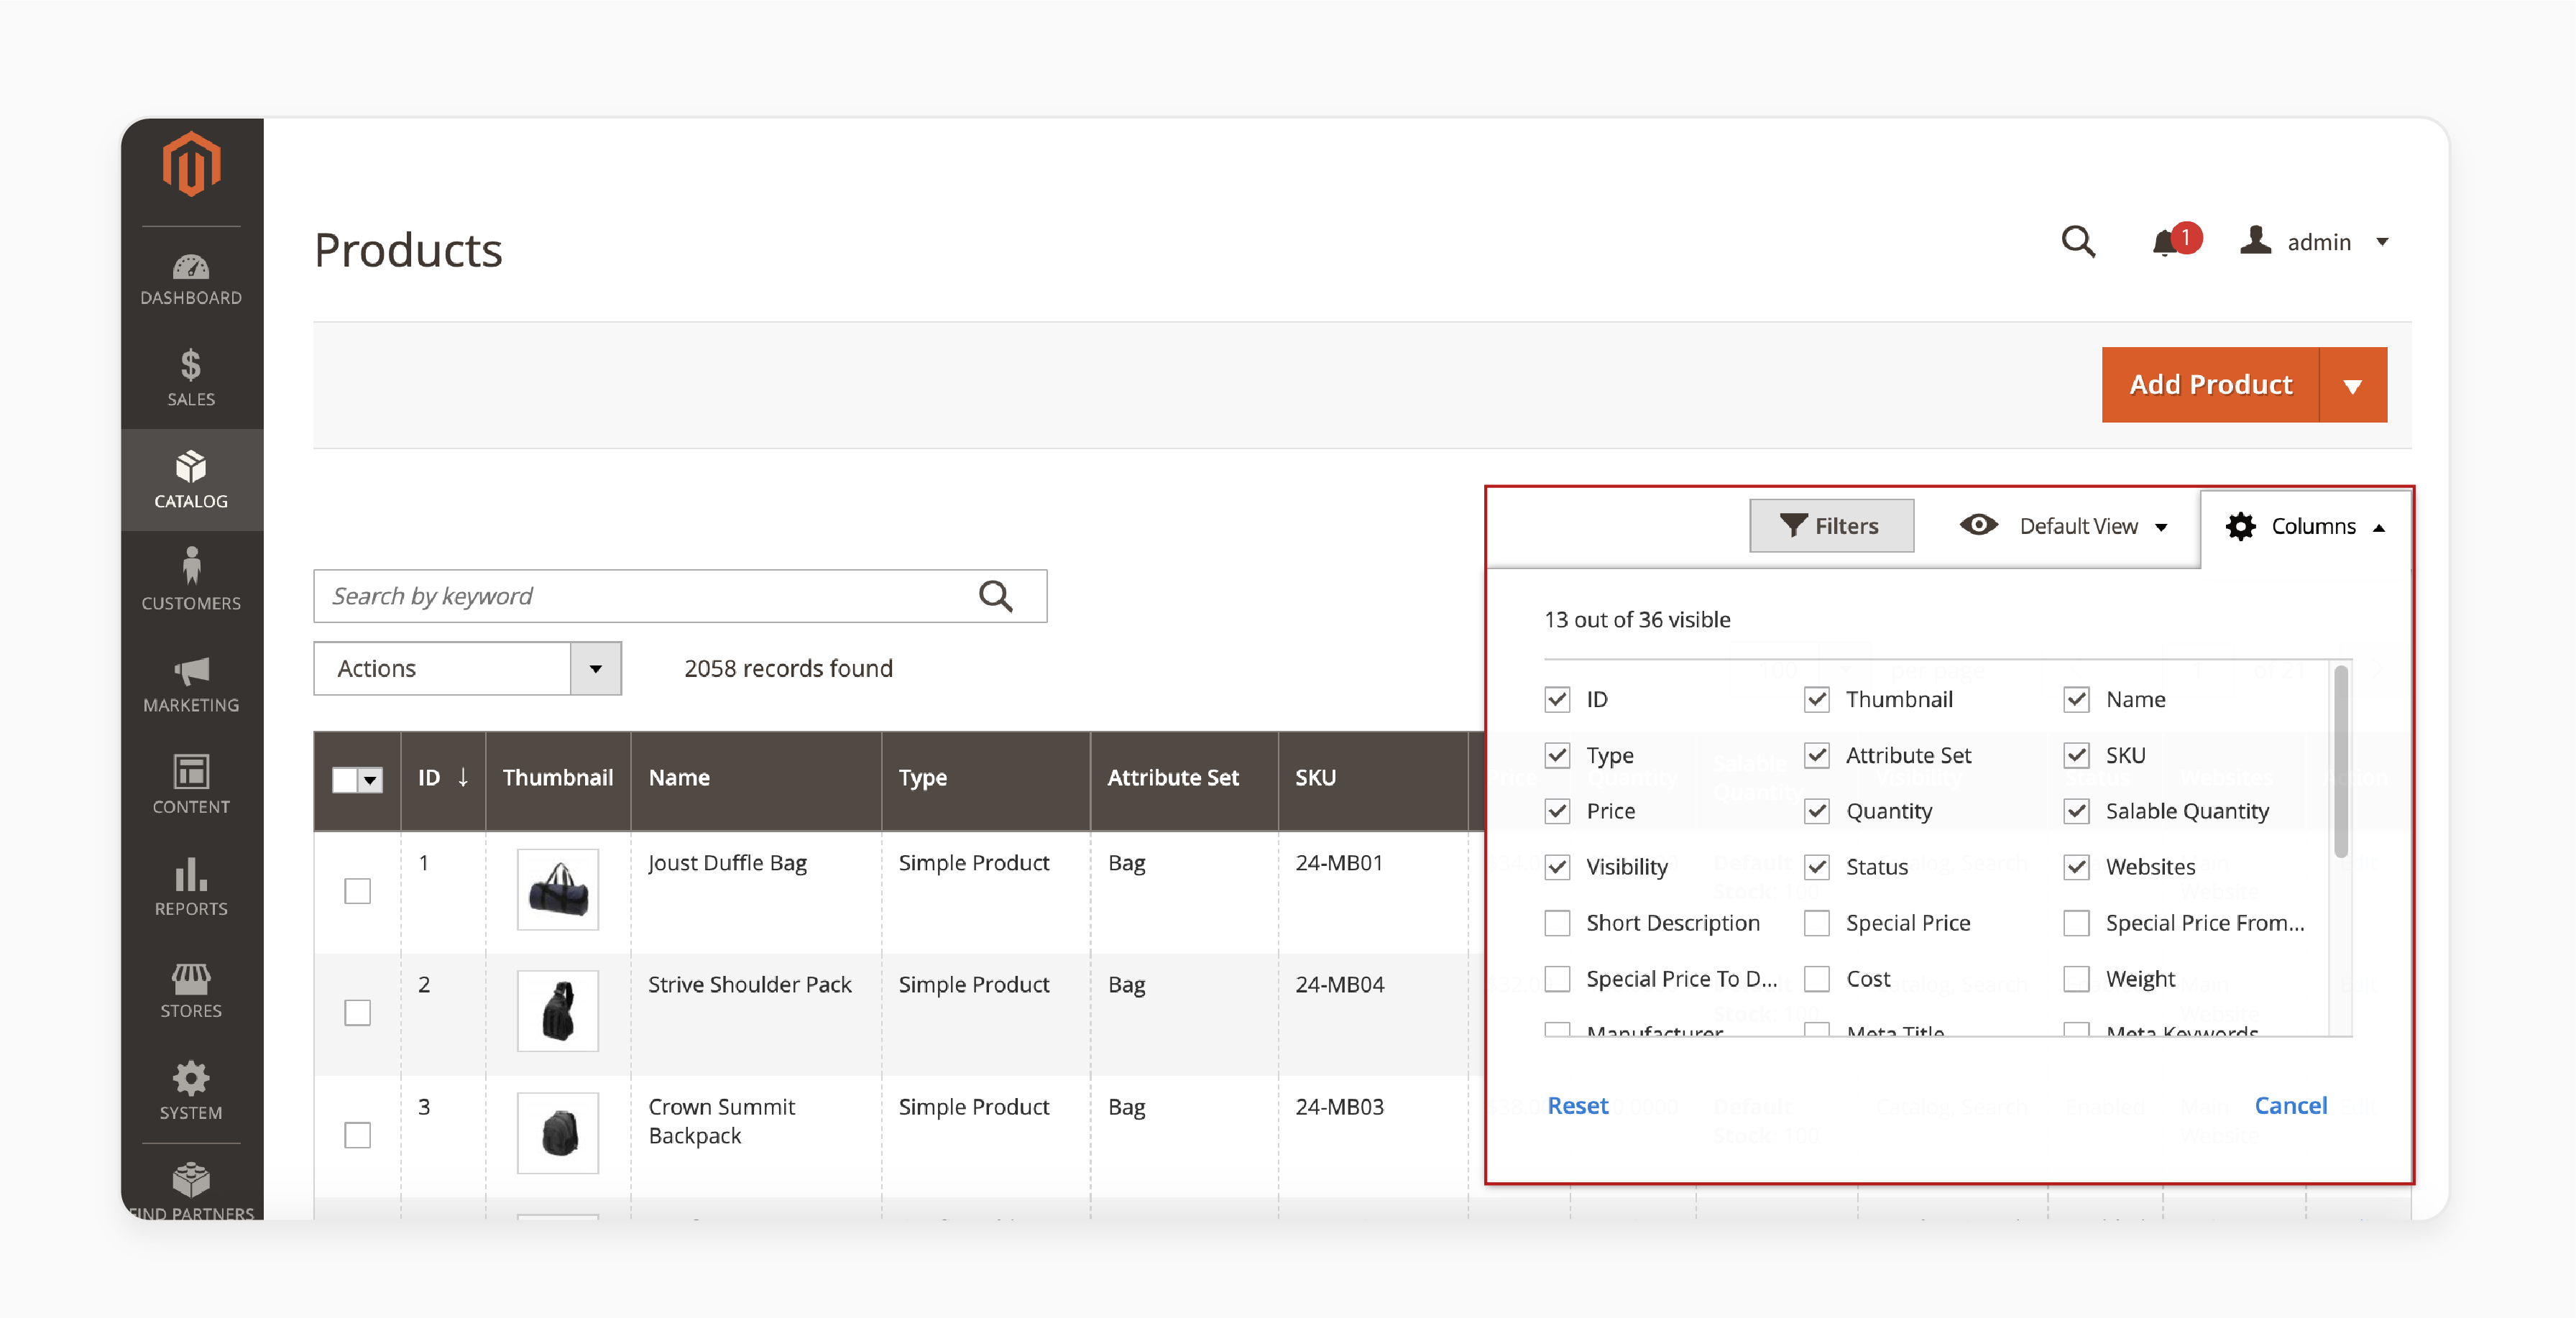
- Navigate to Catalog > Products to manage product listings:
- View product details like name, price, and stock status.
- Add, edit, or delete products in bulk.
- In the Categories section, you can:
- Create, edit, or remove categories and subcategories to organize your products.
- Customize category images, descriptions, and SEO elements.
Step 4: Use the Customers Tab
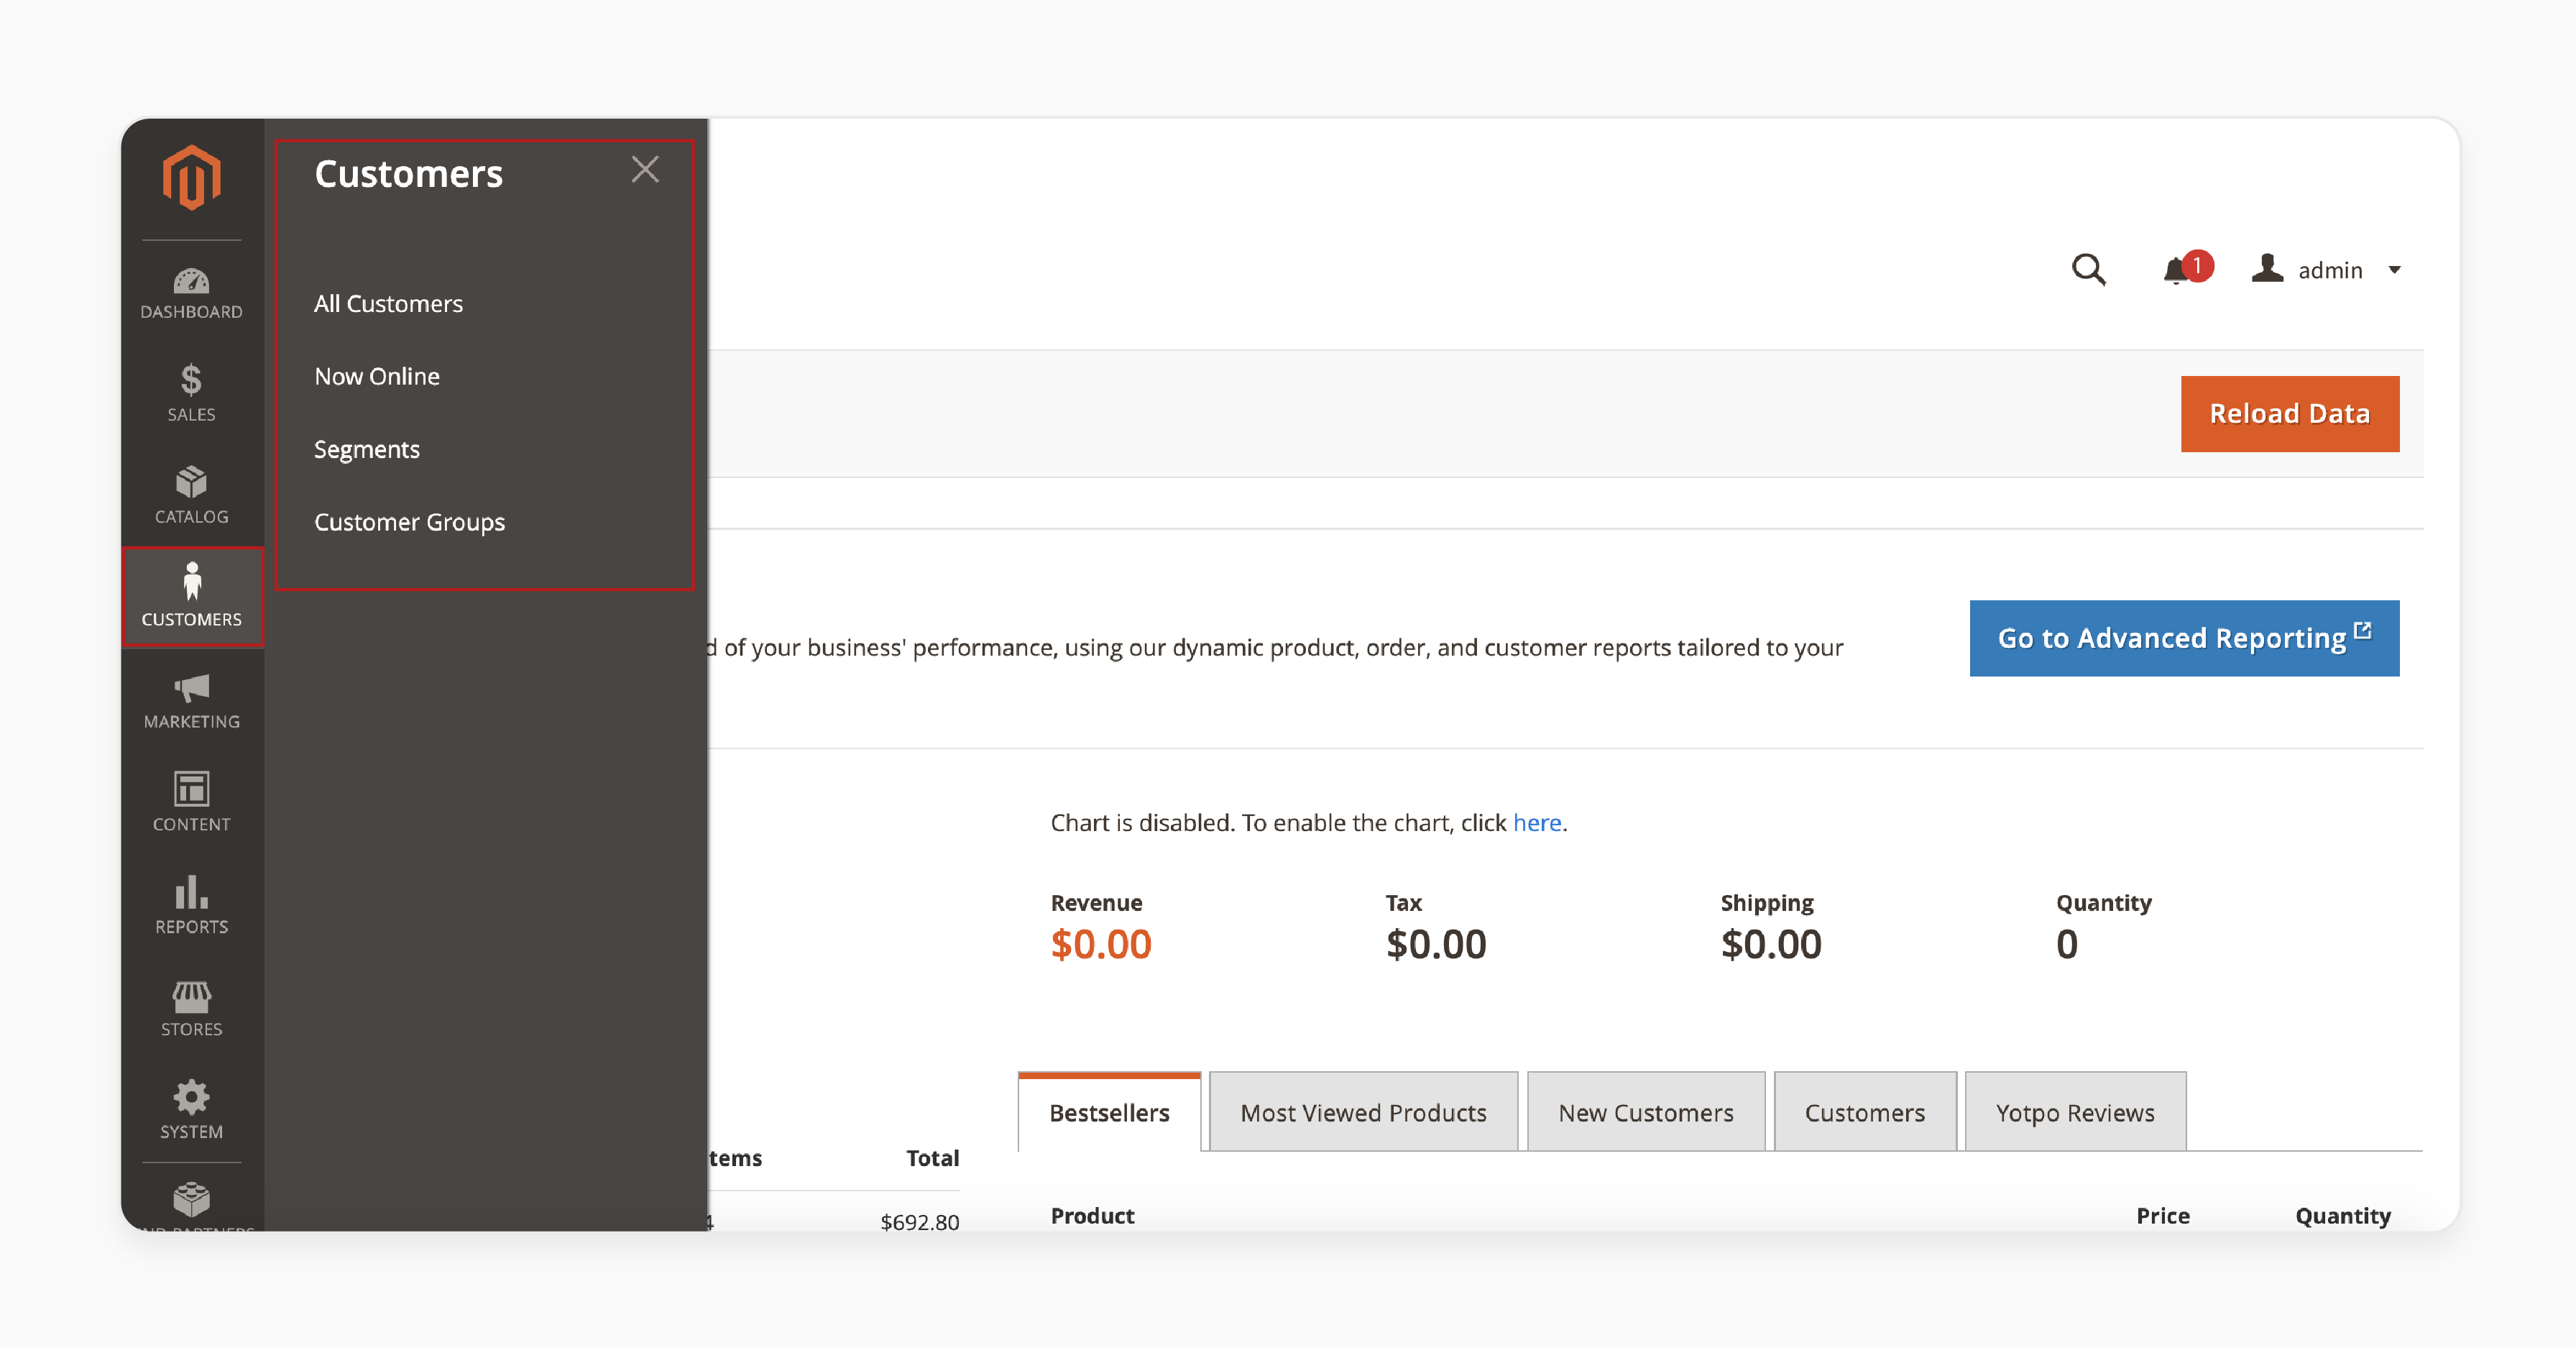
- The Customers Tab provides access to:
- 'All Customers' section to show details like name, email, and customer group.
- 'Now Online' section to track currently active users.
- 'Customer Groups' section to segment your customer base.
- You can also:
- Add new customers or import customer lists.
- View and edit customer details and reset passwords.
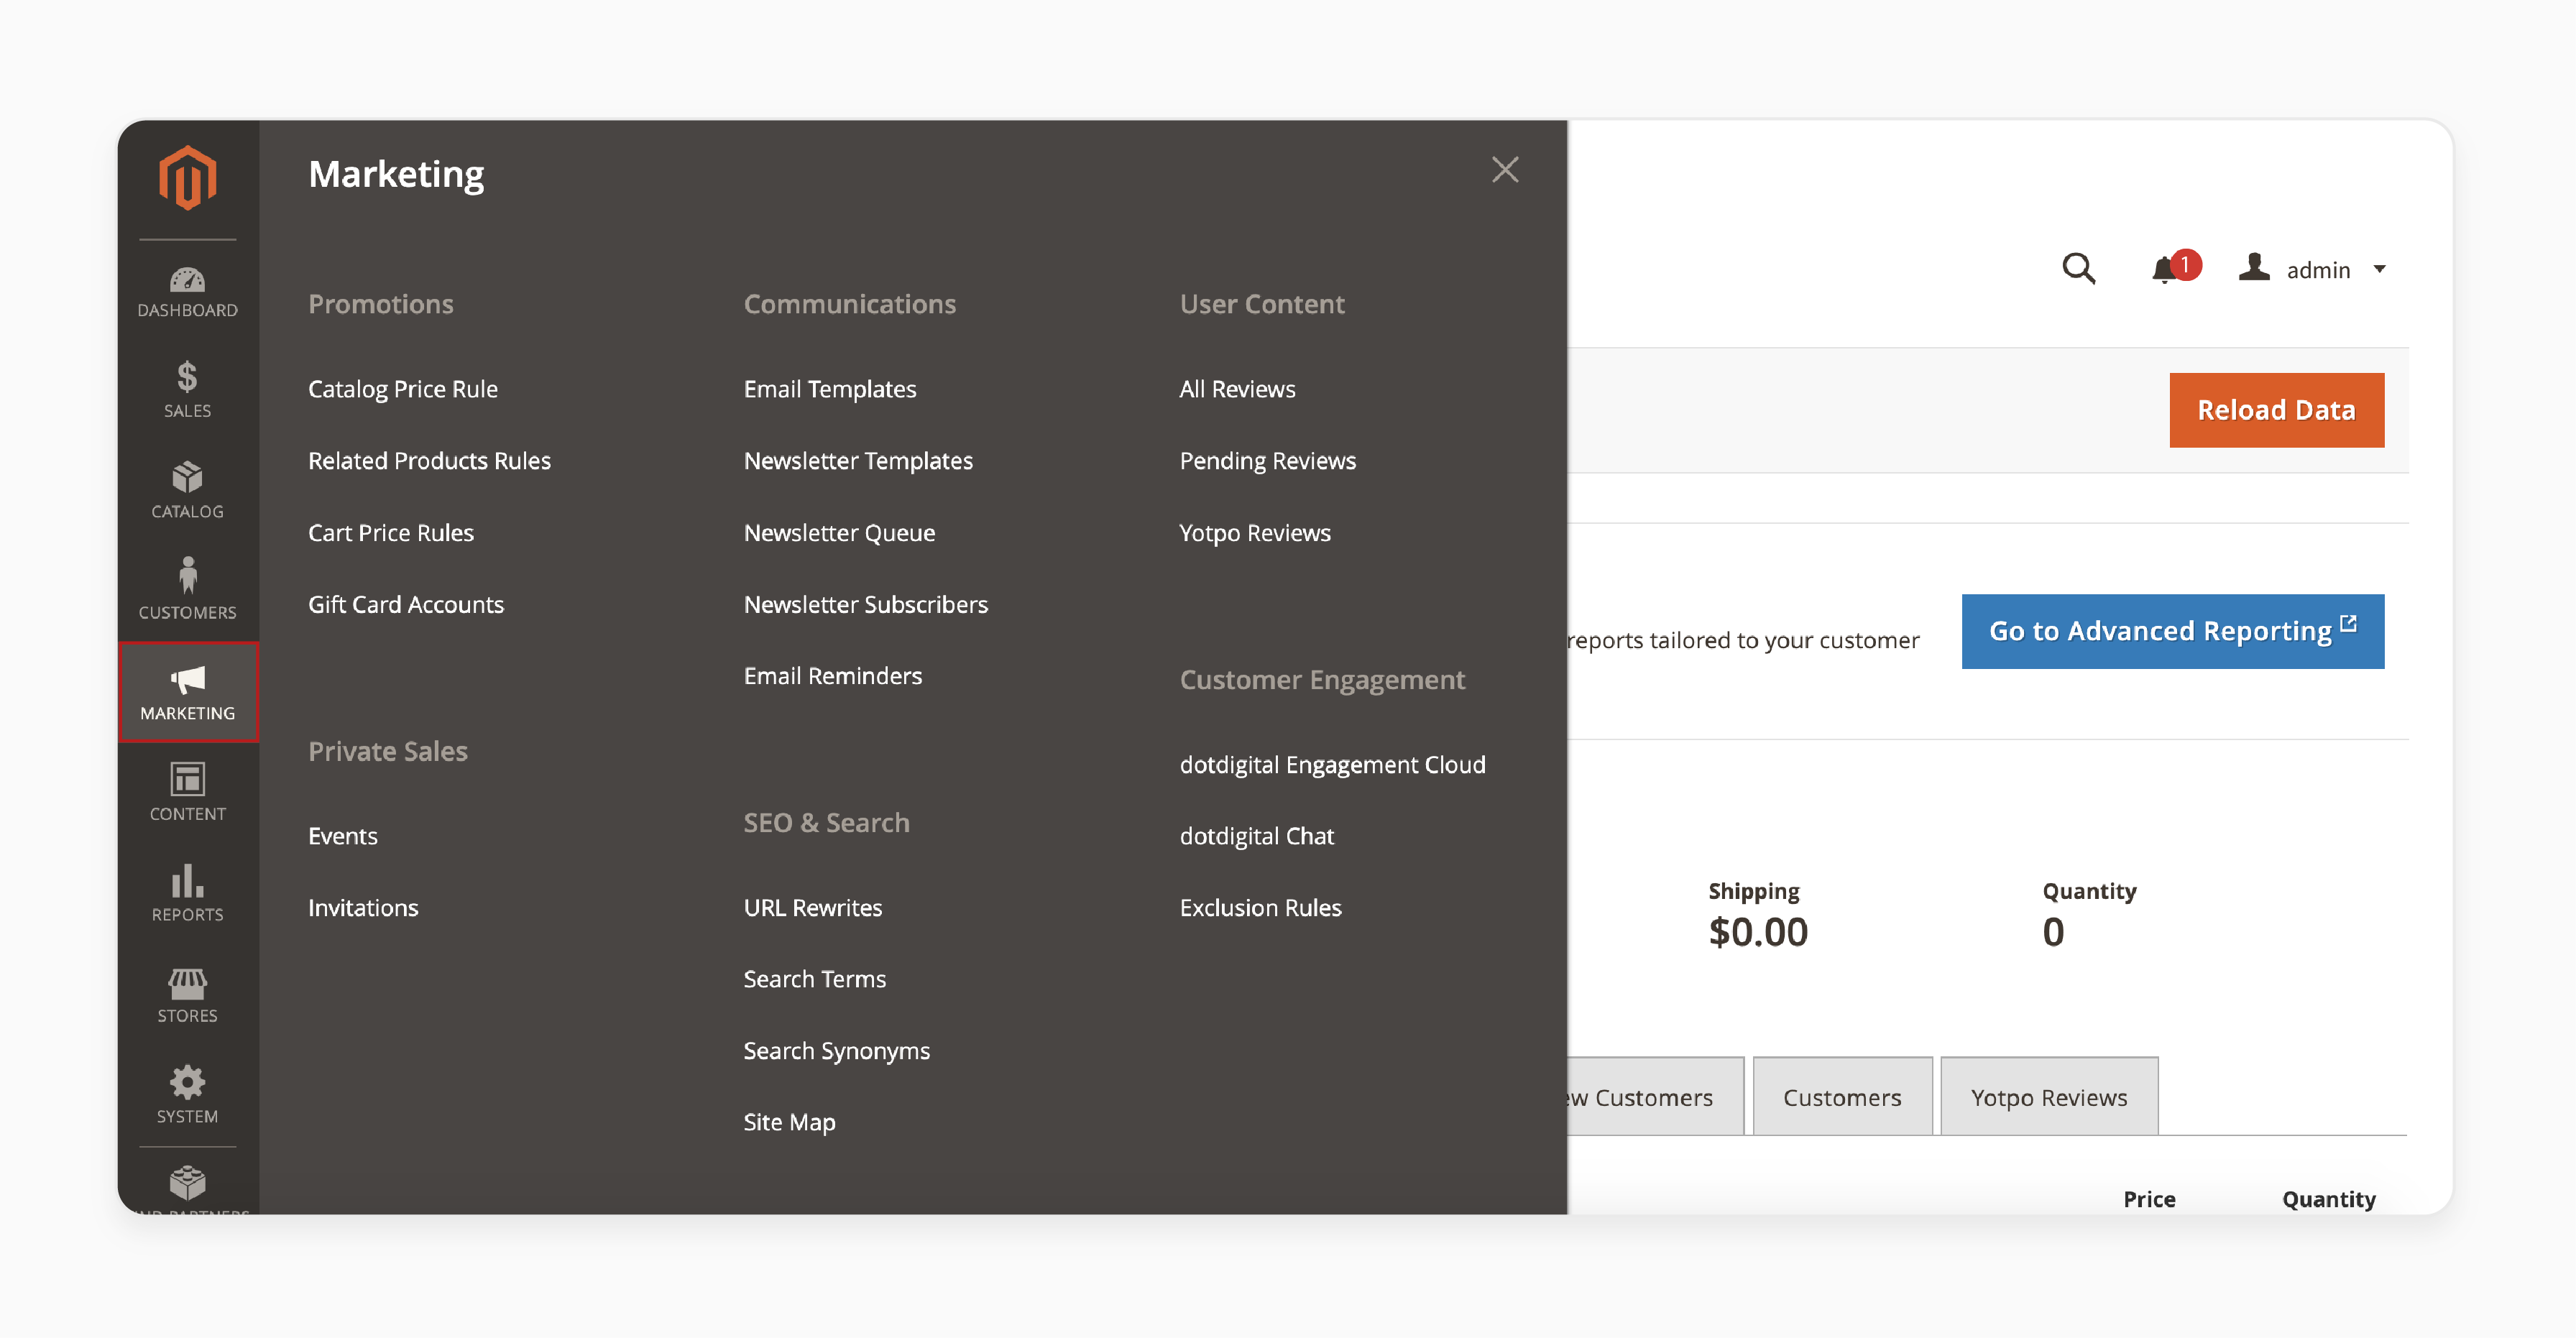
Step 5: Utilize the Marketing Tab
- The Marketing Tab includes tools for creating promotions and managing customer engagement.
- In the 'Promotions' section, create catalog price rules or shopping cart price rules based on product or cart attributes.
- The 'Communication' section allows you to send newsletters and emails using customizable templates.
- Use the 'SEO & Search' section to manage URLs, create sitemaps, and track popular search terms.
- The 'User Content' section helps you manage and approve customer reviews.
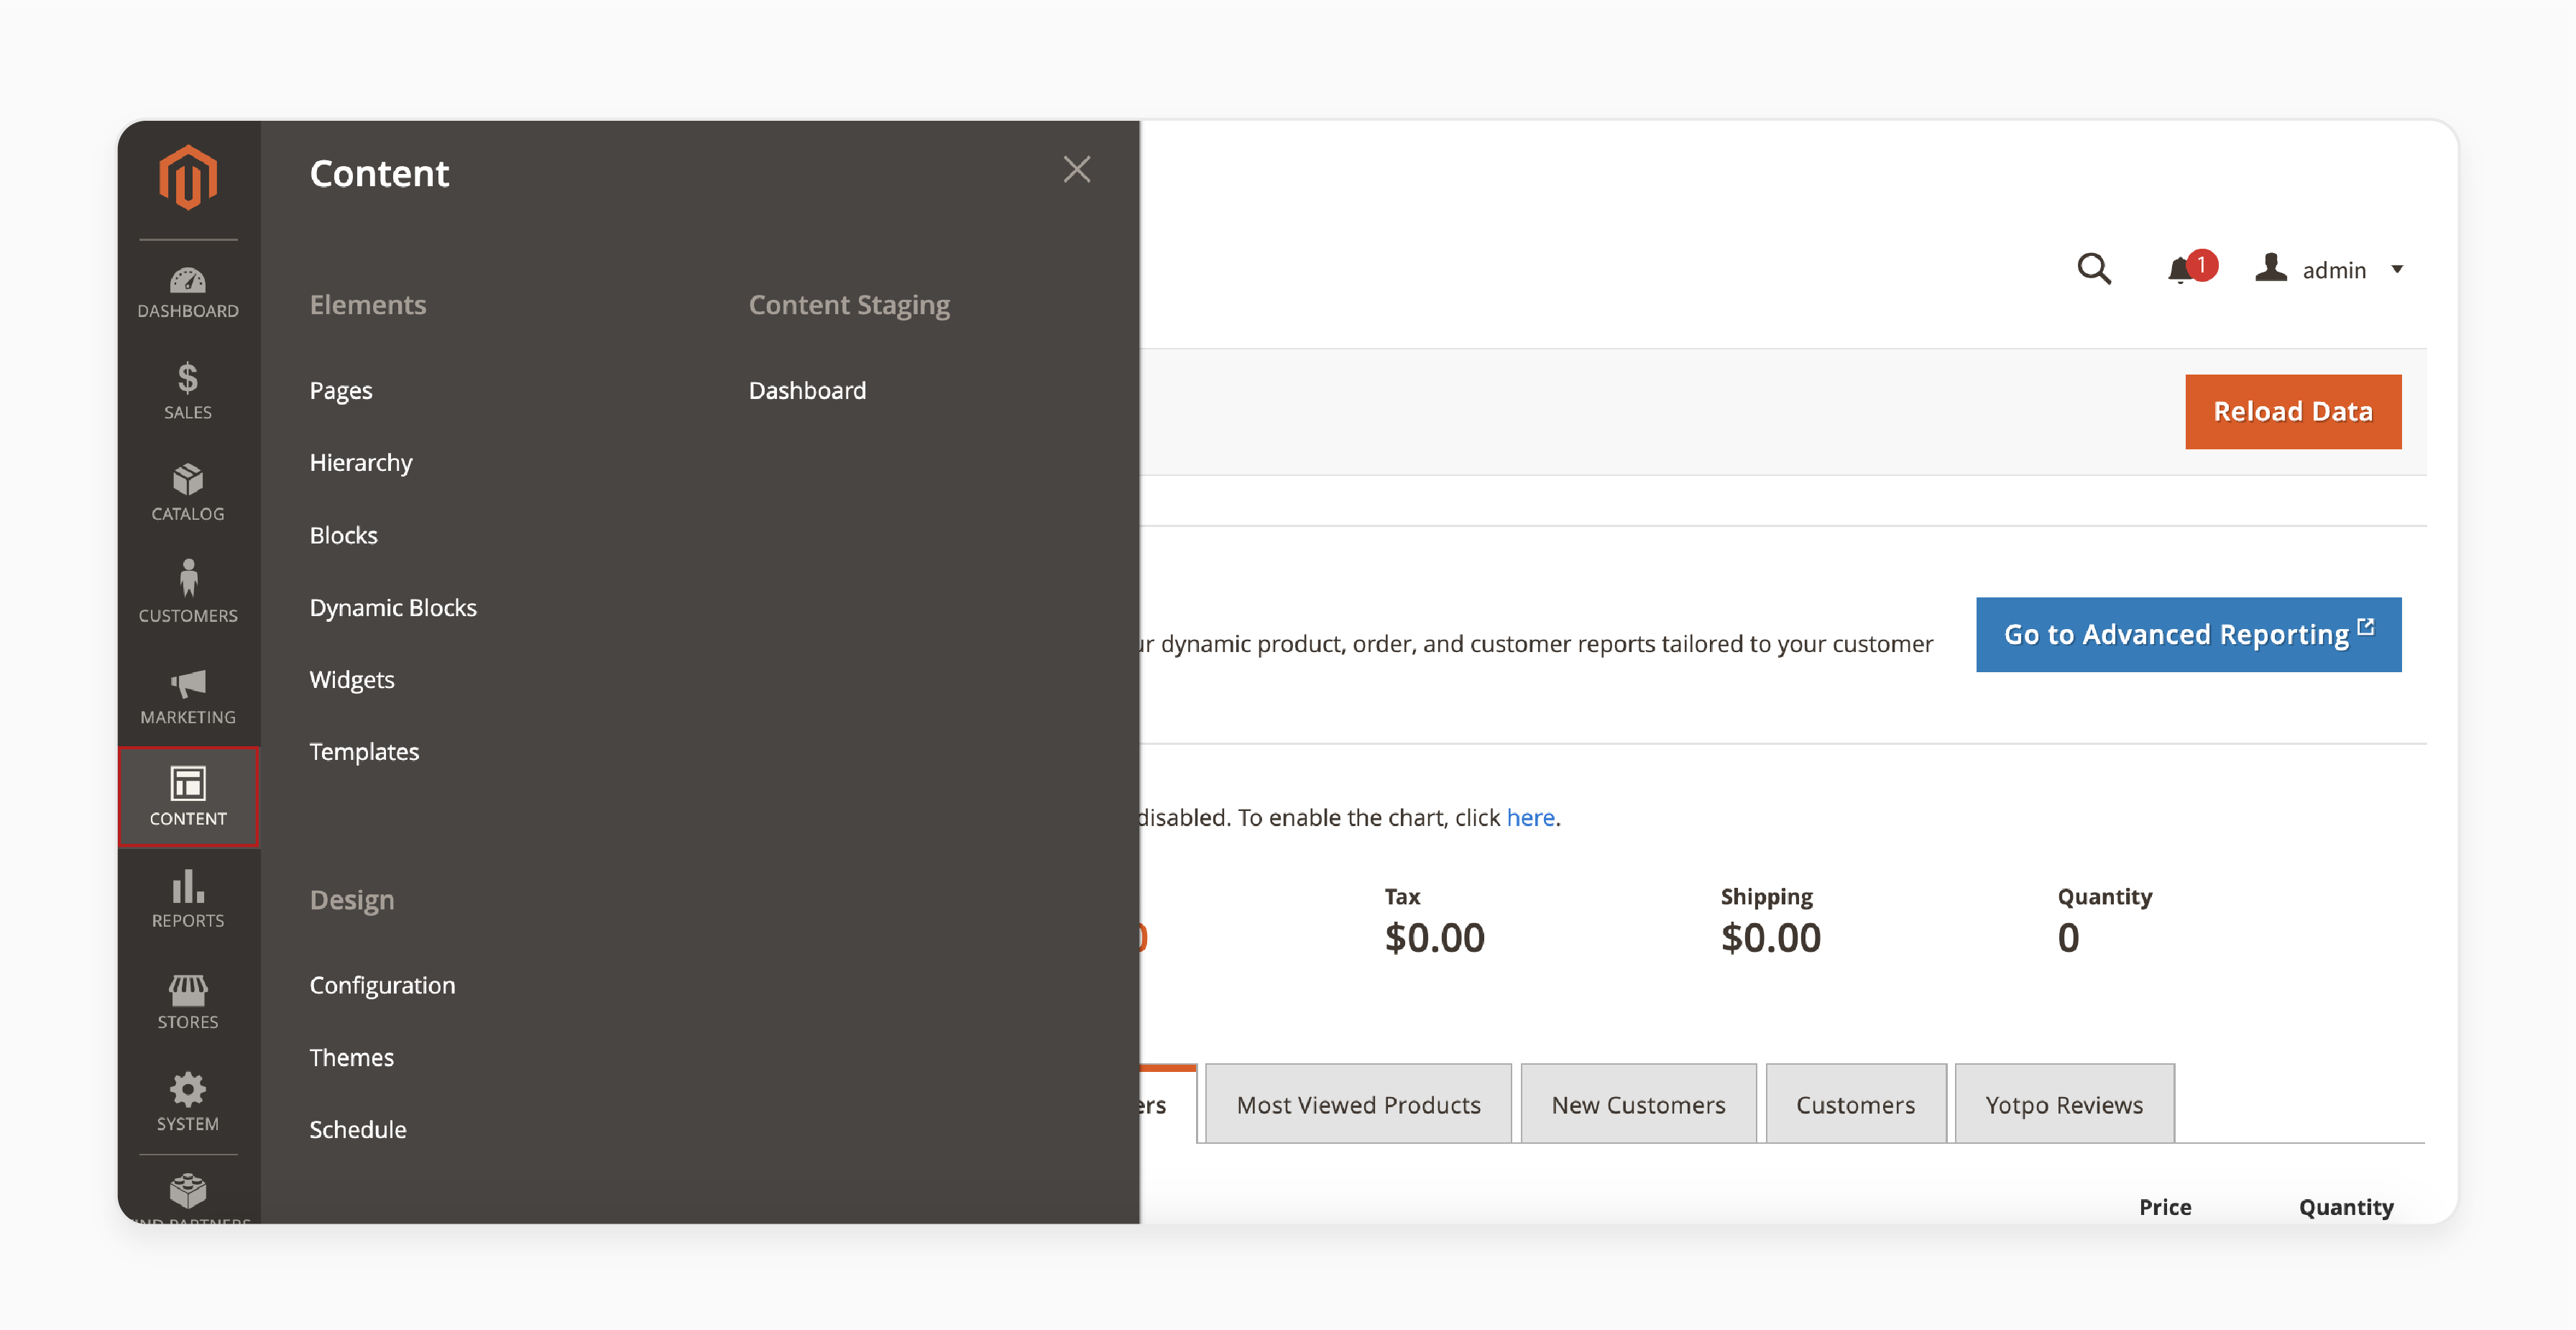
Step 6: Manage Content in the Content Tab
- In the 'Elements' section:
Manage CMS pages, static blocks, and widgets to control your site's content.
- The 'Design' section allows you to:
- Customize themes, headers, and footers.
- Set up automatic theme changes.
- Install custom themes for a unique storefront look.
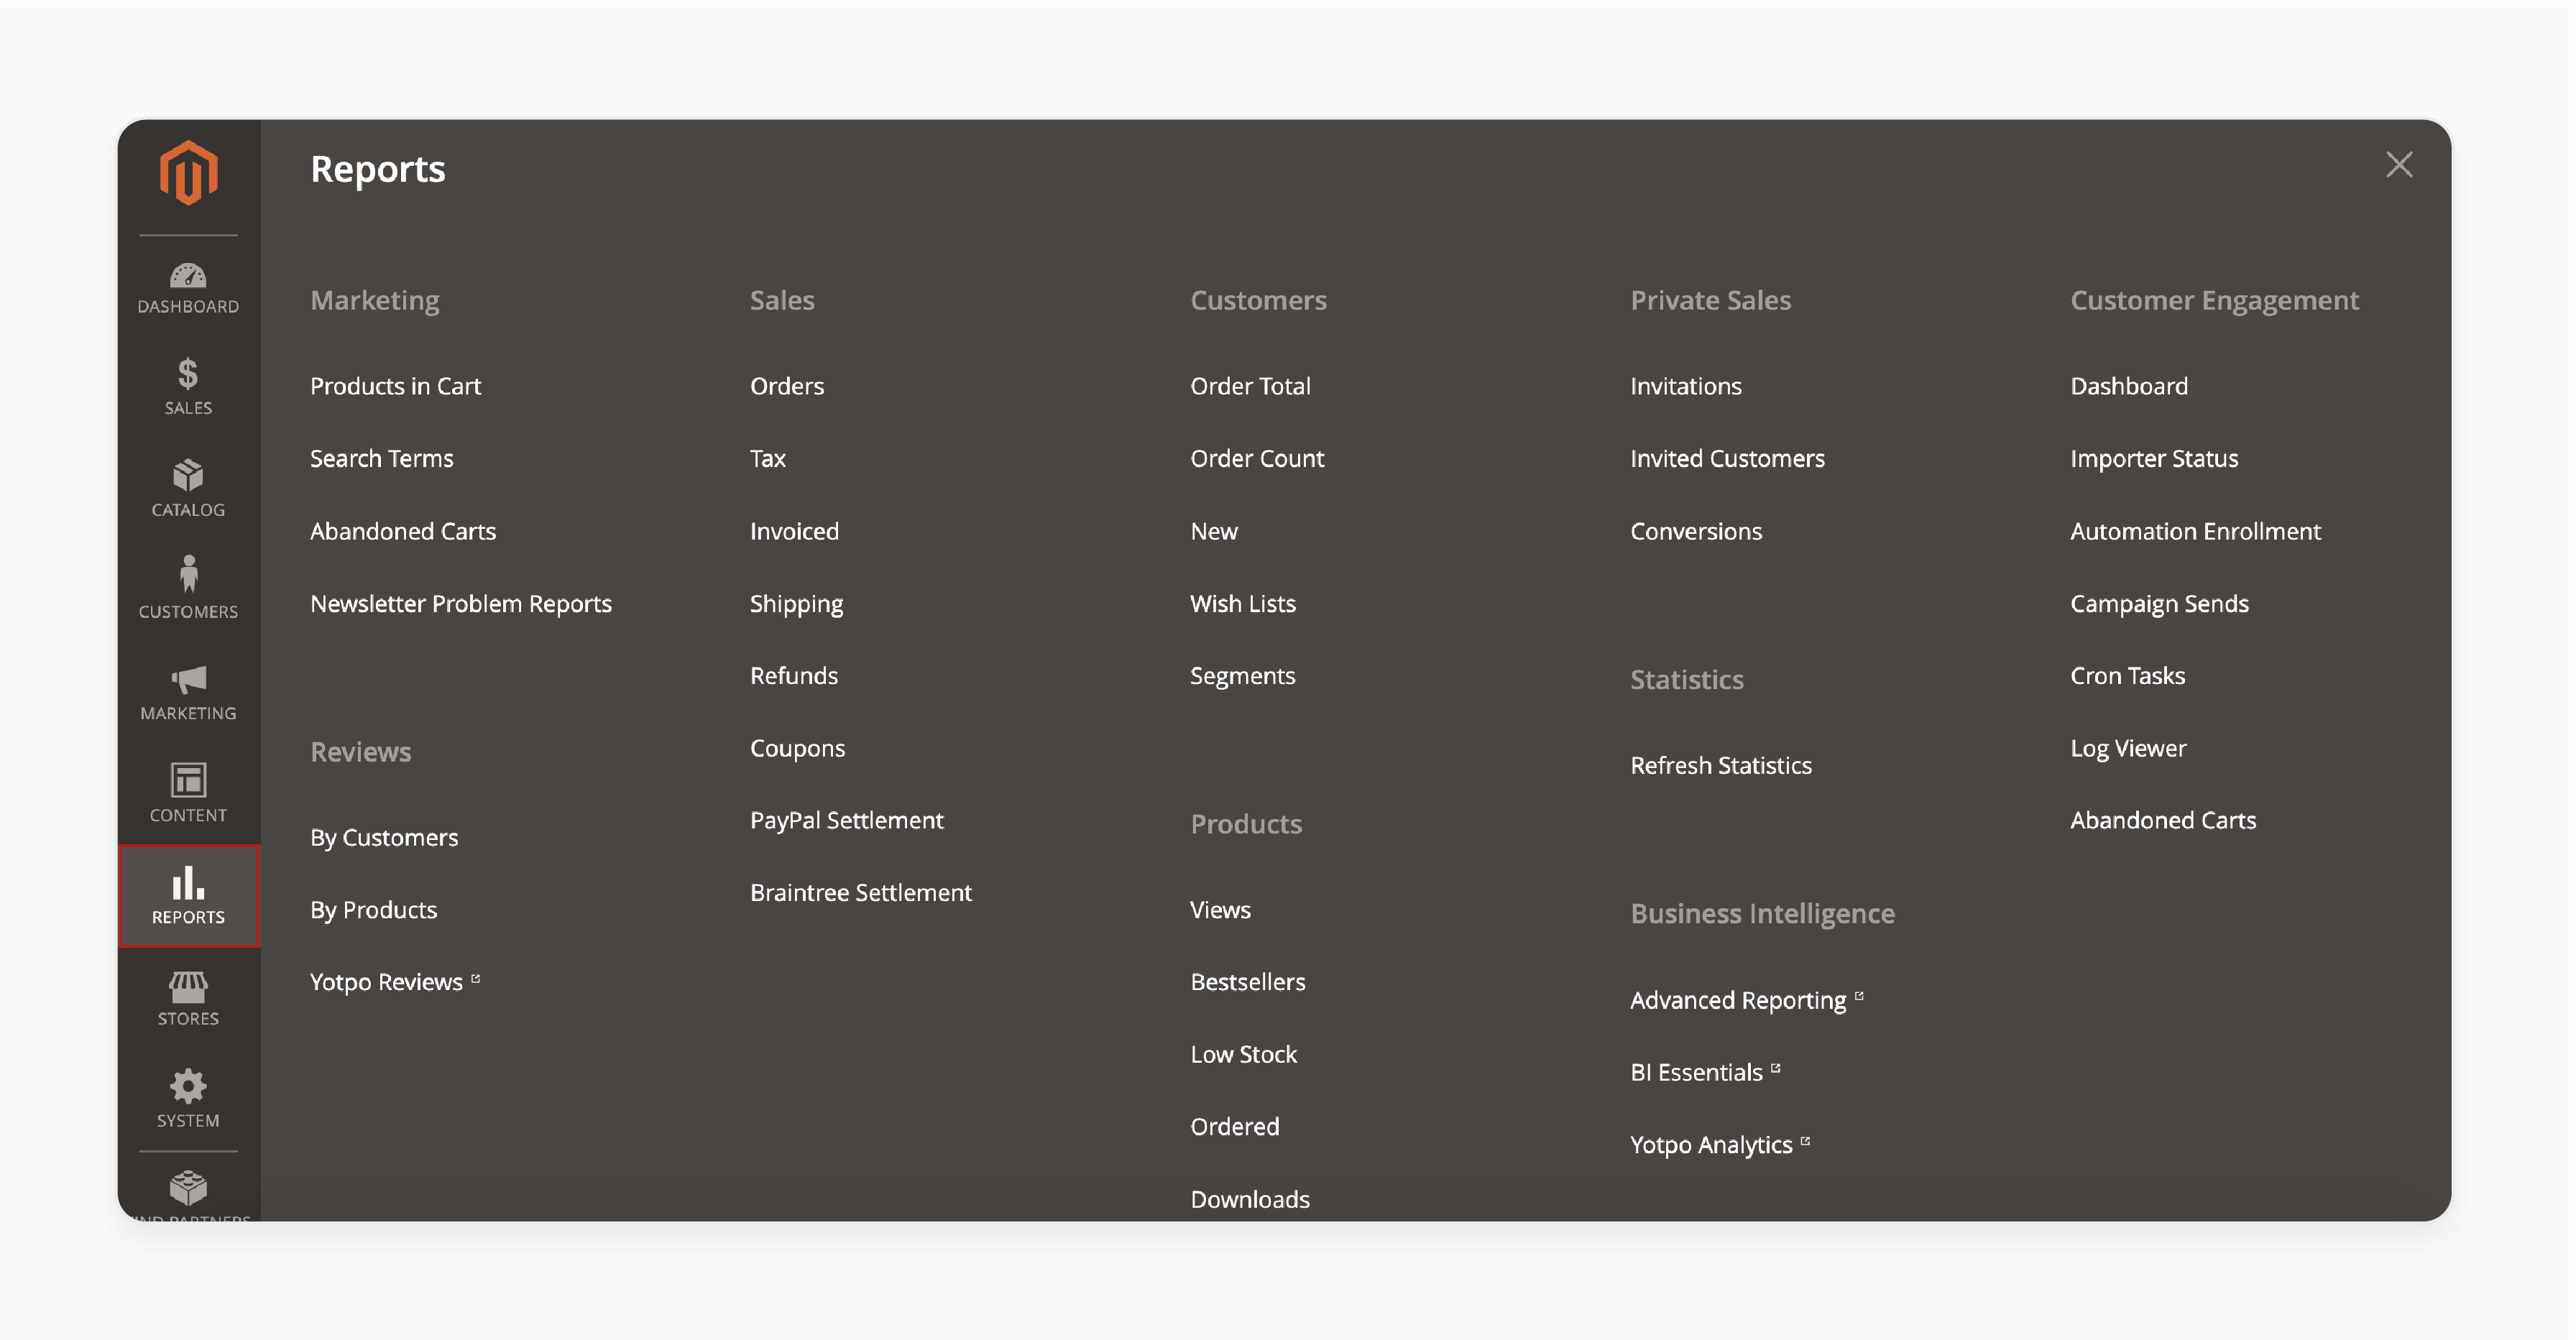
Step 7: Analyze Data with the Reports Tab
- The Reports Tab provides insights into:
- 'Marketing' section metrics like shopping cart data and abandoned carts.
- 'Reviews' section by products or customers.
- 'Sales' section data, including orders, taxes, shipping, and refunds.
- The 'Customers' section tracks orders and account details.
- The 'Products' section shows top-selling items and inventory levels.
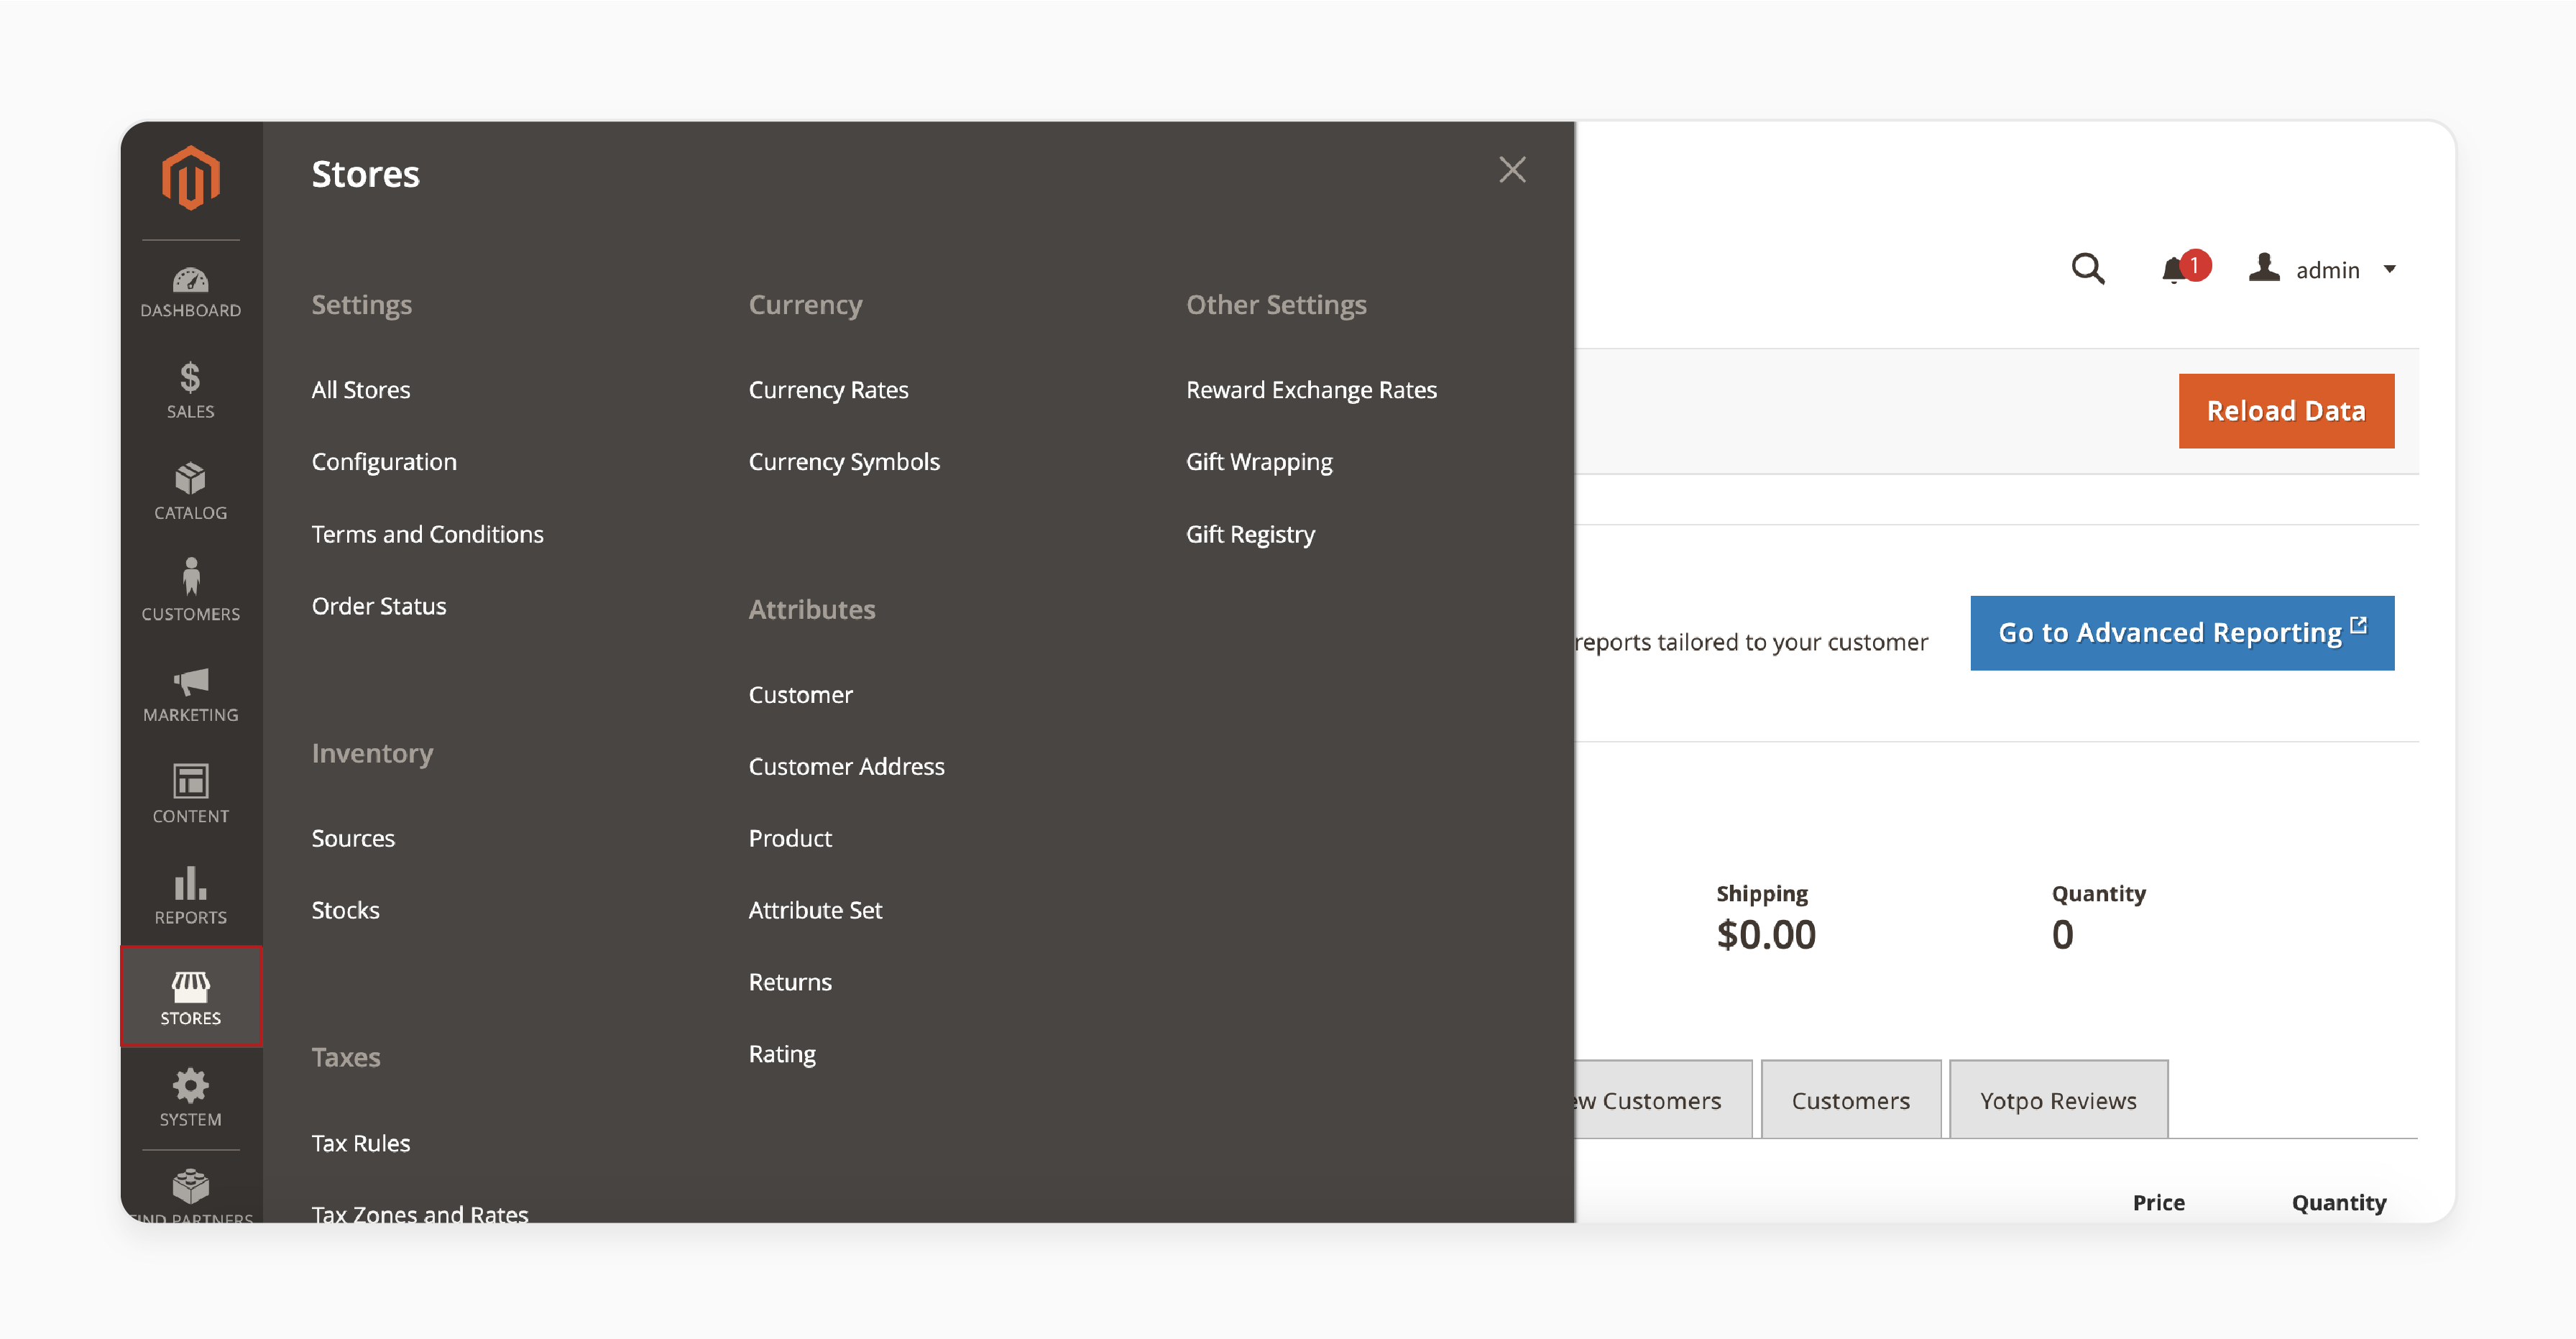
Step 8: Configure Multiple Stores in the Stores Tab
- Navigate to Stores > Settings > All Stores to manage multiple websites, stores, & store views.
- Customize each store’s details, such as:
- Default country and currencies.
- Base URLs and SEO settings.
- Configure store email addresses and contact details.
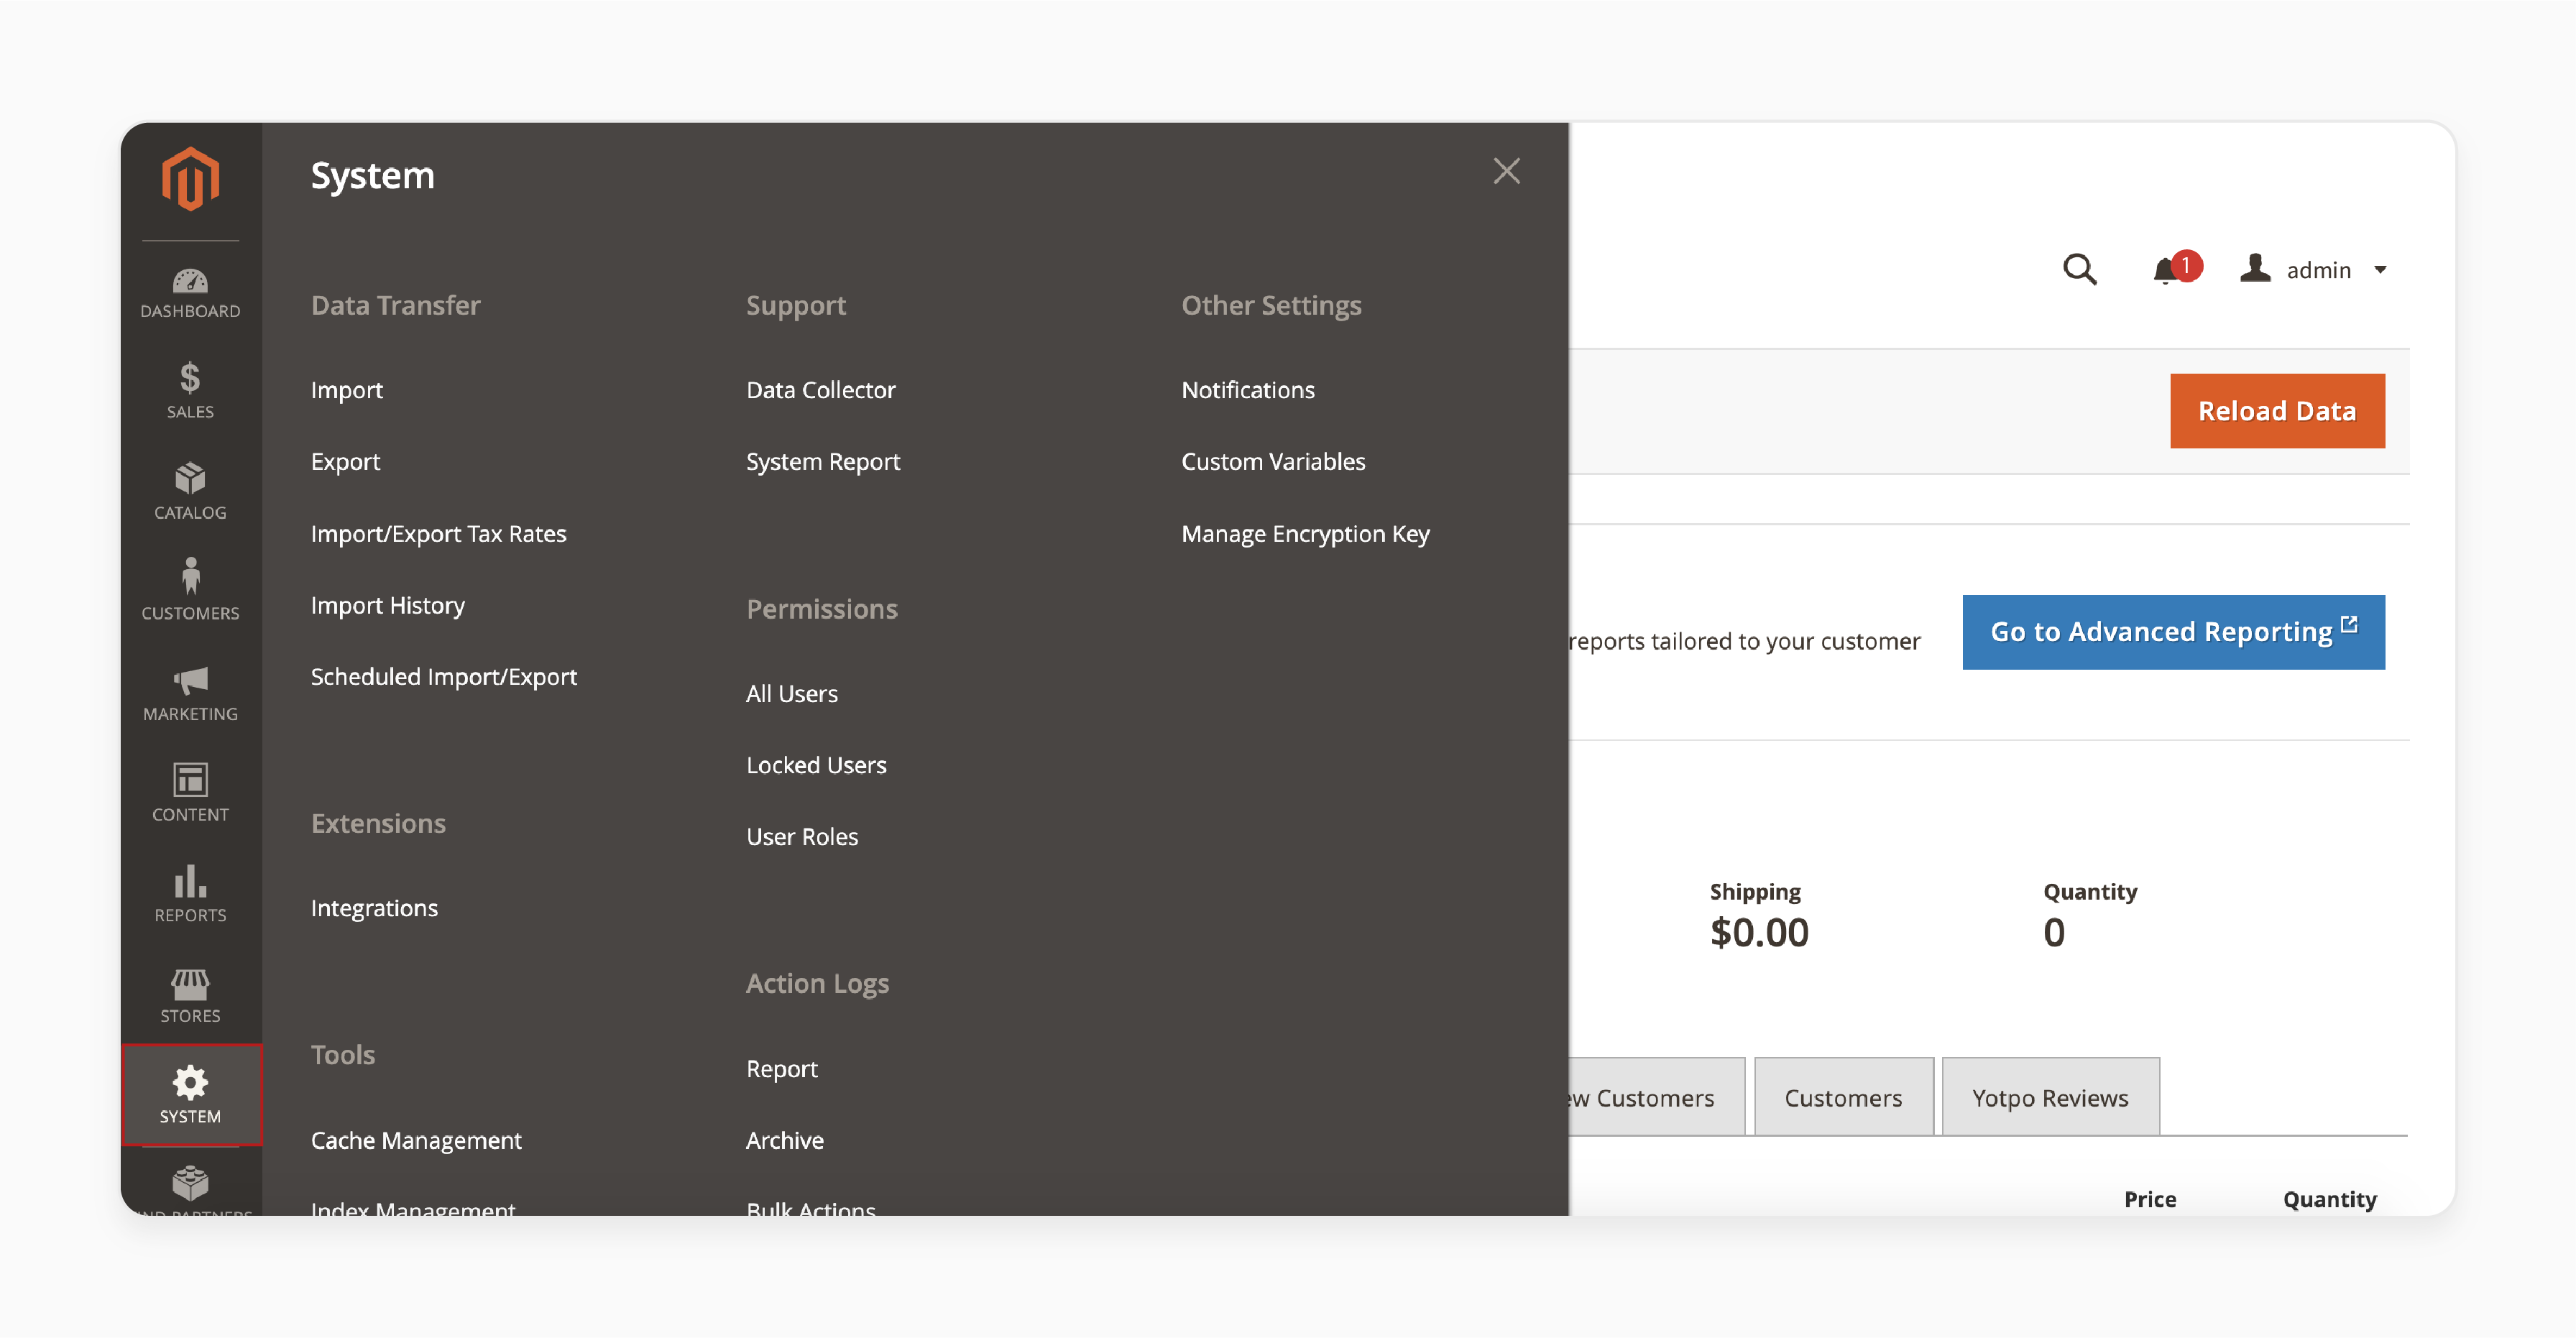
Step 9: Use the System Tab for Data Management
In the System Tab, you can:
- Manage data transfer, backups, and cache settings.
- Import or export products, customers, and other data.
- Update the system and configure security settings.
Step 10: Find Partners and Extensions
- The Find Partners & Extensions Tab leads to the 'Magento Marketplace'.
- Browse third-party extensions and platinum Magento partners to enhance your store's functionality.
Order Management And Performance Optimization In Magento Websites
| Aspect | Description |
|---|---|
| Target Audience | Magento 2 store owners & managers looking to streamline operations and boost store performance |
| Value Proposition | - Manage order - Customize store design - Optimize for search engines and performance |
| Advanced Concepts | - Real-time order status updates - Integration of multiple shipping methods - Page Builder for content management - SEO best practices specific to Magento 2 - Performance tuning techniques - Security measures for e-commerce |
| Practical Application | - Configuring shipping - Managing orders - Customizing templates - Implementing SEO strategies |
| Expected Outcomes | - Improved order processing efficiency - Enhanced user experience - Better search engine rankings - Increased store performance |
Magento 2 Tutorial For Beginners: Setting Up Your Adobe Commerce Store
Step 1: Configure Basic Store Settings (Store Information, Locales, and Currencies)
i. Store Information
- Log in to your Magento Admin Panel.
- Go to Stores > Settings > Configuration.
- Under the General tab, select General and update the following fields:
- Store Name: Enter your store’s name (this appears on invoices and shipments).
- Store Phone Number: Provide your store’s phone number.
- Store Hours of Operation: Set your store’s hours (e.g., Mon-Fri 8-5).
- Country: Select your country.
- Region/State: Choose your region or state.
- ZIP/Postal Code: Enter your ZIP or postal code.
- Street Address: Input primary street address.
- Street Address Line 2: Add a secondary address line (if needed).
- VAT Number: Fill in your store's location details.
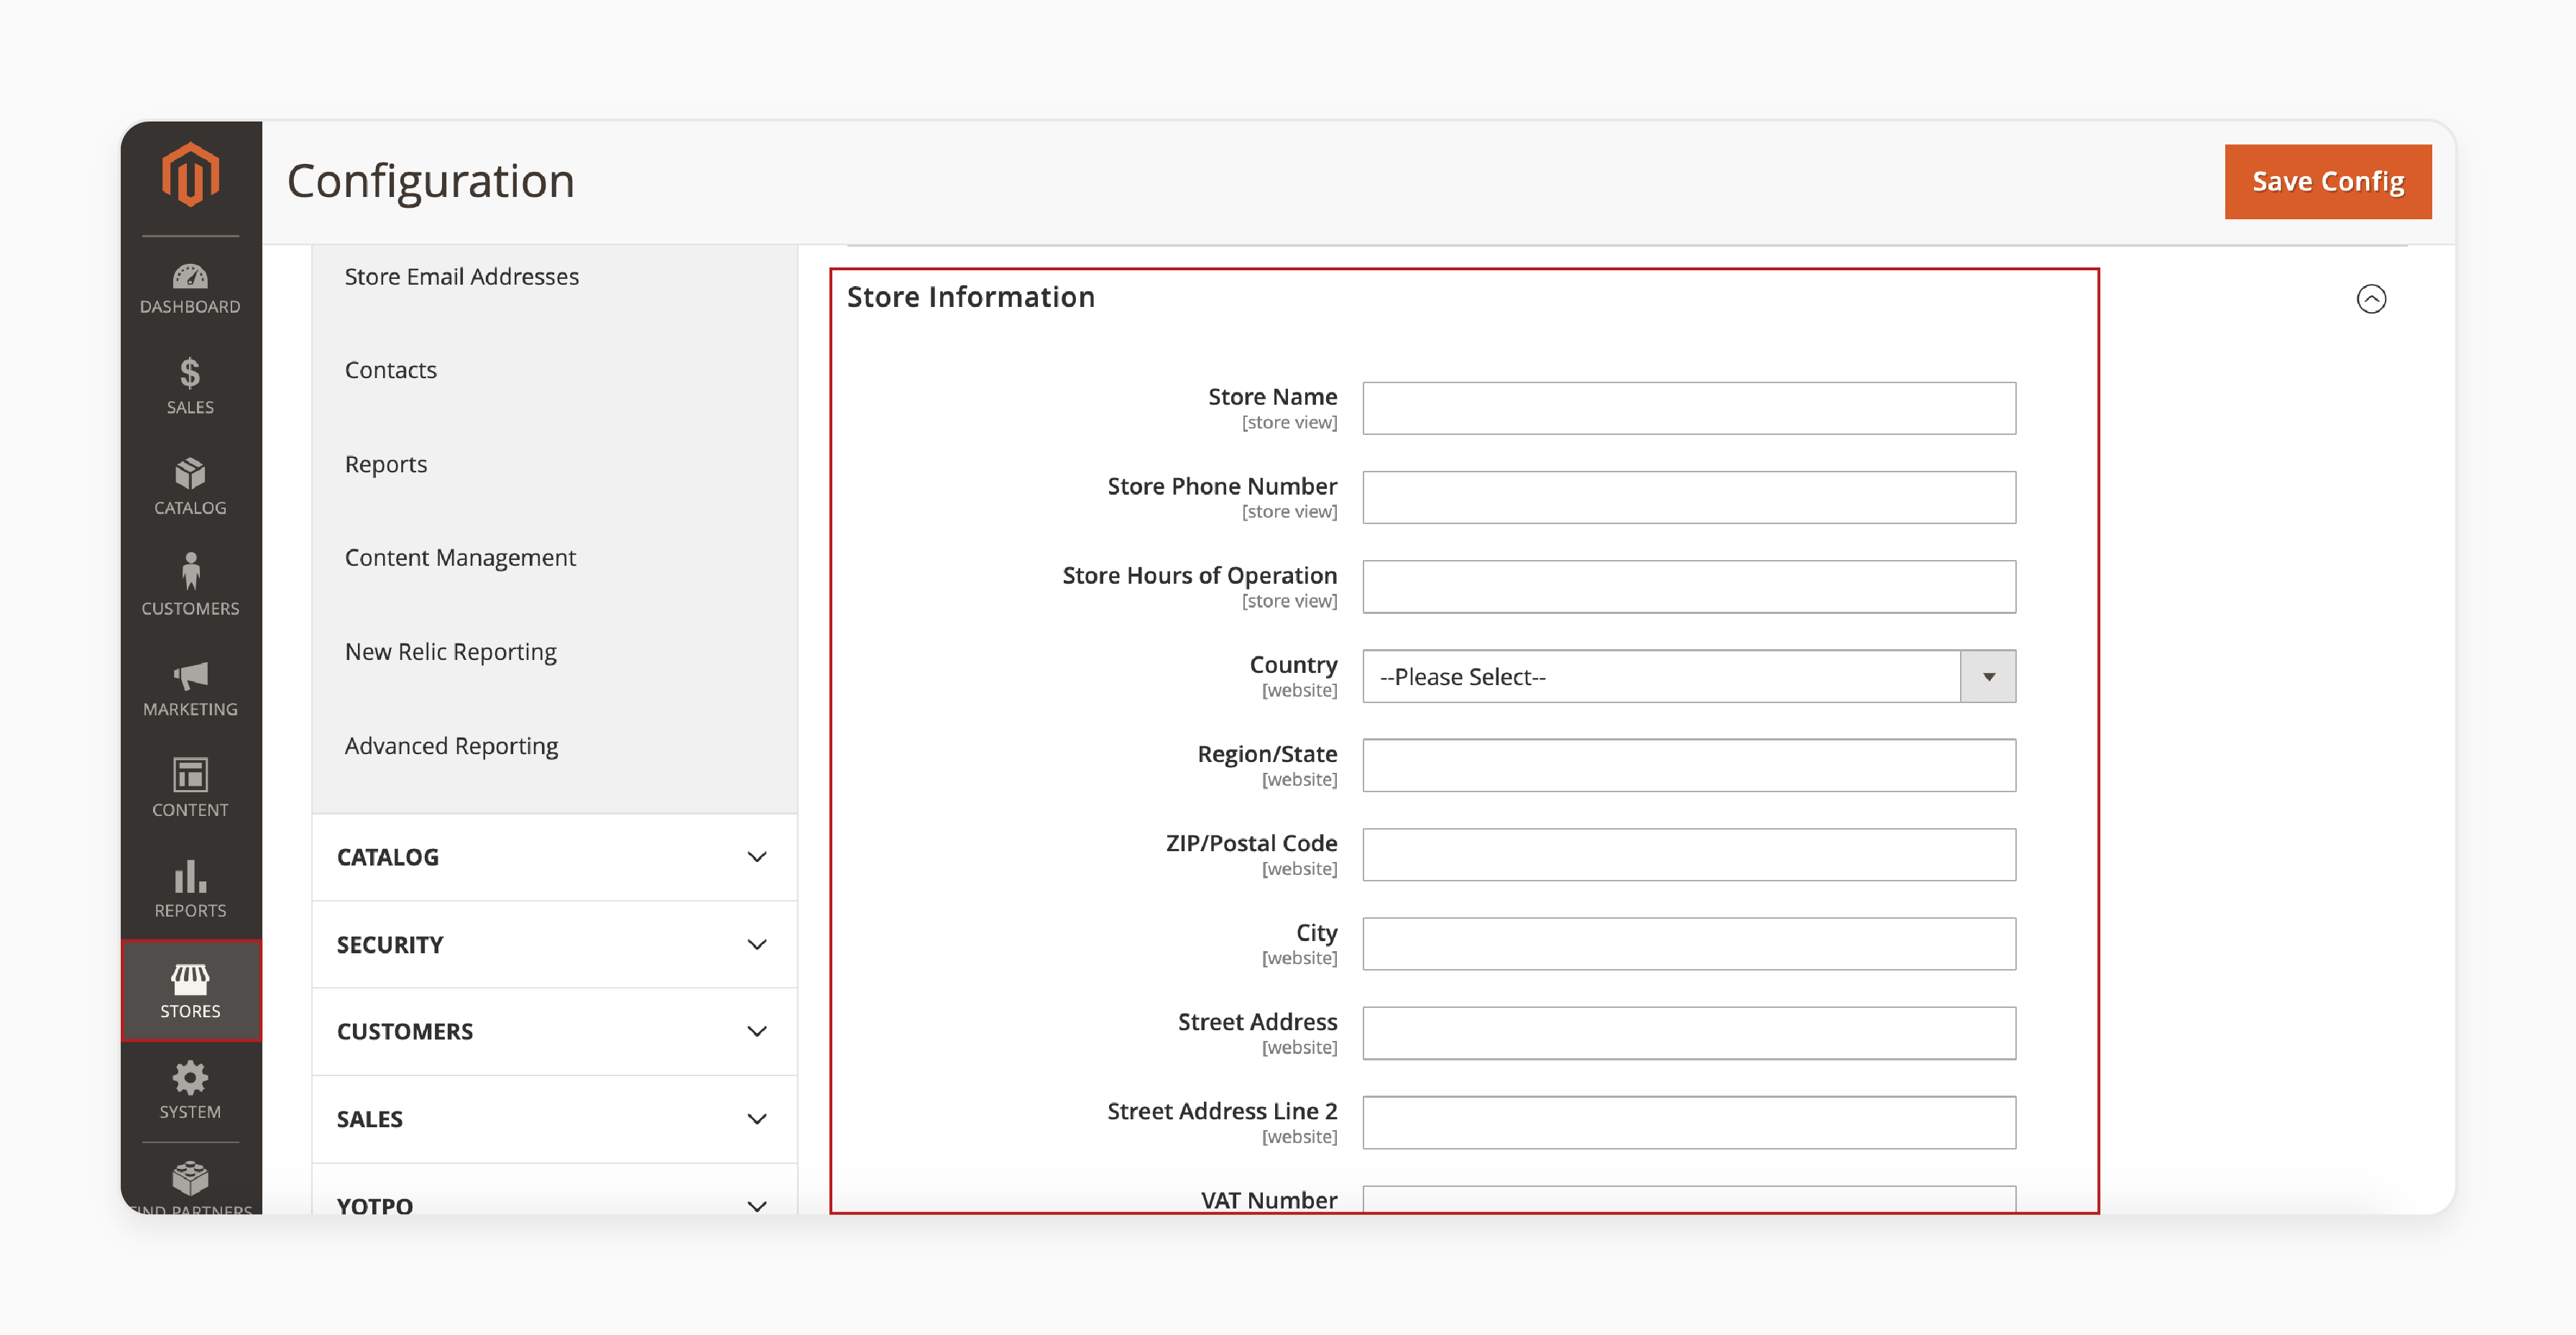
- Click on the 'Save Config' button to apply the changes.
ii. Locale Options
- Go to Stores > Settings > Configuration.
- Under the 'General' tab, select "Locale Options".
- Timezone: Set your store's operating timezone.
- Locale: Choose your primary language and region. Enable and select one or more locales (e.g., English (United States), French (France)).
- Weight Unit: Select between pounds or kilograms for product measurements.
- First Day of Week: Define when your business week starts.
- Weekend Days: Mark your non-operating days.
- Click on the "Save Config" button to apply changes.
iii. Currency Options
- In the same 'Configuration' section, set your preferred currencies.
- Click on the "Save Config" button.
Note: These settings affect your entire ecommerce store. For example, order processing times, customer communications, and shipping calculations.
Step 2: Manage Categories and Products
i. Currently Active
- Go to Catalog > Categories.
- To add a new category, click on the "Add Subcategory" button.
- Fill in the required details:
- Enable Category: Enable the category by setting this option to "Yes".
- Include in Menu: Enable this option to "Yes".
- Category Name: Name the category for the store view.
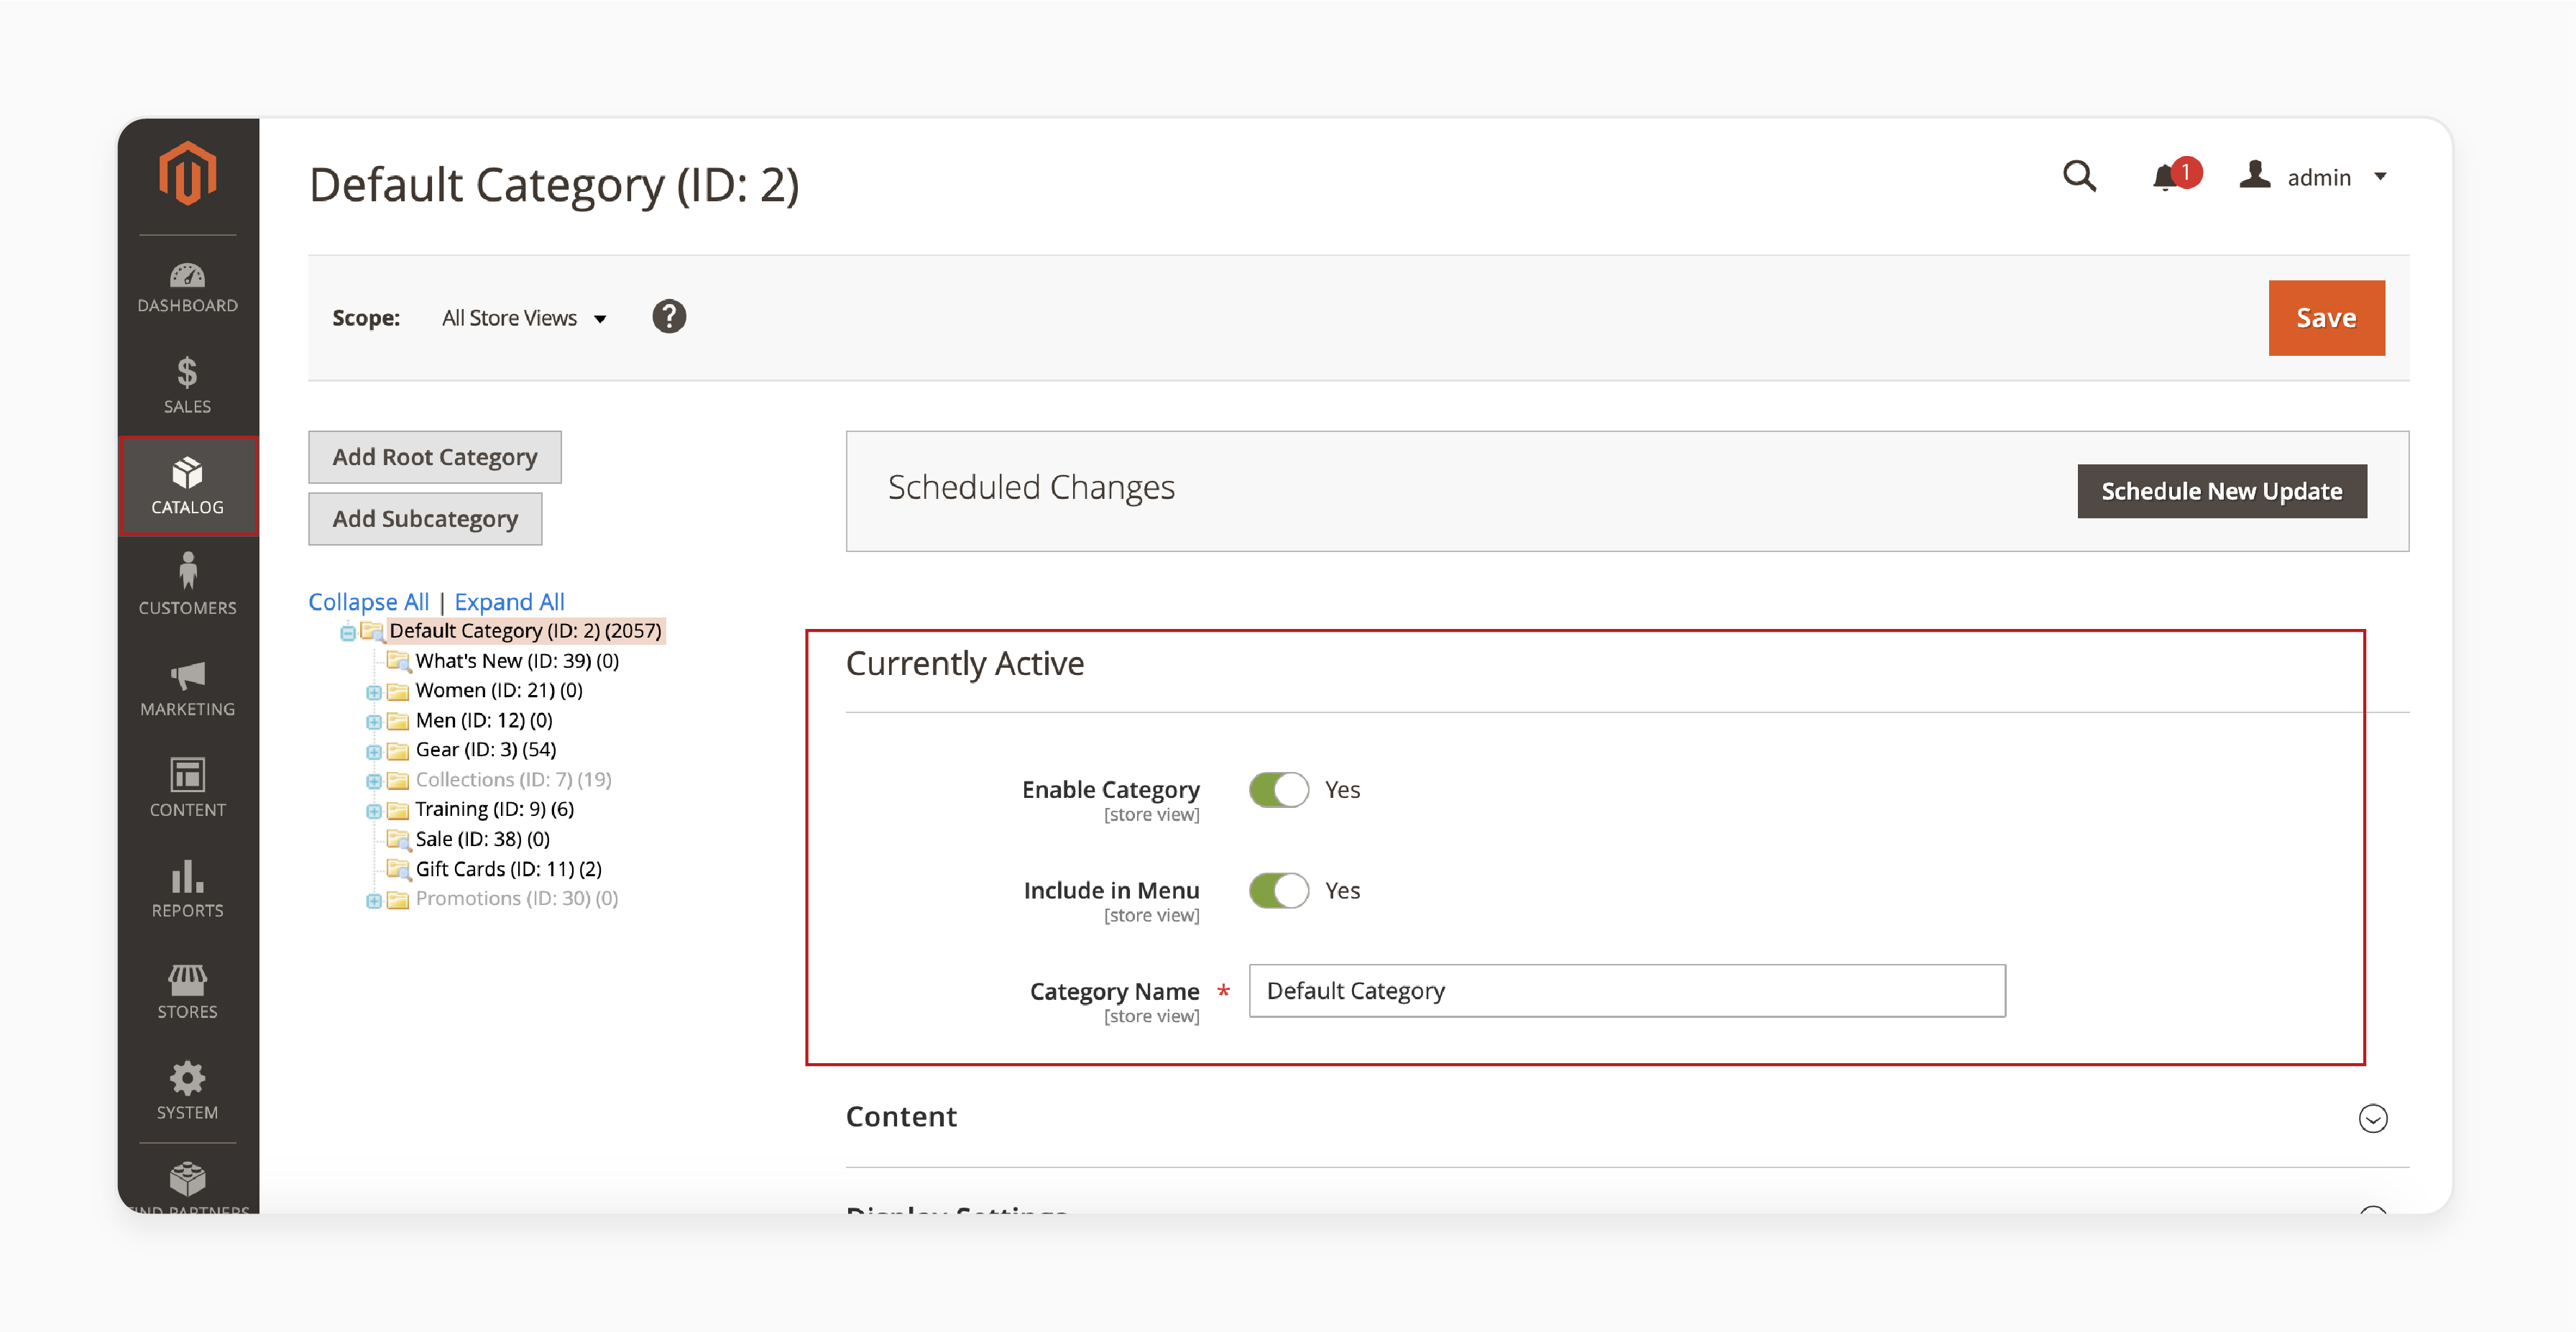
- Save the category.
ii. Content
- Category Image: Add an image from the gallery for your store view.
- Description: Add a description for the category. You can edit it with the "Page Builder" option.
iii. Display Settings
- Display Mode: Choose one from "Products only", "Static block only", and "Both products and static block".
- Anchor: Enable this option for attribute filtering.
- Available Product Listing Sort By: Tick “Use All” or select one option from the list provided.
- Default Product Listing Sort By: Select “Use Config Settings” to use default sorting options. Select specific sort methods ("Position"/"Name"/"Price").
- Layered Navigation Price Step: Select “Use Config Settings” to keep the default price steps. Set custom price ranges for filtering.
- Save your configuration.
iv. Search Engine Optimization
- Meta Title: Display this tag on the browser tab, search results, and sidebar. Keep under 70 characters and make it unique and descriptive.
- Meta Keywords: Add relevant search terms to help search engines understand page content.
- Meta Description: Show this field in search engine results. Write 150-160 characters and include key benefits.
v. Products in Category
- Check the boxes next to the desired items.
- Use the bulk selection option for multiple items.
- Access the filters above each category.
- Narrow down the product lists.
- Click "Reset Filter" to clear all criteria.
- Review the selected items.
- Click "Save" to confirm.
Note: Use filters to locate specific products quickly when working with extensive inventories.
vi. Design
- Use Parent Category Settings: Toggle this option.
- Theme: Select a category theme.
- Layout: Configure the column layout.
- Custom Layout Update: Add a custom Layout Update XML (if required).
- Apply Design to Products: Choose whether to apply design to products.
- Review your changes.
- Click "Save" to update.
Note: Test your design changes in different store views before finalizing.
vii. Schedule Design Update
- Choose the start date and end date.
- Schedule the design updates.
- Use the dragging and dropping for repositioning.
- Adjust the category hierarchy.
- Rearrange the subcategories.
- Locate the 'Delete' button (top right).
- Confirm the deletion prompt.
Note: This action cannot be undone. Review category structure before deletion, as it may affect your storefront navigation.
Step 3: Set Up Payment and Shipping Methods
i. Free Shipping Method
- Go to Stores > Settings > Configuration > Shipping Methods.
- In the Free Shipping section:
- Enabled: Set this option to "Yes".
- Title: Enter the shipping title for the checkout display.
- Method Name: Provide a brief description to set the method name.
- Calculate Handling Fee: Adjust the payment method position.
- Handling Fee: Define the minimum order amount.
- Displayed Error Message: Set an error message for unavailable shipping.
- All Allowed Countries or Specific Countries: Choose all eligible countries. For example, "Ship to Applicable Countries" or "Ship to Specific Countries".
- Show Method if Not Applicable: Configure the visibility when not applicable.
- Sort Order: Set the sorting order at checkout.
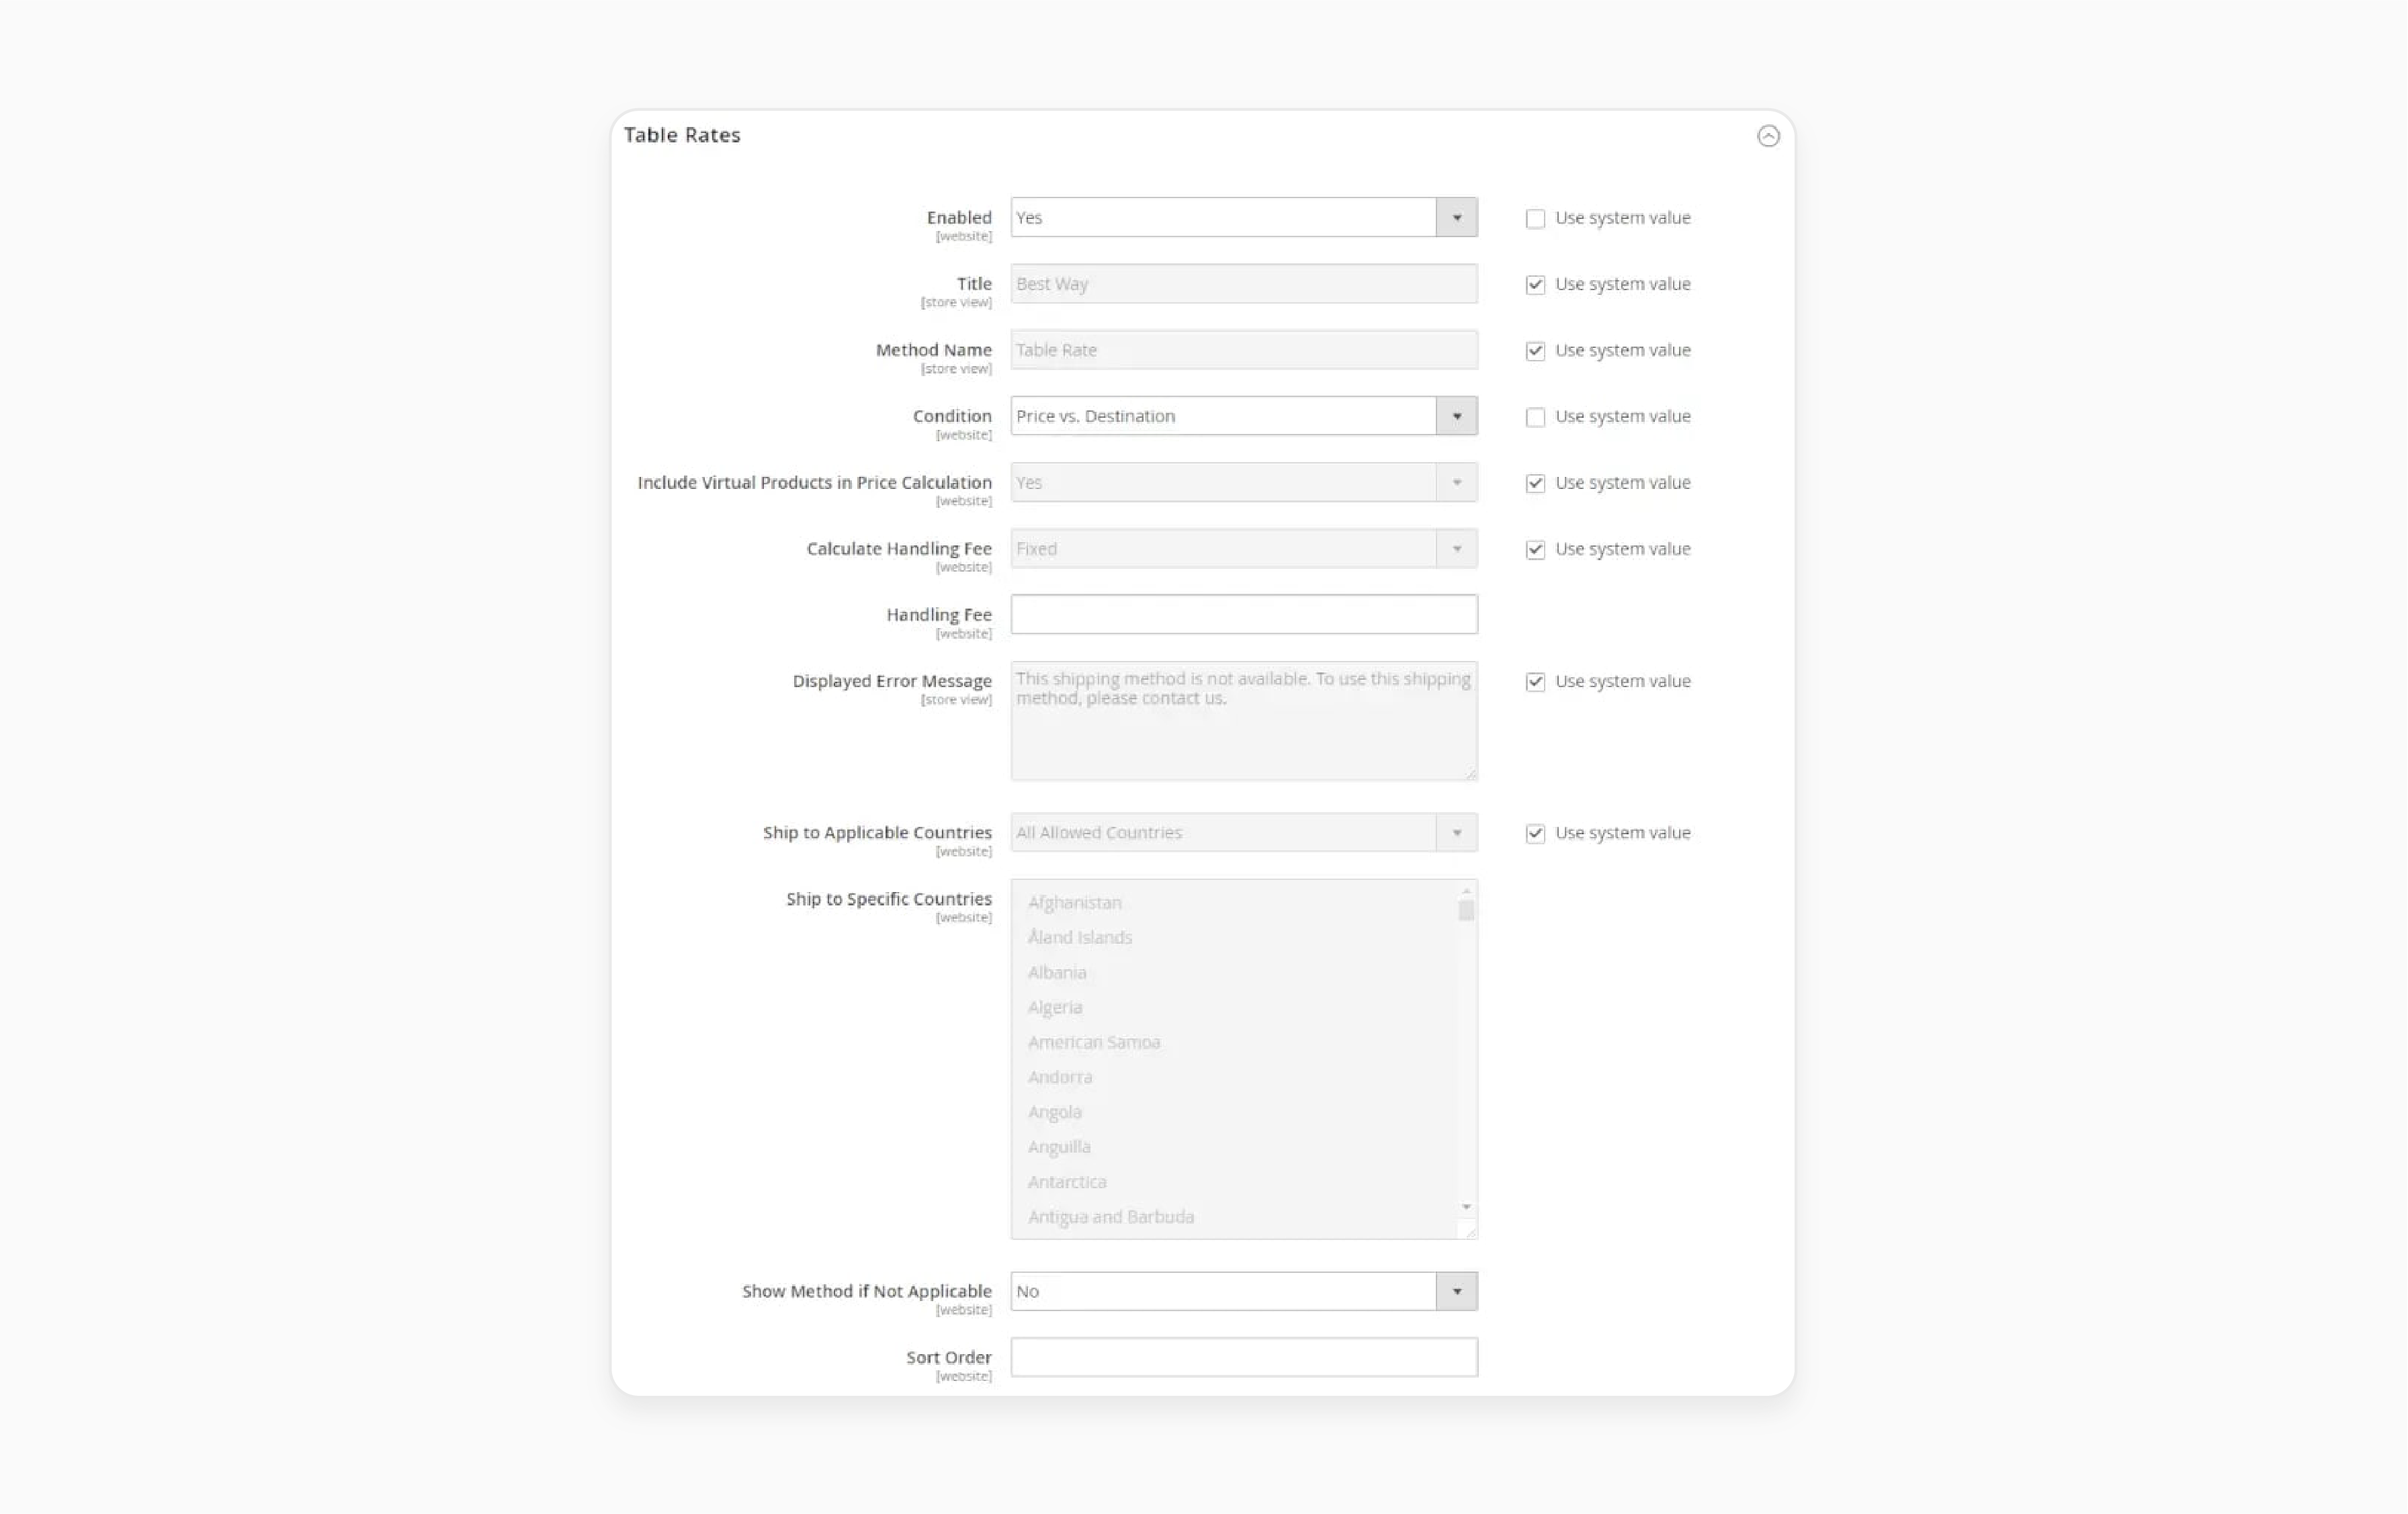
- Save the configuration.
Note: Proper free shipping configuration helps boost your ecommerce store's average order value.
ii. Free Shipping in Carrier Configuration
- Under the UPS section, set 'Free Method' to "Ground."
- Enable free shipping with a minimum order amount.
- Save the configuration.
iii. Customers and Orders
a. Customers
- Log in to the Magento Admin Panel.
- Go to Customers > All Customers.
- Create new customer accounts by selecting 'Add New Customer'.
- Fill in the necessary information under "Customer Information" and "Account Information".
- Assign customers to groups, such as "General", "Wholesale", or "Retailer".
- Use the 'Export' function to download customer data. You can do this in CSV or Excel XML formats for backup or external use.
You can view customer information like:
- Order history
- Billing agreements
- Product reviews
- Wishlist items
b. Orders
- Go to Sales > Orders to view all orders.
- Select an order to view details, update the status, or process returns.
- Configure shipping and payment options.
- Use the 'Customer View Page' for post-sales activities.
There are many available actions on this page, for example:
For managing orders:
- Create orders from the backend.
- View all existing orders.
- Track the order status.
For securing an account:
- Reset the customer password.
- Force sign-in when needed.
For updating a profile:
- Make the necessary changes.
- Click "Save Customer".
Step 4: Follow Best Practices for Security and Maintenance
i. Security Best Practices
- Keep all Magento extensions up to date.
- Use strong passwords and enable Two-Factor Authentication (2FA).
- Customize the admin path for extra security.
- Use SSL/HTTPS for secure data transfer.
ii. Maintenance Best Practices
- Regularly monitor website performance.
- Optimize site speed using a CDN and full-page caching.
- Keep product information and content up to date.
- Efficiently manage your inventory.
Step 5: Enhance Store Functionality with Extensions
- Visit the Magento Marketplace to find extensions that improve store functionality.
- Install extensions to enhance security and shopping experience.
Step 6: Find Magento Developers for Your Website
You can either hire a Magento 2 development agency or a freelance developer. When choosing a developer:
- Ensure they provide Magento Developer Certifications, Quality Assurance and Testing, Support Policy, and Experience and Testimonials.
- Check customer reviews, portfolios, pricing, location, and cost per hour.
Security And Performance Tips For Every Magento Instance
| Aspect | Details | Best Practices |
|---|---|---|
| Encryption Key Management | - Located in Stores > Configuration > Advanced > System. - Protects sensitive data like payment details. |
- Store encryption key securely offline. - Rotate keys periodically. - Use a strong, unique key. |
| Cache Management | - Access via System > Cache Management. - Regular clearing improves performance. |
- Schedule automatic cache clearing. - Clear specific caches based on updates. - Use Redis for improved caching performance. |
| Security Patches | - Regularly released by Magento. - Essential for maintaining security. |
- Subscribe to Magento security alerts. - Test patches in staging before applying them to production. - Document all applied patches. |
| Two-Factor Authentication | - Adds an extra layer of security. - Available for admin users. |
- Enforce 2FA for all admin accounts. - Use app-based 2FA for better security than SMS. |
| File Permissions | - Vital for preventing unauthorized access. - Varies based on server setup. | - Use the least privilege principle. - Regularly audit file permissions. - Use tools like mage-file-permissions for automation. |
| SSL/TLS Configuration | - Encrypts data in transit. - Required for PCI compliance. |
- Use TLS 1.2 or higher. - Implement HSTS. - Regularly update SSL certificates. |
| Database Optimization | - Vital for Magento 2 performance. - Includes indexing and query optimization. |
- Schedule regular reindexing. - Use tools like MySQL Tuner. - Implement database caching. |
| Content Delivery Network (CDN) | - Improves load times for static content. - Reduces server load. |
- Use Cloudflare or similar services. - Configure CDN for static and media files. - Implement proper cache headers. |
| PHP Configuration | - Affects overall Magento 2 performance. - Includes OPcache settings. |
- Use PHP 7.4 or higher. - Enable OPcache. - Adjust PHP memory limits based on store size. |
| Server-side Performance | - Includes web server and PHP-FPM settings. - Important for handling high traffic. |
- Use Nginx with PHP-FPM. - Implement Varnish caching. - Configure proper worker processes. |
Additional Resources For Learning Magento 2
1. Official Magento Documentation
The Magento DevDocs is the primary source for developers. It offers detailed instructions on everything. They range from installation and setup to customization and extension development. It includes comprehensive guides, code samples, and tutorials.
2. Community Forums and Support
The Magento Community is a global network of over 3 million developers. It's an excellent platform for learning, problem-solving, and collaborating with others. The community offers valuable support for both beginners and experienced users.
3. Online Courses and Tutorials
There are many structured learning options available online, including video tutorials & interactive assignments. These courses are suitable for all skill levels. They provide hands-on experience to deepen your understanding of Magento architecture.
4. Books and Blogs
Numerous books on Magento development cover topics from basic concepts to advanced techniques. They are ideal for self-paced learners who prefer reading. Follow blogs written by Magento experts. They can help you stay updated on Magento's latest features, trends, and best practices. For example, MGT Commerce blogs.
FAQs
1. What happens to my store's URLs and customer transcripts when upgrading to a new version of Magento?
During a Magento version upgrade, your existing URLs remain intact through automatic URL rewrites. Customer transcripts and historical data are preserved in the database. However, it's always recommended to back up your data before upgrading to any version.
2. How does Magento 2 come with file system permissions affect my store management?
Magento 2 comes with specific Magento file system owner requirements. They ensure secure B2B operations. This is especially true when managing bulk orders and customer-specific catalogs. The file system permissions maintain data integrity and secure transactions between business partners.
3. Can I upload the original content and manage it after Magento 2 is installed using Composer?
Yes, Magento 2 installed using Composer allows you to manage and upload original content. You can do this through the Page Builder interface. Create and edit custom pages, product descriptions, and promotional content.
4. What are the benefits of using XAMPP for Magento 2 development?
The benefits of using XAMPP include a simplified local development environment. You can test view page layouts and store functionality before going live. XAMPP makes it easier to configure PHP, MySQL, and Apache settings.
5. How can customizing landing pages & email templates help you boost your store's performance?
Well-designed landing pages are combined with personalized email templates. They help you boost customer engagement & conversion rates by creating cohesive marketing campaigns. These customized elements enable better customer communication. Automated order notifications, promotional offers, and targeted campaigns that drive sales.
6. How do root categories enhance your ability to manage sales orders efficiently?
Root categories provide the ability to manage sales orders more effectively. You can organize products in a logical hierarchy. It streamlines order processing and inventory tracking. This foundation helps you create a well-structured catalog. Track sales patterns and manage order fulfillment across different product categories.
Summary
Learn how to use Magento 2 for better search engine visibility & customer experience. Provide an excellent user experience for your customers with user-friendly benefits such as:
- Managing products, orders, and shipping through the admin panel.
- Regular maintenance tasks like cache clearing & security configurations to keep your store running.
- Customizing orders for both small businesses and large enterprises.
- Creating a successful online store to optimize your store's performance.
- Setting up your digital storefront using this leading ecommerce platform.
- Optimizing your ecommerce website for growth.
Consider managed Magento hosting to enhance your ecommerce store with Magento's powerful features and scalability.


