
How to Setup Magento 2 Multistore? Easy Step-by-Step Guide
Magento is a highly flexible ecommerce platform. One of its powerful tools includes the Magento 2 Multi store functionality.
Multistore lets you create many storefronts from a single admin panel. You can have multiple websites, stores & store views operating on the same backend.
It allows you to display products in different categories in many stores. You can divide the products into different niches.
It helps improve user navigation & brand awareness. As the website is separated into different online stores, users can quickly find their desired items.
In this tutorial, we discover how to set up multiple stores for Magento 2.
Magento 2 MultiStore Hierarchy
Magento offers four levels to create a hierarchical system. Each level is configured separately.
-
Global: Global is at the top of the hierarchy. It has the Magento installation and default settings.
-
Website: Magento installation has a single website. It is called the Main Website.
You can add multiple websites from a single installation. It also lets you include different domain names & IP addresses. -
Store: A single website can have many stores. Each store can have different designs & product niches from the same catalog. The stores under the same website have the same Admin and checkout.
-
Store Views: Every store is presented on a specific view. You can add store views to support different languages and more.
How to Set Up Magento 2 Multi Store?
1. Create a New Website
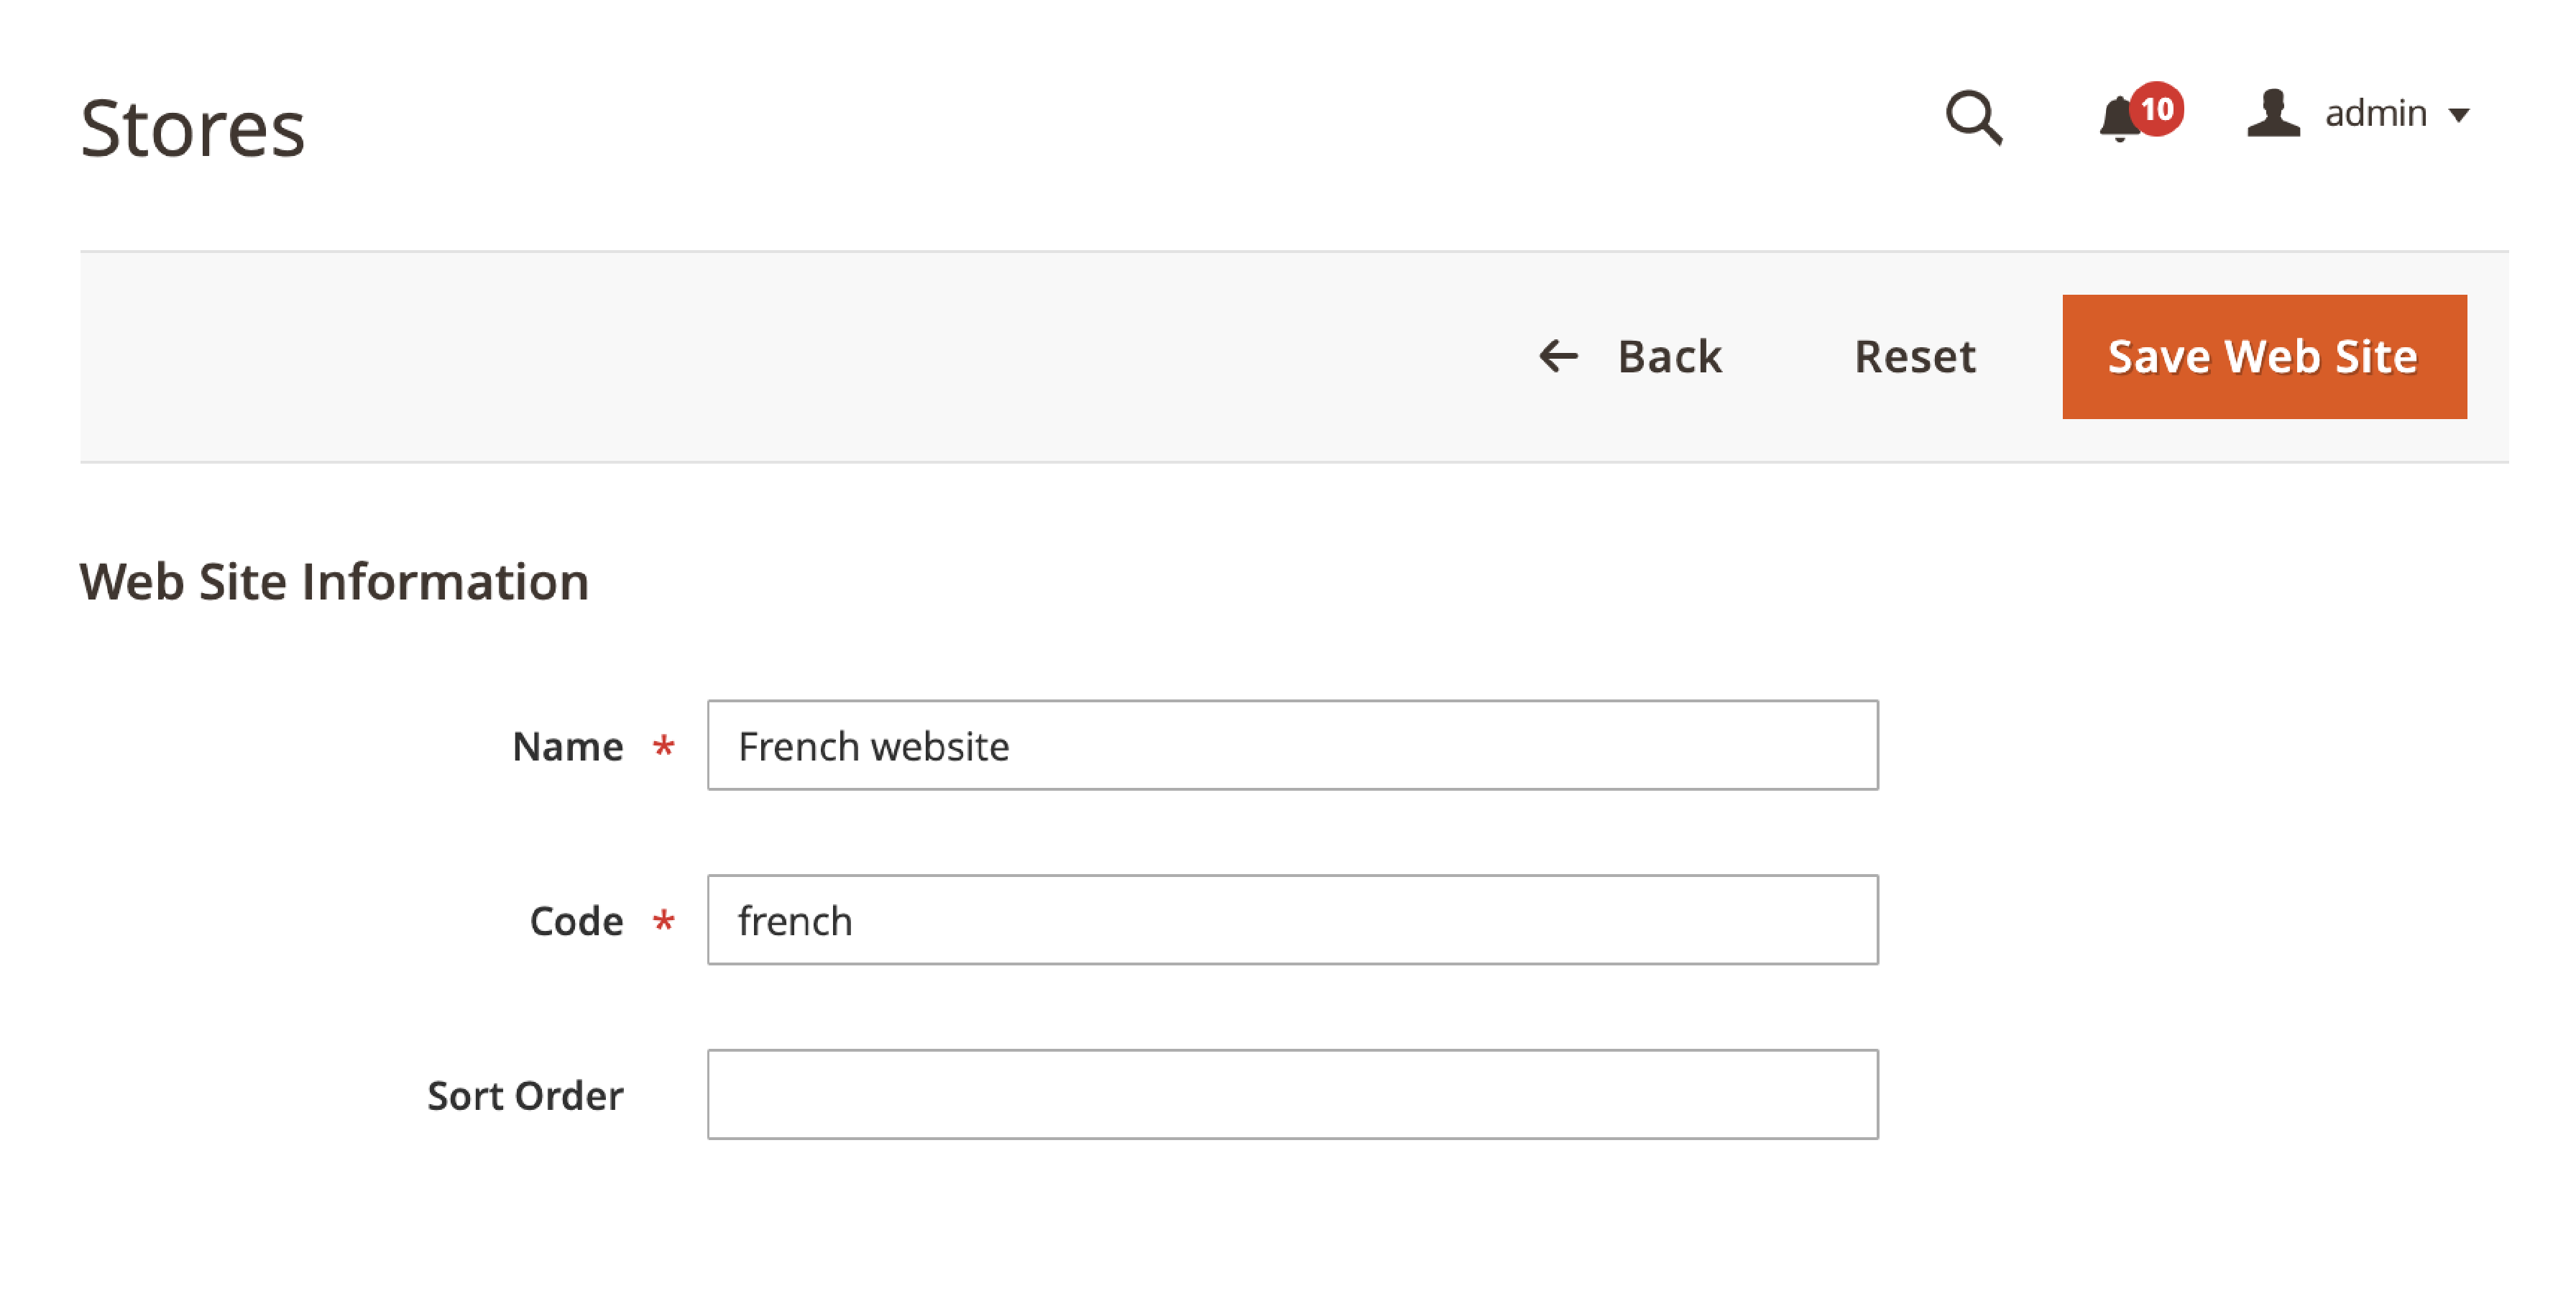
At the top level of the multi-store is a website.
To create a new website, log into the Admin account. You have to be an authorized user to create websites, stores, and store views.
- Go to Stores > Settings > All Stores.
- On the Stores page, click on the Create Website tab. Enter the name, code & sort order.
- Name -Enter a name to help identify the website.
-
Code -Enter a unique code for the website.
If you have a French store, you may enter
french. - Sort Order -Enter an optional numerical sort order.
- Click on the Save Web Site tab to save changes.
- Repeat the steps if you want to create more websites.
2. Create a New Store
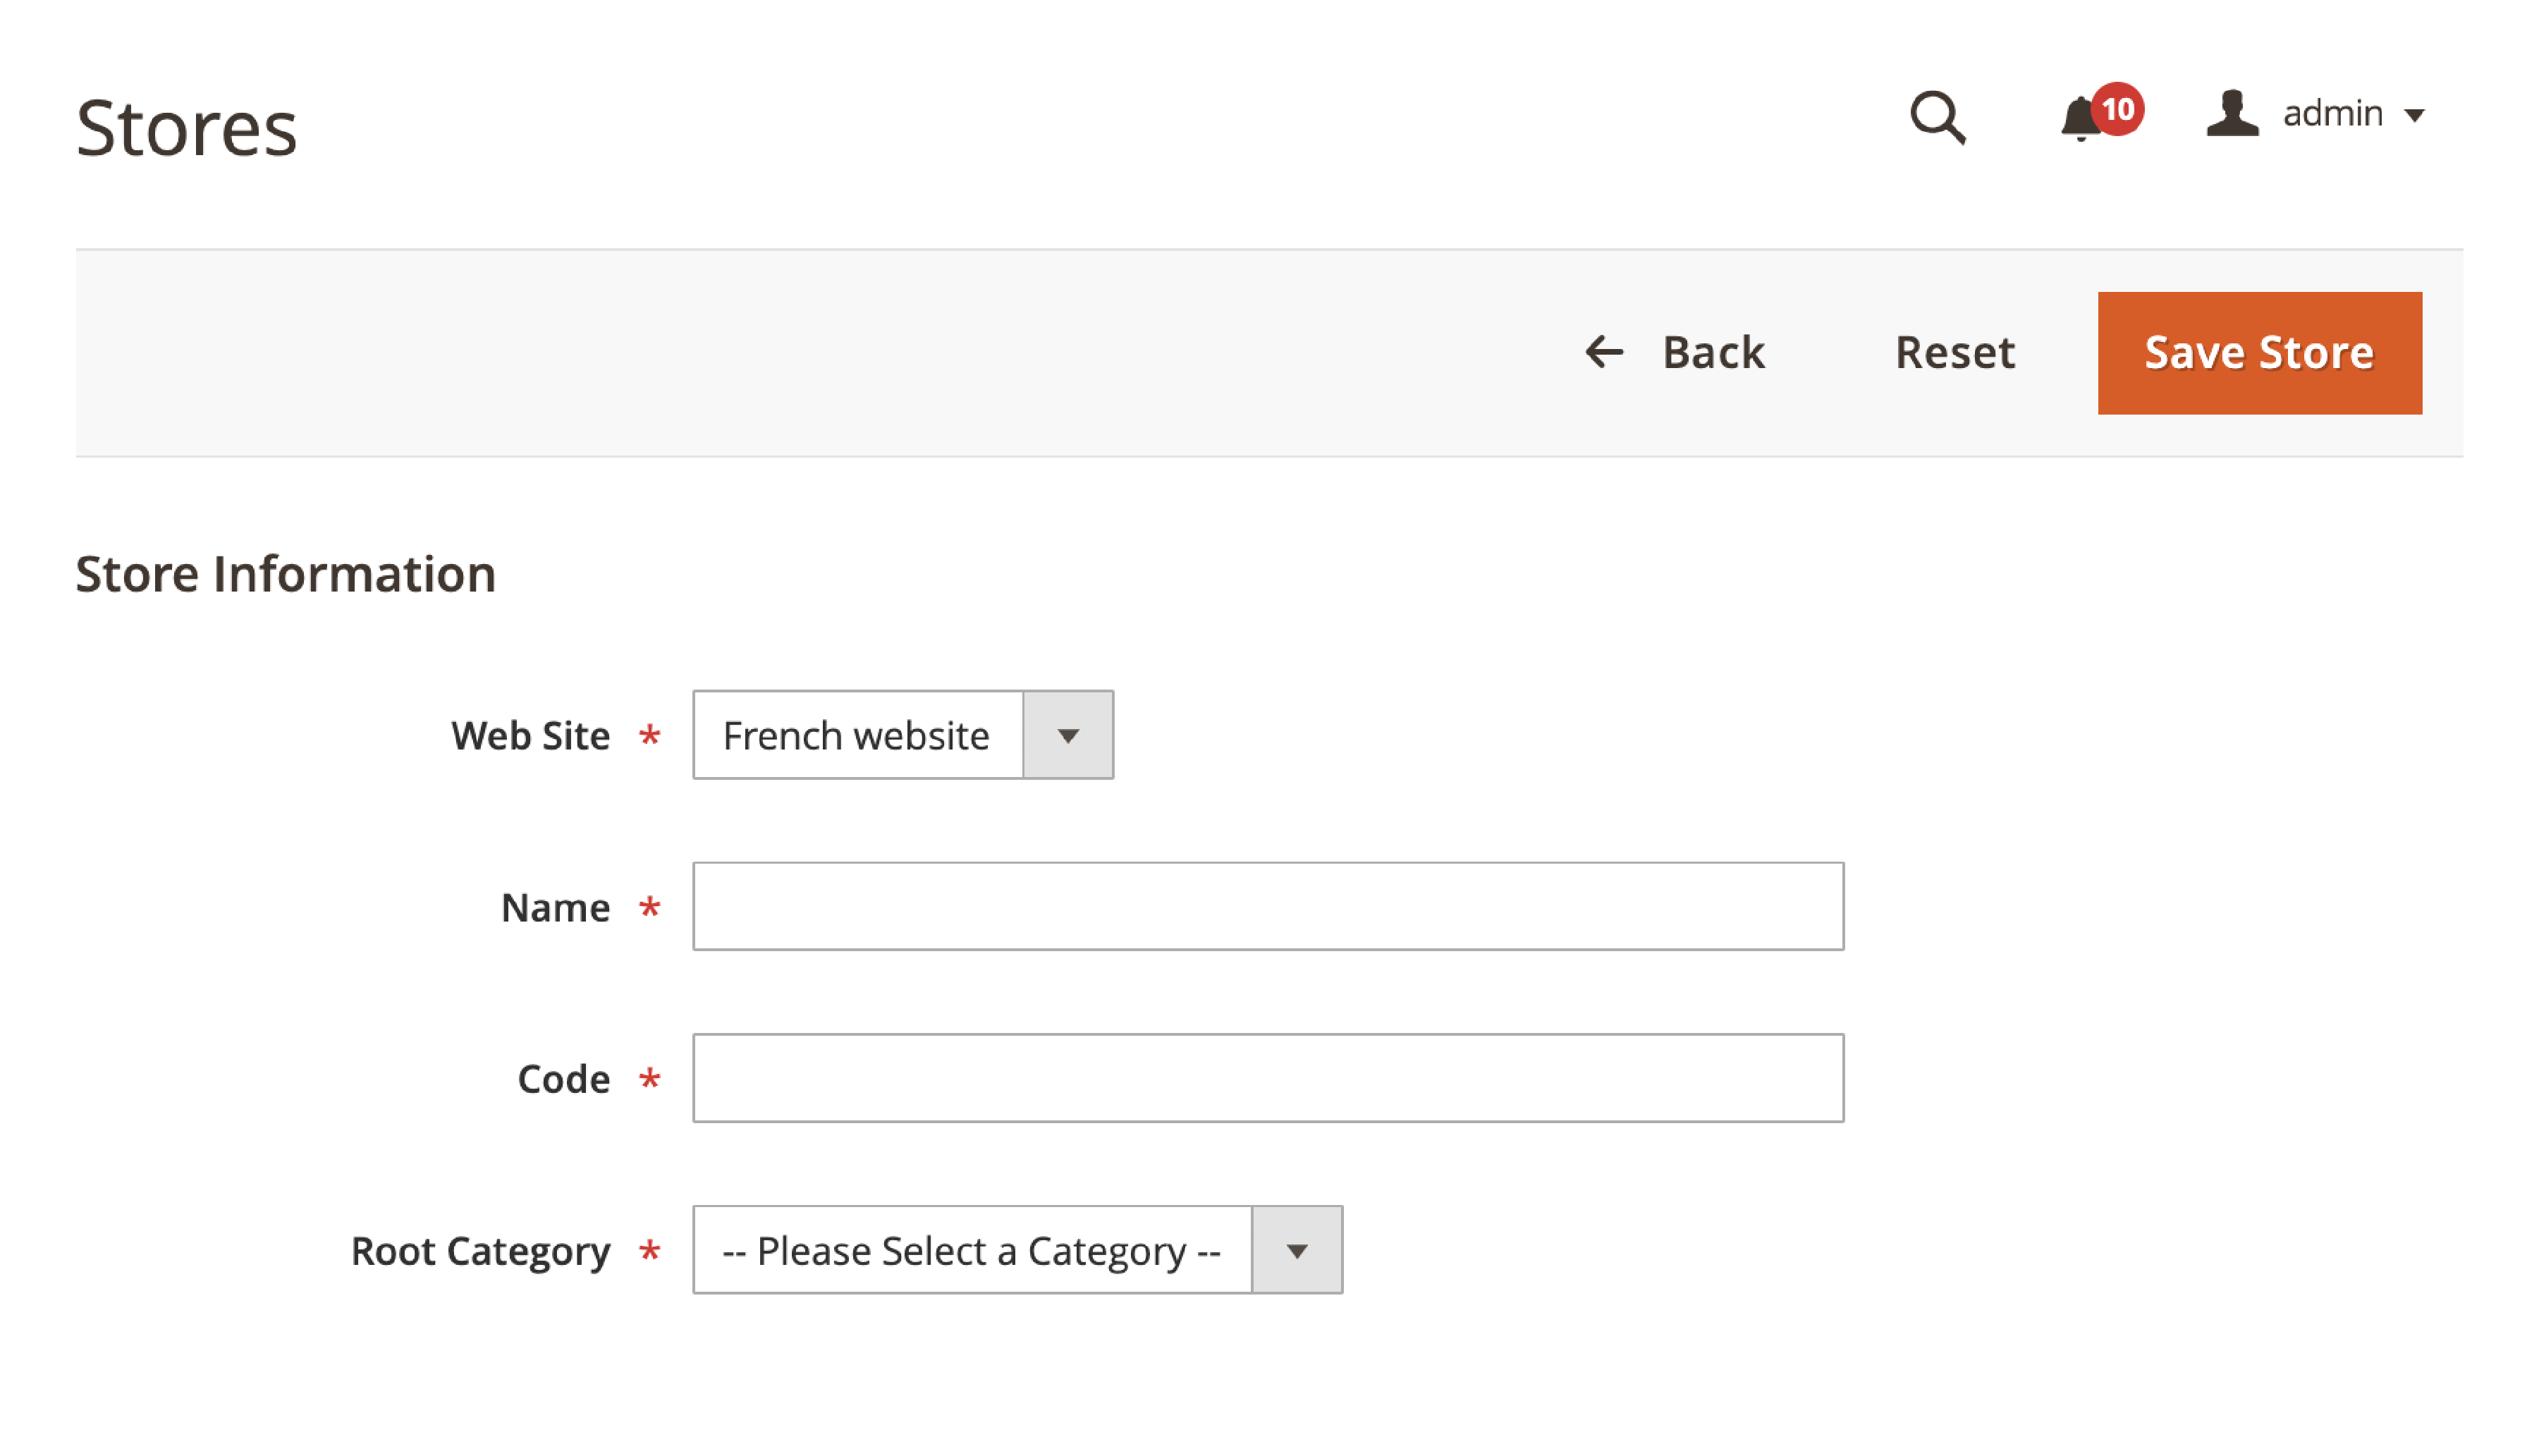
Within a website, you can create stores & store views. You can display different categories & products on the front end.
To create a new store, configure the following steps:
On the Admin panel, go to Stores > Settings > All Stores.
- On the Stores page, select the Create Store tab. Under that, configure the following:
- Web Site -Select the website to associate with the store.
- Name -Add a name for the store.
- Code -Add a unique code to identify the store.
- Root Category -Enter the name of the root category for this store.
- Click on Save Store to save changes.
- Repeat the steps to create Magento 2 multiple stores.
3. Create Store Views
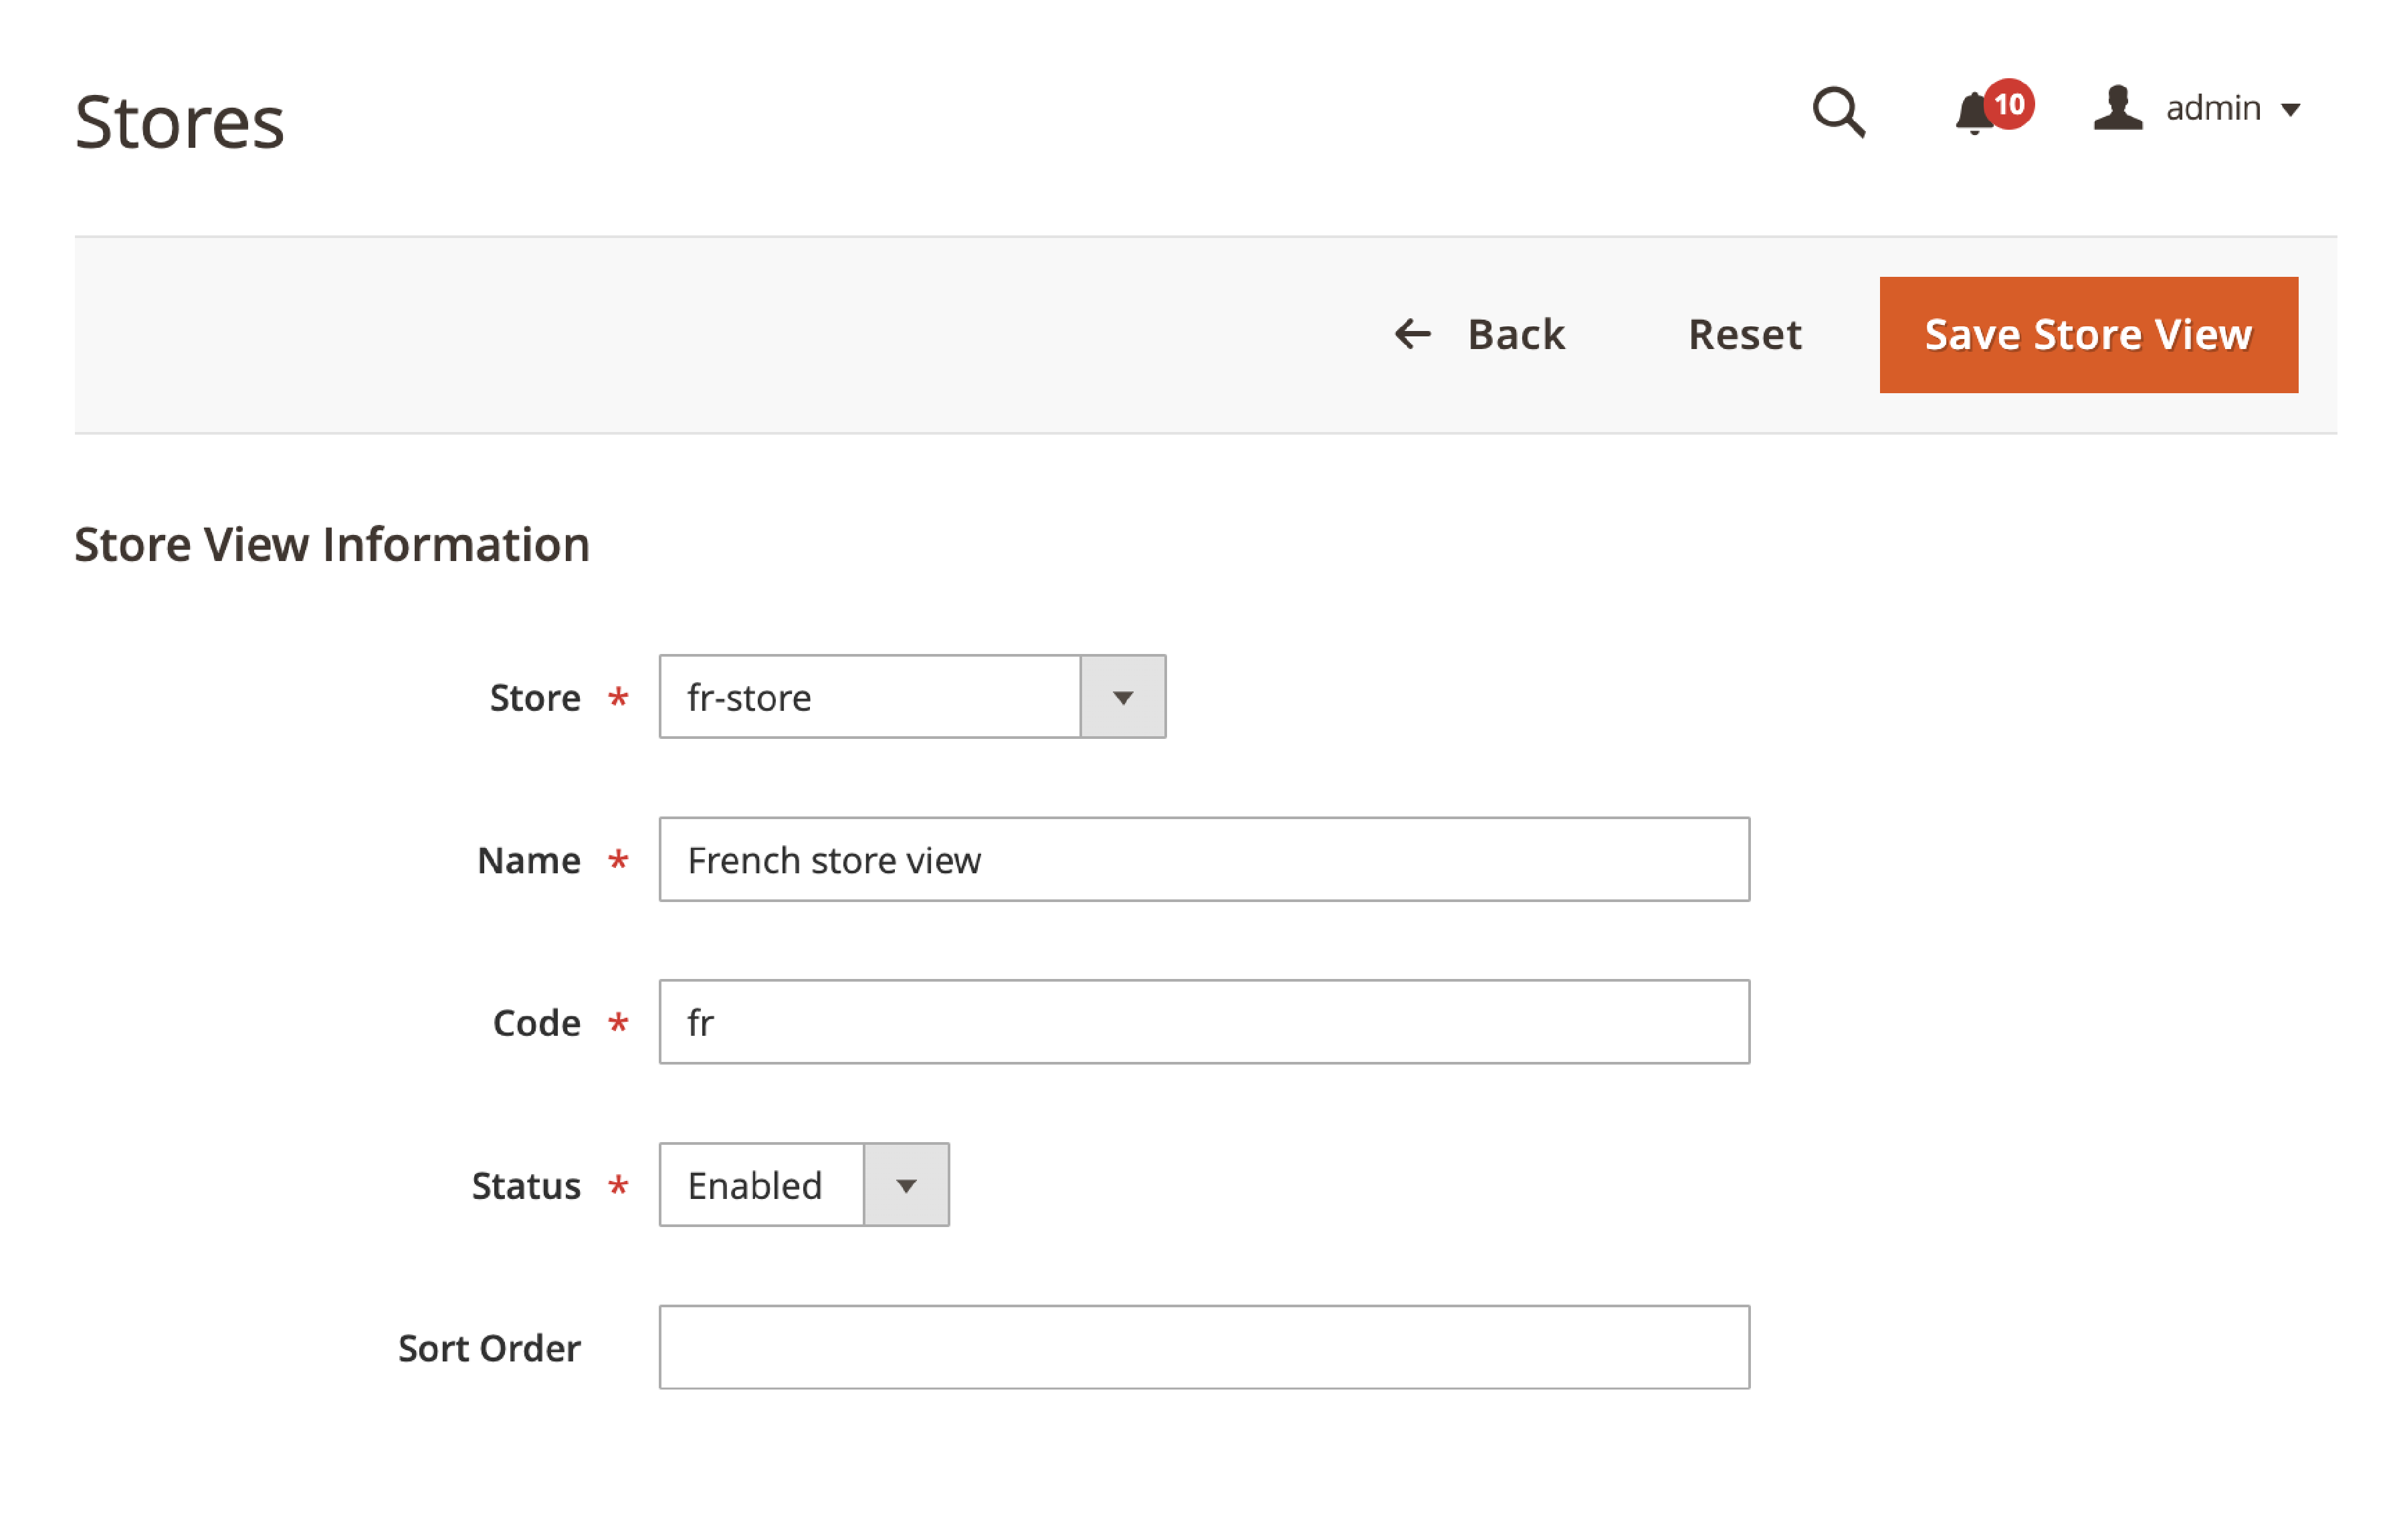
Every Store is presented to customers based on the store view. Initially, a store has a default view for customers. You can add more store views based on different languages.
In this step, we will configure Store Views.
From the Admin panel, navigate to Stores > Settings > All Stores. On the Stores page, select Create Store View. Configure the following store view components:
- Store -Select the name of the store for the new store view.
- Name -Add a name to identify this store view.
- Code -Add a unique code to identify this store view.
- Status -Select Enabled to enable the store view.
Save changes by clicking on Save Store View. You can repeat the steps to create many store views.
4. Change the Websites Base URL
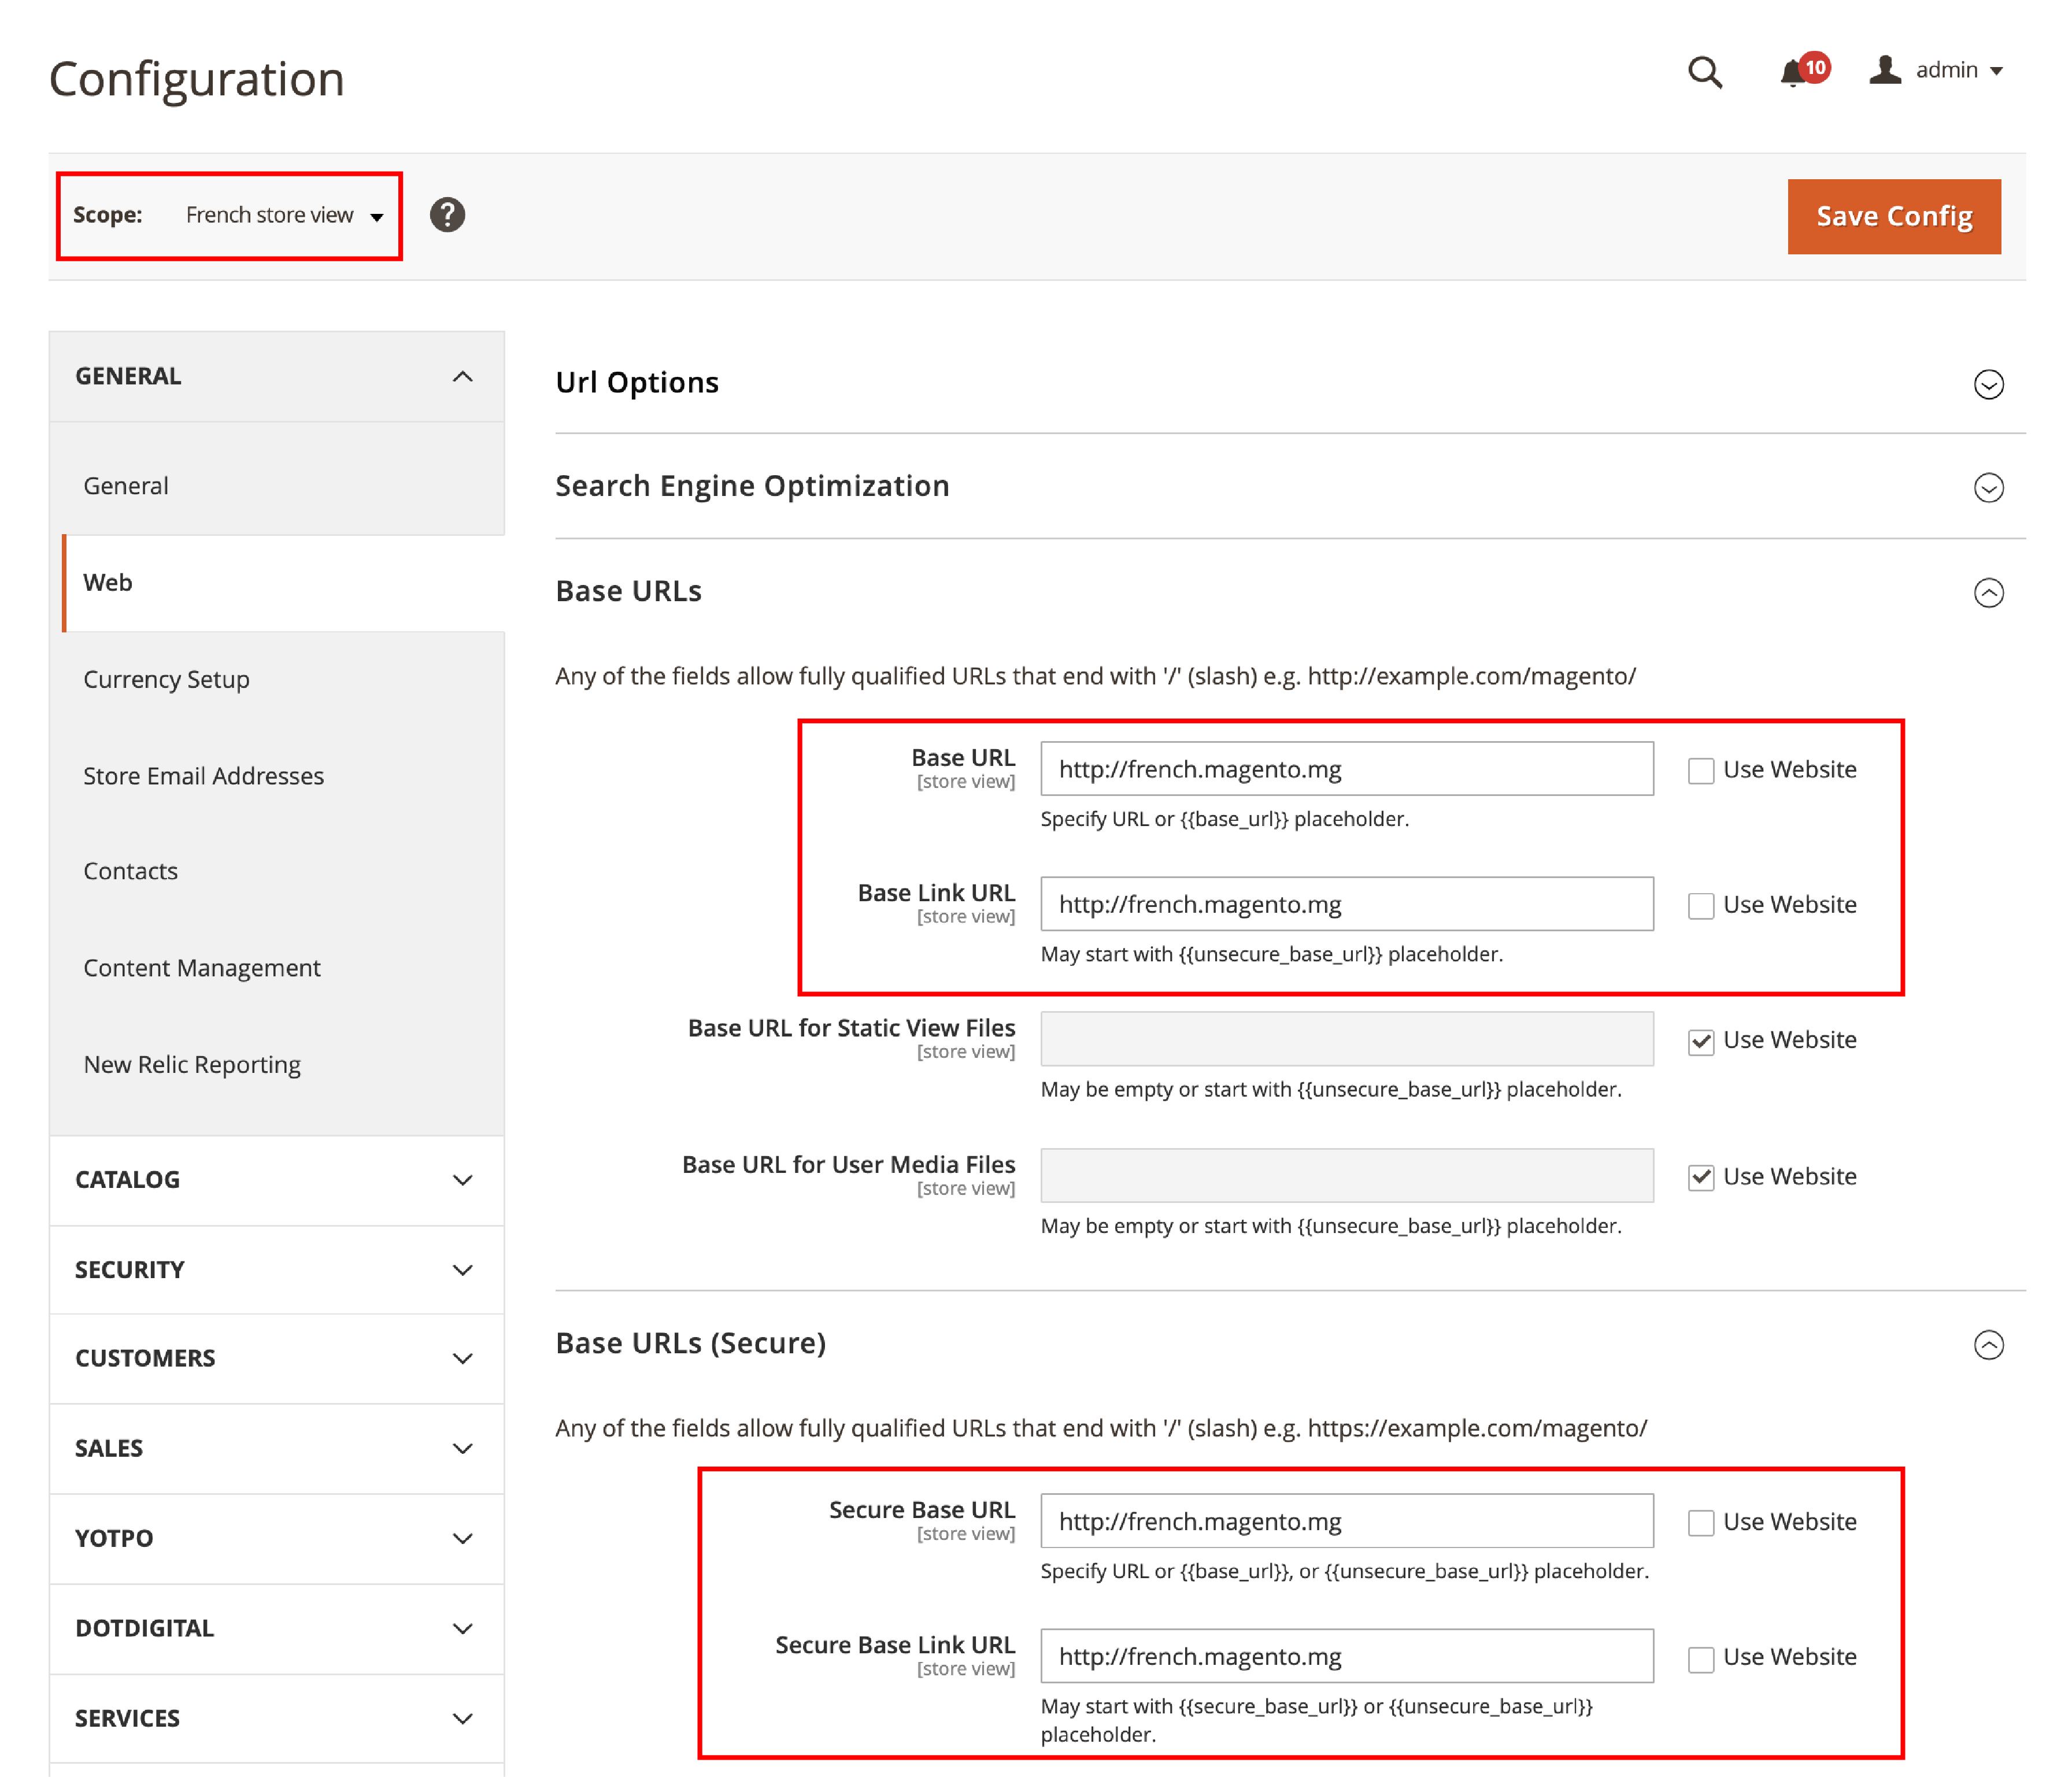
The website has a unique URL such as http://french.magento.mg
You have to change the base URL to access the website with the unique URL.
To change the website base URL:
From the Admin Panel, go to Stores > Settings > Configuration > General > Web.
In the Store View listed at the top, choose your website.
- Go to the right panel, expand the Base URLs tab.
- Add the
http://french.magento.mgURL in the Base URL field. Also, add the same unique URL in the Base Link URL fields. - Add the URL in the Base URLs (Secure) section.
- Click on Save Config to save the settings.
Repeat these steps for other websites that you want to access.
5. Add the Store Code to the Base URL
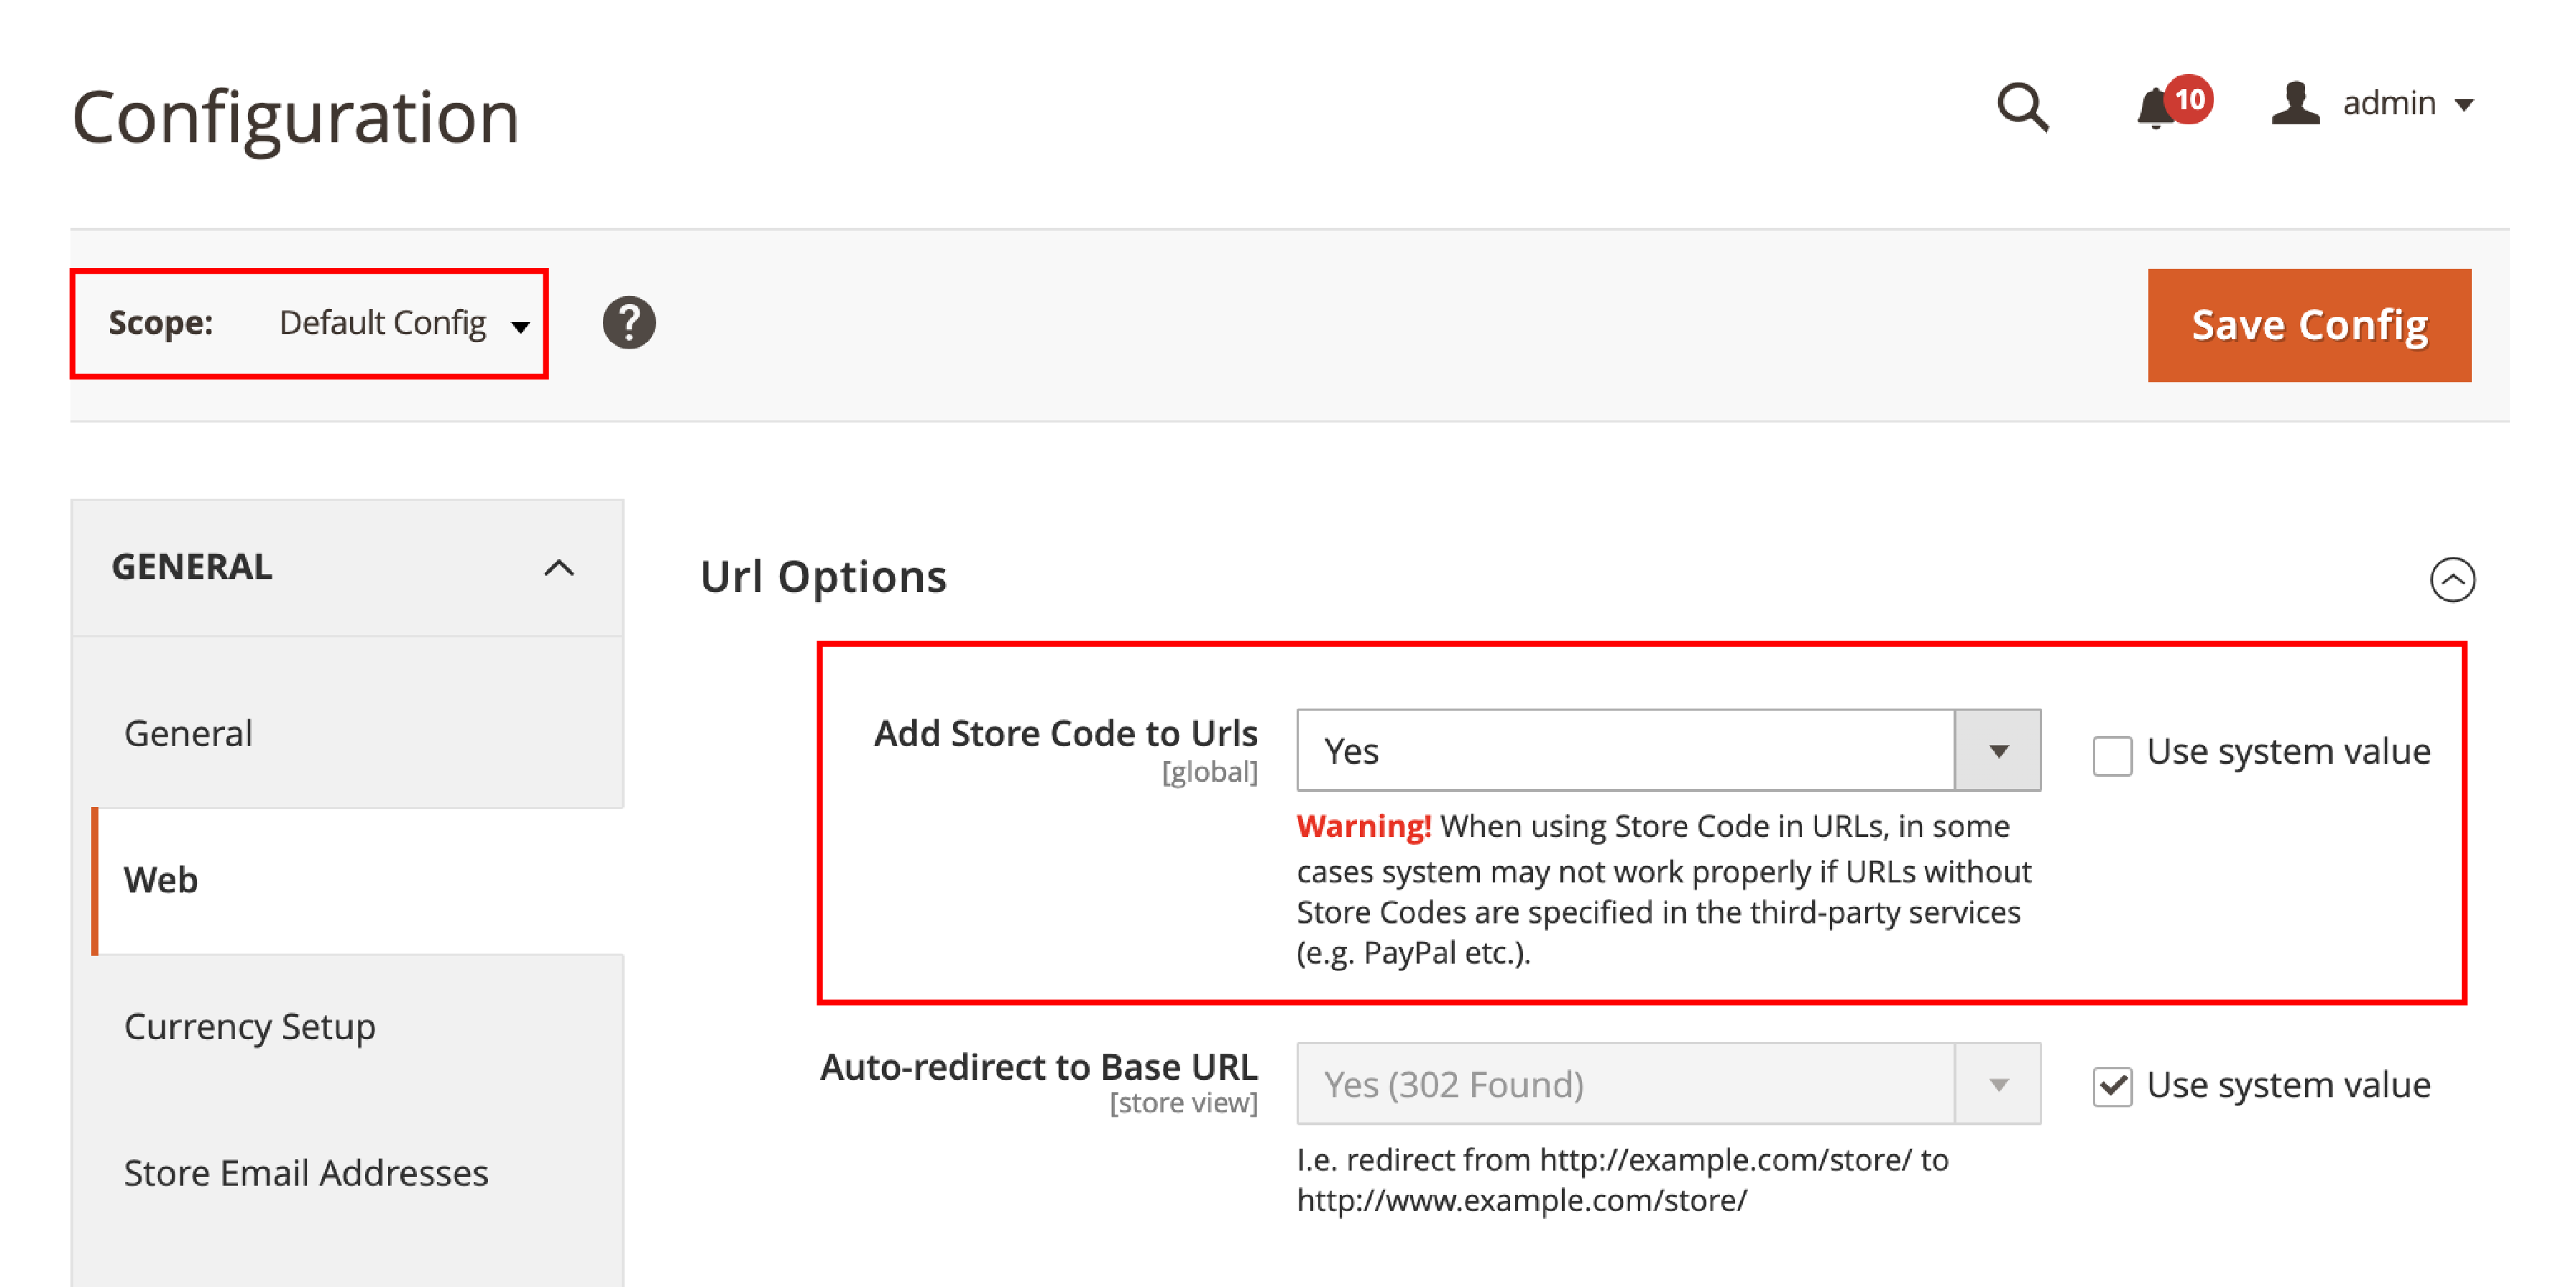
Adding the store code to the site base URL simplifies the process of setting up multiple stores.
You don’t have to create directories on the Magento file system.
There is no requirement to store index.php and .htaccess.
To add store code to the Base URL:
Navigate to Stores > Settings > Configuration > General > Web. Go to Store View at the top of the page and select Default Config.
- Go to the right panel, expand URL Options.
- Clear the Use System Value checkbox. It is located next to Add Store Code to URLs.
- On the Add Store Code to Urls list, select Yes.
- Add the store code to the Store Base URL
- Click Save Config to save the changes.
- If required, flush the Magento cache. Select System > Cache Management.
6. Change the Default Store View base URL
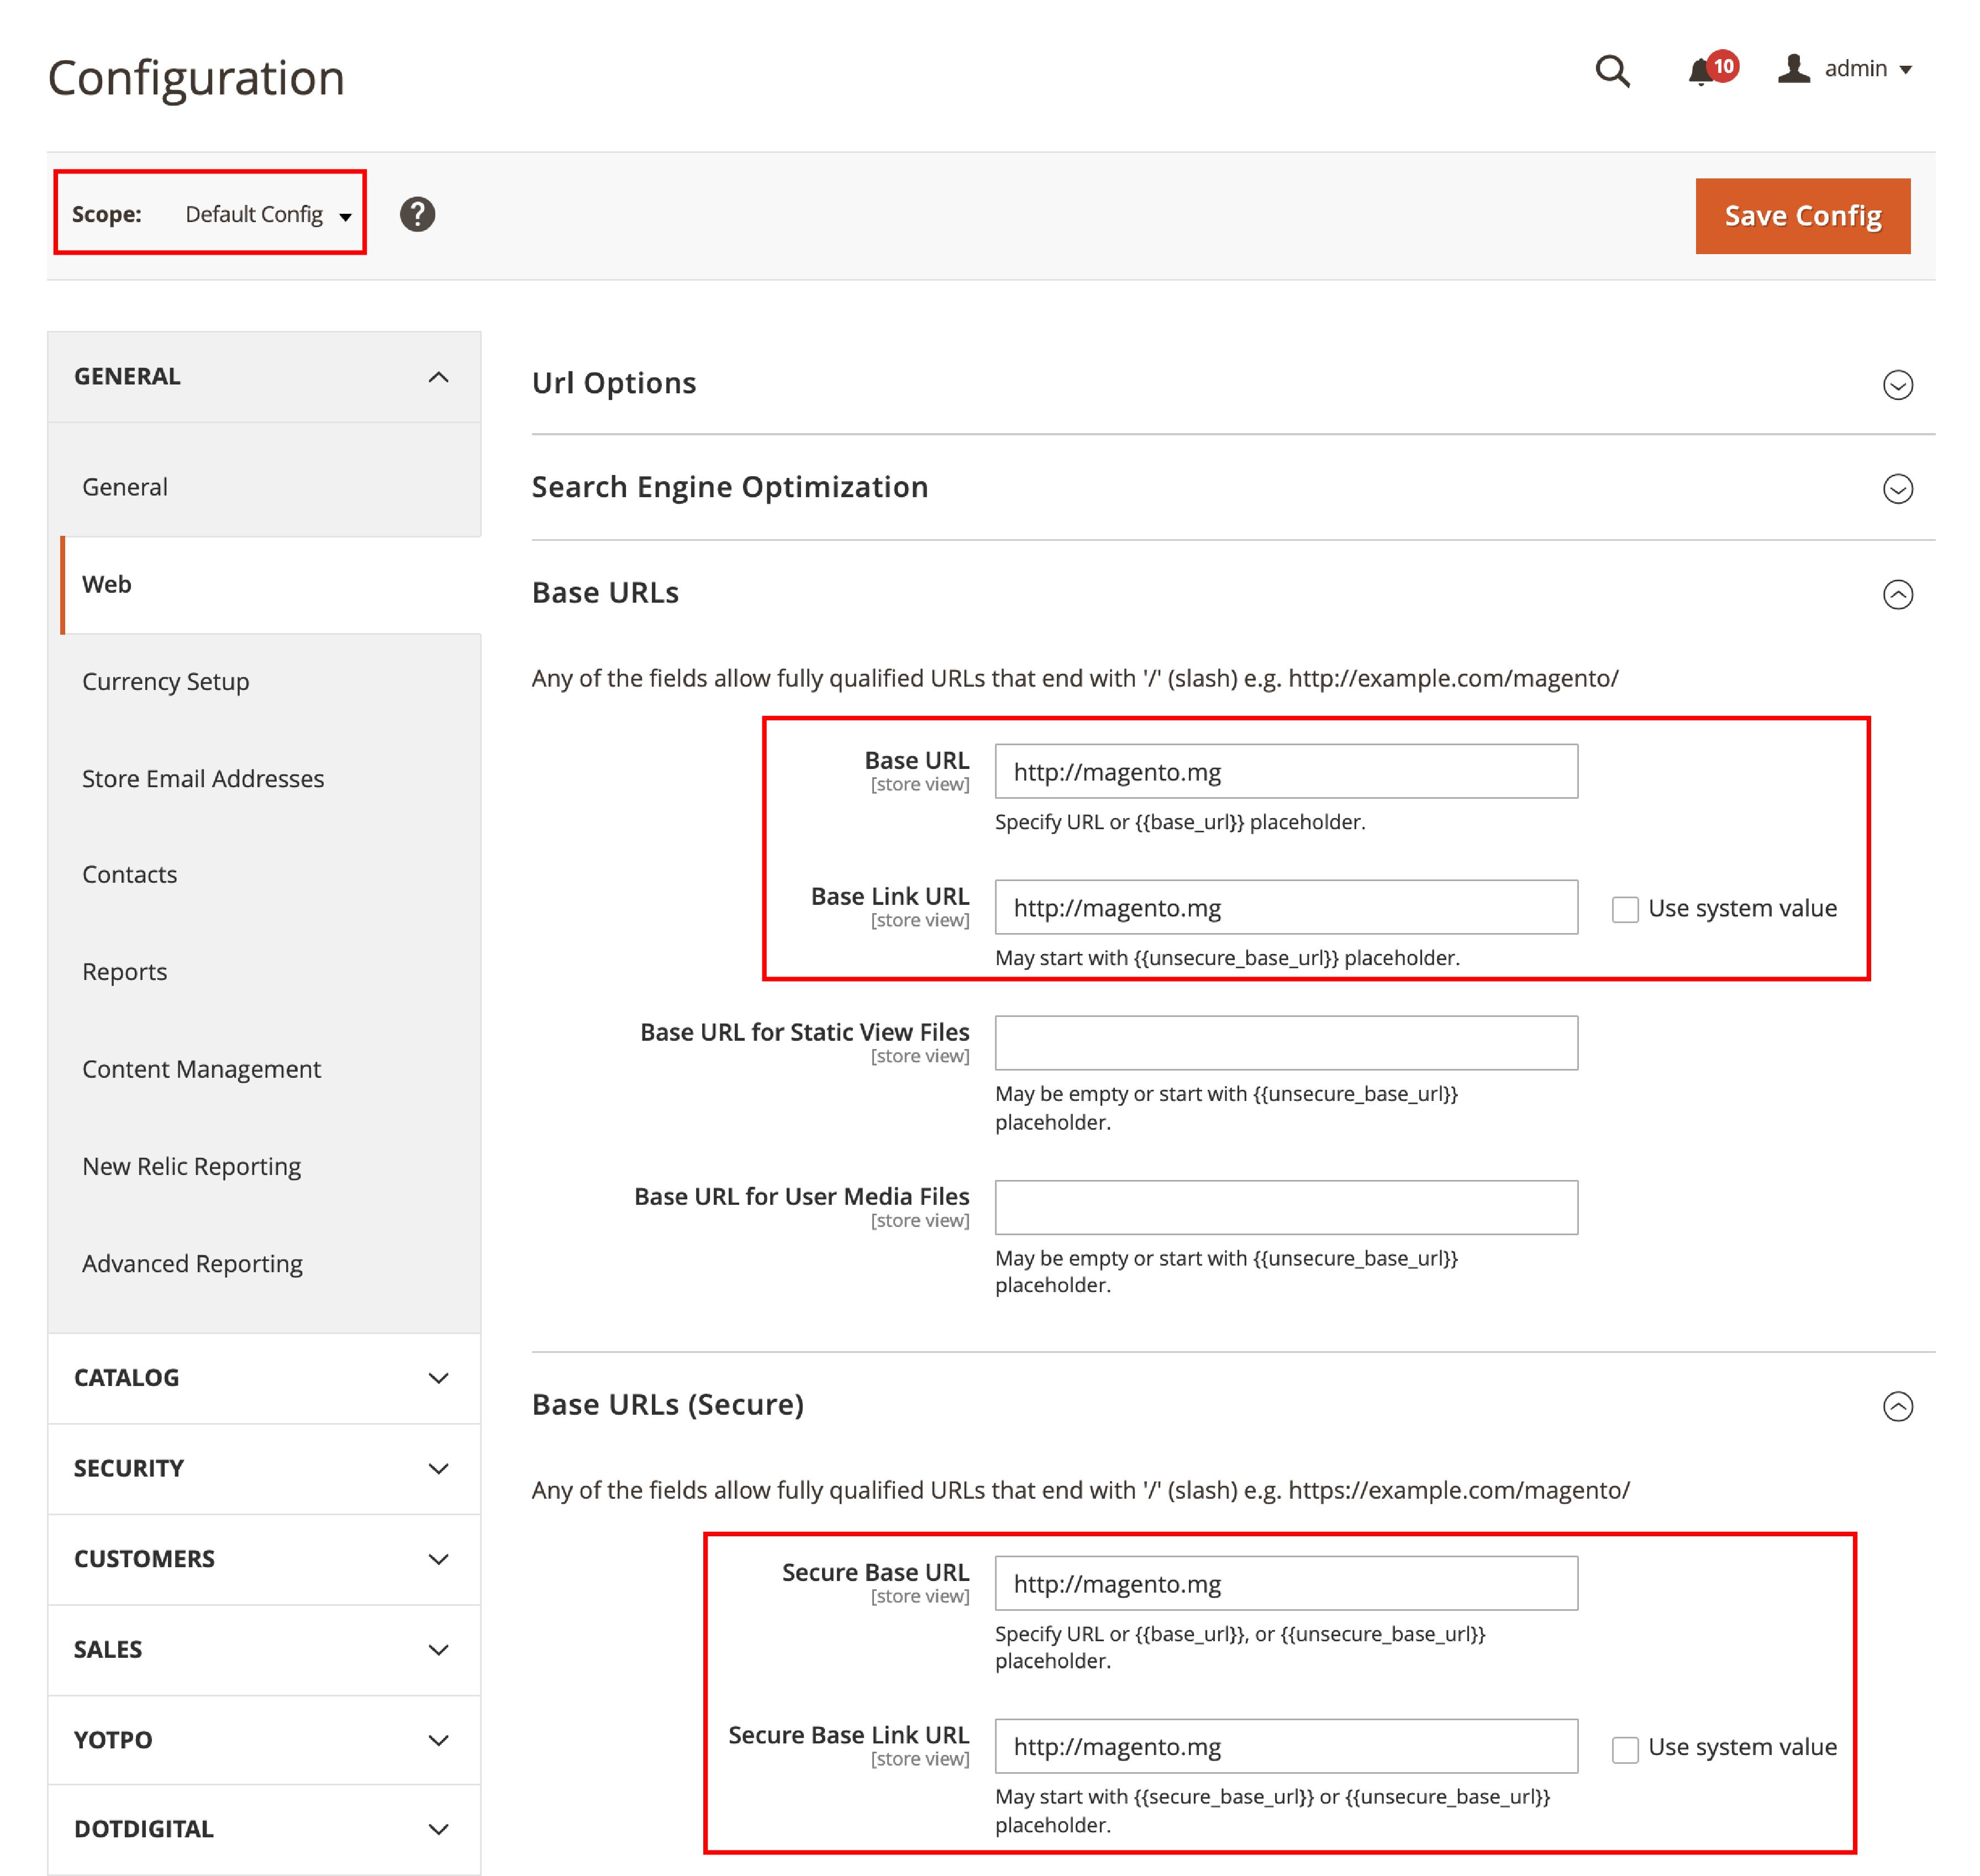
Updating the Default Store view base URL should be done last. You lose Magento Admin access until you set up virtual hosts.
To execute this step, go to Stores > Settings > Configuration > General > Web.
On the Store View list located at the top, select Default Config.
- On the right panel, expand Base URLs.
- Go to the Base URLs section and clear the Use System Value.
- Enter the
http://magento.mgURL in the Base URL. Add the same URL in the Base Link URL fields. - Enter the same URL in the Base URLs (Secure) section.
- Click on Save Config to save the changes.
7. Server-side Configuration
You can set up multiple websites & stores with NGINX or Apache. For NGINX, the primary steps include the following:
- Create a Roadmap to set up multiple websites with NGINX
- Create nginx virtual hosts
- Modify
nginx.conf.sample - Update the Base URL configurations for each website
- Clean the Caches
- Verify the site and add a static route to the host
For Apache server, you can set up websites & stores by:
- Set values in an entry point script
- Understand the roadmap to set up multiple websites with Apache
- Using the Admin panel, create websites, stores, and store views
- Create Apache virtual hosts
- Verify the site
Get the detailed steps of configuring the Apache server for Magento multi-stores.
Conclusion
Magento multistore functions make it simple to manage storefronts. You can operate the multiple stores from a single admin panel.
It also lets you promote brands using different front-ends. You can target international markets with multi-stores.
It lets you add different currencies. You can add local languages & optimize content for each store.
Multi-stores are also useful for holiday seasons in different countries. Manage the store & customer data easily between different storefronts.
This tutorial has covered how to set up Magento 2 multi-stores. You can target potential customers based on their specific demands.
To learn more about the Magento platform, check out the MGT Commerce Blog.


