
2 Steps to Configure GeoIP Magento 2 Extension
Looking to provide a localized shopping experience to your international customers? A GeoIP Magento 2 extension detects a customer's geolocation. It then redirects them to the appropriate store view.
In this tutorial, we will explain how to install and configure the Magento 2 GeoIP extension.
Key Takeaways
-
Learn how to detect customer locations for a personalized shopping experience automatically.
-
Understand how to redirect customers to the appropriate store view and currency.
-
Discover flexible redirect options, including first-visit or every-visit configurations.
-
Learn to use SEO efforts to remain intact by ignoring search engine traffic.
-
Implement best practices like IPv6 compatibility and compliance with privacy laws.
Features of Magento 2 GeoIP Extension
1. Automatically detect the customer's location
-
The Magento 2 GeoIP store switcher module can identify a customer's location using their IP address.
-
It does this by looking at the customer's IP address. It is like a unique address for their computer or device on the internet.
-
This feature provides a personalized shopping experience based on the visitor's geographical location.
2. Redirect Customers to Appropriate Store View
-
The Magento 2 GeoIP redirect module can direct customers to the most relevant store near them.
-
For example, if a customer from Germany visits your site, they will be redirected to the German store view.
-
It helps customers see the content, products, and prices most suitable for their region.
3. Switch Store Currency and Language
-
The Magento 2 store switcher can change the store's language and currency to match the customer’s country.
-
This feature enhances the user experience by displaying prices in the local currency. The content is in the customer’s preferred language.
4. Display a Confirmation Message
-
Before redirecting a customer, the Magento 2 GeoIP store switcher can display a confirmation message.
-
It gives them a chance to stay on the current store view if they prefer.
-
It gives customers control over their browsing experience and avoids sudden changes.
5. Restrict Access from Specific IP Addresses
-
Store owners can use the GeoIP redirect module to block access from certain IP addresses.
-
This feature is for preventing unwanted access from regions where your store does not operate.
-
It could be helpful if you notice fraudulent orders or spam coming from particular IPs.
6. Ignore Search Engine Traffic
-
The Magento 2 store switcher can be configured to ignore traffic from search engines.
-
You likely don't want or need to redirect traffic coming from search engine bots that are crawling your site.
-
It means that only human visitors are redirected. This maintains the integrity of your search engine rankings.
7. Redirect on the First Visit or Every Visit
-
The module provides flexibility. It allows store owners to choose whether to redirect customers on their first visit or every time.
-
This extension also can be adjusted based on the desired user experience and business needs.
8. Set Redirects to Specific URLs
-
You can configure the Magento 2 GeoIP redirect to send customers to specific URLs depending on their location.
-
It is useful for directing traffic to localized landing pages, promotions, or specific product lines.
9. Exclude URLs from Redirection
-
The module allows you to exclude particular URLs from redirection.
-
Important pages, such as customer service, can remain accessible regardless of customer location.
Steps to Install & Configure GeoIP Magento 2 Extension
Step 1: Install GeoIP Extension
-
Download the extension files from the provider. It will usually be a ZIP file. Unzip it to get the extension folder.
-
Upload the extension folder to your Magento 2 installation's
app/codedirectory. You can use an FTP client or SSH to upload. -
Connect to your server via SSH and navigate to your Magento 2 root directory.
php bin/magento module VendorName_ModuleNamephp bin/magento setupphp bin/magento setup:diphp bin/magento setup:static-content -
Clear the Cache:
php bin/magento cache -
Verify if the extension is enabled by entering this code:
php bin/magento moduleVendorName_ModuleName
Step 2: Configure the Extension for Magento 2
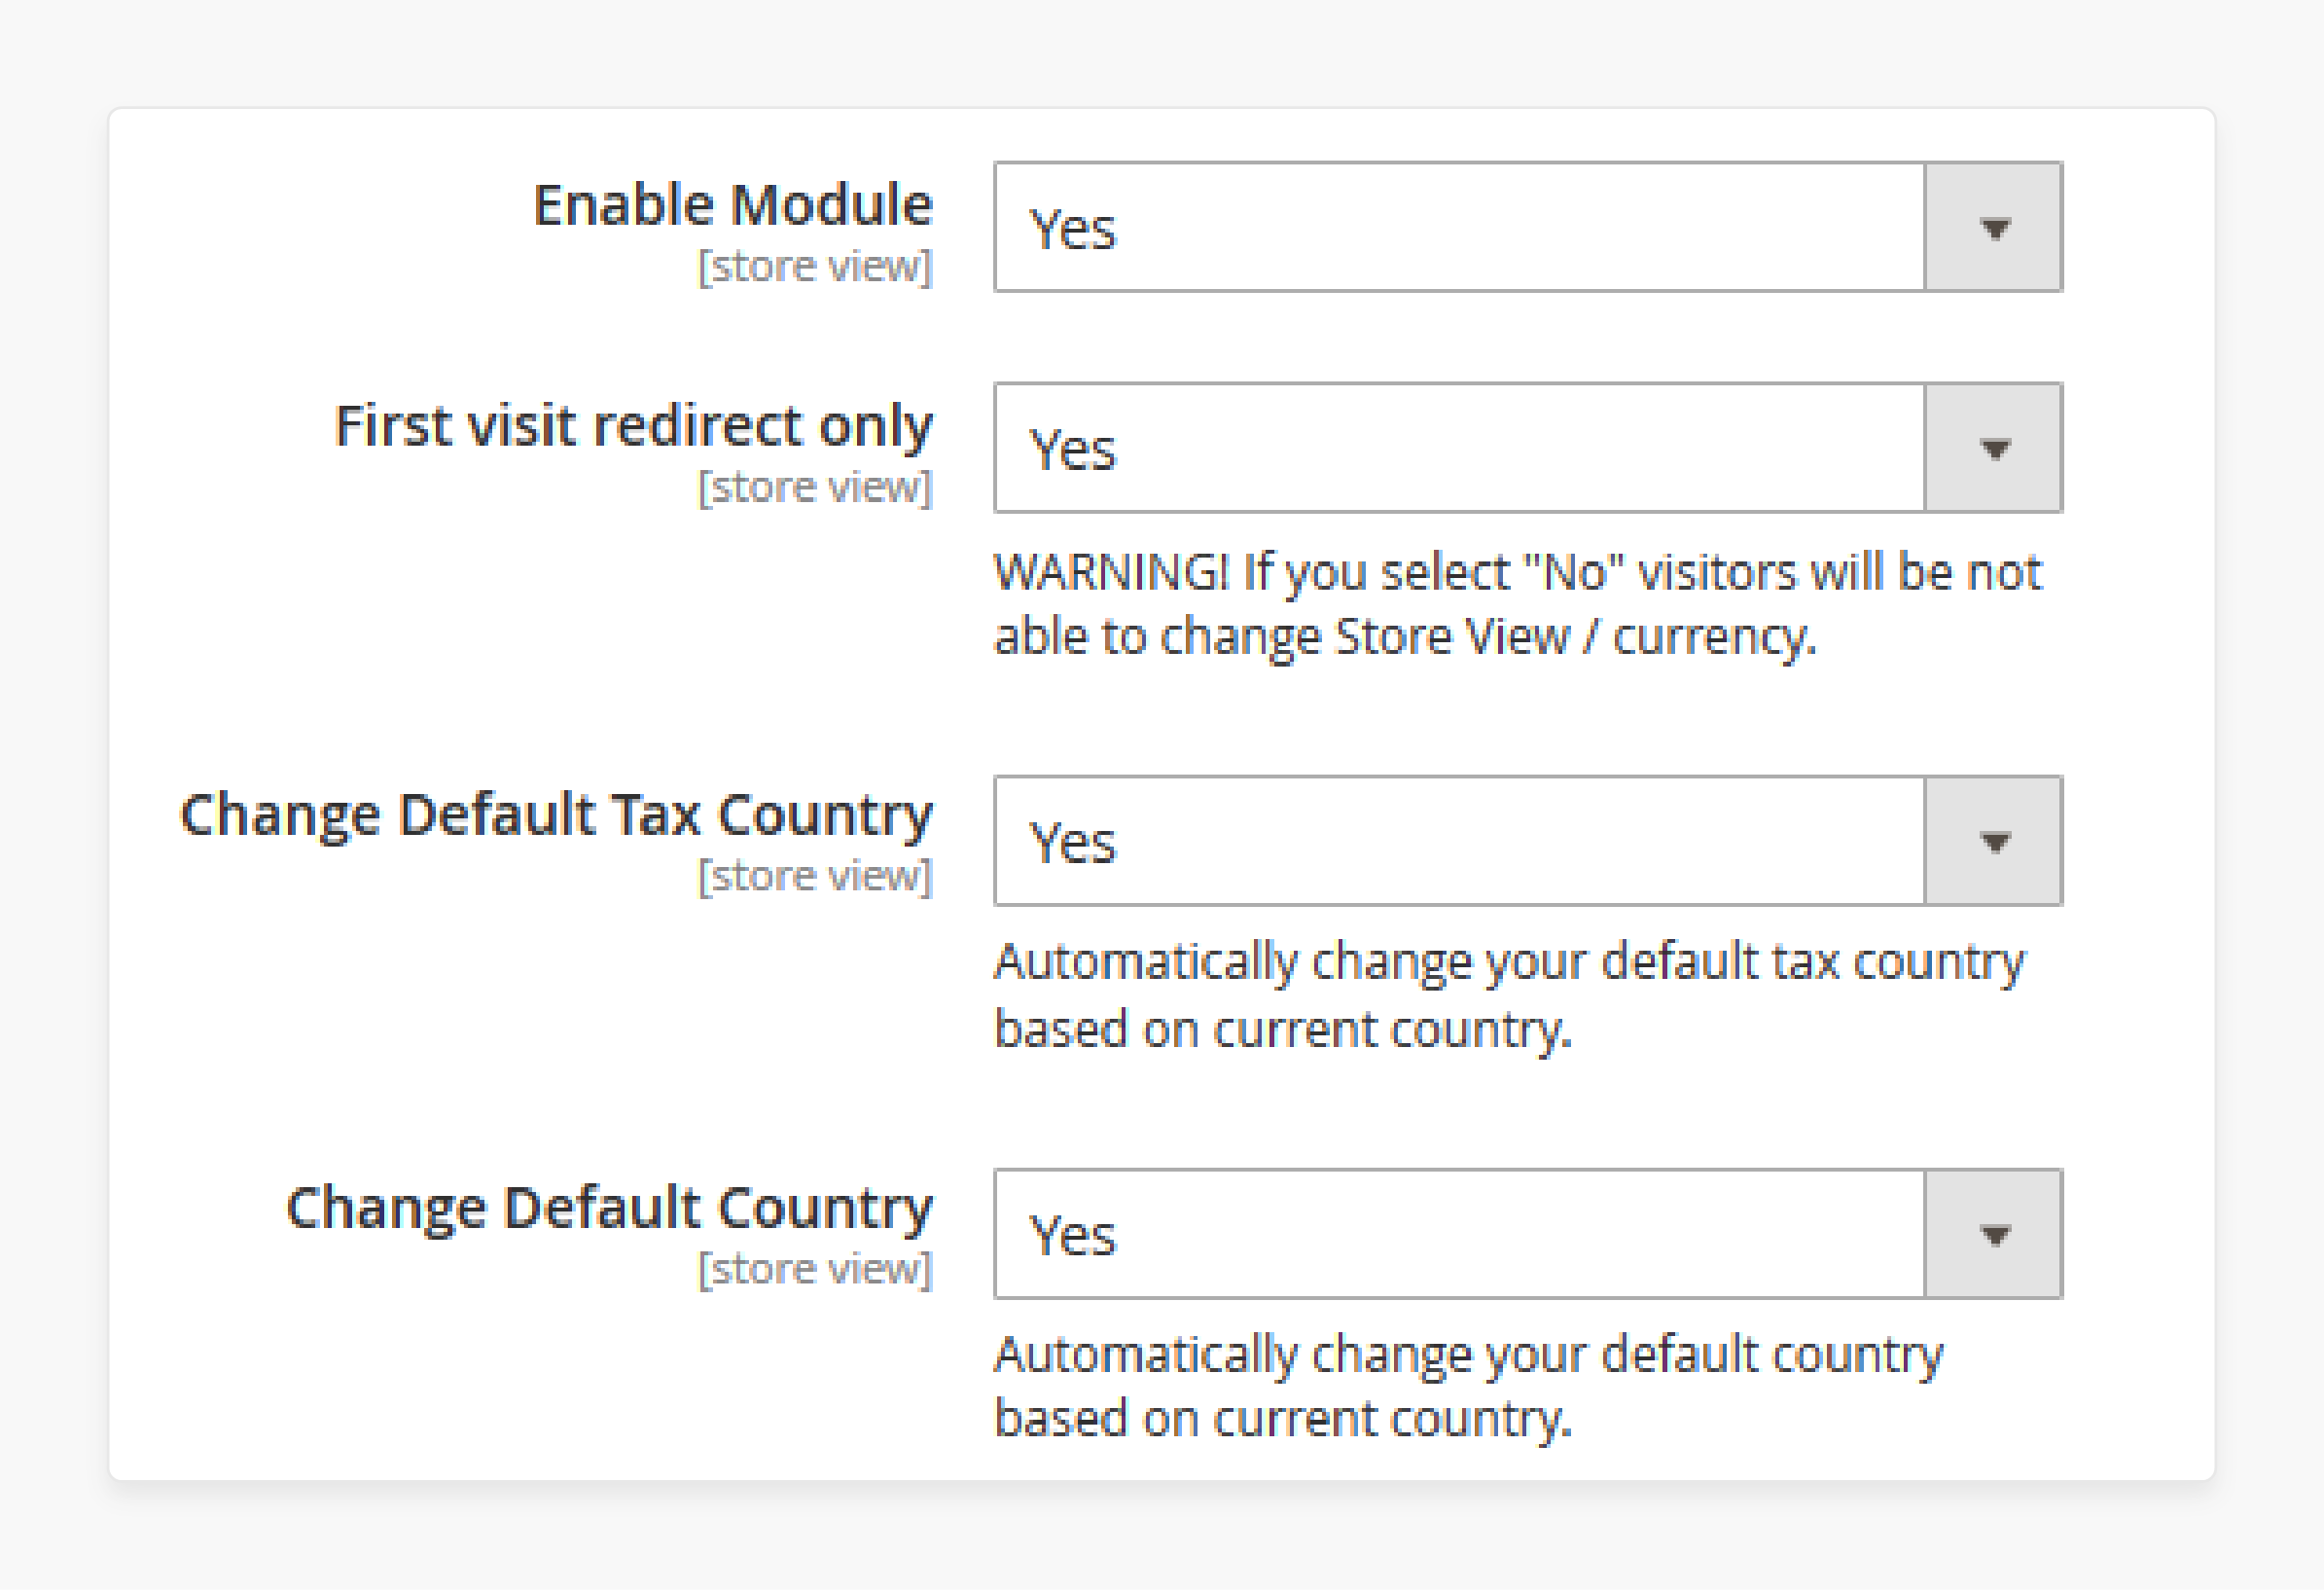
- Log in to the Magento Admin Panel and go to Stores > Configuration > GeoIP extension.
-
Enable the extension and change First visit redirect only to Yes to allow currency change.
-
Select Yes to change the default tax country and default country.
-
Set Restriction Logic for all URLs to redirect customers to specific pages.
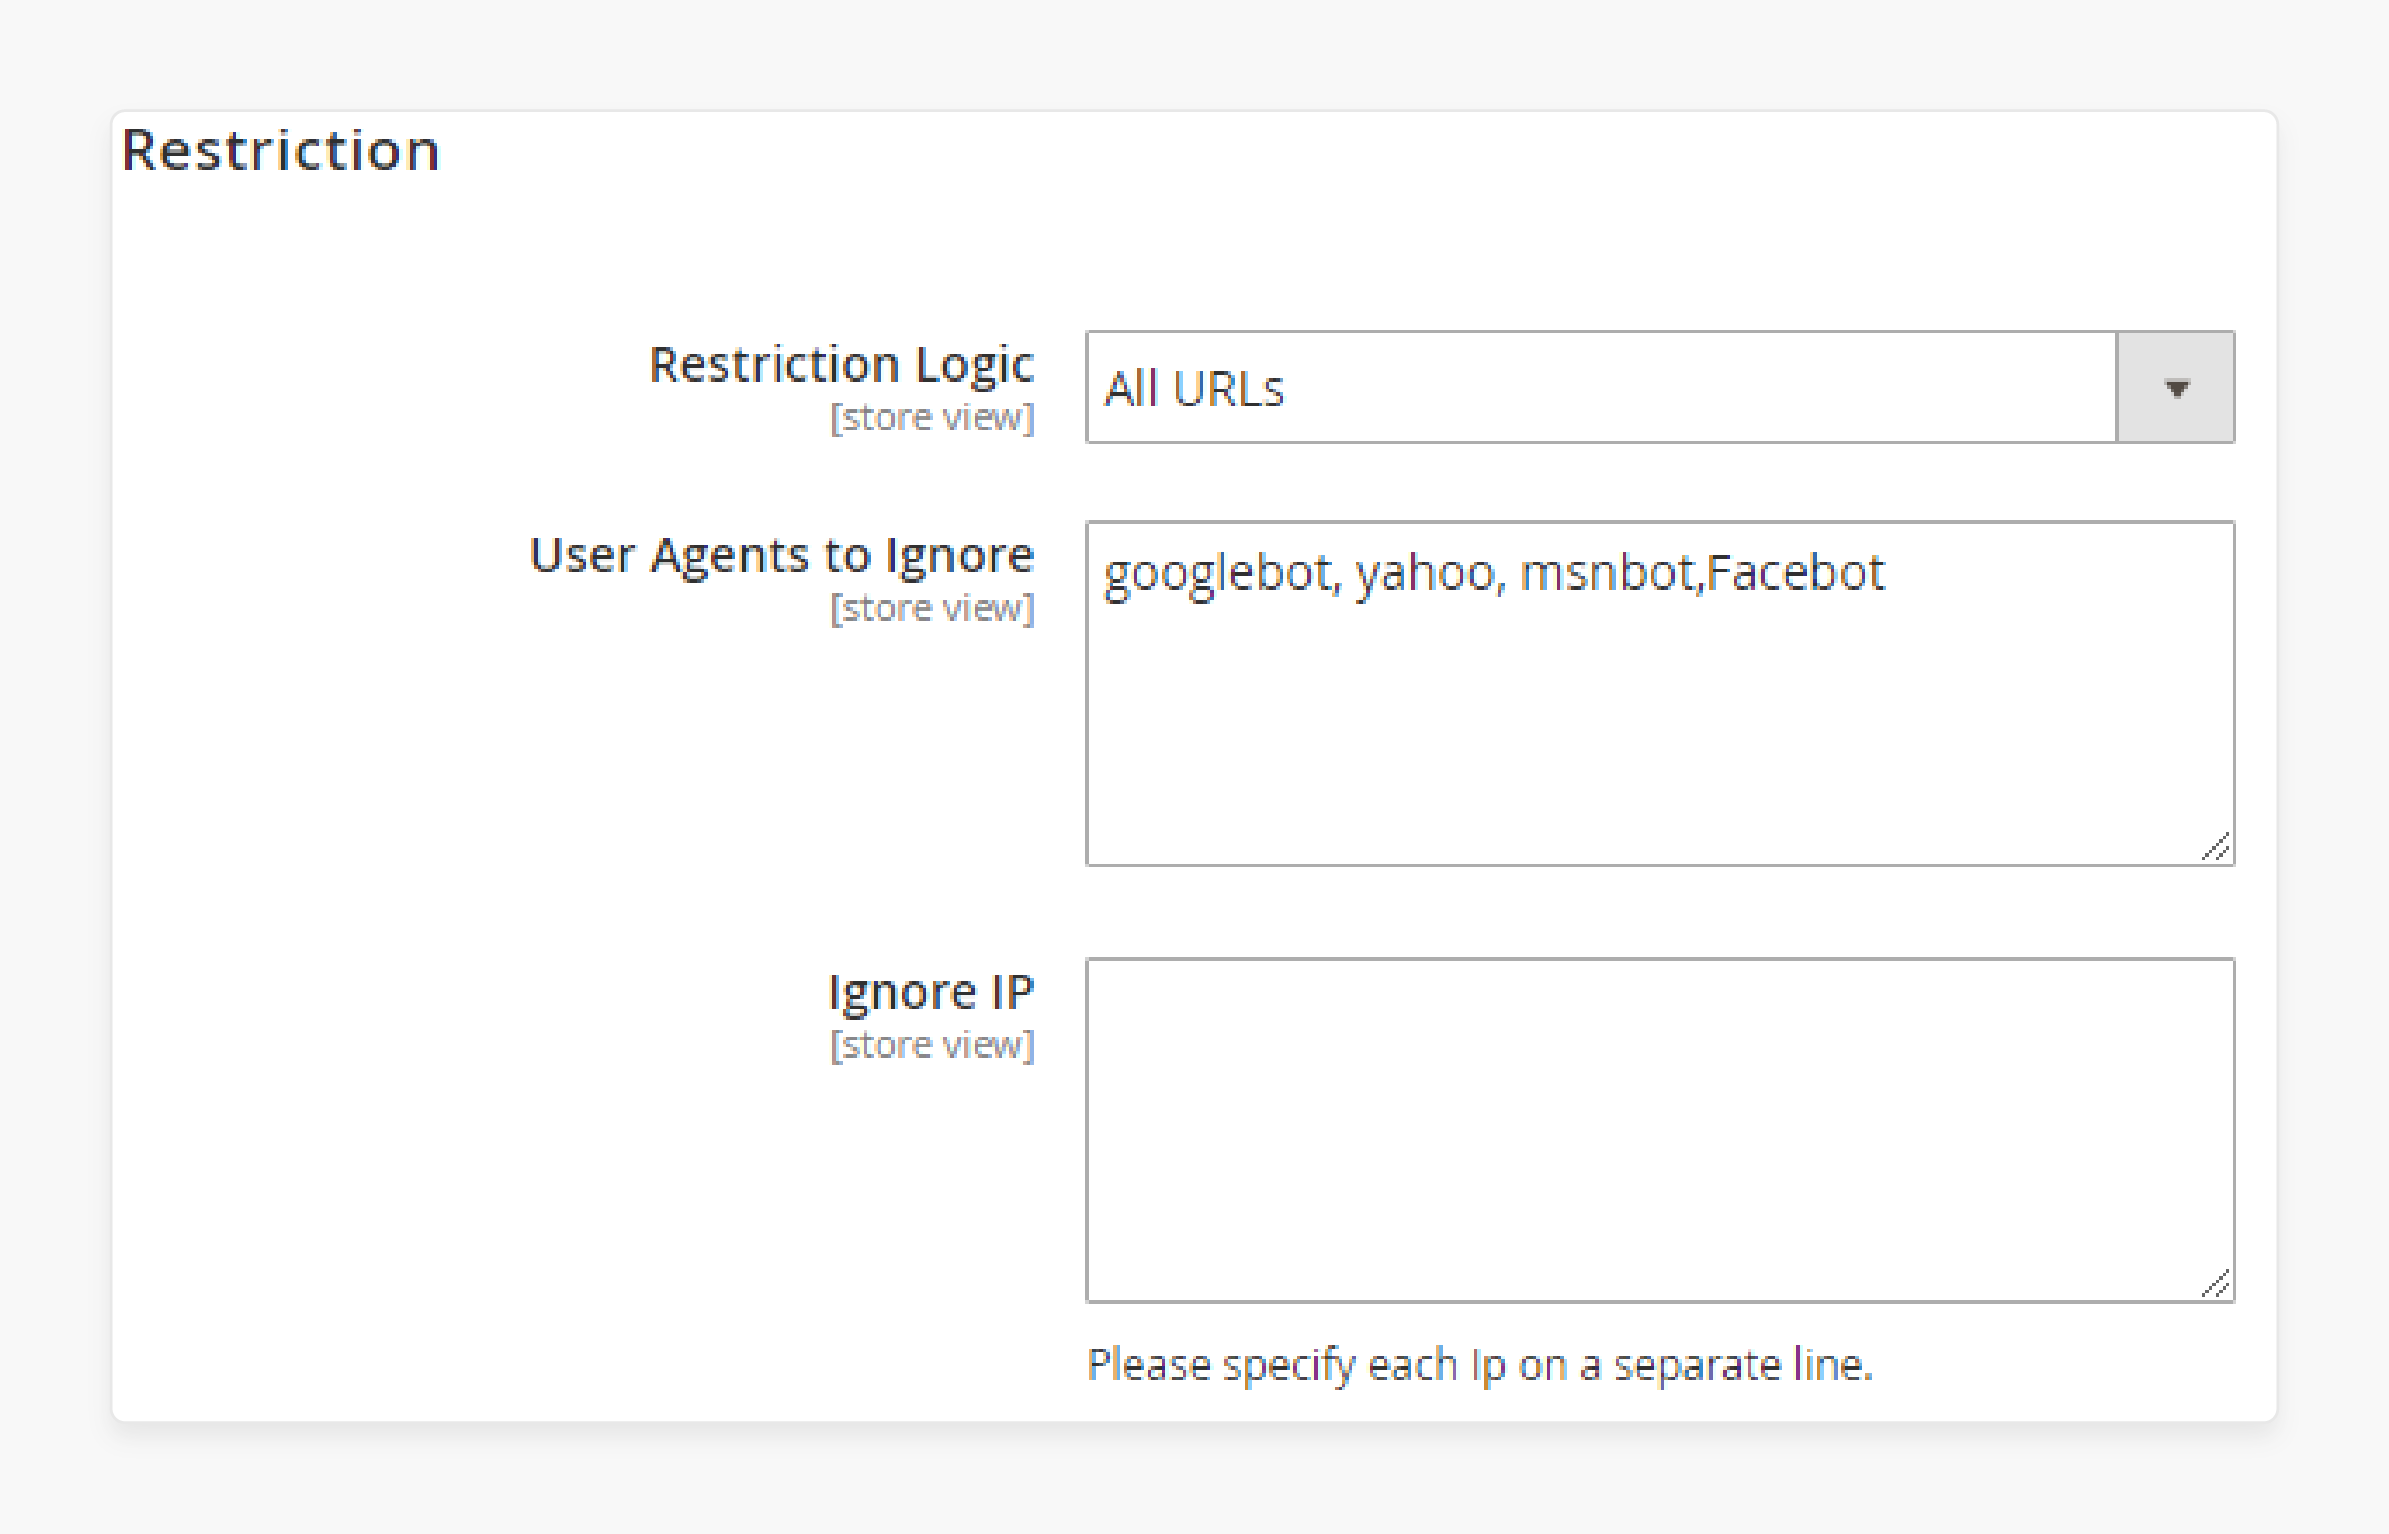
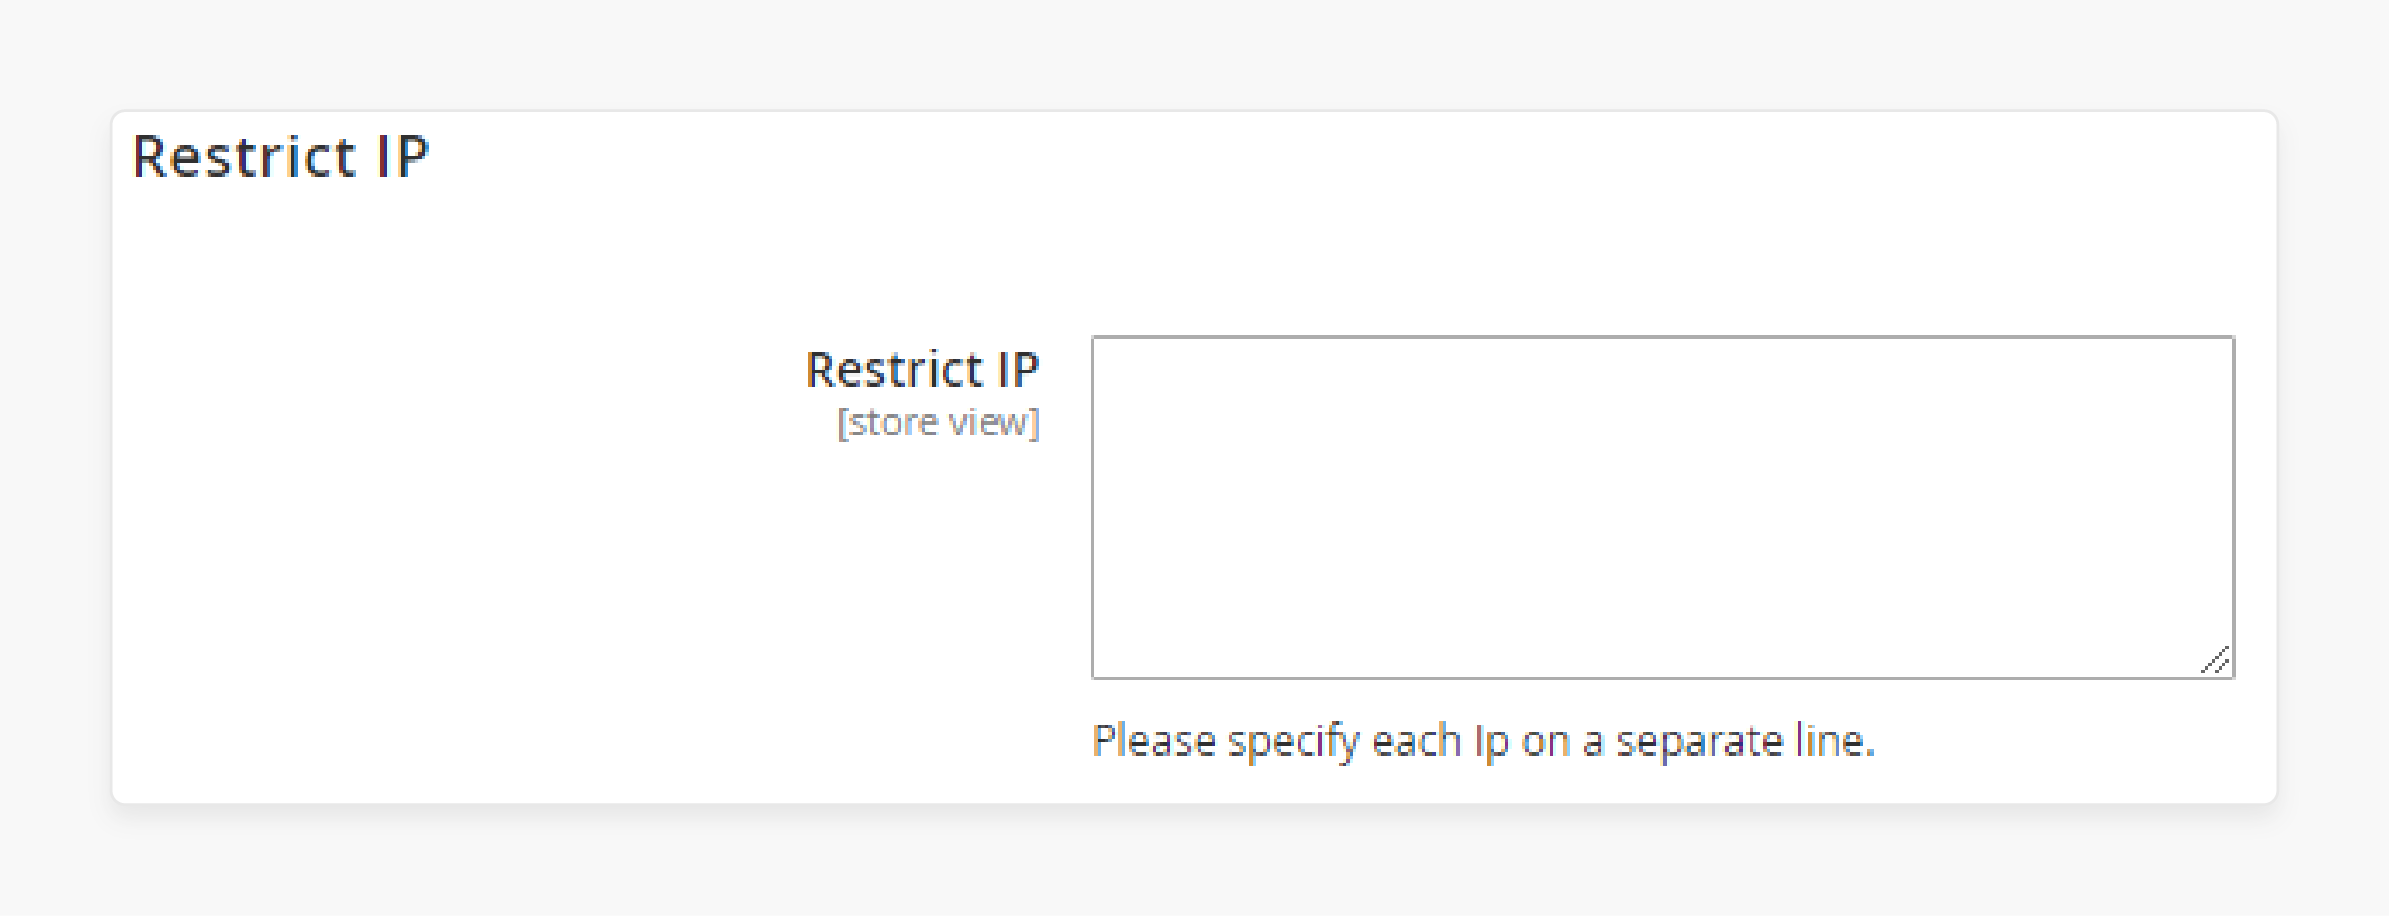
- Enter the names and IPs of bots to restrict under User Agents to Ignore.
-
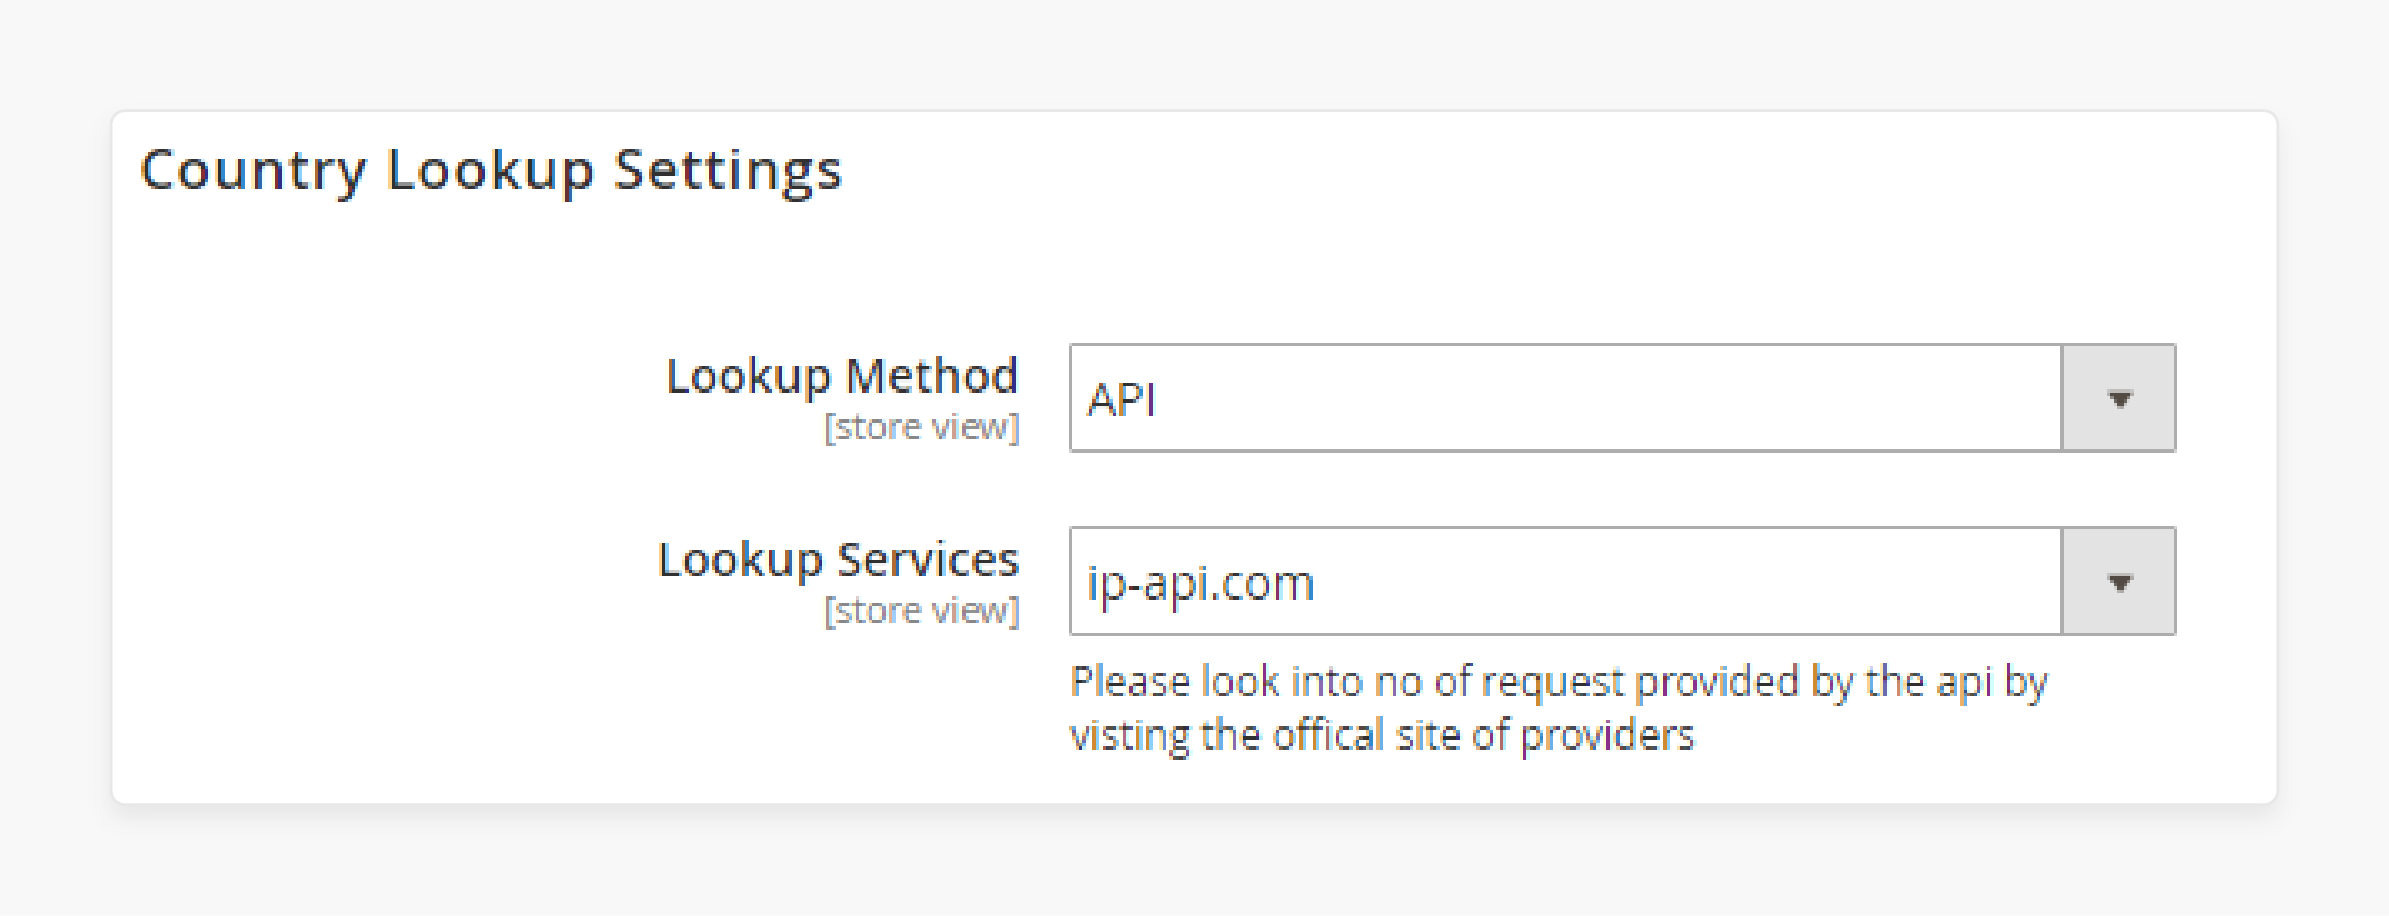
Select API under Lookup Method and select the service given below to get the country location.
-
Go to the GeoIP menu > Manage Country Mapping to view the country and the redirection location.
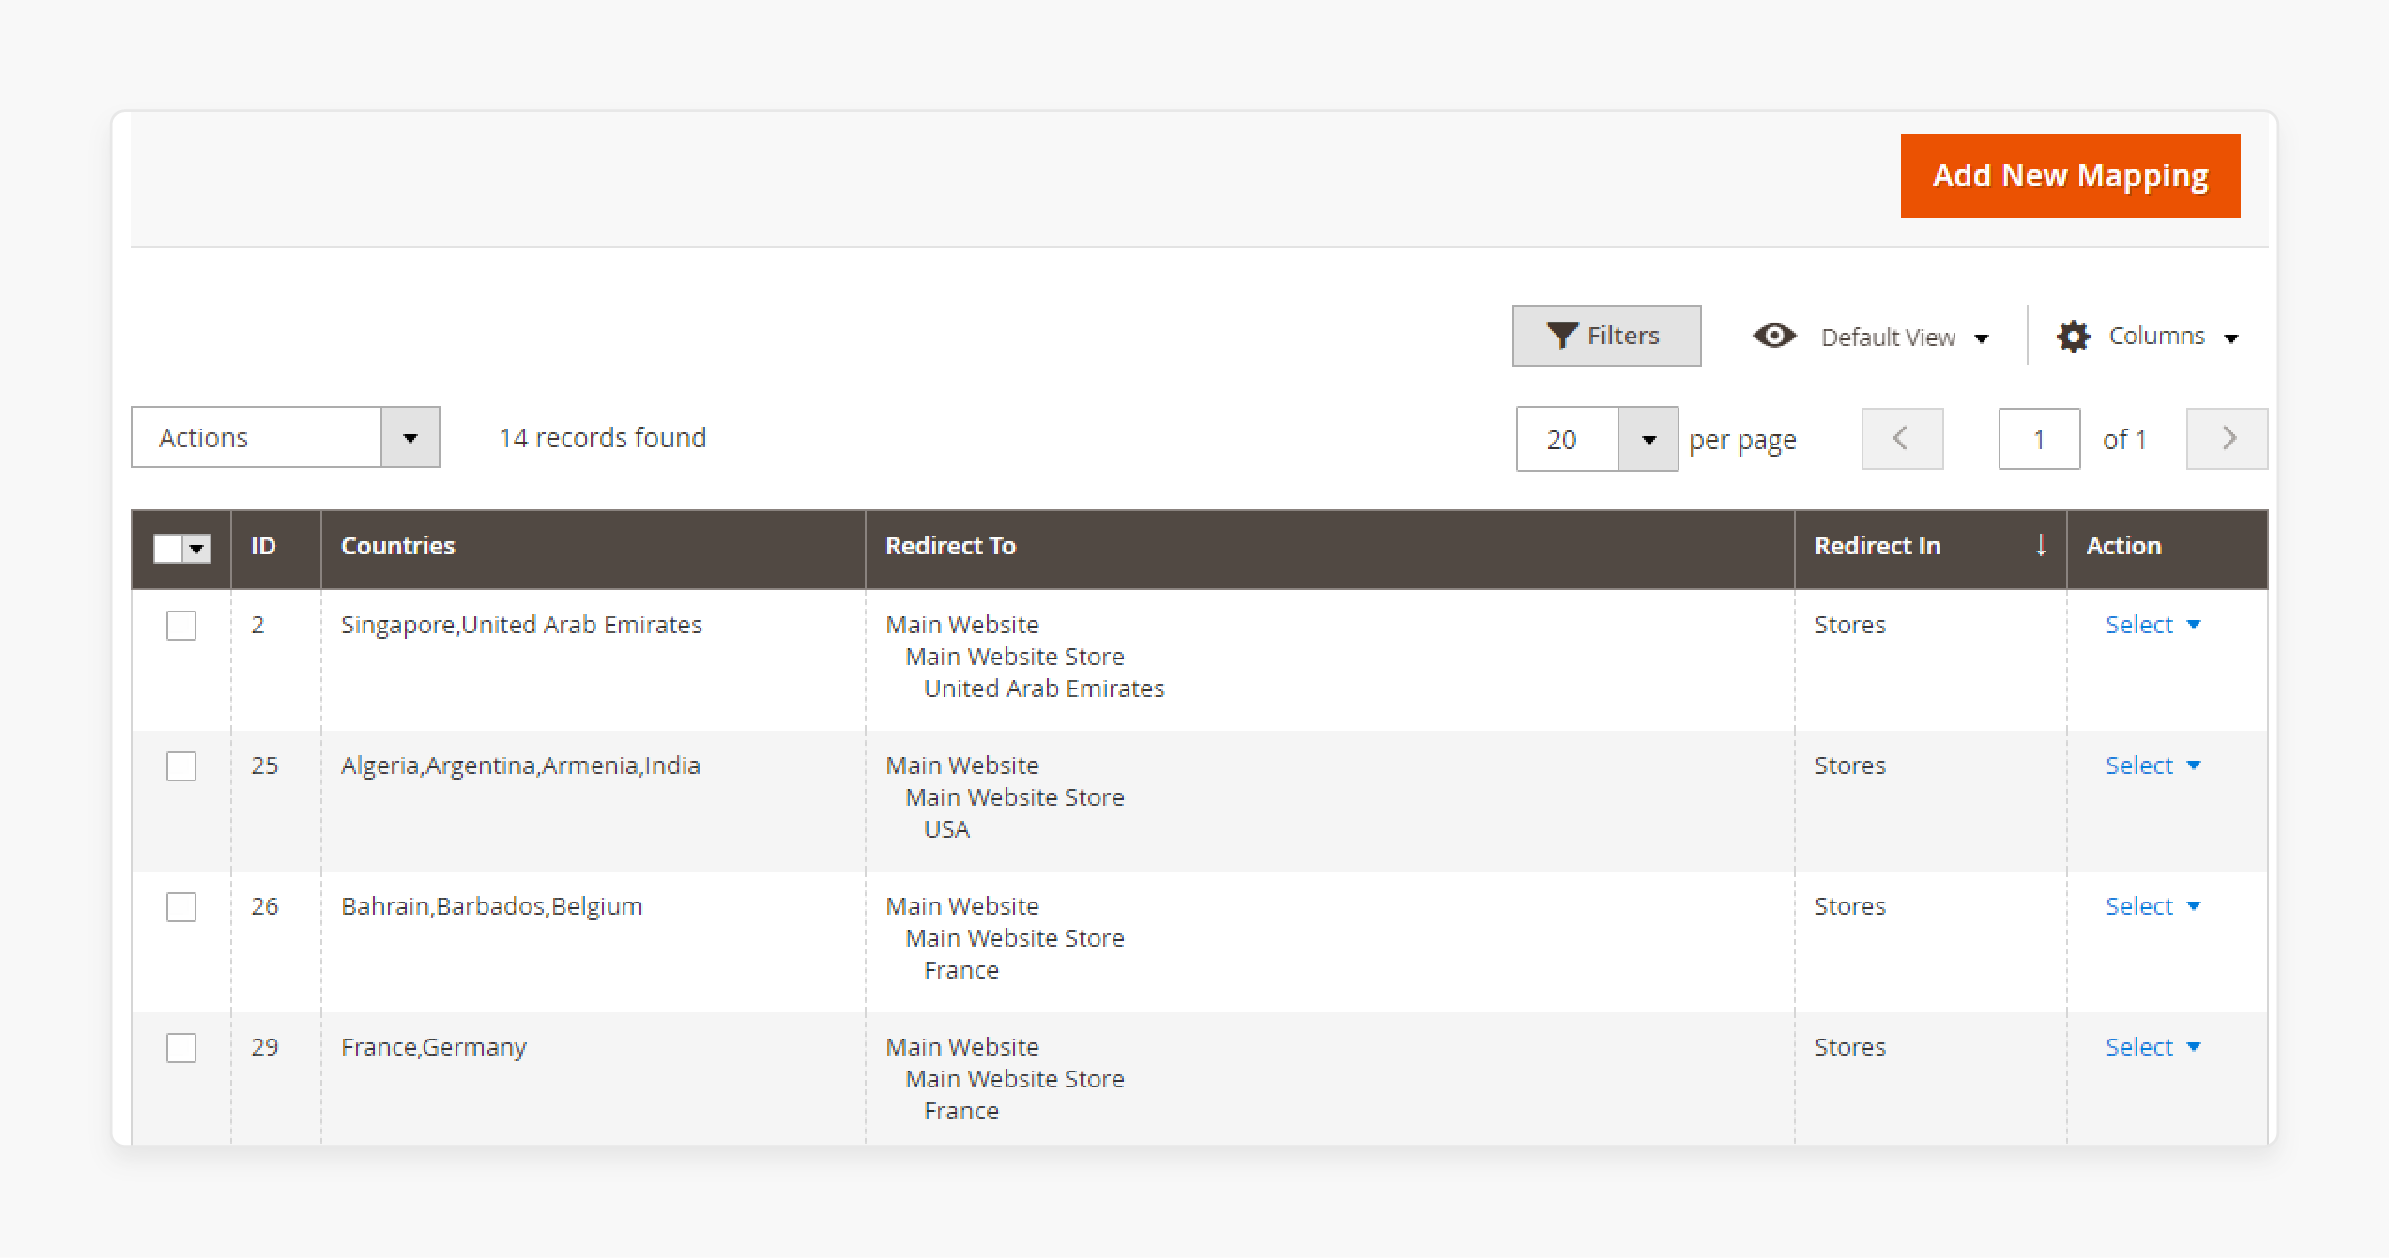
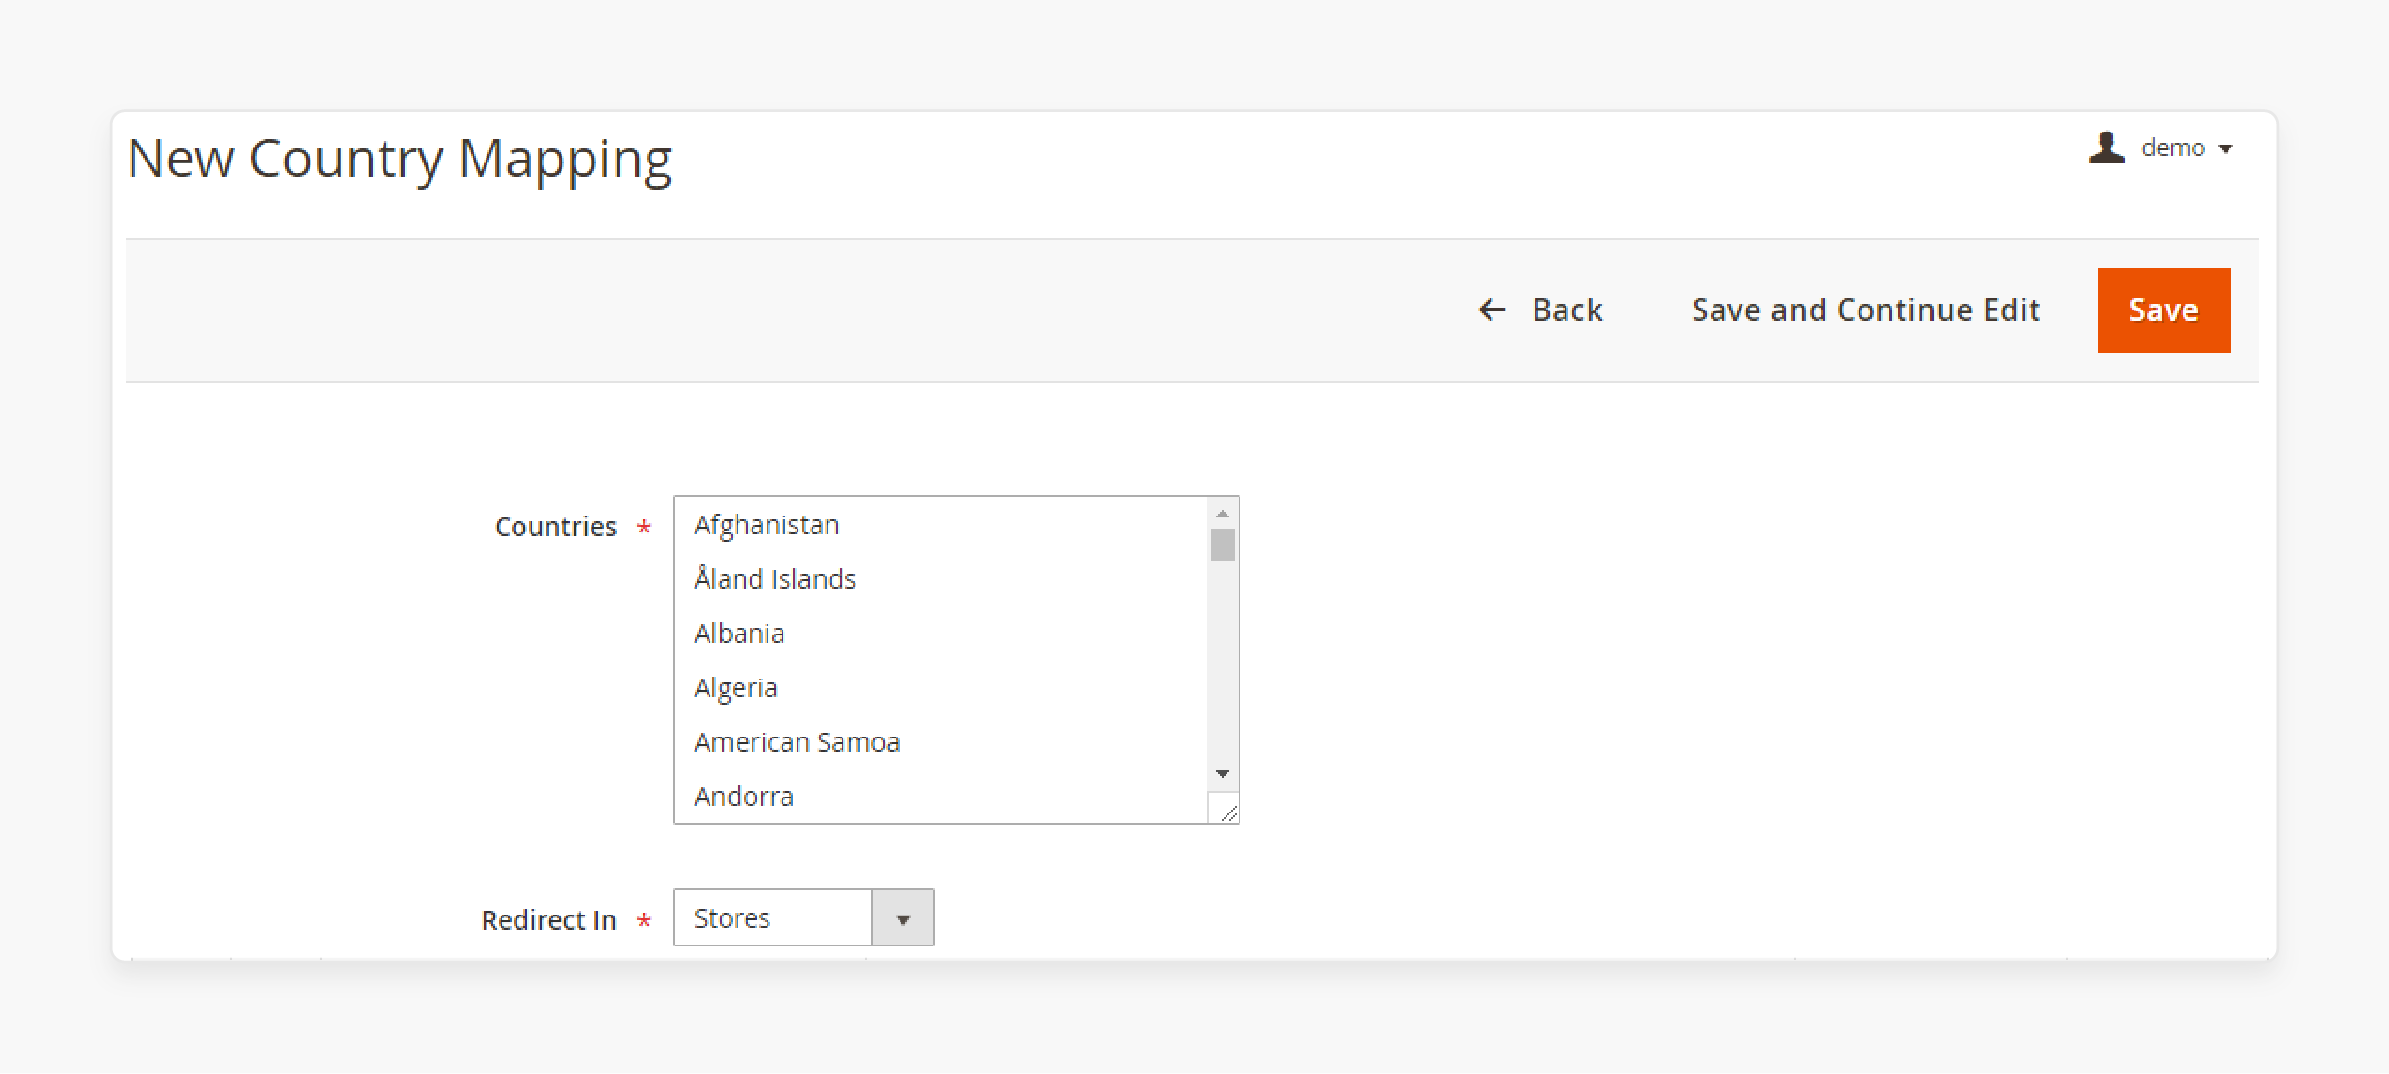
- Click Add New Mapping to include more countries to redirect and add the currency.
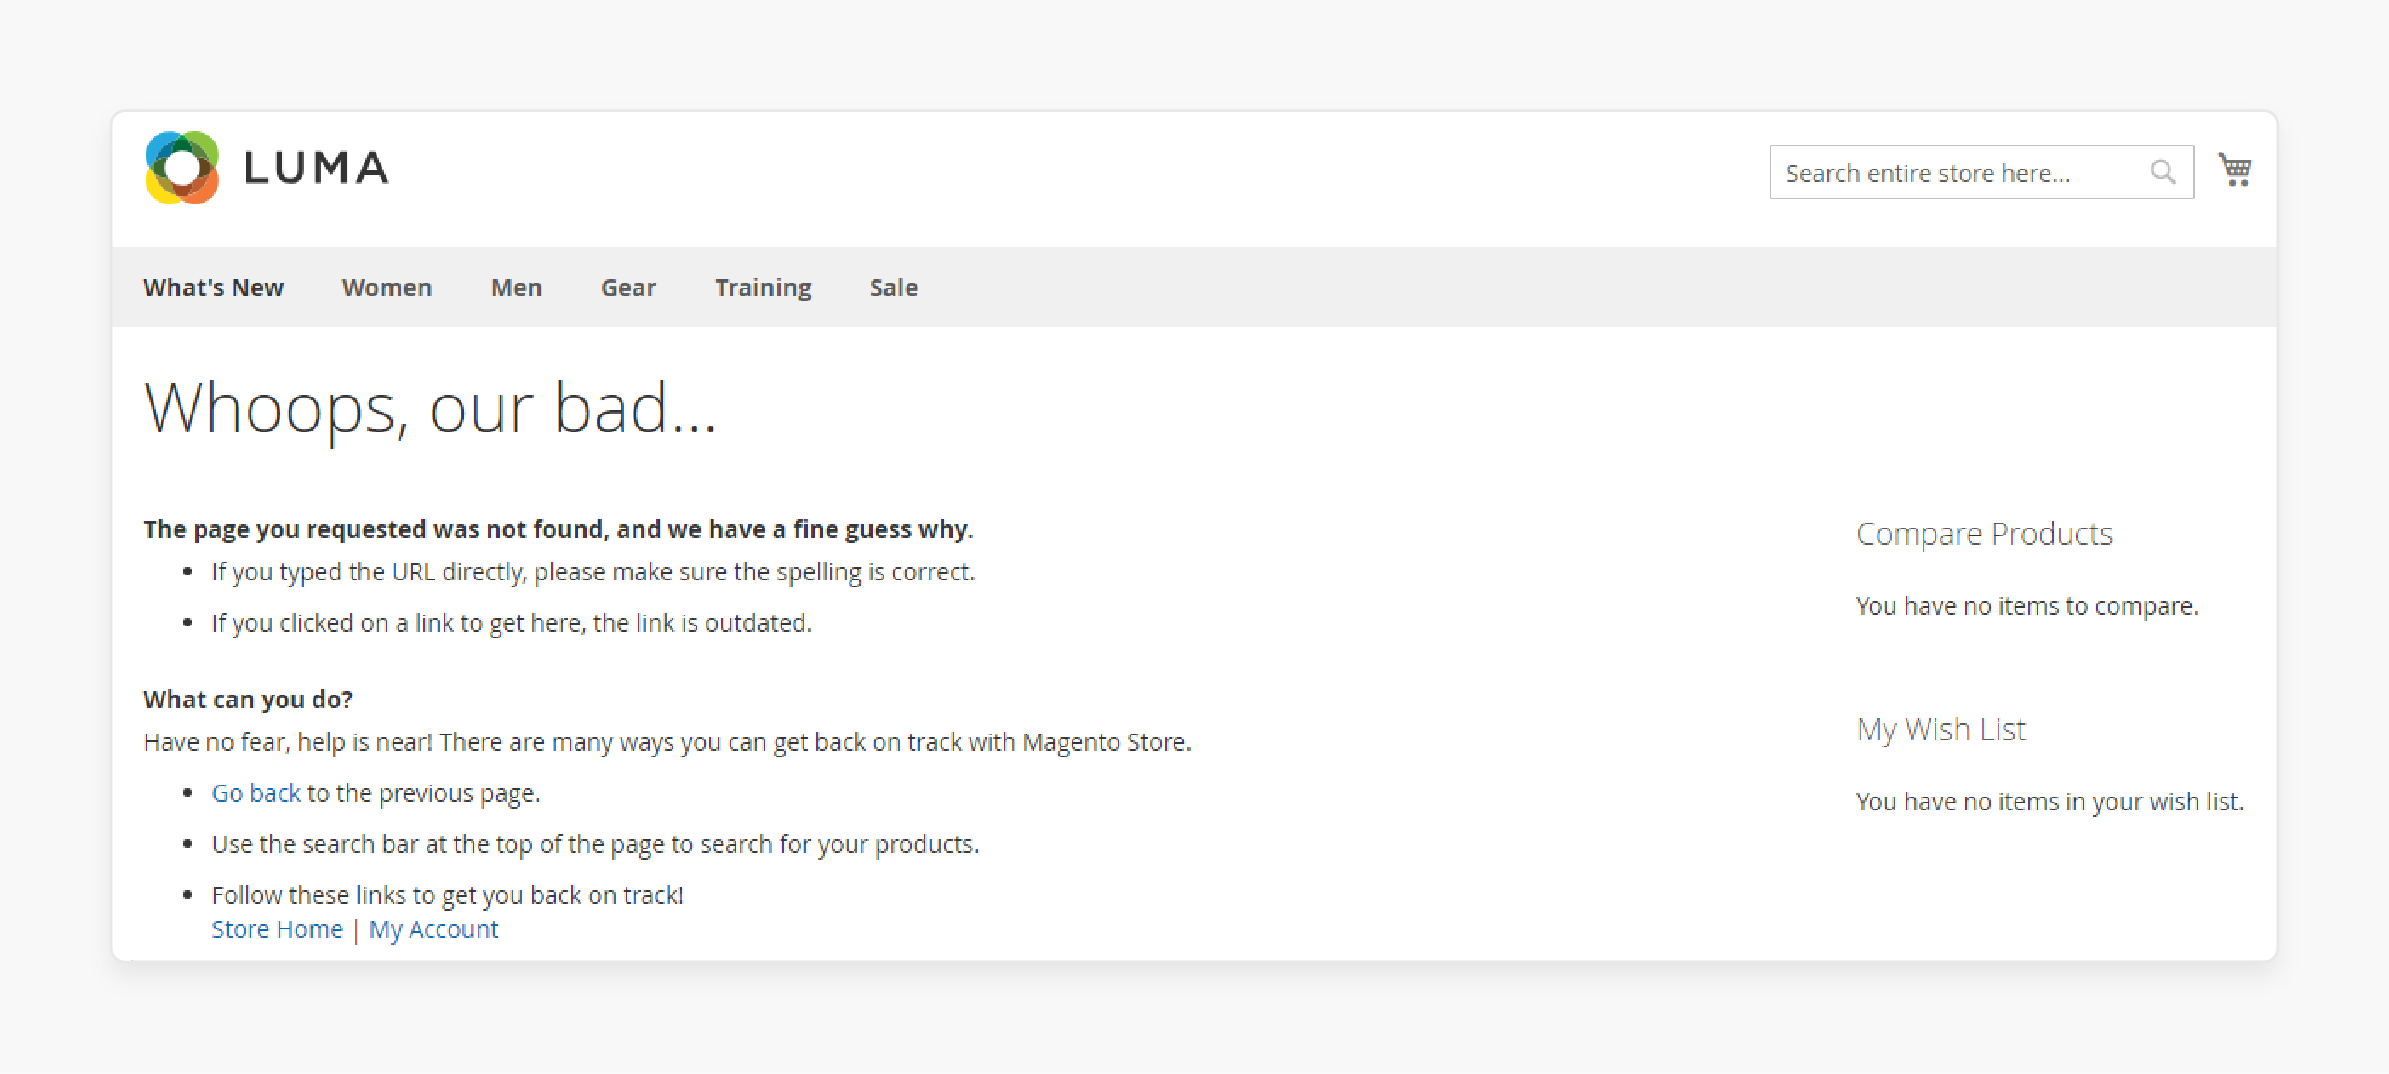

- View the frontend functionality on your website's homepage.
Troubleshooting Issues & Solutions for GeoIP Extension
| Issue | Solution |
|---|---|
| GeoIP data not importing properly | - Check if the import process is taking too long (over 20 mins). If so, increase the maximum execution time for PHP scripts. - Submit a ticket to the extension provider for assistance if the issue persists. |
| Links shared from other countries are not redirecting correctly | - Append the URI path to the redirect URL instead of just redirecting to the homepage. - Use the "Redirect From Home Page Only" option to avoid redirecting for internal links. |
| Varnish cache issues with GeoIP redirects | - Install the Varnish GeoIP module and configure Varnish to handle redirects. - Use a lightweight endpoint to fetch the X-Magento-Vary header and serve cached pages accordingly. - Implement custom logic to handle GeoIP redirects at the Varnish level. |
| Excluding certain IPs from redirection | - Use the extension's settings to specify IP addresses or ranges to exclude from GeoIP rules. - Create a custom "blocked" CMS page and redirect excluded IPs to that page. |
| Redirecting between websites vs store views | - Disable the "Redirect between Websites" option if you only want to redirect between store views. |
| Testing redirects for different countries | - Use a VPN service or IP anonymizer to change your perceived IP address and location. |
| CloudFlare compatibility issues | - Contact your system administrator or the extension provider for assistance. |
| Configuring country to store view mapping | - Follow the guide in the extension's documentation to configure the country-to-store view redirect rules. |
Best Practices for GeoIP Magento 2 Extension
1. Ensure Compatibility with IPv6
-
It's important to ensure the GeoIP store switcher is IPv6 compatible.
-
This means the extension can accommodate the increased demand for IPv6 addresses.
-
It can also provide accurate location detection for customers using IPv6.
2. Configure IP Exceptions
-
In some cases, you may want to exclude certain IP addresses or ranges from the GeoIP redirection rules.
-
The extension allows you to specify IP addresses wherein your store can ignore traffic from these exceptions.
3. Utilize a Reliable GeoIP Database
-
The accuracy of the GeoIP extension depends on the quality of the GeoIP database.
-
It's recommended to use a reputable database, such as MaxMind. It is to ensure accurate location detection.
4. Customize shipping and payment options
-
Restrict or customize shipping and payment options based on the customer's geographic location.
-
Offer region-specific shipping carriers, rates, and estimated delivery times.
-
Enable or disable certain payment methods depending on the customer's country to reduce fraud and improve conversion rates.
5. Ensure fast and accurate IP detection
-
Optimize your server's performance to ensure accurate IP detection for each customer.
-
Consider using a content delivery network (CDN) to speed up the IP detection process. It also improves the default Magento website loading times.
-
Implement caching mechanisms to reduce the number of IP lookups required.
6. Implement GeoIP Currency Switcher
-
Urge store admins to use the Magento 2 GeoIP currency switcher feature for customers.
-
It allows customers to access the store and view product prices in their local currency.
-
This way, the customers do not need to calculate or convert the prices into different currencies.
7. Handle exceptions and edge cases
-
Plan for scenarios where the GeoIP extension may not be able to detect a customer's location accurately.
-
This can happen due to various reasons, such as the use of proxy servers, VPNs, or outdated GeoIP databases.
-
Provide fallback options for cases where the IP address is unknown.
-
Allow customers to select their country or region if needed manually.
8. Comply with privacy laws and regulations
-
Ensure that your use of the GeoIP extension complies with relevant privacy laws like GDPR.
-
Provide clear information to customers about how their location data is being used and obtained.
-
Offer opt-out options for customers who do not wish to have their location detected.
9. Optimize pricing and tax settings
-
Magento 2 GeoIP extension allows you to adjust product prices and tax settings based on the location.
-
Set up different price lists and tax rules for different regions to comply with local regulations.
FAQs
1. How does the GeoIP Magento 2 extension detect a customer's location?
The GeoIP Magento 2 extension detects the customer's location based on their IP address. It redirects them to the suitable store view and currency automatically.
2. Can the GeoIP Magento 2 extension switch store view and currency?
Yes, the extension helps switch the store view and currency to match the customer's geographic location.
3. What are the main benefits of using the GeoIP redirect for Magento 2?
The GeoIP redirect extension assists store owners by directing customers to the relevant store view and currency.
4. Is the GeoIP store switcher extension compatible with IPv6?
Yes, the Magento 2 store switcher extension is IPv6 compatible. It means that the extension can accommodate the increased demand for IPv6 addresses.
5. How does the GeoIP for Magento 2 handle search engine traffic?
The GeoIP extension for Magento 2 can be configured to ignore search engine traffic. It ensures that SEO efforts are not affected and only human visitors are redirected.
Summary
The GeoIP Magento 2 extension is a useful tool that provides location-based shopping experiences for users. In this tutorial, we explained how to set up and configure the extension along with its best practices. Here is a quick summary:
-
Identify customer locations by IP to personalize their shopping experience.
-
Redirect customers to the relevant store view and adjust currency and language.
-
Allow configuration for redirects on the first visit or every visit and specific URLs.
-
Ignore search engine traffic to maintain SEO efforts and only redirect human visitors.
-
Ensure compliance with IPv6, privacy laws, and reliable GeoIP databases.
Choose managed Magento hosting to amplify sales using GeoIP extensions and powerful performance tools.


