Disable Wishlist Magento 2 in 5 Steps
Are you tired of unnecessary features cluttering your store? Disabling Wishlist Magento 2 is a quick way to improve your online store. It removes the add to the save feature from the listing and simplifies shopping.
This tutorial will cover disabling the wishlist and improving the customer experience.
Key Takeaways
-
Disabling the wishlist in Magento 2 makes your store simpler for customers.
-
10 reasons why removing the wishlist can accelerate shopping.
-
5 steps to disable the wishlist through settings.
-
Major impacts of disabling the wishlist in Adobe stores.
-
Resolve common issues that may happen after disabling the wishlist.
What is Disable Wishlist Magento 2?
Disable Wishlist Magento 2 is a process to turn off the built-in wishlist functionality in their online platform.
Disabling Wishlist Magento 2 means removing the wish list feature. A wish list lets customers save their saved items for future buys. The wishlist is a tool for customer engagement and special promotions. The ‘add to wishlist’ button is represented with a heart or star symbol on the item pages. The change has benefits, like simplifying the purchase experience and improving performance.
10 Main Reasons to Disable Wishlist in Magento 2
1. Simplifies the Shopping Experience
The wishlist button in Magento lets customers mark an item for future buy. It can distract them from buying. By choosing to remove the wishlist, you can avoid distractions. For example, flash-sale stores remove the save button. They make sure customers act quickly on deals. It prevents delays and increases changes during time-sensitive offers.
2. Improves Store Performance
Every feature in a store affects performance. The wishlist in an online store creates extra database queries. These queries slow down the site, especially on the item page and front end. For example, sellers with a wide range of products turn off the favorites feature. This improves page load times and ensures smooth shopping during busy periods.
3. Enhances Analytics and Decision-Making
Favorites can confuse analytics by showing items saved but not purchased. Disabling ensures you track only actual purchases. It helps you wisely choose inventory management and marketing plans. For example, subscription brands focus on actual sales data instead of wishlist activity. It allows them to create dynamic newsletter campaigns based on customers' purchases.
4. Reduces Feature Bloat
Not every store needs a tool that allows saving items for later. In many cases, the save button adds unnecessary clutter. Removing it makes the site simpler and easier to use. For example, minimalist brands choose to remove the wishlist. It helps their site stay clean, making it easier for customers to navigate and shop.
5. Aligns with Your Marketing Plan
Removing the wishlist allows you to focus on urgency-based marketing. Campaigns like back-in-stock alerts or limited-time discounts work better. For example, department stores use their promotion system to send personalized offers. Removing the save button lets them focus on strategies that encourage faster purchases.
6. Fits Business Models Focused on Immediate Purchases
Some businesses rely on customers to make fast decisions. Favorites can slow this process and encourage users to save items instead of purchasing them. For example, grocery platforms hide the favorites feature. It ensures customers order immediately, which fits their time-sensitive business model. By removing the wishlist, you encourage quicker purchases.
7. Reduces Complexity in the Server
Managing favorites creates extra work on the server. It includes maintaining the config.php file and monitoring saved items. Disabling this feature simplifies server operations, saving time and effort. For example, small stores with limited resources. It benefits from turning off the wishlist and reduces the need for maintenance services.
8. Prevents Customers from Forgetting Saved Items
Customers may forget about the items they saved when using a wishlist. This leads to missed sales opportunities. Disabling the wishlist encourages customers to buy items immediately. For example, fashion retailers turn off the wishlist and the feature for seasonal collections. It creates urgency and ensures customers act fast before items sell out.
9. Encourages Alternative Solutions
Favorites are not the only way to engage customers. Alternatives like loyalty rewards or limited-time discounts can drive better results. These methods motivate immediate purchases without relying on saved items. For example, furniture stores like IKEA use rewards programs and time-sensitive discounts. These strategies increase brand visibility and drive faster sales.
10. Focuses Attention on Core Features
Removing the wishlist lets your store emphasize features. It includes easy navigation and fast checkout. This improves the custom experience for users when completing purchases. For example, brands focus on features like virtual try-ons and simple checkout. By disabling the wishlist, they make sure customers focus on these essential tools.
5 Steps to Disable Wishlist Magento 2
Step 1: Log in to your dashboard in Magento 2.

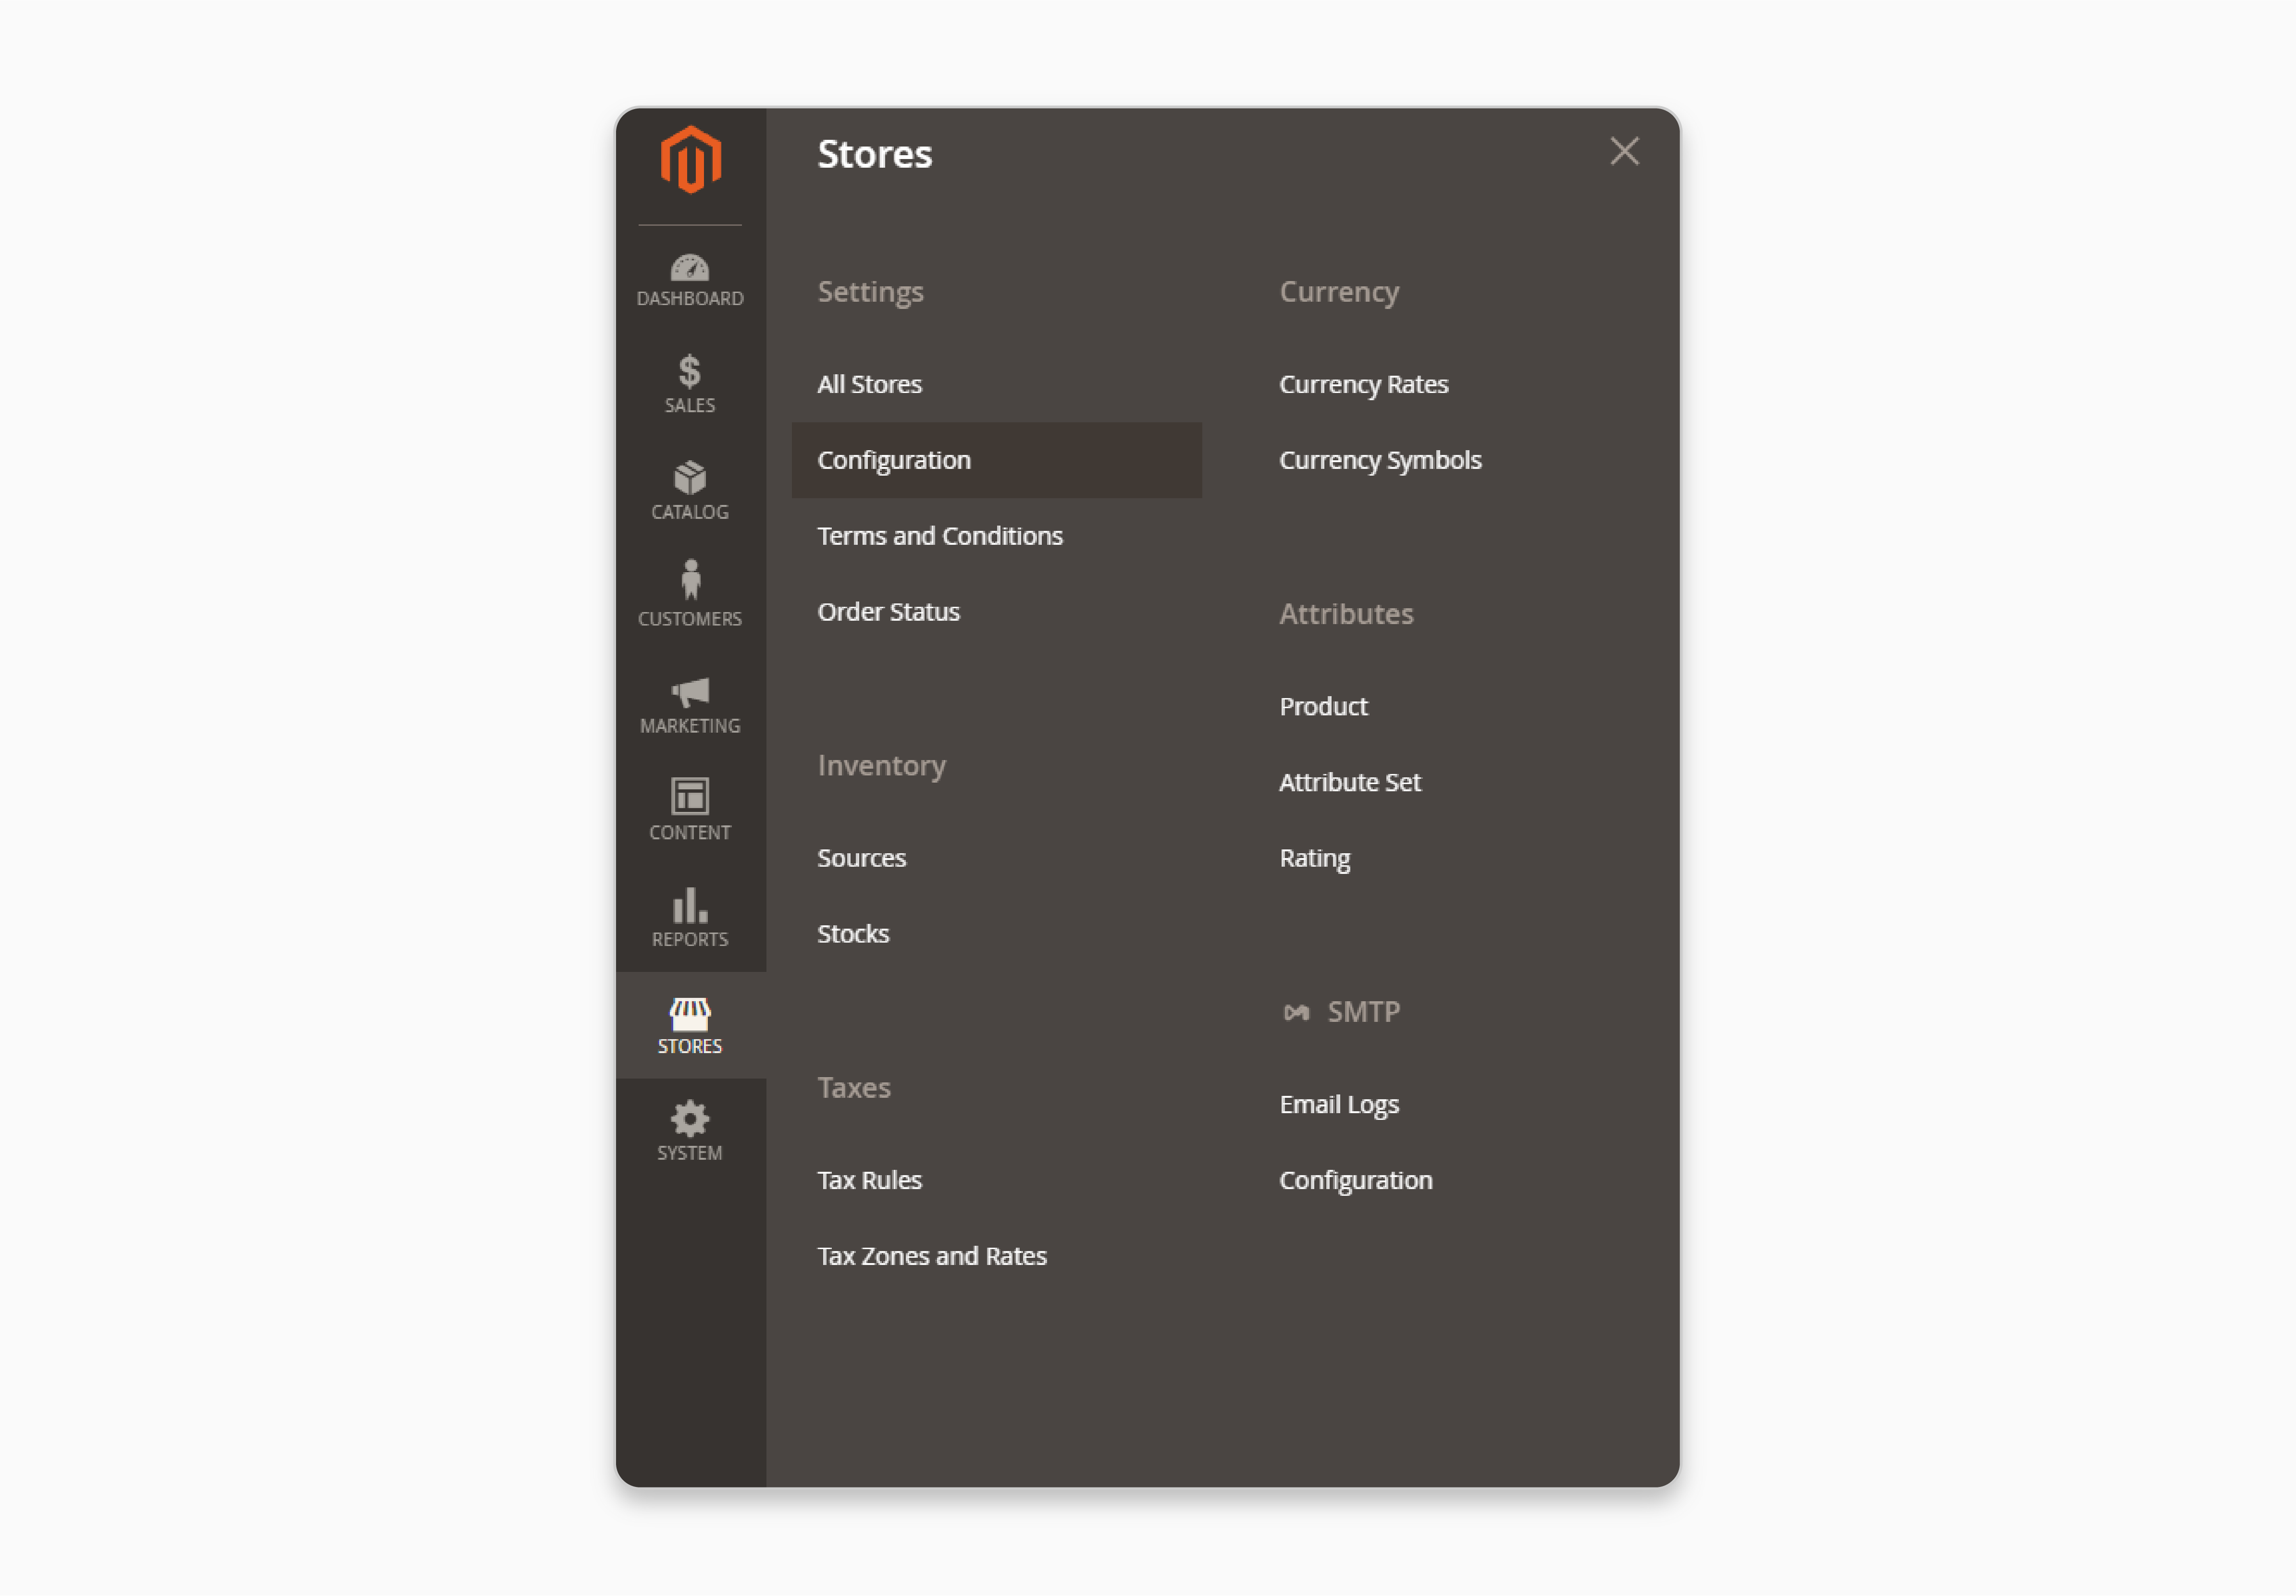
Step 2: In the backend, go to Stores and click Configuration under the Settings menu. It is where you can manage all store settings.

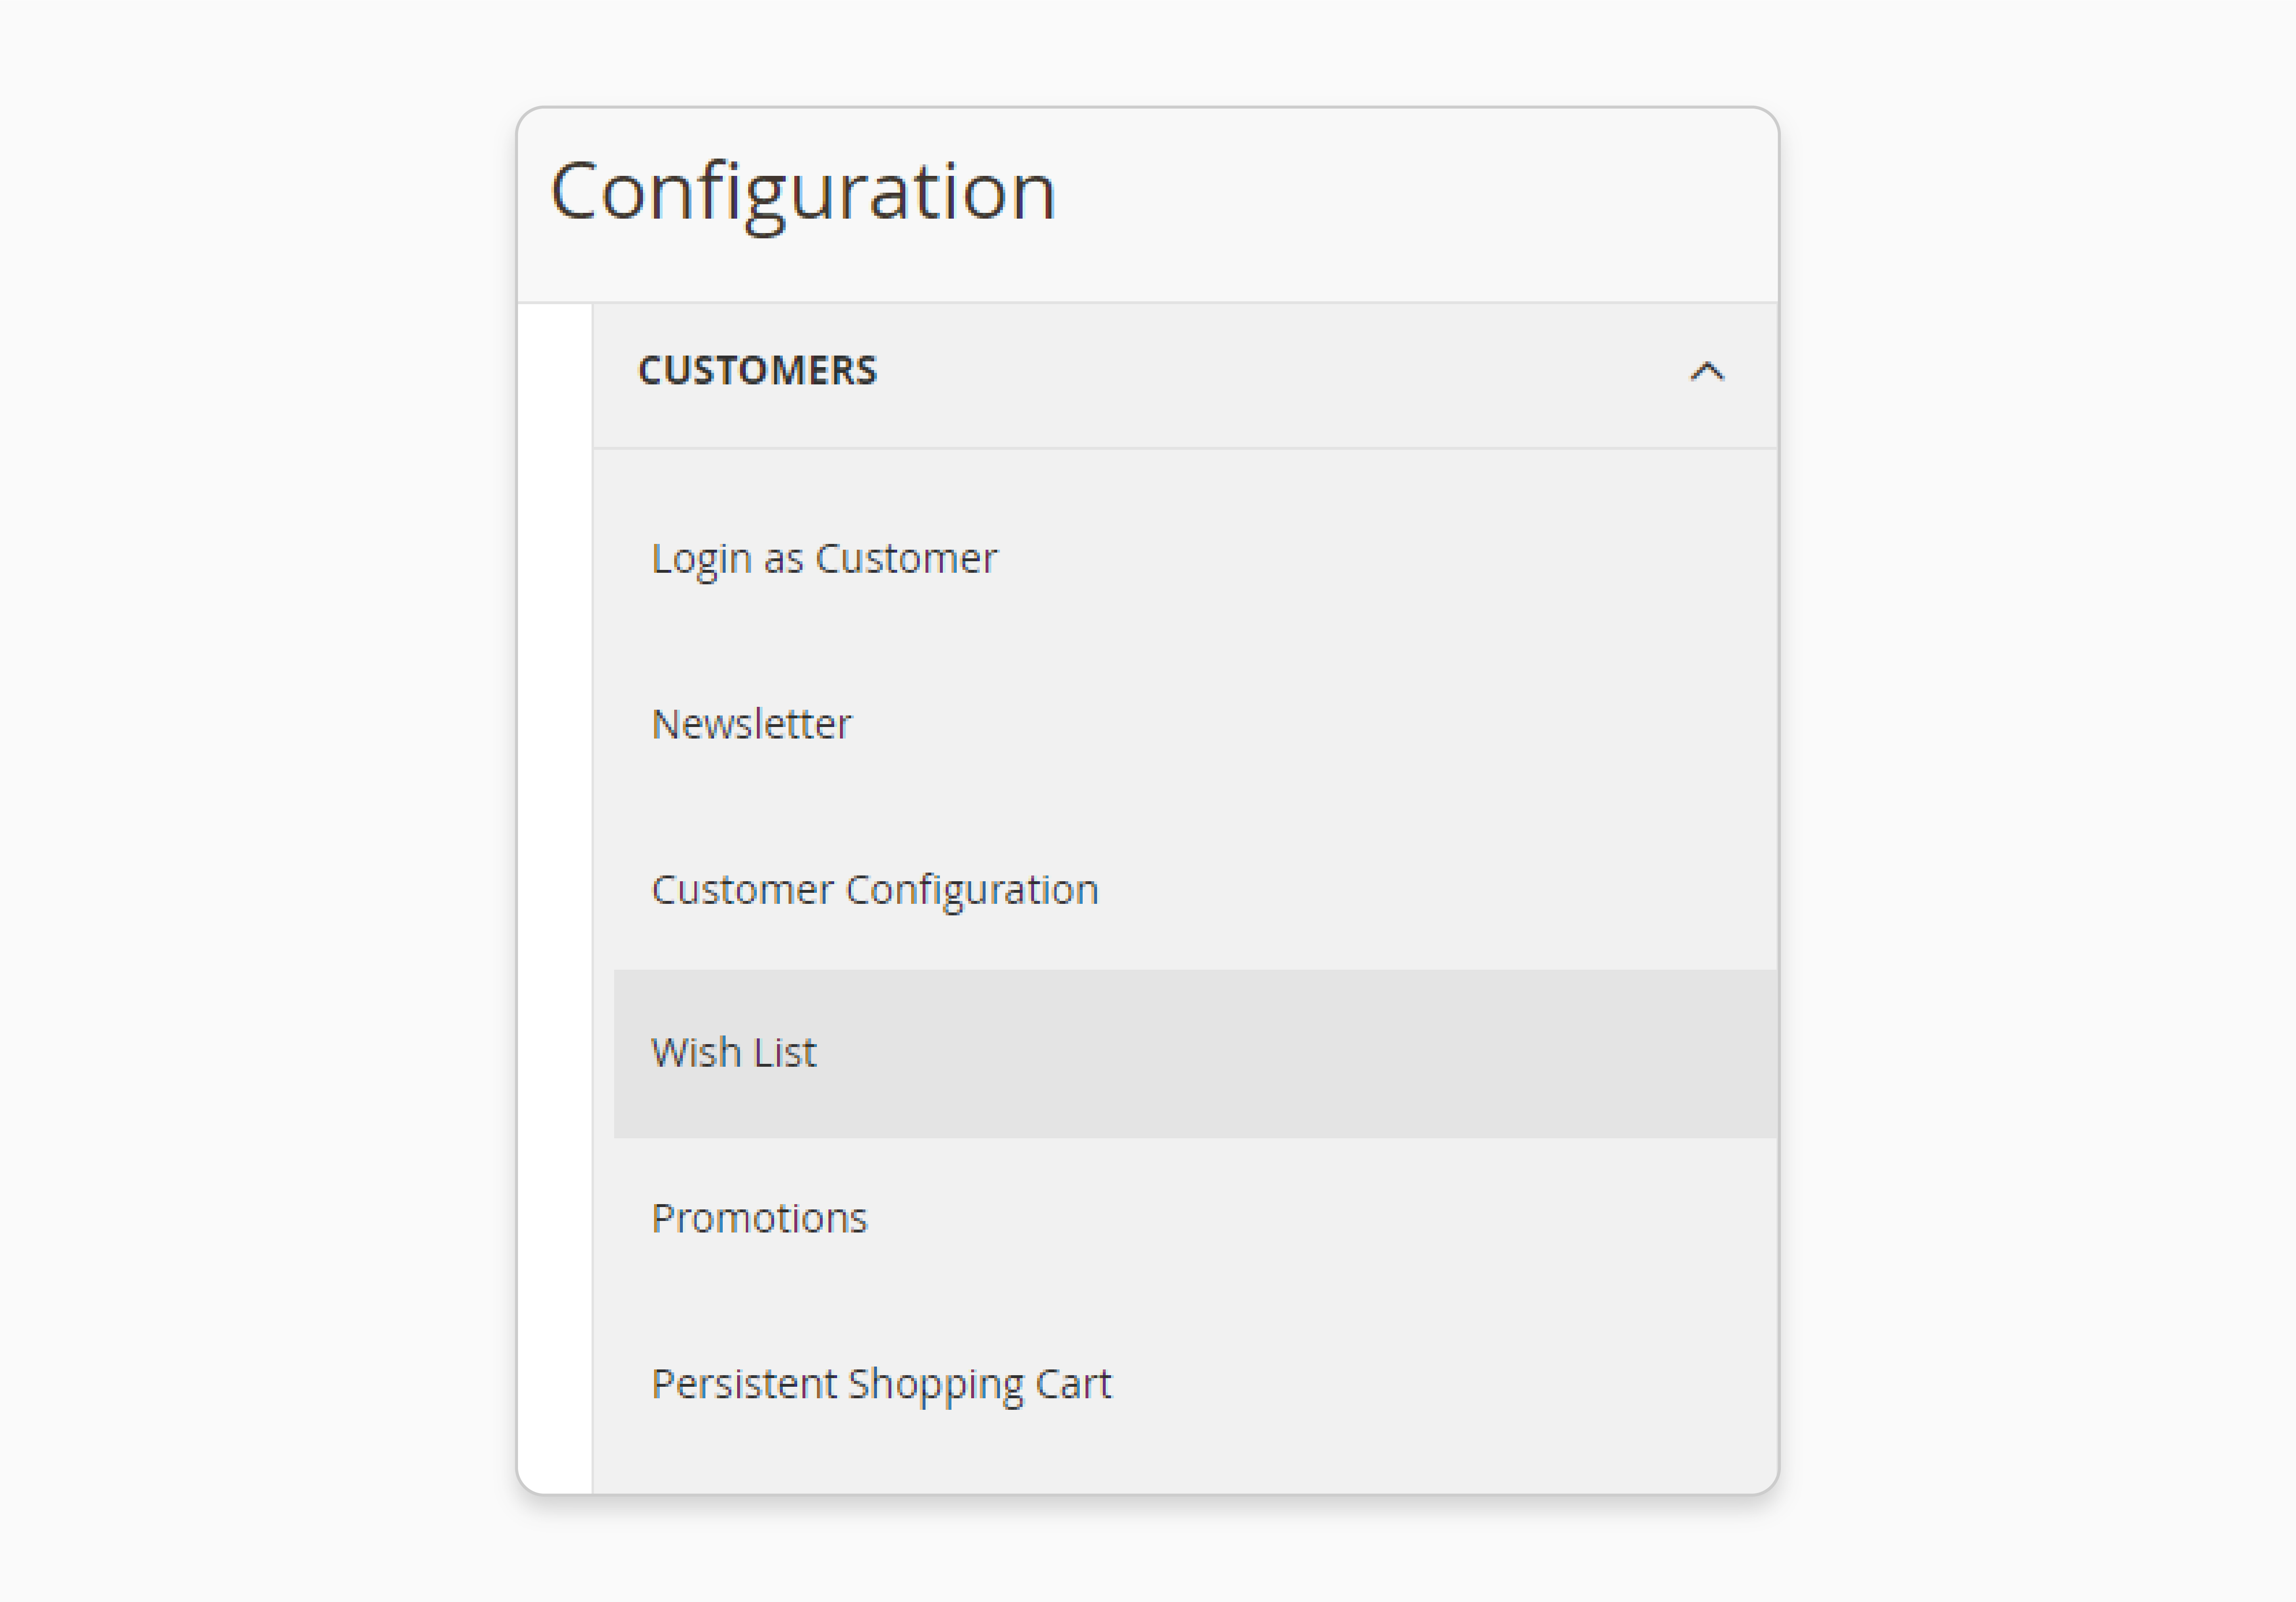
Step 3: Expand the Customers tab and click Wish List. Here, the wishlist is an option you can configure or disable.

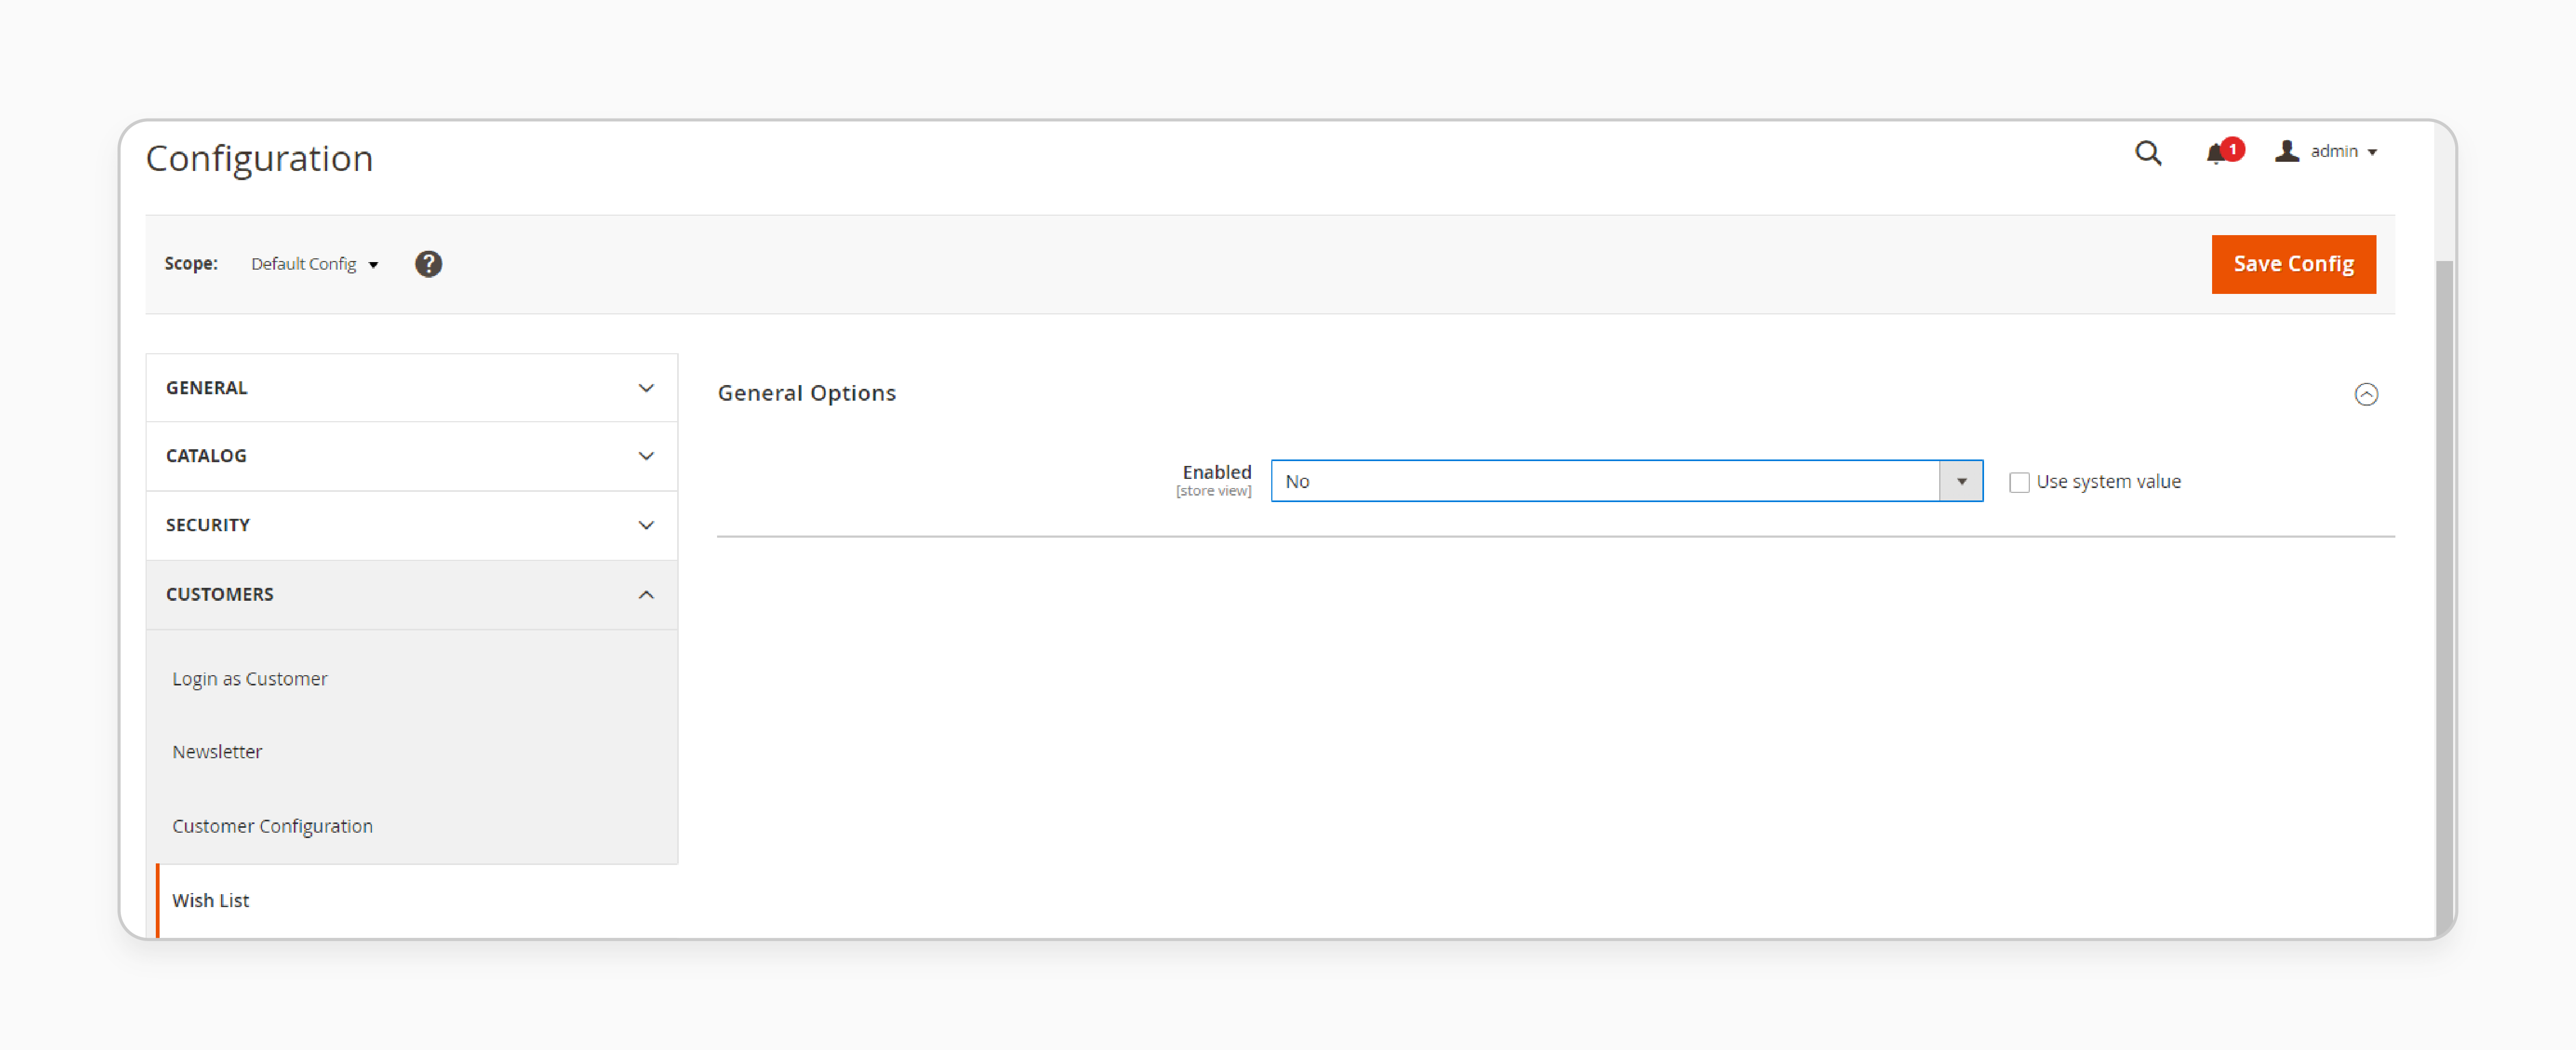
Step 4: Extend the General Options section. Untick the Use system value checkbox to edit the settings.
Step 5: Set Enabled to No. It will stop visitors from using the wishlist' button.
4 Steps to Disable Wishlist in Magento 2 Using Codes
Step 1: Create a file named default.xml in the following directory-
vendor/module/view/layout.
The file will contain the changes to remove wishlist functionality.
Step 2: Add the following code to the default.xml file:
<page xmlns:xsi="http://www.w3.org/2001/XMLSchema-instance" xsi:noNamespaceSchemaLocation="urn:magento:framework:View/Layout/etc/page_configuration.xsd"> <body> <referenceBlock name="wishlist_sidebar" remove="true" /> <referenceBlock name="view.addto.wishlist" remove="true" /> <referenceBlock name="category.product.addto.wishlist" remove="true" /> </body> </page>
The code removes wishlist-related sections. The sidebar represents the wishlist as the “add to wishlist” button.
Step 3: Run the following PHP command to reload the page:
php bin/magento cache:flush
Step 4: If you want to disable the wishlist in more areas, add this code:
<!-- Remove wishlist links and buttons --> <referenceBlock name="wish-list-link" remove="true"/> <referenceBlock name="catalogsearch.product.addto.wishlist" remove="true"/> <referenceBlock name="catalog.wishlist.sidebar" remove="true"/> <referenceBlock name="related.product.addto.wishlist" remove="true"/> <referenceBlock name="upsell.product.addto.wishlist" remove="true"/> <referenceBlock name="crosssell.product.addto.wishlist" remove="true"/> <referenceBlock name="customer-account-navigation-wish-list-link" remove="true"/> <!-- Disable wishlist actions based on product types --> <referenceBlock name="checkout.cart.item.renderers.default.actions.move_to_wishlist" remove="true"/> <referenceBlock name="checkout.cart.item.renderers.simple.actions.move_to_wishlist" remove="true"/> <referenceBlock name="checkout.cart.item.renderers.bundle.actions.move_to_wishlist" remove="true"/> <referenceBlock name="checkout.cart.item.renderers.downloadable.actions.move_to_wishlist" remove="true"/> <referenceBlock name="checkout.cart.item.renderers.grouped.actions.move_to_wishlist" remove="true"/> <referenceBlock name="checkout.cart.item.renderers.configurable.actions.move_to_wishlist" remove="true"/> <referenceBlock name="checkout.cart.item.renderers.virtual.actions.move_to_wishlist" remove="true"/> <!-- Disable wishlist email functionality --> <referenceBlock name="wishlist.email.items" remove="true"/>
The Downside of Magento 2 Wish List for Ecommerce Stores
1. Purchase Distraction
The “add to wishlist” button represents the wishlist. It lets users save items instead of purchasing them. The feature distracts users from purchasing. Instead of moving products to their cart, they save them for later. The behavior makes the CTA less effective.
Instead of driving changes, it encourages users to mark an item for later. For merchants focused on sales, it can be frustrating.
2. Forgotten Items
Many customers forget about the items they have saved on their wishlist. It creates missed sales opportunities. To counter this, you require a flexible promotion system. It helps to remind users about their wishlist items. These campaigns can re-engage users but need time. A well-planned config is necessary to run effective reminders.
7 Impacts of Disabling the Wishlist Functionality on Magento 2 Store Performance
| Impact | Details |
|---|---|
| Faster Load Times | Disabling the wishlist reduces database queries. Magento product listing on the front end loads faster. Customers enjoy smoother navigation and a better experience. |
| Clearer Analytics | Analytics focuses only on actual purchases instead of saved items. It helps merchants make better decisions about inventory and marketing. |
| Simpler Backend | Without wishlist functionality, it avoids processing or storing wishlist data. It saves server resources and makes store management simpler. |
| Fewer Personalization Tools | Without wishlist data, stores lose insights for targeted marketing. Stores with a promotion system in place may struggle to re-engage customers. |
| Better Customer Focus | Removing the save button eliminates distractions. Customers focus on adding items to their cart and completing purchases faster. |
| Reduced Engagement | Customers who use favorites to plan or compare products may feel less satisfied. Removing the feature can make shopping less engaging for these users. |
| Lower Server Strain | Wishlist actions load servers during peak traffic (i.e., sales events). Disabling the feature reduces strain and keeps the store responsive. |
Troubleshooting Common Issues After Wishlist Deactivation
1. Wishlist Buttons Still Visible
Issue: The “add to wishlist” button may still appear on the front end, even after disabling the wishlist.
Solution:
-
Ensure the wishlist is disabled in the Settings section of the config.
-
Verify that the default.xml file includes the code to remove favorites.
-
Run these Magento CLI to clear the cache and apply changes:
php bin/magento cache:flush php bin/magento setup:upgrade.
2. Cache Issues
Issue: Changes to disable the wishlist may not appear. This is because cached data is still in use.
Solution:
- Clear the Magento cache with the following command:
php bin/magento cache:flush.
- Clear your browser’s cache or test the store in incognito mode to see the updates.
3. Favorites Features in Email Templates
Issue: Emails like order confirmations or promotional messages may still include links.
Solution:
-
Update your email templates to remove wishlist-related content.
-
Replace wishlist links with a CTA. It includes directing users to product categories or the cart.
-
Ensure all automated campaigns are updated to reflect the wishlist deactivation.
4. Broken or Missing Links
Issue: Links to the wishlist in navigation menus may lead to broken pages or show missing elements.
Solution:
-
Confirm that all wishlist links are removed from the default.xml file.
-
Check third-party themes or modules that might still include wishlist references.
-
Redirect broken links to other active sections, such as the shopping cart or homepage.
5. Third-Party Module Conflicts
Issue: Third-party extensions or custom modules may rely on wishlist functionality. These modules may stop working after the wishlist is deactivated.
Solution:
-
Disable extensions one at a time to identify any conflicts.
-
Contact the module developer for support or check for compatibility with wishlist deactivation.
-
Replace conflicting modules with ones that don’t depend on the wishlist if necessary.
6. Wishlist Sidebar Still Appearing
Issue: The wishlist sidebar may still appear on the front end, even after the feature is disabled.
Solution:
- Add the following code to the default.xml file to remove the sidebar:
<referenceBlock name="wishlist_sidebar" remove="true" />.
- Flush the cache using CLI commands to apply the changes.
- Verify if the sidebar is being re-added by your theme. The third-party module makes necessary adjustments.
7. Residual Wishlist Database Entries
Issue: Even after disabling the wishlist, old wishlist data may remain in the database. This can waste storage space or cause Magento errors.
Solution:
-
Review wishlist-related tables in the database to ensure they are no longer active.
-
Back up your database before cleaning up unnecessary wishlist entries.
-
Avoid deleting data directly without testing in a staging environment to prevent issues.
FAQs
1. Can the “add to wishlist” button be removed through code?
You can remove it with code. Create a default.xml file in the vendor/module/view/layout directory. Add code to remove “add to wishlist” elements like the sidebar and buttons. Use the command line to flush the cache and apply the changes.
2. Does disabling the wishlist improve the speed of stores?
Disabling the wishlist reduces database queries that slow down pages. It improves speed and is noticeable in high-traffic areas. A faster store creates a smoother purchase experience for customers.
3. Can the wishlist be re-enabled after being disabled?
Merchants are permanently deactivated or re-enabled on the wishlist. Go to settings in the admin panel and set Enabled to Yes. The flexibility lets you adjust features based on your business needs.
4. Does disabling the wishlist eliminate the ability to save items?
Removing the wishlist stops customers from saving items for later. You can use alternatives like loyalty rewards, exclusive discounts, or email alerts. These methods maintain engagement while encouraging immediate purchases.
5. What are the coding steps to completely remove the wishlist?
Create a default.xml file in the layout directory. Add code to disable favorite buttons, links, and features. To apply these changes, run a cache flush command from the command line. It will remove the wishlist from all sections.
6. Why should a merchant consider disabling the wishlist?
If customers want to buy items quickly, the wishlist can be blocked by delaying decisions. Disabling it encourages immediate purchases and aligns better with business models. It also focused on fast-moving products or direct sales.
Summary
Disable Wishlist Magento 2 removes the save feature from online stores. It removes the “add to wishlist” button on listings. This makes shopping easier and improves store speed. It helps businesses that rely on fast customer decisions and direct sales.
Consider the following reasons to disable:
-
Disabling the wishlist removes distractions and simplifies the shopping experience for customers.
-
Turning off the wishlist reduces database queries and improves the store's performance.
-
Removing the wishlist pushes customers to make faster buying decisions.
Explore Magento hosting services to disable your wishlist and simplify your store easily.


