
How to Set up an AWS Cloudfront service with Magento?
AWS CloudFront CDN is a useful tool for improving your Magento site’s performance. Website speed and quality of user experience define the success of your online business. A latency on your Magento e-commerce website equals low sales and revenue. On the other hand, using a content delivery network (CDN) helps fine-tuning your Magento site. It allows the creation of a responsive and secure website that attracts more customers. Let’s look at the Magento 2 Amazon Cloudfront CDN configuration process.
Key Takeaways
-
Configuring Cloudfront CDN for Magento 2 can significantly improve the performance of your Magento website.
-
DNS configuration, CNAMEs, and SSL certificates are crucial for a successful CDN setup.
-
By using Amazon CloudFront CDN, you can reach customers worldwide.
-
Your Magento website’s content is cached in different locations, ensuring fast access for all users.
-
Follow step-by-step instructions to configure AWS CloudFront for your Magento site.
What is Amazon CloudFront CDN and Why Use It in a Magento 2 store?
Amazon CloudFront content delivery network or CDN is a network of servers. The servers store copies of your website data. When a user visits your site, the CDN provides relevant data from the closest server. It helps your website load fast, regardless of the users’ location.
A CDN has a global network of data centers or edge locations, and it accelerates the delivery of static and dynamic content. A fast-loading Magento site helps improve the performance and reach of a business. Amazon CloudFront CDN allows Magento store owners to enhance their website's performance and provide a better customer experience.
Steps to Set Up AWS CloudFront CDN in Magento 2
There are four aspects of a successful CloudFront CDN configuration:
- DNS configuration
- CDN configuration
- Web server configuration
- Magento configuration
The following steps will guide you through configuring the Amazon CloudFront CDN for your Magento site:
Step 1: Create an AWS account
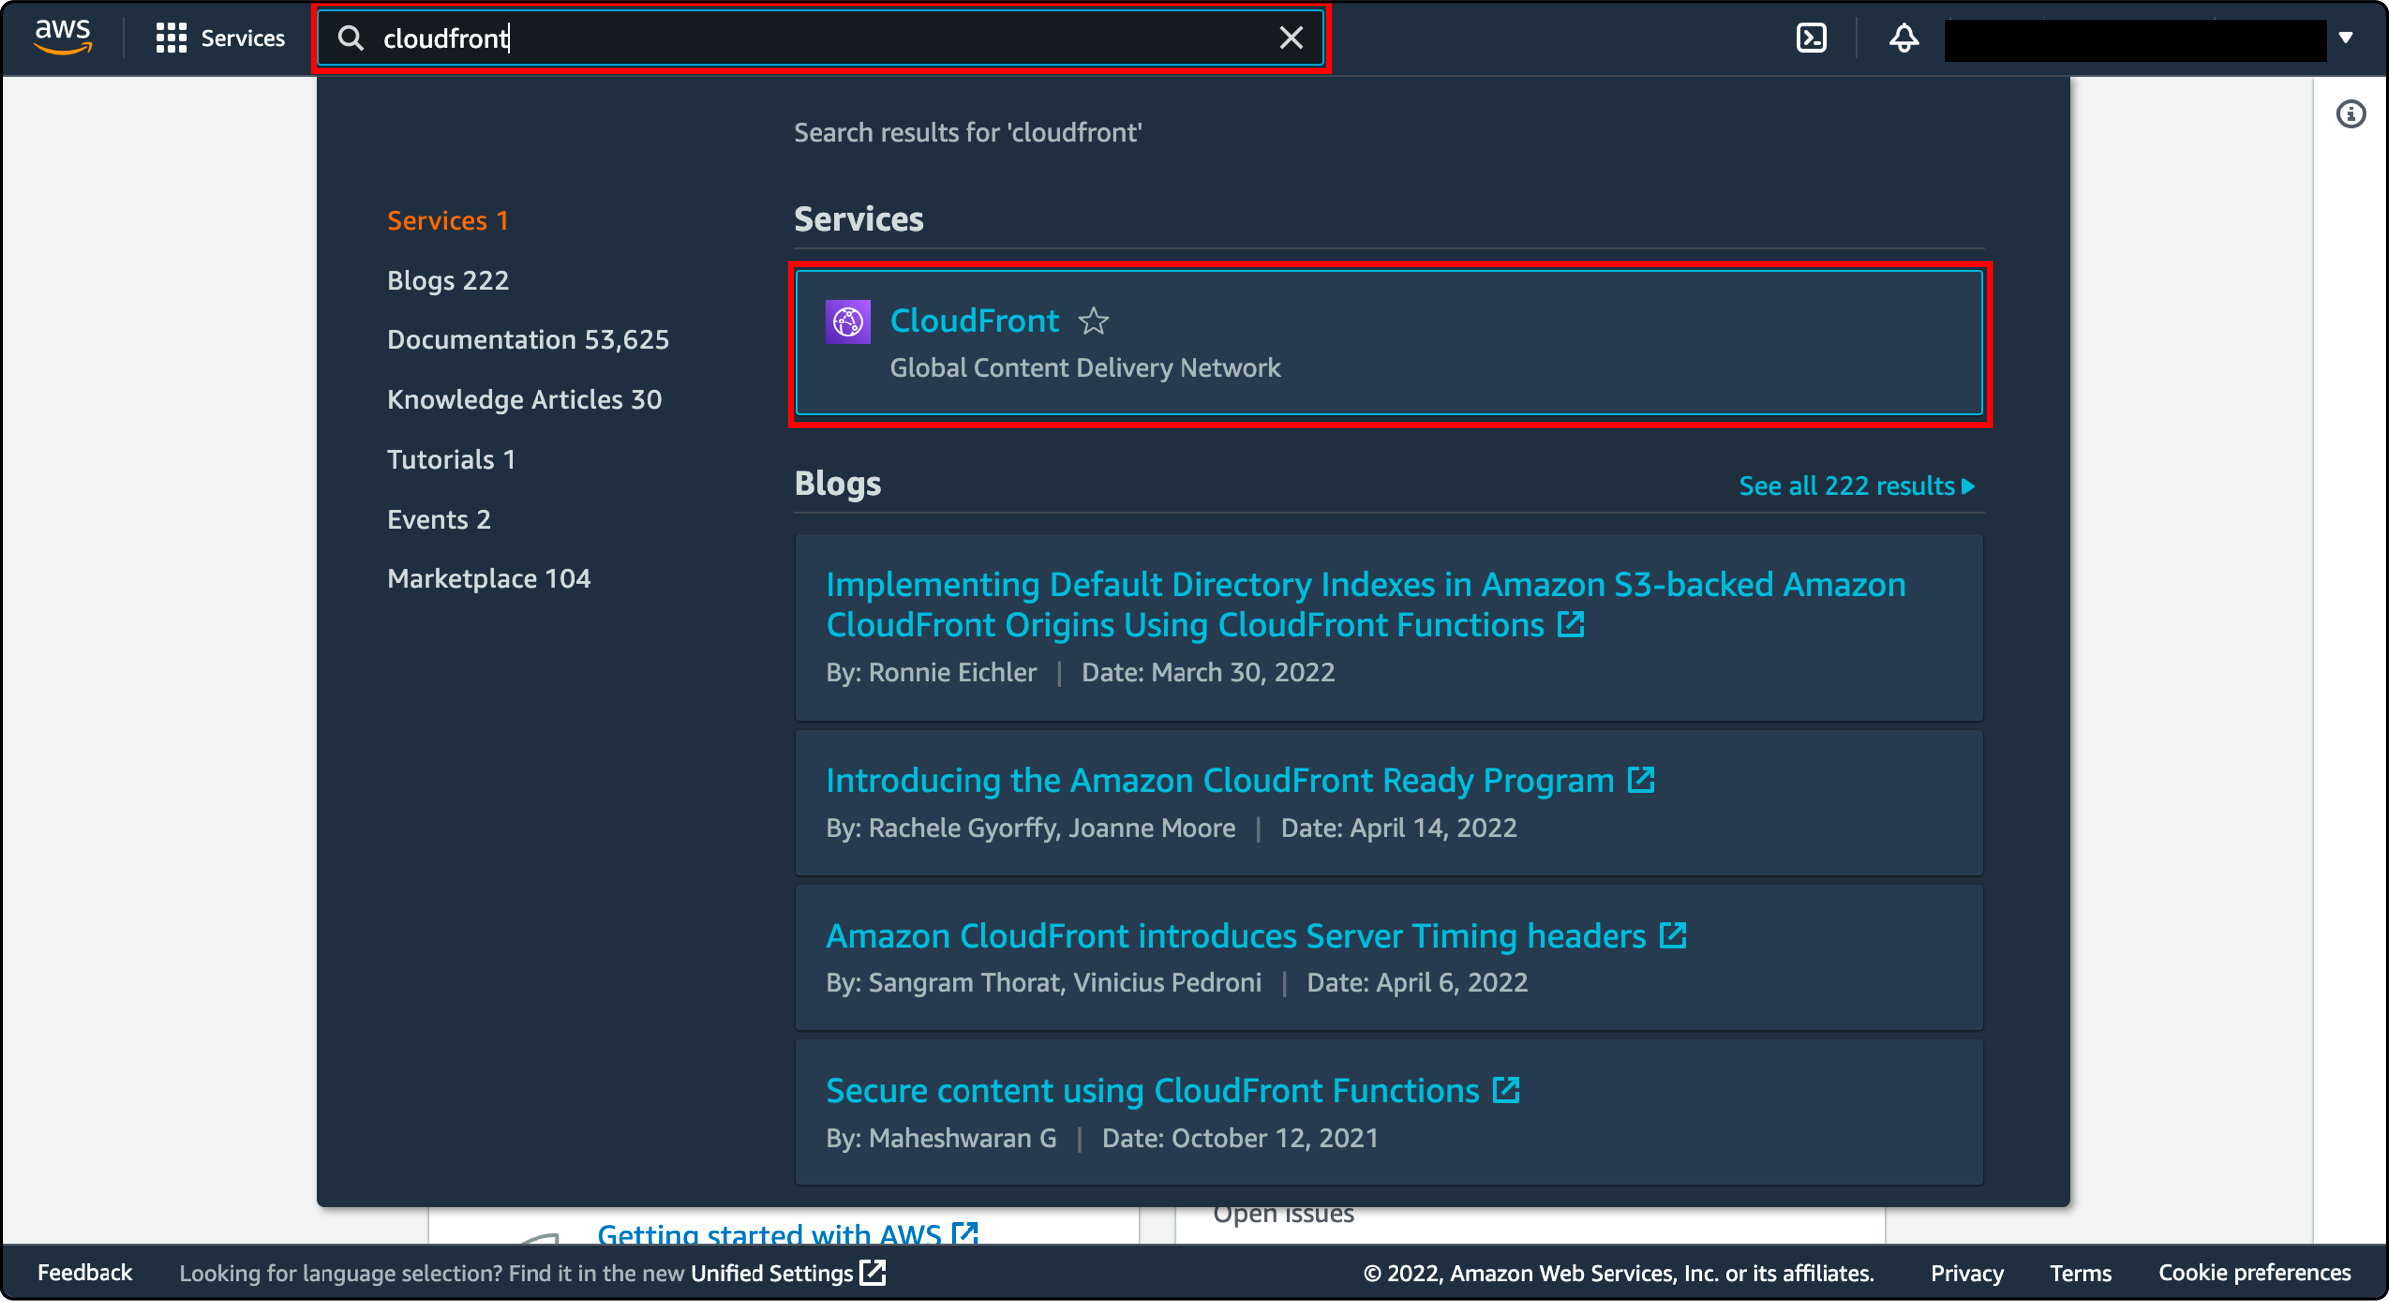
An Amazon Web Services (AWS) account will give you access to the CloudFront service and allow you to configure the distribution. It's important to note that AWS services like CloudFront provide high-security measures, ensuring a secure environment for your e-commerce website.
Creating an AWS account involves providing basic information and setting up your payment method. Sign up for your AWS account at https ://aws.amazon.com/. Activate your account and enter your card details in the payment section. Once the sign-up is complete, expand the Service menu and choose CloudFront.
Step 2: Setting up Distributions
Setting up distributions in Amazon CloudFront is the first step in configuring the CDN. You can edit the General settings as per requirements. To set up distributions:
-
Click the Create Distribution button in your AWS CloudFront panel.
-
Then, choose a delivery method (Web or RTMP) for distribution on your Magento site. Click on the ‘Get Started’ button.
-
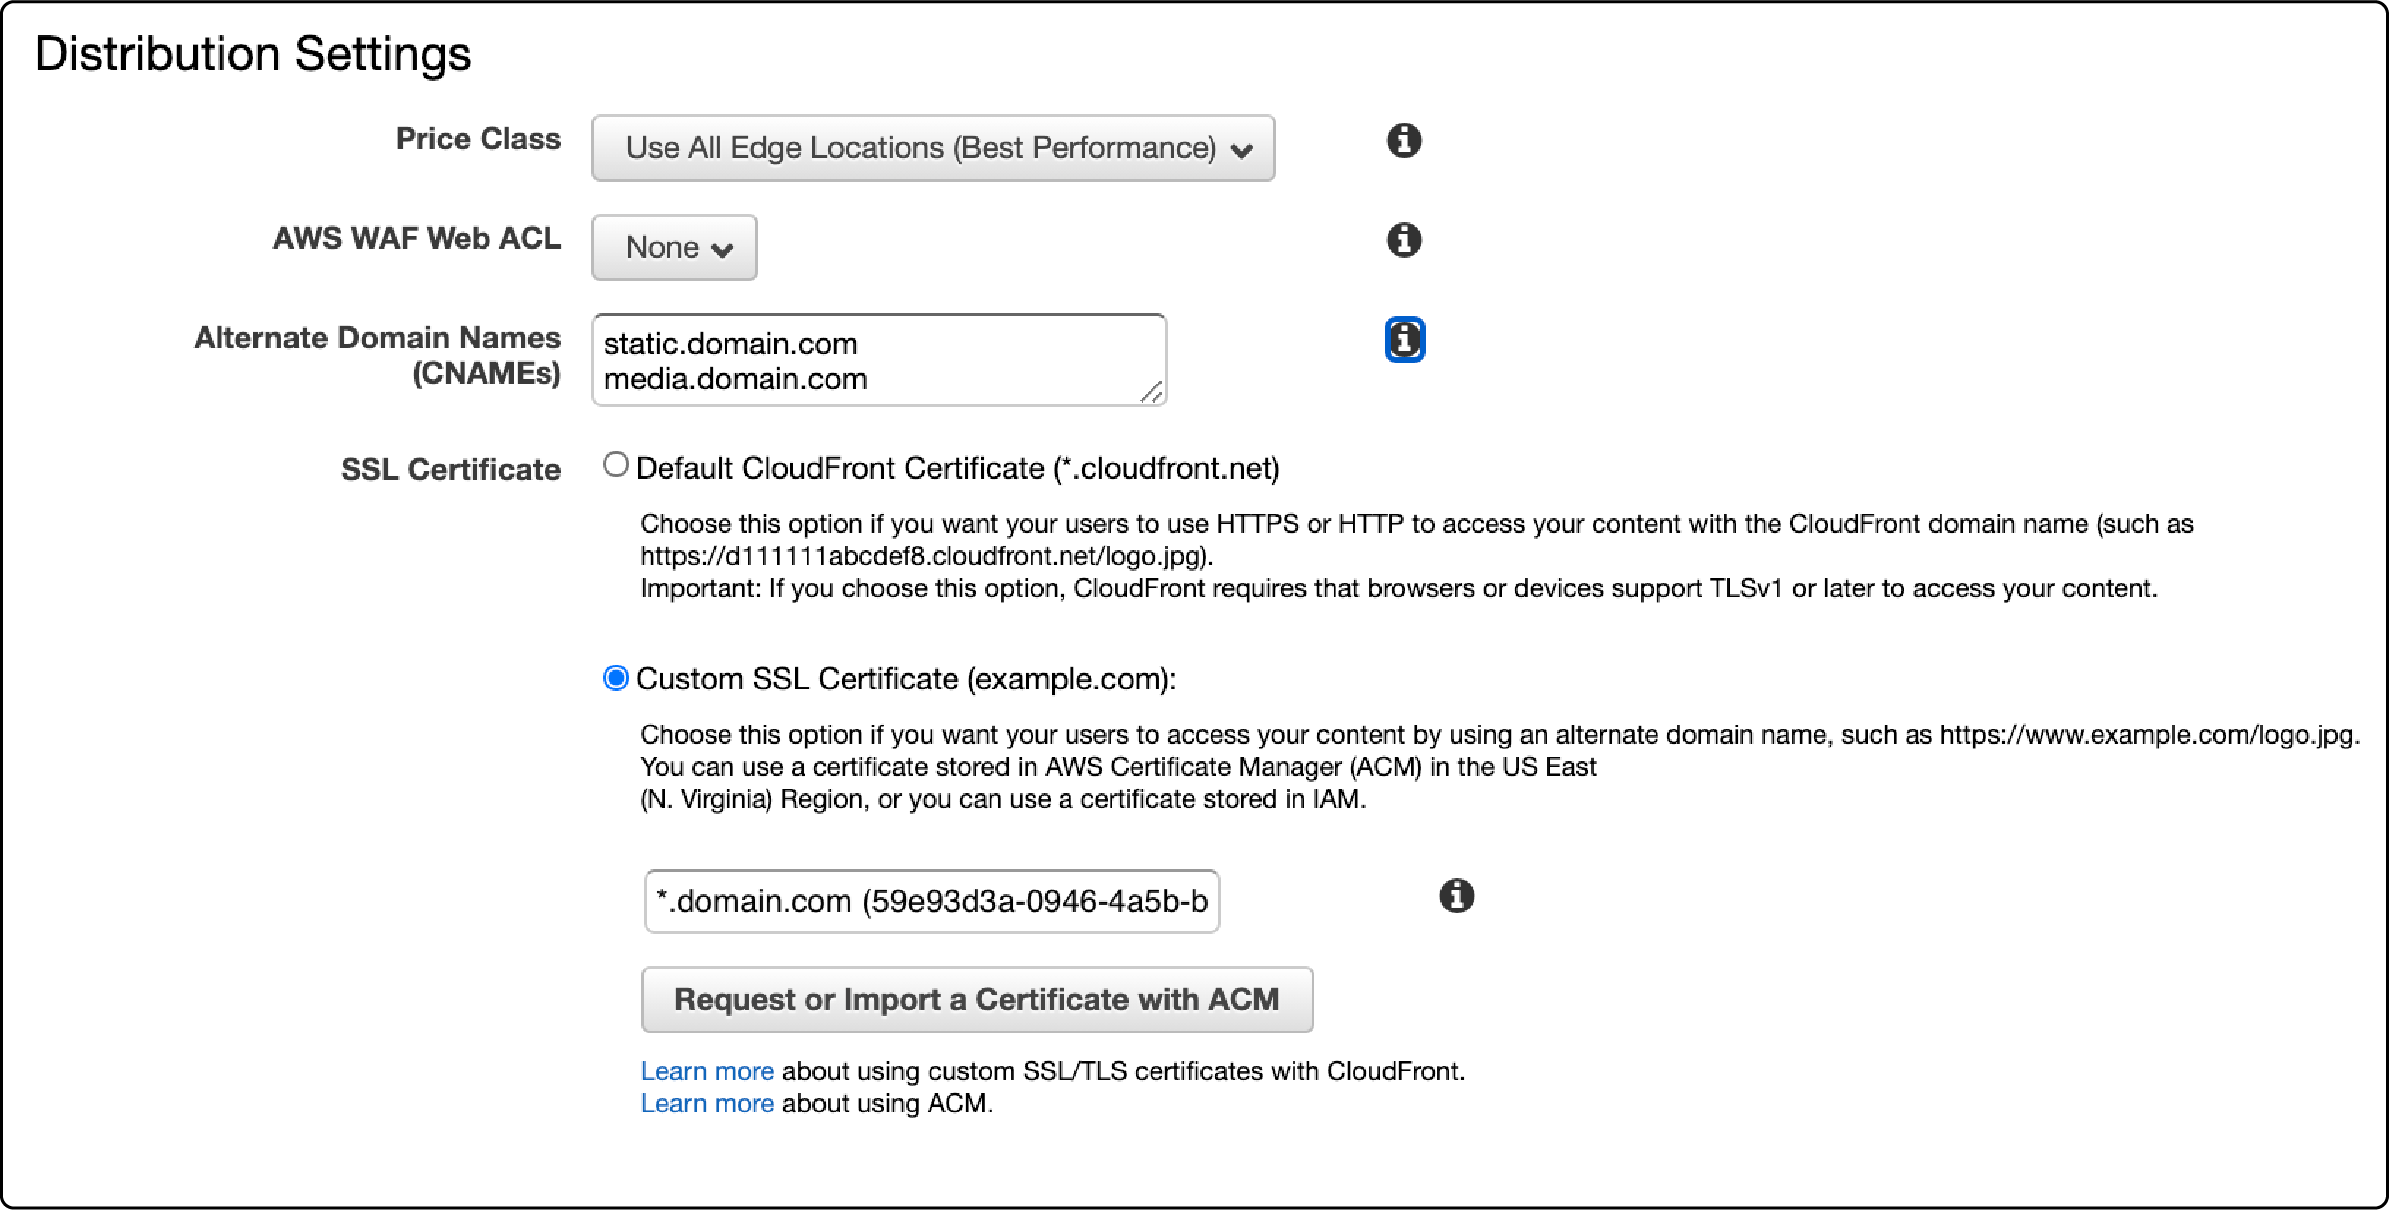
Next, use the distribution settings to choose a Price class, AWS WAF Web ACL, and add alternate domain names.

Creating Alternate Domain Names (CNAMEs)
Magento allows the use of CNAMES to customize the URLs for your content. You can use a domain name like static.domain. com or media.domain. com instead of the cloudfront. net domain name. You can also add an alternate domain name to your distribution. To implement the alternate domain names, you must ensure proper configuration in the server Backend.
For example, if you configure CNAME as "cdn.yoursite. com," you can serve the static and media content with "http//cdn.yoursite. com/image.jpg" URL instead of "http//www .yoursite.com/image.jpg."
Issuing SSL Certificates
Amazon CloudFront uses its native certificates, and you can leave them as the default values. However, you must issue an SSL certificate to add an alternate domain name to your CloudFront distribution. A trusted certificate validates your authorization to use the domain name. The following steps will help generate a certificate:
-
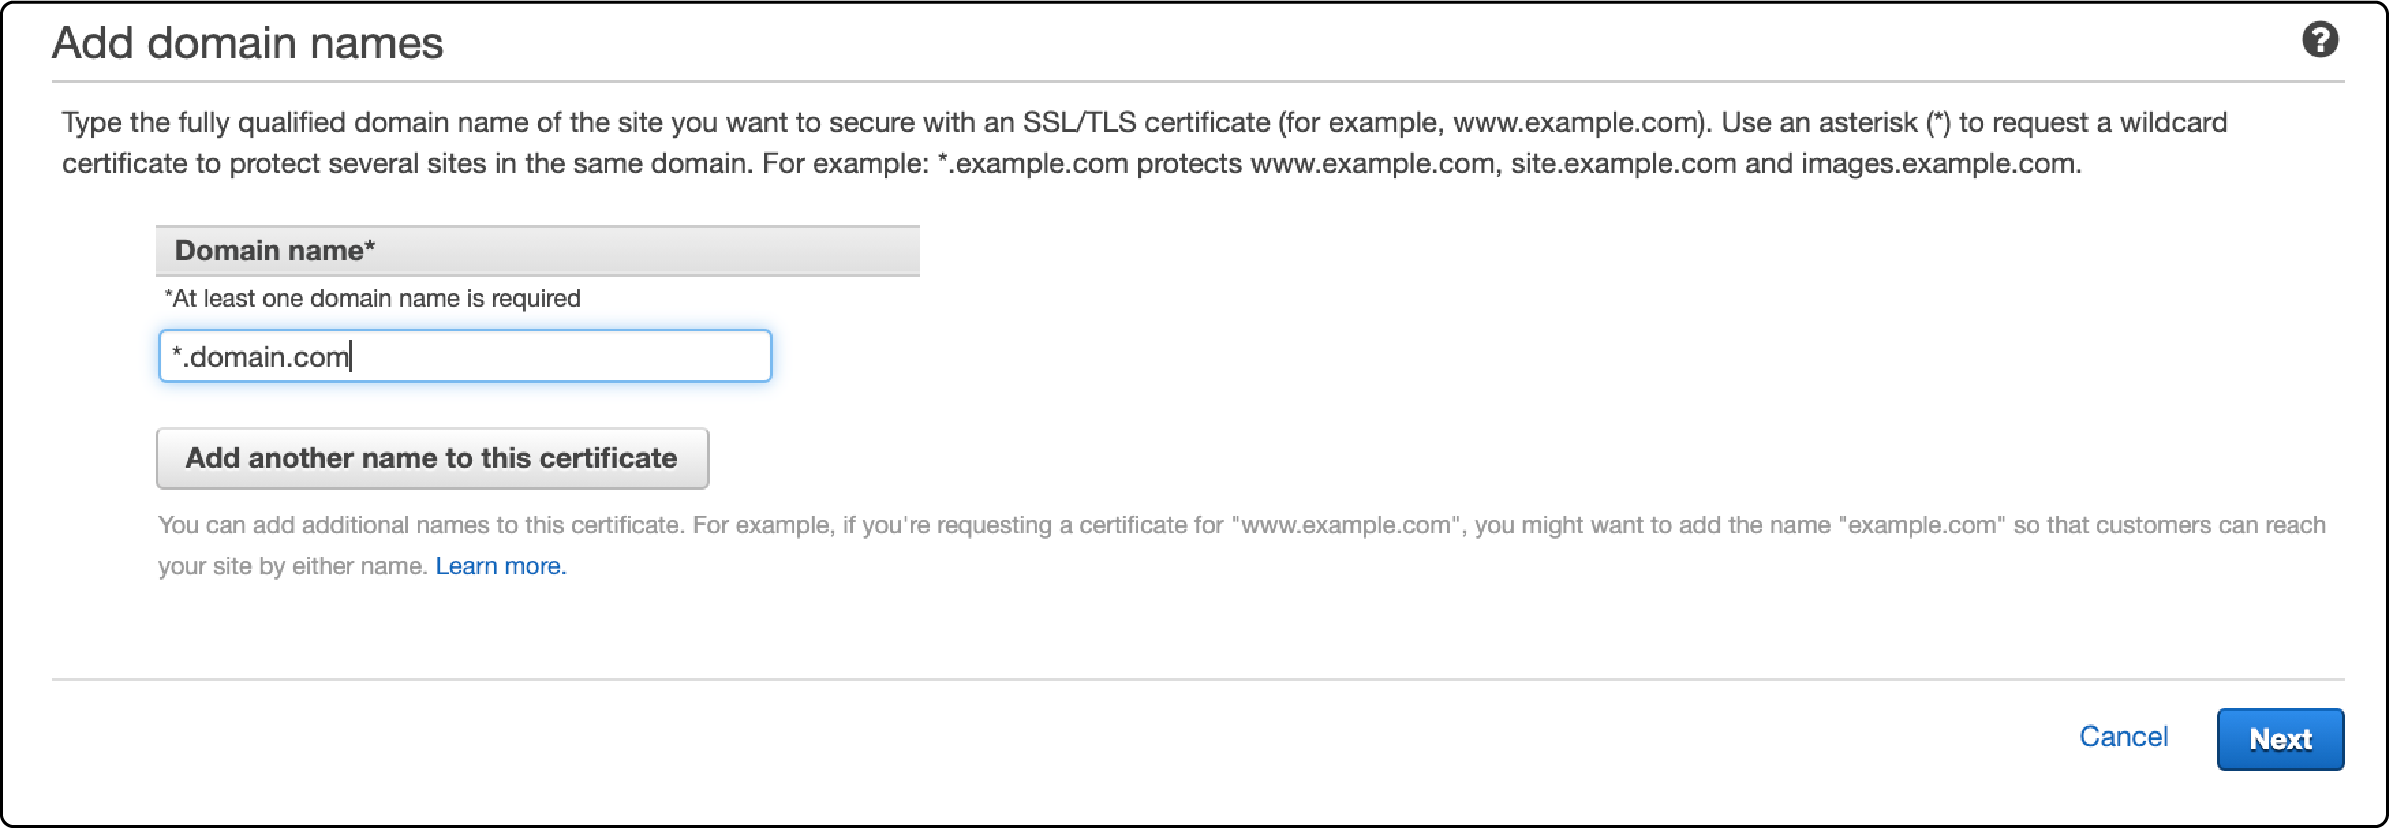
Navigate to AWS Certificate Manager to add a certificate.
-
Then, click the Request a certificate button and request a public certificate. Enter the domain of the certificate you want to add.
-
Click ‘Next’ and select DNS validation.
-
Next, review the changes and click the Request a certificate button.
-
After requesting the certificate, you must add the CNAME record to your domain's DNS configuration.
DNS Configuration
Configuring an alternate domain name requires creating a CNAME record pointing to the CloudFront distribution.
For example, static.domain. com -> CNAME -> examplesite.cloudfront. net

Verification
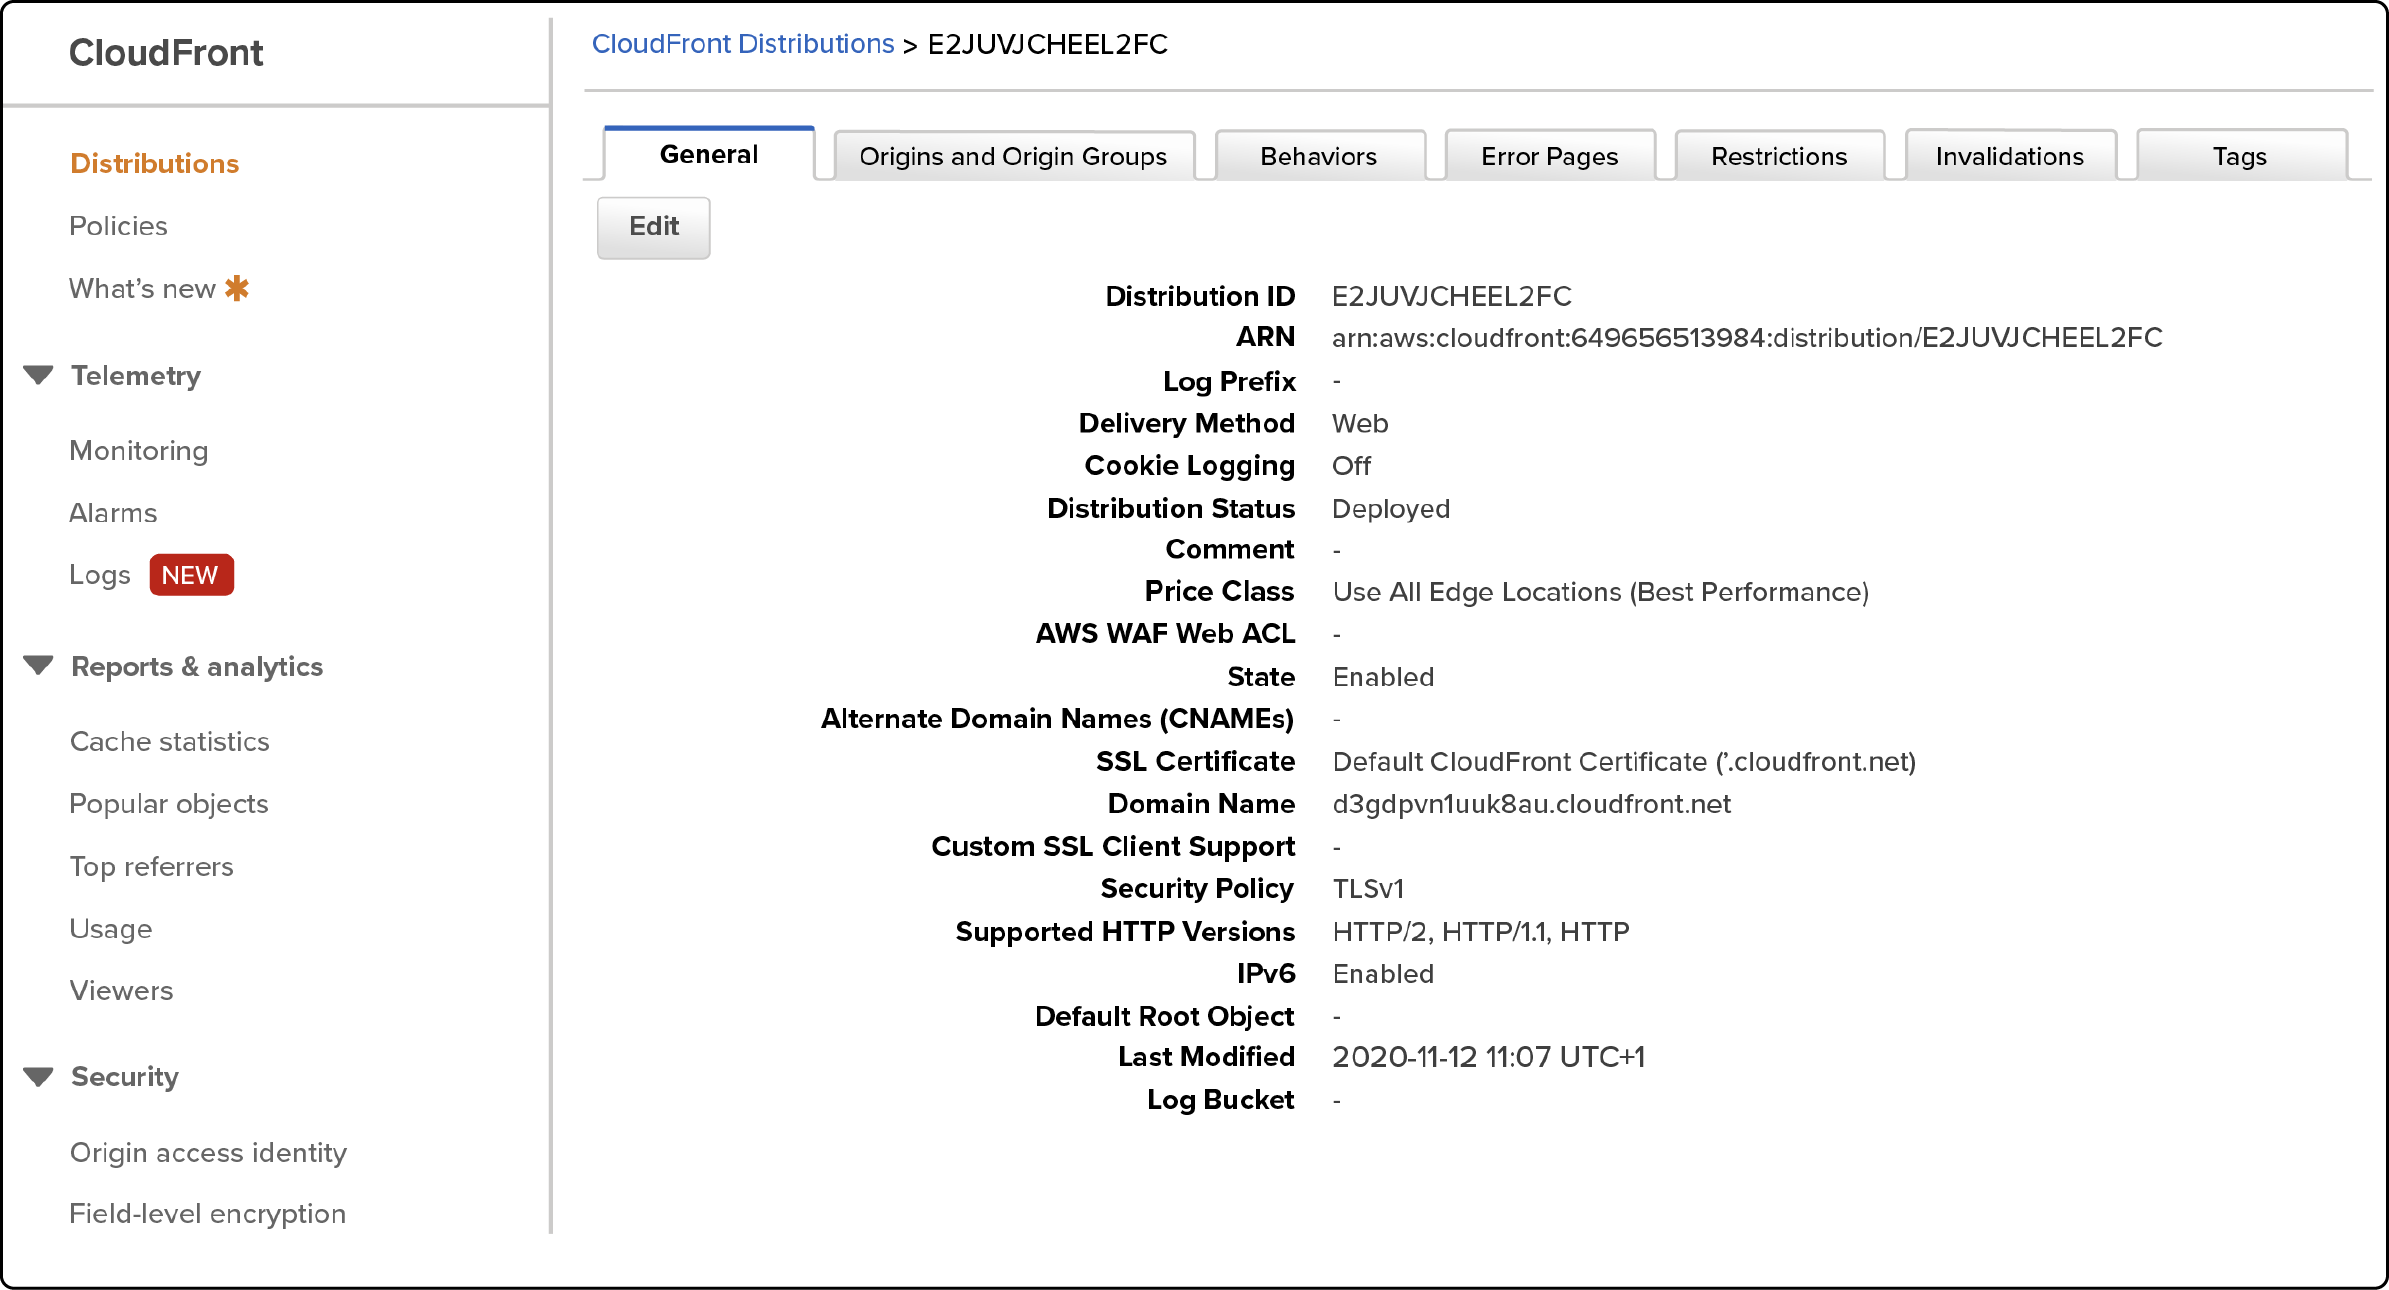
You must wait for the CloudFront service to complete deploying the distribution. The process may take 15 to 40 minutes. After configuring the DNS, your Website’s files should load under the new configuration.
You can click the relevant ID link and check the distribution details created. Access the links to review whether the settings are successful. For example, A domain name created at the CloudFront will replace the "https//www.domain.name/path/to/image.png" domain.
The replaced domain name in the example will be:
https//d2loj73necr1vm.cloudfront.net/path/to/image.png/ or https//media.domain.com/path/to/image.png in case of an alternate domain.
For images, if the original file’s content and the new file match, you have set up Amazon CloudFront CDN successfully. To verify, open the CDN URL
https//d2loj73necr1vm.cloudfront.net/path/to/image.png/ and check if the correct image is loading.
Setting Origins for a Magento website
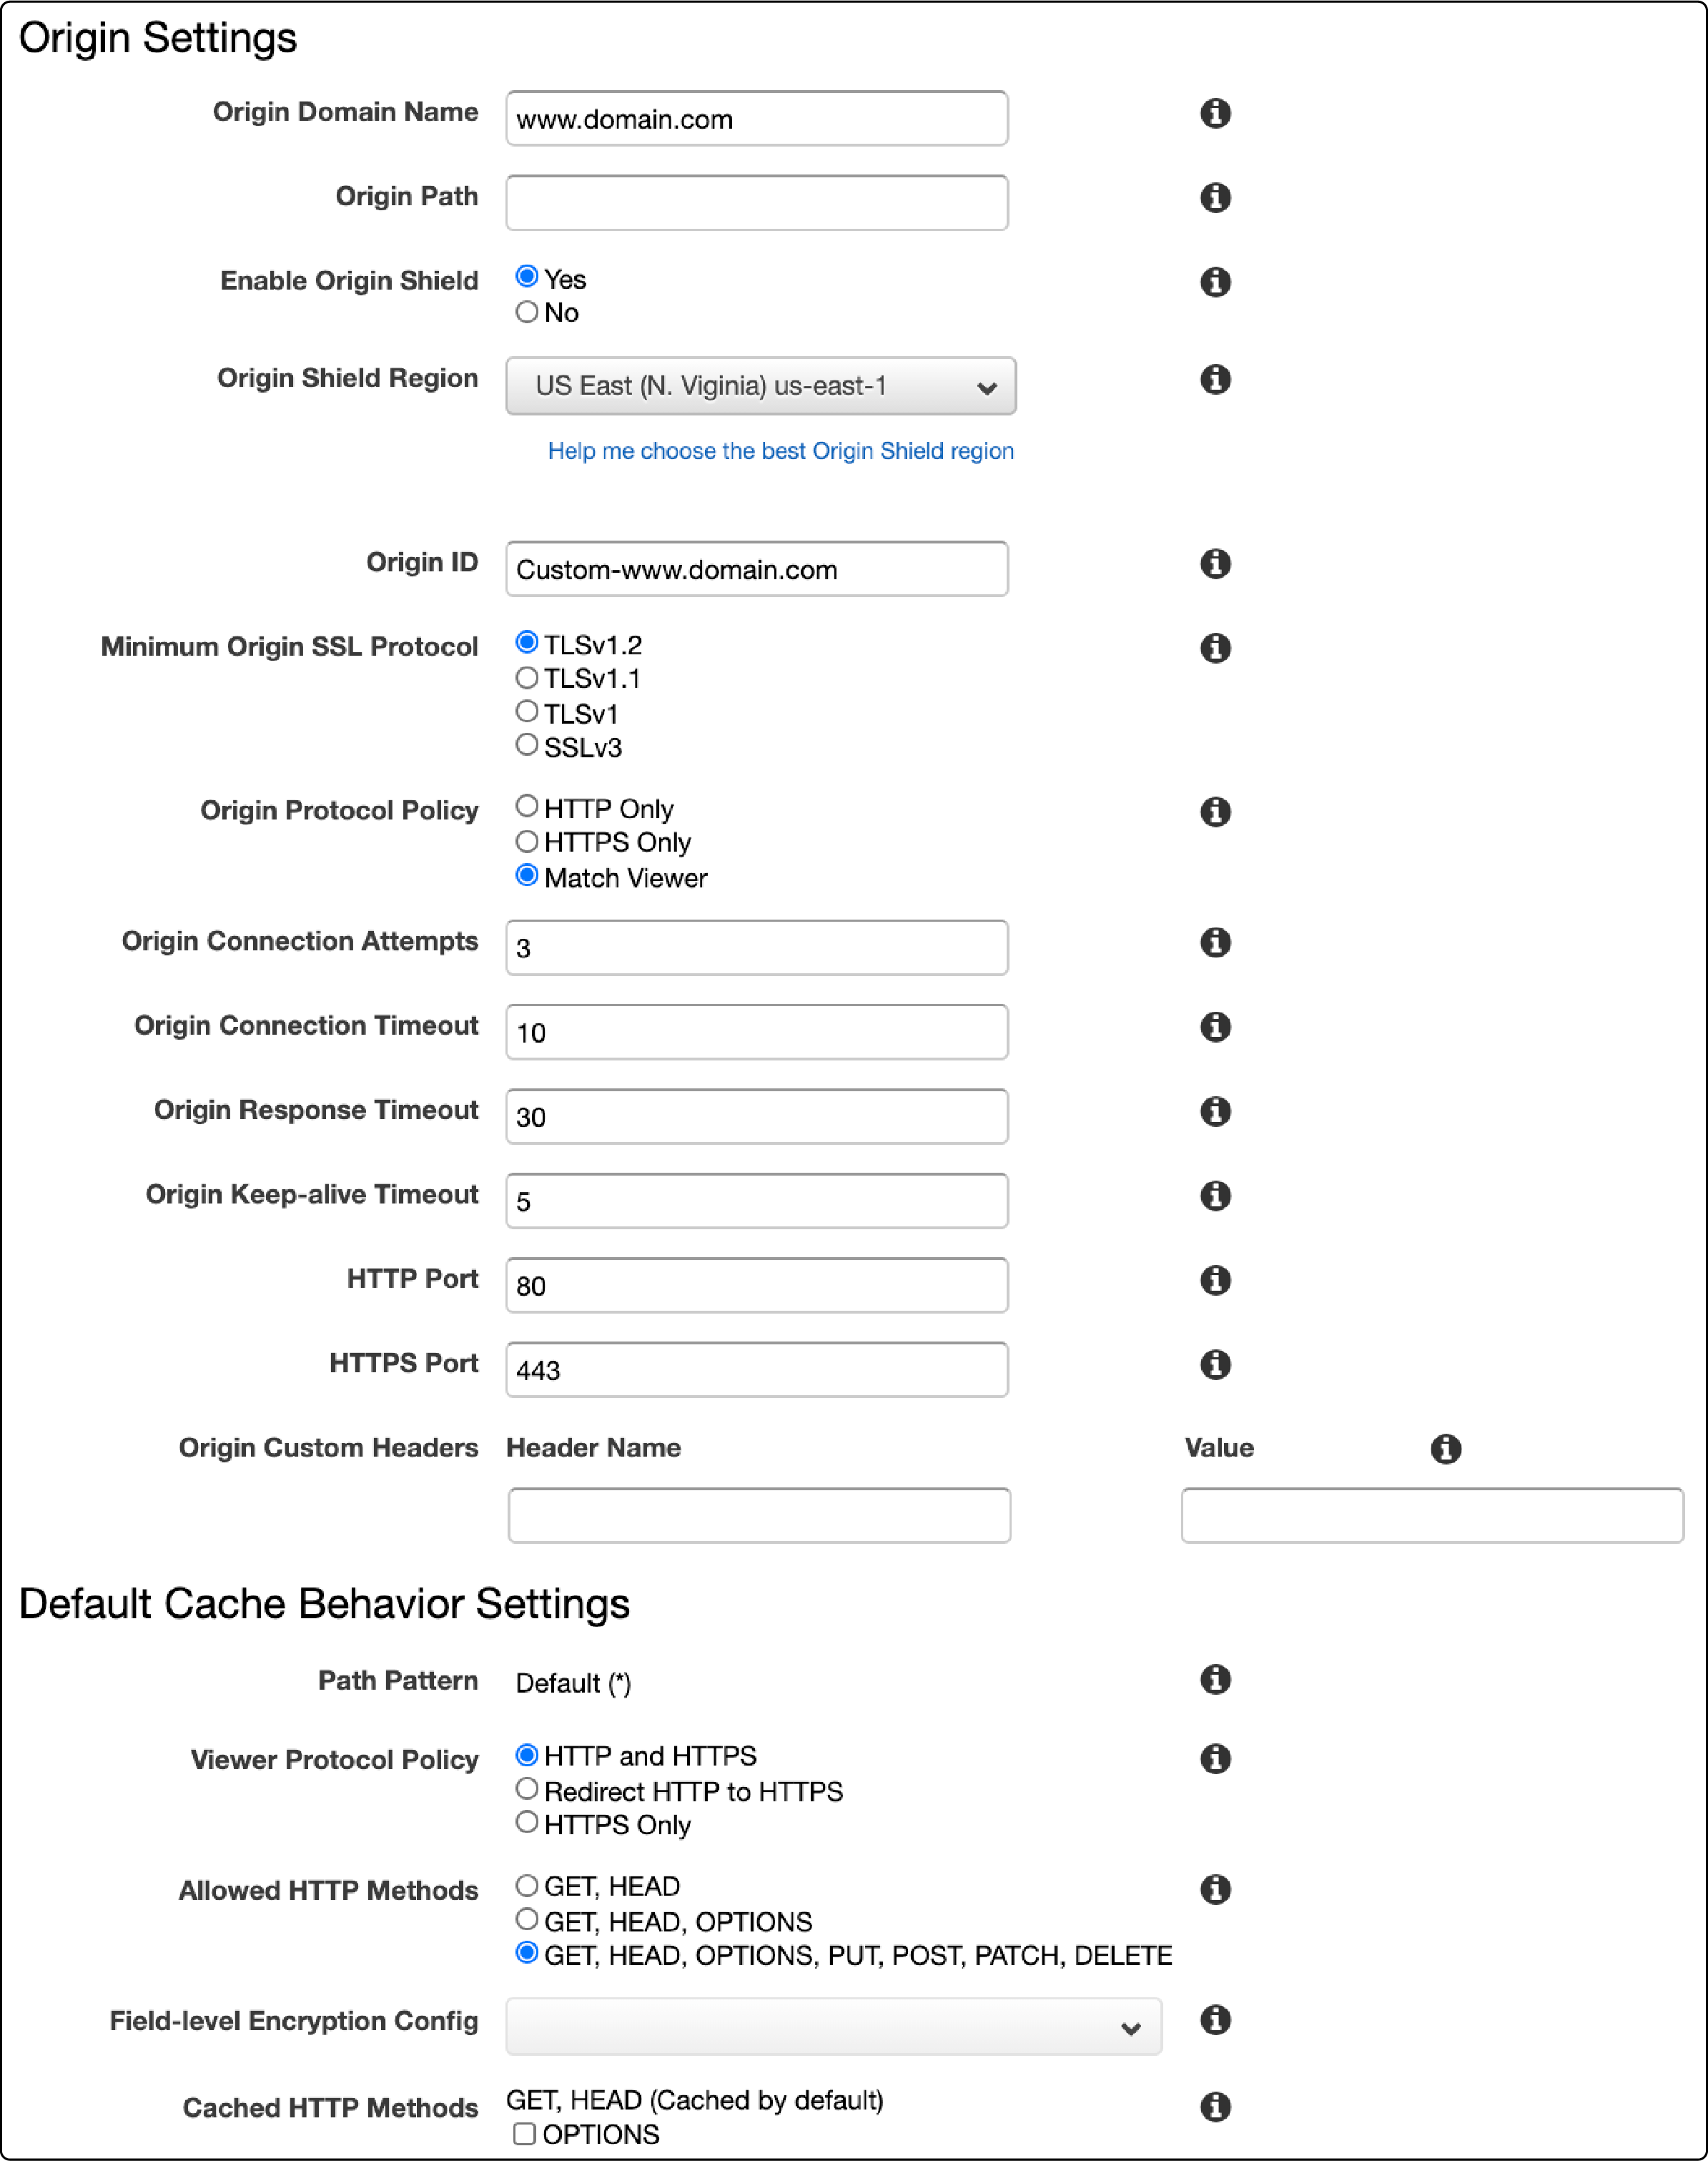
Origins are where you can store the original versions of your web content. Amazon CloudFront accesses the web content from its origins, which is then served to the viewers. Every origin is either an HTTP server or an Amazon S3 bucket.
-
Origin Domain Name: Origin Domain Name is the source domain name. For example, with www.yourwebsitexyz.comyz. com." or without www: "yourwebsitexyz. com."
-
Origin Path: The field is optional and is usually empty.
-
Enable Origin Shield: Yes (ensures that requests from all the CloudFront's caching layers to your origin go through the Origin Shield. It increases the chances of a cache hit. CloudFront can retrieve each object with a single origin request from Origin Shield to your origin. All other CloudFront cache layers (e.g., Edge locations ) can retrieve the object from Origin Shield.)
-
Origin Shield Region: Select an appropriate region.
-
Origin ID: Specify any ID by yourself for easy identification of the origin. It can be your CDN Domain name, or it will be automatically filled.
-
Minimum Origin SSL Protocol: TLSv1.2
-
Origin Protocol Policy: Match Viewer
Default Cache Behaviour Settings
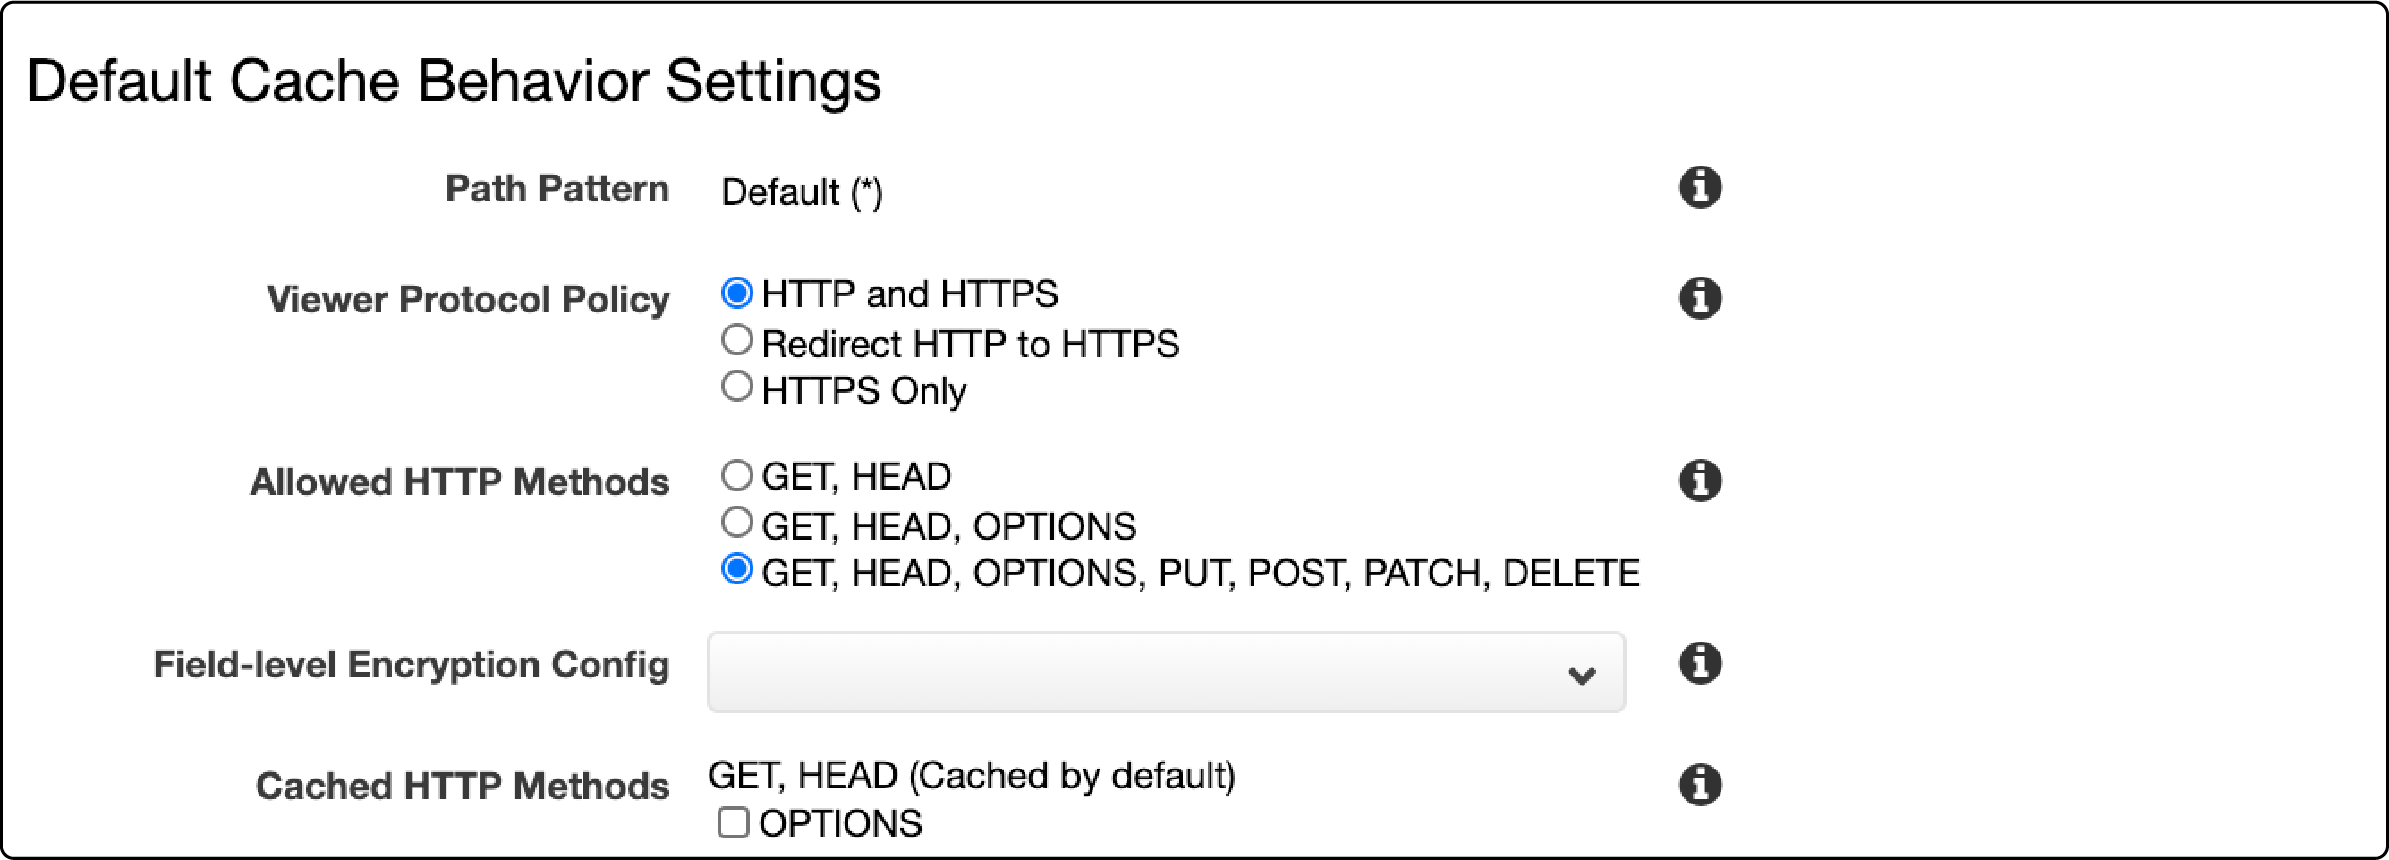
Using a CDN may cause errors like blocked Cross-Origin requests on your Magento 2 website. Behavior configuration helps deal with the errors. In the Default Cache Beha* Using a CDN may cause errors like blocked Cross-Origin requests on your Magento 2 website. Behavior configuration helps deal with the errors. In the Default Cache Behavior Settings tab, take the following actions:
Path pattern: A path pattern (for example, images/*.jpg) specifies the requests to which you want to apply the cache behavior.
The default cache behavior only allows a path pattern of * (forward all requests to the origin specified by origin). To change the behavior or the routing for other requests (for example, *.jpg), add more cache behaviors after creating the distribution.
Viewer Protocol Policy: It allows users to access your web content. Select the policy viewers will use to access your content. It is recommended to use the ‘Viewer Protocol Policy relevant to Origin Protocol Policy.’
Allowed HTTP Methods: You can select from a list of HTTP methods to allow for the cache behavior. For example, GET, HEAD, OPTIONS, PUT, POST, PATCH, DELETE.
Step 3: Configure access-control-allow-origin
Configuring the access-control-allow-origin feature ensures a secure environment for your Magento website. Enhances the security of your e-commerce store and provides a safe browsing experience for your customers.
It also lets you control which domains can access your website's content. Thus preventing unauthorized access and protecting sensitive information.
Magento store owners using the Amazon CloudFront CDN must enable the Apache headers module. It allows the use of the mod_headers module in .htaccess files, which is necessary to permit the requests for static and media files from various domains in a CDN.
You can also use a dedicated Magento hosting platform to ensure optimized website performance at all times.
Pub/static Instructions
By default, the pub/static/.htaccess file provides headers for the static files. You must adjust the headers to permit requests from various domains in the CDN.
The pub/static/.htaccess before modification:
<IfModule mod_headers.c>
   <FilesMatch .*\.(ico|jpg|jpeg|png|gif|svg|js|css|swf|eot|ttf|otf|woff|woff2)$>
       Header append Cache-Control public
   </FilesMatch>
   <FilesMatch .*\.(zip|gz|gzip|bz2|csv|xml)$>
       Header append Cache-Control no-store
   </FilesMatch>
</IfModule>
</code>
The pub/static/.htaccess after adjustments:
<code class="xml">
<IfModule mod_headers.c>
<FilesMatch .*\.(ico|jpg|jpeg|png|gif|svg|js|css|swf|eot|ttf|otf|woff|woff2|html|json)$>
   Header set Cache-Control "max-age=604800, public"
   Header set Access-Control-Allow-Origin "*"
   Header set Access-Control-Allow-Methods "GET, OPTIONS"
   Header set Access-Control-Max-Age "604800"
   Header set Access-Control-Allow-Headers "Host, Content-Type, Origin, Accept"
</FilesMatch>
   <FilesMatch .*\.(zip|gz|gzip|bz2|csv|xml)$>
    Header append Cache-Control no-store
   </FilesMatch>
</IfModule>
</code>
Pub/media Instructions
Include response headers in the pub/media/.htaccess file for the images The original mod_headers.c section from the pub/media/.htaccess:
<code class="xml">
<IfModule mod_headers.c>
   <FilesMatch .*\.(ico|jpg|jpeg|png|gif|svg|js|css|swf|eot|ttf|otf|woff|woff2)$>
       Header append Cache-Control public
   </FilesMatch>

   <FilesMatch .*\.(zip|gz|gzip|bz2|csv|xml)$>
       Header append Cache-Control no-store
   </FilesMatch>
</IfModule>
</code>
The modified mod_headers.c section from the pub/media/.htaccess:
<code class="xml">
<FilesMatch .*\.(ico|jpg|jpeg|png|gif|svg|js|css|swf|eot|ttf|otf|woff|woff2)$>
   Header append Cache-Control max-age=604800
   Header set Access-Control-Allow-Origin "*"
</FilesMatch>
</code>
Step 4: Configure Magento 2
Once the Amazon CloudFront is set up, you must configure Magento. The configuration process may take a few minutes. Follow the steps below:
-
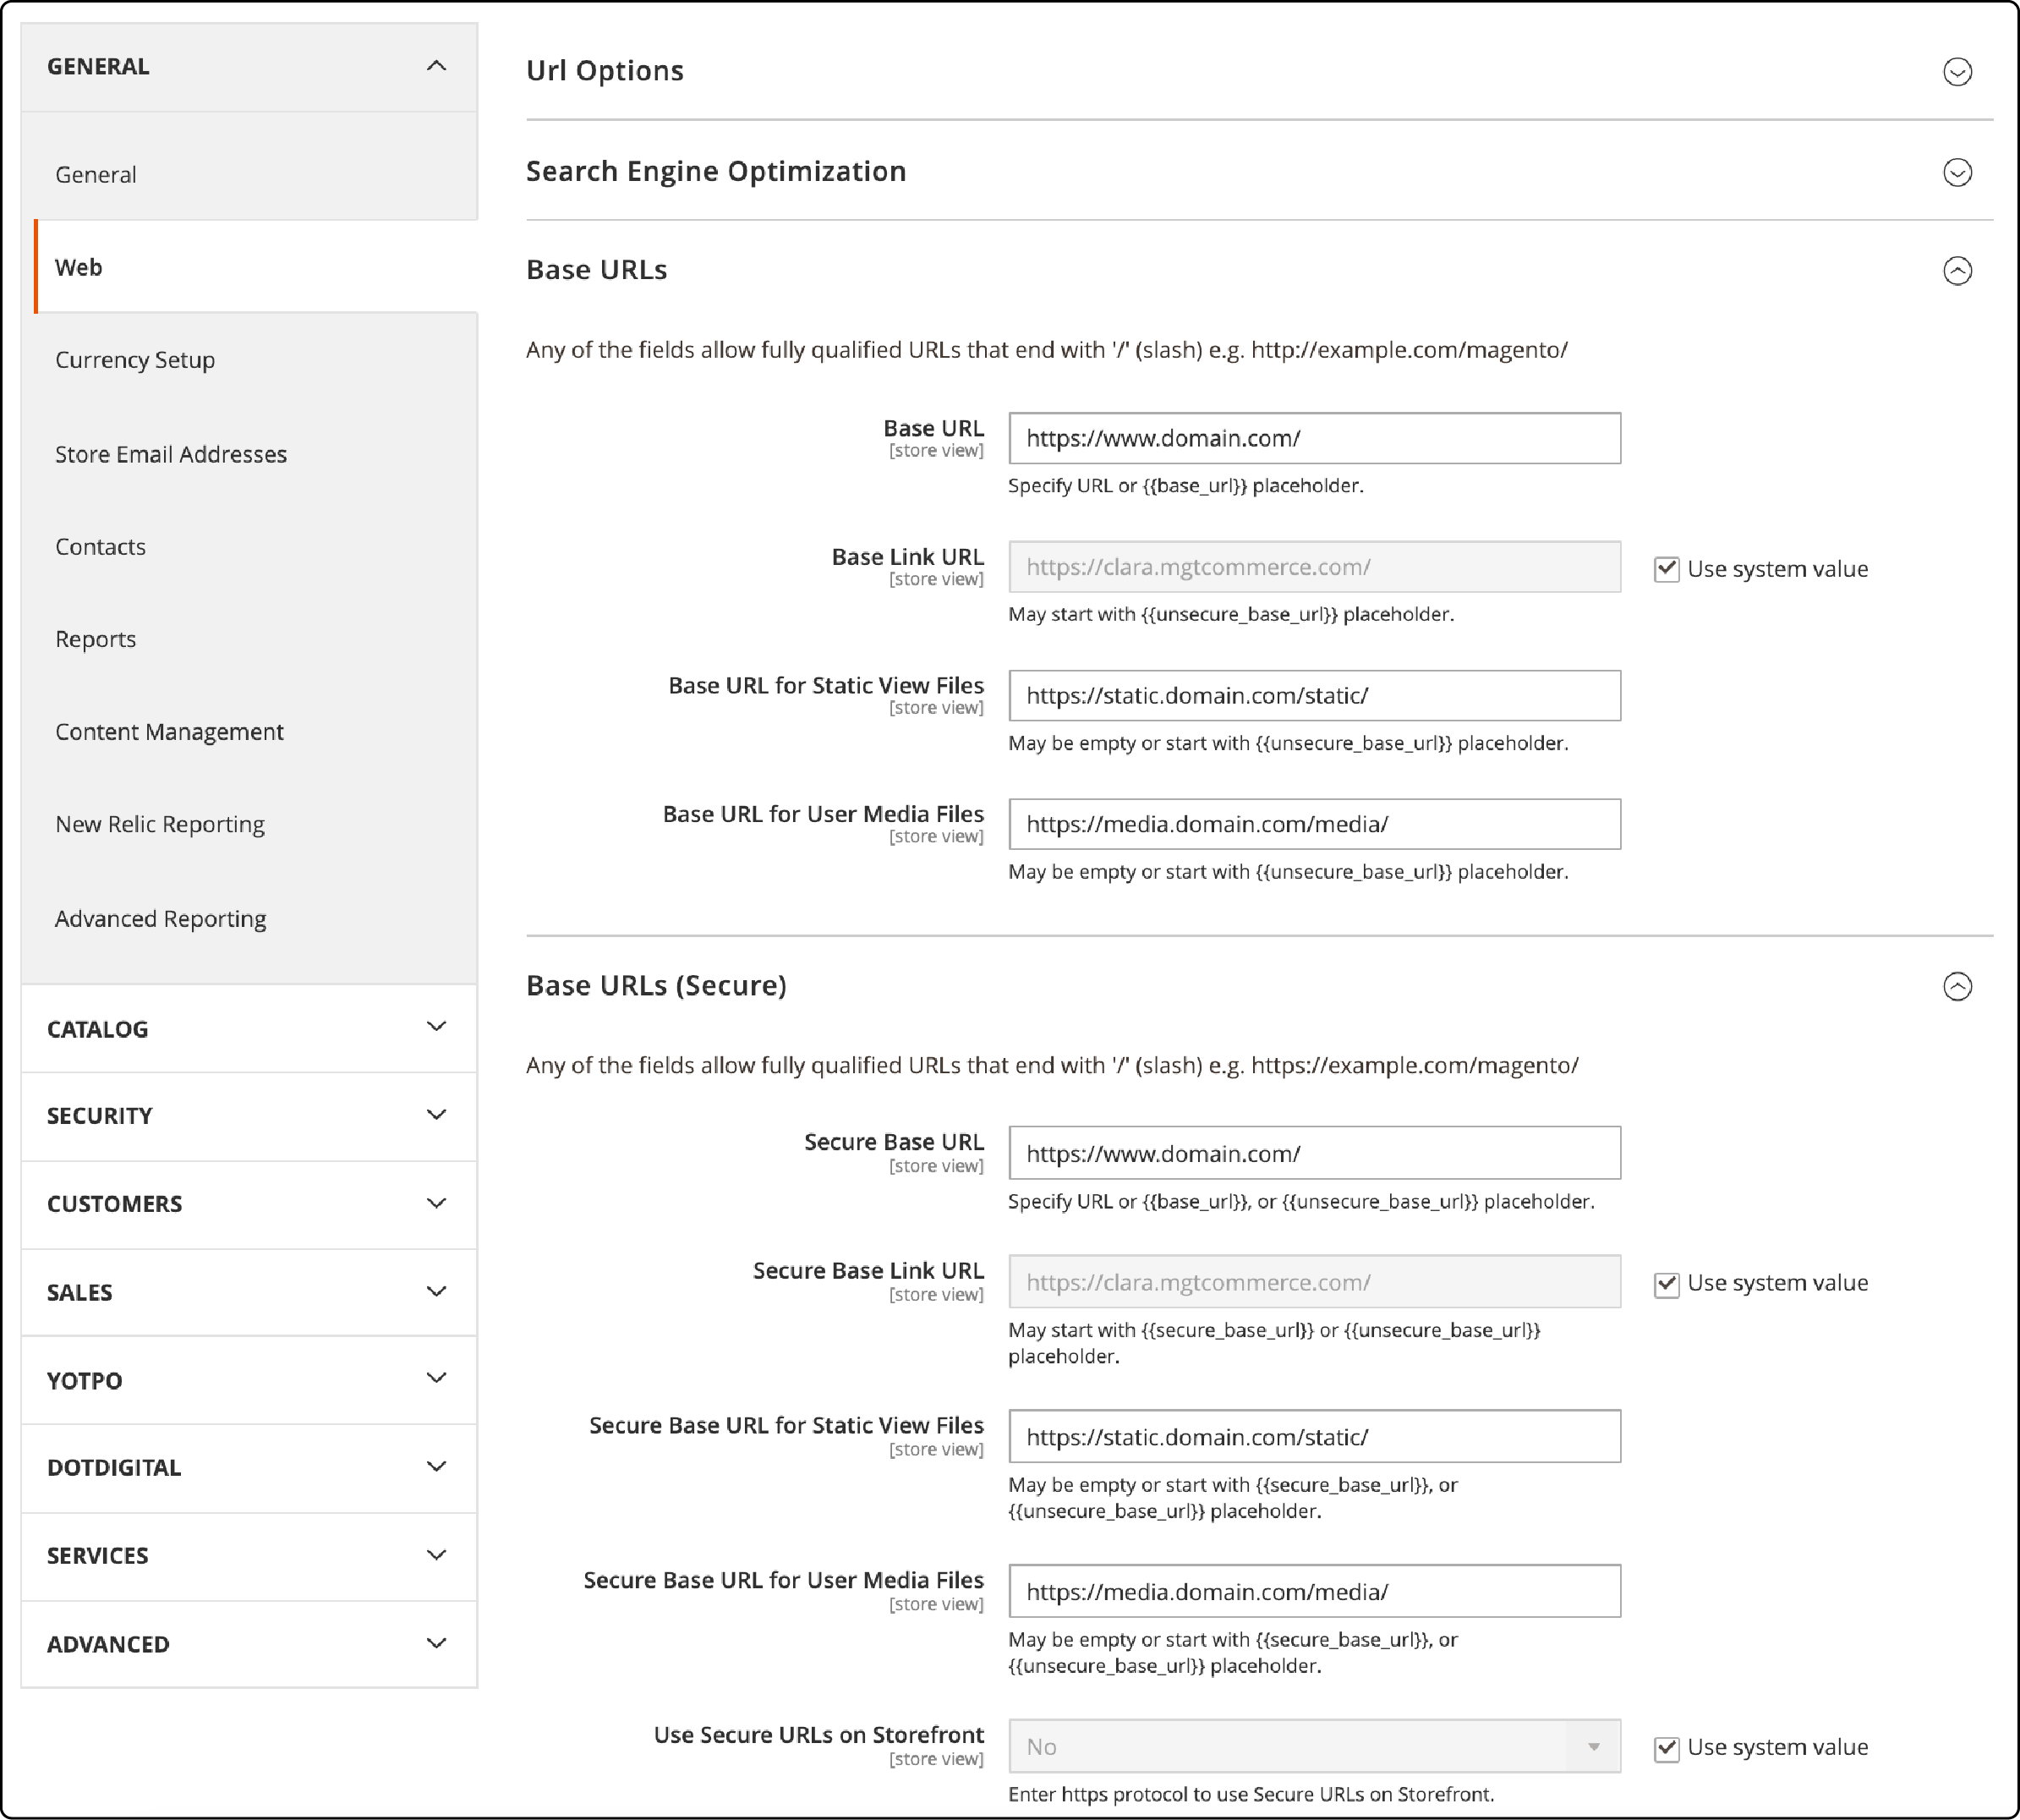
Log in to the Magento Backend and then go to Stores.
-
Go to Configuration, then, under General, open the Web tab.
-
Expand the Base URLs (secure) section.
-
Change the media and static URLs to use the Domain Name or the CNAME of the CloudFront URLs.
-
Select your website URL from the drop-down and modify the fields where you wish to set the CDN URL.
-
To save the changes, click the Save Config button.
-
Refresh the cache from the Cache Management Section.
-
Next, visit your Magento frontend and review the domain name changes.
Step 8: Test
To verify if your website uses Amazon CloudFront CDN, open your website on Chrome and press CTRL+U to view the source code. You can use 'Inspect' to see if any errors are generated in the console. If you find ".cloudfront.net" or "cdn.yourwebsite. com" domains and all the content of your website is loaded properly, you have configured CDN correctly. You can clear the cache if the images are not loading or the website is not working.
FAQs
1. Can I configure Amazon CloudFront to cache static and media content for my Magento website?
You can configure Amazon CloudFront to optimize Magento 2 performance with AWS. To finish the process, you must configure Magento 2 and use CloudFront as your Content Delivery Network (CDN).
First, set up a new CloudFront distribution. Then, configure Magento 2 to send static files via HTTP and HTTPS through CloudFront. Ensure your Magento 2 page load times improve significantly with CloudFront's full-page cache.
2. Does AWS CloudFront configuration for Magento require a custom domain distribution and header settings?
You must set up a new CloudFront distribution with a custom domain (CNAME) to match your Magento website's domain. It allows you to use CloudFront to cache static and media content while maintaining SSL security. Make sure to adjust distribution and header settings as needed for optimal performance.
If you do not need a custom domain, Magento also allows using the default domain provided by CloudFront.
3. Will implementing a Content Delivery Network (CDN) boost my Magento site's speed?
A CDN like AWS Cloudfront enhances your Magento setup by caching media and static files for quick access, leading to better website speed.
4. Can I keep my ecommerce website safe with the AWS Cloudfront setup for Magento 2?
Access control is one of the key features of setting up Amazon CloudFront CDN on a Magento platform. It ensures higher ecommerce security when combined with other optimization practices.
5. What is the need for setting a CNAME and custom URL in Amazon CloudFront CDN distribution?
The CNAME (or Canonical Name) record associates a custom domain with your CloudFront distribution. It allows you to use a specific domain for accessing content through CloudFront. By setting up CloudFront, Magento 2 should send its content through the CDN, resulting in low latency and improved page load times.
Summary
Configuring AWS Cloudfront CDN allows improving the page loading speed of your Magento 2 store. Website speed is one of the most important factors to improve magento 2 performance and user experience. Ensure regular checks for the AWS CloudFront distributions list and monitor the performance. Apart from the Cloudfront CDN, you can also consider a scalable Magento hosting service for your ecommerce business.


