
How to Add Delivery Date to the Checkout Page in Magento 2?
Want to streamline order processing and improve customer satisfaction? The Add delivery date to the checkout page in Magento 2(https://www.mgt-commerce.com/blog/delivery-date-manager-for-magento-2/) feature lets customers choose a delivery date during checkout.
This tutorial will cover the step-by-step process of implementing a delivery date feature on your Magento 2 checkout page.
Key Takeaways
- Advanced configuration for adding a delivery date field to the checkout page.
- Steps to set up and configure your Magento store.
- Flexible delivery and customization options to minimize cart abandonment.
- Insights into custom module development and extension-based approaches.
- Tips to choose your preferred delivery time to enhance your customers' shopping experience.
- Troubleshooting issues to reduce cart abandonment rates with better delivery management.
-
How to Customize the Checkout Page using the Delivery Date Field in Magento 2?
-
Advanced Configuration for Adding Delivery Date and Time in Magento 2
-
Magento Installation Performance Testing with Delivery Date Functionality
-
5 Steps to Add Time with Delivery Date in Magento 2 Default Checkout Page
-
3 Steps to Implement Magento 2 Order Delivery Date Extension
-
Best Practices for Implementing Custom Module Development in Magento 2 Order Delivery
-
Troubleshooting Issues When Setting Delivery Dates in Magento 2
Why Magento 2 Add Delivery Date to Checkout is Important?
1. Enhanced Customer Satisfaction
By selecting a delivery date, you can plan their deliveries based on your schedules. It boosts customers' satisfaction, as they know exactly when to expect their order.
2. Optimized Delivery Operations
By adding the delivery time, you can plan deliveries more efficiently. It allows you to combine orders in nearby areas on the same date. This approach reduces delivery costs and improves logistical efficiency.
3. Lower Cart Abandonment Rates
Customers abandon their shopping carts due to uncertainty in delivery times. By offering a clear delivery date, stores can alleviate this concern. It gives customers confidence in their purchase timeline, reducing abandoned cart rates.
4. Reduced Customer Support Inquiries
A smooth process of selecting the desired delivery date saves time and effort. It reduces the number of support requests. It allows your customer service team to focus on other vital issues.
5. Fewer Failed Deliveries
Adding a date option on the checkout minimizes the risk of missed deliveries. Reducing failed deliveries can lower operational costs and increase customer satisfaction. It is seen mainly in cases where delivery issues aren’t the store’s fault due to customer unavailability.
How to Customize the Checkout Page using the Delivery Date Field in Magento 2?
| Component | Implementation Steps | Technical Details |
|---|---|---|
| Date Picker Setup | 1. Create a knockout JS component. 2. Configure date picker UI. 3. Add a calendar widget. |
- Add to Vendor/Module/view/frontend/web/js/. - Include jQuery UI datepicker. - Set date format: YYYY-MM-DD. |
| Field Validation | 1. Set minimum date. 2. Configure maximum date. 3. Add holiday exclusions. 4. Implement weekend handling. |
- Use PHP validation class. - Add custom validation rules. - Include server-side checks. - Handle timezone differences. |
| UI Styling | 1. Create custom LESS/CSS. 2. Style calendar popup. 3. Format input field. |
- Override default styles. - Maintain responsive design. - Follow Magento UI patterns. |
| Backend Integration | 1. Create database schema. 2. Add order attributes. 3. Configure admin grid. |
- Add to the sales_order table. - Create installation scripts. - Set up admin controls. |
| Front-end Display | 1. Position field in checkout. 2. Add error messages. 3. Handle field interactions. |
- Use checkout_index_index.xml. - Add custom templates. - Implement error handling. |
| Time Slot Integration | 1. Add time picker. 2. Configure slot availability. 3. Set delivery windows. |
- Create a time slot table. - Add availability logic. - Handle slot restrictions. |
| Performance Optimization | 1. Minimize JS loading. 2. Optimize database queries. 3. Cache configuration. |
- Use RequireJS. - Index relevant tables. - Implement proper caching. |
| Testing Requirements | 1. Conduct unit tests. 2. Set up integration tests. 3. Implement frontend validation. |
- Conduct PHPUnit tests. - Implement JavaScript testing methods. - Configure cross-browser checks. |
7 Steps to Configure the Custom Checkout Fields Extension
- Set up a custom module with essential files (e.g.,
registration.php,module.xml). - Add a custom field for the delivery date on the checkout page. Either use a JavaScript component or modify the existing layout.
- Update the checkout process to save the delivery date with the order.
- Extend the quote and order models to include this attribute.
- Use observers or plugins to record and save the delivery date during checkout.
- Update the order view in the admin panel to show the delivery date.
- Modify or create a block and template file to display this information in the order details.
Advanced Configuration for Adding Delivery Date and Time in Magento 2
| Configuration Category | Features | Implementation Details |
|---|---|---|
| Calendar Settings | - Date format customization - Holiday exclusions - Weekend handling - Buffer time settings |
- Configure through Admin Panel > Stores > Configuration. - Set processing periods. - Define cutoff times. - Implement date restrictions. |
| Time Slot Management | - Multiple slot creation - Quota management - Dynamic scheduling - Slot availability rules |
- Create time intervals. - Set maximum orders per slot. - Configure slot pricing. - Enable/disable specific slots. |
| Customer Group Configuration | - Group-specific settings - Shipping method integration - Store view customization - Delivery charges set up |
- Set permissions per group. - Link to shipping carriers. - Configure multi-store options. - Define pricing rules. |
| Order Processing Rules | - Minimum processing time - Maximum advance booking - Same-day delivery rules - Next-day delivery settings |
- Set processing windows. - Configure lead times. - Define cutoff times. - Implement validation rules. |
| Documentation Integration | - Email notifications - PDF document inclusion - Order confirmation display - Invoice integration |
- Configure email templates. - Add to shipping documents. - Customize order views. - Set up PDF layouts. |
| API implementation | - GraphQL support - REST API integration - Custom field mapping - Data synchronization |
- Enable API endpoints. - Configure data structure. - Set up authentication. - Handle responses. |
| Holiday Management | - Single-day exclusions - Date range blocks - Recurring holidays - Special event handling |
- Set up a holiday calendar. - Configure blackout dates. - Define recurring patterns. - Manage exceptions. |
| Validation Rules | - Date range validation - Time slot availability - Order limit checks - Customer restrictions |
- Implement validation logic. - Set up error messages. - Configure restrictions. - Handle exceptions. |
Benefits of Magento 2 Delivery Date Extension
For Magento Store Owners:
1. Enhanced Order Management
Store owners can precisely control delivery schedules through an intuitive admin panel. It includes:
- Setting specific time slots
- Managing daily order quotas
- Creating flexible delivery channels that align with operational capacity
2. Automated Scheduling System
Users can add the delivery date and time field in Magento 2 by:
- Automatically excluding holidays and off days
- Managing time slots with quota limitations
- Preventing overbooking through smart validation
3. Streamlined Documentation
All delivery information seamlessly integrates into the following:
- Order Confirmations
- Invoices
- Shipping labels
- Email notifications
For Customers:
1. Choice of Delivery Date and Time Information
Customers can select their preferred delivery date and time option during checkout. It allows you to add convenience and meet specific delivery needs.
2. Personalized Delivery Instructions
Customers have the option to leave custom messages or specific instructions for delivery. They can enhance communication and meet unique requirements.
3. Flexible Delivery Selection
Customers gain control over their delivery experience with:
- Calendar-based date selection
- Specific time slot options
- Delivery comments functionality
4. Transparent Communication
The extension allows you to develop a custom module by providing:
- Clear delivery timeframes
- Real-time slot availability
- Estimated delivery dates on product pages
Additional API Features for Store Administrators:
1. Exclude Specific Days or Hours
Exclude non-operational days, holidays, or specific hours from the delivery periods. It helps you ensure accurate availability.
2. Enhanced Order Management through API
Enable order attributes in the API. It allows you to integrate with other systems for seamless data handling & reporting.
3. Streamlined Communication of Updated Delivery Dates
Easily update orders, invoices, and emails with revised delivery dates. Your customers can stay informed of any changes.
4. Operational Efficiency
Smart delivery management leads to:
- Reduced customer service inquiries
- Optimized delivery routes
- Better resource allocation
5. Revenue Enhancement
Customers are more likely to complete purchases when given clear delivery dates. The extension supports the delivery date functionality by:
- Offering premium delivery slots
- Enabling same-day delivery options
- Supporting multiple delivery channels
6. Seamless Integration
The default Magento 2 extension offers:
- Full API support
- Multiple language compatibility
- GraphQL implementation
- Complete customization flexibility
7. Advanced Configuration Options
Administrators can:
- Set processing time requirements.
- Configure delivery restrictions.
- Manage multiple store views.
- Create custom delivery rules.
Magento Installation Performance Testing with Delivery Date Functionality
| Testing Category | Test Cases | Validation Points |
|---|---|---|
| Unit Testing | - Date picker validation - Time slot selection - Holiday exclusion logic |
- Test date format handling. - Verify time slot availability. - Check holiday restrictions. - Validate minimum/maximum dates. |
| Integration Testing | - Order placement workflow - Email notifications - Admin panel integration |
- Verify the checkout process. - Check email template integration. - Test admin grid updates. - Validate order processing. |
| Frontend Testing | - UI components - Responsive design - Error messages |
- Test calendar display. - Check mobile responsiveness. - Verify validation messages. - Test user interactions. |
| Backend Testing | - Database operations - API endpoints - Configuration settings |
- Verify data storage. - Test API responses. - Check configuration saves. - Validate admin controls. |
| Performance Testing | - Load time impact - Database queries - Cache effectiveness |
- Measure page load times. - Check query optimization. - Test cache invalidation. - Monitor resource usage. |
| Cross-browser Testing | - Browser compatibility - Date picker rendering - Mobile functionality |
- Test major browsers. - Check mobile browsers. - Verify UI consistency. - Validate interactions. |
| Security Testing | - Input validation - Data sanitization - Permission checks |
- Test XSS prevention. - Verify SQL injection protection. - Check access controls. - Validate user permissions. |
| Acceptance Testing | - Business requirements - User scenarios - Edge cases |
- Verify business rules. - Test customer workflows. - Check error handling. - Validate success paths. |
5 Steps to Add Time with Delivery Date in Magento 2 Default Checkout Page
- Navigate to Stores > Schedule Shipping > Configuration in your Magento admin panel.
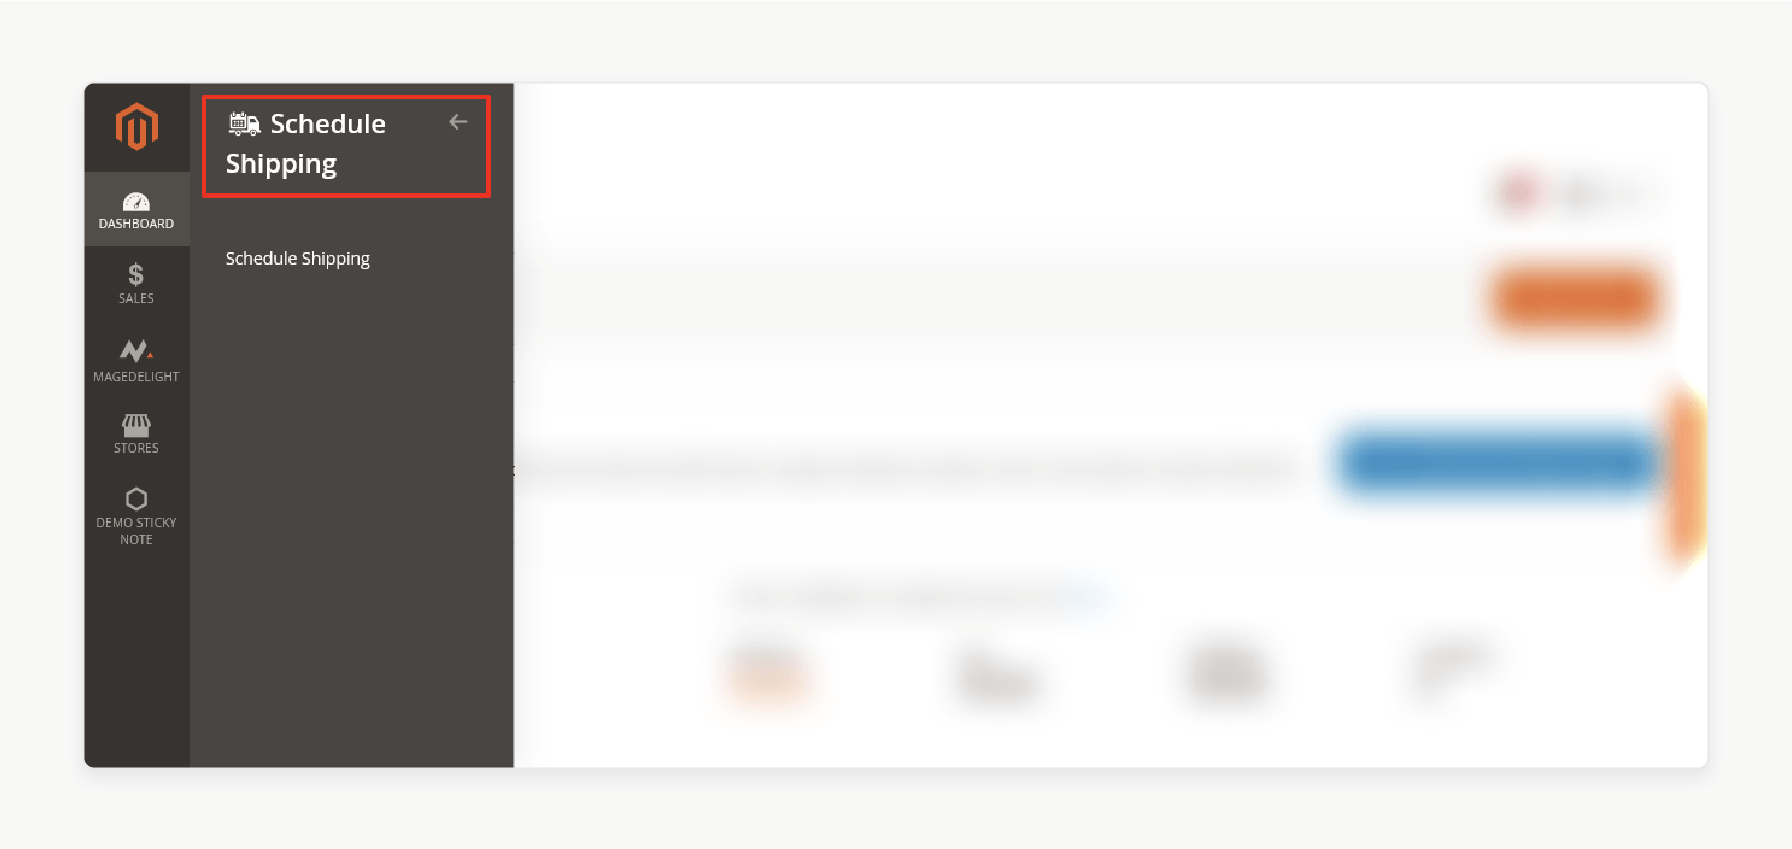
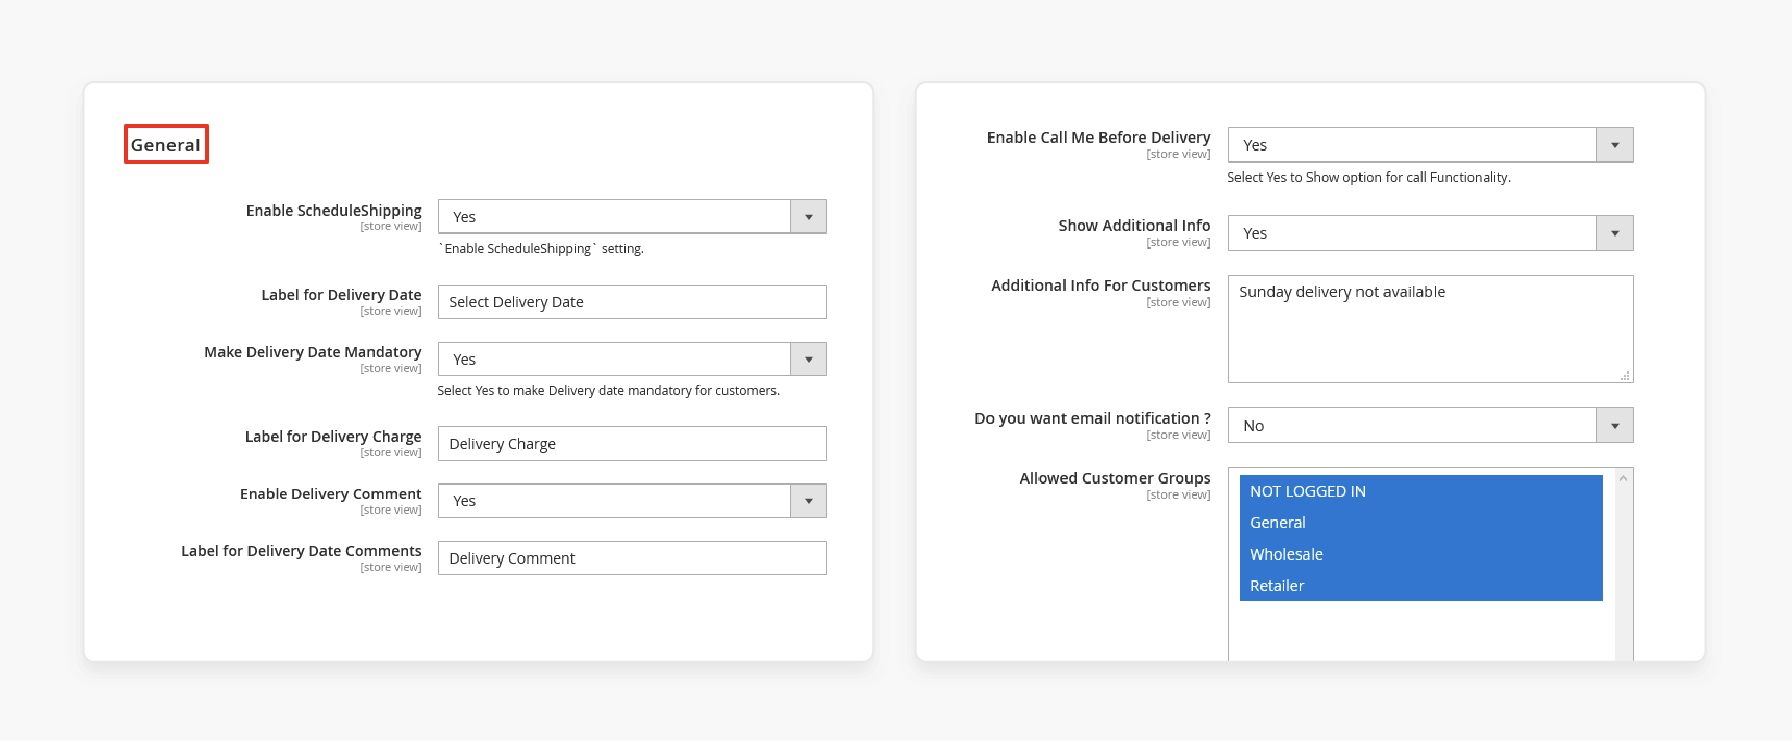
- Under the 'General' section, configure the following settings:
- Enable ScheduleShipping: Set this option to "Yes".
- Label for Delivery Date: Enter text to name the delivery date field.
- Make Delivery Date Mandatory: Enable this option by selecting "Yes".
- Set text for Label for Delivery Charge if additional delivery fees apply.
- Enable Delivery Comment: Enable this option with "Yes" to allow comments.
- Label for Delivery Date Comments: Provide a label for the delivery comments.
- Enable Call Me Before Delivery: Enable this option by selecting "Yes".
- Show Additional Info: Set this option to "Yes". Enter customer information in 'Additional Info For Customers'.
- Do you want email notification?: Disable this option by selecting "No" if needed.
- Allowed Customer Groups: Choose this option to specify customer segments for this feature.
- Expand the 'Calendar view Management' section.
Check the configuration settings below:
- Show Delivery Schedule in: Set this option to "TimeSlot View".
- Maximum Quota Per Time Interval: Define a maximum number to manage booking capacity.

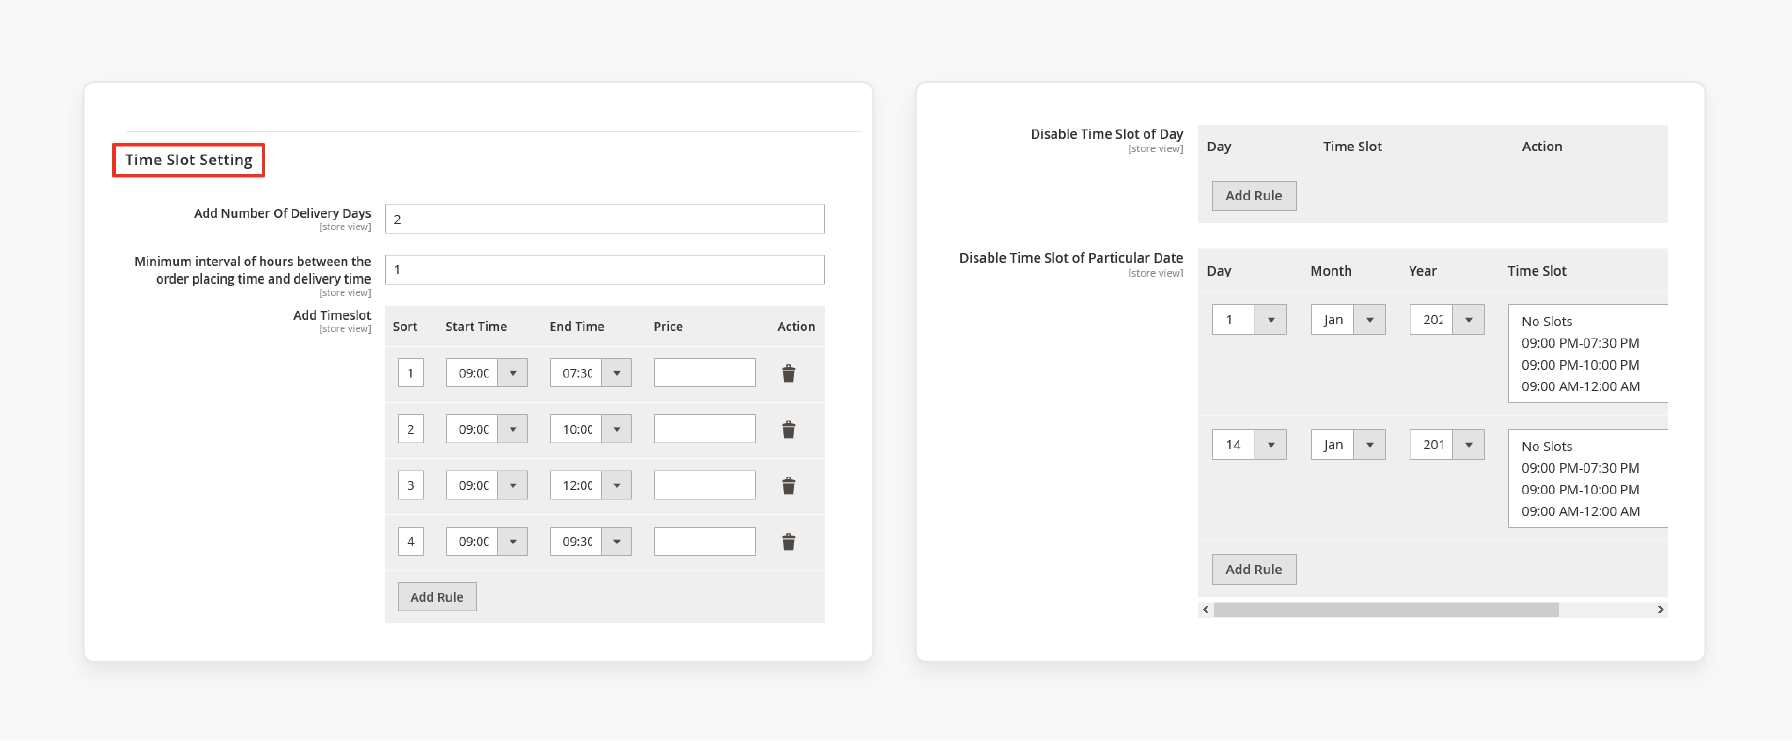
- Expand and configure the 'Time Slot Setting' section as below:
- Add Number of Delivery Days: Set this option to specify available delivery days.
- Minimum interval of hours between the order placing time and delivery time: Insert a numeric value to manage lead times.
- Add Timeslot: Add custom time slots by setting "Sort", "Start Time", "End Time", and "Price". Then, click the 'Add Rule' button.
- Disable Time Slot of Day: Optionally disable specific time slots for any day.
- Disable Time Slot of Particular Date: Disable specific slots on a particular date.
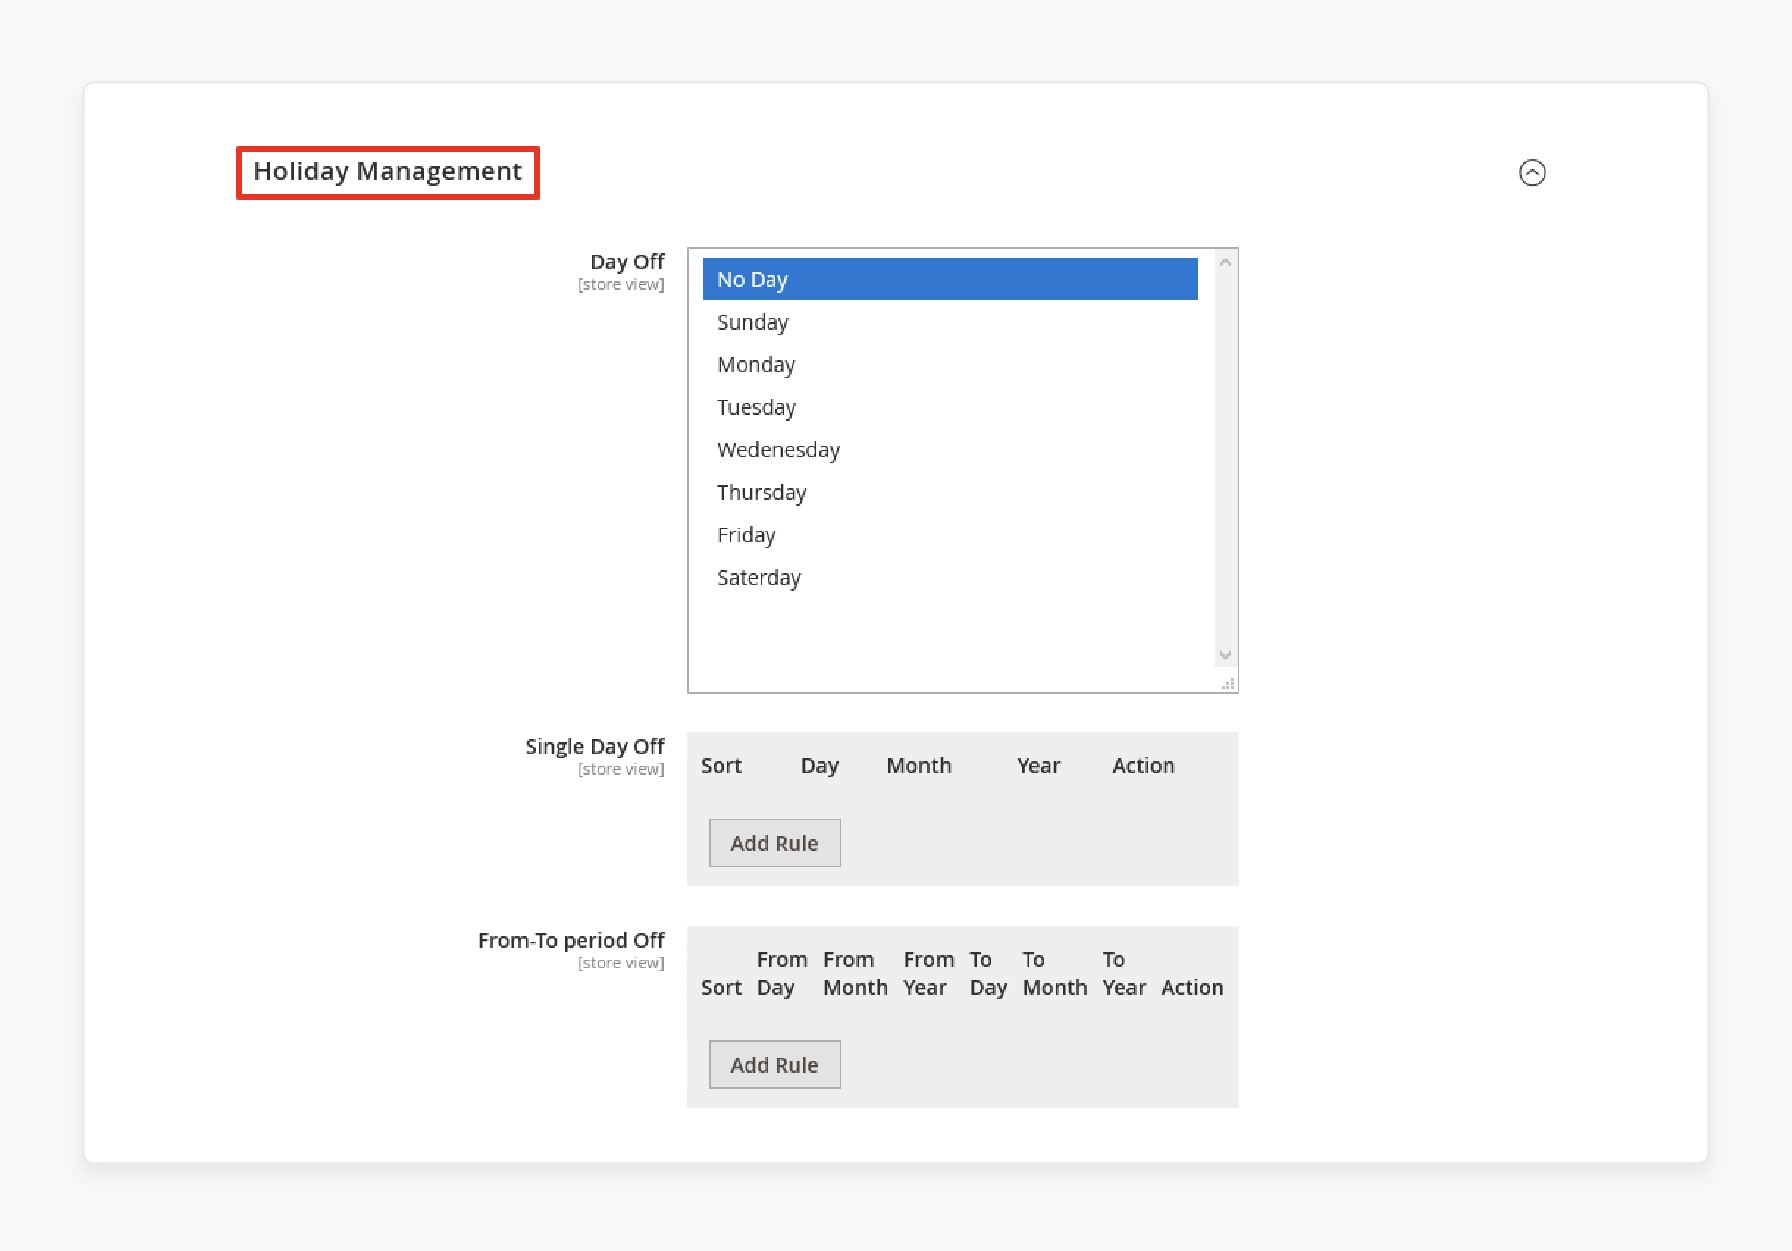
- Expand and configure the 'Holiday Management' settings as shown below:
- Day Off: Mark weekly holidays or select "No Day" to skip holidays.
- Single Day Off: Add single holidays by clicking "Add Rule".
- From-To Period Off: For longer periods, define the range.
Methods to Extend and Disable Delivery Date Functionality
| Configuration Area | Extension Features | Implementation Details |
|---|---|---|
| Basic Functionality | - Enable/disable module. - Delivery date visibility. - Time formats. |
- Access via Admin Panel > Stores > Configuration. - Toggle functionality store-wide. - Set display preferences. |
| Date Restrictions | - Holiday exclusions. - Weekend handling - Blackout dates |
- Set specific dates as unavailable. - Configure recurring holidays. - Define vacation periods. |
| Time Slot Management | - Multiple slots - Order quotas - Delivery windows |
- Configure daily slots. - Set maximum orders per slot. - Manage delivery capacity. |
| Customer Groups | - Group-specific settings. - Access control - Delivery options |
- Set permissions per group. - Configure pricing rules. - Manage availability. |
| Store Configuration | - Multi-store support - Language translations - Time zone settings |
- Configure per store view. - Set regional preferences. - Manage localization. |
| Processing Rules | - Minimum intervals - Cut-off times - Processing windows |
- Set order processing time. - Configure same-day delivery. - Define next-day rules. |
| Documentation | - Order emails - PDF integration - Shipping labels |
- Customize email templates - Configure PDF layouts. - Manage documentation. |
| API integration | - GraphQL support - REST endpoints - Custom field mapping |
- Enable API functionality. - Configure endpoints. - Manage data flow. |
| Performance | - Caching settings - Database optimization - Load management |
- Configure cache rules. - Optimize queries. - Manage system load. |
3 Steps to Implement Magento 2 Order Delivery Date Extension
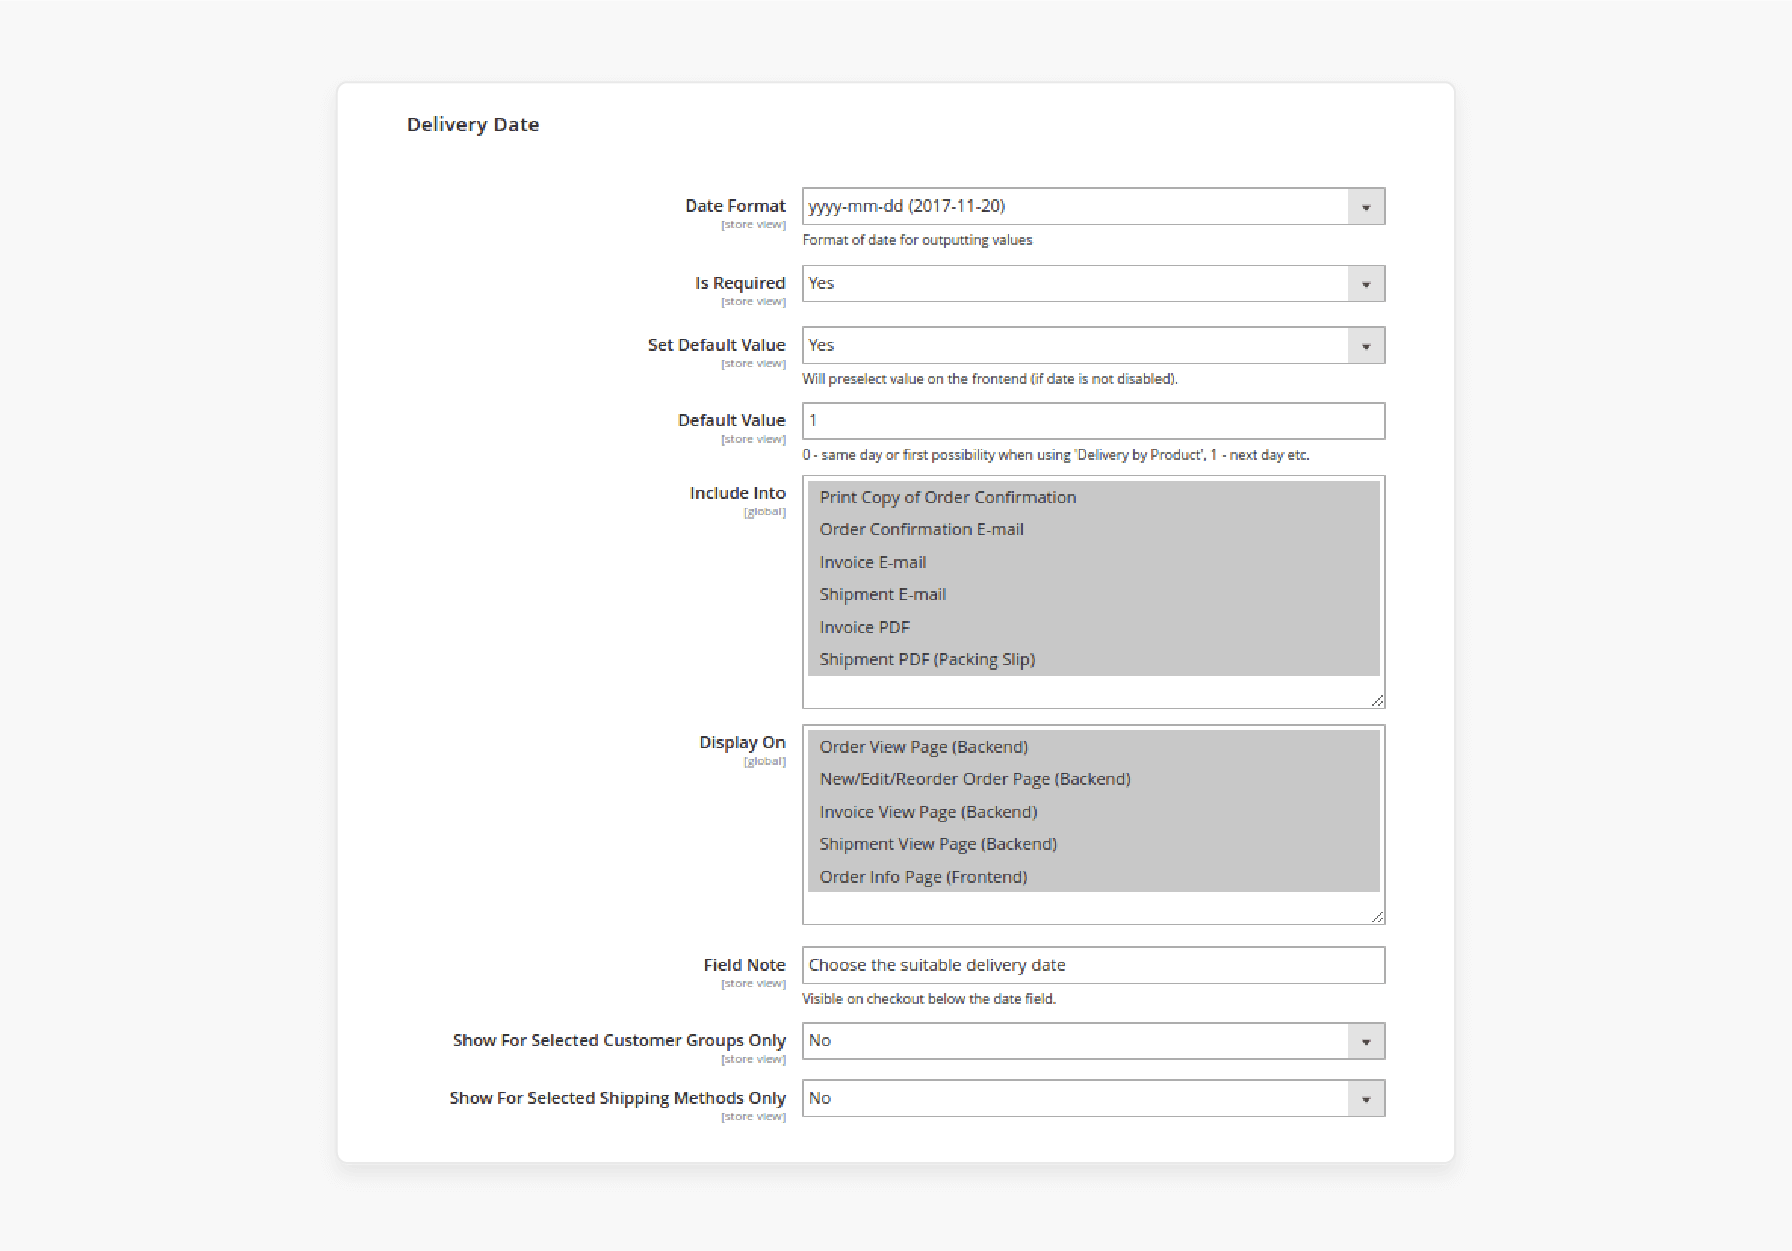
- Go to Stores > Configuration > Delivery Date in your Magento admin.
- Open the Delivery Date section.
- Configure the delivery date options:
-
Date Format: Set your preferred format.
-
Is Required: Select "Yes" to make delivery information mandatory.
-
Set Default Value: Enable this to show a pre-selected delivery date.
-
Default Value Options:
- 0 - closest available date.
- 1 - one day after order creation.
- 2 - two days after order creation, etc.
- 0 - closest available date.
-
Default Value Options:
-
Include Into: Choose where delivery details appear.
-
Display On: Select the backend pages to show delivery details.
-
Field Note: Add a message for customers until they select a delivery time.
-
Show for Selected Customer Groups Only: Select "Yes" if you want this option available for certain customer groups.
-
Show for Selected Shipping Methods Only: Allow delivery options for specific shipping methods.
Best Practices for Implementing Custom Module Development in Magento 2 Order Delivery
| Development Phase | Best Practices | Implementation Details |
|---|---|---|
| Module Structure | - Follow Magento naming conventions. - Maintain proper folder hierarchy. - Use dependency injection. |
- Create an app/code/Vendor/Module structure. - Implement proper registration.php. - Follow PSR-4 autoloading standards. |
| Code Organization | - Separate business logic. - Use interfaces. - Implement design patterns. |
- Create a clear Model/Block/Helper structure. - Use repository patterns. - Implement factory patterns. |
| Database Management | - Use declarative schema. - Implement proper indexing. - Optimize queries. |
- Create setup/schema scripts. - Define proper table relationships. - Use efficient data structures. |
| Frontend Integration | - Use UI components - Implement KnockoutJS. - Follow LESS/CSS standards |
- Create custom checkout fields. - Implement a date picker component. - Use proper theme inheritance. |
| API Development | - Create REST/GraphQL endpoints. - Implement proper authentication - Handle responses efficiently. |
- Define API interfaces. - Implement proper error handling. - Use API versioning. |
| Performance Optimization | - Implement caching. - Minimize database calls. - Optimize JavaScript. |
- Use proper cache tags. - Implement lazy loading. - Optimize asset bundling. |
| Security Measures | - Validate input data. - Implement ACL. - Secure sensitive data. |
- Use proper escaping methods. - Implement CSRF protection. - Follow security best practices. |
| Testing Strategy | - Write unit tests. - Implement integration tests. - Perform UAT. |
- Use PHPUnit for testing. - Create test scenarios. - Document test cases. |
| Deployment Process | - Integrate version control system. - Conduct proper configuration management. - Synchronize environment variables. |
- Use composer for dependencies. - Implement proper deployment flow. - Maintain configuration versions. |
| Maintenance Planning | - Documentation standards. - Implement code review process. - Update compatibility. |
- Maintain README files. - Follow semantic versioning. - Plan upgrade paths. |
Customer Front-End Experience of Magento Checkout Page
1. Delivery Time Slots
Customers can view available delivery time slots and dates on the product page. To do this, they need to select the 'Check Delivery Time Slot' option.
During checkout, customers can choose their preferred delivery date & time slot as follows:
i. Select Shipping Method: Choose an available shipping option. ii. Choose Delivery Date: Pick a date from the calendar. iii. Select Time Slot: Choose a convenient time slot.
Note: Once chosen, "Delivery Date" and "Delivery Time" appear on the right side of the checkout screen.
2. Delivery Information on Email and Order Details
The selected delivery date & time details are included in the order confirmation email. They can then be viewed within the 'Order Details' section on the customer's account.
3. Layout Options
Depending on the backend configuration, the delivery options can appear in various layouts. Examples include "Dropdown", "Chip", and "Box layouts". Each offers a different display style on the product and checkout pages.
4. Zip Code Validation
Customers will be able to choose time slots only after entering a valid "zip code". If the zip code is not provided, a message prompts them to enter one.
5. Multi-Shipping Option
Customers can select time slots for multiple addresses at checkout. They can specify unique time slots for each shipping address. By choosing 'Checkout with Multiple Addresses', you can provide greater flexibility.
6. Viewing Slot Orders
Navigate to Delivery Time Slots > Manage Delivery Time Slots > Time Slot Orders. From here, they can view all delivery slot orders. They can see the chosen delivery date and time for each order.
7. Order Details
Delivery details are accessible within the 'Order Information' section in the admin panel. It gives administrators a comprehensive view of each order's specifics.
8. PDF Documents
Selected delivery information appears on PDF documents. Examples include "invoices", "packing slips", and "credit memos". It ensures delivery details are clear on all order records.
Troubleshooting Issues When Setting Delivery Dates in Magento 2
| Issue Category | Common Problems | Solutions | Prevention Tips |
|---|---|---|---|
| Date Picker Display | - Calendar not showing - Incorrect date format - UI rendering issues |
- Clear browser cache. - Check jQuery conflicts. - Verify template files. - Update UI components. |
- Maintain cache regularly. - Follow Magento coding standards. - Use proper dependency injection. |
| Date Range Configuration | - Invalid minimum days - Maximum date issues - Processing time errors |
- Review admin settings. - Check date calculations. - Validate time zones. - Fix configuration scope. |
- Document configuration changes. - Set realistic processing times. - Implement validation rules. |
| Holiday Management | - Holidays not excluded - Weekend settings ignored - Special dates conflict |
- Update holiday list. - Check date format matching. - Verify exclusion logic. - Fix database entries. |
- Update holiday list regularly. - Test exclusion patterns. - Maintain date formats. |
| Database Issues | - Missing date entries - Corrupt data - Indexing problems |
- Run database repair. - Check table integrity. - Reindex data. - Clear old entries. |
- Maintain database regularly. - Implement data validation. - Schedule reindexing. |
| API Integration | - Sync failures - Invalid responses - Data mapping errors |
- Verify API endpoints. - Check response formats. - Update mappings. - Test connections. |
- Monitor API performance. - Log API interactions. - Conduct regular testing. |
| Performance Problems | - Slow loading calendar - Database query delays - Cache issues |
- Optimize queries. - Enable caching. - Reduce API calls. - Clean logs. |
- Regular performance audits - Implement a caching strategy. - Monitor server resources. |
| Customer Group Conflicts | - Wrong access levels - Pricing rule conflicts - Restriction errors |
- Review permissions. - Check group settings. - Update rule sets. - Fix scope issues. |
- Document group settings. - Implement regular permission audits. - Test group scenarios. |
| Validation Errors | - Wrong error messages - Failed validations - Rule conflicts |
- Update validation rules. - Check error handling. - Fix message display. - Test edge cases. |
- Conduct comprehensive validation testing. - Clear error messages. - Review rules regularly. |
FAQs
1. How do I configure the delivery date and time options in the admin panel?
Access your Magento 2 admin panel, and then navigate to Stores > Configuration. Find the 'Delivery Date Settings' section. Set your preferred delivery time slots and choose available delivery periods. Enable or disable delivery slots for specific days. Add specific cutoff times to set customer group permissions.
2. Can customers add delivery comments with their selected delivery date?
The delivery information field appears below the date selection. Store admins can enable or disable this feature. The comments stay linked to the order details. It helps customers specify any special delivery requirements.
3. How can I disable delivery dates for specific days of the week?
Log into your admin panel, and then go to delivery date settings. Select which days to disable. The checkout page will not show these dates. Customers cannot pick disabled delivery days as the settings update instantly. Apply changes to all customer groups.
4. Why can't customers select a particular date on the checkout page in Magento 2?
Check your delivery period settings and look for any shipping method conflicts. Review customer group permissions to verify the date isn't marked as unavailable. Check if the time slot exists, and then test different customer groups. Clear Magento cache after changes.
5. How does the custom checkout field extension affect delivery date functionality?
Custom checkout fields work alongside delivery date features. They don't interfere with the default Magento functionality. The delivery date field stays separate as both extensions share the checkout page.
-
Can I add the delivery time field in Magento 2 without an extension?
Yes, you can develop a custom module for this feature. Create new database tables for time fields to add fields to the checkout page. Write controllers and style your custom fields to handle data.
-
How do I add order delivery date to customer emails?
Modify your email templates to add delivery date variables to templates. Include the chosen delivery date information and display selected time slots in emails. Add any delivery comments to test email templates thoroughly.
Summary
The "Add delivery date to the checkout page in Magento 2" extension allows customers to add a delivery date and time slot during checkout. It helps store admins:
- Improve the shopping experience by offering flexible delivery time slots.
- Provide a smoother customer experience.
- Make it easier for customers to set a convenient delivery date.
- Reduce cart abandonment and enhance overall service.
- Allow users to select a specific date before completing their orders.
- Improve user experience and make order processing easier.
Allow buyers to pick a delivery date at checkout with Magento hosting plans.


