
Magento 2 Go-Live Checklist For a Smooth Site Launch
Launching a Magento 2 website comes with many tasks. It has to be well-administered to reduce any bugs & issues post-launch.
Before the go-live process, you should verify that everything is configured correctly.
A comprehensive checklist ensures that you don’t miss out on anything. You can use it to perform a quick quality assurance check.
These can be the final checks on your ecommerce project before it is launched.
This article covers a go-live checklist for Magento 2.
Magento 2 Go-Live Checklist
1. System Requirements
To take your site live, you have to meet the Magento 2 system requirements. It includes components such as:
- Operating system
- PHP version
- Redis & Varnish Cache
- Apache & NGINX server support
- Elasticsearch
- PHP extensions
- RabbitMQ
The software versions are officially tested & supported for Magento 2. Without the latest technology stack, you cannot get your site live.
You can learn about the Magento 2 System Requirements here.
2. Create a Favicon
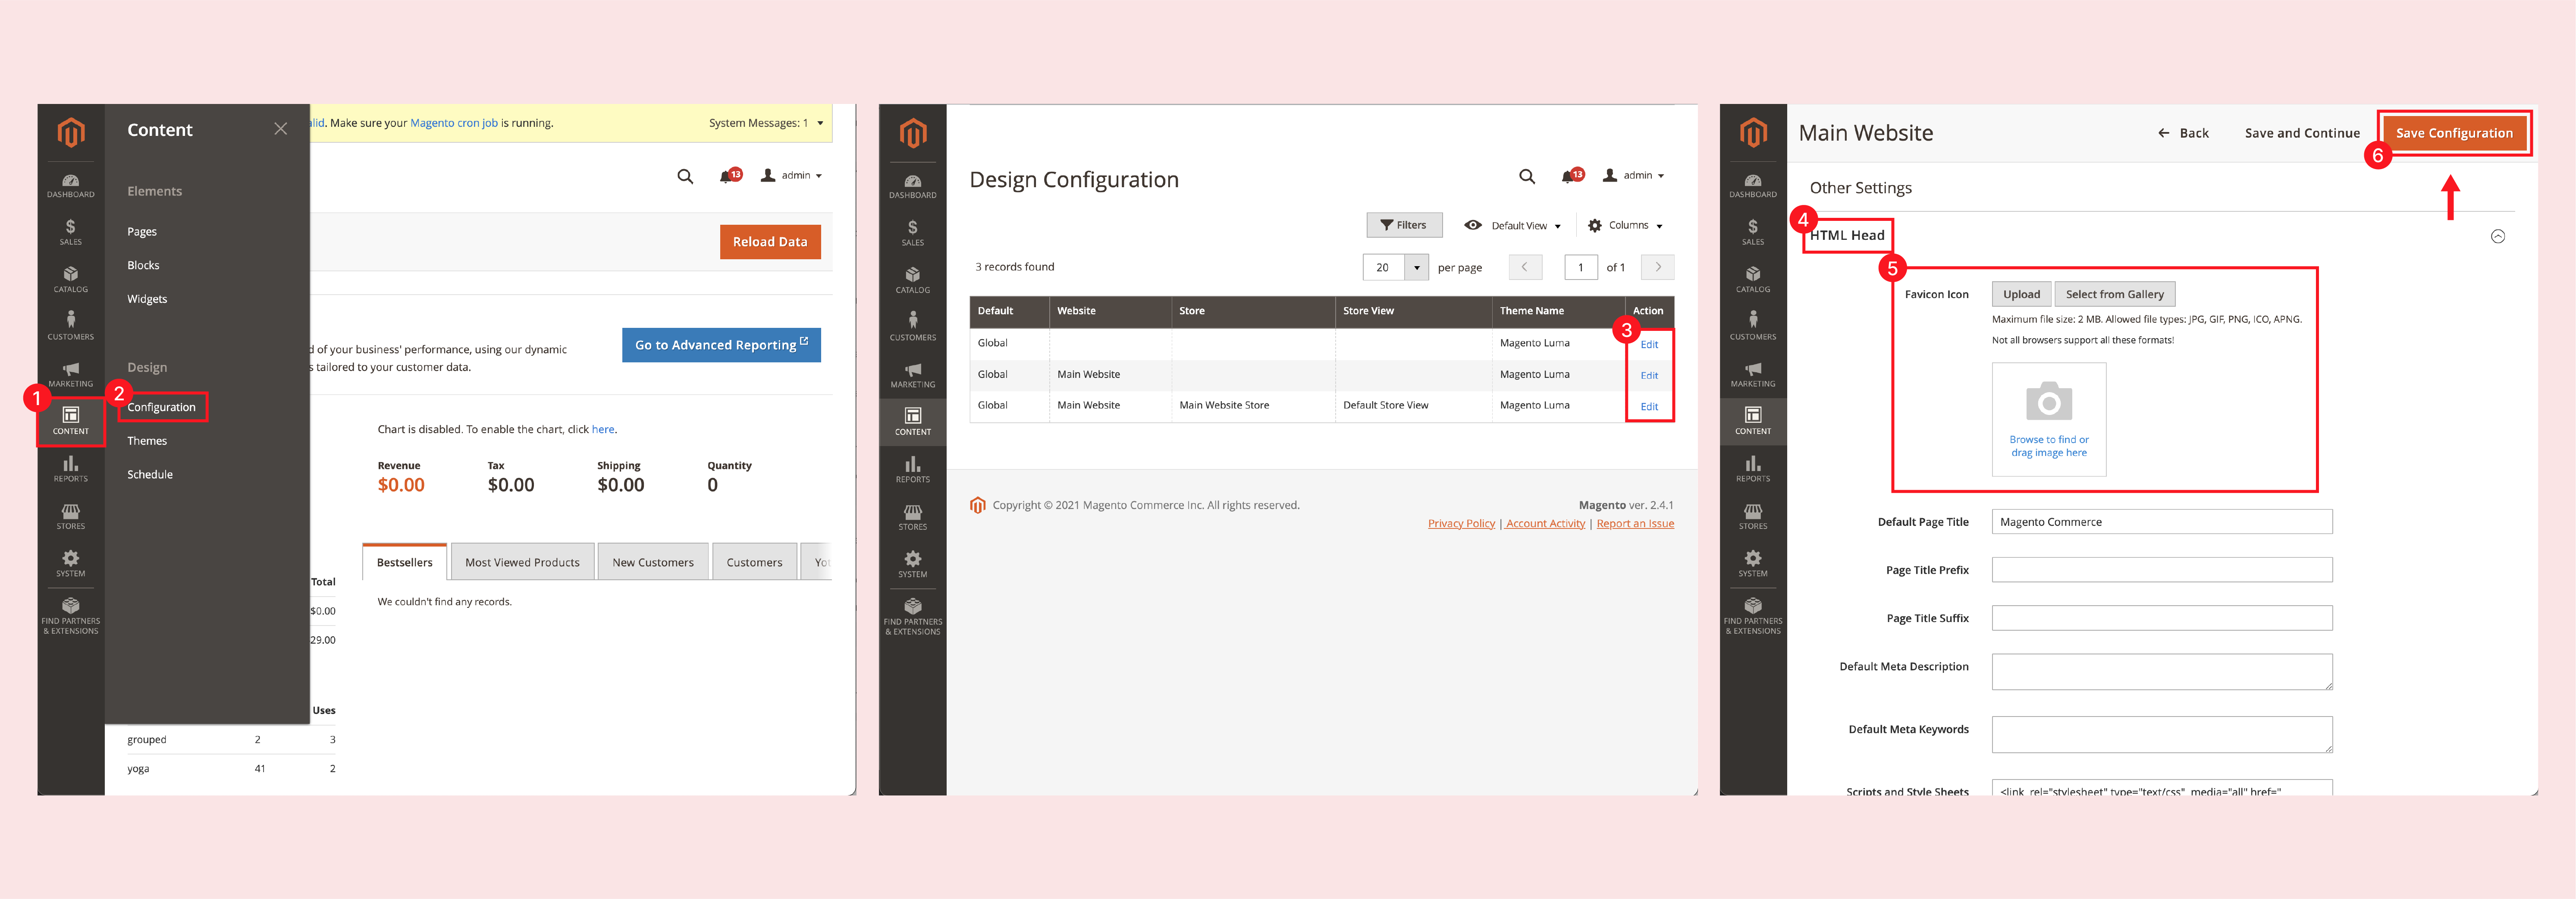
A Favicon is a small icon associated with your brand & website. You can see it on the tab icon or the address bar.
Favicons are prominent on Google’s mobile search. The desktop search favicon is still in the experimental stage.
A favicon ensures brand recognition. It highlights your website in search results. It also improves user navigation on browsers.
To add a custom favicon in Magento 2:
- Go to Content > Design > Configuration.
- In the scope grid, decide the level where you want to configure the favicon. Click Edit to add the changes.
- Under Other Settings, expand the HTML Head options.
- Click Upload next to the Favicon icon. Select a file of your custom favicon.
- Save Configuration in the upper right corner.
3. Check the Store URLs
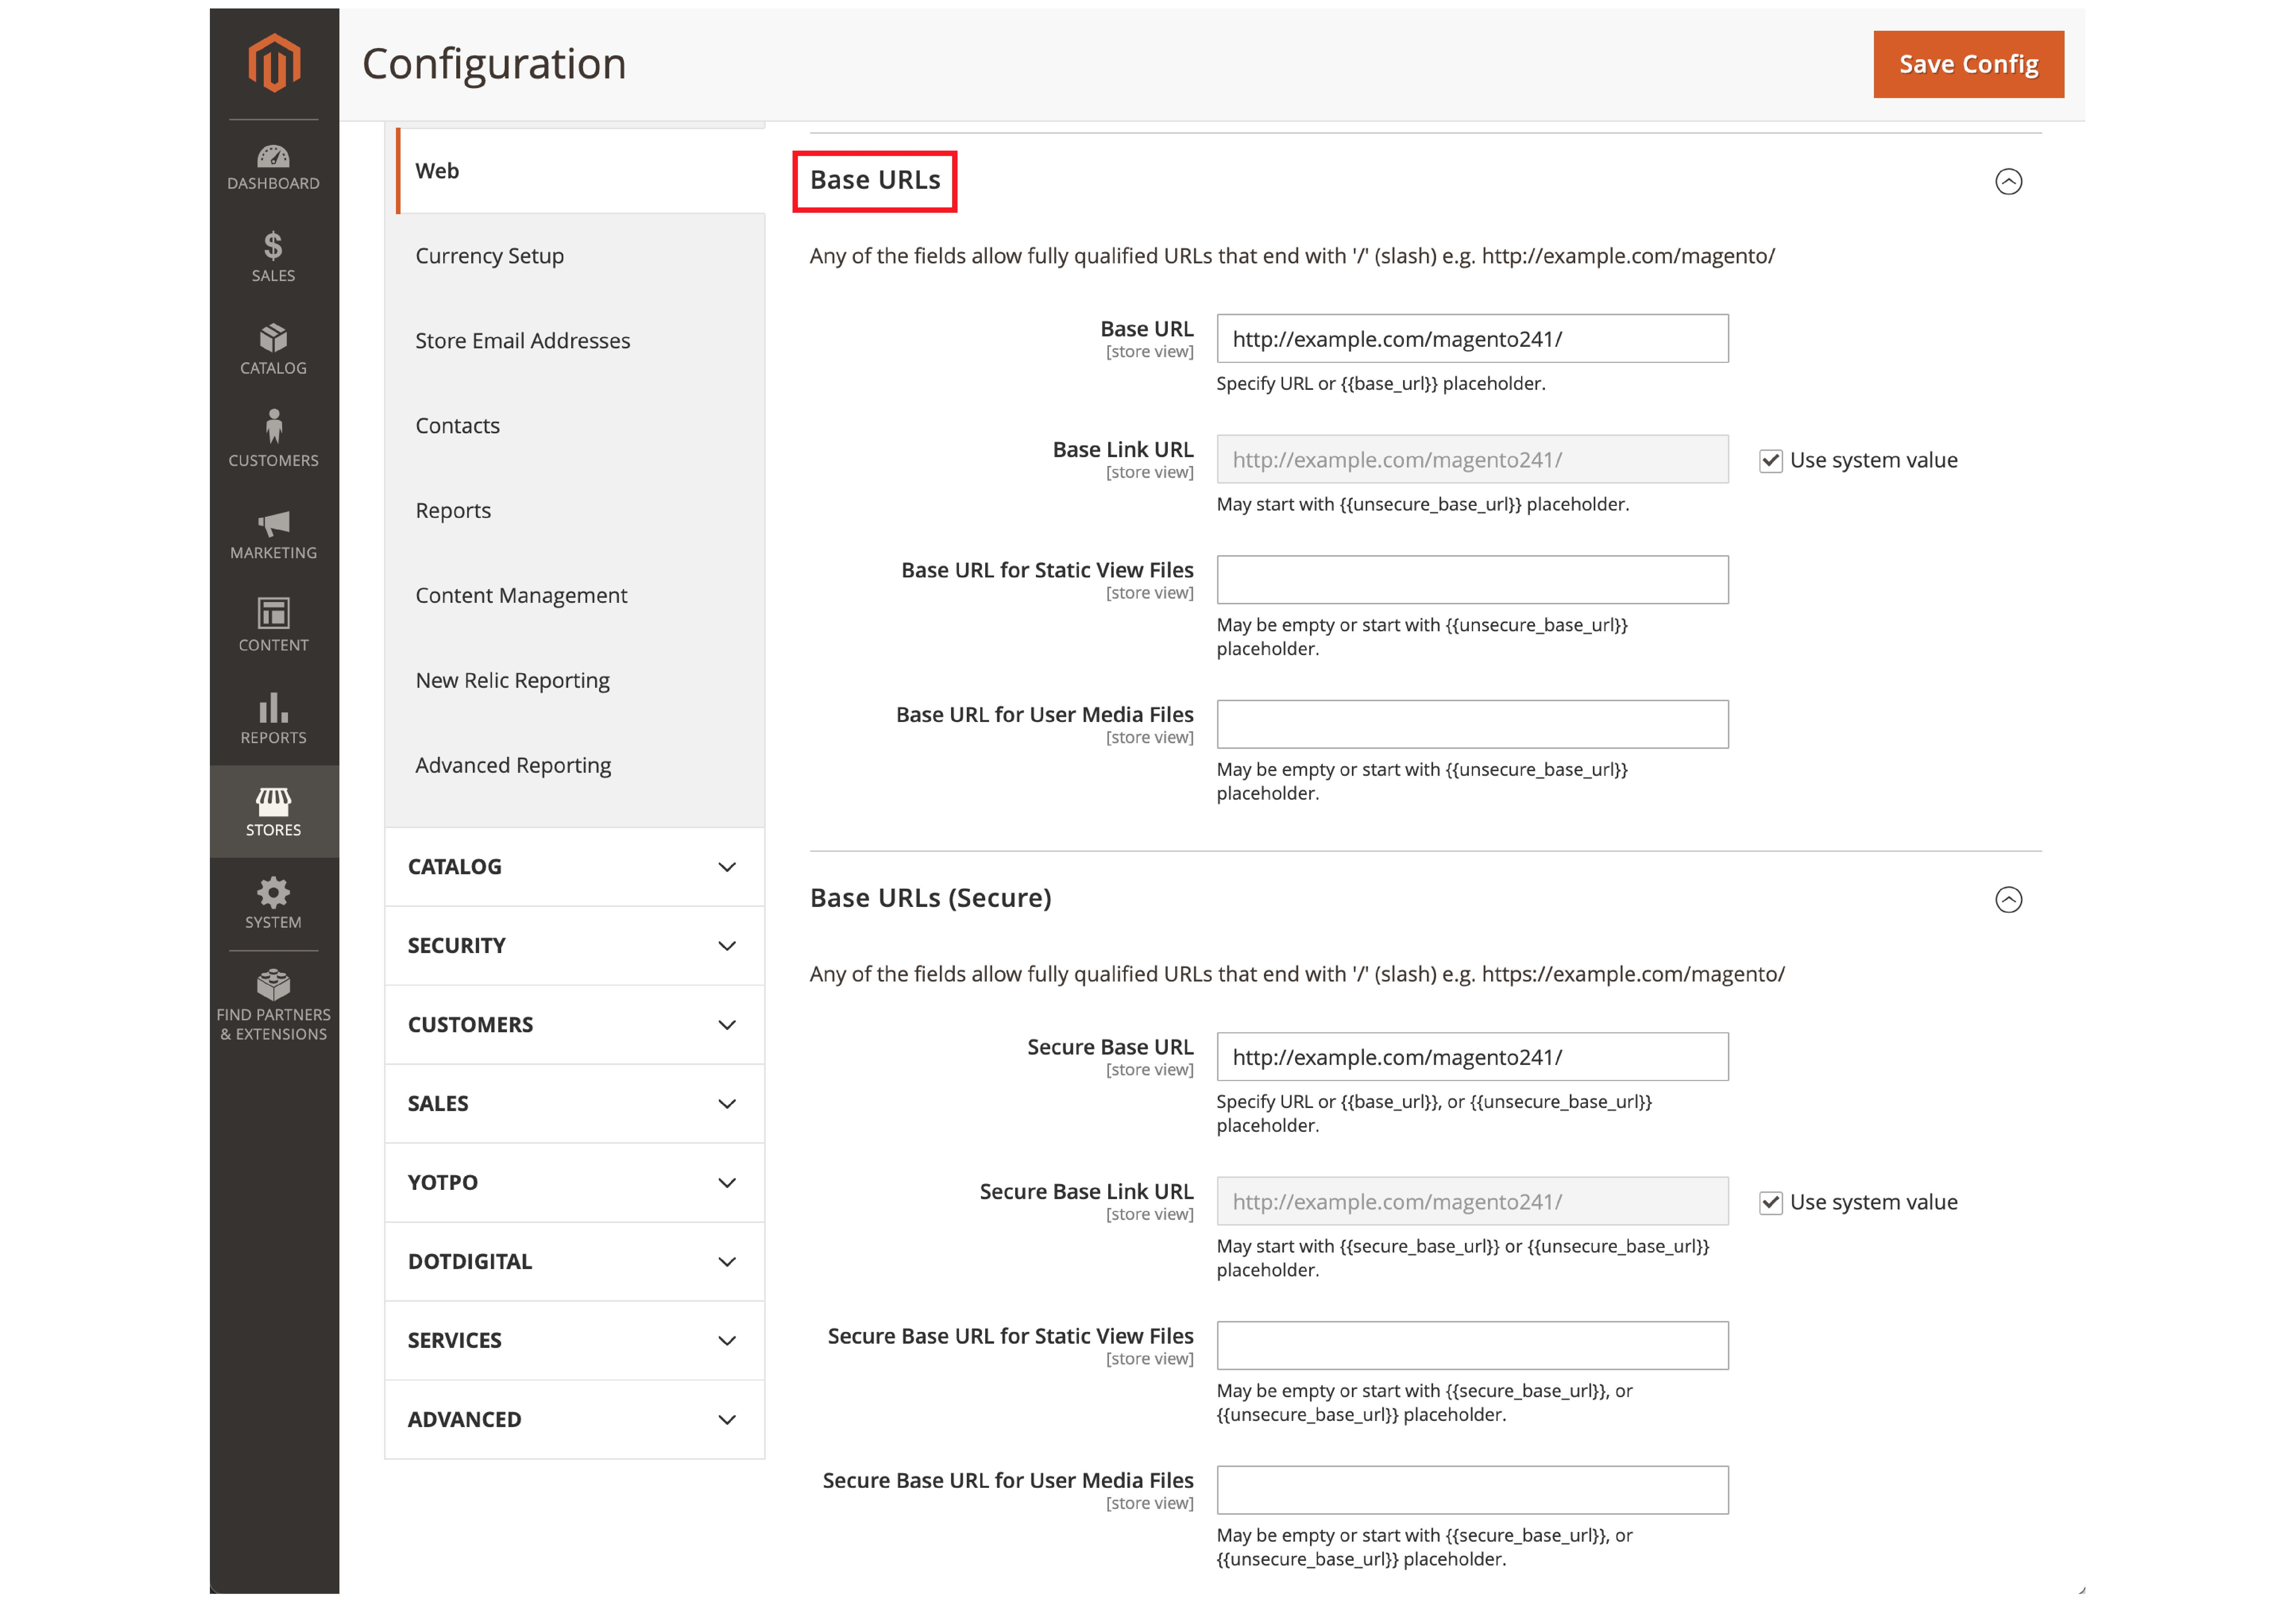
Magento has a base URL assigned to the storefront. There is also an Admin URL that is assigned to the Admin.
Adobe has variables that define the internal links of the store. These are defined in relation to the base URL. That way, you can move the store’s location without updating the links.
Check if you have configured the URLs well & they are working correctly. Some of the things to consider are:
- URLs are showing the 200 OK status
- Check the www and HTTP/HTTPS status
- Base URLs stored in core_config_data have to be updated. Or else they are redirected back to the staging site.
- See if the store URLs are user-friendly.
- Check the catalog and product URLs
4. Transactional Emails
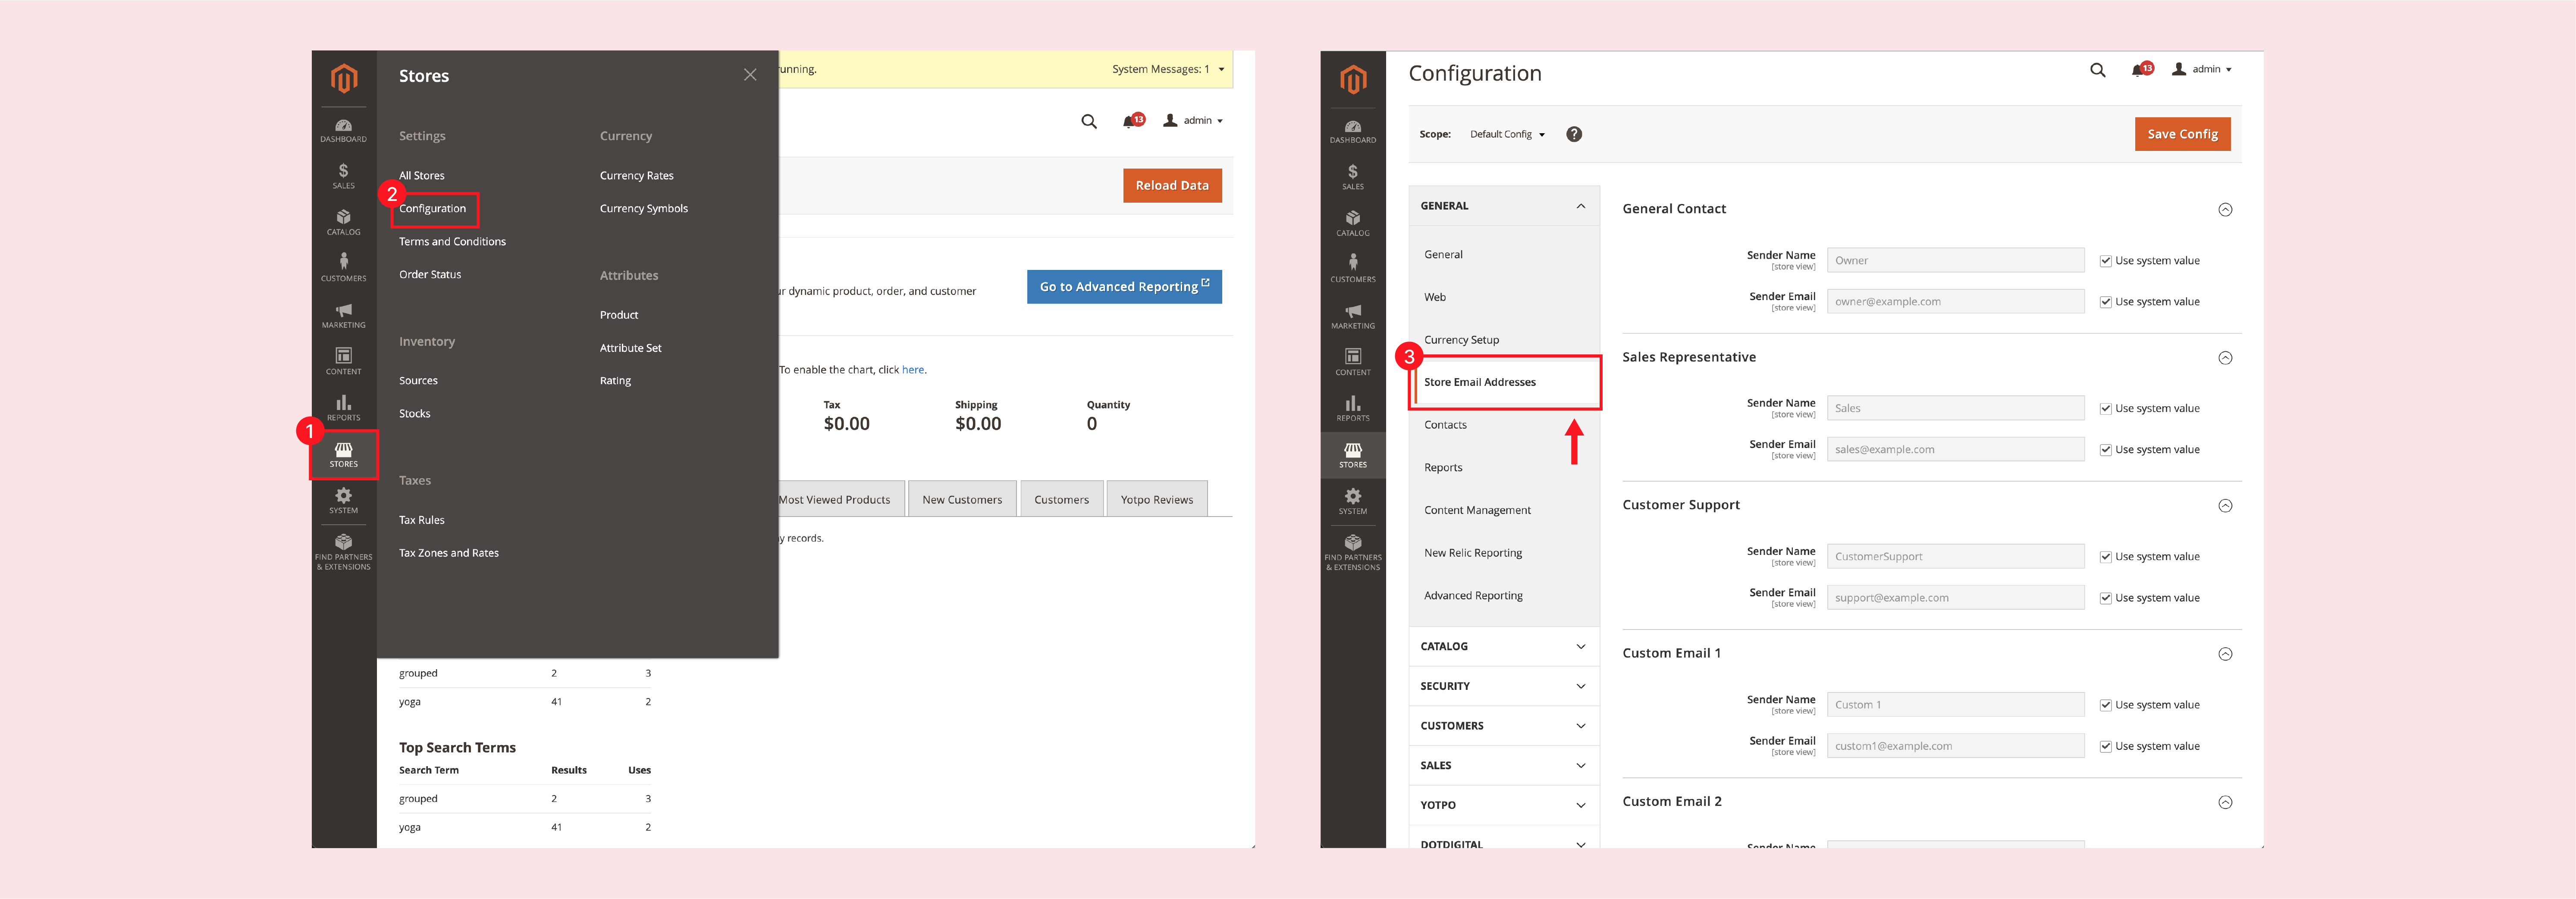
Emails are an excellent way to communicate with your customers. There are many email configurations you can check before going live.
Firstly, update the test email Ids you may have used for the staging environment. Add the real business emails to the list.
You do that by changing the store email address from the Admin sidebar. Go to Stores > Settings > Configuration.
If you have a contact page, you can add a business email address.
- Navigate to Stores > Configuration > General
- Under General, Click on Contacts.
- Expand the Contact Us section to make changes.
Some of the other primary email settings include:
- Sales & order confirmation templates.
- Add new account sign-ups
- Create Forgotten password emails.
- Add links to reset password emails.
- In-stock notifications.
- Store logo in emails for consistent branding.
5. Check Product & Category pages.
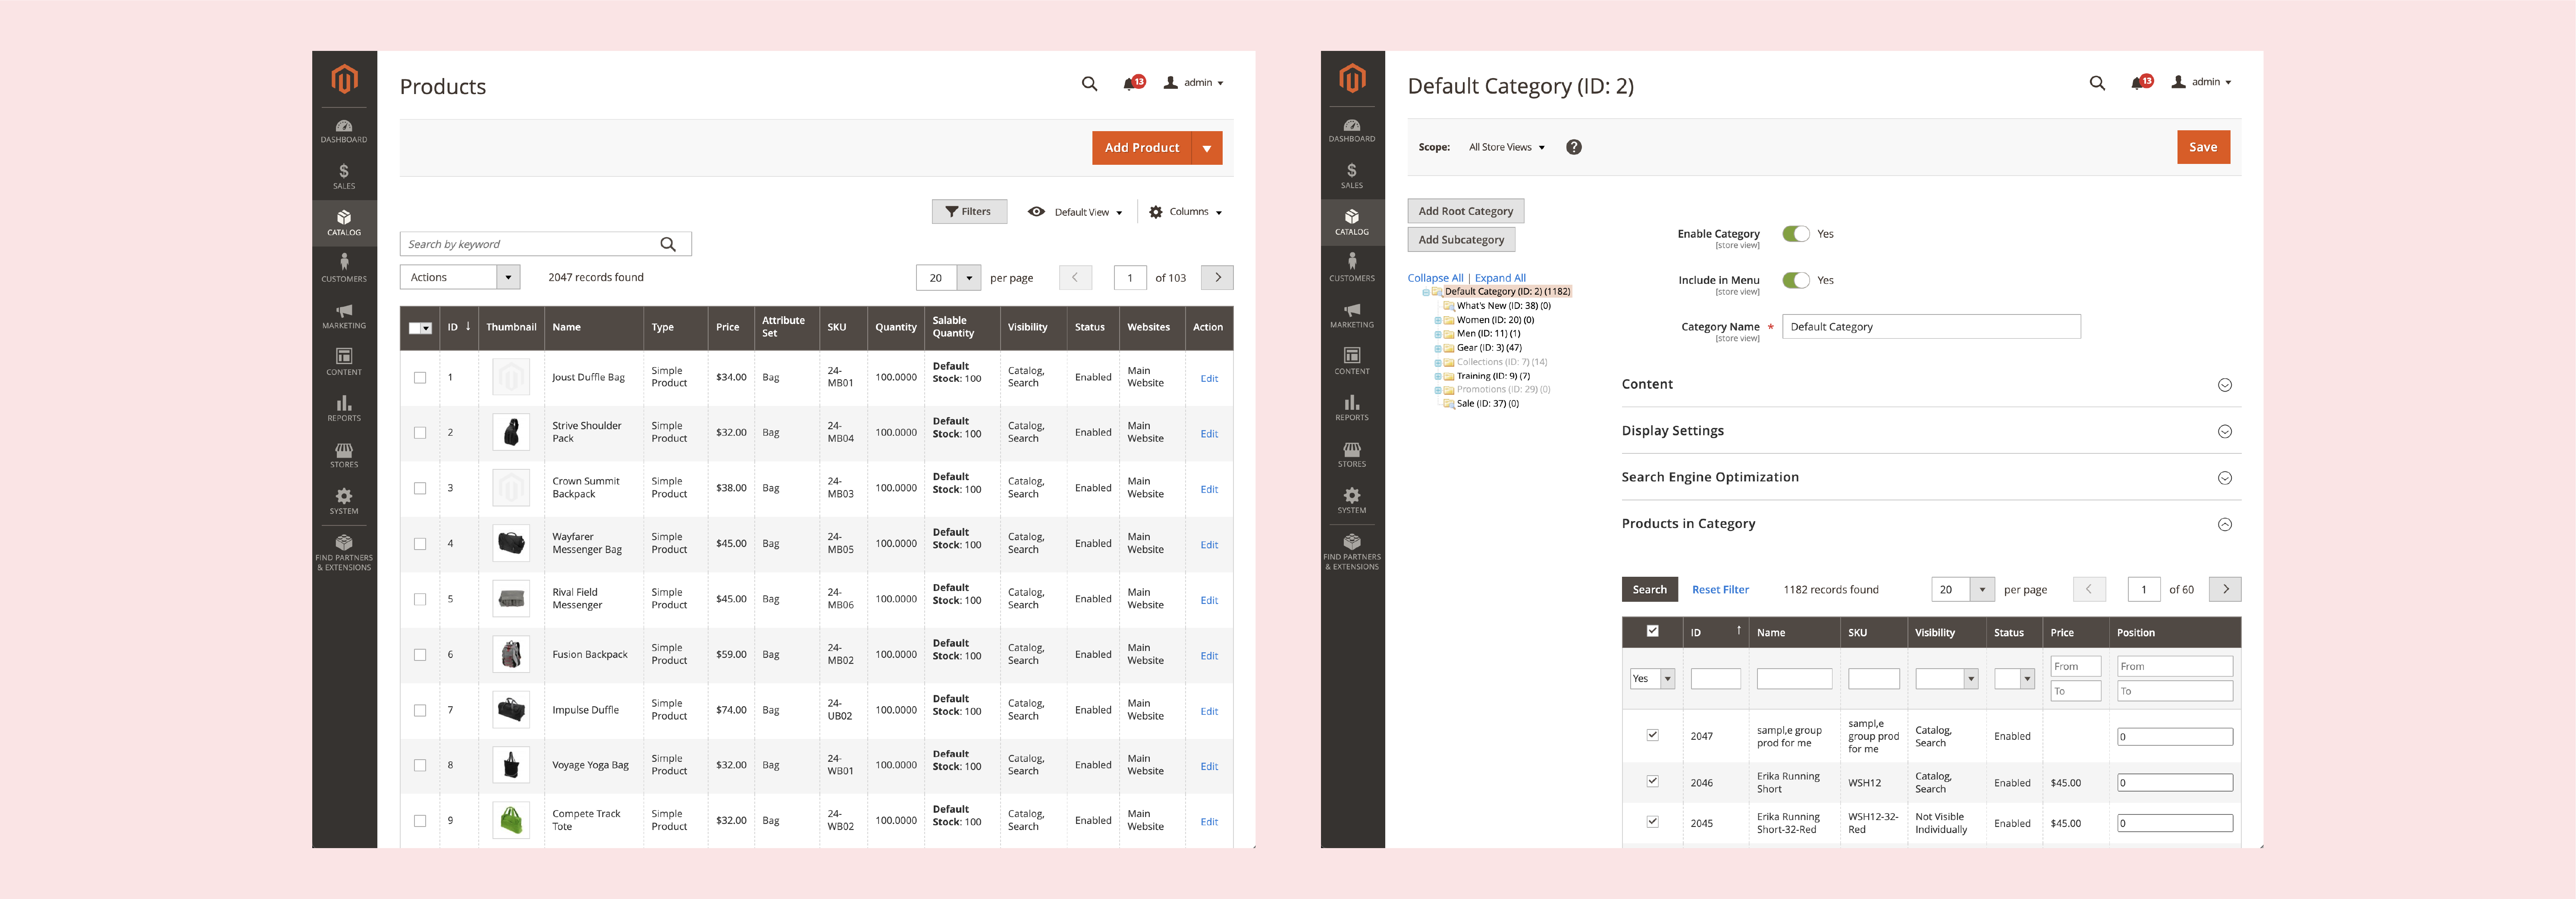
The Product Grid shows the products in a catalog. Ensure that product information & images are optimized for all devices. The product pricing is displayed correctly, along with the “Add to Cart” button.
Check the Add to Wishlist and Out of Stock features. You can also enable Back in Stock notifications.
See that all the “test products” are removed from the site.
For the catalog, check whether the products are grouped under the right brands. The catalog descriptions & functions should be working correctly.
Check the following in the products & catalog pages:
- Product descriptions
- Grouped products
- Pricing and discounts
- Filters & Sort By functions
- Product images are shown properly
- The H1 tag for Product & Category titles
6. SEO Settings
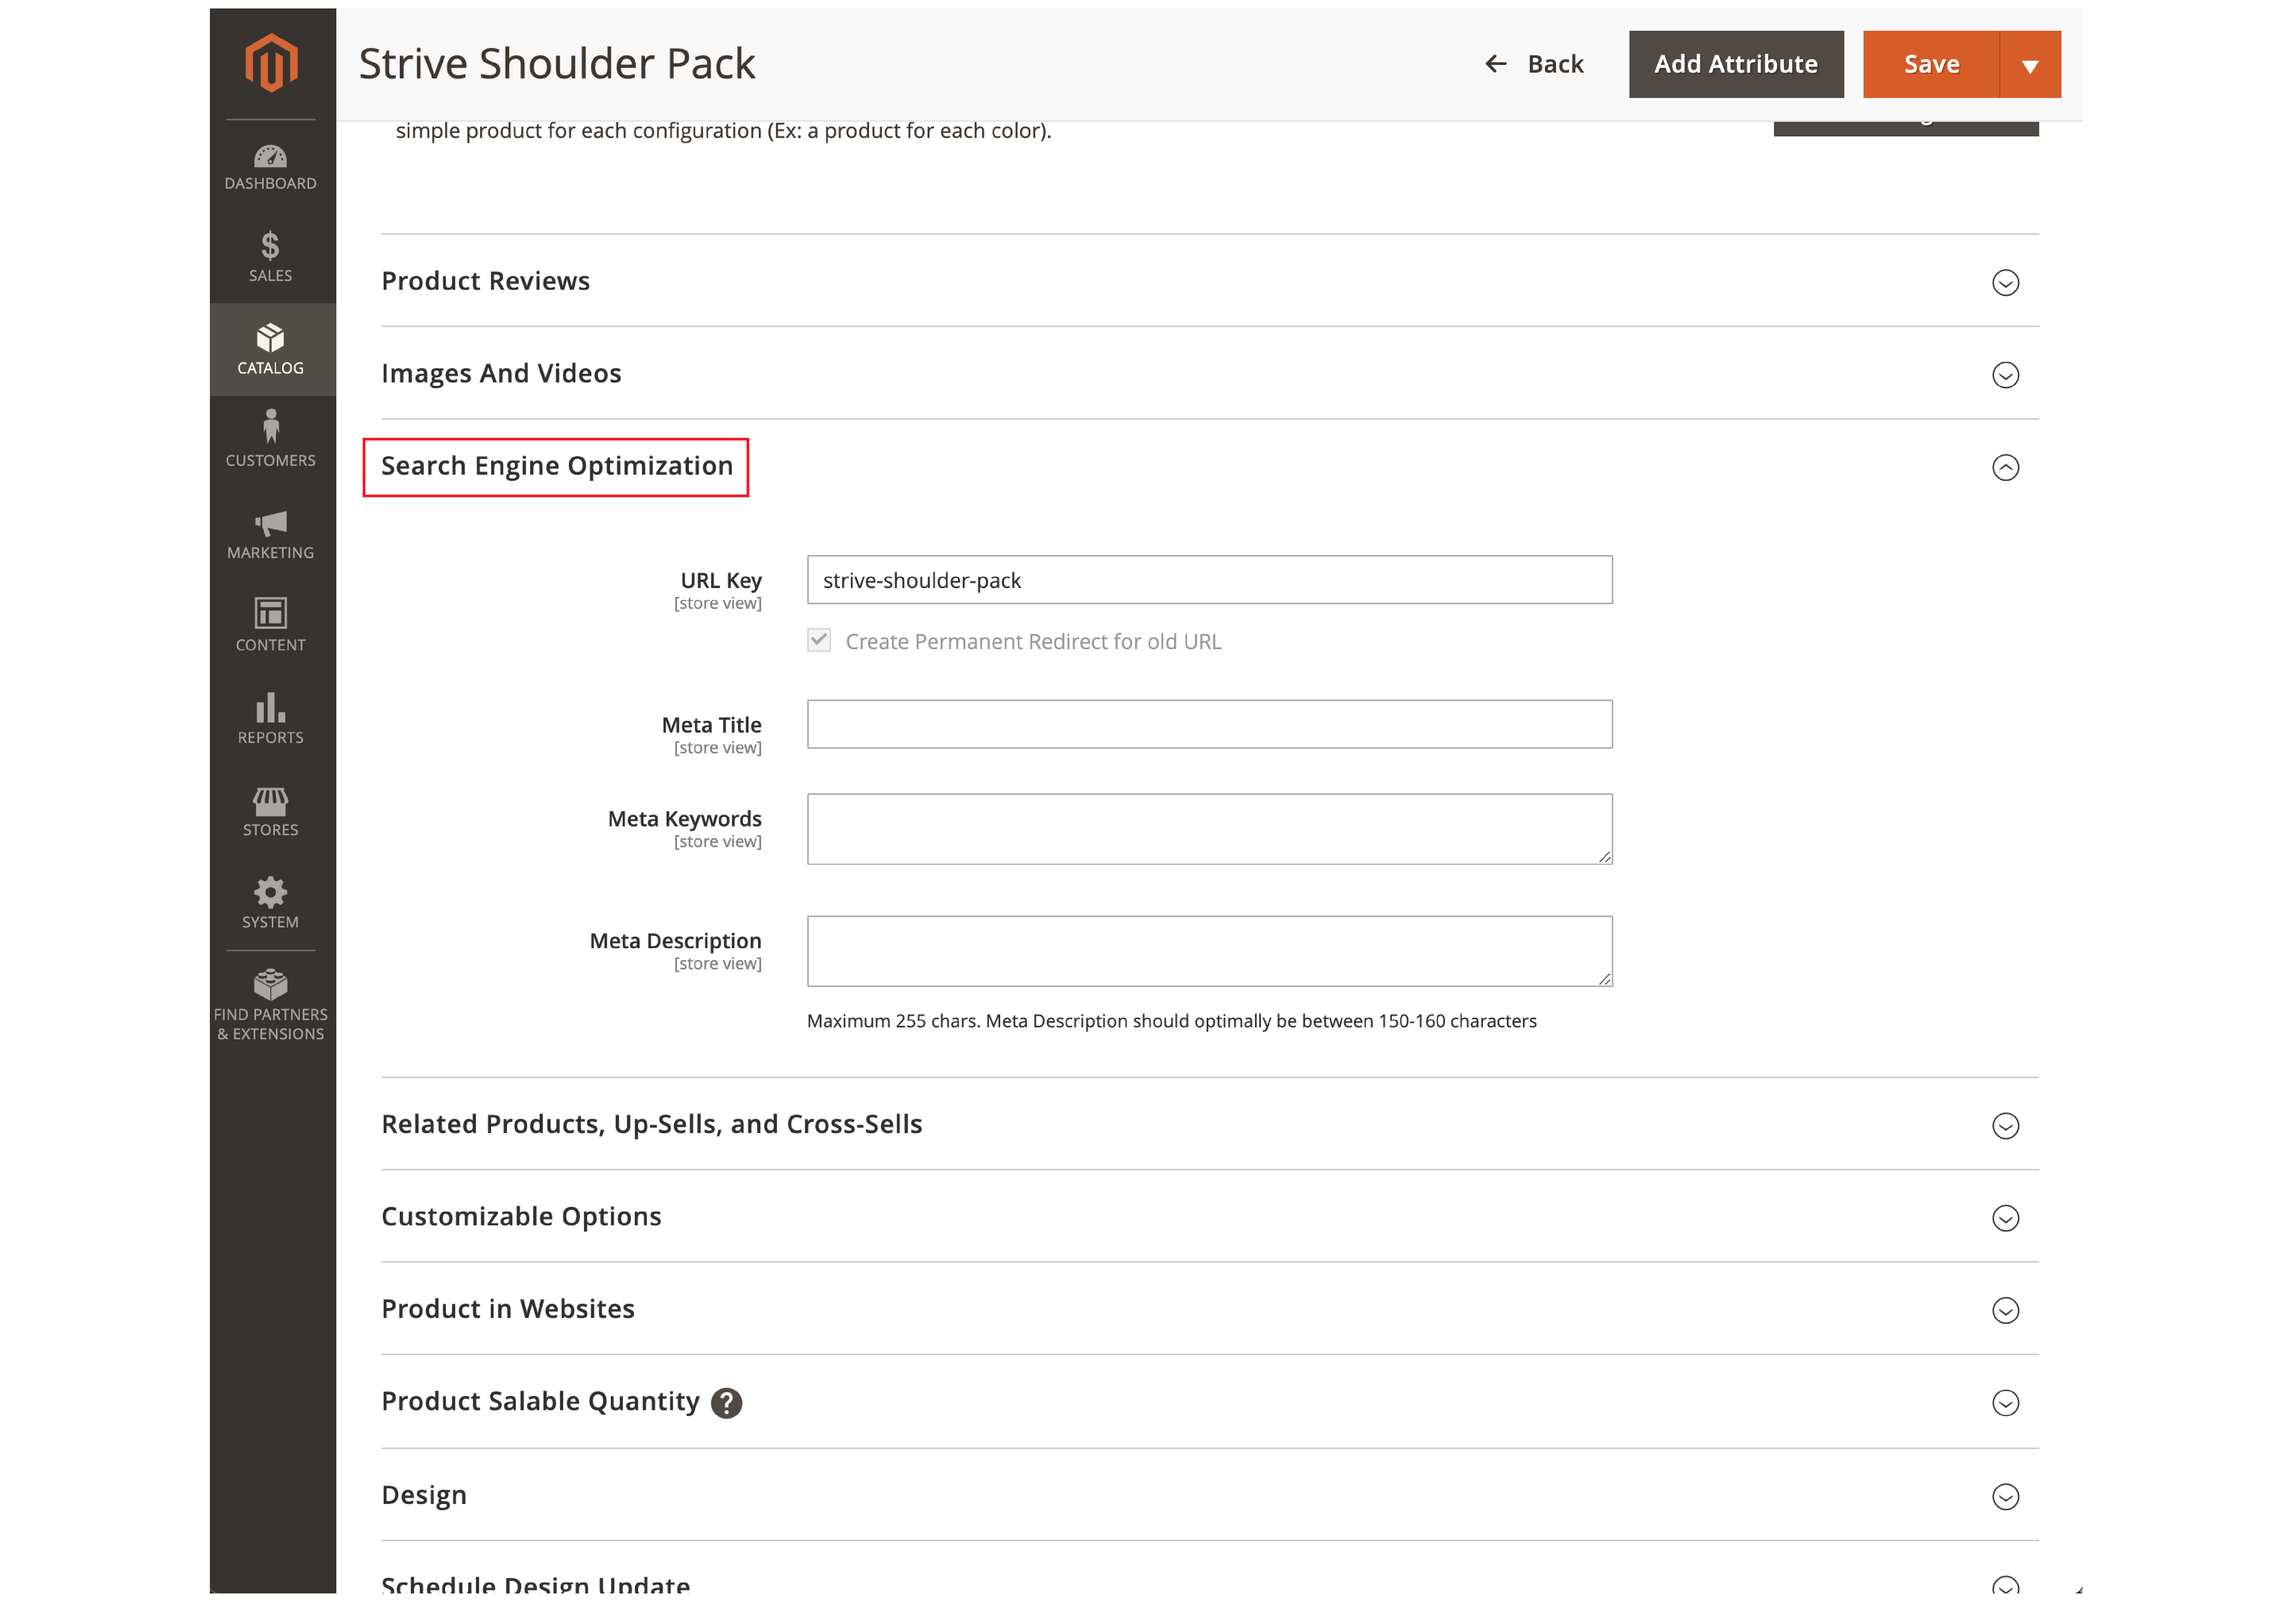
The Magento site can be set to non-index/no-follow before the launch. That way, search engines do not index the site before it has gone live.
Robots.txt blocks search engines from accessing the site. It also prevents dynamic URLs from being indexed.
Once the site is live, you can enable all the SEO settings. Ensure that the site is now set to index/follow. You can unblock the search engines from robots.txt.
The primary SEO aspects to check are:
- Meta title & meta descriptions
- Configure Magento XML Sitemaps
- Schema markup for better SERPs
- Check for broken links in the site content
- 301 Redirects
- High impact keywords for site content
- Images & videos are optimized
- Reviews & ratings
7. Shipping & Payment Method
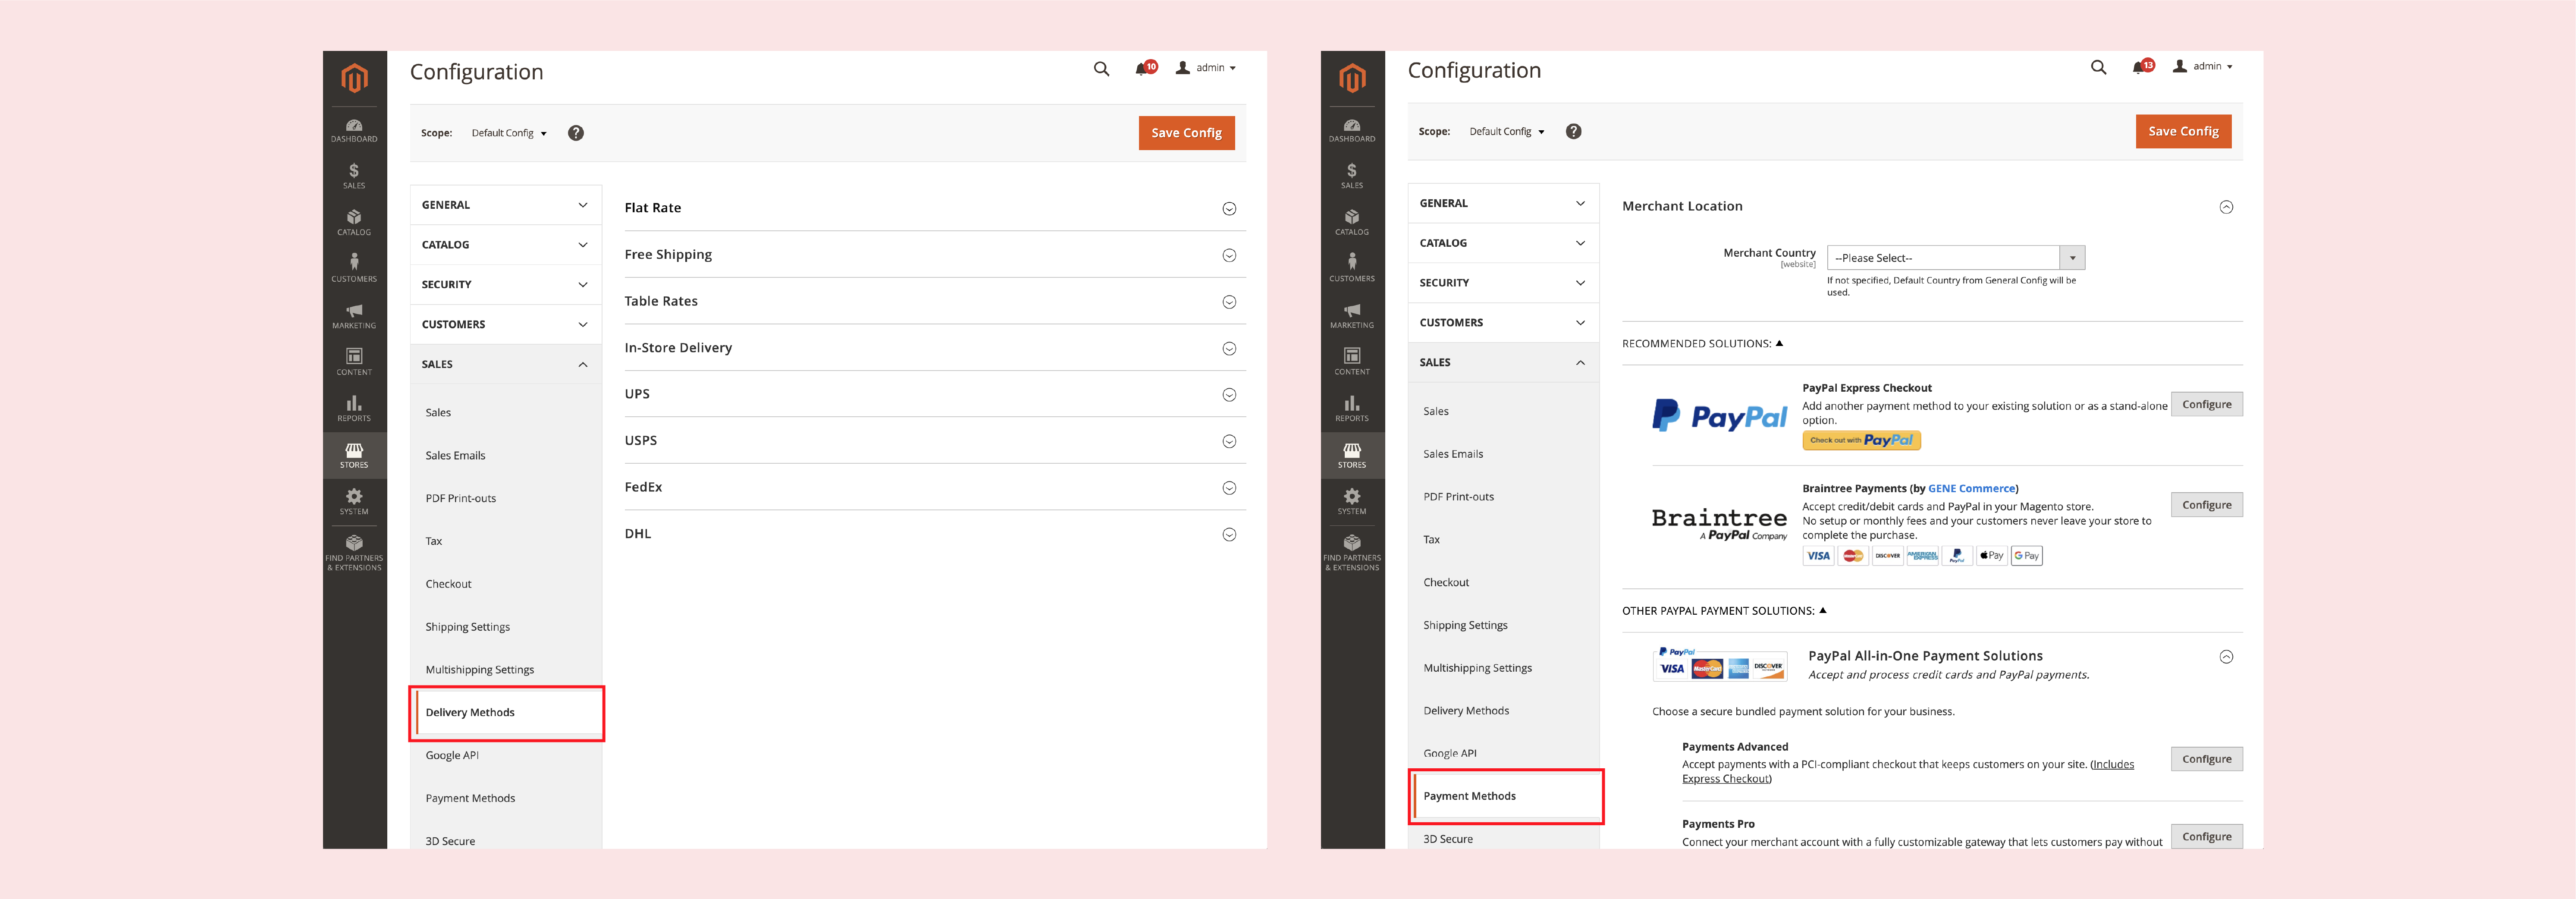
Configure & check the shipping methods before going live. The default Magento offers eight types of shipping. You can add more shipping modes.
The primary shipping methods for Magento 2 include:
- Flat Rate
- Free Shipping
- Table Rates
- In-store Delivery
- UPS
- USPS
- FedEx
- DHL
You can navigate these settings at Store > Configuration > Sales > Delivery Methods Features such as free shipping encourage more sales.
For payment methods, see if the options are well configured.
Go to Stores > Configuration > Sales > Payment Methods
Check if the merchant’s location is set on your preferred business address. Magento recommends Paypal & Braintree as payment methods.
You can configure a range of payment options such as:
- Credit cards & Paypal payments
- Payment gateways like Payflow Pro
- Klarna
- AmazonPay
- Check/ Money Order
- Cash on Delivery Payment
- Bank Transfer Payment
- Purchase Order
It is essential to test the payment methods for smooth transactions.
8. Tax Settings
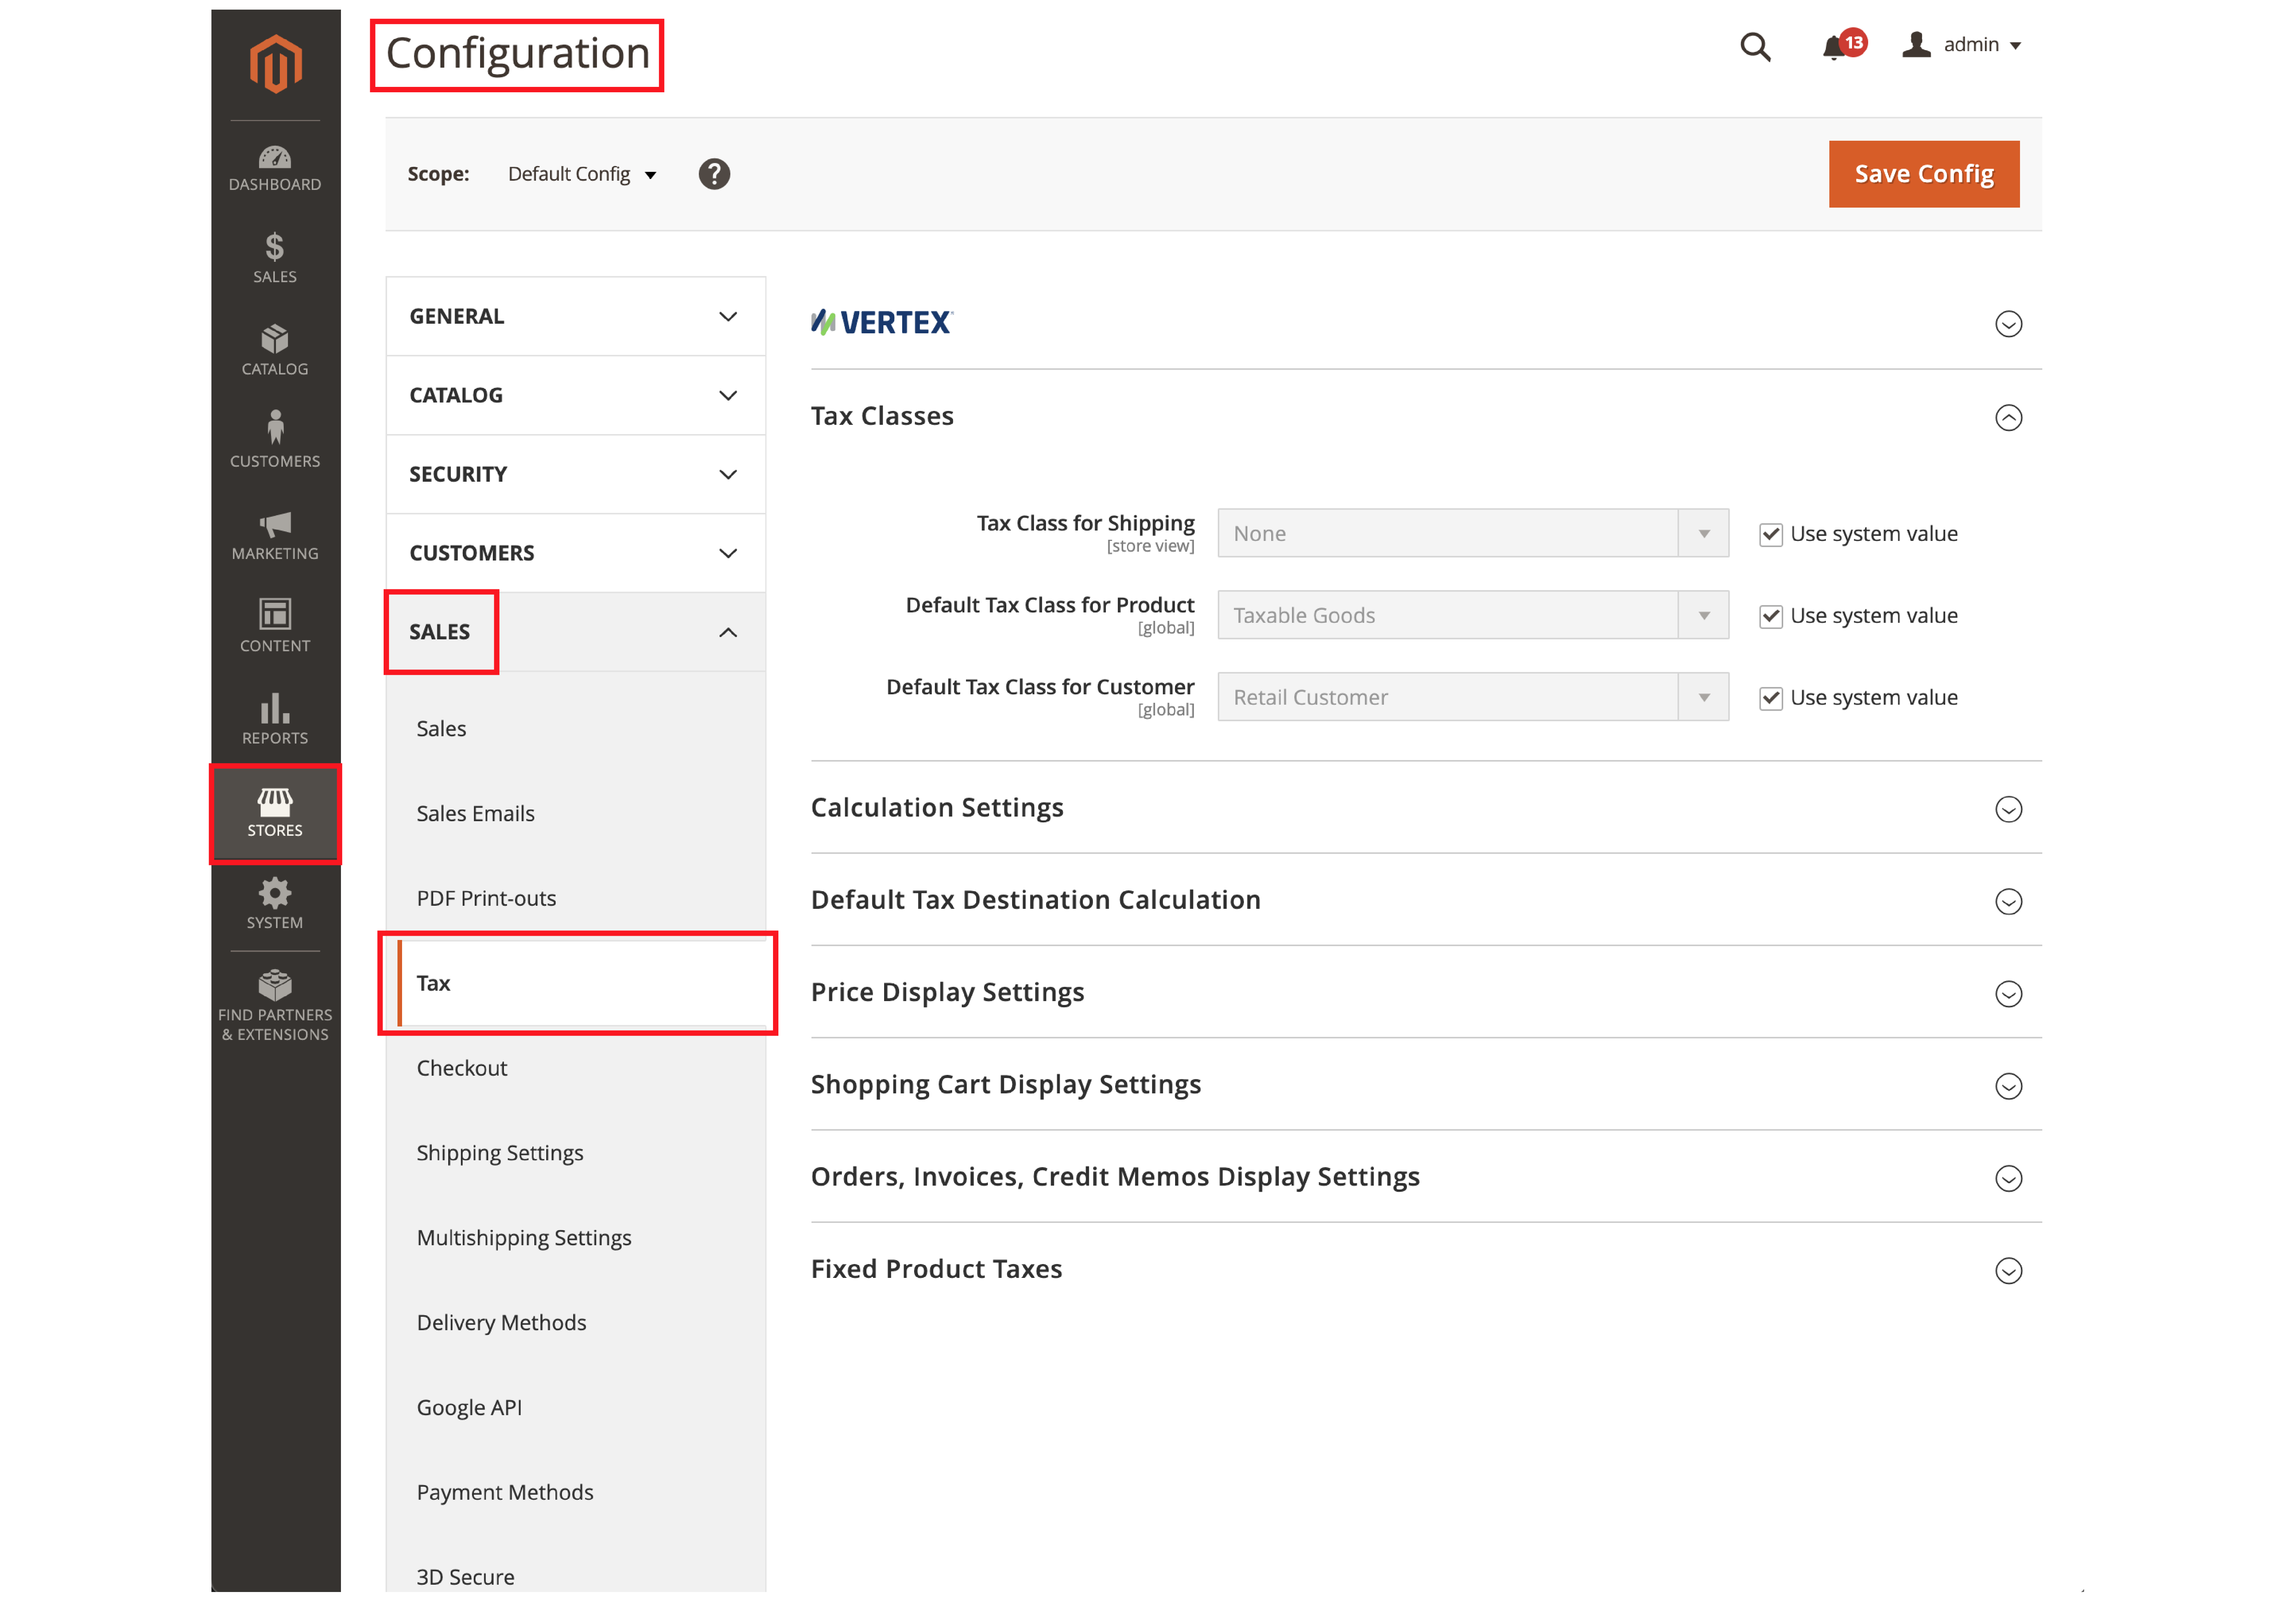
Tax rules depend on many factors, such as locations and zones. It involves the Product Class and Customer Class.
Taxes have to be set for cross-border price consistency. Some countries also require a value-added tax (VAT).
You can check the tax settings by going to Stores > Configuration > Sales > Tax
Ensure that you check the Magento configuration for Vertex tax calculations.
9. Customize the 404 Page
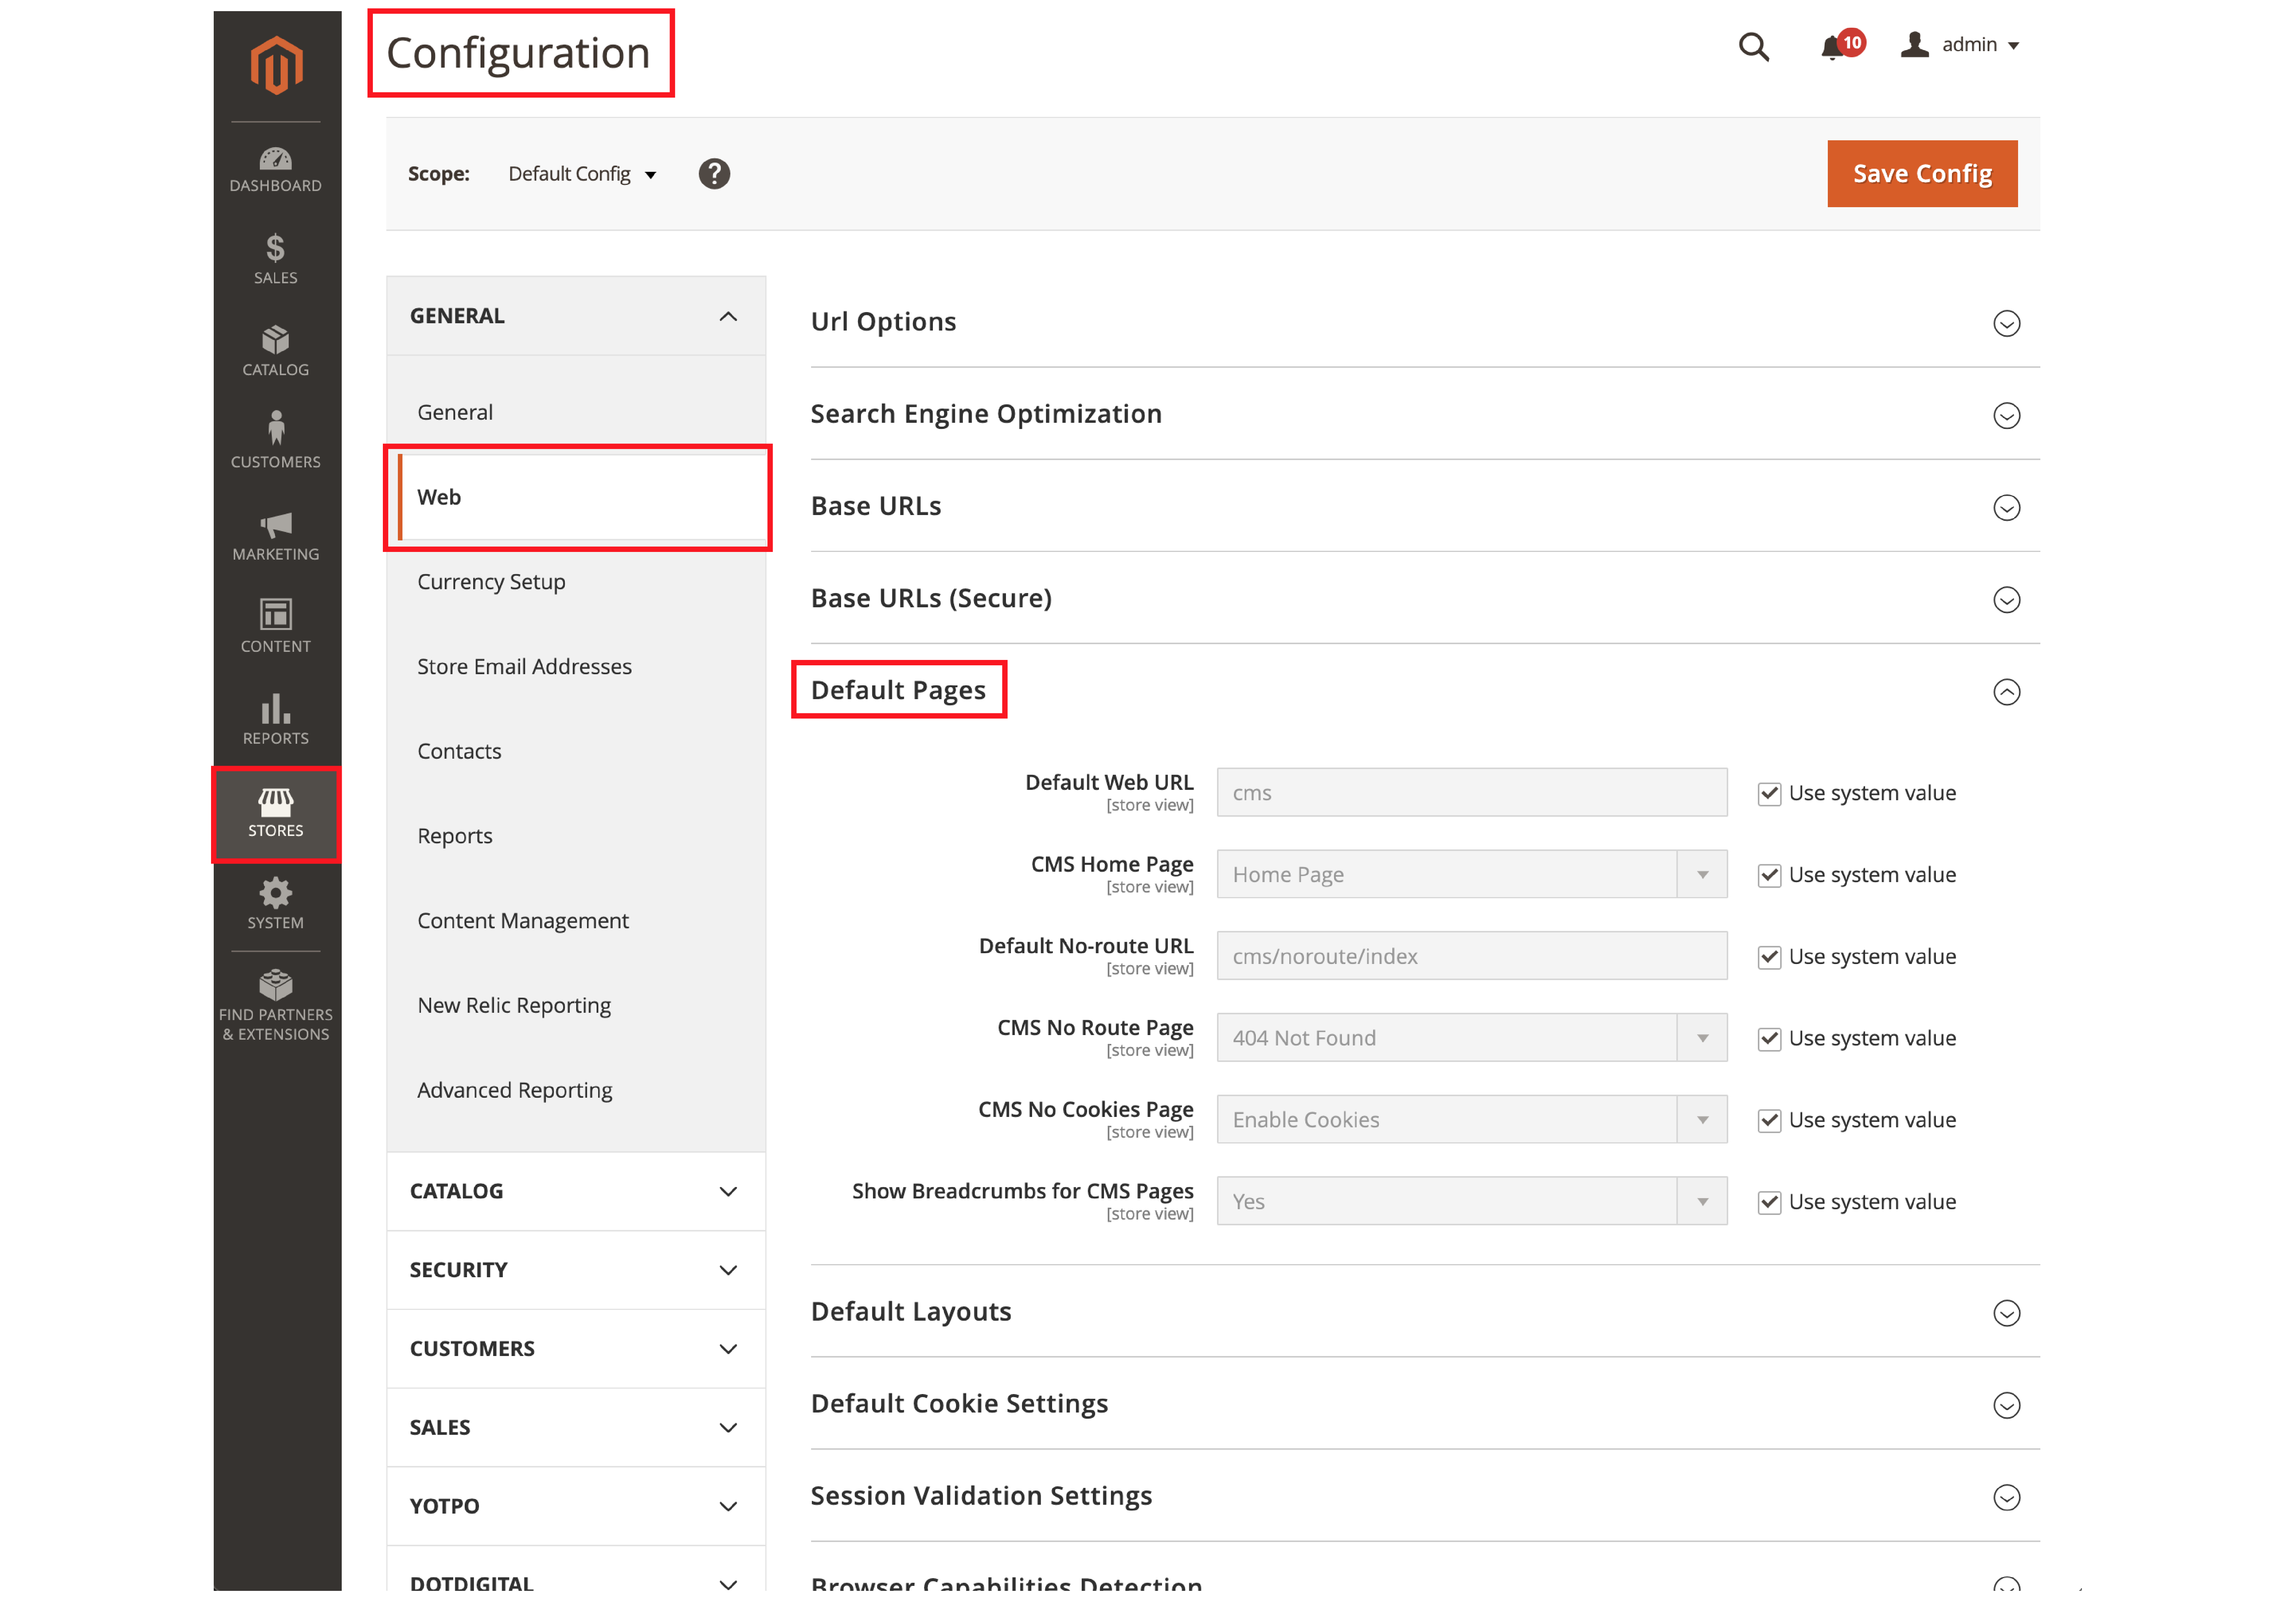
If a visitor clicks on an old or non-existent web page, the server shows a 404 error. It is an indicator that the requested page cannot be found.
Instead of displaying a bland default error page, create a custom 404 page. It improves the user experience & visitors are more likely to stay on the site.
You can add a creative message along with links to other web pages. Configure the 404 error page at Stores > Configurations > Web > Default Pages.
You can review the page settings & customize the 404 page to fit the brand.
10. Add Google Analytics
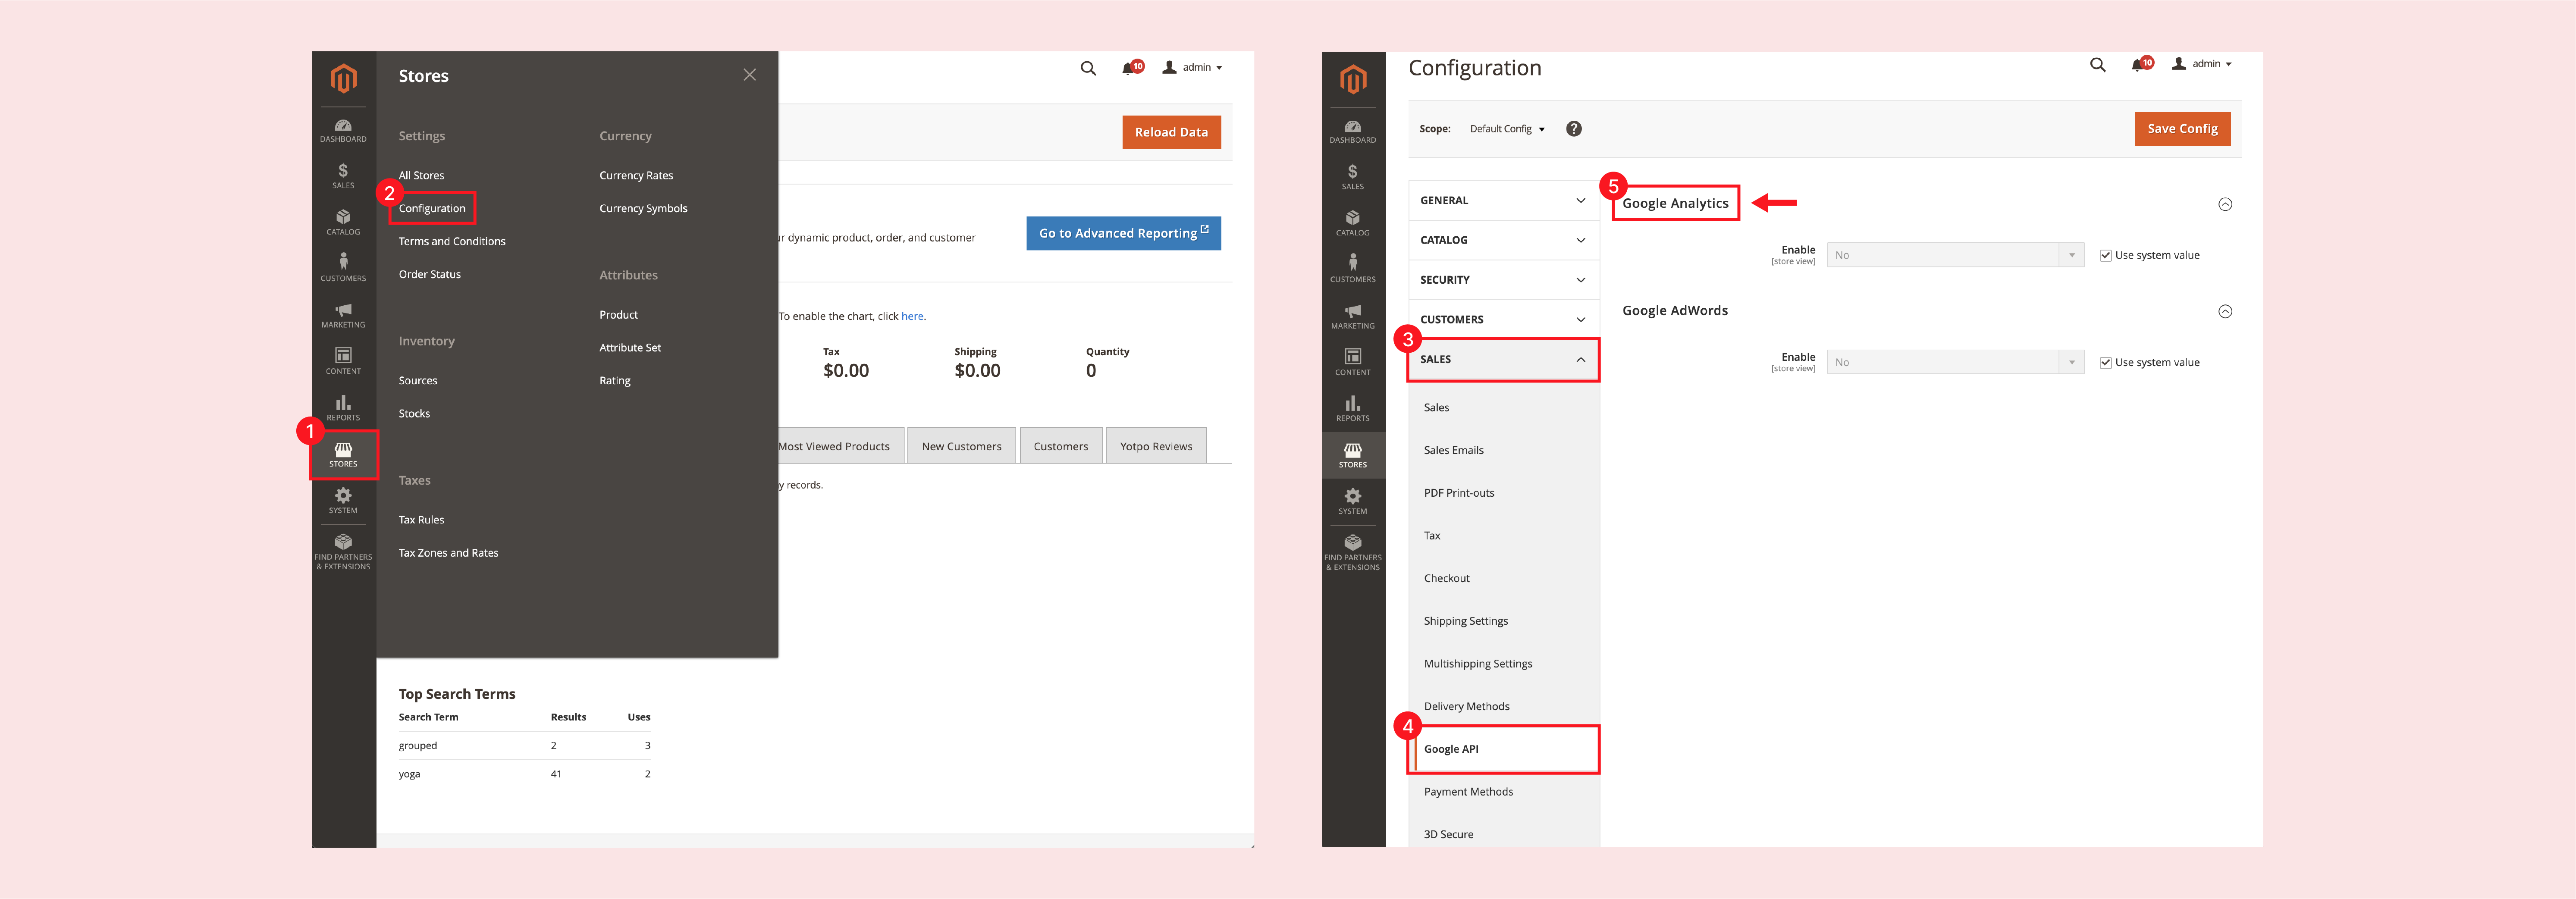
Magento supports Google tools such as Google Analytics & Google Adwords. It helps to analyze data & the site’s progress as soon as it goes live.
To configure Google tools, go to Stores > Configuration > Sales > Google API
You can integrate the preferred Google tools into the store. It provides metrics for tracking & reporting incoming traffic.
You can also use the tools for marketing and A/B testing.
11. Check Performance
Magento’s performance depends on many factors. Test the performance of your site before it goes live.
Many server-side components affect performance. It includes the server configuration & CDN.
Check the Magento application for CSS/JS minification. There are full-page caching and modules that enhance site speed.
Monitor the performance of your site as it goes live. Address any performance issues quickly to the technical team.
Check out the 12 easy tips for Magento 2 speed optimization.
12. Enable Cache
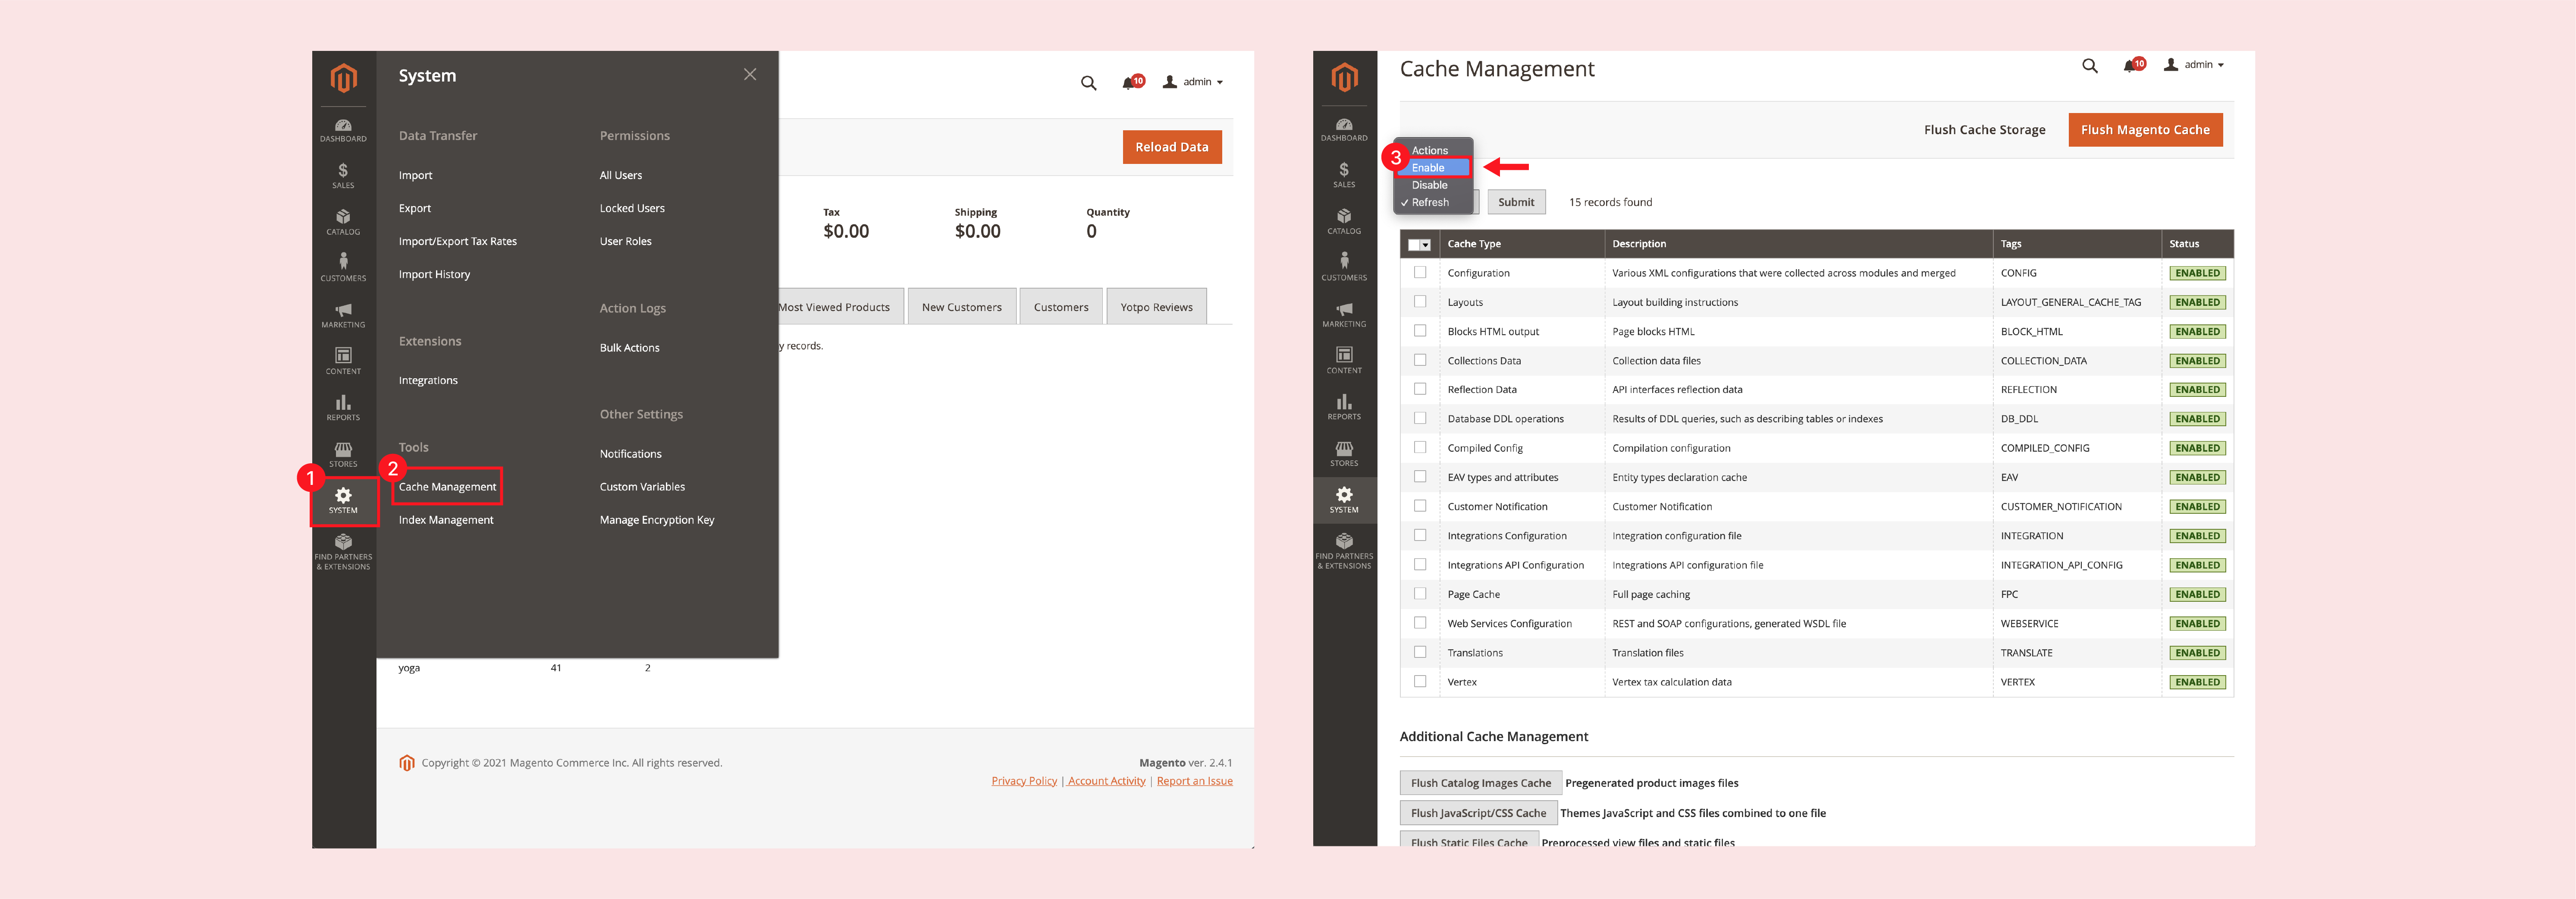
Caching helps improve page loading speed & reduce server load.
In Magento, caching is enabled by default. It can be disabled during the development stage. Ensure that you enable caching before going live to avoid performance dips.
To configure caching, Go to Magento’s Admin Panel > System > Cache Management. You can refresh & enable caching from this section.
13. Check the Third-Party Modules
Magento allows you to integrate many third-party modules. You may have added modules such as Live chats and reviews. Or there may be shipping & tax extensions that enhance store functions.
Some of the extensions will not function without their license key. If you decide to go live with the extensions, ensure that the key is valid.
Remove unnecessary modules from the site. You can disable some Magento functions if you don’t require them.
14. Enable the Cron
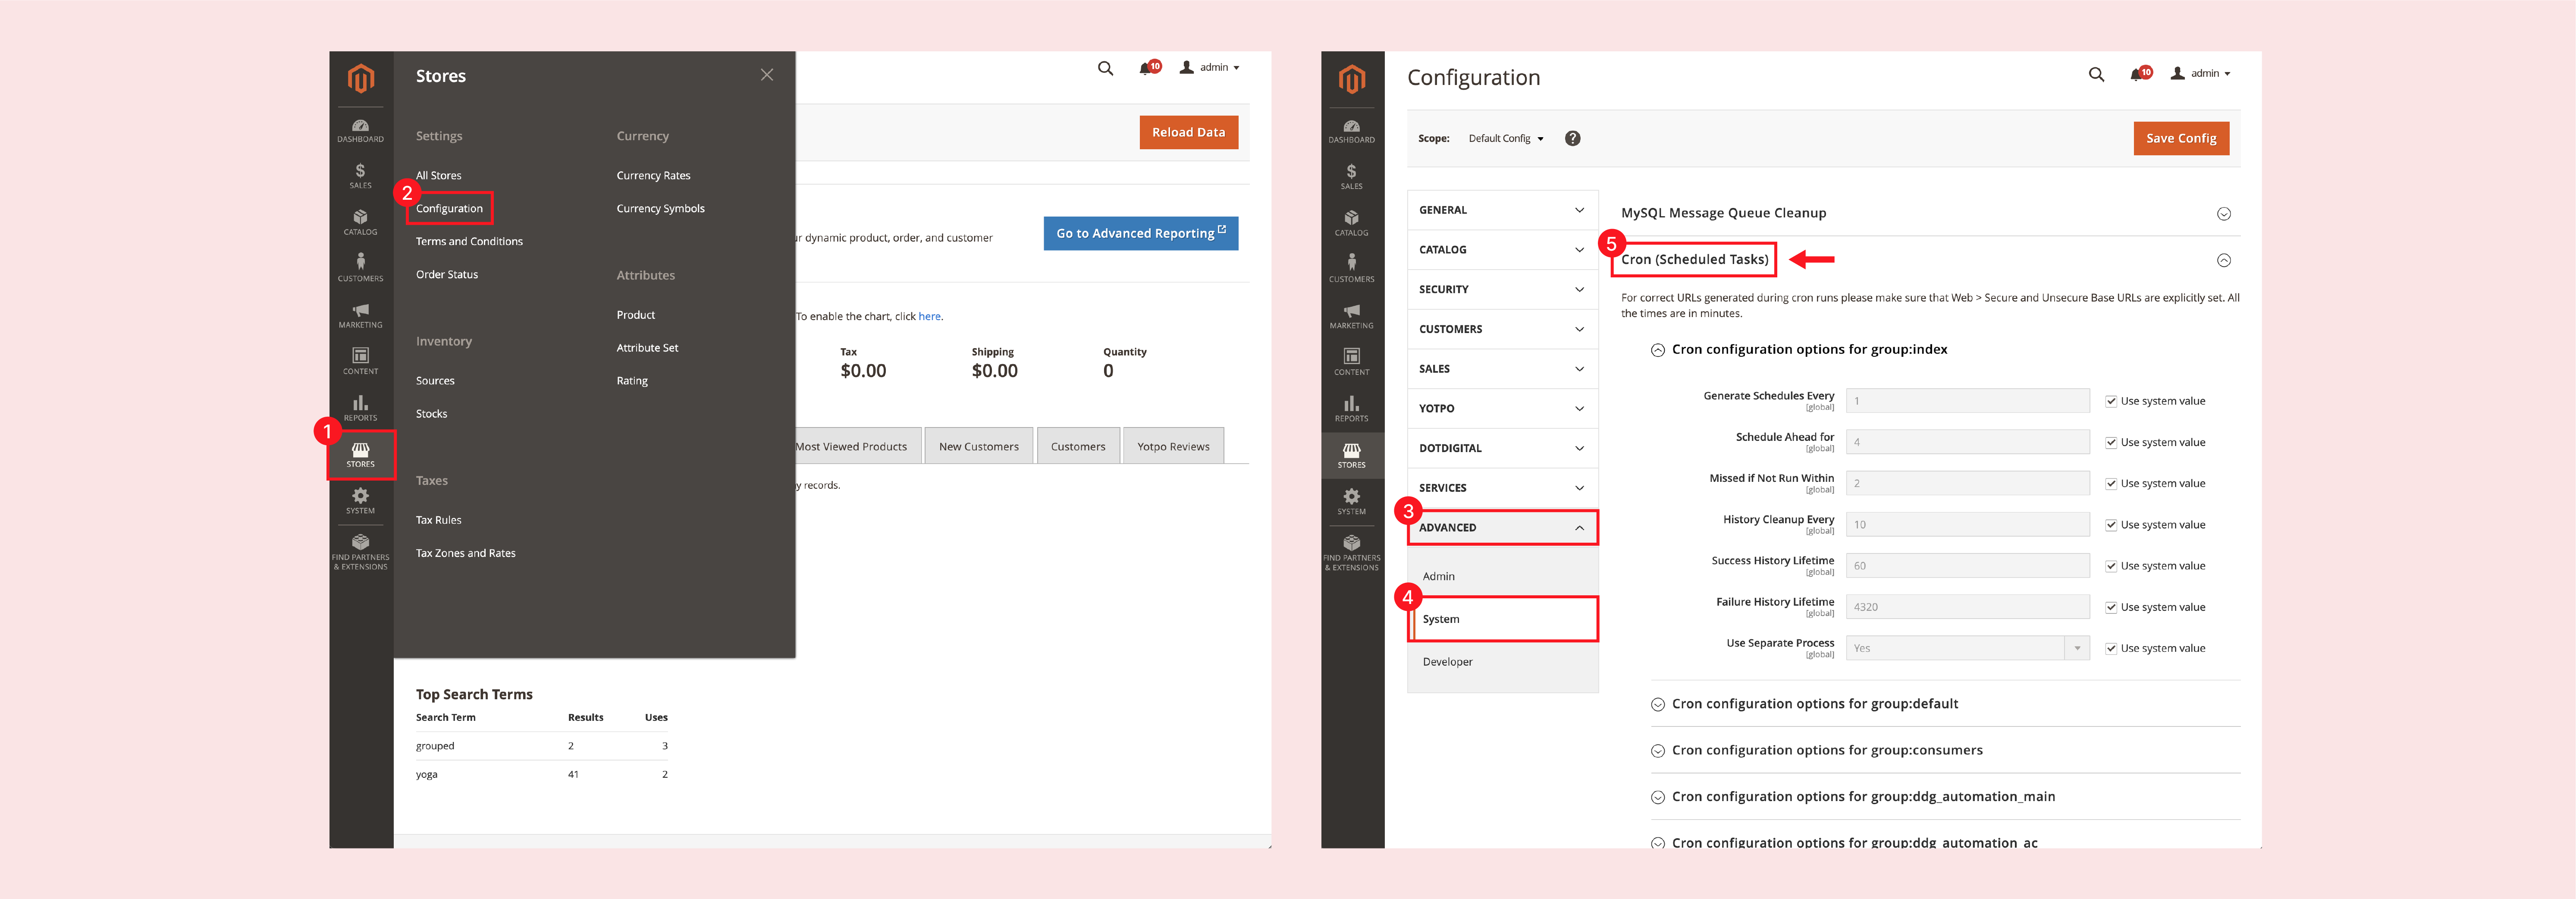
Cron jobs perform Magento tasks on schedule by running a script. Many Magento features require at least one cron job. You can set up cron from the admin panel.
Some of the features that may require cron are:
- Emails
- Catalog price rules
- Newsletters
- Generating Creating
- Customer Alerts for price changes or back in stock.
- Reindexing
- Currency rate updates
Before going live, ensure that the cron is enabled & customized for your store. Navigate to the Store > Settings > Configuration > Advanced > System
You can modify cron jobs based on your requirements. The cron jobs are regularly updated, even after the site is live.
15. Remove Test Data
You may have created test data for orders & products. Test data is helpful to verify the functionality of the store. It is used in the development stage to test the site.
Before taking your site live, delete the test data. It removes the data that is no longer required. Some of the test data may include:
- Products & categories
- Customers & dummy accounts
- Wish Lists
- Reviews
- Search results
- Invoice & shipment data.
Additional Tasks to Remember for Magento 2 go-live:
- Enable crawling so Google can index your store
- Update the Admin URL for better security
- Review store information
- Check the SSL certificate
- Optimize content on the CMS pages
- Check email templates
- Newsletter subscriptions
- Clean the logs & backup your store
Conclusion
Many workloads come with launching an ecommerce store. Retailers want to ensure that the process is seamless & efficient.
A go-live Magento 2 checklist helps review the store’s settings. You can use it as a quick reference to double-check everything.
You can also record & document the steps pre-launch. It helps to track all the changes. Magento offers guidelines & best practices for taking your site live. You also have a lot of community support on Magento forums.
To learn more about Magento, check out the MGT Commerce blog.


