
13 Steps to Set Up Magento 2 Configure Email Server
Ready to improve your email deliverability in Magento 2? Magento 2 configure email server ensures that communications reach your customers’ inboxes rather than being filtered as spam.
In this tutorial, we will explore the configuration steps and providers of the Magento 2 email server.
Key Takeaways
-
Configure the Magento 2 email server for reliable communication.
-
Setting up a Magento 2 SMTP server improves email deliverability.
-
Email configuration supports transactional and customer notifications.
-
Follow the steps to set up, test, and secure your email server.
-
Analytics can improve email performance and engagement.
What is the Magento 2 Email Server?
The Magento 2 email server is a tool for handling transactional and marketing emails directly from a Magento store.
The server keeps customers informed by ensuring efficient delivery of critical emails like:
-
Shipment updates
-
Password resets
By default, Magento doesn’t include an SMTP server. It allows integration with third-party providers to improve deliverability. Extensions are available to enhance email capabilities. These include customization, automation, and analytics.
Store owners ensure reliable email delivery by connecting Magento to an SMTP server. It helps boost customer engagement and supports brand consistency in communications.
Why Configure Magento 2 Email Server?
1. Improved Email Deliverability
-
Store owners ensure their emails land in customers' inboxes instead of being filtered as spam. It is by setting up an SMTP server.
-
Magento 2's default email configuration might need to be more reliable in this regard. Integrating a dedicated SMTP server increases the likelihood that customers receive critical notifications.
-
It reduces the risk of missed updates and enhances customer satisfaction.
2. Enhanced Customer Experience
-
Configuring an email server allows you to automate and send essential transactional emails. These include:
1. Order confirmations
2. Shipping notifications
3. Password resets
4. Account alerts
-
Customers stay informed about their purchases and account activity. It helps build trust and provides a more smooth shopping experience.
3. Professionalism and Branding
-
Magento 2 provides customizable email templates. Store owners can design it to match their brand.
-
Businesses can consistently deliver emails that reflect their brand’s:
1. Style
2. Logo
3. Colors
4. Tone
-
It is by setting up a configured email server. A well-branded email experience makes customers feel connected to the store. It supports overall brand loyalty.
4. Opportunities for Marketing and Retention
-
Email is a powerful marketing channel. Configured email server enables Magento 2 stores to send:
1. Targeted marketing campaigns
2. Promotions
3. Personalized offers
-
Integrating marketing automation enables stores to engage customers post-purchase and drive repeat sales. It also helps nurture long-term relationships and turn one-time buyers into loyal customers.
5. Advanced Analytics and Reporting
-
Many third-party SMTP enablers offer analytics and reporting features. It gives insights into email performance, such as:
1. Open rates
2. Click-through rates
3. Deliverability statistics
-
The data allows store owners to optimize email campaigns and improve engagement. It also adjusts strategies based on what resonates with its audience.
How to Configure an Email Server in Magento 2?
1. Install the desired SMTP extension
2. Log into your Magento admin panel.
3. Go to Extensions > SMTP Configuration > SMTP.
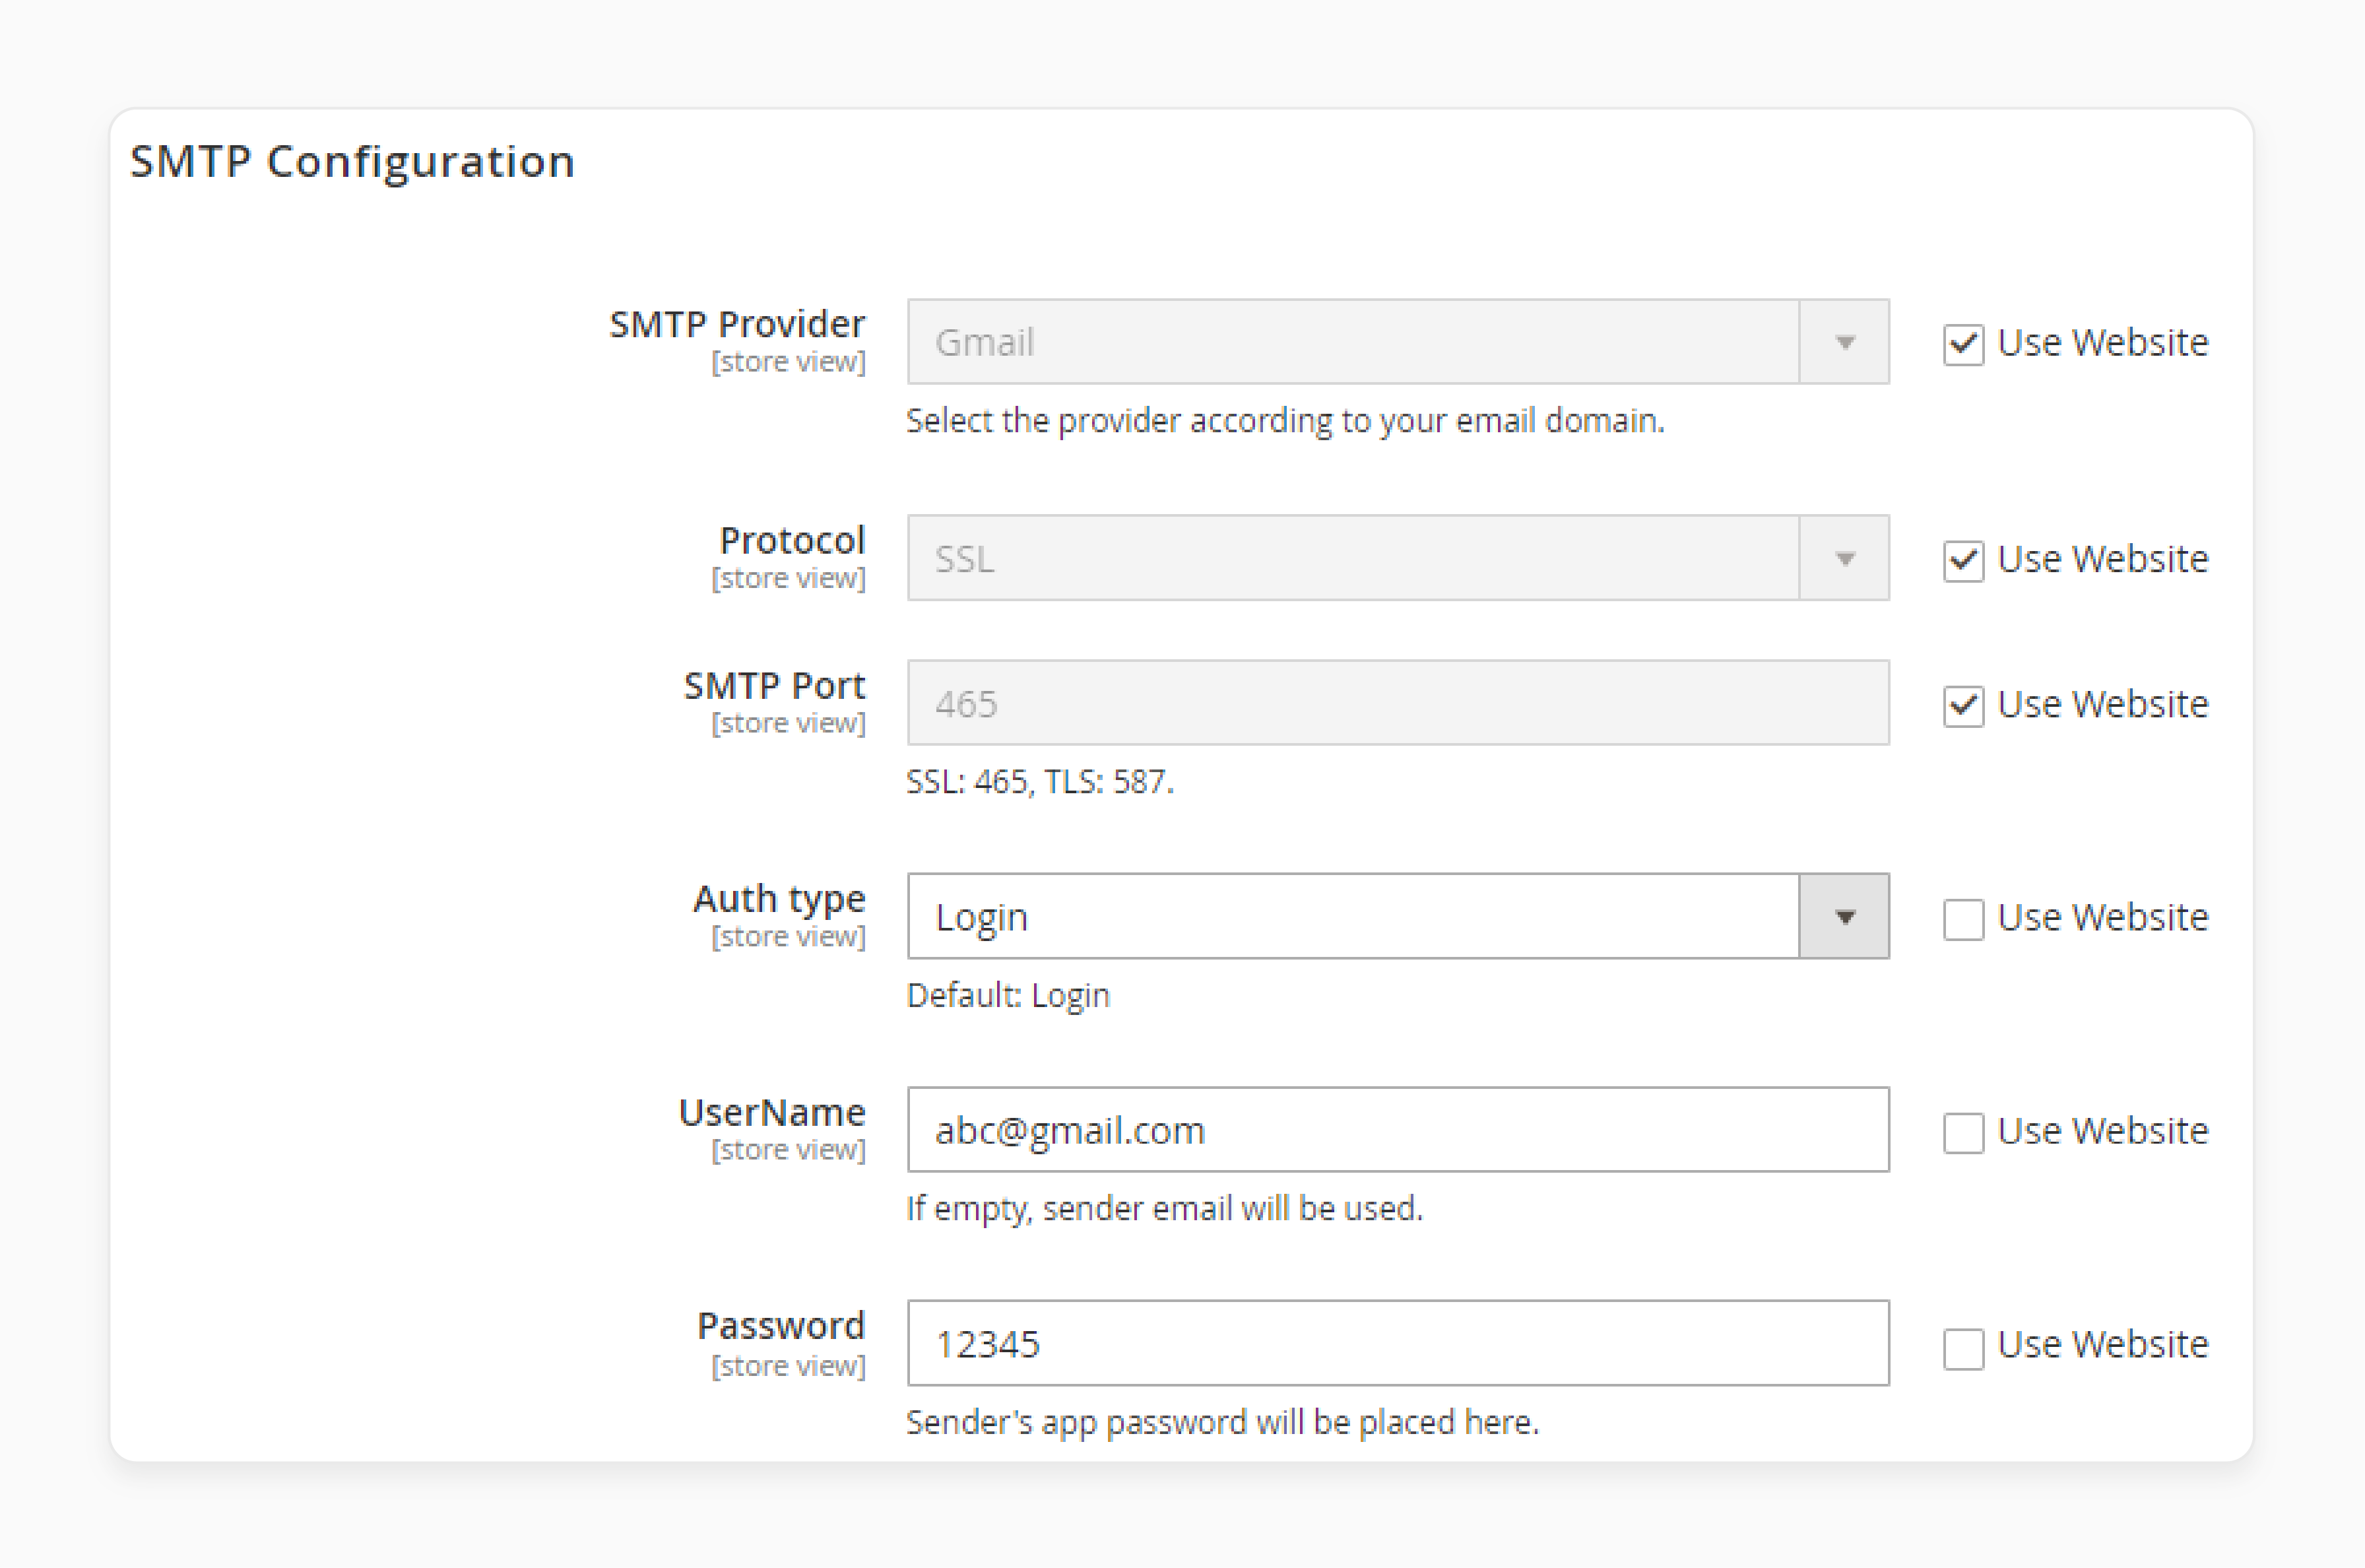
4. Enable the extension and email log.
5. Select your SMTP provider and encryption type (SSL or TLS).
6. Enter the SMTP port, along with the username and password provided by your email service.
7. Set the sender's email address and sender name.
8. Click Save Config to apply settings.
9. Go to the Send Test Email tab within the extension settings.
10. Enter a test email address and click Send Test Email.
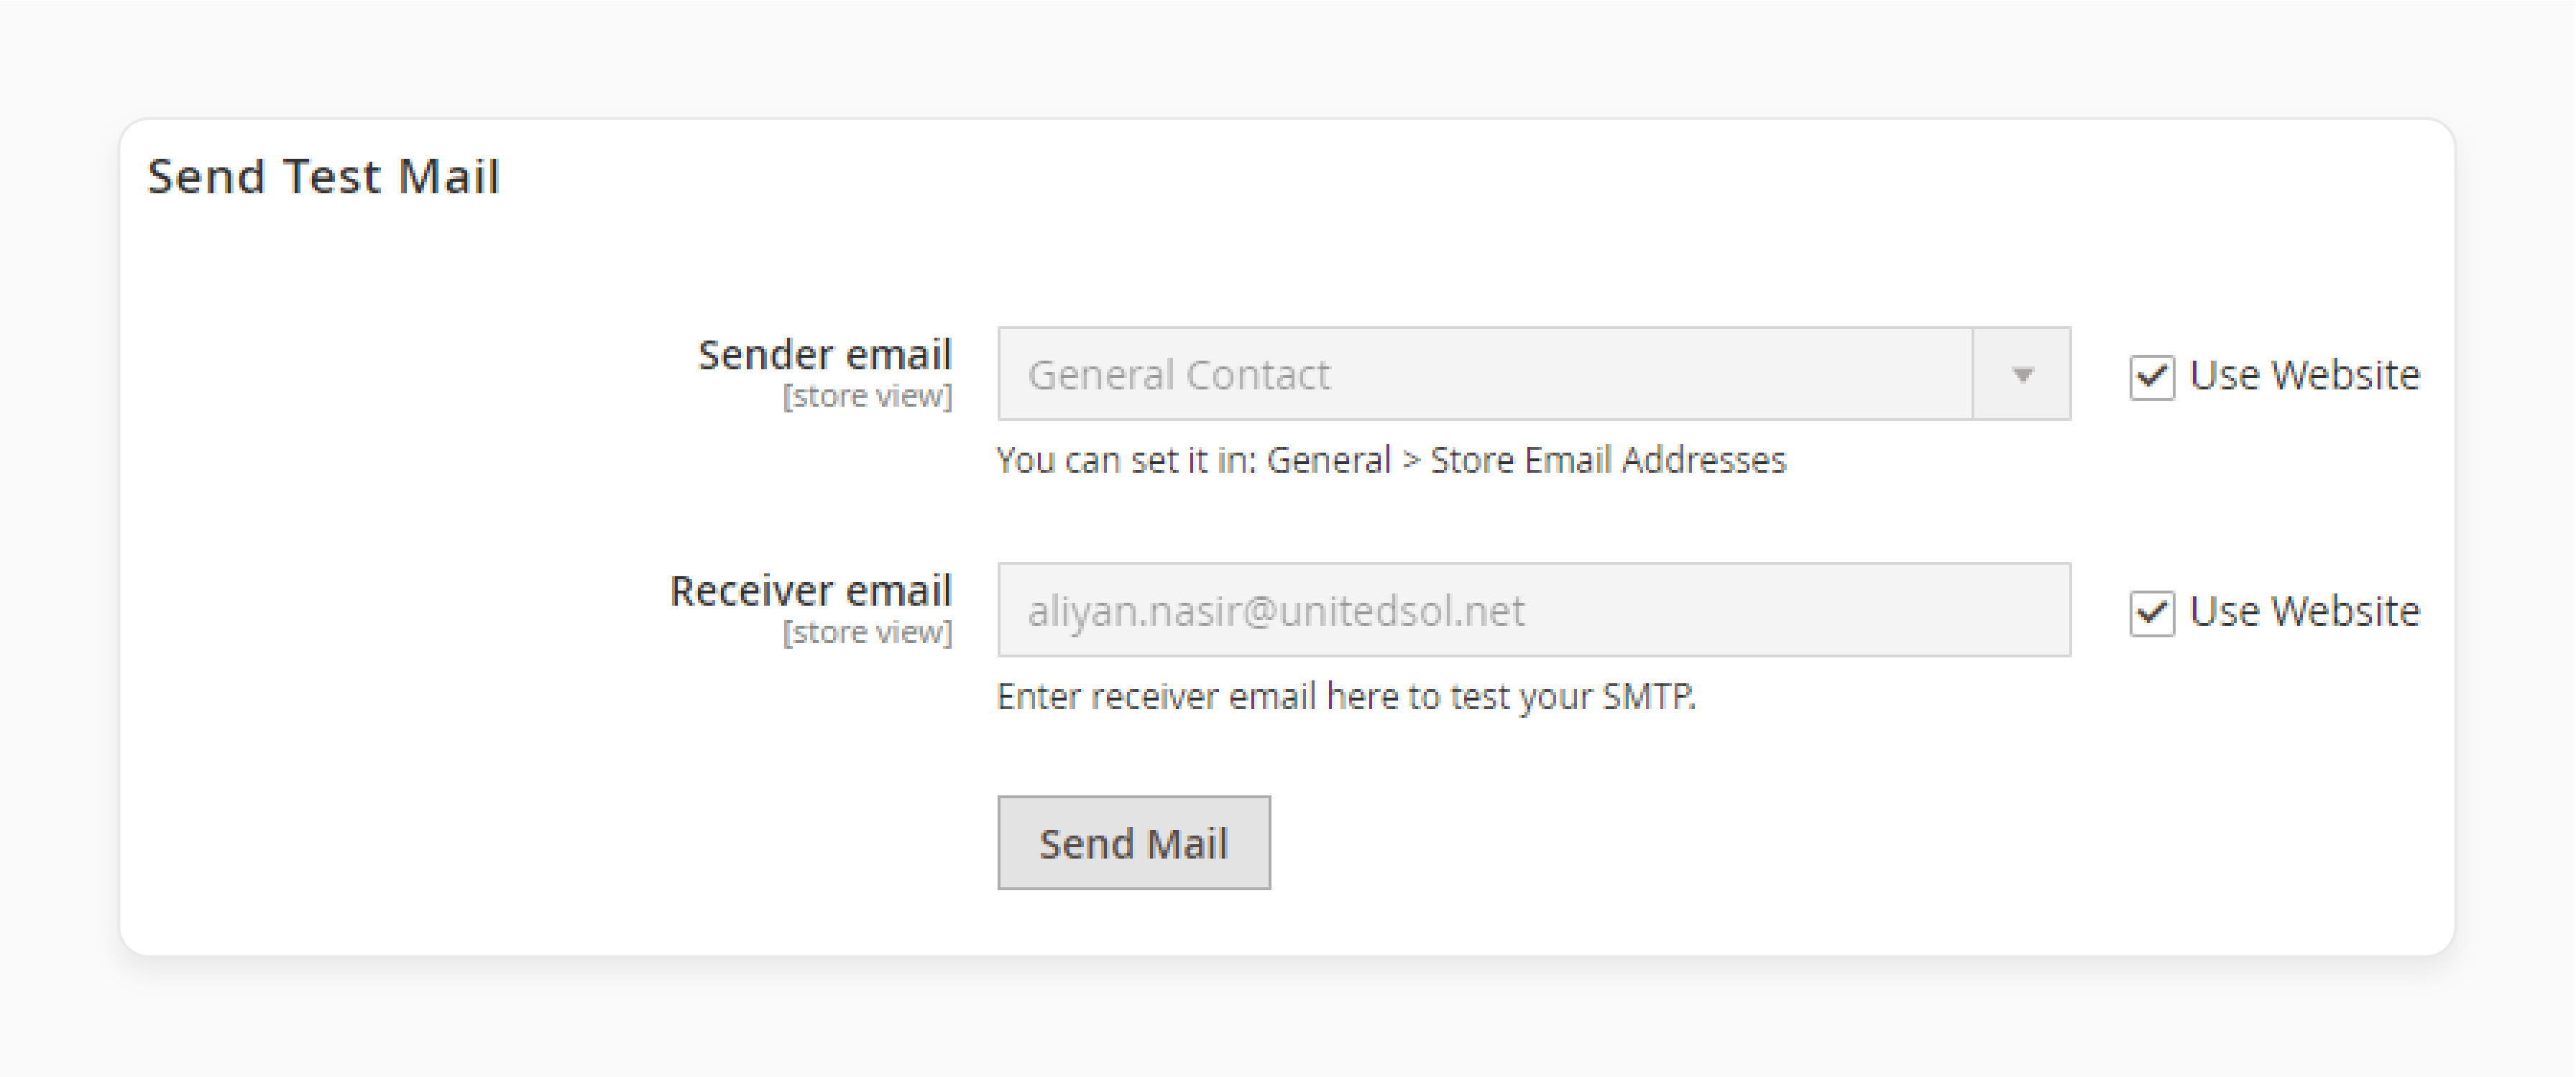
11. Check the test email address inbox to confirm receipt.
12. Run php bin/magento cache:clean to clear the cache.
13. Run php bin/magento indexer:reindex to reindex data.
Best Email Server Providers for Magento 2
1. SMTP Email Settings for Magento 2 - Amasty
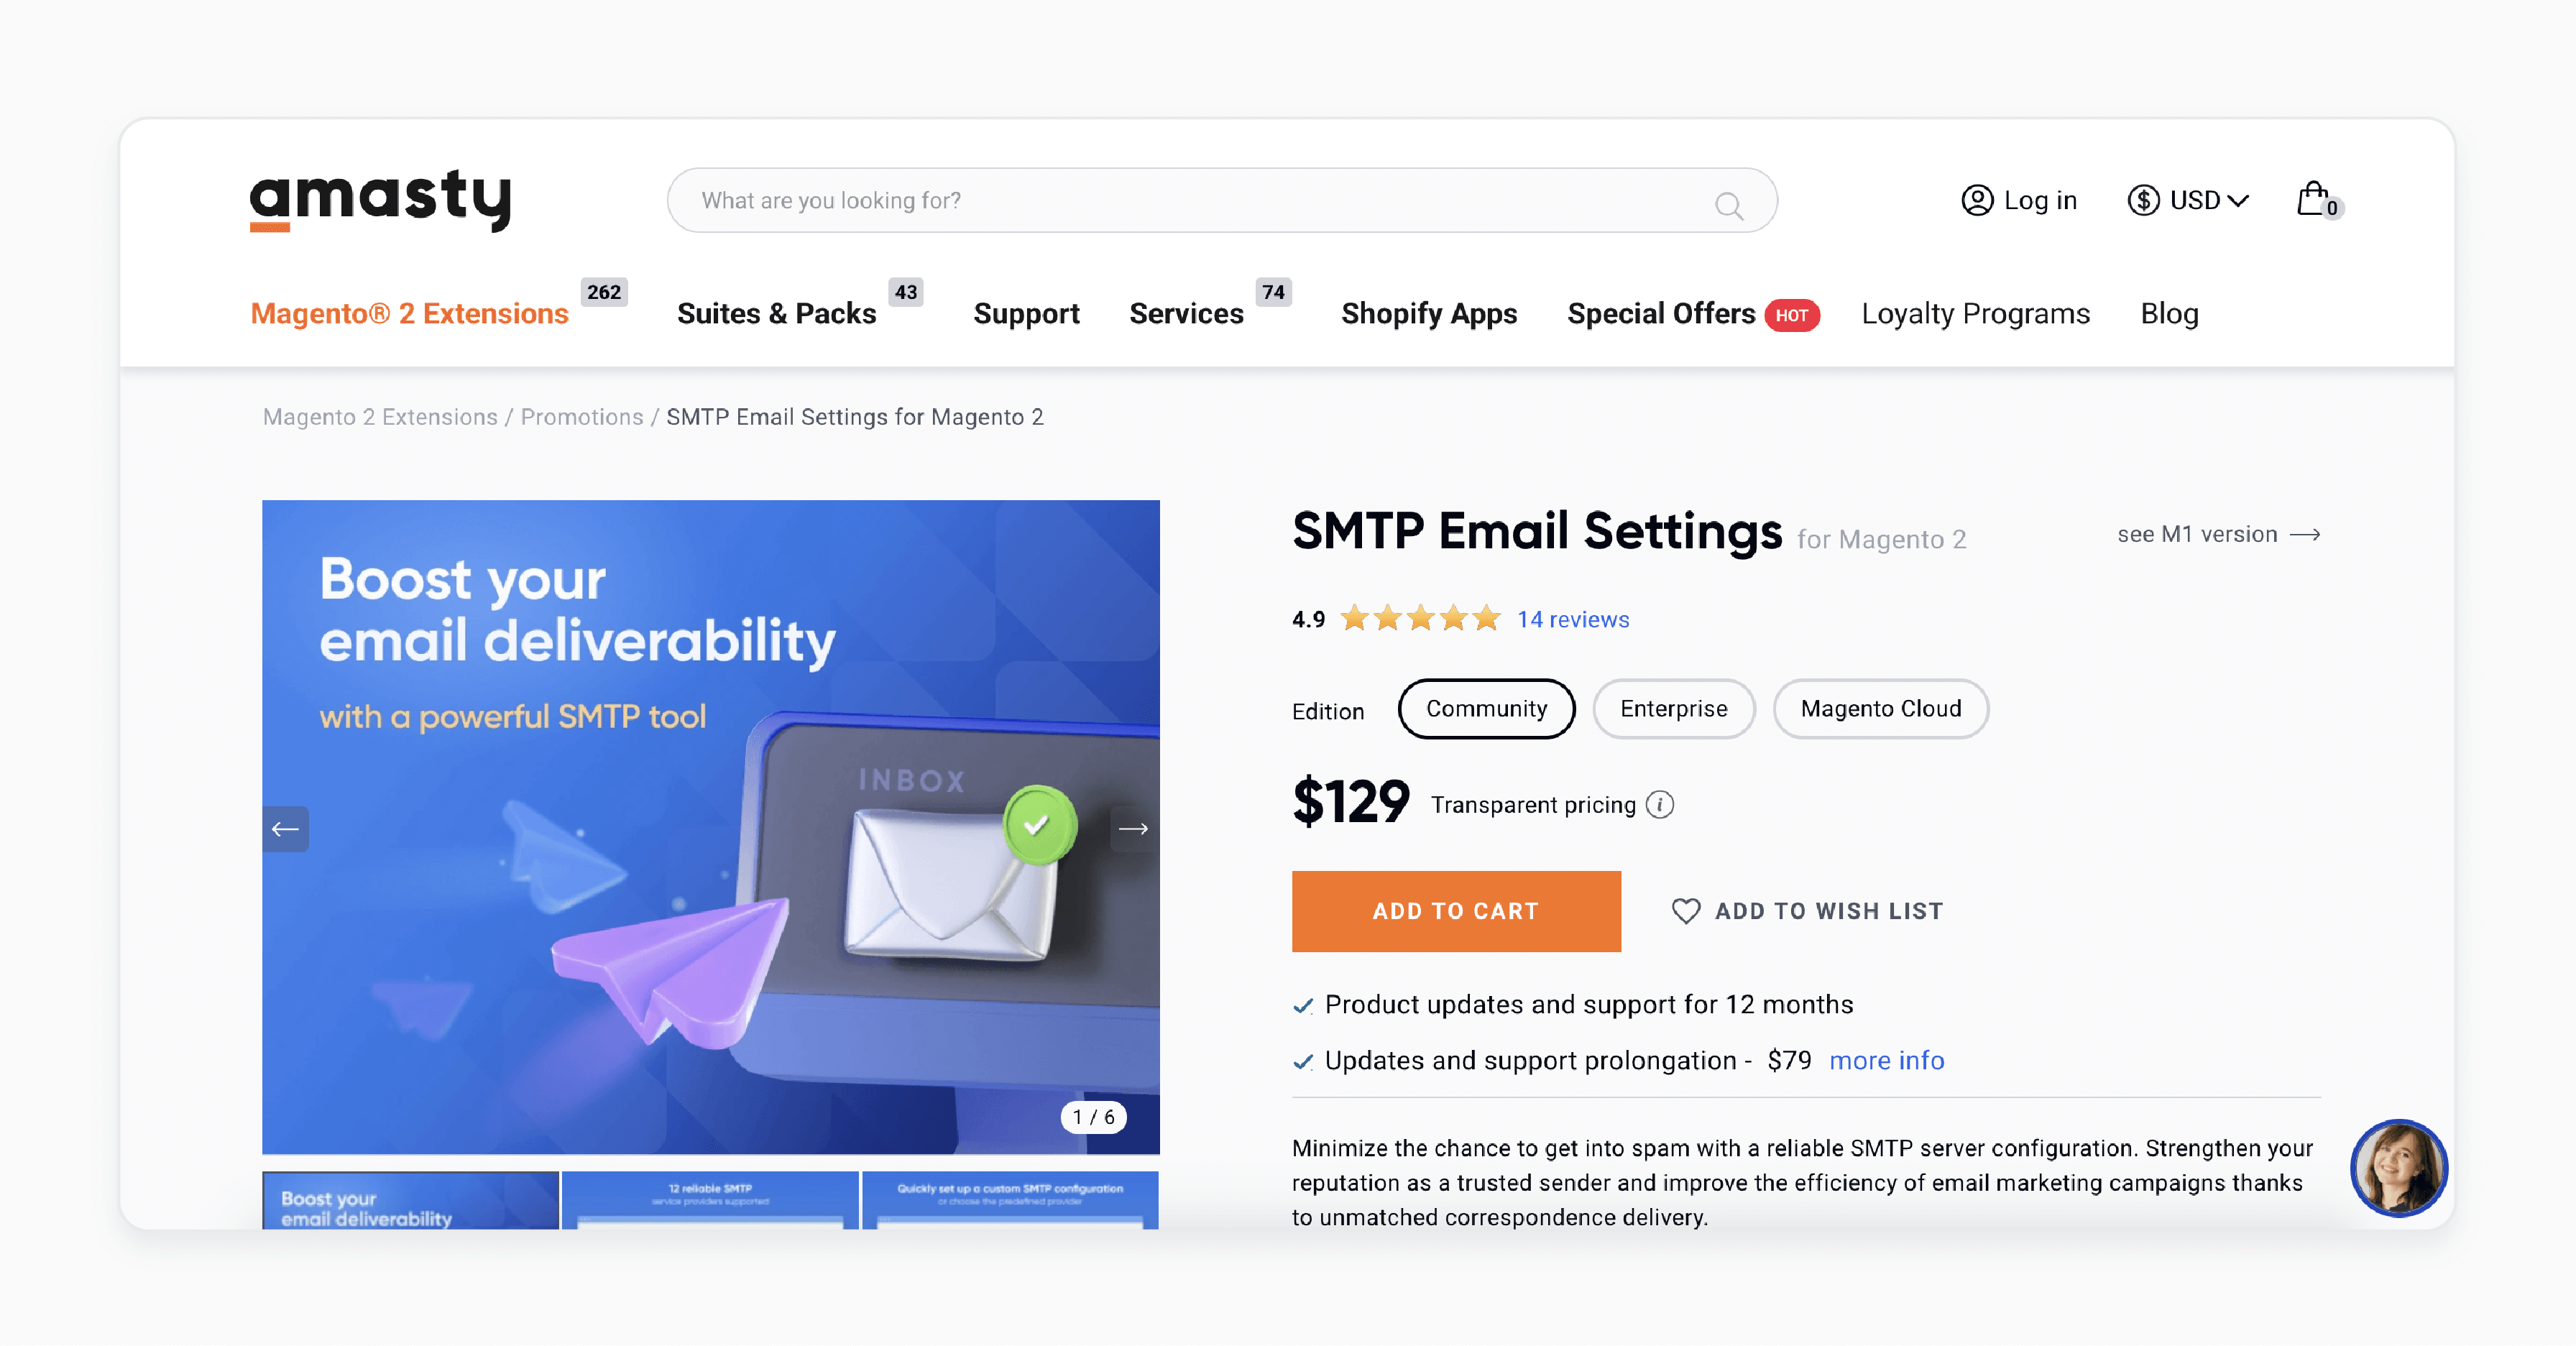
Amasty SMTP email settings minimize the chance of getting into spam with a reliable SMTP server configuration. It strengthens your reputation as a trusted sender. It also helps improve the efficiency of email marketing campaigns. It is compatible with Magento 2.4.6-p4; 2.4.5-p6; 2.4.4-p7; 2.3.7-p4.
Features:
-
Apply ready-made settings of 12+ providers.
-
Set your own configuration.
-
Use the OAuth 2.0 authentication method for Google and Microsoft accounts.
-
Test configuration using debug mode.
-
View the content of sent emails.
-
Log all sent email.
-
Automatically clean logs.
-
Add email addresses to the blacklist.
-
Hyva-compatible by default.
Price:
-
Magento Community Edition: $129 (12 months)
-
Magento Enterprise Edition: $429 (12 months)
-
Magento Cloud Edition: $729 (12 months)
2. SMTP Extension for Magento 2 - Mageplaza
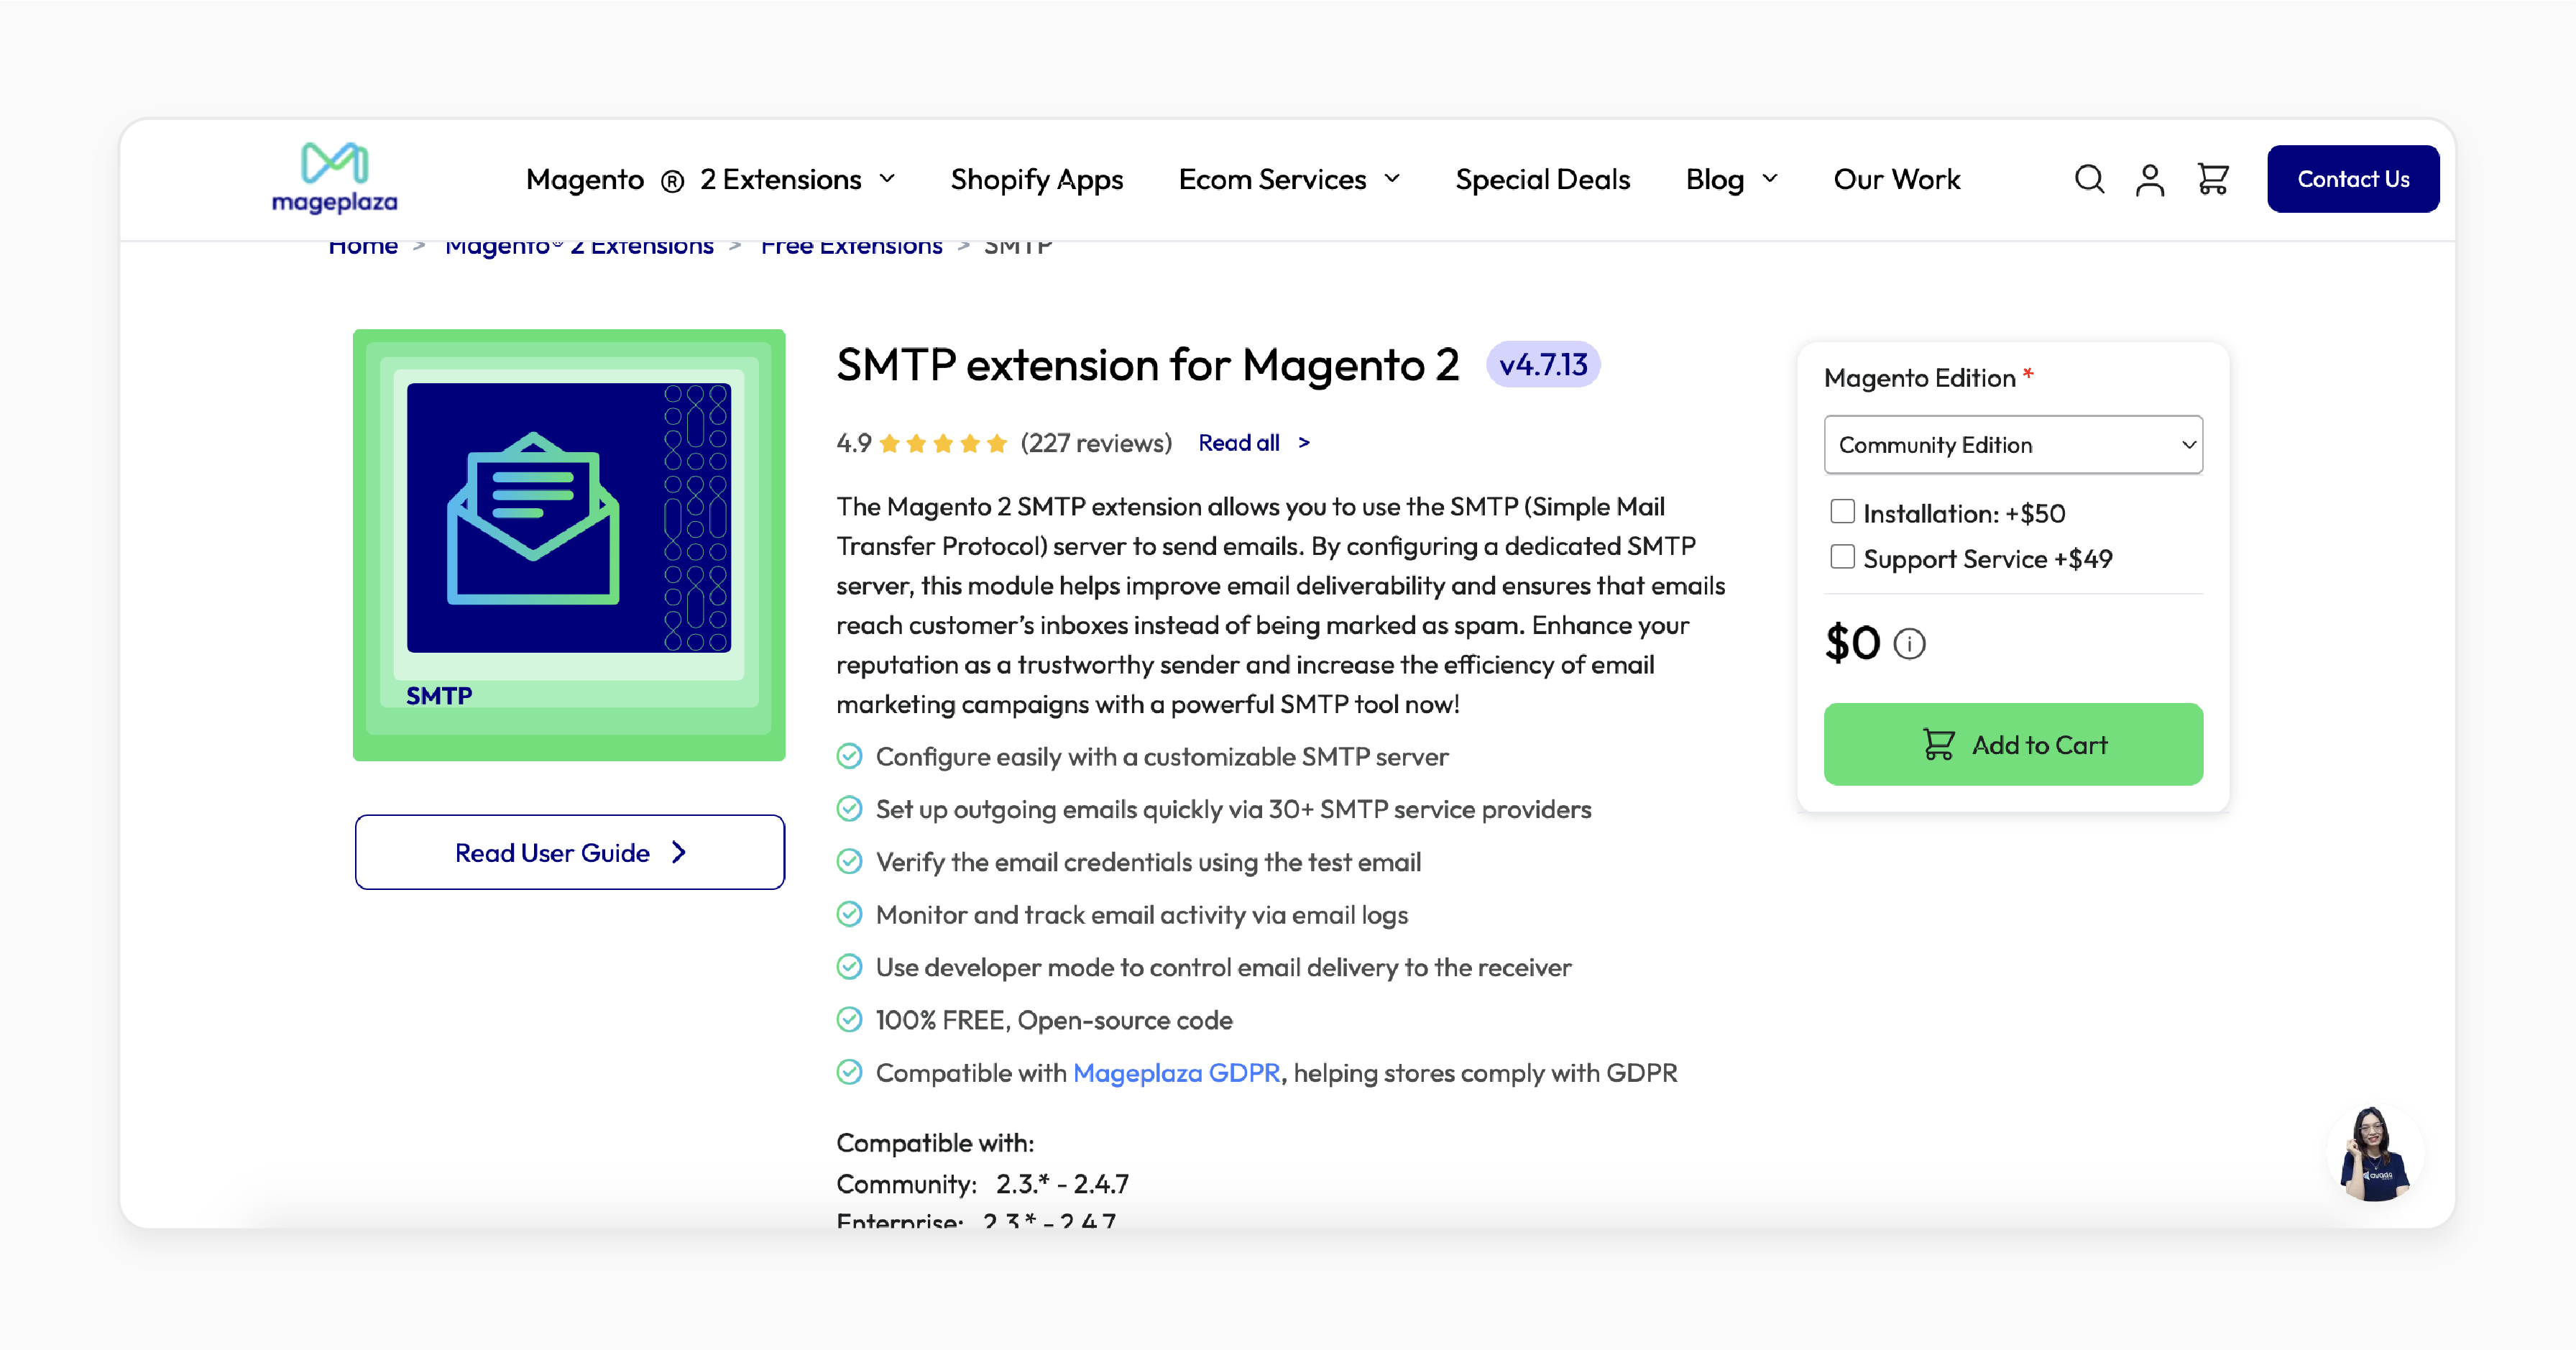
Mageplaza’s SMTP extension allows you to use the SMTP server to send emails. The module helps improve email deliverability. It also ensures that emails reach customer’s inboxes instead of being marked as spam. It is compatible with Magento 2.3.* - 2.4.7.
Features:
-
Configure easily with a customizable SMTP server.
-
Set up outgoing emails via 30+ SMTP service providers.
-
Verify the email credentials using the test email.
-
Monitor and track email activity via email logs.
-
Use developer mode to control email delivery to the receiver.
-
Compatible with Mageplaza GDPR.
Price:
-
Magento Community Edition: Free
-
Magento Enterprise Edition: $200 (12 months)
How Do I Test Email Server Configuration in Magento 2?
1. Verify SMTP Settings
-
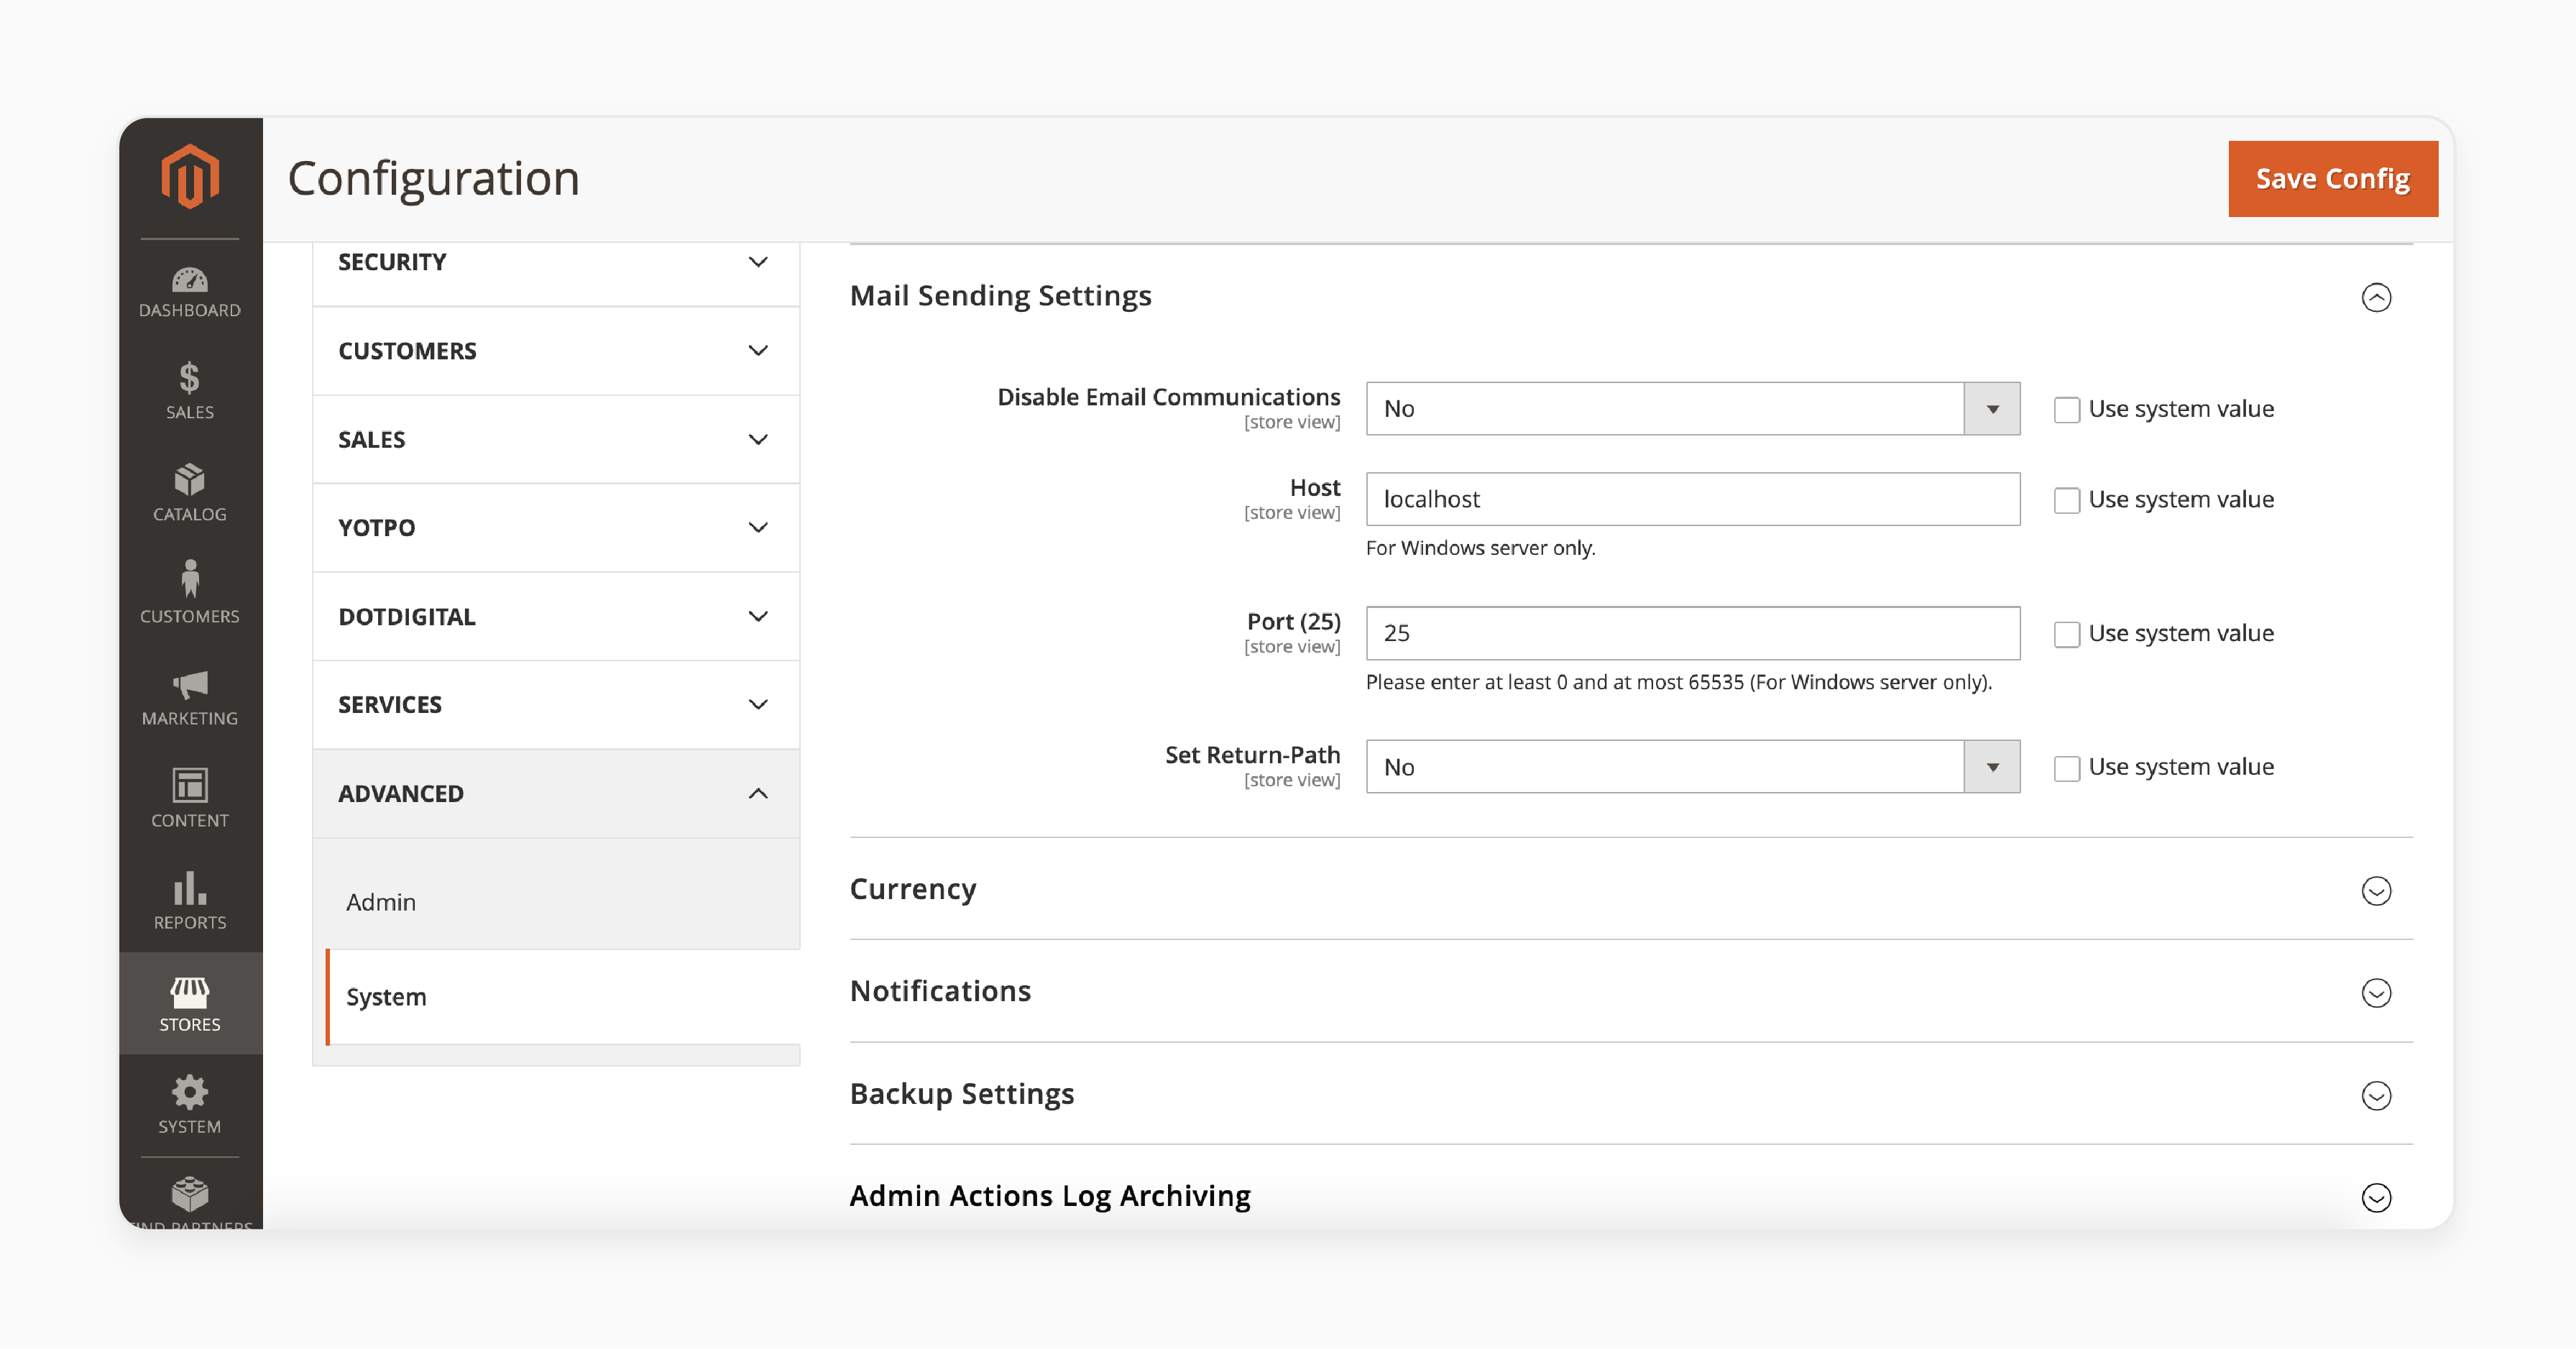
Go to Stores > Configuration > Advanced > System > Mail Sending Settings.
-
Check that all SMTP details are configured correctly for your chosen email provider. These include:
1. Hostname
2. Port
3. Username
4. Password
2. Use a Test Email Tool or Extension
-
Install an SMTP testing extension if available. Many of these extensions allow you to send test emails directly from Magento. It also helps verify that the emails reach the intended destination.
-
In the extension settings, input your SMTP details. Then, select the Test Email option to send a test message.
3. Send Test Transactional Emails
-
Test the actual transactional emails by creating an order as a customer or initiating a password reset.
-
Check if you receive the corresponding email, such as the order confirmation or password reset email.
-
It helps test both the configuration and the Magento email templates.
4. Check Magento Logs for Errors
-
If emails are not sending, check Magento’s logs. Go to var/log/email.log to see if any errors or failed delivery attempts are recorded.
-
It can help identify configuration issues.
5. Verify Delivery and Spam Filters
-
After sending a test email, check your inbox as well as your spam or junk folder.
-
If emails are in spam, consider adjusting your email content. You might also configure additional SPF and DKIM settings with your SMTP provider to improve deliverability.
6. Monitor Email Analytics
-
If your SMTP provider offers analytics such as SendGrid or Amazon SES. You can use them to monitor:
1. Delivery rates
2. Opens
3. Bounce rates
-
The data helps you confirm that emails are not just being sent. Customers are also receiving it.
Required Email Server Settings for Magento 2
1. Configure SMTP Server Settings
By default, Magento does not include SMTP functionality. You need to configure an external SMTP provider such as:
-
Gmail
-
SendGrid
-
Amazon SES
You may also use an SMTP extension for Magento 2 for easier setup. You should configure the extension by:
-
Enter the SMTP server address (e.g., smtp.gmail.com for Gmail).
-
Common ports are:
1. 587 (for TLS)
2. 465 (for SSL)
3. 25 (less secure and sometimes blocked)
-
Select TLS or SSL security and simple mail transfer protocol to secure emails in transit.
-
Enable SMTP Authentication if your provider requires it.
-
Enter your SMTP account’s username and password. You should also enter an app-specific password if two-factor authentication is enabled.
2. Set Sender Email Addresses
-
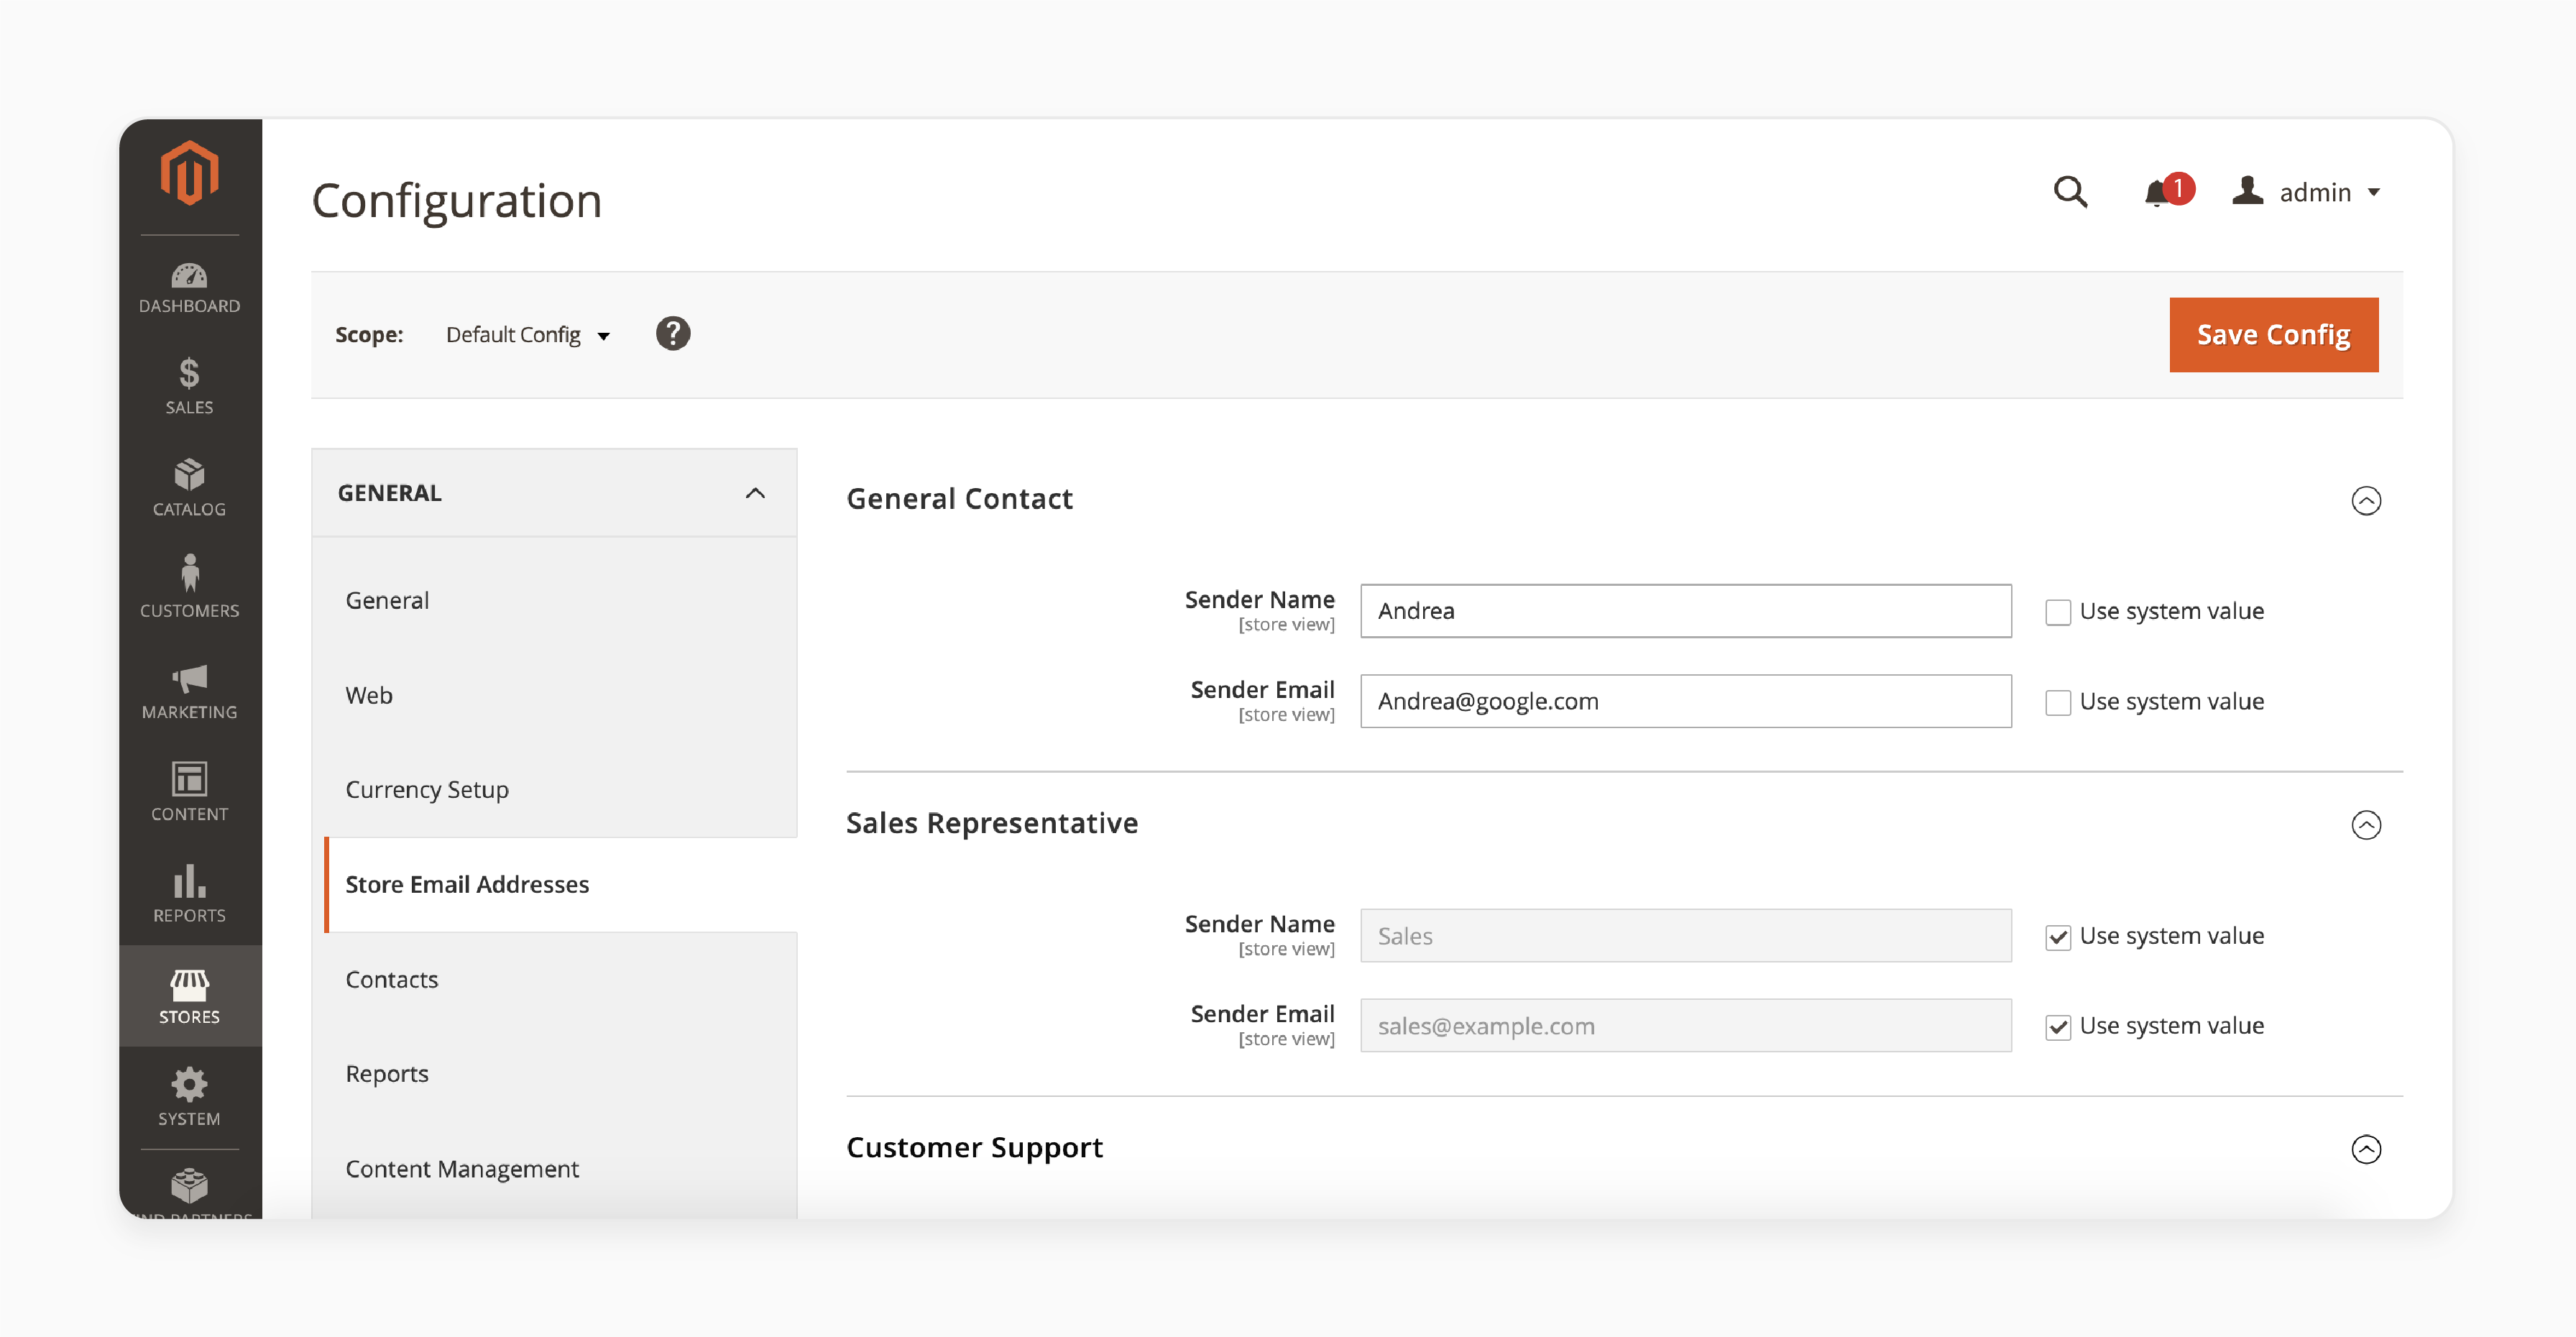
Go to Stores > Configuration > General > Store Email Addresses to set up the sender emails for various roles like:
1. Sales
2. Support
3. General inquiries
-
Enter a display sender name that aligns with your brand.
-
Specify the sender email address for each role, e.g., support@yourstore.com.
3. Define Mail Sending Settings
-
Navigate to Stores > Configuration > Advanced > System > Sending Settings.
-
Set to No to enable email sending from Magento.
-
Set it to “localhos”t if your SMTP server is configured locally. You should also specify the external SMTP server’s hostname.
-
Enter a return-path email address to handle undelivered (bounced) emails.
4. Enable Additional Security (SPF, DKIM, and DMARC)
-
Authorize IPs that are allowed to send emails on behalf of your domain.
-
Enable email signing to verify authenticity.
-
Specify how unauthorized emails should be handled to protect against spoofing.
5. Test Your Configuration
-
Send a test email to verify your SMTP settings. If using an SMTP module, you can send test emails from the extension settings.
-
Perform a test order or password reset to ensure transactional emails work correctly.
Security Best Practices for Magento 2 Email Server Configuration
| Best Practices | Explanation |
|---|---|
| 1. Use Strong Passwords and Two-Factor Authentication (2FA) | Ensure your SMTP account uses a strong, unique password Enable two-factor authentication if available. Use app-specific passwords when 2FA is enabled to prevent unauthorized access. |
| 2. Enable TLS/SSL Encryption | Configure TLS or SSL encryption on your email server. It helps secure the data transmitted between Magento and the email server. TLS, often configured on port 587, ensures emails are encrypted in transit. It helps prevent interception. |
| 3. Limit Access to SMTP Credentials | Restrict access to SMTP credentials to only those who need it. Store credentials in secure environment variables or a password manager. You shouldn’t store it in the codebase to reduce the risk of exposure. |
| 4. Configure SPF, DKIM, and DMARC | SPF adds an approved list of IP addresses. It allows you to send emails from your domain. DKIM digitally signs emails. It ensures they haven’t been altered in transit and proves their authenticity. DMARC helps prevent email spoofing and phishing. It is by specifying how to handle unauthenticated mail. Set your DMARC policy to monitor email activity for added visibility. |
| 5. Use a Trusted SMTP Provider | Choose a reliable SMTP enabler that offers security features. These include encryption, IP filtering, and powerful authentication. These providers often include built-in safeguards to protect your store’s email reputation. |
| 6. Set Up a Separate Bounce Address | Configure a separate bounce address for handling undeliverable emails. A dedicated bounce email address protects your main account from receiving bounced messages. It also helps with monitoring deliverability issues. |
FAQs
1. How do I configure SMTP in Magento 2 for reliable email communication?
Use an SMTP module that allows secure and reliable email communication. Access the SMTP email settings in the Magento 2 admin panel. You can input your SMTP enabler's details and ensure emails reach customers' inboxes.
2. What are the steps to configure email server settings in Magento 2?
Start by installing an SMTP extension, then go to settings in the admin panel. Enter the SMTP details, including server, port, and authentication. Then, test the settings to confirm email functionality.
3. Can I use custom SMTP settings in Magento 2 to enhance email communication?
Magento 2 allows custom SMTP settings. It lets you configure the email server to align with your email provider. Setting up custom SMTP improves deliverability. It helps avoid issues with emails being marked as spam.
4. Why use third-party SMTP for Magento 2 instead of the default email settings?
The default Magento 2 email settings can be limited in reliability. Using a third-party SMTP improves email deliverability. It also offers features like email logging and blacklist management. It enhances security options for effective email communication.
Summary
Magento 2 configure email server to manage transactional and marketing emails effectively. The tutorial uncovers the benefits of the configuration, including:
-
Ensures emails reach customers’ inboxes, not spam folders.
-
Keeps customers informed with automated transactional emails.
-
Aligns email templates with brand identity elements like logos and colors.
-
Enables targeted campaigns and follow-ups, increasing customer retention.
Enhance customer communication and brand consistency by configuring the Magento 2 email server. Pair it with managed Magento hosting for smooth email integration.


