
Advanced Permissions for Magento 2: How to Create User Role?
Are you looking for a way to control who accesses your store’s data? Advanced Permission extension for Magento 2 gives admins complete control over store access. It helps assign custom role permissions and manage tasks in the admin panel.
This tutorial will cover how to simplify user roles and secure the store.
Key Takeaways
-
What are the aspects of advanced permissions?
-
Key reasons for needing access controls for e-commerce stores.
-
Steps to create roles with advanced controls.
-
Improve security by limiting access to important data.
-
Steps to create sub-admin and changing products to keep store operations running smoothly.
-
Common issues faced by businesses using access controls.
-
16 Steps to Create User Roles with Advanced Permissions in Magento 2
-
Security Benefits of Implementing Advanced Permissions in Magento
-
How to Create Sub-Admin Users and Changing Product Owners in Magento 2
-
Common Troubleshooting Issues of Magento Advanced Permissions Extension
What are Advanced Permissions for Magento 2?
Advanced Permissions for Magento 2 is a security and management permissions module. It changes how admin users handle roles and access for store views in their online store.
Advanced permissions for Magento 2 extension allow store owners to restrict access. It sets custom role permissions for specific tasks. It also provides control over who can access to view, or edit sensitive areas. This module ensures that each sub-admin or specific user is able to edit only the areas they need. This keeps store management simple and protects important data.
Why Your Store Needs Advanced Permissions for Magento
1. Enhanced Security
The advanced controls module helps you restrict access to sensitive areas. It includes customer data and financial information. Admins can grant specific permissions to trusted users to keep important data safe. For example, a fashion store’s product owner uses this tool to let the finance team access sales data.
It keeps the product details restricted. Only authorized users can view and edit critical information.
2. Custom Role Management
Admins can create a custom role or adjust existing roles to limit access. For example, a sub-admin assistant can handle particular products without seeing financial details. Assigning role permissions to specific managers ensures tasks stay clear and manageable.
3. Streamlined Operations
Access controls let team members focus on their tasks. Store admins can allow managers to see and edit only particular areas. For example, a retailer uses category access to let product managers update inventory. The finance team makes the pricing updates.
It includes inventory, while pricing remains restricted. This reduces mistakes and keeps workflows simple.
4. Multi-Store Management
This feature is ideal for managing store views or websites in different regions. Admins can grant access based on location, so teams manage their areas independently. For example, a global company uses website permissions to let regional managers handle their stores.
It helps them to avoid cross-region interference. This reduces conflicts and keeps responsibilities clear.
5. Flexibility and Scalability
The Magento 2 advanced permissions module makes it easy to add new users and adjust their permissions. It supports growth by letting you create roles with a custom set of permissions. For example, a food delivery platform grants store admin roles to city managers.
Each manager only accesses their city’s operations, ensuring clear and separate responsibilities.
16 Steps to Create User Roles with Advanced Permissions in Magento 2
Ensure the necessary user account is created before assigning a new role with advanced permissions Magento 2.
Step 1: Go to Magento 2 admin panel > System > Permissions > User Roles.
Step 2: Click the Add New Role button to begin.
Role Information and Resources to Create
Step 1: Provide a clear and descriptive name for the role in the Role Name field.
Step 2: Go to the Role Resources tab.
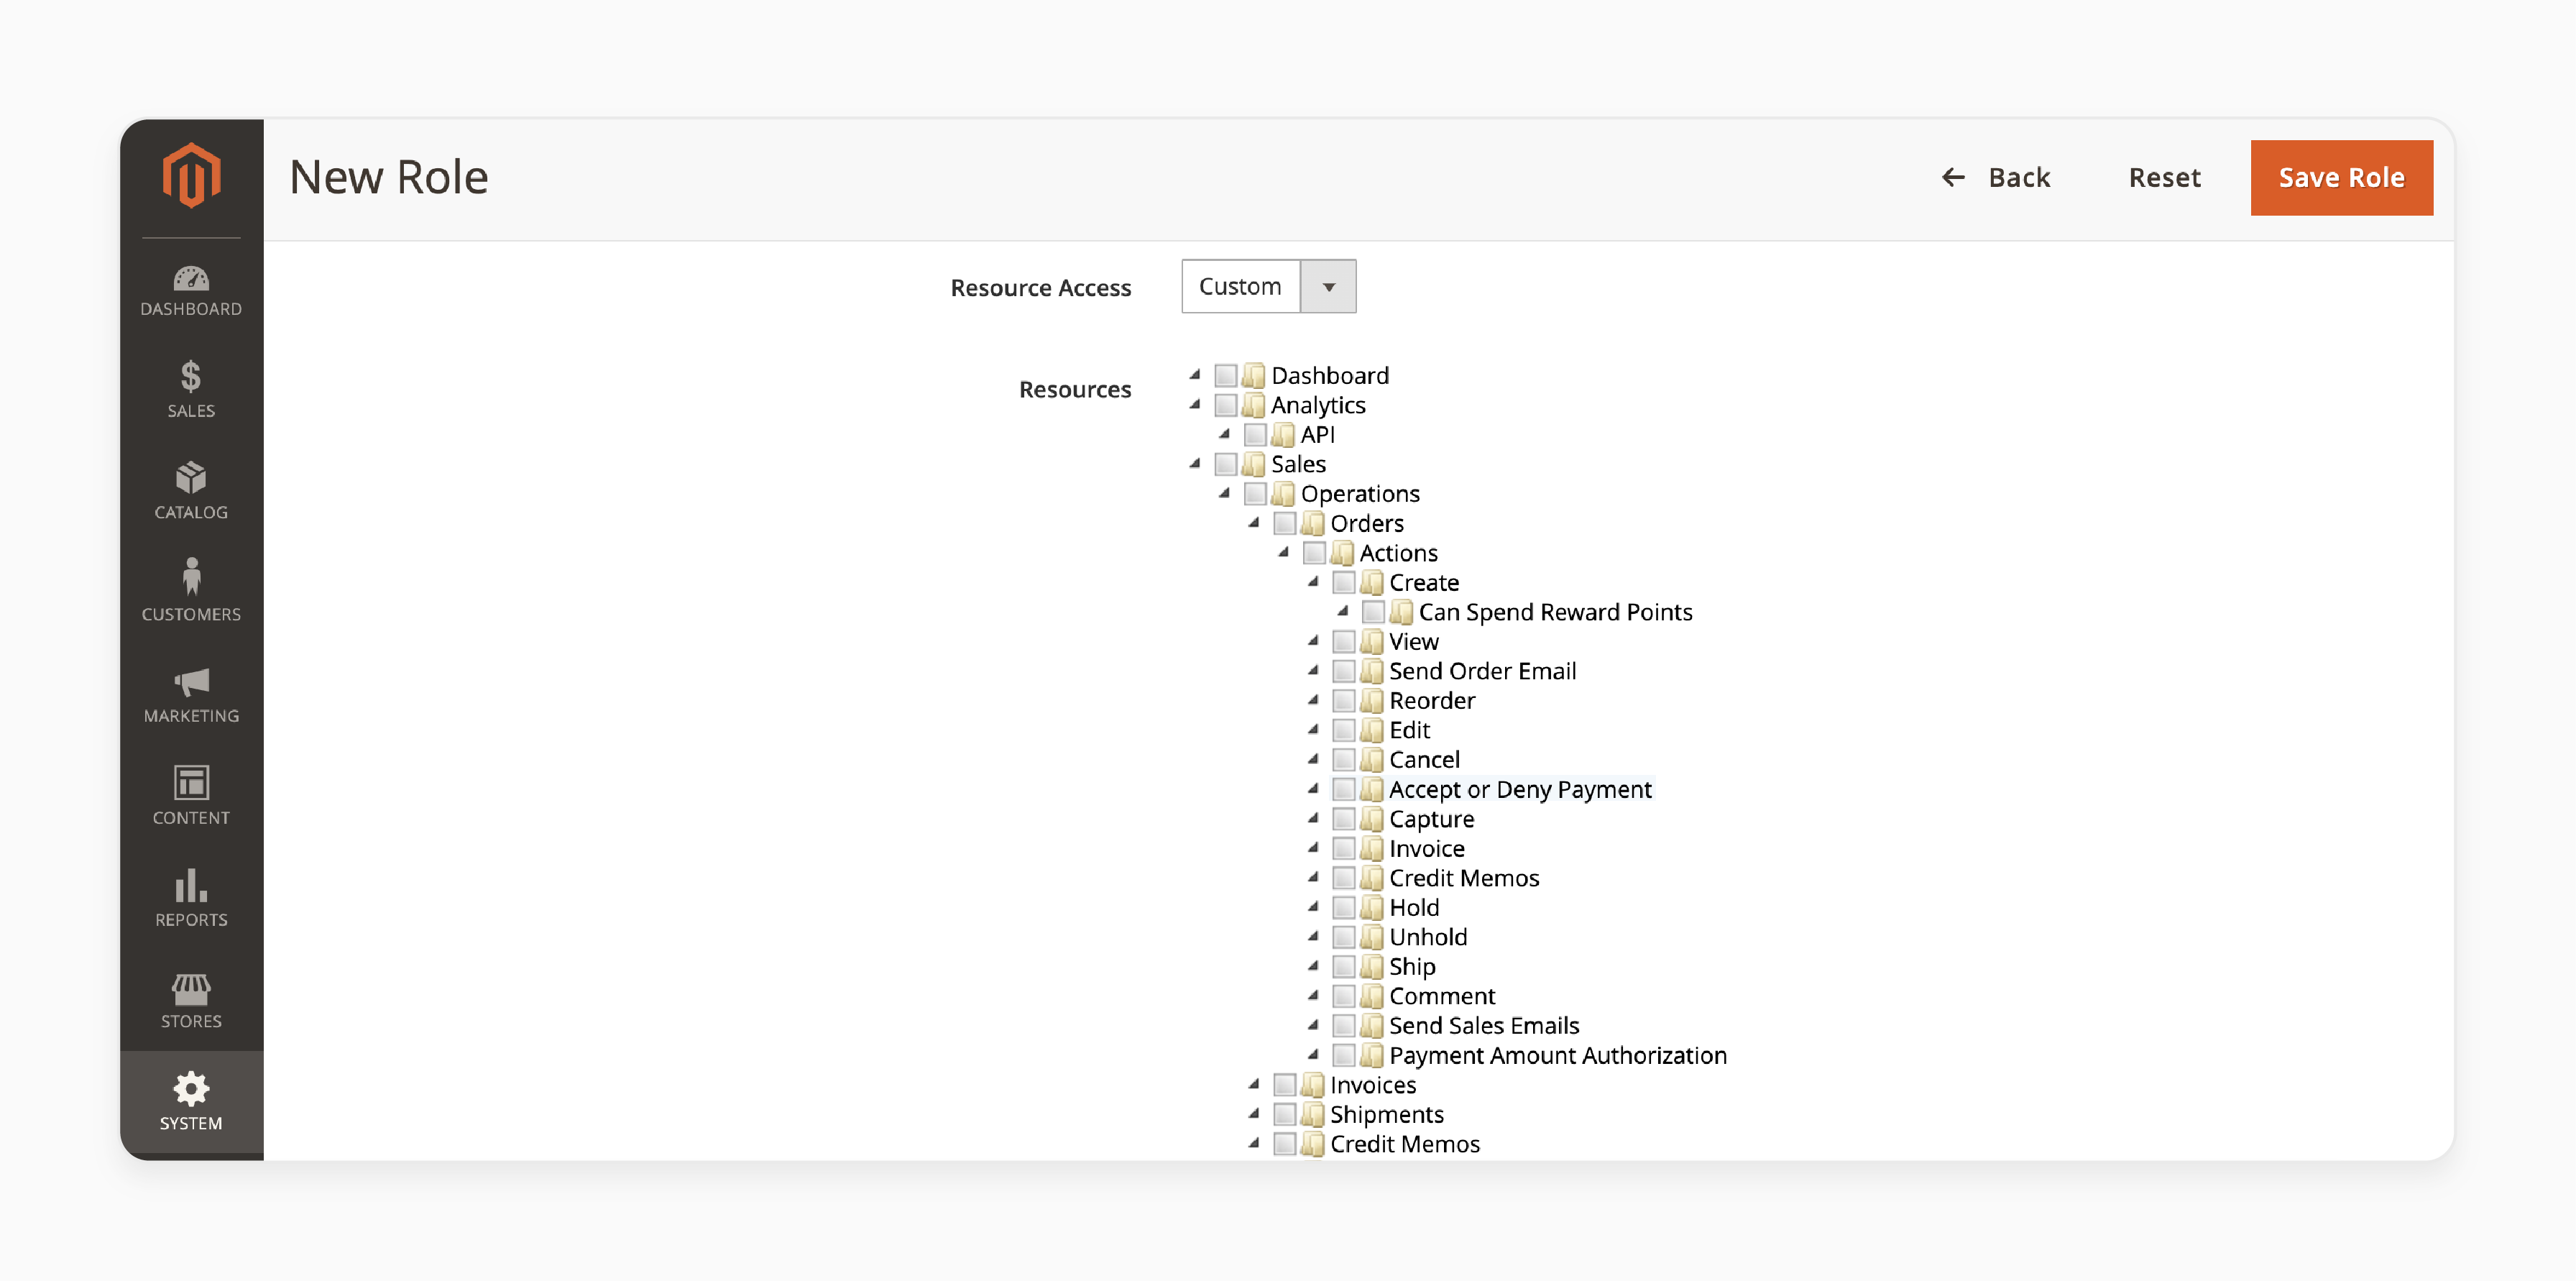
Step 3: Set Resource Access to Custom.
Step 4: Choose specific products or categories, admin sections, or data this role can access.
Step 5: Navigate to System > Extension Role Permissions to add privileges unique to this role.
Step 6: Click Save Role to store the changes. Reopen the role to proceed with user assignments.
Step 7: Open the Role Users tab.
Step 8: Select the users you want to grant by flagging their names.
Setting Advanced Permissions
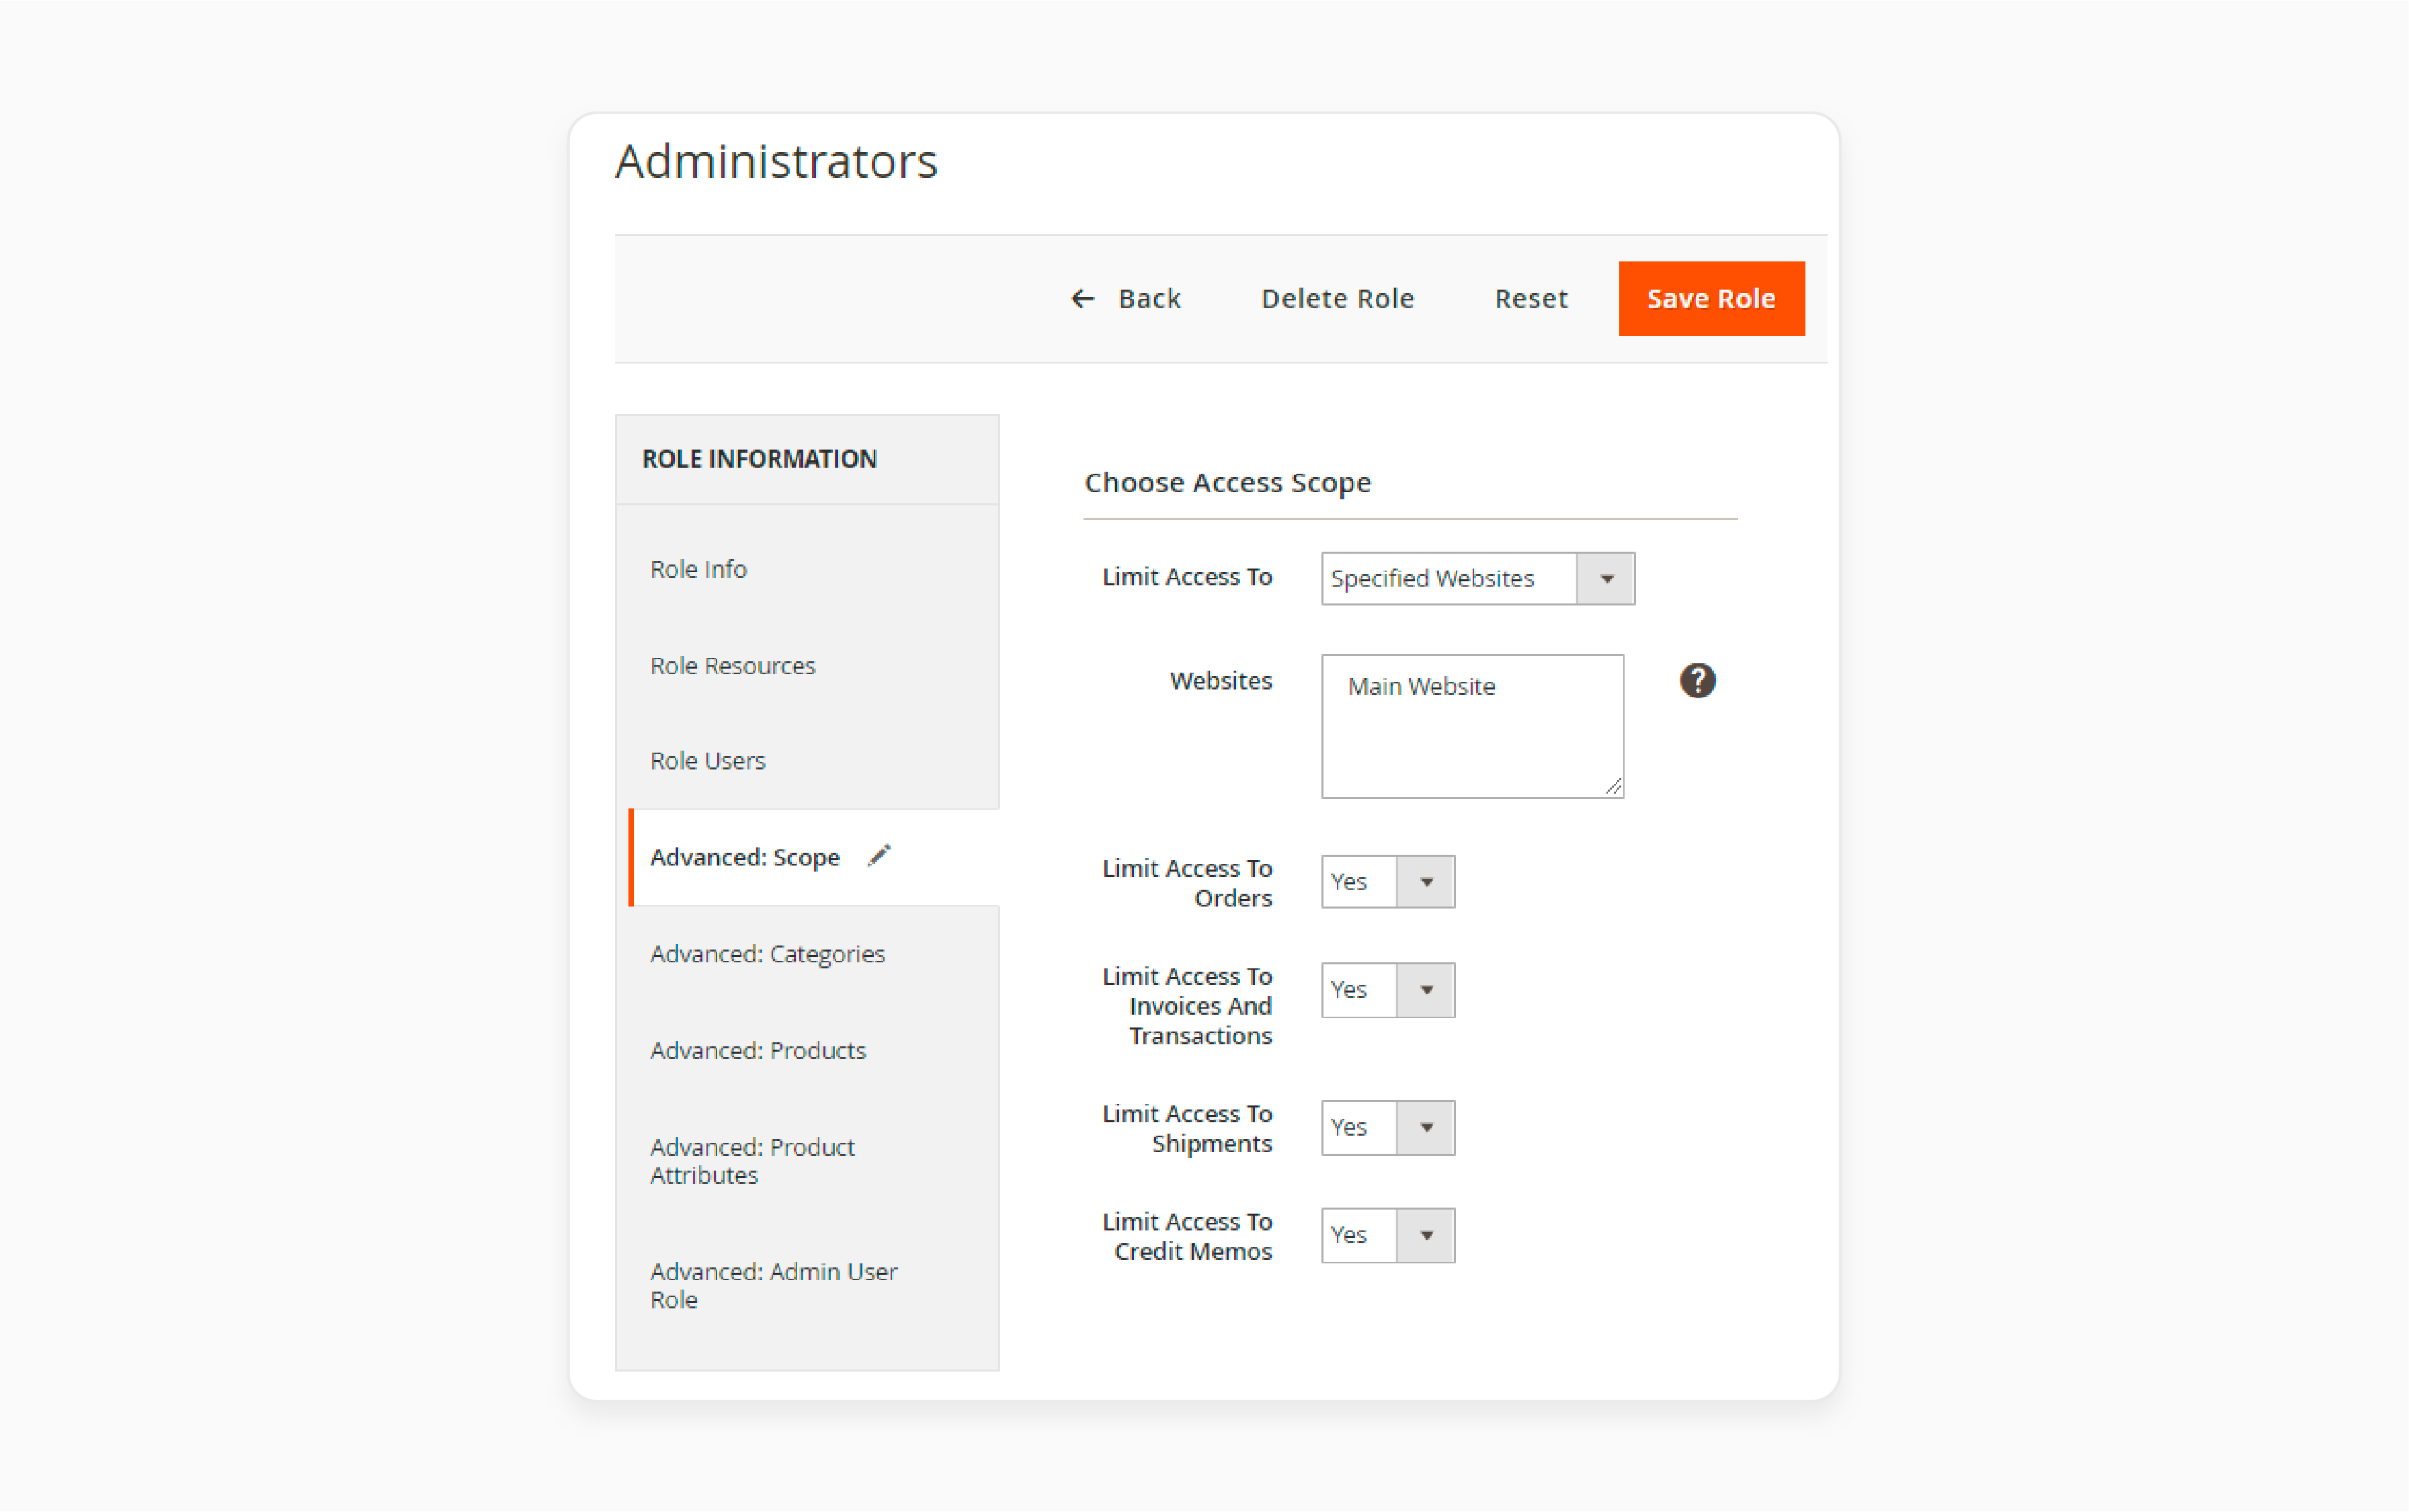
Step 1: Define Scope of Access
-
Go to the Scope tab.
-
Use the Limit Access To setting to choose:
-
Allow All Stores
-
Limit Certain Websites
-
Limit Certain Store Views
-
Note: Limiting access to a store view also restricts access to its product page and CMS elements.
Step 2: Assign Access to Key Areas
In the same scope, determine access permissions for specific store sections like:
-
Orders
-
Invoices and Transactions
-
Shipments
-
Credit Memos
Use Yes or No to allow or restrict access.
Step 3: Manage Category Permissions
-
Open the Categories tab.
-
Choose whether the role can access all categories or specific ones.
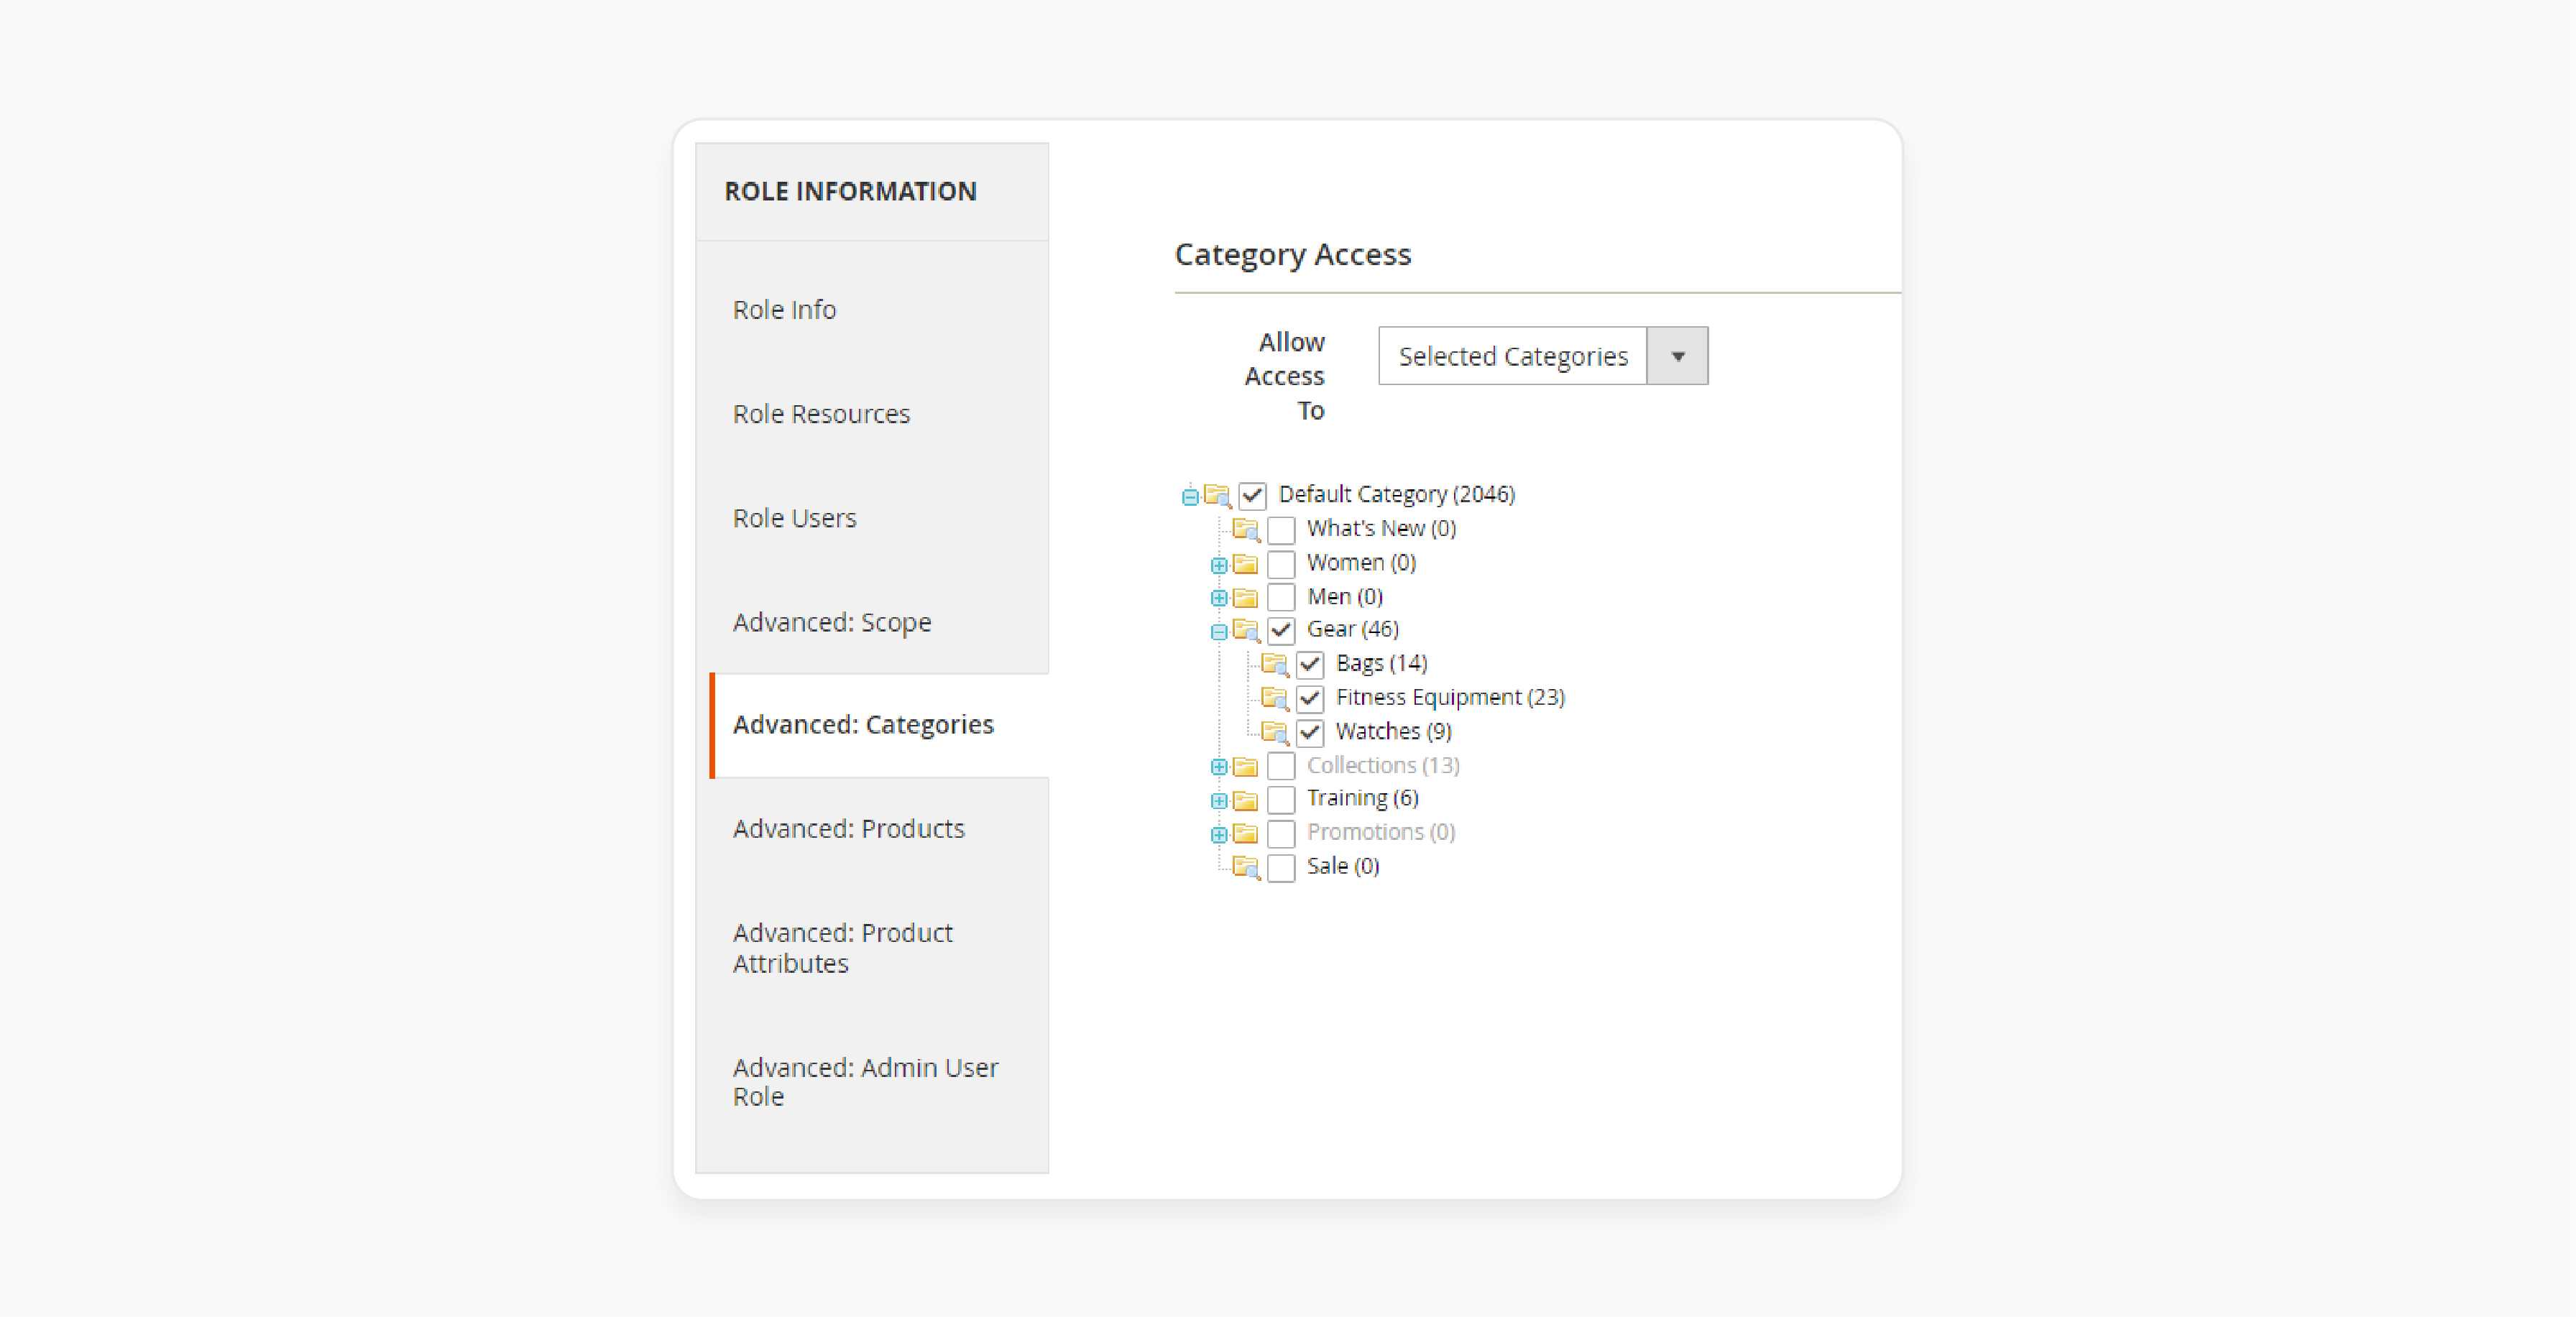
- Tick the boxes for the necessary categories or subcategories.
Step 4: Configure Product Access
-
Open the Products tab to set product access for the user role.
-
Choose one of the following access types:
-
Access to All Products: Gives the user access to every product in the store.
-
Access to Selected Products: Limits the user to specific products. You will need to flag the products they can access.
-
Access to Own Created Products: Restricts the user to products they create themselves.
-
-
If you choose Selected Products, flag the products the user can access.
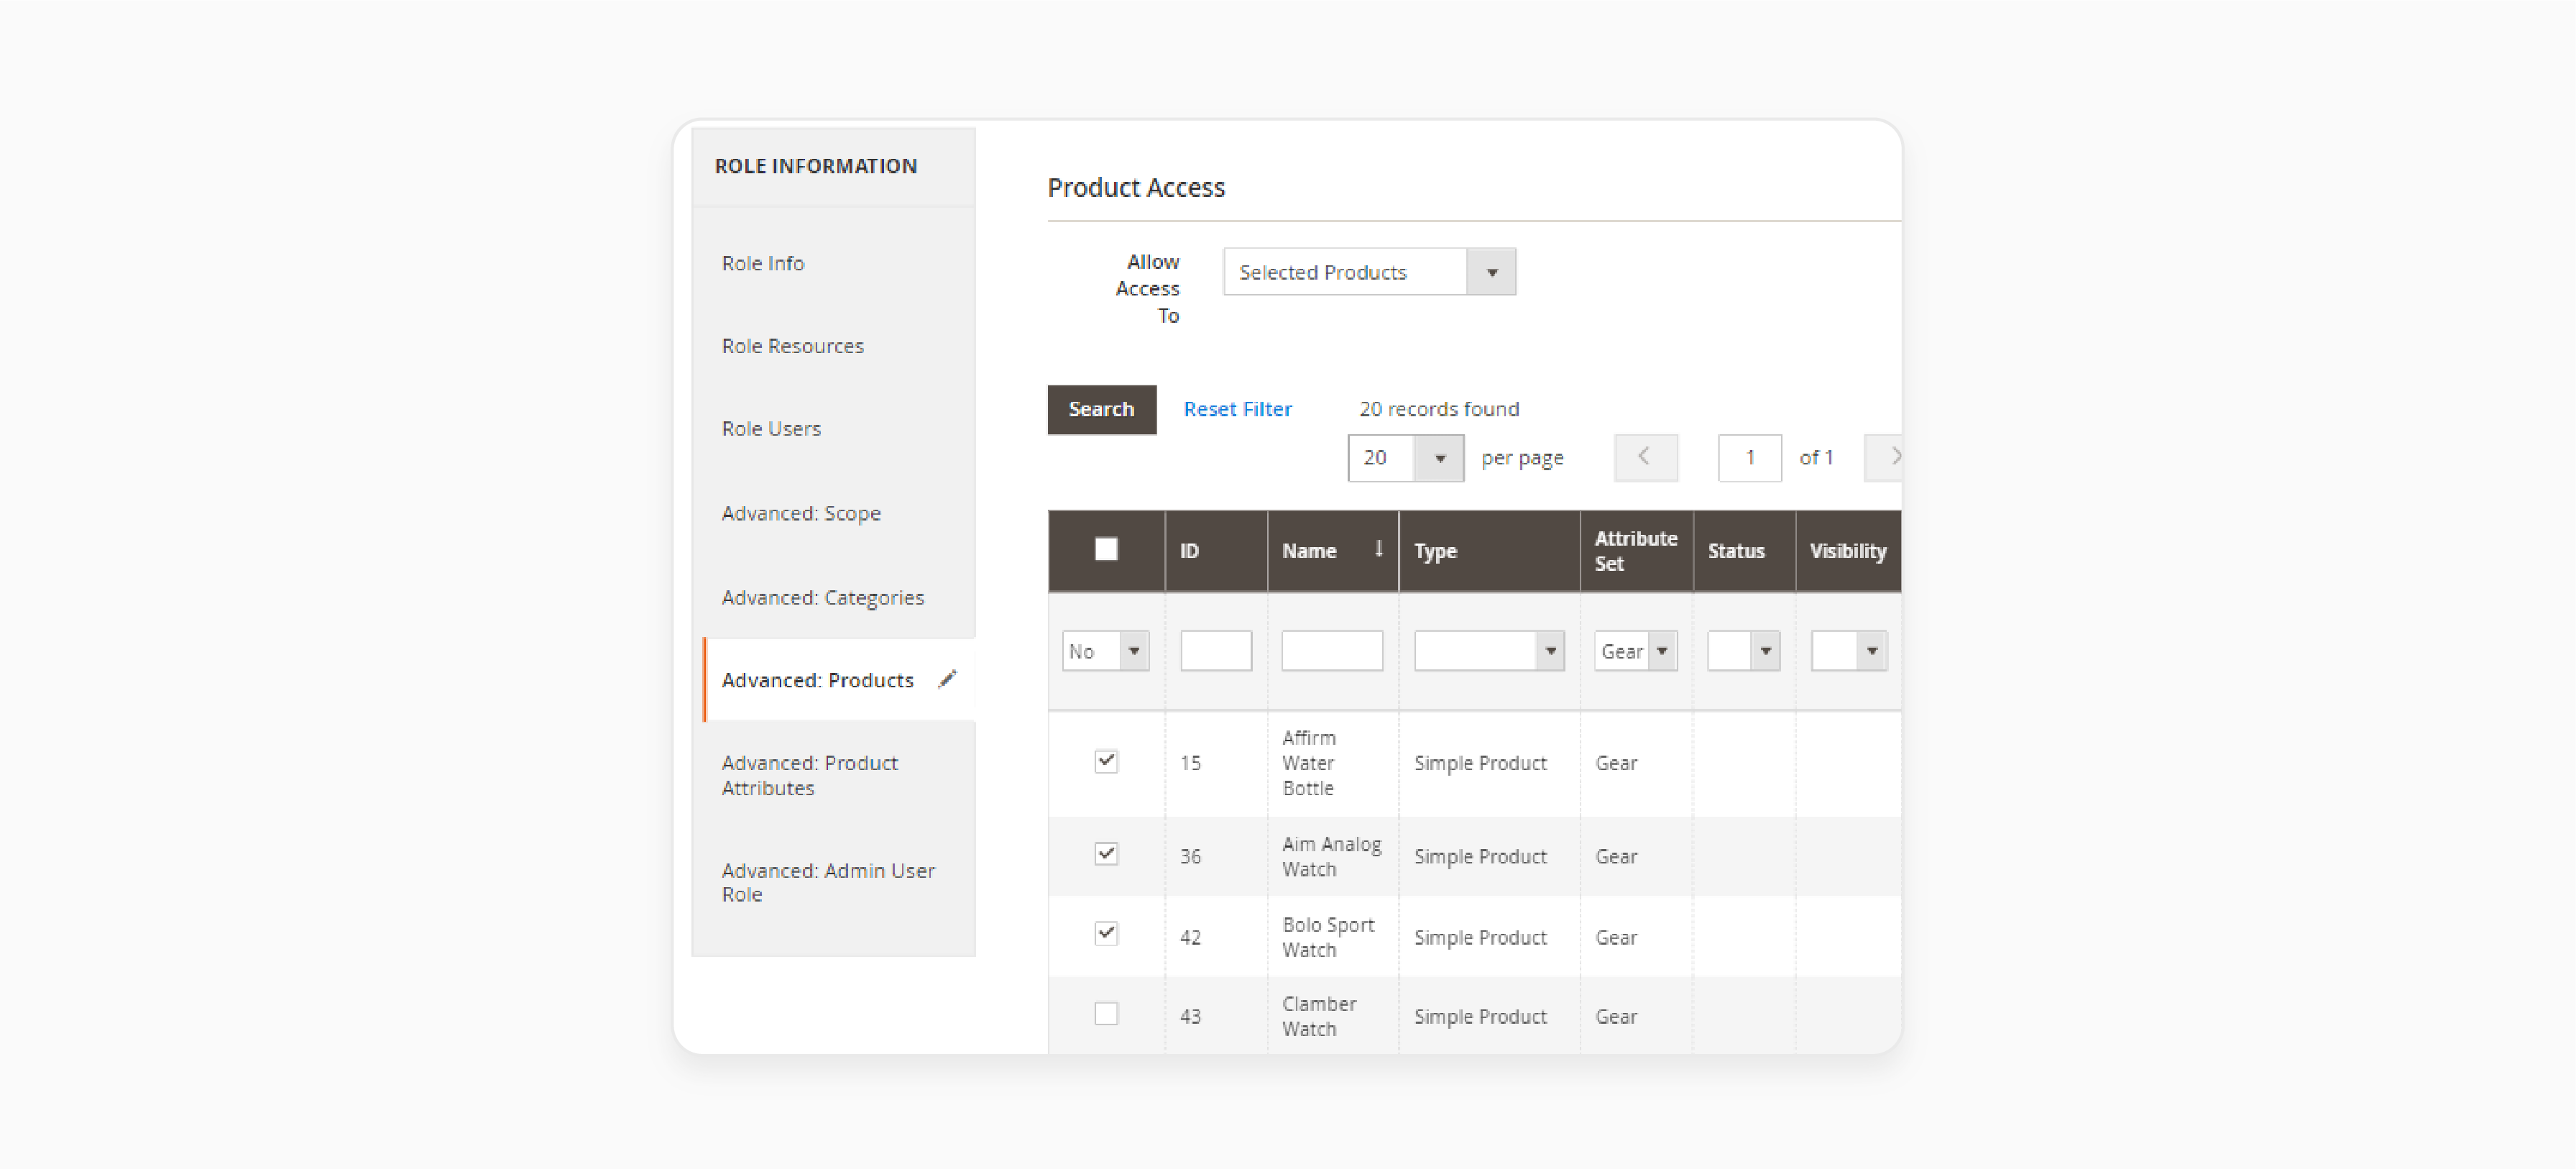
- If you choose Own Created Products, the product grid will stay empty.
- Once the user creates a product, it will appear in the grid and be available for editing.
Step 5: Restrict Product Attributes
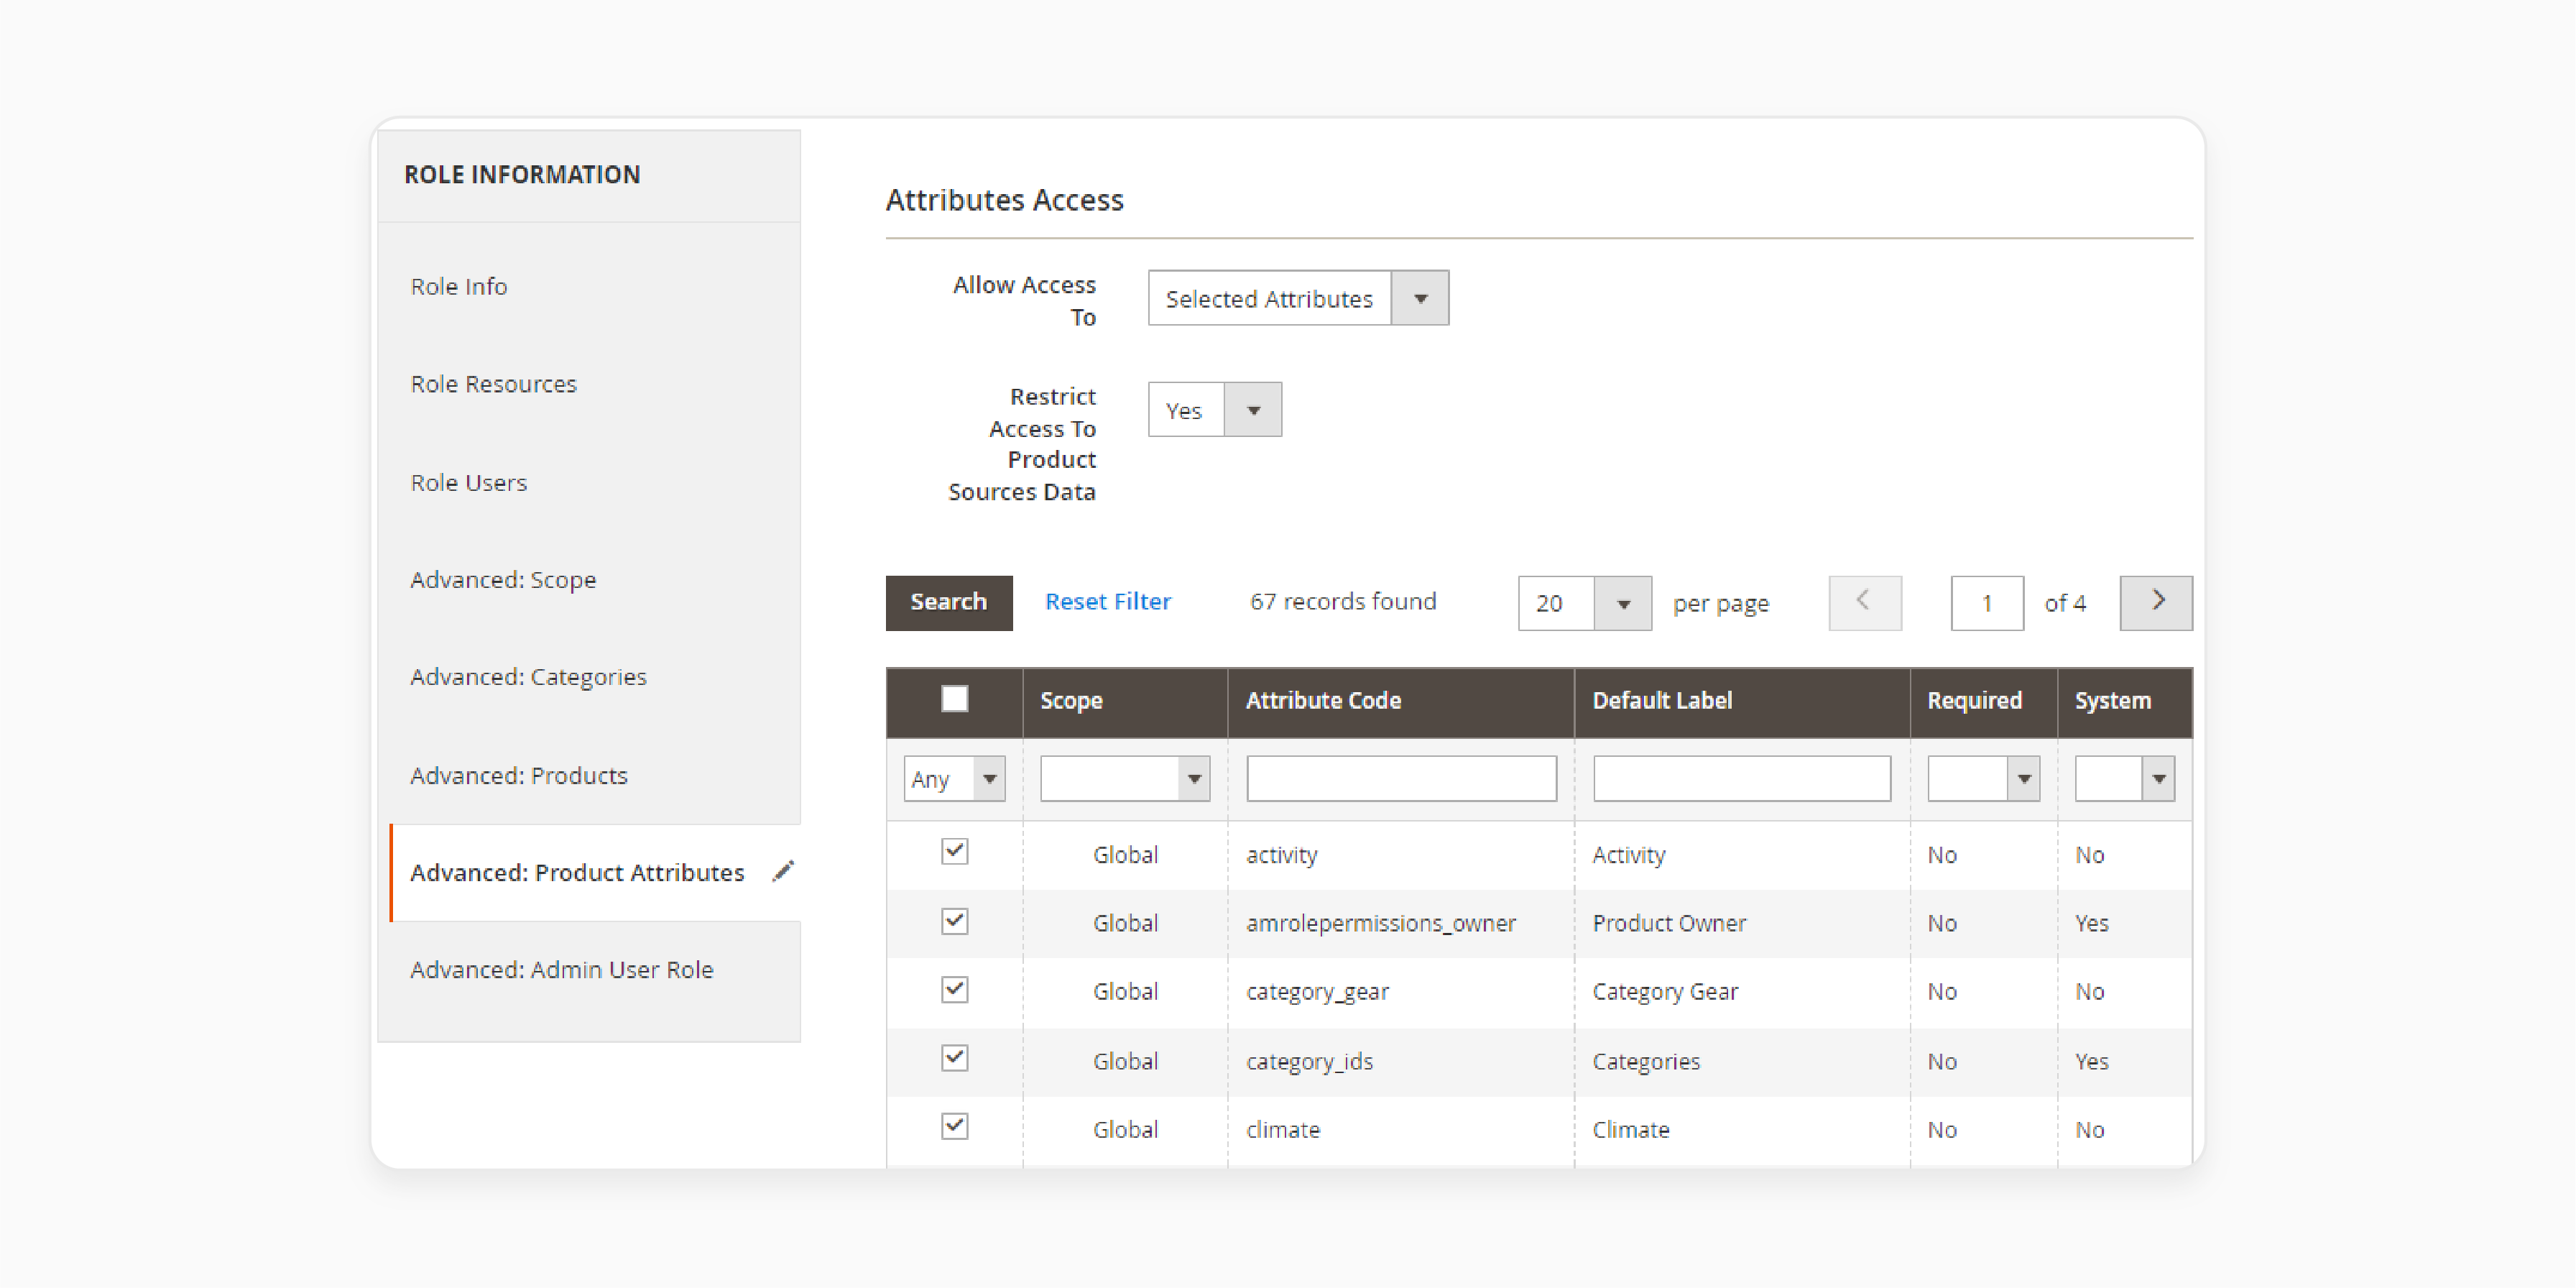
-
Open the Product Attributes tab.
-
Set Allow Access To as Selected Attributes.
-
Choose which attributes the role can access.
-
Enable Restrict Access to Product Sources Data to block changes to product quantities.
Step 6: Enable User Creation Permissions
-
Open the Admin User Role tab.
-
Decide if this role can create new accounts.
-
Choose specific roles from the dropdown for these custom users.
-
Ensure User Role Management is enabled.
-
After completing all configurations, click Save Role.
Security Benefits of Implementing Advanced Permissions in Magento
| Security Benefit | Details |
|---|---|
| Protect Sensitive Data | Limits admin access to sensitive areas. It includes customer details and financial data using Magento 2 permissions management. Only authorized users can view or edit critical information. |
| Enhanced Multi-Store Security | Allows store managers to access only their granted Magento 2 catalog permissions. It keeps other data secure. |
| Custom Role Permissions | Assign custom role permissions to specific users so they can access only the data they need. It includes managing product attributes or pricing. |
| Track User Activities | Monitors admin actions by assigning roles and limiting role resources. This ensures accountability and prevents unauthorized access to sensitive data. |
| Limit Administrative Actions | Restricts key tasks like refunds or store settings to trusted store managers or the super admin. It prevents unauthorized actions. |
| Prevent Accidental Changes | Ensures users edit only particular products granted to them. This reduces mistakes and keeps data accurate. |
How to Create Sub-Admin Users and Changing Product Owners in Magento 2
Creating Sub-Admin Users
Step 1: Go to System > Permissions > All Users.
Step 2: Click the Add New User button to create the new user.
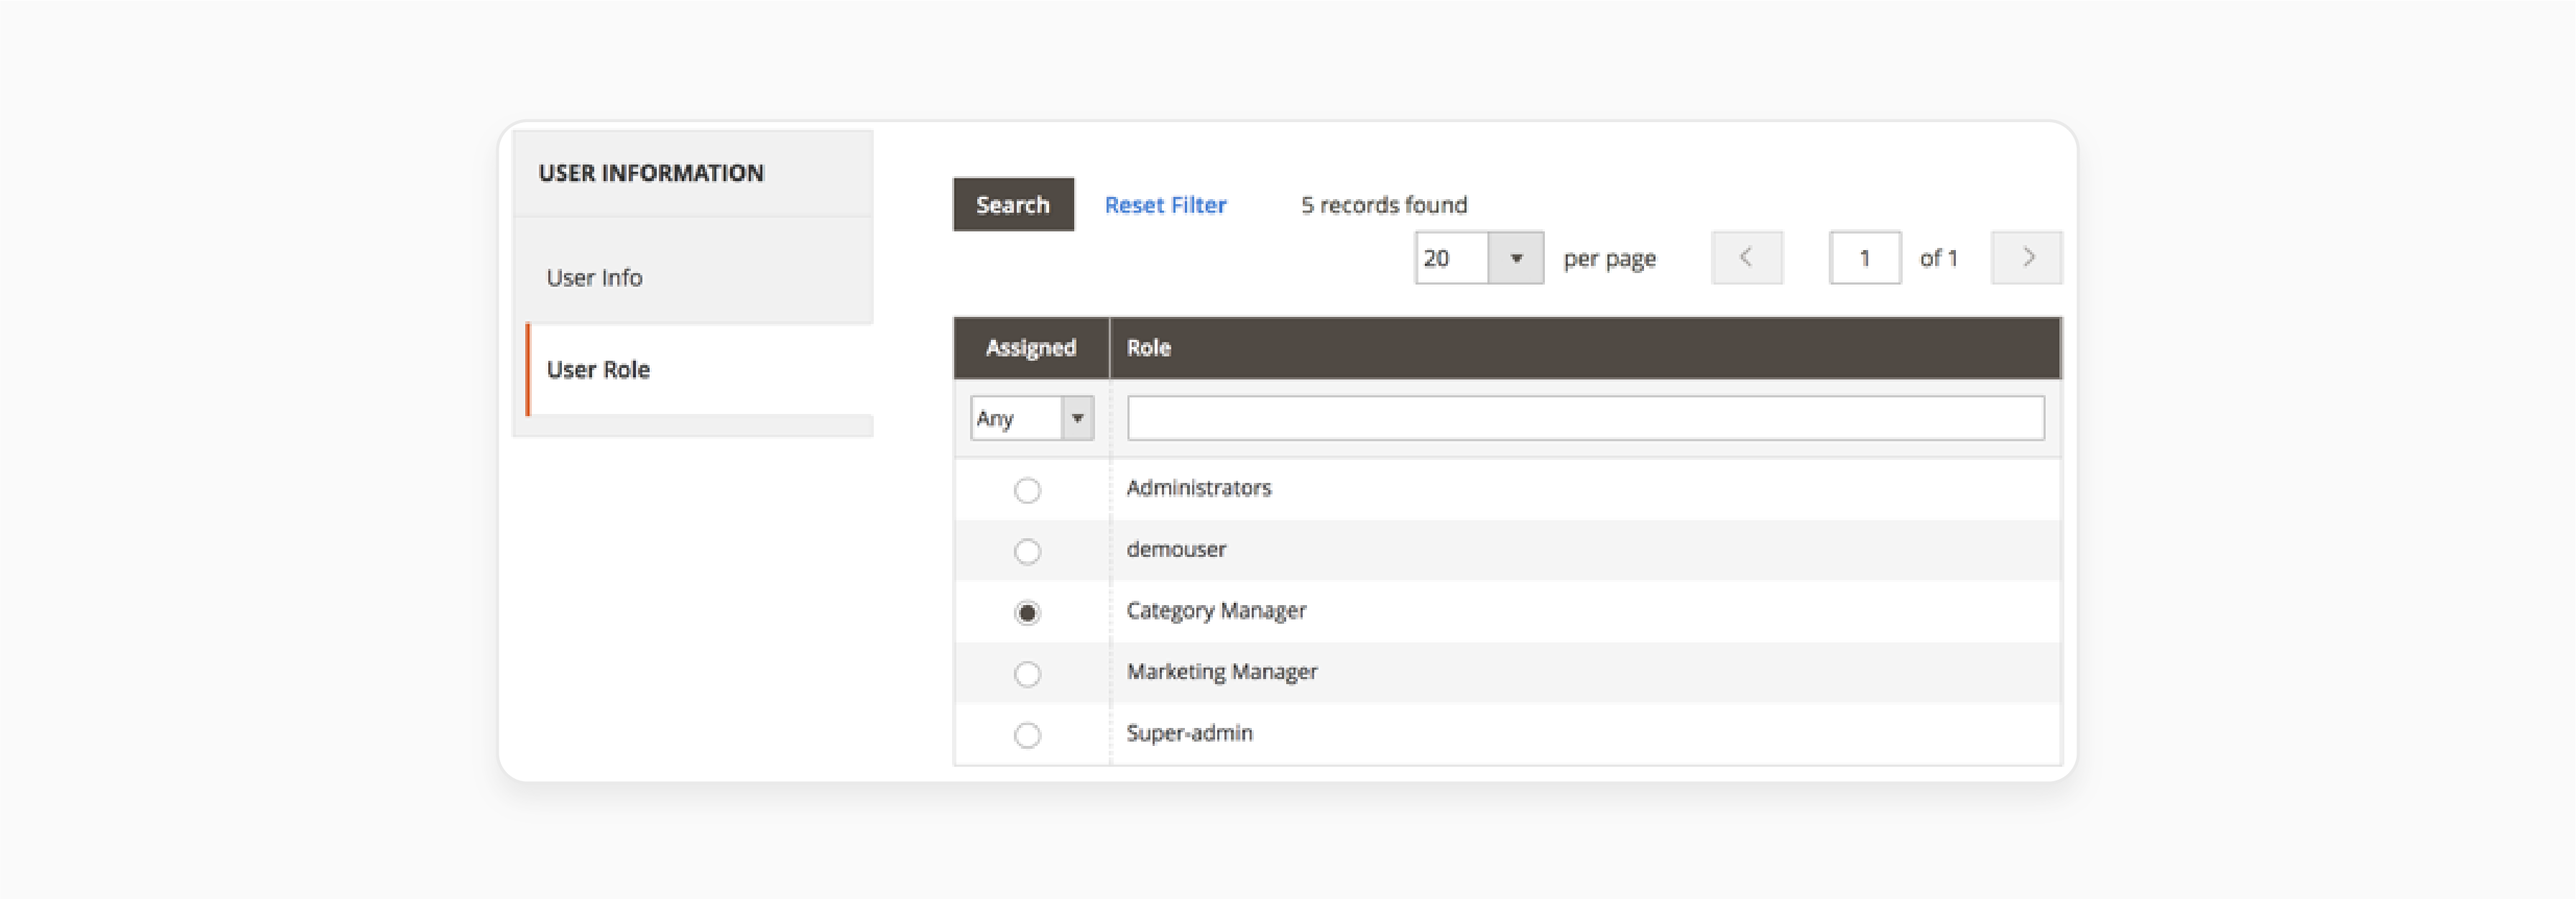
Step 3: Switch to the User Role tab.
Step 4: Select the desired role by ticking the radio button to grant permissions for the user’s access.
Step 5: Click the Save User button after completing all required fields.
Note: If needed, check the steps for configuring admin roles with a custom setup.
Changing Product Owner
Step 1: Navigate to Products > Catalog in the admin panel.
Step 2: Select the product you want to update from the list.
Step 3: Choose the user will be the product owner from the drop-down menu.
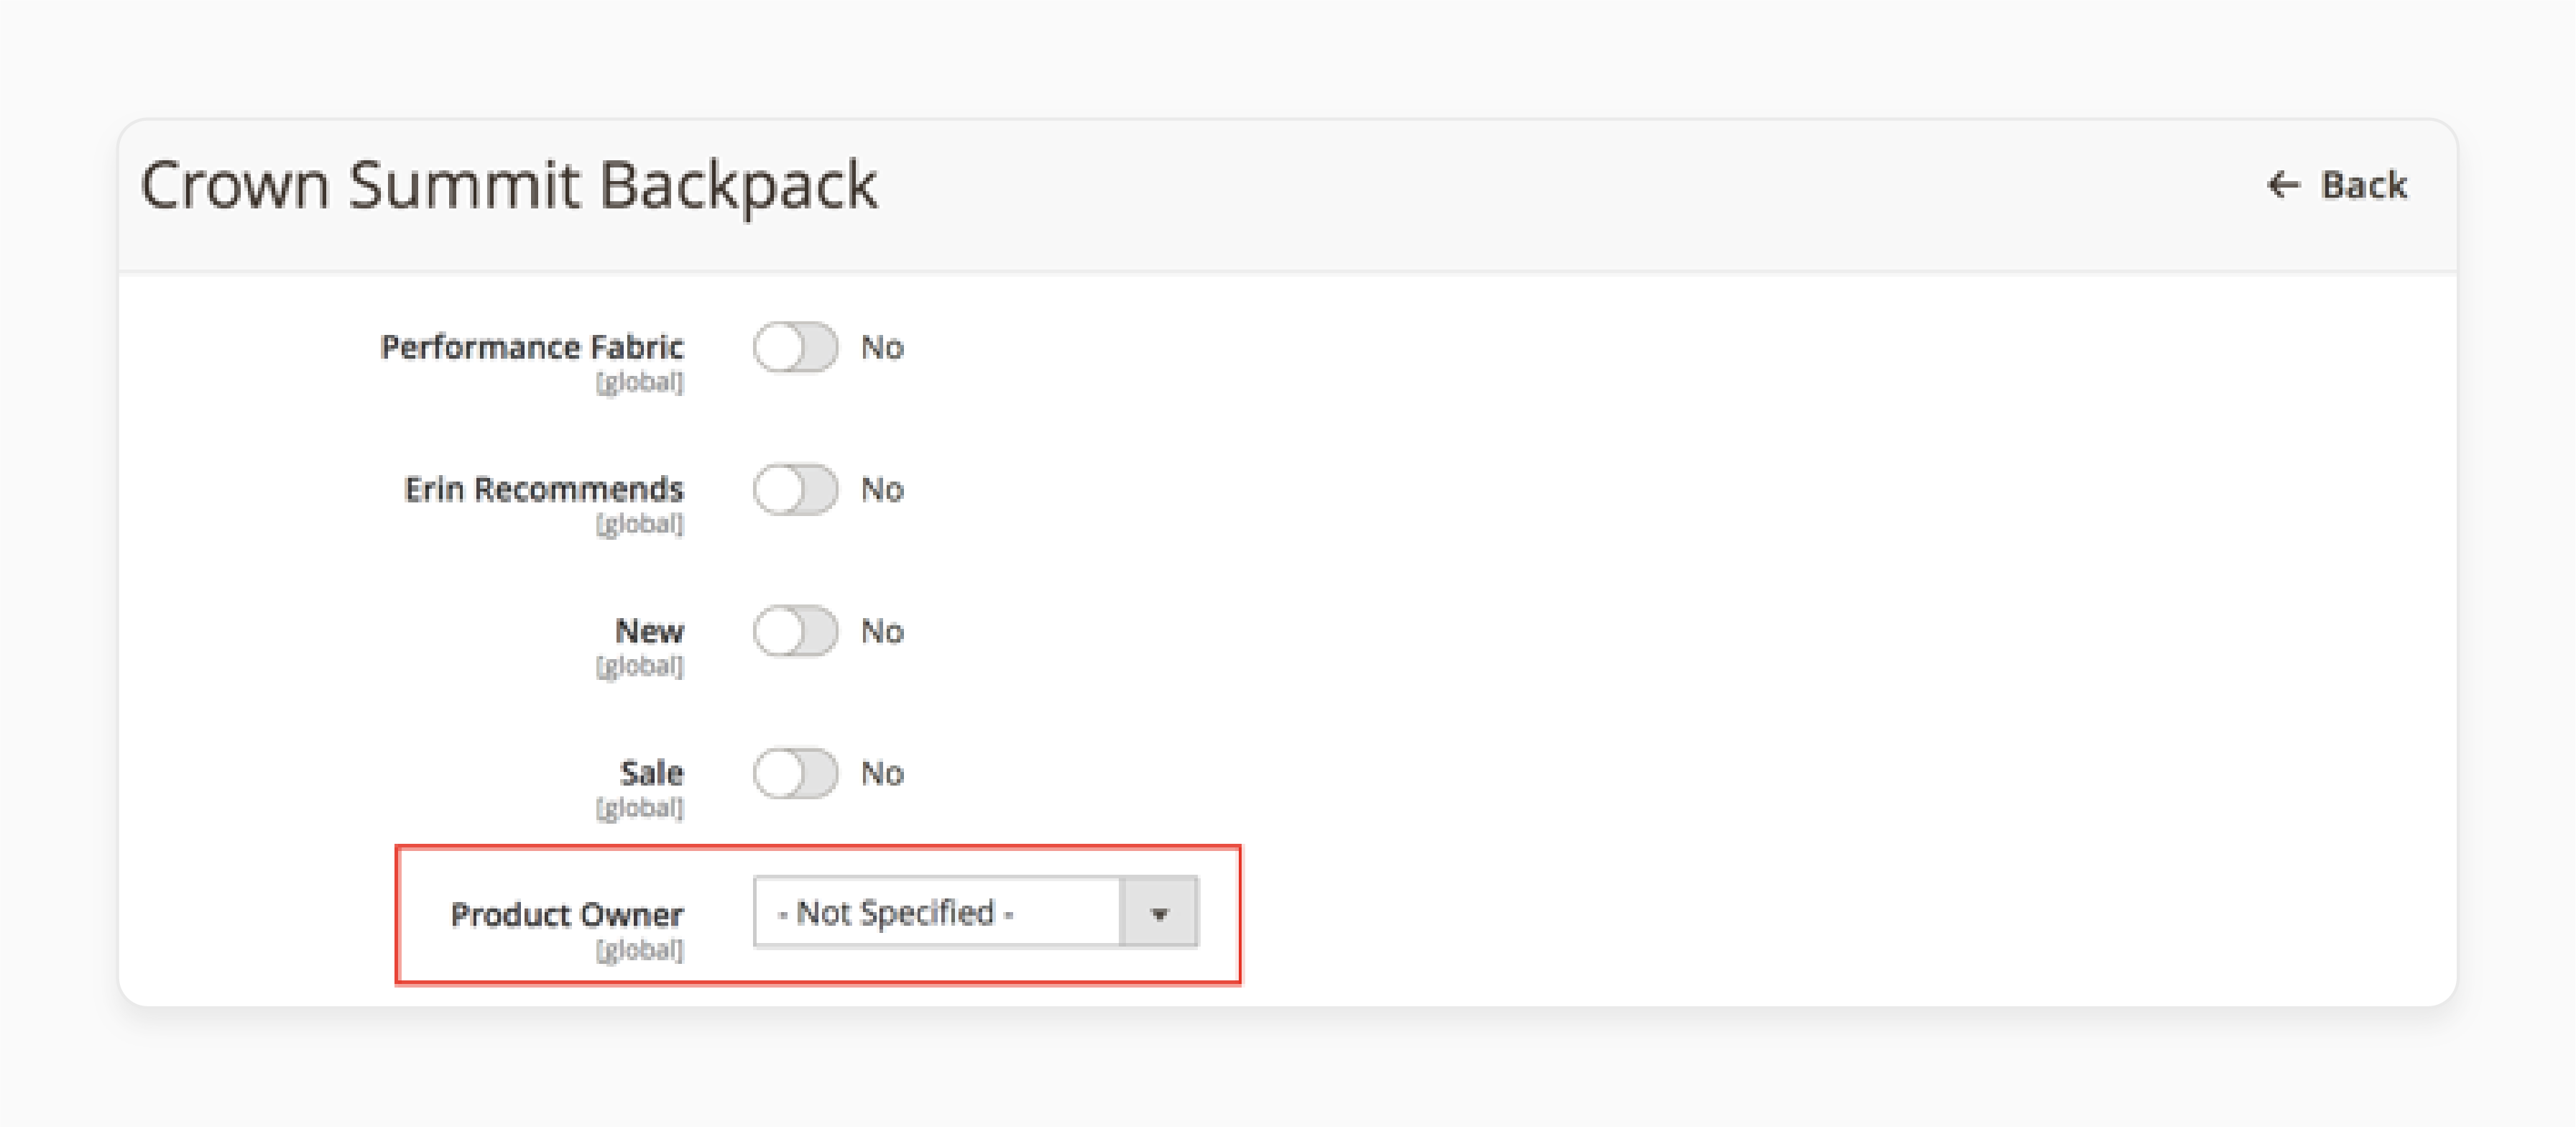
Step 4: Products option to Own Product Only to manage that product.
Common Troubleshooting Issues of Magento Advanced Permissions Extension
| Issue | Details |
|---|---|
| Permissions Not Applied | Users see areas they should not access or permissions from the Magento 2 module fail to work. |
| Role Changes Not Updated | Changes in roles and assign permissions take time for users to show up. |
| Dashboard Data Visible | Restricted users still see the display of dashboard statistics or other sensitive data. |
| Cannot Edit Products or Categories | Users with access to products or Magento catalog permissions face issues editing them. |
| New Products Not Visible | Users cannot see or edit new products created under "Own Created Products," even with proper permissions to provide. |
| Conflicts with Other Extensions | The extension conflicts with other Magento extensions that handle user roles and permissions. |
| Admin Role Errors | Users need help creating or managing roles. It is even when the admin can assign roles properly. |
FAQs
1. How does an advanced permissions extension help configure user roles?
An advanced permissions extension allows admins to create roles. It helps to personalize specific tasks. With features like category access and product attributes, roles can be customized for each user. This ensures secure operations and efficient workflows.
2. Why is a permissions extension for Magento 2 essential for store management?
A permissions extension is important for multi-user stores. It provides permissions to let specific team members access only their granted areas. This keeps sensitive data secure and ensures tasks are managed effectively.
3. How do advanced controls help assign responsibilities to admin users?
Access controls ensure that the admin can also grant specific tasks and roles. Admins can delegate tasks like editing products or handling invoices. It can reduce Magento errors and improve team workflows. Each user gets permissions tailored to their responsibilities.
4. How can existing admin users create new roles in Magento 2?
Existing admin users create new roles using the admin panel. They define user roles and permissions to ensure users have access only to their granted tasks. This feature simplifies managing large teams in the store.
5. What does assigning catalog permissions in Magento 2 entail?
Granting permissions under catalog access to control access to specific products and categories. For example, marketing can manage product descriptions, while finance focuses on pricing. This ensures smooth workflows and role-specific access.
6. Why do I need Magento 2 advanced permissions for team management?
You need Magento 2 access controls to secure operations and improve task delegation. It defines roles and assign permissions clearly, reducing errors and protecting sensitive data. Teams focus on their roles without overlapping responsibilities.
Summary
Advanced Permissions for Magento 2 is a feature that provides permissions that limit user access based on roles. This extension helps admins control user access to sensitive data. With tools, it creates efficient workflows for different users. Consider the following security benefits:
-
Protect Sensitive Data: Admins can limit access to sensitive store data based on roles.
-
Custom Role Permissions: With Magento advanced permissions, admins can create roles.
-
Limit Administrative Actions: The extension also helps admins keep control over admin tasks.
Explore Magento hosting services to enhance advanced permissions for ecommerce with ease.


